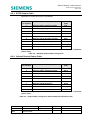
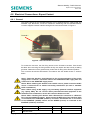
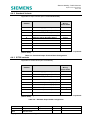
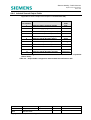
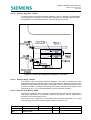
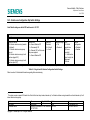
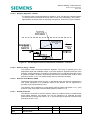
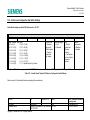
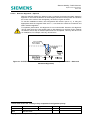
1
Siemens Mobility, Traffic Solutions
Sopers Lane, Poole, Dorset
BH17 7ER
Heimdall Detector
General Handbook
Part no.
667/HB/31900/000
THIS DOCUMENT IS ELECTRONICALLY APPROVED
AND HELD IN THE Siemens DOCUMENT CONTROL TOOL
Prepared By
Company
Siemens Mobility, Traffic Solutions
Department
Engineering
Name
Antonio Rhodes
Function
Engineer
Date
November 14
COPYRIGHT STATEMENT
Checked and Released
Siemens Mobility, Traffic Solutions
Engineering
Dave Martin
Engineering Manager
November 14
The information contained herein is the property of Siemens plc. and is supplied without liability for errors
or omissions. No part may be reproduced or used except as authorised by contract or other written
permission. The copyright and the foregoing restriction on reproduction and use extend to all media in
which the information may be embodied.
Copyright
Siemens plc 2014 All Rights Reserved
Version
10
Page 1 of 120
Status
Last Editor
harry.smyth
Date
Document
GENERAL HANDBOOK FOR HEIMDALL Doc. No.
Name
DETECTORS
Copyright Siemens plc 2014 All Rights Reserved
Issued
03 November 2014
667/HB/31900/000
Siemens Mobility, Traffic Solutions
Sopers Lane, Poole, Dorset
BH17 7ER
Preface
Safety of Installation and Maintenance Personnel
In the interests of health and safety, when installing, using or servicing this equipment the
following instructions must be noted and adhered to:
(1) Only skilled or instructed personnel, with relevant technical knowledge and
experience, who are also familiar with the safety procedures required when dealing
with modern electrical/electronic equipment, are to be allowed to use and/or work on
this equipment. All work shall be performed in accordance with the Electricity at
Work Regulations 1989.
(2) Such personnel must take heed of all relevant notes, cautions and warnings in this
Handbook and any other Document or Handbook associated with the equipment
including, but not restricted to, the following:
(3) The equipment must be correctly connected to the specified incoming power supply.
(4) Mains voltages may be present within traffic signal heads. Before any maintenance
work within the signal head is carried out, any mains supply to it must be isolated /
switched off.
(5) Only trained / competent persons should work on this equipment.
(6) Surfaces within the associated traffic signal get hot, e.g. lamp, lens and reflector.
Therefore care should be taken when working in such areas.
(7) Any power tools must be regularly inspected and tested.
(8) Any ladders used must be inspected before use to ensure they are sound and not
damaged.
(9) When using a ladder, before climbing it, ensure that it is erected properly and is not
liable to collapse or move. If using a ladder near a carriageway ensure that the area
is properly coned off and signed.
(10) Any personnel working on site must wear the appropriate protective clothing, e.g.
reflective vests, etc.
Version
10
Page 2 of 120
Status
Last Editor
harry.smyth
Date
Document
GENERAL HANDBOOK FOR HEIMDALL Doc. No.
Name
DETECTORS
Copyright Siemens plc 2014 All Rights Reserved
Issued
03 November 2014
667/HB/31900/000
Siemens Mobility, Traffic Solutions
Sopers Lane, Poole, Dorset
BH17 7ER
Wireless Safety
The Heimdall detector hardware is a radar device.
This product does emit RF signals which are below the statuary requirements. However,
it is recommended that precautions are taken to reduce prolonged exposure when
operating directly in front of the Heimdall antenna area.
The Heimdall detectors may also include a wireless device which will only transmit when
a wireless connection is made from authorised maintenance personnel using Siecom
software. When connected to Siecom, the wireless transmitter within the plastic case
should have a separation of at least 20cm between the case and the body of the user or
nearby persons, excluding hands, wrists, feet and ankles.
Safety of Road Users
It is important that all personnel are aware of the dangers to road users that could arise
during repair and maintenance of traffic control equipment.
Ensure that the junction area is coned and signed as necessary to warn motorists and
pedestrians of any dangers and to help protect the personnel working on the site.
Personnel should also ensure the safety of pedestrians, especially children, who may
come into contact with parts of the signal poles.
Version
10
Page 3 of 120
Status
Last Editor
harry.smyth
Date
Document
GENERAL HANDBOOK FOR HEIMDALL Doc. No.
Name
DETECTORS
Copyright Siemens plc 2014 All Rights Reserved
Issued
03 November 2014
667/HB/31900/000
Siemens Mobility, Traffic Solutions
Sopers Lane, Poole, Dorset
BH17 7ER
MAINTENANCE PROVISION (MP)
Product Reference
Heimdall Above Ground Detector.
Installation and Commissioning
Methods of Installation are described in this handbook. In addition, there is also a series
of documents written specifically for installation engineers who do not need all the
information contained in this document. These documents are listed here:
Standard Vehicle Approach Detector (MVD)
Installation Instructions
Single Lane Vehicle Approach Detector
667/1/31900/310
Installation Instructions
Selectable Speed Vehicle Approach Detector
667/1/31900/320
Installation Instructions
667/1/31900/330
Stop Line Detector Installation Instructions
SCOOT and MOVA Detector Installation
667/1/31900/340
Instructions
667/1/31900/350
On Crossing Detector Installation Instructions
667/1/31900/360
Kerbside Detector Installation Instructions
Table 1-1 – Installation Documents
667/1/31900/300
Spares and Maintenance
The Heimdall Above Ground Detector unit is designed for ‘return to base’ repair - there
are no user serviceable parts contained within the enclosure. In the case of a faulty
device, replace the unit, ensuring product settings (DIP switches, see section 4.8) and
orientation (see section 4.7.1) are identical to those on the original unit.
Modifications
There are no approved modifications for this product.
Warning
Use of components other than those permitted above or modifications or enhancements
that have not been authorised by Siemens Mobility, Traffic Solutions will invalidate Type
Approval of this product.
Version
10
Page 4 of 120
Status
Last Editor
harry.smyth
Date
Document
GENERAL HANDBOOK FOR HEIMDALL Doc. No.
Name
DETECTORS
Copyright Siemens plc 2014 All Rights Reserved
Issued
03 November 2014
667/HB/31900/000
Siemens Mobility, Traffic Solutions
Sopers Lane, Poole, Dorset
BH17 7ER
TABLE OF CONTENTS
1
INTRODUCTION ........................................................................................................................ 13
1.1 Purpose .............................................................................................................................. 13
1.2 Related Documents ............................................................................................................. 13
1.3 Definitions ........................................................................................................................... 13
1.4 Issue History ....................................................................................................................... 13
2
GENERAL DETECTOR INFORMATION .................................................................................... 15
2.1 The Heimdall Detector ......................................................................................................... 15
2.2 Identification Label .............................................................................................................. 16
2.3 Interface ..............................................................................................................................16
2.4 Product Options .................................................................................................................. 17
3
General Specifications ............................................................................................................. 18
3.1 Electrical Specifications ....................................................................................................... 18
3.1.1
Operating Voltage ................................................................................................. 18
3.1.2
Detection Solid State Relay(s) .............................................................................. 18
3.1.3
Operating Current ................................................................................................. 18
3.1.4
Radio Frequency Transmission Specifications ......................................................18
3.2 Mechanical Specifications ................................................................................................... 19
3.2.1
Weight .................................................................................................................. 19
3.2.2
Dimensions ........................................................................................................... 19
3.3 Environmental Specifications ............................................................................................... 20
3.3.1
Operating Temperature......................................................................................... 20
3.3.2
Environmental Rating............................................................................................ 20
3.3.3
Vibration ............................................................................................................... 20
3.4 EMC Specifications ............................................................................................................. 20
3.5 Highways Agency (HA) Specifications ................................................................................. 21
3.6 Manufacturing Specifications ............................................................................................... 21
3.7 Product Safety..................................................................................................................... 21
4
GENERAL INSTALLATION INSTRUCTIONS ............................................................................ 22
4.1 General Introduction ............................................................................................................ 22
4.2 Tools Required .................................................................................................................... 22
4.3 Order of Installation ............................................................................................................. 22
4.4 Detector Packaging ............................................................................................................. 23
4.4.1
Export Variant ....................................................................................................... 24
4.5 Electrical Connections – UK Variant .................................................................................... 25
4.5.1
General ................................................................................................................ 25
4.5.2
Standard Output Cable ......................................................................................... 26
Version
10
Page 5 of 120
Status
Last Editor
harry.smyth
Date
Document
GENERAL HANDBOOK FOR HEIMDALL Doc. No.
Name
DETECTORS
Copyright Siemens plc 2014 All Rights Reserved
Issued
03 November 2014
667/HB/31900/000
Siemens Mobility, Traffic Solutions
Sopers Lane, Poole, Dorset
BH17 7ER
4.5.3
SiTOS Output Cable ............................................................................................. 27
4.5.4
Isolated Second Output Cable .............................................................................. 27
4.6 Electrical Connections: Export Variant ................................................................................. 28
4.6.1
General ................................................................................................................ 28
4.6.2
Standard Variants ................................................................................................. 30
4.6.3
SiTOS variants ..................................................................................................... 30
4.6.4
Isolated Second Output Cable .............................................................................. 31
4.7 Alignment Features ............................................................................................................. 32
4.7.1
Angle Markings ..................................................................................................... 32
4.7.2
‘Gun-Sight’............................................................................................................ 33
4.8 General Detector Configuration Facilities ............................................................................. 34
4.8.1
DIP Switches ........................................................................................................ 34
4.8.2
Terminal Interface ................................................................................................. 35
4.8.3
Priority of configuration ......................................................................................... 35
4.9 Heimdall Serial Communications Installation (SiTOS) .......................................................... 36
5
TECHNICAL DETAILS ............................................................................................................... 37
5.1 Standard Vehicle Approach Detector (MVD) ........................................................................ 37
5.1.1
Performance Details ............................................................................................. 37
5.1.2
Part Number ......................................................................................................... 37
5.1.3
Operating Current ................................................................................................. 38
5.1.4
Detector Installation Instructions ........................................................................... 39
5.1.5
Side Access Configuration Dip Switch Settings ..................................................... 41
5.2 Single Lane Vehicle Approach Detector ............................................................................... 42
5.2.1
Performance Details ............................................................................................. 42
5.2.2
Part Number ......................................................................................................... 42
5.2.3
Operating Current ................................................................................................. 43
5.2.4
Detector Installation Instructions ........................................................................... 43
5.2.5
Side Access Configuration Dip Switch Settings ..................................................... 45
5.3 Selectable Speed Vehicle Approach Detector Installation .................................................... 46
5.3.1
Performance Details ............................................................................................. 46
5.3.2
Part Number ......................................................................................................... 46
5.3.3
Operating Current ................................................................................................. 47
5.3.4
Detector Installation Instructions ........................................................................... 47
5.3.5
Side Access Configuration Dip Switch Settings ..................................................... 49
5.4 Stop Line Presence Detector ............................................................................................... 50
5.4.1
Performance Details ............................................................................................. 50
5.4.2
Part Number ......................................................................................................... 50
Version
10
Page 6 of 120
Status
Last Editor
harry.smyth
Date
Document
GENERAL HANDBOOK FOR HEIMDALL Doc. No.
Name
DETECTORS
Copyright Siemens plc 2014 All Rights Reserved
Issued
03 November 2014
667/HB/31900/000
Siemens Mobility, Traffic Solutions
Sopers Lane, Poole, Dorset
BH17 7ER
5.4.3
Operating Current ................................................................................................. 51
5.4.4
Detector Installation Instructions ........................................................................... 51
5.4.5
Side Access Configuration Dip Switch Settings ..................................................... 53
5.5 SCOOT and MOVA Detector ............................................................................................... 54
5.5.1
Performance Details ............................................................................................. 54
5.5.2
Part Number ......................................................................................................... 54
5.5.3
Operating Current ................................................................................................. 55
5.5.4
Detector Installation Instructions ........................................................................... 55
5.5.5
Side Access Configuration Dip Switch Settings ..................................................... 59
5.6 On Crossing Pedestrian Detector ........................................................................................ 60
5.6.1
Performance Details ............................................................................................. 60
5.6.2
Part Number ......................................................................................................... 60
5.6.3
Operating Current ................................................................................................. 61
5.6.4
Detector Installation Instructions ........................................................................... 61
5.6.5
Side Access Configuration Dip Switch Settings ..................................................... 66
5.7 Kerbside Pedestrian Detector .............................................................................................. 67
6
5.7.1
Performance Details ............................................................................................. 67
5.7.2
Part Number ......................................................................................................... 67
5.7.3
Operating Current ................................................................................................. 68
5.7.4
Detector Installation Instructions ........................................................................... 69
5.7.5
Side Access Configuration Dip Switch Settings ..................................................... 77
COMMISSIONING ...................................................................................................................... 78
6.1 General Installation Check................................................................................................... 78
6.2 Final Commissioning Procedures ........................................................................................ 79
7
HANDSET INTERFACE ............................................................................................................. 80
7.1 Terminal (Emulator) and a Cable Serial Interface................................................................. 80
7.2 Siecom and a Wireless / Cable Serial Interface.................................................................... 80
7.2.1
Managing Sites ..................................................................................................... 81
7.2.2
Site Connection .................................................................................................... 83
7.2.3
Site Disconnection ................................................................................................ 83
7.3 Access Levels ..................................................................................................................... 84
7.4 Command Format ............................................................................................................... 85
7.5 Terminal Error Codes .......................................................................................................... 87
7.6 Terminal Displays ................................................................................................................ 88
7.6.1
SieCom Implementation ........................................................................................ 88
7.7 Detector Terminal Handset Commands ............................................................................... 89
7.7.1
Status Commands ................................................................................................89
Version
10
Page 7 of 120
Status
Last Editor
harry.smyth
Date
Document
GENERAL HANDBOOK FOR HEIMDALL Doc. No.
Name
DETECTORS
Copyright Siemens plc 2014 All Rights Reserved
Issued
03 November 2014
667/HB/31900/000
Siemens Mobility, Traffic Solutions
Sopers Lane, Poole, Dorset
BH17 7ER
8
7.7.2
Test and Access Facilities..................................................................................... 90
7.7.3
Identities and Issue States .................................................................................... 92
7.7.4
Facilities / Equipment Configured .......................................................................... 93
7.7.5
Fault Log Commands............................................................................................ 96
MAINTENANCE ......................................................................................................................... 97
8.1 Routine Maintenance Visits .................................................................................................97
8.2 First Line Maintenance ........................................................................................................ 97
8.3 Second Line Maintenance ................................................................................................... 97
8.4 Fault Log ............................................................................................................................. 98
9
8.4.1
Introduction........................................................................................................... 98
8.4.2
Viewing the Fault Log ........................................................................................... 98
8.4.3
Clearing the Fault Log........................................................................................... 98
8.4.4
Historic Rolling Log ............................................................................................... 99
PART NUMBERS....................................................................................................................... 105
9.1 Additional Part Numbers.................................................................................................... 105
10 POWER SUPPLIES AND CABLE REQUIREMENTS ................................................................. 108
10.1 Heimdall Detector Power Supply Options ..........................................................................108
10.2 Controller Power Supply Options ....................................................................................... 108
10.2.1
24V DC Supply ................................................................................................... 108
10.2.2
24V AC Supply – LV (Standard) Traffic Controllers ............................................. 108
10.2.3
24 VAC Supply – ST900ELV Traffic Controllers .................................................. 109
11 PERMITTED CABLE LENGTH ‘LOOK-UP TABLES’ ................................................................. 110
11.1 Cable Type........................................................................................................................ 110
11.2 Detector Lookup Tables Using a 50VA Transformer .......................................................... 111
11.3 Detector Lookup Tables Using a 160VA Transformer......................................................... 113
12 CALCULATING PERMISSIBLE DETECTOR SUPPLY CABLE LENGTHS................................ 115
12.1 General Considerations ..................................................................................................... 115
12.2 Method Outline .................................................................................................................. 116
12.3 Calculating Cable Lengths ................................................................................................. 116
12.3.1
24V DC Supply Feed .......................................................................................... 116
12.3.2
24V AC/DC Transformer Supply Feed................................................................. 117
Version
10
Page 8 of 120
Status
Last Editor
harry.smyth
Date
Document
GENERAL HANDBOOK FOR HEIMDALL Doc. No.
Name
DETECTORS
Copyright Siemens plc 2014 All Rights Reserved
Issued
03 November 2014
667/HB/31900/000
Siemens Mobility, Traffic Solutions
Sopers Lane, Poole, Dorset
BH17 7ER
FIGURES
Figure 1 – Heimdall Detector ............................................................................................................... 15
Figure 2 – Example (SCOOT) Detector Product Label ......................................................................... 16
Figure
16
Figure
16
Figure 3 – Heimdall Detector ............................................................................................................... 23
Figure 4 – Mating Cable and Fixing Kit ................................................................................................ 24
Figure 5 – Buccaneer Bulkhead Connector (Front View) ...................................................................... 25
Figure 6 – ELV Detector Power Connections ....................................................................................... 25
Figure 7 : Internal Interface Connector ................................................................................................. 28
Figure 8 : ELV Detector Power Connections ........................................................................................ 29
Figure 9 – Angle Notches on Heimdall Detector ................................................................................... 32
Figure 10 – ‘Gun Sight’ Features on Heimdall Detector ........................................................................ 33
Figure 11 – Heimdall Detector (View with Side Access Door removed) ................................................ 34
Figure 12 – Standard VA Detector Installation – Plan View .................................................................. 40
Figure 13 – Single Lane VA Detector Installation – Plan View .............................................................. 44
Figure 14 – Variable Speed Threshold VA Detector Installation – Plan View ........................................ 48
Figure 15 – Stop Line Detector Installation – Plan View ....................................................................... 52
Figure 16 – SCOOT and MOVA Detector Installation – Plan View (4m installation – Static Algorithm) .. 56
Figure 17 – SCOOT and MOVA Detector Installation – Plan View (4m installation – Static and
Movement Algorithm) .................................................................................................... 57
Figure 18 : SCOOT and MOVA Detector Installation – Second Lane Plan View (6m installation – Static
Algorithm) ..................................................................................................................... 58
Figure 19 : Heimdall Kerbside Mounting Bracket .................................................................................. 62
Figure 20 : Heimdall Kerbside Extension Bracket ................................................................................. 62
Figure 21 : Heimdall set to 25 degrees from horizontal ......................................................................... 63
Figure 22 – Pedestrian On Crossing Detector Installation – Plan View ................................................. 64
Figure 23 : Standard Pole configuration with Kerbside on Standard Bracket ......................................... 69
Figure 24 : Heimdall Kerbside Mounting Bracket Detail ....................................................................... 70
Figure 25 : Heimdall Kerbside Mounting Bracket ................................................................................. 70
Figure 26 : Kerbside Installation Detail ................................................................................................. 70
Figure 27 : Cranked Pole Kerbside Installation and Bracket Detail ....................................................... 71
Figure 28 : Kerbside Detector Mounting Details ................................................................................... 72
Figure 29 : Angle Notches in Heimdall Detector ................................................................................... 73
Figure 30 – Pedestrian Kerbside Detector Installation – Plan View ....................................................... 73
Figure 31 – Helios Side Mount & AGD Bracket Assembly (667/1/30200/058) ..................................... 106
Figure 32 – Heimdall Extension Arm Bracket Assembly (667/1/31941/000) ........................................ 106
Version
10
Page 9 of 120
Status
Last Editor
harry.smyth
Date
Document
GENERAL HANDBOOK FOR HEIMDALL Doc. No.
Name
DETECTORS
Copyright Siemens plc 2014 All Rights Reserved
Issued
03 November 2014
667/HB/31900/000
Siemens Mobility, Traffic Solutions
Sopers Lane, Poole, Dorset
BH17 7ER
Figure 33 – Heimdall Spacer Bracket Assembly (667/1/31942/000) ................................................... 107
Figure 34 : Heimdall Kerbside Mounting Bracket (667/1/31910/000)................................................... 107
Figure 35 : Heimdall Kerbside Extension Bracket (667/1/31911/000) ................................................. 107
Figure 36 : Heimdall Kerbside Straight Bracket (667/1/31914/000) ..................................................... 107
Version
10
Page 10 of 120
Status
Last Editor
harry.smyth
Date
Document
GENERAL HANDBOOK FOR HEIMDALL Doc. No.
Name
DETECTORS
Copyright Siemens plc 2014 All Rights Reserved
Issued
03 November 2014
667/HB/31900/000
Siemens Mobility, Traffic Solutions
Sopers Lane, Poole, Dorset
BH17 7ER
TABLES
Table 1 – Installation Documents ........................................................................................................... 4
Table 2 – Standard Output Cable Configuration ................................................................................... 26
Table 3 – Standard Output Cable Configuration ................................................................................... 27
Table 4 – Output Cable Configuration with Isolated Second Detector O/P ............................................ 27
Table 5 – Standard Output Terminal Block Configuration ..................................................................... 30
Table 6 – Standard Output Cable Configuration ................................................................................... 30
Table 7 – Output Cable Configuration with Isolated Second Detector O/P ............................................ 31
Table 8 – Serial Communication (SiTOS) Configuration Switches ........................................................ 36
Table 9 – Heimdall Standard VA Detector Part Number Options .......................................................... 37
Table 10 – Standard VA Detector Operating Current............................................................................ 38
Table 11 – Additional Facilities Operating Current ................................................................................ 38
Table 12 – Standard VA Detector Configuration Switch Settings .......................................................... 41
Table 13 – Heimdall Single Lane VA Detector Part Number ................................................................. 42
Table 14 – Single Lane VA Detector Operating Current ....................................................................... 43
Table 15 – Additional Facilities Operating Current ................................................................................ 43
Table 16 – Single Lane VA Detector Configuration Switch Settings ...................................................... 45
Table 17 – Heimdall Variable Speed Threshold VA Detector Part Number ........................................... 46
Table 18 – Variable Speed Threshold VA Detector Operating Current.................................................. 47
Table 19 – Additional Facilities Operating Current ................................................................................ 47
Table 20 – Variable Speed Threshold VA Detector Configuration Switch Settings ................................ 49
Table 21 – Heimdall Stop Line Presence Detector Part Number........................................................... 50
Table 22 – Stop Line Presence Detector Operating Current ................................................................. 51
Table 23 – Additional Facilities Operating Current ................................................................................ 51
Table 24 – Stop Line Presence Detector Configuration Switch Settings ............................................... 53
Table 25 – Heimdall SCOOT and MOVA Detector Part Number........................................................... 54
Table 26 – Detector Operating Current ................................................................................................ 55
Table 27 – Additional Facilities Operating Current ................................................................................ 55
Table 28 – SCOOT and MOVA Detector Configuration Switch Settings ............................................... 59
Table 29 – Heimdall On Crossing Pedestrian Detector Part Number .................................................... 60
Table 30 – Pedestrian On Crossing Detector Operating Current........................................................... 61
Table 31 – Additional Facilities Operating Current ................................................................................ 61
Table 32 – Pedestrian On Crossing Configuration Switch Settings ....................................................... 66
Table 33 – Heimdall Kerbside Pedestrian Detector Part Number.......................................................... 67
Table 34 – Pedestrian Kerbside Detector Operating Current ................................................................ 68
Table 35 – Additional Facilities Operating Current ................................................................................ 68
Version
10
Page 11 of 120
Status
Last Editor
harry.smyth
Date
Document
GENERAL HANDBOOK FOR HEIMDALL Doc. No.
Name
DETECTORS
Copyright Siemens plc 2014 All Rights Reserved
Issued
03 November 2014
667/HB/31900/000
Siemens Mobility, Traffic Solutions
Sopers Lane, Poole, Dorset
BH17 7ER
Table 36 – Pedestrian Kerbside Detector Configuration Switch Settings............................................... 77
Table 37 – Terminal Error Codes ......................................................................................................... 87
Table 38 – Status Commands.............................................................................................................. 89
Table 39 – Test and Access Facilities .................................................................................................. 91
Table 40 – Detector Identities and Issue State ..................................................................................... 92
Table 41 – Detector Facilities / Equipment Configured ......................................................................... 95
Table 42 – Fault Log Commands ......................................................................................................... 96
Table 43 – Fault Log Index ................................................................................................................ 104
Table 44 – Spare Part Numbers......................................................................................................... 105
Table 45 – Additional Part Numbers................................................................................................... 106
Table 46 – Siemens AC Detector Supply Specification....................................................................... 115
Table 47 – Siemens AC Detector Supply Specification....................................................................... 116
Table 48 - Calculation of Maximum Cable Length (Controller-mounted AC supply) ............................ 118
Version
10
Page 12 of 120
Status
Last Editor
harry.smyth
Date
Document
GENERAL HANDBOOK FOR HEIMDALL Doc. No.
Name
DETECTORS
Copyright Siemens plc 2014 All Rights Reserved
Issued
03 November 2014
667/HB/31900/000
Siemens Mobility, Traffic Solutions
Sopers Lane, Poole, Dorset
BH17 7ER
1 INTRODUCTION
1.1 Purpose
This handbook gives a general description and specification for the Heimdall series of
above ground detectors. It outlines the general procedures for installation, commissioning
and maintenance.
Detailed installation instructions can be found in this document and in addition, the
appropriate installation guides (reference section 0).
1.2 Related Documents
667/HE/20661/000
667/HE/20662/000
667/HE/20663/000
667/HE/20664/000
667/HE/20665/000
667/HB/30875/000
General Installation Principles
Signals and Poles (for reference only)
Detectors and Cable Terminations
Installation and Testing
General Installation Guide for Above Ground
Detectors
SieCom Handbook
1.3 Definitions
AGD
CRC
CR/LF
DIP
DFM
EEPROM
HA
LED
MP
PCB
PDA
PLL
RF
SCOOT
SieCOM
SiTOS
VA
Above Ground Detector
Cyclic Redundancy Check
Carriage Return/Line Feed
Dual In-Line Package
Detector fault Monitor
Electrically Erasable and Programmable
Memory
Highways Agency
Light Emitting Diode
Maintenance Provisions
Printed Circuit Board
Personal Digital Assistant
Phase-locked Loop
Radio Frequency
Split Cycle Offset Optimisation Technique
Siemens Intelligent Traffic Signal
Communications Terminal
Siemens Traffic Communications Protocol
Vehicle Actuated
1.4 Issue History
1
2
3
4
5
Release
TS004728
TS005346
TS005346
TS006334
Version
10
Page 13 of 120
Status
Last Editor
harry.smyth
Date
Document
GENERAL HANDBOOK FOR HEIMDALL Doc. No.
Name
DETECTORS
Copyright Siemens plc 2014 All Rights Reserved
Issued
03 November 2014
667/HB/31900/000
Siemens Mobility, Traffic Solutions
Sopers Lane, Poole, Dorset
BH17 7ER
6
7
8
9
10
TS006388
TS006649
TS007322
TS007394
TS007704
Version
10
Page 14 of 120
Status
Last Editor
harry.smyth
Date
Document
GENERAL HANDBOOK FOR HEIMDALL Doc. No.
Name
DETECTORS
Copyright Siemens plc 2014 All Rights Reserved
Issued
03 November 2014
667/HB/31900/000
Siemens Mobility, Traffic Solutions
Sopers Lane, Poole, Dorset
BH17 7ER
2 GENERAL DETECTOR INFORMATION
2.1 The Heimdall Detector
The Heimdall series of above ground detectors incorporates ‘state of the art’ radar
antenna designs, tailored to the specific requirement of a range of detector operations.
The range includes On Crossing, Kerbside, a range of Vehicle Approach, SCOOT &
MOVA and Stop Line Data detectors.
The detector is housed in a low profile enclosure to minimise ‘eye clutter’.
Figure 1 – Heimdall Detector
Version
10
Page 15 of 120
Status
Last Editor
harry.smyth
Date
Document
GENERAL HANDBOOK FOR HEIMDALL Doc. No.
Name
DETECTORS
Copyright Siemens plc 2014 All Rights Reserved
Issued
03 November 2014
667/HB/31900/000
Siemens Mobility, Traffic Solutions
Sopers Lane, Poole, Dorset
BH17 7ER
2.2 Identification Label
Each detector has an identification label affixed to the back of the unit, which identifies
the detector type, part number, any optional extras and serial number.
Figure 2 – Example (SCOOT) Detector Product Label
Figure 3
Figure 4
2.3 Interface
The Heimdall detector has three main interfaces.
LED
An LED indicator is mounted on the side of the detector which gives a visual indication of
the detector status. The LED will be ON for the detect state.
The LED indicator is built into the side access door, which may be fitted so that it either
faces forwards (towards on-coming traffic) or backwards (away from on-coming traffic)
dependant on detector type - see section 5.
Interface Cable – UK variant only
Detectors are supplied with a standard interface cable fitted with a Bulgin Buccaneer
connector – see section 4.5.
Configuration DIP Switches
All detectors are fitted with configuration DIP switches.
Refer to the detailed detector specification (section 5) and commissioning section
(section 6) for detailed explanation of these configuration facilities.
Version
10
Page 16 of 120
Status
Last Editor
harry.smyth
Date
Document
GENERAL HANDBOOK FOR HEIMDALL Doc. No.
Name
DETECTORS
Copyright Siemens plc 2014 All Rights Reserved
Issued
03 November 2014
667/HB/31900/000
Siemens Mobility, Traffic Solutions
Sopers Lane, Poole, Dorset
BH17 7ER
2.4 Product Options
There are several additional interface options available. These are identified as follows;
SiTOS Serial Interface
The SiTOS interface provides a facility to transfer detailed detector status / information to
a controller equipped to use the SiTOS (serial) communication protocol. Section 4.9
should be referenced when installing detectors equipped with this option.
Siemens Wireless Link
A wireless add-on can be included with allows the Heimdall detector to be configured
wirelessly using the Siemens SieCom facility.
Section 7.2 should be referenced for further information.
Second Isolated Relay Output
A second, isolated, detector output may be added for an additional detector status output.
The second detector output may for example, be used to identify a fault condition.
Version
10
Page 17 of 120
Status
Last Editor
harry.smyth
Date
Document
GENERAL HANDBOOK FOR HEIMDALL Doc. No.
Name
DETECTORS
Copyright Siemens plc 2014 All Rights Reserved
Issued
03 November 2014
667/HB/31900/000
Siemens Mobility, Traffic Solutions
Sopers Lane, Poole, Dorset
BH17 7ER
3 General Specifications
3.1 Electrical Specifications
3.1.1 Operating Voltage
24V AC ± 20% (48 to 63 Hz)
or
10.8V to 28.8V DC
3.1.2 Detection Solid State Relay(s)
Voltage free output.
On Impedance 25ohms (typical), 35 ohms (maximum).
Open Circuit maintained up to 350V peak.
3.1.3 Operating Current
Detailed current requirements are dependent on detector type, and this information may
be found in the appropriate detector specification section (reference section 5).
3.1.4 Radio Frequency Transmission Specifications
Detector Variant
Frequency of
Operation
Detection
Technique
Standard VA
24.15 – 24.25
CW
Max EIRP1
(dBmW)
17.8
Single Lane VA
24.15 - 24.25
CW
18.6
Speed
24.15 - 24.25
CW
17.8
CW
10.2
On Crossing
13.4 – 14.0
Table 3-1 : Transmission Specifications for CW applications
2
Detector Variant
Frequency of
Operation
Detection
Technique
Sweep Rate
(MHz/mS)
Stopline
24.05 – 24.25
FMCW
13.17
Max EIRP
(dBmW)
18.0
SCOOT
24.05 - 24.25
FMCW
13.17
18.0
FMCW/CW 9.26
8.1
Kerbside
13.4 - 14.0
Table 3-2 : Transmission Specifications for FMCW applications
1
Measurement conditions: Tmin:0 C, Tmax:55 C, Umin:19.2V, Umax:28.8V
o
o
2
Sweep from FL to FH
Version
10
Page 18 of 120
Status
Last Editor
harry.smyth
Date
Document
GENERAL HANDBOOK FOR HEIMDALL Doc. No.
Name
DETECTORS
Copyright Siemens plc 2014 All Rights Reserved
Issued
03 November 2014
667/HB/31900/000
Siemens Mobility, Traffic Solutions
Sopers Lane, Poole, Dorset
BH17 7ER
3.2 Mechanical Specifications
3.2.1 Weight
0.6Kg (without bracket(s))
3.2.2 Dimensions
150mm x 135mm x 90mm (h x w x d) - to the bottom of mounting foot.
Version
10
Page 19 of 120
Status
Last Editor
harry.smyth
Date
Document
GENERAL HANDBOOK FOR HEIMDALL Doc. No.
Name
DETECTORS
Copyright Siemens plc 2014 All Rights Reserved
Issued
03 November 2014
667/HB/31900/000
Siemens Mobility, Traffic Solutions
Sopers Lane, Poole, Dorset
BH17 7ER
3.3 Environmental Specifications
3.3.1 Operating Temperature
Lower limit -400C (-250C with wireless module).
Upper limit +750C.
3.3.2 Environmental Rating
IP56.
3.3.3 Vibration
EN 60068-2-64 Test Fh.
3.4 EMC Specifications
The Heimdall Detectors have been designed and tested against the following
specifications:
EN50293
EN300 440
Electromagnetic compatibility. Road traffic signal
systems. Product standard.
Electromagnetic compatibility and Radio spectrum
Matters (ERM); Short range devices; Radio
equipment to be used in the 1 GHz to 40 GHz
frequency range.
Version
10
Page 20 of 120
Status
Last Editor
harry.smyth
Date
Document
GENERAL HANDBOOK FOR HEIMDALL Doc. No.
Name
DETECTORS
Copyright Siemens plc 2014 All Rights Reserved
Issued
03 November 2014
667/HB/31900/000
Siemens Mobility, Traffic Solutions
Sopers Lane, Poole, Dorset
BH17 7ER
3.5 Highways Agency (HA) Specifications
The Heimdall Detectors have been designed and tested against the following HA
specifications:
TR2130
TR2205
TR2206A
TR2207A
667/BH/31900/040
Environmental Tests for Motorway
Communications. Equipment and Portable and
permanent Traffic Control Equipment.
Performance Specification for Above Ground
Vehicle Detector Systems for use at Permanent
Traffic Signal Installations.
Performance Specification for Above Ground
On-Crossing Pedestrian Detection Systems.
Performance Specification for Kerbside
Detection Systems for use with Nearside Signals
and Demand Units.
Heimdall Above Ground SCOOT and MOVA
Specification.
3.6 Manufacturing Specifications
The Heimdall Detectors have been designed and evaluated against the following
specifications:
2002/95/EC
2002/96/EC
RoHS Directive.
WEEE Directive.
3.7 Product Safety
The Heimdall Detectors have been designed and tested against the following
specification:
EN60950
Product Safety
Version
10
Page 21 of 120
Status
Last Editor
harry.smyth
Date
Document
GENERAL HANDBOOK FOR HEIMDALL Doc. No.
Name
DETECTORS
Copyright Siemens plc 2014 All Rights Reserved
Issued
03 November 2014
667/HB/31900/000
Siemens Mobility, Traffic Solutions
Sopers Lane, Poole, Dorset
BH17 7ER
4 GENERAL INSTALLATION INSTRUCTIONS
4.1 General Introduction
This section outlines the general information required when installing a Heimdall Above
Ground detector.
4.2 Tools Required
As well as a standard Installers tool kit, the following are required when installing and
maintaining the Heimdall Detector:
1.5mm Allen key – for side access door and lid.
T-8 Torx driver – alternative tool for side access door and lid.
13mm Socket spanner – for angular adjustment and installation of detector.
Small flat bladed screwdriver – for DIP switch adjustment.
4.3 Order of Installation
The recommended order in which installation should take place is as follows:
(1) Read the Safety Warning on page 2 of this Handbook.
(2) Unpack items from packaging (reference section 4.4).
(3) Set configuration DIP switches (in most cases the detectors will be supplied ready to
fit, if it is required change these settings then consult appropriate detector
requirements in section 5).
(4) Fit Detector to appropriate mounting structure (refer to appropriate detector
requirements – reference section 5).
(5) Perform initial Detector Alignment (refer to appropriate detector requirements –
reference section 5).
(6) Connect detector to bulkhead mating connector.
(7) Final commissioning (section 6).
Version
10
Page 22 of 120
Status
Last Editor
harry.smyth
Date
Document
GENERAL HANDBOOK FOR HEIMDALL Doc. No.
Name
DETECTORS
Copyright Siemens plc 2014 All Rights Reserved
Issued
03 November 2014
667/HB/31900/000
Siemens Mobility, Traffic Solutions
Sopers Lane, Poole, Dorset
BH17 7ER
4.4 Detector Packaging
Heimdall Detectors are supplied individually in a packing box. The label on the side of the
box details the detector type and part number.
Each detector box contains the following:
(1) Heimdall Detector with the interface lead attached;
(2) A mating connection lead which will (typically) be installed within the traffic signal
enclosure;
(3) Gasket, grommets and fixing screws for the mating connector installation;
(4) Optional labels detailing the Heimdall Wireless Link access addresses.
(5) Quick Installation Guide
Figure 5 – Heimdall Detector
Version
10
Page 23 of 120
Status
Last Editor
harry.smyth
Date
Document
GENERAL HANDBOOK FOR HEIMDALL Doc. No.
Name
DETECTORS
Copyright Siemens plc 2014 All Rights Reserved
Issued
03 November 2014
667/HB/31900/000
Siemens Mobility, Traffic Solutions
Sopers Lane, Poole, Dorset
BH17 7ER
Figure 6 – Mating Cable and Fixing Kit
4.4.1 Export Variant
The export variant is normally shipped without the interface cable or the mating
connection lead.
Version
10
Page 24 of 120
Status
Last Editor
harry.smyth
Date
Document
GENERAL HANDBOOK FOR HEIMDALL Doc. No.
Name
DETECTORS
Copyright Siemens plc 2014 All Rights Reserved
Issued
03 November 2014
667/HB/31900/000
Siemens Mobility, Traffic Solutions
Sopers Lane, Poole, Dorset
BH17 7ER
4.5 Electrical Connections – UK Variant
4.5.1 General
All Heimdall detectors are equipped with a captive lead and standard 9 pin ‘Buccaneer’
connector (see Figure 7).
3
2
4
6
9
8
1
5
7
Figure 7 – Buccaneer Bulkhead Connector (Front View)
The wires from this connector should be terminated in accordance with the details shown
in sections below.
Note 1: Particular attention should be paid to the correct termination of the power
supply wires. The RED wire should be used for the POSITIVE AC/DC supply feed
and the Black wire for the NEGATIVE supply return.
Note 2: When installing this detector with a 24 AC source, please ensure the 24 AC
source is derived from an earthed secondary transformer (as used in standard
traffic installations).
Note 3: When using 24 AC supply, only use battery powered interface equipment
(e.g. laptop, PDA). Do not connect mains powered/connected interface equipment
to the Heimdall series of detectors, as this will cause the detector’s fuse to fail.
Note 4: When installing this detector with a Siemens ELV controller or a Siemens
ELV controller additional supply, please ensure the RED wire of the interface cable
is connected to the POSITIVE (common) connector, the BLACK wire is connected
to the NEGATIVE (-24VDC) source and the GREEN (screen), if included, is
connected to the POSITIVE (common) connector.
Figure 8 – ELV Detector Power Connections
Version
10
Page 25 of 120
Status
Last Editor
harry.smyth
Date
Document
GENERAL HANDBOOK FOR HEIMDALL Doc. No.
Name
DETECTORS
Copyright Siemens plc 2014 All Rights Reserved
Issued
03 November 2014
667/HB/31900/000
Siemens Mobility, Traffic Solutions
Sopers Lane, Poole, Dorset
BH17 7ER
The pin out for the connector is as specified in the Highways Agency Specifications:
TR2505 and is detailed in the following tables.
The Heimdall detector provides additional facilities using the spare connections within the
9 way connector. These are all outlined in the tables below (Table 4-1, Table 4-2 and
Table 4-3).
4.5.2 Standard Output Cable
Applicable to Standard and Wireless Variants (667/1/31900/xx0 and /xx2).
Connector
Pin Number
Comment
Colour
Code
1
Detector Supply (Positive) AC/DC
Red
2
Detector Supply (Negative) AC/DC
Black
3
Screen
Green
4
Detector O/P #1 and 2 (Common)
White
5
Detector O/P #1 (Normally Open)*
Yellow
6
Detector O/P #1 (Normally Closed)*
Blue
7
Not Used
Violet
8
Not Used
Orange
9
Not Used
Brown
Note: * This signal condition refers to the state when the detector is un-powered
(detect state).
Table 4-1 – Standard Output Cable Configuration
Version
10
Page 26 of 120
Status
Last Editor
harry.smyth
Date
Document
GENERAL HANDBOOK FOR HEIMDALL Doc. No.
Name
DETECTORS
Copyright Siemens plc 2014 All Rights Reserved
Issued
03 November 2014
667/HB/31900/000
Siemens Mobility, Traffic Solutions
Sopers Lane, Poole, Dorset
BH17 7ER
4.5.3 SiTOS Output Cable
Applicable to SiTOS variant (667/1/31900/xx1).
Connector
Pin Number
Comment
Colour
Code
1
Detector Supply (Positive) AC/DC
Red
2
Detector Supply (Negative) AC/DC
Black
3
Screen/ RS485 Ground
Green
4
Detector O/P #1 and 2 (Common)
White
5
Detector O/P #1 (Normally Open)*
Yellow
6
Detector O/P #1 (Normally Closed)*
Blue
7
Detector O/P #2 (Normally Open)*
Violet
8
SiTOS RS485 (Terminal A)
Orange
9
SiTOS RS485 (Terminal B)
Brown
Note: * This signal condition refers to the state when the detector is un-powered
(detect state).
Table 4-2 – Standard Output Cable Configuration
4.5.4 Isolated Second Output Cable
Applicable to Second Output Variants (667/1/31900/xx3 and /xx4).
Connector
Pin Number
Comment
Colour
Code
1
Detector Supply (Positive) AC/DC
Red
2
Detector Supply (Negative) AC/DC
Black
3
Screen
Green
4
Detector O/P #1 (Common)
White
5
Detector O/P #1 (Normally Open)*
Yellow
6
Detector O/P #1 (Normally Closed)*
Blue
7
Detector O/P #2 (Common)
Violet
8
Detector O/P #2 (Normally Open)*
Orange
9
Detector O/P #2 (Normally Closed)*
Brown
Note: * This signal condition refers to the state when the detector is un-powered
(detect state).
Table 4-3 – Output Cable Configuration with Isolated Second Detector O/P
Version
10
Page 27 of 120
Status
Last Editor
harry.smyth
Date
Document
GENERAL HANDBOOK FOR HEIMDALL Doc. No.
Name
DETECTORS
Copyright Siemens plc 2014 All Rights Reserved
Issued
03 November 2014
667/HB/31900/000
Siemens Mobility, Traffic Solutions
Sopers Lane, Poole, Dorset
BH17 7ER
4.6 Electrical Connections: Export Variant
4.6.1 General
The export variants of the Heimdall detectors are not supplied with the captive lead and
standard 9 pin ‘Buccaneer’ connector. Instead the interfacing with the Heimdall detector
is via the supplied ‘internal’ interface wiring block connector as shown in Figure 9.
Terminal 1
Figure 9 : Internal Interface Connector
To access the connector, the four fixing screws on the lid must be undone. Care should
be taken when removing the fixing screws as they are captive and are held by a sealing
grommet. Destruction of the grommet may reduce the IP rating of the Siemens product.
This connector should be terminated in accordance with the details shown in sections
below.
Note 1: Particular attention should be paid to the correct termination of the power
supply wires. Terminal 1 should be used for the POSITIVE AC/DC supply feed and
Terminal 2 for the NEGATIVE supply return.
Note 2: When installing this detector with a 24 AC source, please ensure the 24 AC
source is derived from an earthed secondary transformer (as used in standard
traffic installations).
Note 3: When using 24 AC supply, only use battery powered interface equipment
(e.g. laptop, PDA). Do not connect mains powered/connected equipment to the
Heimdall series of detectors, as this will cause the detectors to fail.
Note 4: When installing this detector with a Siemens ELV controller or a Siemens
ELV controller additional supply, please ensure the RED wire of the interface cable
is connected to the POSITIVE (common) connector, the BLACK wire is connected
to the NEGATIVE (-24VDC) source and the GREEN (screen) is connected to the
POSITIVE (common) connector.
Version
10
Page 28 of 120
Status
Last Editor
harry.smyth
Date
Document
GENERAL HANDBOOK FOR HEIMDALL Doc. No.
Name
DETECTORS
Copyright Siemens plc 2014 All Rights Reserved
Issued
03 November 2014
667/HB/31900/000
Siemens Mobility, Traffic Solutions
Sopers Lane, Poole, Dorset
BH17 7ER
Figure 10 : ELV Detector Power Connections
Version
10
Page 29 of 120
Status
Last Editor
harry.smyth
Date
Document
GENERAL HANDBOOK FOR HEIMDALL Doc. No.
Name
DETECTORS
Copyright Siemens plc 2014 All Rights Reserved
Issued
03 November 2014
667/HB/31900/000
Siemens Mobility, Traffic Solutions
Sopers Lane, Poole, Dorset
BH17 7ER
4.6.2 Standard Variants
Applicable to export variants (667/1/31900/1x0 and /1x2).
Terminal
Number
Comment
Normal
Wiring
Colour Code
1
Detector Supply (Positive) AC/DC
Red
2
Detector Supply (Negative) AC/DC
Black
3
Detector O/P #1 (Normally Closed)*
Blue
4
Detector O/P #1 and 2 (Common)
White
5
Detector O/P #1 (Normally Open)*
Yellow
6
Not Connected
Not Used
7
Not Connected
Not Used
8
Not Connected
Not Used
9
Not Connected
Not Used
Note: * This signal condition refers to the state when the detector is un-powered
(detect state).
Table 4-4 – Standard Output Terminal Block Configuration
4.6.3 SiTOS variants
Applicable to SiTOS variant (667/1/31900/1x1).
Terminal
Number
Comment
Normal
Wiring
Colour Code
1
Detector Supply (Positive) AC/DC
Red
2
Detector Supply (Negative) AC/DC
Black
3
Detector O/P #1 (Normally Closed)*
Blue
4
Detector O/P #1 and 2 (Common)
White
5
Detector O/P #1 (Normally Open)*
Yellow
6
Detector O/P #2 (Normally Open)*
Violet
7
SiTOS RS485 (Terminal A)
Orange
8
SiTOS RS485 (Terminal B)
Brown
9
RS485 Common
Green
Note: * This signal condition refers to the state when the detector is un-powered
(detect state).
Table 4-5 – Standard Output Cable Configuration
Version
10
Page 30 of 120
Status
Last Editor
harry.smyth
Date
Document
GENERAL HANDBOOK FOR HEIMDALL Doc. No.
Name
DETECTORS
Copyright Siemens plc 2014 All Rights Reserved
Issued
03 November 2014
667/HB/31900/000
Siemens Mobility, Traffic Solutions
Sopers Lane, Poole, Dorset
BH17 7ER
4.6.4 Isolated Second Output Cable
Applicable to Second Output Variants (667/1/31900/xx3 and /xx4).
Connector
Pin Number
Comment
Colour
Code
1
Detector Supply (Positive) AC/DC
Red
2
Detector Supply (Negative) AC/DC
Black
3
Detector O/P #1 (Normally Closed)*
Blue
4
Detector O/P #1 (Common)
White
5
Detector O/P #1 (Normally Open)*
Yellow
6
Detector O/P #2 (Normally Open)*
Violet
7
SiTOS RS485 (Terminal A)
Orange
8
SiTOS RS485 (Terminal B)
Brown
9
RS485 Common
Green
10
Detector O/P #2 (Common)
11
Detector O/P #3 (Normally Closed)*
Pink
Turquoise
Note: * This signal condition refers to the state when the detector is un-powered
(detect state).
Table 4-6 – Output Cable Configuration with Isolated Second Detector O/P
Version
10
Page 31 of 120
Status
Last Editor
harry.smyth
Date
Document
GENERAL HANDBOOK FOR HEIMDALL Doc. No.
Name
DETECTORS
Copyright Siemens plc 2014 All Rights Reserved
Issued
03 November 2014
667/HB/31900/000
Siemens Mobility, Traffic Solutions
Sopers Lane, Poole, Dorset
BH17 7ER
4.7 Alignment Features
The Heimdall detectors have two built-on features which help with alignment - angle
markings and ‘gun-sight’.
4.7.1 Angle Markings
The Heimdall detector mounting-base has a series of markings which denote 5 degree
angle steps. An installer may use these as an aid to alignment, with regards to detector
angle.
The Heimdall detector body has an arrow which lines up with one of several notches that
are moulded onto the mounting-base (see Figure 11). To make the setting easier, every
third notch is larger (major) than the intervening (minor) notches.
With the arrow lined up with the first major notch (the one nearest to the rear of the
detector) the angle of the detector is zero (horizontal). The next two minor notches are 5
degrees and 10 degrees from horizontal (detector tilted forwards). The next major notch
will align the detector to 15 degrees from the horizontal.
Arrow currently
pointing at the 25
degree mark.
Arrow here means
detector is horizontal
(zero degrees)
Figure 11 – Angle Notches on Heimdall Detector
It should be noted that these angles are all in relation to the mounting surface of the
detector which is not necessarily the same as that of the road surface.
Version
10
Page 32 of 120
Status
Last Editor
harry.smyth
Date
Document
GENERAL HANDBOOK FOR HEIMDALL Doc. No.
Name
DETECTORS
Copyright Siemens plc 2014 All Rights Reserved
Issued
03 November 2014
667/HB/31900/000
Siemens Mobility, Traffic Solutions
Sopers Lane, Poole, Dorset
BH17 7ER
4.7.2 ‘Gun-Sight’
‘Gun-sight features are moulded onto the detector case lid, which an installer may use to
help align the detector. The detector specifications (reference section 5.0) will each
indicate the appropriate aiming point depending on detector type.
Moulded
Features.
Figure 12 – ‘Gun Sight’ Features on Heimdall Detector
Version
10
Page 33 of 120
Status
Last Editor
harry.smyth
Date
Document
GENERAL HANDBOOK FOR HEIMDALL Doc. No.
Name
DETECTORS
Copyright Siemens plc 2014 All Rights Reserved
Issued
03 November 2014
667/HB/31900/000
Siemens Mobility, Traffic Solutions
Sopers Lane, Poole, Dorset
BH17 7ER
4.8 General Detector Configuration Facilities
4.8.1 DIP Switches
All Heimdall detectors are equipped with switches that enable the unit to be installed, for
the majority of applications, without the need for any special terminal (handset)
equipment.
Access to these switches is gained by removal of the side access door. This comes with
a ‘built-in’ retention mechanism to prevent it falling to the ground when removed from the
body. Before removal, make a note of the cover’s orientation and ensure it is replaced the
same way round (refer to appropriate detector specification (section 5) for orientation).
The switches on the PCB nearest the front of the detector (Digital Processor Board)
control the basic functions of the detector and are described in more detail in the
appropriate sections (5.x) of this handbook. This switch is referred to, throughout this
document, as the ‘Detector Configuration DIP Switch’.
The switches provided on the PCB nearest the rear of the detector (Special I/O Board)
control the operation of the Siemens Serial Interface (SiTOS). This switch is referred to,
throughout this document, as the ‘SITOS Interface board DIP Switch’.
For applications that require communication with a SiTOS enabled controller (or any
SiTOS enabled master communications device)1, this will require the SiTOS enabled
detector to be enabled for SiTOS communications. The Detector Configuration DIP
switch 8 is used to control this mode of working.
SiTOS interface
board DIP switch
(SW1 Indicated)
Detector
configuration DIP
switch
Serial Interface
Connector
(SW8 indicated)
Figure 13 – Heimdall Detector (View with Side Access Door removed)
Figure 13 shows all DIP switch setting in the OFF (‘0’) position.
1
The SiTOS facility requires a particular variant of the Heimdall detector. See Section 0
Version
10
Page 34 of 120
Status
Last Editor
harry.smyth
Date
Document
GENERAL HANDBOOK FOR HEIMDALL Doc. No.
Name
DETECTORS
Copyright Siemens plc 2014 All Rights Reserved
Issued
03 November 2014
667/HB/31900/000
Siemens Mobility, Traffic Solutions
Sopers Lane, Poole, Dorset
BH17 7ER
4.8.2 Terminal Interface
All Heimdall detectors are equipped with a terminal interface that will enable the unit to be
configured with a terminal interface. The use of a terminal interface cable is required.
Access to the terminal interface is gained by removal of the side access door. This comes
with a ‘built-in’ retention mechanism to prevent it falling to the ground when removed from
the body. Before removal, make a note of the cover’s orientation and ensure it is replaced
the same way round (refer to appropriate detector specification (section 5) for
orientation).
4.8.3 Priority of configuration
Since the detector can be configured using the DIP switches, terminal interface and/or
the SiTOS there is a hierarchy which is defined as follows;
If the Digital Processor board dip switch SW8 is set to ‘0’ –
DIP switches SW1 to SW7 have full control of the detector configuration settings.
The terminal handset has no write access, with the exceptions where the DIP
switch settings allows for terminal settings to be applied. However the user
Terminal will have full read access.
SiTOS has no write or read access.
If the Digital Processor board dip switch SW8 is set to ‘1’ –
SiTOS has full configuration with both read and write access.
The settings of dip switches SW1 to SW7 are ignored.
User Terminal will normally not have any write access.
The exception is the command SME=249 (override command). This has the effect of
temporarily disabling SiTOS access and allowing the terminal to have full write access to
the configuration setting. The temporary period will terminate after 20 minutes of terminal
inactivity.
If SW8 is set to 1, but a SiTOS is not connected, then the (wireless) user terminal will
have full write and read access. The situation occurs since an unconnected SiTOS will
not overwrite the setting applied by the terminal handset.
Version
10
Page 35 of 120
Status
Last Editor
harry.smyth
Date
Document
GENERAL HANDBOOK FOR HEIMDALL Doc. No.
Name
DETECTORS
Copyright Siemens plc 2014 All Rights Reserved
Issued
03 November 2014
667/HB/31900/000
Siemens Mobility, Traffic Solutions
Sopers Lane, Poole, Dorset
BH17 7ER
4.9 Heimdall Serial Communications Installation (SiTOS)
The Heimdall Detector can be equipped with a serial communications facility to enable
the detector status, configuration parameters and vehicle data (if appropriate) to be
requested by a SiTOS enabled host controller (equipment).
This facility utilises the industry standard RS485 two wire serial communication
technique. A number of detectors can be attached to a common pair of wires and can be
interrogated on an individual basis. To achieve this it is necessary to assign a unique
address to each detector on the common pair using the dual-in-line switch located on the
special serial interface card (see Table 4-7 for details).
Hello
SiTOS DIP Switch Number
1
2
3
Not Used
Line
Termination
0 = Disabled
1 = Enabled
4
5
6
7
8
(SW4 = MS bit, SW8 = LS bit)
Detector Address:
0,0,0,0,0 = Address 0 (00h)
0,0,0,0,1 = Address 1 (01h)
:
1,1,1,1,1 = Address 31 (1Fh)
Table 4-7 – Serial Communication (SiTOS) Configuration Switches
Note: Some DIP switches may be marked with ON/OFF. For the purposes of
definition, OFF is equal to 0 and ON is equal to 1.
Each detector address should be set in accordance with the installation information
supplied with the host equipment. This will also define when the ‘Line Termination’ switch
(SW 1) should be used.
Version
10
Page 36 of 120
Status
Last Editor
harry.smyth
Date
Document
GENERAL HANDBOOK FOR HEIMDALL Doc. No.
Name
DETECTORS
Copyright Siemens plc 2014 All Rights Reserved
Issued
03 November 2014
667/HB/31900/000
Siemens Mobility, Traffic Solutions
Sopers Lane, Poole, Dorset
BH17 7ER
5 TECHNICAL DETAILS
5.1 Standard Vehicle Approach Detector (MVD)
5.1.1 Performance Details
Operating Range1:
<5 m to ~100 m from the Stop Line.
Lane Width:
Approximately 7.0 m.
Vehicle Approach Speed:
4km/h (2.5 mph) to greater than 112 km/h (70
mph)
Detection Presence Time:
Not applicable.
Detector Location:
Can be located on either the ‘nearside’ primary
signal pole or the ‘off-side’ primary signal pole.
Detector Mounting Height:
3.3 m to 4.0 m
Accuracy:
Not applicable.
LED Orientation:
Facing Backwards (reference section 2.3)
5.1.2 Part Number
667/1/31900/00X
Where X is;
0
1
Basic Detector
Basic Detector with RS485 (SiTOS) Serial
Interface2
3
2
Basic Detector with Wireless Link Interface
Basic Detector with a Second Solid-State Relay
3
Output4
Basic Detector with both a Wireless Link and a
4
Second Solid-State Relay Output5
Table 5-1 – Heimdall Standard VA Detector Part Number Options
1
Full range not available and limits are alignment dependant. Standard alignment range is 10 m to 35 m
from the Stop Line.
2
This option is non-standard. Please refer to Siemens Poole for further ordering information.
3
This option is non-standard. Please refer to Siemens Poole for further ordering information.
4
This option is non-standard. Please refer to Siemens Poole for further ordering information.
5
This option is non-standard. Please refer to Siemens Poole for further ordering information.
Version
10
Page 37 of 120
Status
Last Editor
harry.smyth
Date
Document
GENERAL HANDBOOK FOR HEIMDALL Doc. No.
Name
DETECTORS
Copyright Siemens plc 2014 All Rights Reserved
Issued
03 November 2014
667/HB/31900/000
Siemens Mobility, Traffic Solutions
Sopers Lane, Poole, Dorset
BH17 7ER
5.1.3 Operating Current
The overall operating current will depend whether any additional facilities are provided.
Table 5-2 below lists the typical current requirements:
24 VAC Supply
143 mA
24 VDC Supply
113 mA
Table 5-2 – Standard VA Detector Operating Current
Note: When power is first applied to the detector the following surge currents are drawn
from the supply:
DC Supply:
3.2 A (max) for < 2 ms when the supply is 29 VDC.
AC Supply:
4.2 A (max) for < 2 ms when the supply is 29 VAC.
If the detector has additional facilities fitted then the currents listed in Table 5-3 below
should be added to those shown in Table 5-2.
Additional Facility
24 VAC
24 VDC
Siemens SiTOS Serial Interface
6 mA
5 mA
(connected)
Siemens Wireless Interface (connected)
11 mA
10 mA
Table 5-3 – Additional Facilities Operating Current
Refer to Section 10 for details on power and cable length calculations.
Version
10
Page 38 of 120
Status
Last Editor
harry.smyth
Date
Document
GENERAL HANDBOOK FOR HEIMDALL Doc. No.
Name
DETECTORS
Copyright Siemens plc 2014 All Rights Reserved
Issued
03 November 2014
667/HB/31900/000
Siemens Mobility, Traffic Solutions
Sopers Lane, Poole, Dorset
BH17 7ER
5.1.4 Detector Installation Instructions
5.1.4.1
Detector Position
The detector should normally (first choice) be located on the nearside primary signal pole
(position #1 – ref. Figure 14 below). Alternatively the detector may be fitted on alternative
poles (positions 2 and 3 – ref. Figure 14 below) if circumstances dictate. The following
factors may influence position:
Line of sight obstruction such as signs, trees etc.
More than two lanes on approach - one required on nearside pole and one on
offside.
Road layout permits better aim from offside pole.
Cabling requirements.
Please ensure the installation location of the detector is clear from obstructions, such as
signs, trees etc. such that there is a clear line of sight from the detector to the road.
Failure to adhere to this recommendation will reduce detector performance.
5.1.4.2
Detector Height
The detector may be mounted at any height between 3.3 m and 4 m.
5.1.4.3
Detector Angle
The initial installation angle will change depending on the installation height and road
surface angle. For the standard 10 m to 35 m range, as a guide, the angle may be pre-set
to:
25 degrees from horizontal
Version
10
Page 39 of 120
Status
Last Editor
harry.smyth
Date
Document
GENERAL HANDBOOK FOR HEIMDALL Doc. No.
Name
DETECTORS
Copyright Siemens plc 2014 All Rights Reserved
Issued
03 November 2014
667/HB/31900/000
Siemens Mobility, Traffic Solutions
Sopers Lane, Poole, Dorset
BH17 7ER
5.1.4.4
Detector Alignment - Default
The detector uses a movement detection algorithm. Thus, the detector is aimed towards oncoming traffic
and towards the centre of the centre of the carriageway, at a position approximately 25 metres from the
associated ‘stop line’, as shown in Figure 14 below.
Alternative Position #3
(not recommended)
Alternative
Position #2
Typical Aiming
Point for Detector
1 or 2 Lanes
of Apprroach
Typical Detection
Zone
Direction of
Travel
Detector Mounted
on top of Signal
Drawing: Not to Scale
Approx. 10M
Approx. 25M from Stop Line
Approx. 35M from Stop Line
Position #1
(preferred location)
Figure 14 – Standard VA Detector Installation – Plan View
5.1.4.5
Detector Range - Default
The detector uses a movement detection algorithm. The range is typically set by the
appropriate angle and installation height. If the user requires a significant reduction in the
detection range (sensitivity), the detector configuration may be adjusted using DIP switch
6 (reference Table 5-4 below). Alternatively the terminal command RGE could be used
(reference section 7.7.4). The default setting is set for maximum sensitivity.
5.1.4.6
Detector Fault Monitor (DFM)
The detector has a fault monitor function. In the default mode, the detector will generate a
fault output (equivalent to a permanent detect) if the detector has not registered an
activation for a period of twenty hours.
This duration can be adjusted to a user defined value by setting DIP Switch 7 to ‘1’ (On)
and then using the terminal command DFM (reference section 7.7.4).
Version
10
Page 40 of 120
Status
Last Editor
harry.smyth
Date
Document
GENERAL HANDBOOK FOR HEIMDALL Doc. No.
Name
DETECTORS
Copyright Siemens plc 2014 All Rights Reserved
Issued
03 November 2014
667/HB/31900/000
Siemens Mobility, Traffic Solutions
Sopers Lane, Poole, Dorset
BH17 7ER
5.1.5 Side Access Configuration Dip Switch Settings
Note: Default settings are with all DIP switches set to ‘0’/ OFF.
Configuration DIP Switch Number
1
2
Detection Direction
0,0 = Detects vehicles moving towards
unit (default)
0,1 = Detects vehicles moving away from
unit
1,0 = Detects vehicles moving in both
directions (single O/P)
1,1 = Detects vehicles moving in both
directions (dual O/P)1
3
4
Detector LED
0,0 = Normal Detector O/P
0,1 = Permanently Off
1,0 = Detector O/P for 20 minutes
after power applied
1,1 = Normal Detector O/P
5
6
7
8
Detection
Threshold
0 = 8.5 km/h
1 = 4 km/h
Detection Range
0 = Full
1 = Reduced
DFM
0 = Default
monitor time
(20 hours
inactivity)
1 = ‘fault monitor
time’ is set by
the Engineer’s
Terminal
Remote
Configuration
0 = Disabled
1 = Enabled
Note: Some DIP switches may be marked with ON/OFF. For the purposes of definition, OFF is equal to 0 and ON is equal to 1.
Table 5-4 – Standard VA Detector Configuration Switch Settings
Refer to section 5.6 for detailed information regarding final commissioning.
1
This option requires a special I/O board to be fitted. In this dual output mode, detector o/p 1 will detect vehicles moving towards the unit and detector o/p 2 will
detect vehicles moving away.
Version
Last Editor
Document Name
Copyright
10
Page 41 of 120
Status
harry.smyth
Date
GENERAL HANDBOOK FOR HEIMDALL Doc. No.
DETECTORS
Siemens plc 2014 All Rights Reserved
Issued
03 November 2014
667/HB/31900/000
Siemens Mobility, Traffic Solutions
Sopers Lane, Poole, Dorset
BH17 7ER
5.2 Single Lane Vehicle Approach Detector
5.2.1 Performance Details
Operating Range1:
<5 m to ~100 m from the Stop Line.
Lane Width:
Approximately 3.5m.
Vehicle Approach Speed:
4km/h (2.5 mph) to greater than 112 km/h (70
mph)
Detection Presence Time:
Not applicable.
Detector Location:
Can be located on either the ‘nearside’ primary
signal pole or the ‘off-side’ primary signal pole.
Detector Mounting Height:
3.3m to 4.0m
Accuracy:
Not applicable.
LED Orientation:
Facing Backwards (reference section 2.3)
5.2.2 Part Number
667/1/31900/01X
Where X is;
0
1
2
3
4
Basic Detector
Basic Detector with RS485 (SiTOS) Serial
Interface2
Basic Detector with Wireless Link Interface3
Basic Detector with a Second Solid-State Relay
Output4
Basic Detector with both a Wireless Link and a
Second Solid-State Relay Output5
Table 5-5 – Heimdall Single Lane VA Detector Part Number
1
Full range not available and limits are alignment dependant. Standard alignment range is 10 m to 35 m
from the Stop Line.
2
This option is non-standard. Please refer to Siemens Poole for further ordering information.
3
This option is non-standard. Please refer to Siemens Poole for further ordering information.
4
This option is non-standard. Please refer to Siemens Poole for further ordering information.
5
This option is non-standard. Please refer to Siemens Poole for further ordering information.
Version
10
Page 42 of 120
Status
Issued
Last Editor
harry.smyth
Date
10 January 2014
Document
GENERAL HANDBOOK FOR HEIMDALL Doc. No. 667/HB/31900/000
Name
DETECTORS
Copyright Siemens plc 2014 All Rights Reserved
Siemens Mobility, Traffic Solutions
Sopers Lane, Poole, Dorset
BH17 7ER
5.2.3 Operating Current
The overall operating current will depend whether any additional facilities are provided.
Table 5-6 below lists the typical current requirements:
24V AC Supply
143mA
24V DC Supply
113mA
Table 5-6 – Single Lane VA Detector Operating Current
Note: When power is first applied to the detector the following surge currents are drawn
from the supply:
DC Supply:
3.2 Amps (max) for < 2ms when the supply is 29V DC.
AC Supply:
4.2 Amps (max) for < 2 ms when the supply is 29V AC.
If the detector has additional facilities fitted then the currents listed in Table 5-7 below
should be added to those shown in Table 5-6.
Additional Facility
24 VAC
24 VDC
Siemens SiTOS Serial Interface
6 mA
5 mA
(connected)
Siemens Wireless Interface (connected)
11 mA
10 mA
Table 5-7 – Additional Facilities Operating Current
Refer to Section 10 for details on power and cable length calculations.
5.2.4 Detector Installation Instructions
5.2.4.1
Detector Position
The detector should be located on the nearside primary signal pole (detector #1 – Figure
15 below) for the ‘nearside lane’ and offside primary signal (detector #2 - Figure 15
below) for the ‘outside lane’. The following factors may influence position:
Line of sight obstruction such as signs, trees etc.
More than two lanes on approach - one required on nearside pole and one on
offside.
Road layout permits better aim from offside pole.
Cabling requirements.
Please ensure the installation location of the detector is clear from obstructions, such as
signs, trees etc. such that there is a clear line of sight from the detector to the road.
Failure to adhere to this recommendation will reduce detector performance.
5.2.4.2
Detector Height
The detector may be mounted at any height between 3.3 and 4m.
5.2.4.3
Detector Angle
The initial installation angle will change depending on the installation height and road
surface angle. As a guide the angle may be pre-set to:
25 degrees from horizontal
Version
10
Page 43 of 120
Status
Issued
Last Editor
harry.smyth
Date
10 January 2014
Document
GENERAL HANDBOOK FOR HEIMDALL Doc. No. 667/HB/31900/000
Name
DETECTORS
Copyright Siemens plc 2014 All Rights Reserved
Siemens Mobility, Traffic Solutions
Sopers Lane, Poole, Dorset
BH17 7ER
5.2.4.4
Detector Alignment - Default
The detector uses a movement detection algorithm. Thus, the detector is aimed towards
oncoming traffic and towards the centre of the carriageway, at a position approximately
25 metres from the associated ‘stop line’, as shown in Figure 15 below.
Figure 15 – Single Lane VA Detector Installation – Plan View
5.2.4.5
Detector Range - Default
The detector uses a movement detection algorithm. The range is typically set by the
appropriate angle and installation height. If the user requires a significant reduction in the
detection range (sensitivity), the detector configuration may be adjusted using DIP switch
6 (reference Table 5-5 below). Alternatively the terminal command RGE could be used
(reference section 7.7.4). The default setting is set for maximum sensitivity.
5.2.4.6
Detector Fault Monitor (DFM)
The detector has a fault monitor function. In the default mode, the detector will generate a
fault output (equivalent to a permanent detect) if the detector has not registered an
activation for a period of twenty hours.
This duration can be adjusted to a user defined value by setting DIP Switch 7 to ‘1’ (On)
and then using the terminal command DFM (reference section 7.7.4).
Version
10
Page 44 of 120
Status
Issued
Last Editor
harry.smyth
Date
10 January 2014
Document
GENERAL HANDBOOK FOR HEIMDALL Doc. No. 667/HB/31900/000
Name
DETECTORS
Copyright Siemens plc 2014 All Rights Reserved
Siemens Mobility, Traffic Solutions
Sopers Lane, Poole, Dorset
BH17 7ER
5.2.5 Side Access Configuration Dip Switch Settings
Note: Default settings are with all DIP switches set to ‘0’/ OFF.
Configuration DIP Switch Number
1
2
Detection Direction
0,0 = Detects vehicles moving towards
unit (default)
0,1 = Detects vehicles moving away
from unit
1,0 = Detects vehicles moving in both
directions (single O/P)
1,1 = Detects vehicles moving in both
directions (dual O/P)1
3
4
Detector LED
0,0 = Normal Detector O/P
0,1 = Permanently Off
1,0 = Detector O/P for 20 minutes
after power applied
1,1 = Normal Detector O/P
5
6
7
8
Detection
Threshold
0 = 8.5 km/h
1 = 4 km/h
Detection Range
0 = Full
1 = Reduced
DFM
0 = Default
monitor time
(20 hours
inactivity)
1 = ‘fault monitor
time’ is set by the
Engineer’s
Terminal
Remote
Configuration
0 = Disabled
1 = Enabled
Note: Some DIP switches may be marked with ON/OFF. For the purposes of definition, OFF is equal to 0 and ON is equal to 1.
Table 5-8 – Single Lane VA Detector Configuration Switch Settings
Refer to section 5.6 for detailed information regarding final commissioning.
1
This option requires a special I/O board to be fitted. In this dual output mode, detector o/p 1 will detect vehicles moving towards the unit and detector o/p 2 will
detect vehicles moving away.
Version
Last Editor
Document Name
Copyright
10
Page 45 of 120
Status
harry.smyth
Date
GENERAL HANDBOOK FOR HEIMDALL Doc. No.
DETECTORS
Siemens plc 2014 All Rights Reserved
Issued
03 November 2014
667/HB/31900/000
Siemens Mobility, Traffic Solutions
Sopers Lane, Poole, Dorset
BH17 7ER
5.3 Selectable Speed Vehicle Approach Detector Installation
5.3.1 Performance Details
Operating Range1:
<5 m to ~100 m from the Stop Line.
Lane Width:
Approximately 7.0m.
Vehicle Approach Speed:
8km/h (5 mph) to greater than 112km/h (70 mph)
Speed Threshold Settings:
8km/h (5 mph) to 112km/h (70 mph)2.
Detection Presence Time:
Not applicable.
Detector Location:
Can be located on either the ‘nearside’ primary
signal pole or the ‘off-side’ primary signal pole.
Detector Mounting Height:
3.3m to 4.0m
Accuracy:
Not applicable.
LED Orientation:
Facing Backwards (reference section 2.3)
5.3.2 Part Number
667/1/31900/02X
Where X is;
0
1
Basic Detector
Basic Detector with RS485 (SiTOS) Serial
Interface3
2
Basic Detector with Wireless Link Interface4
Basic Detector with a Second Solid-State Relay
3
Output5
Basic Detector with both a Wireless Link and a
4
6
Second Solid-State Relay Output
Table 5-9 – Heimdall Variable Speed Threshold VA Detector Part Number
1
Full range not available and limits are alignment dependant. Standard alignment range is 10 m to 35 m
from the Stop Line.
2
Set by DIP switch settings or via serial terminal facility
3
This option is non-standard. Please refer to Siemens Poole for further ordering information.
4
This option is non-standard. Please refer to Siemens Poole for further ordering information.
5
This option is non-standard. Please refer to Siemens Poole for further ordering information.
6
This option is non-standard. Please refer to Siemens Poole for further ordering information.
Version
10
Page 46 of 120
Status
Issued
Last Editor
harry.smyth
Date
03 November 2014
Document
GENERAL HANDBOOK FOR HEIMDALL Doc. No. 667/HB/31900/000
Name
DETECTORS
Copyright Siemens plc 2014 All Rights Reserved
Siemens Mobility, Traffic Solutions
Sopers Lane, Poole, Dorset
BH17 7ER
5.3.3 Operating Current
The overall operating current will depend whether any additional facilities are provided.
Table 5-10 below lists the typical current requirements:
24V AC Supply
143mA
24V DC Supply
113mA
Table 5-10 – Variable Speed Threshold VA Detector Operating Current
Note: When power is first applied to the detector the following surge currents are drawn
from the supply:
DC Supply:
3.2 Amps (max) for < 2ms when the supply is 29V DC.
AC Supply:
4.2 Amps (max) for < 2ms when the supply is 29V AC.
If the detector has additional facilities fitted then the currents listed in Table 5-11 below
should be added to those shown in Table 5-10.
Additional Facility
24 VAC
24 VDC
Siemens SiTOS Serial Interface
6 mA
5 mA
(connected)
Siemens Wireless Interface (connected)
11 mA
10 mA
Table 5-11 – Additional Facilities Operating Current
Refer to Section 10 for details on power and cable length calculations.
5.3.4 Detector Installation Instructions
5.3.4.1
Detector Position
The detector should be located on a suitable mounting pole located alongside the
detection zone.
The following factors may influence position:
Line of sight obstruction such as signs, trees etc.
More than two lanes on approach - one required on nearside pole and one on
offside.
Road layout permits better aim from offside pole.
Cabling requirements.
Please ensure the installation location of the detector is clear from obstructions, such as
signs, trees etc. such that there is a clear line of sight from the detector to the road.
Failure to adhere to this recommendation will reduce detector performance.
5.3.4.2
Detector Height
The detector may be mounted at any height between 3.3 and 4m.
5.3.4.3
Detector Angle
The initial installation angle will change depending on the installation height and road
surface angle. As a guide the angle may be pre-set to:
25 degrees from horizontal
Version
10
Page 47 of 120
Status
Issued
Last Editor
harry.smyth
Date
03 November 2014
Document
GENERAL HANDBOOK FOR HEIMDALL Doc. No. 667/HB/31900/000
Name
DETECTORS
Copyright Siemens plc 2014 All Rights Reserved
Siemens Mobility, Traffic Solutions
Sopers Lane, Poole, Dorset
BH17 7ER
5.3.4.4
Detector Alignment - Default
The detector uses a movement detection algorithm. Thus, the detector is aimed towards
oncoming traffic and towards the centre of the centre of the carriageway, at a position
approximately 25 metres from the mounting pole position, as shown in Figure 16 below.
Figure 16 – Variable Speed Threshold VA Detector Installation – Plan View
5.3.4.5
Detector Range - Default
The detector uses a movement detection algorithm. The range is typically set by the
appropriate angle and installation height. If the user requires a significant reduction in the
detection range (sensitivity), the detector configuration may be adjusted using DIP switch
6 (reference Table 5-5 below). Alternatively the terminal command RGE could be used
(reference section 7.7.4). The default setting is set for maximum sensitivity.
5.3.4.6
Detector Fault Monitor (DFM)
The detector has a fault monitor function. In the default mode, the detector will generate a
fault output (equivalent to a permanent detect) if the detector has not registered an
activation for a period of twenty hours.
This duration can be adjusted to a user defined value by setting DIP Switch 7 to ‘1’ (On)
and then using the terminal command DFM (reference section 7.7.4).
5.3.4.7
Output Hold Time
The detector continues to hold the detector output for a default period of 1000mS after
actual object detection has ceased. This can be adjusted to an extended and user
defined period by setting DIP Switch 5 to ‘1’ (On) and using the terminal command DHT
(reference section 7.7.4).
Version
10
Page 48 of 120
Status
Issued
Last Editor
harry.smyth
Date
03 November 2014
Document
GENERAL HANDBOOK FOR HEIMDALL Doc. No. 667/HB/31900/000
Name
DETECTORS
Copyright Siemens plc 2014 All Rights Reserved
Siemens Mobility, Traffic Solutions
Sopers Lane, Poole, Dorset
BH17 7ER
5.3.5 Side Access Configuration Dip Switch Settings
Note: Default settings are with all DIP switches set to ‘0’/ OFF.
Configuration DIP Switch Number
1
2
3
4
Speed Threshold: km/h (Mph)
0,0,0,0 = 8 (5)
1,0,0,0 = 72 (45)
0,0,0,1 = 16 (10)
1,0,0,1 = 80 (50)
0,0,1,0 = 24 (15)
1,0,1,0 = 89 (55)
0,0,1,1 = 32 (20)
1,0,1,1 = 97 (60)
0,1,0,0 = 40 (25)
1,1,0,0 = 105 (65)
0,1,0,1 = 48 (30)
1,1,0,1 = 113 (70)
0,1,1,0 = 56 (35)
1,1,1,0 = 121 (75)
0,1,1,1 = 64 (40)
1,1,1,1 = Speed set by Eng. Terminal
5
6
7
8
O/P Hold Time
0 = Standard
‘hold time’ of
1000mS applies
1 = Terminal
applied ‘hold
time’ applies
Detection Range
0 = Full
1 = Reduced
DFM
0 = Default
monitor time
(20 hours
inactivity)
1 = ‘fault monitor
time’ is set by the
Engineer’s
Terminal
Remote
Configuration
0 = Disabled
1 = Enabled
Note: Some DIP switches may be marked with ON/OFF. For the purposes of definition, OFF is equal to 0 and ON is equal to 1
Table 5-12 – Variable Speed Threshold VA Detector Configuration Switch Settings
Refer to section 5.6 for detailed information regarding final commissioning.
Version
10
Last Editor
Document Name
Copyright
Page 49 of 120
Status
harry.smyth
Date
GENERAL HANDBOOK FOR HEIMDALL Doc. No.
DETECTORS
Siemens plc 2014 All Rights Reserved
Error! Unknown document
property name.
03 November 2014
667/HB/31900/000
Siemens Mobility, Traffic Solutions
Sopers Lane, Poole, Dorset
BH17 7ER
5.4 Stop Line Presence Detector
5.4.1 Performance Details
Operating Range:
3m from the stop line
Lane Width:
Typically 3.5m
Vehicle Approach Speed:
0 km/h (0 mph) to 112 km/h (70 mph)1
Detection Presence Time:
1 to 30 minutes (default 4 minutes)
Detector Location:
Normally located on the ‘nearside’ road position or
alternatively on the ‘off-side’ primary signal pole.
Detector Mounting Height:
3.3m to 4.0m.
Accuracy:
>98% accuracy on vehicle count
LED Orientation:
Facing Backwards (reference section 2.3)
5.4.2 Part Number
667/1/31900/03X
Where X is;
0
1
Basic Detector
Basic Detector with RS485 (SiTOS) Serial
Interface2
3
2
Basic Detector with Wireless Link Interface
Basic Detector with a Second Solid-State Relay
3
Output4
Basic Detector with both a Wireless Link and a
4
Second Solid-State Relay Output5
Table 5-13 – Heimdall Stop Line Presence Detector Part Number
1
Subject to configuration (Dip switch #2 –ref Table 5-16)
2
This option is non-standard. Please refer to Siemens Poole for further ordering information.
3
This option is non-standard. Please refer to Siemens Poole for further ordering information.
4
This option is non-standard. Please refer to Siemens Poole for further ordering information.
5
This option is non-standard. Please refer to Siemens Poole for further ordering information.
Version
10
Page 50 of 120
Status
Issued
Last Editor
harry.smyth
Date
03 November 2014
Document
GENERAL HANDBOOK FOR HEIMDALL Doc. No. 667/HB/31900/000
Name
DETECTORS
Copyright Siemens plc 2014 All Rights Reserved
Siemens Mobility, Traffic Solutions
Sopers Lane, Poole, Dorset
BH17 7ER
5.4.3 Operating Current
The overall operating current will depend whether any additional facilities are provided.
Table 5-14 below lists the typical current requirements:
24V AC Supply
143mA
24V DC Supply
113mA
Table 5-14 – Stop Line Presence Detector Operating Current
Note: When power is first applied to the detector the following surge currents are drawn
from the supply:
DC Supply:
3.2 Amps (max) for < 2ms when the supply is 29V DC.
AC Supply:
4.2 Amps (max) for < 2ms when the supply is 29V AC.
If the detector has additional facilities fitted then the currents listed in Table 5-15 below
should be added to those shown in Table 5-14.
Additional Facility
24 VAC
24 VDC
Siemens SiTOS Serial Interface
6 mA
5 mA
(connected)
Siemens Wireless Interface (connected)
11 mA
10 mA
Table 5-15 – Additional Facilities Operating Current
Refer to Section 10 for details on power and cable length calculations.
5.4.4 Detector Installation Instructions
5.4.4.1
Detector Position
The detector should be located on the nearside primary signal pole (detector #1 - Figure
17 below) for the ‘nearside lane’ and, as an alternative, the offside primary signal
(detector #2 - Figure 17 below) for the ‘outside lane’.
Please ensure the installation location of the detector is clear from obstructions, such as
signs, trees etc. such that there is a clear line of sight from the detector to the road.
Failure to adhere to this recommendation will reduce detector performance.
5.4.4.2
Detector Height
The detector may be mounted at any height between 3.3 and 4m.
5.4.4.3
Detector Angle
The initial installation angle will change depending on the installation height. As a guide
these are listed as:
45 degrees from horizontal
Version
10
Page 51 of 120
Status
Issued
Last Editor
harry.smyth
Date
03 November 2014
Document
GENERAL HANDBOOK FOR HEIMDALL Doc. No. 667/HB/31900/000
Name
DETECTORS
Copyright Siemens plc 2014 All Rights Reserved
Siemens Mobility, Traffic Solutions
Sopers Lane, Poole, Dorset
BH17 7ER
5.4.4.4
Detector Alignment
The detectors should be ‘aimed’ at a position approximately 1.5 metres from the
associated ‘stop line’, toward oncoming traffic, as shown in Figure 17 below.
Figure 17 – Stop Line Detector Installation – Plan View
5.4.4.5
Maximum Presence Time
The maximum presence time attribute defines the period of continuous detection before
the detector tunes the stationary object and detection returns to normal. The default
setting is for a period of 4 minutes. However if adjustment is required, DIP switch 5 can
set the maximum presence time to 30 minutes. Alternatively, if a user defined value is
required, the terminal command MPT can be set to the user defined variable (reference
section 7.7.4).
5.4.4.6
Detection Method
The default setting for the detector is such that both static and moving vehicles are
detected. However, the user may modify the detector so that moving vehicles are filtered
from the detection output. This setting can be modified using DIP switch 5 or by using the
terminal command MVA (reference section 7.7.4).
5.4.4.7
Detector Fault Monitor (DFM)
The detector has a fault monitor function. In the default mode, the detector will generate a
fault output (equivalent to a permanent detect) if the detector has not registered an
activation for a period of twenty hours.
This duration can be adjusted to a user defined value by setting DIP Switch 7 to ‘1’ (On)
and then using the terminal command DFM (reference section 7.7.4).
Version
10
Page 52 of 120
Status
Issued
Last Editor
harry.smyth
Date
03 November 2014
Document
GENERAL HANDBOOK FOR HEIMDALL Doc. No. 667/HB/31900/000
Name
DETECTORS
Copyright Siemens plc 2014 All Rights Reserved
Siemens Mobility, Traffic Solutions
Sopers Lane, Poole, Dorset
BH17 7ER
5.4.5 Side Access Configuration Dip Switch Settings
Note: Default settings are with all DIP switches set to ‘0’/ OFF.
Configuration DIP Switch Number
1
2
Not
Used
3
4
Detector LED
0,0 = Normal Detector O/P
0,1 = Permanently Off
1,0 = Detector O/P for 20 minutes
after power applied
1,1 = Normal Detector O/P
5
6
7
8
Maximum Presence
Time
0=4 minutes
(Default)
1= 30 minutes
Detection Method
0 = Static + Movement
Detection (Default)
1= Static Detection Only
DFM
0 = Default monitor time
(20 hours inactivity)
1 = ‘fault monitor time’ is set by
the Engineer’s Terminal
Remote
Configuration
0 = Disabled
1 = Enabled
Note: Some DIP switches may be marked with ON/OFF. For the purposes of definition, OFF is equal to 0 and ON is equal to 1.
Table 5-16 – Stop Line Presence Detector Configuration Switch Settings
Refer to section 5.6 for detailed information regarding final commissioning.
Version
10
Last Editor
Document Name
Copyright
Page 53 of 120
Status
harry.smyth
Date
GENERAL HANDBOOK FOR HEIMDALL Doc. No.
DETECTORS
Siemens plc 2014 All Rights Reserved
Error! Unknown document
property name.
03 November 2014
667/HB/31900/000
Siemens Mobility, Traffic Solutions
Sopers Lane, Poole, Dorset
BH17 7ER
5.5 SCOOT and MOVA Detector
5.5.1 Performance Details
Operating Range:
Not applicable.
Lane Width:
Replicates the function of a normal single lane
SCOOT or a MOVA ‘in’ loop.
Vehicle Approach Speed:
0 km/h (0 mph) to 112 km/h (70 mph)
Detection Presence Time:
1 to 30 minutes (4 minutes default)
Detector Location:
Normally located on the ‘nearside’ road position.
Detector Mounting Height:
3.3m to 8.0m1.
Accuracy:
98% accuracy on vehicle count
LED Orientation
Facing Backwards (reference section 2.3)
5.5.2 Part Number
667/1/31900/04X
Where X is;
0
1
Basic Detector
Basic Detector with RS485 (SiTOS) Serial
Interface2
3
2
Basic Detector with Wireless Link Interface
Basic Detector with a Second Solid-State Relay
3
Output4
Basic Detector with both a Wireless Link and a
4
Second Solid-State Relay Output5
Table 5-17 – Heimdall SCOOT and MOVA Detector Part Number
1
Actual SCOOT ‘footprint’ will be dependant on the mounting height.
2
This option is non-standard. Please refer to Siemens Poole for further ordering information.
3
This option is non-standard. Please refer to Siemens Poole for further ordering information.
4
This option is non-standard. Please refer to Siemens Poole for further ordering information.
5
This option is non-standard. Please refer to Siemens Poole for further ordering information.
Version
10
Page 54 of 120
Status
Issued
Last Editor
harry.smyth
Date
03 November 2014
Document
GENERAL HANDBOOK FOR HEIMDALL Doc. No. 667/HB/31900/000
Name
DETECTORS
Copyright Siemens plc 2014 All Rights Reserved
Siemens Mobility, Traffic Solutions
Sopers Lane, Poole, Dorset
BH17 7ER
5.5.3 Operating Current
The overall operating current will depend whether any additional facilities are provided.
below lists the typical current requirements:
24V AC Supply
143mA
24V DC Supply
113mA
Table 5-18 – Detector Operating Current
Note: When power is first applied to the detector the following surge currents are drawn
from the supply:
DC Supply:
3.2 Amps (max) for < 2 ms when the supply is 29V DC.
AC Supply:
4.2 Amps (max) for < 2 ms when the supply is 29V AC.
If the detector has additional facilities fitted then the currents listed in Table 5-19 below
should be added to that shown in .
Additional Facility
24 VAC
24 VDC
Siemens SiTOS Serial Interface
6 mA
5 mA
(connected)
Siemens Wireless Interface (connected)
11 mA
10 mA
Table 5-19 – Additional Facilities Operating Current
Refer to Section 10 for details on power and cable length calculations.
5.5.4 Detector Installation Instructions
5.5.4.1
Detector Position
The detector should be located on a suitable mounting pole located alongside the
detection zone.
Please ensure the installation location of the detector is clear from obstructions, such as
signs, trees etc. such that there is a clear line of sight from the detector to the road.
Failure to adhere to this recommendation will reduce detector performance.
5.5.4.2
Detector Height
The detector should be located on a suitable mounting pole located alongside the
detection zone. The detector may be mounted at any height between 3.4 and 8m, with
the 4m height considered optimum. Ensure that the appropriate height range has been
selected, using the appropriate DIP switches, as detailed in section 5.5.5 or using the
appropriate terminal command DMH.
The equivalent loop length, along direction of travel, will vary depending on installation
height, thus:
4m – equivalent loop size 1.8m
6m – equivalent loop size 2.3m
8m – equivalent loop size 2.7m
The factory default is for installation heights ~4.0m.
Version
10
Page 55 of 120
Status
Issued
Last Editor
harry.smyth
Date
03 November 2014
Document
GENERAL HANDBOOK FOR HEIMDALL Doc. No. 667/HB/31900/000
Name
DETECTORS
Copyright Siemens plc 2014 All Rights Reserved
Siemens Mobility, Traffic Solutions
Sopers Lane, Poole, Dorset
BH17 7ER
5.5.4.3
Detector Angle
The initial installation angle will change depending on the installation height. As a guide
these are listed as:
4m – 50 degrees from horizontal
6m – 75 degrees from horizontal
8m – 85 degrees from horizontal
Reference section 4.7.1 for instructions on how to pre-set mounting angle
5.5.4.4
Detector Angle for Second Lane Detection
The initial installation angle will change depending on the installation height. In order to
maintain a reasonable line-of-sight it is expected that second lane detection will require at
least 6m installation height as a minimum. As a guide these are listed as:
6m – 50 degrees from horizontal
8m – 75 degrees from horizontal
Reference section 4.7.1 for instructions on how to pre-set mounting angle
5.5.4.5
Detector Alignment - Default
The detector default setup uses a static detection algorithm. The detector is aimed
perpendicular to the traffic flow and just below the centre of the carriageway, as shown in
Figure 18 below. To use this installation method, ensure DIP switch 6 is set to ‘0’, or
using the appropriate terminal command ‘DAA’ is set to ‘0’1. This is factory default.
For optimum performance, it is recommended that this alignment is used.
Figure 18 – SCOOT and MOVA Detector Installation – Plan View (4m installation – Static
Algorithm)
1
Please read section 4.8 carefully to fully comprehend configuration priority
Version
10
Page 56 of 120
Status
Issued
Last Editor
harry.smyth
Date
03 November 2014
Document
GENERAL HANDBOOK FOR HEIMDALL Doc. No. 667/HB/31900/000
Name
DETECTORS
Copyright Siemens plc 2014 All Rights Reserved
Siemens Mobility, Traffic Solutions
Sopers Lane, Poole, Dorset
BH17 7ER
5.5.4.6
Detector Alignment – Optional
With this optional method, the detector uses a combined ‘movement and static’ detection
algorithm. In this case the detector is aimed slightly towards oncoming traffic and towards
the centre of the centre of the carriageway, as shown in Figure 19 below.
To use this installation method, use configuration DIP switch 6 (set to ‘1’), or using the
appropriate terminal command ‘DAA’ set to ‘1’, to activate the combined ‘movement and
static’ detection algorithm1.
For optimum performance, this alignment is not recommended. However, this alignment
can be used where the users would prefer to limit detection to vehicles moving towards
the detector and a drop in detection performance is acceptable. This may also be of use
on installations, for example, with very narrow lanes.
Figure 19 – SCOOT and MOVA Detector Installation – Plan View (4m installation – Static and
Movement Algorithm)
1
Please read section 4.8 carefully to fully comprehend configuration priority
Version
10
Page 57 of 120
Status
Issued
Last Editor
harry.smyth
Date
03 November 2014
Document
GENERAL HANDBOOK FOR HEIMDALL Doc. No. 667/HB/31900/000
Name
DETECTORS
Copyright Siemens plc 2014 All Rights Reserved
Siemens Mobility, Traffic Solutions
Sopers Lane, Poole, Dorset
BH17 7ER
5.5.4.7
Detector Alignment – Second Lane Detection (default)
The detector default setup uses a static detection algorithm. The detector is aimed
perpendicular to the traffic flow and just below the centre of the carriageway, as shown in
Figure 18 below. To use this installation method, ensure DIP switch 6 is set to ‘0’, or
using the appropriate terminal command ‘DAA’ is set to ‘0’1. This is factory default.
Figure 20 : SCOOT and MOVA Detector Installation – Second Lane Plan View (6m installation –
Static Algorithm)
5.5.4.8
Maximum Presence Time
The maximum presence time attribute defines the period of continuous detection before
the detector tunes the stationary object and detection returns to normal. The default
setting is for a period of 4 minutes. However if adjustment is required, DIP switch 5 can
set the maximum presence time to 30 minutes. Alternatively, if a user defined value is
required, the terminal command MPT can be set to the user defined variable (reference
section 7.7.4).
5.5.4.9
Detector Fault Monitor (DFM)
The detector has a fault monitor function. In the default mode, the detector will generate a
fault output (equivalent to a permanent detect) if the detector has not registered an
activation for a period of twenty hours.
This duration can be adjusted to a user defined value by setting DIP Switch 7 to ‘1’ (On)
and then using the terminal command DFM (reference section 7.7.4).
1
Please read section 4.8 carefully to fully comprehend configuration priority
Version
10
Page 58 of 120
Status
Issued
Last Editor
harry.smyth
Date
03 November 2014
Document
GENERAL HANDBOOK FOR HEIMDALL Doc. No. 667/HB/31900/000
Name
DETECTORS
Copyright Siemens plc 2014 All Rights Reserved
Siemens Mobility, Traffic Solutions
Sopers Lane, Poole, Dorset
BH17 7ER
5.5.5 Side Access Configuration Dip Switch Settings
Note: Default settings are with all DIP switches set to ‘0’/ OFF.
Configuration DIP Switch Number
1
2
Detector Height
0,0 = < 4.5 m
0,1 = 4.5m to 6.5m
1,0 = > 6.5m
1,1 = As per 0,0
3
4
Detector LED
0,0 = Normal Detector O/P
0,1 = Permanently Off
1,0 = Detector O/P for 20 minutes
after power applied
1,1 = Normal Detector O/P
5
6
7
8
Maximum
Presence Time
0=4 minutes
(Default)
1= 30 minutes
Detection
Alignment
0=
Perpendicular
(static only)
1 = Angled
(static +
movement)
DFM
0 = Default
monitor time
(20 hours
inactivity)
1 = ‘fault monitor
time’ is set by the
Engineer’s
Terminal
Remote
Configuration
0 = Disabled
1 = Enabled
Note: Some DIP switches may be marked with ON/OFF. For the purposes of definition, OFF is equal to 0 and ON is equal to 1.
Table 5-20 – SCOOT and MOVA Detector Configuration Switch Settings
Refer to section 6 for detailed information regarding final commissioning.
Version
10
Last Editor
Document Name
Copyright
Page 59 of 120
Status
harry.smyth
Date
GENERAL HANDBOOK FOR HEIMDALL Doc. No.
DETECTORS
Siemens plc 2014 All Rights Reserved
Error! Unknown
property name.
03 November 2014
667/HB/31900/000
document
Siemens Mobility, Traffic Solutions
Sopers Lane, Poole, Dorset
BH17 7ER
5.6 On Crossing Pedestrian Detector
5.6.1 Performance Details
Operating Range1:
4m to 12m.
Crossing Width:
2.4m to 4m.
Crossing Length:
Detection system can be adjusted to
accommodate crossing lengths between 4m to
12m.
Detector Locations:
A typical system will comprise two Heimdall
detectors located on opposite sides of the
crossing.
Detection Presence Time:
Not applicable.
Detector Mounting Height:
3.3m to 4.0m.
Accuracy:
Not applicable.
LED Orientation:
Facing forwards (reference section 2.3).
5.6.2 Part Number
667/1/31900/05X
Where X is;
0
1
Basic Detector
Basic Detector with RS485 (SiTOS) Serial
Interface2
3
2
Basic Detector with Wireless Link Interface
Basic Detector with a Second Solid-State Relay
3
Output4
Basic Detector with both a Wireless Link and a
4
Second Solid-State Relay Output5
Table 5-21 – Heimdall On Crossing Pedestrian Detector Part Number
1
Standard Alignment
2
This option is non-standard. Please refer to Siemens Poole for further ordering information.
3
This option is non-standard. Please refer to Siemens Poole for further ordering information.
4
This option is non-standard. Please refer to Siemens Poole for further ordering information.
5
This option is non-standard. Please refer to Siemens Poole for further ordering information.
Version
10
Page 60 of 120
Status
Issued
Last Editor
harry.smyth
Date
03 November 2014
Document
GENERAL HANDBOOK FOR HEIMDALL Doc. No. 667/HB/31900/000
Name
DETECTORS
Copyright Siemens plc 2014 All Rights Reserved
Siemens Mobility, Traffic Solutions
Sopers Lane, Poole, Dorset
BH17 7ER
5.6.3 Operating Current
The overall operating current will depend whether any additional facilities are provided.
Table 5-22 below lists the typical current requirements:
24 VAC Supply
167 mA
24 VDC Supply
131 mA
Table 5-22 – Pedestrian On Crossing Detector Operating Current
Note: When power is first applied to the detector the following surge currents are drawn
from the supply:
DC Supply:
3.2 Amps (max) for < 2 ms when the supply is 29 VDC.
AC Supply:
4.2 Amps (max) for < 2 ms when the supply is 29 VAC.
If the detector has additional facilities fitted then the currents listed in Table 5-23 below
should
be
added
to
those
shown
in
Table 5-22.
Additional Facility
24 VAC
24 VDC
Siemens SiTOS Serial Interface
6 mA
5 mA
(connected)
Siemens Wireless Interface (connected)
11 mA
10 mA
Table 5-23 – Additional Facilities Operating Current
Refer to Section 10 for details on power and cable length calculations.
5.6.4 Detector Installation Instructions
5.6.4.1
Detector Position
Each detector must be aimed at the opposite kerb as shown in Figure 24 below.
There must be no obstruction between the front face of the detector and the detection
zone, i.e. no obstruction by backing boards or signal aspects. Failure to adhere to this
recommendation will reduce detector performance.
The detector should normally (first choice) be located on the offside primary signal pole
(ref. Figure 24 ). Alternatively the detector may be fitted on other poles if circumstances
dictate. The following factors may influence position:
Line of sight obstruction such as signs, trees etc.
Road layout permits better aim from offside pole.
Cabling requirements.
If the detector is installed alongside a Heimdall kerbside detector, using the standard
Kerbside Mounting Bracket, it can be installed on one of the mounting holes halfway
along its length. This is only recommended for thin crossings as the bracket can part
mask wider installations. If this is the case a kerbside extension bracket can be used to
move the on crossing detector to a better position.
Version
10
Page 61 of 120
Status
Issued
Last Editor
harry.smyth
Date
03 November 2014
Document
GENERAL HANDBOOK FOR HEIMDALL Doc. No. 667/HB/31900/000
Name
DETECTORS
Copyright Siemens plc 2014 All Rights Reserved
Siemens Mobility, Traffic Solutions
Sopers Lane, Poole, Dorset
BH17 7ER
If there is no Kerbside detector (Kerbside Mounting Bracket) fitted or if circumstances
dictate, the On Crossing detector should be mounted on a standard Signal Head bracket.
The user should reference Table 9-1 - p105 for part numbers.
Figure 21 : Heimdall Kerbside Mounting Bracket
Figure 22 : Heimdall Kerbside Extension Bracket
Version
10
Page 62 of 120
Status
Issued
Last Editor
harry.smyth
Date
03 November 2014
Document
GENERAL HANDBOOK FOR HEIMDALL Doc. No. 667/HB/31900/000
Name
DETECTORS
Copyright Siemens plc 2014 All Rights Reserved
Siemens Mobility, Traffic Solutions
Sopers Lane, Poole, Dorset
BH17 7ER
5.6.4.2
Detector Height
The detector may be mounted at any height between 3.3 and 4m.
5.6.4.3
Detector Angle
The initial installation angle will change depending on the installation height and road
surface angle. However, the detector is aimed towards oncoming pedestrians, at the
centre line of the on crossing area and towards the far side of the carriageway, as shown
in Figure 24 below.
As a starting point the mounting angle may be pre-set to:
25 degrees from horizontal for a 12 m crossing
Arrow pointing
to 25 degrees
(One Large &
Two
Small
Notches)
Figure 23 : Heimdall set to 25 degrees from horizontal
5.6.4.4
Detector Alignment - default
The detector uses a movement detection algorithm. Thus, the detector is aimed towards
oncoming pedestrians, at the centre line of the on crossing area and towards the far side
of the carriageway, as shown in Figure 24 below.
Version
10
Page 63 of 120
Status
Issued
Last Editor
harry.smyth
Date
03 November 2014
Document
GENERAL HANDBOOK FOR HEIMDALL Doc. No. 667/HB/31900/000
Name
DETECTORS
Copyright Siemens plc 2014 All Rights Reserved
Siemens Mobility, Traffic Solutions
Sopers Lane, Poole, Dorset
BH17 7ER
5.6.4.5
Detector Range – default
The detector uses a movement detection algorithm. Thus, the detector is aimed towards
oncoming pedestrians, at the right of the centre line of the on crossing area and towards
the far side of the carriageway.
If user requires increased detection sensitivity of pedestrians moving away from the
detector, the detector configuration may be adjusted using DIP switch 6 (reference Table
5-24 below). Alternatively the terminal command SEN could be used (reference section
7.7.4).
Figure 24 – Pedestrian On Crossing Detector Installation – Plan View
Version
10
Page 64 of 120
Status
Issued
Last Editor
harry.smyth
Date
03 November 2014
Document
GENERAL HANDBOOK FOR HEIMDALL Doc. No. 667/HB/31900/000
Name
DETECTORS
Copyright Siemens plc 2014 All Rights Reserved
Siemens Mobility, Traffic Solutions
Sopers Lane, Poole, Dorset
BH17 7ER
5.6.4.6
Detection Fault Monitor
The detector has a fault monitor function. In the default mode, the detector will generate a
fault output (equivalent to a permanent detect) if the detector has not registered an
activation for a period of twenty hours.
This duration can be adjusted to a user defined value by setting DIP Switch 7 to ‘1’ (On)
and then using the terminal command DFM (reference section 7.7.4).
5.6.4.7
Detector Hold Time
The detector continues to hold the detector output for a default period of 600mS after
actual object detection has ceased. This can be adjusted to an extended period of
2000mS by setting DIP Switch 5 to ‘1’ (On).
5.6.4.8
Installation and Commissioning Guide
Once the detector has been installed the crossing coverage must be tested, this is done
by walking towards the detector.
For ease of use when testing with only one person the ‘Inline Installation Assistance
Cable’, can be used to allow the detect LED to be more visible. The user should
reference Table 9-1 - p105 for part numbers.
(1) From a standing position several feet back from the kerb, walk along each dotted
white line either side of the crossing towards the detector.
(2) The detector should start to detect as you step off of the kerb until you get near to
the opposite side in both cases. If this is not the case re-align detector and start
perform step (1) again.
(3) Again from a standing point several feet back from the kerb, walk the centre of the
crossing towards the detector.
(4) The detector will probably pick you up before you leave the kerb, this is perfectly
normal, and should detect almost all the way across.
(5) Repeat these steps for the opposite detector to ensure the whole crossing is
covered.
Version
10
Page 65 of 120
Status
Issued
Last Editor
harry.smyth
Date
03 November 2014
Document
GENERAL HANDBOOK FOR HEIMDALL Doc. No. 667/HB/31900/000
Name
DETECTORS
Copyright Siemens plc 2014 All Rights Reserved
Siemens Mobility, Traffic Solutions
Sopers Lane, Poole, Dorset
BH17 7ER
5.6.5 Side Access Configuration Dip Switch Settings
Note: Default settings are with all DIP switches set to ‘0’/ OFF.
Configuration DIP Switch Number
1
2
Detection Direction
0,0 = Detects pedestrians moving in
both directions (default)
0,1 = Detects pedestrians moving
away from unit only
1,0 = Detects pedestrians moving
towards unit only
1,1 = As per 0,0
3
4
Detector LED
0,0 = Normal Detector O/P
0,1 = Permanently Off
1,0 = Detector O/P for 20 minutes
after power applied
1,1 = Normal Detector O/P
5
6
7
8
Detector Hold
Time
0 = 600mS
1 = 2000mS
Detection
Sensitivity
0 = Normal
1 = High
DFM
0 = Default
monitor time
(20 hours
inactivity)
1 = ‘fault monitor
time’ is set by the
Engineer’s
Terminal
Remote
Configuration
0 = Disabled
1 = Enabled
Note: Some DIP switches may be marked with ON/OFF. For the purposes of definition, OFF is equal to 0 and ON is equal to 1.
Table 5-24 – Pedestrian On Crossing Configuration Switch Settings
Refer to section 6 for detailed information regarding final commissioning.
Version
10
Last Editor
Document Name
Copyright
Page 66 of 120
Status
harry.smyth
Date
GENERAL HANDBOOK FOR HEIMDALL Doc. No.
DETECTORS
Siemens plc 2014 All Rights Reserved
Error! Unknown
property name.
03 November 2014
667/HB/31900/000
document
Siemens Mobility, Traffic Solutions
Sopers Lane, Poole, Dorset
BH17 7ER
5.7 Kerbside Pedestrian Detector
5.7.1 Performance Details
Operating Range:
Detection
system
can
be
adjusted
accommodate crossing widths up to 4m1.
Zone Width:
Basic detection zone width is 1.6m, with a width of
2.4m close to the mounting pole.
Zone Length:
Approximately 2.5m (can be extended to 4.5m by
setting)
Detector Locations:
A typical system will comprise of a single Heimdall
detector located on a pole just to one side of the
push button.
Detection Presence Time:
Not applicable.
Detector Mounting Height:
3.3m to 4.0m.
Accuracy:
Not applicable.
LED Orientation:
Facing forwards (reference section 2.3)
5.7.2 Part Number
667/1/31900/06X
Where X is;
0
1
Basic Detector
Basic Detector with RS485 (SiTOS) Serial
Interface2
2
Basic Detector with Wireless Link Interface3
Basic Detector with a Second Solid-State Relay
3
4
Output
Basic Detector with both a Wireless Link and a
4
Second Solid-State Relay Output5
Table 5-25 – Heimdall Kerbside Pedestrian Detector Part Number
1
Assumed that the mounting pole is 0.5m away from the crossing area
2
This option is non-standard. Please refer to Siemens Poole for further ordering information.
3
This option is non-standard. Please refer to Siemens Poole for further ordering information.
4
This option is non-standard. Please refer to Siemens Poole for further ordering information.
5
This option is non-standard. Please refer to Siemens Poole for further ordering information.
Version
10
Page 67 of 120
Status
Issued
Last Editor
harry.smyth
Date
03 November 2014
Document
GENERAL HANDBOOK FOR HEIMDALL Doc. No. 667/HB/31900/000
Name
DETECTORS
Copyright Siemens plc 2014 All Rights Reserved
to
Siemens Mobility, Traffic Solutions
Sopers Lane, Poole, Dorset
BH17 7ER
5.7.3 Operating Current
The overall operating current will depend whether any additional facilities are provided.
Table 5-26 below lists the typical current requirements:
24V AC Supply
167mA
24V DC Supply
131mA
Table 5-26 – Pedestrian Kerbside Detector Operating Current
Note: When power is first applied to the detector the following surge currents are drawn
from the supply:
DC Supply:
3.2 Amps (max) for < 2ms when the supply is 29V DC.
AC Supply:
4.2 Amps (max) for < 2ms when the supply is 29V AC.
If the detector has additional facilities fitted then the currents listed in Table 5-27 below
should be added to those shown in Table 5-26.
Additional Facility
24 VAC
24 VDC
Siemens SiTOS Serial Interface
6 mA
5 mA
(connected)
Siemens Wireless Interface (connected)
11 mA
10 mA
Table 5-27 – Additional Facilities Operating Current
Refer to Section 10 for details on power and cable length calculations.
Version
10
Page 68 of 120
Status
Issued
Last Editor
harry.smyth
Date
03 November 2014
Document
GENERAL HANDBOOK FOR HEIMDALL Doc. No. 667/HB/31900/000
Name
DETECTORS
Copyright Siemens plc 2014 All Rights Reserved
Siemens Mobility, Traffic Solutions
Sopers Lane, Poole, Dorset
BH17 7ER
5.7.4 Detector Installation Instructions
Note: There must be no obstruction between the front face of the detector and the
detection zone, i.e. no obstruction by backing boards, signal aspects or foliage. Foliage
such as trees and bushes that are within the detection zone, will mean there is a risk of
false detects and possibly Permanent or no detect situations
Failure to adhere to these recommendations will reduce detector performance
5.7.4.1
Standard Detector Installation - Recommended
The standard traffic pole with the head mounted to one side is a suitable installation
scenario, where the aspect (traffic light) is mounted to one side of the detector location
and therefore provides for a clear view of the expected detection area.
In this situation the Kerbside should be mounted with the standard Kerbside mounting
bracket, which ensures the correct mounting distance in front of the nearside. The user
should reference Table 9-1 - p105 for part numbers.
Use of this bracket assumes that the pole has been installed with its mounting holes in
parallel to the kerb; if this is not the case then please see section 5.7.4.3.
Figure 25, below, illustrates the recommended detector and aspect configuration for all
new site installations that require a Heimdall detector Kerbside.
Figure 25 : Standard Pole configuration with Kerbside on Standard Bracket
Version
10
Page 69 of 120
Status
Issued
Last Editor
harry.smyth
Date
03 November 2014
Document
GENERAL HANDBOOK FOR HEIMDALL Doc. No. 667/HB/31900/000
Name
DETECTORS
Copyright Siemens plc 2014 All Rights Reserved
Siemens Mobility, Traffic Solutions
Sopers Lane, Poole, Dorset
BH17 7ER
Figure 26 : Heimdall Kerbside Mounting Bracket Detail
Figure 27 : Heimdall Kerbside Mounting Bracket
Figure 28 : Kerbside Installation Detail
Version
10
Page 70 of 120
Status
Issued
Last Editor
harry.smyth
Date
03 November 2014
Document
GENERAL HANDBOOK FOR HEIMDALL Doc. No. 667/HB/31900/000
Name
DETECTORS
Copyright Siemens plc 2014 All Rights Reserved
Siemens Mobility, Traffic Solutions
Sopers Lane, Poole, Dorset
BH17 7ER
5.7.4.2
Cranked Pole Installation- Recommended
The Heimdall Kerbside detector can also be installed on a cranked pole. This installation
is also suitable as it ensures the detector has a clear view of the detection area. The
Heimdall Kerbside extension bracket can be used in this scenario. The installer should
reference Table 9-1- p105 for support equipment part numbers.
Figure 29 : Cranked Pole Kerbside Installation and Bracket Detail
Version
10
Page 71 of 120
Status
Issued
Last Editor
harry.smyth
Date
03 November 2014
Document
GENERAL HANDBOOK FOR HEIMDALL Doc. No. 667/HB/31900/000
Name
DETECTORS
Copyright Siemens plc 2014 All Rights Reserved
Siemens Mobility, Traffic Solutions
Sopers Lane, Poole, Dorset
BH17 7ER
5.7.4.3
General Detector Installation – Non-Ideal
It is recommended that the standard installation and cranked pole installation is used.
However, if the user requires the general installation details are provided.
The Kerbside detector should be aligned downwards, to cover the area of the kerb
adjacent to the crossing. The normal detector angle (pre-set at factory) is 60 degrees.
The detector must be mounted so that there is no obstruction between the detector and
the detection zone. Failure to adhere to this recommendation can reduce detector
performance.
If the mounting pole has a near-side attached, the Kerbside detector should be mounted
such that it is at least 7cm away from the side of the nearside and at least 9cm in front.
See Figure 30 below.
This is normally achieved by using a standard Kerbside mounting bracket, but the
extension bracket may also assist in meeting the mounting requirements. There are
several mounting positions available on the standard Kerbside Mounting Bracket for the
Kerbside Extension Bracket, two bolts must be used to secure the two together in all
instances.
Failure to meet these mounting requirements may mean the detector will operate nonoptimally and therefore performance specifications are not valid.
Nearside
Unit
Figure 30 : Kerbside Detector Mounting Details
The optimum position for the detector is 0.75m from the edge of the carriageway.
However, distances between 0.5m and 1m can be accommodated.
It should be aligned parallel to the kerb edge and face downwards to the aiming point as
shown in Figure 32 below.
Version
10
Page 72 of 120
Status
Issued
Last Editor
harry.smyth
Date
03 November 2014
Document
GENERAL HANDBOOK FOR HEIMDALL Doc. No. 667/HB/31900/000
Name
DETECTORS
Copyright Siemens plc 2014 All Rights Reserved
Siemens Mobility, Traffic Solutions
Sopers Lane, Poole, Dorset
BH17 7ER
5.7.4.4
Detector Height
The detector can be mounted at any height between 3.3m and 4m.
5.7.4.5
Detector Alignment – Default
The detector is aimed at an angle of 60 degrees from the horizontal, as shown in Figure
32 below. Adjustment of this angle is not recommended and will impact on detection
performance.
Arrow pointing to
60 degrees
(Four Large
Notches)
Figure 31 : Angle Notches in Heimdall Detector
The detector should point along the line of the kerb from its installed position; this should
allow detection up to and over the kerb.
At the closest point to the detector the zone is wider to take in the tactile paving, while the
thinner end of the detection zone stretches out to the end of the zone (Maximum 4m).
This can be altered using the DIP switch 6 under the side access panel, OFF is Long
zone (default) while ON shortens the end part of the zone for thinner crossings.
In Figure 32 the zone is shown with the wider part nearest the detector extending into the
road. This would pick up vehicles though the Heimdall software filters these out. This filter
has the side effect of making the near zone smaller, DIP switch 1 can be switched to 1 to
disable this filter in situations where the vehicle filter is not required and a wider near
zone is desirable.
Figure 32 – Pedestrian Kerbside Detector Installation – Plan View
Version
10
Page 73 of 120
Status
Issued
Last Editor
harry.smyth
Date
03 November 2014
Document
GENERAL HANDBOOK FOR HEIMDALL Doc. No. 667/HB/31900/000
Name
DETECTORS
Copyright Siemens plc 2014 All Rights Reserved
Siemens Mobility, Traffic Solutions
Sopers Lane, Poole, Dorset
BH17 7ER
5.7.4.6
Detection Length
In standard installations, the detector is normally set such that detection can occur at
distances up to 4.5m from the mounting pole. The will be adequate for most crossing
widths. However, some crossing widths are significantly shorter. DIP switch 6, can be
used to reduce the detection range to a region of approximately 2.5m from the mounting
pole.
5.7.4.7
Vehicle Detection
The detector uses various detection algorithms to eliminate false detection due to
vehicles. If the detector is to be installed in locations where vehicle detection is not
considered and issue, the detection can have its detection sensitivity increased slightly
by using DIP switch 1. It should be noted that the recommended setting will be with the
vehicle detection algorithm activated (DIP Sw1 OFF).
5.7.4.8
Detector Fault Monitor (DFM)
The detector has a fault monitor function. In the default mode, the detector will generate a
fault output (equivalent to a permanent detect) if the detector has not registered an
activation for a period of twenty hours.
This duration can be adjusted to a user defined value by setting DIP Switch 7 to ‘1’ (On)
and then using the terminal command DFM (reference section 7.7.4).
Version
10
Page 74 of 120
Status
Issued
Last Editor
harry.smyth
Date
03 November 2014
Document
GENERAL HANDBOOK FOR HEIMDALL Doc. No. 667/HB/31900/000
Name
DETECTORS
Copyright Siemens plc 2014 All Rights Reserved
Siemens Mobility, Traffic Solutions
Sopers Lane, Poole, Dorset
BH17 7ER
5.7.4.9
Site Calibration
The Kerbside Detector needs to be calibrated to the background noise for each site
before it can work to its optimum performance. This calibration needs to be carried out
for any changes of the detectors orientation or other changes to street furniture on the
pole or in the zone.
The Kerbside will store the calibration information in flash memory so in event of the
detector losing power it will have the same background information on power up. This
background information will be updated during long periods of inactivity in the zone (at
least 10 minutes) and would normally occur over night.
Once installed and aligned the following steps need to be carried out for the initial site
calibration:
(1) In order to allow for single person installation, or where there is no switch to turn off
the detector supply from the controller; connect the ‘Inline Installation Assistance
Cable’ (see section 9.1 of the manual).
(2) Remove the side door and toggle switch 5 (off – on – off), replace side door (detect
LED will be flashing)
(3) Move all equipment (Ladders etc.) away from zone and pole.
(4) Ensure that the zone is clear of pedestrians and that no vehicles are passing (Use of
push buttons to stop traffic is recommended).
(5) Cycle the power to the detector using the ‘Inline Installation Assistance Cable’ or by
other means if not used.
(6) Calibration will take approx. 10s, during which time both the detect LED and the
output LED on the ‘Inline Installation Assistance Cable’ will flash several times.
(7) If the zone has been empty during this time the detectors calibration will be complete
and the Zone needs to be tested.
Note: When using the Inline Installation Assistance Cable the LED will not work properly
if the unused core for the detector relay is attached to ground in the pole top
termination. This must be “Floating”, wired in to a terminal on its own to allow the LED to
operate.
5.7.4.10 Commissioning Steps
When the site calibration is complete the zone needs to be tested to ensure coverage
and detection is acceptable. If the zone testing is not acceptable the detector will need to
be re-aligned and recalibrated before testing again.
(1) If you are using the ‘Inline Installation Assistance Cable’, position it so you can view
the LED from anywhere in the zone. If you have a second person to assist, ensure
that they are positioned outside the detection zone.
(2) Standing sideways to the detector (facing the road) move along the kerb stopping on
every other tactile paving slab for approx. 10s ensuring that the detector holds. Brief
moments of non- detect are quite normal but the detector should predominantly hold
on while you are in the zone.
Version
10
Page 75 of 120
Status
Issued
Last Editor
harry.smyth
Date
03 November 2014
Document
GENERAL HANDBOOK FOR HEIMDALL Doc. No. 667/HB/31900/000
Name
DETECTORS
Copyright Siemens plc 2014 All Rights Reserved
Siemens Mobility, Traffic Solutions
Sopers Lane, Poole, Dorset
BH17 7ER
(3) Do the same next to the push button and at various points in the expected zone.
(4) When you’re happy with the performance of the detector, remove the ‘Inline
Installation Assistance Cable’ if fitted and plug the detector back in. The detector will
use the previously calibrated values when it starts back up.
(5) In cases where the detector is not performing as required, check alignment and
make adjustments before performing the Site calibration and zone testing again.
In cases where the detector does not hold people in the zone, or where there are places
in the zone which do not appear to detect; re-alignment of the detector will be required.
On a “Standard Installation” where the standard Kerbside Mounting Brackett has been
used, it may require repositioning using a Kerbside Extension Bracket. See section
5.7.4.3 for details of non- standard installations and check the distances from the
nearside unit.
Where the zone edge along the kerb has poor performance then the detector can be
angled in toward the road to fill this area in.
Version
10
Page 76 of 120
Status
Issued
Last Editor
harry.smyth
Date
03 November 2014
Document
GENERAL HANDBOOK FOR HEIMDALL Doc. No. 667/HB/31900/000
Name
DETECTORS
Copyright Siemens plc 2014 All Rights Reserved
Siemens Mobility, Traffic Solutions
Sopers Lane, Poole, Dorset
BH17 7ER
5.7.5 Side Access Configuration Dip Switch Settings
Note: Default settings are with all DIP switches set to ‘0’/ OFF.
Configuration DIP Switch Number
1
2
3
4
Vehicle Filter
0 = Enabled
1 = Disabled
Not
Used
Detector LED
0,0 = Normal Detector O/P
0,1 = Permanently Off
1,0 = Detector O/P for 20
minutes after power applied
1,1 = Normal Detector O/P
5
6
7
8
Recalibration
Detection
Length
0 = Normal
1 = Reduced
DFM
0 = Default monitor time
(20 hours inactivity)
1 = ‘fault monitor time’ is set by the
Engineer’s Terminal
Remote
Configuration
0 = Disabled
1 = Enabled
Toggle switch (01-0).
Controls the
effective range
of the detector.
Note: Some DIP switches may be marked with ON/OFF. For the purposes of definition, OFF is equal to 0 and ON is equal to 1.
Table 5-28 – Pedestrian Kerbside Detector Configuration Switch Settings
Refer to section 6 for detailed information regarding final commissioning.
Version
10
Last Editor
Document Name
Copyright
Page 77 of 120
Status
harry.smyth
Date
GENERAL HANDBOOK FOR HEIMDALL Doc. No.
DETECTORS
Siemens plc 2014 All Rights Reserved
Error! Unknown
property name.
03 November 2014
667/HB/31900/000
document
Siemens Mobility, Traffic Solutions
Sopers Lane, Poole, Dorset
BH17 7ER
6 COMMISSIONING
6.1 General Installation Check
The detector should have been installed as detailed in Section 4 and Section 5, which
include the appropriate adjustments for the tilt / alignment to the specific point on the
road surface or crossing area.
Before applying power to the Detector, ensure that the following checks are undertaken:
Detector power leads are connected to the correct terminals within the pole;
The correct detector relay outputs are used. For a standard detector (UK
Variant) these are usually blue and white (i.e. closed for detect);
The detector basic configuration dual-in-line switch located on the Digital PCB
has been set correctly (refer to the sections specific to the detector).
Note: In most instances the default setting, all off (0), will be the correct setting, unless
special circumstances apply. See the specific installation instructions for each particular
detector to determine the correct setting.
The Serial Communications interface terminations (if required) are connected to
the appropriate signal leads within the pole;
The Serial Communications interface Address Switch (if applicable) has been
set to the correct address for that particular communications line to the
associated controller (see Controller Configuration documentation).
The wireless interface MAC address label (if supplied) is stored in a suitable
location (e.g. the nearest traffic controller cabinet).
Version
10
Page 78 of 120
Status
Issued
Last Editor
harry.smyth
Date
03 November 2014
Document
GENERAL HANDBOOK FOR HEIMDALL Doc. No. 667/HB/31900/000
Name
DETECTORS
Copyright Siemens plc 2014 All Rights Reserved
Siemens Mobility, Traffic Solutions
Sopers Lane, Poole, Dorset
BH17 7ER
6.2 Final Commissioning Procedures
Power is applied to the unit and the operation of the detector observed by looking at the
output from the indicator LED which is visible on the side door. If necessary, adjustment
can be made to the alignment by:
(1) ‘Slackening off’ the mounting nut slightly,
(2) Making the minor adjustment whilst, at the same time, observing the detector
operation by looking at the LED;
(3) Re-tighten the mounting nut.
The controller’s input status should then be checked to ensure the detector signal is
connected as required.
Ensure the detector configuration access door is replaced correctly. Refer to
appropriate detector specification (reference 5).
Version
10
Page 79 of 120
Status
Issued
Last Editor
harry.smyth
Date
03 November 2014
Document
GENERAL HANDBOOK FOR HEIMDALL Doc. No. 667/HB/31900/000
Name
DETECTORS
Copyright Siemens plc 2014 All Rights Reserved
Siemens Mobility, Traffic Solutions
Sopers Lane, Poole, Dorset
BH17 7ER
7 HANDSET INTERFACE
7.1 Terminal (Emulator) and a Cable Serial Interface
Either a PC or a PDA, in conjunction with appropriate terminal software1, may be used
as a terminal.
The terminal (either PC or PDA) should be connected to the Serial Interface connector
on the detector using a suitable serial interface cable (667/1/31962/000).
The Detector communicates at 19200 baud using 8 data bits with no parity bit, one stop
bit (8,N,1) and no ‘Flow Control’.
When the Terminal is connected and the ‘return’, ‘enter’ or ‘CR/LF’ key pressed a
number of times ‘SIEMENS’ should be displayed together with a prompt character ‘>’
indicating that the terminal has been recognised and is awaiting a user commend.
The user command tables can be found in section 7.7.
7.2 Siecom and a Wireless / Cable Serial Interface
The Heimdall detector can be accessed by a wireless device using the SIEMENS
Siecom Terminal application (part number 667/1/30875/000).
The following instructions assume the Siecom software has been installed on a PC or
PDA, as required. For detailed Siecom installation details please refer to the Siecom
users Handbook (reference section 0).
It is recommended that the appropriate Heimdall detector Equipment Definition File
(EDF - 667/YK/31977/001) has been installed in order to enable access to all
appropriate handset commands.
1
Example terminal software for PC would be Hyperterm and for a PDA ZTerm.
Version
10
Page 80 of 120
Status
Issued
Last Editor
harry.smyth
Date
03 November 2014
Document
GENERAL HANDBOOK FOR HEIMDALL Doc. No. 667/HB/31900/000
Name
DETECTORS
Copyright Siemens plc 2014 All Rights Reserved
Siemens Mobility, Traffic Solutions
Sopers Lane, Poole, Dorset
BH17 7ER
7.2.1
Managing Sites
Prior to attempting communication with the on-site equipment, you need to create and
select a 'site' definition file, using the Siecom software. A site will normally be
associated with each detector location.
A ‘site’ definition file contains information on the communication method, wireless
address (where appropriate), equipment type, communication settings, and any
additional useful reminder information.
7.2.1.1
Site Definition File Creation
To create a new site definition file, select Site
New from the menu. A blank site
properties window is displayed allowing the site information to be entered.
Site Definition File Selection
To select an existing site definition file select Site
Open from the menu. A file
browsing window will be displayed to allow the site file to be selected. Once the file has
been selected a prompt will be displayed asking if you want to connect to the site. If you
are opening the site to make configuration changes or just to view the settings select
the ‘No’ button. If you want to connect to the equipment select the ‘Yes’ button, see
section on Site Connection 7.2.2
7.2.1.2
Saving Site Definition File Changes
To save select the menu Site
7.2.1.3
Save.
Cloning a Site Definition File
It is possible to clone a site by opening an existing site definition file, changing the
address and specific information and selecting Site
Save As...
Version
10
Page 81 of 120
Status
Issued
Last Editor
harry.smyth
Date
03 November 2014
Document
GENERAL HANDBOOK FOR HEIMDALL Doc. No. 667/HB/31900/000
Name
DETECTORS
Copyright Siemens plc 2014 All Rights Reserved
Siemens Mobility, Traffic Solutions
Sopers Lane, Poole, Dorset
BH17 7ER
7.2.1.4
Site Definition File Properties
Info Tab:
Site Id
This is the unique site reference identifier and will be used as the default file name for
the site definition file. This can also be used in scripts.
Name
A user friendly name for the site which can also be used in scripts.
Description
This gives the user information regarding equipment configuration, location, etc.
Settings Tab:
Primary Equipment File
Allows an equipment file to be specified. The primary file is configured for the
equipment, whose handset port, Siecom will be connected to. In this case the Heimdall
Equipment Definition file would be used. All sites must have a correctly configured
primary file as this contains the information on how to talk to the specific type of
equipment. When the equipment file is changed a prompt will ask if you want to use the
default communication settings for the equipment. Under normal circumstances ‘YES’
should be selected, as this will remove the need for manual input of some of the
communications settings referenced below.
Comms Tab:
Connection Type
Set the connection tab to indicate ‘wireless’ for wireless connections or ‘direct’ for
cabled connection.
Address (not required for ‘direct’ connections)
Since the connection type is wireless then the (MAC) address of the Heimdall unit must
be used. The wireless Heimdall MAC address is in the format 00:04:3E:25:XX:XX where
X is a hexadecimal digit in uppercase. This address will normally be found supplied with
the unit and should be stored safely (e.g. in the nearest controller cabinet). If the MAC
address has been misplaced, the unit will need to be returned to Siemens for
MAC address recovery.
The following settings are those loaded from a specified equipment file, if selected.
Baud Rate
The baud rate should be set to 19200 for correct Heimdall communications.
Data Bits
Number of data bits should be set to 8.
Stop Bits
Number of stop bits for each byte should be set to 1.
Parity
Type of check bit used to validate the byte should be set to None.
Click the OK button to close the properties window. At this point any changes are not
saved. To save, select Site
Save.
Version
10
Page 82 of 120
Status
Issued
Last Editor
harry.smyth
Date
03 November 2014
Document
GENERAL HANDBOOK FOR HEIMDALL Doc. No. 667/HB/31900/000
Name
DETECTORS
Copyright Siemens plc 2014 All Rights Reserved
Siemens Mobility, Traffic Solutions
Sopers Lane, Poole, Dorset
BH17 7ER
7.2.2 Site Connection
Once a site file has been successfully opened it is possible to connect to the equipment
by selecting Site
Connect from the menu. For wireless connections this can take a
number of seconds especially if the Bluetooth is switched off, and also depending on
the current environmental conditions. It is recommended to start at a close distance for
the first connection to ensure range is not an issue. Generally once the connection is
established the range can be increased to a point beyond that at which an initial
connection could be achieved.
If the correct EDF has been installed, a successful wireless connection will be indicated
by ‘SIEMENS’ together with a ‘>’ being displayed.
If repeated connections fail, then a SOFT reset of the Pocket PC may be required.
7.2.3 Site Disconnection
Once the equipment connection is no longer required, select Site
close down the connection to the equipment.
Disconnect to
Version
10
Page 83 of 120
Status
Issued
Last Editor
harry.smyth
Date
03 November 2014
Document
GENERAL HANDBOOK FOR HEIMDALL Doc. No. 667/HB/31900/000
Name
DETECTORS
Copyright Siemens plc 2014 All Rights Reserved
Siemens Mobility, Traffic Solutions
Sopers Lane, Poole, Dorset
BH17 7ER
7.3 Access Levels
This section describes how to use the terminal to view and modify data within the
Detector.
There are two levels of access as follows:
Level 1 (R)
Read Only
Level 2
Modify/Initialise data items.
Access Level 1 (R)
No special access codes are required for Access Level 1 as it is ‘Read Only’ and does
not change any detector data/configurations etc.
Access Level 2
To enable Access Level 2 access, enter the appropriate ‘SME’ numeric code, as
described in Section 7.7.2.
Level 2 access will remain enabled for approximately 20 minutes or until the terminal is
unplugged or the wireless link has been disconnected. Entering the security code again
will give another 20 minutes of level 2 access.
Version
10
Page 84 of 120
Status
Issued
Last Editor
harry.smyth
Date
03 November 2014
Document
GENERAL HANDBOOK FOR HEIMDALL Doc. No. 667/HB/31900/000
Name
DETECTORS
Copyright Siemens plc 2014 All Rights Reserved
Siemens Mobility, Traffic Solutions
Sopers Lane, Poole, Dorset
BH17 7ER
7.4 Command Format
All operator commands start with a three character command code (mnemonic)
indicating the parameter to be monitored or changed. See Section 7.7 for a full list of
commands.
This mnemonic is normally an abbreviation of the associated parameter making them
easier to remember, for example, entering the mnemonic ‘DOS’ displays the Detector
Output Status on the User Terminal.
Following the mnemonic may be one or two indexes before the required information is
displayed.
For example;
SPT
After the mnemonic and the indexes (if any), the detector will display the current value
of the parameter. A colon ‘:’ is used to separate this from the mnemonic and indexes.
Therefore, to view the current value of the Detector Speed Threshold the following
command would be entered and then the result would be displayed:
Keystrokes
Display
SPT
SPT:50
i.e. Speed Threshold is 50 km/h
To modify the value, the full command can be entered followed by an equal sign ‘=‘ and
the new value required.
Note: Write access may need to be entered first before data can be modified; see page
84, and most commands have configurable range limits to limit the range of values that
can be entered.
Keystrokes
Display
SPT=60
SPT:60
Version
10
Page 85 of 120
Status
Issued
Last Editor
harry.smyth
Date
03 November 2014
Document
GENERAL HANDBOOK FOR HEIMDALL Doc. No. 667/HB/31900/000
Name
DETECTORS
Copyright Siemens plc 2014 All Rights Reserved
Siemens Mobility, Traffic Solutions
Sopers Lane, Poole, Dorset
BH17 7ER
Once the required parameter is being displayed, the value can be modified by simply
entering ‘=‘ and the new value, without needing to re-enter the mnemonic and the
indexes:
Keystrokes
Display
SPT
SPT:60
=
SPT=
55
SPT=55
SPT:55
Once a command has been entered and the result is being displayed, the ‘+’ and ‘-’
keys can be used to display the information for the next or previous index:
Keystrokes
Display
Comment on Detected Vehicle
VCL 0
VCL 0:56
Vehicle Speed was 56 km/h
+
VCL 1:7
Vehicle Length was 7m
+
VCL 2:5
-
VCL 1:7
Vehicle Classification was 1
(truck)
Vehicle Length was 7m
Version
10
Page 86 of 120
Status
Issued
Last Editor
harry.smyth
Date
03 November 2014
Document
GENERAL HANDBOOK FOR HEIMDALL Doc. No. 667/HB/31900/000
Name
DETECTORS
Copyright Siemens plc 2014 All Rights Reserved
Siemens Mobility, Traffic Solutions
Sopers Lane, Poole, Dorset
BH17 7ER
7.5 Terminal Error Codes
If the command entered contains an error, the command is re-displayed up to the point
at which the error was detected and then one of the following error codes is displayed.
For example, entering the following command results in the error message shown:
Keystrokes
Display
SPT=160
SPT=160*R
Table 7-1 below, lists all of the terminal error codes.
Error
Code
Name
*A
Access Level
*B
*C
*D
*F
*I
*M
*N
*O
*P
*R
*S
*U
*V
*W
Description
Access level for this command has not
been enabled.
The terminal system is still busy storing the
System Busy
data from the previous command into
checksum protected memory.
Not
The facility to which the command relates is
Configured
not available on this Detector.
Mismatch
Detector firmware and type mismatch.
The + and - keys are not applicable to
Fixed Index
current command.
The facility to which the command relates is
Inaccessible
not accessible, i.e. Detector not configured
to provide the facility or communications
has with the host has failed.
Mnemonic Not The three-character command mnemonic is
Recognised
not recognised.
Needless
An index (+ or - ) has been added to a
Index
command without an index.
Index Out of
The index (+ or -) entered is Out of Range
Range
for the current command.
Premature
The command line contains insufficient
data, i.e. additional index or value input
End Of Line
required.
The preceding value is out of range; i.e. is
Range Error
outside of the limits defined for that
command.
Invalid character detected at the point
Syntax Error
immediately preceding the asterisk.
The detector is in ‘Firmware Upload Mode’.
Upload Only
Only commands ‘SME’ and ‘LNF’ are
recognised.
Invalid Current An ‘=‘, ‘+’ or ‘-’ operation has been
attempted but no valid terminal command is
Address
currently being displayed.
Write
Modification of the information specified in
preceding command not permitted. The
Protected
information is read only.
Table 7-1 – Terminal Error Codes
Version
10
Page 87 of 120
Status
Issued
Last Editor
harry.smyth
Date
03 November 2014
Document
GENERAL HANDBOOK FOR HEIMDALL Doc. No. 667/HB/31900/000
Name
DETECTORS
Copyright Siemens plc 2014 All Rights Reserved
Siemens Mobility, Traffic Solutions
Sopers Lane, Poole, Dorset
BH17 7ER
7.6 Terminal Displays
In addition to the ‘static’ displays described so far, the detector may be continuously
updating some outputs.
For example, entering ‘SPD’ displays the current speed of the vehicle being detected:
Keystrokes
Display
SPD
SPD:45
Comment
First vehicle
SPD:40
Second vehicle
SPD:33
Third vehicle
...
...
Although not clear from the above diagram, the new display will appear on the same
line as the original, thus overwriting the old display, and not on the following line as the
diagram may imply.
Note: Functions that have data changes which occur more often than once a
second may not be accurately reflected on the terminal display. For example, if
‘DOS’ is used to display detector activations, then very short activations
(<200mS) may not appear on the terminal display.
7.6.1 SieCom Implementation
The user may find they are using the Siemens SieCom interface connection with either
a cable connection or a wireless link. In both cases, if a continuous updated is required
the command ‘POLL’1 must precede the updateable command.
For example; ‘POLL DOS’ will provide a continuous updated display of the detector
output condition.
1
This is a function of the Siecom terminal interface not the detector unit. If terminal connection is made
via a normal terminal unit (e.g. hyperterminal), then the ‘POLL’ command will not be required.
Version
10
Page 88 of 120
Status
Issued
Last Editor
harry.smyth
Date
03 November 2014
Document
GENERAL HANDBOOK FOR HEIMDALL Doc. No. 667/HB/31900/000
Name
DETECTORS
Copyright Siemens plc 2014 All Rights Reserved
Siemens Mobility, Traffic Solutions
Sopers Lane, Poole, Dorset
BH17 7ER
7.7 Detector Terminal Handset Commands
7.7.1 Status Commands
DOS
DESCRIPTION AND REMARKS
DOS <Digital Output, 0 to 1>:<Status, 0 to 1>
R
Status ‘0’= Inactive, ‘1’= ‘Active’.
SPD
DOS is updated every 200mS and indicates detector states.
SPD:<Vehicle Speed>
VCL
The speed of the current detected vehicle is displayed (km/h).
Note: Vehicle Approach, Selectable Speed and Stop Line Detectors
Only
R
VCL <Vehicle Classification, 0 to 2>:<Data>
VCL 0:<Speed (km/h)>
VCL 1:<Occupancy (length in metres) >
VCL 2:<Classification, n> where n: 0=Not Relevant, 1=Car, 2=Truck,
3=Unclassified
Table 7-2 – Status Commands
Version
10
Page 89 of 120
Status
Issued
Last Editor
harry.smyth
Date
03 November 2014
Document
GENERAL HANDBOOK FOR HEIMDALL Doc. No. 667/HB/31900/000
Name
DETECTORS
Copyright Siemens plc 2014 All Rights Reserved
R
Siemens Mobility, Traffic Solutions
Sopers Lane, Poole, Dorset
BH17 7ER
7.7.2 Test and Access Facilities
DEF
DESCRIPTION AND REMARKS
DEF:<Reset Configurations to Default, 0 to 1>
2
LED
DEF=0 Normal operation (default)
DEF=1 Set the configuration values to the ‘factory default’ setting.
LED:<LED Operation, 0 to 1>
2
LED=0: LED display is as per the IND command (default)
LED=1: LED flashes for 10 minutes to confirm Bluetooth connection.
OHC
The LED will return to normal operation after ten minutes (LED: 0).
OHC:<Operating Hours Counter, yy:ddd:hh>
R
yy = years (00…99)
ddd = days (000…364)
hh = hours (00…23)
SME
SOS
OHC is an internal command that shows the time elapsed since the
very first start-up or the last initialisation of the EEPROM data. The
value of OHC is updated regularly in the EEPROM and survives a
power cycle.
SME=249
Access enable code for ‘Level 2’.
Notes
1) This is the only command that can be written whilst the detector is
under SiTOS control.
2) The SiTOS control is applied by using DIP switch 8 on the Digital
Processor card. (I.e. Left hand card when viewed through the access
door).
3) Detailed clarification can be found in section 7.3
4) Timeout i.e. SME:0 after ‘20’ minutes of inactivity.
SOS:<Source of Settings, 0 to 2>
SOS:0 Configuration DIP Switches
(SW8=0, Remote Configuration disabled)
SOS:1 SiTOS
(SW8=1, Remote Configuration enabled, 'SME=x', x != 249)
SOS:2 Handset Terminal
(SW8=1, Remote Configuration enabled; 'SME=249')
SOS is an internal command that helps to figure out which source is
currently entitled to deliver configuration settings (Configuration DIP
switches, SiTOS, Handset Terminal).
Version
10
Page 90 of 120
Status
Issued
Last Editor
harry.smyth
Date
03 November 2014
Document
GENERAL HANDBOOK FOR HEIMDALL Doc. No. 667/HB/31900/000
Name
DETECTORS
Copyright Siemens plc 2014 All Rights Reserved
-
R
Siemens Mobility, Traffic Solutions
Sopers Lane, Poole, Dorset
BH17 7ER
STE
DESCRIPTION AND REMARKS
STE:<Self Test Sequence, 1,2,4 or 5>
STE=1: Basic test sequence, with manual intervention and checks.
STE=2: Basic test sequence together with a SiTOS serial interface
check.
STE=4: Basic Tests together with tests of dual-in-line switches on
Digital pcb.
STE=5: Basic test sequence together with a SiTOS serial interface
check and tests of dual-in-line switches on both PCBs.
Self Test Facility – Reference Production Self Test Facilities Section
7.7.2.
Table 7-3 – Test and Access Facilities
Version
10
Page 91 of 120
Status
Issued
Last Editor
harry.smyth
Date
03 November 2014
Document
GENERAL HANDBOOK FOR HEIMDALL Doc. No. 667/HB/31900/000
Name
DETECTORS
Copyright Siemens plc 2014 All Rights Reserved
2
Siemens Mobility, Traffic Solutions
Sopers Lane, Poole, Dorset
BH17 7ER
7.7.3 Identities and Issue States
ADD
DET
BLR
PIC
DESCRIPTION AND REMARKS
ADD:<SiTOS Detector Address, 0 to 31>
DET:<Detector Type, 0 to 7>
0 = Standard VA Approach
1 = Single Lane VA Approach
2 = Selectable Speed
3 = Stop Line
4 = SCOOT
5 = On Crossing
6 = Kerbside
7 = Traffic Data
BLR:<BootLoader Revision, vx.yy.zzz>
Example: v1.02.010
x = <main version number> (0…15 decimal)
yy = <sub version number> (0…15 decimal)
zzz = <build version number> (0…255 decimal)
PIC: <Program Identity Code>
The Program Identity Code consists of a Part Number ‘n’ and a
Firmware Issue Number ‘vx.yy.zzz’.
Example: 31900 v1.02.010
x = <main version number> (0…15 decimal)
yy = <sub version number> (0…15 decimal)
zzz = <build version number> (0…255 decimal)
Table 7-4 – Detector Identities and Issue State
Version
10
Page 92 of 120
Status
Issued
Last Editor
harry.smyth
Date
03 November 2014
Document
GENERAL HANDBOOK FOR HEIMDALL Doc. No. 667/HB/31900/000
Name
DETECTORS
Copyright Siemens plc 2014 All Rights Reserved
R
R
R
R
Siemens Mobility, Traffic Solutions
Sopers Lane, Poole, Dorset
BH17 7ER
7.7.4 Facilities / Equipment Configured
DFO
DESCRIPTION AND REMARKS
DFO:<Detector Fault Output Setting, 0 to 1>
2
DFO=0: Second Relay or Solid State output provides the same
indication as the first (default)
DFO=1: Second Relay or Solid State output provides the function of a
‘Fault Output’ indication. (See also the DFM command)
DAA
Note: If set, ‘DIR 3’ Command takes priority.
DAA:<Detector Alignment Algorithm, 0 to 1>
2
DAA=0: Perpendicular to traffic flow
DAA=1: Toward Traffic Flow
DFM
Note: Applicable to SCOOT Detector only
DFM:<Detector Fault Monitor Period, xx:yy>
2
xx = 0 to 23 (Monitor period in hours – default is 0)
yy = 0 to 59 (Monitor period in minutes – default is 0)
DHT
The default setting of 0:0 indicates that the facility is disabled.
Note: ‘Hours’ and ‘Minutes’ are separated by a colon (i.e.
DFM=10:30, sets the DFM time to 10 hours and 30 minutes).
DHT:<Detector Hold Time, 0 to 4000>
2
DIR
Number of milliseconds after detector activation before the detector
output is permitted to return to the ‘non-active’ state.
Default is 600 mS.
N.B. Applicable to Pedestrian On Crossing Detectors only.
DIR:<Target Direction, 0 to 3>
2
DIR=0:
DIR=1:
DIR=2:
DIR=3:
Detects vehicles moving towards unit (single o/p)* (default)
Detects vehicles moving away from unit (single o/p)*
Detects vehicles moving in both directions (single o/p)*
Detects vehicles moving in both directions (dual o/p)**
* Output 1.
** Output 1 for vehicles moving towards unit, Output 2 for vehicles
moving away from unit.
Note: Applicable to Standard and Single Lane Vehicle Detectors
only.
Version
10
Page 93 of 120
Status
Issued
Last Editor
harry.smyth
Date
03 November 2014
Document
GENERAL HANDBOOK FOR HEIMDALL Doc. No. 667/HB/31900/000
Name
DETECTORS
Copyright Siemens plc 2014 All Rights Reserved
Siemens Mobility, Traffic Solutions
Sopers Lane, Poole, Dorset
BH17 7ER
DMH
DESCRIPTION AND REMARKS
DMH:<Detector Mounting Height, 0 to 2>
2
DMH=0: Mounting Height #1 (<4.5m) (default)
DMH=1: Mounting Height #2 (4.5 to 6.5m),
DMH=2: Mounting Height #3 (>6.5m)
IND
Note: Applicable to SCOOT Detector only
IND:<Detector Output Indication, 0 to 2>
2
LST
IND=0 LED indicates detector output (default)
IND=1 LED permanently off
IND=2 LED indicates detector output for 20 minutes after power
applied.
LST:<Low Speed Threshold, 0 to 1>
2
LST=0: 8.5 Km/h (default)
LST=1: 4.0 Km/h
MPT
N.B. Applicable to both Standard and Single Lane Vehicle
Detectors
MPT:<Maximum Presence Time, x,y>
2
MVA
x,y is the time in minutes and seconds after which the detector will
return to the ‘in-active’ state even though the vehicle may still be
present. (x – time in minutes, 0 to 255; y – time in seconds, 0 to 59).
Default is x= 5, y = 0. i.e. 5 minutes recovery time.
N.B. Applicable to SCOOT and Stop Line Detectors only.
MVA:<Moving Vehicle Algorithm, 0 to 1>
2
MVA=0: Movement and Static Detection Algorithm
MVA=1: Static Detection Algorithm (default)
RGE
N.B. Applicable to Stop Line Detectors only.
RGE:<Detection Range, 0 to 1>
2
RGE=0: Full Range (default)
RGE=1: Reduced Range
SDA
N.B. Applicable to Standard and Single Lane Vehicle Detectors
only.
SDA:<Speed Detector Deactivation Period, 0 to 5000>
Number of milliseconds after detector activation before the detector
output is permitted to return to the ‘active’ state.
Default is 0 mS.
N.B. Applicable to Speed Detectors only.
Version
10
Page 94 of 120
Status
Issued
Last Editor
harry.smyth
Date
03 November 2014
Document
GENERAL HANDBOOK FOR HEIMDALL Doc. No. 667/HB/31900/000
Name
DETECTORS
Copyright Siemens plc 2014 All Rights Reserved
2
Siemens Mobility, Traffic Solutions
Sopers Lane, Poole, Dorset
BH17 7ER
SEN
DESCRIPTION AND REMARKS
SEN:<Sensitivity, 0 to 1>
2
SEN=0: Low sensitivity (default)
SEN=1: High sensitivity
SPH
Note: Pedestrian On-Crossing and Pedestrian Kerbside Detectors
Only
SPH:<Detector Output Hold Period, 0 to 5000>
SPT
Number of milliseconds for which the detector will remain active after
the target vehicle has passed through the detection zone.
Default is 600 mS.
Note: Vehicle Approach, Selectable Speed and Stop Line Detectors
Only
2
SPT:<Speed Detector Speed Threshold, 8 to 150>
VEH
Speed threshold in km/h before any target vehicles are sensed.
Default is 48 km/h.
N.B. Applicable to Speed Detectors only.
VEH:<Vehicle Filter, 0 to 1>
VEH=0: Filter enabled (default)
VEH=1: Filter disabled
N.B. Applicable to Pedestrian Kerbside Detectors only.
Table 7-5 – Detector Facilities / Equipment Configured
Version
10
Page 95 of 120
Status
Issued
Last Editor
harry.smyth
Date
03 November 2014
Document
GENERAL HANDBOOK FOR HEIMDALL Doc. No. 667/HB/31900/000
Name
DETECTORS
Copyright Siemens plc 2014 All Rights Reserved
2
2
Siemens Mobility, Traffic Solutions
Sopers Lane, Poole, Dorset
BH17 7ER
7.7.5 Fault Log Commands
The fault log is described in more detail in Section 8.4.
DESCRIPTION AND REMARKS
FFS
FFS <Fault Flag 0 to 63>:<Value 0 or 255> <Mnemonic>
R
View the fault log flags using the Fault Flag Scan which only shows
each fault flag status (0=inactive, 255=active) followed by a short fault
mnemonic to help identify it.
FDS
FDS <Fault Flag 0 to 63>:<Value 0 or 255> <Mnemonic>
R
View the fault log flags using the Fault Data Scan. Entering FDS <ret>
will display the first active fault flag. If there are no active faults, FDS
scrolls through each fault flag in turn.
FLD
FLD <Fault Log Index 0 to 31>:<Fault Flag 0 to 63> <Value 10 Bytes of
data>
R
View the Fault Log Data associated with a particular fault. Each
displayed value can be up to 10 Bytes in length.
FLG
FLG <Fault Log Index 0 to 31>:<Fault Flag 0 to 63> <Runtime Period
(yy:ddd:hh)>
R
This is the historic fault log.
Use the ‘+’ (plus) and ‘-‘ (minus) keys to navigate forwards and
backwards in the log.
NFI
NFI:<Next Fault Log Index 0 to 31>
R
NFI is an internal command that helps to see the index of the next fault
log array entry that will be used in case a new fault is to be stored. The
value of NFI is stored in the EEPROM and survives a power cycle.
RFL
RFL:<Reset Fault Log, 0 to 1>
Used to reset the fault log using ‘RFL=1’. Response will be ‘RFL:0’.
Clears all the entries in the Fault Log arrays FFS and FLD. Does not
affect the FLG entries.
Table 7-6 – Fault Log Commands
Version
10
Page 96 of 120
Status
Issued
Last Editor
harry.smyth
Date
03 November 2014
Document
GENERAL HANDBOOK FOR HEIMDALL Doc. No. 667/HB/31900/000
Name
DETECTORS
Copyright Siemens plc 2014 All Rights Reserved
2
Siemens Mobility, Traffic Solutions
Sopers Lane, Poole, Dorset
BH17 7ER
8 MAINTENANCE
Before starting any maintenance work, read the Safety Warning on page 2 of this
Handbook.
8.1 Routine Maintenance Visits
The interval between visits depends on local conditions but may consist of the following:
check the detector securing bolt to ensure it has not worked loose,
re-align the detector if necessary,
ensure the configuration access door is properly retained and seated,
clean the LED indicator lens with a soft cloth to remove dirt and grime,
check the connection lead for any damage.
8.2 First Line Maintenance
First line maintenance will be achieved on a modular replacement basis.
Check which type of detector is fitted, make a note of its alignment to the installation
and only replace with a similar part. When carrying out detector maintenance or
replacement, wherever possible, remove the suspect item from its mounting position
and work on the ground.
Ensure the replacement detector configuration switches are set to the same positions
as the original unit.
Read the accompanying installation information to see if the detector requires any
additional special configuration using the terminal interface.
Install and re-align the detector to the previously noted position.
8.3 Second Line Maintenance
All faulty units should be returned for repair to the following address.
Siemens Mobility, Traffic Solutions
Sopers Lane
Poole
Dorset
BH17 7ER
Version
10
Page 97 of 120
Status
Issued
Last Editor
harry.smyth
Date
03 November 2014
Document
GENERAL HANDBOOK FOR HEIMDALL Doc. No. 667/HB/31900/000
Name
DETECTORS
Copyright Siemens plc 2014 All Rights Reserved
Siemens Mobility, Traffic Solutions
Sopers Lane, Poole, Dorset
BH17 7ER
8.4 Fault Log
8.4.1 Introduction
The detector’s fault log holds all the faults that are currently active.
When the detector finds a fault, it sets the associated fault flag (normally to the non-zero
value of 255) and may also set additional fault log data bytes.
In addition to the above fault log, which holds the currently active faults, the detector
also contains an historic rolling log which records the elapsed time (in years, days and
hours) that various events occurred since the unit was first powered-up. This will
provide an approximate indication of the time and date that the event may have
occurred.
8.4.2 Viewing the Fault Log
To display the currently active fault flags, enter ‘FFS
enter ‘FLD ’.
or FDS ’, and for the fault data,
The ‘+’ and ‘-’ keys can then be used to scroll through the active faults.
The FFS command provides a listing of all the possible detector faults with an indication
if the fault is active or not. The ‘+’ and ‘-‘ keys can be used to step through this array.
The FDS command provides a selective view of the Fault Log, only presenting faults
that are currently active. Again the ‘+’ and ‘-‘ keys can be used to step through this
display.
8.4.3 Clearing the Fault Log
Entering ‘RFL=1’ will reset the fault log of any active faults that are able to be cleared.
Note: The historic rolling log is not cleared by entering RFL=1. However there will
be an entry in the historic log indicating that the RFL command has been
invoked.
This command should only be used after each fault log entry has been investigated.
After the RFL command has been invoked the output will indicate ‘RFL: 0’. This
indicated that all fault status flags have been set to zero (0). However, if the LED is not
extinguished, then the fault(s) may not have cleared. Further investigation may be
required to ascertain if a fault is still active.
Version
10
Page 98 of 120
Status
Issued
Last Editor
harry.smyth
Date
03 November 2014
Document
GENERAL HANDBOOK FOR HEIMDALL Doc. No. 667/HB/31900/000
Name
DETECTORS
Copyright Siemens plc 2014 All Rights Reserved
Siemens Mobility, Traffic Solutions
Sopers Lane, Poole, Dorset
BH17 7ER
8.4.4 Historic Rolling Log
The Heimdall detector contains a ‘rolling’ historic log that records the elapsed time when
various events occurred. This elapsed time is defined as the period of time after the
detector was initially installed and is presented as:
Years: Days: Hours
To display the log entries, the terminal command ‘FLG’ is used. See the ‘FLG’
command for further details on operation (reference section 7.7).
A time stamped entry is added to the log when:
the power is switched off and back on,
when any fault is set, e.g. ‘FFS 11 DFMT:255’
when any fault is cleared (RFL=1)
Note: The historic log is not cleared when a new detector configuration is loaded.
To view the historic rolling log, enter the command ‘FLG ’, and the most recent entry is
displayed. Use the ‘+’ and ‘-’ keys to scroll (move) through the historic log.
If the ‘+’ key is then used then a more recent entry is displayed. If the ‘-’ key is used,
then the user may scroll through the log in the reverse direction.
To move directly to the most recent entry press <SPACE>.
If the power is cycled (switched off and back on), or the handset is disconnected, then
the next time that ‘FLG ’ is entered, the most recent entry will be displayed.
The table below details the description of each possible fault flag and historic log entry.
Version
10
Page 99 of 120
Status
Issued
Last Editor
harry.smyth
Date
03 November 2014
Document
GENERAL HANDBOOK FOR HEIMDALL Doc. No. 667/HB/31900/000
Name
DETECTORS
Copyright Siemens plc 2014 All Rights Reserved
Siemens Mobility, Traffic Solutions
Sopers Lane, Poole, Dorset
BH17 7ER
Fault
Log
Index
0
Description
Mnemonic Category
Front End
Mismatch
FRMS
No. of
Fault
Data
Bytes
Hardware 2
Description / Data Bytes
Further Comments / Byte Parameters
Wrong RF Front End.
Byte 0: 4 = SCOOT and MOVA
Byte 0: Detector Type
Byte 1: Front End Type
Byte 1: 7 = Unsupported type
1
NF Signal Fault NFSG
Hardware 0
I or Q channel LF signal out
of range.
2
PLL Unlocked
Hardware 0
RF PLL is unlocked.
3
HV Power Fault HVPW
Hardware 0
RF front end supply voltage
out of range.
4 to 9
Reserved for
future use.
10
Cycle Time
Fault
CYCT
Software 0
Measurement cycle not
finished within expected
time.
11
DFM Timeout
DFMT
Software 0
No valid detection within
specified DFM time.
Version
10
Last Editor
Document Name
Copyright
PLLU
Page 100 of 120
Status
harry.smyth
Date
GENERAL HANDBOOK FOR HEIMDALL Doc. No.
DETECTORS
Siemens plc 2014 All Rights Reserved
Error!
Unknown
property name.
03 November 2014
667/HB/31900/000
document
Siemens Mobility, Traffic Solutions
Sopers Lane, Poole, Dorset
BH17 7ER
Fault
Log
Index
Description
12
EEPROM Fault EEPF
Mnemonic Category
No. of
Fault
Data
Bytes
Software 2
Description / Data Bytes
Further Comments / Byte Parameters
Engineering data.
Byte 0: Function ID
0 : writeChunkHeader()
1...4
1 : writeConfigurationDataChunk()
Error Range
1...3
2 : writeFaultLogDataChunk()
1...3
3 : writeFaultLogFlagStatusChunk() 1...3
4 : writeAllChunks()
1...3
5 : recalculateChunkCrc()
1...3
6 : updateConfigurationDataChunk() 1...3
7 : setDetectorType()
1...2
8 : resetFaultFlag()
1
9 : findChunk()
1...6
10 : readFaultLogEntry()
1
11 : readFaultLogFlagStatus()
1
Byte 1: Error code returned by function
13
EEPROM
Invalid
Configuration
Version
Software 1
Engineering data.
Configuration Data Chunk read from EEPROM is invalid
Byte 0: Error code returned by readConfigurationDataChunk()
CRC failure occurred on Configuration Data Chunk in EEPROM
Parameter: Error code returned by the function that reads the
Configuration Data Chunk out of the EEPROM.
10
Last Editor
Document Name
Copyright
CONF
Page 101 of 120
Status
harry.smyth
Date
GENERAL HANDBOOK FOR HEIMDALL Doc. No.
DETECTORS
Siemens plc 2014 All Rights Reserved
Error!
Unknown
property name.
03 November 2014
667/HB/31900/000
document
Siemens Mobility, Traffic Solutions
Sopers Lane, Poole, Dorset
BH17 7ER
Fault
Log
Index
Description
Mnemonic Category
14
EEPROM
Invalid
Fault Data
FLTD
15
Detector Type
Error
16
No. of
Fault
Data
Bytes
Description / Data Bytes
Further Comments / Byte Parameters
Software 0
Fault Log Data is invalid.
CRC failure occurred on Fault Data Chunk in EEPROM
DETT
Software 0
Detector Type read from
EEPROM is invalid.
All three locations in EEPROM storing the Detector Type showed CRC
failures. Detector goes into Detector Type Input Mode. This should occur at
production time only.
Soft Error
SOFT
Software 0
An undetermined firmware
error occurred
The external watchdog has not been reset (kicked) in time (1.6 sec).
17
Boot Loader
Error
BTLD
Software 2
Boot Loader CRC failed
Byte 0: Boot Loader Version
low byte.
Byte 1: Boot Loader Version
high byte.
The F/W checks the integrity of the Boot Loader during initialisation. This
fault can be registered only if the Boot Loader at least managed to
positively check and start the F/W. If this fault occurs the Boot Loader has
to be reprogrammed as soon as possible!
Parameters: Current revision of the Boot Loader Firmware (in Flash
Section A).
18-22
Reserved for
future use
23
Latest Power
Up
LPRU
Info
Power Up indication. This
information code is used to
log when the last power
cycle occurred.
In order to be able to monitor power-ups this information fault code has
been introduced. The time stamp of this information fault code indicates
the time of the last power-up with respect to the “operating hours counter”.
Version
10
Last Editor
Document Name
Copyright
0
Page 102 of 120
Since this is provided for information only, the status flag of this fault will
always remain cleared.
Status
harry.smyth
Date
GENERAL HANDBOOK FOR HEIMDALL Doc. No.
DETECTORS
Siemens plc 2014 All Rights Reserved
Error!
Unknown
property name.
03 November 2014
667/HB/31900/000
document
Siemens Mobility, Traffic Solutions
Sopers Lane, Poole, Dorset
BH17 7ER
Fault
Log
Index
Description
Mnemonic Category
No. of
Fault
Data
Bytes
Description / Data Bytes
Further Comments / Byte Parameters
24
Fault Status
FSFC
Flag(s) Cleared
Info
0
Fault status flag(s) cleared.
This information code is
used to log when the ‘reset
fault log’ (RFL) was used.
Since this is provided for information only, the status flag of this fault will
always remain cleared.
25
Terminal
Framing Error
Software 2
Framing error on serial
handset port:
Byte 0: number of Handset
Framing Errors (low byte)
The DSP built-in UART detected a framing error on the serial input line
Terminal_RX, SCIRXDA (GPIO28).
Parameters: Current value of terminal framing error counter
TRFR
Byte 1: number of Handset
Framing Errors (high byte)
26
SiTOS Framing STFR
Error
Software 2
Framing error on SiTOS
port:
Byte 0: number of SiTOS
Framing Errors (low byte)
Byte 1: number of SiTOS
Framing Errors (high byte)
The DSP built-in UART detected a framing error on the serial input line
RS485_RX, SCIRXDB (GPIO23).
Parameters: Current value of SiTOS framing error counter
27
SiTOS Parity
Error
Software 2
Parity error on SiTOS port:
Byte 0: number of SiTOS
Parity Errors (low byte)
Byte 1: number of SiTOS
Parity Errors (high byte)
The DSP built-in UART detected a parity error (odd number of ‘1’ bits,
including parity bit) on the serial input line RS485_RX, SCIRXDB
(GPIO23).
Parameters: Current value of SiTOS parity error counter
Version
10
Last Editor
Document Name
Copyright
STPR
Page 103 of 120
Status
harry.smyth
Date
GENERAL HANDBOOK FOR HEIMDALL Doc. No.
DETECTORS
Siemens plc 2014 All Rights Reserved
Error!
Unknown
property name.
03 November 2014
667/HB/31900/000
document
Siemens Mobility, Traffic Solutions
Sopers Lane, Poole, Dorset
BH17 7ER
Description
Mnemonic Category
No. of
Fault
Data
Bytes
28
Signal
Interference
SGIN
Warning
0
Radar signal is corrupted.
29
Background
Invalid
BGIN
Warning
0
No valid ground tracking
signal available
SCOOT/MOVA/TASS.
30
Firmware
FWST
Update Started
Info
3
New firmware upload
started:
Byte 0: Firmware Revision
(old)
Byte 1: Protocol Comms
Version Issue (old)
Byte 2: Protocol Comms
Version Sub Issue (old)
Parameters: Previous (old) firmware revision
31
Firmware
Update
Finished
FWFN
Info
3
Parameters: New firmware revision
A new firmware has been
loaded into the flash memory
Byte 0: Firmware Revision
(new)
Byte 1: Protocol Comms
Version Issue (old)
Byte 2: Protocol Comms
Version Sub Issue (old)
32-63
Reserved for
Future Use
Fault
Log
Index
Description / Data Bytes
Further Comments / Byte Parameters
Table 8-1 – Fault Log Index
Version
10
Last Editor
Document Name
Copyright
Page 104 of 120
Status
harry.smyth
Date
GENERAL HANDBOOK FOR HEIMDALL Doc. No.
DETECTORS
Siemens plc 2014 All Rights Reserved
Error!
Unknown
property name.
03 November 2014
667/HB/31900/000
document
Siemens Mobility, Traffic Solutions
Sopers Lane, Poole, Dorset
BH17 7ER
9 PART NUMBERS
Listed below are the part numbers for the Siemens Heimdall Above Ground Detector to
be used as spares. See the warning on page 4 regarding the use of parts other than
those listed.
Description
Part Number
Standard VA Approach Detector
Single Lane VA Approach Detector
Selectable Speed Detector
Stop Line Detector
SCOOT Detector
Pedestrian On Crossing Detector
Pedestrian Kerbside Detector
Detector 5Way Bulkhead 1.8m Cable Assy
(standard cable)
Detector 5Way Bulkhead 10m Cable Assy
(standard cable)
Detector 5Way Bulkhead 5m Cable Assy
(standard cable)
Detector 9Way Bulkhead 1.8m Cable Assy (used
when SITOS or second isolated output required)
667/1/31900/00x
667/1/31900/01x
667/1/31900/02x
667/1/31900/03x
667/1/31900/04x
667/1/31900/05x
667/1/31900/06x
667/1/31961/100
Detector 9Way Bulkhead 10m Cable Assy (used
when SITOS or second isolated output required)
667/1/31961/111
Detector 9Way Bulkhead 5m Cable Assy (used
when SITOS or second isolated output required)
667/1/31961/151
667/1/31961/110
667/1/31961/150
667/1/31961/101
Table 9-1 – Spare Part Numbers
All the above part numbers provide the complete detector with all connection cables and
associated connectors as shown in Figure 5 and Figure 6.
9.1 Additional Part Numbers
The following table lists some additional but useful part numbers:
Description
Part Number
SieCom Terminal Interface
SieCom Equipment Definition File (EDF)
Siecom Site Definition File (SDF)
Siecom Quick Key File (QKF)
Serial Interface Cable (Heimdall)
Helios Side mount & AGD Bracket Assembly (ref. Figure
33)
Heimdall Extension Arm Bracket Assembly (ref. Figure 34)
667/1/30875/000
667/YK/31977/001
667/YK/31977/002
667/YK/31977/003
667/1/31962/000
667/1/30200/058
667/1/31941/000
Version
10
Page 105 of 120
Status
Issued
Last Editor
harry.smyth
Date
03 November 2014
Document
GENERAL HANDBOOK FOR HEIMDALL Doc. No. 667/HB/31900/000
Name
DETECTORS
Copyright Siemens plc 2014 All Rights Reserved
Siemens Mobility, Traffic Solutions
Sopers Lane, Poole, Dorset
BH17 7ER
Heimdall Spacer Bracket Assembly (ref. Figure 35)
Heimdall Kerbside Mounting Bracket Kit (ref. Figure 34)
Heimdall Kerbside Extension Bracket Kit (ref. Figure 35)
Heimdall Kerbside Straight Bracket Kit (ref. Figure 36)
Heimdall Inline Installation Assistance Cable
Table 9-2 – Additional Part Numbers
667/1/31942/000
667/1/31910/000
6671/31911/000
667/1/31914/000
667/1/31912/000
Figure 33 – Helios Side Mount & AGD Bracket Assembly (667/1/30200/058)
Figure 34 – Heimdall Extension Arm Bracket Assembly (667/1/31941/000)
Version
10
Page 106 of 120
Status
Issued
Last Editor
harry.smyth
Date
03 November 2014
Document
GENERAL HANDBOOK FOR HEIMDALL Doc. No. 667/HB/31900/000
Name
DETECTORS
Copyright Siemens plc 2014 All Rights Reserved
Siemens Mobility, Traffic Solutions
Sopers Lane, Poole, Dorset
BH17 7ER
Figure 35 – Heimdall Spacer Bracket Assembly (667/1/31942/000)
Figure 36 : Heimdall Kerbside Mounting Bracket (667/1/31910/000)
Figure 37 : Heimdall Kerbside Extension Bracket (667/1/31911/000)
Figure 38 : Heimdall Kerbside Straight Bracket (667/1/31914/000)
Version
10
Page 107 of 120
Status
Issued
Last Editor
harry.smyth
Date
03 November 2014
Document
GENERAL HANDBOOK FOR HEIMDALL Doc. No. 667/HB/31900/000
Name
DETECTORS
Copyright Siemens plc 2014 All Rights Reserved
Siemens Mobility, Traffic Solutions
Sopers Lane, Poole, Dorset
BH17 7ER
10 POWER SUPPLIES AND CABLE REQUIREMENTS
10.1 Heimdall Detector Power Supply Options
The Heimdall detector may be powered by a nominal 24 volts ac or dc supply and either
method may be employed depending upon circumstances.
The Heimdall detector power supply voltage should be within +20% of its nominal value,
i.e. 19.2v to 28.8v dc or ac RMS, and should not be more than 29 volts under any
circumstances.
The power supply requirements for the Heimdall detectors are listed in the appropriate
detector specification, Section 5.
10.2 Controller Power Supply Options
10.2.1 24V DC Supply
In general Siemens controllers are equipped with a 24 volt dc supply which is available
for a small number of detectors. This supply may be used providing there is sufficient
spare current capacity.
10.2.2 24V AC Supply – LV (Standard) Traffic Controllers
If the DC controller supply capacity is insufficient then an additional 24v ac voltage supply
may be added.
The standard Siemens part numbers of the controller mounted AC Detector Supply kits
are:-
Nominal 50 VA, (2 amps):Nominal 160 VA, (6.6amps):-
667/1/27853/000
667/1/20292/008
The kit contains a transformer, fusing and termination facilities.
The output of the transformer is nominally 25 volts but it will drop if the mains voltage falls
to the legal minimum (207 volts, which is -10% on the standard European voltage of 230v
or -13.75% on the standard UK voltage of 240v). Further voltage drops will occur due to
the loading of the transformer, the initial tolerance of the transformer and the resistance
of the cable.
Section 11, details the appropriate look-up tables for these transformers.
For more eccentric installations or non-standard transformer installation, section 12
details the appropriate method for calculating the appropriate cable lengths.
Version
10
Page 108 of 120
Status
Issued
Last Editor
harry.smyth
Date
03 November 2014
Document
GENERAL HANDBOOK FOR HEIMDALL Doc. No. 667/HB/31900/000
Name
DETECTORS
Copyright Siemens plc 2014 All Rights Reserved
Siemens Mobility, Traffic Solutions
Sopers Lane, Poole, Dorset
BH17 7ER
10.2.3 24 VAC Supply – ST900ELV Traffic Controllers
If the traffic controller is an ELV type and an additional 24v AC supply is required, the
controller mounted AC Detector supply kits are;
Nominal 50VA, (2 amps):Nominal 160VA, (6.6amps):-
667/1/33075/000
667/1/33074/000
The kit contains a transformer, fusing and termination facilities.
Section 12 details the method for calculating the appropriate cable lengths.
Version
10
Page 109 of 120
Status
Issued
Last Editor
harry.smyth
Date
03 November 2014
Document
GENERAL HANDBOOK FOR HEIMDALL Doc. No. 667/HB/31900/000
Name
DETECTORS
Copyright Siemens plc 2014 All Rights Reserved
Siemens Mobility, Traffic Solutions
Sopers Lane, Poole, Dorset
BH17 7ER
11 PERMITTED CABLE LENGTH ‘LOOK-UP TABLES’
This section assumes that the standard Siemens 24v AC Detector Supply transformer is
used.
The standard Siemens part numbers of the controller mounted AC Detector Supply kits
are assumed to be as follows.
Nominal 50VA, (2 amps)
Nominal 160VA, (6.6amps)
667/1/27853/000
667/1/20292/008
The following tables are provided to enable a very quick assessment to be made of the
suitability of a particular AC supply transformer and the required loading/cable runs.
These tables err on the ‘safe side’ and if particular installations do not fit the scenarios
presented then you will have to carry out the detailed calculations described in Section
11.
How to use the tables:
Determine how many other detectors are connected to the particular transformer.
Select the most appropriate table based on ‘point 1’ above. If there is no exact match
with the tables given choose the next highest.
Determine how many detectors are to be connected to the cable in question.
Determine the required cable length.
The table can then be viewed to see if standard ‘Serial’ (S) or ‘Parallel’ (P) supply feeds
should be used. A ‘Blank’ box is shown for situations which cannot be supported and a
re-design is necessary or a more detailed calculation is required, as described in Section
11.
11.1 Cable Type
Throughout these sections it is assumed that the installation has been completed with a
supply and return cable of 1 mm2.
Version
10
Page 110 of 120
Status
Issued
Last Editor
harry.smyth
Date
03 November 2014
Document
GENERAL HANDBOOK FOR HEIMDALL Doc. No. 667/HB/31900/000
Name
DETECTORS
Copyright Siemens plc 2014 All Rights Reserved
Siemens Mobility, Traffic Solutions
Sopers Lane, Poole, Dorset
BH17 7ER
Cable Length
Cable Length
Cable Length
11.2 Detector Lookup Tables Using a 50VA Transformer
50m
100m
150m
200m
250m
50m
100m
150m
200m
250m
50m
100m
150m
200m
250m
No
other
Heimdall
Detector
connected to the transformer
1 other Heimdall Detector connected
to the transformer
Detectors on Cable
Detectors on Cable
1
S
S
S
S
S
2
S
S
S
S
S
3
S
S
S
P
P
4
S
S
P
P
5
S
P
P
6
S
P
1
S
S
S
S
S
2
S
S
S
S
P
3
S
S
S
P
P
4
S
S
P
P
5
S
P
P
6
S
P
2 other Heimdall Detectors connected
to the transformer
4 other Heimdall Detectors connected
to the transformer
Detectors on Cable
Detectors on Cable
1
S
S
S
S
S
2
S
S
S
S
P
3
S
S
P
P
P
4
S
P
P
5
S
P
6
S
P
1
S
S
S
S
S
2
S
S
S
P
P
3
S
S
P
P
4
S
P
P
5
S
P
6
P
6 other Heimdall Detectors connected
to the transformer
8 other Heimdall Detectors connected
to the transformer
Detectors on Cable
Detectors on Cable
1
S
S
S
S
S
2
S
S
S
P
P
3
S
S
P
4
S
P
5
P
6
P
1
S
S
S
S
S
2
S
S
P
P
P
3
S
P
P
4
S
P
Version
10
Page 111 of 120
Status
Issued
Last Editor
harry.smyth
Date
03 November 2014
Document
GENERAL HANDBOOK FOR HEIMDALL Doc. No. 667/HB/31900/000
Name
DETECTORS
Copyright Siemens plc 2014 All Rights Reserved
5
6
Siemens Mobility, Traffic Solutions
Sopers Lane, Poole, Dorset
Cable Length
BH17 7ER
50m
100m
150m
200m
250m
10
other
Heimdall
Detectors
connected to the transformer
12
other
Heimdall
Detectors
connected to the transformer
Detectors on Cable
Detectors on Cable
1
S
S
S
S
P
2
S
S
P
P
3
4
5
6
1
2
3
4
Version
10
Page 112 of 120
Status
Issued
Last Editor
harry.smyth
Date
03 November 2014
Document
GENERAL HANDBOOK FOR HEIMDALL Doc. No. 667/HB/31900/000
Name
DETECTORS
Copyright Siemens plc 2014 All Rights Reserved
5
6
Siemens Mobility, Traffic Solutions
Sopers Lane, Poole, Dorset
BH17 7ER
Cable Length
Cable Length
11.3 Detector Lookup Tables Using a 160VA Transformer
50m
100m
150m
200m
250m
50m
100m
150m
200m
250m
No
other
Heimdall
Detector
connected to the transformer
1 other Heimdall Detector connected
to the transformer
Detectors on Cable
Detectors on Cable
1
S
S
S
S
S
2
S
S
P
P
P
3
S
P
P
P
4
S
P
5
S
P
6
P
1
S
S
S
S
S
2
S
S
P
P
P
3
S
P
P
4
S
P
5
S
P
6
P
2 other Heimdall Detectors connected
to the transformer
4 other Heimdall Detectors connected
to the transformer
Detectors on Cable
Detectors on Cable
1
S
S
S
S
S
2
S
S
P
P
P
3
S
P
P
4
S
P
5
S
P
6
P
1
S
S
S
S
P
2
S
S
P
P
P
3
S
P
P
4
S
P
Version
10
Page 113 of 120
Status
Issued
Last Editor
harry.smyth
Date
03 November 2014
Document
GENERAL HANDBOOK FOR HEIMDALL Doc. No. 667/HB/31900/000
Name
DETECTORS
Copyright Siemens plc 2014 All Rights Reserved
5
P
6
P
Siemens Mobility, Traffic Solutions
Sopers Lane, Poole, Dorset
Cable Length
Cable Length
BH17 7ER
50m
100m
150m
200m
250m
50m
100m
150m
200m
250m
6 other Heimdall Detectors connected
to the transformer
8 other Heimdall Detectors connected
to the transformer
Detectors on Cable
Detectors on Cable
1
S
S
S
S
S
2
S
S
P
P
3
S
P
P
4
S
P
5
P
6
P
1
S
S
S
S
P
2
S
S
P
P
3
S
P
4
S
P
5
P
6
P
10
other
Heimdall
Detectors
connected to the transformer
12
other
Heimdall
Detectors
connected to the transformer
Detectors on Cable
Detectors on Cable
1
S
S
S
S
P
2
S
S
P
P
3
S
P
4
S
P
5
P
6
P
1
S
S
S
S
P
2
S
S
P
3
S
P
4
P
Version
10
Page 114 of 120
Status
Issued
Last Editor
harry.smyth
Date
03 November 2014
Document
GENERAL HANDBOOK FOR HEIMDALL Doc. No. 667/HB/31900/000
Name
DETECTORS
Copyright Siemens plc 2014 All Rights Reserved
5
P
6
P
Siemens Mobility, Traffic Solutions
Sopers Lane, Poole, Dorset
BH17 7ER
12 CALCULATING PERMISSIBLE DETECTOR SUPPLY
CABLE LENGTHS
This section can be used to calculate the permissible cable lengths for non-standard
installation requirements, for example the ST900 ELV detector supply kits.
12.1 General Considerations
When considering power supply needs for the Heimdall detector, care must be taken to
ensure that all power losses are taken into account. This is particularly true for supply
feeder runs to each detector.
The following rules must be followed for each installation:
The minimum allowed voltage at any time on any detector is 19.2 volts
This voltage applies at the minimum mains voltage of 207 volts (which is -10% on
the standard European voltage of 230v or -13.75% on the standard UK voltage of
240v).
This voltage applies when the transformer is loaded with all the installed
detectors volts (if applicable).
The detector interface cable resistance must be allowed for in calculating the
maximum permissible cable lengths.
The following fixed parameters will need to be applied to all calculations:
The supply and return resistance for a 1 mm2 cable is 0.042 ohms per metre.
Transformer secondary winding resistance
Worst case no-load voltage
Maximum supply current.
For the Siemens supplied 24 AC Detector Transformers the following table can be
consulted.
Kit
160VA LV Supply
667/1/20292/008
50VA LV Supply
667/1/27853/000
Transformer Part Number
667/7/15855/005
667/7/00977/007
Rs
Vmin
0.309 ohms
21.26v
1.3 ohms
23.13v
Imax
6.6 A
2A
Resistance
Worst case no-load
voltage at 207 volts
mains (i.e. 230v -10%)
Maximum current
Table 12-1 – Siemens AC Detector Supply Specification
Version
10
Page 115 of 120
Status
Issued
Last Editor
harry.smyth
Date
03 November 2014
Document
GENERAL HANDBOOK FOR HEIMDALL Doc. No. 667/HB/31900/000
Name
DETECTORS
Copyright Siemens plc 2014 All Rights Reserved
Siemens Mobility, Traffic Solutions
Sopers Lane, Poole, Dorset
BH17 7ER
For the Siemens supplied ELV detector power extension kit the following table can be
consulted.
Kit
160VA ELV Supply
667/1/33074/000
50VA ELV Supply
667/1/33075/000
Transformer Part Number
667/7/15855/024
667/7/00977/024
Rs
Vmin
0.309 ohms
21.26v
1.3 ohms
23.13v
Imax
6.6 A
2A
Resistance
Worst case no-load
voltage at 207 volts
mains (i.e. 230v -10%)
Maximum current
Table 12-2 – Siemens AC Detector Supply Specification
12.2 Method Outline
The voltage falls by Rs in (e.g. in Table 12-1) for each amp of current drawn from the
transformer. For each individual cable there is a voltage drop down the cable of 0.042
volts for each go-and-return metre of (1 mm2) cable. Therefore the current must be
calculated for each cable run using the current per detector shown in , Section 3, for each
detector (Is). The total current must then be calculated for all detectors supplied from the
transformer. The maximum length of cable can be then calculated.
12.3 Calculating Cable Lengths
12.3.1 24V DC Supply Feed
When the Heimdall Detector is powered from the associated controller’s 24V DC supply
first calculate the total detector supply load. This must not exceed the limits of that
available for this particular installation.
Check that the minimum supply voltage at this load is greater than the detector minimum
voltage of 19.2V.
For each detector supply cable calculate:
Maximum cable length =
__Vs (min) - 19.2
_
total cable current x 0.042
Where: Vs = 24V PSU output voltage negative tolerance.
0.042 = cable resistance in ohms per metre.
If longer cables are required, the arrangements must be revised. For example by using
two cable cores in parallel the maximum cable length changes to:
_
Vs (min) - 19.2
_
total cable current x 0.021
Version
10
Page 116 of 120
Status
Issued
Last Editor
harry.smyth
Date
03 November 2014
Document
GENERAL HANDBOOK FOR HEIMDALL Doc. No. 667/HB/31900/000
Name
DETECTORS
Copyright Siemens plc 2014 All Rights Reserved
Siemens Mobility, Traffic Solutions
Sopers Lane, Poole, Dorset
BH17 7ER
12.3.2 24V AC/DC Transformer Supply Feed
In order to use the Siemens Detector transformers it is necessary to perform specific
calculations to ensure that the minimum supply voltage to the Heimdall detector is
maintained under all circumstances.
To assist the reader quick reference ‘look-up tables’ are included in Section 11 of this
document to provide the answer for installations where the same detector type is
connected to the supply cable being considered. If more complicated installations are
being considered then the procedures detailed below must be followed.
First calculate the lowest transformer voltage under worst case conditions using the total
transformer current (i.e. the total supply current for all detectors installed):
V Xmfr (min) = Vs(min) - (Rs x total transformer current in Amps)
Where: V Xmfr (min) = the minimum transformer secondary voltage at full detector load.
Vs (min) = the minimum transformer secondary voltage at no load and minimum mains
voltage.
Rs = the transformer secondary winding resistance.
Then subtract the minimum voltage at which the detector will work (19.2 volts). This gives
the maximum voltage drop which can be allowed in any cable.
Max allowed voltage drop
=
V Xfmr (min) - 19.2
The maximum allowable length for each cable can then be calculated:
Maximum cable length =
__V Xfmr (min) - 19.2
_
total cable current x 0.042
(0.042 is the cable resistance in ohms per metre)
If longer cables are required, the arrangements must be revised. For example by using
two cable cores in parallel the maximum cable length changes to:
_
V Xfmr (min) - 19.2
_
total cable current x 0.021
Running separate cables to each post improves the situation since the calculation applies
to each cable, so that each cable will take less current. All loads on each cable must be
allowed for including pedestrian crossing detectors and kerbside detectors.
Where the situation is more complicated due to sharing of cables it will be necessary to
calculate the voltage at each detector - This voltage must be at least 19.2 volts.
The voltage at the end of any single cable is given by subtracting 0.042 x the length of
the cable in metres x the current in the cable from the voltage at the start of the cable.
This applies to 1 mm 2 cable with a separate return conductor for each run. This is based
on the out-and-return resistance of the cable being 0.042 ohms per metre.
Version
10
Page 117 of 120
Status
Issued
Last Editor
harry.smyth
Date
03 November 2014
Document
GENERAL HANDBOOK FOR HEIMDALL Doc. No. 667/HB/31900/000
Name
DETECTORS
Copyright Siemens plc 2014 All Rights Reserved
Siemens Mobility, Traffic Solutions
Sopers Lane, Poole, Dorset
BH17 7ER
The calculations may be worked out using the tabular form shown below:
Cable
1
Current
Cable
2
Cable
3
+
+
+
Amps
=
Volts (Transformer
voltage drop)
x Rs =
Vs (min) -
=
Volts
(Lowest transformer
voltage)
(Maximum allowable
Voltage drop in any cable)
- 19. 2 =
X 0.042 =
(or 0.021 for
conductors in
parallel
Total
Current
Cable
4
Maximum allowable
cable length =
Voltage drop
in Cable 1
=
Metres
(Cable 1)
Table 12-3 - Calculation of Maximum Cable Length (Controller-mounted AC supply)
Note: The above chart yields the maximum length of one cable. The calculation within
the dashed area must be repeated for the other cables.
Version
10
Page 118 of 120
Status
Issued
Last Editor
harry.smyth
Date
03 November 2014
Document
GENERAL HANDBOOK FOR HEIMDALL Doc. No. 667/HB/31900/000
Name
DETECTORS
Copyright Siemens plc 2014 All Rights Reserved
Siemens Mobility, Traffic Solutions
Sopers Lane, Poole, Dorset
BH17 7ER
INDEX
F
*
*A, *R, etc… (Handset Error Codes) ......................85
A
Access Levels ......................................................82
C
Fault Log
Clearing Using RFL=1 ...................................... 96
Current Fault Log (FLG) ................................... 94
Displaying (FFS and FDS) ................................ 96
Fault Flag Data Scan (FDS) ............................. 94
Fault Flag Scan (FFS) ...................................... 94
Configuration
Detection Range (RGE) ....................................92
Detector Fault Monitor Period (DFM).................91
Detector Fault Output (DFO) .............................91
Detector Indicator (IND) ....................................92
Detector Mounting Height (DMH) ......................92
Detector Output Hold Period (SPH) ...................93
Detector Type (DET) ........................................90
Fault Log Data (FLD)........................................ 94
Reset Fault Log (RFL) ...................................... 94
FDS (Fault Data Scan).......................................... 96
FDS (Fault Flag Data Scan) .................................. 94
FFS (Fault Flag Scan)..................................... 94, 96
FLD (Fault Log Data) ............................................ 94
FLG (Current Fault Log) ........................................ 94
General............................................................32
Low Speed Threshold (LST) .............................92
Max Presece Time (MPT) .................................92
Speed Detr. De-Activation Period (SDA) ...........92
Speed Threshold (SPT) ....................................93
Target Direction (DIR) ......................................91
D
DET (Detector Type) .............................................90
H
Handset
Access Levels .................................................. 82
Bluetooth Connection ....................................... 78
Command Format ............................................ 83
Connecting ...................................................... 78
Displays........................................................... 86
Error Codes ..................................................... 85
Health and Safety ................................................... 2
Detector Transformer
Calculation Chart............................................ 116
Specification .......................................... 113, 114
DFM (Detector Fault Monitor Period) .....................91
DFO (Detector Fault Output) .................................91
DIR (Target Direction) ...........................................91
I
IND (Detector Output Indication) ........................... 92
Installation
Check .............................................................. 76
Recommended Order ....................................... 20
DMH (Detector Mounting Height)...........................92
E
Electrical Details ..................................................17
L
LED (LED Status) ................................................. 88
LST (Low Speed Threshold) ................................. 92
Electrical Connections
M
General............................................................23
Isolated Second Output Cable .................... 25, 29
Maintenance
Standard Output Cable ......................... 24, 25, 28
First line........................................................... 95
Error Codes ..........................................................85
Second Line..................................................... 95
Version
10
Page 119 of 120
Status
Issued
Last Editor
harry.smyth
Date
03 November 2014
Document
GENERAL HANDBOOK FOR HEIMDALL Doc. No. 667/HB/31900/000
Name
DETECTORS
Copyright Siemens plc 2014 All Rights Reserved
Siemens Mobility, Traffic Solutions
Sopers Lane, Poole, Dorset
BH17 7ER
Mechanical Details................................................19
SiTOS .................................................................. 16
MPT (Max. Presence Time)...................................92
Installation & Configuration ............................... 34
P
Part numbers ................................................ 15, 103
PIC (Program Identity Code) .................................90
Power Supply
SME (Maintenance Engineer Access Code) .... 82, 88
Spares ............................................................... 103
SPH (Detector Output Hold Period) ....................... 93
SPT (Speed Threshold) ........................................ 93
Standard VA Approach Detector
Limits ............................................................. 106
Options .......................................................... 106
Program Identity Code and Issue (PIC)..................90
R
RFL (Reset Fault Log)..................................... 94, 96
RGE (Detection Range) ........................................92
Configuration ............................ 39, 43, 47, 64, 75
Status Information
Vehicle Speed (SPD) ....................................... 87
STE (Self-Test)..................................................... 89
Stop Line Detector
Configuration ................................................... 51
Supply Cable
S
Resistance..................................................... 113
Safety Warning ...................................................... 2
T
SCOOT Detector
Configuration ...................................................57
SDA (Speed Detr. De-Activation Period) ................92
Selectable Speed Detector
Installation .......................................................44
Siemens Radio Link ............................................16
Test & Access
Access Enable (SME) ..................................... 88
LED Status (LED) ............................................ 88
Reset Configuration (DEF) ............................... 88
Self-Test (STE) ................................................ 89
Version
10
Page 120 of 120
Status
Issued
Last Editor
harry.smyth
Date
03 November 2014
Document
GENERAL HANDBOOK FOR HEIMDALL Doc. No. 667/HB/31900/000
Name
DETECTORS
Copyright Siemens plc 2014 All Rights Reserved