1
Technical
Short Takes
by
Mark
Spencer,
WA8SME
Steve
Ford,
WB8IMY,
[email protected]
Xtal Set Society SADL
RF Attenuator Kit
Rich Arland, K7SZ
[email protected]
There are times that many of us need a step
attenuator to accurately control the output of
an RF generator during receiver alignment,
or to reduce the output of a QRP transmitter
for on-air testing. Let’s not forget the need
for a step attenuator for use in transmitter
hunting, where you need to drop the input
to your receiver to avoid overload as you
approach the hidden transmitter.
There have been many articles
detailing with how to build a step
attenuator. The current ARRL
Handbook has a construction project
on how to fabricate one of these inexpensive pieces of test gear. The obvious
hurdle to overcome is parts procurement.
Also, most of the step attenuators are not
constructed to handle more than a half
watt of input, and then only for a very short
time.
Thankfully the creative folks at the Xtal Set
Society have overcome these obstacles and
provide a nifty little kit, including a plastic
enclosure, for the paltry sum of only $49.95
plus shipping/handling. The really sweet
thing about this attenuator kit is that in
addition to a built-in dummy load with LED
indicator, it will handle a full 5 W of RF
indefinitely, making it an ideal tool for the
QRP workbench/shack. This kit can be
ordered in three configurations: complete
kit with case, kit without case and PC board
only.
Building the Kit
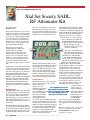
My QRP SADL (complete) kit arrived from
the Xtal Set Society in a small box. The PC
board was very well done with all throughhole components, which makes an easy
build for my old eyes. All components are of
high quality. Instructions are very easy to
follow and the total build time was just short
of two hours.
The build went smoothly right up until the
very last resistor, R15. The instructions and
the parts list called for a 10 kΩ 1⁄4 W resistor,
but the kit was furnished with a 1 kΩ 1⁄4 W.
A quick look at the schematic showed that
R15 was a current limiting resistor for the
LED indicator. Past experience had shown
that a 1 kΩ resistor would be okay to use in
this application so I went ahead and used the
supplied resistor for R15 with no ill effects.
After switching out the attenuator’s dummy
load I systematically proceeded to crank in
3, then 6, then 9 and finally 12 dB pads and
watched the RF on the calibrated meter. All
worked as advertised with the RF output
dropping from 5 W to 2.5, to 1.25 W, to
0.625 W and so on — just as it should.
One nice thing is the visual indicator.
It’s an LED that lights when the internal dummy load is activated and 5 W is
applied to the input port of the
attenuator. This is a great tuning
aid for the workbench.
The choice of attenuator steps is
interesting. Many attenuators are
configured to include the following
switchable pads: 3 dB, 6 dB and
several 10 dB and 20 dB pads. This
allows a wide range of attenuation.
The Xtal Set attenuator kit has a single
3 dB pad, a single 6 dB pad and two
When mounting the high-wattage resistors
12 dB pads. The 3 dB pad cuts the RF
onto the PC board the instructions called for
signal in half and is equal to 1⁄2 of an S unit.
using masking tape to hold the resistors in
A 6 dB attenuator equals 1 S unit, or a
place before turning the PC board over and
signal decrease by a factor of four. The
soldering the parts. I feel that this step is
12 dB pad equals 2 S units or a factor of 16.
unnecessary if you take the time to slightly
In other words, this attenuator makes it easy
bend the component leads away from the
to assess S meter accuracy. It also makes
hole and then solder the connections. It’s a
quick work out of figuring your QRPp
minor point, but one that speeds the build.
(power levels below 1 watt) when reducing
your transmitter output for those times you
Testing and Use
want to play the “How low can you go”
Initial testing was a breeze. The instructions
game. You can accurately attenuate your
outline a valid testing procedure, which I
5 W QRP signal all the way down to
followed. However, I
2.5 mW in 12 discrete
decided to do some
steps for a total of
All
components
are
of
additional testing. Having
high quality. Instructions 33 dB of attenuation!
a calibrated QRP wattmeter and dummy load, I are very easy to follow and Bottom line: This Xtal
Set Society SADL
the total build time was
connected the SADL kit
QRP attenuator is an
between my Elecraft K3
just short of two hours.
excellent first homeand my calibrated wattbrew/kit building
meter/dummy load and
project and provides the frugal QRPer
proceeded to apply 5 W of RF. With all the
with a very useful and interesting piece of
attenuators bypassed I observed 5 W on the
test equipment at an extremely attractive
wattmeter. I then switched in the attenuator’s
dummy load and the output meter dropped to price.
2.5 W. Essentially, both the dummy load in
Manufacturer: Xtal Set Society, PO Box 3636,
the attenuator and the dummy load on the
Lawrence, KS 66046; tel 405-517-7347;
wattmeter are in parallel and the output
www.midnightscience.com. $49.95;
should drop to half the initial output of 5 W,
kit without case, $41.95.
which is exactly what happened.
50 April 2012 ARRL – the national association for Amateur Radio www.arrl.org