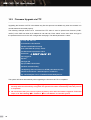
1
0
Table of Contents
1. CWP-100 OVERVIEW ................................................................................................................................................ 4
2. PRODUCT DESCRIPTION........................................................................................................................................ 5
3. HARDWARE OVERVIEW.......................................................................................................................................... 6
4. LCD ICON OVERVIEW .............................................................................................................................................. 8
5. INSTALLATION OVERVIEW..................................................................................................................................... 9
5.1. CWP-100 INSTALLATION ........................................................................................................................................ 9
6. BASIC CONFIGURATION ....................................................................................................................................... 10
6.1. WIRELESS LAN ACCESS POINT SCAN ................................................................................................................. 10
6.2. SYSTEM SETTING
.............................................................................................................................................. 11
6.2.1. Current Setting ............................................................................................................................................ 12
6.2.2. Static IP Setting ........................................................................................................................................... 12
6.2.3. Dynamic IP (DHCP) Setting ...................................................................................................................... 13
6.2.4. ADSL Setting ............................................................................................................................................... 13
6.3. VOIP SETTING ...................................................................................................................................................... 14
6.3.1. Server Setting .............................................................................................................................................. 14
6.3.2. Name Setting ............................................................................................................................................... 15
6.3.3. Codec Setting .............................................................................................................................................. 15
6.3.4. NAT Traversal .............................................................................................................................................. 15
7. BASIC SERVICES .................................................................................................................................................... 18
7.1. MAKING A PHONE CALL ........................................................................................................................................ 18
7.2. RECEIVING A PHONE CALL.................................................................................................................................... 18
7.3. EXTRA FUNCTIONS ON CALL ................................................................................................................................. 19
7.3.1. Phonebook ................................................................................................................................................... 19
7.3.2. Call history ................................................................................................................................................... 19
1
7.3.3. Call hold........................................................................................................................................................ 19
7.3.4. Call mute ...................................................................................................................................................... 19
7.3.5. Call Transfer................................................................................................................................................. 19
7.3.6. Call Waiting .................................................................................................................................................. 20
8. SUPPLEMENTARY SERVICES.............................................................................................................................. 21
8.1. PHONEBOOK ......................................................................................................................................................... 21
8.1.1. Register ........................................................................................................................................................ 21
8.1.2. Search .......................................................................................................................................................... 22
8.1.3. Delete............................................................................................................................................................ 22
8.2. CALL HISTORY ...................................................................................................................................................... 23
8.2.1. Check Recent Dialed/Received/Missed Calls......................................................................................... 23
8.2.2. Delete Calls.................................................................................................................................................. 23
8.3. EXTRA SETTING .................................................................................................................................................... 23
8.3.1 Melody Setting.............................................................................................................................................. 24
8.3.2 Screen Message Setting............................................................................................................................. 24
8.3.3. Time Server Setting .................................................................................................................................... 24
8.3.4. Time Zone Setting....................................................................................................................................... 25
8.3.5. Alarm Setting ............................................................................................................................................... 25
8.3.6. Phone Lock Setting..................................................................................................................................... 25
8.3.7. Firmware Management .............................................................................................................................. 26
8.3.8. Call Forwarding ........................................................................................................................................... 26
8.3.9. Vibration Mode ............................................................................................................................................ 26
9. CONFIGURATION WITH INTERNAL WEB INTERFACE .................................................................................. 27
9.1. NETWORK CONFIGURATION .................................................................................................................................. 28
9.1.1. Network Mode Configuration..................................................................................................................... 28
9.1.2. Miscellaneous Network Configuration...................................................................................................... 28
9.2. VOIP CONFIGURATION ......................................................................................................................................... 29
9.3. SUPPLEMENTARY FUNCTION CONFIGURATION .................................................................................................... 30
9.3.1. Call Waiting .................................................................................................................................................. 30
9.3.2. Use External Voice Mail Server ................................................................................................................ 30
9.3.3. Incoming Call Processing Configuration.................................................................................................. 31
9.3.4. Outgoing Call Processing Configuration.................................................................................................. 32
9.4. NAT TRAVERSAL CONFIGURATION ....................................................................................................................... 34
10. FIRMWARE UPGRADE AND FACTORY RESET ............................................................................................. 36
2
10.1. FIRMWARE UPGRADE VIA DISPLAY MENU .......................................................................................................... 36
10.2. FIRMWARE UPGRADE VIA FTP ........................................................................................................................... 37
10.3. SYSTEM RESET BY FACTORY VALUE .................................................................................................................. 38
11. CHARACTER INPUT USING KEYPAD .............................................................................................................. 39
11.1. ENGLISH CHARACTER ......................................................................................................................................... 39
11.2. SYMBOLIC CHARACTERS .................................................................................................................................... 39
3
1. CWP-100 Overview
1. CWP-100 Overview
Conform to Wireless LAN standard 802.11b.
Operate on wireless LAN AP (Access Point) with static IP, ADSL and dynamic IP(DHCP).
Provide VoIP calls.
Provide CID service.
Provide NAT traversal function that enables external calls with private IP address behind NAT
network environment.
Provide various ring melody.
Provide phonebook and speed dial function.
Support user-friendly menu system with ICON and LCD.
4
2. Product Description
2. Product Description
Please check and make sure that you have the following package contents.
Item
Quantity
CWP-100 Body
1
CWP-100 main body
Charger
1
CWP-100 proprietary charger
Battery
Power Adaptor
(DC 5V 2A)
1
CWP-100 proprietary Battery
1
Power supply device
1
User guide that explains features, functions
and implementation examples
User Manual
5
Description
3. Hardware Overview
3. Hardware Overview
6
Controls
Handset
Send and receive the sound during a call.
LCD
Display system status and user information.
LEFT SOFT
KEY
RIGHT SOFT
KEY
ENTER
SEND
Function
Button
Description
Select the menu option at the down-left side of the LCD.
Select the menu option at the down-right side of the LCD.
Activate the menu that the cursor point.
Confirm input of character string or numeric constants.
Activate the call with the dialed number.
Return to the main menu.
END
Deactivate the call.
Press this button for few seconds to turn the CWP-100 on or off.
Adjust the receiver volume during the call.
▲▼
Adjust the ring melody volume on the melody setting menu.
Navigate the menu items when manipulating the menu.
Return to the previous menu.
CANCEL
Erase the previous character when editing the text.
Erase the phone number from the dialed/received calls list.
Erase the recorded message and move to the next recorded message.
numerical keypad
7
Enter numbers and characters.
Select the menu directly with the numerical keypad
4. LCD Icon Overview
4. LCD Icon Overview
The descriptions of the icons displayed on CWP-100 LCD are as below.
•
CLIPCOMM CWP-100
12:00:49 AM
MENU
Please refer to the table below for the descriptions of each icon.
Icons
Category
AP connection status Icon
Proxy server register status
Icon
Meaning
The signal strength received from the AP.
Success in registration.
Failure in registration
None : No registration
Vibration mode Icon
Vibration mode is on.
Alarm Icon
Alarm clock setup is on.
Mute Icon
Reject all the incoming calls.
Battery Life Icon
More bars indicate better isolation.
8
5. Installation Overview
5. Installation Overview
Please check the parts of the CWP-100 and then follow the steps bellow to instal CWP-100 properly.
Caution: Use only the power adaptor, charger and battery supplied by the provider. Using other
power adaptor, charger and battery may cause the CWP-100 to deteriorate the voice quality and
malfunction.
5.1. CWP-100 Installation
9
①
Set the CWP-100 on the charger. (Figure “A”)
②
Plug the power adaptor (5V) to the charger. (Figure “B”)
③
Connect the headset to the CWP-100 in order to use the wired headset. (Figure “C”)
④
Press END button for a few seconds to start CWP-100.
6. Basic Configuration
6. Basic Configuration
You can set the CWP-100 system with the keypad or the embedded web interface. The descriptions of
setting the system with LCD and keypad are explained below. Please refer to Chapter9. “Configuration with
Internal Web Interface” to set the system with the web interface.
CLIPCOMM CWP-100
12:00:49 AM
MENU
To set the system with LCD and keypad, press ”LEFT SOFT KEY”. Then you will enter the main menu and
see the displays as below.
1: Phonebook
2: Call History
3: System Setting
4: Extra Setting
5: System Restart
6.1. Wireless LAN Access Point Scan
Before you use the CWP-100, you need to get connected to the wireless LAN access point. Follow the steps
as MENU
“3: System Setting”.
1: Network Setting
2: VoIP Setting
3: Wireless Setting
4: PWD Chang
①
Select “3: Wireless Setting”, then you will see the displays as below.
10
1: AP Scan
2: Device Addr
3: WLAN Mode
4: ESSID
5: Channel
6: WEP Setting
②
Select “1: AP Scan” to search the wireless LAN access point around the CWP-100.
If the CWP-100 succeeds in searching the AP, the CWP-100 LCD display “AP Scan Success”
and restart automatically.
If there is no AP around or if the CWP-100 fails in searching the AP, the CWP-100 LCD display
“AP Not Found” and return to the previous menu.
③
Select “2: Device Addr” to check the CWP-100 MAC address.
④
Select “3: WLAN Mode” to choose the CWP-100 wireless LAN mode.
Selecting “Disable” will indicate that you will not connect the CWP-100 to the wireless
LAN AP.
Selecting “Station” will indicate that you will connect the CWP-100 to the wireless LAN AP.
⑤
On “4: ESSID”, you can enter the ESSID for connecting the CWP-100 to the wireless LAN AP.
⑥
On “5: Channel”, you can assign the channel for connecting the CWP-100 to the wireless
LAN AP. (You can choose the channel from 1to 13.)
⑦
On “6: WEP Setting”, you can enter the password for connecting the CWP-100 to the
wireless AP. (You can assign up to 4 number of passwords.)
1: Key Size
2: Key Selecting
Select “1: Key Size” and choose the size of the key among “Disable”, “64bit” and 128bit”.
Select “2: WEP Key” and enter the WEP Key Index and WEP Key.
6.2. System Setting
You need to register with the Internet Service Provider (ISP) to utilize the IP phone functionalities. If you are
using ADSL Wireless LAN AP (Access Point), set the CWP-100 network as ADSL. If your AP gets the IP
address from the DHCP server, set the CWP-100 network as DHCP. In other cases, set the CWP-100
network as static IP.
11
Follow the steps as MENU
“3: System Setting”
”1: Network Setting” to check the current setting.
1: Current Setting
2: Static IP
3: DHCP
4: ADSL
5: Restart
6.2.1. Current Setting
① Follow the steps as MENU
“3: System Setting”
”1: Network Setting”
“1: Current Setting” to view
the current settings. You can check current network mode and network parameters.
1: Current Mode
DHCP
2: IP address
192.168.0.223
3: G/W Address
192.168.0.1
4: DNS Address
168.126.63.1
5: Netmask
255.255.255.0
6: Enet Address
000788100AE1
6.2.2. Static IP Setting
① Follow the steps as MENU
“3: System Setting”
”1: Network Setting”
“2: Static IP”.
1: IP
2: G/W
3: DNS
4: Netmask
5: Restart
② Select “1: IP” from the menu. Input the IP address and then press ENTER button. To express “.”
between the numbers, press the # key.
IP address
211.12.23.34_
MODE: A
③ In the same way, input the gateway address, DNS address and Netmask address in order.
12
④ The changed parameter will apply only after the system restarts. Select “5:Restart” from the menu
and press ENTER button. Then the system will automatically restart with the new network
parameters.
6.2.3. Dynamic IP (DHCP) Setting
① Follow the steps as MENU
“3: System Setting”
”1: Network Setting”
“3: DHCP”.
Use DHCP?
Yes
No
② Select “Yes” and press ENTER button. Then the system will automatically restart with the DHCP
mode.
6.2.4. ADSL Setting
① Follow the steps as MENU
“3: System Setting”
”1: Network Setting”
“4: ADSL”.
② You will see the figure as below once you select “4: ADSL”.
1: ADSL ID
2: ADSL Password
3: Connect ADSL
③ Select “1: ADSL ID” and input the ADSL ID.
Enter ADSL ID
myid_
MODE : A
④ In the same way, input the ADSL password.
⑤ Select “3: Connect ADSL” and press ENTER button. Then the CWP-100 will automatically attempt
the ADSL connection.
⑥ In case ADSL connection fails, follow the steps as MENU
connection.
13
“5: System Restart” to reattempt the
6.3. VoIP Setting
You need to register with the Internet Telephony Service Provider (ITSP) to utilize various VoIP services. You
may set the CWP-100 as your ITSP requests.
To set the system with the LCD and the keypad, follow the steps as MENU
“3: System Setting”
“2: VoIP
Setting”. Then you will enter the submenu and see the display as below.
1: Server Setting
2: Name Setting
3: Codec Setting
4: NAT Traversal
6.3.1. Server Setting
① Follow the steps as MENU
“3: System Setting”
“2: VoIP Setting”
“1: Server Setting”.
1: SIP Server
2: Register On
3: Registrar Server
4: Registration
5: Outbound Proxy
6: Expiry[sec]
② Select “1: SIP Server” and input the SIP server address.
SIP Server
192.168.0.6
MODE : A
③ To register with the Registrar server, press “2: Register On” and select “Yes.”
④ In the same way, set the Registrar Server, Outbound Proxy and register Expires parameters.
Generally, the Registrar Server and Outbound Proxy are identical with the SIP Server.
The Registrar Server and Outbound Proxy may appear as FQDN1.
The Register Expires is the time for transmitting the Register message periodically so that the
CWP-100 keeps registering.
⑤ “4: Registration” indicates the current register status.
1
FQDN: Fully Qualified Domain Name. (domain name or IP address):(Port number). ex) clipcomm.co.kr:15060
14
6.3.2. Name Setting
① Follow the steps as MENU
“3: System Setting”
“2: VoIP Setting”
“2: Name Setting”.
1: User ID
2: Display Name
3: AUTH ID
4: Password
② Select “1: User ID” and input the phone number you wish to make a call. Press ENTER button to
confirm or CANCEL button to erase the number.
User ID
7711
MODE: 1
③ In the same way, set Display name, Authentication ID, Password parameters.
Display name is the user name set as user information. This value is generally identical with the
user ID or not used.
Authentication is the ID to register the server that requires password. This value is generally
identical with the user ID.
Password is the key value to enable the password when the server requires a password to register.
6.3.3. Codec Setting
Follow the steps as MENU
“3: System Setting”
“2: VoIP Setting”
“3: Codec Setting”. Then you
will see the current codec for a moment and then see the menu as below.
1: G.723.1A
2: G.711 Mu Law
3: G.711 A Law
4: G.729 Annex AB
You may select the codec that you wish to use and then restart the CWP-100 to utilize the selected
codec.
6.3.4. NAT Traversal
In case the CWP-100 is used in a private network environment behind the IP router, NAT traversal function
enables the CWP-100 to connect with the external VoIP devices. When the server supports NAT traversal
function, no other configurations are required with the VoIP device. However, in case the server does not
support NAT traversal function, the NAT traversal configuration for the VoIP device is required. The CWP-100
conforms to the IETF (Internet Engineering Task Force) standard protocol STUN (Simple Traversal of UDP
through NAT) to cope with the NAT traversal problems of VoIP protocol.
15
Follow the steps as MENU
“4: NAT Traversal”.
1: NAT Function
2: STUN Address
3: NAT Router IP
4: NAT Timer
6.3.4.1. NAT Traversal using STUN server
① To use NAT traversal function with the STUN server, follow the steps as MENU
“1: NAT Function”
“2: Use STUN”.
“4: NAT Traversal”
1: NOT USE
2: Use STUN
3: Use Manually
② Follow the steps as MENU
“4: NAT Traversal”
“2: STUN Address” and then input the STUN
server address. This parameter may appear as FQDN.
STUN Addr.
clipcomm.co.kr:5088
MODE: A
6.3.4.2. NAT Traversal without using STUN server
① To use NAT traversal function without the STUN server, follow the steps as MENU
Traversal”
“1: NAT Function”
“3: Use Manually”.
② Follow the steps as MENU
“4: NAT Traversal”
“4: NAT
“3: NAT Router IP” and then input the NAT router
16
external IP address.
NAT Router IP
211.211.211.211
MODE: A
6.3.4.3. NAT Session Timer
When using the NAT traversal function, you need to set the session time for transmitting the packet
periodically so that the CWP-100 maintains the NAT router and the NAT session. Follow the steps as
MENU
“4: NAT Traversal”
“4: NAT Timer” and then input appropriate time.
NAT Timer[sec]
30
MODE: A
You may use the embedded web page and configure more parameters for VoIP settings. Please
refer to Chapter 9 ”Web Configuration” for details.
17
7. Basic Services
7. Basic Services
7.1. Making a Phone Call
① Dial the phone number that you wish to make a call.
In case making a direct call to the devices’ IP address, press “LEFT SOFT KEY” to
select
A and then press 1 to express “.” between the numbers.
Press CANCEL button to edit the numbers.
② Press SEND button to make call.
You need to register with the Internet Telephony Service Provider (ITSP) to use PSTN calls in the
VoIP service mode. Please contact your service provider for details.
You can adjust the receiver volume during the call. Press ▲,▼ to adjust the receiver volume.
You can check the recent dialed calls by pressing SEND button.
7.2. Receiving a Phone Call
① Press SEND button when the bell rings.
② Talk over the phone.
③ Press END button to hang up call..
18
7.3. Extra functions on Call
You can use various functions with SEND button or menu button during call.
7.3.1. Phonebook
Follow the steps as Menu
“1: Phone book” during the call to check the phone number list that is saved on
the Phonebook. Press END to return to the main menu.
7.3.2. Call history
Follow the steps as Menu
“2: Call History” during the call to check the sent/received/missed call list. Press
END to return to the main menu.
7.3.3. Call hold
Follow the steps as Menu
“3: Call Hold” during the call to hold the call. Then the CWP-100 will intercept
the sound so that the other party cannot hear anything.
Follow the steps as Menu
“3: Call Hold” again during the call to cancel the call hold.
7.3.4. Call mute
Follow the steps as Menu
“4: Call Mute” during the call to mute the call. Then the CWP-100 will intercept
the sound so that the other party cannot hear anything, but you will hear what the other party says. Follow
the steps as Menu
“4: Call Mute” again during the call to cancel call mute.
7.3.5. Call Transfer
You can transfer the call to the other party during the call. Assuming that you are talking with person A, and
would like to transfer the call to person B;
① Press SEND during the call to make person A in the waiting mode.
② Dial the phone number of person B for call transfer.
③ If you would like to cancel the call transfer and return to person A while dialing the phone number,
press END.
④ After dialing the phone number of person B, press SEND again to transfer the call.
⑤ If you press SEND during the call with person B, you can talk to person A again. In the meantime,
person B will be in the waiting mode.
⑥ If you press END during the call with person B, the CWP-100 will end the call. Person A and person
19
B will be able to talk to each other.
7.3.6. Call Waiting
When there is an incoming call while you are on the phone, the CWP-100 can put the incoming call in the
waiting mode and do not reject the call. To enable call waiting, you need to use the embedded web interface.
Please refer to Chapter9. “Configuration with Internal Web Interface” to set the system with the web interface.
① The CWP-100 LCD display as below when there is an incoming call while you are on the phone.
8800 indicates the phone number for the initial call. And 8801 indicates the phone number for the
second incoming call.
8800
8801
② The number that “ ” points is the phone number that you are currently communicating. You can talk
to the other party if you press SEND during the call.
20
8. Supplementary Services
8. Supplementary Services
The CWP-100 provides various supplementary services addition to basic services.
8.1. Phonebook
You can save and delete the phone number on the phonebook. Follow the steps as MENU
”1:
Phonebook”.
8.1.1. Register
① Follow the steps as MENU
”1: Phonebook”
“1: Register”.
No.
MODE: A
② Input the entry on the first row, the name on the second row and the phone number on the third row.
The last row indicates the mode of the text.
③ Use ▲,▼ to move to the row you want, and then press ENTER button to enter the input mode.
④ After inputting the values, press ENTER button to check all the values.
⑤ After inputting all the values, press END button. Then you the display asking whether to save the
entry or not will appear.
Save Entry?
Yes
No
⑥ Select “Yes” and press ENTER button to save the entry.
You may save up to 120 entries on the phonebook.
21
8.1.2. Search
You can search the phone number with the registered name and the entry number.
① Follow the steps as MENU
”1: Phonebook”
“2: Search”.
② Select the menu among All Entries, By Names, By Phone No. and By Entry No.
All Entries : Display all the registered phone numbers.
By Name : Search the phone number with the name.
By Phone No.: Search the phone number with the partial phone number.
By Entry No.: Search the phone number with the previously assigned entry number.
③ Input the name, number or entry number and then press ENTER button.
④ Display the searched phone number.
⑤ When you press ENTER button, the CWP-100 display the details of the phone number.
8.1.3. Delete
You can delete the registered phone number.
① Follow the steps as MENU
”1: Phonebook”
“3: Erase”.
1: One By one
2: Erase All
② If you select “1: One By One,” the CWP-100 display all the saved phone numbers. Select the phone
number that you wish to delete and then press “Enter”.
Delete?
Yes
No
③ Select “Yes” and press ENTER button to delete the selected phone number.
④ If you select “2: Erase All”, You can delete all the saved phone number.
22
8.2. Call History
You can save and delete the call history on the phonebook by following the steps as MENU
”2: Call
History”.
Choose the menu from below.
1: Placed Call
2: Received Call
3: Missed Call
4: Delete Call
8.2.1. Check Recent Dialed/Received/Missed Calls
① “1: Placed Call” is the list of recent dialed calls. Maximum of 10 entries will be saved.
② “2: Received Call” is the list of recent received calls. Maximum of 10 entries will be saved.
③ “3: Missed Call” is the list of recent missed calls. Maximum of 10 entries will be saved.
④ You may check the details by using ▲,▼ or numeric buttons.
You may make the call to the phone number if you press SEND button on the assigned phone
number.
8.2.2. Delete Calls
① Select “4. Delete Call”.
② If you select “1. One By One”, the CWP-100 display all the saved phone numbers on the call history.
Select the phone number that you wish to delete and then press Enter button.
③ If you select “2. Erase All”, You can delete all the saved phone numbers on the call history. Select
“Yes” to delete all the entries or “No” to cancel.
8.3. Extra Setting
You can set supplementary functions here including the ring melody, time and call forwarding functions.
Follow the steps as MENU
”4: Extra Setting”.
1: Melody Setting
2: Screen Message
23
3: Time Server
4: Time Zone
5: Alarm Setting
6: Phone Lock
7: Firmware
8: Call Forwarding
8.3.1 Melody Setting
① Select “1. Melody Setting”.
1: Melody Selection
2: Melody Volume
② Use ▲,▼ to choose the ring melody that you wish to use and then press ENTER button.
③ Select “2. Melody Volume” and use ▲,▼ to set the melody volume and then press ENTER button.
8.3.2 Screen Message Setting
① Select “2. Screen Message”.
1: User Defined
2: Registration ID
② If you select “1: User Defined”, the CWP-100 display the main screen message and you can edit the
screen message here.
③ If you select “2: Registration ID”, the default phone number will be set as the main screen message.
8.3.3. Time Server Setting
① The CWP-100 receives the current time information from the time server. Select “3: Time Server” to
change the time server.
Enter IP Address
211.234.222.98_
24
MENU: A
② Input the time server and press ENTER button to confirm or END button to cancel.
8.3.4. Time Zone Setting
You can set the time zone according to your region. Select “4: Time Zone”, then CWP-100 will display the
current wall-clock time according to the time information from the time server interpreted by this time zone.
8.3.5. Alarm Setting
① Select “5: Alarm Setting”.
1: Alarm Cancel
2: Alarm Time
3: Alarm Melody
4: Alarm Volume
② If you intend to disable the alarm function, select “1: Cancel Alarm” and then select “Yes”.
③ To change the alarm time, select “2: Alarm Time” and then the frequency of the alarm. Then press
ENTER button to confirm. You can select the alarm frequency as once or daily.
④ After setting the alarm frequency, input the alarm time. Use ▲,▼ to move the cursor and then press
ENTER button.
04/20
13h:28m
__h:__m
MENU: 1
⑤ Select “3: Alarm Melody” to change the alarm melody.
⑥ Select “4: Alarm Volume” to adjust the alarm melody volume by using ▲,▼.
8.3.6. Phone Lock Setting
① You can lock the CWP-100 in order to prevent others from using the phone. Select “6: Lock Phone.”
to lock the phone.
Current Pass?
__
MODE: 1
② Input the password to lock the phone and press ENTER button.
③ The user should input the password to make a call or to enter menu.
25
8.3.7. Firmware Management
You can return to the factory reset or update the firmware.
① Select “7: Firmware” to check the current firmware version.
1: Load Default
2: Firmware Ver.
3: Firmware Update
4: Update Server
② Select “1: Load Default” to return to the factory reset.
③ Select “2: Firmware Ver.” to check the current version.
④ Select “3: Firmware Update” to update the firmware from the assigned server.
⑤ Select “4: Update Server” to set the server for updating the firmware.
8.3.8. Call Forwarding
You can forward the incoming call to the previously assigned phone number.
① Follow the steps as Menu
”4: Extra Setting”
”8: Call Forwarding”.
1: Setting
2: Forward NUM
② Select “1: Setting” and then choose the conditions for enabling the call forwarding functions.
1: Disable
2: Unconditional
3: Busy
4: No Answer
③ Select “2: Forward NUM” and then input the phone number to forward the call.
④ Once you enable the call forwarding function, the CWP-100 will display “CallForward ON” on the
LCD main screen.
8.3.9. Vibration Mode
You can change the CWP-100 to vibrate instead of the melody ring for the incoming call.
① Press * for three seconds to change to the vibration mode.
② Once the vibration mode is enabled, the CWP-100 display
icon on the LCD.
26
9. Configuration with Internal Web
9. Configuration with Internal Web Interface
The CWP-100 provides the internal web interface for convenient configuration and monitoring. Once the
CWP-100 is available for networking after the configuration with the keypad, you can use the web interface
by inputting the CWP-100 IP address on the web browser. With the web interface, you can check the current
settings and set the parameters that are hard to configure with the phone buttons.
In case the CWP-100 has the IP address alike a PC as the figure below, input “http://current CWP-100
IP address:1001” on the web browser.
In order to protect the web page contents, the user ID and the password is required to enter the web
page. Input “admin” as the user ID and “0000” as the password.
Notice: By default, the user ID is “admin”, and the password is “0000”.
27
9.1. Network Configuration
9.1.1. Network Mode Configuration
9.1.1.1. Network Mode Configuration with Internal Web Interface
① Select “System Configuration”
“Network” from the CWP-100 embedded web page.
② Select the appropriate IP configuration parameters that match your network environment from below.
(a) Static IP
A. Select “Static IP”.
B. Input IP, gateway, subnet mask and DNS address.
(b) DHCP(Dynamic IP) or Cable modem
A. Select “DHCP”.
(c) ADSL
A. Select “ADSL”.
B. Input ADSL ID and the password.
③ After inputting the parameters, select “save and restart.”
④ The CWP-100 will restart with the new parameters.
9.1.2. Miscellaneous Network Configuration
You can configure miscellaneous network configuration parameters besides the CWP-100 IP network mode.
Parameter
Description
Default
DNS
The user can assign up to two DNS addresses. In this case, the
DNS address that the user had assigned acts even when the
DHCP server assigns a DNS address with the dynamic IP address
(DHCP).
automatic
External Enet
Address
External Ethernet address assigned to the CWP-100. Do not
change this parameter except for special cases.
N/A
Time Server
(SNTP)
Time Zone
Password for
System
Access
Set the time server address that obtains current time information.
Set the local time that the CG is located.
The user can change the password for accessing the system with
HTTP, FTP protocol and phone lock function.
time.kriss.re.kr
+09:00
0000
28
9.2. VoIP Configuration
VoIP configuration is required to enable VoIP calls. Please contact your service provider or the network
administrator for more information on VoIP configuration.
①
Select “System Configuration”
“VoIP” on the left side of the web page.
②
Set each configuration parameters with appropriate value.
Parameter
Description
Default
SIP Server
Standard SIP server name for service area, which is also called
SIP Domain.
N/A
Server Registration
Registrar Server
(FQDN1)
Enable this parameter to register on the server.
Assign the Registrar server address. Notice that most of this
address is identical with SIP server. In case the port number is
not 5060, input colon (:) and the number at the end.
disable
N/A
Ex) clipcomm.co.kr:15060
Outbound Proxy
(FQDN)
Outbound VoIP packets pass through this address. The packets
will go out through Registrar server if the user leaves this
parameter blank. In case the “Outbound Proxy” is assigned, all
the packets during the VoIP call will be transmitted to “Outbound
Proxy” even the “Server Registration” is disabled. In case the
port number is not 5060, input colon (:) and the number at the
end.
N/A
Ex) clipcomm.co.kr:15060
User ID
The phone number set as user information.
10000
The user name set as user display name.
10000
Authentication ID
The ID to register the server that requires password. The User ID
and the Authentication ID are usually identical.
10000
Password
The key value to enable the password when the server requires
a password to register.
N/A
RTP Port
The RTP port that transmits the voice packets during VoIP call.
Please notice that by default, the assigned port value will be
used for VoIP calls and the RTP port+2 will be used for additional
second call such as Call Transfer or Call Waiting.
7080
Display Name
1
29
FQDN: Fully Qualified Domain Name. (Domain name or IP address):(Port number).
Ex) clipcomm.co.kr:15060
Parameter
Expiry
SIP Local Port
Voice Codec
Description
Set the time for transmitting the REGISTER
periodically so that the CG keeps registering.
Default
message
Set the CG port that send and receive SIP packet. Please notice
that this is not the port that proxy server receives.
Set the VoIP call voice codec among G.7231.A, G.711 µ -law,
G.711 A-law and G.729AB.
3600
5060
G.723.1A
Set the DTMF transmission method when the user press digits
during VoIP call.
DTMF Transmission
RFC2833 : Transmit DTMF information in RTP packet with
RFC2833 standard.
RFC2833
INFO : Transmit DTMF information with SIP INFO message.
Inband : Transmit DTMF information with DTMF tone sound
itself, not with packet.
Use VAD
Do not transmit voice packet when G.7231A is in use and detect
silence.
disable
Jitter Buffer Size
Set the jitter buffer size of the voice packet that has been saved
during VoIP call. The size differs dynamically within the assigned
range according to the network condition.
50 ~ 1000
9.3. Supplementary Function Configuration
The CWP-100 provides various additional functions.
9.3.1. Call Waiting
The CWP-100 enables the user to accept incoming call from a third party during an active call. By default, it
is enabled.
Parameter
Description
enable
The user hears a beep when there is an incoming call from a third party
during the call. You can accept the call by pressing SEND button.
disable
The CWP-100 rejects the call from a third party during the call. The third
party will receive a busy signal.
9.3.2. Use External Voice Mail Server
Addition to the CWP-100 embedded voice message saving function, the CWP-100 supports MWI (Message
30
Waiting Indication) and enables the user to use external voice mail server.
Parameter
Description
Use External Voice
Mail System
The user can use external voice mail server when the service provider
supports Voice Mail server. The user can simultaneously use auto
answering function that the CWP-100 supports itself. In case there is a
new message from the external voice mail server, the CWP-100 will
display a message icon. The user may check the message by calling his
mail sever that the Internet service provider provides.
9.3.3. Incoming Call Processing Configuration
The CWP-100 provides the services as below for incoming calls.
9.3.3.1. Auto Answering
The CWP-100 answers the incoming call automatically and records the message that the caller leave.
(You can use Auto Answering function only with G.723.1A codec.)
The description and default value for auto answering function is as follows.
Parameter
Description
Default
Waiting Time
Set the waiting time that the auto answering function operates.
5sec
Msg.Center PIN
Code(4 digits)
The user can access the message center to check the saved
message or edit the greeting message by pressing “*”, PIN
Code, and then SEND in order. The user will hear the IVR and
may follow the directions. The PIN Code should always start
with “*”.
*0000
Please notice that the internal auto answering machine is available only when the voice codec is
assigned as G.723.1A.
The saved messages will be deleted when the CWP-100 power goes out. But the greeting
message will remain.
You may record the greeting message for maximum of 20 minutes.
9.3.3.2. Call Forwarding
The CWP-100 can forward the incoming call to the previously assigned phone number.
Parameter
Forwarding
31
Description
Set the conditions for call forwarding.
Default
Unconditional
Condition
Unconditional : The CWP-100 immediately forwards all the
incoming calls to the previously assigned phone number.
Busy : The CWP-100 forwards the incoming call when the
channel is in use.
No Answer: The CWP-100 forwards the incoming calls to the
previously assigned phone number when the CWP-100 user
does not answer the phone for 30 seconds.
Call Forwarding
Number
Set the phone number to forward the incoming call.
N/A
9.3.4. Outgoing Call Processing Configuration
The CWP-100 provides the services as below for outgoing calls.
9.3.4.1. Dial Plan
The CWP-100 edits the outgoing phone number according to the rules that the user assigns. The user can
set up to 20 entries for dial plan.
Parameter
Description
The pattern that the user input while dialing. The user can use the digit and
characters below to find the pattern.
Number
0 ~ 9 number : General phone number.
? : any single digit.
~ : any numbers of digits.
The outgoing call will operate immediately without termination digit if the
LEN
pattern that the user input is identical to the ones saved on Number, and the
length of them is identical to the one saved on LEN.
TRNC
Prefix
Postfix
Block
Dest. Address
Eliminate the phone numbers at the front as the saved value on TRNC if the
pattern that the user input is identical to the ones saved on Number.
Add the phone numbers at the front as the saved value on Prefix if the pattern
that the user input is identical to the ones saved on Number.
Add the phone numbers at the end as the saved value on Postfix if the pattern
that the user input is identical to the ones saved on Number.
Reject the outgoing call phone if the pattern that the user input is identical to
the ones saved on Number.
Attempt the outgoing call to the assigned IP address as the destination line if
the pattern that the user input is identical to the ones saved on Number.
32
Usually, users use this function when he wants to call a remote VoIP device
directly with IP address without server registration.
Examples for Dial Plan
① Input the values as below and click the [Insert] button and then the [save] button.
In case the user dials the phone number that starts with 00 and press ‘#’ to make an outgoing call, the
CWP-100 will eliminate the first 2 digits, add “555” at the front as prefix and add “1004” at the end as
postfix and then attempt the outgoing VoIP call with the final phone number.
② Input the values as below and click the [Insert] button and then the [save] button.
‘?’ indicates any single digit. Thus in case the user dials a phone number of three or more digits that ends
with 77, the CPW-100 will reject the attempt and terminate the outgoing call immediately since the “Block”
parameter is checked.
③
Input the values as below and click the [Insert] button and then the [save] button.
In case the user dials the phone number that starts with 8, the CWP-100 will eliminate one digit at the front
and attempt the outgoing VoIP call to 192.168.0.41.
Generally, “Dest. Address” operates without registering the server addresses on “VoIP” page.
④
33
The final dial plan scenario s as follows.
When the user picks up the handset and dial the phone number, the CWP-100 starts searching the
pattern that coincide with the recent dial plan entries (from the bottom to the top).
In case the user dial “00123” and press “#” to make an outgoing call;
The CWP-100 will edit the final dialing number as “5551231004” and attempt the outgoing VoIP call.
In case the user dial “85556677” and press “#” to make an outgoing call;
The CWP-100 will edit the final dialing number as “5556677” and attempt the outgoing VoIP call to
“192.168.0.41”.
In case the user dial “5550001” and press “#” to make an outgoing call;
The CWP-100 will not edit the final dialing number since there is no pattern that coincide with the dial plan
entries, and attempt the outgoing call to “5550001”
9.3.4.2. Miscellaneous Functions
Parameter
Description
Press SEND after dialing the phone number to assign that the dialing
is completed and attempts the outgoing call. The user may set the
Last Digit
Configuration CWP-100 to attempt the outgoing cal after an assigned time without
pressing SEND.
Use Speed
Dial
Speed Dial
Setting
Enable the speed dial function.
The user can assign up to 20 speed dial numbers for the phone
numbers or IP addresses that are mainly used.
Default
Use
“SEND”
button
disable
N/A
9.4. NAT Traversal Configuration
The CWP-100 can enable NAT traversal when the CWP-100 has a private IP behind NAT environment. Then
the CWP-100 is able to make and receive external VoIP calls behind NAT. The user may use the external
STUN server or directly use the NAT router’s IP address to use NAT traversal.
Parameter
Description
Default
Select NAT traversal.
Not Use : Do not use NAT.
NAT Traversal
STUN : Use NAT traversal through STUN server.
Not Use
Manual : Use NAT traversal manually when there is no appropriate
STUN server.
34
STUN Server
(FQDN) for
STUN
NAT Router IP
for Manual
Use
NAT Keep
Alive Interval
35
Assign STUN server address and server port when using NAT traversal
through “STUN.”
N/A
Ex) stun.Clipcomm.co.kr:3478
Assign the NAT router’s external IP address of the network that CWP100 is connected while using NAT Traversal manually when there is no
appropriate STUN server.
The user should assign the SIP local port, RTP port, CWP-100 IP
address etc that the CWP-100 uses behind NAT router. Setting up these
ports is called Port mapping, which enables the CWP-100 to run behind
the NAT router.
Assign the packet transmit periodic time so that the CWP-100 maintains
the connection when it uses NAT traversal. Then the NAT router will be
able to keep the CWP-100 IP and port information continuously.
N/A
30s
10. Firmware Upgrade and Factory Reset
10. Firmware Upgrade and Factory Reset
You easily upgrade the new firmware with a simple process.
10.1. Firmware Upgrade via Display Menu
You can upgrade the firmware with the CWP-100 LCD display menu. This process is available only when the
network is in normal state and connected properly.
① Select MENU and follow the steps as “4: Extra Setting”
”7: Firmware”.
1: Load Default.
2: Firmware Ver.
3: Firmware Update
4: Update Server
② Select “2. Firmware Ver.” to check the current firmware version.
③ Select “4. Upgrade Server” to check the server address for the upgrade.
④ Select “3. Firmware Update” to start upgrading the firmware.
CAUTION: Do not interfere until upgrading the firmware is completed. Upgrading procedure
normally takes about one minute. The system will restart automatically when the process is
completed.
36
10.2. Firmware Upgrade via FTP
Upgrading the firmware via FTP is the fastest way. But this process is available only when the network is in
normal state and connected properly.
The following example shows how a command line FTP client is used to upload new firmware (“CWP100.fls”) to the CWP-100 when its IP address is 192.168.0.36. Enter “admin” as the user name and type in
the password that is set on the VoIP configuration web page. The default password is “0000.”
C:\> ftp 192.168.0.36
Connected to 192.168.0.36.
220 Precise/RTCS FTP Ready
User (192.168.0.36:(none)): admin
331 Password required for admin
Password:
비밀번호(4자리숫자) 입력
230 Logged in
ftp> bin
200 Type OK
ftp> put CWP-100.fls flash
200 Port command okay
150 Opening data connection for STOR (192.168.0.14,1161)
226 File received OK – 1053136 bytes in 10.640 sec
ftp: 1053136 bytes sent in 10.55Seconds 99.82Kbytes/sec.
The system will reboot automatically when upgrading the firmware via FTP is completed.
CAUTION: Do not interfere until upgrading the firmware is completed. Upgrading procedure
normally takes few minutes by using FTP. The system will restart automatically when the process
is completed.
We recommend that you reset the system by factory value after the firmware upgrade. Follow the
steps as”4. Extra Setting” ”7. Firmware” ”1. Load Default” to reset the system.
37
10.3. System Reset by Factory Value
The CWP-100 can reset system by factory value with its LCD [MENU].
After booting the CWP-100 successfully, follow the steps as [MENU]
”4: Extra Setting”
”7:
Firmware”
“1: Load Default”. Then the CWP-100 will ask to input the password for resetting the
system.
Input the correct password and then press ENTER. Then the CWP-100 will automatically reboot with
the factory value.
38
11. Character Input Using Keypad
11. Character Input Using Keypad
In character input mode during menu manipulation, you can change current character set by pressing SOFT
Key 1 repetitively. The character set circulates as upper case letter, lower case letter, numeric character and
symbolic character.
Icons
Category
Character Input Mode
Meaning
Upper case letter, lower case letter, numeric character and
symbolic character
11.1. English Character
Press SOFT Key 1 and select upper case letter or lower case letter.
Two or three alphabets are mapped to all nine numeric buttons from 1 to 9. You can input a specific
alphabet by pressing the button to which the alphabet is mapped. If printed alphabet is not the one
you want, you can switch among three alphabets using
and # buttons.
Example: “A” “B” and “C” are mapped to
A:
2
B:
2
+
C:
2
+
2
button, thus,
#
To input a space, press
0
button.
11.2. Symbolic Characters
In character input mode, and then press SOFT Key 1 to select the symbolic character.
When symbolic set is selected, each numeric key represents a specific symbol as following table:
39
Key
Symbol
Key
Symbol
Key
Symbol
1
!
2
@
3
$
4
?
5
:
6
,
7
(
8
)
9
-
0
~
#
#
40