1
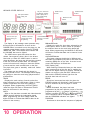
IMPORTANT SAFETY INSTRUCTIONS
THESE INSTRUCTIONS ARE TO PROTECT YOU AND THE MclNTOSH INSTRUMENT. BE SURE TO FAMILIARIZE
YOURSELF WITH THEM.
1.
Read all instructions - Read the safety and
operating instructions before operating the
instrument.
2.
Retain Instructions - Retain the safety and
operating instructions for future reference.
3. Heed warnings - Adhere to warnings and
operating instructions.
4. Follow Instructions - Follow all operating and use
instructions.
WARNING: TO REDUCE RISK OF FIRE OR
ELECTRICAL SHOCK, DO NOT EXPOSE THIS
INSTRUMENT TO RAIN OR MOISTURE.
5. Power Sources - Connect the power supply only to
the type described in the operating instructions or
as marked on the unit.
6. Power-Cord Protection - Route power-supply cords
so that they are not likely to be walked on or
pinched by items placed upon or against them,
paying particular attention to cords at plugs,
convenience receptacles, and the point where they
exit from the instrument.
7. Ventilation - Locate the instrument for proper
ventilation. For example, the instrument should
not be placed on a bed, sofa, rug, or similar
surface that may block ventilation openings; or,
placed in a built-in installation, such as a bookcase
or cabinet, that may impede the flow of air
through the ventilation openings.
8. Heat - Locate the instrument away from heat
sources such as radiators, heat registers, stoves, or
other appliance (including amplifiers) that produce
heat.
9. Wall or Cabinet Mounting - Mount the instrument
in a wall or cabinet only as described in the
owners manual.
10. Water and Moisture - Do not use the instrument
near water - for example, near a bathtub,
washbowl, kitchen sink, laundry tub, in a wet
basement, or near a swimming pool, etc.
11. Cleaning - Clean the instrument by dusting with a
dry cloth. Clean the panel with a cloth moistened
with a window cleaner.
12. Object and Liquid Entry - Do not permit objects to
fall and liquids to spill into the instrument through
enclosure openings.
13. Power Lines - Locate any outdoor antenna away
from power lines.
14. Outdoor Antenna Grounding - If an outdoor
antenna is connected to the antenna terminal, be
sure the antenna system is grounded to provide
some protection against voltage surges and built
up static charge.
In the U.S.A., section 810 of the National Electrical
Code, ANSI/NFPA No. 70-1987, provides
information on the proper ground for the mast
and supporting structure, ground for the lead-in
wire to an antenna discharge unit, and size of
ground conductors, location of antenna-discharge
unit, connection to grounding electrodes, and
requirements for the grounding electrode.
For ground wire:
a) Use No. 10 AWG (5.3 mm2) copper No. 8 AWG
(8.4 mm2) aluminum, No. 17 AWG (1.0 mm2)
copper-clad steel, bronze wire, or larger as ground
wire.
b) Secure antenna lead-in and ground wires to
house with stand-off insulators spaced from 4 feet
(1.22 meters) to 6 feet (1.83 meters) apart.
c) Mount antenna discharge unit as closely as
possible to where lead-in enters house.
d) Use jumper wire not smaller than No. 6 AWG
(13.3 mm2) copper or equivalent when separate
antenna grounding electrode is used.
15. Nonuse Periods - Unplug the power cord from the
AC power outlet when left unused for a long
period of time.
16. Damage Requiring Service - Service must be
performed by qualified service personnel when:
A. The power supply cord or the plug has been
damaged; or
B. Objects have fallen, or liquid has been spilled
into the instrument; or
C. The instrument has been exposed to rain; or
D. The instrument does not appear to operate
normally or exhibits a marked change in
performance; or
E. The instrument has been dropped, or the
enclosure damaged.
17. Servicing - Do not attempt to service beyond that
described in the operating instructions. All other
service should be referred to qualified service
personnel.
18. Grounding or Polarization - Do not defeat the
inherent design features of the polarized plug.
Non-polarized line cord adaptors will defeat the
safety provided by the polarized AC plug.
The lightning flash with arrowhead, within an
equilateral triangle, is intended to alert the user to
the presence of uninsulated "dangerous voltage"
within the product's enclosure that may be of
sufficient magnitude to constitute a risk of electric
shock to persons.
19. CAUTION: TO PREVENT ELECTICAL SHOCK DO
NOT USE THIS (POLARIZED) PLUG WITH AN
EXTENSION CORD, RECEPTACLE OR OTHER
OUTLET UNLESS THE BLADES CAN BE FULLY
INSERTED TO PREVENT BLADE EXPOSURE.
Note to CATV system installer:
This reminder is provided to call the CATV system
installer's attention to Article 820-22 of the NEC
that provides guidelines for proper grounding
and, in particular, specifies that the cable ground
shall be connected to the grounding system of
the building, as close to the point of cable entry
as practical.
ATTENTION; POUR PREVENIR LES CHOCS
ELECTRIQUES PAS UTILISER CETTE FICHE
POLARISEE AVEC UN PROLONGATEUR, UNE PRISE
DE COURANT OU UNE AUTRE SORTIE DE
COURANT, SAUF SI LES LAMES PEUVENT ETRE
INSEREES A FOND SANS EN LAISSER AUCUNE
PARTIE A DECOUVERT.
The serial number, purchase date, and Mclntosh
Laboratory Service Contract number are important to
you for possible insurance claim or future service.
Record this information here.
Serial Number
CAUTION
RISK OF ELECTRIC SHOCK
DO NOT OPEN
Purchase Date
CAUTION: TO PREVENT THE RISK OF ELECTRIC
SHOCK, DO NOT REMOVE COVER (OR BACK). NO
USER-SERVICABLE PARTS INSIDE. REFER SERVICING
TO QUALIFIED PERSONNEL.
The exclamation point within an equilateral triangle
is intended to alert the user to the presence of
important operating and maintenance (servicing)
instructions in the literature accompanying the
appliance.
Service Contract Number
Upon application, Mclntosh Laboratory
provides a Service Contract to the original
purchaser. Your Mclntosh Authorized
Service Agency can expedite repairs when
you provide the Service Contract with the
instrument for repair.
Copyright 1989 © by Mclntosh Laboratory Inc.
Contents
INTRODUCTION
INSTALLATION
HOW TO CONNECT
FRONT PANEL
CONTROLS
OPERATION
HELPFUL HINTS
PERFORMANCE DATA
3
4, 5
6
Your MCD 7007 Compact Disc Player will give you
many years of satisfactory performance. If you have
any questions, please contact,
CUSTOMER SERVICE
7, 8
9, 10, 11,
12, 13
14, 15
16
Mclntosh Laboratory Inc.
2 Chambers Street
Binghamton, New York 13903-9990
Phone: 607-723-3512
Take Advantage of 3 Years of
Contract Service. . .
Fill in the Application NOW.
MclNTOSH THREE YEAR SERVICE CONTRACT
An application for A THREE YEAR SERVICE CONTRACT is included with this manual.
The terms of the contract are:
1. If the instrument covered by this contract
becomes defective, Mclntosh will provide all parts,
materials, and labor needed to return the
measured performance of the instrument to the
original performance limits free of any charge. The
service contract does not cover any shipping costs
to and from the authorized service agency or the
factory.
2. Any Mclntosh authorized service agency will
repair all Mclntosh instruments at normal service
rates. To receive the free service under the terms
of the service contract, the service contract certificate must accompany the instrument when
taken to the service agency.
3. Always have service done by a Mclntosh
authorized service agency. If the instrument is
2
modified or damaged as a result of unauthorized
repair the service contract will be cancelled.
Damage by improper use or mishandling is not
covered by the service contract.
4. The service contract is issued to you as the
original purchaser. To protect you from
misrepresentation this contract cannot be
transferred to a second owner.
5. Units in operation outside the United States and
Canada are not covered by the Mclntosh Factory
Service Contract, irrespective of the place of
purchase. Nor are units acquired outside the USA
and Canada, the purchasers of which should
consult with their dealer to ascertain what, if any,
service contract or warranty may be available
locally.
The third generation Compact Disc player
continues the world-wide Mclntosh reputation for
technological advancement as the reason for a new
model. Every aspect of performance is improved:
focusing and tracking, decoding, error correction,
digital filtering, digital to analog conversion
(converters are specially selected for matched
channel to channel linearity.)
The MCD7007 uses a new integral massive cast
disc drive platform whose variable reluctance
suspension system is adjusted and tuned to reduce
or eliminate both high and low frequency
resonances, and the impact of vibrations and shock.
There is a low mass, low inertia, high compliance
single beam laser pen. The laser pen assembly
achieves exceptional radial trackability through a
sub-miniature, resonance damped, precisely balanced
rigid system design.
The single-spot laser - which was already
recognized for its readout purity - stays even more
precisely on track and in focus, and the digital signal
that is read out is processed even more truthfully.
Even in the face of disc eccentricity and warp and of
disc defects or dirt that would interrupt play in the
majority of players, the sound of the Mclntosh
MCD 7007 Compact Disc player sets superlative
standards of purity.
The focus and collimator lenses, the receiver and
transmitter faces employ flat glass replica technology.
• The motorized front-loading tray is a new antijamming design protected from damage by forced
closure. If forced, it will close directly to play the
disc or to stand by for additional instruction.
• The 10 key access pad permits direct access to
the track desired, any sequence of selected tracks,
preprogramming by track, index time or combination
of these:
1. Button programming in any order of up to
twenty tracks.
2. Programability directy from a short scan of each
track.
3. Three speed search forward or backward with
the sound muted only in the high speed mode
in either direction.
The full 18-bit dynamic range is derived from
matched linear input to output dual 16-bit digital to
analog converters with 4-times oversampling.
A large FIFO memory can adsorb any data stream
fluctuations with adaptive error corrections which
can handle bursts to 15 audio frames.
The single DAC chip - specifically selected for high
performance - incorporates separate 16-bit converters
for left and right channels. There is no multiplexing,
no delay time between channels, and an extra 4 dB
of channel separation.
Both high-precision servos are integrated to a
higher degree than ever, embodying many functions
that have to be performed with discreet components
in other players. For these functions, there is no
wear, no deterioration with time no setting-up
adjustment to go wrong. Thus a permanent
improvement in readout accuracy is achieved.
Enhanced performance Cross Interleave Reed
Solomon Code (CIRC) provides maximum error
detection and correction. Error correction has soft
muting reinforced with enhanced error concealment
of up to 8 uncorrectable samples.
Volume can be controlled from either the hand
held remote or the front panel buttons.
With the MCD7007 Mclntosh Compact Disc Player
performance moves to a new pinnacle of cutting
edge technological achievement and highest quality
music reproduction. Even with dirty or damaged
discs, even when the player is bumped or knocked,
the music retains its surpassing purity. The full
integrity of the sound is preserved beginning with
the readout from the compact disc through to the
gold-plated connectors on the output.
Your selection of the MCD7007 will be continously
strenghtened by your day to day use of this superb
instrument. Happy listening.
INTRODUCTION 3
PLAYER LOCATION
The MCD 7007 may be installed in a Mclntosh
cabinet or custom installed in furniture of your
choice. Always provide adequate ventilation. Never
place it above heat generating components such as
high powered amplifiers. Provide 1½ inches (3 cm) of
space above the player to maintain with a cooling air
flow. Always use the compact disc player horizontally, out of direct sunlight and away from other heat
sources.
REMOVE THE TRANSIT SCREWS
On the bottom of the player are two screws which
lock the player mechanism to protect it during
transportation. Remove these screws and keep them
in a safe place. If the player is to be transported
these screws must be replaced to prevent damage.
CUSTOM INSTALLATION
The PANLOC system of installing equipment conveniently and securely, is a product of Mclntosh
research. The PANLOC buttons on the front panel
will lock the unit firmly in place when turned approximately one-quarter turn clockwise. A onequarter counterclockwise turn of the PANLOC buttons unlocks the chassis from its mounting,
To install the instrument in a Mclntosh cabinet,
follow the instructions that are enclosed with the
cabinet. For any other type of installation follow
these instructions:
1. Unpack from Carton
Open the carton and remove the PANLOC brackets,
hardware package, and mounting template. Remove
the instrument from its plastic bag and place it upside down on the shipping pallet. Unscrew the four
plastic feet from the bottom of the chassis and
unscrew and remove the transit screws. When the instrument is transported, damage can occur unless its
transit screws are in place. Keep the transit screws in
a safe place for use should you transport the unit.
2. Mark the Cabinet Panel
Tape the mounting template in position on the
cabinet panel where the instrument is to be install-
cd. The broken lines that represent the outline of
the rectangular cutout also represent the outside
dimensions of the chassis. Make sure these lines
clear shelves, partitions, or any equipment. With the
template in place, first mark the six A and B holes
and the four small holes that locate the corners of
the cutout. Then, join the four corner markings with
pencil lines, using the edge of the template as a
straightedge.
3. Drill Holes
Use a drill with a 3/16 inch (5 mm) bit held perpendicular to the panel and drill the six A and B holes.
Then, using a drill bit slightly larger than the tip of
your saw blade, drill one hole at each of two diagonally opposite corners. The holes should barely
touch the inside edge of the penciled outline. Before
taking the next step, make sure that the six A and B
holes have been drilled.
4. Saw the Panel Cutout
Saw carefully on the inside of the penciled lines.
First make the two long cuts and then the two short
cuts. After the rectangular opening has been cut out,
use a file to square the corners and smooth any irregularities in the cut edges.
5. Install the Mounting Strips
In the hardware package you will find two mounting
strips, and two sets of machine screws. For panels
that are less than 1/2 inch (12.7 mm) thick, use the
3/4 inch (19.1 mm) screws; for panels that are more
than 1/2 inch (12.7 mm) thick, use the 1-1/4 inch (31.8
mm) screws.
Starting at the right-hand side of the panel, insert a
screw of the proper length into the center hole in
the panel, marked B on the template. On the back of
the panel, align a mounting strip with the holes in
the panel and tighten the screw until the screwhead
is pulled into the wood.
4 INSTALLATION
Repeat this procedure to attach the mounting strip
to the (eft side of the panel.
6. Attach the PANLOC Brackets
Using two screws of the proper length in the A holes
on each side, attach the PANLOC brackets to the
cabinet panel; the short flange is mounted against
the front (face) of the cabinet panel. The screws pass
through the PANLOC bracket flange, the cabinet
panel, and then through the mounting strips
previously mounted.
7. Install the Instrument
Guide the AC power cord through the panel opening
to the back of the cabinet; then, slide the instrument
into the opening carefully so that the rails on the
bottom of each side of the chassis engage the tracks
on the mounting brackets. Continue to slide the instrument into the cabinet until the front panel is
flush with the cabinet panel. Turn the PANLOC buttons at the lower left and right corners of the instrument panel clockwise to lock the unit firmly in the
cabinet. Turn the PANLOC buttons counterclockwise
to unlock the instrument. It can then slide outward
to permit the removal of the instrument from the
cabinet.
INSTALLATION 5
The back cover of this manual folds out to show
photographs of the front and rear panels of the MCD
7007. Fold it out to assist you in identifying and
locating the connections. The letters refer to the
paragraphs that follow.
The back panel of the MCD 7007 has connectors
labeled FIXED OUTPUT, VARIABLE OUTPUT,
REMOTE, a port marked DIGITAL OUTPUT and the
AC power cord. The VARIABLE OUTPUT is adjusted
by the front panel VOLUME
buttons while the
FIXED OUTPUT is unaffected by these controls.
Use shielded cables to connect the output signal to
a preamplifier or power amplifier. To minimize the
possibility of hum, the shielded cables should be of
parallel construction or loosely twisted together and
located away from the speaker connecting cables
and AC power cords. Be certain to use good quality
shielded cables for all interconnections. Your dealer
can advise you on the kind and length of cables that
will best suit your installation.
A. FIXED OUTPUT
The FIXED OUTPUT jacks are used to feed
program to a stereo preamplifier or other
equipment with its own volume control.
B. VARIABLE OUTPUT
Use the VARIABLE OUTPUT jacks to connect to
a power amplifier or a tape recorder where
control of the volume at the player is desired.
There is no difference in the signal quality at
either pair of output jacks. Both pairs of output
jacks may be used simultaneously.
Connect the audio output of the player to the
"CD", "AUX", or other high level input on the
preamplifier. Do not connect to the "PHONO"
input. Connect the Right player output to the
right preamplifier input and the Left player
output to the left preamplifier input.
E.
AC POWER
Plug the AC power cord into a 120 volt 50/60
Hz receptical. The plug blades are polarized so
be certain the plug is fully inserted in the outlet
to prevent blade exposure.
CAUTION: TO PREVENT ELECTRIC SHOCK, DO
NOT USE THE (POLARIZED) PLUG ON THIS UNIT
WITH AN EXTENSION CORD, RECEPTACLE, OR
OTHER OUTLET UNLESS THE BLADES CAN BE FULLY
INSERTED TO PREVENT BLADE EXPOSURE.
INSERTING THE BATTERIES IN THE
REMOTE CONTROL
Your Mclntosh Compact Disc Player includes an
infrared Remote Controller. In your hand you have
the ability to control normal operating functions of
the disc player.
The controller runs on two AA, 1.5 Volt batteries.
Slide open the cover on the back of the remote
controller and insert the batteries as shown in the
diagram in the battery compartment, then slide the
cover closed again.
Battery life is normally about one year. Remove the
batteries as soon as they are dead to prevent damage
by possible battery leakage. The batteries should be
removed, also if the remote controller is not used for
a long time.
C. REMOTE
The REMOTE control connector is designed for
use with the Mclntosh multi-area infrared remote
control systems. With these systems, you can,
from a hand-held remote control, operate the
disc player and the entire system from various
listening areas.
D. DIGITAL OUTPUT
The digital data stream is available from this
port for use in systems that can accept digital
data directly.
6 HOW TO CONNECT
Fold out this manual's back cover to assist you in
locating the controls. The numbers on the photographs
refer to the paragraphs that follow,
The glass upper half of the MCD 7007 front panel
contains the CD drawer, the IR REMOTE SENSOR,
the REMOTE response LED, the DAMAGED DISC
indicator and the message center. The message
center displays the current status of the mode of
operation, disc time, the CD functions in use and
the horizontally displayed volume level indicator.
The black anodized lower half of the front panel
contains the buttons to program the player, activate
the various player functions, and to control the
VOLUME. A headphone jack with its own volume
control and PANLOC loading buttons are also on this
panel.
Before operating your Compact Disc player,
familiarize yourself with the controls and what they
do.
1. POWER
Touch to switch the AC power to the player on or
off.
2. LOAD
Touch to open or close the disc drawer. An LED
above the LOAD button illuminates when the drawer
is operating.
3. PLAY
Touch to close the disc drawer and to start play.
Touch to return to the beginning of the track being
played.
4. VOLUME
Volume may be adjusted by using the VOLUME
or
on the front panel or on the remote
controller. The volume is adjusted by an electronically
switched, precision, ladder attenuator. The Mclntosh
electronic precision ladder attenuator adjusts volume
using C2 MOS transistor switches to select the right
combinations of deposits of resistive material for the
volume programmed. The entire range of volume
adjustment is 66 dB in 2 dB increments. Left and
right tracking is controlled to a fraction of a dB.
Because there aren't any moving parts, the volume
adjustment cannot generate noise or misalignment.
5. MESSAGE CENTER
The message center presents information about the
number of tracks on the disc, the playing time, the
progress of play, the particular functions of the
player, and signals errors during operation or
programming. (See also: MESSAGE CENTER pg. 10).
6.-7.
REV AND FF
Touch and hold to provide quick access to a
particular passage.
8. REPEAT
Touch to repeat the disc or a program.
9. PAUSE
Touch to interrupt and hold play. Touch again to
continue the playback.
10. STOP
Touch to stop play during playback and to delete a
program.
11. TIME
Displays, in the message center, the eLAPsed
playing time or the time REMaining on the disc.
12. BACK TRACK
Touch, during play to return to the previous track.
13. NEXT TRACK
Touch, during play to move to the next track.
14. PHONES
Jack provided for private headphone listening.
15. LEVEL
Adjust the loudness in the headphones.
16. SCAN
Touch to close the disc drawer and/or to
automatically play the beginning 10 seconds of each
track on the disc.
17.
Touch at beginning and end when a section of a
Compact Disc is to be played repetitively.
18. REVIEW
Once a disc has been programmed, the program
can be displayed in the message center when the
REVIEW button is touched. If there isn't a program
entered, ERROR will illuminate.
19. SELECT
Each time the SELECT button is touched when
programming, the programming mode is advanced
through TRACK, to INDEX, to MINutes and to SEConds.
20. 0 thru 9
Buttons permit direct access programming. The
MCD 7007 can be programmed by TRACK, INDEX,
MINutes and SEConds or combinations of these.
21. STORE
Each detail of the programming will be inserted in
the memory by a touch on the STORE button.
FRONT PANEL 7
22. CLEAR
When touched will erase from the memory an
entry error or break out of an
continuous
loop.
23. REMOTE SENSOR
Receives the coded infrared signals from the
remote control.
24. DAMAGED DISC/MUTE
Lights when a playing disc is damaged or has
errors which are not correctable by electronic
interpolation. It also lights when the player is muted
by more seriously damaged discs, or when PAUSE,
STOP,
REV, FF
, BACK TRACK and NEXT
TRACK are used and when a disc is not playing.
25. REMOTE
This LED lights when the IR Remote Control is
used to operate the functions of the MCD 7007.
26. PANLOC
Turn to secure or release the player from the
cabinet.
8 FRONT PANEL
POWER-1.
Touch the POWER button to turn the player on.
The TRACK, INDEX, TIME, eLAPsed time and
VOLUME indicators will light up in the display area.
Touch POWER again and the player is turned off
and the indicators turn off.
LOAD-2.
Touch the LOAD button and the LED above this
button will illuminate, then after 1 second the
drawer will open. If the drawer is obstructed, it will
not continue to open. Should this happen remove
the obstruction, touch LOAD twice in succession to
bring the drawer fully out.
Hold the disc at the rim and place it, label side up,
in the disc drawer.
Close the drawer by touching PLAY, SCAN or
LOAD. Use PLAY if you want to play the complete
disc, SCAN if you first want to preview each track on
the disc or store tracks from it, and LOAD if you
want to program the disc. In each case, the drawer
slides in when the button is touched. If the drawer is
obstructed as it closes, the drawer will come out
again after about 3 seconds.
Using LOAD to close the drawer, permits the laser
pen to read the contents list and then display the
number of tracks and the total time encoded on the
disc. After reading the contents list, the MCD 7007
switches to stand-by mode ready for further
instructions.
The DAMAGED DISC/MUTE indicator remains
lighted until play begins. If the light remains on and
the disc refuses to play, make sure that the disc is
properly in the drawer and label side is up.
To close the drawer when it is empty touch the
LOAD button. The DAMAGED DISC/MUTE sign will
light. To prevent the entry of dust, do not leave the
drawer open.
Opening the drawer during play, will stop the disc.
PLAY-3.
To play the complete disc, close the drawer by
touching PLAY. After the contents list on the disc has
been read, the number of tracks on the disc will be
displayed on the track indicator. When play begins,
elapse playing time is displayed and the eLAPsed
indicator lights.
To go back to the beginning of a track while it is
playing, touch PLAY. The track is then repeated from
the beginning. When all the tracks have been played,
the track indicator, the total elapsed time and the
DAMAGED DISC/MUTE indicator will light. All
indicators except the volume display turn off.
VOLUME-4.
Volume may be adjusted by using the VOLUME
or VOLUME
on the front panel or on the remote
control. Adjustment of the volume is performed by
an electronically switched precision ladder
attenuator.
The Mclntosh electronic precision ladder
attenuator adjusts volume by C2 MOS transistor
switches that select the right combinations of highly
accurate deposits of resistive material for the volume
programmed.
The entire range of volume adjustment is 66 dB in
2 dB increments. Left and right tracking is controlled
to a fraction of a dB. Because there aren't any
moving parts, the volume adjustment cannot
generate noise or misalignment.
The VOLUME indicator in the message center is a
10 segment display. As volume is increased, more
segments are lighted to indicate relative volume.
SCAN-16.
The first 10 seconds of each track will be played
when the SCAN button is used to initiate play. As
each track is previewed the SCAN indicator, the
TRACK number and the eLAPsed TIME is displayed.
When the tracks have been previewed, the SCAN
indicator turns off, the laser pick-up returns to the
beginning of the first track. The total number of
tracks and the total time will be displayed in the
message center.
If, before you have previewed all tracks, you
decide to listen to all of the remaining tracks on the
disc, touch PLAY. The SCAN indicator will go off and
the remaining tracks will play in their entirety,
beginning with the track indicated in the message
center.
Any track can be entered in the memory for later
playing while using SCAN. To enter a track, touch
STORE while the track is playing and the TRACK will
be inserted in the memory. The player will preview
the next track and the indicator for that track will be
displayed.
When all tracks have been previewed, SCAN will
go off. To listen to the stored program, touch PLAY
And the disc will play the stored tracks in the
sequence selected.
OPERATION 9
MESSAGE CENTER DISPLAY-5.
Disc symbol flashes
during loading and
starting
Track or index symbols flash during programming.
Minutes or Seconds
symbols flash during
programming.
Play is in continuous
loop between selected
points A (start) and B
(end). Flashes during
programming.
Indicates REMaining
Total Time or eLAPsed
Track Time.
The display in the message center presents many
different types of information. As soon as the
POWER button is touched to turn the player on, the
message center shows a series of zeros in TRACK,
INDEX and TIME. The eLAPsed time indicator and
the VOLUME bar are also lighted.
The LOAD button opens and closes the disc
drawer. Once opened, place a disc in the drawer
label side up. When the LOAD button is used to
close the drawer, the laser pen will read the contents
of the disc from the encoded data. The message
center information will change to show the number
of tracks and the total recorded time on the disc.
The player then goes to 'stand-by' mode until further
instructed.
The drawer can be closed and play begun by
touching SCAN or PLAY. The message center display
will change to show the track being played and the
eLAPsed time.
TRACK
Displays the total number of tracks on the disc
when activated by the LOAD button. When in other
modes of operation, the track being played is
displayed. When programming, the word TRACK
under the digits will flash to indicate that TRACK
data can be entered in the memory.
INDEX
When a disc has been encoded with index data the
INDEX area will display the index being played.
When programming, the word INDEX under the
digits will flash to indicate that INDEX data can be
entered in the memory.
10 OPERATION
SCAN function
is active.
PAUSE function
is active.
REPEAT function
is active.
Indicates Relative
volume level
Indicates program
has been stored.
Encoded program is
being displayed.
MINutes/SEConds
Displays the total disc time when activated by the
LOAD button. When in other modes of operation,
the eLAPsed time on the track being played will
show. When programming, the MINutes or SEConds
will flash to indicate that data can be entered in the
memory.
eLAPsed/REMainder
This button changes the display in MINutes and
SEConds from elapsed (LAP) time on this track to the
remaining (REM) time on the disc. A second touch
returns the display to eLAPsed time.
DISC (flashing red)
When flashing indicates the laser pen has moved
to the contents area of the disc and is reading the
data into the digital memory for display. Should the
drawer not contain a disc the DISC indicator will
flash and the ERROR indicator light for a few
seconds then both will turn off.
ERROR
Should an inaccurate instruction be given the
ERROR indicator will light briefly. New instructions
must be instituted to put the player in action.
When illuminated, the player has been
programmed to play and repeat a portion of the disc
programmed by the
button. A flashing
indicator reminds you that the
programming
is not completed. When completed both the
and the PROGRAM indicators are lighted.
PROGRAM
Illuminates to show that the sequence of playback
is controlled by the preselected program or the
continuous loop.
SCAN
If the SCAN button was used to activate the player
the SCAN indicator will light and remain lighted until
all tracks have been scanned.
REVIEW
When the REVIEW button is activated the indicator
is lighted and the program is displayed in sequence
on the appropriate TRACK, INDEX, and MIN/SEC
indicators.
REPEAT
The REPEAT indicator will light to show that the
disc or program will be replayed upon completion.
PAUSE
When the PAUSE button is pressed, the laser pen
stops instantly while the disc continues to rotate.
The player remains ready to play at the precise point
that the PAUSE was activated. Very useful in tape
recording, answering the phone, etc.
VOLUME
A 10 segment horizontal bar displays the relative
loudness of the volume. As volume is increased
more segments are illuminated.
REV - FF
-6-7
During play, you can quickly locate a particular
music passage in a track by holding in
REV or
FF
. While you hold
REV, the laser pick-up
moves toward the beginning of the track or disc;
while you hold FF
, the laser pick-up moves
toward the end of the track or disc. By using
REV and FF
alternately, you can find any
part of any passage. After release, play restarts at
once.
During
REV and FF
, the laser pick-up
moves at three successive speeds: for the first few
seconds relatively slowly, for the next few seconds
faster, and after approximately 10 seconds, at
maximum speed. During the two slower speeds, the
program material can be heard at reduced volume.
At high speed the sound is muted. If you continue
to hold down the FF
or
REV the numbers
of the time display run on at a corresponding rate.
When nearing the desired passage, release momentarily to go back to the lowest speed.
If, by holding in
REV, the laser pick-up moves
to the run-in of the first track, the ERROR indication
lights and the laser pick-up stops at the beginning of
the track. The disc continues to spin, however, so
that play will resume upon release of the button.
If, by holding in FF
, the laser pick-up moves
to the run-out of the last track, the ERROR indication
lights, and the laser pick-up moves back over the
disc about 20 seconds and remains at that point until
FF
is released.
REPEAT-8.
To hear the whole disc or a program again, touch
REPEAT before the disc ends. The REPEAT sign will
light, and the disc will repeat continuously until you
touch REPEAT again. The REPEAT sign will go off and
the disc will play to the end and stop. Touch LOAD
or STOP, the REPEAT sign will go off and play will
stop at once.
PAUSE-9,
The laser pick-up can be stopped exactly at the
start of a track or a passage by touching PAUSE and
the PAUSE sign will light. To start play, touch PAUSE
again. The PAUSE sign will go off.
To hold play at the beginning of a track or a
passage, or to interrupt the program, touch PAUSE.
To begin play again, touch PAUSE. It will resume at
the exact point it was interrupted. The PAUSE sign
will go off.
STOP-10.
To stop play before the end of the disc, press
STOP.
TIME-11.
Anytime the disc is playing the message center will
display the eLAPsed time of the track playing. Touch
the TIME button to display the remaining (REM) time
on the disc. Touch again to return to eLAPsed time.
BACK TRACK-12.
To play an earlier track on the disc, touch BACK
TRACK. Each touch moves the laser pen and the
display on the track indicator back one track. Play is
temporarily interrupted while the laser pick-up
moves.
If you touch BACK TRACK during play of the first
track, the ERROR sign will light, as a reminder that
there is no previous track. Play of the first track
continues.
NEXT TRACK-13
To play a later track on the disc, touch NEXT
TRACK. Each touch moves the laser pen and the
display on the track indicator forward one track. Play
is temporarily interrupted while the laser pick-up
moves.
OPERATION 11
If you touch NEXT TRACK during play of the last
track, the ERROR sign will light as a reminder that
there is no next track. Play of the last track
continues.
LISTENING WITH HEADPHONES-14.
With headphones connected to the PHONES jack,
you can listen to discs without having to use an
amplifier. Adjust the sound level with the LEVEL
control.
The headphones must have a 0.25 inch (6.3 mm)
jack plug and an impedance between 8 and 1000
ohms.
-17.
Should you wish to hear a portion of the disc
repeatedly, touch the
button at the start of
the section you wish repeated. Allow the disc to play
until the end of the repeat section and touch
again. The program between the two points will be
repeated until CLEAR, STOP or LOAD are touched.
0 thru 9-20.
These buttons provide a total sequence of direct
access input of 20 tracks selected from tracks 1
through 99 for storage in the memory of the
MCD 7007; any sequence of TRACKS, of INDEX
numbers or of time.
To start playing a disc other than at the beginning,
touch the track number to be played on the 0-9 key
pad followed by the PLAY button. The selected track
number will be displayed in the message center and
the track indicator will flash. The disc will begin at
the track selected and play the remaining tracks on
the disc. If you have selected a track which does not
exist ERROR will appear briefly on the display.
STORE-21
From the program list provided with the compact
disc, decide on the tracks you want to include in the
program. For each track, touch the appropriate
number buttons and then the STORE button to insert
the disc track in the program memory. Tracks may
be stored in the sequence on the disc when in the
SCAN mode. While listening to the preview of a
track in SCAN, touch the STORE button to store that
track for later playback. The PROGRAM indicator will
light and the TRACK display will immediately move
to the next track.
The total memory will store up to 20 tracks in any
order, these tracks may be selected from any
number of tracks up to 99. They do not need to be
sequential.
12 OPERATION
Your program can contain any combination of:
• TRACK
• TRACK and INDEX
• TRACK and TIME
• TRACK, INDEX and TIME
However, you are limited to 20 units of memory.
Each TRACK number takes up 1 unit each, TRACK
and INDEX number takes up 2 units and each
TRACK, INDEX and TIME takes up 5 units. If there is
an attempt to enter more than 20 units, ERROR
appears on the display.
To enter a program, insert a disc and use LOAD to
close the disc tray.
If you make a mistake or wish to change your
program at any time, touch the CLEAR button before
touching the STORE button to erase the memory,
then begin program entry again.
Follow this example of a program from a disc
containing 32 tracks. The program sequency desired
from the disc is: 3, 10, 31, 18, 2, etc. using the
numeric key pad, touch 3 then STORE, the TRACK
indicator will show 1 to indicate that block has been
used. Touch 1 then 0 then STORE, touch 3 then 1
then STORE, touch 1 then 8 then STORE, touch 2
then STORE, etc. until your entire program has been
entered into the memory. If ERROR appears on the
display make sure the selected track number exists
or whether all 20 memory blocks are full.
Touch PLAY to listen to the entire program as
entered. The program can be played again, before
touching STOP or LOAD by touching the PLAY
button. The program remains in the memory until
the STOP or LOAD button is touched.
CLEAR-22
Touch CLEAR to remove an incorrect selection
from the memory.
To erase any single TRACK entry from the program,
touch the REVIEW button to exhibit in the message
center the program entered. Each entry will be
briefly displayed. As soon as the entry to be deleted
is seen, touch the CLEAR button which will erase
that entry from the memory.
REVIEW-18
The program entered can be reviewed by touching
the REVIEW button. The TRACK numbers in the message center will be illuminated in the sequence
entered in the memory.
SELECT-19
Touch the SELECT button to change the input to
memory from TRACK to INDEX or to TIME.
Touch SELECT once and the TRACK indicator will
flash on and off which indicates the numeric key pad
TRACK selection is connected to the memory input.
Touch SELECT twice which causes the INDEX
indicator to flash and which connects the numeric
key pad INDEX selection to the memory input.
Touch SELECT three times and the MINutes flash
for programming by any given minute in a track.
When SELECT is touched four times programming
can be started on the second. Suppose you wish to
hear track 7 at 4 minutes and 18 seconds. Touch in
sequence SELECT, the TRACK indicator will flash,
touch 7, then touch SELECT two times, the MINutes
indicator will flash, touch 4, then touch SELECT once,
the SEConds indicator will flash, touch 1, then 8, and
PLAY. The disc will start track 7 at 4 minutes and 18
seconds and play to completion.
Programming in progressive numeric sequence by
TRACK is easily done when the SCAN button is used
to start the play sequence. As a TRACK number is
displayed in the message center a touch on the
STORE button will insert, the displayed track into the
memory. The display will immediately switch to the
next track. Up to 20 TRACKS can be stored.
To program TRACKs in random sequence use the
0-9 keypad. Twenty tracks in any order from 1 to 99
can be inserted in the memory. When the 20 tracks
have been programmed filling all units of memory,
further entries will not be stored and the red ERROR
indicator will light for a few seconds. Twenty units of
memory provide programming by direct TRACK
input, TRACK and INDEX TRACK AND TIME, TRACK,
INDEX and TIME and any combinations of the four,
the STORE and the SELECT buttons. Each TRACK
entered used one unit of memory; each TRACK and
INDEX, uses two units of memory and each TRACK
and TIME entry, five units of memory. Up to 20
TRACKS only may be programmed, up to 10 TRACKS
with INDEX or 4 TRACK and TIME entries.
To arrange TRACK in the sequence of your choice,
use the 0-9 keypad and STORE button. When the
disc drawer has been closed by using the LOAD
button, the message center will display the number of
tracks and the total recorded time on the disc. On
the 0-9 keypad touch the track number and then
touch STORE to program the sequence you desire.
The memory will be updated and the display will
show the number of entries made and the total time
of these entries and the PROGRAM will light.
To program by TRACK and INDEX, the 0-9 keypad,
the SELECT and STORE buttons are used. First, close
the disc drawer using the LOAD button. Enter the
desired track by using the keypad. Upon entering
the track, the word TRACK, under the digits, will
flash. Move the flashing symbol to the INDEX space
by touching SELECT. When the word INDEX begins
to flash enter the desired INDEX number by using
the keypad, followed by touching the STORE button.
The PROGRAM block will light in the message center
and TRACK will switch to show the number of
entries made to the memory. The TIME indicator will
show only zeros.
DISC MAINTENANCE
For the best results, apply the same care in storing
and handling the Compact Disc as with conventional
records, Even though the music track in the disc is
covered by a protective layer, treat the disc carefully.
Always pick up discs by the edge, and put them
back in their protective cases immediately after use.
Wipe fingerprints, dust or dirt off with a soft,
lint-free cloth. Wipe in a straight line from center to
edge. You can breathe on the disc first if necessary.
Cleaning agents for conventional records, detergent
or abrasive cleaners must never be used.
Never write on the label side of the disc. Writing
will emboss the disc and destroy the digital data. If
you follow these suggestions, the Compact disc will
provide a lifetime of pure listening enjoyment.
PLAYER MAINTENANCE
The player mechanism has self-lubricating bearings,
and must mot be oiled or greased. The disc drawer
should be kept free of dust.
OPERATION 13
The greatest care has been taken in the
manufacture of your Mclntosh Compact Disc player.
In case of operational difficulties and to save you
unnecessary service calls, here is a list of their
possible causes and suggested solutions. Should you
need further guidance, contact your dealer. He will
be able to advise you. Under no circumstances
should you open up the player. To do so can void
the service contract.
1. After touching POWER, the track indicator does not
light.
• Touch the POWER button again. POWER was not
pressed in far enough. They require only .007"
movement to engage.
• The player is not properly plugged into the 120V
AC supply.
• There is no 120V AC supply. Plug in another
electrical appliance and see if it functions in the
same outlet.
2. After touching LOAD, the disc drawer does not slide
out.
• The player is not switched on and the message
center data will not light.
• The microprocessor has not received the
command correctly. Touch STOP and then touch
LOAD again to see if the drawer opens.
• The drawer drive is not functioning. You cannot
correct this yourself. If a disc is in position,
remove it by pulling the drawer open carefully,
then push the drawer in to close it again.
3. After touching LOAD, PLAY or SCAN, the disc
drawer does not slide in.
• The 120 VAC supply has been disconnected and
the track indicator will not light.
• The microprocessor has not received the correct
command. Touch STOP and then touch LOAD,
PLAY or SCAN again to see if the drawer closes.
• The drawer drive is not functioning. You cannot
correct this yourself. If a disc is in position,
remove it, than push the drawer in carefully to
close it.
4. After closing the drawer the Message Center Data
shows the 'OoOoo' and the DISC and ERROR light
and nothing further happens.
clean disc.
• The disc is defective. See if another disc clears the
problem.
• There is an unwanted object in the disc drawer,
such as a piece of paper or a remnant of the
packaging.
• The player is not horizontal.
5. The disc is being played as shown by the time elapsed indicator, but there isn't any sound.
• The microprocessor has not received the correct
command. Check if touching STOP and then restarting clears the problem.
• The preamplifier is not switched on.
• The preamplifier source selector is not turned to
the input to which the player is connected.
• The preamplifier, amplifier or the loudspeakers
connected to it are not working. Check with
another sound source.
• The connection between the player and the
preamplifier is broken.
• The input to which the player is connected is
defective. Check by connecting the player to
another input.
• Volume control is turned down.
• Player in PAUSE mode
6. The sound is poor or distorted or you can hear only
one channel.
• The transport screws have not been removed.
• The disc is dirty or badly scratched. Clean the disc
or use another clean, scratch-free disc.
• There is an unwanted object in the disc drawer,
such as a piece of paper or a remnant of
packaging.
• The preamplifier or the loudspeakers connected to
it are not working properly. Check with another
sound source.
• The player is connected to the PHONO input not
the CD, AUX, or other high level input of the
preamplifier.
• One of the plugs of the connecting cable is either
not connected or not properly connected.
• The player is not horizontal.
• The transport screws have not been removed.
• The disc is not inserted label up or there isn't a
disc in the drawer and you have missed the
ERROR DISC sign.
• The disc is dirty. Clean the disc, or use another,
14 HELPFUL HINTS
7. Programming is not working properly.
• The disc is dirty or badly scratched. Clean the disc
or try programming with a scratch-fee disc.
• The microprocessor has not processed the
commands properly. Clear the program by
touching STOP and store it again; re-start play.
• All 20 memory places are already programmed and
you have missed the ERROR sign that shows this.
Check by touching the REVIEW button to ensure
the program memory.
8. The following problems can be caused by the same
circumstances:
Playback does not begin with the first track on
the disc or of the program, but with another track.
Playback stops before the end of the disc or the
program.
• The microprocessor has not processed the
command correctly. Touch STOP and re-start to
clear the memory.
• The disc is dirty or badly scratched. Clean the disc
or use another, clean, scratch-free disc.
• The disc is defective. Try another disc.
• There is an unwanted object in the disc drawer
such as a piece of paper or a remnant of
packaging.
• The player is not horizontal.
9. The player does not react to commands from the
remote control.
• The batteries are low and the distance to the
player is too great. Aim in the direction of the
player.
• Direct sunlight or high intensity room light
shining on the remote sensor. Shade the sensor
from sunlight.
• The batteries are dead.
HELPFUL HINTS 15
TYPICAL AUDIO PERFORMANCE
NUMBER OF CHANNELS
2, left and right
FREQUENCY RESPONSE
20-20,000 Hz, +0, -0.3 dB
DYNAMIC RANGE
96 dB (114 dB EIA)
SIGNAL-TO-NOISE RATIO
107 dB (A)
CHANNEL SEPARATION
102 dB (at 1000 Hz)
TOTAL HARMONIC DISTORTION
0.0012% (at 1000 Hz)
WOW AND FLUTTER
Quartz crystal precision
SAMPLING RATE
176.4 kHz
D/A CONVERSION
Quadruple oversampling (176.4 kHz) with digital
filter and two 16 bit D/A converters
ERROR CORRECTION SYSTEM
Cross Interleave Reed Solomon Code (CIRC)
AUDIO OUTPUT LEVEL
2.5V
IMPEDANCE HEADPHONES
8-1000 ohms
DIGITAL OUTPUT
Output for digital signal processing
OPTICAL READOUT SYSTEM
LASER
Semi-conductor AIGaAs
WAVE LENGTH
780 nm
SIGNAL FORMAT
SAMPLING FREQUENCY
44.1 kHz
QUANTIZATION
16 bit linear/channel
DISC
DIAMETER
120 mm
THICKNESS
1.2 mm
ROTATION (seen from reading side)
Counter-clockwise
SCANNING VELOCITY
1.2-1.4 m/s
ROTATION SPEED
500-200 rpm
PLAYING TIME (maximum)
74 minutes (stereo)
TRACK PITCH
1.6 um
MATERIAL
Plastic
BUTTONS
Power
Scan*
A
B*
Review
Select
Store*
Clear
0 thru 9
Volume*
Volume
*
Load
Play*
Rev*
FF
Repeat*
Pause*
Stop*
Time
Back Track*
Next Track*
*also provided on HR7007 Remote Control Transmitter.
CONTROLS
Level for Headphones
Headphone Jack
SPECIAL FEATURE
Damaged Disc/Mute Error Correction Indicator
POWER SUPPLY
120V, 50/60 Hz, 30 watts
MECHANICAL
INFORMATION
SIZE
Front panel measures 16 1/8 inches wide (41 cm) by
5 7/16 inches high (13.8 cm) by 13 inches deep
(33 cm), including connectors. Knob clearance
required is 3/4 inches (1.9 cm) in front of mounting
panel.
FINISH
Front panel is glass with gold/teal nomenclature
illumination and anodized gold and black aluminum.
Chassis is black.
MOUNTING
Exclusive Mclntosh developed professional PANLOC.
WEIGHT
18 pounds (8.2 kg) net, 30 pounds (13.6 kg) in
shipping carton.
16 PERFORMANCE DATA
THE LOCATION OF
CONTROLS AND BUTTONS
The numbers and letters correspond to the paragraphs on pages 6 thru 13