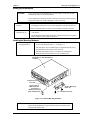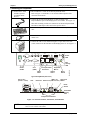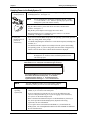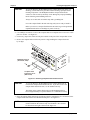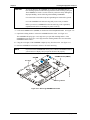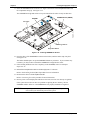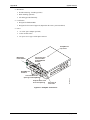
1
ReadySystem™ 1U
Users Guide
P/N 5001791A Revision B
Notice Page
NOTICE
No part of this document may be reproduced, transmitted, transcribed, stored in a retrieval system, or
translated into any language or computer language, in any form or by any means, electronic, mechanical,
magnetic, optical, chemical, manual, or otherwise, without the prior written permission of Ampro
Computers, Incorporated.
DISCLAIMER
Ampro Computers, Incorporated makes no representations or warranties with respect to the contents of
this manual or of the associated Ampro products, and specifically disclaims any implied warranties of
merchantability or fitness for any particular purpose. Ampro shall under no circumstances be liable for
incidental or consequential damages or related expenses resulting from the use of this product, even if it
has been notified of the possibility of such damages. Ampro reserves the right to revise this publication
from time to time without obligation to notify any person of such revisions. If errors are found, please
contact Ampro at the address listed below on the Notice page of this document.
TRADEMARKS
Ampro and the Ampro logo are registered trademarks, and CoreModule, EnCore, Little Board,
LittleBoard, MightyBoard, MiniModule, ReadyBoard, ReadyBox, ReadyPanel and ReadySystem are
trademarks of Ampro Computers, Inc. All other marks are the property of their respective companies.
REVISION HISTORY
Revision
Reason for Change
Date
A, A
Initial Release
Jan/06
A, B
Update/Changes
Aug/06
Ampro Computers, Incorporated
5215 Hellyer Avenue
San Jose, CA 95138-1007
Tel. 408 360-0200
Fax 408 360-0222
www.ampro.com
© Copyright 2006, Ampro Computers, Incorporated
Audience Assumptions
This guide is for the person who designs or uses computer related equipment, including but not limited
to hardware and software design and implementation of the same. Ampro Computers, Inc. assumes you
are qualified in designing and implementing your hardware designs and its related software into your
prototype computer equipment.
ii
Users Guide
ReadySystem 1U
Contents
Chapter 1
Setting Up the ReadySystem 1U .................................................................................. 1
About the ReadySystem 1U............................................................................................................... 1
Using this Guide ................................................................................................................................. 1
Requirements................................................................................................................................. 1
What’s in the Box ........................................................................................................................... 2
Setup Steps........................................................................................................................................ 2
Preparations................................................................................................................................... 2
Setting Up the Workspace ............................................................................................................. 3
Installing the Mounting Hardware .................................................................................................. 3
Connecting the Peripherals............................................................................................................ 3
Applying Power to the ReadySystem 1U....................................................................................... 6
Chapter 2
Installing ReadySystem 1U Options ............................................................................ 7
Compact Flash Card Installation ........................................................................................................ 7
Tools Required............................................................................................................................... 7
Installing the Compact Flash Card................................................................................................. 7
Removing the Compact Flash Card............................................................................................... 9
ReadySystem 1U Disassembly/Re-Assembly ................................................................................. 10
Tools Required............................................................................................................................. 10
Removing the ReadyBoard from Enclosure ................................................................................ 10
Installing the ReadyBoard into Enclosure.................................................................................... 12
Connecting the Power Cables ..................................................................................................... 15
Connecting the Remaining Cables .............................................................................................. 17
Memory Installation .......................................................................................................................... 19
Tools Required............................................................................................................................. 19
Installation Guidelines.................................................................................................................. 19
Removing the SODIMM ............................................................................................................... 19
Installing the SODIMM ................................................................................................................. 21
Appendix A Technical Support ....................................................................................................... 23
Appendix B System Overview ......................................................................................................... 25
EPIC Architecture............................................................................................................................. 25
Product Description .......................................................................................................................... 25
ReadyBox 1U Features................................................................................................................ 25
I/O Panel Description ................................................................................................................... 27
Power/IDE LED Definitions .......................................................................................................... 29
Specifications ................................................................................................................................... 30
Environmental Specifications....................................................................................................... 30
Power Specifications.................................................................................................................... 30
Physical Specifications ................................................................................................................ 30
Mechanical Specifications............................................................................................................ 31
Mounting and Cover Location ...................................................................................................... 34
List of Figures
Figure 1-1. ReadySystem 1U Accessories ....................................................................................... 2
Figure 1-2. Installing Mounting Hardware ......................................................................................... 3
Figure 1-3. I/O Panel Controls, Connectors, and Indicators ............................................................. 4
ReadySystem 1U
Users Guide
iii
Contents
Figure 2-1. Removing Compact Flash Protective Cover ...................................................................8
Figure 2-2. Installing Compact Flash Card ........................................................................................9
Figure 2-3. Removing ReadySystem Top Cover.............................................................................11
Figure 2-4. Removing USB Connectors ..........................................................................................11
Figure 2-5. Removing ReadyBoard from Enclosure........................................................................12
Figure 2-6. Internal Cables Shown Separated ................................................................................13
Figure 2-7. ReadyBoard Positioned Under LAN Ports ....................................................................14
Figure 2-8. Installing ReadyBoard into Enclosure ...........................................................................14
Figure 2-9. Connector Locations (Typical ReadyBoard) .................................................................15
Figure 2-10. Connector and Jumper Pin-1 Locations (Typical ReadyBoard)..................................16
Figure 2-11. Installing Power Cables...............................................................................................17
Figure 2-12. Installing IDE, Audio, and USB Cables .......................................................................18
Figure 2-13. Removing SODIMM from Socket ................................................................................20
Figure 2-14. Installing SODIMM into Socket ...................................................................................22
Figure B-1. ReadyBox 1U Enclosure...............................................................................................26
Figure B-2. Optional Rack-Mount Hardware (Installed) ..................................................................27
Figure B-3. I/O Panel Controls and Connectors (Front view)..........................................................28
Figure B-4. I/O Panel Access Openings (Front view)......................................................................29
Figure B-5. Width and Depth Dimensions (Top view) .....................................................................31
Figure B-6. Width and Height Dimensions (Front view) ..................................................................31
Figure B-7. Benchtop or Surface Mounting Dimensions (Top View)...............................................32
Figure B-8. Benchtop or Surface Mounting Dimensions (Front View).............................................32
Figure B-9. Optional Rack-Mounting Dimensions (Top View).........................................................33
Figure B-10. Optional Rack-Mounting Dimensions (Front View).....................................................33
Figure B-11. Rack Mounting Hardware ...........................................................................................34
Figure B-12. Removing Top Cover ..................................................................................................34
List of Tables
Table 1-1. I/O Panel Connectors, Controls, and Indicators...............................................................5
Table A-1. Technical Support Contact Information..........................................................................23
Table B-1. Installed Connectors or Controls....................................................................................27
Table B-2. Connectors or Control/Indicator I/O Panel Openings ....................................................28
Table B-3. Power/IDE Activity LED Indicators.................................................................................29
Table B-4. Environmental Requirements.........................................................................................30
Table B-5. Power Requirement .......................................................................................................30
Table B-6. Weight and Footprint Dimensions..................................................................................30
iv
Users Guide
ReadySystem 1U
Chapter 1 Setting Up the ReadySystem 1U
About the ReadySystem 1U
The ReadySystem™ products are intended for users of turn-key embedded systems, who prefer long
lifecycle, configuration controlled computers over desktop grade systems with frequently changing
motherboards. ReadySystem models feature the ReadyBoard single board computer (SBC), from the
400 MHz Intel Celeron® CPU to the Intel 1.4 GHz Pentium® M 738 CPU. The desired operating
system (OS) is pre-loaded onto the internal 40 GB (or greater) 2 ½" hard disk drive (HDD). Just load
your application software and you are ready to use your system applications.
Using this Guide
This guide provides the most efficient way to set up your ReadySystem 1U with your desired Operating
System (OS). The instructions provided in this guide include:
• Removing the ReadySystem™ 1U from the shipping container and inventorying the accessories
• Connecting peripherals to the ReadySystem 1U
• Powering up the ReadySystem 1U
Information not provided in this Users Guide includes:
• ReadyBoard model specifications
• Environmental requirements
• ReadyBoard model connector/pin numbers and definitions
• Operating System programming, or operating instructions
NOTE
Refer to the specific Ampro OS manual or the OS manufacturer's
manual for instructions when using the OS software.
Requirements
The following peripherals and devices are needed to make full use of the ReadySystem 1U.
• Peripherals (Customer provided):
♦
PS/2 Keyboard and PS/2 Mouse
♦
CRT (VGA) Monitor
• Power Cord and AC-DC Adapter (Ampro or Customer provided):
♦
AC to DC (+12 VDC or +24 VDC) Brick Power Adapter (with screw-type mating connector)
CAUTION
The ReadySystem 1U only accepts 12VDC or 24VDC power. Voltages other than 12
or 24 will damage the system.
• Optional Devices/Connections (Customer provided):
♦
Ethernet (LAN) connection
♦
USB Devices, including a keyboard and mouse
ReadySystem 1U
Users Guide
1
Chapter 1
Setting Up the ReadySystem 1U
What’s in the Box
The Contents List identifies items in the shipping container of the ReadySystem 1U QuickStart Kit.
Production quantities of the ReadySystem 1U, except for the first of multiple boxes, may not contain
all of the optional items listed for the QuickStart Kit, but all boxes will have the standard items such
as the mounting hardware and the PS/2 Y-cable. The optional items, such as the power adapter,
power cords, and rack mount kit may be shipped separately. See Figure 1-1.
Mounting
Hardware
Power
Cords (2)
RdySy1U_01a
AC-DC
Convertor
ReadySystem 1U
PS/2 Y-Cable
Rack Mounting
Hardware
CD-ROM
Figure 1-1. ReadySystem 1U Accessories
Setup Steps
It is important to follow the setup steps in this section in the exact order listed here, but skip any steps
that do not apply to your situation. References are provided to chapters within this guide or other Ampro
manuals for more information about installation and use of this ReadySystem 1U.
Preparations
1) Open shipping box
• Locate the ReadySystem 1U Contents List. See Figure 1-1.
• Unpack the contents of the shipping box.
2) Verify Contents
• Verify the contents of the shipping box against the Contents List
included with your ReadySystem 1U shipping box.
• If anything is missing or damaged, call your sales representative. Refer
to Appendix A for contact information.
3) Support Documentation
(ReadyBoard model
Documentation and
Support Software
(Doc & SW) CD-ROM
located in the first
QuickStart Kit)
ReadySystem 1U Users Guide
This document describes how to setup and power up the ReadySystem 1U and
is provided on the ReadyBoard model Doc & SW CD-ROM as a PDF file.
ReadyBoard Model Reference Manual
This document describes the ReadyBoard model used in the ReadySystem 1U
enclosure and provides detailed reference information for your ReadyBoard
and is located on the ReadyBoard model Doc & SW CD-ROM as a PDF file
ReadyBoard Model QuickStart Guide
This document describes how to setup, install, and power up the ReadyBoard
model installed inside the ReadySystem 1U enclosure and is located on the
ReadyBoard model Doc & SW CD-ROM as a PDF file.
Operating System Manual(s)
These documents describe how to use the desired operating system (OS) with
the ReadySystem 1U and provide more detailed programming and operating
information. These documents may or may not be provided with
ReadySystem 1U depending on the specific licensing requirements.
2
Users Guide
ReadySystem 1U
Chapter 1
Setting Up the ReadySystem 1U
Setting Up the Workspace
CAUTION
To prevent damage to the ReadySystem 1U, ensure there is sufficient clearance
around the air vents for unrestricted airflow.
The air temperature inside the enclosure could rise above the specified operating
temperature limits if the airflow through the vents is restricted.
4) Select workbench
location
• The workbench location should be a flat clean surface for setup and operation
(including the connection of any external peripherals and optional devices).
• Ensure sufficient airflow clearance exists around the complete enclosure.
5) Unpack
ReadySystem 1U
• Remove the ReadySystem 1U from its shipping container and place it on a flat
work surface.
The ReadyBoard model and the hard drive with the desired OS pre-installed
form a complete system ready for operation.
Installing the Mounting Hardware
6) Connect the appropriate
mounting hardware
• Connect the mounting hardware for surface mounting to the bottom
or rear of the ReadySystem 1U. See Figure 1-2.
The four plastic feet are mounted prior to shipment and will protect
the paint finish on the bottom of the enclosure.
Optional rack mount brackets are available for mounting the
ReadySystem into the standard 1U rack mounting space.
RdySy1U_02ab
ReadySystem 1U
(ReadyBox 1U with ReadyBoard
installed)
Compact Flash
Card Slot
Plastic Feet (4)
(Mounted prior
to shipment)
M3x0.5 Screws (4)
(6mm, No Washers)
Surface Mounting
Plates (2)
1/4 - 20 UNC Screws (4)
Figure 1-2. Installing Mounting Hardware
NOTE
ReadySystem 1U
All M3 screws use 0.5 mm pitch expressed as M3x0.5 in this manual.
Metric thread designations use pitch in place of the more familiar USA
method of threads per inch.
Users Guide
3
Chapter 1
Setting Up the ReadySystem 1U
Connecting the Peripherals
• This includes the Y-cable for the PS/2 keyboard & mouse.
7) Connect the Y-cable
and the respective
peripheral cables/
devices
Refer to Figure 1-3 and Table 1-1 for location and description of the
connectors and controls.
• Connect the PS/2 Keyboard & Mouse Y-cable assembly to the
Keyboard/Mouse port on the ReadySystem 1U I/O Panel. See Figure 1-3.
This cable assembly provides two connectors for the PS/2 Keyboard and
PS/2 Mouse shared port with icons for the specific device.
• Connect the keyboard to the free Y-cable connector with keyboard icon
on it.
• Connect the PS/2 mouse to the Y-cable connector with the respective
mouse icon.
• Connect the CRT (VGA) monitor through its 15-pin cable to the CRT
(VGA) connector on the I/O Panel of the ReadySystem 1U. See Figure 1-3.
COM 2
MIC
LINE IN LINE OUT
USB2
USB3
Power
LED
COM 1
CRT
RESET
POWER
HDD
IDE
Activity
LED
COMPACT FLASH
Compact Flash
Slot Cover
LAN1/
LAN2
Keyboard/
Mouse
USB 0/
USB 1
RdySy1U_03a
CRT
(VGA)
COM 1/
COM 2
Reset
Switch
Typical ReadyBoard (Side view)
Serial 1 & 2
(Serial 1 Lower)
CRT
USB 0 & 1
Keyboard/
Ethernet 1 Ethernet 2 (USB 0 Lower) Mouse
Reset
Switch
Power/IDE
Activity
LED
Compact Flash Socket
Figure 1-3. I/O Panel Controls, Connectors, and Indicators
NOTE
4
ReadyBoard models with only one Ethernet connector (LAN 1)
have a cover over the LAN 2 Port.
Users Guide
ReadySystem 1U
Chapter 1
Setting Up the ReadySystem 1U
Table 1-1. I/O Panel Connectors, Controls, and Indicators
Control/Connector Description
Power Switch
This momentary push button Power Switch controls DC power and has an
internal 2-wire cable, 5-pin connector attached to the ReadyBoard.
DC IN
This 2-pin coaxial connector is connected to the internal DC regulator and
accepts 12 VDC or 24 VDC +/- 5% from an AC-to-DC converter (Brick power
supply) or a customer provided DC power supply with compatible cord.
CRT (VGA)
Use this standard 15-pin (DB15) connector for the video connection. This
connector is provided on the ReadyBoard.
Keyboard/Mouse
Use this PS/2 connector for Keyboard & Mouse connections through the required
PS/2 Y-cable adapter provided in the ReadySystem 1U QuickStart Kit or shipping
container. The Y-cable has icons for the respective mouse or keyboard
connection. This PS/2 connector is on the ReadyBoard.
USB 0 & 1
Use these two USB 4-pin connectors for the first two USB devices connected to
the ReadySystem 1U. These USB type A connectors are on the ReadyBoard.
USB 2 & 3
Use these two USB 4-pin connectors for any additional USB devices. These USB
connectors and the respective internal cables are connected to the ReadyBoard
installed inside the enclosure.
LAN 1 (Ethernet 1)
This Ethernet port is typically used for the 10/100BaseT Ethernet connection.
This 8-pin (RJ45) connector is provided on the ReadyBoard.
LAN 2 (Ethernet 2)
This Ethernet port is typically used for the Gigabit Ethernet (10/100/1000BaseT)
connection, if provided on the ReadyBoard model (10-pin RJ45 connector). If
not, it uses the standard 8-pin RJ45 connector for 10/100BaseT Ethernet. This
connector is provided on the ReadyBoard. This port is covered for single Ethernet
ReadyBoard modules.
COM 1 & COM 2
Use these two 9-pin (DB9) serial ports for the standard RS232 connections to the
(Serial 1 & Serial 2) ReadySystem 1U. These two connectors are provided on the ReadyBoard.
AUDIO:
MIC, Line In,
Line Out
Use these three Audio In/Out connectors for the standard Stereo In/Out and MIC
in connections to the ReadySystem. These Audio connectors and the respective
internal cables are connected to the ReadyBoard installed in the enclosure.
Power-On LED
This green power-on indicator, located on the ReadyBoard, glows when power is
turned on and goes dark when power is turned off to the ReadySystem 1U.
HDD Activity LED
This yellow activity indicator, located on the ReadyBoard, flickers when there is
I/O activity for the IDE HDD or compact flash card used with the ReadySystem.
Reset Button
Press this reset button momentarily (located on the ReadyBoard) to reset the
ReadySystem (hard reset).
Compact Flash
Cover and Slot
This compact flash cover and slot (not shown) protects the compact flash card if
installed, and ensures good EMI shielding for the ReadySystem 1U.
Compact Flash
Socket
The compact flash socket (not shown) is provided on the underside of the
ReadyBoard and accepts the compact flash card, if installed, through the opening
in the I/O panel of the ReadySystem 1U.
Hard Disk Drive
(2 ½")
The rear panel assembly holds a 40 GB (or greater), 2 ½" hard disk drive (HDD)
installed inside the enclosure and connected to the ReadyBoard.
NOTE
ReadySystem 1U
If you wish to connect a floppy disk drive (FDD) or CD-ROM to the
ReadySystem 1U, you can use one of the USB ports to connect the device.
Users Guide
5
Chapter 1
Setting Up the ReadySystem 1U
Applying Power to the ReadySystem 1U
8) Power up the
ReadySystem 1U
• Connect the DC power adapter or customer supplied DC supply into DC IN jack
of ReadySystem 1U. See Figure 1-3.
NOTE
Turn Ring
CW
Power supplied to the unit must be within the allowed +12VDC
+/- 5% or +24VDC +/-5%. Failure to provide proper power may
damage the system and void the warranty.
• Plug the CRT monitor’s power cord into an AC outlet, and turn on the
monitor. See Figure 1-3.
• Plug the DC power adapter or DC supply into an AC outlet.
• Press the ReadySystem 1U’s momentary power switch (≈ 1 sec) before
continuing. See Figure 1-3 and Table 1-1.
9) Verify the
ReadySystem 1U
powers on
satisfactorily
• If you want to enter the BIOS Setup before the operating system loads, press the
<Del> key during POST at the prompt.
Use BIOS Setup during the initial boot to set the desired options (including time
and date, etc.).
• You should see POST complete successfully before the system starts loading
the operating system. If you are using Linux, the boot loader will appear first,
similar to the one shown below with the desired OS name displayed.
NOTE
The 40 GB (or greater) hard disk drive (2 ½") installed in the
ReadySystem 1U enclosure comes with three partitions for the
OS and swap space.
(The Linux 2.6 OS is shown as an example.)
GNU GRUB version 0.95 (632k lower/250768 upper memory)
RdySy1U_4a
Fedora Core (2.6.9-xxx)
Use the and keys to select which entry is highlighted.
Press Enter to boot the selected OS, ‘e’ to edit the
commands before booting, ‘a’ to modify the kernel
arguments before booting, or ‘c’ for a command-line.
NOTE
10) Using the
Operating
System (OS)
The GNU GRUB boot loader screen will continue to display
indefinitely, unless you execute one of the listed options.
• You should see a prompt of some kind indicating the OS is loading, or has
loaded, as you view the screen at this point.
• If you are required to log into the OS, use root for the admin name and
software as the password to log on. If you are logging in as a normal user,
use software for the name and password.
• Refer to the desired OS manual (Ampro's or OS Manufacturers), that may or
may not be provided with the ReadySystem, (depends on licensing
agreements) for more information.
• If you require drivers not installed on the HDD (2½") located inside the
ReadySystem, refer to ReadyBoard model Doc & SW CD-ROM for additional
drivers and instructions.
6
Users Guide
ReadySystem 1U
Chapter 2 Installing ReadySystem 1U Options
The procedures in this chapter describe how to install or remove the ReadySystem 1U supported
options. This includes removing/installing the compact flash card and its cover, as well as removing
the ReadyBoard model SBC from the ReadySystem 1U enclosure and removing/installing memory.
NOTE
The ReadyBoard 700 is used in these ReadyBoard examples, but you
will need to refer to the specific documentation for your ReadyBoard
model to locate and identify the jumper and connector locations.
Refer to the ReadyBoard model QuickStart Guide or the ReadyBoard
model Reference Manual for more specific installation/removal
information than is provided in this Chapter.
Compact Flash Card Installation
This brief procedure describes how to remove the protective cover from the compact flash opening in the
I/O panel and installing the compact flash card into the open slot. Refer to the ReadyBoard model
documentation for specific compact flash jumper settings and compatibility.
NOTE
You may use compact flash cards (Type I or II) from commercial
vendors. Ensure you verify the firmware bit status, DMA or UDMA
compatibility of the compact flash card before purchasing. Not all
card vendors define or support these parameters. Consult the
ReadyBoard product Hardware Release Notes and your compact
flash card vendor for these parameter compatibilities.
Tools Required
Use these tools to remove and install the compact flash card into or out of the ReadySystem 1U.
• Small to medium Phillips screwdriver
• Anti-static service kit - Use a complete anti-static service kit (or the equivalent) to remove or
install the compact flash card. A complete anti-static service kit should include a staticdissipating work surface, a chassis clip lead, and a wrist or ankle strap.
Installing the Compact Flash Card
1. Prepare the ReadySystem 1U for compact flash (CF) card installation:
♦
If the ReadySystem is already prepared for compact flash installation, including removal of
the CF cover, with power turned off and the coaxial power cable disconnected, skip to Step 5.
♦
If the ReadySystem has power applied and is operating, continue with the next step.
CAUTION
To prevent damage to the ReadyBoard, ensure the power switch on the
ReadySystem is turned off, and the coaxial power cable has been
disconnected from the DC IN connector.
2. Initiate a shut down sequence through the OS, or hold in the power switch for 4-6 seconds to turn
off power.
The Power LED should turn off completely when the power is turned off.
3.
Disconnect the coaxial power cable from the DC IN connector.
ReadySystem 1U
Users Guide
7
Chapter 2
Installing ReadySystem 1U Options
CAUTION
To prevent damage to the ReadyBoard or the compact flash card, ensure you
discharge yourself and follow good Electrostatic Discharge principals before
touching components. The ReadyBoard and the compact flash card are
sensitive to static electricity and easily can be damaged by improper handling.
Do the following when handling either one:
Always use an anti-static wrist/ankle strap and a grounding mat.
Leave the compact flash in the anti-static bag until you are ready to install it.
Before you remove a compact flash from the anti-static bag, touch a grounded,
unpainted metal surface to discharge any static electricity.
4. Use a Phillips screwdriver to remove the compact flash cover and place the two screws in a safe
place for use later. See Figure 2-1.
5. If necessary, inspect the socket for bent pins or debris on the pins of the compact flash socket.
RdySy1U_05ab
6. Remove the compact flash card from its protective bag, handling the compact flash card
by its edges.
M3x0.5 Screws (2)
(Flat Head, 3mm)
Compact Flash
Protective Cover
(RFI Shield)
Figure 2-1. Removing Compact Flash Protective Cover
CAUTION
To prevent damage to the ReadyBoard or the compact flash card, do
not force the compact flash card into the slot. If you have to force the
compact flash card into the slot, it is not installed correctly.
The guides on the compact flash sockets on the ReadyBoard series
have enough flexibility to expand when the CF is installed incorrectly.
7. Insert the compact flash card into the opening provided by matching the pin-1 orientation of the
compact flash card with the arrowhead on the I/O panel. See Figure 2-2.
NOTE
8
The keyed slots and lip (or catch edge) on the compact flash card are
used to install into the socket in only one orientation. Pin-1 should
be down and to the right as shown in the Figure 2-2.
Users Guide
ReadySystem 1U
Chapter 2
Installing ReadySystem 1U Options
8. Push the compact flash card into the opening until it firmly seats into the socket and mates with
the pins. See Figure 2-2.
RdySy1U_06a
Lip or
Catch Edge
Keyed
Slots (2)
Pin-1
Indicator
Figure 2-2. Installing Compact Flash Card
9. If your application or environment requires protection of the compact flash card, for security or
EMI protection, you can re-install the protective cover over the compact flash card.
See Figure 2-1.
Reconnecting the protective cover will provide full EMI protection.
10. Refer to the specific ReadyBoard documentation for any required jumper settings for the compact
flash card, before restoring power to the ReadySystem 1U.
CAUTION
Depending on BIOS Setup, some ReadyBoard products will power
on as soon as you connect DC power to the system.
Removing the Compact Flash Card
To remove the compact flash card from the ReadySystem 1U through the enclosure opening, simply
reverse the installation procedure and follow all of the safety precautions listed.
ReadySystem 1U
Users Guide
9
Chapter 2
Installing ReadySystem 1U Options
ReadySystem 1U Disassembly/Re-Assembly
Accessing the bottom of the ReadyBoard, where the SODIMM memory is installed, requires removing
the ReadyBoard from the ReadySystem 1U enclosure. The following procedures described how to
remove and re-install the ReadyBoard into the ReadySystem 1U enclosure.
NOTE
Some of the cables or components, including the ReadyBoard, may not be
shown in the following figures to simplify the figure and improve clarity.
Tools Required
Use these tools to install and remove the ReadyBoard into or out of the ReadySystem 1U enclosure.
• Small to medium Phillips #2 screwdriver.
• Anti-static service kit - Use a complete anti-static service kit (or the equivalent) to remove or
install the ReadyBoard. A complete anti-static service kit should include a static-dissipating
work surface, a chassis clip lead, and a wrist or ankle strap.
Removing the ReadyBoard from Enclosure
1. Prepare the ReadySystem 1U for the ReadyBoard removal.
♦
If the ReadySystem is already prepared for ReadyBoard removal, with the top cover removed,
power turned off, and the coaxial power cable disconnected, skip to Step 5.
♦
If the ReadySystem has power applied and operating, continue with the next step.
CAUTION
To prevent damage to the ReadyBoard, ensure the power switch on the
ReadySystem is turned off and the coaxial power cable has been disconnected.
2. Initiate a shut down sequence through the OS, or hold in the power switch for 4-6 seconds to turn
power off.
The Power LED should turn off completely when the power is turned off.
3. Disconnect the coaxial power cable from the DC IN connector of the I/O panel.
4. Remove the top cover from the ReadySystem enclosure.
a. Remove the six screws from the enclosure cover and slide the top cover to the rear.
b. Lift the top cover up and away from the enclosure. See Figure 2-3.
c. Set aside the top cover for later re-installation.
CAUTION
To prevent damage to the static sensitive components on the ReadyBoard,
ensure you follow good Electrostatic Discharge principles. Components
on the ReadyBoard are sensitive to static electricity and can be easily
damaged by improper handling. Do the following when handling the
ReadyBoard:
Always use an anti-static wrist/ankle strap and a grounding mat.
Before you handle the ReadyBoard, touch a grounded, unpainted metal
surface to discharge any static electricity.
10
Users Guide
ReadySystem 1U
Chapter 2
Installing ReadySystem 1U Options
Remove Top Cover
RdySy1U_07ab
M3x0.5 Screws (6)
Figure 2-3. Removing ReadySystem Top Cover
5. If necessary, remove or loosen the four screws holding the two USB cables (USB 2 & USB 3) to
the enclosure I/O Panel. See Figure 2-4.
You might be able to just loosen the two USB connectors (USB 2 & USB 3) to free the
ReadyBoard from the enclosure because of the tight fit between the two USB connectors and the
tops of the Ethernet ports. If not, you will have to remove the two USB connectors (USB 2 &
USB 3) from the enclosure. See Figure 2-4.
6. If necessary, remove the two USB cables (USB 2 & USB 3) connected to the enclosure I/O Panel.
See Figure 2-4.
Loosen or remove the Audio In/Out
USB2 and USB3 connectors.
M3x0.5
Screws (4)
Power Switch
Enclosure Fan
Power In
Power-On
RdySy1U_8ab
DC In
Primary IDE
+5V Regulator
Board
Figure 2-4. Removing USB Connectors
ReadySystem 1U
Users Guide
11
Chapter 2
Installing ReadySystem 1U Options
7. Disconnect all of the remaining cables from the ReadyBoard, before continuing. See Figures 2-4,
2-5, and 2-6.
To remove the ReadyBoard from the enclosure with greater freedom, you may find it necessary
to disconnect any cables between the +5 volt regulator and the internal parts of the ReadySystem.
Refer also to the respective ReadyBoard QuickStart Guide for more cable removal information.
8. Remove all screws (8) holding the ReadyBoard to the enclosure standoffs. See Figure 2-5.
9. Slowly work the ReadyBoard to the rear of the enclosure until it is safely clear and place it on a
protective surface. See Figure 2-5.
Place the ReadyBoard on a protective surface for SODIMM removal/replacement.
ReadyBoard
M3x0.5 Screws (8)
6 mm thread length
with washers and
lock washers
RdySy1U_09ab
Note: All standoffs have a
thread size of M3x0.5
and accept M3x0.5 screws
Figure 2-5. Removing ReadyBoard from Enclosure
Installing the ReadyBoard into the Enclosure
1. Prepare the ReadySystem for ReadyBoard installation.
♦
If the ReadySystem is already prepared for ReadyBoard installation with the top cover
removed, a SODIMM installed, and the coaxial power cable disconnected, skip to Step 6.
This includes installing the correct size SODIMM onto the ReadyBoard, since you will not
have access to the SODIMM socket once the ReadyBoard is installed into the ReadySystem.
♦
If the ReadySystem is not ready for the ReadyBoard installation, continue with the next step.
CAUTION
12
To prevent damage to the ReadyBoard, ensure the coaxial power cable
has been removed from the DC IN connector of the I/O panel and the
AC-DC adapter has been disconnected from the AC power source.
Users Guide
ReadySystem 1U
Chapter 2
Installing ReadySystem 1U Options
2. Disconnect the coaxial power cable from the DC IN connector of the I/O panel.
3. Remove any of the six screws still holding the top cover to the ReadySystem. See Figure 2-3.
4. Slide the top cover to the rear and lift it up and away from the ReadySystem.
Set aside the top cover for later re-installation.
5. If you have not made the necessary changes to the ReadyBoard, including changing the
SODIMM, do so now before continuing.
Once the ReadyBoard is installed into the ReadySystem enclosure, you will not be able to access
the SODIMM socket on the ReadyBoard.
Refer to Removing the SODIMM and Installing the SODIMM procedures.
6. Move the internal cables out of the way to allow installation of the ReadyBoard. See Figure 2-6.
♦
If you did not remove the two USB cables (USB 2 & USB 3) from the enclosure to remove
the ReadyBoard, you need to do so before installing the ReadyBoard back into the enclosure.
♦
If necessary, for greater access to the internal space of the ReadySystem, disconnect any cables
between the +5 volt regulator and the internal parts of the ReadySystem. See Figures 2-4 & 2-6.
Refer also to the respective ReadyBoard QuickStart Guide for more cable removal information.
CAUTION
To prevent damage to the static sensitive components on the
ReadyBoard, ensure you follow good Electrostatic Discharge
principles. Components on the ReadyBoard are sensitive to static
electricity and can be easily damaged by improper handling. Do the
following when handling the ReadyBoard:
Always use an anti-static wrist/ankle strap and a grounding mat.
Before you handle the ReadyBoard, touch a grounded, unpainted
metal surface to discharge any static electricity.
Power Switch Cable
to ReadyBoard
Enclosure
Fan Cables
Audio In/Out
Cable
+5VDC Regulator
Board
DC In Cable to
Regulator Board
IDE Cable
Power In Cable
to ReadyBoard
RdySy1U_10a
Power On
Cable to
ReadyBoard
Figure 2-6. Internal Cables Shown Separated
ReadySystem 1U
Users Guide
13
Chapter 2
Installing ReadySystem 1U Options
7. Position the ReadyBoard near the eight standoffs on the enclosure base at about a 10° angle to the
mounting surface. See Figures 2-7 and 2-8.
8. Insert the ReadyBoard and its LAN connectors just under the lip of the LAN port on the
enclosure wall, behind the I/O panel. See Figure 2-7.
9. Slowly work the ReadyBoard into place, inserting the I/O connectors and LEDs into the
respective openings on the I/O Panel.
When you have the ReadyBoard in position you should clearly see the mounting holes for the
eight standoffs under the board mounting holes, and the LEDs should fit into the openings
provided on the I/O Panel.
Insert ReadyBoard
into enclosure just
above standoffs
I/O Panel
I/O Panel
Ready
Board
ReadyBox 1U
Right Side View
LA N 1
le
ReadyBox 1U
Left Side View
RdySy1U_11a
10° Ang
LAN Port
Lip
Figure 2-7. ReadyBoard Positioned Under LAN Ports
ReadyBoard
M3x0.5 Screws (8)
6 mm Thread Length
with washers and
lock washers
RdySy1U_12bb
Note: All standoffs have a
thread size of M3x0.5
and accept M3x0.5 screws.
Figure 2-8. Installing ReadyBoard into Enclosure
14
Users Guide
ReadySystem 1U
Chapter 2
Installing ReadySystem 1U Options
10. Insert eight M30.5, 6mm screws with washers into the standoffs on the enclosure floor. See
Figure 2-8.
Connecting the Power Cables
When connecting the cables, refer to the pin-1 designations shown in Figure 2-10. Pin-1 is shown as a
black pin (round or square) at the connectors and jumpers, unless otherwise noted. If you desire more
installation information than is provided in this guide refer to the ReadyBoard model QuickStart Guide
or Reference Manual.
NOTE
The connector reference designators in the text and illustrations are
based on the ReadyBoard 700 and may be different from your
respective ReadyBoard product, but the functions will be the same and
the connector locations will typically be in the same area.
1. Connect the Power Switch (two-wire) cable to the Utility connector (pins 1 & 2) on the
ReadyBoard, matching the red wire with pin-1. See Figures 2-9, 2-10 and 2-11.
The Utility connector placement differs slightly on the various ReadyBoards, but all Utility
connectors use a 5-pin header and are in the general area shown in Figure 2-10. Refer to the
respective ReadyBoard documentation for any variations, but match the red wire with pin-1.
2. Connect the Power In cable to the Power In connector (J4). See Figures 2-9, 2-10 and 2-11.
The Power In connectors are located in the same place on all boards and use a 4-pin header.
3. Connect the Power-On cable to the Power-On connector (J6) on the ReadyBoard, as shown in
Figure 2-11. See Figures 2-9 and 2-10.
The Power-On (3-pin) connector placement differs slightly on the various ReadyBoards. Refer to
the respective ReadyBoard documentation for any variations.
4. Connect the DC In cable to the +5 volt Regulator board. See Figure 2-11.
Infrared (J17)
Primary IDE (J22)
Floppy/Parallel (J20)
PC/104 (J13/14)
Audio In/Out (J19)
(hidden)
Utility (J18)
(hidden)
PC/104-Plus (J12)
Power On (J6)
USB 2 & 3 (J21)
Power In (J4)
PS/2 Keyboard/
Mouse (J16)
USB 0 & 1 (J15)
(USB 0 Lower)
Ethernet 1 (J10)
GPIO (J2)
Serial 3 & 4 (J3)
(COM 3 & 4)
CRT (J8)
Serial 1 & Serial 2 (COM 1 & 2)
(J5A/B) (Serial 1 Lower)
RdySy1U_13a
Ethernet 2 (J11)
Fan (J1)
Figure 2-9. Connector Locations (Typical ReadyBoard)
ReadySystem 1U
Users Guide
15
Chapter 2
Installing ReadySystem 1U Options
Serial B (J3A/B)
Serial B (J3)
RS485 Termination
CPU Fan (J1)
(COM3 & 4) GPIO (J2) (JP6, COM3 & 4)
TFT/LCD
Clock (JP1)
J1
Serial A
(J5A/B)
(COM1 & 2)
J3
3
2
JP6
U2
U12
U1
J2
4
Q11
J4
1
Power In
(J4)
JP1
U32
LCD Voltage
Setting (JP2)
J5
U3
U4
LVDS (J7)
Power-On
Header (J6)
J6
J26
D1
JP2
Y1
CRT (J8)
(VGA)
RdySy1U_14a
J7
U5
U6
J8
U33
LCD (J9)
J13
J9
U7
U8
J12
Ethernet 1
(J10)
J10
J14
PC/104
(J13A/B
J14A/B)
Lithium
Battery
(B1)
Y2
J11
Ethernet 2
(J11)
CMOS
Normal/
Clear (JP3)
J15
Y3
U10
U11
J16
D2
PS/2
Keyboard/
Mouse (J16)
U9
J19
J18
U15
D4
J21
Audio In/
Out (J19)
U13
U12
X2
U14
JP5
J22
J20
USB 2 & 3 (J21A/B)
JP3
Floppy/Parallel (J20)
BT1 J17
SW1
Utility (J18)
Battery
Header
(BT1)
X1
USB 0 & 1
(J15A/B)
PC/104-Plus
(J12)
JP4
IR (Infrared)
(J17)
CF Master/
Slave (JP4)
Flash
BIOS (JP5)
IDE (J22)
Figure 2-10. Connector and Jumper Pin-1 Locations (Typical ReadyBoard)
16
Users Guide
ReadySystem 1U
Chapter 2
Installing ReadySystem 1U Options
Power Switch Cable
to ReadyBoard
Enclosure
Fan Cable Power In Cable
to ReadyBoard
RdySy1U_15a
Power On
Cable to
ReadyBoard
DC In Cable to
Regulator Board
+5VDC Regulator
Board
Figure 2-11. Installing Power Cables
Connecting the Remaining Cables
The following procedure describes how to install the remaining cables to the ReadyBoard. Refer also to
the respective ReadyBoard QuickStart Guide for any variations to the board shown in the figures when
connecting the cables to the ReadyBoard. Skip any cable(s) that do not apply to your situation.
NOTE
Ampro recommends using the cable routing shown in the figures.
This will help to ensure cables and wiring do not come in contact
with the heatsinks.
1. Reconnect USB2 & USB3 cables to the USB2 & USB3 openings in the I/O panel as shown in
Figure 2-12.
The USB 2 cable is always connected to pins 3 & 5 on the 10-pin connector and USB 3 is always
connected to pins 4 & 6 on the 10-pin connector, regardless of the ReadyBoard model. This 10-pin
connector has odd/even pin arrangement where all odd pins of the connector are on one side, while
all even pins are on the opposite side of the connector.
2. Connect the USB2 & USB3 cable to the USB2 & USB3 (10-pin) connector (J21) on the
respective ReadyBoard. See Figures 2-9, 2-10, and 2-12.
All USB2 & USB3 connectors are located in the same place on the board and share the same 10pin header. Refer to the respective ReadyBoard documentation for the pin-1 location.
3. Connect the Audio cable to the Audio In/Out (16-pin) connector on the respective ReadyBoard.
See Figures 2-9, 2-10, and 2-12.
The Audio In/Out (16-pin) connector placement differs slightly on the various ReadyBoards, but
is in the same general area on the board. Refer to the respective ReadyBoard documentation for
any variations and the pin-1 location.
ReadySystem 1U
Users Guide
17
Chapter 2
Installing ReadySystem 1U Options
4. Connect the IDE cable to the IDE connector (J22). See Figures 2-9, 2-10, and 2-12.
♦
If you did not disconnect the IDE cable from the hard disk drive earlier, just connect the free
end of the IDE cable to the IDE connector (J22) on the ReadyBoard.
♦
If you also disconnected the IDE cable from the hard disk drive (HDD) earlier, then reconnect it to the IDE connector on the HDD. The red strip on the cable should match with
pin-1 on the HDD and is typically located next to the jumper settings on the HDD. See
Figure 2-12.
USB2 and USB3
Cable
Audio In/Out
Cable
M3x0.5
Screws (4)
b
6a
_1
1U
Sy
y
Rd
IDE Cable
Figure 2-12. Installing IDE, Audio, and USB Cables
5. You may replace the top cover before restoring power to check the ReadySystem 1U operation,
or restore power to check system operation before replacing the top cover to the enclosure.
In either case, observe all safety precautions when replacing the top cover or restoring power to
the system.
6. Follow the power-on procedures outlined in Chapter 1 to restore power to the ReadySystem.
CAUTION
18
Depending on BIOS Setup, some ReadyBoard products will power
on as soon as you connect live DC power to the system.
Users Guide
ReadySystem 1U
Chapter 2
Installing ReadySystem 1U Options
Memory Installation
The ReadyBoard model uses a single SODIMM socket available on the underside of the board. The
ReadyBoard SBC must be removed from the ReadySystem 1U enclosure to remove or install the single
SODIMM.
NOTE
Refer to the specific ReadyBoard model QuickStart Guide or
Reference Manual for SODIMM installation recommendations.
Tools Required
Use an anti-static service kit (or the equivalent) to remove or install the SODIMM. An anti-static service
kit should include a static-dissipating work surface, a chassis clip lead, and a wrist or ankle strap.
Installation Guidelines
• When handling a SODIMM, observe anti-static discharge precautions to avoid damage.
• Refer to the specific ReadyBoard model QuickStart Guide or Reference Manual for SODIMM
installation recommendations.
• The typical SODIMM sizes are available from Ampro: 64 MB, 128 MB, 256 MB, 512 MB, or
1 GB, depending on the supported memory size of the ReadyBoard model.
• The supported SODIMM memory size is ReadyBoard model specific.
Removing the SODIMM
Use this procedure to remove the SODIMM from the SODIMM socket on the ReadyBoard.
1. Prepare the ReadySystem 1U for SODIMM removal:
♦
If the ReadyBoard model is already prepared for SODIMM removal, with the ReadyBoard
removed from the enclosure, skip to Step 7.
♦
If the ReadySystem has power applied and operating, continue with the next step.
CAUTION
To prevent damage to the ReadyBoard, ensure the power switch on the
ReadySystem is turned off and the coaxial power cable has been
disconnected from the DC IN connector.
2. Initiate a shut-down sequence through the OS, or hold in the power switch for 4-6 seconds to turn
off the power.
The Power LED should turn off completely when the power is off.
3. Disconnect the coaxial power cable from the DC IN connector.
4. Remove the six screws holding the top cover to the ReadySystem enclosure and then slide the
cover to the rear as shown in the Figure 2-3.
5. Disconnect the cables to the ReadyBoard model and lay the free ends out of the way.
6. Remove the ReadyBoard model from the ReadySystem enclosure and place it on an anti-static
surface.
Refer to Removing ReadyBoard from Enclosure for more information.
7. Turn over the ReadyBoard model for access to the bottom of the board while laying it on a flat
anti-static surface. See Figure 2-13.
ReadySystem 1U
Users Guide
19
Chapter 2
Installing ReadySystem 1U Options
CAUTION
To prevent damage to the SODIMM, do not touch the SODIMM until you
have discharged yourself and followed good Electrostatic Discharge principals.
The SODIMMs are sensitive to static electricity and can be easily damaged by
improper handling. Do the following when handling a SODIMM:
Use an anti-static wrist/ankle strap and a grounding mat connected to ground.
Leave the SODIMM in the anti-static bag until you are ready to install it.
Before you remove a SODIMM from the anti-static bag, touch a grounded,
unpainted metal surface to discharge any static electricity.
8. Locate the SODIMM socket (DIMM1) on the bottom of the ReadyBoard model. See Figure 2-13.
9. Open both retaining latches to release the SODIMM from the socket. See Figure 2-13.
The SODIMM will spring up to a 45° angle once you open both retaining latches. If the
SODIMM does not spring up to a 45° angle, then the retaining latches have not released the
SODIMM from the socket.
10. Using the card edges, lift the SODIMM completely away from the socket. See Figure 2-13.
11. Place the SODIMM on an anti-static surface or in an anti-static bag.
NOTE
If you remove the SODIMM and restore power without a SODIMM installed,
you will not see a display, and your system will not work properly.
SODIMM Socket (DIMM1)
SODIMM
RdySy1U_20a
45° Angle
Retaining Latches
Figure 2-13. Removing SODIMM from Socket
20
Users Guide
ReadySystem 1U
Chapter 2
Installing ReadySystem 1U Options
Installing the SODIMM
If you want to install a larger size SODIMM or replace the existing SODIMM, refer to the following
procedure.
1. Prepare the ReadyBoard model for SODIMM installation:
♦
If the ReadyBoard model is already prepared for SODIMM installation, with the ReadyBoard
removed from the ReadySystem enclosure, skip to Step 7. If the SODIMM socket is empty,
skip to Step 9.
♦
If the ReadySystem has power applied and operating, continue with next step.
CAUTION
To prevent damage to the ReadyBoard, ensure the power switch on the
ReadySystem is turned off and the coaxial power cable has been
disconnected from the DC IN connector.
2. Initiate a shut down sequence through the OS, or hold in the power switch for 4-6 seconds to turn
off power.
The Power LED should turn off completely when the power is turned off.
CAUTION
To prevent damage to the SODIMM, do not touch the SODIMM until you have
discharged yourself and followed good Electrostatic Discharge principals. The
SODIMMs are sensitive to static electricity and can be easily damaged by
improper handling. Do the following when handling a SODIMM:
Use an anti-static wrist/ankle strap and a grounding mat connected to ground.
Leave the SODIMM in the anti-static bag until you are ready to install it.
Before you remove a SODIMM from the anti-static bag, touch a grounded,
unpainted metal surface to discharge any static electricity.
3. Disconnect the coaxial power cable from the DC IN connector.
4. Remove the six screws holding the top cover to the ReadySystem enclosure and then slide the
cover to the rear as shown in Figure 2-3.
5. Disconnect the cables to the ReadyBoard model and lay the free ends out of the way.
6. Remove the ReadyBoard model from the ReadySystem enclosure and place the board on an antistatic surface.
Refer to Removing ReadyBoard from Enclosure for more information.
7. Turn over the ReadyBoard model for access to the bottom of the board while laying it on a flat
anti-static surface. See Figure 2-14.
8. If you need to remove the existing SODIMM from the SODIMM socket before continuing, refer
to Removing the SODIMM, beginning with Step 9.
Follow Steps 9 to 11 in the next procedure, Removing the SODIMM, before continuing with the
next step in this procedure.
9. Remove the SODIMM from its protective bag, handling the SODIMM by its edges.
NOTE
Refer to the specific ReadyBoard model QuickStart Guide or
Reference Manual for SODIMM installation recommendations.
10. Ensure there is nothing in the SODIMM socket that would prevent its installation.
ReadySystem 1U
Users Guide
21
Chapter 2
Installing ReadySystem 1U Options
11. Insert the SODIMM into the socket at a 45° angle to the bottom of the ReadyBoard model with
the components facing up. See Figure 2-14.
The SODIMM card edge and socket are keyed to install into the socket in only one direction.
SODIMM Socket (DIMM1)
SODIMM
RdySy1U_21a
45° Angle
Retaining Latches
Alignment Notch
Figure 2-14. Installing SODIMM into Socket
12. Press the edges of the SODIMM down between the latches, until the latches snap into place.
See Figure 2-14.
The latches should open to accept the SODIMM without any resistance. If you encounter any
resistance, you may not have inserted the SODIMM far enough into the socket.
13. If the retaining latches do not close completely on the SODIMM, remove it and repeat
Steps 10 to 12.
14. Reinstall the ReadyBoard model into the ReadySystem 1U enclosure.
Refer to the Installing the ReadyBoard procedure for more information.
15. Reconnect the cables to the ReadyBoard model.
Refer to Connecting the Cables procedure for more information.
16. Restore power to the ReadySystem and observe the boot screen for new memory recognition.
If the system does not boot or there is a problem recognizing the new memory, the new
SODIMM could be defective or the SODIMM was not properly installed or recognized.
CAUTION
22
Depending on BIOS Setup, some ReadyBoard products will power
on as soon as you connect DC power to the system.
Users Guide
ReadySystem 1U
Appendix A
Technical Support
Ampro Computers, Inc. provides a number of methods for contacting Technical Support listed in the
Table A-1 below. Requests for support through the Virtual Technician are given the highest priority,
and usually will be addressed within one working day.
• Ampro Virtual Technician – This is a comprehensive support center designed to meet all your
technical needs. This service is free and available 24 hours a day through the Ampro web site at
http://ampro.custhelp.com. This includes a searchable database of Frequently Asked Questions,
which will help you with the common information requested by most customers. This is a good
source of information to look at first for your technical solutions. However, you must register
online before you can login to access this service.
• Personal Assistance – You may also request personal assistance by going to the "Ask a Question"
area in the Virtual Technician. Requests can be submitted 24 hours a day, 7 days a week. You
will receive immediate confirmation that your request has been entered. Once you have
submitted your request, you must log in to go to the "My Stuff" area where you can check status,
update your request, and access other features.
• Embedded Design Resource Center – This service is also free and available 24 hours a day at the
Ampro web site at http://www.ampro.com. However, you must be registered online before you
can log in to access this service.
The Embedded Design Resource Center was created as a resource for embedded system
developers to share Ampro's knowledge, insight, and expertise gained from years of experience.
This page contains links to White Papers, Specifications, and additional technical information.
Table A-1. Technical Support Contact Information
Method
Contact Information
Virtual Technician
http://ampro.custhelp.com
Web Site
http://www.ampro.com
Standard Mail
Ampro Computers, Incorporated
5215 Hellyer Avenue
San Jose, CA 95138-1007, USA
ReadySystem 1U
Users Guide
23
Appendix A
24
Technical Support
Users Guide
ReadySystem 1U
Appendix B
System Overview
This system overview presents general information about the ReadySystem 1U enclosure (ReadyBox 1U)
and the EPIC Architecture. After reading this chapter you should understand:
• EPIC architecture
• ReadyBox 1U features, including I/O Panel features and connectors
• ReadyBox 1U Specifications
• ReadyBox 1U mounting dimensions
EPIC Architecture
In 2004, five companies collaborated to fill the void between the EBX size and the PC/104 size with a
new industry standard form factor (115 mm x 165 mm, or ≈ 4.5" x 6.5") called “Embedded Platform for
Industrial Computing (EPIC).” The EPIC standard principally defines physical size, mounting hole
pattern, and power connector locations. It does not specify processor type or electrical characteristics.
There are recommended connector placements for serial/parallel, ethernet, graphics, and memory
expansion, including an optional location for PC card (PCMCIA) expansion. This embedded single
board computer (SBC) standard ensures that embedded system OEMs can standardize their designs and
that embedded computing solutions can be designed into even more space constrained environments
than ever before.
The EPIC standard boasts the same highly flexible and adaptable system expansion as EBX, easily
allowing addition of modular functions such as USB 2.0, IEEE 1394 (Firewire), or wireless networking
not usually contained in standard product offerings.
The EPIC standard also brings stability to the mid-sized embedded board market and offers OEMs
assurance that a wide range of products will be available from multiple sources – now and in the future.
The EPIC specification is freely available to all interested companies, and may be used without licenses
or royalties. For further technical information on the EPIC standard, visit the web site at
http://www.epic-sbc.org. See Figure 2-1.
Product Description
The ReadyBox 1U is a small enclosure (1U) for Ampro’s ReadyBoard products and will accept any
Ampro ReadyBoard SBC.
The ReadyBox 1U is particularly well suited to embedded applications and meets the size, power
consumption, temperature range, quality, and reliability demands of many embedded systems.
ReadyBox 1U Features
• Compact size
• Quiet operation
• Compatibility with any Ampro ReadyBoard SBC
• ReadyBoard I/O modified to a single I/O panel
• Compatibility with any capacity 2 ½" Hard Disk Drive
ReadySystem 1U
Users Guide
25
Appendix B
System Overview
• Mechanical
♦
Flexible mounting – benchtop (surface)
♦
Rack mounting (optional)
♦
All cabling provided internally
• Certification
♦
Designed for EMI standards
♦
Designed for UL/CSA/CE approval (depends on the exact system assembled)
• Power
♦
AC to DC power adapter (optional)
♦
Power On/Off switch
♦
DC power screw-type coaxial input connector
ReadyBox 1U
Top Cover
Momentary
Power Switch
Connectors with
Internal Cables
for ReadyBoard
Headers
ReadyBox 1U
I/O Panel
Compact Flash Card
Cover and Opening
DC Power In
Connector
RdyBx1U_01a
Connector/Indicator
Openings for ReadyBoard
Figure B-1. ReadyBox 1U Enclosure
26
Users Guide
ReadySystem 1U
System Overview
RdyBx1U_02a
Appendix B
Figure B-2. Optional Rack-Mount Hardware (Installed)
I/O Panel Description
Table B-1 describes the connectors or controls on the I/O panel provided with the ReadyBox 1U shown
in Figure B-3.
Table B-1. Installed Connectors or Controls
Control/Connector Description
Power Switch
This momentary push button Power Switch controls DC power and has an
internal cable and connector. The integrator must connect the 2-wire, 5-pin
connector to the ReadyBoard at the Utility connector.
DC IN
This 2-pin coaxial connector is connected to the internal DC regulator and
accepts 12 or 24 VDC, +/- 5% from an AC-to-DC converter (brick power
supply).
Audio:
These two 3-pin connectors and one 2-pin connector (MIC) with respective
cable are provided with the ReadyBox 2U. The integrator must connect the
cable to the Audio In/Out connector on the ReadyBoard.
MIC, Line In,
Line Out
USB 2 & 3
These two 4-pin connectors with the respective cable are provided with the
ReadyBox 1U. The integrator must connect the cable to the ReadyBoard USB
header.
Compact Flash
Cover and Slot
This compact flash cover and slot (not shown) protects the compact flash card
if installed, and ensures good EMI shielding for the ReadyBox 1U.
ReadySystem 1U
Users Guide
27
Appendix B
System Overview
Momentary
Power Switch
Audio Connectors
COM 2
MIC
COM 1
LINE IN LINE OUT
USB2 and USB3
USB2
DC IN
USB3
RESET
POWER
HDD
COMPACT FLASH
RdyBx1U_03a
CRT
Figure B-3. I/O Panel Controls and Connectors (Front view)
Table B-2 describes the I/O panel access openings for connector, control, or indicators provided with the
ReadyBoard SBC shown in Figure B-4.
Table B-2. Connectors or Control/Indicator I/O Panel Openings
28
Access Opening
Description
Power-On LED
This power-on indicator is provided on the ReadyBoard.
HDD Activity LED
This IDE activity indicator shows when there is I/O activity for the IDE hard
drive or compact flash card and is provided on the ReadyBoard.
Reset Switch
This reset switch is provided on the ReadyBoard. Pressing the Reset switch
supplies a ground signal on the reset line causing a hard reset.
Keyboard/Mouse
This 6-pin single PS/2 Keyboard/Mouse connector is provided on the
ReadyBoard. It requires a dual PS/2 output cable provided in the ReadyBoard
SBC QuickStart kit.
USB 0 & 1
These two 4-pin USB type A connectors are provided on the ReadyBoard.
LAN 1 (Ethernet 1)
This 8-pin (RJ45) connector is provided on the ReadyBoard.
LAN 2 (Ethernet 2)
This 8-pin or 10-pin (RJ45) connector is provided on the ReadyBoard.
Video (CRT VGA)
This 15-pin (DB15) connector is provided on the ReadyBoard.
COM 1 & COM 2
(Serial 1 & Serial 2)
These two 9-pin (DB9) connectors are provided on the ReadyBoard.
Compact Flash
Socket
The compact flash socket (not shown) is provided on the underside of the
ReadyBoard and accepts the compact flash card, if installed, through the
opening at the bottom of the I/O panel of the ReadyBox 1U.
Users Guide
ReadySystem 1U
Appendix B
System Overview
COM 2
MIC
LINE IN LINE OUT
USB2
USB3
Power
LED
COM 1
CRT
RESET
POWER
HDD
IDE
Activity
LED
COMPACT FLASH
LAN1/
LAN2
Keyboard/
Mouse
Reset
Switch
USB 0/
USB 1
Typical ReadyBoard (Side view)
Serial 1 & 2
(Serial 1 Lower)
CRT
USB 0 & 1
Keyboard/
Ethernet 1 Ethernet 2 (USB 0 Lower) Mouse
RdyBx1U_04a
Compact Flash
Slot Cover
CRT
(VGA)
COM 1/
COM 2
Reset
Switch
Power/IDE
Activity
LED
Compact Flash Socket
Figure B-4. I/O Panel Access Openings (Front view)
Power/IDE LED Definitions
Table B-3 provides the LED colors and definitions for the Power and IDE drive activity LEDs that are
part of the installed ReadyBoard and Figure B-3 shows the locations. Refer to the specific ReadyBoard
SBC for the Ethernet LED activity.
Table B-3. Power/IDE Activity LED Indicators
LED
On
Off
Power LED
Steady Green = Power On
Steady Off = Power Off
IDE Activity LED
Flashing Yellow = IDE activity
(2 ½" IDE drive or Compact flash)
Steady Off = No IDE activity
ReadySystem 1U
Users Guide
29
Appendix B
System Overview
Specifications
Environmental Specifications
Table B-4 provides the most efficient operating and storage condition ranges required for the
ReadyBoard SBC installed into the ReadyBox 1U.
Table B-4. Environmental Requirements
Parameter
Conditions
Temperature
Operating
+0° to +45°C (32° to +122°F)
Storage
–20° to +75°C (–4° to +167°F)
Humidity
Operating
5% to 95% relative humidity, non-condensing
Non-operating
5% to 95% relative humidity, non-condensing
Power Specifications
Table B-5 lists the power requirements for the ReadyBox 1U.
Table B-5. Power Requirement
Parameter
Description
Input Type
+12VDC +/-5% or +24VDC +/-5%
Physical Specifications
Table B-6 gives the physical dimensions of the ReadyBox 1U as shown in Figures B-5 and B-6, and the
mounting dimensions in Figures B-7 through B-12.
Table B-6. Weight and Footprint Dimensions
30
Parameters
Measurements
(Enclosure Only)
Additional Measurements
Weight
0.89 kg (1 lb. 15.6 oz.)
Weight of enclosure without any ReadyBoards
Height
44 mm (1.73")
52 mm (2.045") with plastic feet
Width
186 mm (7.32")
481.8 mm (18.97") with rack mounting
attachments
Depth
209.4 mm (8.24")
Users Guide
ReadySystem 1U
Appendix B
System Overview
Mechanical Specifications
Figures B-5 through B-10 show the ReadyBox 1U enclosure dimensions and mounting dimensions.
186mm
7.32”
203.2mm
209.4mm
8.244”
8.00”
180mm
7.09”
Top View
Figure B-5. Width and Depth Dimensions (Top view)
RdyBx1U_07a
180mm
7.09”
44mm
1.73”
I/O Panel (Front) View
Figure B-6. Width and Height Dimensions (Front view)
ReadySystem 1U
Users Guide
31
Appendix B
System Overview
Benchtop or Surface Mounting
*Note: Can subtract up to 1.75mm (0.068”) from both ends
due to hole size in mounting bracket placement.
*216mm
*8.50”
186mm
7.32”
158mm
6.22”
1/4 - 20 UNC (4)
90mm
3.54”
70.0mm
2.76”
115mm
4.53”
54mm
2.13”
209.4mm
8.24”
9.8mm
0.38”
RdyBx1U_08a
3.9mm
0.15”
180mm
7.09”
Top Cover View
Figure B-7. Benchtop or Surface Mounting Dimensions (Top View)
Benchtop or Surface Mounting
44mm
1.73”
196mm
7.72”
216mm
8.50”
RdyBx2U_09a
7.2mm
0.28”
51.2mm
2.02”
180mm
7.09”
I/O Panel (Front) View
Figure B-8. Benchtop or Surface Mounting Dimensions (Front View)
32
Users Guide
ReadySystem 1U
Appendix B
System Overview
433.5mm
17.07”
153.6mm
6.05”
204.4mm
8.05”
362.5mm
14.27”
220.5mm
8.68”
203.2mm
8.00”
27mm
1.06”
481.8mm
18.97”
Top Cover View
481.8mm
18.97”
469mm
461mm 18.46”
18.15”
44mm
1.73”
180mm
7.09”
I/O Panel (Front) View
RdyBx1U_13a
31.75mm
1.25”
5.8mm
0.225”
Figure B-9. Optional Rack-Mounting Dimensions (Top View)
Figure B-10. Optional Rack-Mounting Dimensions (Front View)
ReadySystem 1U
Users Guide
33
Appendix B
System Overview
Mounting and Cover Location
Figures B-11 and B-12 provide an illustration of the optional rack mounting and an illustration of the top
cover location. The four optional plastic feet with screws are also shown in Figure B-12.
1/4 - 20 UNC Screws (6)
RdyBx1U_02ba
Rackmount Sides (2)
(Left & Right)
Figure B-11. Rack Mounting Hardware
Remove Top Cover
RdyBx1U_14ab
M3x0.5 Screws (6)
Figure B-12. Removing Top Cover
NOTE
34
Slide the top cover to the rear as shown in Figure B-12 before
lifting the top cover off the enclosure.
Users Guide
ReadySystem 1U