1
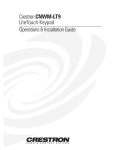
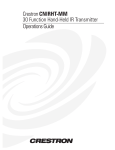
CRESTRON CNTV
Cresnet Television Control Unit
TABLE OF CONTENTS
DESCRIPTION............................................................................................................................1
Functional Description..................................................................................................1
Physical Description......................................................................................................1
LEADING SPECIFICATIONS ...................................................................................................1
CONTROLS AND INDICATORS..............................................................................................2
Controls..........................................................................................................................2
Indicators.........................................................................................................................3
IR ..........................................................................................................................3
MESSAGE..........................................................................................................3
READY ................................................................................................................3
T and R.................................................................................................................3
INSTALLATION/SETUP ...........................................................................................................3
Optional Equipment.......................................................................................................3
Identity Code ..................................................................................................................4
Power and IR Testing ....................................................................................................4
Power Sensor Placement................................................................................4
IR Probe Placement...........................................................................................7
Preparation for Use .......................................................................................................7
PROGRAMMING .......................................................................................................................9
TEST/TROUBLESHOOTING....................................................................................................9
FURTHER INQUIRIES................................................................................................................10
APPENDIX..................................................................................................................................11
Software Setup and Diagnostics.................................................................................11
MRMT11 Setup Menus................................................................................................12
Net ID Tasks ......................................................................................................12
Downloading Tasks...........................................................................................13
Configuration Information .................................................................................13
Enter Test Menu ...............................................................................................13
RETURN AND WARRANTY POLICIES...................................................................................17
Merchandise Returns / Repair Service .......................................................................17
CRESTRON Limited Warranty.......................................................................................17
R E M O T E
C O N T R O L
S Y S T E M S
DOC. 8105B
CRESTRON CNTV
Cresnet Television Control Unit
FRONT
IR
MESSAGE
READY
BACK
T
1
R
COM
2
DIGITAL
N ET
IN OUT
1.5 in
3.8 cm
CRESTRON
CNTV
PWR
IR
SENSE
OUT
1 2 3 4 G
CRESTRON
ELECTRONICS INC.
5.4 in
13.8 cm
1 2 1 2 G
PWR
CRESSKILL N.J. 07626
UNIT DEPTH: 4.9 in (12.4 cm)
Figure 1. CNTV, Panel Views
DESCRIPTION:
Functional Description
The CNTV, illustrated in figure 1, is part of the MRMT-21 RF Classroom System or may be used
separately as a Cresnet network device. Regardless of the system, the primary function of the CNTV is to
accept and process system commands to control televisions or other associated audio/video devices in a
remote location. The scope of this document provides technical information of the CNTV as a stand-alone
Cresnet network device. Refer to the latest revision of MRMT-21 (Doc. 5602) for operation of the unit
within the MRMT-21 system.
Physical Description
The CNTV is housed in a black enclosure with silk-screened labels on the front and back of the case. On
the front, there are five red LEDs for indicating the current status of the unit. All connections are made on
the back of the unit.
There are four rubber feet on the base of the unit for stability and to prevent slippage. If necessary, the
user can apply Dual Lock fasteners to the unit's underside. The rubber feet do not need to be removed. The
fasteners may be preferred for additional stability when mounting the unit onto the surface of a TV.
LEADING SPECIFICATIONS:
Table 1 provides a summary of leading specifications for the CNTV. Dimensions and weight are rounded to
the nearest tenth unit.
Table 1. Leading Specifications
R E M O T E
C O N T R O L
SPECIFICATION
DETAILS
Power Requirements
SIMPL Windows
CNMSX Upgrade File
CNRACKX Upgrade File
1.2 Watts, 9 - 28 VDC
Version 1.30.11 or later 1
Version 5.04.11x.upz or later2
Version 5.07.06w.upz or later 2
S Y S T E M S
1
DOC. 8105B
CRESTRON CNTV
Cresnet Television Control Unit
Table 1. Leading Specifications (Continued)
SPECIFICATION
DETAILS
Dimensions & Weight
Height: 1.5 in (3.8 cm)
Width: 5.4 in (13.8 cm)
Depth: 4.9 in (12.4 cm)
Weight: 1.3 lb (0.6 kg)
1
The latest software versions can be obtained from the Downloads page (SIMPLWIN Library) of Crestron's
website (www.crestron.com). New users are required to register in order to obtain access to the FTP site.
2
UPZ extension files can be obtained from the Downloads page (OPSYS Library) of Crestron's website.
As of the date of manufacture, the unit has been tested and found to comply with specifications for CE
marking.
NOTE
This device complies with part 15 of the FCC rules. Operation is subject to the
following two conditions: (1) this device may not cause harmful interference, and (2)
this device must accept any interference received, including interference that may
cause undesired operation.
CONTROLS AND INDICATORS:
Controls
The CNTV has an IR receiver on the front-right side, located above the CNTV label. Verify that the receiver
is in a line-of-sight path and unobstructed. The LED flashes when IR is received, confirming a good line-ofsight path.
CAUTION
Direct sunlight or other light sources may prevent the unit from working properly by
desensitizing the CNTV IR receiver.
All CNTVs contain an IR receiver port, two IR outputs, two power sensors, four VersiPorts, two serial
ports, and a CRESNET port. The IR receiver port receives signals from the MRHC transmitter. The two IR
outputs are designed to work with IR controlled devices including TVs and other classroom equipment.
The digital connector of the CNTV-CS (supplied) attaches to the DIGITAL IN/OUT back panel connector of
the CNTV. The CNTV-CS senses whether a single television set (9" color or larger) is OFF or ON. The
NET port is provided for connection to the Cresnet system. There are four bidirectional TTL lines (or
VersiPorts) on the unit which are capable of sensing TTL voltage levels, analog voltage levels, or contact
closures to ground. They can also output TTL/CMOS logic levels. These lines provide control or sensing of
additional classroom equipment (i.e., security systems).
R E M O T E
C O N T R O L
S Y S T E M S
2
DOC. 8105B
CRESTRON CNTV
Cresnet Television Control Unit
The ports are preconfigured by Crestron to determine which of the following functions each port performs.
The serial ports are capable of several different functions.
1. Connection of wired control panel (MRWP or MRWPLCD).
2. Connection to a classroom computer running Crestron's IBM Linkway interface, Crestron's Course
Director software, or Crestron's MacIntosh Transmitter software.
Indicators
There are five LED indicators located on the front panel of the CNTV.
IR
This red LED turns "on" when an IR signal from the hand transmitter is received by the CNTV.
MESSAGE
This red LED "lights" when a message has been sent to the classroom in which the unit resides. To turn
"off" the LED, depress the Message button on the transmitter (MRHC) or wired panel (MRWP or
MRWPLCD).
READY
This red LED "lights" when sources have been scheduled and are active for the classroom in which the
unit resides.
T and R
These two red LEDs "light" or flash rapidly when there is communication between the associated control
system and the CNTV. The LEDs should illuminate when power is supplied to the CNTV.
INSTALLATION/SETUP:
Optional Equipment
Due to variations in installation requirements, not all possible peripheral pieces of equipment are supplied
with the CNTV. Table 2 provides a list of all optional equipment that can be used in conjunction with the
CNTV.
Table 2. Optional Equipment
EQUIPMENT
Wall Jack
RJ11 (6-position, 6-pin)
modular telephone
connector cable
R E M O T E
C O N T R O L
S Y S T E M S
PART NUMBER
MANUFACTURER
048-0059-ND
Digi-Key
Digi-Key
Consult catalog
regarding application
requirements.
3
RATIONALE
Provides interface to Cresnet system.
Provides connection to Cresnet system.
DOC. 8105B
CRESTRON CNTV
Cresnet Television Control Unit
Table 2. Optional Equipment (Continued)
EQUIPMENT
PART NUMBER
MANUFACTURER
MRIRP
MRIRP
Crestron
Diagnostic cable (9-pin D
to 6-position, 6-pin
modular telephone jack)
Power Sensor Loop
15676-2
Crestron
N/A
Refer to figure 3.
MRWP
MRWPLCD
MRHC
MRWP
MRWPLCD
MRHC
Crestron
Crestron
Crestron
RATIONALE
Connects system to additional IR devices.
One MRIRP is supplied with CNTV.
Supplied by Crestron (with MRSC) to
provide connection to PC for software setup
and diagnostics. Refer to figure 2.
Detects electromagnetic fields. Use in place
of CNTV-CS or on second TV.
Wired control panel.
Wired control panel with LCD.
IR handheld remote.
Identity Code
The CNTV identity code (ID CODE) consists of a two-digit hexadecimal number. These codes are vital for
proper communication and typically factory set. An ID CODE label is affixed to each unit. The ID CODE can
range from 03 to FE. The ID CODE of each unit must match the ID CODE specified in the SIMPL Windows
program in order for the device to be addressed properly.
If the CNTV ID CODE needs to be altered, it can be set from a PC via CNTV SETUP menus. Refer to the
Appendix in this guide for details that describe the method of setting the CNTV ID CODE.
Power and IR Testing
Power and IR testing consists of equipment placement and running a software test. Placement of sensing
devices must be performed before running the software test. Make proper connections as shown in figure
4. Refer to the Appendix in this guide for details that describe how to run a power sensor test. If a wired
panel is employed, an abridged power sensor test consists of observing illumination of the "POWER" LED
while turning TV power on and off manually.
Power Sensor Placement
Use a CNTV-CS (supplied) or power sensor loop (optional) to detect power from television or other
equipment to be controlled. The CNTV-CS should be plugged into an AC outlet and the television to be
current sensed is plugged into the CNTV-CS. The digital connector of the CNTV-CS is attached to the
DIGITAL IN/OUT back panel connector of the CNTV. Alternatively, a wire loop (as shown in figure 3) can
be constructed and placed in the electromagnetic field of the television flyback transformer. Perform
Power Sensor Test (refer to Enter Test Menu in the Appendix of this guide) to determine if the device is
OFF or ON or in the electromagnetic field.
NOTE
The loop is less reliable than the CNTV-CS, since it depends heavily on position and
the low-power emissions of the television.
R E M O T E
C O N T R O L
S Y S T E M S
4
DOC. 8105B
CRESTRON CNTV
Cresnet Television Control Unit
IR Probe Placement
Place a MRIRP over the IR window on a television or other equipment to be controlled. MRIRP must
completely cover IR window and other extraneous light should be blocked with opaque tape. Turn the TV
on manually. If the TV does not respond to "MUTE" or "VOLUME" commands from the transmitter or
wired panel, change the position of the MRIRP.
Preparation for Use
NOTE
The CNTV should be powered from a 12 VDC power pack. Obtaining power from the
power pack and the network does not result in damage to the unit. If system design
prevents use of power pack (i.e., absence of AC outlet) contact a Crestron technical
support representative for power alternatives.
Crestron recommends specific power packs for its network devices. The recommended power pack for
the CNTV is Crestron part number PW-1205. If an external power pack other than this Crestron model is
obtained, verify that it meets the required specifications and polarity as shown in table 3.
Table 3. DC Power Pack Specifications
CRESTRON POWER PACK
INPUT SPECS
OUTPUT SPECS
PW-1205
120VAC 60Hz 18W
12VDC 500mA
DC Power Pack Polarity
Refer to figure 5 for a typical hook-up diagram of the CNTV within a Cresnet system. Connecting cables
and hardware are not supplied with the unit, due to variations of installation requirements. Crestron
recommends that wall jacks with an RJ11 (6-6) receptacle be located in the room with a CNTV. Use a
telephone cable of appropriate length to connect the CNTV to the wall jack. Wire a Cresnet cable to the
four terminals at the rear of the wall jack.
CAUTION
The modular NET port on the CNTV requires unique wiring. Wiring the port according to
Crestron Network Modular Cable Requirements (latest version of Doc. 5682) will
result in damage to the CNTV.
Due to the wire order within the cable, the connecting color scheme is non-standard and illustrated in
Detail A of Figure 5. Local power is provided, so the fourth wire (+24V) is not needed. If a wall jack
connection is not an option, Detail A also illustrates a direct to Cresnet alternative. Detail B provides a
detailed illustration of the communication cable required if a wired panel is employed as an interface.
R E M O T E
C O N T R O L
S Y S T E M S
7
DOC. 8105B
CRESTRON CNTV
Cresnet Television Control Unit
PROGRAMMING:
The CNTV requires custom configuration in order to program. Prior to closing your order, it was necessary
to complete the Crestron CNTV Worksheet. This worksheet permits Crestron to prepare a specific
configuration file based on the intended use of the CNTV. Append this file to the overall control system
program in SIMPL Windows. For more details regarding programming the CNTV, consult a Crestron
technical representative.
TEST/TROUBLESHOOTING:
Table 4 provides corrective action for possible trouble situations. If further assistance is required, please
contact a Crestron technical representative.
Table 4. Troubleshooting Guide
TROUBLE
POSSIBLE CAUSE(S)
TV is not responding to hand control.
TV is not responding to hand control.
MESSAGE LED is illuminated.
R E M O T E
C O N T R O L
S Y S T E M S
CORRECTIVE ACTION
Batteries in hand control may be dead.
Interference with IR commands from
other source or obstructions.
Replace batteries.
Verify a direct line-of-sight path
between the emitters at the top of
the hand control and the IR receptor
on the CNTV front panel. Do not
allow direct sunlight or other light
sources to shine directly on the
CNTV IR receptor.
Transmitter is near maximum range.
Move closer and try again until IR
LED "lights" when a button is
depressed.
IR transmitter in hand control may not be Correct the position of the hand
pointed directly at CNTV.
control or the position of the CNTV
for optimum performance.
Power sensor may not be attached to
Verify that power sensor is correctly
TV.
positioned. Perform Power Sensor
Test, refer to Enter Test Menu in this
guide.
IR probe may not be attached to TV.
Verify that IR probe is correctly
positioned. Depress the MUTE
button to see if the TV responds.
Incorrect IR driver assigned for TV
Verify make of TV and obtain correct
(during installation only).
IR driver number from Crestron.
Call media center to obtain message.
Message has been sent to the
classroom by the headend or scheduling Depress Message button to
extinguish MESSAGE LED.
computer.
9
DOC. 8105B
CRESTRON CNTV
Cresnet Television Control Unit
Table 4. Troubleshooting Guide (Continued)
TROUBLE
POSSIBLE CAUSE(S)
READY LED is not illuminated.
T and R LEDs are not illuminated.
CORRECTIVE ACTION
Event is not scheduled for this classroom Call media center to check
at the current time.
scheduling time. Verify correct date
and time (AM or PM).
Scheduled event has not been prepared. Call media center to determine if
event is prepared.
Communication between scheduling
Check the message window on the
computer and CNTV has been disrupted. scheduling computer to determine if
a network failure has occurred.
Check that the scheduling software
(SchoolNet) is running.
Check all connections between PC
and network.
Verify that the ID for the CNTV is
properly set to match the SIMPL
program and scheduling computer.
CNTV is not communicating with its
Verify that power is supplied to the
associated control system.
CNTV and control system.
Verify that the ID for the CNTV is
properly set to the network ID which
matches the SIMPL program.
FURTHER INQUIRIES:
If after reviewing this Operations Guide for the CNTV, you cannot locate specific information or have
questions, please take advantage of Crestron's award winning technical support team by calling:
In the US and Canada, call Crestron's corporate headquarters at 1-888-CRESTRON
[1-888-273-7876] or 1-201-767-3400.
In Europe, call Crestron International at +32-15-50-99-50.
In Asia, call Crestron Asia at +852-2341-2016.
In Latin America, call Crestron Latin America at +525-574-15-90.
For local support from exclusive Crestron factory-trained personnel call:
In Australia, call Soundcorp at +613-9488-1555.
In New Zealand, call Amber Technologies at +649-410-8382.
R E M O T E
C O N T R O L
S Y S T E M S
10
DOC. 8105B
CRESTRON CNTV
Cresnet Television Control Unit
APPENDIX
Software Setup and Diagnostics
CNTV setup parameters and diagnostic tools are accessible via a PC. A diagnostic cable, illustrated in
figure 2, is used to connect the PC to COM1 port of the CNTV for setup and diagnostic purposes.
Connect a computer running a terminal emulator, such as Windows Terminal (included with WindowsTM),
ProComm Plus, or Telix. Set the communication parameters and text transfer parameters, as follows.
1.
From the Windows Terminal program (Accessories menu), select Settings and Communications to
open the Communications dialog box.
2.
Alter the terminal's communication parameters. Crestron requires the following settings.
Baud Rate:
Data Bits:
Parity:
Stop Bits:
19200
8
None
1
The COM port on the PC is open to the discretion of the user. The Communications dialog box will
appear, as shown below.
3.
R E M O T E
C O N T R O L
Click OK. The program assigns communication parameters.
S Y S T E M S
11
DOC. 8105B
CRESTRON CNTV
4.
Cresnet Television Control Unit
Select Settings and Text Transfers to open the Text Transfers dialog box.
5. Select "Line at a Time" Flow Control. The Text Transfers dialog box will appear, as shown below.
6.
Click OK. The program alters the flow control to provide support for ASCII file transfers with a 0.1
second delay between lines.
MRMT11 Setup Menus
The MRMT11 SETUP menus can be accessed only after connecting the communication port of the PC
(specified in the previous section) to the COM1 port of the CNTV with the diagnostic cable and applying
power. Refer to the Preparation for Use section for details that describe CNTV power connections.
Immediately after applying power to the CNTV, depress the letter "x" on the keyboard. The menu
selections are not case sensitive. The MRMT11 Setup Menu appears on the screen as six lines of text.
MRMT11 Setup Menu
1 - Net ID Tasks
2 - Downloading Tasks
3 - Configuration Information
4 - Enter Test Menu
0 - Return to normal operation
The menu consists of five options. Selection is made by depressing the appropriate number for each menu
option.
Net ID Tasks
Depressing "1" from the MRMT11Setup Menu opens the Net ID Setup Menu which appears on the
screen as four lines of text.
R E M O T E
C O N T R O L
S Y S T E M S
12
DOC. 8105B
CRESTRON CNTV
Cresnet Television Control Unit
Net ID Setup Menu
1 - Display Current Net ID
2 - Enter new Net ID
0 - Return to previous menu
To display the current CNTV ID CODE setting, depress "1". To enter a new CNTV ID CODE, depress "2",
enter the new ID CODE, and depress "Enter". The program responds by displaying the ID CODE as
verification. Refer to the Identity Code section of this guide for details on choosing a proper ID CODE. To
return to the MRMT Setup Menu, depress "0".
Downloading Tasks
Depressing "2" from the MRMT11 Setup Menu opens the MRMT11 Downloading Tasks Menu which
appears on the screen as six lines of text.
MRMT11 Downloading Tasks Menu
1 - Load Scratch Page
2 - Verify Scratch Page
3 - Program Data
4 - Program Code
0 - Return to previous menu
The options available from the MRMT11 Downloading Tasks Menu are beyond the scope of this
operations guide and should only be used under supervision from a Crestron technical support
representative during telephone support.
Configuration Information
Depressing "3" from the MRMT11 Setup Menu opens the MRMT11 Retrieve Information Menu which
appears on the screen as six lines of text.
MRMT11 Retrieve Information Menu
1 - Firmware Version
2 - Current Configuration File Name
3 - Show all Configuration Files
4 - Change Current Configuration File
0 - Return to previous menu
The options available from the MRMT11 Retrieve Information Menu are beyond the scope of this
operations guide and should only be used under supervision from a Crestron technical support
representative during telephone support.
Enter Test Menu
Depressing "4" from the MRMT11 Setup Menu opens the MRMT11 Test Menu which appears on the
screen as four lines of text.
MRMT11 Test Menu
1 - Power Sensor Test
2 - VersiPort Tests
0 - Return to previous menu
R E M O T E
C O N T R O L
S Y S T E M S
13
DOC. 8105B
CRESTRON CNTV
Cresnet Television Control Unit
To display the MRMT11 Power Sensor Test Menu and begin power sense testing, depress "1". To
display the CNTV VersiPort Test Menu and begin testing, depress "2". To return to the MRMT11 Setup
Menu, depress "0".
Power Sensor Tests
Depressing "1" from the MRMT11 Test Menu opens the MRMT11 Power Sensor Test Menu
which appears on the screen as four lines of text.
MRMT11 Power Sensor Test Menu
1 - Power Sensor 1
2 - Power Sensor 2
0 - Return to previous menu
Before beginning a power sensor test, refer to figure 4 for wiring connections of the power
sense (PWR SENSE) and infrared output (IR OUT) ports of the CNTV. The figure provides
connections to one or two TVs. The test requires additional equipment: CNTV-CS, MRIRP, and
possibly a power sensor loop. The quantity of each piece of equipment depends one whether one
or two TVs are being sensed. A single CNTV-CS and MRIRP is shipped with each CNTV. The
power sensor loop is a make item (not supplied). Figure 3 describes the loop materials and how
to make one. If the CNTV is driving more than one TV, an additional MRIRP must be ordered.
To initiate the Power Sensor Test for the power sense (PWR SENSE) 1 port, depress "1". To
initiate the Power Sensor Test for the power sense (PWR SENSE) 2 port, depress "2". To return
to the MRMT11 Test Menu, depress "0".
The MRMT11 Power Sensor Test for either port begins by the PC prompting the user to depress
the space bar to initialize the test. Turn on power to the TV. As long as the power sensor
hardware is detecting power, an asterisk (*) appears on the screen every quarter second. If the
power sensor hardware is not detecting power, a dash (-) appears on the screen at quarter
second intervals. Move the loop while watching the screen to determine the best placement of
the sensors. To end the test, depress the space bar.
VersiPort Tests
Depressing "2" from the MRMT11 Test Menu opens the MRMT11 VersiPort Test Menu which
appears on the screen as six lines of text.
MRMT11 VersiPort Test Menu
1 - Test Digital Inputs
2 - Read Analog Inputs
3 - Set Analog Input Thresholds
4 - Test Analog Inputs
0 - Return to previous menu
There are four types of VersiPort tests. Selection is made by depressing the appropriate number
for each menu option.
R E M O T E
C O N T R O L
S Y S T E M S
14
DOC. 8105B
CRESTRON CNTV
Cresnet Television Control Unit
Test Digital Inputs
Depressing "1" from the MRMT11 VersiPort Test Menu opens the MRMT11 VersiPort Digital
Input Test Menu which appears on the screen as six lines of text.
MRMT11 VersiPort Digital Input Test Menu
1 - VersiPort 1
2 - VersiPort 2
3 - VersiPort 3
4 - VersiPort 4
0 - Return to previous menu
To initiate the VersiPort Digital Input Test for each pin in the DIGITAL IN/OUT port, depress the
corresponding menu number. For example, to test pin 1, depress 1 on the keyboard.
The MRMT11 VersiPort Digital Input Test begins by the PC prompting the user to depress the
space bar to initialize the test. As long as the VersiPort is detecting an active signal, an asterisk
(*) appears on the screen every quarter second. If the VersiPort is not detecting an active
signal, a dash (-) appears on the screen at quarter second intervals. An active signal is defined
by a contact closure to ground or TTL logic "0". Inactive signals are defined as open or TTL logic
"1". To end the test, depress the space bar.
Read Analog Inputs
Depressing "2" from the MRMT11 VersiPort Test Menu opens the MRMT11 VersiPort Display
Analog Input Menu which appears on the screen as six lines of text.
MRMT11 VersiPort Display Analog Input Menu
1 - VersiPort 1
2 - VersiPort 2
3 - VersiPort 3
4 - VersiPort 4
0 - Return to previous menu
To initiate a reading of the VersiPort Analog Input for each pin in the DIGITAL IN/OUT port,
depress the corresponding menu number. For example, to test pin 1, depress 1 on the keyboard.
The MRMT11 VersiPort Display Analog Input begins by the PC prompting the user to depress
the space bar to initialize the reading. The actual value read from the VersiPort is displayed on
the screen every quarter second. Acceptable input levels range between 0 and 5 volts or
contact closure (equivalent to logic "0"). Readings are provided in a two-digit hexadecimal
format. The values range from 00 to FF which corresponds to 0 to 5 volts (e.g., 40 is equivalent
to 1.25 volts, 80 is equivalent to 2.50 volts, etc.). To end the test, depress the space bar.
Set Analog Input Thresholds
Depressing "3" from the MRMT11 VersiPort Test Menu opens the MRMT11 VersiPort Set
Analog Threshold Menu which appears on the screen as six lines of text.
R E M O T E
C O N T R O L
S Y S T E M S
15
DOC. 8105B
CRESTRON CNTV
Cresnet Television Control Unit
MRMT11 VersiPort Set Analog Threshold Menu
1 - VersiPort 1
2 - VersiPort 2
3 - VersiPort 3
4 - VersiPort 4
0 - Return to previous menu
To set the VersiPort Analog Threshold for each pin in the DIGITAL IN/OUT port, depress the
corresponding menu number. Therefore , to set pin 1, depress 1 on the keyboard. Enter two
hexadecimal digits as the threshold value for each VersiPort pin. For example, entering the
hexadecimal value of 40 (1.25 volts) is a good threshold for TTL logic.
Test Analog Inputs
Depressing "4" from the MRMT11 VersiPort Test Menu opens the MRMT11 VersiPort Analog
Input Test Menu which appears on the screen as six lines of text.
MRMT11 VersiPort Analog Input Test Menu
1 - VersiPort 1
2 - VersiPort 2
3 - VersiPort 3
4 - VersiPort 4
0 - Return to previous menu
To initiate the VersiPort Analog Input Test for each pin in the DIGITAL IN/OUT port, depress the
corresponding menu number. For example, to test pin 1, depress 1 on the keyboard.
The MRMT11 VersiPort Analog Input Test begins by the PC prompting the user to depress the
space bar to initialize the test. This test indicates whether the threshold value is exceeded. As
long as the value read at the VersiPort is greater than or equal to the threshold value, an
asterisk (*) appears on the screen every quarter second. If the value read at the VersiPort is
less than the threshold value, a dash (-) appears on the screen at quarter second intervals. To
end the test, depress the space bar.
R E M O T E
C O N T R O L
S Y S T E M S
16
DOC. 8105B
CRESTRON CNTV
Cresnet Television Control Unit
RETURN AND WARRANTY POLICIES:
Merchandise Returns / Repair Service
1.
No merchandise may be returned for credit, exchange, or service without prior authorization from
CRESTRON. To obtain warranty service for CRESTRON products, contact the factory and request an
RMA (Return Merchandise Authorization) number. Enclose a note specifying the nature of the
problem, name and phone number of contact person, RMA number, and return address.
2.
Products may be returned for credit, exchange, or service with a CRESTRON Return Merchandise
Authorization (RMA) number. Authorized returns must be shipped freight prepaid to CRESTRON,
Cresskill, N.J., or its authorized subsidiaries, with RMA number clearly marked on the outside of all
cartons. Shipments arriving freight collect or without an RMA number shall be subject to refusal.
CRESTRON reserves the right in its sole and absolute discretion to charge a 15% restocking fee,
plus shipping costs, on any products returned with an RMA.
3.
Return freight charges following repair of items under warranty shall be paid by CRESTRON, shipping
by standard ground carrier. In the event repairs are found to be non-warranty, return freight costs
shall be paid by the purchaser.
CRESTRON Limited Warranty
CRESTRON ELECTRONICS, Inc. warrants its Cresnet products, denoted by a "CN" prefix model number,
to be free from manufacturing defects in materials and workmanship for a period of three (3) years from
the date of shipment to purchaser. Disk drives and any other moving or rotating mechanical parts are
covered for a period of one (1) year. CRESTRON warrants all its other products for a period of one year
from the defects mentioned above, excluding touchscreen display components which are covered for 90
days. Incandescent lamps are completely excluded from Crestron's Limited Warranty. CRESTRON shall, at
its option, repair or replace any product found defective without charge for parts or labor. Repaired or
replaced equipment and parts supplied under this warranty shall be covered only by the unexpired portion
of the warranty.
CRESTRON shall not be liable to honor warranty terms if the product has been used in any application
other than that for which it was intended, or if it has been subjected to misuse, accidental damage,
modification, or improper installation procedures. Furthermore, this warranty does not cover any product
that has had the serial number altered, defaced, or removed.
This warranty shall be the sole and exclusive remedy to the purchaser. In no event shall CRESTRON be
liable for incidental or consequential damages of any kind (property or economic damages inclusive)
arising from the sale or use of this equipment. CRESTRON makes no other warranties nor authorizes any
other party to offer any warranty, expressed or implied, including warranties of merchantability for this
product. This warranty statement supersedes all previous warranties.
Trademark Information
All brand names, product names, and trademarks are the sole property of their respective owners. Windows is a
registered trademark of Microsoft Corporation. Windows95, Windows98 and WindowsNT are trademarks of
Microsoft Corporation.
R E M O T E
C O N T R O L
S Y S T E M S
17
DOC. 8105B