1
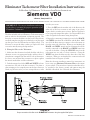
0RXQWLQJ&XS 5(&$// 7$&+ 5306(7 &/($5 &DS1XW .H\SDG 6KLIW/LJKW 'LJLWDO'LVSOD\ 7\SH%XOE 6HOHFWRU6ZLWFKHV Diagram D Top Eliminator Dimensions and Switch Settings 4. After you have correctly positioned the selector switches to exactly match your cylinder and ignition type, reassemble the mounting cup to the rear of the tachometer with the four (4) cap nuts. II. Mounting the Tachometer 1. Select a location to mount the tachometer. Eliminator Tachometers can be mounted in four different ways, depending on your preference. They can be: ¶ Column or roll bar mounted. A short contoured foot is included so you can mount the tachometer this way. · In-dash shock mounted. ¸ In-dash flush mounted with an optional U-bracket (#240 104). ¹ Top-dash mounted with an optional long foot (#240 103) for stability. 2. Mount the tachometer, making sure it does not rest against glass, the windshield post, or the roll bar. (NOTE: To ensure proper operation, don't mount the tachometer too close to any electrical items like an ignition system box, coils, or an electrical fuel pump. The wires from these shouldn't be routed by the tachometer, either.) Recommended installation is on the steering column using a band clamp available at any local auto parts store. In some instances the drilling of new holes for the repositioning of the keypad may be necessary. For mounting on the dash, use the optional long mounting bracket #240 103. Use the holes provided in the bracket to secure the tachometer. Flush dash mounting requires a 4¾" hole and the optional U-bracket #240 104. For competition dash mounting, the rubber mounting grommet supplied can be used. This requires a 3½" hole. Remove the rubber grommet from the mounting ring and place the tachometer into the hole. The mounting cup can be used for a mounting bracket. Mounting without the grommet requires a 3 3/16 " hole. If the dash panel is ½" thick or less, the mounting cup can be used for a bracket. Or, use a modified in-dash bracket #240 104. 3. The keypad can be remote mounted using the optional 6' remote cable #240 207. Remove the keypad from the mounting ring, then remove the mounting cup. Unplug the cable from the back of the tach housing. Insert the male end of the extension cable into the back of the tach. Then insert the male end of the control pad cable into the female end of the extension cable. Reattach the mounting cup, then mount the keypad in the location of your choice. III. Wiring the Tachometer 1. Remove the key from the ignition and disconnect the negative terminal from the battery post. 2. Wire the tachometer to the vehicle as shown in Diagram H on Page 4. Please understand that proper wiring must be maintained throughout your vehicle. If it isnt, the tachometer may pick up signals that have been produced by electrical devices other than the ignition system. Dont coil up excess tachometer wires during installation. Cut wires and cables to length, and route them making sure they cant be Page 3