1
Attaching the S50V to the Rack
Warning: As with all electrical devices of this type, take all necessary safety precautions to prevent injury
when installing the system. Electrostatic discharge (ESD) damage can occur if components are
mishandled. Always wear an ESD-preventive wrist or heel ground strap when handling the switch and its
components.
Warning: For fan maintenance and proper ventilation, position the switch in an equipment rack (or
cabinet) with a minimum of five inches (12.7 cm) of clearance around the side intake and exhaust vents.
Warning: The site where the switch is placed should be a dry, clean, well-ventilated, and
temperature-controlled room, away from heat sources such as hot air vents or direct sunlight, and have an
environmental temperature between 32° – 122°F (0° – 40°C).
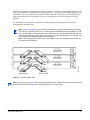
The S50V is shipped with universal front-mounting brackets (rack ears) attached. The screws for attaching
those ears to a standard 19-inch rack are in the bag that also contains the S-Series CD-ROM.
Position the S50V chassis in the rack. Secure the chassis with two screws through each bracket and onto
the rack post.
fn00147as50V
Figure 1 Front-mounting the S50V
Note: The front-mounting installation above is one of several installation options contained in the
book Installing the S50V System. Other options include rear mounting, four-post mounting, and
table-mounting.
Connecting Stacking Ports (optional)
You can connect up to eight switches (S25P and S50V) together through their stack ports to configure them
to act as a unified system, called a stack.
Note: The original S50 model stacks only with other switches of that model.
8
Installing the Hardware