1
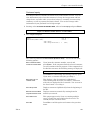
GETTING
STARTED
© 2001
Enterprise Computer Systems, Inc.
Dim11 (Rev. 11.0)
NOTICE
This manual is designed to enhance your Dimensions system capabilities. It is your responsibility to determine that this
information is in accordance with your own business procedures.
Enterprise Computer Systems, Inc. has prepared this document for use by Enterprise associates, customers, and prospective
customers. The information herein shall not be reproduced in whole or part without the prior approval of Enterprise
Computer Systems, Inc.
Enterprise Computer Systems, Inc. reserves the right to make changes in specifications and other information in this
document without prior notice, and you should in all cases consult Enterprise Computer Systems, Inc. to determine if such
changes have been made.
In no event shall Enterprise Computer Systems, Inc. be liable for any incidental, indirect, special or consequential damages
whatsoever (including but not limited to lost profits) arising out of or related to this document or the information in it.
Enterprise Computer Systems, Inc.
4910 Amelia Earhart Drive, Suite. 100
Salt Lake City, UT 84116
Corporate Headquarters:
Enterprise Computer Systems, Inc.
PO Box 2383
Greenville, SC 29602-2383
www.ecs-inc.com
© Enterprise Computer Systems, Inc. 2001. Produced in the United States of America. All rights reserved.
GETTING STARTED USER MANUAL
DIM11 (Rev. 11.0)
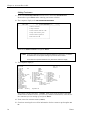
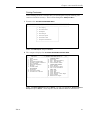
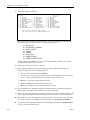
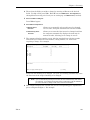
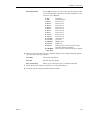
TABLE OF CONTENTS
Introduction to Getting Started................................................ 1
About This Manual...........................................................................................................1
Pick a System Manager....................................................................................................1
Ordering Forms, Paper & Supplies .................................................................................1
Implementation Process...................................................................................................2
The Phases of Implementation ........................................................................................3
Hotline Support ................................................................................................................3
Our Commitment..............................................................................................................4
Chapter 1. Hardware Training ................................................. 5
Site Planning Guide ................................................................................................................6
Temperature & Humidity Requirements........................................................................6
Adequate Air Flow & Cooling ..........................................................................................6
Noise ..................................................................................................................................6
Power Requirements ........................................................................................................6
Electrical Considerations .................................................................................................7
Phone Requirements ........................................................................................................7
Places to Avoid Locating the Computer ..........................................................................8
Cabling .......................................................................................................................................9
Computer Hardware Components.....................................................................................11
Descriptions & Illustrations...........................................................................................11
Care & Cleaning .............................................................................................................16
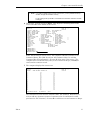
Chapter 2. System Training..................................................... 21
Booting Up the System – SuperDOS..................................................................................22
“Cold” Boot (aka “hard” boot) ........................................................................................22
“Warm” Boot (aka “soft” boot) ........................................................................................22
Booting Up the System – Unix ............................................................................................24
“Cold” Boot (aka “hard” boot) ........................................................................................24
“Warm” Boot (aka “soft” boot) ........................................................................................24
Passwords - SuperDOS .........................................................................................................25
Password Screen .............................................................................................................25
“Live” Data vs. “Play” Data............................................................................................26
Menus ..............................................................................................................................27
Passwords – Unix ...................................................................................................................29
Login Screen ...................................................................................................................29
“Live” Data vs. “Play” Data............................................................................................30
Menus ..............................................................................................................................31
Keyboard..................................................................................................................................33
Table of Contents
System Prompt (>) - SuperDOS ..........................................................................................35
BYE..................................................................................................................................35
M ......................................................................................................................................35
System Prompts - Unix .........................................................................................................36
exit ...................................................................................................................................36
m ......................................................................................................................................36
User Groups - SuperDOS......................................................................................................37
File Structure..........................................................................................................................38
File...................................................................................................................................38
Record..............................................................................................................................38
Field.................................................................................................................................39
Key...................................................................................................................................39
File Maintenance Guidelines ..............................................................................................40
Edit Options (A,V,E,?) ....................................................................................................40
Printing Reports ....................................................................................................................42
Batches .....................................................................................................................................45
On-Line Help System ............................................................................................................47
On-Line Help Files .........................................................................................................47
On-Line Help Programs .................................................................................................47
Using On-Line Help Programs ......................................................................................48
Custom Help ...................................................................................................................48
Guidelines for Backup ..........................................................................................................50
What Is a Backup?..........................................................................................................50
Why Do I Back Up? ........................................................................................................50
When Do I Back Up? ......................................................................................................50
How Do I Back Up?.........................................................................................................50
Where Do I Get the Backup Tapes? ..............................................................................50
How Do I Care for the Tapes?........................................................................................51
Backup Procedures (using “BACKUP” job)...................................................................51
Conventions Used in the User Manuals ...........................................................................52
Manual Organization .....................................................................................................52
Type Used in Dim3D (Rev. 10.0) User Manuals...........................................................52
Chapter 3. “Go Live” Tracks .................................................... 54
1.
2.
3.
4.
5.
A/R Invoice Posting ...................................................................................................55
Point of Sale (computer-generated invoices)............................................................57
Inventory Control with Physical Count & Purchasing/Receiving ..........................59
Accounts Payable .......................................................................................................60
General Ledger ..........................................................................................................61
Chapter 4. Accounts Receivable ............................................. 64
A/R Overview ..................................................................................................................64
Customer Files................................................................................................................66
Getting A/R Started ...............................................................................................................68
Basic Customer Data......................................................................................................69
Numbering Accounts ......................................................................................................71
Getting into A/R..............................................................................................................74
Adding Customers ..........................................................................................................76
Table of Contents
Changing Customer Information ..................................................................................79
Printing Customers ........................................................................................................81
Deleting Customers ........................................................................................................84
Values Worksheet...........................................................................................................85
A/R Values Load Form ...................................................................................................93
Entering Values for Customers .....................................................................................95
Entering Variable File Information ..............................................................................99
Doing A/R Cutover........................................................................................................111
Customer Inquiry .........................................................................................................129
Sample Customers........................................................................................................134
Accounts Receivable Exercises ........................................................................................140
Chapter 5. Inventory ............................................................... 141
Inventory Overview......................................................................................................141
Inventory Files..............................................................................................................144
Getting Inventory Started .................................................................................................147
Numbering Inventory...................................................................................................148
Sample Group/Section Map .........................................................................................153
Group/Section Worksheet ............................................................................................157
Getting into Inventory .................................................................................................158
Entering Department, Group, & Section Descriptions ..............................................161
Basic Inventory Data....................................................................................................165
Adding Items.................................................................................................................178
Changing Item Information .........................................................................................180
Printing Items...............................................................................................................182
Deleting Items ..............................................................................................................184
Costs & Prices ...............................................................................................................186
Print Price Book............................................................................................................195
Inventory Inquiry .........................................................................................................198
Sample Items ................................................................................................................202
Inventory Exercises ............................................................................................................222
Chapter 6. Accounts Payable................................................. 223
Accounts Payable Overview .........................................................................................223
Vendor Files ..................................................................................................................225
Getting A/P Started .............................................................................................................226
Basic Vendor Data........................................................................................................227
Numbering Accounts ....................................................................................................230
Getting into A/P ............................................................................................................231
Adding Vendors ............................................................................................................233
Changing Vendor Information.....................................................................................235
Printing Vendors ..........................................................................................................238
Deleting Vendors ..........................................................................................................241
Entering Variable File Information ............................................................................242
Doing A/P Cutover........................................................................................................251
Vendor Inquiry .............................................................................................................259
Sample Vendors ............................................................................................................267
Accounts Payable Exercises..............................................................................................272
Table of Contents
Chapter 7. General Ledger..................................................... 273
General Ledger Overview ............................................................................................273
G/L Files ........................................................................................................................275
Flow of G/L Data...........................................................................................................276
Getting G/L Started .............................................................................................................277
Determining G/L Posting Method for Sales ................................................................277
Deciding Which Chart of Accounts to Use ..................................................................280
Getting into G/L............................................................................................................281
Changing GM1 Descriptions........................................................................................283
Adding GM1 Balances ..................................................................................................285
Printing Financial Statements ....................................................................................291
Sample General Ledgers ....................................................................................................296
Chapter 8. Point of Sale (POS) .............................................. 315
Point of Sale Overview .................................................................................................315
Sales Files .....................................................................................................................317
Getting POS Started............................................................................................................318
Getting into the Sales Variable File ............................................................................319
Getting into the Accounts Receivable Variable File...................................................348
Getting into the General Ledger Variable File...........................................................350
Getting into the System Manager Variable File ........................................................352
Run a Partial Day End .................................................................................................356
APPENDIX A: Terminals & Printers................................... 358
Terminals ......................................................................................................................358
Printers .........................................................................................................................358
Terminals ...............................................................................................................................359
IBM 3151 ..............................................................................................................................359
Set Up Mode..................................................................................................................359
Default Parameters ......................................................................................................359
Function Key Setup ......................................................................................................360
IBM 3153 ..............................................................................................................................361
Set Up Mode..................................................................................................................361
Default Parameters ......................................................................................................362
Function Key Setup ......................................................................................................363
WYSE 50...............................................................................................................................364
Set Up Mode..................................................................................................................364
Default Parameters ......................................................................................................364
Function Key Setup ......................................................................................................364
WYSE 55...............................................................................................................................366
Set Up Mode..................................................................................................................366
Default Parameters ......................................................................................................366
Function Key Setup ......................................................................................................367
WYSE 60...............................................................................................................................368
Set Up Mode..................................................................................................................368
Default Parameters ......................................................................................................368
Function Key Setup ......................................................................................................369
WYSE 150.............................................................................................................................370
Set Up Mode..................................................................................................................370
Default Parameters ......................................................................................................370
Table of Contents
Function Key Setup ......................................................................................................371
Terminal Trouble Shooting .................................................................................................372
Printers ..................................................................................................................................373
OKIDATA 292 ......................................................................................................................373
Menu Selection .............................................................................................................373
Standard Printer Settings (Okidata emulation)........................................................373
OKIDATA 320/321 ...............................................................................................................374
Menu Selection .............................................................................................................374
Standard Printer Settings (Okidata emulation).........................................................374
OKIDATA 3410 - PARALLEL & SERIAL..........................................................................375
Menu Selection .............................................................................................................375
Standard Printer Settings (Okidata 3410-Parallel & Serial) ....................................376
Printer Trouble Shooting ....................................................................................................377
APPENDIX B: Exercise Solutions........................................ 379
Accounts Receivable Exercises ........................................................................................380
Inventory Exercises ............................................................................................................384
Accounts Payable Exercises..............................................................................................388
APPENDIX C: Field Definitions........................................... 393
Add New Customers ............................................................................................................394
Customer Master File (CM1.D) Fields: .......................................................................394
Customer Misc. File (CM2.D) Fields: ..........................................................................400
Extra Signatures File (CM14.D) Fields: .....................................................................401
Customer Credit File (CM10.D) Fields: ......................................................................402
Add New Items......................................................................................................................403
Inventory Static Data File (IM1.D) Fields: .................................................................403
Inventory Store Data File (IM2.D) Fields:..................................................................419
Multiple Vendor File (OM4.D) Fields:.........................................................................423
Multiple Location File (IM9.D) Fields:........................................................................424
Bar Code File (BC1.D) Fields:......................................................................................425
Add New Vendors.................................................................................................................426
Main Vendor File (AM1.D) Fields: ..............................................................................426
Vendor Message/Fax File (AM2.D) Fields: .................................................................430
Add/Maintain G/L Master...................................................................................................432
G/L Master File (GM1.D) Fields: .................................................................................432
APPENDIX D: System Manager Handbook ....................... 437
Introduction ..................................................................................................................437
Part 1: Passwords ................................................................................................................438
SuperDOS Password List ................................................................................................438
PASSWORDFM – How to Create New Password ..........................................................440
MG500– How to Assign a Menu to a Password..............................................................443
Print a Password List.......................................................................................................445
Expand a Password File ..................................................................................................446
Part 2: Menus ........................................................................................................................447
Maintain Menu File .........................................................................................................448
Table of Contents
C. Change ......................................................................................................................449
D. Delete........................................................................................................................451
H. Heading ....................................................................................................................453
I. Insert..........................................................................................................................453
V. View ..........................................................................................................................454
Print Menus......................................................................................................................455
Part 3: Error Messages .......................................................................................................456
System Failures................................................................................................................456
Exception Errors ..............................................................................................................456
BASIC & SuperDOS Errors.............................................................................................457
Program Errors ................................................................................................................458
Miscellaneous Error .........................................................................................................458
Part 4: What to Do in Case of …........................................................................................459
Power Failure ...................................................................................................................459
Electrical Storm................................................................................................................460
Part 5: Variable File Options for Inventory & A/R ......................................................461
Add IM1/IM2 Fields .........................................................................................................461
Add/Maintain CM1/CM2 Fields ......................................................................................462
A/R Inquiry Fields............................................................................................................464
INDEX......................................................................................... 466
Introduction
Introduction to Getting Started
About This Manual
Welcome! Thank you for selecting Dimensions as your computer system. We
think you will be pleased with your decision.
Getting Started is a comprehensive guide that contains the procedures you need to
get the Dimensions system started. To help you learn and use the software
efficiently, this manual is organized by module. Each chapter contains
information on starting a different module. In addition, the appendixes provide
reference materials referred to throughout this manual. Refer to the Table of
Contents for a list of what is contained in this manual.
We want you to understand how important you are to us and how deter-mined we
are to provide you with the finest product available, supported by an aggressive,
knowledgeable implementation and support staff. You have purchased the system
of choice for today’s successful companies and we feel that the following
procedures will help us help you.
Pick a System Manager
One of your employees will be appointed the System Manager and will be
responsible for learning the system completely. This person should have a good
understanding of day-to-day business and operational procedures. They should
also have access to your company’s accountant. This person will be adequately
trained to train others in your organization, including new employees hired at
later dates. The System Manager is the person who should be consulted within
your organization if there is a question or problem and who calls Dimensions
support. This also insures that your employees won’t be duplicating efforts by
calling in with individual questions, which someone in your staff can already
answer. We feel that the system works best for you when your people have a good
background in every aspect of its operation. This knowledge grows to be an
important asset for your company.
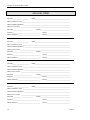
Assign a System Manager: _____________________________________________
Assistant System Manager
We also recommend that the System Manager train an assistant to fill in during
times of illness, vacation, or extended absence.
Assign an Assistant System Manager: ___________________________________
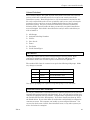
Ordering Forms, Paper & Supplies
Forms
Document Solutions is the division of Enterprise that provides the following forms,
paper and supplies:
Dim11
1
Introduction
Ø
Ø
Ø
Ø
Ø
Ø
Invoices
Quotes/Orders
Statements
Checks (Accounts Payable and Payroll)
Price stickers and bin labels
Mailing labels
At the time contracts are signed and processed, a document specialist and inside
sales rep from Document Solutions are assigned to you. The document specialists
for Dimensions are:
Linda Byrne
Bernice Murdock
(800) 569-6309 #5533
(800) 569-6309 #5535
Enterprise Document Solutions
One Independence Point
P.O. Box 2423
Greenville, SC 29602
Computer Paper
You will also need to purchase some regular, blank continuous form computer
paper for report printing purposes. This can be obtained from Document Solutions
or from a local computer/office supply store. You will want single-part, 9-1/2 x 11”
paper. A paper weight of 12 to 20 lbs. will work well. Do not get blank paper
forms with the micro-fine or laser-cut perfs as this type of paper seems to jam
easily in printers.
Supplies
Ø Data tape cartridges (backup tapes)
Ø 3.5” diskettes (HD)
You will receive a small supply of these items with your new system. When you
need more, you can get them through Document Solutions or a local
office/computer supply store.
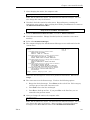
Implementation Process
The basic goals of the implementation process are installing a new computer
system and corresponding software in your place of business and then training
your organization with the tools to successfully and profitably use the system to
operate your business. There are many steps involved in doing this. There are
also many factors that influence the progression of the implementation process.
Some of the questions that need to be addressed are:
Ø How many people do you have on your staff and how much time can they
devote to learning a new computer system?
Ø What is the prior computer experience of your staff?
Ø How many devices (terminals and printers) will there be in your new
system?
2
Dim11
Introduction
Ø Are you using existing computer equipment (computers, terminals,
printers, and so forth)?
Ø Is your business one physical store or perhaps several different locations?
How long does it take to get from one location to another?
Ø Is data from an existing computer system being converted to the
Dimensions system?
Ø Do you have custom programming needs?
Ø Are you using custom or standard forms for documents such as invoices,
pick tickets, statements, and checks?
Ø What are the overall scheduling considerations?
All of the above factors, as well as many others, can impact the length and
progress of a successful computer installation.
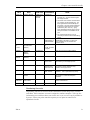
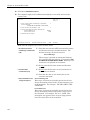
The Phases of Implementation
The general implementation process can be separated into 4 broad and flexible
categories.
1 Pre-installation phase Work in this phase prepares the computer for the
installation.
2 Phase I training
This is when the computer is installed and the
appropriate software training is conducted.
3 Phase II or
“Go Live” training
“Go Live” is when you begin to using the computer for
sales, purchasing, A/R, A/P, payroll, etc. More training is
needed at this stage.
4 Follow-up phase
Sometimes a follow-up stage is required for fine tuning
the entire system--hardware, software, training, etc.
These categories are only guidelines. Sometimes circumstances may dictate
significant changes to the implementation process. Dimensions will be as flexible
as possible and make every effort to perform the installation according to your
individual needs.
Hotline Support
You will have a special team of support analysts assigned to you during your
initial months of training. They are experts in training on all aspects of the
Dimensions system. Call hotline support at 1-800-755-5911 and enter extension
173. The support operator will take your call and log it into our call tracking
system. Our regular business hours are Monday through Friday, 6 am to 6 pm,
Mountain Time. We also have an after hours service that will contact the support
analyst for emergency calls outside our regular hours and on holidays. All we ask
is that you use these extended hours for emergencies only. If you have an
emergency outside these hours, you can still contact a support analyst.
Emergencies include problems that are of a nature that cannot wait until the next
regularly scheduled business day to be resolved. Non-emergency calls will be
billable at our standard rate. To reach the support analyst on call, call the 800
number above and dial extension 300. Leave your name, phone number and a
brief description of your question or problem. Please allow thirty minutes for a
response.
Dim11
3
Introduction
Our Commitment
Our system has been designed with a great deal of emphasis on making it both
powerful and flexible. We feel that the time taken to learn the proper use of the
system provides you with its own rewards. As always, we welcome any
suggestions or comments you have and we appreciate your feedback. We are
looking forward to working with you to make the future a success. Thank you
again for selecting Dimensions.
4
Dim11
Chapter 1. Hardware Training
Chapter 1. Hardware Training
See the following parts for an introduction to the hardware used in your system:
Ø Site Planning Guide
Temperature & Humidity Requirements
Adequate Air Flow & Cooling
Noise
Power Requirements
Electrical Considerations
Phone Requirements
Places to Avoid Placing the Computer
Ø Cabling
Ø Computer Hardware Components
Descriptions & Illustrations
Care & Cleaning
Dim11
5
Chapter 1. Hardware Training
Site Planning Guide
Temperature & Humidity Requirements
With few exceptions, you will find your Dimensions system undemanding in its
physical needs. The computer will operate properly at approximately the same
temperature that people enjoy. While the hardware is operating, it must be in an
area with a temperature range of 41 to 95 degrees Fahrenheit. While it is stored,
this range is extended to -14 to 122 degrees. The machine will operate in a climate
with a relative humidity of 30% to 80%, non-condensing. To protect your
investment, keep the machinery operating in a moderate environment.
Adequate Air Flow & Cooling
To assure adequate air flow and cooling:
Ø Leave at least 6” of clearance around all sides of the equipment, especially
the CPU and UPS, which generate a considerable amount of heat.
Ø
Ø
Ø
Ø
Make sure that no curtains will be sucked into the cooling vents.
Never place paper or books on top of the CPU.
Never place paper under the CPU.
Always operate the CPU with the cover in place.
The computer (CPU), printers, and terminals should be placed on top of a sturdy
desk, table, or other suitable stand. Make sure that nothing blocks the air-intakes
that provide the cooling to the motors. Do not place the hardware on a soft surface
that may block the air intake from the underside.
Noise
Like other office equipment, computer systems do not operate silently. The
sounds made by printers and disk drives are similar to those made by typewriters
and photocopying machines. You may wish to take steps to deaden sound in the
room where the system printer is located. Terminals, however, are virtually silent
and function well in any office environment. Thus you may locate them according
to your data processing needs without disrupting office procedures.
Power Requirements
The main computer (CPU) must be connected to a standard dedicated office power
source. No other equipment can be on the same circuit. The power requirements
for the CPU are as follows:
AC Power Requirements: 115 VAC +/- 10% 47-63 Hz
Power Consumption:
400 watts
You will need a second regular outlet with a minimum of 20 amps also near the
computer for the system printer, modem, and communication equipment.
Terminals and printers use standard 110 current with grounded 3-prong plugs.
Space heaters, air conditioners, or other high amperage appliances should not be
plugged into the same outlets as terminals or printers.
6
Dim11
Chapter 1. Hardware Training
Electrical Considerations
Because computer hardware is extremely sensitive to electrical and magnetic
fields, a few special precautions should be taken. The hardware should be plugged
into clean lines only. Do not plug the CPU into a outlet, which is already being
used for other hardware (i.e., air conditioners, thermostatic devices, saws). Also
avoid having objects with magnetic fields near the CPU and terminals (decorative
magnets, cellular phones, etc.).
Use anti-static carpeting, anti-static mats, or anti-static carpet sprays to eliminate
problems caused by static discharges near system components. These products
are available through any major supplier of commercial floor covering or computer
supplies.
You should also use electronic surge protectors. Power surges commonly occur
when lightning strikes a nearby power line, when the lights switch off, or during
utility line maintenance. You can’t prevent these circumstances but you can
protect your computer equipment from damage. Surge protectors provide full
surge suppression and also filter out conducted noise on power lines that can
interfere with computer memory. These devices are not lightning arrestors. They
will not afford protection in those rare instances when lightning actually strikes
the building, service entrance, or antenna.
Phone Requirements
Ø Modem Line Requirements
Your modem is to be connected to your system. It is required that you have a
single-line phone with a modular jack (RJ11C) that does not go through your
switch board. This modem jack must be located near the main CPU (within
15’). This phone line could be shared with a fax machine. If you do share the
line with a fax machine, you will need a switching device (A/B switch) to allow
automatic switching from fax to modem and back.
Ø Phone Line Requirements
A regular phone line(which can go through your switchboard) needs to be
located next to the main computer system. At times during support calls, you
will need to be seated at the main CPU. This is a great help to you and the
Dimensions support staff.
Ø Dedicated Date Line Requirements
Digital point to point leased lines
w 56k is the current speed for our digital connections
w Compatible modem is MultiTech MT56DSU
Analog 2 wire point to point leased lines using modems
w 14.4kb, 19.2kb, 28.8kb speed
w Compatible modems are MultiTech MT1932ZDX, MT1432BA,
MT2834BA
Dim11
7
Chapter 1. Hardware Training
Analog voice grade line using modems
w 14.4kb, 19.2kb, or 28.8kb speed
w Compatible modems are MultiTech MT1932ZDX, MT1432BA,
MT2834BA
F NOTE:
Using voice grade lines only one device (terminal or printer) can be placed at a remote
site for each pair of modems.
Analog 4 wire point to point leased lines using statistical multiplexers
w 9600kb or 19,200kb speed
w See Dimensions for complete list of available statistical multiplexers
Analog 4 wire point to point leased lines using modems
w 28kb speed
w Compatible modem is MultiTech MT2834BL
Other configurations (such as T1 and Frame Relay) using existing equipment or
lines are possible and will be judged on a case-by-case basis. Dimensions will
work closely with you and the local phone company in such instances to determine
solutions.
Places to Avoid Locating the Computer
Ø
Ø
Ø
Ø
Ø
Ø
Any dusty location (as dust-free as possible)
Any smoky location
Under the sprinkler system
Near any water source which may damage it
Any area where the temperature in uncontrolled or uncontrollable
Near a window or skylight or any place where it will be exposed to direct
sunlight
Ø Near a key duplicating machine. The metal shavings get everywhere.
8
Dim11
Chapter 1. Hardware Training
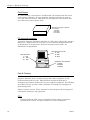
Cabling
Each device connected to the main computer system (CPU) such as terminals and
port printers, require cables. See Dimensions Wiring Configuration available from
Dimensions support for details. You will need to determine the correct cable
length for each device to the nearest 20 feet. When measuring cable requirements,
be sure to allow 4 feet at both ends for the cable to reach under counters (floor to
counter top).
1. Using your site map, determine how each cable run will be strung (i.e.,
through walls, overhead, etc.). Each terminal and port printer (addressable
printer) must have a cable connecting it to the main computer. WARNING:
Do not string the cables over fluorescent lights or near any magnetic field.
This causes electrical interference with the current in the cables. Also, be
aware of obstructions such as cinderblock walls, beams, posts, ceilings, and so
forth.
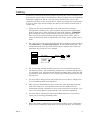
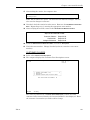
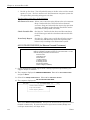
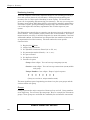
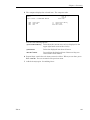
2. The cable run for each device attached to the main computer system goes from
the wallboard to a terminating walljack. See the illustration below. The
wallboard must be located 4-6 feet from the main computer and is normally
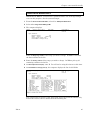
attached to the closest wall. For example:
(CAT 5 CABLE)
RJ45 cable
or
Port
Printer
Terminal
Terminating
Walljack
Wallboard
3. The terminating walljack should be placed as close as possible to the device
(terminal or printer). The terminating walljack has a receptacle like the plug
in a telephone jack. The narrow side should be pointing down so that dirt and
sawdust does not accumulate in the receptacle, preventing a good contact with
the plug end.
4. You may want to string several extra cables into areas of heavy computer use
to accommodate possible later expansion.
5. After you have determined the layout of the cable runs, determine how long
each cable needs to be. You should measure from the wallboard to the
terminating walljack. Remember to leave several extra feet on each end. It is
easy to cut cables shorter if needed but the cable cannot be lengthened.
6. You may want to consult with your local building inspector or contractor to
insure you are meeting all building codes.
3
3
7. Each cable must be numbered on each end with stickers or tape. Dimensions
prefers that the numbering begin with 3 and go up from there. For example:
Dim11
9
Chapter 1. Hardware Training
8. You may staple cables to walls but do not staple through the cable shielding.
The slightest damage will render the cable useless.
9. Try not to run too many cables through one small opening. If one needs
replacement, it will be difficult to maneuver a new cable through a small
opening.
10. If the cable run is over 200 feet, you may need a signal booster. If the cable
needs to be run outdoors or underground, special cable may be needed. Please
consult Dimensions in these circumstances.
11. As a final note, please do not consider these cable runs to be permanent. Even
the most careful preparation cannot take into account all possible variables.
Often times, a faulty cable or the change of peripheral location necessitates
adding more cable runs. Please be prepared to string other cables if you and
Dimensions decide it is necessary.
10
Dim11
Chapter 1. Hardware Training
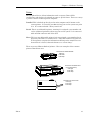
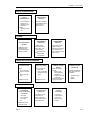
Computer Hardware Components
Descriptions & Illustrations
The following descriptions and illustrations will help you get a picture of what the
computer system will look like and how much room is needed for each piece of
equipment. It is a general guide for the dimensions of common computer
hardware used in the Dimensions system.
CPU (Central Processing Unit)
This is an electronic device where all processing and calculating of the computer
system takes place. It is the main piece of equipment in the computer system.
Often it is referred to simply as “the computer” or “the box”. Ports in the CPU
allow peripheral devices to be hooked up with this central unit, thereby extending
its power to many users.
A typical desktop model looks like this:
Diskette Drive
Dimensions of CPU
7.00" high
17.50" wide
15.50" deep
A typical floor model looks like this:
Dimensions of CPU only
20.00"
high
8.00"
wide
20.00"
deep
Every CPU has a system monitor (screen display and keyboard) attached to it.
See System Monitor below.
If your space is limited or you are concerned with the space requirements of the
CPU, please contact your Implementation Coordinator.
Dim11
11
Chapter 1. Hardware Training
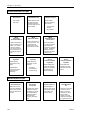
Floppy Diskette Drive
There is usually a floppy diskette drive built into the CPU that allows information
to be copied to or from a floppy (or portable) diskette. Floppy disks actually used
to be floppy but are now more protected with a hard plastic cover. Diskettes are
used to send programs as needed.
System Monitor
This is the screen display/keyboard combination attached to the CPU normally
used as port #1. It is located close to the CPU.
Dimensions of monitor only
16.00" high
14.00" wide
16.00" deep
Dimensions of IBM Keyboards
2.00" high
19.25" wide
8.00" deep
Tape Drive
This piece of equipment is used to make tape backups of information on the
computer. The tapes can then be kept for archive purposes or system restoration
in case of computer failure. The tapes are also portable but they can contain much
more information than can be kept on a floppy disk. The backup tapes must be
compatible in size and storage capacity depending on the type of tape drive.
Dimensions of a typical tape drive
4.00" high
6.50" wide
14.00" deep
12
Dim11
Chapter 1. Hardware Training
UPS (Uninterrupted Power Supply)
This is the battery backup for the CPU. In case of power failure, the UPS will
provide uninterrupted power to the computer for a specified length of time so
valuable data will not be lost. It provides enough time to appropriately shut down
the computer if needed.
Dimensions of a typical UP
5.50" high
10.00" wide
16.00" deep
Modem
This is an electronic device that connects the computer with a telephone line
allowing the computer to communicate with a remote location terminal. It
actually stands for MOdulate/DEModulate, a term describing its function. Modems
are peripheral devices requiring a port to the computer.
Dimensions of modem
2.00" high
6.00" wide
9.00" deep
A/B Switch
This is a switching device that allows one port to be shared, for example, between
a terminal and a modem. When the switch is turned to A, it functions as a
terminal. When it is turned to B, it functions as a modem. Sometimes it is
necessary to have an A/B/C or A/B/C/D switch. It is usually port #2.
Front View
Rear View
Input-Output
A
B
Dim11
A
B
Dimensions of a typica
2.50" high
6.00" wide
5.50" deep
13
Chapter 1. Hardware Training
Concentrator
A concentrator is a complete subsystem with 16 RS-232 asynchronous serial ports
for communication with the host CPU that allows terminals and printers to
function.
CPU
Dimensions of 16-port concentrator
2.25"high
12.00"wide
7.00"deep
Terminal (CRT)
This peripheral device allows information to be sent to the user from the computer
and to the computer from the user. It looks much like a typewriter with a screen.
It is connected to the CPU through a port.
It is sometimes referred to as a CRT, which stands for cathode ray tube.
Technology changes but human habit is hard to die.
There are many different kinds of terminals. Here are examples of the common
terminals Dimensions uses.
Dimensions of IBM 3153
Screen
Keyboard
14.00" high
1.50" high
12.50" wide
17.50" wide
13.00" deep
6.50" deep
Dimensions of Wyse 55
Screen
Keyboard
13.25" high
1.50" high
13.00" wide
17.00" wide
12.00" deep
7.75" deep
Dimensions of Wyse 150
Screen
Keyboard
12.50" high
1.50" high
12.50" wide
17.00" wide
13.50" deep
7.75" deep
14
Dim11
Chapter 1. Hardware Training
Printer
This peripheral device allows information such as reports, Point of Sale
transactions, and checks to be printed on paper or special forms. There are 3 ways
a printer could be hooked up to the computer:
Parallel This is hooked up directly to the main computer and is known as the
system printer. It is usually port #90 and any port on the system can print
to it. It is connected with a heavy round cord.
Serial This is an addressable printer, meaning it is assigned a port number and
can be addressed (printed to) from any port on the system. It is connected
with an RJ45 connector and a flat cable.
Slave This is a non-addressable printer (it is not assigned a port number) but is
physically attached to a terminal or PC. Only that terminal can print to it.
A slave printer can print the information showing on the terminal screen
from which it is slaved, otherwise known as a “screen dump.”
There are many different kinds of printers. Here are examples of the common
printers Dimensions uses.
Dimensions of Okidata 320/520
6.00" high
17.00" wide
14.50" deep
Dimensions of Okidata 3410
(not including stand)
8.00" high
24.25" wide
16.00" deep
Dimensions of Laser Printer
6.50" high
17.50" wide
17.00" deep
Dim11
15
Chapter 1. Hardware Training
Cash Drawer
In a retail setting, a cash drawer is included with each terminal that will accept
cash customer payments. In some situations, multiple terminals can open (or
“fire”) the same cash drawer. Both multi-fire and single-fire cash drawers must
have their own electrical power outlet.
Dimensions of Single or Multi-fire
Cash Drawer
4.00" high
18.00" wide
16.75" deep
PC (personal computer)
A personal computer, sometimes referred to as a PC, can be added to the system to
function as a terminal but also to provide access to DOS-based applications such
as spreadsheets, word processors, data base managers, and so forth. All
dimensions are approximate.
Dimensions of PC
4" high
14" wide
15" deep
Dimensions of PC monitor
15" high
15" wide
15" deep
Dimensions of PC keyboard
2.50"high
19.25"wide
9.00"deep
Care & Cleaning
Your Dimensions hardware is extremely well-constructed and durable. If you
provide it with some basic care that your give other office equipment, it will
perform satisfactorily for years. Many problems result from improper or
inadequate preventative maintenance on your computer equipment. The following
procedures will save you time, effort, and money in keeping your equipment in
good running order.
Safety is a prime concern. Please remember to turn the power off and unplug all
cables before working on any equipment.
CPU
Cleaning inside the CPU is not recommended as this usually causes more
problems than it solves. Keep the outside cover clean and dust-free.
16
Dim11
Chapter 1. Hardware Training
Floppy Disk Drive
Cleaning the diskette drive periodically is highly recommended. The “read
heads” can become dirty either from use or from collecting dust floating in the
air. This may cause the drive to be unable to read the information or data that
is stored on a diskette. It is recommended that you clean the drive before
loading a Dimensions release or copying any data to a diskette to make sure
the drive is functioning properly.
Use a commercial diskette drive cleaning kit that uses a liquid cleaning
solution rather than an abrasive. These are available at most computer
supply stores.
1. Follow the instructions included in the cleaning kit up to the point of
inserting the cleaning diskette.
2
Sign on the computer with a password that allows access to the system
prompt.
3. Insert the cleaning diskette.
4. At the SuperDOS prompt (>), enter:
DIR 1:*:*
Press Enter.
Or at the Unix prompt ($), enter:
tar -tv -f/dev/fd0
Press Enter.
5. The system accesses the cleaning diskette and then displays an error
message. Ignore the error and enter the DIR command 3-4 more times to
clean the heads completely.
6. Remove the cleaning diskette from the diskette drive.
7. Allow the heads to dry a few minutes before using the diskette drive.
Tape Drive
This is probably the most important peripheral cleaning you need to do. You
should clean the tape drive a minimum of once every eight hours of tape drive use.
In some environments, excessive airborne dust will accumulate and force more
frequent cleanings. There are two methods of cleaning the tape drive--using a
cleaning kit or manually cleaning it.
Cleaning Kits
This is the easiest method of cleaning a tape drive. Obtain the right cleaning
kit for your specific tape drive and follow the manufacturer’s directions. If
you change the model or type of tape drive, remember to get a new cleaning
kit as well.
Dim11
17
Chapter 1. Hardware Training
Manual Cleaning
Use the following instructions to manually clean the tape drive. These are
manufacturers’ recommended procedures.
CAUTION: If you have an Exabyte, Gigatrend, or Dat drive, use only the recommended cleaning kits.
No manual cleaning should be done.
Supplies Needed:
1. Lint-free swabs (foam-tipped, not cotton).
2. 80% or higher isopropyl alcohol. Any lesser percentages of alcohol contain
high enough concentrations of water to cause oxidation of the tape drive
parts.
3. Low-pressure canned air. Do not use an oil-lubricated air compressor.
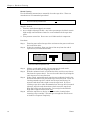
Procedure:
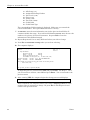
Step 1.
Step 2.
Turn the power off to the tape drive and remove the power cord from
the back of the drive.
Using the canned air, blow any dust or lint away from the end of
tape sensor (see illustration below).
End of Tape
Sensor
Capstan
Tape Read/Write
Head
Left or front side of tape drive unit
Step 3.
Step 4.
Step 5.
Step 6.
18
Moisten a swab with alcohol. Do not saturate the swab to the
prevent the alcohol from dripping into the drive.
With the moistened swab, reach into the drive and clean any dust or
lint from the capstan wheel. You can clean this wheel by moving the
swab tip across it in any direction.
Using a fresh, moistened swab, wipe the tape read/write head in the
direction that follows the path of the tape across the head. If you are
cleaning a 60mb tape drive, which has the tape head facing you,
wipe the swab from left to right across the tape head. If you are
cleaning a tape drive other than 60mb where the tape head is turned
sideways, wipe the swab from front to back across the tape head.
Wipe the head in one direction only. Do not wipe back and forth.
Wipe left to right or front to back only.
Allow the tape drive to dry for 10 minutes after cleaning before
inserting a tape cartridge. This will give enough time for all traces
of alcohol to evaporate completely.
Dim11
Chapter 1. Hardware Training
Tape Cartridges
Also, it is important to use the proper tape cartridges for your drive. If you are
unsure as to which type of cartridge to use, call Dimensions. Using a different
type of cartridge can damage the heads on the drive.
Every new tape cartridge should be retensioned once prior to using it as a backup
tape. After retensioning a new tape cartridge, the tape drive should be cleaned
using the procedure outlined above.
Terminal Screens
Use Fantastik or 409 all-purpose cleaners on a clean, soft rag or paper towels to
clean the plastic parts. Spray the rag, not the equipment. For the screen, use a
glass cleaner that is safe for television and computer screens with a clean, soft rag
or paper towels. Also, spray the rag, not the screen.
Keyboards
Use Fantastik or 409 all-purpose cleaner and clean rags or paper towels to clean
the key caps and surrounding areas. Spray the rag, not the equipment. Remove
the key caps, if desired, to clean all surfaces. If you remove the key caps, clean
only 1 keyboard at a time so the key caps are replaced on the correct machine. DO
NOT submerge the keyboard regardless of the manufacturer’s claims.
Printers
Turn the power off and unplug all cables.
Outside plastic cover
Use Fantastik or 409 on a clean rag or paper towels.
Inside plastic cover
Use compressed canned air or a compressor with a
moisture trap to blow out dust and lint.
Mechanism
No cleaning or lubrication is recommended.
Ribbons
Use the manufacturer’s suggested ribbon rather than
generic ribbons. They tend to last longer and wear more
consistently. DO NOT re-ink ribbons.
CAUTION: Do not turn the platen knob while the power is on. This strips the plastic gears that move
the paper through the printer.
Dim11
19
Chapter 1. Hardware Training
This page left blank intentionally.
20
Dim11
Chapter 2. System Training
Chapter 2. System Training
See the following parts for an introduction to the some of the utilities used in your
system:
Ø Booting Up the System - SuperDOS
“Cold” boot
“Warm” boot
Ø Booting Up the System - Unix
“Cold” boot
“Warm” boot
Ø Passwords- SuperDOS
Password screen
“Live” data vs. “Play” data
Menus
Ø Passwords- Unix
Login screen
“Live” data vs. “Play” data
Menus
Ø Keyboard
Ø System Prompt - SuperDOS
Ø System Prompt - Unix
Ø User Groups - SuperDOS
Ø File Structure
File
Record
Field
Key
Ø File Maintenance Guidelines
Ø Printing Report
Ø Batches
Ø On-Line Help System
Ø Guidelines for Backup
Ø Conventions Used in the User Manuals
Dim11
21
Chapter 2. System Training
Booting Up the System – SuperDOS
The term “booting up the system” simply means turning on the CPU. It is taken
from the phrase “pulling yourself up by your own bootstraps”. It starts a process
which automatically checks the computer’s memory, sets all standard defaults and
comes to the password screen on the system monitor and peripheral terminals.
There are 2 methods of booting up the system, a “cold” boot and a “warm” boot.
“Cold” Boot (aka “hard” boot)
1 All users should be signed off the system before performing a cold boot.
2 Make sure the system monitor is also signed off and is displaying the password
screen.
3 Turn off the power switch to the CPU (the “red” or “white” switch). This is not the
power switch to the system monitor. It is the power switch to the main computer
system.
4 Allow the machine to come to complete silence. Fans, spinning disks, etc. must be
fully disengaged.
5 Turn on the power switch to the CPU. Wait while the diagnostics take place
automatically.
6 The computer displays:
Operating system to Boot -- SuperDOS, DOS
Enter S, D, or #: S
Enter S and press Enter (or merely press Enter to accept the displayed S) to
access the SuperDOS partition (area) which contains the Dimensions system. On
rare occasions you might boot to the DOS partition--only if directed by Dimensions
support or if you wish to access a program running under DOS. If no response is
made within 10 seconds, the computer automatically boots to the SuperDOS
system, taking the displayed response.
7 The boot process is completed after the system monitor displays the password
screen. See the next section, PASSWORDS - SuperDOS.
“Warm” Boot (aka “soft” boot)
1 The same conditions apply as in the cold boot. All users should be signed off the
system before performing a warm boot.
2 At the system monitor, sign on with a level 7 password (obtained from the
Implementation Specialist or system manager).
3 At the SuperDOS prompt (>), enter boot or reboot and press Enter.
22
Dim11
Chapter 2. System Training
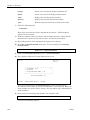
4 If you entered reboot, the computer displays:
REBOOT
Rev 6.1.0
Cold System Reboot
Warning!!
This program cold-boots the machine.
Please make sure all tasks are logged off and that
this is what you want to do.
Are you sure you want to reboot [Y/N]? [N]
Enter Y and press Enter to begin the process or N and Enter to end the program.
Allow the system to perform the diagnostics automatically.
5 When the computer asks which operating system to boot (Enter S, D, or #:) , enter S
and press Enter.
6 The boot process is completed after the system monitor displays the password
screen. See the next section, PASSWORDS - SuperDOS.
IMPORTANT: No users should sign on other terminals until the system monitor displays the
password screen. If a user signs on before the boot is complete, it will be necessary to
reboot the system again.
.
REMEMBER:
A “cold” boot means to turn off the CPU and turn it back on again.
A “warm” boot means to enter the command boot or reboot from the SuperDOS prompt under a
level 7 password.
Do not sign on until after the system monitor is at the password screen.
Dim11
23
Chapter 2. System Training
Booting Up the System – Unix
The term “booting up the system” simply means turning on the CPU. It is taken
from the phrase “pulling yourself up by your own bootstraps”. It starts a process
which automatically checks the computer’s memory, sets all standard defaults and
comes to the login screen on the system monitor and peripheral terminals. There
are 2 methods of booting up the system, a “cold” boot and a “warm” boot.
“Cold” Boot (aka “hard” boot)
1 All users should be signed off the system before performing a cold boot.
2 Make sure the system monitor is also signed off and is displaying the login screen.
3 Turn off the power switch to the CPU (the “red” or “white” switch). This is not the
power switch to the system monitor. It is the power switch to the main computer
system.
4 Allow the machine to come to complete silence. Fans, spinning disks, etc. must be
fully disengaged.
5 Turn on the power switch to the CPU. Wait while the diagnostics take place
automatically.
6 The boot process is completed after the system monitor displays the login screen.
See the next section, PASSWORDS - Unix.
“Warm” Boot (aka “soft” boot)
1 The same conditions apply as in the cold boot. All users should be signed off the
system before performing a warm boot.
2 At the system monitor, log in as root.
3 Type one of the following commands:
(AIX) shutdown +0 -r
(SCO) shutdown -g0 -y
NOTE: Make sure you type the zero (0) character and not the letter O.
4 The boot process is completed after the system monitor displays the login screen.
See the next section, PASSWORDS - Unix.
IMPORTANT: No users should sign on other terminals until the system monitor displays the
password screen. If a user signs on before the boot is complete, it will be necessary to
reboot the system again.
.
REMEMBER:
A “cold” boot means to turn off the CPU and turn it back on again.
A “warm” boot means to enter the command shutdown +0 –r for AIX or shutdown g0 –y for
SCO under the root directory.
Do not sign on until after the system monitor is at the login screen.
24
Dim11
Chapter 2. System Training
Passwords - SuperDOS
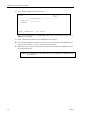
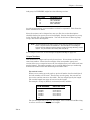
Password Screen
The purpose of passwords is two-fold: first they control security of data and second
they control access to certain tasks. You are provided a set of standard passwords
to be used when setting up the system. You must keep track of your passwords
especially if you change the standard passwords. Dimensions cannot assume
responsibility for changed passwords.
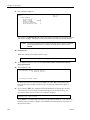
This is the password screen.
Welcome to Dimensions
SuperDOS
Password
......
It is the first screen that appears when the CRT (terminal) is turned on after being
hooked up to the computer and after booting the system. You must start and end
every day at the password screen. It tells the computer that you are not signed on
the computer under any password and therefore are not working in any programs.
You should verify that every CRT is at the password screen at the end of every
day. The Day End program will sign every user off the system automatically but
it is still better to have signed yourself off.
Under the word Password are six dots. The cursor appears on the first dot. This is
where you type in your password. Passwords can be up to 6 characters long, made
up of letters, numbers, and punctuation marks. You will be given the standard
passwords either by the implementation specialist or the system manager.
When you type in your password, it will not appear on the screen. It is hidden so
others cannot see what you have typed. In computer terms, it does not “echo”
back. Also, you must type the password exactly with no mistakes. The backspace
key does not function on the password. If you type the wrong key, just press
Enter. The computer displays NOT FOUND and allows you to enter the password
again. You must press Enter (or Return) after the password to send it to the
computer so it can recognize that you are trying to sign on.
.
REMEMBER:
Begin and end every day at the password screen.
Type the password exactly. Backspacing is not allowed.
Press Enter after the password is entered.
Dim11
25
Chapter 2. System Training
“Live” Data vs. “Play” Data
Certain passwords give you access to your live data and others give you access to
the play data. The play account has data files to be used for practice before
entering actual records in your live data or for seeing how certain programs work.
The files for live and play data are stored in different areas on your computer disk.
Be sure to know which password you are using.
.
REMEMBER:
Live and play passwords are different. They access different sets of files.
The play account allows you to practice using the play files.
Be sure you know which password you are using.
26
Dim11
Chapter 2. System Training
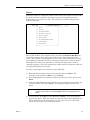
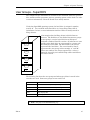
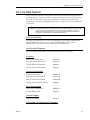
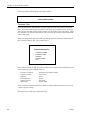
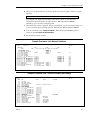
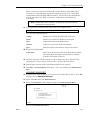
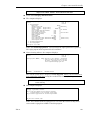
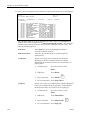
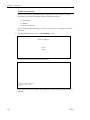
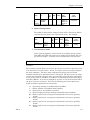
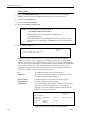
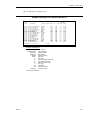
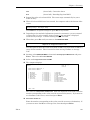
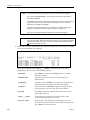
Menus
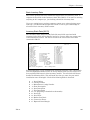
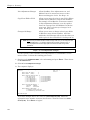
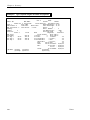
Generally, passwords are assigned to menus, which allow you to perform certain
tasks. So when you enter a password from the password screen, the corresponding
menu is displayed on your screen every time. For example, the system manager
password displays this menu:
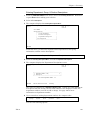
+-----------------------------------------------------------------------------+
|
DIM 10 DATA
|
=== DIMENSIONS MAIN MENU ===
| 10.1|
+-----------------------------------------------------------------------------+
| 1. Sales
|
|
|
| 2. Inventory
|
|
|
| 3. Accounts Receivable
|
|
|
| 4. Purchasing & Receiving
|
|
|
| 5. Accounts Payable
|
|
|
| 6. General Ledger
|
|
|
| 7. Day End/Month End/Year End
|
|
|
| 8. System Manager
|
|
|
| 9. Other Options
+
|
|
+-----------------------------------------+
The top line includes your company name, menu title (== Dimensions Main Menu ==),
and release number (10.0). The center of the screen contains the body of the
menu. Menu option 1 is highlighted in reverse video. Since Dimensions is menubased software, programs are run by selecting an option from a menu of options.
Throughout the system you will either be selecting an option from a menu or
running a program. The menu options lead to other menus or programs and back
out again through the same menus.
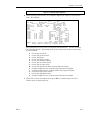
To select a menu option, you can do one of the following:
Ø Enter the menu number of your selected option and press Enter. For
example, enter 2 and press Enter to go to Inventory.
Ø If the highlighted bar is positioned on the menu item you want, merely press
Enter.
Ø Move the highlighted bar to the menu item you want using the arrow keys (up
or down arrows). Then press Enter. The computer displays the selected
menu.
F NOTE:
Pressing up arrow (#) at 1. Sales will move the highlighted bar to 8. Other Options.
Likewise, pressing down arrow at 8. Other Options will move the highlighted bar to 1.
Sales.
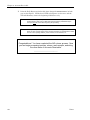
Ø To end a menu, press Esc or enter E and press Enter. You are returned to
the previous menu. When you return to a previous menu, the highlighted bar
will be positioned on the menu option you left. Or if you were at the main
menu, the screen goes back to the password screen.
Dim11
27
Chapter 2. System Training
A Final Note on Menus
Dimensions reserves the right to change menus at any time. Therefore when you
receive updates to programs or a completely new release of the software, you are
most likely to see new menus. The menus must change to include new programs
but often they change for other reasons. Do not get in the habit of memorizing
what menu number a particular option is because it may change and selecting the
wrong option on the menu could cause you problems.
.
REMEMBER:
Run programs by selecting options from menus.
Move the highlighted bar using the up or down arrow keys (# or $).
Press Enter when the desired menu option is highlighted.
Press Esc to return to the previous menu or the password screen.
28
Dim11
Chapter 2. System Training
Passwords – Unix
Login Screen
The purpose of logins and passwords is two-fold: first they control security of data
and second they control access to certain tasks. You are provided a set of standard
logins/passwords to be used when setting up the system. You must keep track of
them especially if you change the standard logins/ passwords. Dimensions cannot
assume responsibility for changed logins/ passwords. This is the login screen.
AIX Version 4
(C) Copyrights by IBM and by others 1982, 1996.
login:
It is the first screen that appears when the CRT (terminal) is turned on after being
hooked up to the computer and after booting the system. You must start and end
every day at the login screen. It tells the computer that you are not signed on the
computer under any password and therefore are not working in any programs.
You should verify that every CRT is at the login screen at the end of every day.
The Day End program will sign every user off the system automatically but it is
still better to have signed yourself off.
The cursor is positioned next to the word login:. This is where you type in your
login ID. Logins can be up to 8 characters long, made up of letters, numbers, and
punctuation marks. The login identifies who you are. As you enter the login, you
can see what you are typing.
Next the computer displays password:. Passwords control who can use a login ID.
Enter the assigned password to gain access to the system. When you type in your
password, it will not appear on the screen. It is hidden so others cannot see what
you have typed. In computer terms, it does not “echo” back. Backspacing is
allowed if you make a mistake entering the password. You must press Enter (or
Return) after the password.
In most cases, once a user has been given an initial password, they can change
that password later so that they can be responsible for periodically changing their
password for security purposes.
.
REMEMBER:
Begin and end every day at the login screen.
Backspacing is allowed at login and password.
Press Enter after entering both the login and password.
Dim11
29
Chapter 2. System Training
“Live” Data vs. “Play” Data
Certain logins give you access to your live data and others give you access to the
play data. The play account has data files to be used for practice before entering
actual records in your live data or for seeing how certain programs work. The files
for live and play data are stored in different areas on your computer disk. Be sure
to know which login you are using.
.
REMEMBER:
Live and play passwords are different. They access different sets of files.
The play account allows you to practice using the play files.
Be sure you know which password you are using.
30
Dim11
Chapter 2. System Training
Menus
Generally, logins are assigned to menus, which allow you to perform certain tasks.
So when you enter a login from the login screen, the corresponding menu is
displayed on your screen every time. For example, the system manager login
displays this menu:
+-----------------------------------------------------------------------------+
|
DIM 10 DATA
|
=== DIMENSIONS MAIN MENU ===
| 10.1|
+-----------------------------------------------------------------------------+
| 1. Sales
|
|
|
| 2. Inventory
|
|
|
| 3. Accounts Receivable
|
|
|
| 4. Purchasing & Receiving
|
|
|
| 5. Accounts Payable
|
|
|
| 6. General Ledger
|
|
|
| 7. Day End/Month End/Year End
|
|
|
| 8. System Manager
|
|
|
| 9. Other Options
+
|
|
+-----------------------------------------+
The top line includes your company name, menu title (== Dimensions Main Menu ==),
and release number (10.0). The center of the screen contains the body of the
menu. Menu option 1 is highlighted in reverse video. Since Dimensions is menubased software, programs are run by selecting an option from a menu of options.
Throughout the system you will either be selecting an option from a menu or
running a program. The menu options lead to other menus or programs and back
out again through the same menus.
To select a menu option, you can do one of the following:
Ø Enter the menu number of your selected option and press Enter. For
example, enter 2 and press Enter to go to Inventory.
Ø If the highlighted bar is positioned on the menu item you want, merely press
Enter.
Ø Move the highlighted bar to the menu item you want using the arrow keys (up
or down arrows). Then press Enter. The computer displays the selected
menu.
F NOTE:
Pressing up arrow (#) at 1. Sales will move the highlighted bar to 8. Other Options.
Likewise, pressing down arrow at 8. Other Options will move the highlighted bar to 1.
Sales.
Ø To end a menu, press Esc or enter E and press Enter. You are returned to
the previous menu. When you return to a previous menu, the highlighted bar
will be positioned on the menu option you left. Or if you were at the main
menu, the screen goes back to the login screen.
Dim11
31
Chapter 2. System Training
A Final Note on Menus
Dimensions reserves the right to change menus at any time. Therefore when you
receive updates to programs or a completely new release of the software, you are
most likely to see new menus. The menus must change to include new programs
but often they change for other reasons. Do not get in the habit of memorizing
what menu number a particular option is because it may change and selecting the
wrong option on the menu could cause you problems.
.
REMEMBER:
Run programs by selecting options from menus.
Move the highlighted bar using the up or down arrow keys (# or $).
Press Enter when the desired menu option is highlighted.
Press Esc to return to the previous menu or the password screen.
32
Dim11
Chapter 2. System Training
Keyboard
Since the keyboard is used to enter data into the computer, you should become
familiar with its function and the special keys that allow you to move around in
the system. The most important habit you can form is to read the instructions on
the screen. Most programs will help you by giving you cues for what you should
enter. These cues are usually shown at the bottom of the screen.
This section presents the following keys: Enter, Esc, up arrow (π), E, and Tab. A
typical keyboard looks like this:
Esc
Up arrow
Tab
E
Enter
Enter is the standard way to indicate “press the Enter key”. It
terminates the operator’s input and blanks out all the characters
from the cursor to the end of the field. You may also see other
references to this key on the screen and in the user manuals such
as <Ent>, CR, or <CR> (as in “carriage return”). They all mean
the same thing--press Enter.
F NOTE:
Esc
Enter
Do not press Enter if you wish to retain existing information in a field. It
would delete the information in that field and move the cursor to the next
field. Press Tab instead to keep the existing data in the field. See Tab.
This is the Escape key and is usually found in an upper corner of
the keyboard. It is abbreviated Esc on the keycap. This key
moves the cursor backwards one field. This is helpful when
entering data to make corrections. If there are no more fields to
back up to, Esc will end the function or program. In the programs
and the user manuals, ESC, <ESC>, and Esc all mean the same
thing.
Up arrow (#) Depending on which program you are running, this special key
takes on many different actions. Always be sure to read the
options on the screen for what the up arrow is meant to do. You
may also see other references to this key on the screen and in the
user manuals such as <UpA> or <Up Arrow>. They all mean the
same thing.
Dim11
33
Chapter 2. System Training
34
E
This is the letter “E” found between the “W” and “R” on the
keyboard. It stands for “end this function”. It must be entered as
a capital letter. The program will always display when this option
is valid (i.e., E=END). You must always press the Enter key after
entering E to end.
Tab
Terminates input for a field but leaves all the remaining
characters past the cursor intact.
Dim11
Chapter 2. System Training
System Prompt (>) - SuperDOS
The system prompt for the SuperDOS operating system is >. Sometimes it is
referred to as simply “the prompt”. This symbol appears on the far left side of the
screen after you enter a valid password indicating you have logged on successfully
or after ending from the Main Menu indicating you are ready to log off the
password. It indicates that SuperDOS is ready for you to enter the next command.
F NOTE:
Most passwords are set up so that the menu shows immediately after entering the
password rather than go to the system prompt. This saves you a step when signing on
the computer.
There are many commands that can be entered at the system prompt. For now,
you need to know only two--BYE and M.
BYE
When entered at the system prompt and followed by pressing Enter, this
command logs off the password and returns the terminal to the PASSWORD
screen. For example:
>BYE
It terminates the session under any password. You can also enter simply B and
press Enter.
There is a shortcut using BYE to log off one password and log on another with one
command. Enter BYE, one space, the password with which you wish to log on,
and press Enter. For example:
>BYE SAMPLE
This command logs off the old password and logs on the new password SAMPLE.
Make sure to leave a space after BYE and before the new password.
M
“M” stands for menu. When entered at the system prompt and followed by
pressing Enter, this command displays the Dimensions Main Menu again (or the
last menu displayed before falling out to the system prompt).
Dim11
35
Chapter 2. System Training
System Prompts - Unix
There are several system prompts used in a Unix system. Sometimes they are
referred to as simply “the prompt”.
$
Operating system level when not root user
#
Operating system level when root user
*
UBB environment
One of these symbols appears on the far left side of the screen after you enter a
valid password indicating you have logged in successfully or after ending from the
Dimensions Main Menu indicating you are ready to log off the password. It
indicates that Unix is ready for you to enter the next command.
F NOTE:
Most passwords are set up so that the menu shows immediately after entering the
password rather than go to the system prompt. This saves you a step when signing on
the computer.
There are many commands that can be entered at the system prompt. For now,
you need to know only two--exit and m.
exit
When entered at the system prompt and followed by pressing Enter, this
command logs off the password and returns the terminal to the login screen. For
example:
#exit
It terminates the session under any password.
m
“m” stands for menu. When entered at the system prompt and followed by
pressing Enter, this command displays the Dimensions Main Menu again (or the
last menu displayed before falling out to the system prompt).
36
Dim11
Chapter 2. System Training
User Groups - SuperDOS
The computer stores information of all kinds on the hard disk--data files, practice
files, month end files, programs, projects, operating system, and so forth. In order
to retrieve information, it must be stored in an orderly manner.
Under the SuperDOS operating system, the hard drive is assigned a number,
usually “5”. You can think of the hard drive as a large filing cabinet full of
information. In fact, it stores information similar to what is usually stored in
filing cabinets.
Now imagine that the filing cabinet is divided into 64
drawers. The disk drive is also divided into 64 user groups.
A user group is a major logical division of disk space
assigned a number between 0 and 63. All references to user
groups on the hard drive are represented by a 2-part code.
For example, 5:1 or 5:51. The first number (“5”) always
represents the hard drive. The second number always
represents the user group, in this example, “1” and “51”.
These two numbers are always separated by a colon (:).
Basically, this tells you in which filing cabinet and drawer
the data is stored.
5:1
5:21
5:31
5:0
The following list shows the user groups and what type of data is stored in the
ones that are used. Some user groups are not used at all.
5:1
Current data
5:21
Year end data from last year end processing
5:31
Last month’s data from month end processing
5:51
Programs and menus
5:54
Play company data
5:0
Operating system
F NOTE:
Dim11
User group can be abbreviated simply “ug.”
37
Chapter 2. System Training
File Structure
Data files contain a variety of information depending on the file: customers,
vendors, invoices, payments, inventory items, journal entries, and so forth. A
basic understanding of simple file structure is useful as you learn the Dimensions
system. The following terms are used when dealing with files.
File
A file is a subdivision of the user group used to organize a specific kind of data. It
is like a file folder in the file drawer.
Each file has a unique
filename, which
corresponds to the type
of data it is storing. It
comes after the
drive:user group and is
preceded by a colon.
For example:
Inventory Static File
Customer Transaction File
Customer Master File
5:1:CM1.D
Customer Master File
5:1:CM3.D
Customer Transaction File
5:1:IM1.D
Inventory Static File
5:1:SM0.D
Sales Master File
Files contain records, one record for each entry in the file.
Record
A record is an entry in a file. This is like one piece of paper in the file folder. For
example, the Customer
Master File contains
one record for each
customer.
CM1.D
Each record contains
fields of specific information.
38
Customer Master File
Y
999 OMPAN
C
XYZ
--------- ------------------ ----------- ---------- ------------------------- --------- ------------ ----------- ------- ------- --------------------
Dim11
Chapter 2. System Training
Field
A field is one item of information for a record. For example, the records in the
Customer Master File include customer name, address, phone number, tax type,
price level, and so forth. Each one is considered a field.
Y
999 OMPAN
.
C
in Rd
XYZ
unta
t Mo 99999
s
e
W
A
1400 wn, US 0
to
Any 456-789
)
3
---(12
------ --1
-----PE:
Y
T
-TAX E LVL: 2 ---------PRIC ------------- ----------------- -------------
Certain fields are also identified as keys.
Key
A key is a special field (or fields) in a record used to organize the record for more
efficient retrieval. For example, the Customer Master File keys are the customer
number and customer name. The customer number and name must be unique to
each customer so it is used as the key to the record.
NY
999 OMPA
C
d.
in R
XYZ
unta
t Mo 99999
s
e
W
A
1400 wn, US 0
Anyto 456-789
)
3
---(12
------ -1
------- PE:
Y
T
TAX E LVL: 2 ----------PRIC ------------- ----------- -------------- -------------
Dim11
The Customer Master File can be
sorted by customer number or name.
Customer reports can be printed in
either customer number or name
order. Also you can enter the
customer number or name to have the
computer display further information
about that customer.
39
Chapter 2. System Training
File Maintenance Guidelines
Certain file maintenance programs in the Dimensions system use the following
edit options to add, change, delete and view information in the particular file you
have selected. When you enter a maintenance function with these options, the
computer displays at the bottom of the screen:
ENTER OPTION (A,V,E,?):
These edit options are explained below.
Edit Options (A,V,E,?)
A
This option allows you to ADD a new record containing data to the file.
V
This option allows you to VIEW an existing data record. It also allows you
to perform other file maintenance options: CHANGE, DELETE, NEXT,
PREVIOUS. After you select V for VIEW and enter the record you wish to
view, the computer displays the following options:
ENTER OPTION (A,C,D,N,P,V,E,?):
C, D, N, and P are added options at this point.
C (CHANGE)
This option allows you to change the displayed record.
1
The cursor moves to the first field allowed to be changed (keys cannot
be changed).
2
If the field needs changing, type in the correct data and press Enter.
If the field does not need changing, press Tab to bypass. Do not press
Enter unless you need to blank out the data in the field. Press Esc to
back up one field.
3
Repeat Step 2 until all desired fields have been changed.
4
When all changes have been made, either Tab through all remaining
fields or enter “.” (period) and press Enter.
5
The computer asks:
OK TO CHANGE RECORD? Y/N
Enter Y and Enter to make the change effective or N and Enter to
leave the record unchanged.
6
You are still in the change mode. Select another record to change or
press Esc to end the CHANGE option.
D (DELETE)
This option allows you to delete the displayed record. The computer asks:
OK TO DELETE? Y/N
Enter Y and Enter to delete the displayed record or N and Enter to leave
it alone. You are returned to ENTER OPTION (A,V,E,?).
40
Dim11
Chapter 2. System Training
N (NEXT)
View the NEXT record. You must VIEW a record first before you can go to
the next record
P (PREVIOUS)
View the PREVIOUS record. You must VIEW a record first before you can
go to the previous record.
Dim11
E
This option allows you to END the program or procedure. You are
returned to the previous menu to make another selection.
?
Show HELP message (not available).
41
Chapter 2. System Training
Printing Reports
Throughout the system you can print numerous reports to help you compile the
information you need. All of the report programs are designed to look and act the
same, therefore making it easier for you to run them.
1 Whenever you select a report from a menu, the computer displays the input
parameters for that report. For example, here is the Credit Limit Report from
Accounts Receivable:
DS02322
Rev10.0.1
Credit Limit Report
DIM 10 DATA
Date mm/dd/yy
Port 36
Store 01
1. Input Parameters
Print 1) Numerically, 2) Alphabetically
1
Beginning Customer
.000
Ending
Customer
999999.999
Percentage Used
100
Store Number
(0=All)
0
Number of Copies
1
Report Date
mmddyy
Select Optional Field (Y/N)
<Ent> = Print Report
(E) = End
N
(1) = Input Parameters
You can do one of the following options:
<Ent>=Print Report
Press Enter to accept all of the displayed default values
and print the report. Go to Step 3.
Enter E and press Enter to end this report and return to
the previous menu.
(E)=End
(1)=Input Parameters
Enter 1 and press Enter to change the input parameters.
Go to Step 2.
2 If you entered 1 to change the input parameters, the cursor moves to the first
parameter. Most parameters are self-explanatory, such as printing the report in
numerical or alphabetical order, beginning and ending numbers or names, and so
forth. You can either enter the desired response and press Enter or merely press
Tab to bypass it. Or you can press Esc to bypass all remaining parameters and
continue with printing the report. If a parameter is special or unique to this
report or perhaps needs further explanation, instructions can be found in the
Reports section of each user manual. The following general rules apply to
entering common input parameters for most reports.
Beginning
(such as beginning customer number)
Enter the first customer you wish to appear on the report. Or press Tab to
begin with the first customer in the file.
Ending
(such as ending customer number)
Enter the last customer you wish to appear on the report. Or press Tab to
use all remaining customers. If you wish to print the report showing only
one customer, enter the same number (or name) in both Beginning and
Ending parameters.
42
Dim11
Chapter 2. System Training
Store Number
(for multi-stores)
Enter the specific store number to include on the report and press Enter.
Or enter 0 (zero) to print for all stores.
Number of Copies
Enter the number of copies (1-9) of this report you wish to print and press
Enter. The default is one copy.
Report Date
The current system date is displayed. If you wish to accept it, press Tab.
Or enter the date you wish to appear on the heading of the report in the
standard date format (mmddyy) and press Enter.
3 After you accept or enter the input parameters, the computer asks:
Output Device (P,T,S,F,PORT#):
Enter one of the following options and press Enter.
Esc
Press Esc to end this report and return to Step 1.
P
Printer
This is the main system printer (port 90). Make sure it is
turned on and ready to print.
T
Terminal
The report will be printed to your terminal screen.
Slave
printer
This printer is attached to your terminal, slaving
information directly from the terminal. Make sure the
printer is turned on and ready to print.
File
The report will be printed to a text file, which can be
printed later. Nothing prints on the printer at this time.
You will be asked to name the file. It can be up to 5 alphanumeric characters long. The computer automatically
places the prefix Z@ in front of the file name. This helps
organize these text files so they show up together when
listing the files (such as a directory). To print these text
files, see System Manager, System Functions, System
Utilities, SuperDOS Utilities or Unix Utilities, Print a Text
File.
Any valid
printer
port
This is helpful if your normal printer is busy or if you
wish to send the report to another printer. See the
System Manager for valid port numbers.
Search
for port
number
Press # (up arrow) to begin searching at the first
valid printer port. Or enter a port number and then
# to begin the search from that port number. The
computer displays a list of printers starting with the
closest match to the one you entered. For example:
S
F
PORT#
#
Scroll / Select - Printer Ports
Dim11
+-------Printer Ports---------+
| 24 BRUCE’S OFFICE
|
| 90 SYSTEM PRINTER
|
| 91 SYSTEM PRINTER #2
|
+-----------------------------+
Jump To
__
43
Chapter 2. System Training
The computer displays up to 5 printers at a time. The
cursor is positioned at Jump To. You have the following
options:
Press Enter
# or $
Enter another
printer number
and press Enter
Press Esc
Selects the highlighted printer and prints
the report to that port.
Press the up or down arrow to scroll
through the displayed list.
This jumps to another area of the
list.
End this search routine. Go on to Step 4,
using the printer port that was highlighted
when you ended the search/select routine.
4 Then the computer asks:
Compressed Print (Y/N):
Enter Y if you wish to compressthe print on the report, N if not. Normal print
consists of 80 columns (characters) across the screen or page whereas compressed
print has 132 columns. Most reports printed to a terminal need to be in
compressed print so you can easily read them without having screen wrap-around.
However, the system monitor does not feature compressed print on the screen.
5 Some reports allow single, double, or triple spacing:
Report Spacing (1,2,3):
Enter 1 for single, 2 for double, or 3 for triple spacing.
6 The computer prints the report as directed. If you printed the report to the
terminal, it prints one screen page at a time. Press Enter to view the next page or
enter E and press Enter to end the report and return to Step 1.
7 After the computer prints the report, you are returned to Step 1 to select other
input parameters and print again or E to end the report printing process.
44
Dim11
Chapter 2. System Training
Batches
The batch process is used in most data entry tasks (A/R cash receipts, A/P invoice
entry, payroll processing, inventory physical count, inventory adjustments, etc.).
Batch processing allows you to enter a group of entries into a batch, check the
entries for accuracy, edit the batch if necessary, and then update the batch to the
appropriate file(s). Depending on the type of data you are entering, this would be
done on a regular basis. For example, cash receipts would probably be entered
daily.
The following procedures are alike for all kinds of batches.
1 Identify the Batch
After selecting a batch entry process such as entering A/P invoices, the computer
asks:
1. Batch Identification : AP___________
Depending on the task, the computer fills in the appropriate prefix to the batch
I.D. In this case, A/P invoice batches always begin with “AP” so the computer
displays “AP________”. Then you can enter the batch I.D. It can be up to 10
characters long, including the 2-character prefix. The most common method of
naming batches is to use the date (month and day) and the operator’s initials. For
example, if a batch was being entered on May 1 by Ann Smith, enter 0501AS.
Notice that leading zeroes are used to make the date a full 4 characters. You can
use this method of identifying batches or devise your own scheme but you should
try to make them consistent, understandable, and easy for others to interpret.
F NOTE:
After entering the batch I.D., the computer displays “OLD” or “NEW”. An “old” batch has
entries in it which have not been updated. Unless you are adding to an old batch, you
should be careful to complete an old batch by updating and printing the reports before
entering a new batch.
2 Calendar Month
After entering the batch I.D., check the displayed calendar month and period code.
All entries in this batch will be posted to this G/L accounting period. Change if
necessary. (Enter 2 and press Enter. Then enter the correct calendar month, not
the fiscal month. The computer will then show the fiscal period.)
3 Store Number
Check the displayed store number. If you need to change it, enter the number for
Change Store No and press Enter. Then enter the correct store number.
4 Date
Check the date as displayed in the upper right hand corner of the screen. All the
entries in this batch will be assigned this date. Change if necessary. Enter the
number for Change Date and press Enter. Then enter the correct date in the
standard date format (mmddyy).
Dim11
45
Chapter 2. System Training
5 Make the entries in the batch according to normal procedures for the specified
task (refer to the corresponding user manual). Each entry is assigned a sequence
number automatically as it is entered. The sequence numbers, then, are in
chronological order.
6 Print an edit list and check it carefully. The report includes the sequence number
for each entry.
7 If needed, edit the batch to correct any errors. Use normal procedures.
8 Print the edit list again. Check carefully.
9 Update the batch according to normal procedures for the task. The update will
make journal entries into the General Ledger.
10 Print the G/L Entries report (GPOST).
11 Print any other reports on the menu and file together.
46
Dim11
Chapter 2. System Training
On-Line Help System
An on-line help system has been added to some of the maintenance programs for
inventory items, customers, vendors, and General Ledger as well as the Variable
File. On-line help allows you to gain information about any data field on the
maintenance screen by pressing F1 (function key 1) when the cursor is positioned
on the field.
F NOTE:
For SuperDOS systems, the program Flipscreen from Bluebird Systems is required and
must be running on any port that wants to use on-line help. Flipscreen is optional
software that must be purchased. If you do not have Flipscreen and would like more
information, contact Dimensions, Inside Sales Department.
On-Line Help Files
Standard on-line help text is stored in HLPSTND.D and its index HLPSTND.I1.
Custom help that you can create is stored in HLPCUST.D and its index
HLPCUST.I1. See below for more information on custom help.
On-Line Help Programs
On-line help has been added to the following maintenance programs:
Inventory
Add New Inventory Items
DS03011A
Inventory Static Data IM1.D
DS03011N
Change Selected Fields IM1
DS03912
Change Selected Fields IM2
DS03910
Accounts Receivable
Add New Customers
DS02011C
Main Customer File CM1.D
DS02011B
Misc. Customer File CM2.D
DS02012B
Change Selected Fields CM1.D
DS02502
Accounts Payable
Add Vendor Information
DS05011C
Vendor Maintenance
DS05011
General Ledger
Master File (GM1)
DS01011
All Variable File Maintenance Programs
Dim11
47
Chapter 2. System Training
Using On-Line Help Programs
1 In any of the programs listed above, position the cursor on any data field and press
F1 (function key 1).
2 The screen is re-displayed showing a box with additional information about the
selected field. For example:
DS03011A
10.0.1
1.
2.
3.
4.
5.
6.
7.
8.
9.
10.
11.
12.
13.
14.
15.
16.
17.
18.
19.
Special Inventory Add
DIM 10 DATA
Date mm/dd/yy
Port 36
+---------------------CATALOG NUMBER--------------------------+
**** IM1.D *|
|
Item No
| 1. In addition to the item number, each item must have a
|
Catalog
|
catalog number. The catalog number is the most
|
Mfg No
|
common number used during POS and Purchasing/Receiving
|
Short Desc |
to look up items.
|
Mfg Name
| 2. Catalog numbers can be up to 15 characters long
|
Item Desc
|
including letters, numbers, punctuation marks, and
|
Unit Desc
|
spaces. For example:
|
Item Code
|
|
Non Disc
|
DF2410G
Doug Fir 2x4-10 Green
|
Non Tax
|
24RLH
2x4 Random Length Hem Fir
|
Enter Desc |
58CDX
4x8-5/8 CDX Plywood
|
C or M
|
44CPF
4x100 4 Mil Clear Polyfilm
|
Type (0-7) |
GWG
1 Gallon Titebond Wood Glue
|
Price Basis |
|
Mkt Cst Bas | 3. It is required for all items. There can be no
|
Conv Factor |
duplicate catalog numbers.
|
Ex Gross Mar| 4. If you are using price stickers, the stickers can be
|
Cost Percent+--IM1:2:STANDARD---------------------------------------------+
Second Desc
The heading of the box indicates the selected field. The information at the bottom
of the box indicates the filename, field number, and whether it is coming from the
standard or custom help file. Use the arrow keys (π,θ) to scroll through the
information in the box. When done, press Esc to return to the data field.
F NOTE:
If you have custom help set up, the computer displays is first. Press Esc to view the
standard help. Press Esc again to return to the data field.
Custom Help
The On-Line Help system comes set up with a standard set of information that
relates to all Dimensions customers. In addition, you can create your own custom
help screens if certain fields require further procedures or instructions specific to
your company. You must be signed on with a pass-word having a user level 6 or
higher to create custom help screens. To set up custom help for a specific field, do
the following steps:
1 To set up custom help for a specific field, position the cursor on the selected field.
2 Press F1 to display the standard help screen.
3 Press M to get the Help Options Menu. (Do not press Enter after the M).
4 The following help options are displayed:
+-------------------------+
| 1. Edit Custom Help
|
|
|
| 3. Position Window
|
| 4. Delete Custom Help |
|
|
| 6. Edit Help Box Title |
| 7. Cross Reference
|
+-------------------------+
48
Dim11
Chapter 2. System Training
To end this Help Options Menu, press Esc to return to the selected field. Or enter the
number of the desired option or use the arrow keys to display it. Then press
Enter to select it. You have the following options:
1. Edit Custom Help
An empty box will be displayed with the cursor positioned in the upper left corner.
Type the information you would like to have displayed when someone chooses help
for this field. This could be specific procedures that you would like your employees
to follow, other information that you feel helps explain the field better, or just
notes as to how you have used this field previously. Press Esc when done to
return to the Help Options Menu above.
3. Position Window
Allows you to re-position the help window on the screen. When you select this
option, you will be prompted at the bottom of the screen to position the cursor to
the top left corner of the new place that you want the window to appear. Do this
by using the arrow keys to move left, right, up, or down. Then press Enter. Now
you will be prompted to position the cursor to the bottom right corner of the new
place where you would like the window to end. Use the arrow keys to move the
cursor where you want it and then press Enter. The help window will be
repainted to the position that you specified and the cursor will return to the Help
Options Menu.
4. Delete Custom Help
Allows you to delete custom help information. You may edit or change the
information in the custom help window by using the Edit Custom Help option at any
time. This option deletes the entire custom help window and keeps it from
displaying. When you choose this option, a message at the bottom of the screen
will be displayed indicating the program and field and asking if you want to delete
the help from the custom file. Enter Y to delete the custom help window or N to
not delete it. You are returned to the Help Options Menu above.
6. Edit Help Box Title
Allows you to define a new title for the top of the help window. When this option
is chosen, a prompt will be displayed asking for the new title for the window. You
may enter up to 40 characters for the new title.
7. Cross Reference
Allows you to use the same help information across different programs. For
example, if you have a custom help window created for your company’s procedure
on the groups to use for new items, you can create the help information once and
then cross reference the information from the Add New Inventory Item program to the
IM1 item maintenance program.
Dim11
49
Chapter 2. System Training
Guidelines for Backup
What Is a Backup?
A backup is a copy of your data, programs, menus, and operating system stored on
a magnetic tape. It could be used to restore this information on the computer if it
had been damaged or lost.
Why Do I Back Up?
There are many reasons to have a backup of your data. All of your computer
hardware (CPU, disk, monitor, printers, terminals, and so forth) can be replaced if
damaged. The only thing Dimensions cannot replace is your data. We can give
you a new operating system and new programs but we cannot replace your data.
Therefore, you are responsible for making regular backups. Damages may result
from fire, flood, or other natural disasters, theft or vandalism, or hardware failure.
You are taking a great risk by not backing up.
When Do I Back Up?
You will back up at the end of every business day. All users must be done with the
day’s work and be signed off the system before the backup can be made. You will
also back up at the end of every month before doing the month end procedure and
before the year end closing. You must also have a backup of the current programs,
menus, and operating system in case you need to load this information on your
system again. It would be quicker to have that available on-site rather than wait
for us to ship it to you.
How Do I Back Up?
Use the following instructions to make a backup. You will use this method of
backing up until you “go live” (the point at which you convert to using the
computer for daily transactions). After you “go live”, the day end procedure
includes the backup routine which is done automatically.
Where Do I Get the Backup Tapes?
You will receive 10 data cartridge tapes as part of your Supply Pack. Each tape
comes in a plastic cover box along with some self-adhesive labels. Affix 2 labels on
the plastic cover box and 1 on the tape itself. Take 6 or 7 tapes and label each one
for a day of the business week (MONDAY, TUESDAY, etc.) or 1, 2, 3, 4, etc. The
remaining tapes will be used for month end and year end backups. You should
keep 12 separate month end tapes (one for each month end) as well as a year end
tape for every year. These tapes will be stored off-site in a safe place such as a
safety deposit box. They are archived just as you archive other company records.
Additional tapes may be obtained either from Dimensions or a computer supply
store.
50
Dim11
Chapter 2. System Training
How Do I Care for the Tapes?
Keep tapes clean and dry and in a comfortable temperature range (40-80 degrees
Fahrenheit). Do not store near electrical wiring or magnetic fields. Do not leave
in a car or in direct sunlight. Even a fire-proof safe is not reliable--the tape may
not catch fire but the heat of the a fire could melt it or distort the data. Store the
latest tape out of the building, preferably in a safety deposit box or other safe
place. You might want to make arrangements to drop the daily tape in your
bank’s night deposit so they can store it in your safety deposit box the next day.
You would then need to stop by the bank to pick up your next daily tape so you can
make your backup on the next tape.
The tape cartridges are designed to perform up to 5,000 reads and writes. They
have quite a healthy lifespan but you may encounter a bad tape once in a while or
it might get damaged from a faulty or dirty tape drive. Tapes cannot be repaired.
This is one reason why you rotate tapes and make more than one tape at fiscally
important dates (month end and year end).
Backup Procedures (using “BACKUP” job)
1 At the system monitor, make sure you are on task 1.
2 Sign on with the manager password.
3 Put the next sequenced tape into the tape drive and shut the tape drive door.
4 From the Dimensions Main Menu on the computer, select 7 for Day End/Month End/Year
End.
5 Select 1 for Day End.
6 Select 1 for Automatic Day End.
7 The computer displays:
DS08525
Rev10.0.1
Job Stream Driver
DIM 10 DATA
Date mm/dd/yy
Port 39
Store 01
1. Input Parameters
Projects to Execute (Max=20)
_________
Time to Begin
If no time is entered,
project(s) will begin immediately.
Enter BACKUP and press Enter.
8 Press Enter again 4 more times.
9 The backup process begins automatically.
10 After the backup is finished, check the tapelog that is printed to make sure it has
no errors. Also, write the current date on the label of the tape you used.
Dim11
51
Chapter 2. System Training
Conventions Used in the User Manuals
Manual Organization
Ø The standard set of Dim3D (Rev. 10.0) user manuals includes the following
titles. They are organized by module.
Sales User Manual
Inventory User Manual
Accounts Receivable User Manual
Purchasing & Receiving User Manual
Accounts Payable User Manual
General Ledger User Manual
Day/Month/Year End User Manual
System Manager User Manual
Ø Each user manual contains at least 5 sections:
Procedures
Reports
Variable File
Special Maintenance
Appendix
Files
Optional Software
Ø Read the introduction to the Procedures and Reports sections in each user
manual. They provide further general information on how to run procedures
and print reports.
Ø If you need specific information on setting up a module such as Accounts
Receivable or Inventory, refer to this manual, Getting Started.
Type Used in Dim3D (Rev. 10.0) User Manuals
Ø Sample screens look like this:
DS02011C
Rev10.0.18
Add New Customer
1.Cust No
.000
3.Addr 1
5.Addr 3
7.Phone
9.Tax No
12.Tax Type
15.Signature Req (Y/N)
18.Save Lien Info
21.Price Level
24.Terms
27.Extra Code
30.Open Date
33.Install Pmt
36.Delivery Zone
39.Ship To 1
41.Ship To 3
43.Email
45.Message/Note 1
46.Message/Note 2
47.Message/Note 3
<Esc>=End
<F1>=Help
52
0
0
0
DIM 10 DATA
Date mm/dd/yy
Port 39
Store 01
2.Name
4.Addr 2
6.Zip
8.Contact
10.A/R Group
0 11.A/R Type
13.Each Price (Y/N)
14.PO Required
16.Cust Has Jobs (Y/N)
17.Save History
19.Store Number
0 20.Rep Number
22.Class
0 23.Credit Hold
25.Statement Day
0 26.Tax Code
28.Credit Limit
0 29.Bid Number
31.Credit Limit Type
32.Statement Detail
34.SSN #
35.Resale Price Level
37.Route Difficulty
38.Map Code
40.Ship To 2
42.Builder's Club #
44.Cell Phone
0
0
0
<UpA>=New Job
Dim11
Chapter 2. System Training
Ø Bold characters within text indicate what you enter. For example:
Select 3 and press Enter.
This means press the number 3 and then press the Enter key.
Ø Words displayed on the screen look like this in the manual text:
At Enter Option, enter 3 for Change Store No and press Enter.
Ø Italics indicate titles of books and names of procedures. For example,
Inventory User Manual and Cash Receipts by Batch.
Ø Notes of special interest are presented in a box. For example:
F NOTE:
Dim11
An "old" batch has entries in it that have not been updated. Unless you are adding to an
old batch, you should be careful to complete an old batch by updating and printing the
reports before entering a new batch.
53
Chapter 3. “Go Live” Tracks
Chapter 3. “Go Live” Tracks
To “go live” means to use the computer for regular data processing using your real
data. You should try to “go live” as fast as possible, taking into consideration your
needs and resources. If you are having an inventory conversion done or if you are
getting the commodity list for your inventory file, much of the set up for inventory
is already done for you. You can “go live” on inventory much faster than starting
from scratch.
The following list is a suggestion only. It starts with A/R invoice posting. You
may wish to start at this level and enter customer invoices until you have refined
your inventory to the point where you could start Point of Sale (POS). Or you
could skip A/R invoice posting altogether and go directly to POS to have the
computer generate invoices for customer accounts and control inventory. This
section is a guide to help you decide what you want to do next and when to “go
live” most comfortably for you. More detailed information is contained in
Chapters 4-8 of this manual.
The first three items on the list are a logical progression taking you from simple
invoice posting to inventory. You could choose to accomplish each step in a
progressive manner or jump in at any point when you are ready. The last two
items, Accounts Payable and General Ledger, can “go live” any time you wish.
You may or may not have definite ideas of how and when you want to accomplish
these areas. This section will help you formulate your plan for the next few weeks.
Using the checklists that follow this page, decide when you will “go live” on the
Dimensions system for the following areas. Write down your estimated dates.
_______________
A/R Invoice Posting or Invoice Posting by Batch
_______________
Point of Sale (computer generates invoices)
_______________
Inventory control with physical count. Purchasing
and Receiving.
_______________
Accounts Payable
_______________
General Ledger
. NOTE:
54
All “go live” tracks presented here assume you will either be using the standard G/L chart
of accounts that comes already set up for you or you have loaded your own chart of
accounts and will make the necessary Variable File entries to integrate it properly.
Dim11
Chapter 3. “Go Live” Tracks
1. A/R Invoice Posting
A/R invoice posting allows you to enter invoices and returns for customer accounts
after-the-fact. No printed ticket is produced by the computer. You can choose
either normal invoice posting or invoice posting with inventory group distribution.
The transactions will be updated to the customers’ accounts, the Totals File, and
the Sales Master File as each one is entered. The invoice date can be assigned
automatically using the current system date or be entered using CHANGE DATE.
The discount date will be assigned according to the terms code for each customer.
You will enter the ticket subtotal and the sales tax will be calculated automatically
according to the tax code for each customer. You can also enter addons to each
ticket. No inventory is needed to post invoices, however one miscellaneous item
(99999999) must be set up to allow the program to work properly. Charge and
cash sales will be posted to the General Ledger during the day end process.
This option is good preparation for Point of Sale or Order Entry. The same files
are used and the day end procedure is the same. You could train on POS by
entering quotes, if you have an inventory file set up, thereby getting a feel for
POS. This is also a good method of balancing to your manual bookkeeping or
previous computer system.
Another similar option of invoice posting is to enter invoices with a group
distribution. “Group” refers to inventory groups or types of items. It is used to
track customer purchases by inventory group in a general sense.
You will also be entering cash receipts (customer payments) to the A/R accounts.
There are 2 ways of entering cash receipts--regular cash receipts where the
customer’s account is updated immediately as the payment entry is made or cash
receipts by batch where many customer payments are entered into a batch which
is checked for accuracy before posting it to the their accounts. These customer
payments are updated to the General Ledger no matter which method you use to
enter them.
Having the invoices and payments entered, statements can be printed at month
end or any time. You will also start getting sales analysis information by assigned
salesman, written by salesman, and sales tax (and addons if you are using A/R
invoice posting).
What needs to be done before going live?
G 1. All customers are entered including a cash customer (account 1.000). No
balances or agings are entered yet.
G 2. Enter 1 miscellaneous non-perpetual inventory item (99999999) in the
inventory files. This is for A/R invoice posting only.
G 3. The Variable File records must be set up (terms, sales tax information,
customer classes, assigned and written by salesman numbers/names, etc.).
G 4. Decide the go live date for A/R invoice posting. You will probably want to
do this at the end of a month, quarter, or year.
Dim11
55
Chapter 3. “Go Live” Tracks
The day before going live, do the following:
G 5. Do the A/R cutover process from a current aging. This process allows you
to enter the aging balances and outstanding invoices for each customer.
You will also enter the beginning total A/R in the Totals File for today,
MTD, and YTD.
G 6. Check the due dates and discount dates for terms in the Variable File for
Accounts Receivable. Check the calendar month in the Variable File for
General Ledger, Basic Store Information.
G 7. Print the Daily Report found on the Day End Menu. Check that all sales
are zero and that the A/R Summary shows the beginning A/R balance only. If
there are balances in any field other than A/R Summary, they must be
cleared out of the Totals File. The easiest way to do this is to clear T2ssyy
totals and re-enter the beginning A/R balances (today, MTD, YTD).
Contact Dimensions for specific instructions.
G 8. Run a day end, either manually of with the DE project. Watch carefully for
any errors or problems backing up, printing reports, or updating.
What is the commitment of going live?
Once you go live using A/R invoice posting or invoice posting by batch, you are
committed to entering customer invoices and payments regularly and performing
the day end procedure every day. Day End will provide the following:
l
l
l
l
l
Daily backup tape.
Sales Analysis Report showing sales by customer class, assigned salesman,
written by salesman, charge and cash transactions, addons, and sales tax.
Daily Report showing today and month-to-date charge and cash transactions,
A/R summary, and cash settlement.
Transaction Register (only if using A/R invoice posting).
Transaction Day End Update which clears the Sales Master File and Totals
File of the current day’s transactions, updates Sales History if used, and posts
sales to the General Ledger (only if using A/R invoice posting).
You must also run the month end process for A/R every month. The month end
will generate finance charges and increment the terms dates (discount and due
dates) to the next month. It will also allow you to print customer statements from
the month end password (MOEND). You must also perform the month end update
for the Totals File. This will clear out all month-to-date figures.
56
Dim11
Chapter 3. “Go Live” Tracks
2. Point of Sale (computer-generated invoices)
Point of Sale allows you to enter invoices, returns, quotes, and orders through the
Transaction Entry system using individual inventory items. A printed ticket will
be generated for each transaction with either a computer-generated number or a
transaction number you provide. This is different from invoice posting because it
keeps quotes and orders by customer, which can be recalled and changed into
sales. Point of Sale replaces invoice posting. You will be getting sales analysis
and history information by item. You will also be getting the same sales
information by assigned salesman, written by salesman, sales tax, and addons.
Costs and prices are tracked but quantities are not. The quantity on-hand, onreserve, and on-order will be meaningless until you take a physical count.
What needs to be done before going live?
G 1. All steps from A/R invoice posting must be done. Or if you are already
processing A/R invoices, just complete the following steps.
G 2. Enter all inventory items. This can be done through a conversion from a
previous computer system, the commodity list provided by Dimensions, or
entering each item through file maintenance.
G 3. Enter and check all prices and costs. Print a price book if desired.
G 4. The corresponding Variable File entries must be set up:
A. Sales, Entry Options, POS Enter Detail Screen
l
8. Verify On-Hand Exceeded
Should be N until quantities on-hand in inventory are used.
B. Sales, Print Options
l
Double check the print programs used for different tickets. Use
plain paper print programs if you have not received your preprinted forms yet.
C. Sales, Descriptions (if saving sales totals)
l
Truck
l
Delivered By
l
Loaded By
l
Checked By
D. Sales, Messages
l
Messages printed on tickets
E. Sales, Miscellaneous Codes, History
l
Dim11
3. Save Sales History
Should be Y if you wish to save invoice history for charge sales, C to
save charge and cash sales, or N if you do not wish to save invoice
history. This is different from the 13-month item history, which can be
started when you have a more complete inventory file.
57
Chapter 3. “Go Live” Tracks
l
l
l
8. Save Delivered By
9. Save Checked By
10. Save Loaded By
Should be Y if you wish to track them from POS. You can save any
combination of this information or none at all.
F. Inventory, Basic Inventory Information, Store Information
l
3. Post Inventory Adjustment to G/L
Should be N.
G. Accounts Receivable, Terms Information
l
21. Print Discount on Invoice
Should be Y if you wish to print the available discount on each
transaction, R to print on all except returns, or N to not print at all.
H. System Manager, Port Information, Printer Assignments
l
I.
System Manager, Store Name & Address
l
G 5
Double check the print flow by port (which printer will print
certain transactions
Store name and address printed on tickets
Decide the go live date for POS. You might want to do this at the
beginning of a new month.
What is the commitment of going live?
This is the same as going live for A/R invoice posting plus you must perform a
month end update for inventory as well. This process clears out all month-to-date
inventory figures. You must also maintain the costs and prices of the items. This
is done either through Price/Cost Changes or through the receiving system using nonP.O. receipts. If you use the receiving system, you can also create invoices in A/P
and write checks (see Accounts Payable). Even though you will not be controlling
quantities, sales will reduce stock and receipts will increase stock. These
quantities will be meaningless until you take a physical count.
58
Dim11
Chapter 3. “Go Live” Tracks
3. Inventory Control with Physical Count & Purchasing/Receiving
Point of Sale with a counted inventory is the final step of going live with complete
inventory control. It will provide you with all of the features discussed previously
as well as control inventory quantities by watching minimum/maximum stock
levels, turnovers, and the like. You will also be able to use the suggested order
system to aid in purchasing inventory.
What needs to be done before going live?
G 1. All steps from POS with full inventory must be done.
G 2. Double check the following Variable File options. Change if needed.
A. Sales, Entry Options, POS Enter Detail Screen
l
8. Verify On-Hand Exceeded
Should be Y. You will want to know at POS if the quantities are not
adequate for the ticket.
B. Inventory, Basic Inventory Information, Store Information
l
3. Post Inventory Adjustment to G/L
Should be Y if you want to start posting inventory sales, receipts,
adjustments, and counts to the G/L. Or if you want to post receipts
only, it should be R.
G 3. Decide go live date. Determine when you will take a physical count.
Immediately prior to going live:
G 4. Take and enter a physical count. You may wish to count your common or
fast-moving items first and then fill in the rest of the items later.
G 5. Determine the beginning inventory total value and enter it in the Totals
File for today, MTD, and YTD (records 1010, 1020, and 1030). See your
installer for further instructions.
G 6. Print the Daily Report under Day End to check the Inventory Summary
section for the beginning inventory balance.
G 7. Enter the outstanding customer orders with deposits in the live POS
system. Print an Open Order Register or Open Order Detail to check your entries.
What is the commitment of going live?
You must do everything described for POS plus now maintain a regular process of
physical counts. You must decide whether to do cycle counting by group
throughout the year or count the entire stock once a year at year end. The
purchasing and receiving system must also be implemented to keep the on-order
and on-hand quantities accurate. You are also in a position to bring up other
inventory sub-systems such as inventory adjustments, fabrication, serial number
control, suggested orders, on-line ordering, multiple vendors, and multiple
locations.
Dim11
59
Chapter 3. “Go Live” Tracks
4. Accounts Payable
The Accounts Payable system allows you to enter vendor invoices by batch, pay
invoices by printing computer checks or entering handchecks, and post this
activity to the General Ledger. Invoices can be entered manually (such as utility
bills, loan payments, and rent) as well as be generated from inventory receipts
originating from the Purchasing/Receiving system.
What needs to be done before going live?
G 1. All vendors are entered including miscellaneous vendors (no balances or
aging). Optional: You may also enter the G/L debit account number for
each vendor.
G 2. Check the Variable File entry for the A/P check printing program.
G 3. Decide the go live date for A/P invoice posting and check writing. You will
probably want to do this when you have the fewest invoices, such as after
paying on the 10th. It is easiest to process (pay) the outstanding invoices
on your old system and enter new invoices with invoice dates on or after
your go live date. This will let you know that invoices with invoice dates
before your go live date are on your old system (whether hand books or
computer) plus you won’t be duplicating your work on both systems.
Immediately before going live, do the following:
G 4. Print an Aging Report from the Accounts Payable Reports Menu to check that
vendors are starting with zero balances.
What is the commitment of going live?
Once you go live using Accounts Payable, you are committed to entering vendor
invoices by batch for the current month, posting the batch to the G/L (even if you
are not running G/L yet), selecting which invoices to pay by computer check or
entering handcheck information if you do not have your checks yet, and updating
the checks to the invoices and G/L.
At month end, you should print the Invoices Due Report and the Receipts Not
Invoiced Report for comparison. Then make sure the calendar month is correct in
the new month (gets changed during the Totals month end update).
60
Dim11
Chapter 3. “Go Live” Tracks
5. General Ledger
General Ledger is the final step to completing your accounting cycle and producing
financial statements. It is recommended that you wait until you are comfortable
to bring up you General Ledger so you can concentrate on refining the other parts
of the system. The very best time to go live with General Ledger, of course, is at
the beginning of a new accounting year. You would have your beginning year
balances for assets and liabilities, an accurate physical count and beginning
inventory value, and zero balance income and expense accounts. Of course you
could start anywhere in the middle of an accounting year, after a quarter or month
end, but you would need to decide if you want to enter the account balances up to
your go live date or start with zero balances.
In addition, you must consider the numbering of the chart of accounts. Your
system comes set up already with a comprehensive chart of accounts. The
numbering system uses 4-digit account numbers. Pre-set balance sheet and
income statement formats are already designed for you as well as all of the
integration accounts in the Variable File are correlated to the standard G/L. If
you have been running already, making GPOST entries here and there, you may
have realized the intricate and comprehensive role the General Ledger plays
throughout the system. We highly recommend you use the G/L chart of accounts
as it has been set up for you to avoid having to change many areas of the system.
If you decide, however, to change the numbering of the General Ledger, see “What
needs to be done before going live with a new G/L Chart of Accounts” below.
What needs to be done before going live with the standard G/L?
G 1. If not done already, determine how sales and cost of sales will be posted to
the General Ledger. Only one type of posting is allowed. This is set up in
the Variable File for Sales, G/L Integration, Sales, 1. G/L Posting Methods for
Sales. G/L sales by type of sale (N) is the default because it is most
common.
N =
by type of sale (charge vs. cash).
C =
sales by customer class.
A =
by assigned salesperson.
Y =
sales by inventory group. Corresponding sales and cost of sales
accounts must be set up in the income section of the chart of
accounts for each group.
B =
by customer class by inventory group.
G 2. Print a Trial Balance, Balance Sheet, and Income Statement. Determine if
changes need to be made to account numbers, account descriptions, and
report formats (such as layout, spacing, totaling, etc.). If major changes to
the basic chart of accounts are absolutely required, see the following
section, “What needs to be done before going live with a new G/L chart of
accounts.”
G 3. Make the minor changes in the G/L Master File (GM1.D) and the G/L
Format Master (GM2.D) if necessary.
Dim11
61
Chapter 3. “Go Live” Tracks
G 4. Check any GPOST edit lists for incorrect account numbers (account
number 0 is the most common). Determine which account(s) should be
added or modified or if the Variable File needs to be modified.
G 5. Decide the go live date for General Ledger operation (year end, quarter
end, or month end).
The day before going live, do the following:
G 6. Enter the beginning balances in GM1.D. You can also enter the net
change for each accounting period if you want. You would obtain this
information from your former bookkeeping system.
G 7. If you have been running G/L updates throughout the system and if you do
not wish to keep the accumulated GPOST entries, create a new GM3.D. If
you wish to keep the entries (if they are significant numbers to you), go
ahead and merge the entries by accounting month. The merge process
removes the GM3.D records, adds them to GM4.D (Yearly Transaction
File), and adds the totals to the balances in GM1.D.
What needs to be done before going live with a new G/L chart of
accounts?
G 1. Determine the account numbers and descriptions for the chart of accounts.
G 2. Enter the G/L Master File (GM1.D). You would need to create a new,
blank GM1.D before adding your new accounts.
G 3. Design a Balance Sheet and Income Statement. Enter the G/L Format
Master File (GM2.D) for each report. The Format Master controls how the
report are laid out.
G 4. Change all entries in the following Variable File records:
A. Sales, G/L Integration, Sales. Determine how sales and cost of sales
will be posted to the G/L (see above).
B. Sales, G/L Integration, Sales. If G/L Posting Method for Sales=Y for
inventory groups, identify and enter the G/L account numbers for
every group for:
l
l
Sales
Cost of goods
C. Sales, G/L Integration, Inventory Sold. Identify and enter the G/L
account numbers for every group for:
l
Inventory Sold
D. Inventory, G/L Integration. Identify and enter the G/L account
numbers for every group for:
l
l
Inventory adjustments
Inventory adjustments to physical
E. Inventory, Other Options, Fabrication. Identify and enter the G/L
account numbers for every group for:
l
62
Inventory fabrication
Dim11
Chapter 3. “Go Live” Tracks
F. Purchasing & Receiving, G/L Integration, Group Information. Identify
and enter the G/L account numbers for every group for:
l
Inventory purchases
G. Sales, Addon Information, Sales Addons. Identify and enter the G/L
account numbers for every addon.
H. Sales, Sales Tax, Sales Tax Options. Identify and enter the G/L
numbers for every sales tax record (no G/L record needed for non-tax).
G 5. In Accounts Payable, check each vendor’s G/L debit account in AM1.D
against the new chart of accounts.
G 6. Decide the go live date for General Ledger operation (year end, quarter
end, or month end).
The day before going live, do the following:
G 7. Enter the beginning balances in GM1.D. You can also enter the net
change for each accounting period if you want. You would obtain this
information from your former bookkeeping system.
G 8. Create a new GM3.D and GM4.D. Any existing journal entries should not
be saved because the account numbers no longer exist.
G 9. Print a Trial Balance, Balance Sheet, and Income Statement representing
your beginning balances.
What is the commitment of going live?
Once you go live using the General Ledger, you are committed to running all
GPOST updates from the following functions:
l
l
l
l
l
l
l
l
POS or Invoice Posting (Day End update)
Purchasing & Receiving (Day End or manual update)
Inventory Adjustments
Inventory Physical Count
Inventory Fabrication
A/R Cash Receipts
A/P Invoicing and Check Writing
G/L Journal Entries
You must merge the G/L postings by calendar month (can be done as many times
during or after the month as needed) and make any manual journal entries as
needed to print up-to-date financial reports. You must also perform procedures at
year end to prepare the G/L files for the next fiscal year.
Dim11
63
Chapter 4. Accounts Receivable
Chapter 4. Accounts Receivable
A/R Overview
This overview is divided into 2 sections to give you some background information
before you organize your customer information:
Objectives for A/R
Helps you understand the objective of the Accounts
Receivable module and the tasks necessary for
accomplishing those objectives.
Customer Files
Shows you the files affected during the initial file set up
for Accounts Receivable as well as the other A/R files that
will be used once you are set up and running.
Objectives for A/R
100% accurate customer balances on a daily basis and
timely credit controls.
In order to achieve this general objective, you must accomplish specific tasks in a
logical order. A little planning now will pay off down the road.
The major tasks to getting A/R running are loading customer data and doing an
A/R Cutover. Each task breaks down into smaller projects. Following is an
outline of the tasks. You will find more detailed instructions later in the section
"Getting A/R Started.”
1
LOADING CUSTOMER DATA
Ø PREPARATION
1
Gather existing customer information - name, bill to address, phone
number, contact person.
2
Determine numbering system for Customer Master File.
3
Determine set up values for eight of the fields in the Customer Master
File used to run the basic features of A/R - A/R group, assigned sales
rep numbers, price level, class, terms, tax code, and credit limit/type.
4
Assign customers the 8 values defined above.
F NOTE:
64
If you ordered a file conversion for A/R, this may be done for you automatically depending
on whether or not it can be converted.
Dim11
Chapter 4. Accounts Receivable
Ø DATA LOAD
1
Enter all customers - number, name, address, phone number, contact
person using Add New Customer.
2
Enter 8 set up values for all customers using either Change Customers
with Range or Change Selected Fields.
3
Print customer list and check work.
4
If needed, delete customers with inaccurate information and re-enter
them.
2 DOING A/R CUTOVER
IMPORTANT
Once you do an A/R Cutover, you must be prepared to do the
steps to maintain A/R integrity as outlined below.
Ø PREPARATION
1
Determine cutover date.
2
Gather outstanding invoices and balances as of the cutover date
(either from hand system or previous computer system).
F NOTE:
If you ordered a file conversion for A/R, this may be done for you automatically depending
on whether or not it can be converted.
Ø DATA LOAD
1
Enter the A/R balances using the A/R Cutover procedure.
2
Print an Aging Report on Dimensions system.
3
Reconcile balances between old system and Dimensions system.
Correct any differences.
STEPS TO MAINTAIN A/R INTEGRITY
1 Enter invoices and returns daily either through Point of Sale or Invoice
Posting.
2 Enter and update cash receipts (customer payments) daily.
3 Perform Day End Processing daily.
4 Reconcile the totals on the A/R Aged Analysis (Aging Report) to the Daily
Report each day (printed during Day End Processing).
5 Perform Month End Processing monthly including calculating finance
charges and printing statements.
6 Print the following reports each month and archive for at least 12 months:
- Aging Report (Aged Analysis)
- A/R Statement Backup
- Open Items Applied
7 Periodically review and update credit limits and credit holds.
Dim11
65
Chapter 4. Accounts Receivable
The big payoff for following this procedure will be:
100% accurate customer balances on a daily basis and
timely credit controls.
Customer Files
Accounts Receivable information is stored and processed using several customer
files. These files will be built already for you when your system arrives, ready for
you to begin entering customer data (unless you are doing a file conversion). Each
file contains very specific information and is used by the system when performing
certain functions.
When you are getting started in A/R, you will be entering customer information in
the Customer Master File, also called CM1.D:
CM1.D
Customer Master File
- customer number
- customer name
- address
- phone number
- etc.
This is the main file in A/R. It is like a folder that contains major information and
setup values for each customer such as:
Customer Number
Customer Name
Address
Phone Number
Contact Person
A/R Group
Assigned Sales Rep Number
Price Level
Class
Terms
Tax Code
Credit Limit
It also contains customer balances, which are updated during normal invoice and
cash receipt processing.
The other files in A/R serve other functions:
66
Dim11
Chapter 4. Accounts Receivable
REGULAR PROCESSING
CM2.D
Customer
Misc. File
- ship to address
- email address
- cell phone #
- SS#
- messages (3
lines)
- etc.
CM3.D
Customer
Transaction File
- open invoices &
returns
- unapplied
payments
- paid invoices
CM4.D
Cash Receipts
Transactions File
- customer
payments
- adjustments
CM4H.D
Cash Receipts
Transaction History
Similar to CM4.D but
keeps a history of
customer payments.
Updated at month
CM15.D
Cash Receipts by
Batch File
CM5.D
Open Items Applied
File
CM5H.D
Open Items Applied
History File
Optional method of
entering cash receipts
Holds activity against
customers’ charges
Similar to CM5.D but
keeps a history of
how customer
payments were
applied to invoices.
Cleared at month end
Cleared at month end
Updated at month
CMC.D
Customer
Change File
Used in Change
Customer Numbers
by Batch. Contains
customer number
changes and allows
you to edit the batch
before updating them
throughout the A/R
and sales files.
CREDIT MANAGEMENT
CM9.D
Credit History File
Used in A/R File
Inquiry to show a
history recap of sales
activity by month.
Also used on the
Credit History Report.
CM10.D
Customer Credit
File
CM16.D
Multiple Credit Note
File
Used in A/R File
Inquiry showing:
- high balance since
account was
opened
- credit hold detail
(when put on and
taken off)
Holds credit notes
(comments) entered
through A/R File
Inquiry.
CM6.D
CM7.D
CM8.D
Customer Lien File
Bad Check File
A/R Posting File
OPTIONAL FEATURES
- bad check I.D.
- name
Checked at POS
Dim11
Used only in A/R
batch posting
- invoices entered
as a batch then
posted to
customer
accounts
Used only in pre-lien
system.
- property owner
name & address
- original contractor
name & address
- construction lender
name & address
CM14.D
Extra Signature File
Holds unlimited
number of extra
signatures
(authorized names of
buyers) for each
customer.
67
Chapter 4. Accounts Receivable
Getting A/R Started
The following pages will help you begin gathering customer information for
Accounts Receivable. You will be collecting general information such as customer
names, addresses, phone numbers, credit limits, etc. This is an excellent time to
clear out old accounts and update your A/R files.
You will not be handling customer balances and current activity at this time. You
will decide later when you wish to enter the aging and "go live." This process is
called the A/R Cutover. Be aware that at the time you cut over you will need to
have a current aging and list of outstanding invoices for each customer. You must
do an A/R Cutover before your first ticket, whether you will be doing Invoice
Posting, Point of Sale, or Order Entry.
Getting A/R Started is your guide to beginning work with the A/R system. In this
section, you will find instructions for:
Basic Customer Data
Numbering Accounts
Getting into A/R
Adding Customers
Changing Customer
Information
Printing Customers
Deleting Customers
Values Worksheet
Entering Values for
Customers
Entering Variable File
Information
Doing A/R Cutover
68
Helps you begin gathering the basic elements of your
customer file on an A/R Load Form – names, addresses,
phone numbers, and so on.
Suggests how to number customer accounts.
Shows you how to get into the Accounts Receivable Menu for
getting started on the computer.
Shows you how to enter the basic customer information
into the computer.
Shows you how to change the basic customer information
if you need to make corrections.
Shows you how to print some reports to check your
entries.
Shows you how to delete customer entries if they are
incorrect so you can enter them again correctly.
Helps you decide the 8 values you need to have to run the
basic features of the Accounts Receivable system – A/R
group, assigned sales rep numbers, price levels, classes,
terms, tax codes, and credit limits/types. Includes a load
form.
Shows you two methods of quickly entering the values
from the worksheet, Change Selected Fields and Change Fields
by Range.
Leads you through making the appropriate entries in the
Variable File for “going live”.
Helps you enter beginning A/R balances for customers on
the Dimensions system in preparation for "going live".
Dim11
Chapter 4. Accounts Receivable
Customer Inquiry
Sample Customers
Shows you how to perform an inquiry on an A/R
customer, displaying it on the screen. Also explains how
to search for and select a customer.
Presents 4 different customers and how they are set up
using the Add New Customers screen.
Basic Customer Data
This section will help you actually begin gathering information for Accounts
Receivable. You won't be entering anything in the computer, just gathering data
to get ready. Starting with your current system of tracking A/R, there are several
methods of gathering data:
1. If you are keeping records manually and have no preprinted customer
information (as in a computer printed report), use the A/R load form. Take the
blank load form on the next page and make as many copies as you need to
accommodate all your customers. There is space for 4 customers per page.
Then fill out the forms. The chart following the blank load form explains each
field on the load form.
2. Use credit applications, if available, as a source for the information. Make
sure you have a current credit application for every charge customer. Or use a
mixture of this method and the first method.
3. If you have ledger cards, you won't need to fill out load forms but you will need
to make notations of the codes on the cards.
4. If you are coming from a previous computer system, you won't need to fill out
load forms but you will need to print out a customer list and make any
notations for corrections and additions.
5. If you ordered a file conversion for A/R, you also won't need to fill out load
forms. Dimensions will work with you to make sure your new system will
contain the proper information.
You should read through this section to gain a basic knowledge of what the
customer fields contain, even if you are doing a file conversion.
Dim11
69
Chapter 4. Accounts Receivable
A/R LOAD FORM
CUST NO_________________________
NAME______________________________________________________
ADDR 1 (PO BOX or ATTN) _________________________________________________________________________
ADDR 2 (STREET ADDRESS) ______________________________________________________________________
ADDR 3 (CITY, STATE)
___________________________________________________________________________
ZIP CODE _____________________________
PHONE______________________________________________
CONTACT__________________________________________
TAX NO____________________________________
CREDIT CONTACT___________________________________
FAX NO____________________________________
70
Dim11
Chapter 4. Accounts Receivable
FIELD
WHAT
CUST NO
Customer Number
HOW LONG
6 digits plus 3
following a
decimal
FOR EXAMPLE
123456.001
MORE...
1. Customer numbers 1-99 are for cash
accounts only. Accounts 100 and higher
are charge accounts.
2. The format of the customer number allows
any customer to have multiple jobs. The
three digits after the decimal identify the
job number. The main account would end
in all zeroes (.000) and the job accounts
would follow (.001, .002, etc.). Aging
report and statements will show a total for
each job as well as a consolidation for all
jobs.
3. For customers without jobs, it is not
necessary to enter the decimal and trailing
zeroes.
This controls how the account is
alphabetized. See Step 2 on page 72 for
more explanation of how to format the
customer name.
NAME
Customer Name
30 characters
FRANK WHITE
INDUSTRIES or
WHITE/FRANK
PO BOX
or
ATTN
Bill to P.O. Box or
Attn information
(ADDR 1)
25 characters
P.O. BOX 888
or
ATTN: Accounts
Payable
STREET
Bill to street
address
(ADDR 2)
25 characters
CITY,
STATE
Bill to city & state
(ADDR 3)
25 characters
Newtown, CO
Separate the city and state with a comma.
ZIP CODE
Zip code
10 characters
87101
87101-1234
You can use the 5-digit zip or the 9-digit zip.
Use a dash (-) in the 9-digit zip code.
PHONE
Phone Number
12 characters
800/222-3333
800-222-3333
222-3333 x123
Enter the phone number exactly how you wish
it to print on reports, transaction entry
screens, and inquiry screens.
CONTACT
Contact Person
20 characters
Bill W. or
Mrs. Johnson
Enter the name of the contact person for this
customer. This is optional but very handy.
TAX NO
Sales Tax ID
Number
15 characters
16656-8
If the customer is tax exempt, you should find
this number on a sales tax exemption
certificate.
CREDIT
CONTACT
Contact Person for
credit matters
20 characters
Mary S.
This could be different from the Contact
Person entered above.
FAX NO
Fax Number
12 characters
702-222-4444
This can be the actual mailing address.
Numbering Accounts
Organizing customer accounts with the Dimensions system helps save you time
and effort. Each customer account is assigned a customer number. You type the
information once and then when you need to use it you can call it up by number or
by name. When you print customer reports you can print in numerical or
alphabetical order.
Dim11
71
Chapter 4. Accounts Receivable
STEP 1 WHAT IS MY SOURCE OF CUSTOMER INFORMATION?
Get an alphabetized list of your charge customer accounts. This can come from:
Ø Filling out and alphabetizing A/R Load Forms. Make copies of the Load Form
found on page 94. Each field is described on the chart found following the
Load Form.
Ø Manual ledger cards.
Ø Computer printout from your previous computer system. You may wish to
keep your same numbering system or you may wish to reorganize your
customers as described below. Print out a customer list from your previous
system to use as a basis for your work.
Ø File conversion. If you are doing a file conversion for Accounts Receivable
from a previous system, do not proceed. Dimensions will work with you to
determine the numbering system.
F IMPORTANT:
Customer numbers 1-99 are reserved for cash customers. Customer number 1 is
typically the account used for regular walk-in cash sales where the method of
payment is cash, check, or credit card. You may want to fill out load forms for
cash customers separately since they are numbered below 100.
Customer numbers 100 and up are used for charge sales where the transactions
are tracked through the A/R system.
STEP 2 WHO ARE MY CUSTOMERS?
Ø Fill out the load forms, leaving the customer number blank. Try to keep the
accounts in alphabetical order as much as possible. Depending on how many
customers you have, you may want to start a new sheet for each letter of the
alphabet.
HELPFUL TIP:
You don't have to keep the customers in alphabetical order because the system lets
you look up by number or by name, but Dimensions recommends you start out with
an organized list as much as possible.
Ø Company names are alphabetized by the first letter of the first name. For
example:
FRANDSOM CONTRACTORS
FRANK WHITE INDUSTRIES, INC.
FULLER ELECTRIC
Ø Individuals are alphabetized by the first letter of the last name. For example:
BLACK/TOM
GREEN/ROBERT
WHITE/FRANK
For individual names, the last name is typed first with a slash (/) separating
the first name. Invoices and statements will then switch these and
WHITE/FRANK will print as FRANK WHITE but be alphabetized under WHITE.
HELPFUL TIP:
72
You could also use this feature to alphabetize company names like THE DECK
DOCTOR (DECK DOCTOR/THE).
Dim11
Chapter 4. Accounts Receivable
STEP 3 HOW MANY CUSTOMERS DO I HAVE?
Ø Determine the total number of charge customers you have. Write the total
here: __________________
STEP 4 HOW DO I WANT TO NUMBER MY CUSTOMER ACCOUNTS?
Ø From the following chart, determine how to start numbering your charge
customers. Normally you will want to number the accounts so that numeric
order is the same as alphabetic order. You will want to leave plenty of
numbers between accounts so that future additions will still be in alphabetical
order.
TOTAL #
OF
ACCOUNTS
# OF DIGITS
FOR CUST
NO
< 75
76-750
751-7500
7501-75000
3
4
5
6
STARTING
CUST NO
INCREMENT
BY*
110
1010
10010
100010
10
10
10
10
NEXT
CUST NO
120
1020
10020
100020
* For heavily used letters, you may wish to increment by 20 or more.
STEP 5 WHERE’S MY PENCIL?
Ø Begin numbering customer accounts on the A/R load forms (or ledger cards or
computer printed report) using the beginning number determined in STEP 4.
Be sure to leave plenty of numbers between each account for future additions,
maintaining the alphabetical order.
OTHER USES & METHODS OF NUMBERING ACCOUNTS:
Dim11
Ø
Last 6 digits of phone number
Ø
Give heavily-used customers numbers that are easy to remember (i.e., 5555 or
123)
Ø
House account
Ø
Employee A/R accounts in a separate range of numbers
Ø
Affiliate companies in a separate range of numbers
Ø
Separate cash and charge customers for special quotes such as decks, sheds,
houses, etc.
Ø
Special "spiff" customer to be used when creating a spiff as a quote first. A spiff is
a group of items on sale with a specified beginning and ending date.
73
Chapter 4. Accounts Receivable
Getting into A/R
Now you are ready to start entering this information on the computer. Before
beginning, you should be familiar with the following concepts:
♦
Passwords
♦
Menus
♦
Keyboard & Keys
If you are not familiar with these or wish to review them, see Chapter 2, System
Training.
1 For SuperDOS systems, start at the PASSWORD screen:
WELCOME TO DIMENSIONS
SuperDOS
Password
......
Or for Unix systems, start at the login screen:
Enterprise Computer Systems Inc.
slc-aix02.slc.ecs-inc.com
login:
Sign on with the password/login provided by your Dimensions support analyst or
installer.
74
Dim11
Chapter 4. Accounts Receivable
2 The computer displays the DIMENSIONS MAIN MENU:
+-----------------------------------------------------------------------------+
|
DIM11 DATA
|
=== DIMENSIONS MAIN MENU ===
| 11.0 |
+-----------------------------------------------------------------------------+
| 1. Sales
|
|
|
| 2. Inventory
|
|
|
| 3. Accounts Receivable
|
|
|
| 4. Purchasing & Receiving
|
|
|
| 5. Accounts Payable
|
|
|
| 6. General Ledger
|
|
|
| 7. Day End/Month End/Year End
|
|
|
| 8. System Manager
|
|
|
| 9. Other Options
|
|
|
+-----------------------------------------+
Enter 3 for Accounts Receivable and press Enter.
3 The computer displays the ACCOUNTS RECEIVABLE MENU:
+-----------------------------------------------------------------------------+
|
DIM11 DATA
|
=== ACCOUNTS RECEIVABLE ===
| 11.0 |
+-----------------------------------------------------------------------------+
| 1. File Inquiry
|
|
|
| 2. File Maintenance
|
|
|
| 3. A/R Reports
|
|
|
| 4. Cash Receipts
|
|
|
| 5. Other A/R Options
|
|
|
| 6. A/R Variable File
|
|
|
| 7. A/R Special Maintenance
|
|
|
+-----------------------------------------+
You have these options from this menu:
1. File Inquiry
Perform inquiry on any customer.
2. File Maintenance
Add new customers, change or delete existing customers.
3. A/R Reports
Print customer reports to check data.
4. Cash Receipts
Used later to enter customer payments.
5. Other A/R Options
Used if you purchase other optional A/R software.
6. A/R Variable File
Enter set up information to customize your A/R system.
7. A/R Special Maintenance
Dim11
Allows access to the A/R cutover process and other special
maintenance functions. Security protected access.
75
Chapter 4. Accounts Receivable
Adding Customers
1 From the Accounts Receivable Menu shown above, enter 2 for File Maintenance.
Remember to press Enter after entering your menu selection.
2 The computer displays the A/R FILE MAINTENANCE MENU:
+-----------------------------------------------------------------------------+
|
DIM11 DATA
|
=== A/R FILE MAINTENANCE ===
| 11.0 |
+-----------------------------------------------------------------------------+
| 1. Add New Customers
|
|
|
| 2. Change Customers
|
|
|
| 3. Delete Customer from CM1 & CM2
|
|
|
| 4. Purge Credit Notes by Date
|
|
|
| 5. Maintain Extra Signatures
|
|
|
| 6. Bad Check File CM6
|
|
|
+-----------------------------------------+
Select 1 for Add New Customers and press Enter.
F NOTE:
There is an option that controls which fields are displayed on this screen. It is found in
the Variable File. See the system manager if you wish to use this feature.
These instructions present all fields as if they had all been selected to display.
3 The computer displays:
DS02011C
Rev10.0.18
Add New Customer
1.Cust No
.000
3.Addr 1
5.Addr 3
7.Phone
9.Tax No
12.Tax Type
15.Signature Req (Y/N)
18.Save Lien Info
21.Price Level
24.Terms
27.Extra Code
30.Open Date
33.Install Pmt
36.Delivery Zone
39.Ship To 1
41.Ship To 3
43.Email
45.Message/Note 1
46.Message/Note 2
47.Message/Note 3
<Esc>=End
<F1>=Help
0
0
0
DIM11 DATA
Date mm/dd/yy
Port 41
Store 01
2.Name
4.Addr 2
6.Zip
8.Contact
10.A/R Group
0 11.A/R Type
13.Each Price (Y/N)
14.PO Required
16.Cust Has Jobs (Y/N)
17.Save History
19.Store Number
0 20.Rep Number
22.Class
0 23.Credit Hold
25.Statement Day
0 26.Tax Code
28.Credit Limit
0 29.Bid Number
31.Credit Limit Type
32.Statement Detail
34.SSN #
35.Resale Price Level
37.Route Difficulty
38.Map Code
40.Ship To 2
42.Builder's Club #
44.Cell Phone
0
0
0
<UpA>=New Job
The cursor is at the first field, 1. Cust No. From your list of customers (the A/R
Load Form or whatever source you have for customer information), enter the for
the customer you are setting up and press Enter.
4 Next, enter the customer name (2. Name).
5 Continue entering the rest of the information for the customer up through 9. Tax
No.
76
Dim11
Chapter 4. Accounts Receivable
F NOTE:
If you make a mistake during your entry on this screen, you can press Esc to back up
one field. Re-type the information correctly.
To skip entering a field, press Tab. This will leave the information contained in the field
unchanged.
6 Then enter . (period) and press Enter. This skips the remaining fields on the
screen and asks at the bottom of the screen:
DS02011C
Rev10.0.18
Add New Customer
1.Cust No 65400.000
3.Addr 1 456 Main Street
5.Addr 3 Anytown, USA
7.Phone 222-333-4444
9.Tax No W77888
12.Tax Type
15.Signature Req (Y/N)
18.Save Lien Info
21.Price Level
0
24.Terms
0
27.Extra Code
0
30.Open Date
33.Install Pmt
36.Delivery Zone
39.Ship To 1
41.Ship To 3
43.Email
45.Message/Note 1
46.Message/Note 2
47.Message/Note 3
Add Record <Y/N>?
DIM11 DATA
Date mm/dd/yy
Port 41
Store 01
2.Name
Best Customer Inc.
4.Addr 2
Suite 300
6.Zip
77777
8.Contact Fred M.
10.A/R Group
* 11.A/R Type
13.Each Price (Y/N)
14.PO Required
16.Cust Has Jobs (Y/N)
17.Save History
19.Store Number
0 20.Rep Number
0
22.Class
0 23.Credit Hold
0
25.Statement Day
0 26.Tax Code
0
28.Credit Limit
0 29.Bid Number
31.Credit Limit Type
32.Statement Detail
34.SSN #
35.Resale Price Level
37.Route Difficulty
38.Map Code
40.Ship To 2
42.Builder's Club #
44.Cell Phone
Enter Y if the entry is correct so far. The computer adds this customer to the
Customer Master File (CM1.D) and you will continue to Step 7 to add the
Customer Misc. File information. Or enter N if the entry is not correct. The
computer does not add this entry and you are returned to Step 3 (1. Cust No) to
enter another customer record.
7 The computer displays the next screen:
DS020114A
Rev9.0.4
Customer :
Maintain Signatures
DIM11 DATA
Date mm/dd/yy
Port 41
Store 01
65400.000 Best Customer Inc.
1.
2.
3.
4.
5.
6.
7.
8.
9.
10.
11.
12.
13.
14.
15.
16.
17.
18.
Record Doesn't Exist -
19.
20.
21.
22.
23.
24.
25.
26.
27.
28.
29.
30.
31.
32.
33.
34.
35.
36.
(A)dd Record
37.
38.
39.
40.
41.
42.
43.
44.
45.
46.
47.
48.
49.
50.
51.
52.
53.
54.
(E)nd
This information comes from the Customer Misc. File (CM2.D). Enter A if you
wish to add any signatures (names of customers who are authorized to make
purchases for this customer). Or enter E to end this screen and continue to Step 8.
Dim11
77
Chapter 4. Accounts Receivable
8 The computer displays the next screen:
DS02011C
Rev10.0.18
Add New Customer
DIM11 DATA
Date mm/dd/yy
Port 41
Store 01
------------------------- Credit Information ----------------------------1. Credit Contact
___________________
2. Fax Number
<Esc>=Quit
<Tab>=Next Field
(.)=End
<F1>=Help
The cursor is positioned at 1. Credit Contact. Enter the credit contact name or press
Enter to leave blank.
9 Then enter the fax number or press Enter to leave blank.
10 The computer adds the customer record to the Customer Misc. File (CM2.D) and
returns you to Step 3 so you can enter the next customer.
11 When there are no more customers to be entered, press Esc at 1. Cust No to return
to the previous menu.
F NOTE:
78
For a complete listing of each field on this screen, see Appendix C. Field Definitions, Add
New Customers.
Dim11
Chapter 4. Accounts Receivable
Changing Customer Information
If you need to change customer information entered up to this point, use the
following procedure:
1 Return to the A/R File Maintenance Menu.
2 Select 2 for Change Customers.
3 Select 1 for Customer Master File CM1.D.
4 Select the customer you wish to change using the standard customer selection
routine (see Customer Inquiry on page 129 for instructions on selecting
customers). Or press Esc to end this process.
5 The computer displays the CM1.D information for the selected customer. You can
do one of the following:
(N)=Next Number
Display the next customer in numerical order.
(A)=Next Name
Display the next customer in alphabetical order.
(P)=Previous
Display the previous customer in numerical order.
(F)=Change By Field
(C)=Change
<Esc>=Back to Customer
Select and change specific fields for the displayed
customer. See Steps 6-11.
Change all fields for the displayed customer. See Steps
12-15.
Return to the previous screen to select another customer
or end this process.
6 (F)=Change By Field. The computer asks:
Enter Field Number
Enter the field number you wish to change. For example if you want to change the
phone number, enter 7.
7 The cursor moves to the selected field. Enter the new value for this field and
Enter.
8 Repeat Steps 6 and 7, entering field numbers and new values as many times as
needed.
9 When done, press Esc at Enter Field Number.
10 The computer asks:
OK to Save Changes (Y/N)
Enter Y to save the changes you made or N to not save them.
11 Return to Step 5 to select another option.
12 (C)=Change. The cursor moves to field 2, Name. Enter the new value for this field
and Enter to move to the next field. Or press Tab to go to the next field without
changing the value.
Dim11
79
Chapter 4. Accounts Receivable
CAUTION: Do not press Enter to move to the next field. This will erase the existing value in the
current field.
13 Continue changing fields as needed for this customer. When done, you can press
Tab through the remaining fields or enter . (period) and Enter to bypass the
remaining fields and go to Step 14.
14 The computer asks:
OK to Save Changes (Y/N)
Enter Y to save the changes you made or N to not save them.
15 Return to Step 5 to select another option.
80
Dim11
Chapter 4. Accounts Receivable
Printing Customers
After entering the basic customer data, you should print a report showing your
entries to check for accuracy. This is done through the A/R Reports Menu.
1 Return to the ACCOUNTS RECEIVABLE MENU:
+-----------------------------------------------------------------------------+
|
DIM11 DATA
|
=== ACCOUNTS RECEIVABLE ===
| 11.0 |
+-----------------------------------------------------------------------------+
| 1. File Inquiry
|
|
|
| 2. File Maintenance
|
|
|
| 3. A/R Reports
|
|
|
| 4. Cash Receipts
|
|
|
| 5. Other A/R Options
|
|
|
| 6. A/R Variable File
|
|
|
| 7. A/R Special Maintenance
|
|
|
+-----------------------------------------+
Enter 3 for A/R Reports and press Enter.
2 The computer displays the ACCOUNTS RECEIVABLE REPORTS MENU:
+----------------------------------------------------------------------------+
|
DIM11 DATA
|
=== ACCOUNTS RECEIVABLE REPORTS ===
| 11.0 |
+----------------------------------------------------------------------------+
|
LISTS
|
STATEMENT FORMATS
|
| 1. Name & Address
| 12. Blank Paper
|
| 2. Codes
| 13. Form - Preprinted Heading
|
| 3. Phone/Contact/Tax Exempt
| 14. Form - Print Heading
|
| 4. Customer List/Fax Information
| 15. Other Statement Formats
|
| 5. Ship To Address
|
|
| 6. Authorized Signatures
|
CUSTOMER SALES REPORTS
|
| 7. Messages
| 16. Profit Analysis
|
| 8. Customer Labels
| 17. Sales Tax Receipt Report
|
|
| 18. Year to Date Information
|
|
AGING REPORTS
|
|
| 9. Traditional
|
CREDIT INFO
|
| 10. Other Aging Formats
| 19. Credit Limit
|
| 11. Customers Out of Balance
| 20. Credit Hold
|
|
| 21. Credit Note Report
|
|
| 22. Credit Analysis & Sales Report
|
|
| 23. History Reports
|
|
| 24. Mechanics Lien Report
|
|
|
|
+----------------------------------------------------------------------------+
Enter 1 for Name & Address and press Enter. Or you can enter 3 for Phone/Contact/Tax
and press Enter. These reports contain different kinds of information.
Exempt
Dim11
81
Chapter 4. Accounts Receivable
3 If you selected 1, the computer displays the Customer List--Name & Address report
screen:
DS02301
Rev10.0.1
Customer List - Name & Addr
DIM11 DATA
STORE #1
Date mm/dd/yy
Port 38
Store 01
1. Input Parameters
Order: 1)Number, 2)Name or 3)Zip
Beginning Customer Number
Ending
Customer Number
Store Number
(0 = All)
Print Job Accounts (Y/N)
Print Job Address (Y/N)
Number of Copies
Report Date
Second Line of Data (Ph, Sman, etc.)
1
.000
999999.999
0
Y
N
1
mmddyy
(Y/N)
N
Select Optional Field (Y/N)
<Ent> = Print Report
(E) = End
N
(1) = Input Parameters
If you selected 3, the computer displays the Customer List--Phone/Contact/Tax Exempt
report screen:
DS02303
Rev10.0.1
Customer List - Phone,Contact,Tax-No
DIM11 DATA
DATE mm/dd/yy
Port 38
Store 01
1. Input Parameters
Print 1) Numerically,
Beginning Customer
Ending
Customer
Number of Copies
Report Date
2) Alphabetically
Select Optional Field (Y/N)
<Ent> = Print Report
(E) = End
1
.000
999999.999
1
mmddyy
N
(1) = Input Parameters
Do not change any of the report parameters. Press Enter to print the report.
4 The computer asks where you wish to print the report:
Output Device (P,T,S,F,Port#):
Port No <UpA> = Search Port No
It will be easiest to check this report if you print it out on paper so press P and
Enter. This will print the report on your system printer. Make sure it is turned
on, the paper is loaded, and is ready to print.
5 Then the computer asks if you want to print in compressed print:
Compressed Print (Y/N):
Enter Y and press Enter. This will fit the report on 8-1/2x11” paper.
82
Dim11
Chapter 4. Accounts Receivable
6 Then you can determine if you want to print the report in single, double, or triple
spacing:
Report Spacing (1, 2, 3):
If you think you might need to make notes on the report as you check the
information, print it double- or triple-spaced. Enter 2 and press Enter.
Otherwise, you can print it single-spaced.
7 Wait while the report is printed. When it is finished, you are returned to Step 3 so
you can end the report printing process. Enter E (for END) and press Enter.
8 You are returned to the A/R REPORTS MENU. Enter E and press Enter again to
return to the ACCOUNTS RECEIVABLE MENU.
9 See below for sample reports.
Sample Customer List--Name & Address
mm/dd/yy
09:51:41
CUSTOMER LIST - NAME & ADDRESS
STORE : ALL
NUMBER NAME
CONTACT
1.000
2.000
3.000
100.000
150.000
200.000
300.000
1010.000
1010.100
1010.101
1010.102
1010.700
1010.800
1010.998
1031.000
1031.001
1040.000
1050.000
PHONE
CASH SALES
CASH SALES (RESALE)
CASH SALES (NON PROFIT)
STORE 1 TRANSFERS
ABC CONSTRUCTION
STORE 2 TRANSFERS
STORE 3 TRANSFERS
F P S, INC. DBA BURGER KING
F P S OFFICE
F P S, INC. DBA BURGER KING
F P S, INC. DBA BURGER KING
F P S, INC. DBA BURGER KING
F P S, INC. DBA BURGER KING
F P S, INC. DBA BURGER KING
ANDERSON/MIKE
ANDERSON/MIKE
BECK STREET CONSTRUCTION
BONHAM/STAN
DIM 11 DATA
ADDR1
C-HOLD
CLASS
SMAN
STORE #1
ADDR2
PLVL TERMS
TXCD
NORWALK, CT
NORWALK, CT
NORWALK, CT
ADDRESS 2
NORWALK, CT
ADDRESS 1
PO BOX 357
123 MAIN ST.
PO BOX 357
PO BOX 357
PO BOX 357
PO BOX 357
PO BOX 357
5144 KENSINGTON STREET
5144 KENSINGTON STREET
P.O. BOX 16325
4410 SOUTH MAIN STREET
ADDR3
INST PYMNT
ZIP
ADDRESS 3
SOUTHAMPTON,
SOUTHAMPTON,
SOUTHAMPTON,
SOUTHAMPTON,
SOUTHAMPTON,
SOUTHAMPTON,
SOUTHAMPTON,
NORWALK,
NORWALK,
NORWALK,
NORWALK,
DS02301
PAGE 0001
CT
CT
CT
CT
77777
MA
MA
MA
MA
MA
MA
MA
01073
01073
01073
01073
01073
01073
01073
84025
84025
84116
84115
etc.
Sample Customer List—Phone/Contact/Tax Exempt
mm/dd/yy
09:55:45
NUMBER
1.000
2.000
3.000
100.000
150.000
200.000
300.000
1010.000
1010.100
1010.101
1010.102
1010.700
1010.800
1010.998
1031.000
1031.001
1040.000
1050.000
1060.000
1070.000
1080.000
1080.899
1080.900
1090.000
CUSTOMER LIST - PHONE, CONTACT, TAX NUMBER
NAME
CASH SALES
CASH SALES (RESALE)
CASH SALES (NON PROFIT)
STORE 1 TRANSFERS
ABC CONSTRUCTION
STORE 2 TRANSFERS
STORE 3 TRANSFERS
F P S, INC. DBA BURGER KING
F P S OFFICE
F P S, INC. DBA BURGER KING
F P S, INC. DBA BURGER KING
F P S, INC. DBA BURGER KING
F P S, INC. DBA BURGER KING
F P S, INC. DBA BURGER KING
ANDERSON/MIKE
ANDERSON/MIKE
BECK STREET CONSTRUCTION
BONHAM/STAN
BRODERICK AND ZARBOCK PLUMBING
CHRISTENSEN/DAVID
CLASSY BUILDERS
CLASSY BUILDERS
CLASSY BUILDERS
CONSTRUCTION ADVISORS
DIM11 DATA
PHONE
CONTACT
888-999-1111
CONTACT FOR CUST 100
1,4135277474
413-527-7474
413-527-7474
413-527-7474
413-527-7474
413-527-7474
413-527-7474
480-2311
480-2311
531-2698
262-2574
572-1258
485-1187
254-0484
254-0484
254-0484
583-8043
DS02303
PAGE 0001
TAX NUMBER
123-45-6789
123-45-6789
MARSHA REED
JOHN ZARBOCK
JANICE SMYTHE
JANICE SMYTHE
JANICE SMYTHE
OLY BENNETT
etc.
Dim11
83
Chapter 4. Accounts Receivable
Deleting Customers
If you wish to delete the customer and start over, use the following procedure.
F IMPORTANT:
This method is not to be used once you start invoicing the customer accounts. It
is to be used only in the start up phase of implementation.
1 Return to the ACCOUNTS RECEIVABLE MENU. Enter 2 for File Maintenance.
2 Select 3 for Delete Customer from CM1 & CM2.
3 The computer displays:
DS02402
Delete customer numbers
Rev10.0.2
Customer
DIM11 DATA
Date mm/dd/yy
Port 38
Store 01
.000
<Ent> = Next Customer
<Esc> = End
The cursor is positioned at Customer. On the report, find the customer number that
needs to be deleted and enter it. Press Enter.
4 The selected customer is displayed. The computer asks:
Delete Cust?
If this is the one you need to delete, enter Y and Enter. Or enter N and Enter if
this is not the desired customer.
5 Repeat Steps 2 and 3 for each customer you need to delete. When you are done,
press Esc at Customer. You are returned to the previous menu.
6 Add the customer(s) again. See ADDING CUSTOMERS.
84
Dim11
Chapter 4. Accounts Receivable
Values Worksheet
The Customer Master File (CM1.D) holds many fields associated with customer
activity, which will eventually need to be set up to run certain parts of the
Dimensions system. Even though there is a lot of information contained in this
file, only certain fields need to be set up initially until you are ready to bring the
inventory on line or wish to use more sophisticated features of the Accounts
Receivable system. For now, you need to decide how you wish to handle the
following fields. This will make the data you enter for your initial installation
more meaningful. Each field is described below and you will be asked how you
wish to handle it.
Ø
Ø
Ø
Ø
Ø
Ø
Ø
A/R Groups
Assigned Sales Rep Numbers
Classes
Price Levels
Terms
Tax Codes
Credit Limits/Types
A/R GROUPS
A/R groups control how the General Ledger balance sheet is posted. Each
customer is assigned an A/R group code (1-4). Then the A/R group code
determines which asset account to post as transactions are updated.
The standard G/L chart of accounts is set up for the following A/R groups. Make
any changes as needed.
A/R Group #
G/L Acct #
Account Description
1
1210.00
Accounts Receivable - Trade
2
1220.00
Accounts Receivable - Other
3
1230.00
Accounts Receivable - Employees
4
1240.00
Accounts Receivable - Affiliated Company
If no special groupings are required, assign A/R group 1 to all customers.
ASSIGNED SALES REP NUMBERS
Do you pay commissions to salesmen based on customer purchases or do you have
salesmen who perform outside sales functions? If so, you will need to assign each
customer an assigned sales rep number. Assigned sales rep numbers are set up in
the Variable File for Sales, Descriptions. If you have already set them up, fill in
the blanks below. If not, write down all names that could possibly be assigned to
customer accounts. The computer can handle up to 99 assigned salesmen. You
can use the whole name, initials, first initial/last name, or any other system you
wish. See below for examples:
Dim11
85
Chapter 4. Accounts Receivable
List my assigned sales reps here.
Sales Rep #
01
Name (up to 28 characters)
F. Brown
or
FB
or
FRED BROWN
or
FRED
___________
______________________________________________________
___________
______________________________________________________
___________
______________________________________________________
___________
______________________________________________________
___________
______________________________________________________
___________
______________________________________________________
___________
______________________________________________________
___________
______________________________________________________
___________
______________________________________________________
___________
______________________________________________________
___________
______________________________________________________
___________
______________________________________________________
If you do not wish to keep track of assigned salesmen, enter 1 as the "House
Account" for all customers.
F NOTE:
An assigned sales rep is different from a written by sales rep. Each time a transaction is
entered at POS, you also enter a written by sales rep code, indicating the person who
entered or completed the transaction. The computer stores the sales information for both
assigned and written by salesmen. This information is printed on sales analysis reports.
The computer allows up to 255 written by sales rep numbers. See Chapter 8, Point of
Sale (POS), for more information on setting up written by sales rep.
CLASSES
These are the different customer classes you have. You can have up to 99
customer classes. The computer uses customer class information for sales
analysis. Categorize the type of customers you normally do business with.
Usually pricing strategies are matched to customer classes.
86
Dim11
Chapter 4. Accounts Receivable
Common classes are:
Other kinds of classes are:
Retail
Level I Contractors (small)
Level II Contractors (medium)
Level III Contractors (large)
Government
Wholesale only
Painters
Drywallers
Framers
Home builders
Each class will be assigned a class number (1-99).
List my customer classes here.
Class #
Description
___________
______________________________________________________
___________
______________________________________________________
___________
______________________________________________________
___________
______________________________________________________
___________
______________________________________________________
___________
______________________________________________________
___________
______________________________________________________
___________
______________________________________________________
___________
______________________________________________________
If you need more space, use another sheet of paper.
PRICE LEVELS
Along with customer classes, you need to determine how to handle price levels.
You will most likely want to coordinate the customer class and price level. First,
look at the way you do business. Are you a retail store? Do you sell to
contractors? Can the contractors be categorized based on how much business they
do with you? Do you have government accounts?
Price levels come into play when you have the inventory set up and are generating
invoices at POS. The computer can handle up to 99 different price levels for each
inventory item. Normal price levels are numbered 1-9. Special and less common
price levels are numbered 10-99 and are set up in a price matrix. For now, take
your customer classes as entered above and describe your pricing policies for each.
A few examples are included to get you started.
Dim11
87
Chapter 4. Accounts Receivable
List my price levels here.
Price Level
Class
Pricing
1
Retail
Retail list price
2
Level I contractors
List price less 10% discount
3
Level II contractors
List price less 20% discount
50
Level III contractors
Cost plus 30%
55
Government
Cost plus 20%
_________
________________________
_______________________________
_________
________________________
_______________________________
_________
________________________
_______________________________
_________
________________________
_______________________________
_________
________________________
_______________________________
_________
________________________
_______________________________
_________
________________________
_______________________________
_________
________________________
_______________________________
_________
________________________
_______________________________
_________
________________________
_______________________________
_________
________________________
_______________________________
F NOTE:
More information on pricing can be found in Chapter 5, Inventory.
TERMS
These are the terms you extend to your customers for prompt payment such as 2%
10th, Net 30, COD, etc. You can have up to 99 different types of terms depending
on your company policies. Each type of terms is assigned a code number (called
“terms code”) and the specifications highlighted below.
88
Dim11
Chapter 4. Accounts Receivable
DSVM0201
Rev10.0.1
1.
2.
3.
4.
5.
6.
7.
8.
9.
10.
11.
12.
13.
14.
15.
A/R Terms Information
Store Number
Terms Number (1-99)
Description
Description for Invoice
Due Date/Days
DIM11 DATA
1
0
FINANCE CHARGES:
Finance Charge Code
Monthly Finance Charge % (#1)
Dollar Limit for FC% (#1)
Monthly Finance Charge % (#2)
Dollar Limit for FC% (#2)
Monthly Finance Charge % (#3)
Minimum Finance Charge
Minimum Past Due
Charge FC if Payment Recvd (Y/N)
Calculate FC on Fin Charges (Y/N)
16.
17.
18.
19.
20.
21.
Date mm/dd/yy
Port 36
Store 01
PROMPT PAYMENT DISCOUNTS:
Discount Date/Days
Discount %
(#1)
Discount Limit (#1)
Discount %
(#2)
Discount Limit (#2)
Print Discount on Invoice
REVOLVING ACCOUNTS:
22. Revolving # of Payments
23. Minimum Payment
24.
25.
26.
27.
28.
29.
OTHER:
Auto Line Discount %
Allow Spiff Pricing
Customer Return Hold #(0-99)
Special Flag
Volume Discount Code (0-99)
Vol Disc on Discbl Amt (Y/N)
There are additional features of the terms code but this is the minimum
information required for your initial installation. Terms codes are set up in the
Variable File for A/R, Terms Information. If you have no established policy on
terms, now is the time to implement one. You probably don't want to have a lot of
terms. Four or five should be adequate.
Description
This description can be up to 15 characters long. For
example: 2% 10th, Net 30, Net 30th, COD. A terms description
will be printed on invoices generated at POS (Point of
Sale).
Due Date/Days
When a customer makes a purchase, an invoice is
generated at POS. It is assigned an invoice date (date of
transaction) and a due date based on this field. The
aging used for aging reports, finance charge calculation,
and statements is calculated based on the due date of an
invoice. There are 2 ways to use the due date:
Ø Enter the actual date the invoices are due. If
invoices are due on the 10th of every month, enter
mm10yy where mm=month and yy=year. For
example, if you are entering invoices in July, the due
date will be August 10th. Enter 081094. During
month end processing, this due date is automatically
changed to the next month (in this case 091094).
Ø Enter the number of days after the invoice date that
this invoice is due (i.e., 30 which means 30 days from
the invoice date). For example, if the invoice date is
Jun 17, the invoice is due on July 17.
Do I charge finance charges on overdue accounts?
If yes, you will need to define the next 2 fields for the finance charge calculation.
If no, skip the next 2 fields.
Dim11
89
Chapter 4. Accounts Receivable
Finance Charge Code
How many days past due will finance charges be
calculated? This is the number of days past the due date.
Each range of days is assigned a code:
0 = no F/C
1 = 1-30
2 = 31-60
3 = 61-90
4 = 91 & over
Finance charge calculations are done during month end
processing.
DUE DATE
# DAYS PAST
DUE
MONTH END
PROCESSING
DATE
FINANCE CHARGE
CALCULATED?
--------------------
-------------------
--------------------------
---------------------------------
July 10
1-30
July 31
Yes
July 10
31-60
July 31
No
July 10
31-60
Aug 31
Yes
If a finance charge is calculated, it is added to the
customer's account as a separate transaction.
Monthly Finance
Charge %
How much do you charge monthly for a finance charge?
This is a percentage of the customer's overdue balance.
For example, 1.5% or 2%.
Do I allow a discount for prompt payment?
If yes, you will need to define the next 2 fields for the discount calculation. If no,
skip the next 2 fields.
Discount Date/Days
When must the customer pay the invoice to receive a
prompt payment discount? This discount date will be
printed on the invoice and the statement for the
customer's information. You also have the option of
printing the discount amount as well. There are 2 ways
to use the discount date:
Ø Enter the actual date through which the discount is
available. If discounts are allowed through the 5th of
every month, enter mm05yy where mm=month and
yy=year. For example, if you are entering invoices in
July, the discount date will be August 5th. Enter
080501. During month end processing, this due date
is automatically changed to the next month (in this
case 090501).
Ø Enter the number of days after the invoice date
through which a prompt payment discount is allowed
(i.e., 10 which means 10 days from the invoice date).
For example if the invoice date is June 17, the
discount date is June 27.
90
Dim11
Chapter 4. Accounts Receivable
What is the percentage of discount allowed for prompt
payment? The computer uses this percentage to calculate
the discount amount on invoices generated at POS. It
can be printed on the invoice along with the discount
date, if desired. If the terms are net, enter zero.
Discount %
Use the following worksheet to define my terms.
If you need more room, use another sheet of paper. A few examples of common
terms are listed for you.
Description
Due
Date/Days
FC Code
Monthly
FC%
Discount
Date/Days
Discount%
Net 30
30
--
--
--
--
2% 10th, Net 30th
073093
1
1.5
071094
2
2% 10, Net 30
30
1
2
10
2
NET-COD
0
--
--
--
--
____________________
___________
______
______
____________
______
____________________
___________
______
______
____________
______
____________________
___________
______
______
____________
______
____________________
___________
______
______
____________
______
____________________
___________
______
______
____________
______
____________________
___________
______
______
____________
______
____________________
___________
______
______
____________
______
____________________
___________
______
______
____________
______
____________________
___________
______
______
____________
______
____________________
___________
______
______
____________
______
____________________
___________
______
______
____________
______
TAX CODES
These are the different ways you handle sales tax. Tax codes include both taxable
and non-taxable classes. The computer can handle up to 999 different tax codes.
It uses taxable and non-taxable data for sales analysis purposes. For now,
describe the different ways your business has to deal with sales tax. A few
examples are given to get you started.
Dim11
91
Chapter 4. Accounts Receivable
List my tax codes here.
Tax
Code #
Class
Tax Description
Tax %
1
Retail
6.25% State Sales Tax
2
Level I contractors
Resale (requires exemption
certificate)
6.25
0
3
Government
No need to explain
0
4
Wholesale only
Resale (requires exemption
certification)
0
_______
_________________
___________________________
________
_______
_________________
___________________________
________
_______
_________________
___________________________
________
_______
_________________
___________________________
________
_______
_________________
___________________________
________
_______
_________________
___________________________
________
_______
_________________
___________________________
________
_______
_________________
___________________________
________
_______
_________________
___________________________
________
_______
_________________
___________________________
________
CREDIT LIMITS/TYPES
Each charge customer should have an established credit limit. If you have not
implemented a credit limit policy in the past, now is the time to start. Credit
management is an integral part of A/R management. Credit limits are entered as
whole dollars up to $9,999,999. For example, 1000 or 5000 (do not use commas). If
a customer exceeds their credit limit at POS, a message is displayed on the screen
and the transaction cannot continue until the situation is fixed (either by
obtaining a credit limit release code from the system manager or credit manager
or by changing the transaction to a cash transaction instead of charge).
If a customer has no credit, make the credit limit=1 (for $1.00).
CAUTION: If you do not specify an amount for a credit limit, the computer interprets that as unlimited
credit. Be sure to be thorough when assigning credit limits.
In conjunction with a credit limit, each customer is also assigned a credit limit
type. The credit limit type indicates what balances to use when calculating the
available credit.
92
Dim11
Chapter 4. Accounts Receivable
T = Total jobs + on order + account balance. Can be used on the main
account of a customer with jobs.
J = Total jobs (no on order) + account balance.
O = On order (no total jobs) + account balance.
Others = Account balance only (no jobs and no on order).
A/R Values Load Form
Now that you have determined the key values used for customer information, you
can begin filling out the A/R Values Load Form. Use the form found on the next
page and make several copies. Fill out the forms. It is recommended you do this
in customer number order. You will use these forms to enter the information into
the computer. Or if you are coming from a previous computer system, print out
your customer lists and make notations of any needed changes and modifications.
Dim11
93
Chapter 4. Accounts Receivable
A/R VALUES LOAD FORM
CUST NO
CUSTOMER NAME
A/R
ASSIGNED
GROUP
SALES REP
PRICE
CLASS
LEVEL
TERMS
TAX
CREDIT
CODE
LIMIT/TYPE
Page _______
94
Dim11
Chapter 4. Accounts Receivable
Entering Values for Customers
Now you are ready to enter the values from the worksheet for customers on the
computer. There are 2 tools to help you do this-- Change Selected Fields CM1.D and
Change Fields W/Range CM1.
Change Selected Fields CM1.D
This method allows you to select the fields you want to change in the Customer
Master File (CM1.D), then pull up customers one at a time or automatically select
the next customer (in numerical order), and then change only the fields you
selected. This is helpful because you are not entering every field in this file yet.
Change Fields W/Range CM1
This method allows you to change customer data by selecting a range of customers
and the field and its value to place in that field for all selected customers. You
probably have many customers who have the same values. For example, you
might not be tracking assigned sales rep so every customer is given assigned sales
rep number 1. Or most of your customers are retail and so are charged state sales
tax. These customers are assigned the same sales tax code. Even if all your
customers are not the same sales tax code, you could use this process to add a
sales tax code for all customers and then go back and change the accounts which
are exceptions by either changing selected fields or changing the customer (see
Change Selected Fields above or Changing Customer Information). This method
is a very quick way of adding information to the customer file.
See the procedures below for each method.
CHANGE SELECTED FIELDS CM1.D
1 From the Accounts Receivable Menu, select 2 for File Maintenance.
2 Select 2 for Change Customers.
3 Select 3 for Change Selected Fields CM1.D.
4 Choose the method of adjustment:
Ø
Ø
Ø
Ø
Dim11
1=Manually Select Each Customer.
Allows you to select each customer to be
changed, one at a time.
2=Automatically Select Next Customer in NUMBER Order.
Allows you to select the first
customer to be changed and then the computer will automatically select the
next customer to change, in numerical order one at a time. If your A/R Values
Load Form is filled out in customer number order, use this method. Your
entries will go much faster.
3=Automatically Select Next Customer in NAME Order.
Same as option 2 except uses
customer name order.
E=END.
End this program and return to the previous menu.
95
Chapter 4. Accounts Receivable
5 Then the computer displays:
DS02502
Rev10.0.1
[
[
[
[
[
[
[
[
[
[
[
]
]
]
]
]
]
]
]
]
]
]
3.
6.
9.
12.
15.
18.
21.
24.
27.
30.
66.
Change Select CM1.D Flds
Address 1
[
Zip Code
[
Tax Exempt Number [
Tax Type
[
Signature Required[
Save Lien Info
[
Price Level
[
Terms
[
Extra Code
[
Open Date
[
Installment Pymnt [
]
]
]
]
]
]
]
]
]
]
]
4.
7.
10.
13.
16.
19.
22.
25.
28.
59.
67.
DIM11 DATA
Address 2
Phone Number
AR Group
Each Pricing
Cust has Jobs
Store Number
Class
Statement Day
Credit Limit
Credit Lim Type
Temporary Terms
[
[
[
[
[
[
[
[
[
[
[
]
]
]
]
]
]
]
]
]
]
]
5.
8.
11.
14.
17.
20.
23.
26.
29.
63.
70.
Date mm/dd/yy
Port 38
Store 01
Address 3
Contact
AR Type
PO Required
Save Cust History
Salesman Number
Credit Hold
Tax Code
Bid Number
Detail w/Statement
Resale Price Level
Put an 'X' in the fields you wish to change.
Hit <Up Arrow> if you are finished selecting fields.
Enter an X in the fields you wish to change. If you are changing all the fields on
the A/R Values Load form, put an X in the following fields:
10.
20.
21.
22.
24.
26.
28.
59.
AR GROUP
SALES REP NUMBER
PRICE LEVEL
CLASS
TERMS
TAX CODE
CREDIT LIMIT
CREDIT LIMIT TYPES
To skip a field, press Enter. To go back a field, press Esc. When you are done
selecting fields, press up arrow (#).
6 Select the customer you wish to change.
7 The computer displays the selected customer along with the first field to be
changed. Enter one of the following options:
Ø
Value for the requested field and Enter.
Ø
Up arrow (#) to accept the previous value for this field from a prior customer
record. (On the first customer, the "previous value" will be -0-.)
Ø
Enter to accept the current displayed value.
Ø
SPACE + Enter to clear the value in this field.
Ø
Esc to not change the customer and return to Step 5.
8 The next field to be changed is displayed. Make changes as instructed in Step 7.
Repeat until all fields for the customer have been displayed.
9 Then you can select the next customer to change if you are selecting manually. Or
if the computer is automatically selecting the next customer, it will be displayed.
10 Repeat Steps 6-9 for all customers needing changes. If you do not wish to change
any more customers, press Esc until you return to the Accounts Receivable Menu.
11 If you wish, print report #3, Phone/Contact/Tax Exempt, from the A/R Reports Menu
to give your work a final check.
96
Dim11
Chapter 4. Accounts Receivable
CHANGE FIELDS W/RANGE CM1.D
BEFORE YOU BEGIN: You must use a password with a user level high enough
to access this program. See the system manager.
1 From the Accounts Receivable Menu, select 7 for A/R Special Maintenance.
2 Select 2 for Change Fields W/Range CM1.
3 The computer displays:
DS02501
Rev9.0.2
1.
Change by Field (CM1.D)
DIM11 DATA
Date mm/dd/yy
Port 39
Store 01
Input Parameters:
Beginning Cust No
.000
Ending
Cust No
999999.999
Select Optional Fields (Y/N)
N
Field Number to Change(3-67,70)
Enter the Beginning Cust No of the range you wish to change. Or Tab to start with
the first customer in the file.
4 Enter the Ending Cust No of the range you wish to change. Or Tab to pick up all
remaining customers in the file.
5 At Select Optional Fields (Y/N), enter N. You will not be using this feature at this time.
6 At Field Number to Change (3-67,70), the computer displays the list of valid fields:
DS02501
Rev9.0.2
1.
Change by Field (CM1.D)
DIM11 DATA
Date mm/dd/yy
Port 39
Store 01
Input Parameters:
Beginning Cust No
1010.000
Ending
Cust No
1010.000
Select Optional Fields (Y/N)
N
Field Number to Change(3-67,70)
0
+-------------------------------------------------------------------------+
¦ 3-Address 1
14-PO Required (Y/N)
25-Statement Day (0-31) ¦
¦ 4-Address 2
15-Signature Required
26-Tax Code (1-999)
¦
¦ 5-Address 3
16-Cust. Has Jobs (Y/N) 27-Extra Code (0-99)
¦
¦ 6-Zip Code
17-Save Group Hist(Y/N) 28-Credit Limit
¦
¦ 7-Phone
18-Save Lien Info (Y/N) 29-Bid Number
¦
¦ 8-Contact
19-Store Number (1-255) 30-Open Date (MMDDYY)
¦
¦ 9-Tax Exempt Number
20-Salesman Number
31-Last Pay Dt (MMDDYY) ¦
¦ 10-AR Group (1-4)
21-Price Level (1-99)
32-Last Pur Dt (MMDDYY) ¦
¦ 11-AR Type(B,O,R)
22-Class (1-99)
33-Lien Date (MMDDYY)
¦
¦ 12-TAX Type (R,S)
23-Credit Hold (0-99)
34-Lien Invoice
¦
¦ 13-Each Pricing (Y/N)
24-Terms (1-99)
35-High Bal Dt (MMDDYY) ¦
+-------------------------------------------------------------------------+
<UpA>= View Additional Fields
You can press the up arrow to view more fields. Since the Values Worksheet only
deals with 8 values, enter a number from the following list:
Dim11
97
Chapter 4. Accounts Receivable
10
20
21
22
24
26
28
59
A/R Group (1-4)
Assigned Sales Rep Number
Price Level (1-99)
Class (1-99)
Terms (1-99)
Tax Code (1-999)
Credit Limit
Credit Limit Type
The corresponding field description is displayed. Make sure you entered the
correct field number. If not, press Esc and enter it correctly.
7 At New Value, enter the new information you wish to place in that field for all
customers within the range. If you selected field 26 for Tax Code, enter the tax code
number to be given to all selected customers. Or press Tab to leave the
information in this field unchanged.
8 Repeat Steps 6 and 7 for as many fields and values you wish to change.
9 Press Esc at Field Number to Change when you are done selecting.
10 The computer displays:
DS02501
Rev9.0.2
1.
Change by Field (CM1.D)
DIM11 DATA
Date mm/dd/yy
Port 39
Store 01
Input Parameters:
Beginning Cust No
1010.000
Ending
Cust No
1050.000
Select Optional Fields (Y/N)
N
Field Number to Change(3-67,70)
27 Extra Code (0-99)
Beginning Customer:
Ending
Customer:
1010.000
1050.000
F P S, INC. DBA BURGER KING
BONHAM/STAN
This program will replace fields in CM1.D with the following values:
Extra Code (0-99)
5
Are you sure you want to proceed (YES/NO)?
To begin the process, you must enter YES and press Enter. See Step 11. Or if
you do not wish to continue, enter NO and press Enter. You are returned to the
previous menu.
11 After entering YES, the computer begins the change process and displays:
***Now replacing fields ---PLEASE WAIT ***
When completed, the computer returns you to Step 3 (Beginning Cust No) to enter
another range of customers to change. Or press Esc to end this process and
return to the previous menu.
98
Dim11
Chapter 4. Accounts Receivable
Entering Variable File Information
Before “going live” and doing the A/R cutover process, check the following Variable
File information to make sure it is correct. There is A/R information from the
following Variable File options:
Ø
Ø
Ø
Ø
Ø
Terms Information
Statement Information
Descriptions
G/L Integration
Miscellaneous Codes
Getting into the Variable File
1 From the ACCOUNTS RECEIVABLE MENU, select 6 for A/R Variable File.
2 The computer displays the A/R Variable File Maintenance Menu:
DSVM0200
Rev7.0.100
A/R Variable Maintenance
DIM11 DATA
Date mm/dd/yy
Port 39
Store 01
Choose A/R Variable File Maintenance Menu:
+-------------------------------+
¦ 1. Terms Information
¦
¦ 2. Statement Information
¦
¦ 3. Special Pricing
¦
¦ 4. Descriptions
¦
¦ 5. Transaction Numbers
¦
¦ 6. G/L Integration
¦
¦ 7. Miscellaneous Codes
¦
¦ 8. Password Account Options ¦
¦ 9. Reports
¦
+-------------------------------+
<Esc>=End
From this menu you can do the following:
1. Terms Information
See Steps 3-8.
2. Statement Information
See Steps 9-19.
4. Descriptions
See Steps 20-46.
6. G/L Integration
See Steps 47-56.
7. Miscellaneous Codes
See Steps 57-64.
Steps 3-8: TERMS INFORMATION
3 Select 1 for Terms Information.
Dim11
99
Chapter 4. Accounts Receivable
4 The computer displays the terms information screen:
DSVM0201
Rev10.0.1
1.
2.
3.
4.
5.
6.
7.
8.
9.
10.
11.
12.
13.
14.
15.
A/R Terms Information
Store Number
Terms Number (1-99)
Description
Description for Invoice
Due Date/Days
DIM11 DATA
1
0
FINANCE CHARGES:
Finance Charge Code
Monthly Finance Charge % (#1)
Dollar Limit for FC% (#1)
Monthly Finance Charge % (#2)
Dollar Limit for FC% (#2)
Monthly Finance Charge % (#3)
Minimum Finance Charge
Minimum Past Due
Charge FC if Payment Recvd (Y/N)
Calculate FC on Fin Charges (Y/N)
16.
17.
18.
19.
20.
21.
Date mm/dd/yy
Port 39
Store 01
PROMPT PAYMENT DISCOUNTS:
Discount Date/Days
Discount %
(#1)
Discount Limit (#1)
Discount %
(#2)
Discount Limit (#2)
Print Discount on Invoice
REVOLVING ACCOUNTS:
22. Revolving # of Payments
23. Minimum Payment
24.
25.
26.
27.
28.
29.
OTHER:
Auto Line Discount %
Allow Spiff Pricing
Customer Return Hold #(0-99)
Special Flag
Volume Discount Code (0-99)
Vol Disc on Discbl Amt (Y/N)
The cursor is positioned at 2. Terms Number (1-99). Check the store number in field 1.
If it is correct, continue to Step 5. If it is incorrect, press Esc to back up 1 field to
change it.
5 Enter the number of the terms code you wish to add or view.
F NOTE:
Using the terms table filled out on page 91, assign each type of terms a number from 199.
6 If you are adding a new terms code, the computer displays:
Record Doesn’t Exist – (A)dd Record
(V)iew Next Record
(E)nd
Enter A to add this record and continue by entering the following fields. If you are
viewing an existing terms code, the computer fills in the entries for the selected
store and terms code. Make sure the responses are correct for the following fields.
Use C for Change or F for Change by Field.
CAUTION: Not all fields are used at this stage of getting the A/R module started. Press Tab to
bypass a field. Press Esc to back up one field.
3. Description
5. Due Date/Days
6. Finance Charge Code
7. Monthly Finance Charge %
(#1)
16. Discount Date/Days
17. Discount % (#1)
100
Enter the terms description for this terms code as you
wish it to print on invoices (see page 89).
Enter either the actual due date (mmddyy) or the number
of days from the invoice date (see page 89).
Enter the finance charge code (0-5) for this terms code
(see page 90).
Enter the finance charge percent to be charged on the
customer’s overdue balance. This calculation is made
during the month end process (see page 90).
Enter either the actual discount date (mmddyy) or the
number of days from the invoice date (see page 90).
Enter the discount percent for the prompt pay discount
calculation (see page 91).
Dim11
Chapter 4. Accounts Receivable
7 After changing the entries, the computer asks:
Save Changes <Y/N>?
Enter Y if all entries are correct. Or enter N to not make the changes. You can
also change this entry for all stores.
8 If needed, check the entries for other stores. Repeat Steps 5-6, entering the
appropriate store number. After verifying these fields, press Esc twice to return to
the A/R Variable File Maintenance Menu.
Steps 9-19: STATEMENT INFORMATION
9 From the A/R Variable File Maintenance Menu, select 2 for Statement Information.
10 Check the store number. Change if needed (select 98, enter the correct store
number).
10 Select 1 for A/R Statement Messages.
12 The computer displays the A/R Statement Messages screen with entries for the
current store:
DSVM0202
Rev11.0.3
A/R Statement Messages
DIM11 DATA
Date mm/dd/yy
Port 38
Store 01
1. Statement Message Lines for Current Accounts:
THANK YOU FOR YOUR PAYMENT.
THANK YOU. THANK YOU. THANK YOU.
2. Statement Message Lines for 1-30 Days Past Due Accounts:
YOUR ACCOUNT IS NOW PAST DUE. IF THERE IS A
PROBLEM, PLEASE CONTACT OUR OFFICE IMMEDIATELY.
3. Statement Message Lines for 31-60 Days Past Due Accounts:
YOUR ACCOUNT IS PAST DUE!!
PLEASE PAY IMMEDIATELY TO PROTECT YOUR CREDIT
RATING.
4. Statement Message Lines for 61-90 Days Past Due Accounts:
YOUR ACCOUNT IS SERIOUSLY PAST DUE.
IF NO PAYMENT IS RECEIVED AND WE DON'T HEAR FROM
YOU, WE WILL TURN YOUR ACCOUNT OVER FOR COLLECTION.
5. Statement Message Lines for 91+ Days Past Due Accounts:
YOUR ACCOUNT IS CLOSED AND BEING TURNED OVER
FOR COLLECTION.
(C)hange
(D)elete
Change by (F)ield
(E)nd
Make sure the messages are correct to be printed on statements. Enter C for
Change.
13 The cursor moves to the first message. You have the following options:
Ø
Retype the desired message. Press Enter at the each of line. Each category
can have up to 3 lines of 51 characters each.
Ø
Press Tab to leave the line unchanged.
Ø
Press Esc to back up one line. If you press Esc at the first line, you are
returned to the previous menu.
14 After you change the entries, the computer asks:
Save Changes <Y/N>?
Enter Y if all entries are correct. Or enter N to not make the changes. You can
also change this entry for all stores. After reviewing or changing statement
messages, select E for End and return to the A/R Statement Information Menu.
Dim11
101
Chapter 4. Accounts Receivable
15 Select 2 for A/R Statement Options.
16 The computer displays the A/R Statement Options screen with entries for the
current store:
DSVM0202
Rev11.0.3
A/R Statement Options
DIM11 DATA
Date mm/dd/yy
Port 38
Store 01
1. Print Discount Amount and Message on Statements
Discount Message:
DISCOUNT MAY BE DEDUCTED IF PAID WITHIN_
Y
2. Print Due Dates on Statements (Y/N)
Y
3. Optional Statement Late Charge Descriptions:
Account Summary Area
Invoice Detail Lines
FIN CHG
F/CHG
4. Statement Detail Program
<Esc>=Go Back One Field
<Tab>=Go Forward One Field
(.)=End
<F1>=Help
Make sure the responses are correct for these fields.
1. Print Discount Amount
and Message on Statements
(Y/N)
Y = Print discount amount (MTD statement discounts)
and discount message on A/R statements. The
discount message can also be entered:
Discount Message:
This message is printed on statements following
the calculated discount amount. For example: DISC
ALLOWED FOR PAYMENT WITHIN TERMS. Enter up to 40
characters to be printed on statements.
N =Do not print the discount amount and discount
message.
2. Print Due Dates
on Statements (Y/N)
Y = Do not print the due date of each transaction on
the customer statement
N =Print the due date of each transaction on the
customer statement.
3. Optional Statement Late
Charge Descriptions
Account Summary Area
Enter up to 8 characters (including spaces) for the late
charge description printed in the account summary area
of the statement. For example: FIN CHG, SRVC CHG,
LATE CHG.
Invoice Detail Lines
Enter up to 5 characters (including spaces) for the late
charge description printed in the invoice detail area of
the statement. For example: F/C, S.C., LATE. This
description also appears in the recap of aging printed
below the detail lines on the statement.
102
Dim11
Chapter 4. Accounts Receivable
17 After making the entries, the computer asks:
Save Changes <Y/N>?
Enter Y if all entries are correct. Or enter N to not make the changes. You can
also save the changes to all stores.
18 If needed, check the entries for other stores. Return to the A/R Statement Information
Menu. Repeat Steps 15-17, entering the appropriate store number.
19 After verifying these fields, return to the A/R Variable File Maintenance Menu.
Steps 20-46: DESCRIPTIONS
Customer Classes
Credit Holds
Assigned Salesmen
Steps 20-28.
Steps 29-35.
Steps 36-46.
20 From the A/R Variable File Maintenance Menu, select 4 for Descriptions.
21 Check the store number. Change if needed (select 98, enter the correct store
number).
CUSTOMER CLASSES
22 Select 1 for Customer Class Descriptions.
23 The computer displays the Customer Class Descriptions screen.
DSVM0203
Rev7.0.50
Customer Class Descriptions
DIM11 DATA
Date mm/dd/yy
Port 39
Store 01
+---------------------------------------------------+
¦ 1. Customer Class Number (1-99)
0 ¦
¦ 2. Description
¦
¦ 3. Alternate Customer Class for Direct Sales
¦
+---------------------------------------------------+
Last Used Customer Class Number:
<Esc>=End
99
<F1>=Help
The cursor is positioned at 1. Customer Class Number (1-99). If there are some
customer classes entered already, the last used number is also displayed. Enter
the customer class number you wish to add or change.
Dim11
103
Chapter 4. Accounts Receivable
24 If you entered an existing class number, the computer displays the description and
asks:
(C)hange
(D)elete
(N)ext
(P)revious
(E)nd
You have the following options:
(C)hange
Allows you to change the displayed customer class.
(D)elete
Allows you to delete the displayed customer class.
(N)ext
Displays the next customer class number.
(P)revious
Displays the previous customer class number.
(E)nd
Ends this option and returns to the previous menu.
25 Fill in the following field:
2. Description:
Enter up to 28 characters for the customer class
description. This description will appear on day end
reports and G/L postings.
3. Alternate Customer:
Class for Direct Sales
Press Tab to bypass. You will not set up the field at this
time.
26 Then the computer asks if you wish to add or change the entry. Enter Y if the
information is correct and you wish to add it. Or enter N to not add it. You can
also change the information for all stores.
27 Repeat Steps 23-26 for each customer class to be entered.
28 Press Esc at Customer Class Number when done. You are returned to the A/R
Descriptions Menu.
CREDIT HOLDS
29 Select 2 for Credit Hold Descriptions.
30 The computer displays the Credit Hold Descriptions screen.
DSVM0203
Rev7.0.50
Credit Hold Descriptions
DIM11 DATA
Date mm/dd/yy
Port 39
Store 01
+---------------------------------------------------+
¦ 1. Credit Hold Number (1-99)
0 ¦
¦ 2. Description
¦
+---------------------------------------------------+
Last Used Credit Hold Number:
<Esc>=End
90
<F1>=Help
The cursor is positioned at 1. Credit Hold Number (1-99). If there are some credit hold
descriptions entered already, the last used number is also displayed. Enter the
credit hold number you wish to add or change.
104
Dim11
Chapter 4. Accounts Receivable
When a customer is placed on credit hold, credit is denied at POS until either
released by a credit manager or system manager or paid by cash. Credit hold
management is done through A/R File Inquiry. You can have up to 99 different
reasons for credit hold. Each is assigned a number from 1-99 and given a
description.
F NOTE:
Credit hold 99 is used for closed jobs. A customer with credit hold 99 will not be
displayed in the customer job search.
31 If you entered an existing credit hold number, the computer asks:
(C)hange
(D)elete
(N)ext
(P)revious
(E)nd
You have the following options:
(C)hange
Allows you to change the displayed credit hold.
(D)elete
Allows you to delete the displayed credit hold.
(N)ext
Displays the next credit hold number.
(P)revious
Displays the previous credit hold number.
(E)nd
Ends this option and returns to the previous menu.
32 Fill in the following field:
2. Description:
Enter up to 28 characters for the credit hold description.
This description will appear at POS when a customer
with this credit hold is selected.
33 Then the computer asks if you wish to add or change the entry. Enter Y if the
information is correct and you wish to add it. Or enter N to not add it.
34 Repeat Steps 30-33 for each credit hold description to be entered.
35 Press Esc at Credit Hold Number when done. You are returned to the A/R Descriptions
Menu.
ASSIGNED SALES REP
36 Assigned sales rep descriptions are set up in the Variable File for Sales. Press Esc
until you see the DIMENSIONS MAIN MENU.
37 Select 1 for Sales then 7 for Sales Variable File.
38 Select 5 for Descriptions. The computer displays the Sales Descriptions Menu:
DSVM0105
Rev11.0.2
Sales Descriptions
Store Number
DIM11 DATA
Date mm/dd/yy
Port 38
Store 01
1
Choose Selection:
+-------------------------------------+
| 1. Payment Methods
|
| 2. Rep Number Descriptions
|
| 3. POS Additional Fields
|
|
|
| 98. Change Store
|
+-------------------------------------+
<Esc>=End
Select 2 for Rep Number Descriptions.
Dim11
105
Chapter 4. Accounts Receivable
39 The computer displays the Rep Number Descriptions screen.
DS04500
Rev11.0.5
1.
2.
3.
4.
5.
Maintain Rep Numbers
DIM11 DATA
Store Number
Rep Type
Rep Number (1-9999)
Rep Name
Alternate Rep Number for Directs
Scroll / Select - Rep Type
1
Date mm/dd/yy
Port 38
Store 01
+---------Rep Type----------+
| 1 = Assigned Salesperson |
| 2 = POS/PO Written By
|
| 3 = Delivered By
|
| 4 = Loaded By
|
| 5 = Checked By
|
| 6 = Truck By
|
| 7 = PO Received By
|
+---------------------------+
<Esc> to Change Store
From the displayed list, select 1 for Assigned Salesperson to add or maintain.
40 The computer continues with the entry process by asking for the rep number you
wish to enter. For example:
DS04500
Rev11.0.5
1.
2.
3.
4.
5.
Maintain Rep Numbers
DIM11 DATA
Store Number
Rep Type
Rep Number (1-9999)
Rep Name
Alternate Rep Number for Directs
<Esc>=Go Back One Field
1
1
0
Date mm/dd/yy
Port 38
Store 01
Assigned Salesperson
<Tab>=Go Forward One Field
<F1>=Help
Enter the assigned rep number you wish to enter, change, or delete. You can
enter up to four digits.
41 If the rep number already exists, the computer displays the rep name and asks at
the bottom of the screen:
(C)hange
(D)elete
(N)ext
(P)revious
(E)nd
Use normal Variable File maintenance procedures for changing the rep number.
Or if the rep number does not already exist, the program continues by displaying:
Record Doesn't Exist -
(A)dd Record
(V)iew Next Record
(E)nd
Enter A if you wish to add a new record. (Or enter V if you wish to view the next
record in the REP.D file.)
106
Dim11
Chapter 4. Accounts Receivable
42 The program continues by asking for the Rep Name:
DS04500
Rev11.0.5
1.
2.
3.
4.
5.
Maintain Rep Numbers
DIM11 DATA
Store Number
Rep Type
Rep Number (1-9999)
Rep Name
Alternate Rep Number for Directs
<Esc>=Go Back One Field
Date mm/dd/yy
Port 38
Store 01
1
1 Assigned Salesperson
43
<Tab>=Go Forward One Field
<F1>=Help
Enter the rep name exactly how you wish it to appear on the screen at POS and on
Sales Analysis reports. For example: Smith/Tom or Tom Smith or T. Smith or
TOM. There are 28 characters available for the rep name, including spaces and
punctuation.
43 At Alternate Rep Number for Directs, press Tab to bypass. You will not enter this
information at this time.
44 Finish entering the rep number record by adding the record (Add Record <Y/N>?) or
changing it (Save Change <Y/N>?).
45 Repeat Steps 40-44 for each assigned sales rep to be entered.
46 Press Esc at Assigned Sales Rep Number when done. Press Esc again until you get
back to the DIMENSIONS MAIN MENU.
Steps 47-56: G/L INTEGRATION
There are 4 areas of G/L integration that need G/L numbers: A/R Groups, Cash
Receipts Bank, A/R Discounts, and Finance Charges Applied.
47 Go back to Accounts Receivable, A/R Variable File.
48 Select 6 for G/L Integration.
49 The computer displays the A/R G/L Integration screen:
DSVM0206
Rev9.0.2
A/R G/L Integration
DIM11 DATA
Date mm/dd/yy
Port 39
Store 01
1. Store Number
1
2. A/R Group Account Numbers:
GROUP
G/L ACCOUNT
DESCRIPTION
1
1210.01
ACCOUNTS RECEIVABLE - TRADE
2
1220.01
ACCOUNTS RECEIVABLE - OTHER
3
1230.01
ACCOUNTS RECEIVABLE - EMPLOYEES
4
1240.01
ACCOUNTS RECEIVABLE - AFFILIATED CO
3. Cash Receipts Bank Account Numbers:
BANK
G/L ACCOUNT
DESCRIPTION
1
1120.01
CASH IN BANK - CHECKING
2
1120.01
CASH IN BANK - CHECKING
3
1120.01
CASH IN BANK - CHECKING
4
1120.01
CASH IN BANK - CHECKING
5
1120.01
CASH IN BANK - CHECKING
6
1120.01
CASH IN BANK - CHECKING
7
1120.01
CASH IN BANK - CHECKING
8
1120.01
CASH IN BANK - CHECKING
9
1120.01
CASH IN BANK - CHECKING
4. A/R Discounts
8510.01
PAYMENT DISCOUNT ALLOWED
5. A/R Finance Charges
8140.01
FINANCE AND CARRYING CHARGE
<Esc>=Change Store
(C)hange
(D)elete
(E)nd
You have the following options:
Dim11
107
Chapter 4. Accounts Receivable
<Esc>=Change Store
Allows you to change the displayed store number.
Allows you to change the entries on the screen. Go to
Step 50.
(C)hange
Allows you to delete the displayed entries.
(D)elete
Ends this screen and returns to the A/R Variable File
Maintenance Menu.
(E)nd
50 After selecting C for Change, the cursor moves to the top of the screen:
DSVM0206
Rev9.0.2
A/R G/L Integration
DIM11 DATA
Date mm/dd/yy
Port 39
Store 01
1. Store Number
1
2. A/R Group Account Numbers:
GROUP
G/L ACCOUNT
DESCRIPTION
1
1210.01
ACCOUNTS RECEIVABLE - TRADE
2
1220.01
ACCOUNTS RECEIVABLE - OTHER
3
1230.01
ACCOUNTS RECEIVABLE - EMPLOYEES
4
1240.01
ACCOUNTS RECEIVABLE - AFFILIATED CO
3. Cash Receipts Bank Account Numbers:
BANK
G/L ACCOUNT
DESCRIPTION
1
1120.01
CASH IN BANK - CHECKING
2
1120.01
CASH IN BANK - CHECKING
3
1120.01
CASH IN BANK - CHECKING
4
1120.01
CASH IN BANK - CHECKING
5
1120.01
CASH IN BANK - CHECKING
6
1120.01
CASH IN BANK - CHECKING
7
1120.01
CASH IN BANK - CHECKING
8
1120.01
CASH IN BANK - CHECKING
9
1120.01
CASH IN BANK - CHECKING
4. A/R Discounts
8510.01
PAYMENT DISCOUNT ALLOWED
5. A/R Finance Charges
8140.01
FINANCE AND CARRYING CHARGE
<Esc>=Change Store
(C)hange
(D)elete
(E)nd
Enter the following fields.
2. A/R Group Account Numbers:
A/R groups control how the G/L balance sheet is posted (debited) when a customer
sale is updated. Each customer in the Customer Master File is assigned an A/R
group code (1-4) representing different types of customers. For example, A/R
Trade, A/R Affiliated Co., A/R Other. Then the A/R group will determine which
asset account to post as transactions are updated.
Most often when starting up the A/R system, only one A/R group is used. All
customers are assigned A/R group 1. For this example, however, all four A/R
groups are shown using the standard chart of accounts. Change if needed.
F NOTE:
The G/L numbers shown are from the standard chart of accounts. Your G/L numbers
may be different. Print a Trial Balance from the G/L system to verify account numbers.
51 3. Cash Receipts Bank Account Numbers:
A/R cash receipts (customer payments) can be posted to one of 9 different bank
accounts (9 different G/L asset accounts). When updating a batch of cash receipts,
you will be asked to which bank number you wish to add (debit). That bank
number corresponds to the bank number found here and will debit the assigned
G/L asset account. For this example, the standard chart of accounts is used and
all bank numbers use the same G/L account. Change if needed.
108
Dim11
Chapter 4. Accounts Receivable
52 4. A/R Discounts:
A/R Discount controls how the G/L income statement is posted when a customer
discount is taken. For this example, the standard chart of accounts is used. This
account is found in Other Expenses. Change if needed.
53 5. A/R Finance Charges:
This entry controls how the G/L income statement is posted when a customer is
charged a finance charge (credit). For this example, the standard chart of
accounts is used. This account is found in Other Income. Change if needed.
54 After making the entries, the computer asks:
Save Changes <Y/N>?
Enter Y if all entries are correct. Or enter N to not make the changes.
55 If needed, check the entries for other stores. Repeat Steps 49-54, entering the
appropriate store number.
56 After verifying these fields, return to the A/R Variable File Maintenance Menu.
Steps 57-64 : MISCELLANEOUS CODES
57 From the A/R Variable File Maintenance Menu, select 7 for Miscellaneous Codes.
58 Check the store number. Change if needed (select 98, enter the correct store
number).
59 Select 1 for Miscellaneous Codes.
60 The computer displays the A/R Miscellaneous Codes screen with entries for the
current store:
DSVM0207
Rev10.0.5
A/R Miscellaneous Codes
DIM11 DATA
Date mm/dd/yy
Port 39
Store 01
1. Print Discount Amount on Invoices (Y/N): Y
(Store default if not set up in
A/R Terms Information)
2. Returns Credit Option:
2
1. Credit 1-30 Days Past Due Balance
2. Credit Current Balance
3. Number Months Credit and Payment History 12
4. Randomly Generated Credit Limit
Release Code
(Y/N)
N
5. Credit Limit Release Code
1234
6. Credit Hold Option for New Job Accounts
C
7. Beginning Credit Hold to Not Copy
6
8. Ending
Credit Hold to Not Copy
12
<Esc>=Go Back One Field
<Tab>=Go Forward One Field
(.)=End
<F1>=Help
The cursor is positioned at 1. Print Discount Amount on Invoices. Enter one of the
following options:
Y=
Print discounts on both invoices and returns at POS.
N = Do not print discounts.
R=
Dim11
Print discounts on invoices but not returns.
109
Chapter 4. Accounts Receivable
61 After making an entry, press Tab through the remaining fields.
62 If a change was made, the computer asks:
Save Changes <Y/N>?
Enter Y if the entry is correct. Or enter N to not make the changes. You can also
change this entry for all stores.
63 Press Esc to return to the previous menu.
64 You are done entering the Variable File information for Accounts Receivable.
Press Esc until you return to the DIMENSIONS MAIN MENU.
110
Dim11
Chapter 4. Accounts Receivable
Doing A/R Cutover
Now you are ready to perform the A/R cutover procedure.
Before continuing, make sure you have done the following:
1. Enter all customers including a cash customer (account 1.000). See Basic
Customer Data, Numbering Accounts, Getting into A/R, and Adding
Customers.
2. Enter the 8 set up values you need to have to run the basic features of the A/R
system (A/R groups, assigned sales rep numbers, classes, price levels, terms,
tax codes, and credit limits/types). See Values Worksheet, Entering Values for
Customers.
3. Check file status (all customers in system, A/R Aged Analysis has zero
balance, Daily Report has zero balance, print File Status Report-DS09025).
4. Prepare the inventory files according to which method of A/R entry you are
planning to use:
Ø Invoice Posting
Enter one miscellaneous non-perpetual inventory item (99999999) in the
inventory files.
Ø Invoice Posting/Group Distribution
Enter a miscellaneous non-perpetual item for each inventory group in the
inventory files.
Ø Point of Sale (POS)/Order Entry
Enter all inventory items. Check all prices and costs.
See Chapter 5, Inventory, for more complete information on setting up inventory.
5. Verify the following Variable File information for A/R features:
Ø Statement Information
1. A/R Statement Messages
2. A/R Statement Options
1. Print Discount Amount and Message on Statements
2. Print Due Dates on Statements
3. Optional Statement Late Charge Descriptions
Ø A/R Descriptions
1. Customer Class Descriptions
Ø Sales Variable File
3. Sales Tax
5. Descriptions
2. Assigned Sales Rep Descriptions
6. If you will be using POS/Order Entry to enter sales, enter the Variable File
information for sales features. See Chapter 8, Point of Sale (POS), for more
complete information on setting up for entering sales.
Dim11
111
Chapter 4. Accounts Receivable
7. Decide "go live" date. You will probably want to do this at the end of a month,
quarter, or year. "Go live" means to use the Dimensions computer system for
all regular data processing using your real data.
The day before "going live", do the following:
A/R Cutover Process Allows you to enter the aging balances for each customer.
Steps 1-39 describe the cutover for balance forward
accounts. Steps 40-70 describe the cutover for open item
accounts. And Step 71 describes the Totals File entries
(total A/R for today, MTD, and YTD).
Check Variable File
See Step 72. Verifies the due dates and discount dates
for all terms types and the calendar month used for G/L
posting.
Print Daily Report
See Step 73. Allows you to verify that all sales are zero
and that the A/R Summary shows the beginning A/R
balance only according to the Dimensions system.
A/R CUTOVER PROCESS (for Balance Forward Customers)
BEFORE YOU BEGIN: On your old system, print a current aging report to obtain the account
balances of all balance forward customers as of the cutover date. You will
need the following information for each account:
Customer name
Total balance due
Current balance
1-30 days past due
31-60 days past due
61-90 days past due
Over 90 days past due
Finance charges (if available)
1 On the Dimensions system, sign on with a manager password provided by your
support analyst or installer.
2 The computer displays the DIMENSIONS MAIN MENU. Enter 3 for Accounts Receivable
and press Enter.
3 Select 7 for A/R Special Maintenance. Select 18 for A/R Cutover Process.
4 The computer displays the A/R CUTOVER PROCESS MENU:
+-----------------------------------------------------------------------------+
|
DIM11 DATA
|
=== A/R CUTOVER PROCESS ===
| 11.0 |
+-----------------------------------------------------------------------------+
| 1. Balance Forward Customers
|
|
|
| 2. Open Item Customers
|
|
|
| 3. Enter Beginning Balances
|
|
|
+-----------------------------------------+
Enter 1 for Balance Forward Customers. This process describes how to process balance
forward accounts only. If you need to cutover open item accounts (brings over
each open transaction), see Steps 40-70.
112
Dim11
Chapter 4. Accounts Receivable
5 The computer displays the BALANCE FORWARD CUSTOMERS MENU:
+-----------------------------------------------------------------------------+
|
DIM11 DATA
|
=== BALANCE FORWARD CUSTOMERS ===
| 11.0 |
+-----------------------------------------------------------------------------+
| 1. Enter Aging Balances
|
|
|
| 2. Copy CUSTOMER Files to ug 31
|
|
|
| 3. Print Aging-No Recalculation
|
|
|
| 4. Create BF Records in CM3 File
|
|
|
| 5. Print Aging-With Recalculation
|
|
|
+-----------------------------------------+
You will work from this menu for Steps 6-39. Enter 1 for Enter Aging Balances.
Steps 6-12: ENTER AGING BALANCES
6 The computer displays the ENTER BALANCE DUE screen:
DS02901
Rev8.1.1
Enter Balance Due
DIM11 DATA
Date mm/dd/yy
Port 42
Store 01
Customer Number:
Balance Due
:
Current
1-30
31-60
61-90
Over 90
Finance
:
:
:
:
:
:
Days
Days
Days
Days
Chrg
Next Customer:
.000
<Esc> = End
The cursor is positioned at the bottom of the screen at Next Customer. Enter the
customer number for which you wish to enter a balance. The customer must have
already been entered into the Customer Master File (CM1.D). Or if you wish to
end this procedure, press Esc to return to the previous menu.
7 The computer displays the corresponding customer name. Verify it before
continuing.
8 Balance Due:
Enter the total balance of the account from the old system (total balance = current
+ 30 days + 60 days + 90 days + over 90 days + finance charges).
Dim11
113
Chapter 4. Accounts Receivable
Á
QUICK TIP:
Or you can skip this field and enter the balances in Step 9 to determine what this
total balance should be. The computer will indicate in Step 10 that this account is
out of balance and show the amount. You are returned to BALANCE DUE where
you can enter the correct balance due amount.
9 Then enter the following buckets that make up the total Balance Due:
Current
1-30 Days
31-60 Days
61-90 Days
Over 90 Days
Finance Chrg
:
:
:
:
:
:
Press Enter after each entry.
10 The account must balance before continuing. The Balance Due must equal the sum
of the buckets. If the entry is not in balance, the computer displays a message
similar to the following:
Out of Balance By:
-87.99
The cursor returns to Balance Due where you can enter the amounts again. You
cannot continue until the account balances.
11 The computer then displays at the bottom of the screen the next customer number
found in the Customer Master File (CM1.D). Press Tab to accept it or enter a
different customer number. Or press Esc to end this process.
12 Repeat Steps 7-11 to enter the balances for the remaining customers. Press Esc
when done and you are returned to the Balance Forward Customers Menu as in Step 5.
Steps 12-15: COPY CUSTOMER FILES TO UG 31
13 Select 2 for Copy CUSTOMER Files to ug 31.
14 The computer displays:
This program will copy your customer files
to the user group you select.
Do you wish to proceed? (Y/N)
The purpose of copying the customer files to another user group is to have a
backup copy of the work you just entered in case you experience an operator or
mechanical error in the following steps. Enter Y only if you are sure you wish to
continue. You cannot abandon this procedure in the next step.
114
Dim11
Chapter 4. Accounts Receivable
15 If you answered Y above, the computer displays:
This program will copy your customer files
to the user group you select.
Please prepare your system printer for the copy report.
You are required to review this report for any errors
in the copy process.
If any errors are encountered
DO NOT PROCEED until corrected.
NOTE: Any files with the suffix '.sv' will be globally
excluded, this is normal and is done to save disk space.
Any other errors MUST be corrected before continuing.
Please enter the drive:user group to copy the file to. 5:31
Enter the drive and user group if different than the displayed drive and user
group. Or press Enter to begin the copy process.
16 When done, be sure to return to the Balance Forward Customers Menu.
Steps 17-22: PRINT AGING - NO RECALCULATION
17 Select 3 for Print Aging - No Recalculation.
18 The computer displays:
DS02390N
Rev10.0.1
Age Analysis
DIM11 DATA
Date mm/dd/yy
Port 38
Store 00
1. Input Parameters
Report Date
mmddyy
Print 1) Numerically or 2) Alphabetically
1
Beginning Customer (Aging & Stmnts)
.000
Ending
Customer (Aging & Stmnts)
999999.999
Selection Code:
0
0 = All Accounts
1 = Only Past Due
31 = Only Over 30
61 = Only Over 60
91 = Only Over 90
Print Customers with Zero Balances (Y/N)
N
Print the Total Page Only (Y/N)
N
Number of Copies
1
Store Number (0 = All Stores)
0
Select Optional Field (Y/N)
N
2. Print Aging Report
Enter Option - (E) to End
Enter 2 for Print Aging Report. You will most likely want to include all customers on
this report and not change any of the input parameters so option 1, Input Parameters,
is not necessary.
19 Select the output device for this report (P=printer, S=slave printer,
Port#=another printer port). You will need a hard copy of this report so printing
to the terminal is not a valid option.
20 Select the compressed print option (Y/N) and report spacing (1, 2, 3) you wish for
this report. You may wish to print this report double-spaced so you can make
notes on it if necessary.
21 Review each account on the report for accuracy. Make sure all accounts have been
entered. If you have been careful in your data entry, there should be no need to
make corrections. If you do need to make corrections, re-do Steps 5-21, making
the necessary changes..
22 Return to the Balance Forward Customers Menu.
Dim11
115
Chapter 4. Accounts Receivable
Steps 23-31: CREATE BF RECORDS IN CM3 FILE
23 Select 4 for Create BF Records in CM3 File.
24 The computer displays:
DS09001
Rev8.1.3
A/R Conversion
DIM11 DATA
Date mm/dd/yy
Port 42
Store 01
1. Change Store No
2. Create Open Item Transactions From Aging (CM3)
Enter Option - (E) to End:
If you need to change the displayed store number, select 1 for Change Store No.
(Transactions are created by store number.) Then select 2 for Create Open Item
Transactions From Aging (CM3).
25 ENTER CURRENT CALENDAR YEAR (EX. 1987)
Enter the current calendar year, all 4 digits.
26 ENTER DAY OF MONTH INVOICES ARE DUE (1-31)
Enter the calendar month that just ended and for which your A/R records are
closed (1=Jan, 2=Feb, 3=Mar, etc.). You should have ending statements and/or
age analysis.
27 ENTER MONTH JUST ENDED (1-12)
Enter the day of the month the majority of your invoices are due (i.e., 10 for the
10th, 25 for the 25th). It is likely that most of your balance forward customers are
due on the same day.
28 Based on your entries made in Steps 25-27, the computer calculates the invoice
dates and due dates for the transaction about to be created from the aging
balances:
116
Dim11
Chapter 4. Accounts Receivable
DS09001
Rev8.1.3
A/R Conversion
DIM11 DATA
Date mm/dd/yy
Port 42
Store 01
Enter Current Calendar Year (Ex. 1987)
Enter Month Just Ended (1-12)
Enter Day of Month Invoices are Due (1-31)
2001
9
10
Based on the above input, transactions will be generated with the
following invoice and due dates:
Age Bucket
Invoice Date
Due Date
-----------------------------------------------Current
09/15/01
10/10/01
1-30 days past due
08/15/01
09/10/01
31-60 days past due
07/15/01
08/10/01
61-90 days past due
06/15/01
07/10/01
over 90 days past due
05/15/01
06/10/01
After reviewing the above dates - Do you wish to continue ?? (Y/N)
Enter Y if you wish to continue. Or enter N to return to Step 25 and enter the
dates again.
29 Finally the computer asks:
This program will now create transactions for each of the aging buckets
previously entered.
Do you wish to proceed ?
(Y/N)
Enter Y if you wish to proceed and create transactions in the Customer
Transaction File (CM3.D) for the balances according to the displayed dates. Or
enter N to not proceed and return to Step 25 to enter the dates again or end this
process.
30 The computer takes one customer at a time and creates a transaction for each
bucket for which there is a balance and display:
Now Building Transactions for Customer
10000.000
Transaction numbers are assigned automatically. They begin at 1 and increment
by 1 for as many transaction as needed. Wait until all customers are processed.
31 You are returned to Step 25 to end this procedure. Return to the Balance Forward
Customers Menu.
Steps 32-38: PRINT AGING - WITH RECALCULATION
32 Select 5 for Print Aging - With Recalculation.
Dim11
117
Chapter 4. Accounts Receivable
33 The computer displays:
DS02390
Rev11.0.1
Aging Analysis
DIM11 DATA
Date mm/dd/yy
Port 38
Store 01
1. Input Parameters
Report Date
mmddyy
Customer Print Order
1
Beginning Customer
(Aging & Stmts)
.000
Ending
Customer
(Aging & Stmts)
999999.999
Selection Code
0
Print Customers With Zero Balances
(Y/N)
N
Print The Total Page Only
(Y/N)
N
Sales/Payment Print Option
(S/P)
S
Print Optional Headings
(Y/N)
N
Number of Copies
1
Store Number
(0 = All)
0
Consolidate Jobs
(Y/N)
N
Print Credit Notes After Date Entered (MMDDYY)
0
Print Pymt History After Date Entered (MMDDYY)
0
Select Optional Field
(Y/N)
N
Numerically
All Accounts
Last Sale Date
(0=Don't Print)
(0=Don't Print)
2. Calculate Aging Balances
3. Print Aging Report
Enter Option - (E) to End:
Enter 2 to Calculate Aging Balances. Do not change the input parameters (option 1).
This aging report must be printed for all customers.
34 After selecting 2 above, the computer displays:
DS02383
Rev9.0.1
Calculate Aging
Enter Aging Date (MMDDYY):
<Tab>=Next
DIM11 DATA
Date mm/dd/yy
Port 42
Store 00
mmddyy This date is very important. Transactions
with a due date on or after this date will
be current. Everything prior to this date
will be aged based on days past due.
<S-Tab>=Previous
<Esc>=End/Continue
The current system date is displayed at Enter Aging Date. Enter your last statement
date (statement cutoff date) using the standard date format (mmddyy).
F NOTE:
This message is very important. Be sure to read it and enter the correct statement date
before continuing.
35 The computer displays:
The Aging is performed as follows:
Step 1: Clear aging buckets for non-revolving customers.
Volume discounts will be calculated if applicable.
Step 2: Generate aging buckets for non-revolving customers.
Do you wish to continue (Y/N)?
Enter Y to continue with the aging process. Or enter N to return to Step 35 to
enter another aging date or Esc to exit this program.
118
Dim11
Chapter 4. Accounts Receivable
36 The computer displays:
Now Clearing Aging for Customer: 10000.000
Now Generating Aging for Customer 10000.000
And Calculating Volume Discount
From Transaction
#######
Each customer number is displayed as it is aged. This process may take a few
seconds depending on how many customers you have. The aging process takes the
transactions found in the Customer Transaction File (CM3.D) and recalculates the
buckets according to the aging date entered in Step 34. For more information on
the aging theory, see the introduction to A/R Reports in the Accounts Receivable
User Manual.
37 You are returned to the screen in Step 33 to select the print option. Enter 3 for
Print Aging Report.
38 Proceed with the standard print routine by selecting the output device (printer),
compressed print option, and report spacing. You should print a hard copy of this
report.
39 Make one last check on this report for accuracy in each bucket. Match the
computer's A/R totals to the old A/R totals for balance forward customers you took
before Step 1. They should balance at this point because you have been checking
the agings through the previous steps.
F NOTE:
If you have open item customers mixed in with balance forward customers, you need to
enter those transactions at this point. Complete Steps 40-70. Then go to Step 71 to finish
the cutover process.
BEFORE YOU BEGIN: From your old system, determine the account balances and transactions for
each open item customer as of the cutover date. You will also need a total
A/R amount for open item customers.
40 Return to the A/R Cutover Process Menu (see Step 4):
+-----------------------------------------------------------------------------+
|
DIM11 DATA
|
=== A/R CUTOVER PROCESS ===
| 11.0 |
+-----------------------------------------------------------------------------+
| 1. Balance Forward Customers
|
|
|
| 2. Open Item Customers
|
|
|
| 3. Enter Beginning Balances
|
|
|
+-----------------------------------------+
Enter 2 for Open Item Customers.
Dim11
119
Chapter 4. Accounts Receivable
41 The computer displays the Open Item Customers Menu:
+-----------------------------------------------------------------------------+
|
DIM11 DATA
|
=== OPEN ITEM CUSTOMERS ===
| 11.0 |
+-----------------------------------------------------------------------------+
| 1. Enter Open Item Customer Bal.
|
|
|
| 2. Enter Open Item Transactions
|
|
|
| 3. Copy CUSTOMER Files to ug 31
|
|
|
| 4. Print Aging-With Recalculation
|
|
|
+-----------------------------------------+
Select 1 for Enter Open Item Customer Bal.
Steps 42-46 : ENTER OPEN ITEM CUSTOMER BAL.
42 The computer displays the ENTER BALANCE DUE screen:
DS02905
Rev8.0.0
Enter Balance Due
DIM11 DATA
Date mm/dd/yy
Port 42
Store 01
Customer Number:
Balance Due:
PALLETS
Next Customer:
.000
<Esc> = End
The cursor is positioned at the bottom of the screen by Next Customer. Enter the
customer number for which you wish to enter a balance. The customer must have
already been entered into the Customer Master File (CM1.D). Or if you wish to
end this procedure, press Esc to return to the previous menu.
43 The computer display the corresponding customer name. Verify it before
continuing.
44 Balance Due:
Enter the total balance of the account from the old system (total balance = current
+ 30 days + 60 days + 90 days + finance charge).
45 The computer then displays at the bottom of the screen the next customer number
found in the Customer Master File (CM1.D). Press Tab to accept it or enter a
different customer number. Or press Esc to end this process.
46 Repeat Steps 42-45 to enter the balance due for the remaining open item
customers. Press Esc when done and you are returned to the Open Item Customer
Menu as in Step 41.
120
Dim11
Chapter 4. Accounts Receivable
Steps 47-57 : ENTER OPEN ITEM TRANSACTIONS
47 Select 2 for Enter Open Item Transactions.
48 The computer displays:
DS02906
Rev8.1.1
Enter Transactions
DIM11 DATA
Date mm/dd/yy
Port 42
Store 01
1. Change Store No
2. Input Open Item Transactions (CM3.D)
Enter Option - (E) to End
If you need to change the displayed store number, select 1 for Change Store No.
(Transactions are stored by store number.) Then select 2 for Input Open Item
Transactions (CM3.D). Or enter E to end this process and return to the previous
menu.
49 The computer displays:
DS02906
Rev8.1.1
Enter Transactions
DIM11 DATA
Date mm/dd/yy
Port 42
Store 01
Customer Number:
Balance Due:
Transaction
Number
Type
Type
Type
Type
Type
Type
Next Customer:
.000
Transaction
Date
1
2
6
8
9
=
=
=
=
=
Due
Date
Transaction
Amount
Invoice
Return (Sign Must be Entered)
Transfer
Late Charge
Unapplied
<Esc> = End
The cursor is positioned at the bottom of the screen by Next Customer. Enter the
customer number for which you wish to enter transactions. Or if you wish to end
this procedure, press Esc to return to the previous menu.
50 The computer displays the customer name and address for the selected customer
and asks:
Transaction Number
Enter the invoice number, return number (if applicable), debit or credit memo
number for this transaction, up to 7 digits, and press Enter.
51 Type
Using the table of types displayed on the screen, enter the corresponding
transaction type.
Dim11
121
Chapter 4. Accounts Receivable
52 Transaction Date
Enter the corresponding transaction date in the standard date format (mmddyy).
You must enter a transaction before proceeding.
53 Due Date
Enter the appropriate due date for this transaction according to your terms. You
must enter a due date before proceeding.
54 Transaction Amount
Enter the total amount of this transaction, including sales tax if applicable. If this
transaction is a return, you must enter a negative amount (i.e., -25.00).
55 The transaction is added to the Customer Transaction File (CM3.D). You are
returned to Step 50 where you can enter another transaction for the selected
customer.
56 Repeat Steps 50-55 for each transaction. When you are done entering transactions
for this customer, press Esc at Transaction Number. Return to Step 49 to select the
next customer.
57 When you are done entering all transactions for open item customers, you are
ready to proceed to Step 58 to copy the files to user group 31. Return to the Open
Item Customers Menu as in Step 51.
Steps 58-61 : COPY CUSTOMER FILES TO UG 31
58 Select 3 for Copy CUSTOMER Files to ug 31.
59 The computer displays:
This program will copy your customer files
to the user group you select.
Do you wish to proceed?
(Y/N)
The purpose of copying the customer files to another user group is to have a
backup copy of the work you just entered in case you experience an operator or
mechanical error in the following steps. Enter Y only if you are sure you wish to
continue. You cannot abandon this procedure in the next step.
60 If you answered Y above, the computer displays:
This program will copy your customer files
to the user group you select.
Please prepare your system printer for the copy report.
You are required to review this report for any errors
in the copy process. If any errors are encountered
DO NOT PROCEED until corrected.
NOTE:
Any files with the suffix '.sv' will be globally
excluded, this is normal and is done to save disk space.
Any other errors MUST be corrected before continuing.
Please enter the drive:user group to copy the file to.
5:31
61 When done, be sure to return to the Open Item Customers Menu.
122
Dim11
Chapter 4. Accounts Receivable
Steps 62-69: PRINT AGING - WITH RECALCULATION
62 Select 4 for Print Aging - With Recalculation.
63 The computer displays:
DS02390
Rev11.0.1
Aging Analysis
DIM11 DATA
Date mm/dd/yy
Port 38
Store 01
1. Input Parameters
Report Date
mmddyy
Customer Print Order
1
Beginning Customer
(Aging & Stmts)
.000
Ending
Customer
(Aging & Stmts)
999999.999
Selection Code
0
Print Customers With Zero Balances
(Y/N)
N
Print The Total Page Only
(Y/N)
N
Sales/Payment Print Option
(S/P)
S
Print Optional Headings
(Y/N)
N
Number of Copies
1
Store Number
(0 = All)
0
Consolidate Jobs
(Y/N)
N
Print Credit Notes After Date Entered (MMDDYY)
0
Print Pymt History After Date Entered (MMDDYY)
0
Select Optional Field
(Y/N)
N
Numerically
All Accounts
Last Sale Date
(0=Don't Print)
(0=Don't Print)
2. Calculate Aging Balances
3. Print Aging Report
Enter Option - (E) to End:
Enter 2 to Calculate Aging Balances. Do not change the input parameters (option 1).
This aging report must be printed for all customers.
64 After selecting 2 above, the computer displays:
DS02383
Rev9.0.1
Calculate Aging
Enter Aging Date (MMDDYY):
<Tab>=Next
DIM11 DATA
Date mm/dd/yy
Port 42
Store 00
mmddyy This date is very important. Transactions
with a due date on or after this date will
be current. Everything prior to this date
will be aged based on days past due.
<S-Tab>=Previous
<Esc>=End/Continue
The current system date is displayed at Enter Aging Date. Enter your last statement
date (statement cutoff date) using the standard date format (mmddyy).
F NOTE:
This message is very important. Be sure to read it and enter the correct statement date
before continuing.
65 The computer displays:
The Aging is performed as follows:
Step 1: Clear aging buckets for non-revolving customers.
Volume discounts will be calculated if applicable.
Step 2: Generate aging buckets for non-revolving customers.
Do you wish to continue (Y/N)?
Enter Y to continue with the aging process. Or enter N to return to Step 64 to
enter another aging date or Esc to exit this program.
Dim11
123
Chapter 4. Accounts Receivable
66 The computer displays:
Now Clearing Aging for Customer: 10000.000
And Calculating Volume Discount
Now Generating Aging for Customer 10000.000
From Transaction
#######
Each customer number is displayed as it is aged. This process may take a few
seconds depending on how many customers you have. The aging process takes the
transactions found in the Customer Transaction File (CM3.D) and recalculates the
buckets according to the aging date entered in Step 64. For more information on
the aging theory, see the introduction to A/R Reports in the Accounts Receivable
User Manual.
67 You are returned to the screen in Step 63 to select the print option. Enter 3 for
Print Aging Report.
68 Proceed with the standard print routine by selecting the output device (printer),
compressed print option, and report spacing. You should print a hard copy of this
report and keep it.
69 Match the computer's A/R totals to the old open item plus balance for ward
customer totals you took before beginning this process.
70 Now you need to enter the beginning A/R totals in the file T2ssyy.D (ss=store
number, yy=year. Ex. T20101.D). For instructions, see Step 71 below.
71 Enter sales totals:
A. Still under a manager password, return to the DIMENSIONS MAIN MENU.
B. Select 1 for Sales.
C. Select 9 for Sales Special Maintenance.
D. Select 3 for Totals.
E. Select 1 for Sales Totals (T2ssyy).
F. The computer displays:
DS003120
Rev10.0.1
Maintain T2.D Information
DIM11 DATA
Date mm/dd/yy
Port 42
Enter Store
Enter Year (Ex:1994)
<Esc> = End
Enter the store number (most likely store 1).
G. At Enter Year (Ex: 1994), enter the current year, all 4 digits.
124
Dim11
Chapter 4. Accounts Receivable
H. The computer displays:
DS003120
Rev10.0.1
Maintain T2.D Information
Enter Store
Enter Year (Ex:1994)
DIM11 DATA
Date mm/dd/yy
Port 42
1
2001
Maintenance Will be on File T20101.D
View Mode
:
No changes will be allowed. T2 or REP.D records will not be
locked so that all normal updating will continue.
Change Mode:
The T2 or REP.D record selected to be changed will be locked
as soon as it is entered. This will put all ports that are
updating this record on hold until the record is changed,
saved and unlocked.
(V) = View
(C) = Change
<Esc> = Change Store/Year or End
Select C for Change.
I.
The computer displays:
DS003120
Store: 01
Year : 00
Maintain T2.D Information
DIM11 DATA
+--------------------------------+
| 1. Taxes
|
| 2. Addons
|
| 3. Group Totals
|
| 4. Class Totals
|
| 5. Assigned Salesman Totals
|
| 6. Written By Totals
|
| 7. Loaded By Totals
|
| 8. Checked By Totals
|
| 9. Delivered By Totals
|
| 10. Truck By Totals
|
| 11. Cash Invoice Sales
|
| 12. Charge Invoice Sales
|
| 13. Cash Return Sales
|
| 14. Charge Return Sales
|
| 15. Charge Transfers
|
| 16. Cash In/Out
|
| 17. Deposits
|
| 18. Cash Received
|
| 19. A/R Summary
|
| 20. Inventory Summary
|
| 21. Port Totals
|
+--------------------------------+
Date mm/dd/yy
Port 42
Select 19 for A/R Summary.
J. The computer displays the A/R Summary screen:
DS003120
Maintain T2.D Information
Store: 01
Year : 00
A/R Summary
DIM11 DATA
Date mm/dd/yy
Port 42
Beginning Balance
Payments
Discounts Given
Finance Charge Charged
Finance Charge Paid
Finance Charge Written Off
G/L Adjustments
Statement Discounts
Cash Receipt Bank
Daily
.00
.00
.00
.00
.00
.00
.00
.00
.00
Month To Date
.00
.00
.00
.00
.00
.00
.00
.00
.00
Year To Date
.00
.00
.00
.00
.00
.00
.00
.00
.00
Totals Include Sales Not Shown
.00
.00
.00
1.
2.
3.
4.
5.
6.
7.
8.
9.
Enter Line To Change
<Esc>=End
At Enter Line To Change, enter 1 for Beginning Balance.
Dim11
125
Chapter 4. Accounts Receivable
K. The cursor moves to Daily. Enter the total beginning A/R balance (balance
forward and open item customers).
L. The cursor moves to Month to Date. Enter the same total as in Daily.
M. The cursor moves to Year To Date. Enter the same total as in Daily and Month to
Date.
N You are returned to Enter Line To Change. Press Esc to end this screen.
O. If you are using the General Ledger, you must also enter the beginning A/R
balance in the General Ledger Master File (GM1.D) for ACCOUNTS
RECEIVABLE-TRADE (account #1210.00). To do this, follow these steps:
1)
2)
3)
4)
5)
6)
7)
8)
9)
10)
11)
12)
13)
14)
Return to the DIMENSIONS MAIN MENU.
Select 6 for General Ledger.
Select 1 for G/L File Maintenance.
Select 1 for Master File GM1.D.
Enter V for View.
Enter 1 at CONTROL#. Enter 1210 at G/L ACCOUNT NO (or your equivalent
A/R Trade account number).
Verify the account name is ACCOUNTS RECEIVABLE-TRADE (or your
equivalent).
Enter C for Change.
Press Tab 5 times to move the cursor to the column Current Bal, line Beg Bal.
Enter the same A/R beginning balance as in Step L and press Enter.
Enter period (.) and press Enter.
At OK To Change Record Y/N?, enter Y if your entry is correct. Otherwise,
enter N and fix your entry.
Press Esc once, then E for End.
Return to the DIMENSIONS MAIN MENU.
F NOTE:
This completes the A/R cutover portion, which prepares the A/R files for regular
processing. You still need to perform Step 72 to make sure the other features of the
Dimensions system are ready for A/R processing.
72 Check the Variable File entries for terms and calendar month. Return to the
DIMENSIONS MAIN MENU.
A. Select 3 for Accounts Receivable.
B. Select 6 for A/R Variable File Maintenance.
C. Select 1 for Terms Information.
D. Enter the first terms number you have set up (probably terms number 1).
E. Verify the due date and discount date for this terms code (fields 5 and 16).
These will be the dates assigned to new transactions entered on the
Dimensions system. Change if necessary (use C for Change or F for Change by
Field).
F. Repeat for each terms code you have. If necessary, check for each store.
G. Go back to the DIMENSIONS MAIN MENU. Select 6 for General Ledger.
H. Select 7 for G/L Variable File.
I.
126
Select 1 for Basic Store Information.
Dim11
Chapter 4. Accounts Receivable
J. Check field 2, Current Calendar Month. Make sure it is the current calendar
month or the month in which A/R transactions will begin being entered
(1=Jan, 2=Feb, 3=Mar, etc.). Change if necessary. This determines the
accounting month for G/L postings from A/R.
K. Check for each store.
L. Return to the DIMENSIONS MAIN MENU.
73 Print a Daily Report:
A. From the DIMENSIONS MAIN MENU, select 7 for Day End/Month End/ Year End.
B. Select 1 for Day End.
C. Select 5 for Daily Report.
D. Using the standard print routine, print this report to a printer. Here is a
sample Daily Report:
SAMPLE DAILY REPORT
mm/dd/yy
12:59:05
STORE 01
DAILY REPORT
DIM11 DATA
-----------------TODAY----------------SALES
ADDONS
TAX
TOTAL
CHARGE
INVOICES
RETURNS
0.00
0.00
------NET CHARGE 0.00
CASH
INVOICES
RETURNS
0.00
0.00
------NET CASH
0.00
NET SALES
DS04202
------------------ MTD -----------------SALES
ADDONS
TAX
TOTAL
0.00
0.00
------0.00
0.00
0.00
------0.00
0.00
0.00
------0.00
0.00
0.00
------0.00
0.00
0.00
------0.00
0.00
0.00
------0.00
0.00
0.00
------0.00
0.00
0.00
------0.00
0.00
0.00
------0.00
0.00
0.00
------0.00
0.00
0.00
------0.00
0.00
0.00
------0.00
0.00
0.00
------0.00
0.00
0.00
------0.00
0.00
0.00
0.00
0.00
0.00
0.00
0.00
0.00
CASH IN/OUT 0.00
TRANSFERS
0.00
------TOTAL
0.00
0.00
0.00
------0.00
0.00
0.00
------0.00
0.00
0.00
------0.00
0.00
0.00
------0.00
0.00
0.00
------0.00
0.00
0.00
------0.00
0.00
0.00
------0.00
TODAY
AMOUNT
MTD
AMOUNT
INVOICES
0.00
RETURNS
0.00
CASH IN/OUT
0.00
DEPOSITS RECEIVED
0.00
DEPOSITS USED
0.00
----------TOTAL
0.00
0.00
0.00
0.00
0.00
0.00
--------0.00
CASH TRANSACTIONS
A/R SUMMARY
BEGINNING BALANCE
INVOICES
RETURNS
TRANSFERS
PAYMENTS
DISCOUNTS GIVEN
F/C CHARGED
F/C WRITTEN OFF
G/L ADJUSTMENTS
ENDING BALANCE
7,240.07
0.00
0.00
0.00
0.00
0.00
0.00
0.00
0.00
--------7,240.07
7,240.07
0.00
0.00
0.00
0.00
0.00
0.00
0.00
0.00
---------7,240.07
** MEMO **
STATEMENT DISCOUNTS
TODAY
AMOUNT
CASH
CHANGE GIVEN
0.00
0.00
0.00
0.00
NET CASH
0.00
0.00
0.00
0.00
0.00
0.00
0.00
-------0.00
0.00
0.00
0.00
0.00
0.00
-------0.00
0.00
0.00
0.00
--------0.00
0.00
0.00
0.00
-------0.00
0.00
0.00
0.00
0.00
--------0.00
0.00
0.00
0.00
0.00
--------0.00
CHECKS
VISA
MC
OTHER
MISC
TOTAL
MTD
AMOUNT
DEPOSIT SUMMARY
BEGINNING BALANCE
DEPOSITS RECEIVED
DEPOSITS USED
ENDING BALANCE
INVENTORY SUMMARY
0.00
0.00
0.00
0.00
--------CASH TO ACCOUNT FOR
0.00
0.00
0.00
--------0.00
CASH RECEIPTS BANK
CASH TRANSACTIONS
CASH SETTLEMENT
BEGINNING BALANCE
PURCHASES
ADJUSTMENTS
INVENTORY SOLD
ENDING BALANCE
E. Check that all sales are zero and that the A/R Summary shows the beginning
A/R balance only.
Dim11
127
Chapter 4. Accounts Receivable
F. Print the Daily Report again but this time change the Period to Print to include
year-to-date figures. Check that all YTD sales figures are also zero and the
YTD A/R Summary shows the beginning A/R balance only.
F NOTE:
F NOTE:
If there are sales figures, they will need to be cleared out. Contact your installer or a
support analyst to clear T2ssyy.D totals and enter the beginning A/R balances again.
This report must be correct before beginning A/R processing.
You may wish to put a message on your first run of statements telling your customers
about your new computer system and to check the information on the statements to make
sure it is correct--spelling, address, phone numbers, account balances, etc.
*************************
Congratulations! You have completed the A/R cutover process. Now
you can begin processing invoices, returns, cash receipts, and doing
the other tasks of Accounts Receivable.
************************
128
Dim11
Chapter 4. Accounts Receivable
Customer Inquiry
Use this procedure to examine the status of any A/R customer account. You can
view information such as how the customer is set up, the last payment and last
charge dates, available credit, year-to-date balances, a monthly account activity
summary, as well as payment and invoice detail. You can also change credit
information if your password level is high enough.
1 Starting at the ACCOUNTS RECEIVABLE MENU, select 1 for File Inquiry and press Enter.
Steps 2-4: SEARCH FOR & SELECT A CUSTOMER
2 The computer displays:
DS02201
Customer Inquiry
Rev10.0.7
Enter Customer (Number or Name):
DIM11 DATA
Date mm/dd/yy
Port 42
Store 01
<UpA> = Search
<DnA> = Change Search Store #:
0
(0=All)
The cursor is positioned at Enter Customer (Number or Name):. You can do one of the
following options:
Enter a customer number
to look for an exact match
If you know the customer number, enter it and
press Enter. If the computer finds the selected customer,
you will continue with the program. If the computer does
not find the customer, the following message is displayed:
6600 Not Found
(CM1)
Press Enter to acknowledge this message and try again.
If you enter a customer with jobs, go to Step 4.
Enter part or all of a
customer name
Press the up arrow
Enter the account number
and press the down arrow
Press down arrow
Press Esc
Dim11
This displays a list of customers in alphabetical
order starting with the name you entered. Customers
with jobs are displayed with an asterisk. You are now in
the search mode. Go to Step 3.
Displays customers alphabetically from the beginning of
the file.
Displays customers numerically starting from the
number you entered.
This option appears only if you are running multiple
stores. Change the store number for the search. Or
enter 0 (zero) to search all stores.
Press Esc to end this option and return to the previous
menu.
129
Chapter 4. Accounts Receivable
3 Once you have displayed some customers in the search mode, the screen displays:
DS02201
Customer Inquiry
Rev10.0.7
Enter Customer (Number or Name):
DIM11 DATA
<Ent>=Select
<UpA/DnA>=Scroll
L# <Ent>=Select
L#
1
2
3
4
5
6
7
8
9
10
11
12
13
14
15
1010.000
1031.000
1040.000
1050.000
1060.000
1070.000
1080.000
1090.000
1400.000
2000.000
2010.000
2020.000
2030.000
2040.000
2050.000
(.)=Page Down
* F P S, INC. DBA BURGER
* ANDERSON/MIKE
BECK STREET CONSTRUCTIO
BONHAM/STAN
BRODERICK AND ZARBOCK P
CHRISTENSEN/DAVID
* CLASSY BUILDERS
CONSTRUCTION ADVISORS
* CYSTIC FIBROSIS FOUNDAT
DRAPER/ROY
DYNAPACK ROTATING SIGNS
* DYNASTY CORPORATION
ELDREDGE/JOEL
ENTEC
ESCO ENGINEERING
Date mm/dd/yy
Port 39
Store 01
(,)=Page Up
PO BOX 357
5144 KENSINGTON STR
P.O. BOX 16325
4410 SOUTH MAIN STR
570 EAST 10345 SOUT
7375 SOUTH LUANA CI
13008 SOUTH 1300 WE
2361 LOGAN AVE.
1234 WAY RD
9502 NORTH 6800 WES
338 WEST HAVEN AVE.
5899 SOUTH STATE ST
6941 SOUTH 160 EAST
145 WEST 2950 SOUTH
3500 SOUTH MAIN STR
NORWALK,
NORWALK,
NORWALK,
NORWALK,
NORWALK,
NORWALK,
NORWALK,
NORWALK,
NORWALK,
NORWALK,
NORWALK,
NORWALK,
NORWALK,
NORWALK,
<Esc>=Exit
CT
CT
CT
CT
CT
CT
CT
CT
CT
CT
CT
CT
CT
CT
The computer displays up to 15 customers at a time, with a corresponding line
number. The cursor is positioned at Enter Customer (Number or Name). The customer
with the closest match will be the first customer highlighted on line 1 (L#). You
have the following options:
<Ent>=Select
<Up/Dn Arrow>=Scroll
(.)=Page Down
Press Enter to select the highlighted customer.
Continue with the program.
Press the up or down arrow to scroll through the
displayed list.
Allows you to page down, using the last customer
displayed as the first customer of the new display.
Depending on the keyboard, there are several ways of
paging down:
Ø
All keyboards
Press the period (.) and
Enter
Ø
IBM 3151
Ø Wyse terminals
Ø
(,)=Page Up
Press Home
Press PAGE
Prev
PAGE
Next
PCs and monitors Press Page Down
Allows you to page up, using the first customer displayed
as the last customer of the new display. Depending on
the keyboard, there are several ways of paging up:
Ø
All keyboards
Press the comma (,) and
Enter
Ø
IBM 3151
Ø Wyse terminals
Ø
130
Press Shift-Home
Press Shift-PAGE
Prev
PAGE
Next
PCs and monitors Press Page Up
Dim11
Chapter 4. Accounts Receivable
<Esc>=Exit
L# <Ent>=Select
Enter another name or
number to go to another
area of the customer list
Press Esc to end this routine and return to the previous
menu.
Enter the line number from the left column to select a
specific customer.
To quickly go to another area of the customer list,
enter the letter(s) or number(s) and press Enter
as in Step 2.
REMEMBER: Once you find the needed customer in the search mode, you still need to select it. If it
is highlighted, merely press Enter. Or if it is not highlighted, enter the line number and
Enter.
4 If you selected a main account customer with jobs, the search routine is a little
different. The computer displays a search routine showing the customer’s jobs in
job number order, starting with the main account information. For example:
DS02201
Customer Inquiry
Rev10.0.7
Enter Customer (Number or Name):
DIM11 DATA
<Ent>=Select
<UpA/DnA>=Scroll
(.)=Page Down
L# <Ent>=Select
1010.000 * F P S, INC. DBA BURGER PO BOX 357
L#
1
1010.000 *
2
1010.100 * F P S OFFICE
JOHN SMITH
3
1010.101
F P S, INC. DBA BURGER PO BOX 357
4
1010.102
F P S, INC. DBA BURGER PO BOX 357
5
1010.200 * BURGER KING 3257
JOE SMITH
6
1010.300 * BURGER KING-PAGE BLV
JIM SMITH
7
1010.328 * JONES JOB
8
1010.600 * SCHWEITZER JOB
9
1010.700
SMITH COTTAGE
10
1010.800
SMITH HOUSE
11
1010.900 * 2798 ELM STREET
12
1010.998
CANE STREET JOB
Date mm/dd/yy
Port 39
Store 01
(,)=Page Up
<Esc>=Exit
413-123-4567
413-567-8923
413-987-6543
Or if the Job Scroll Order option is set in the Sales Variable File (Entry Options,
Company Options, field 2=A), the computer displays the jobs in job name
(alphabetical) order) For example:
DS02201
Customer Inquiry
Rev10.0.7
Enter Customer (Number or Name):
DIM11 DATA
<Ent>=Select
<UpA/DnA>=Scroll
(.)=Page Down
L# <Ent>=Select
1010.000 * F P S, INC. DBA BURGER PO BOX 357
L#
1
1010.000 *
2
1010.900 * 2798 ELM STREET
3
1010.200 * BURGER KING 3257
JOE SMITH
4
1010.300 * BURGER KING-PAGE BLV
JIM SMITH
5
1010.998
CANE STREET JOB
6
1010.100 * F P S OFFICE
JOHN SMITH
7
1010.101
F P S, INC. DBA BURGER PO BOX 357
8
1010.102
F P S, INC. DBA BURGER PO BOX 357
9
1010.328 * JONES JOB
10
1010.600 * SCHWEITZER JOB
11
1010.700
SMITH COTTAGE
12
1010.800
SMITH HOUSE
Date mm/dd/yy
Port 36
Store 01
(,)=Page Up
<Esc>=Exit
413-567-8923
413-987-6543
413-123-4567
Then use the arrow keys to highlight the desired account and press Enter.
Dim11
131
Chapter 4. Accounts Receivable
Steps 5-6 : CUSTOMER INQUIRY
5 After you select a customer above, the computer displays the inquiry screen for
that customer. For example:
Number
8000.000
HOUSES R' US
501 S.W. MCLEOD ST.
801-444-9876 BRYCE MILLER
P.O. BOX 3456
JORDAN, UT
A/R Group: 1 BF
B Each-Prices
85113
PO-Required Sig-Required
Store : 1
SMan : 2
Price : 1
Class : 3
Terms : 1
St Day: 0
Tax : 1
Extra : 0
YTD Sales:
YTD F/C :
On-Order :
Credit Limit :
10000
Available Credit:
6243
Opened Date :03/31/94
Last Payment :02/29/96
1256.28
Last Charge :03/25/96
Lien Date
:03/25/96 Inv#: 2100178
High Balance :03/25/96 Amt :
3757
Previous Year High Bal Amt :
25246
4710.48 History :024000000034
21.47 MTD Disc :
43.21
50.11
(N)=Next Number (A)=Next Name (P)=Previous
(C)=Credit Options (L)=Lien Data (D)=Detail
F NOTE:
Rel Cd: 5100
Store : 1
Bid:
STM Disc
:
Begin Month Bal:
Charges
:
Returns
:
Payments
:
Discounts
:
Late Chgs
:
Adjustments
:
Ending Balance :
8000.000
Save-Lien
.00
1452.67
3561.50
.00
-1256.28
.00
.00
.00
3757.89
(S)=Signatures (I)=Item Pricing
<Esc>=Back to Select
There is an option that controls which fields are displayed on this screen. It is found in
the Variable File. See the system manager if you wish to use this feature.
These instructions present all fields as if they had been selected to display.
There are several options listed at the bottom of the screen. Depending on how
the selected customer is set up, some of these options may not be available.
(N)=Next Number
Goes to next customer in numerical order.
(A)=Next Name
Goes to next customer in alphabetical order.
(P)=Previous
Goes to previous customer in numerical order.
(S)=Signatures
Option displays only if there are extra signatures in
CM14.D for the selected customer. Shows extra
signatures for this customer.
(I)=Item Pricing
(C)=Credit Options
Shows pricing and costs for any item you select for this
customer.
Changes credit information.
- Put On Credit Hold
- Take Off Credit Hold
- Change Credit Limit Release Code
- Change Credit Limit
- Credit Notes/History
- Credit Contact/Fax#
(L)=Lien Data
132
Option displays only if there are lienable invoices entered
in the Pre-Lien system.
Dim11
Chapter 4. Accounts Receivable
(D)=Detail
Shows payment and invoice detail for this customer.
(M)=Misc
Option displays only if there is a CM2 record for this
customer. Shows CM2.D information:
Number
1010.000
F P S, INC. DBA BURGER KING
Ship To 1
Ship To 2
Ship To 3
Builder's Club Acct
Email Address
Cell Phone Number
Message 1
Message 2
Message 3
Delivery Zone
Route Difficulty
Map Code
CALL HOME NOW!!!
288
<Ent> to Continue
<Esc>=Back to Select
Ends this screen and goes back to Enter Customer.
See the Accounts Receivable User Manual for a complete explanation of each field
and option on this screen (Section 1. A/R Procedures, A/R File Inquiry).
6 When you are done viewing the customer, press Esc to return to Step 2 to select
another customer or end this process.
Dim11
133
Chapter 4. Accounts Receivable
Sample Customers
Class Codes
1 Retail
2 Large Contractor
Price Levels
1 Retail
3 Retail less 20%
Terms Codes
1 Net 10th, 1.5% F/C
2 2%, 10th Net 30th, 1.5% F/C
90 C.O.D.
Example 1. Large contractor with jobs (main account)
Terms: 2% 10th Net 30th, 1.5% F/C
Price Level: 3
Customer Class: 2
Tax Code: 1
Salesman: 5
Example 2. Large contractor job #100
Example 3. Retail charge customer
Terms: Net 10th, 1.5% F/C
Price Level: 1
Customer Class: 1
Tax Code: 1
Salesman: 99 (house)
Example 4. Retail cash customer
Terms: Net - Cash (C.O.D.)
Price Level: 1
Customer Class: 1
Tax Code: 1
Salesman: 99 (house)
There is also a blank load form that can be copied and filled out as needed.
134
Dim11
Chapter 4. Accounts Receivable
CUSTOMER LOAD FORM
Example 1. Large contractor with jobs (main account)
1.CUST NO _4140.000_____________
2.NAME __MOUNTAIN TOP CONTRACTORS____
3.ADDR 1 __P.O. BOX 9876________
4.ADDR 2 ____100 S. MOUNTAIN DRIVE____
5.ADDR 3 ___NEWTOWN, CO_________
6.ZIP
7.PHONE __(222)333-4567_________
8.CONTACT ___GEORGE HILL______________
9.TAX NO ____X54321___
12.TAX TYPE
___R____
____80101______________________
10.A/R GROUP(1-4) _1___
11. A/R TYPE
13.EACH PRICE
14.PO REQ
_N_____
__O____
___Y______
15.SIGNATURE REQ __N___
16.CUST HAS JOBS _Y____
17.SAVE HISTORY _Y___
18.SAVE LIEN INFO __Y__
19.STORE NO
___1____
20.ASSGN REP NO _5___
21.PRICE LEVEL
22.CLASS
__2_____
23.CREDIT HOLD __0___
__3____
24.TERMS (1-99) __2____
25.STMT DAY(0-31) _0___
26.TAX CODE
27.EXTRA CODE
__0____
28.CREDIT LIMIT _7500__
29.BID NUMBER _______
_________
31.CRED LIMIT TYPE _J__
32.STMT DETAIL __N___
33.INSTALL PMT ________
34.SS#
35.RESALE PRC LVL ___
36.DELIVERY ZONE ______
37.ROUTE DIFF
30.OPEN DATE
__666-77-8888__
________
__11____
38.MAP CODE __________
39.SHIP TO 1
_______________________ 40.SHIP TO 2 _______________________
41.SHIP TO 3
_______________________ 42.BUILDER’S CLUB#
43.EMAIL
________________
___________________________ 44.CELL PHONE ______________________
45.MESSAGE/NOTE1
________________________________________________________
46.MESSAGE/NOTE2
________________________________________________________
47.MESSAGE/NOTE3
________________________________________________________
------------------------Credit Information ------------------------------1.CREDIT CONTACT ______GEORGE HILL ______________________________________
2.FAX NUMBER
Dim11
______(222)333-5678_______________________________________
135
Chapter 4. Accounts Receivable
CUSTOMER LOAD FORM
Example 2. Large contractor job #100
1.CUST NO _____4140.100_________
2.NAME _______________________________
3.ADDR 1 _______________________
4.ADDR 2 _____________________________
5.ADDR 3 _______________________
6.ZIP
7.PHONE ________________________
8.CONTACT ____________________________
9.TAX NO _____________
12.TAX TYPE
________
_______________________________
10.A/R GROUP(1-4) _____
11. A/R TYPE
13.EACH PRICE
14.PO REQ
_______
_______
__________
15.SIGNATURE REQ ______
16.CUST HAS JOBS ______
17.SAVE HISTORY _____
18.SAVE LIEN INFO _____
19.STORE NO
________
20.ASSGN REP NO _____
21.PRICE LEVEL
22.CLASS
________
23.CREDIT HOLD ______
_______
24.TERMS (1-99)
______
25.STMT DAY(0-31) _____
26.TAX CODE
_______
28.CREDIT LIMIT _______
29.BID NUMBER _______
_________
31.CRED LIMIT TYPE ____
32.STMT DETAIL ______
33.INSTALL PMT ________
34.SS#
35.RESALE PRC LVL ___
36.DELIVERY ZONE ______
37.ROUTE DIFF
27.EXTRA CODE
30.OPEN DATE
_______________
________
________
38.MAP CODE __________
39.SHIP TO 1
____LOT 100____________ 40.SHIP TO 2 _MEADOW RIDGE SUBDIV.__
41.SHIP TO 3
___717 MEADOW CIRCLE___ 42.BUILDER’S CLUB#
43.EMAIL
________________
___________________________ 44.CELL PHONE ______________________
45.MESSAGE/NOTE1
________________________________________________________
46.MESSAGE/NOTE2
________________________________________________________
47.MESSAGE/NOTE3
________________________________________________________
------------------------Credit Information ------------------------------1.CREDIT CONTACT ________________________________________________________
2.FAX NUMBER
136
__________________________________________________________
Dim11
Chapter 4. Accounts Receivable
CUSTOMER LOAD FORM
Example 3. Retail charge customer
1.CUST NO _____1090.000__________
2.NAME __ADAMS/FRANK_________________
3.ADDR 1 _______________________
4.ADDR 2 ___2222 RIVERSIDE____________
5.ADDR 3 ___NEWTOWN, CO________
6.ZIP
7.PHONE ___(222)444-6789_______
8.CONTACT __FRANK ADAMS________________
9.TAX NO _____________
12.TAX TYPE
___R____
__80101_________________________
10.A/R GROUP(1-4) __1__
11. A/R TYPE
13.EACH PRICE
14.PO REQ
__Y____
__O____
____N_____
15.SIGNATURE REQ __N___
16.CUST HAS JOBS __N___
17.SAVE HISTORY _N___
18.SAVE LIEN INFO __Y__
19.STORE NO
__1_____
20.ASSGN REP NO _99__
21.PRICE LEVEL
22.CLASS
___1____
23.CREDIT HOLD __0___
__1____
24.TERMS (1-99)
__1___
25.STMT DAY(0-31) _0___
26.TAX CODE
__0____
28.CREDIT LIMIT _1000__
29.BID NUMBER _______
_________
31.CRED LIMIT TYPE _0__
32.STMT DETAIL __N___
33.INSTALL PMT ________
34.SS#
35.RESALE PRC LVL ___
36.DELIVERY ZONE ______
37.ROUTE DIFF
27.EXTRA CODE
30.OPEN DATE
_555-44-3333___
________
__1_____
38.MAP CODE __________
39.SHIP TO 1
_______________________ 40.SHIP TO 2 _______________________
41.SHIP TO 3
_______________________ 42.BUILDER’S CLUB#
43.EMAIL
________________
___________________________ 44.CELL PHONE ______________________
45.MESSAGE/NOTE1
________________________________________________________
46.MESSAGE/NOTE2
________________________________________________________
47.MESSAGE/NOTE3
________________________________________________________
------------------------Credit Information ------------------------------1.CREDIT CONTACT ______FRANK ADAMS_______________________________________
2.FAX NUMBER
Dim11
_____(222)444-6790________________________________________
137
Chapter 4. Accounts Receivable
CUSTOMER LOAD FORM
Example 4. Retail cash customer
1.CUST NO ____1.000______________
2.NAME ____CASH SALES________________
3.ADDR 1 _______________________
4.ADDR 2 _____________________________
5.ADDR 3 _______________________
6.ZIP
7.PHONE ________________________
8.CONTACT ____________________________
9.TAX NO _____________
12.TAX TYPE
___R____
_______________________________
10.A/R GROUP(1-4) _1___
11. A/R TYPE
13.EACH PRICE
14.PO REQ
__Y____
__O____
____N_____
15.SIGNATURE REQ __N___
16.CUST HAS JOBS __N___
17.SAVE HISTORY __N__
18.SAVE LIEN INFO __N__
19.STORE NO
__1_____
20.ASSGN REP NO _99__
21.PRICE LEVEL
22.CLASS
___1____
23.CREDIT HOLD __0___
_1_____
24.TERMS (1-99)
__90__
25.STMT DAY(0-31) __0__
26.TAX CODE
_______
28.CREDIT LIMIT _______
29.BID NUMBER _______
_________
31.CRED LIMIT TYPE ____
32.STMT DETAIL __N___
33.INSTALL PMT ________
34.SS#
35.RESALE PRC LVL ___
36.DELIVERY ZONE ______
37.ROUTE DIFF
27.EXTRA CODE
30.OPEN DATE
_______________
________
__1_____
38.MAP CODE __________
39.SHIP TO 1
_______________________ 40.SHIP TO 2 _______________________
41.SHIP TO 3
_______________________ 42.BUILDER’S CLUB#
43.EMAIL
________________
___________________________ 44.CELL PHONE ______________________
45.MESSAGE/NOTE1
________________________________________________________
46.MESSAGE/NOTE2
________________________________________________________
47.MESSAGE/NOTE3
________________________________________________________
------------------------Credit Information ------------------------------1.CREDIT CONTACT ________________________________________________________
2.FAX NUMBER
138
__________________________________________________________
Dim11
Chapter 4. Accounts Receivable
CUSTOMER LOAD FORM
1.CUST NO _____________________
2.NAME _______________________________
3.ADDR 1 _______________________
4.ADDR 2 _____________________________
5.ADDR 3 _______________________
6.ZIP
7.PHONE ________________________
8.CONTACT ____________________________
9.TAX NO _____________
12.TAX TYPE
________
_______________________________
10.A/R GROUP(1-4)______
11. A/R TYPE
13.EACH PRICE
14.PO REQ
_______
_______
__________
15.SIGNATURE REQ ______
16.CUST HAS JOBS ______
17.SAVE HISTORY _____
18.SAVE LIEN INFO _____
19.STORE NO
________
20.ASSGN REP NO _____
21.PRICE LEVEL
22.CLASS
________
23.CREDIT HOLD ______
_______
24.TERMS (1-99)
______
25.STMT DAY(0-31) _____
26.TAX CODE
_______
28.CREDIT LIMIT _______
29.BID NUMBER _______
_________
31.CRED LIMIT TYPE ____
32.STMT DETAIL ______
33.INSTALL PMT ________
34.SS#
35.RESALE PRC LVL ___
36.DELIVERY ZONE ______
37.ROUTE DIFF
27.EXTRA CODE
30.OPEN DATE
_______________
________
________
38.MAP CODE __________
39.SHIP TO 1
_______________________ 40.SHIP TO 2 _______________________
41.SHIP TO 3
_______________________ 42.BUILDER’S CLUB#
43.EMAIL
________________
___________________________ 44.CELL PHONE ______________________
45.MESSAGE/NOTE1
________________________________________________________
46.MESSAGE/NOTE2
________________________________________________________
47.MESSAGE/NOTE3
________________________________________________________
------------------------Credit Information ------------------------------1.CREDIT CONTACT ________________________________________________________
2.FAX NUMBER
Dim11
__________________________________________________________
139
Chapter 4. Accounts Receivable
Accounts Receivable Exercises
The following exercises are intended to test your knowledge of the A/R customer
files and how certain features are set up.
Each of the 8 problems has a specific solution which can be found in Appendix B.
Self-check at the end of the exercises.
1. Add an account to track COD deliveries.
2. Add a new charge account for Angie Smith Construction. The address is 3215
South Division Street. This account has 2% 10th terms, regular state tax,
contractor class, regular retail price, and is a house account. The bookkeeper
has indicated his preference to have separate statements for each job.
3. Add two job accounts for Angie Smith Construction. The first one is for Lot 31
- Maple Woods and the second is for Lot 45 - Tall Oaks.
4. The bookkeeper from Angie Smith Construction calls to give you their new
mailing address. They now have a P.O. Box 3526 in addition to their street
address. Change the accounts to have the new mailing address.
5. Print a name and address list for customer numbers 1 through 150.
6. Add a terms code. This terms code will allow 2% discount if paid by the 10th,
net is due on the 25th. It will also apply a late change of 18% (annual)
beginning on 1-30 days past due.
7. Add a tax code. The G/L account is 2380 and the tax is 5%.
8. Change the credit limit type field on the main account for Angie Smith
Construction to use T (total job balances plus on order amount plus account
balances) to see if limit has been exceeded.
140
Dim11
Chapter 5. Inventory
Chapter 5. Inventory
Inventory Overview
This overview is divided into 2 sections to give you some background information
before you organize your inventory information:
Objectives for
Inventory
Helps you understand the objectives of the inventory
module and the tasks necessary for accomplishing those
objectives.
Inventory Files
Shows you the files affected during the initial file set up
for Inventory as well as the other inventory files that will
be used once you are set up and running.
Objectives for Inventory
1.
2.
3.
4.
5.
Organize inventory departments, groups, and sections.
Determine numbering system for inventory items.
Understand key values for inventory items.
Add inventory items.
Load costs and prices.
In order to achieve this general objective, you must accomplish specific tasks in a
logical order. Inasmuch as the inventory system needs to accommodate large
amounts of data, you will want to organize the information carefully from the
beginning.
The major tasks to getting inventory running are organizing inventory, adding
inventory item information, and loading costs and prices. Each task breaks down
into smaller projects. Following is an outline of the tasks. You will find more
detailed instructions later in the section “Getting Inventory Started.”
1
ORGANIZING INVENTORY
Ø PREPARATION
1
Determine numbering system for departments, groups, and sections.
2
Understand the structure of the item number.
F NOTE:
If you ordered a file conversion for inventory, this may be done for you automatically
depending on whether or not it can be converted.
Ø DATA LOAD
Dim11
1
Enter department descriptions.
2
Enter group and section descriptions.
141
Chapter 5. Inventory
2
ADDING INVENTORY ITEM INFORMATION
Ø PREPARATION
1
Understand the key fields of the basic inventory data: item number,
catalog number, manufacturer’s (mfg) number, short description, item
description, unit description, C or M pricing, item type, price basis,
market cost basis, conversion factor, and expected gross margin.
Ø DATA LOAD
1
Enter all items either from a load tape made during a file conversion,
the commodities list, or manually. Each item has an item number,
catalog number and item description as well as other key fields, which
further define the item. This information is stored in the Inventory
Static File (IM1).
2
Refine the inventory file by changing and/or deleting items.
3
Print an item list and check work.
4
If needed, make corrections as determined from the item list.
3 LOADING COSTS & PRICES
Ø PREPARATION
1
Determine the price levels you will use. There are 9 available for
regular pricing (1-9) plus 90 others (10-99) for matrix pricing. Not all
99 price levels need to be used. Usually 2 or 3 levels are adequate.
Price levels are coordinated with A/R customers. If you have Accounts
Receivable running, refer to the price levels you assigned there.
2
Determine List/Base and Price Adjustments 1-9 for each item.
3
Determine average, last, and market costs for each item.
Ø DATA LOAD
142
1
Enter List/Base and Price Adjustments 1-9 for each item using
Price/Adjustment Changes. This information is stored in the Inventory
Store File (IM2).
2
Enter average, last, and market costs for each item using Copy from
Field to Field. This information is also stored in the Inventory Store
File (IM2).
3
Do an inventory file inquiry or print a price book to check prices and
costs.
4
If needed, make corrections as determined by the inquiry or price book.
Dim11
Chapter 5. Inventory
The big payoff for following this procedure will be:
1.
2.
3.
4.
5.
6.
7.
Dim11
Inventory sales reports are much more accurate.
Inventory departments, groups, and sections are organized.
Inventory items are well prepared.
Costs and prices are set up.
Future items fit easily into the correct group and section.
Bid and matrix pricing are much more effective and organized.
Suggested ordering is much easier and effective.
143
Chapter 5. Inventory
Inventory Files
Inventory information is stored and processed using several different files. These
files will be built already for you when your system arrives, ready for you to begin
entering inventory data (unless you are doing a file conversion in which case you
will work directly with the implementation specialist to refine the inventory data).
Each file contains very specific information that is used by the system when
performing certain functions.
When you are getting started in inventory, you will be entering item information
in two main inventory files, the Inventory Static File (IM1.D) ) and the Inventory
Store File (IM2.D). )
IM1.D
Inventory Static File
- item number
- catalog number
- item description
- item type
- conversion factor
- etc.
As the name implies, the Inventory Static File (IM1.D) contains information for
each inventory item that remains constant or static such as the information shown
in the illustration above. In addition, it contains set up values for other features of
inventory, POS (Point of Sale) and Purchasing. There is one record per item.
IM2.D
Inventory Store File
- store number
- list/base
- price adjustment levels 1-9
- average, last, & market cost
- units on hand
- minimum/maximum stock
- etc.
On the other hand, the Inventory Store File (IM2.D) contains information, which
changes for each item by store location such as prices, costs, quantities on hand,
on order, on reserve, and month-to-date and year-to-date sales analysis. There is
one record per item per store. If you are running with multiple stores, IM2.D will
be larger than IM1.D
The other files in inventory serve other functions:
144
Dim11
Chapter 5. Inventory
REGULAR PROCESSING
OM3.D
Inventory
Adjustments File
- store #, batch #,
card #, item #
- adjustment type
- price/cost
changes
- quantity change
- etc.
IMD.D
Delete Items by
Batch File
Holds item numbers
to be deleted through
Delete Items by
Batch routine.
PRICING
OM7.D
Price Maintenance
by Batch
Holds future price
changes by item
before making them
effective in IM2.D.
BH0.D
Bid/Spiff/Matrix
Header File
Holds heading
information for all
bids, spiffs, and
matrix pricing.:
- sale beginning
and
ending dates
- bid expiration
BD0.D
Bid/Spiff/Matrix
Detail File
Holds items on sale
(spiff) and items
quoted a special price
to a customer on a
bid. Also holds matrix
prices 10-99.
INVENTORY HISTORY/RANKING
IM3.D
13-Month History
IMH.D
Revolving History
Either:
13 months units
sold & purchased
Or:
26 months units
sold
Last 16 months of:
- YTD sales
- YTD cost of sales
- average inventory
value
Updated at month
Updated at month
IM12.D
13-Month Transfer
History
Adds during POS
update:
- MTD & YTD
units/cost/sales
transferred
- Periods 1-13 units
transferred
Month end shifts data
to previous period
IM8ss.D
Inventory Rank File
(ss=store #)
Created automatically
when items ranks are
calculated:
- average margin
- sales
- GMROI
PHYSICAL COUNT
IM7ss.D
Count Sheets
Count Transactions
(ss=store #)
- count date
- count quantity
- count cost
- etc.
IM7H.D
Inventory Count
History File
Contains the same
information as
IM7ss.D as well a
count update date for
history purposes.
TM2.D
Count by
Count Tags
- count date
- count quantity
- count cost
- tally by length
- location
Deleted when next
count file is built
Dim11
145
Chapter 5. Inventory
OTHER INVENTORY OPTIONS
BC1.D
Bar Code File
- item number
- UPC code
IM4.D
Fabrication
Production Master
Holds components of
fab type C items as a
batch. The components are reduced
from stock when the
item is produced, not
sold like fab types A
& B.
TR0.D
Tag Header
SN0.D
Serial Number File
IM9.D
Multiple Locations
Holds detail for serial
number items with
tracking information
for when they are sold
and received.
Holds multiple
locations codes by
item number.
IM5.D
Fabrication Master
OM9.D
Remanufacturing
Transactions
Holds components of
fab types A & B. The
components are
reduced from stock
when the item is sold.
TR1.D
Tag Detail
Holds heading
information for tag
items.
Holds tallies and
quantities for each
tag item.
Updated when
receiving tag items
through P.O. &
Receiving.
- original qty
- committed qty
- sold/reman qty
- store number
- location
- item number
Holds transactions
from Reman system
(inbound goods,
processes, outbound
goods). Updates to
OM3.D (Inventory
Adjustments File) for
posting to G/L.
TS0.D
Sold or
Reman/Committed
Tag Header
TS1.D
Sold or
Reman/Committed
Tag Detail
Holds heading information for sold tags
and tags committed
for Order Entry or
reman-ufacturing.
Holds tallies and
quantities for each
sold and committed
tag ite.
FL1.D
Fineline Class File
ISM.D
Stock Movement
File
MISCELLANEOUS FILES
IM10.D
Associated Items
Holds a list of items
that can be displayed
at POS when certain
items are selected on
a ticket.
146
IMC.D
Item Number
Change File
Contains item number
changes as a batch
and allows you to edit
the changes before
updating the items
throughout the
inventory and sales
files.
Holds templates of
inventory item set ups
to be used by default
when adding new
inventory items.
Tracks the movement
of inventory stock.
Holds a record for
each item per transaction showing
quantity, cost, and
value that was added
to or subtracted from
i
t
Dim11
Chapter 5. Inventory
Getting Inventory Started
The following pages will help you begin gathering inventory item information.
You will be collecting and determining general information such as item numbers,
catalog numbers, and so forth. This is an excellent time to effectively organize
your inventory.
Getting Inventory Started is your guide to beginning work with the inventory
system. In this section, you will find instructions for:
Numbering Inventory
Getting Into Inventory
Entering Dept., Group,
& Section Descriptions
Basic Inventory Data
Adding Items
Changing Item Information
Printing Items
Deleting Items
Costs & Prices
Inventory Inquiry
Sample Items
Dim11
Helps you understand the function of the item number
and how it is used to organize your inventory into groups
and sections. Also discusses departments and
miscellaneous items.
Shows you how to get into the INVENTORY MENU for getting
started on the computer.
Shows you how to enter the department, group, and
section descriptions in the Variable File.
Helps you understand the basic elements or fields of your
inventory file.
Shows you how to enter the basic inventory data into the
computer.
Shows you how to change the basic inventory data if you
need to make corrections.
Shows you how to print a report to check your entries.
Shows you how to delete items if they are incorrect so you
can enter them again correctly or if they need to be
removed from the commodity list, supplier load file, or a
file conversion.
Discusses the cost options--average, last, and market.
Explains the relationship between List/Base, price
adjustments, and price basis. Shows you how to load
costs and prices into the Inventory Store File (IM2.D).
Shows you how to perform an inquiry on any inventory
item, displaying it on the screen. Also explains how to
search for and select an item.
Presents 7 different items and how they are set up using
the Add New Items screen.
147
Chapter 5. Inventory
Numbering Inventory
Your new computer can do many important things for you including presenting a
clear and accurate picture of your inventory. Setting up and organizing your
inventory files is a major part of obtaining accurate reports. You should take
great care in organizing and structuring your inventory. The way you set up your
inventory items affects POS (Point of Sale), sales analysis, inventory maintenance
and control, reports, pricing (including matrix pricing), and G/L distribution. You
can see the impact that inventory organization has on other aspects of your
system.
The Dimensions system helps you organize your inventory items by assigning each
item a number. Every product you buy and sell has an item number. If you have
60,000 items in your store, it would be impractical to start with number 1 and end
with number 60000. So Dimensions has designed the item number to function as
an organizational tool for inventory. The item number has some specific
characteristics:
Ø
Ø
Ø
Ø
Ø
Ø
Ø
Required for all items
8 digits long, all numeric
No alphabetic characters allowed ("A" or "B", etc.)
No punctuation marks allowed ("-" or "/", etc.).
No spaces allowed
No duplicates allowed
Consists of 3 parts:
Group = first 2 digits. You can have up to 99 groups (01-99).
Section = next 2 digits. You can have up to 99 sections (01-99) within
each group.
Unique Number = last 4 digits. Keeps a logical sequence.
G
1
G
0
S
0
S
1
U
0
U
0
U
0
U
2
(Group 10, section 01, unique number 0002).
The most significant part of organizing your items is to plan your groups and the
sections within each group.
Groups
Groups represent the major categories of items you buy and sell. Group numbers
are 2 digits long. You can have up to 99 groups. Here is a sample list of inventory
groups. These groups are used with the commodity list and most file conversions.
SAMPLE INVENTORY GROUPS
148
Dim11
Chapter 5. Inventory
10
11
12
13
14
15
16
17
18
19
20
21
22
23
24
25
26
27
31
32
33
34
35
36
37
38
39
40
41
HARDWARE
HEAVY HARDWARE
HAND TOOLS
POWER TOOLS & ACCESSORIES
ELECTRICAL
PLUMBING & HEATING
PAINT
PAINT SUNDRIES
LAWN & GARDEN
CLEANING SUPPLIES
MOUDLINGS & EDGINGS*
HOUSEWARES
AUTOMOTIVE
FARM GOODS
SPORTING GOODS
WALL COVERINGS
FLOORING
INTERIOR WALL PRODUCTS*
SHEATHINGS & SIDINGS*
LUMBER*
BULDING MATERIALS*
INSULALTION*
ROOFING*
DOORS*
ROCK PRODUCTS
WINDOWS*
OTHER MILLWORK
STORE SUPPLIES
FASTENERS*
42 MISC. & MISCODED ITEMS
51 DIMENSIONAL LUMBER
52 TIMBERS
53 BOARDS
54 CEDAR
55 REDWOOD
56 TREATED & STAINED LUMBER
57 HARDWOOD LUMBER
58 PLYWOOD/WAFERBOARD
59 MANUFACTURED PANELS
60 MANUFACTURED STRUCTURAL
61 MISC. WOOD PRODUCTS
62 MOLDINGS
63 CONSTRUCTION METALS
64 HEAVY HARDWARE
65 FASTENERS
66 INSULATION
67 GYPSUM PRODUCTS
68 MASONRY PRODUCTS
69 ROOFING
70 SIDINGS & FACIA
71 INTERIOR COVERINGS
72 MILLWORK
73 DOORS
74 WINDOWS
90-97
RESERVED
98 RESERVED-DIRECTS
99 RESERVED
*Temporary holding groups for some file conversions and buying groups. Items in these groups can be
rearranged later into the standard groups 51-74.
Usually not all groups are used. You will notice a few gaps in the numbering on
the sample list. This allows you to add new inventory groups later into the
appropriate part of your inventory. The most common practice is using the first 49
groups of inventory for hard-ware items and using groups 51-99 for commodity or
yard items.
F NOTE:
You are not required to use this group number scheme. However, the standard
commodity list and G/L chart of accounts that come with your system use this group list.
Since the groups can be designed any way you like, the group names must be
defined so reports are more meaningful. Most inventory reports are subtotaled by
group. Group names are set up in the Variable File, Group Information. You will
do this later in Entering Dept, Group, and Section Descriptions.
The groups themselves can be combined into departments for sales reporting
purposes. A department number is assigned each group. Then the department
descriptions are defined in the Variable File, Misc. Descriptions. You will do this
later in Entering Dept, Group, and Section Descriptions.
SAMPLE INVENTORY DEPARTMENTS
Dim11
1
2
LUMBER
HARDWARE
4
5
LABOR-OVERHEAD-REMAN
DIRECT SALES
149
Chapter 5. Inventory
3
HAND TOOLS
6
NON-COMMODITY INVENTORY
You will see the use of groups quite frequently throughout the system. Whenever
you see it, it refers to the first 2 digits of the item number specifying a major
category of items. The most significant uses of groups are:
1. Sales Analysis by Group Report - shows the sales, cost, and margin by
group.
2. Sales Analysis Reports by various entities:
w Customer Class by Group - shows what different types of customers
are buying by group.
w Assigned Sales Rep by Group - shows what assigned salesmen are
selling by group (can be used to figure commissions).
w Written By Sales Rep by Group - shows what written by salesmen
are selling by group.
w Customer by Group - shows what individual customers are buying by
group.
3. General Ledger Distribution - organize financial statements to show
sales and cost of sales by inventory group.
4. Matrix and bid pricing.
5. Spiff (sale) pricing.
6. Suggested orders.
Sections
Sections can further subdivide similar items within each group. The second two
digits of the item number represent the section. You can have up to 99 sections
per group. Most inventory reports are subtotaled by section and then by group.
The short description sometimes represents a section.
Sections are useful to break down groups such as dimensional lumber because
there are many types and grades of lumber. For example, group 51,
DIMENSIONAL LUMBER, might have the following sections:
SECTION
01
03
05
07
09
11
13
15
17
99
150
DESCRIPTION
STUDS-DIM.
DOUG FIR-DIM.
HEM FIR-DIM.
FIR LARCH-DIM.
SPRICE/PINE/FIR-DIM.
SO. YELLOW PINE-DIM.
WHITE WOOD-DIM.
MIXED SPECIES-DIM.
STRESS RATED-DIM.
MISC. DIMENSIONAL
Dim11
Chapter 5. Inventory
And group 74, WINDOWS, might have the following sections:
SECTION
01
03
05
99
DESCRIPTION
WOOD WINDOWS
VINYL WINDOWS
METAL WINDOWS
MISC. WINDOWS
As with group numbers, section numbers need not be sequential. This allows for
future sections to be added.
Since the sections can be designed any way you like, the section descriptions
should be defined so reports are more meaningful. Section descriptions are set up
in the Variable File, Group Information. You will do this later in Entering Dept,
Group, and Section Descriptions.
F NOTE:
"Section descriptions" are used in inventory reports when they subtotal a group and/or
section. They are entered in the Variable File. "Short descriptions" can be assigned
each item and are used when searching for items at POS, Purchasing/ Receiving, and file
inquiries. They are entered in the Inventory Static File (IM1.D).
For a sample section list, see the Sample Group/Section Map on page 154.
Unique Numbers
Item numbers are unique and can only be used once. No two items can have the
same item number. Where the first 4 digits of the item number (group and
section) allow you to categorize items, the last 4 digits allow you to make each item
number unique. The unique number can be used two different ways--numbering
dimensional lumber items and numbering non-lumber items.
Dimensional Lumber
When you are setting up each grade or species of lumber, the first six digits of
the item number are the same. The first two are the group, the next two are
the section, and the next 2 are the width. The last 2 digits specify the length.
The random length item (type 2) has "00" for the length.
For example: Group 51 (lumber), section 05 (hem fir), width 4"
ITEM NUMBER
51050400
51050408
51050410
51050412
51050414
51050416
etc.
DESCRIPTION
2x4 RL Hem Fir
2x4-08' Hem Fir
2x4-10' Hem Fir
2x4-12' Hem Fir
2x4-14' Hem Fir
2x4-16' Hem Fir
The last two digits must always be the length. This is used POS and Receiving
to relieve and receive the appropriate lengths.
Dim11
151
Chapter 5. Inventory
Non-Lumber Items
You can set up the unique number system in any manner to accommodate
non-lumber items. Take into consideration the following:
Ø
Ø
Number according to size, such as drill bits or screwdrivers, starting
with low item numbers for small items and increasing the item
number as the item gets bigger.
Increment the item number by 5 or 10 so you can insert new items
later in the appropriate area.
Miscellaneous Items
Every group must have 2 miscellaneous type items as the last 2 item numbers in
the group (i.e., 34999998 and 34999999). These items would be set up as nonperpetual and allow you to enter the description and price at POS. One
miscellaneous item requires you to enter a cost and the other will calculate a cost
automatically. They can also be set up at the section level. Then if you try to sell
an item with no item number set up yet, you can sell it as the miscellaneous item
for the appropriate group/section and still get a fairly accurate sales analysis by
group. However, no quantities are relieved or tracked.
F IMPORTANT:
152
Once you are maintaining a perpetual inventory for the items within a group or
section, the miscellaneous item number should only be used for special order
items.
Dim11
Chapter 5. Inventory
Sample Group/Section Map
The following table shows how groups and sections are set up with the standard
commodity list.
Dept #/Desc
Group #
Group Description
1-Lumber
10
11
12
13
14
15
16
17
18
19
20
21
22
23
24
25
26
27
31
32
33
34
35
36
37
38
39
40
41
42
51
HARDWARE
HEAVY HARDWARE
HAND TOOLS
POWER TOOLS & ACC.
ELECTRICAL
PLUMBING & HEATING
PAINT
PAINT SUNDRIES
LAWN & GARDEN
CLEANING SUPPLIES
MOLDINGS & EDGINGS*
HOUSEWARES
AUTOMOTIVE
FARM GOODS
SPORTING GOODS
WALL COVERINGS
FLOORING
INTERIOR WALL PRODUCTS*
SHEATHINGS & SIDINGS*
LUMBER*
BUILDING MATERIALS*
INSULATION*
ROOFING*
DOORS*
ROCK PRODUCTS*
WINDOWS*
OTHER MILLWORK
STORE SUPPLIES
FASTENERS*
MISC. & MISCODED ITEMS
DIMENSIONAL LUMBER
1-Lumber
52
TIMBERS
Section #
Section Description
01
03
05
07
09
11
13
15
17
99
01
03
05
Studs - Dim.
Doug Fir - Dim.
Hem Fir - Dim.
Fir Larch - Dim.
Spruce/Pine/Fir - Dim.
So. Yellow Pine - Dim.
White Wood - Dim.
Mixed Species - Dim.
Stress Rated - Dim.
Misc. Dimensional
Douglas Fir - Timbers
Hem Fir - Timbers
Fir Larch - Timbers
*Temporary holding groups for some file conversions and buying groups. Items in these groups can be rearranged later into the
standard groups 51-74.
Cont.
Dim11
153
Chapter 5. Inventory
Dept #/Desc
Group #
Group Description
1-Lumber
53
BOARDS
1-Lumber
54
CEDAR
1-Lumber
55
REDWOOD
1-Lumber
1-Lumber
1-Lumber
56
57
58
TREATED & STAINED LBR
HARDWOOD LUMBER
PLYWOOD/WAFERBOARD
1-Lumber
59
MFD. PANELS
1-Lumber
60
MFD. STRUCTURAL
Section #
Section Description
07
09
11
13
15
17
19
99
01
03
05
07
09
11
13
15
17
19
21
23
25
99
01
03
05
07
09
11
13
99
01
03
99
Spruce/Pine/Fir - Timbers
So. Yellow Pine - Timbers
White Wood - Timbers
Mixed Species - Timbers
Ponderosa Pine - Timbers
Sugar Pine - Timbers
Stress Rated - Timbers
Misc. Timbers
Douglas Fir - Boards
Hem Fir - Boards
Fir Larch - Boards
Spruce/Pine/Fir - Boards
So. Yellow Pine - Boards
White Wood - Boards
Mixed Species - Boards
Engleman Spruce - Boards
Ponderosa Pine - Boards
Idaho White Pine - Boards
Sitka Spruce - Boards
Sugar Pine - Boards
Spruce Pine - Boards
Misc. Boards
Western Red Cedar
Alaska Yellow Cedar
Inland Red Cedar
Port Orford Cedar
Western Cedar
Cedar Fencing
Aromatic Cedar
Misc. Cedar
Redwood
Redwood Fencing
Misc. Redwood
01
03
05
07
09
99
01
03
05
99
01
03
05
07
99
Softwood Plywoods
Hardwood Plywoods
Waferboards
Plywood Sidings
Pre-cut Plywood
Misc. Plywood
Particleboard-Mfd. Panels
Hardboards - Mfd. Panels
Sidings - Mfd. Panels
Misc. Mfd. Panels
Beams - Mfd. Structural
Dimensional - Mfd. Structural
Trusses - Mfd. Structural
Boards - Mfd. Structural
Misc. Mfd. Structural
Cont.
154
Dim11
Chapter 5. Inventory
Dept #/Desc
Group #
1-Lumber
1-Lumber
Group Description
61
62
MISC. WOOD PRODUCTS
MOLDINGS
63
CONSTRUCTION METALS
64
HEAVY HARDWARE
65
FASTENERS
66
INSULATION
67
GYPSUM PRODUCTS
68
MASONRY PRODUCTS
69
ROOFING
70
SIDINGS & FACIA
71
INTERIOR COVERINGS
72
MILLWORK
Section #
01
03
05
07
99
01
03
99
01
03
05
07
99
01
03
05
07
99
01
03
05
99
01
03
99
01
03
05
07
99
01
03
05
07
09
99
01
03
05
99
01
03
05
07
09
99
01
03
99
Section Description
Wood Moldings
Manufactured Moldings
Prefinished Moldings
Specialty Moldings
Misc. Moldings
Framing Metals & Hangers-CM
Metal Studs & Beams-CM
Misc. Construction Metals
Wires & Mesh-HH
Reinforcing Mesh & Rebar-HH
Fencing-HH
Raingutter-HH
Misc. Heavy Hardware
Nails - Fasteners
Power Nails - Fasteners
Screws & Bolts - Fasteners
Anchors - Fasteners
Misc. Fastners
Rolled Insulation
Panel Insulation
Blowing & Pour Insulation
Misc. Insulation
Wallboards - Gypsum
Compounds/Metals/Tapes-Gyp
Misc. Gypsum Products
Cement & Bag Mixes-MP
Additives & Compounds-MP
Form Materials-MP
Block & Brick-MP
Misc. Masonry Products
Asphalt Roofing
Wood Roofing
Roofing Metals & Flanges
Metal Roofing
Roof Compounds & Adhesives
Misc. Roofing
Metal Sidings & Fascia
Vinyl Sidings & Fascia
Wood Sidings & Fascia
Misc. Siding & Fascia
Interior Wall Panels-Int. Cov.
Ceiling Tile & Access.-Int. Cov.
Counter & Sill Coverings-Int. Cov.
Wallpaper & Access.-Int. Cov.
Window Coverings-Int. Cov.
Misc. Interior Coverings
Cabinets-Millwork
Stair Parts & Access.-Millwork
Misc. Millwork
Cont.
Dim11
155
Chapter 5. Inventory
Dept #/Desc
156
Group #
Group Description
73
DOORS
74
WINDOWS
90
91
92
93
94
95
96
97
98
99
RESERVED
RESERVED
RESERVED
RESERVED
RESERVED
RESERVED
RESERVED
RESERVED
RESERVED-DIRECTS
RESERVED
Section #
01
03
05
07
09
11
99
01
03
05
99
Section Description
Interior Wood Doors
Exterior Wood Doors
Door Frames & Jambs
Storm & Screen Doors
Metal Doors
Garage Doors
Misc. Doors
Wood Windows
Vinyl Windows
Metal Windows
Misc. Windows
Dim11
Chapter 5. Inventory
Group/Section Worksheet
List your groups and sections here. If you need more room, copy this page or use
another sheet of paper.
Dept #/Desc
Group #
Group Description
Section #
Section Description
Page ____________
Dim11
157
Chapter 5. Inventory
Getting into Inventory
Now you are ready to start entering this information on the computer. Before
beginning, you should be familiar with the following concepts:
♦
Passwords
♦
Menus
♦
Keyboard & Keys
If you are not familiar with these or wish to review them, see Chapter 2, System
Training.
1 For SuperDOS systems, start at the PASSWORD screen:
WELCOME TO DIMENSIONS
SuperDOS
Password
......
Or for Unix systems, start at the login screen:
Enterprise Computer Systems Inc.
slc-aix02.slc.ecs-inc.com
login:
Sign on with the password/login provided by your Dimensions support analyst or
installer.
158
Dim11
Chapter 5. Inventory
2 The computer displays the DIMENSIONS MAIN MENU:
+-----------------------------------------------------------------------------+
|
DIM11 DATA
|
=== DIMENSIONS MAIN MENU ===
| 11.0 |
+-----------------------------------------------------------------------------+
| 1. Sales
|
|
|
| 2. Inventory
|
|
|
| 3. Accounts Receivable
|
|
|
| 4. Purchasing & Receiving
|
|
|
| 5. Accounts Payable
|
|
|
| 6. General Ledger
|
|
|
| 7. Day End/Month End/Year End
|
|
|
| 8. System Manager
|
|
|
| 9. Other Options
|
|
|
+-----------------------------------------+
Enter 2 for Inventory and press Enter.
3 The computer displays the INVENTORY MENU:
+-----------------------------------------------------------------------------+
|
DIM11 DATA
|
=== INVENTORY ===
| 11.0 |
+-----------------------------------------------------------------------------+
| 1. File Inquiry
|
|
|
| 2. File Maintenance
|
|
|
| 3. Inventory Reports
|
|
|
| 4. Pricing
|
|
|
| 5. Inventory Adjustments
|
|
|
| 6. Physical Count
|
|
|
| 7. Inventory Management
|
|
|
| 8. Other Inventory Options
|
|
|
| 9. Inventory Variable File
|
|
|
| 10. Inventory Special Maintenance
|
|
|
+-----------------------------------------+
You have these options from this menu:
1. File Inquiry
2. File Maintenance
3. Inventory Reports
4. Pricing
5. Inventory Adjustments
Dim11
Perform inquiry on any inventory item.
Add new items to all appropriate files. Change or delete
existing items.
Print item reports to check data.
Maintain pricing, print price books, price stickers and
other pricing reports, and maintain matrix, bid, and spiff
pricing.
Enter inventory adjustments such as cutting,
substitution, scrap, shrinkage, etc.
159
Chapter 5. Inventory
6. Physical Count
7. Inventory Management
8. Other Inventory Options
9. Inventory Variable File
10. Inventory Special
Maintenance
160
Enter physical count information. Physical count can be
done annually, quarterly, monthly, or any other cycle.
Perform management functions dealing with inventory
information such as calculating min/max/EOQ,
calculating item ranks, creating manual stock checks,
and printing management reports (Stock Movement,
Sales Exceptions, Sales Analysis, Item Ranking, Obsolete
Inventory, Group and Item Performance, and Daily Sales
by Item).
Accesses other systems within the inventory module (bar
codes, fabrication, multiple locations, and serial
numbers). Also used if you purchase other optional
inventory software.
Enter set up information to customize your inventory
system.
Allows access to special maintenance functions.
Security protected access.
Dim11
Chapter 5. Inventory
Entering Department, Group, & Section Descriptions
1 From the INVENTORY MENU shown above, enter 9 for Inventory Variable File. Remember
to press Enter after making your selection.
2 Select 2 for Descriptions.
3 The computer displays the Inventory Descriptions Menu:
DSVM0302
Rev11.0.1
Inventory Descriptions
Store Number
DIM11 DATA
Date mm/dd/yy
Port 43
Store 01
1
Choose Selection:
+-------------------------------------+
| 1. Group Information
|
| 2. Section Descriptions
|
| 3. Department Descriptions
|
|
|
| 98. Change Store
|
+-------------------------------------+
<Esc>=End
From this menu, you will enter department descriptions first, then group
information, and the section descriptions.
Steps 4-10: Department Descriptions
4 From the Inventory Descriptions Menu, select 3 for Department Descriptions.
5 The computer displays the Department Descriptions screen:
DSVM0302
Rev11.0.1
Department Descriptions
DIM11 DATA
Date mm/dd/yy
Port 38
Store 01
+---------------------------------------------------+
¦ 1. Department Number (1-99)
0 ¦
¦ 2. Description
¦
+---------------------------------------------------+
Last Used Department Number:
<Esc>=End
<Tab>=Go Forward One Field
99
<F1>=Help
The cursor is positioned at 1. Department Number (1-99). If there are some department
descriptions entered already, the last used number is also displayed. Enter the
department number you wish to add or change. See page 150 for more
information on department number.
6 If you entered an existing department number, the computer asks:
(C)hange
(D)elete
(N)ext
(P)revious
(E)nd
You have the following options:
Dim11
161
Chapter 5. Inventory
(C)hange
Allows you to change the displayed department.
(D)elete
Allows you to delete the displayed department.
(N)ext
Displays the next department number.
(P)revious
Displays the previous department number.
(E)nd
Ends this option and returns to the previous menu.
7 Fill in the following field:
2. Description:
Enter up to 28 characters for the department description. This description
appears on sales reports.
8 Then the computer asks if you wish to add or change the entry. Enter Y if the
information is correct and you wish to add it. Or enter N to not add it.
9 Repeat Steps 5-8 for each department description to be entered.
10 Press Esc at Department Number when done. You are returned to the Inventory
Descriptions Menu.
Steps 11-17 : Group Descriptions
11 From the Inventory Descriptions Menu, select 1 for Group Information.
12 The computer displays the Group Information screen:
DSVM0302
Rev11.0.1
Group Information
DIM11 DATA
Date mm/dd/yy
Port 38
Store 01
+---------------------------------------------------+
¦ 1. Group Number (0-99)
0 ¦
¦ 2. Description
¦
¦
¦
¦ 3. Assigned Department Number (1-99)
¦
¦
¦
+---------------------------------------------------+
Last Used Group Number:
<Esc>=End
<Tab>=Go Forward One Field
100
<F1>=Help
The cursor is positioned at 1. Group Number (1-99). If there are some group
descriptions entered already, the last used number is also displayed. Enter the
group number you wish to add or change. See page149 for more information on
group numbers.
13 If you entered an existing group number, the computer asks:
(C)hange
(D)elete
(N)ext
(P)revious
(E)nd
You have the following options:
162
Dim11
Chapter 5. Inventory
(C)hange
Allows you to change the displayed group.
(D)elete
Allows you to delete the displayed group.
(N)ext
Displays the next group number.
(P)revious
Displays the previous group number.
(E)nd
Ends this option and returns to the previous menu.
14 Fill in the following fields:
2. Description
Enter up to 20 characters for the group description. This description appears on
sales reports.
3. Assigned Department Number (1-99)
Enter the department to which this group is assigned. For example, department 1
is for lumber and hardware. The computer displays the corresponding department
description for your verification.
15 Then the computer asks if you wish to add or change the entry. Enter Y if the
information is correct and you wish to add it. Or enter N to not add it.
16 Repeat Steps 12-15 for each group to be entered.
17 Press Esc at Group Number when done. You are returned to the Inventory Descriptions
Menu.
Steps 18-25 : Section Descriptions
18 When you are done entering group descriptions, you can enter the section
descriptions. From the Inventory Descriptions Menu, select 2 for Section Descriptions.
19 The computer displays the Section Descriptions screen:
DSVM0302
Rev11.0.1
Section Descriptions
DIM11 DATA
Date mm/dd/yy
Port 43
Store 01
+---------------------------------------------------+
| 1. Group Number
(0-99)
|
|
|
| 2. Section Number (0-99)
|
| 3. Section Description
|
| 4. Assigned Department Number (1-99)
|
|
|
+---------------------------------------------------+
<Esc>=End
<Tab>=Go Forward One Field
<F1>=Help
The cursor is positioned at 1. Group Number (1-99). Enter an existing group number.
The computer displays the corresponding group description for your verification.
20 2. Section Number (0-99)
Enter the section number you wish to add or change for the selected group. See
page 151 for more information on sections.
Dim11
163
Chapter 5. Inventory
21 If you entered an existing section number, the computer asks:
(C)hange
(D)elete
(N)ext
(P)revious
(E)nd
You have the following options:
(C)hange
Allows you to change the displayed section.
(D)elete
Allows you to delete the displayed section.
(N)ext
Displays the next section number.
(P)revious
Displays the previous section number.
(E)nd
Ends this option and returns to the previous menu.
22 Fill in the following fields:
3. Description
Enter up to 20 characters for the section description. This description appears on
sales reports. Skip entering the assigned department number by pressing Tab.
4. Assigned Department Number
Enter the department to which this group/section is assigned. For example,
department 1 is for lumber and hardware. The computer displays the
corresponding department description for your verification.
23 Then the computer asks if you wish to add or change the entry. Enter Y if the
information is correct and you wish to add it. Or enter N to not add it.
24 Repeat Steps 19-23 for each section to be entered.
25 Press Esc at Section Number when done. You are returned to the Inventory Descriptions
Menu.
164
Dim11
Chapter 5. Inventory
Basic Inventory Data
This section presents the basic information required for each inventory item. It
explains the key fields in the Inventory Static File (IM1.D). You won’t be entering
anything in the computer yet, just learning about basic inventory data.
If you are coming from a previous computer system or are using a buying group
load tape, you should read through this section as well to gain a knowledge of
what these basic inventory fields contain.
Inventory Static Data (IM1.D)
The Inventory Static Data File (IM1.D) holds many fields associated with
inventory items which will eventually need to be set up to fully run certain parts
of the Dimensions system. The first 31 fields on the screen below show data
contained in IM1.D:
DS03011A
11.0.1
Special Inventory Add
DIM11 DATA
Date mm/dd/yy
Port 36
**** IM1.D ****
**** IM2.D ****
1. Item No
0
32. Non Perpet
2. Catalog
33. No History
3. Mfg No
34. Minimum
4. Short Desc
35. Maximum
5. Mfg Name
36. Ave/Lst Cost
6. Item Desc
37. Market Cost
7. Unit Desc
20. Second Desc Use
38. LIFO Cost
8. Item Code
21. Unts p/Pkg
39. List/Base
9. Non Disc
22. EOQ
40. Price Adj 1
10. Non Tax
23. Season Code
41. Price Adj 2
11. Enter Desc
24. Stock Code
42. Price Adj 3
12. C or M
25. Price Round Code
43. Price Adj 4
13. Type (0-7)
26. Purchasing Code
44. Price Adj 5
14. Price Basis
27. Vol/Wt Conv
45. Price Adj 6
15. Mkt Cst Bas
28. Prt Price Stckrs
46. Price Adj 7
16. Conv Factor
29. Misc Code-1
47. Price Adj 8
17. Ex Gross Marg
30. Misc Code-2
48. Price Adj 9
18. Cost Percent
31. Assoc #
19. Second Desc
<UpA> = Enter Group/Section
<Esc> = Change Store
Even though there is a lot of information contained in this file, only certain fields
(note the highlighted fields) need to be set up initially until you are ready to use
more sophisticated features of the inventory module. You need to decide how to
handle the following fields. This will make the data you enter for your initial
installation more meaningful. Each of the following fields is described.
♦
♦
♦
♦
♦
♦
♦
♦
♦
♦
♦
♦
Dim11
1.
2.
3.
4.
6.
7.
12.
13.
14.
15.
16.
17.
Item Number
Catalog Number
Manufacturer’s (mfg) Number
Short Description
Item Description
Unit Description
C or M (pricing in hundreds or thousands)
Item Type
Price Basis
Market Cost Basis
Conversion Factor
Expected Gross Margin
165
Chapter 5. Inventory
ITEM NUMBER
Field #1
Each item must have an item number. It is one of 4 ways the computer stores and
retrieves information for that particular item (the others are catalog number,
manufacturer's (mfg) number, and short description). Most inventory reports can
be printed in order of these 4 ways to retrieve item information. If you have not
done so already, read "Numbering Inventory" for a thorough explanation of item
number.
CATALOG NUMBER
Field #2
In addition to the item number, each item must have a catalog number. The
catalog number is the most common number used during POS and
Purchasing/Receiving to look up items. Item numbers are rarely used because
they are 8 digits long and can be difficult to remember. Catalog numbers may
contain numbers, letters, and punctuation marks, which help to make the item
more recognizable. The catalog number has some simple characteristics:
Ø Required for all items
Ø No duplicates allowed
Ø 15 characters long including numbers, letters, punctuation marks, and
spaces
Here are some examples of commonly used catalog numbers:
DF2410G
24RLH
2408H
2412CCA
58CDX
1206PBS
2020SHM
44CPF
58DWF
10COM
A100A-6
GWG
PAINT SPRAYER
Doug Fir 2x4-10 Green
2x4 Random Length Hem Fir
2x4-8 Hem Fir
2x-12 CCA Treated
4x8-5/8 CDX Plywood
3/4x12-06 Particle Board Shelf
2/0x2/0 Single Hung Mill
4x100 4 Mil Clear Polyfilm
4x8-5/8 Firecode Dry Wall
10d Common Nails
A 100 A 6x6 Passage Knob
1 Gallon Titebond Wood Glue
Paint Sprayer for Rental
Remember, make catalog numbers easy to remember or figure out. You can also
have the price sticker be printed with the catalog number if you are using price
stickers.
166
Dim11
Chapter 5. Inventory
MANUFACTURER'S (MFG) NUMBER
Field #3
The manufacturer's number is another way of selecting items during POS and
Purchasing/Receiving in addition to item number and catalog number. Very often
the manufacturer will print its own item number directly on the item or the
packaging in addition to a barcode. (Bar codes are maintained in a separate file,
BC1.D. If you wish to use the bar code system, contact Enterprise.)
The manufacturer's number has some specific characteristics:
Ø 15 characters long including letters, numbers, spaces, and punctuation
marks.
Ø Optional. Can be used for some items and not for others.
Ø Duplicates allowed. Since duplicates are allowed, when selecting items at
POS and Purchasing/Receiving, the computer will display the
manufacturer's number with the lowest item number first.
Ø Most inventory reports can be sorted and printed by manufacturer's
number.
Ø Throughout the system, the manufacturer's number may also be referred
to as:
MFG NO
MFG/UPC NUMBER
MFG#
M#
SHORT DESCRIPTION
Field #4
A short description should be assigned to each inventory item, which is another
way to search for items at POS and Purchasing/Receiving. Normally the short
description can correspond to the section of items it is describing (as in
group/section) or even smaller categories (as in hammer, saw, blade, etc.).
The specific characteristics of the short description are:
Ø 15 characters long including letters, numbers, spaces, and punctuation
marks.
Ø Optional. Can be used for some items and not for others (although the
greatest benefit comes if all items have short descriptions).
Ø Duplicates allowed.
Ø Most inventory reports can be sorted and printed by short description.
Ø Can be designated as the primary search key for POS.
Dim11
167
Chapter 5. Inventory
ITEM DESCRIPTION
Field #6
The item's description can be up to 31 characters long including letters, numbers,
punctuation marks, and spaces. This description will appear on all POS
transactions (invoices, returns, quotes, orders), purchase orders, receipts,
inventory reports, item searches, and inventory file inquiries.
UNIT DESCRIPTION
Field #7
The unit description is a 2-character code, which identifies the unit of measure for
the item. Common unit descriptions are:
EA
BF
SF
LF
DZ
YD
Each
Board Feet
Square Feet
Lineal Feet
Dozen
Yard
LB
BX
RL
CT
CS
CD
Pound
Box
Roll
Carton
Case
Card
Unit descriptions are combined with the C or M code, which identifies pricing in
hundreds or thousands. The two combined are printed on inventory reports,
displayed on inventory file inquiry and at POS/ Order Entry and
Purchasing/Receiving, and printed on POS transactions, purchase orders, and
receipts whenever the item is shown.
If you use a conversion factor for the item, use the corresponding unit of measure.
See “Conversion Factor” below.
C OR M
Field #12
The C or M code defines how the item is priced and costed.
C = hundreds
M = thousands (rounds price up to next dollar)
Blank = neither (each item)
Combined with the unit description, it is shown whenever the item is used. For
example:
MBF
CLF
MSF
Blank
thousand board feet
hundred lineal feet
thousand square feet
Each item
Not all items will have both the unit description and the C or M code (or blank for
each).
168
Dim11
Chapter 5. Inventory
ITEM TYPE
Field #13
The item type describes the nature of how the item is controlled in inventory.
Items can be controlled either by the piece or by the unit of measure (footage,
weight, etc.). There are 8 item types (0-7).
0
All items sold by the piece (or by each). For example:
hammers.
These items do not have a conversion factor. They are bought by the
piece and sold by the piece.
1
Items that have a conversion factor. For example: specific
length lumber and plywood.
The quantity sold is multiplied by the conversion factor to get the total
units sold. These items are usually priced per hundred (C) or per
thousand (M) feet. You must enter the C or M code and the conversion
factor for each type 1 item. No tally will be required when entering
type 1 items at POS.
Board feet (BF) and square feet (SF) are the most common items. For
example:
Item
2x4-03 Fir Larch
1/2x4-8 CDX
F NOTE:
2
Quantity
(# of pieces)
Conversion
Factor
Resulting Units
(footage)
100
100
5.333
32.000
533
3200
Item type 2-6 below require additional dimensions to be entered as a tally in POS and
Purchasing/Receiving. If the conversion factor is not zero, it will be used in calculating
the total units.
Items that are purchased and sold by the random length but
are controlled by specific lengths.
("Controlled" means dollar values and quantities are tracked using the
specific length items and not the random length item.) The actual
item relieved or received is determined by the length as it is entered as
part of the tally.
Type 2 items are memo items. They are usually used for random
length lumber items. For example:
Item #
51080100
51080108
51080110
51080112
Dim11
Description
2x4 R/L Doug Fir
2x4-08 Doug Fir
2x4-10 Doug Fir
2x4-12 Doug Fir
Item Type
2
1
1
1
169
Chapter 5. Inventory
The item numbers must be identical for this range of items except for
the last 2 digits, which represent the length. The random length item
number (type 2) must end in 00 and each individual length item under
it (which are type 1 items) must end in the two digits representing the
length. As the tally is entered at POS and Receiving, the length
portion is substituted for the last two digits of the item number to find
the proper item in inventory to be relieved or received. For example, if
you enter the following tally at POS for item #51080100, the computer
reduces quantity on hand as shown below.
TALLY (pieces/length)
Item #
51080100
51080108
51080110
51080112
3
208/8
416/10
Description
416/12
Qty Sold
2x4 R/L Doug Fir
2x4-08 Doug Fir
2x4-10 Doug Fir
2x4-12 Doug Fir
0
208
416
416
True random length items. For example: molding.
The tally listing the number of pieces and lengths will be called for at
POS to calculate the total units to be relieved from stock. For
example:
4
Item #
Catalog #
Description
5301110
34COVE
3/4 COVE
Unit
Desc
Tally sold
at POS
LF
2/8
Total units
relieved
16 (2x8)
Random length and random width. For example: hardwoods.
The width (in inches) and tally (number of pieces and length in feet)
will be called for at POS to calculate the total units to be relieved from
stock. For example:
Item #
Cat #
Descriptio
n
C
or
M
Unit
Desc
Conv
Fact
Tally
sold
at POS
Total
units
relieved
5910010
4/4 RWRL
RED OAK
M
BF
.0833
Width: 6
Pieces: 20
Length: 8
79.97
(6x20x8x.0833)
44OAK
5
Dimensions and random length. For example: Hardwoods
which come in varying thicknesses (5/4 or 4/4).
The thickness (in inches), width (in inches), and tally (number of
pieces and length in feet) will be called for at POS to calculate the total
units to be relieved from stock. For example:
170
Dim11
Chapter 5. Inventory
Item #
Cat #
Descriptio
n
C
or
M
Unit
Desc
Conv
Fact
Tally
sold
at POS
5920010
Doug Fir
M
BF
.000
Thick:1
0
TimbersWidth: 6*
DF
RW&RL
Pieces: 20
Timbers
Length: 8
*Calculates as whatever portion of 1 foot. 6=1/2 foot (.5)
6
Total
units
relieved
80
(1x.5x20x8)
Square footage items
The width (in feet) and the length (in feet) will be called for at POS to
calculate the total units to be relieved from stock. For example:
7
Item #
Cat #
Descriptio
n
C
or
M
Unit
Desc
Conv
Fact
Tally
sold
at POS
Total
units
relieved
56390100
DGPLYWOODG
Doug Fir
Plywood
RW&RL
M
SF
.000
Pieces:5
Width: 4
Length: 4
80
(5x4x4)
Non-inventory items
Labor, treating expenses, and overhead are examples of type 7 items.
Only MTD and YTD sales and cost are updated to the Totals File and
the General Ledger. No dollar value is maintained in the inventory.
PRICE BASIS
Field #14
The inventory system allows you to have up to 9 price levels for an inventory item.
You don't have to use all 9 levels. In fact, 2 or 3 price levels are usually adequate
for most companies. The three main components of pricing are Price Basis,
List/Base and the price adjustment levels 1 through 9. The price basis you assign
to each item determines how the price is computed by using the price adjustment
levels as they relate to List/Base. List/Base is a value kept in the Inventory Store
Data File (IM2.D). It can also be thought of as retail or cost, the basis from which
the price levels are calculated. You have the following price basis options (see
below for further explanation of each option):
0
1
2
3
10
= Percentage markup or markdown from List/Base
= Dollar markup or markdown from List/Base
= Actual prices. No List/Base is needed
= Gross margin percentage markup or markdown from List/Base
= Same as price basis 0 except price adjustment levels 6-9 are quantity
breaks
11 = Same as price basis 1 except price adjustment levels 6-9 are quantity
breaks
12 = Same as price basis 2 except price adjustment levels 6-9 are quantity
breaks
13 = Same as price basis 3 except price adjustment levels 6-9 are quantity
breaks
Dim11
171
Chapter 5. Inventory
F NOTE:
It is not necessary that the price basis be the same for all items in your inventory. In fact,
you need to have the flexibility of pricing certain items using one method and other items
using another method. You will probably have entire sections using the same price basis.
Each customer is assigned a price level in the Customer Master File (CM1.D). The
price level corresponds to the inventory price adjustment and determines the price
the customer receives at POS. If a customer is price level 3, the prices at POS will
reflect price level 3 on all items purchased and not price levels 2 or 1 (unless
manually overridden). Make sure each inventory item has adequate pricing to
accommodate all price levels assigned in Accounts Receivable. See Chapter 4,
Accounts Receivable, for more information on price level.
F NOTE:
For all pricing methods, price level 1 (PRICE ADJ 1) is your highest price.
0 = Percentage Markup/Markdown
Use this method if you wish to markup or markdown from List/Base using
a percentage of List/Base. A change to List/Base will change the
calculated price levels accordingly. For example, if an item's cost is $10.00
and you want to markup from cost, enter 10.00 in List/Base. Then enter
the percentages to markup in Price Adj 1-9:
Calculation
List/Base + % of List/Base
Price Adj 1
Price Adj 2
Price Adj 3
etc.
100.00
90.00
80.00
10.00
10.00
10.00
+
+
+
10.00
9.00
8.00
Selling price
for:
PL 1
PL 2
PL 3
20.00
19.00
18.00
Customers assigned to price level 1 will be sold the item at $20.00. Price
level 3 customers will be sold the item at $18.00.
If you want to markdown from a list price, use negative price adjustments
(List/Base=10.00):
Calculation
List/Base + % of List/Base
Price Adj 1
Price Adj 2
Price Adj 3
etc.
0.00
-3.00
-5.00
10.00
10.00
10.00
-
.00
.30
.50
Selling price
for:
PL 1
PL 2
PL 3
10.00
9.70
9.50
If you know the gross margin you want to make on this item but you do
not want to use price basis 3 (or 13), enter the markup percent that will
calculate the price to the desired gross margin. See "Gross Margin %
Conversion Table" at the end of this section for a quick reference of
markup percentages).
172
Dim11
Chapter 5. Inventory
1 = Dollar Markup/Markdown
Use this method if you wish to markup or markdown from List/Base using
a dollar amount. It is similar to price basis 0 except you use dollar
amounts. A change to List/Base will change the calculated price levels
accordingly.
For example, if an item's cost is $5.00 and you want to markup from cost,
enter 5.00 in List/Base. Then enter the dollar amounts to markup in Price
Adj 1-9:
Calculation
List/Base + Dollar Amount
Price Adj 1
Price Adj 2
Price Adj 3
etc.
2.00
1.80
1.60
5.00
5.00
5.00
+
+
+
2.00
1.80
1.60
Selling price
for:
PL 1
PL 2
PL 3
7.00
6.80
6.60
Price level 1 customers will buy the item at $7.00. Price level 3 customers
will buy the item at $6.60.
If you want to markdown, from a list price (retail), use negative price
adjustments. For example (List/Base is $5.00):
Calculation
List/Base + % of List/Base
Price Adj 1
Price Adj 2
Price Adj 3
etc.
0.00
- .50
-1.00
5.00
5.00
5.00
-
.00
.50
1.00
Selling price
for:
PL 1
PL 2
PL 3
5.00
4.50
4.00
2 = Actual Prices
Use this method if you wish to enter the actual prices in price adjustments
1 through 9. No List/Base is needed. Whenever the prices change, you
must manually change each price level when you use this method.
Selling price for:
Price Adj 1
Price Adj 2
Price Adj 3
etc.
20.00
18.00
16.00
PL 1
PL 2
PL 3
20.00
18.00
16.00
3 = Gross Margin Percentage Markup/Markdown
Use this method if you wish to markup or markdown from List/Base using
a gross margin percentage. A change to List/Base will change the
calculated price levels accordingly. Gross margin is calculated using this
formula:
Total Selling Price - Total Cost
Total Selling Price
Dim11
173
Chapter 5. Inventory
For example, if an item's cost is $10.00 and you want to markup from cost,
enter 10.00 in List/Base. Then enter the percentage to markup in Price
Adj 1-9:
G.M.%
Selling Price
Calculation
Price Adj 1
33.34
PL 1
15.00
Price Adj 2
25.93
PL 2
13.50
Price Adj 3
16.67
PL 3
12.00
15.00 - 10.00
15.00
13.50 - 10.00
13.50
12.00 - 10.00
12.00
etc.
If you want to markdown from a list price (retail), use negative price
adjustments.
F NOTE:
Because of the use of Price Adj 6-9 for quantity breaks on price basis, 10, 11, 12, and 13,
you cannot use price levels 6-9 for any customers if you are using price basis 10-13.
10=Percentage Markup/Markdown with Quantity Breaks
Use this method if you wish to mark up or down from List/Base using a
percentage (same as price basis 0) but also give quantity breaks. For
example, if a customer buys in quantities of 1-24 of a certain item, they get
price level 1. But if they buy 25-99, the price is figured on price level 2. If
they buy 100-499, the price goes to price level 3. The percentages for
markup or markdown are kept in Price Adj 1-5 (same as price basis 0) and
the quantity breaks are kept in Price Adj 6-9.
Price Adj 1
Price Adj 2
Price Adj 3
Price Adj 4
Price Adj 5
100
90
80
70
60
Price Adj 6
Price Adj 7
Price Adj 8
Price Adj 9
25
100
500
1000
Markup 100%
Markup 90%
Markup 80%
Markup 70%
Markup 60%
Qty required for price level 2
Qty required for price level 3
Qty required for price level 4
Qty required for price level 5
11=Dollar Markup/Markdown with Quantity Breaks
Same as price basis 1 (dollar markup/markdown) but also gives quantity
breaks as described above for price basis 10.
12=Actual Prices with Quantity Breaks
Same as price basis 2 (actual prices) but also gives quantity breaks as
described above for price basis 10.
13=Gross Margin Percentage Markup/Markdown with Quantity
Breaks
Same as price basis 3 (gross margin percentage markup/ markdown) but
also gives quantity breaks as described above for price basis 10.
174
Dim11
Chapter 5. Inventory
MARKET COST BASIS
Field #15
The system can maintain the following costs for each inventory item: average, last,
and market. For a more thorough look at inventory costs, see the next section,
Costs & Prices.
The market cost basis is a code assigned to each item that defines how the market
cost is determined. The daily Sales Analysis report as well as some other Sales
Analysis reports allow you to print showing gross margin based on either average
or market cost or both. You have the option to use a different market cost basis for
different items in your inventory depending on the nature of the items. The
market cost basis codes are:
0 = Use last cost as market cost. As the receiving last cost changes, so does
market cost automatically.
1 = Use List/Base as market cost. As List/Base changes, so does market cost
automatically.
2 = Use market cost as market cost. This is used on lumber items with
frequent cost fluctuations such as redwood. You must manually
maintain the market cost of these items using one of the price/cost
maintenance procedures.
3 = Use cost % as market cost. If the item is set up for cost%=0 (field 18), POS
will stop and ask for a cost for this item even though there may be an
average and market cost already set up.
For hardware items or items with infrequent cost changes, you may wish to use
option 0 (last cost as market cost). For commodity items where costs and prices
fluctuate according to market trends, you may wish to use option 2 (market cost as
market cost) and manually maintain the market cost.
CONVERSION FACTOR
Field #16
This is the multiplication factor needed to convert to a different unit of measure
other than each. It can be up to 4 digits before and 4 digits after the decimal
(9999.9999). For example:
Board Feet = Number of board feet in one unit
Thickness x width x length
12
2 x 4 x 8
12
= 5.3334
2 x 2 x 14
12
= 4.6667
1 x 2 x 8
12
= 1.3333
Square Feet = Number of square feet in one unit
Width x length
4 x 4 = 16.0000
4 x 8 = 32.0000
Dim11
175
Chapter 5. Inventory
Lineal Feet = Number of lineal feet in one unit
Length
10' piece = 10.0000
16' piece = 16.0000
Others = Any other item requiring a conversion factor
Roll of insulation of 83-1/3 sq ft = 83.3334
Ceiling tile of 40 square feet per box = 40.0000
If the item is to be priced and controlled by each, no conversion factor is
needed. Leave blank.
EXPECTED GROSS MARGIN
Field #17
It is important to establish an acceptable range of gross margin for all items in
inventory. Gross margin % is calculated as follows:
Sales - Cost of Sales
Sales
Each item is assigned an expected gross margin percent that defines what the
lowest acceptable gross margin is expected. In conjunction, a low and high margin
percent is defined storewide in the Variable File which extends the range of
expected margin. For example:
Expected
Gross
Margin
Same for all items
Low %
High %
Acceptable range
Item A
25%
5%
10%
20% to 35%
Item B
20%
5%
10%
15% to 30%
Item C
30%
5%
10%
25% to 40%
Each time an item is sold at POS, the gross margin % is calculated and compared
to the expected gross margin for the item. If the gross margin is below the
acceptable range, the terminal will beep (if the option is selected to notify you of
bad profit) before accepting the line. Also, if your password allows you to view
costs and margins for each line item, an “M-” or “M+” will appear next to the
displayed costs if the gross margin is outside of the acceptable range. In addition,
the following reports will show exceptions to the acceptable gross margin range:
Transaction Register - Under the report heading “M”, an M- or M+ will be
printed if the gross margin percent was below or above the expected
range on at least one item.
Transaction Detail - In both the report heading and detail lines, a - or +
will be printed if the gross margin percent was below or above the
expected range.
Daily Sales by Item Report - There is a report parameter that allows you
to print all items above or below the expected range.
176
Dim11
Chapter 5. Inventory
GROSS MARGIN % CONVERSION TABLE
PRICE BASIS 0 & 10
Locate the gross margin percent in the right hand column you wish to make for a
specific price level. Use the markup percent directly to the left as the price
adjustment to use for calculating the selling price. For example, if you want to
achieve a 30% gross margin, you will use a 43% markup.
Gross
Markup
2
3
4
5
6
7
8
9
10
11
12
13
14
15
16
17
18
19
20
21
22
23
24
25
26
27
28
29
30
31
32
33
34
Dim11
Margin %
2.00%
3.00%
4.00%
4.75%
5.66%
6.50%
7.50%
8.25%
9.00%
10.00%
10.75%
11.50%
12.25%
13.00%
13.75%
14.50%
15.25%
16.00%
16.66%
17.33%
18.00%
18.66%
19.33%
20.00%
20.66%
21.25%
21.75%
22.50%
23.00%
23.66%
24.25%
24.75%
25.44%
Gross
Markup
35
36
37
38
39
40
41
42
43
44
45
46
47
48
49
50
51
52
53
54
55
56
57
58
59
60
61
62
63
64
65
66
67
Margin %
26.00%
26.50%
27.00%
27.50%
28.00%
28.50%
29.00%
29.50%
30.00%
30.50%
31.00%
31.50%
32.00%
32.50%
32.75%
33.33%
33.75%
34.25%
34.66%
35.00%
35.50%
36.00%
36.33%
36.75%
37.00%
37.50%
37.75%
38.25%
38.66%
39.00%
39.33%
39.75%
40.00%
Gross
Markup
68
69
70
71
72
73
74
75
76
77
78
79
80
81
82
83
84
85
86
87
88
89
90
91
92
93
94
95
96
97
98
99
100
Margin %
40.50%
41.00%
41.25%
41.50%
42.00%
42.25%
42.50%
43.00%
43.25%
43.50%
43.75%
44.25%
44.50%
44.75%
45.00%
45.33%
45.66%
46.00%
46.25%
46.50%
46.75%
47.00%
47.33%
47.66%
48.00%
48.25%
48.50%
48.75%
49.00%
49.25%
49.50%
49.75%
50.00%
177
Chapter 5. Inventory
Adding Items
1 From the DIMENSIONS MAIN MENU shown in Getting Into Inventory, select 2 for
Inventory. Remember to press Enter after entering your menu selection.
2 Select 2 for File Maintenance.
3 Select 1 for Add Inventory Items.
4 Select 1 for Add New Inventory Items.
F NOTE:
If you have multiple stores, you will first be asked:
Do You Wish to Add to All Stores (Y/N): Y
Enter Y to add to all stores. Or enter N and the computer will ask:
Enter Store to Add: 0
Enter the appropriate store number and press Enter. Enter any other store numbers
requiring the items you will be adding. Press Enter when you are done selecting store
numbers.
5 The computer displays:
DS03011A
11.0.1
Special Inventory Add
DIM11 DATA
Date mm/dd/yy
Port 36
Store 01
Do You Wish to Add to All Stores (Y/N): Y
Inventory Template <Ent> = None :
A template provides default values for certain inventory fields for different
categories of items. Once a template for hardware items is set up, for instance,
with the desired item type, unit description, price basis, and so on, that template
can be used to enter new hardware items quickly by just providing the information
that is unique to that item. The other information which is the same for all
hardware items is already entered. This features uses FL1.D (Fine Line ClassGroup Section File). You have the following options:
Esc
<Ent>=None
Enter an inventory
template number
<UpA>=Search
Press Esc to return to the previous menu.
Do not use an inventory template for entering an item.
Continue to the next screen (Step 4).
Use this template as a basis for the item you wish
to enter. Continue to the next step.
If you do not know the template number you wish to use,
press # to search the template list. The computer
displays a list of the templates found in FL1.D and the
standard search/select routine:
DS03011A
Special Inventory Add
Inventory Template
Description
HARDWARE
HAND TOOLS
Date mm/dd/yy
Port 39
Store 01
:
<Ent>=Select
<UpA/DnA>=Scroll
L# <Ent>=Select
L# Template#
1 1
2 A123
DIM11 DATA
(.)=Page Down
(,)=Page Up
<Esc>=Exit
Grp Sec
0 0
23 0
Highlight the desired template and press Enter.
178
Dim11
Chapter 5. Inventory
6 The computer displays the Special Inventory Add screen:
DS03011A
11.0.1
Special Inventory Add
DIM11 DATA
Date mm/dd/yy
Port 36
**** IM1.D ****
**** IM2.D ****
1. Item No
0
32. Non Perpet
2. Catalog
33. No History
3. Mfg No
34. Minimum
4. Short Desc
35. Maximum
5. Mfg Name
36. Ave/Lst Cost
6. Item Desc
37. Market Cost
7. Unit Desc
20. Second Desc Use
38. LIFO Cost
8. Item Code
21. Unts p/Pkg
39. List/Base
9. Non Disc
22. EOQ
40. Price Adj 1
10. Non Tax
23. Season Code
41. Price Adj 2
11. Enter Desc
24. Stock Code
42. Price Adj 3
12. C or M
25. Price Round Code
43. Price Adj 4
13. Type (0-7)
26. Purchasing Code
44. Price Adj 5
14. Price Basis
27. Vol/Wt Conv
45. Price Adj 6
15. Mkt Cst Bas
28. Prt Price Stckrs
46. Price Adj 7
16. Conv Factor
29. Misc Code-1
47. Price Adj 8
17. Ex Gross Marg
30. Misc Code-2
48. Price Adj 9
18. Cost Percent
31. Assoc #
19. Second Desc
<UpA> = Enter Group/Section
<Esc> = Change Store
F NOTE:
There is an option that controls which fields are displayed on this screen. It is found in
the Variable File. See the system manager if you wish to use this feature. These
instructions present all fields as if they had all been selected to display.
The cursor is at the first field, 1. Item No. Enter the item number for the item you
are setting up and press Enter. Or press Esc to end this process.
7 If you used a template, the default values from the template are filled in. Enter
the catalog number.
8 Continue entering the other basic information for the item (item description, unit
description, C or M code, conversion factor, price basis, and so forth). The fields
with values from the template will be displayed but are not allowed to be changed.
F NOTE:
If you make a mistake during your entry on this screen, you can press Esc to back up
one field. Retype the information correctly. To skip entering a field, press Tab. This will
leave the information contained in the field unchanged.
9 When you are done entering the information for this item, enter . (period) and
press Enter. This skips the remaining fields on the screen.
10 The computer adds the item record to the Inventory Static File (IM1) and the
Inventory Store File (IM2) and returns you to Step 3 so you can enter the next
item.
11 When there are no more items to be entered, press Esc at 1. Item No to return to the
previous menu.
F NOTE:
Dim11
For a complete listing of each field on this screen, see Appendix C. Field Definitions, Add
New Items.
179
Chapter 5. Inventory
Changing Item Information
If you need to change item information entered up to this point, use the following
procedure.
F NOTE:
You cannot change the item number, catalog number, mfg number, or short description
using this method. If you need to change any of these fields for an item at this point, you
must delete the item and enter it again correctly. Changing this information after POS is
running requires a different procedure.
1 Return to the INVENTORY FILE MAINTENANCE MENU.
2 Select 2 for Change Inventory Items.
3 Select 1 for Inventory Static File IM1.D.
4 The computer displays:
DS03011N
Rev10.0.3
Maint. Inv. Static Data
DIM11 DATA
Date mm/dd/yy
Port 39
--------------------------------------------------------------------------------Select Item:
<Ent> = Display Search Options
(?) = Help
Select the item you wish to change by using the standard item selection routine
(see Inventory Inquiry for instructions on selecting items). Or press Esc to end
this process.
F NOTE:
There is an option that controls which fields are displayed on this screen. It is found in
the Variable File. See the system manager if you wish to use this feature. These
instructions present all fields as if they had all been selected to display.
5 The computer displays the IM1 information for the selected item. For example:
DS03011N
Maint. Inv. Static Data
DIM11 DATA
Date mm/dd/yy
Rev10.0.3
Port 43
1. Item No
10010020
2. Catalog No
4863247
3. Mfg No
8318B-1
4. Short Description SHORT
5. Mfg Name
MFG1
6. Item Description
8318B-1 BRASS 3" HOUSE NUMBER
7. Unit Description
BA
8. Item Code (N,A,B,C,O,R,T,Z)
9. Non-Discountable (Y/N)
10. Non-Taxable (Y,N,S)
N
11. Enter Desc (Y/N)
12. C or M
13. Type (0-7)
0
14. Price Basis
0
15. Market Cost Basis (0-9)
0
16. Conv Factor
.0000
17. Associated Number
0
18. Vol/Wt C-Fact
.0000
19. Expect GM Percent
.00
20. Cost Percent
.00
21. Second Description
22. Second Desc Use
0
23. Units/Pack
10.00
24. Season Code
0
25. Stock Code
26. Price Rounding Code
27. Purchasing Code
28. Print Price Sticker
29. Date Added (MMDDYY)
0
30. Misc Code 1
31. Misc Code 2
N = Next
P = Previous
180
F = Change By Field
C = Change
<Esc>= First Screen
______________
Dim11
Chapter 5. Inventory
The cursor is positioned at the bottom of the screen. You can do one of the
following:
N=Next
Display the next item in numerical order.
P=Previous
Display the previous item in numerical order.
F=Change By Field
Select and change specific fields for the displayed item.
See Steps 6-11.
Change all fields for the displayed item. See Steps 12-15.
C=Change
Return to the previous screen to select another item or
end this process.
Esc=First Screen
6 F=Change By Field. The computer asks:
Enter Field Number
Enter the field number you wish to change. For example if you want to change the
unit description, enter 7.
7 The cursor moves to the selected field. Enter the new value for this field and press
Enter.
8 Repeat Steps 6 and 7, entering field numbers and new values as many times as
needed.
9 When done, press Esc at Enter Field Number.
10 The computer asks:
OK To Save Changes (Y/N)
Enter Y to save the changes you made or N to not save them.
11 Return to Step 5 to select another option.
12 C=Change. The cursor moves to field 5, Mfg Name. Enter the new value for this field
and press Enter to move to the next field. Or press Tab to go to the next field
without changing the value.
CAUTION:
Do not press Enter to move to the next field. This will erase the existing value in the
current field.
13 Continue changing fields as needed for this item. When done, you can press Tab
through the remaining fields or enter . (period) and press Enter to bypass the
remaining fields and go to Step 14.
14 The computer asks:
OK To Save Changes (Y/N)
Enter Y to save the changes you made or N to not save them.
15 Return to Step 5 to select another option.
Dim11
181
Chapter 5. Inventory
Printing Items
After entering the basic inventory data, you should print a report showing your
entries to check for accuracy.
1 Return to the INVENTORY MENU.
2 Select 3 for Inventory Reports.
3 Select 1 for Static Data IM1.
4 The computer displays the Inventory Static Data report screen:
DS03031
Rev10.0.3
Inventory Static Data
DIM11 DATA
STORE #1
Date mm/dd/yy
Port 39
Store 01
1. Input Parameters
Report Print Order
1
Beginning Value to Print
0
Ending
Value to Print
99999999
Vendor Number
(0=All)
0
Print
1) Single Line Format
1
2) Double Line Format
3) No Detail Lines
Print Section/Loc Totals (Y/N)
Y
Print Group Totals
(Y/N)
Y
Type 2 Items Only (where applicable)
N
Print Items Not in IM2
(Y/N)
N
Number of Copies
1
Store Number
1
Report Date
mmddyy
Select Optional Field (Y/N)
N
<Ent> = Print Report
(E) = End
Item Number
(1) = Input Parameters
Do not change any of the report parameters. Press Enter to print the report.
5 The computer asks where you wish to print the report:
Output Device (P,T,S,F,Port#):
Port No <UpA> = Search Port No
It will be easiest to check this report if you print it out on paper . Make sure the
system printer is turned on, the paper is loaded, and it is ready to print. Enter P
and press Enter. This will print the report on your system printer.
6 Then the computer asks if you want to print in compressed print:
Compressed Print (Y/N):
Enter Y and press Enter. This will fit the report on 8-1/2x11 paper.
7 Then you can determine if you want to print the report in single, double, or triple
spacing:
Report Spacing (1, 2, 3):
If you need to make notes on the report as you check the information, print it
double- or triple-spaced. Enter 2 or 3 and press Enter. Otherwise, you can print
it single-spaced (enter 1).
8 Wait while the report is printed. When it is finished, you are returned to Step 3 so
you can end the report printing process. Enter E (for End) and press Enter.
182
9 You are returned to the Inventory Static Data (IM1) Menu. Enter E and press Enter
again to return to the INVENTORY MENU.
Dim11
Chapter 5. Inventory
10 See below for a sample report.
Sample Inventory List—Static Data IM1.D
mm/dd/yy
11:07:04
ITEM
01011120
01011125
01011130
01011135
01011160
01011165
01011170
01011180
01011185
01011190
01011210
01011215
01011220
01011225
01011230
01011240
01011241
01011250
INVENTORY STATIC DATA (IM1.D)
DESCRIPTION
DIM11 DATA
CATALOG
2X4-92 5/8 STUD WHITE WOOD
2X4-92 5/8 STUD HEM FIR
2X4 92 5/8 STUD FIR
2X4-94 5/8 STUD WHITE WOOD
2X4-96 STUD WHITE WOOD
2X4-96 STUD HEM FIR
2X4-96 STUD FIR
2X6-92 5/8 STUD WHITE WOOD
2X6-92 5/8 STUD HEM FIR
2X6-92 5/8 STUD FIR
2X6-96 STUD WHITE WOOD
2X6-96 STUD HEM FIR
2X6-96 STUD FIR
2X6-94 5/8 STUD HEM FIR
2X4-92 5/8 STUD ECONOMY
2X4-96 STUD ECONOMY
PRACTICE ITEM
2X5 TEST FOR AVE COST
SECTION TTL: 01-01 *** STUDS ***
MFG/UPC
249258WW
249258H
249258
249458WW
2496WW
2496H
2496
269258WW
269258H
269258
2696WW
2696H
2696
269458H
249258E
2496E
2497
250TEST
SHORT
STUD
STUD
STUD
STUD
STUD
STUD
STUD
STUD
STUD
STUD
STUD
STUD
STUD
STUD
STUD
STUD
STUD
STUD
DS03031
PAGE 0001
MFG
MBF
MBF
MBF
MBF
MBF
MBF
MBF
MBF
MBF
MBF
MBF
MBF
MBF
MBF
MBF
MBF
MBF
EA
FDXET PB CB
FACTOR
1 0
1 0
1 0
1 0
1 0
1 0
1 0
1 0
1 0
1 0
1 0
1 0
1 0
1 0
1 0
1 0
1 0
1 10
5.3340
5.3340
5.3340
5.3340
5.3340
5.3340
5.3340
8.0000
8.0000
8.0000
8.0000
8.0000
8.0000
8.0000
5.3340
5.3340
.0000
32.0000
1
1
1
1
1
1
1
1
1
1
1
1
1
1
1
1
0
1
18 ITEMS
REPORT HEADING KEY
ITEM
DESCRIPTION
CATALOG
MFG/UPC
SHORT
MFG *
F*
D*
X*
E*
T
PB
CB
FACTOR
Item number
Item description
Catalog number
Mfg number
Short description
Mfg name
Fab code
Non-discountable code (Y/N)
Non-taxable code (Y/N)
Enter description (Y/N)
Item type
Price basis
Market cost basis
Conversion factor
*Not entered at this time
Dim11
183
Chapter 5. Inventory
Deleting Items
If you wish to delete an item and start over, use the following procedure.
F IMPORTANT:
This method is not to be used once you start receiving and selling inventory. It is
to be used only in the start up phase of implementation.
This process deletes the item(s) from the Inventory Static File (IM1.D) and
Inventory Store File (IM2.D) and the following files if found:
IM3.D
IMH.D
IM9.D
OM4.D
BC1.D
13 Month History File
Revolving History File
Multiple Location File
Multiple Vendors
Bar Code File
1 From the INVENTORY MENU, select 10 for Inventory Special Maintenance.
2 Select 4 for Other Inventory Files.
3 Select 1 for Delete Items-No Transactions
4 The computer displays the Delete Item Numbers screen:
DS03402
Rev10.0.1
Delete Item Numbers
Item No
<UpA>
<Ent>
<Esc>
DIM11 DATA
Date mm/dd/yy
Port 39
Store 01
0
= Change Store
= Next Item
= End
The cursor is positioned at Item No. You have the following options:
<UpA>=Change Store
Enter an item to delete
<Ent>=Next Item
<Esc>=End
184
Press up arrow to change the store number.
Enter the item number you wish to delete. If you don’t
know the item number, you can find it on an item report.
Be sure to press Enter after you enter the item number.
After you display and/or delete an item, you can press
Enter to view the next item in item number order.
Press Esc to end this procedure and return to the
previous menu.
Dim11
Chapter 5. Inventory
5 The computer displays the selected item. The computer asks:
DS03402
Rev10.0.1
Delete Item Numbers
Item No 10010055
<UpA>
<Ent>
<Esc>
DIM11 DATA
1-C BROWN RURAL MAIL BOX
= Change Store
= Next Item
= End
Date mm/dd/yy
Port 39
Store 01
Delete Item?
(I) = Current Store IM2 Only
(Y) = Delete Item
<Ent>= Don't Delete
You have the following options:
(I)=Current Store IM2 Only
(Y)=Delete Item
<Ent>=Don’t Delete
Delete from the current store only (as displayed in the
upper right hand corner of the screen).
Delete the displayed item from all stores.
Do not delete the displayed item. Return to Step 4 to
enter another item number.
6 Repeat Steps 4 and 5 for each item you need to delete. When you are done, press
Esc at Item No. You are returned to the previous menu.
7 Add the item(s) again. See Adding Items.
Dim11
185
Chapter 5. Inventory
Costs & Prices
Inventory Costs
The Dimensions system allows for the following costs for each item:
Ø
Ø
Ø
Ø
Average Cost
Last Cost
Market Cost
LIFO (last in first out)
These costs are held in the Inventory Store File (IM2.D) which allows for different
costs from one store to another. All costs can be up to 7.2 digits long (9999999.99).
The daily Sales Analysis report as well as the group totals sales analysis reports
allow you to print showing gross margin based on either average or market cost or
both. Purchasing, receiving, physical inventory count, as well as some inventory
reports allow you to choose among several options for cost.
Ø Average Cost
It is especially important to have a correct average cost for your inventory
items. The average cost not only affects your inventory value, but it is the cost
that is updated to cost of sales and inventory in the General Ledger.
Average cost is updated during inventory receipts. As receipts are entered,
the computer uses a weighted average to compute the new average cost. For
example, you have 10 hammers with an average cost of $10.00 each. You
receive 10 additional hammers with a new cost of $12.00 each.
Beginning Balance
Inventory Receipt
# UNITS
AVG COST
EXTENDED COST
10
+ 10
______
20
10.00
12.00
100.00
+ 120.00
_________
220.00
Extended cost 220.00 / Total units 20 = 11.00
(new average cost)
Since average cost is updated to the General Ledger, changes to average cost
must be made through inventory adjustment or physical count procedures
because those procedures include a G/L value update.
F IMPORTANT:
Once the average cost is entered initially, you must never change it through
inventory maintenance. It should only be changed through inventory adjustment
or physical count procedures.
Ø Last Cost
Last cost is updated every time there is an inventory receipt entered. It is a
straight-through update. That is, whatever cost is entered on the receipt is
used for last cost in IM2.D. If there are two receipts entered on the same day
for the same item, the cost on the last one posted is used as the last cost.
F NOTE:
186
When setting up originally, the average and last costs are usually the same amount.
Dim11
Chapter 5. Inventory
Ø Market Cost
The value for market cost is determined by the market cost basis code set up
in field #15 in IM1.D. See Basic Inventory Data for an explanation of market
cost basis.
Ø LIFO Cost
This is a manually maintained cost. It is entered and changed only through
inventory maintenance. LIFO cost is used for your information only.
Cost Percent
Every item sold at POS/Order Entry should have a cost. If there is no cost set up
in IM2 for this item, the computer will calculate a cost. To help it estimate a fairly
accurate cost, you should enter a cost percent (IM1.D, field 20). The selling price
is multiplied by the cost percent to compute a cost. If there is no cost or cost
percent set up for the item, you will be asked to enter a cost when the item is
selected at POS/Order Entry.
Inventory Prices
The Dimensions system allows for 9 price levels for each inventory item. In
addition, matrix pricing provides for 90 more price levels, making a total of 99
prices per item. Typically, this many price levels are not used or even needed in
normal, day-to-day operations but they are provided. A/R customers are assigned
a price level so that when they purchase items at POS, the correct price is supplied
automatically by the computer. The price level in the customer’s record
corresponds to the price adjustments in the inventory record.
For the purposes of getting inventory started, the concept of price levels and their
relationship to Price Basis, List/Base, and Price Adjustments 1-9 should be
understood. If not done already, read about Price Basis in Basic Inventory Data.
It also explains about List/Base and Price Adjustments 1-9. Then return here.
F NOTE:
There is an option to round prices which will change the results of price calculations. See
Appendix C. Field Definitions, Add New Items, field 25 (Price Round Code) for more
information.
Loading Costs & Prices
Gather the following information for each inventory item. If desired, you can work
with a section or group of inventory at a time.
Ø
Ø
Ø
Ø
Ø
Ø
Dim11
List/Base
Price Adjustments 1-9
Market Cost
Average Cost
Last Cost
Cost Percent
There are several different ways of getting this information into the inventory file.
This section presents 3 of these procedures:
187
Chapter 5. Inventory
Price/Adjustment Changes
Allows List/Base, Price Adjustments 1-9, and
Market Cost to be entered one item at a time.
Shows resulting price levels. See Step 1-12.
Copy From Field to Field
Allows you to move the value in any field in IM2 to
another field in IM2 for a range of item numbers.
For example, if List/Base for an item was entered
in Price/Adjustment Changes, it can be copied to
Last Cost, Average Cost, and Market Cost for the
same item. This is a fast way to change a lot of
items. See Step 13-21.
Change with Range
Allows you to enter or change values in any fields
in IM2 for a range of item numbers. All items
within the selected range will receive the value you
wish to place in the selected field. See Steps 22-32.
F
NOTE: None of these procedures would be used to change costs once you are using POS and
Purchasing/Receiving. You would do that through Purchasing, Physical Count, or
Inventory Adjustments because appropriate G/L entries are made through these
procedures.
Steps 1-12: Price/Adjustment Changes
Use this option to enter List/Base, Price Adjustments 1-9, and Market Cost one
item at a time. It shows the resulting price levels.
1 Starting at the INVENTORY MENU, select 4 for Pricing and press Enter. Then select 1
for Price Maintenance.
2 Select 2 for Price/Adjustment Changes.
3 The computer displays:
DS03914
Rev10.0.1
Price/Adjustment Changes
Select Store No (0=All):
Select Vendor
(0=All):
Select
[
[
[
[
[
[
Inventory Field(s)
] New Price (Only)
] List/Base Price
] Price Adjustment
] Price Adjustment
] Price Adjustment
] Price Adjustment
DIM11 DATA
Date mm/dd/yy
Port 39
Store 01
0
0
With 'X'
[
[
1
[
2
[
3
[
4
[
]
]
]
]
]
]
Price Adjustment
Price Adjustment
Price Adjustment
Price Adjustment
Price Adjustment
Market Cost
5
6
7
8
9
Select Cost Base For Margin%: 1
1=Average
3=Market
2=Last
4=List/Base
Select Method of Adjustment:
1
1 = Manually Select Each Item
2 = Automatically Select Next Item
<Esc>=End Program
If you have multiple stores, the cursor is at Select Store No (0=All). Enter the
appropriate store number or 0 (zero) for all stores. Then the cursor is at Select
Vendor (0=All). Press Enter to bypass.
188
Dim11
Chapter 5. Inventory
4 Then select the fields you wish to change by entering an X next to the desired
fields. To skip a field, press Tab. Enter X next to List/Base Price, Price Adjustment 1
through however many price levels you are setting up, and Market Cost (if needed).
5 Select Cost Base for Margin% :
Press Tab to bypass.
6 Select Method of Adjustment:
1=Manually Select
Each Item
2=Automatically Select
Next Item
Allows you to manually select each item to be changed,
one at a time, using the standard item selection routine.
Allows you to enter the first item to be changed and then
the computer automatically displays the next item in
numerical order, allowing you to change it as well.
7 The computer displays another screen with the standard item selection routine
and allows you to enter the item number, catalog number, etc. of the item
requiring a change. For example:
DS03914
Price/Adjustment Changes
Store:01
+------------------------------------------------------------------------------+
¦Description
List/Base
Price Adj
Price
¦
+------------------------------------------------------------------------------+
1
2
PB:
3
CB:
4
5
Ave Cost:
6
Last Cost:
7
Mkt Cost:
8
------------------------------------------------------------------------------Select Item:
<Ent> = Display Search Options
(?) = Help
Select the item needing to be changed. Or if you are selecting automatically, enter
the first item of the range of needing to be changed.
F NOTE:
If you are automatically selecting the next item, the order is determined by what number
you enter here. If you want to see the items in item number order, enter the ITEM NO. If
you want to see them in catalog number order, enter the CATALOG NO.
8 The computer displays the selected item and its corresponding price adjustments,
prices, and gross margin %. For example:
Dim11
189
Chapter 5. Inventory
DS03914
Price/Adjustment Changes
Store:01
+------------------------------------------------------------------------------+
¦Description
List/Base
Price Adj
Price
¦
+------------------------------------------------------------------------------+
1-GALLON ALL PURPOSE
1.35 EA 1
35.50
1.83
26.23
2
30.00
1.76
23.30
PB: 0 MARKUP %
3
25.00
1.69
20.12
CB: 0 LAST COST
4
20.00
1.62
16.67
5
20.00
1.62
16.67
Ave Cost:
1.35
6
.00
1.35
.00
Last Cost:
1.35
7
.00
1.35
.00
Mkt Cost:
1.35
8
.00
1.35
.00
9
.00
1.35
.00
------------------------------------------------------------------------------Item #: 15021110
Catlg #: 1GAP
Mfg #:
Short : DRYWALL ACCESS
T: 0
Fact: 0
Rnd:
Last Sale: 09/20/99
Previous Item Value:
<UpA>=Previous Items List/Base
Last Purchase: 02/23/96
.00
'.'=Change Complete
The cursor is positioned at the first field you selected in Step 4, most likely
List/Base. You can do one of the following:
Enter the new value
Tab
<UpA> = Previous Item’s
(value)
Enter
. (period) and Enter
Esc
Enter the new value for the requested item/field and
press Enter. If New Price was selected, it is the only value
that can be changed.
Press Tab to accept the displayed value and go on to the
next selected field to change. When there are no more
fields to change, go on to Step 9 to accept or reject the
change.
If you had already entered a new value for another
item, it is displayed by Previous Item’s (value). If desired,
press the up arrow to use that value for this item as well.
On the first item, there is no previous item’s value.
Press Enter to move the cursor to the actual price. You
can enter the desired actual price. The price adjustment
will be recalculated for you. Or you can move the cursor
to the gross margin % column (far right) and enter a
different gross margin percent. The price adjustment
will be recalculated for you.
Accepts the current changes, bypasses any remaining
fields, and continues to Step 9 to accept or reject all
changes to the item.
Makes no changes to this item. Go back to Step 7 to
select another item (either manually or automatically).
Or backs up to the previous field to allow changes.
If an item has quantity breaks, the price will print next to the quantity with a “Q”
preceding it. The value in the Price column for Price Adj 6-9 are only displayed and
can be changed by selecting Price Adj 2-5. There are additional fields displayed on
the screen:
XXX%
T:
190
(Far right column). Gross margin percent based on the
cost selected in Step 5 above (average, last, market, or
list/base).
(Lower half). Item type.
Dim11
Chapter 5. Inventory
Fact:
(Lower half). Conversion factor.
Rnd:
(Lower half). Rounding flag from IM1.D.
9 Repeat Step 8 for each selected field. The cursor stops automatically for you to
make an entry.
10 When all selected fields have been entered, the computer asks at the bottom of the
screen:
<Ent>=Accept Change
<Esc>=Reject Change
Press Enter to accept the changes or press Esc to reject them.
11 Depending on the method of adjustment (manual or automatic), you are returned
to either Step 7 to select another item to change or the next item is displayed
automatically in Step 8. Continue making changes as needed.
12 When done, press Esc until you return to the INVENTORY MENU.
Steps 13-21: Copy from Field to Field
Use this option to move the value in any field in IM2 to any other field in IM2 for a
range of item numbers. These instructions show moving List/Base to Average
Cost.
13 Starting at the INVENTORY MENU, select 10 for Inventory Special Maintenance and press
Enter. Then select 2 for Store Data IM2.
14 Select 11 for Copy Field From/To Field IM2.
15 The computer displays:
DS03911
Rev8.0.1
Move Values
DIM11 DATA
Select Value To Move From:
Select Value To Move To :
1.
2.
3.
4.
5.
6.
7.
New Price
List/Base
Average Cost
Last Cost
Market Cost
Lifo Cost
Count Cost
Date mm/dd/yy
Port 39
Store 01
0
8.
9.
10.
11.
12.
13.
14.
15.
16.
Price
Price
Price
Price
Price
Price
Price
Price
Price
Adj
Adj
Adj
Adj
Adj
Adj
Adj
Adj
Adj
1
2
3
4
5
6
7
8
9
17.
18.
19.
20.
21.
22.
23.
24.
25.
26.
Minimum
Maximum
Beg Year Balance
Units On Hand
EOQ
Dollar Value
Before Count Units
Before Count Dollars
Count Units
Count Dollars
<Esc> = End
The cursor is at Select Value To Move From. From the displayed list of fields, enter the
number corresponding to the value you wish to move from (source). If you want to
use List/Base as the source, enter 2 and press Enter.
16 Select Value To Move To:
Enter the number corresponding to the value you wish to move to (destination). If
you want to move List/Base to Average Cost, enter 3 and press Enter.
Dim11
191
Chapter 5. Inventory
17 The computer displays:
DS03911
Rev8.0.1
Move Values
DIM11 DATA
Date mm/dd/yy
Port 39
Store 01
1. Input Parameters
Beginning Item No
0
Ending
Item No
99999999
Source Store Number
1
Destination Store Number
1
Select Optional Field (Y/N)
N
The cursor is at Beginning Item No. Enter the first item number of the range of items
you wish to change. This must be the item number and not the catalog number.
F NOTE:
If you want to change items within a certain group and/or section, enter the group/section
number followed by all zeroes. For example: to change group 72, section 3, enter
72030000.
18 Ending Item No
Enter the ending item number of the range.
F NOTE:
To pick up all remaining items with the group/section of the example, enter 72039999.
19 Press Tab through the next 3 fields (Source Store Number, Destination Store Number,
Select Optional Field).
20 The computer asks:
This Program Will Now Move 'List/Base' In Store
To 'New Price' In Store
1
1
Are You Ready To Proceed? (YES/NO)
To begin the process, you must enter YES. Or enter NO to discontinue the
process and return to Step 15 where you can enter the information again if
needed.
21 If you entered YES, the computer begins immediately to change the selected
values for the selected range of items and displays the records as they are
processed. When the job is done, the computer displays:
Normal End of Job - <Ent> = Continue
Press Enter to acknowledge this message and return to Step 15. You can set up
another range of items to change or press Esc to end this process and return to
the previous menu.
192
Dim11
Chapter 5. Inventory
Steps 22-32: Change with Range
Use this option to enter or change values in any field or fields in IM2 for a range of
items. All items within the range will receive the same value.
22 From the SPECIAL IM2 MAINTENANCE MENU, select 1 for Change Fields with Range IM2.
23 The computer displays:
DS03502
Rev8.0.0
Change By Field (IM2.D)
DIM11 DATA
1. Input Parameters:
Beginning Store No
Ending
Store No
Beginning Item No
Ending
Item No
Select Optional Fields (Y/N)
Field Number to Change (3-56)
Date mm/dd/yy
Port 39
Store 01
1
255
0
99999999
N
The cursor is at Beginning Store No. Press Tab twice to bypass this and Ending Store
No.
24 Beginning Item No
Enter the first item of the range of items you wish to change. This must be the
item number and not the catalog number.
25 Ending Item No
Enter the ending item number of the range.
26 Select Optional Fields (Y/N)
Press Tab to bypass.
27 Field Number to Change (3-56)
Enter the first field number you wish to change. The fields that may be changed
at this point are listed below. The computer displays the field description for your
verification.
Field #
10
11
12
13
14
15
16
17
18
19
20
21
22
Dim11
Description
List/Base Price
Price Adjustment 1
Price Adjustment 2
Price Adjustment 3
Price Adjustment 4
Price Adjustment 5
Price Adjustment 6
Price Adjustment 7
Price Adjustment 8
Price Adjustment 9
Average Cost
Last Cost
Market Cost
193
Chapter 5. Inventory
28 Enter the new value (new information) you wish to place in that field for all
selected items. Or press Tab to leave unchanged (if you selected the wrong field).
29 Then you can select another field number and its new value. Repeat for as many
fields as you need to change for the selected range of items.
30 When you are done selecting fields and entering new values, press Esc.
31 The computer displays:
DS03502
Rev8.0.0
Change By Field (IM2.D)
DIM11 DATA
1. Input Parameters:
Beginning Store No
Ending
Store No
Beginning Item No
Ending
Item No
Select Optional Fields (Y/N)
Field Number to Change (3-56)
Beginning Item: 10010055
Ending
Item: 10010070
Date mm/dd/yy
Port 39
Store 01
1
1
10010055
10010070
11
Price Adjustment 1
1-C BROWN RURAL MAIL BOX
CD1755 US4 SAFETY DOOR VIEWER
This program will replace fields in IM2.D with the following values:
Price Adjustment 1
100.00
Are you sure you want to proceed (YES/NO)?
It also displays the field(s) and value(s) you entered. To begin the change process,
you must enter YES. Or if you do not wish to continue, enter NO.
32 If you entered YES, the computer begins immediately to change the selected fields
for the selected range of items and displays the records as they are processed.
When the job is done, you are returned to Step 23 to set up another range to
change or press Esc to end this process and return to the previous menu.
33 If you wish, print the report Store Data (Costs/Prices) from the INVENTORY REPORTS
MENU or a price book from the PRICING MENU to give your work a final check. See
the next section for instructions on printing a price book.
194
Dim11
Chapter 5. Inventory
Print Price Book
1 Starting at the INVENTORY MENU, select 4 for Pricing and press Enter.
2 Select 2 for Pricing Reports.
3 Select 1 for Price Books. Then select 1 for Price Book - Format A.
4 The computer displays:
DS03310
Price Book
DIM11 DATA
Date mm/dd/yy/
Rev10.0.3
STORE #1
Port 39
1. Input Parameters
Report Descr
Calculation Basis(N=New,L=L/B) L
Beginning Item Number
0
Ending Item Number
99999999
Vendor Number (0=All)
0
Section Page Break(Y/N)
N
Column Multiplier (0=Not Used) 0
Group Page Break(Y/N)
Y
Report Date
mmddyy
Store Number
1
Number of Copies
1
Beginning Page Number
1
Cat#/MFG# (C,M,N) C
Pricing - Types 1 And 3 Only (B=Both, F=Factor Only, E=Each Only)
B
Print Items With Zero Amounts
N
Item Type (0-7 A=All)
A
Order: 0=Item 1=Catalog 2=Short Descr 3=Item Descr 4=MFG Name
0
Select Optional Field (Y/N)
N
Value Column 1 (0-16) 0
Value Column 5 (0-16) 0
Value Column 2 (0-16) 0
Value Column 6 (0-16) 0
Value Column 3 (0-16) 0
Value Column 7 (0-16) 0
Value Column 4 (0-16) 0
<Ent> = Print Report
(E) = End
(1) = Input Parameters
You must enter column information to set up this report so enter 1 to input new
parameters. Each parameter is described below. If you press Enter to print the
report without entering any parameters, the computer will display:
You Must Enter Column Information
Press Enter to acknowledge this message and then enter the input parameters
starting with Value Column 1 (0-15). See below.
5 If you entered 1 to change the input parameters, the cursor moves to the top of the
screen. Answer the input parameters as desired.
Report Desc
Calculation Basis
(N=New, L=L/B)
Beginning Item No
Ending Item Number
Dim11
Enter a customized description (up to 19 characters) for
this report. You can title the report anything that will
describe its many options. For example, if you wish to
produce a report showing price level 1 and list/base price,
you could title the report LIST/BASE & PRICE 1 or
LIST/RETAIL.
Enter N if the calculation basis is to be the new price or
L for the list/base price.
Enter the first item number you wish to appear on the
report or press Tab to begin with the first item in the file.
Either enter the ending item number or press Tab to
accept the default of printing all remaining items in the
file.
195
Chapter 5. Inventory
Vendor Number (0=All)
Section/Page Break (Y/N)
Column Multiplier
(0=Not Used)
Group Page Break (Y/N)
Report Date
Store Number
Number of Copies
Beginning Page Number
Cat#/MFG# (C,M,N)
Pricing - Types 1 and
3 Only (B=Both,
F=Factor Only,
E=Each Only)
Print Items With Zero
Amounts
Item Type (0-7 A=All)
Order: 0=Item
1=Catalog
2=Short Descr
3=Item Descr
4=MFG Name
Select Optional Field
Value Column 1 (0-15)
196
If you have set up multiple vendors, enter the vendor
number you wish to print for item selection. Only items
with a matching vendor number will be printed. The
vendor name will be displayed for your verification. Or
enter 0 to select from all vendors.
Enter Y if you wish to begin each inventory section on a
new page, N if not.
If you wish to increase each value in every column on
the price book by a certain value, enter that multiplier
here. For example, if you wish to double every price on
the report, enter 2. Or enter 0 to not use this option.
Enter Y if you wish to begin each inventory group on a
new page, N if not.
The current system date is displayed. If you wish to
accept it, press Tab. Or enter the date you wish to
appear on the heading of the report.
Enter the store number for this report. Items from the
selected store will be printed.
Enter the number of copies (1-9) you wish to print of this
report.
Enter the page number (1-9999) to appear on the first
page of this report.
Enter C if you wish to print the catalog number next to
the item number, M to print the mfg number, or N to
print neither.
Enter B for both factor and each pricing, F for factor
only, or E for each only.
Enter Y if you wish to print items even if they have
zero amounts (values as selected in Value Columns 1-7). Or
enter N to not print these items.
If you wish to print a specific item type, enter the type
here (0-7). Or enter A for all types of items.
Enter the code corresponding to the order in which the
price book is to be printed.
Press Tab to bypass. If you need to use this option, refer
to the introduction to Section 2, Inventory Reports, in the
Inventory User Manual.
You can design this report with up to 7 columns of prices
and/or costs. Enter the value (1-15, 16, 101-199) you
wish to print in the first column. If you wish nothing to
print in this column, enter 0. The value codes are listed
at the bottom of the screen as follows:
Dim11
Chapter 5. Inventory
Select Optional Field
Press Tab to bypass. If you need to use this option, refer
to the introduction to Section 2, Inventory Reports, in the
Inventory User Manual.
1 = New
2 = L/B
3 = Price 1
4 = Price 2
5 = Price 3
6 = Price 4
7 = Price 5
8 = Price 6
9 = Price 7
10 = Price 8
11 = Price 9
12 = Ave Cost
13 = Lst Cost
14 = Mkt Cost
15 = LF Cost
16 = Del Prc
101-199=Matrix
Value 10-99
New price
List/Base price
Price level 1
Price level 2
Price level 3
Price level 4
Price level 5
Price level 6
Price level 7
Price level 8
Price level 9
Average cost
Last cost
Market cost
LIFO cost
Delivery price code for zone #1 (this
requires optional software)
Price levels 10-99 from the price matrix
6 After you enter a value code, the computer displays the corresponding description.
You have the following 3 options:
Press Enter
Clears the description
Press Tab
Retains the description
Enter a new heading
Enter up to 8 characters for a customized heading
7 Enter the desired values for columns 2-7 as described above.
8 Print the report using the standard print routine.
Dim11
197
Chapter 5. Inventory
Inventory Inquiry
Use this procedure to examine the status of any inventory item. You can view
information such as how the item is set up, its costs and prices, stock status, and
sales analysis history (once POS is active).
1 Starting at the INVENTORY MENU, select 1 for File Inquiry and press Enter.
F NOTE:
If you have multiple stores, you will first be asked:
Enter Store Number
Enter the appropriate store number and press Enter.
Steps 2-5: SEARCH FOR & SELECT AN ITEM
2 The computer displays:
-------------------------------------------------------------------------------Select Item:
<Ent>=Display Search Options
<Esc>=Store Number
(?)=Help
The cursor is positioned at Select Item:. You can do one of the following options:
Enter a number to look
for an exact match
<Ent>=Display Search
Options
(?)=Help
You can either enter a catalog number, item
number, or mfg number and the computer looks for an
exact match. If a match is found, the selected item is
displayed. If no match is found, the computer enters the
search mode using the number you entered as the closest
match to begin the search. If you entered a mfg number
and there are duplicates found, you are taken to the
search mode starting at the first occurrence of the
entered mfg number.
Press Enter to display the search options box. See
Step 3.
Enter ? and press Enter for help with this field. The
following box is displayed:
-----------------------------------------------------------------Select Item:
¦
<Ent>=Search Options
¦
¦ Data <Ent>=Exact Match
¦
¦ F15/N<Ent>=Next Search Item ¦
¦
<UpA>=
N/A
¦
¦ Data <UpA>=Search Short
¦
¦
<Esc>=Store Number
¦
¦
<DnA>=
N/A
¦
+-----------------------------+
<Ent>=Display Search Options
<Esc>=Store Number
(?)=Help
These are all the options you can do at Select Item:
198
Dim11
Chapter 5. Inventory
<Ent>
Data <Ent>
F15/N <Ent>
<UpA>
Data <UpA>
<Esc>
<DnA>
Press Enter to display the search options.
Enter some data, such as the item number or
catalog number, and press Enter to select an
exact matching item.
Press either F15 (function key 15) or N and
press Enter to view the next search item in
the search mode. If you were searching by
item number, the computer displays the next
item number. If you were searching by
catalog number, the computer displays the
next catalog number.
N/A
Enter some data, in this case catalog number,
and press the up arrow. The computer
immediately goes to the search mode
beginning with the entered catalog number.
This is the default key for inventory searches
as set up in the Variable File (Basic
Inventory Information or Password Account
Options).
Press Esc to end the inventory inquiry and
return to the previous menu.
N/A
3 If you pressed Enter in Step 2, the computer displays the search options box:
Search By:
+---------------------------+
¦ 1. Catalog Number
¦
¦ 2. Short Description
¦
¦ 3. Item Number
¦
¦ 4. Manufacturer Number
¦
¦ 5. Location Number
¦
¦ 6. Vendor Catalog
¦
¦ 7. Bar Code Number
¦
¦ 8. Group/Section
¦
¦ 9. Keyword
¦
+---------------------------+
You can select one of the search options either by entering the number (1-9) and
pressing Enter or moving the highlighted bar using the up or down arrow.
4 After selecting a search method, you are asked to enter the beginning number to
search. For example, if you selected to search by catalog number, the computer
asks Start At Catalog:. You can do one of the following options:
Ø
Enter a beginning number to search and press Enter.
Ø
Press Enter to start searching at the beginning of the file according to the search method
(catalog number, short description, etc.).
Ø
Press Esc to go back to the search options box in Step 4.
Dim11
199
Chapter 5. Inventory
F NOTE:
If you selected to search by group/section, the search procedure is a little different.
The computer asks Start At Group:. Enter the first group number (1-99) to start the
search and press Enter.
The available group numbers and descriptions are displayed. Select the desired group by
using the up or down arrows or enter another group number to jump to. When the
desired group is highlighted, press Enter.
If you have section descriptions set up in the Variable File, the section numbers and
descriptions are displayed. Select the section the same way as the group.
At this point, the computer displays the first item in the selected group/section.
F NOTE:
If you selected to search by keyword, the computer searches through the IM1.D file
(Inventory Static Data), reading each description, looking for a match against the keyword
you entered. This takes some time, so if you have a large inventory file this is probably
not the best way to search for items.
5 Once you are in the search mode, the computer displays the first 5 items according
to the search method. For example:
------------------------------------------------------------------------------<Ent>=Select
<UpA/DnA>=Scroll
(.)=Page Down
(,)=Page Up
<Esc>=Exit
Jump to
(*)=Assoc Items (;)=Item Search
Item No--Catalog No------Description----------------------------Price-----Net
12229000 1/2 REDWOOD
1/2" REDWOOD STUD R/L
325.00
-20
12229004 1/2 REDWOOD 04 1/2" REDWOOD STUD R/L
2100.00
776
12229006 1/2 REDWOOD 06 1/2" REDWOOD STUD R/L
600.00
641
12229008 1/2 REDWOOD 08 1/2" REDWOOD STUD R/L
325.00
1043
12229010 1/2 REDWOOD 10 1/2" REDWOOD STUD R/L
325.00
388
The cursor is positioned at Jump to _____ Number:. The first item on the list is
highlighted. You now have the following options:
<Ent>=Select
<UpA/DnA>=Scroll
(.)=Page Down
(,)=Page Up
<Esc>=Exit
Jump to ____ Number
Enter a line number
200
Press Enter to select the highlighted item. Continue
with the program.
Press the up or down arrow to scroll through the
displayed list.
Press the period and Enter to page down, using the last
item displayed as the first item of the new display.
Press the comma and Enter to page up, using the first
item displayed as the last item of the new display.
Press Esc to end this routine and return to the search
options box in Step 3.
To quickly go to another area of the item list, enter
another beginning number to search.
Even though a line number is not displayed, you can
enter the line number (1-5) from the displayed items and
press Enter to select that item.
Dim11
Chapter 5. Inventory
Steps 6-7: INVENTORY INQUIRY
6 After selecting an item above, the computer displays the inquiry screen for that
item. For example:
3015100 1X10-RL #2 & BTR PINE
C#:110RL2P
M#:
Use: 0
UPC#:
Short: SHORT
MFG Name: MFG1
Dscabl
Taxabl
Season Cd: 0 Stock Code:
Price Round Cd:
Purchasing Code:
Type: 2
Unit: MBF
Expected Margin: 25.00
Price Basis: 0
Item Code:
Enter Desc:
Cost Percentage: 75.00
Mkt Cost Basis: 1
Conv Factor:
.8334
Spiff:
0
Primary
Assoc. Number :
0
Vendor:
0
Vol/Wght Factor:
.0000
Location:
Units Per Pack
.00
Store: 1
Price
Perpetual
Save-Hist
New Price
2.00
Price Sticker
Misc Code 1:
List/Base
479.99
Min:
0
Misc Code 2:
Prc Adj 1
60.00
768.00
Max:
1
On Hand:
1000.00
Prc Adj 2
60.00
768.00
Sales-RK N
0 On Rsv :
.00
Prc Adj 3
50.00
720.00
Avmar-RK N
0 Net
:
1000.00
Prc Adj 4
45.00
696.00
Gmroi-RK N
0 On Ord :
.00
Prc Adj 5
40.00
672.00
AVE :
480.00 EOQ
:
1.00
Prc Adj 6
35.00
648.00
LAST:
480.00 Dtl-Sale: 00/00/00
Mkt :
480.00 Dtl-Pur : 00/00/00
Dtl-Ct : 10/01/96
Value:
480.00 Dt Added: 00/00/00
(N)=Next (P)=Prev
(O)=Ordrd (M)=Multi Store (V)=Vendor (S)=Sum
(G)=Graph (R)=Rsrvd (Q)=Quick Tally (H)=History (T)=Tallies
The information on this screen is somewhat self-explanatory. You can also enter
the following options. Depending on the item’s setup, some of these options may
not be available.
N
P
H
G
V
R
O
M
S
T
Q
F
S
to view the next item
to view the previous item
to view the history
to view the history graph
to view the multiple vendors
to view the on reserve detail
to view the on order detail
to view the detail from other stores (multi-stores only)
(random length items) to view the sum of the specific lengths
(random length items) to view the tallies of the specific lengths
to show the quick tally routine
to view the spiff information
(random length items) to view the sum of the specific lengths
7 When you are done viewing the item, press Esc to return to Step 2 to select
another item or end this process.
Dim11
201
Chapter 5. Inventory
Sample Items
Example 1.
Each item
Type 0
Percentage markdown from list (retail)
Example 2.
Specific lengths of lumber and plywood
Type 1
Percentage markup from cost (base)
Example 3.
Random length for Example 2
Type 2
Percentage markup from cost (base)
Example 4.
Molding
Type 3 / Conversion factor 1
Percentage markup from cost (base)
Example 5.
Molding
Will enter lineal feet
List/Base is in single footage
Example 6.
Misc. Molding
Type 0 / Conversion factor 0
Example 7.
Electrical wire, rope, dowels, fasteners
Type 0
Purchasing Code=P (purchase quantity is different
from selling quantity
Percentage markup from cost (base)
Example 8.
Misc. item 98
Cost calculated from cost %
Non-perpetual
Example 9.
Misc. item 99
Enter price and cost at POS
Non-perpetual
Along with each sample load form, there is an inventory inquiry screen showing
you the item with its resulting price levels.
The last page is a blank load form that can be copied and filled out as needed.
202
Dim11
Chapter 5. Inventory
INVENTORY LOAD FORM
Example 1. Each item (hammer)
**** IM1.D ****
**** IM2.D ****
1.Item No __05311101_______________
32.Non Perpet __N___
2.Catalog _____16 OZ HAMMER______________
33.No History __N___
3.Mfg No
_______________________________
34.Minimum ____________
4.Short Desc _____HAMMER_________________
35.Maximum ____________
5.Mfg Name
36.Ave/Lst Cost _15.00___
____________________________
6.Item Desc ____CR11XL HAMMER 11442____________
37.Market Cost __________
7.Unit Desc ___EA____
20.Second Desc Use ___
38.LIFO Cost ____________
8.Item Code _________
21.Units p/Pkg
_0_
39.List/Base 29.95-retail
9.Non Disc
_________
22.EOQ
________
40.Price Adj 1 __-10_____
10.Non Tax
_________
23.Season Code _______
41.Price Adj 2 __-20_____
11.Enter Desc _______
24.Stock Code
42.Price Adj 3 __________
12.C or M
25.Price Round Code ___
43.Price Adj 4 __________
26.Purchasing Code
___
44.Price Adj 5 __________
14.Price Basis __0___
27.Vol/Wt Conv ________
45.Price Adj 6 __________
15.Mkt Cst Basis _1__
28.Prt Price Stckrs ___
46.Price Adj 7 __________
16.Conv Factor ________
29. Misc Code-1 _____
47.Price Adj 8 __________
17.Ex Gross Marg _33.00
30. Misc Code-2 _____
48.Price Adj 9 __________
18.Cost Percent _75.00_
31. Assoc # _________
13.Type (0-7)
_______
__0___
_______
19.Second Desc ____________________________________________________________
**** OM4.D – Vendors ****
**** IM9.D – Locations ****
49.Vendor
-1 ___________________
57..Location 1 __________________
50.Catalog
-1 ___________________
58..Location 2 __________________
51.Units p/Pkg-1 ___________________
52.Order Cost -1 ___________________
**** BC1.D - Bar Codes ****
53.Vendor
-2 ___________________
59..Bar Code 1
_________________
54.Catalog
-2 ___________________
60..Bar Code 2
_________________
55.Units p/Pkg-2 ___________________
56.Order Cost -2 ___________________
Dim11
203
Chapter 5. Inventory
Example 1. Each item (hammer)
5311101 CR11XL HAMMER 11442
C#:16 OZ HAMMER
M#:
Use: 0
UPC#:
Short: HAMMER
MFG Name:
Dscabl
Taxabl
Season Cd: 0 Stock Code:
Price Round Cd:
Purchasing Code:
Type: 0
Unit: EA
Expected Margin: 33.00
Price Basis: 0
Item Code:
Enter Desc:
Cost Percentage: 75.00
Mkt Cost Basis: 1
Conv Factor:
.0000
Spiff:
0
Primary
Assoc. Number :
0
Vendor:
0
Vol/Wght Factor:
.0000
Location:
Units Per Pack
.00
Store: 1
Price
Perpetual
Save-Hist
New Price
Price Sticker
Misc Code 1:
List/Base
29.95
Min:
0
Misc Code 2:
Prc Adj 1
29.95
Max:
0
On Hand:
.00
Prc Adj 2
-10.00
26.95
Sales-RK N
0 On Rsv :
.00
Prc Adj 3
-20.00
23.96
Avmar-RK N
0 Net
:
.00
Gmroi-RK N
0 On Ord :
.00
AVE :
15.00 EOQ
:
.00
LAST:
15.00 Dtl-Sale: 00/00/00
Mkt :
.00 Dtl-Pur : 00/00/00
Dtl-Ct : 00/00/00
Value:
.00 Dt Added: 00/00/00
(N)=Next (P)=Prev
(O)=Ordrd
(V)=Vendor
(G)=Graph (R)=Rsrvd
(H)=History
204
Dim11
Chapter 5. Inventory
INVENTORY LOAD FORM
Example 2. Type 1-specific lengths of lumber and plywood
**** IM1.D ****
**** IM2.D ****
1.Item No ____51051108_____________
32.Non Perpet __N___
2.Catalog _____2408H_____________________
33.No History __N___
3.Mfg No
_______________________________
34.Minimum ____________
4.Short Desc _____HF_____________________
35.Maximum ____________
5.Mfg Name
36.Ave/Lst Cost 250.00**_
____________________________
6.Item Desc ___2x4-08 STD & BTR HEM FIR________
37.Market Cost __________
7.Unit Desc ___BF____
20.Second Desc Use ___
38.LIFO Cost ____________
8.Item Code _________
21.Units p/Pkg Use ___
39.List/Base _250.00**___
9.Non Disc
_________
22.EOQ
________
40.Price Adj 1 ___60.00__
10.Non Tax
_________
23.Season Code _______
41.Price Adj 2 ___55.00__
11.Enter Desc _______
24.Stock Code
42.Price Adj 3 ___50.00__
12.C or M
25.Price Round Code ___
43.Price Adj 4 __________
26.Purchasing Code
___
44.Price Adj 5 __________
14.Price Basis __0___
27.Vol/Wt Conv ________
45.Price Adj 6 __________
15.Mkt Cst Basis _0__
28.Prt Price Stckrs ___
46.Price Adj 7 __________
13.Type (0-7)
__M____
__1___
16.Conv Factor _5.333*
_______
29. Misc Code-1 _____
17.Ex Gross Marg _15.00
30. Misc Code-2 _____
18.Cost Percent _75.00_
31. Assoc # _________
47.Price Adj 8 __________
48.Price Adj 9 __________
19.Second Desc ____________________________________________________________
**** OM4.D – Vendors ****
**** IM9.D – Locations ****
49.Vendor
-1 ___________________
57..Location 1 __________________
50.Catalog
-1 ___________________
58..Location 2 __________________
51.Units p/Pkg-1 ___________________
52.Order Cost -1 ___________________
**** BC1.D - Bar Codes ****
53.Vendor
-2 ___________________
59..Bar Code 1
_________________
54.Catalog
-2 ___________________
60..Bar Code 2
_________________
55.Units p/Pkg-2 ___________________
56.Order Cost -2 ___________________
* Specific length lumber=thickness x width x length/12.
** Cost per thousand
Dim11
Plywood=width x length
205
Chapter 5. Inventory
Example 2. Type 1-specific lengths of lumber and plywood
51051108 2x4-08 STD & BTR HEM FIR
C#:2408H
Use: 0
M#:
UPC#:
Short: HF
MFG Name:
Dscabl
Taxabl
Season Cd: 0 Stock Code:
Price Round Cd:
Purchasing Code:
Type: 1
Unit: MBF
Expected Margin: 15.00
Price Basis: 0
Item Code:
Enter Desc:
Cost Percentage: 75.00
Mkt Cost Basis: 0
Conv Factor:
5.3333
Spiff:
0
Primary
Assoc. Number :
0
Vendor:
0
Vol/Wght Factor:
.0000
Location:
Units Per Pack
.00
Store: 1
Price
Each
Perpetual
Save-Hist
New Price
Price Sticker
Misc Code 1:
List/Base
250.00
1.33 Min:
0
Misc Code 2:
Prc Adj 1
60.00
400.00
2.13 Max:
0
On Hand:
.00
Prc Adj 2
55.00
388.00
2.07 Sales-RK N
0 On Rsv :
.00
Prc Adj 3
50.00
375.00
2.00 Avmar-RK N
0 Net
:
.00
Gmroi-RK N
0 On Ord :
.00
AVE :
250.00 EOQ
:
.00
LAST:
250.00 Dtl-Sale: 00/00/00
Mkt :
.00 Dtl-Pur : 00/00/00
Dtl-Ct : 00/00/00
Value:
.00 Dt Added: 00/00/00
(N)=Next (P)=Prev
(O)=Ordrd
(V)=Vendor
(G)=Graph (R)=Rsrvd
(H)=History
206
Dim11
Chapter 5. Inventory
INVENTORY LOAD FORM
Example 3. Type 2-random length item
**** IM1.D ****
1.Item No 51051100____
**** IM2.D ****
32.Non Perpet _N____
must end in “00”
2.Catalog __24RLH__ must have “RL” in Catalog #
33.No History __N___
3.Mfg No
_______________________________
34.Minimum ____________
4.Short Desc __HF________________________
35.Maximum ____________
5.Mfg Name
36.Ave/Lst Cost _250.00__
____________________________
6.Item Desc __2X4-RL STD & BTR HEM FIR
37.Market Cost __________
must have “RL” in Item Desc
7.Unit Desc ___BF____
20.Second Desc Use ___
38.LIFO Cost ____________
8.Item Code _________
21.Units p/Pkg Use ___
39.List/Base _250.00_____
9.Non Disc
_________
22.EOQ
________
40.Price Adj 1 __________
10.Non Tax
_________
23.Season Code _______
41.Price Adj 2 __________
11.Enter Desc _______
24.Stock Code
42.Price Adj 3 __________
12.C or M
25.Price Round Code ___
43.Price Adj 4 __________
26.Purchasing Code
___
44.Price Adj 5 __________
14.Price Basis ___0__
27.Vol/Wt Conv ________
45.Price Adj 6 __________
15.Mkt Cst Basis _0__
28.Prt Price Stckrs ___
46.Price Adj 7 __________
13.Type (0-7)
__M____
__2___
16.Conv Factor _.6667*
_______
29. Misc Code-1 _____
17.Ex Gross Marg _25.00
30. Misc Code-2 _____
18.Cost Percent _75.00_
31. Assoc # _________
47.Price Adj 8 __________
48.Price Adj 9 __________
19.Second Desc ____________________________________________________________
**** OM4.D – Vendors ****
**** IM9.D – Locations ****
49.Vendor
-1 ___________________
57..Location 1 __________________
50.Catalog
-1 ___________________
58..Location 2 __________________
51.Units p/Pkg-1 ___________________
52.Order Cost -1 ___________________
**** BC1.D - Bar Codes ****
53.Vendor
-2 ___________________
59..Bar Code 1
_________________
54.Catalog
-2 ___________________
60..Bar Code 2
_________________
55.Units p/Pkg-2 ___________________
56.Order Cost -2 ___________________
* Thickness x width/12
Dim11
207
Chapter 5. Inventory
Example 3. Type 2-random length item
51051100 2x4-RL STD & BTR HEM FIR
C#:24RLH
Use: 0
M#:
UPC#:
Short: HF
MFG Name:
Dscabl
Taxabl
Season Cd: 0 Stock Code:
Price Round Cd:
Purchasing Code:
Type: 2
Unit: MBF
Expected Margin: 25.00
Price Basis: 0
Item Code:
Enter Desc:
Cost Percentage: 75.00
Mkt Cost Basis: 0
Conv Factor:
.6667
Spiff:
0
Primary
Assoc. Number :
0
Vendor:
0
Vol/Wght Factor:
.0000
Location:
Units Per Pack
.00
Store: 1
Price
Perpetual
Save-Hist
New Price
Price Sticker
Misc Code 1:
List/Base
250.00
Min:
0
Misc Code 2:
Prc Adj 1
60.00
400.00
Max:
0
On Hand:
.00
Prc Adj 2
55.00
388.00
Sales-RK N
0 On Rsv :
.00
Prc Adj 3
50.00
375.00
Avmar-RK N
0 Net
:
.00
Gmroi-RK N
0 On Ord :
.00
AVE :
250.00 EOQ
:
.00
LAST:
250.00 Dtl-Sale: 00/00/00
Mkt :
.00 Dtl-Pur : 00/00/00
Dtl-Ct : 00/00/00
Value:
.00 Dt Added: 00/00/00
(N)=Next (P)=Prev
(O)=Ordrd
(V)=Vendor (S)=Sum
(G)=Graph (R)=Rsrvd (Q)=Quick Tally (H)=History (T)=Tallies
208
Dim11
Chapter 5. Inventory
INVENTORY LOAD FORM
Example 4. Type 3-molding
**** IM1.D ****
**** IM2.D ****
1.Item No __21020001_______________
32.Non Perpet __N___
2.Catalog ____BRICKMOLD____________
33.No History __N___
3.Mfg No
_____21020001____________
34.Minimum ____________
4.Short Desc __BRICKMOLD___________
35.Maximum ____________
5.Mfg Name
____________________________
36.Ave/Lst Cost _20.00___
6.Item Desc ___5-1/4 BRICK MOLDING_____________
37.Market Cost __________
7.Unit Desc ___LF____
20.Second Desc Use ___
38.LIFO Cost ____________
8.Item Code _________
21.Units p/Pkg Use ___
39.List/Base __25.00_____
9.Non Disc
_________
22.EOQ
________
40.Price Adj 1 _40.00____
10.Non Tax
_________
23.Season Code _______
41.Price Adj 2 _35.00____
11.Enter Desc _______
24.Stock Code
42.Price Adj 3 __35.00___
12.C or M
25.Price Round Code ___
43.Price Adj 4 _30.00____
26.Purchasing Code
___
44.Price Adj 5 _30.00____
14.Price Basis __1___
27.Vol/Wt Conv ________
45.Price Adj 6 __________
15.Mkt Cst Basis __2_
28.Prt Price Stckrs ___
46.Price Adj 7 __________
13.Type (0-7)
___C___
___3__
_______
16.Conv Factor _1.0000
29. Misc Code-1 _____
47.Price Adj 8 __________
17.Ex Gross Marg 30.00
30. Misc Code-2 _____
48.Price Adj 9 __________
18.Cost Percent 75.00
31. Assoc # _________
19.Second Desc ____________________________________________________________
**** OM4.D – Vendors ****
**** IM9.D – Locations ****
49.Vendor
-1 ___________________
57..Location 1 __________________
50.Catalog
-1 ___________________
58..Location 2 __________________
51.Units p/Pkg-1 ___________________
52.Order Cost -1 ___________________
**** BC1.D - Bar Codes ****
53.Vendor
-2 ___________________
59..Bar Code 1
_________________
54.Catalog
-2 ___________________
60..Bar Code 2
_________________
55.Units p/Pkg-2 ___________________
56.Order Cost -2 ___________________
Dim11
209
Chapter 5. Inventory
Example 4. Type 3-molding
21020001 5-1/4 BRICK MOLD
C#:BRICKMOLD
M#:
Use: 0
UPC#:99921020001
Short: BRICKMOLD
MFG Name:
Dscabl
Taxabl
Season Cd: 0 Stock Code:
Price Round Cd:
Purchasing Code:
Type: 3
Unit: CLF
Expected Margin: 30.00
Price Basis: 1
Item Code:
Enter Desc:
Cost Percentage: 75.00
Mkt Cost Basis: 2
Conv Factor:
1.0000
Spiff:
1
Primary
Assoc. Number :
0
Vendor:
Vol/Wght Factor:
.0000
Location:
Units Per Pack
.00
Store: 1
Price
Perpetual
Save-Hist
New Price
Price Sticker
Misc Code 1:
List/Base
25.00
Min:
0
Misc Code 2:
Prc Adj 1
40.00
65.00
Max:
0
On Hand:
.00
Prc Adj 2
35.00
60.00
Sales-RK E
0 On Rsv :
.00
Prc Adj 3
35.00
60.00
Avmar-RK E
0 Net
:
.00
Prc Adj 4
30.00
55.00
Gmroi-RK E
0 On Ord :
.00
Prc Adj 5
30.00
55.00
AVE :
20.00 EOQ
:
.00
LAST:
20.00 Dtl-Sale: 00/00/00
Mkt :
.00 Dtl-Pur : 00/00/00
Dtl-Ct : 00/00/00
Value:
.00 Dt Added: 00/00/00
(N)=Next (P)=Prev
(O)=Ordrd
(V)=Vendor
(F)=Spiff
(G)=Graph (R)=Rsrvd (Q)=Quick Tally (H)=History
210
Dim11
Chapter 5. Inventory
INVENTORY LOAD FORM
Example 5. Type 0-molding
**** IM1.D ****
**** IM2.D ****
1.Item No __21010002_______________
32.Non Perpet __N___
2.Catalog __CASING_______________________
33.No History __N___
3.Mfg No
__21010002_____________________
34.Minimum ____________
4.Short Desc __CASING____________________
35.Maximum ____________
5.Mfg Name
36.Ave/Lst Cost _20.00___
____________________________
6.Item Desc __2-1/4” DOOR CASING_______________
37.Market Cost __________
7.Unit Desc ___FT____
20.Second Desc Use ___
38.LIFO Cost ____________
8.Item Code _________
21.Units p/Pkg Use ___
39.List/Base __25.00_____
9.Non Disc
_________
22.EOQ
________
40.Price Adj 1 __40.00___
10.Non Tax
_________
23.Season Code _______
41.Price Adj 2 __35.00___
11.Enter Desc _______
24.Stock Code
42.Price Adj 3 __30.00___
12.C or M
25.Price Round Code ___
43.Price Adj 4 __30.00___
26.Purchasing Code
___
44.Price Adj 5 __30.00___
14.Price Basis __1___
27.Vol/Wt Conv ________
45.Price Adj 6 __________
15.Mkt Cst Basis _2__
28.Prt Price Stckrs ___
46.Price Adj 7 __________
16.Conv Factor __.0000_
29. Misc Code-1 _____
47.Price Adj 8 __________
17.Ex Gross Marg _25.00
30. Misc Code-2 _____
48.Price Adj 9 __________
18.Cost Percent __75.00
31. Assoc # _________
13.Type (0-7)
_______
__0___
_______
19.Second Desc ____________________________________________________________
**** OM4.D – Vendors ****
**** IM9.D – Locations ****
49.Vendor
-1 ___________________
57..Location 1 __________________
50.Catalog
-1 ___________________
58..Location 2 __________________
51.Units p/Pkg-1 ___________________
52.Order Cost -1 ___________________
**** BC1.D - Bar Codes ****
53.Vendor
-2 ___________________
59..Bar Code 1
_________________
54.Catalog
-2 ___________________
60..Bar Code 2
_________________
55.Units p/Pkg-2 ___________________
56.Order Cost -2 ___________________
Dim11
211
Chapter 5. Inventory
Example 5. Type 0-molding
21010002 2-1/4" DOOR CASING
M#:
UPC#:99921010002
Short: CASING
MFG Name:
Dscabl
Taxabl
Season Cd: 0 Stock Code:
Price Round Cd:
Purchasing Code:
Type: 0
Unit: FT
Expected Margin: 25.00
Price Basis: 1
Item Code:
Enter Desc:
Cost Percentage: 75.00
Mkt Cost Basis: 2
Conv Factor:
.0000
Spiff:
Primary
Assoc. Number :
0
Vendor:
Vol/Wght Factor:
.0000
Location:
Units Per Pack
.00
Store: 1
Price
Perpetual
Save-Hist
New Price
Price Sticker
Misc Code 1:
List/Base
25.00
Min:
0
Misc Code 2:
Prc Adj 1
40.00
65.00
Max:
0
On Hand:
.00
Prc Adj 2
35.00
60.00
Sales-RK B
0 On Rsv :
.00
Prc Adj 3
30.00
55.00
Avmar-RK B
0 Net
:
.00
Prc Adj 4
30.00
55.00
Gmroi-RK B
0 On Ord :
.00
Prc Adj 5
30.00
55.00
AVE :
20.00 EOQ
:
.00
LAST:
20.00 Dtl-Sale: 00/00/00
Mkt :
.00 Dtl-Pur : 00/00/00
Dtl-Ct : 00/00/00
Value:
.00 Dt Added: 00/00/00
(N)=Next (P)=Prev
(O)=Ordrd
(V)=Vendor
(F)=Spiff
(G)=Graph (R)=Rsrvd
(H)=History
212
C#:CASING
Use: 0
Dim11
Chapter 5. Inventory
INVENTORY LOAD FORM
Example 6. Misc. molding
**** IM1.D ****
**** IM2.D ****
1.Item No ___21999999______________
32.Non Perpet __Y___
2.Catalog ___MOLDING_____________________
33.No History __Y___
3.Mfg No
___21999999____________________
34.Minimum ____________
4.Short Desc ___MOLDING__________________
35.Maximum ____________
5.Mfg Name
36.Ave/Lst Cost _.00_____
____________________________
6.Item Desc ___MISCELLANEOUS MOLDING___________
37.Market Cost __________
7.Unit Desc ___EA____
20.Second Desc Use ___
38.LIFO Cost ____________
8.Item Code _________
21.Units p/Pkg Use ___
39.List/Base ___.00______
9.Non Disc
_________
22.EOQ
40.Price Adj 1 _(blank)_
10.Non Tax
_________
23.Season Code _______
41.Price Adj 2 ___”______
11.Enter Desc ___Y___
24.Stock Code
42.Price Adj 3 ___”______
12.C or M
25.Price Round Code ___
13.Type (0-7)
_______
__0__
________
_______
26.Purchasing Code
___
43.Price Adj 4 ___”______
44.Price Adj 5 ____”______
14.Price Basis __1___
27.Vol/Wt Conv ________
45.Price Adj 6 __________
15.Mkt Cst Basis _2__
28.Prt Price Stckrs ___
46.Price Adj 7 __________
16.Conv Factor _.0000
29. Misc Code-1 _____
17.Ex Gross Marg _35.00
30. Misc Code-2 _____
18.Cost Percent _65.00_
31. Assoc # _________
47.Price Adj 8 __________
48.Price Adj 9 __________
19.Second Desc ____________________________________________________________
**** OM4.D – Vendors ****
**** IM9.D – Locations ****
49.Vendor
-1 ___________________
57..Location 1 __________________
50.Catalog
-1 ___________________
58..Location 2 __________________
51.Units p/Pkg-1 ___________________
52.Order Cost -1 ___________________
**** BC1.D - Bar Codes ****
53.Vendor
-2 ___________________
59..Bar Code 1
_________________
54.Catalog
-2 ___________________
60..Bar Code 2
_________________
55.Units p/Pkg-2 ___________________
56.Order Cost -2 ___________________
Dim11
213
Chapter 5. Inventory
Example 6. Misc.-molding
21999999 MISCELLANEOUS MOLDINGS
C#:MOLDING
M#:21999999
Use: 0
UPC#:
Short: MOLDING
MFG Name:
Dscabl
Taxabl
Season Cd: 0 Stock Code:
Price Round Cd:
Purchasing Code:
Type: 0
Unit: EA
Expected Margin: 35.00
Price Basis: 1
Item Code:
Enter Desc: Y
Cost Percentage: 65.00
Mkt Cost Basis: 2
Conv Factor:
.0000
Spiff:
0
Primary
Assoc. Number :
0
Vendor:
0
Vol/Wght Factor:
.0000
Location:
Units Per Pack
.00
Store: 1
Price
Nonperpetual No-Hist
New Price
Price Sticker
Misc Code 1:
List/Base
Min:
0
Misc Code 2:
Prc Adj 1
.00
Max:
0
On Hand:
.00
Sales-RK E
6 On Rsv :
.00
Avmar-RK E
6 Net
:
.00
Gmroi-RK E
5 On Ord :
.00
AVE :
.00 EOQ
:
.00
LAST:
.00 Dtl-Sale: 00/00/00
Mkt :
.00 Dtl-Pur : 00/00/00
Dtl-Ct : 00/00/00
Value:
.00 Dt Added: 00/00/00
(N)=Next (P)=Prev
(O)=Ordrd
(V)=Vendor
(G)=Graph (R)=Rsrvd
(H)=History
214
Dim11
Chapter 5. Inventory
INVENTORY LOAD FORM
Example 7. Electrical wire, rope, dowels, fasteners (Purchasing Code=P)
**** IM1.D ****
**** IM2.D ****
1.Item No ___65011002______________
32.Non Perpet ______
2.Catalog ___3D__________________________
33.No History ______
3.Mfg No
_______________________________
34.Minimum ____________
4.Short Desc __NAILS BOX_________________
35.Maximum ____________
5.Mfg Name
36.Ave/Lst Cost __.40**__
____________________________
6.Item Desc ____3d BOX NAILS___________________
37.Market Cost __________
7.Unit Desc ___LB____
20.Second Desc Use ___
38.LIFO Cost ____________
8.Item Code _________
21.Units p/Pkg Use _50*
39.List/Base ___.40**____
9.Non Disc
_________
22.EOQ
________
40.Price Adj 1 __60.00___
10.Non Tax
_________
23.Season Code _______
41.Price Adj 2 _55.00____
11.Enter Desc _______
24.Stock Code
42.Price Adj 3 __50.00___
12.C or M
25.Price Round Code ___
43.Price Adj 4 __________
26.Purchasing Code
_P*
44.Price Adj 5 __________
14.Price Basis ___0__
27.Vol/Wt Conv ________
45.Price Adj 6 __________
15.Mkt Cst Basis _0__
28.Prt Price Stckrs ___
46.Price Adj 7 __________
13.Type (0-7)
_______
__0___
16.Conv Factor _1.0000
_______
29. Misc Code-1 _____
17.Ex Gross Marg _25.00
30. Misc Code-2 _____
18.Cost Percent __75.00
31. Assoc # _________
47.Price Adj 8 __________
48.Price Adj 9 __________
19.Second Desc ____________________________________________________________
**** OM4.D – Vendors ****
**** IM9.D – Locations ****
49.Vendor
-1 ___________________
57..Location 1 __________________
50.Catalog
-1 ___________________
58..Location 2 __________________
51.Units p/Pkg-1 ___________________
52.Order Cost -1 ___________________
**** BC1.D - Bar Codes ****
53.Vendor
-2 ___________________
59..Bar Code 1
_________________
54.Catalog
-2 ___________________
60..Bar Code 2
_________________
55.Units p/Pkg-2 ___________________
56.Order Cost -2 ___________________
* Purchase quantity 1 = 1 50 lb. box.
** Cost per pound
Dim11
Selling quantity 1 = 1 lb.
215
Chapter 5. Inventory
Example 7. Electrical wire, rope, dowels, fasteners (Purchasing Code=P)
65011002 3d BOX NAILS
C#:3D
Use: 0
M#:
UPC#:
Short: NAILS BOX
MFG Name:
Dscabl
Taxabl
Season Cd: 0 Stock Code:
Price Round Cd:
Purchasing Code: P
Type: 0
Unit: LB
Expected Margin: 25.00
Price Basis: 0
Item Code:
Enter Desc:
Cost Percentage: 75.00
Mkt Cost Basis: 0
Conv Factor:
1.0000
Spiff:
0
Primary
Assoc. Number :
0
Vendor:
0
Vol/Wght Factor:
.0000
Location:
Units Per Pack
50.00
Store: 1
Price
Perpetual
Save-Hist
New Price
Price Sticker
Misc Code 1:
List/Base
.40
Min:
0
Misc Code 2:
Prc Adj 1
60.00
.64
Max:
0
On Hand:
.00
Prc Adj 2
55.00
.62
Sales-RK N
0 On Rsv :
.00
Prc Adj 3
50.00
.60
Avmar-RK N
0 Net
:
.00
Gmroi-RK N
0 On Ord :
.00
AVE :
.40 EOQ
:
.00
LAST:
.40 Dtl-Sale: 00/00/00
Mkt :
.00 Dtl-Pur : 00/00/00
Dtl-Ct : 00/00/00
Value:
.00 Dt Added: 00/00/0
(N)=Next (P)=Prev
(O)=Ordrd
(V)=Vendor
(G)=Graph (R)=Rsrvd
(H)=History
216
Dim11
Chapter 5. Inventory
INVENTORY LOAD FORM
Example 8. Misc. item 98 (cost calculated)
**** IM1.D ****
**** IM2.D ****
1.Item No ___55999998______________
32.Non Perpet ___Y__
2.Catalog ___M55P________________________
33.No History ___Y__
3.Mfg No
_______________________________
34.Minimum ____________
4.Short Desc _MISC_______________________
35.Maximum ____________
5.Mfg Name
36.Ave/Lst Cost _.00_____
____________________________
6.Item Desc _MISCELLANEOUS REDWOOD – PERCENT
37.Market Cost __________
7.Unit Desc _________
20.Second Desc Use ___
38.LIFO Cost ____________
8.Item Code _________
21.Units p/Pkg Use ___
39.List/Base __.00_______
9.Non Disc
_________
22.EOQ
________
40.Price Adj 1 _(blank)__
10.Non Tax
_________
23.Season Code _______
41.Price Adj 2 ____”_____
11.Enter Desc ___Y___
24.Stock Code
42.Price Adj 3 ____”_____
12.C or M
25.Price Round Code ___
43.Price Adj 4 ____”_____
26.Purchasing Code
___
44.Price Adj 5 __________
14.Price Basis __0___
27.Vol/Wt Conv ________
45.Price Adj 6 __________
15.Mkt Cst Basis _0__
28.Prt Price Stckrs ___
46.Price Adj 7 __________
16.Conv Factor _.0000
29. Misc Code-1 _____
13.Type (0-7)
_______
___0__
_______
17.Ex Gross Marg _25.00
30. Misc Code-2 _____
18.Cost Percent _75.00_
31. Assoc # _________
47.Price Adj 8 __________
48.Price Adj 9 __________
19.Second Desc ____________________________________________________________
**** OM4.D – Vendors ****
**** IM9.D – Locations ****
49.Vendor
-1 ___________________
57..Location 1 __________________
50.Catalog
-1 ___________________
58..Location 2 __________________
51.Units p/Pkg-1 ___________________
52.Order Cost -1 ___________________
**** BC1.D - Bar Codes ****
53.Vendor
-2 ___________________
59..Bar Code 1
_________________
54.Catalog
-2 ___________________
60..Bar Code 2
_________________
55.Units p/Pkg-2 ___________________
56.Order Cost -2 ___________________
Dim11
217
Chapter 5. Inventory
Example 8. Misc.-item 98 (cost calculated)
55999998 MISCELLANEOUS REDWOOD-PERCENT
C#:M55P
Use: 0
M#:
UPC#:
Short: MISC
MFG Name:
Dscabl
Taxabl
Season Cd: 0 Stock Code:
Price Round Cd:
Purchasing Code:
Type: 0
Unit:
Expected Margin: 25.00
Price Basis: 0
Item Code:
Enter Desc: Y
Cost Percentage: 75.00
Mkt Cost Basis: 0
Conv Factor:
.0000
Spiff:
0
Primary
Assoc. Number :
0
Vendor:
0
Vol/Wght Factor:
.0000
Location:
Units Per Pack
.00
Store: 1
Price
Nonperpetual No-Hist
New Price
Price Sticker
Misc Code 1:
List/Base
Min:
0
Misc Code 2:
Prc Adj 1
.00
Max:
0
On Hand:
.00
Sales-RK N
0 On Rsv :
.00
Avmar-RK N
0 Net
:
.00
Gmroi-RK N
0 On Ord :
.00
AVE :
.00 EOQ
:
.00
LAST:
.00 Dtl-Sale: 00/00/00
Mkt :
.00 Dtl-Pur : 00/00/00
Dtl-Ct : 00/00/00
Value:
.00 Dt Added: 00/00/00
(N)=Next (P)=Prev
(O)=Ordrd
(V)=Vendor
(G)=Graph (R)=Rsrvd
(H)=History
218
Dim11
Chapter 5. Inventory
INVENTORY LOAD FORM
Example 9. Misc. item 99 (cost entered)
**** IM1.D ****
**** IM2.D ****
1.Item No ____55999999_____________
32.Non Perpet __Y___
2.Catalog ___M5S_________________________
33.No History __Y___
3.Mfg No
_______________________________
34.Minimum ____________
4.Short Desc ___MISC_____________________
35.Maximum ____________
5.Mfg Name
36.Ave/Lst Cost __.00____
____________________________
6.Item Desc ___MISCELLANEOUS REDWOOD___________
37.Market Cost __________
7.Unit Desc _________
20.Second Desc Use ___
38.LIFO Cost ____________
8.Item Code _________
21.Units p/Pkg Use ___
39.List/Base ___.00______
9.Non Disc
_________
22.EOQ
________
40.Price Adj 1 _(blank)__
10.Non Tax
_________
23.Season Code _______
41.Price Adj 2 ____”_____
11.Enter Desc __Y____
24.Stock Code
42.Price Adj 3 ____”_____
12.C or M
25.Price Round Code ___
43.Price Adj 4 ____”_____
26.Purchasing Code
___
44.Price Adj 5 __________
14.Price Basis __0___
27.Vol/Wt Conv ________
45.Price Adj 6 __________
15.Mkt Cst Basis _0__
28.Prt Price Stckrs ___
46.Price Adj 7 __________
16.Conv Factor _.0000
29. Misc Code-1 _____
47.Price Adj 8 __________
17.Ex Gross Marg _25.00
30. Misc Code-2 _____
48.Price Adj 9 __________
18.Cost Percent __.00__
31. Assoc # _________
13.Type (0-7)
_______
__0___
_______
19.Second Desc ____________________________________________________________
**** OM4.D – Vendors ****
**** IM9.D – Locations ****
49.Vendor
-1 ___________________
57..Location 1 __________________
50.Catalog
-1 ___________________
58..Location 2 __________________
51.Units p/Pkg-1 ___________________
52.Order Cost -1 ___________________
**** BC1.D - Bar Codes ****
53.Vendor
-2 ___________________
59..Bar Code 1
_________________
54.Catalog
-2 ___________________
60..Bar Code 2
_________________
55.Units p/Pkg-2 ___________________
56.Order Cost -2 ___________________
Dim11
219
Chapter 5. Inventory
Example 9. Misc.-item 99 (cost entered)
55999998 MISCELLANEOUS REDWOOD-PERCENT
C#:M55P
Use: 0
M#:
UPC#:
Short: MISC
MFG Name:
Dscabl
Taxabl
Season Cd: 0 Stock Code:
Price Round Cd:
Purchasing Code:
Type: 0
Unit:
Expected Margin: 25.00
Price Basis: 0
Item Code:
Enter Desc: Y
Cost Percentage: 75.00
Mkt Cost Basis: 0
Conv Factor:
.0000
Spiff:
0
Primary
Assoc. Number :
0
Vendor:
0
Vol/Wght Factor:
.0000
Location:
Units Per Pack
.00
Store: 1
Price
Nonperpetual No-Hist
New Price
Price Sticker
Misc Code 1:
List/Base
Min:
0
Misc Code 2:
Prc Adj 1
.00
Max:
0
On Hand:
.00
Sales-RK N
0 On Rsv :
.00
Avmar-RK N
0 Net
:
.00
Gmroi-RK N
0 On Ord :
.00
AVE :
.00 EOQ
:
.00
LAST:
.00 Dtl-Sale: 00/00/00
Mkt :
.00 Dtl-Pur : 00/00/00
Dtl-Ct : 00/00/00
Value:
.00 Dt Added: 00/00/00
(N)=Next (P)=Prev
(O)=Ordrd
(V)=Vendor
(G)=Graph (R)=Rsrvd
(H)=History
220
Dim11
Chapter 5. Inventory
INVENTORY LOAD FORM
**** IM1.D ****
**** IM2.D ****
1.Item No _________________________
32.Non Perpet ______
2.Catalog _______________________________
33.No History ______
3.Mfg No
_______________________________
34.Minimum ____________
4.Short Desc ____________________________
35.Maximum ____________
5.Mfg Name
36.Ave/Lst Cost _________
____________________________
6.Item Desc ___________________________________
37.Market Cost __________
7.Unit Desc _________
20.Second Desc Use ___
38.LIFO Cost ____________
8.Item Code _________
21.Units p/Pkg Use ___
39.List/Base ____________
9.Non Disc
_________
22.EOQ
________
40.Price Adj 1 __________
10.Non Tax
_________
23.Season Code _______
41.Price Adj 2 __________
11.Enter Desc _______
24.Stock Code
42.Price Adj 3 __________
12.C or M
25.Price Round Code ___
43.Price Adj 4 __________
26.Purchasing Code
___
44.Price Adj 5 __________
14.Price Basis ______
27.Vol/Wt Conv ________
45.Price Adj 6 __________
15.Mkt Cst Basis ____
28.Prt Price Stckrs ___
46.Price Adj 7 __________
16.Conv Factor ________
29. Misc Code-1 _____
47.Price Adj 8 __________
17.Ex Gross Marg ______
30. Misc Code-2 _____
48.Price Adj 9 __________
18.Cost Percent _______
31. Assoc # _________
13.Type (0-7)
_______
______
_______
19.Second Desc ____________________________________________________________
**** OM4.D – Vendors ****
**** IM9.D – Locations ****
49.Vendor
-1 ___________________
57..Location 1 __________________
50.Catalog
-1 ___________________
58..Location 2 __________________
51.Units p/Pkg-1 ___________________
52.Order Cost -1 ___________________
**** BC1.D - Bar Codes ****
53.Vendor
-2 ___________________
59..Bar Code 1
_________________
54.Catalog
-2 ___________________
60..Bar Code 2
_________________
55.Units p/Pkg-2 ___________________
56.Order Cost -2 ___________________
Dim11
221
Chapter 5. Inventory
Inventory Exercises
The following exercises are intended to test your knowledge of the inventory files
and how certain features are set up.
Each of the 8 problems has a specific solution which can be found in Appendix B.
Self-check at the end of the exercises.
1. Add a group/section description for 51/13 Dimensional Lumber/White Wood.
2. Print a Price Book for item numbers 51000000 through 51999999. Print L/B
and Price Adjustment 1.
3. Print a Static Data Report for item numbers 51000000 through 51999999.
4. Use the paint template to add a gallon of white latex semi-gloss paint.
5. Add a drill bit to group 13, section 50. The expected gross margin on the item
is 20 percent. The price for the item will have an actual price in the
adjustments.
6. Add crown molding to group 62, section 1. The item is purchased by CLF and
sold by the lineal foot. Expected gross margin on the item is 17 percent. The
price for the item will be a markup percent from a base price.
7. Add 2x4-RL Southern Yellow Pine to group 51, section 11. The item should be
set up MBF. The expected gross margin is 10 percent. The price for the item
will a markup percent from a base price.
8. Add 2x4-8’ Southern Yellow Pine to group 51, section 11. The item is
purchased by MBF and sold by the piece. The expected gross margin is 10
percent. The price for the item will be a markup percent from a base price.
222
Dim11