1
System Administrator’s Manual
Part Number 770804B
April 1992
Including Software Version 3.0 Supplement
1
cl *I
4
5
7 1
7
Li 8l
*
7 Ot
SystemAd.min,istrato.& M:an.u.al~:
S-upp&vmt:
“”..:..i
The lNFOSTAR’“W2
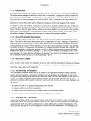
is now being shipped with softwareversion 3.0. This document gives a description ofthe
new features and the changes that were made to the existing features. A new section - Section 70 - System
Administration Reports has been added to the back of this manual. The command summaries on page 5.7 and
pages 6.25 -26 have been updated to software version 3.0.
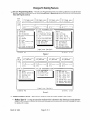
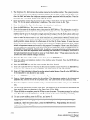
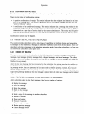
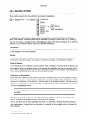
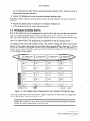
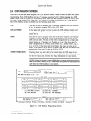
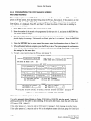
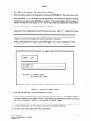
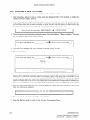
New Features
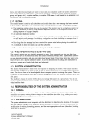
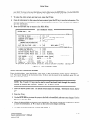
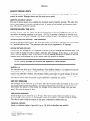
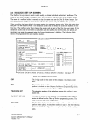
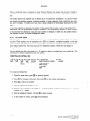
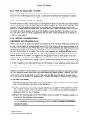
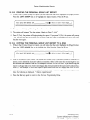
D Access Code Protection
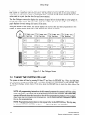
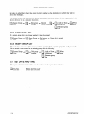
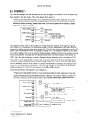
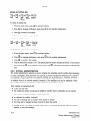
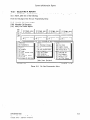
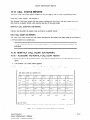
For The System Administrator - The On Line Programming Menu is now propressing F8 for the On Line Programming Menu, the system prompts for an
tected by an access code. After
access code. See Figure 1. The
system administrator’s mailbox.
mailbox access code is 6947,
[ver 3.01
COMPANIES
[A] Setup
[D] Status
[E] Link
[F] Ext. Access
access code is the 3-character company code and the access code forthe
For example, if the company code is EXC and the system administrator’s
the access code is entered as EXC6947.
[ON LINE
PROGRAMMING MENU]
Code
[S]
[T]
[U]
[V]
[cl Type
[H] Out Dial Sched.
[I] C.C.R
IJ1 Class Of Service
[PgDn]
InfoStar
Next
Line Set Up
Bin Numbers
D.N.1.S Table
Message Info
[Esc]Quit
Vx2
12/16/91
17:23
Figure 1
0
New Sizes - The following
new configurations
of the INFOSTAWX2
are available:
o Ports - The VX2 can be ordered in the following additional port increments: 12, 16, 20, and 24.
l
Hours - The VX2 can be ordered in the following additional disk sizes: 30, 60, and 100 hours. The 30
hour disk drive can be ordered with either the INFOSTAR/AP/G or the INFOSTAR/AP/12.
the 60 and 100 hour disk drives require the use of the INFOSTAR/AP/12.
March 2, 1992
Page 1 of 4
However, both
Q Reports - The optional Reports feature is designed to help system administrators
analyze data and
monitor subscriber’s usage so they can operate their systems at optimum performance
and plan for
additional capacity (ports and hours). Reports are accessed via the system monitor. The reports can
be viewed on the system monitor, printed to the system printer, or “printed”
to a floppy disk for
storage. The follotiing reports are available:
The Mailbox Directory report provides a listing of the mailboxes programmed in the system.
The Mailbox Summary report provides a usage report for each mailbox.
The Uninitialized Mailbox report provides a listing of mailboxes which have been created, but have not
been used for the first time by a subscriber.
The .Sy.stem Group Listreport provides a listing of the members of each of the system group lists established.
The Persona/ Group List report provides a listing of the members of each of the personal group lists
established for each mailbox.
The Port Statistics report is a listing of the number of times each port is used (inbound, outbound, and
total), the amount of time (inbound, outbound, and total) each port is in use, the number of transfers, and
the percent of time busy for total reporting period.
The /-/our/y Port Statistics report provides the number of connections to the system, the number of connect minutes, the number of ports busy, and the time busy for the system by hour.
The System Port Statistics report provides a summary of port activity for the reporting period.
The Outdialing
Detail report provides a listing of each outdial call placed by the system.
See the attached section titled System Administration
ture.
Reports for a detailed description
of the Reports fea-
0 Multiple Greetings - Additional greetings are available for each mailbox. These are greetings 4,5 and 6.
These greetings are played when the appropriate code is sent before the mailbox number by the telephone
system the VX2 is integrated with. Each subscriber mailbox supports the following greetings:
m Greeting 1 - Name
a Greeting 2 - Mailbox Greeting (played when mailbox number is dialed into the VX2)
a Greeting
Greeting
* Greeting
w Greeting
n
3456-
Temporary Greeting (when active, overrides all other greetings)
No Answer Greeting (played when *l + mailbox number is dialed into the VX2)
Busy Greeting (played when *2 + mailbox number is dialed into the VX2)
Out of Office Greeting (played when *3 + mailbox number is dialed into the VX2)
In order to make use of these greetings, the telephone system must be able to send the appropriate
before the mailbox number, for each status of an extension.
To record the additional
.
n
code
greetings:
Dial 3 for Personal Options
Dial 1 for Greetings
= Dial 2 to Record
Dial #, then the greeting to be recorded (4, 5, or 6).
n
Page 2 of 4
March 2, 1992
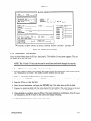
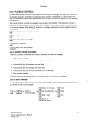
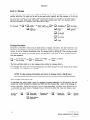
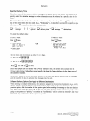
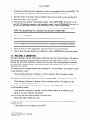
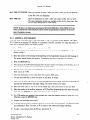
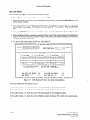
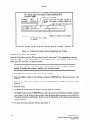
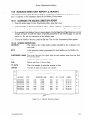
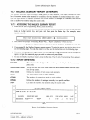
Changes To Existing
0
Features
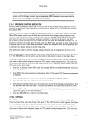
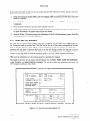
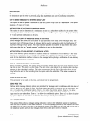
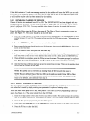
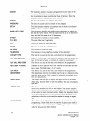
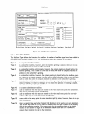
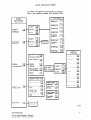
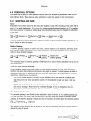
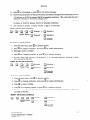
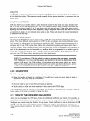
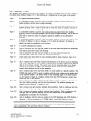
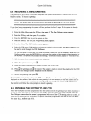
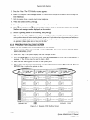
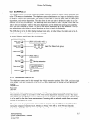
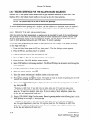
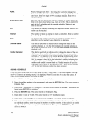
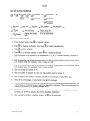
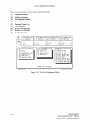
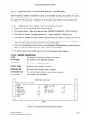
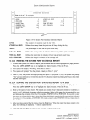
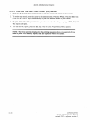
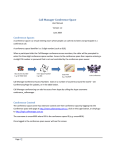
On Line Programming
Menu - The On Line Programming menu has been updated to include the new
features. The menu is now two pages. Press the Page Up or Page Down keys to move from one page to the
next. See Figures 2 and 3.
[Ver 3.01
COMPANIES
[A] Setup
[B] Parameters
MAILBOX
[C] Setup
[D] Status
[E] Link
[F] Ext. Access
[cl Type
[ON LINE
[L]
InfoStar
Personal
Groups
P.B.X Parameters
[N] P.B.X Functions
CALLS STATUS
[OA] Call Count
[M]
Code
[H] Out Dial Sched.
[I] C.C.R
rJ1 Class Of Service
i:
PROGRAMMING MENU]
[OC] Hourly
Count
[PgDn]
[Esc]Quit
Next
Vx2
QUEUE
[&A] M.W.I
[QB] Out Dial
[QC] Agent Status
[QD] Specified
Time
[QE] Group Deliv.
Q.
MISC.
[S] Line Set Up
[T] Bin Numbers
[U] D.N.1.S Table
[v] Message Info
[W] Out Dial Param.
12/16/91
17:23
Figure 2
L[Ver'3.0]-
[ON LINE
PROGRAMMING MENU]
[T] Outdial
Stat
Rpt
\
[PgUp]
InfoStar
Prev
[Esc]Quit
Vx2
12/16/91
17:24
Figure 3
Q Additional
.
Mailbox Types - The following
mailbox types have been added to the system:
Mailbox Type 16 - is a regular subscriber mailbox which is allowed to skip listening to broadcast messages, and is allowed to delete the broadcast message before listening to the entire message. (Press 3
to delete, ##to skip).
March 2, 1992
Page 3 of 4
.
q
.
Mailbox Type 17 - calls to mailboxes with this type are routed to the starting point for non-subscriber
voice mail with prompts to spell the subscriber’s name. This mailbox type accepts only spell-by-name.
A mailbox number cannot be dialed.
Mailbox Type 18 - calls to mailboxes with this type are routed to the starting point for non-subscriber
voice mail with prompts to spell the subscriber’s name. This mailbox type accepts only spell-by-name.
A mailbox number cannot be dialed.
Mailbox Type 19 - is a regular subscriber mailbox which does not receive broadcast messages.
0 Prompting During Dial By Name Addressing - When a subscriber routes a message using Dial By Name,
the system prompts for the spelling of the name of the destination mailbox. If the subscriberwishes to enter
another destination, the system continues to prompt for the spelling of the name of the destination mailbox
instead of the extension number.
rJ Messages Sent To A Group List - After sending a message to a group list, the system immediately
prompts that the message has been sent, even though it may not have completed the process. This frees
the subscriber to perform other functions while the message is being sent.
0 Definition Of When Messages Are Considered
Listened To - In this software version, messages are
considered “listened to” if at least 5 seconds of a message has been played. The check receipt feature
would indicate the message as being received if the message was played for at least 5 seconds even if the
receiver did not act on the message (save, delete, forward, etc.). Depending upon the NlWlReset Option on
a mailbox’s class of service, this also effects the message waiting indication.
a Copying The Same Message To The Same Mailbox - The same message cannot be copied to the same
destination mailbox if there is a copy of that message already in that mailbox. In this situation, a message is
played indicating that there is already a copy of the message in the mailbox.
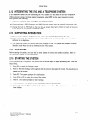
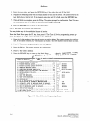
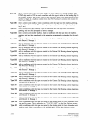
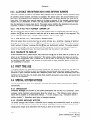
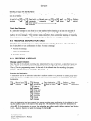
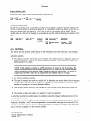
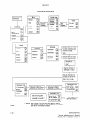
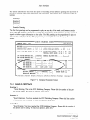
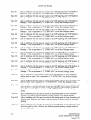
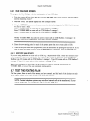
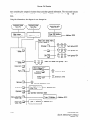
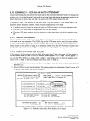
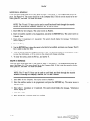
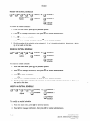
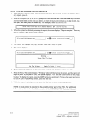
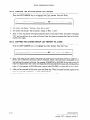
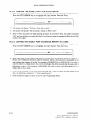
0 CCR Mailbox Screen - The names of two of the fields on the CCR Mailbox screen have been changed.
This is ONLY a name change, the fields perform the same function. The CCR field has been renamed to
BOX. The MSG# field has be renamed to GRT#. See Figure 4.
;~AIL;;;;;?ho
t--i-
GET
IL1
121 L.l[ -1
[41[-1[p
1 r-1
[51 f-1 I-
[71[.J[p
1 Ll
[C]
[M]
GOT0
GOT0
L-1
NEXT CCR
MAILBOX
----I
L-1
I L-1
[61 r-1 [ .---I
r-1
[81 L-1 Lp
1 L-1
[gl L-1 Lp
LOIL-1[-
1 L-1
[#I [-I[ -1
EXT.
EXT.
SCREENED
NOT SCREENED
TIME
TIME
OUT
OUT
BOX
FROM/TO
INPUT
[II Ll L-...-
[*I r-1 [ -1
- -jr;
[D]
[E]
L-1
DIAL
DIAL
[31[-I[
1 Ll
f-1
ERRORS
MAX WRONG KEY ERRORS..j
MAX ERRORS
[-I[
[FS]CLEAR
[FS]SAVE
[FG]DEL
tI;
[F7]scRoLL
MAX
MAX
[FB]FIND
ERRORS....
[-I[
[FS]PREV
[F~O]NEXT
[ESC]QUIT
Jl
Figure 4
Page 4 of 4
March 2, 1992
Table of Contents
Section
Page
,
Section 1 - Introduction
.......................................................................
1.1 INTRODUCTION
.............................................................
1.1.1 BASIC DESCRB’TION
......................................................................
1.1.2 MAILBOXES
..................................................
1.1.3 BULLETIN
BOARD MAILBOXES
1.1.4 MULTIPLE USERS ................................................................
1.15 AUTOMATED
ATTENDANT
.......................................................
1.1.6 CUSTOM CALL ROUTING
........................................................
.........................................................................
1.1.7 oUTDIAL
1.1
1.1
1.2
1.2
1.2
1.2
1.2
1.3
1.2 THE INFOSTARNX2
1.3
IS EASY TO USE ..................................................
............................................................
1.3 SYSTEM ADMINISTRATION
1.3
................................
1.4 RESPONSIBILITIES
OF THE SYSTEM ADMINISTRATOR
1.4.1 OVERALL .........................................................................
1.4.2 IMPLEMENTATION
...............................................................
1.4.3 SUBSCRIBER TRAINING
..........................................................
.............................................
1.4.4 ON-GOING SYSTEM MANAGEMENT
1.3
1.3
1.3
1.4
1.4
1.5 HARDWARE
COMPONENTS
...........................................................
1.5.1 ENCLOSURE
......................................................................
1.5.2 CPU ...............................................................................
1.5.3 SCSI HOST (DISK DRIVE) CONTROLLER
BOARD .................................
1.5.4 VIDEO CONTROLLER
BOARD ....................................................
1.5.5 TELEPHONE
INTERFACE BOARD ................................................
1.5.6 FLOPPY DISK DRIVE .............................................................
1.5.7 HARD DISK DRIVE ................................................................
1.5.8 HARDWARE
ACHVATOR
.........................................................
1.4
1.4
1.4
1.4
1.4
1.4
1.4
1.5
1.5
1.6 SYSTEM SOFTWARE
1.5
1.7 AVAILABLE
...................................................................
CONFIGURATIONS
........................................................
1.5
Section2 - Initial Setup
2.1 LNTRODUCl-ION
.......................................................................
2.1
2.2 SYSTEM MENUS AND SCREENS .......................................................
2.2.1 ENTERING DATA INTO A SCREEN ................................................
2.2.2 CONFIRMATIONREQUIRED
.....................................................
2.2.3 DEFAULTVALUES
................................................................
2.1
2.1
2.2
2.2
2.3 AUTO INTEGRATION
2.2
..................................................................
2.4 BOOTING THE SYSTEM ................................................................
2.5 RUN DIALOGUE
SCREEN ..............................................................
2.3
2.6 TAKING
2.4
2.7 COMPANY
THE SYSTEM OFF-LINE
INFORMATION
INFOSTARIVXZ
System Administrator’s
revised 7191
.......................................................
.............................................................
2.3
2.5
i
Manual
Table of Contents
Section
2.8 COMPANY PARAMETERS
..............................................................
2.8.1 MAILBOX..
.......................................................................
2.8.2 GREETING
.......................................................................
2.8.3 GENERAL
........................................................................
2.8.4 HOW TO PROGRAM ..............................................................
2.9 PBX PARAME TERS SCREEN ............................................................
2.9.1 HOW TO PROGRAM
..............................................................
2.10 PBX FUNCTIONS SCREEN ............................................................
................................................
2.10.1 MESSAGE WAITING INDICATION
........................................................................
2.10.2 OUTDIAL
2.11 LINE SET-UP SCREEN ................................................................
2.12 INTEGRATING
THE VX2 AND A TELEPHONE SYSTEM ...............................
..........................................................
2.13 SUPPORTING INTEGRATION
e .................................
2.14 MAILBOXES
........................................
2.15 STARTING
THE SYSTEM
..............................................................
2.6
2.6
2.7
2.7
2.8
2.9
2.10
2.12
2.13
2.13
2.14
2.15
2.15
2.15
2.15
Section 3 - Mailboxes
3.1 INTRODUCTION
.......................................................................
3.2 CLASS OF SERVICE ....................................................................
3.2.1 ESTABLISH CLASSES OF SERVICE ................................................
3.2.2 MODIFY CLASSES OF SERVICE ...................................................
3.2.3 DELETE CLASSES OF SERVICE ...................................................
3.3 MAILBOX SET-UP SCREEN ............................................................
3.3.1 MAILBOX TYPES .................................................................
3.3.2 ADDING MAILBOXES .............................................................
3.3.3 MODIFYING
MAILBOXES
........................................................
3.3.4 DELETE AMAILBOX
.............................................................
3.1
3.1
3.5
3.5
3.6
3.7
3.9
3.11
3.13
3.14
Section4 - SystemAdministration
4.1 INTRODUCTION
.......................................................................
.............................................................
4.2 ON-LINEPROGRAMMING
4.3 SYSTEM GROUP LISTS .................................................................
4.3.1 ESTABLISHING
A SYSTEM GROUP LIST ..........................................
4.3.2 MODIFY A SYSTEM GROUP LIST .................................................
4.3.3 ERASE AN ENTIRE SYSTEM GROUP LIST ........................................
4.4 PERSONAL GROUP LISTS ..............................................................
4.4.1 ESTABLISHING
A PERSONAL GROUP LIST .......................................
4.4.2 MODIFY A PERSONAL GROUP LIST ..............................................
4.4.3 ERASE AN ENTIRE PERSONAL GROUP LIST .....................................
ii
4.1
4.1
4.1
4.2
4.4
4.4
4.5
4.5
4.7
4.7
INFOSTARIVX2
System Administrator’s
Manual
revised 7191
Table of Contents
Section
Page
Section 5 - System Administrator
5.1 INTRODUCTION
Mailboxes
.......................................................................
5.2 SYSTEM ADMINISTlViTOR’S
OF’TIONS
5.1
.................................................
5.3 SYSTEM GREETINGS
..................................................................
5.3.1 SAMPLE GREETINGS
.............................................................
5.3.2 RECORDING
SYSTEM GREETINGS
...............................................
5.3.3 PLAYING SYSTEM GREETINGS ................
.;. ................................
5.3.4 ERASING SYSTEM GREETINGS ...................................................
5.1
5.4 BROADCASTMESSAGE
................................................................
5.4.1 SENDING A BROADCAST MESSAGE ..............................................
5.4.2 LISTENING TO A BROADCAST MESSAGE ........................................
5.4.3 TO ERASE A BROADCAST MESSAGE .............................................
5.3
5.3
5.4
5.4
5.5 MAILBOX
ADMINISTRATION
.........................
.................................
5.5.1 RESET ACCESS CODES ...........................................................
5.5.2 ADD MAILBOXES
.................................................................
5.5.3 DELETE MAILBOXES
.............................................................
5.5.4 RECORDING
MAILBOX
GREETINGS
.............................................
5.5.5 RESET MESSAGE WAITING INDICATOR
..........................................
5.4
5.4
5.4
5.4
5.5
5.5
5.6 SYSTEM GROUP LISTS ..................................................................
5.6.1 LIST GROUP MEMBERS
..........................................................
5.6.2 ESTABLISHING
GROUP LISTS ....................................................
5.6.3 ERASE GROUP LIST ..............................................................
5.6.4 MODIFY GROUP LIST ............................................................
5.5
5.5
5.5
5.6
5.6
5.7 SET DATE AND TIME
5.6
..................................................................
5.1
5.2
5.2
5.3
5.3
Section 6 - Operation
6.1 INTRODUCTION
6.1
.......................................................................
6.2 GENERAL OPERATION
.................................................................
6.2.1 SYSTEMPROMPTS..
..............................................................
6.2.2 IF NO RESPONSE FROM THE USER ..............................................
6.2.3 IF TOO MANY ERRORS ...........................................................
6.2.4 WHY THE SYSTEM TRANSFERS USERS AUTOMATICALLY
.......................
6.2.5 ALLOWABLE
TIME BETWEEN KEYS WHEN ENTERING NUMBERS
..............
6.2.6 THE KEY AS ANUMBERTERMINATOR
..........................................
6.2.7 THE KEY AS A RECORDING
TERMINATOR
......................................
6.2.8 DIALING
TO HANG UP ...........................................................
6.1
6.1
6.1
6.1
6.1
6.2
6.2
6.2
6.2
6.3 FIRSTTIMEUSE
6.2
.......................................................................
6.4 SPECIAL SYSTEM NOTICES ............................................................
6.4.1 BROADCAST ......................................................................
64.2 ERASED MESSAGE NOTICES .....................................................
6.4.3 CONFIRMATION
NOTICES ........................................................
INFOSTARIVX2
System Administrator’s
revised 7191
6.2
6.2
6.2
6.3
. ..
111
Manual
Table of Contents
Page
Section
6.5 MESSAGE PLAYBACK FEATURES ......................................................
6.51 ORDER OF REVIEW ..............................................................
6.5.2 FEATURES AVAILABLE WHILE LISTENING TO MESSAGES .......................
6.5.3 REVIEW A MESSAGE .............................................................
6.5.4 WHILE LISTENING TO A MESSAGE ...............................................
6.5.5 PLAYBACK CONTROLS ...........................................................
6.5.6 EXPERT MODE FEATURES .......................................................
6.5.7 AFTER LISTENING TO A MESSAGE ...............................................
.......................................................
6.6 MESSAGE SENDING FEATURES
6.6.1 RECORDING
A MESSAGE ........................................................
6.6.2 DELIVERY OPTIONS ..............................................................
....................................................
6.6.3 SEND TO GUEST MAILBOXES
.....................................................................
6.7 CHECK DELIVERY
6.8 PERSONAL OPTIONS ...................................................................
6.8.1 GREETINGS AND NAME ..........................................................
.........................................................
6.8.2 TEMPORARY GREETING
6.8.3 ACCESS CODES ...................................................................
6.8.4 NOTES ABOUT ACCESS CODES ..................................................
6.8.5 GROUP DISTRIBUTION
LISTS ....................................................
6.9 OUTDIAL
..............................................................................
6.9.1 OUTDIAL BINS ...................................................................
.....................................................
6.9.2 OUTDIAL ADMINISTRATION
.........................................................
6.9.3 TURN OUTDIAL ON/OFF
6.9.4 ANSWERING AN OUT-DIAL CALL .................................................
6.9.5 THINGS TO KNOW ABOUT THE OUTDIAL SCHEDULE ...........................
6.10 RETURN TO ATTENDANT. .............................................................
6.11 TELEPHONE ANSWERING MODE .....................................................
6.11.1 SHORTCUT FOR NON-SUBSCRIBERS
............................................
6.11.2 CALLS FORWARDED TO THE SYSTEM ..........................................
6.11.3 TRANSFER TO OPERATOR ......................................................
6.3
6.3
6.3
6.4
6.4
6.5
6.5
6.7
6.9
6.9
6.11
6.13
6.13
6.14
6.14
6.15
6.15
6.16
6.16
6.17
6.18
6.19
6.22
6.22
6.23
6.23
6.23
6.23
6.23
6.24
Section 7 - Auto Attendant
7.1
7.2
7.3
7.4
7.5
7.6
7.7
7.8
7.9
iv
INTRODUCTION
. . . . . . . . . . . . . . . . . . . . . . . . . . . . . . . . . . . . . . . . . . . . . . . . . . . . . . . . . . . . . . . . . . . . . . . 7.1
HOW CALLERS USE AN AUTOMATED
ATTENDANT
...................................
7.1
SETTING UP AN AUTOMATED
ATTENDANT
...........................................
7.1
PROGRAM SYSTEM PORTS ............................................................
7.2
RECORD A GREETING .................................................................
7.3
7.5.1 SAMPLE GREETINGS .............................................................
7.4
7.52 RECORDING
SYSTEM GREETINGS ...............................................
7.5
7.5.3 PLAYING SYSTEM GREETINGS ...................................................
7.5
7.5.4 ERASING SYSTEM GREETINGS ...................................................
7.5
..............................
PROGRAM A MAILBOX FOR AUTOMATED
AmNDANT
7.6
RECORDING
A MAILBOX GREETING ..................................................
7.6
TESTTHE APPLICATION
...............................................................
7.7
TRAIN SUBSCRIBERS AND OUTSIDE CALLERS . . . . . . . . . . . . . . . . . . . . . . . . . . . . . . . . . . . . . . . . 7.7
INFOSTARIW2
System Administrator’s
Manual
revised 7191
Table
of Contents
Section
Page
Section8 - Custom Call Routing
8.1 lNTRODUCTION
..............
.........................................................
8.1
8.2 DESIGNING
THE ROUTING PLAN .....................................................
8.2.1 WHERE TO ROUTE CALLERS?
...................................................
8.2.2 HOWDOCALLSGETTOCCR?
...................................................
8.2.3 WHEN SHOULD CCR BE ACllVE? .................................................
8.2.4 SPECKAL CONSIDERATIONS
i ....................................
.................
8.2.5 SUGGESTIONS ....................................................................
8.3 CREATE THE REQUIRED MAILBOXES
.................................................
8.3.1 MAILBOX TYPES .................................................................
8.4 CCR MAILBOX
SCREEN. ...............................................................
8.4.1 ADDING A CCR MAILBOX
........................................................
8.4.2 MODIFYING
A CUSTOM CALL RECORD ..........................................
8.4.3 DELETE A CUSTOM CALL RECORD ..............................................
8.5 RECORDING
A MENU/GREETING
.....................................................
8.11
8.6 PROGRAM THE SYSTEM TO USE CCR .................................................
8.6.1 RUN DIALOGUE
SCREEN ........................................................
8.6.2 SPECIFIC MAILBOXES
..............
..............................................
8.11
8.12
8.12
8.7 TEST THE ROUTING
8.12
PLAN ......
.......................................................
8.8 EXAMPLE 1 ...............................
.............................................
8.8.1 CREATE THE MAILBOXES
........................................................
8.8.2 CREATE THE CCR MAILBOXES ...................................................
8.8.3 RECORD GREETINGS FOR THE BULLETIN
BOARD MAILBOXES
................
8.8.4 RECORD THE CCR MENU ........................................................
8.8.5 PROGRAM RUN DIALOGUE
SCREEN .............................................
8.9 EXAMPLE 2 ........
....................................................................
8.9.1 DESIGNING
THE PLAN ...........................................................
8.9.2 WHY HAVE TWO MAIN MENUS DOING THE SAME THING? ......................
8.9.3 GREETINGS
..............................
........................................
8.9.4 PLAN SUMMARY
.................................................................
8.9.5 CREATE THE MAILBOXES
........................................................
8.9.6 PROGRAMMING
THE CCR MAILBOX SCREEN . . .................................
8.9.7 RECORD GREETINGS FOR THE BULLETIN
BOARD MAILBOXES
................
8.9.8 RECORD THE CCR MENU/GREETINGS
...........................................
8.9.9 PROGRAM RUN DIALOGUE
SCREEN .............................................
8.10 EXAMPLE 3 - CCR AS AN AUTO AmNDANT
.........................................
8.10.1 CREATE THE MAILBOX
.........................................................
8.10.2 MODIFY THE FIRST CCR MAILBOX
.............................................
8.10.3 CHANGE THE CCR MENU/GREETINGS
.........................................
INFOSTARIVX2
a.2
8.2
8.3
8.3
8.3
8.4
8.4
8.5
8.7
8.9
8.10
8.10
8.13
8.14
8.14
8.15
8.15
8.16
8.17
8.17
8.19
8.19
8.19
8.19
8.20
8.24
8.24
8.25
8.26
8.26
8.26
8.27
Table
of
Contents
Section
Page
,
Section 9 - Outdial
9.1 INTRODUCTION
......................................................................
9.1
9.2 MAILBOX
USER .......................................................................
9.3 SYSTEM ADMINISTRATION
...........................................................
9.3.1 RECORDING
THE COMPANY NAME FOR OUTDIAL
GREETING
9.3.2 PLAYING THE COMPANY NAME .................................................
9.3.3 ERASING THE COMPANY NAME ................................................
9.1
.................
9.4 SYSTEM PROGRAMMING
FOR OUTDIAL
.............................................
9.4.1 PBX FUNCTIONS
SCREEN - OUTDIAL
...........................................
9.4.2 MAILBOX
SET-UP SCREEN ......................................................
9.4.3 MAILBOX BIN NUMBER SCREEN ................................................
9.4.4 OUTDIAL
SCHEDULE
...........................................................
9.4.5 OUTDIAL PARAMETERS SCREEN ...............................................
9.5 SUBSCRIBER PROGRAMMING
........................................................
9.5.1 OUTDIAL BINS ..................................................................
9.5.2 OUTDIAL ADMINISTRATION
....................................................
9.5.3 TURN OUTDIAL
ON/OFF ........................................................
9.5.4 ANSWERING
AN OUTDIAL
CALL ................................................
9.5.5 THINGS TO KNOW ABOUT THE OUTDIAL
SCHEDULE
..........................
Section 10 - System Administration
9.2
9.2
9.2
9.2
9.2
9.3
9.4
9.4
9.7
9.11
9.13
9.13
9.14
9.17
9.17
9.18
Reports
10.1 INTRODUCTION
.....................................................................
10.1.1 SYSTEM ADMINISTRATION
REPORTS ..........................................
10.1.2 CALL STATUS REPORTS ........................................................
10.1
10.1
10.2
10.2 GENERATING
A REPORT ............................................................
10.2.1 SELECTING A REPORT .........................................................
10.2
10.3
10.3 DISPLAYING
...........................................
10.5
10.4 PRINTING THE REPORTS ............................................................
10.4.1 CALL STATUS REPORTS ........................................................
10.4.2 SYSTEM ADMINISTRATION
REPORTS ..........................................
10.4.3 A WORKING EXAMPLE .........................................................
10.5
10.5
10.6
10.7
10.5 COPYING
10.8
A REPORT ON THE SCREEN
A FILE TO A DISK
.........................................................
10.6 MAILBOX DIRECTORY
REPORT (L REPORT) .........................................
10.6.1 ACCESSING THE MAILBOX DIRECTORY
REPORT ..............................
10.6.2 SCREEN DEFINITIONS
..........................................................
10.6.3 PRINTING THE MAILBOX DIRECTORY
REPORT ................................
10.6.4 COPYING THE MAILBOX DIRECTORY REPORT TO A DISK .....................
10.9
10.9
10.9
10.10
10.10
10.7 MAILBOX
SUMMARY REPORT (M REPORT) ..........................................
10.7.1 ACCESSING THE MAILBOX SUMMARY REPORT. ...............................
10.7.2 REPORT DEFINITIONS
..........................................................
40.7.3 PRINTING THE MAILBOX SUMMARY REPORT .................................
10.7.4 COPYING THE MAILBOX SUMMARY REPORT TO A DISK .......................
10.11
10.11
10.11
10.12
10.12
vi
INFOSTARIVX2
System Administrator’s
Manual
revised 2192 - sqftware version
3
Table of Contents
Section
Page
10.8 UNINITIALIZED
MAILBOX REPORT (N REPORT) .....................................
10.8.1 ACCESSING THE UNINITIALIZED
MAILBOX REPORT ..........................
10.8.2 REPORT DEFINITIONS
..........................................................
10.8.3 PRINTING THE UNINITIALIZED
MAILBOX REPORT ............................
10.8.4 COPYING THE UNINITIALIZED
MAILBOX REPORT TO A DISK .................
10.13
10.13
10.13
10.14
10.14
10.9 SYSTEM GROUP LIST REPORT (0 REPORT) ..........................................
10.9.1 ACCESSING THE SYSTEM GROUP LIST REPORT ...............................
10.9.2 REPORTDEFINITIONS
..........................................................
10.9.3 PRINTING THE SYSTEM GROUP LIST REPORT .................................
10.9.4 COPYING THE SYSTEM GROUP LIST REPORT TO A DISK ......................
10.15
10.15
10.15
10.16
10.16
10.10 PERSONAL GROUP LIST REPORT (P Report) .........................................
10.10.1 ACCESSING THE PERSONAL GROUP LIST REPORT ...........................
10.10.2 REPORTDEFINITIONS
.........................................................
10.10.3 PRINTING THE PERSONAL GROUP LIST REPORT .............................
10.10.4 COPYING THE PERSONAL GROUP LIST REPORT TO A DISK ..................
10.17
10.17
10.17
10.18
10.18
10.11 PORT STATISTICS BY PORT REPORT (Q REPORT) ...................................
10.11.1 ACCESSING THE PORT STATISTICS BY PORT REPORT .........................
10.11.2 REPORT DEFINITIONS
.........................................................
10.11.3 PRINTING THE PORT STATISTICS BY PORT REPORT ...........................
10.11.4 COPYING THE PORT STATISTICS BY PORT REPORT TO A DISK ................
10.19
10.19
10.19
10.20
10.20
10.12 SYSTEM PORT STATISTICS REPORT (R REPORT) ....................................
10.12.1 ACCESSING THE SYSTEM PORT STATISTICS REPORT .........................
10.12.2 REPORTDEFINITIONS
.........................................................
10.12.3 PRINTING THE SYSTEM PORT STATISTICS REPORT ...........................
10.12.4 COPYING THE SYSTEM PORT STATISTICS REPORT TO A DISK ................
10.21
10.21
10.21
10.22
10.22
10.13 HOURLY PORT STATISTICS REPORT (S REPORT) ....................................
10.13.1 ACCESSING THE HOURLY PORT STATISTICS REPORT .........................
10.13.2 REPORT DEFINITIONS
.........................................................
10.13.3 PRINTING THE HOURLY PORT STATISTICS REPORT ...........................
10.13.4 COPYING THE HOURLY PORT STATISTICS REPORT TO A DISK ................
10.23
10.23
10.23
10.24
10.24
10.14 OUTDIALING
DETAIL REPORT (T REPORT) .........................................
10.14.1 ACCESSING THE OUTDIAL DETAIL REPORT ..................................
.........................................................
10.14.2 REPORT DEFINITIONS
10.14.3 PRINTING THE OUTDIALING
DETAIL REPORT ................................
10.14.4 COPYING THE OUTDIALING
DETAIL REPORT TO A DISK .....................
10.25
10.25
10.25
10.26
10.26
10.15 CALL
..
STATUS REPORTS
............................................................
10.27
10.16 MONTHLY CALL COUNT (OA REPORT) .............................................
10.16.1 ACCESSING THE MONTHLY CALL COUNT REPORT ...........................
10.16.2 PRINTING THE MONTHLY
CALL COUNT REPORT .............................
10.27
10.27
10.28
10.17 MONTHLY
CALL DURATION
(OB REPORT) .........................................
10.17.1 ACCESSING THE MONTHLY CALL DURATION REPORT .......................
10.17.2 PRINTING THE MONTHLY
CALL DURATION
(OB) REPORT ....................
10.28
10.28
10.29
10.18 DAILY CALL COUNT (OC REPORT) .................................................
_10.18.1 ACCESSING THE DAILY CALL COUNT REPORT ...............................
10.18.2 PRINTING THE DAILY CALL COUNT (OC) REPORT ............................
10.29
10.29
10.30
INFOSTARIVX2
System Administrator’s
Manual
revised 2192 - software version 3
vii
Section 1 - Introduction
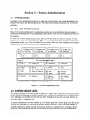
1 .I INTRODUCTION
The INFOSTAR”/VX2
is a compact high performance voice processing system which connects to a
business telephone system. This voice processing system offers businesses the ability to exchange information through the telephone without requiring simultaneous participation by the caller and the receiver. Callers can give instructions to the system about which extension they want to reach.
The system converts human speech to digital signals and stores them on a disk, and converts the digital signals on the disk to human speech.
The system interfaces and integrates with a variety of PBX and Central Office equipment. Interfaced
systems require the caller to enter an extension (or mailbox) number in order to hear a personal
greeting, and provide no message waiting indicator. Integration provides a personal greeting automatically, and a message waiting indicator. Both interfaced and integrated systems provide the ability to
return to the operator.
1.1 ml BASIC DESCRIPTION
INFOSTAWVXZ
stores and processes large volumes of digitized voice for retrieval. System architecture uses an INFOSTAR/AP/6
(or /AP/12), and proprietary software and storage techniques.
The system’s first function is telephone answering. When a person is not available or prepared to receive calls, the user (subscriber) may forward calls to the system. The system answers calls, takes messages, and stores the messages for retrieval at any time, from any place.
The second function is voice mail. Subscribers can send voice messages to other subscribers. Since
almost half of all phone transactions need only one-way communications, the voice mail function
streamlines business communications.
The system includes the ability to:
Send messages in telephone
l
_
answering and voice mail mode
0 Send copies of messages with or without introductory
Send messages to multiple
l
comments
destinations and group distribution
lists
e Obtain a summary count of messages waiting for review
l
Erase, reply, save, replay, or skip a message
l
Receive envelope information
o Change recorded
In addition,
indicating
the date, time, and sender
name, personal greeting, and access code
the system provides:
l
Playback controls when sending or reviewing messages
l
Delivery options when sending or replying to messages
l
Dial-by-name
l
Secretary mailbox and Guest mailboxes
l
Temporary
addressing for messages
greeting
In order to simplify storing messages, two queues are used. The new message queue stores all messages which have not been listened to by the subscriber. The saved message queue is used to store
messages for future action.
INFOSTARIVX2
System Administrator’s
1.1
Manual
Introduction
1.1.2 MAILBOXES
As messages are recorded, they need to be stored in such a way that they can be retrieved efficiently.
The system stores messages in mailboxes. Each user, or subscriber, is assigned a mailbox number for
their private use. Each mailbox is protected by a user-programmed
access code. Thus, the user is the
only one who can retrieve messages left in their mailbox. When a subscriber uses their mailbox for
the first time, a tutorial walks them through the process of setting up their mailbox. The user is
prompted to record their name and to change the temporary access code assigned by the system.
In addition to their own mailbox, subscribers can have Guest mailboxes (depending upon mailbox parameters). These mailboxes provide for limited voice mail capabilities between the subscriber and their
guests. However, the first guest mailbox, called the Secretary mailbox, can only listen to the envelope
information of the messages in the subscriber’s mailbox. The secretary mailbox cannot listen to the
subscriber’s messages. Messages cannot be sent to or sent by the secretary mailbox.
1.1.3 BULLETIN BOARD MAILBOXES
There are special types of mailboxes in the system which are used to play an announcement to the
caller. The caller is then either disconnected, give an opportunity to leave a message, or transferred
depending upon the mailbox type. When a caller reaches one of these special mailboxes, the pre-recorded greetings are played. These mailboxes can have up to seven greetings recorded. The greetings
are played in order. If a greeting is not recorded, it is skipped over and the next one is played. This
allows some flexibility in editing the message you wish to deliver without having to record the entire
message over again. For example, greetings 1, 2, and 3 can be recorded, and together form a complete message. At a later date the information in greeting 2 may need to be changed. Greeting 2 can
be re-recorded without having to re-record greetings 1 and 3.
1.1.4 MULTIPLE USERS
More than one person can use the system features. Each port allows one user access to the system. A
port is a path to the system. For example, up to four users could be recording or listening to messages
at the same time with a four port system. Since not all users would be accessing the system at the
same time, many users can be supported.
1.1.5 AUTOMATED ATTENDANT
The Automated Attendant allows calls to be routed to the appropriate telephone system extension
without operator assistance. Automated Attendant can help eliminate the bottleneck of calls at the
attendant console during peak traffic hours, and allows callers to reach the destination they need very
quickly. If a caller is unfamiliar with extension numbers, the Automated Attendant can be programmed to prompt callers to spell the person’s name and then connect the call. Auto Attendant can
be used to:
8 Answer all calls to a company’s/departments
main number.
e Answer overflow calls from the operator.
l
Answer calls from employees and frequent
callers on an alternate number.
o Answer calls to the main number when the switchboard
is unattended.
1.1.6 CUSTOM CALL ROUTING
Custom Call Routing (CCR) is an optional feature which permits the system to route calls based on
caller input, rather than having an operator route the call. When a call is answered by a system programmed with CCR, the caller is presented with a menu which gives a choice of destinations. The
caller-uses the dial pad of a DTMF telephone to select one of the destinations. The wording of the
1.2
INFOSTARIVX2
System Administrator’s
Manual
revised 7191
Introduction
menu, and which dial pad digits are used to route calls are completely under the system administrator’s control. Based on caller input, a call can be routed to a telephone system extension (or hunt
group, ucd group, etc.), a system mailbox, or another CCR menu. A call routed to an extension is an
unscreened, and unsupervised transfer.
1.1.7
OUTDIAL
The outdial feature is used to call subscribers and notify them that a new message has been received
in their mailbox. Subscribers can control how they want this feature to work. A subscriber specifies:
0 The telephone number where they can be reached. This number may be a telephone system (or
Centrex) extension, a local or long distance telephone number, or the telephone number and
dialing sequence of a pager (beeper).
An alternate
l
telephone
number.
* The type of message that causes an outdial call. A subscriber can specify either all new messages,
or only priority new messages. In addition, a subscriber can limit outdialing to messages from a
member of a group list, or from a particular mailbox.
l
How long after the message has been received the system waits before placing the outdial call.
o A schedule of when the system can call the subscriber.
o The number
of times the system is to attempt to reach the subscriber.
1.2 THE INFOSTARNX2
IS EASY TO USE
The system’s options are very logically presented to users. User commands are just one digit long.
They do not have to be memorized since the system constantly prompts users. Experienced subscribers can interrupt prompts, and can even skip ahead several steps if they know what they want to do.
Ease-of-use is not a purely subjective matter. It can be demonstrated by asking new subscribers to
perform a certain set of tasks-both
basic and advanced.
1.3 SYSTEM ADMINISTRATION
The System Administrator’s
needs were not forgotten in designing the system. The human interface
was carefully thought out to make it easy to add or delete subscribers, or to change subscriber parameters. You do not have to be knowledgeable about computer systems to manage the system. There are
a number of tools available which aid in careful management of the two valuable resources: ports and
disk space.
The mailbox’s classes of service (COS) allow you manage disk space on a group basis. You do not
need to specify maximum message lengths, message capacity, or message retention times on an individual mailbox basis.
1.4 RESPONSIBILITIES
1.4.1
OF THE SYSTEM ADMINISTRATOR
OVERALL
The System Administrator’s
responsibilities include working with the organization that installs and
maintains the system, making routine changes to the subscriber data base, (e.g., adding new users)
and optimizing and controlling the use of the system with class of service variables.
1.4.2
IMPLEMENTATION
The system administrator must cooperate with the distributor to determine the location of the system
and the required changes in the telephone system hardware or software. The list of subscribers, the
modification
of existing forwarding patterns, and the most appropriate end user (subscriber) training
must also be planned.
INFOSTARIVXZ
System Administrator’s
revised 7191
1.3
Manual
Introduction
1.4.3 SUBSCRIBER TRAINING
Each system administrator must determine, in conjunction with the installing organization, the most
appropriate training strategy for the organization. Training options range from formal training sessions
to just sending out a memo along with copies of the user documentation.
Other alternatives include
training via INFOSTAIUVXZ
messages or personal one-on-one sessions.
1.4.4 ON-GOING SYSTEM MANAGEMENT
System administrators are generally responsible for routine tasks such as adding or deleting users,
maintaining system-wide group lists, giving assistance to individual subscribers, recording broadcast announcements, stocking Quick Reference Guides and User’s Guides, and coordinating maintenance
with the service organization.
1.5 HARDWARE COMPONENTS
The hardware components of the system consists of an INFOSTAR/AP/6
(or /AP/12) which contains
the enclosure with power supply, circuit boards, the disk drives, keyboard and monitor.
1.5.1 ENCLOSURE
Each enclosure consists of an aluminum chassis, a 135 Watt switching power supply, reset switch, keyboard connector, cooling fans, and a 6-slot, 4-layer, low-noise passive backplane. The component
circuit cards plug into the backplane.
1.52
CPU
This is the main computing device, or “brains,” of the system. All the various functions are controlled
through the CPU. The CPU contains an 80286 microprocessor, and 2 MB of dynamic RAM. The
keyboard and reset switch are connected to the CPU. A parallel printer can be connected to the parallel port on the board.
1.5.3 SCSI HOST (DISK DRIVE) CONTROLLER BOARD
The disk drive controller board provides the driver circuitry for both the floppy and SCSI hard disk
drives. The disk drive controller is the interface between the CPU and the disk drives.
1.5.4 VIDEO CONTROLLER BOARD
This board provides the video driver circuitry for the monitor.
1.5.5 TELEPHONE INTERFACE BOARD
This board is the interface between the voice processing system and the telephone system. The conversion between voice and digital information takes place on this board. Each board provides jacks for
the connection of four lines from the telephone system. Each jack connects two lines (RI-14 type).
1.5.6 FLOPPY DISK DRIVE
The 3.5 inch 1.44 MB floppy disk drive is used initially to load the operating system, software programs,- and voice prompts onto the hard disk. After the system is setup, the floppy drive is then used
to make backups of the system software and configuration data, and to perform software upgrades.
1.4
ZNFOSTARIVX2
System Administrator’s
Manual
revised 7191
Introduction
1.5.7 HARD DISK DRIVE
This is the storage device
for the system. It provides storage for:
,
8 operating system
0 system software
0 voice prompts
0 user voice messages
The storage capacity of the hard disk is either 40, 80, or 200 MB, depending
sired.
1.58
upon storage time de-
HARDWARE ACTIVATOR
The system also requires a hardware activator be installed. This hardware activator is commonly called
a “dongle,” or a “key” and is installed on the parallel printer port. This activator does not interfere
with the operation of the printer.
da
Figure l-l
Eda
Hardware
Activator
‘i .6 SYSTEM SOFTWARE
System software is located on the system hard disk. The disk based software includes the operating
system, the voice mail code, system prompts, and greetings.
The operating system software controls the system hardware resources. The voice mail software controls the user interface and determines the options available to the subscribers.
1.7 AVAILABLE
CONFIGURATIONS
The INFOSTAWVX2
is available with 2, 4, or 8 ports, and can be equipped with a hard disk to provide 3, 6, or 15 hours of storage. A 40 MB disk can store approximately 3 hours of voice messages.
An 80 MB disk can store approximately 6 hours of voice messages. A 200 MB disk can store approximately 15 hours of voice messages. Each model can be easily upgraded from one size to the next.
INFOSTARIKYZ
1.5
Section 2 - Initial Setup
2.1 INTRODUiTlON
Before the system actually begins processing calls, certain information must be entered to complete the
installation. Information
about the company, the telephone system, and mailboxes must be entered.
This section gives you the information you need to customize the VX2 to a particular installation, and
to begin working with the monitor and keyboard. It describes the format of the displays and the use
of the special-purpose keys on the keyboard.
Navigating the menus can be accomplished by either pressing a designated key, or moving the cursor
to the desired selection and pressing the ENTER or RETURN key. The instructions given in this
manual will tell you to press a designated key.
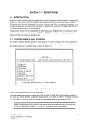
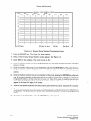
2.2 SYSTEM MENUS AND SCREENS
The system’s software provides menus for each function. A screen is simply a list of the required entries associated with each task. The screens are used to set system operating parameters, and maintain
the mailbox data base. A sample menu is shown in Figure 2-1.
Mon Mar 04 1991
----
MAIN MENU ----
1>lSYSI(F2>l((FS>l((F4>lI(ESC>
1
2
3
4
5
6
COMPANIES
BOXES
LINK BOXES
CCR BOXES
EXTD. ACCESS CODE
CLASS OF SERVICE
1 BOX TYPE
8 SYSTEM MISC.
9 GROUPS & CALL COUNT
OI<ESC>
EXIT
(C)Copyright
Executone
Corp.
All
Figure 2-l
2.2.1
rights
reserved.
Main Menu
ENTERING DATA INTO A SCREEN
You must position the cursor at a data entry field in order to input data. Most entries are made in
the form of a yes/no decision, a selection among options, or a name or number. If nothing is entered
in a field when a screen is saved, the system uses the default value for the particular field.
NOTE: Programming
be labeled RETURN,
INFOSTARIKX2
System Administrator’s
revised 7191
instructions in this manual refer to the RETURN key. This key may
ENTER, or just M
depending upon the keyboard.
2.1
Manual
Initial
Setup
2.2.2 CONFIRMATION REQUIRED
For some functions you may be asked to confirm the action you requested before it is actually executed by the system: This confirmation process is a safeguard for actions that would cause some inconvenience if performed accidentally. When a confirmation is required, a prompt appears on the
screen requesting you enter “Y” or “RETURN”to
confirm the operation. Pressing “N” cancels the
request.
2.2.3
DEFAULT VALUES
Most screens contain pre-defined
(system generated) data in one or more of their data entry areas.
For example, when you review the parameters for a particular class of service, you will note that all
entries on the screen have been filled in. These default values are entered so the system can begin to
operate without entering data in all fields. You should change these values as needed.
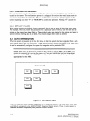
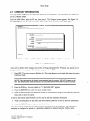
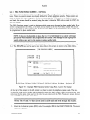
2.3 AUTO INTEGRATION
When the system is powered up for the first time, or after the system has been upgraded from a software release without the auto integration, a PBX Selection menu appears (see Figure 2-2). This menu
is used to automatically configure the system for integration with a particular PBX.
NOTE: This menu is designed to configure the system to certain PBXs. If the PBX your
system is connected to is not on the menu, or if you are interfacing
(and not integrating)
the system to the PBX, select EXC. Then configure the system using the Integration
Note
appropriate
for the PBX.
Select
Your
Figure 2-2
PBX
PBX Selection Menu
The PBX Selection menu contains integrations for 4 telephone systems. The codes EXC, IDS, 228,
and l-08 all correspond to the EXECUTONE@ Integrated Digital System. These 4 codes appear to
maintain backward compatibility with previous software releases.
2.2
INFOSTARIVX2
System Administrator’s
Manual
rovi~oa
7191
Initial
NOTE: Select IDS for new system installations
EXECUTONE
IDS.
Setup
when integrating
to any configuration
of the
The code S96 is used to integrate the ISOETEC@ SysterrJ96. The code S66 is used to integrate the
ISOETEC@ System/66. The code ECX is used to integrate the Encore” CX telephone systems. Use
the arrow keys to move the cursor to the desired code (make certain the NUM LOCK is off), then
press RETURN.
2.4 BOOTING THE SYSTEM
After a selection is made from the PBX Selection menu, or when the power for the system is turned
on (after the first time), the Run Dialogue screen appears (see Figure 2-3), and the system begins
running the voice message application. Before the system actually begins processing calls, certain information must be entered into the system. The Custom Sys and Utilities menus are used to enter information about the company, and the installation. The system needs to know how many digits are in a
mailbox, the type of PBX the system is connected to (if this was not defined using the PBX Selection
menu), the system administrator mailbox numbers, initial access codes, and which of the system ports
are to be used for sending a message waiting indication (if the telephone system can accept and utilize
a message waiting indication).
After this initial information
has been entered, the system administrator may enter classes of service,
mailbox numbers, system group lists, and other information to customize the system to the particular
application. Many of the system administration functions can be performed from either the monitor
and keyboard, or using the system administrator’s mailbox.
NOTE: The system should be taken off-line
before any initial programming
can take
place. However, most of the system programming
screens can be accessed while the system
is running using the On Line Programming
Menu.
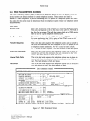
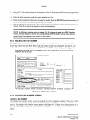
2.5 RUN DIALOGUE SCREEN
The Run Dialogue screen is displayed while the system is running. The main purpose of this screen is
to define the task each port is to execute when called. Valid entries for each port are:
l
T TIME1
o T AUTOM
0001 (normal
voice mail)
0001 (normal
voice mail with prompts
l
T AUTO1
0001 (Automated
Attendant)
l
T AUTOS
0001 (Automated
Attendant
l
T CCRBl
0001 (Custom Call Routing).
0 T CCRBX
0001 through
for spell by name)
with spell by name feature)
0014 (Custom Call Routing with multiple
starting points)
NOTE: T CCRBX 0001 means start at CCR record 1 message 1. T CCRBX 0002 means start
at CCR record 2 message 1, etc. T CCRBX 0014 means start at CCR record 14 message 1.
NOTE: The same task should be assigned to every port in the system. However, certain
applications
may required a different task be programmed
for some of the system ports.
INFOSTARIVX2
System Administrator’s
revised 7191
2.3
Manual
Initial
In addition
link a port
which Line
values used
Setup
to defining the task for each of the system's
ports,
the Run Dialogue screen is used to
to a particular Line Set-up screen. The Run field at the top left of the screen defines
Set-up screen is used for a particular port. The Line Set-up screen defines the set of PBX
on a port (see the Line Set-up Screen section).
The Run Dialogue screen also displays the amount
of space left on the hard disk in a bar graph on
the left side of the screen. The top of the graph shows HD: 1 (the hard drive). The bottom of the bar
graph displays the total storage (in hours) of the drive.
Along the bottom of the screen, the system displays the current time and date programmed
system. A cursor moving from left to right indicates the system is running.
InfoStar
in the
Vx2
Figure 2-3
Run Dialogue Screen
2.6 TAKING THE SYSTEM OFF-LINE
The system is taken off-line by pressing F4 then F7 and then the ESCAPE key. When the ESCAPE
key is pressed, message processing stops. The system prompts for confirmation to stop running. Press
Y. The Run Dialogue screen clears. From here, press the ESCAPE key to reach the Main Menu (Figure 2-l).
NOTE: All programming
instructions
in this manual presume the system is off-line unless
otherwise noted. The system may be programmed
while on-line, however, the screens may
operate differently
than the instructions for off-line programming
indicate. For example,
steps requiring confirmation
may be simplified. This is intentional
and is designed to speed
the on-line programming.
NOTE: Programming
-be labeled RETURN,
2.4
instructions in this manual refer to the RETURN key. This key may
ENTER, or just u
depending upon the keyboard.
INFOSTARIVX2
System Administrator’s
Manual
Initial
2.7 COMPANY
Setup
INFORMATION
The first thing to program is the name and address of the installation.
on the Company screen.
This information
is programmed
From the Main Menu, press the Fl key, then press 1. The Company screen appears. See Figure 2-4.
The ESCAPE key can be used at any time while in this screen to return to the Main Menu.
[COMPANY s.cREEN]
SCREEN]!,
COMPANY....
MAILBOX DIR -
STARTS: _NAME:
ADDRESS:
P.O.BOX:
CITY:
STATE: -
/I-
/I-
ZIP:
---
TELEPHONE:
FAX:
REMARKS:
== [FS]Clear
[FB]Save
[FB]D~~
[FB]Del
[F'I]Scroll
[FI]Find
Figure 2-4
Company
[FQ]P~~V
[FQ]Prev
[FlO]Next
[Esc]Quit
=
Screen
At the top of the screen in the left corner is a place to enter the company code. This is a 3-digit
code used to define which company this screen is being programmed for. Presently, the system can be
‘programmed for one company. The default company code is EXC.
1.
Enter EXC. The cursor moves to MaiZbox Dir. This is the directory on the hard disk where the system
mailboxes reside.
NOTE: This information
is already programmed
into the system. DO NOT change or delete this information
unless directed to by an authorized INFOSTAR/VXZ,
service center.
2.
Press the FlO key. An entry similar to “C: \MAILBOX\EXC”
3.
Press the RETURN
4.
Enter the name, address, and telephone number of the installation using the RETURN
entry and to move the cursor.
A field at the bottom
appears.
key until the cursor reaches Name.
key after each
called Remarks can be used to add any necessary information.
5.
When all information
for this menu has been entered, press the F5 key to save the information.
6.
Press the ESCAPE key to return to the Main Menu.
After the company information has been entered, the system must be configured. The information
necessary to configure the system to a particular installation is entered using the Utilities menu.
INFOSTARIW2
System Administrator’s
revised 7191
2.5
Manual
Initial
Setup
2.8 COMPANY PARAMETERS
The Company Parameters screen is used to enter information about mailboxes
tem administrator mailboxes, and the initial greeting information.
and access codes, sys-
2.8.1 MAILBOX
Mailbox
Extension
This value is the number of digits in a mailbox number. A single digit
from 1 to 7 is entered in this field. All mailboxes in the system have
the same number of digits. The default value for this field is 4.
Length
This value is the number of digits in a telephone system extension
number. A single digit from 1 to 9 is entered in this field. This number must match the number of digits in a telephone system extension
number. The default value for this field is 4.
Max Length
Group Code Max Length
This value is the number of digits in a Group dial access code. A
single digit from 1 to 4 is entered in this field. The default value for
this field is 2. This field should not be changed from its default value
except for special applications.
System
Manager
Enter the mailbox numbers to be used as the system administrator’s
mailboxes. These numbers are any valid mailbox numbers. There are
no default values for these fields. These mailboxes must also be added
to the system in Mailbox programming.
Access
Code Min Length
Mailboxes
This value is the minimum number of digits in a mailbox access code.
A mailbox owner must enter at least this many digits for the mailbox
access code. A single digit from 1 to 9 is entered in this field. The
default value for this field is 4.
[COMPANY
COMPANY
CODE
)
PARAMETERS
SCREEN]
Data
EXC
MAILBOX LENGTH.........4
EXTENSION MAX LENGTH...4
[4]
[4]
1..7
l..Q
ACCESS CODE MIN LENGTH....4
ACCESS CODE MAX LENGTH....4
[4]
[Q]
GROUP CODE MAX LENGTH..2
[Z]
1..4
SYSTEM GROUP RANGE....30:7Q
PERSONAL GROUP RANGE..ll:ZQ
[
[
1ST SYSTEM MANAGER BOX....
2ND SYSTEM MANAGER BOX....[
GREETING
1ST
2ND
3RD
4TH
5TH
CREETING......[
GREETING......[
CREETING......[
CREETING......[
GREETING......[N]
[0005000]
GENERAL DELIVERY
BOX........[
1
DAYS-FROM-TO
-;
yr
-:
---;
;-:_
DAYS-i-SUN
Found
l..D
l..Q
30
11
781
281
-1
PDB -
-:-;
-:-:-;
-:'I-SAT
t:i
[j
GENERAL
OPERATOR EXT....0
[
OPTIONS: REPORT...[-]
BROADCAST YESSAGE.[-][
: [FB]Clear
[FS]Save
[Ft?]Del
3001]
/
[F'I]Scroll
Figure 2-5
2.6
LANGUAGE...
/
-:-:[FB]Find
[
]
CLEAN UP..O3:00
[03:00]
SCREEN TRANS [-]
-1
[FQ]P~~V
[FlO]Next
[Esc]Quit
=
Company Parameters Screen
INFOSTARIVX2
System Administrator’s
Manual
revised 7191
Initial
Setup
Access
Code Max Length
This value is the maximum number of digits in a mailbox access code.
A mailbox access code may be any length from the value entered for
Access Code Min Length up to the value entered for Access Code Max
Length. A single digit from 1 to 9 is entered in this field. The default
value for this field is 4.
System
Group Range
This is the range of numbers in the System Group List access codes.
Enter the range using the same number of digits as defined for Group
Code Max. The default value for this field is 30 to 79. This field
should not be changed from its default value except for special applications.
Personal
Group
Range
General
Delivery
Box
2.8.2
This is the range of numbers in the Personal Group
Enter the range using the same number of digits as
Code Max. The default value for this field is 11 to
should not be changed from its default value except
cations.
List access codes.
defined for Group
29. This field
for special appli-
Enter the mailbox number to be used as the General Delivery mailbox. A General Delivery mailbox is one that receives messages when a
caller does not enter a mailbox number. A caller may not enter a
mailbox number because he is using a rotary telephone, or does not
know the mailbox number of the person he is calling. The system can
have one General Delivery mailbox.
GREETING
The system can store and play up to 5 greetings. These are the greetings played when the system is
accessed before any dialed digits are received. The first 4 greetings can be programmed to play on
any day of the week with a start and stop time. The 5th greeting can only be programmed to play on
a single day and plays all hours. This greeting is designed to deliver urgent messages to callers, and
when used, it overrides the programming of the first four greetings (greeting 5 does not override the
greetings recorded for CCR). All 5 greetings can be programmed whether or not to route callers to
the General Delivery mailbox (GDB).
The days of the week are entered by number where Sunday is 1 and Saturday is 7. The hours are
entered in 24-hour clock format, i.e., 1 o’clock in the afternoon is 13:O0.
The actual greeting is recorded using the system administrator’s
2.8.3
mailbox.
GENERAL
This area is used to program the telephone system extension number of the attendant (operator), and
the time of day the system can perform routine clean-up work, and the options installed in the system.
Operator
This is the number dialed by the system to transfer a call back to the
telephone system when the caller presses “0” or when the system detects the caller needs assistance. This number does not have to be an
extension number, but can be the access code for a station hunt group
or any valid telephone system dial access code.
Ext
Clean up
Enter a time (in 24-hour clock format) when the system can perform
its clean up routines. Enter a time when little, or no, traffic is on the
system.
Options
This field is used by the system to list the options installed. No entry
is permitted in this field. This field is not used at this time.
INFOSTARIVX2
System Administrator’s
revised 7191
2.1
Manual
Initial
Broadcast
Message
Setup
No entry is permitted in this area. This area indicates if there is a system broadcast message active (a plus sign in the first field) and the
time and date it was recorded. A minus sign in the first field indicates
a broadcast message that was deleted.
*
Screen
Trans
2.8.4
HOW TO PROGRAM
This field is not used at this time.
From the Main Menu, press the F4 key, then press 1. The Company Parameters screen appears. See
Figure 2-6. The ESCAPE key can be used at any time while in this screen to return to the Main
Menu.
At the top of the screen in the left corner is a place to enter the company code. This is a 3-digit
code used to define which company this screen is being programmed for. Presently, the system can be
programmed for only one company. The default company code is EXC.
1.
Enter EXC. The system prompts
gramming is displayed.
for confirmation.
Press Y. The present Company Parameters
pro-
2.
Press the RETURN key. Change the information on the screen as necessary for the installation. Use
the RETURN and arrow keys to move around the screen. As a field is filled, the cursor moves to the
next field. To move to the next field before a field is filled, press the RETURN key. Use the DELETE
key to remove information
from a field. Use the Fl key to clear the field and start over.
3.
To erase the entire screen and start over, press the F3 key.
4.
Once all information for this screen has been entered, press the F5 key to save the information.
The
system prompts for confirmation.
Press Y if all information is correct. Press N to cancel the request to
save the information.
5.
Press the ESCAPE key to return to the Main Menu.
[COMPANY PARAMETERS SCREEN]
COMPANY CODE )
EXC
Data
MAILBOX
MAILBOX LENGTH.........4
EXTENSION MAX LENGTH...4
[4]
141
1..7
l..Q
ACCESS CODE MIN LENGTH....4
ACCESS CODE MAX LENGTH....4
[4]
[Q]
GROUP CODE MAX LENGTH..2
[2]
1..4
SYSTEM GROUP RANGE....30:79
PERSONAL GROUP RANGE..11:2Q
[
[
1ST SYSTEM MANAGER BOX.. ..[0005000]
2ND SYSTEM MANAGER BOX....[ -1
GREETING
1ST
2ND
3RD
4TH
5TH
GREETING......[
GREETING......1
GREETING......[
GREETING......[
GREETING......[N]
GENERAL DELIVERY
DAYS-FROM-TO
-1
;_:-
-1
BOX........[
E [FS]Clear
[Fb]Save
[FB]Del
] [_il
-i-1
I-:-
-:-I
Figure 2-6
2.8
LANGUAGE...[
/
-:-:-
Company
781
291
-1
i-1
7-SAT
ki
30011
[F'I]Scroll
30
11
DB -
DAYS l-SUN
/
l..Q
l..Q
-:j
GENERAL
OPERATOR EXT....0
[
OPTIONS: REPORT...[-]
BROADCAST MESSAGE.[-][
Found
[FB]Find
]
CLEAN UP..O3:00
[03:00]
SCREEN TRANS [-]
-1
[FQ]Prev
[FlO]Next
[Esc]Quit
q
Parameters Screen
INFOSTARIVX2
System Administrator’s
Manual
Initial
2.9 PBX PARAMETERS
Setup
SCREEN
The PBX Parameter; screen is used to describe the telephone system to the VX2 system. There are
several screens are already defined for certain telephone systems. These systems are listed in
Section 2.3 Auto Integration. If you are connecting the VX2 system to a telephone system not listed,
the values for this screen must be determined from the telephone system vendor (or telephone system
documentation).
DIAL AREA
System
This is the 3-character code assigned to a particular telephone system.
This code corresponds to the to the entry in the Link To PBX field of
the Line Set-up screen. This tells the system which set of PBX parameters to use for a given telephone interface port.
Code
Use Tone or Pulse
This field is used to select the VX2 dial signaling (DTMF or rotary).
For most applications the VX2 is going to dial DTMF tones to the
telephone system. This field defaults to tone.
Transfer
This is the dial code sequence the telephone system uses to transfer a
call from the extensions that are connected to the VX2 system to other telephone system extensions. An “&” is used to insert a flash.
A “ ,” is used to insert a pause. This field defaults to flash and pause.
Sequence
Outbound
Internal
This is the dial code sequence the telephone system uses to place an
outside line call from the extensions that are connected to the VX2
system. This field defaults to flash and pause.
Calls Prefix
This is the dial code sequence the telephone system uses to place an
internal call from the extensions that are connected to the VX2 system. This field defaults to flash and pause
Calls Prefix
This is the dial code sequence the telephone system uses to reconnect
to a call placed on hold. This field defaults to flash.
Reconnect
[PBX PARAMETERS SCREEN]
SYSTEM CODE )
IDS
YIr.b
USE TONE OR PULSE..............T
TRANSFER SEQUENCE..............&,
OUTBOUND CALLS PREFIX..........&,
INTERNAL CALLS PREFIX..........&,
RECONNECT...................
...&
BEFORE DIALING/RECEIVING
MINIMUM ON-HOOK DURATION (SEC).1
WAIT FOR DIAL TONE (SEC)......2
IT1
T-P
[&:#
]
PBX AREA CODE [ -1
[@, 1
[,
1
[&,*-I
[03]
[02]
PAUSE.....,
WINK @SEC)
[,-I
[
]
HANG-UP-
SILENCE ON DURATION............0
SILENCE OFF DURATION...........0
# OF REPETITION TO CHECK.......0
MAX NON SILENCE PERIOD (SEC)...0
MAX NON SILENCE PERIOD (SEC)...0
["o"o"o;
loo1
[08]
[lo]
(RECORD)
(PLAYBACK)
COYMUNICATION-
PORT NUMBER....1
STOP BIT.......1
DATA WORD......8
X-ON..........30
BUFFER IN.. .1024
= [FS]Clear
[FS]Save
[l]
[l]
[8]
[30]
[1024]
[~8]~el
BAUD RATE..00000
PARITY.........0
X-OFF.........70
[70]
BUFFER OUT..1024
[1024]
[F'I]Scroll
[FB]Find
[FB]Prev
Figure 2-7
INFOSTARIVX2
System Administrator’s
revised 7191
[00000]
[0]
[FlO]Next
[Esc]Quit
PBX Parameters Screen
2.9
Manual
InitiaZ Setup
Minimum
On-hook
Duration
This is the minimum time a VX2 system port must stay on-hook after
completing a call before going off-hook for another action. This field
is used to prevent calls from being inadvertently placed on hold. This
field defaults to 1 second.
Wait For Dial Tone
This is how long the VX2 system waits for dial tone from the telephone system before going on-hook and trying again. This field defaults to 2 seconds.
PBX Area Code
This is the S-digit telephone
Pause
This is the length of a system pause. Each comma represents 2 seconds.
Wink
This field is not used and should not be programmed.
HANG-UP
area code of the location of the system.
AREA
Silence
On Duration
This field is not used and should not be programmed.
Silence
Off Duration
This field is not used and should not be programmed.
# Of Repetition
This field is not used and should not be programmed.
To Check
Max Non Sit. Prd Record
This is how long the system listens to dial tone while recording before
disconnecting from the call. This field defaults to 0, but should be
programmed for 8 seconds. This field should be programmed to a value within seconds of the Max Non Silence Playback value and should
be less than that value.
Max Non Sil. Prd Playback
This is how long the system plays dial tone (within a message) during
a playback before disconnecting from the call. This field defaults to 0,
but should be programmed for 10 seconds. This field should be programmed to a value within seconds of the Max Non Silence Record
value and should be greater than that value.
COMMUNICATIONS
AREA
There are no fields used in this area at this time. This area should not be changed from its default
programming.
2.9.1
HOW TO PROGRAM
ADDING PBX PARAMETER
SCREEN
From the Main Menu, press the F4 key, then press 2. If there is an existing screen, it is displayed.
Press F3, and then Y to clear the screen. If there are no existing screens, the screen is blank. The
ESCAPE key can be used at any time while in this screen to return to the Main Menu.
At the top of the screen in the left comer is a place to enter the system code. This is the 3-character
code assigned to a particular telephone system. This code corresponds to the to the entry in the Link
To PBX field of the Line Set-up screen. This tells the system which set of PBX parameters to use for
a given telephone interface port.
not found, press RE1. Enter the system code.The system should display the message, “Information
TURN to continue.” If the system displays the bin number, or displays “Information
found, display it
Y/N?” the system code has already been programmed, select another.
6.
2.10
Press the RETURN key. Change the information on the screen as necessary for the installation. Use
the RETURN and arrow keys to move around the screen. As a field is filled, the cursor moves to the
INFOSTARIVX2
System Administrator’s
Manual
revised 7191
Initial
Setup
next field. To move to the next field before a field is filled, press the RETURN
key. Use the DELETE
key to remove information
from a field. Use the Fl key to clear the field and start over.
7.
To erase the entire screen and start over, press the F3 key.
8.
Once all information for this screen has been entered, press the F5 key to save the information. The
system prompts for confirmation. Press Y if all information is correct. Press N to cancel the request to
save the information.
9.
Press the ESCAPE
key to return to the Main Menu.
[PBX PARAMETERS SCREEN]
SYSTEM CODE )
IDS
DIAL-
USE TONE OR PULSE..............T
TRANSFER SEQUENCE..............&,
OUTBOUND CALLS PREFIX..........&,
INTERNAL CALLS PREFIX..........&,
RECONNECT......................&
BEFORE DIALING/RECEIVING
MINIMUM ON-HOOK DURATION (SEC).1
WAIT FOR DIAL TONE (SEC)......2
T-P
[Tl
]
PBX AREA CODE [
[&,#
[Q, 1
[,
1
SILENCE ON DURATION............0
SILENCE OFF DURATION...........0
# OF REPETITION TO CHECK.......0
MAX NON SILENCE PERIOD (SEC)...0
MAX NON SILENCE PERIOD (SEC)...0
[000]
PORT NUMBER....1
STOP BIT.......1
DATA WORD......8
X-ON..........30
BUFFER IN. ..1024
[FB]Clear
[FJ]Save
[l]
[l]
[S]
[30]
[1024]
[FG]Del
MODIFYING
PBX PARAMETER
[&a *-I
[03]
[02]
:::;I
[08]
[lo]
PAUSE.....,
WINK @SEC)
[,-I
[-I
HANG-UP-
(RECORD)
(PLAYBACK)
COMMUNICATION-
BAUD RATE..00000
PARITY.........0
[00000]
[0]
X-OFF.........70
[70]
BUFFER OUT..1024
[1024]
(F7]Scroll
[FB]Find
[FQ]Prev
Figure 2-8
1
PBX Parameters
[FlO]Next
[Esc]Quit
Screen
SCREEN
From the Main Menu, press the F4 key, then press 2. The programming screen appears. See Figure
2-8. The cursor should be in the System Code. If this is not the record to be modified, press F3, and
then Y to clear the screen.
NOTE:
instead
F9 and FIO keys can be used
of entering the company, mailbox,
The
to scroll back and forth
etc. to find a record.
through
1. Enter the desired system code. The system should display the message, “Information
it? ”
the records
found, display
2. Press the Y key.
3.
Use the RETURN
key to move the cursor to the field to be modified,
Fl key to clear the field.
and enter your changes. Use the
4. When all desired fields are changed, press the F5 key. The system prompts for confirmation.
to save the information,
or N to return to the screen and change something.
Press Y
5. To clear the screen, press the F3 key, and answer Y.
INFOSTARIVXZ
System Administrator’s
revised 7191
2.11
Manual
Initial
Setup
NOTE: In software versions prior to release 2.0, if a change is made to a PBX Parameter
screen, and the change is saved, the corresponding
PBX Function screen must also be
saved (even if no changes were made to this screen).
DELETE PBX PARAMETER
SCREEN
From the Main Menu, press the F4 key, then press 2. The programming screen appears. See Figure
2-8. The cursor should be in the System Code. If this is not the record to be deleted, press F3, and
then Y to clear the screen.
NOTE:
instead
The F9 and FlO keys can be used to scroll back and forth
of entering the company, mailbox, etc. to find a record.
through
the records
1. Enter the desired system code. The system should display the message, “Information
it? ”
found, display
2. Press the Y key.
3. Press the F6 key, and then press Y to confirm.
2.10
PBX FUNCTIONS
SCREEN
The PBX Functions screen is used to integrate the message waiting indication (MWI) and outdial features. There are several screens are already defined for certain telephone systems. These systems are
listed in Section 2.3 Auto Integration. If you are connecting the VX2 system to a telephone system
not listed, the values for this screen must be determined from the telephone system vendor (or telephone system documentation).
[PBX FUNCTION SCREEN]
DTMF
SET ON .......
SET OFF ......
DATA
SET ON.......
SET OFF.....,
FLAGS........
t-1 t-1 i-1 t-1 t-1 t-1
USE PORT . . . . I-1
II
: [Ft]Clear
[Fb]Save
[FG]Del
[F'I]Scroll
Figure 2-9
2.12
-
L-1 L-1
[FI]Find
PBX Functions
I-1
[FB]Prev
[FlO]Next
[Esc]Quit
=
Screen
INFOSTARIKY2
Initial
Setup
NOTE: In software versions prior to release 2.0, if a change is made to a PBX Function
screen, and the’change
is saved, the corresponding
PBX Parameter screen must also be
saved (even if no changes were made to this screen).
2.10.1
MESSAGE WAITING INDICATION
The dial codes the telephone system uses to turn on and off the message waiting indication are programmed on this screen. This information is programmed in DTMF Set On and DTMF Set Off fields
for function MWI.
Certain PBXs permit multiple message waiting indication codes to be dialed while a port is off-hook.
Other PBXs require a port to go off-hook and on-hook for each message waiting indication code.
The first Flags field is used to tell the system how to dial the message waiting indication dial codes
when there is more than one indication waiting to be dialed. If the field is left blank, the MWl
port(s) goes off-hook and dials the MWl codes one after the other and then goes on-hook. If a 1 is
entered in this field, the system goes off-hook, dials one MWl code, and goes on-hook. This process
is repeated until all MWl codes have been dialed. Consult the Integration Note for the particular PBX
to determine the proper setting of the first Flags field.
The system ports used to send the message waiting indication
field.
may be programmed
in the Use Port
From the Main Menu, press the F4 key, then press 3. The PBX Functions screen appears. See Figure
2-9. The ESCAPE key can be used at any time while in this screen to return to the Main Menu.
At the top of the screen in the left comer is a place to enter the system code. This is a 3-character
code used to define which telephone system the VX2 system is being integrated with. This code must
be the same code used on the Line Set-up screen and the PBX Parameters screen (System code and
PBX code are the same thing).
1.
Enter the 3-character
moves to Function.
2.
Enter MWI. The system prompts for confirmation.
is displayed.
3.
Enter the dial codes for DTMF
4.
Press the down arrow key until the cursor reaches Use Port.
5.
system (PBX) code. For example, IDS for the EXECUTONE
IDS. The cursor
Press Y. The present PBX Functions programming
Set On or Off for the particular
telephone
system.
Enter the port number(s) which are to be used for turn on and off the message waiting indicator. Press
key after each entry. If no ports are entered, the system uses all ports for MWI.
the RETURN
6.
Press the F5 key. The system prompts for confirmation.
cancel the request to save the information.
7.
Press the ESCAPE key to return to the Main Menu.
2.10.2
Press Y if all information
is correct. Press N to
OUTDIAL
The PBX Functions screen is used to designate which ports are to be used to place outdial calls.
From the Main, Menu, press the F4 key, then press 3. The PBX Functions screen appears. See Figure
2-9. The ESCAPE key can be used at any time while in this screen to return to the Main Menu.
At the-top of the screen in the left corner is a place to enter the system code. This is a 3-character
code used to define which telephone system the VX2 system is being integrated with. This code must
INFOSTARIVXZ
System Administrator’s
revised 7191
2.13
Manual
Initial
Setup
be the same code used on the Line Set-up screen and the PBX Parameters screen (System code and
PBX code are the same thing).
.
1. Enter the 3-character system (PBX) code. For example, IDS for the EXECUTONE IDS. The cursor
moves to Function.
2.
Enter OCL. The system prompts for confirmation.
is displayed.
3.
Press the down arrow key until the cursor reaches Use Port.
4.
Enter the port number(s) which are to be used for outdial. Press the RETURN
no ports are entered, the system uses all ports for outdial.
5.
Press the F5 key. The system prompts for confiiation.
cancel the request to save the information.
2.11
Press Y. The present PBX Functions programming
key after each entry. If
Press Y if all information
is correct. Press N to
LINE SET-UP SCREEN
The Line Set-up screen is used to link a port with a Company (usually EXC) and a PBX based on
the 3-character code in the Run field. The Run field at the top of the screen corresponds to the Run
field on the Run Dialogue screen. When a call is answered on a port, the Line Set-up screen programmed with the same 3-character Run code as on the Run Dialogue screen for that port is used to
process the call. This Line Set-up screen tells the system which PBX Parameter and PBX Function
screens to use, and which 3-character Company code to use (e.g., which Company Parameters
screen, which mailbox numbers, etc.). The Line Set-up screens are pre-programmed
for a number of
PBXs and the information on the screens should not normally be changed.
The fields on the Line Set-up screen used for Release 2.0 are RUN, PORT, LINK TO COMPANY,
LINK TO PBX, and RINGS BEFOR ANSWER. The remaining fields are deliberately left blank. Do
NOT program anything in these fields.
[LINE
SET-UP SCREEN]
RUN................[EXC]
LINK TO COMPANY....[EXC]
PORT...................[Ol]
LINK TO PBX...........[IDS]
PULSE OPTION.......[-]
INCREMENT TIME OUT.[-]
MAP [#I > 1-1
Am L-1
[*I>[-1
RINGS BEFOR ANSWER.[l]
VOICE FILE NAME....[
RUN TIME PATH......[
REPORTS............[-]
ACCEPT DID.........[
USE Tl.............[-j
TRANSFER ALLOWED...[-]
AUTO ACTIV
[-I
i
]
ACCEPT DNIS.......[-]
HOST TYPE......[
Sun [ : l-I-:-l
Tue [ -:-l-L:-1
Thu [ -:-1-[-:-1
Sat [-:-l-[-:-l
E [FB]Clear
[FS]Save
[Fs]Del
Figure 2-10
2.14
[F'I]Scroll
[FB]Find
-1
Man [-:-l-[-:-l
Wed [-:-l-[-:-l
Fri
f-:-1-1-:-1
[FB]Prev
[FlO]Next
[Esc]Quit
Line Set-up Screen Release 2.0
INFOSTARIVX2
System Administrator’s
Manual
revised 7191
Initial
2.12
INTEGRATING
If the telephone
(PBX Selection)
Then perform
Setup
THE VX2 AND A TELEPHONE
SYSTEM
system you are connecting the VX2 system to is not listed on the Auto Integration
screen, but does support integration, select EXC on the Auto Integration screen.
the following:
0 Create a 3-character
code to designate the telephone
@ Create and save a PBX Parameter
and PBX Function
system.
screen using the created 3-character
code.
0 Change the Link to PBX field on the Line Set-up screen (Run field = EXC) for each of the ports
in the system to the selected 3-character code.
2.13
SUPPORTING INTEGRATION
A telephone
l
system supports integration
Using a dial code, the telephone
indicator on a telephone.
to the VX2 if the following qualifications
are met:
system can be told to turn on and turn off a message waiting
0 The telephone system can forward calls from a station to the VX2 system and transmit a station
identifier code when the call is answered by the VX2 system.
2.14
MAILBOXES
Before starting the system, you may wish to enter classes of service and mailbox numbers.
the Mailboxes chapter for this information.
2.15
Refer to
STARTING THE SYSTEM
Once programming
is completed,
the system must be started again to begin processing calls. From the
Main Menu,
1.
Press F3 to reach the Dialogue menu.
2.
Press 1. The Run Dialogue screen appears with the cursor in the upper left comer. The installed ports
appear on the screen.
3.
Press F5. The system prompts for confirmation.
4.
Press FlO or F9 to select the correct Run screen.
5.
Press Y. The system prompts to start running.
6.
Press RETURN.
7.
If you wish, press the F6 key to hide the Run Dialogue menu. Press F7 to display the screen after it has
been hidden.
INFOSTARIVXZ
System Administrator’s
revised 7191
The system is now running and ready to process calls.
2.15
Manual
Section 3 - Mailboxes
3.1 INTRODUeTION
There are two programming screens the system administrator uses to add, modify, or delete mailboxes. There is a Mailbox Set-up screen which is used to program the mailbox, and associate the
mailbox with an extension number in the telephone system. The Class of Service programming screen
is used to program various features and system resources for groups of mailboxes rather than having to
program each mailbox individually.
NOTE:
A Class of Service must be created
before
it is used on the Mailbox
screen.
3.2 CLASS OF SERVICE
The INFOSTAWVX2
allows you to establish multiple classes of service through which you grant or
restrict access to various features and system resources. As system administrator you may specify different classes of service and then assign each mailbox to one of these classes. The system has two
default classes of service. COS 100 is used for general subscriber mailboxes. COS 700 is used to define the system administrator’s mailboxes. Provided below are the various features controlled by the
classes of service:
CLASS OF SERVICE
[-I
[CLASS OF SERVICE SCREEN]
NAME:
A)
B)
C)
D)
E)
F)
G)
H)
I)
J)
MAXIMUM NUMBER OF MESSAGES......................0
0
MAXIMUM MESSAGE LENGTH.........................12
0
MAXIMUM SILENCE DURING RECORDING ..............
...4
MINIMUM MESSAGE LENGTH .........................
..O
GREETING MAXIMUM LENGTH.........................6
0
SPECIFIED DELIVERY TIME UP TO...................6
0
MAXIMUM SPECIFIED DELIVERY TIME MESSAGES........2
0
REVIEW METHOD FIFO/LIFO ........................
..l
...4
GUESTS 1-9 ....................................
KEEP NEW MESSAGES...............................3
0
K) KEEP SAVED MESSAGES.............................1
0
L) PERSONAL GROUPS.................................1
8
M) DESTINATION.....................................2
5
N) OK TO SEND MESSAGE TO SYSTEM GROUP LIST ........
..Y
..Y
0) NOTIFICATION OF AUTOMATIC MESSAGE ERASE ........
P) AUTOMATIC ALERT OF MESSAGE ERASE IN ADVANCE .... ..O
Q) NOTIFICATION OF NON RECEIPT OF MESSAGE AFTER ... ..l
R) END OF RECORDING ALERT IN ADVANCE...............1
0
S) TYPE OF OUT DIALING ............................
..O
T) SEND MSG TAG (1:CONF 2:PRE 3:PROOF 4:SDT) IN..1234
U) MWI RESET OPTION.................................1
: [F3]Clear
[FS]Save
[F6]Del
[F?]Scroll
[FB]Find
[FQ]Prev
Figure 3-l
Class Of Service Programming
SECONDS
SECONDS
SECONDS
SECONDS
DAYS IN ADVANC
lFIF0
2LIF0
DAYS
DAYS
Y/N
DAYS
DAYS
SECONDS
[----I
I-1
OUT i-1
[FlO]Next
[Esc]Quit
Screen
CLASS OF SERVICE
This is the class of service the information on the screen is for. The COS is a three digit number
which can range from 001 to 999. To avoid confusion, program the smallest number of classes of service necessary for your installation.
INFOSTARIKX2
System Administrator’s
3.1
Manual
Mailboxes
NAME
Each class of service should have a descriptive name assigned to it (e.g., secretary class, executive
class, etc.). This name is displayed each time you call up an individual class of service programming
screen. The name may be up to 34 characters length, and must be unique.
MAXIMUM
NUMBER OF MESSAGES
This is the maximum number of messages a mailbox can accommodate. A class of service can be programmed for a maximum of 60 messages. This value can be used to limit the amount of disk space a
mailbox can take up.
MAXIMUM
MESSAGE LENGTH
This value defines the maximum length of a single message for each class of service. A message must
be at least as long as the Minimum Length, and can be at most 9999 seconds long. This value is entered in seconds. The following illustrates the effect of Maximum Message Length on a mailbox.
Example: Mailbox 3003 has a COS allowing a Maximum Message Length of 20 seconds.
0 Mailbox
3003 may record and send messages of up to 20 seconds in duration.
0 Mailbox 3003 may receive messages of longer than 20 seconds from mailbox holders having a
COS with a greater Maximum Message Length value.
0 Non-subscribers
MAXIMUM
may leave messages of up to 20 seconds for mailbox 3003.
SILENCE DURING RECORDING
While recording a message, the system listens for silence. If the system detects a silent period for the
amount of time programmed in this field, it presumes the message is ended. This field should be left
programmed to 4.
CLASS OF SERVICE
[-]
[CLASS OF SERVICE SCREEN]
NAME:
A) MAXIMUM NUMBER OF MESSAGES......................6
0
B) MAXIMUM MESSAGE LENGTH.........................12
0
C) MAXIMUM SILENCE DURING RECORDING ..............
...4
..O
D) MINIMUM MESSAGE LENGTH .........................
E) GREETING MAXIMUM LENGTH.........................6
0
F) SPECIFIED DELIVERY TIME UP TO...................6
0
C) MAXIMUM SPECIFIED DELIVERY TIME MESSAGES........2
0
..l
H) REVIEW METHOD FIFO/LIFO ........................
I) GUESTS 1-B ....................................
...4
J) KEEP NEW MESSAGES...............................3
0
K) KEEP SAVED MESSAGES.............................1
0
L) PERSONAL GROUPS.................................1
8
M) DESTINATION........................'.............2
5
..Y
N) OK TO SEND MESSAGE TO SYSTEM GROUP LIST ........
0) NOTIFICATION OF AUTOMATIC MESSAGE ERASE ........
..Y
P) AUTOMATIC ALERT OF MESSAGE ERASE IN ADVANCE .... ..O
Q) NOTIFICATION OF NON RECEIPT OF MESSAGE AFTER ... ..l
R) END OF RECORDING ALERT IN ADVANCE...............1
0
S) TYPE OF OUT DIALING ............................
..O
T) SEND MSG TAG (1:CONF 2:PRE 3:PROOF 4:SDT) IN..123 4
U) MWI RESET OPTION ...............................
..l
: [FZ]Clear
[F5]Save
[FB]D~~ [F7]Scroll
[FB]Find
[F@]Prev
Figure 3-2
3.2
Class Of Service Programming
[
[ -;
[ ]
[-]
[]
[--]
[ -1
SECONDS
SECONDS
SECONDS
SECONDS
DAYS IN ADVANC
lFIF0
ki
i-1
L-1
]
[
[-]
[IF
[-]
[-]
[-]
kT1
[ -1
t-1
PLIFO
DAYS
DAYS
Y/N
DAYS
DAYS
SECONDS
OUT l-1
[FlO]Next
[Esc]Quit
:
Screen
INFOSTARIVX2
System Administrator’s
Manual
revised 7191
Mailboxes
MINIMUM
MESSAGE LENGTH
A message must be at least this value in seconds before it is considered a valid message. This value is
entered in seconds. hessages shorter than this value are not saved.
GREETING MAXIMUM
LENGTH
The class of service allows you to establish the maximum length of mailbox greetings. This value may
be any value between 15 seconds and 999 seconds. It applies to both mailbox and temporary greetings. This value is entered in seconds.
SPECIFIED DELIVERY TIME UP TO
Specified Delivery Time is a feature that permits a subscriber to record a message and have the system deliver the message sometime in the future. SDT Up To provides a limitation on how far in advance a subscriber can send a message. This value is entered in days. The maximum value is 60 days.
MAXIMUM
SPECIFIED DELIVERY TIME MESSAGES
Maximum Specified Delivery Time. This limits the number of messages a subscriber can have marked
for “specified delivery time.” The maximum value that can be programmed is 60 messages.
REVIEW METHOD
Normally
value is
first in,
message
FIFO/LIFO
the first message sent to a subscriber’s mailbox is the first message the subscriber hears. This
used to change the order in which a subscriber hears messages. If this value is 1, the normal
first out method is used. If this value is 2, the last message delivered to a mailbox is the first
heard, and messages play in the reverse order they entered the mailbox.
NOTE:
Priority
messages are delivered
first regardless
of review
method.
GUESTS 1-9
The subscriber can have up to 9 Guest mailboxes. Guest
retary privileges only. A secretary mailbox can only play
tained in the subscriber’s mailbox. The secretary mailbox
scriber’s mailbox, and cannot send or receive messages.
This value is used to limit the number of guest mailboxes
mailbox number 1 is a mailbox that has secthe envelope information of messages concannot play the actual messages in the subGuest mailboxes 2-9 are reserved for guests.
a subscriber can activate.
KEEP NEW MESSAGES
New messages can be stored for up to 60 days. This value is used to limit the number of days a message is kept without being heard before it is automatically erased by the system. If a message is not
heard before this amount of time expires, the message will be erased even though it has not been
heard. This value is entered in days.
KEEP SAVED MESSAGES
Saved messages can be stored for up to 60 days. This value is used to limit the number of days a
saved message is kept before it is automatically erased by the system. This value is entered in days.
This value is used to limit the amount of disk space a subscriber’s mailbox takes up.
. .. .
PERSONAL GROUPS
Specify a maximum
number of group lists (up to 19) which a subscriber may establish.
3.3
INFOSTARIVX;!
System Administrator’s
revised 7191
Manual
Mailboxes
DESTINATION
The maximum
of destinations
number of destinations per group list. Both the number of group lists and the number
per list refer to personal group lists established and used by individual subscribers.
OK TO SEND MESSAGE TO SYSTEM GROUP LIST
This option is used to permit a subscriber to use the System Group Lists as a destination.
requires a Y (yes) or N (no).
NOTlFlCATlON
OF AUTOMATIC
This option
MESSAGE ERASE
This option is used to determine if a notification is sent to a subscribers mailbox by the system when
a message has been, or is about to be, automatically erased. This option requires a Y (yes) or N (no).
A Y (yes) permits notifications to be sent.
AUTOMATIC
ALERT OF MESSAGE ERASE IN ADVANCE
Saved messages are stored for the number of days specified in the Keep Saved Messages field. The
Automatic Alert Of Message Erase In Advance field is used in conjunction with the Notification
Of
Automatic Message Erase option. The value entered specifies the number of days before the scheduled erase date that an “erased message” notification is sent to the subscriber.
NOTIFICATION
OF NON RECEIPT OF MESSAGE AFTER
One of the delivery options available to mailbox holders is “notification
of non-delivery.”
The value
entered for Notification Of Non Receipt Of Message After specifies the number of days the system
waits for the destination mailbox to listen to the message before placing a notification of non-delivery
in the sending subscriber’s mailbox.
END OF RECORDING ALERT IN ADVANCE
When recording a message,
ing time is near. This alert
message in the subscriber’s
long before the end of the
seconds.
the system alerts the mailbox holder when the end of the
is a short beep. The alert tone is also played to an outside
mailbox. The value programmed for the End of Recording
recording time the system alerts the subscriber. This value
allowed recordcaller leaving a
Beep is how
is entered in
TYPE OF OUT DIALING
This parameter
is not used at this time, and should not be programmed.
SEND MSG TAG
Defines which message delivery options are permitted for messages sent to mailboxes with this class of
service. There are two fields to enter. The field labeled IN refers to messages sent by subscribers. Enter a 1 to allow the confidential option. Enter a 2 to allow the priority option. Enter a 3 to allow
proof of delivery. Enter a 4 to allow “specify delivery time.” The field labeled OUT refers to messages sent by non-subscribers.
Enter a 1 to allow the confidential option. Enter a 2 to allow the priority option. Options 3 and 4 have no function for messages sent by non-subscribers.
MWI RESET OPTION
This option effects when a message waiting indication is sent to the telephone system for mailboxes
with this class of service. If this field contains a 1, the first message received in the mailbox will cause
the MWI turn on code to be sent to the telephone system. The MWI turn off code will not be sent to
the telephone system until all new messages have been acted upon (saved or erased).
3.4
INFOSTARlW2
System Administrator’s
Manual
revised 7191
Mailboxes
If this field contains a 2, each new message received in the mailbox will cause the MWI turn on code
to be sent to the telephone system. The MWI turn off code will be sent to the telephone system after
a valid mailbox access code has been entered for the mailbox.
3.2.1
ESTABLISH
CLASSES OF SERVICE
Classes of Service are numbered from 001 to 999. The INFOSTAWVX2
has been shipped with two
predefined classes of service, one for standard mailboxes (COS 100) and one for the system administrator’s mailboxes (COS 700). You may establish other classes of service, for needs that have not
been predefined.
From the Main Menu press the Fl key, then press 6. The Class of Service programming
pears. See Figure 3-l. The cursor should be in the COS field.
screen ap-
4. Enter the 3-digit number of the class of service you are establishing. It is recommended to use a
number between 10 1 and 199. The system informs you that the COS does not exist, “Information
not
found. ”
5. Press the RETURN
key. The cursor moves to the Name field.
6. Enter a name for the new class of service up to 34 characters, then press the RETURN
moves to the first field.
7. Enter the desired value, then press the RETURN
key. The cursor
key.
8. Program the remaining fields with the values desired for this class of service. The cursor moves to the
next field when a field is full. If the desired value does not fill a field, press the RETURN key.
9. When all fields are complete, press the F5 key to save the screen. The system prompts for confirmation. Press Y to save the information, and N to return to the screen and change something.
10. After the first Class of Service has been saved, the screen does not clear. This is so the existing values
can be used as a model for the next.
NOTE:
Be careful
not to overwrite
an existing
Class of Service and then save it.
NOTE: The pre-defined
Class of Service (100) can be used as a model. Enter 100 for Class
of Service, then save it. The parameters
remain on the screen. Enter the number of the
Class to be defined, and continue from step 6.
3.2.2
MODIFY CLASSES
OF SERVICE
You may change any of the established classes of service (including the predefined ones) to meet your
own subscriber’s needs by simply entering new parameter‘s in place of existing values.
From the Main Menu press the Fl key, then press 6. The Class of Service programming
pears. See Figure 3-l. The cursor should be in the COS field.
screen ap-
1. Enter the 3-digit number of the class of service you wish to modify. The system prompts for confirmation. If the system informs you “Information
not found,” the COS number entered does not exist.
2. Enter Y. The present programming
3. -Using either the RETURN
for this COS appears.
key or the ARROW
keys, move the cursor to the field to be changed.
4. Press the Fl key to clear the field.
INFOSTARIVX2
3.5
Mailboxes
5. Enter the new value, and press the RETURN
key if the value does not fill the field.
6. Program the remaining fields with the values desired for this class of service. The cursor moves to the
next field when a field is full. If the desired value does not fill a field, press the RETURN key.
7. When all fields are complete, press the FS key. The system prompts for confirmation.
the information,
and N to return to the screen and change something.
Press Y to save
8. Press the ESCAPE key to return to the Main Menu.
3.2.3 DELETE CLASSES
OF SERVICE
You may delete any of the established classes of service.
From the Main Menu press the Fl key, then press 6. The Class of Service programming
pears. See Figure 3-1. The cursor should be in the COS field.
screen ap-
1. Enter the 3-digit number of the class of service you wish to delete. The system prompts for confirmation. If the system informs you “Information
not found,” the COS number entered does not exist.
2. Press Y. The present programming
for this COS appears.
3. Press the F6 key. The system prompts for confirmation.
4. Press Y. The COS is deleted.
5. Press the ESCAPE key to return to the Main Menu.
CLASS OF SERVICE
[-I
[CLASS OF SERVICE SCREEN]
NAME:
MAXIMUM NUMBER OF MESSAGES......................60
[
[ z-3
MAXIMUM MESSAGE LENGTH.........................120
SECONDS
MAXIMUM SILENCE DURING RECORDING.................4
[ ]
SECONDS
D) MINIMUM MESSAGE LENGTH .........................
..O
SECONDS
E) GREETING MAXIMUM LENGTH.........................6
0
SECONDS
F) SPECIFIED DELIVERY TIME UP TO...................6
0
DAYS IN ADVANC
G) MAXIMUM SPECIFIED DELIVERY TIME MESSAGES........2
0
.I
H) REVIEW METHOD FIFO/LIFO ........................
..l
lFIF0 2LIFO
I) GUESTS 1-O .....................................
..q
J) KEEP NEW MESSAGES...............................3
0
DAYS
K) KEEP SAVED MESSAGES.............................1
0
DAYS
L) PERSONAL GROUPS.................................1
8
M) DESTINATION.....................................2
5
N) OK TO SEND MESSAGE TO SYSTEM GROUP LIST ........
..Y
..Y
0) NOTIFICATION OF AUTOMATIC MESSAGE ERASE ........
Y/N
P) AUTOMATIC ALERT OF MESSAGE ERASE IN ADVANCE .... ..O
DAYS
Q) NOTIFICATION OF NON RECEIPT OF MESSAGE AFTER ... ..l
DAYS
R) END OF RECORDING ALERT IN ADVANCE...............1
0
SECONDS
..O
S) TYPE OF OUT DIALING ............................
[ ---I
T) SEND MSG TAG (l:CONF 2:PRE 3:PROOF 4:SDT) IN..1234
OUT 1-1
U) MWI RESET OPTION.................................1
1-I
: [FB]Clear
[FB]Save
[FG]Del
[F7]Scroll
[FS]Find
[FO]Prev
[FlO]Next
[Esc]Quit
=
A)
B)
C)
Figure 3-3
3.6
Class Of Service Programming
Screen
INFOSTARIVX2
System Administrator’s
Manual
revised 7191
Mailboxes
3.3 MAILBOX
SET-UP SCREEN
Set-up screen is used to add, modify, or delete individual subscribers’ mailboxes. The
screen is also used to define a mailbox’s type, class of service, and the name of the mailbox holder.
The name of a mailbox holder is entered so that the system can use the DiaZ By Name feature. System administrator’s mailboxes must also be added to the system using the Mailbox Set-up screen.
The Mailbox
When a mailbox has been added, the system assigns it a temporary access code. Write this code down
and give it to the mailbox owner. The temporary access code is needed to access the mailbox for the
first time. The mailbox owner then changes the access code as part of the first time user setup. If this
temporary access code is lost before a subscriber uses the mailbox for the first time, the system administrator can reset the password using the System Administrator’s
Mailbox. The following fields
need to be programmed for each mailbox number,
[MAILBOX
CbfPL-1
BOX[ ----I
SCREEN]
III
1
ATR/GRT TYPE......[-].......NEW
OUT DIAL ALLOWED..[-]
y/n
OUT DIAL AREA CODE[
DEPARTMENT........[
SPELL NAME........[
L
=[FB]Clear
[FJ]Save
USER TUTORIAL.[-]
]
CCR INPUT........[
-1
---
SECRETARY
GUEST
2
GUEST
3
GUEST
4
GUEST
5
[-]
Ll
l-1
E-1
L-1
GUEST
ATTEND EXT
-1
[FB]D~~
[F'I]Scroll
Figure 3-4
[FB]Find
Mailbox
[FO]Prev
[FlO]Next
[Esc]Quit
Set-up Screen
CMP
The 3-digit code for the name of the company.
EXC.
BOX
The number of the mailbox you are programming. The length of a
mailbox is defined on the Company Parameters programming screen.
The mailbox number can have up to 7 digits.
TELEPHONE
The extension number of the telephone
ciated with.
EXT
At present, enter
system this mailbox is asso-
CLASS OF SERVICE
The class of service for this mailbox. The meaning of each class of
service is defined on the Class of Service programming screen. The
class of service must be a 3-digit entry.
BOX TYPE
The Box Type defines the function of the mailbox and the task it is to
perform when called. A subscriber mailbox is type 1. See the following
Section 3.3.1 MaiZbox Types for a complete list of available mailbox
types.
INFOSTARIKYZ
System Administrator’s
revised 7191
3.7
Manual
Mailboxes
GUESTS
.
The maximum number of guests is programmed on the Class of Service screen. This field is used to increase the number of guests a mailbox is permitted to have (override the Class of Service). Enter the
maximum number of guests allowed in this field.
OPENED
The date the mailbox was added to the system.
PASSWORD
The date the access code was issued or last changed.
SET BY
This field indicates whether the password was set from the keyboard
(KBD) or from a telephone (TEL).
NAME LAST,
FIRST
This parameter identifies the mailbox when subscribers or callers use
the Dial By Name feature. The last name may be up to 16 characters
long, and the first name up to 10 characters.
STREET
The subscriber’s business or home address.
P.O. BOX
The post office box if applicable.
CITY
The city in which the subscriber lives.
STATE
The state in which the subscriber lives.
ZIP CODE
The business or home zip code.
TELEPHONE
The business or home telephone
ATR/GRT
This field is not used at this time, and should not be programmed.
TYPE
number of the subscriber.
OUT DIAL ALLOWED
Enter a Y in this field if the mailbox is allowed to use the outdial feature. If this field is blank, or contains N, outdial is not allowed.
OUT DIAL AREA CODE
This field is not used at this time, and should not be programmed.
NEW USER TUTORIAL
Whether or not to play the New User Tutorial
box is used. This field takes a Y or N entry.
CCR INPUT
This field is not used at this time, and should not be programmed.
DEPARTMENT
The department code for the mailbox may be up to 4 characters long
including blank spaces. This is useful for arranging the mailbox numbers into departments.
SPELL NAME
The system uses this field to display the digits that are to be dialed
when using Dial By Name to call this mailbox. You can not program
this field.
ATTEND
This field is used to identify which telephone system extension should
serve as an attendant for calls to this mailbox. The system transfers
callers to these attendants when the caller presses 0, or when the caller has made too many incorrect entries. Ideally, the attendant should
be an answering position or center located in close proximity to the
subscribers so that he or she could be reached to accept an urgent
call.
EXT
GUEST BOXES
3.8
the first time the mail-
These fields are for informational purposes only, and do not require
programming. These fields show the number of guest access codes a
subscriber has active in the mailbox. A “Y” appears when an access
code for the guest has been entered.
INFOSTARIKX2
System Administrator’s
Manual
revised 7191
Mailboxes
[MAILBOX
BOX[ -1
CMPL-1’
NAME LAST
STREET...
P.O.BOX..
CITY.....
STATE....
TELEPHONE -
I
FIRST....
ZIP:
-
ATR/CRT TYPE ......
[-].......NE
OUT DIAL ALLOWED..[- ] y/n
OUT DIAL AREA CODE[
DEPARTMENT ......
SPELL NAME ......
=[FB]Clear
[Fb]Save
..[ -3
..[
W USER TUTORIAL. [-]
CCR INPUT ......
..[
]
-3
-GUEST
BOXESSECRETARY
GUEST
2
GUEST
3
GUEST
4
GUEST
5
GUEST
6
GUEST
7
GUEST
8
GUEST
B
ATTEND EXT
[FG]Del
[F'I]Scroll
Figure 3-5
3.3.1
SCREEN]
[FI]Find
Mailbox
[FQ]Prev
[FlO]Next
[Esc]Quit
:
Set-up Screen
MAILBOX TYPES
The Mailbox Type defines the function of a mailbox. A number of mailbox types have been added to
the system since software release 1.3.3. The following box types are available in the system:
Type 1
Type 2
Type 3
Type 4
Type 5
Type 10
Type 11
Type 12
Type 13
Type 14
is a regular subscriber mailbox.
is a subscriber mailbox, however, after the mailbox greeting is played, there are no system prompts, just the tone to begin recording.
is a subscriber mailbox with prompts, however, the system greeting is played before the
mailbox greeting. This is used for DID calls to notify the caller of company reached in
addition to the subscriber’s greeting.
is a subscriber mailbox, however, the system greeting is played before the mailbox greeting, there are no system prompts, just the tone to begin recording. This is used for DID
calls to notify the caller of company reached in addition to the subscriber’s greeting.
is a subscriber mailbox, however, after the mailbox greeting is played, the caller is given a
choice of dialing 1 to leave a message, or 0 to reach the operator. If nothing is dialed,
the caller is transferred to the operator.
is a system administrator mailbox.
calls to mailboxes with this type are routed to the voice mail entry point for subscribers.
This type is used with Custom CalI Routing.
calls to mailboxes with this type are routed to the voice mail entry point for non-subscribers. This type is used with Custom CalI Routing.
routes calls to the entry point for auto attendant spell by name, however, there is no system introduction.
this is a special type used when Custom Call Routing is to be used as an auto attendant.
The DTMF digit used in CCR to reach a mailbox with this type is taken as the leading
digit in the extension number. The system waits for the remaining digits to be dialed
(based on the number of digits in an extension number from the PBX Parameters
screen) then transfers the call to that extension.
INFOSTARIVXZ
3.9
Mailboxes
Type 15
this is a special type to be used when CCR is to route callers to a specific mailbox. The
DTMF digit used in CCR to reach a mailbox with this type is taken as the leading digit in
the mailbox number. The system waits for the remaining digits to be dialed (based on the
number of digits in a mailbox number from the PBX Parameters screen) then routes the
call to that mailbox.
Type 200
this is a listen
and are then
ing 2, etc.)
this is a listen
greeting, and
Type 201
only mailbox. Calls to mailboxes with this type hear the mailbox greetings,
disconnected. The mailbox greetings are played in order (greeting 1, greetand reply mailbox. Calls to mailboxes with this type hear the mailbox
are then prompted to leave a message.
Type 202
this is a listen and transfer mailbox. Calls to mailboxes with this type hear the mailbox
greeting, and are then transferred to the extension programmed as attendant for the mailbox.
Type 300
calls to mailboxes with this type are routed to the Custom Call Routing scheme beginning
with Record 1 Message 1.
Type 301
calls
with
calls
with
calls
with
calls
with
calls
with
Type 302
Type 303
Type 304
Type 305
to mailboxes with this
Record 1 Message 1.
to mailboxes with this
Record 2 Message 1.
to mailboxes with this
Record 3 Message 1.
to mailboxes with this
Record 4 Message 1.
to mailboxes with this
Record 5 Message 1.
type are routed to the Custom Call Routing scheme beginning
type are routed to the Custom Call Routing scheme beginning
type are routed to the Custom Call Routing scheme beginning
type are routed to the Custom Call Routing scheme beginning
type are routed to the Custom Call Routing scheme beginning
Type 306
calls to mailboxes with this type are routed to the Custom Call Routing scheme beginning
with Record 6 Message 1.
Type 307
calls
with
calls
with
calls
with
to mailboxes with
Record 7 Message
to mailboxes with
Record 8 Message
to mailboxes with
Record 9 Message
calls
with
calls
with
to mailboxes with this type are routed to the Custom Call Routing scheme beginning
Record 10 Message 1.
to mailboxes with this type are routed to the Custom Call Routing scheme beginning
Record 11 Message 1.
Type 308
Type 309
Type 310
Type 311
this type are routed to the Custom Call Routing scheme beginning
1.
this type are routed to the Custom Call Routing scheme beginning
1.
this type are routed to the Custom Call Routing scheme beginning
1.
Type 312
calls to mailboxes with this type are routed to the Custom Call Routing scheme beginning
with Record 12 Message 1.
Type 313
calls to mailboxes with this type are routed to the Custom Call Routing scheme beginning
with Record 13 Message 1.
Type 314
calls to mailboxes with this type are routed to the Custom Call Routing scheme beginning
with Record 14 Message 1.
Type 400
calls to mailboxes with this type are routed to the starting point for Auto Attendant without spell by name. This is equivalent to “T AUTO1 0001” on the Run Dialogue screen,
Type 401
calls to mailboxes with this type are routed to the starting point for Auto Attendant with
spell by name. This is equivalent to “T AUTOS 0001” on the Run Dialogue screen.
3.10
INFOSTARIVX2
System Administrator’s
Manual
Mailboxes
Type
402
calls to mailboxes with this type are routed to the starting point for non-subscriber
voice
mail. However, it prompts the caller to spell the subscribers name instead of asking for
the maiIbox number. This is equivalent to “T AUTOM 0001” on the Run Dialogue
screen.
Type
403
calls to mailboxes with this type are routed to the starting point for Auto Attendant.
However, the mailbox personal greeting is played instead of the system greeting.
Type
404
calls to mailboxes with this type are routed to the starting point for Auto Attendant
with
spell by name. However, the mailbox personal greeting is played instead of the system
greeting.
Type
405
calls to mailboxes with this type are routed to the starting point for non-subscriber voice
mail using spell by name. However, the mailbox personal greeting is played instead of the
system greeting.
3.3.2 ADDING MAILBOXES
Mailbox numbers can be any number in the range chosen for the system. The range is decided by the
length of a mailbox number. The default value for mailbox numbers is 4. Using the default value,
mailboxes can range from 0001 to 9999.
From the Main Menu press the Fl key, then press 2. The Mailbox
3-4. The cursor should be in the Cmp field.
1. Enter EXC
for the company.
Set-up screen appears. See Figure
The cursor moves to Box.
2. To add a mailbox to the system, enter a unique mailbox number not currently used by any subscriber.
It is recommended to use the same number for a mailbox as the subscriber’s telephone extension
number. Enter the desired mailbox number using the number of digits in the length of the mailbox,
then press the RETURN
key. The system informs you that the mailbox does not exist, “Information
not found.” Attempting to enter a mailbox number already issued results in a message “Information
found display it (y/n) ?” Press the RETURN
key. The cursor moves to the Telephone field.
[MAILBOX
1 CMP[vl
BOX[-1
'[F3]Clear
[FS]Save
USER TUTORIAL.[
]
CCR INPUT........[
-1
--II
-GUEST
BOXESSECRETARY r i
GUEST
2
GUEST
3
GUEST
4
GUEST
5
GUEST
6
GUEST
I
GUEST
8 L-J
GUEST
9 rL-J i
ATTEND EXT
-1
[FS]Del
[F7]Scroll
Figure 3-6
INFOSTARWX2
System Administrator’s
revised 7/91
1
I II
ATR/CRT TYPE......[-].......NEW
OUT DIAL ALLOWED..[-]
y/n
OUT DIAL AREA CODE[
DEPARTYENT........[
SPELL NAME........[
SCREEN
[Fa]Find
Mailbox
[F9]Prev
[FlO]Next
[Esc]Quit
Set-up Screen
3.11
Manual
Mailboxes
3. The Telephone Ext. field contains the number entered as the mailbox number. The system presumes
that mailbox numbers and telephone extension numbers are the same. If this is not so, press Fl to
clear the field, ‘and enter the telephone extension number associated with this mailbox. Press the
RETURN key. The cursor moves to the Class of Service.
4. Enter the desired 3-digit class of service for this mailbox. COS 100 is used for standard mailboxes.
Enter 700 for the system administrator’s
mailboxes. The cursor moves to Box Type.
5. Enter the desired Box Type. Use Box type 1 for subscribers’ mailboxes.
6. Press the RETURN
key. The cursor reaches Name Lust.
7. Enter the last name of the mailbox owner, then press the RETURN key. This information is used for
the Dial By Name feature and care should be taken to spell the names correctly. The last name of the
mailbox may be up to 16 characters in length and must be unique. Dial By Name allows callers and
subscribers to spell the name of the destination they wish to reach instead of entering a number. In
order to make this feature easier to use, enter nicknames (e.g. Bob instead of Robert) if these names
are commonly used by business associates. MAKE SURE TO SPELL NAMES CORRECTLY.
Misspelling mailbox names destroys the effectiveness of the Dial By Name feature. If more than one
person has the same name, a letter or number must be entered to uniquely identify the name. Middle
initials or department names can be used for this purpose. For example, if there is one John Smith in
the Sales department and another John Smith in the Service department, enter the names as SMITH,
JOHN SERVICE and SMITH, JOHN SALES. In addition, encourage subscribers with the same name
to record their name and department when initializing their mailboxes. For example, John Smith in
the Sales department should record his name as “John Smith, Sales.” These steps ensure that subscribers and callers address messages correctly.
8. Enter the first name of the mailbox
9. Enter the address and telephone
after each entry.
owner, then press the RETURN
key.
number of the mailbox owner if desired. Press the RETURN
key
key until the cursor reaches New User Tutorial.
10.
Press the RETURN
1 I.
Enter a Y to play the New User Tutorial the first time the mailbox is used. Press N or the RETURN
if the New User Tutorial is not to be played. The cursor moves to Out Dial Allowed.
key
12. Enter a Y if this subscriber is allowed to use the optional outdial feature. Press N or the RETURN
if the subscriber is not allowed to use outdial.
key
13. Press the RETURN
14.
key until the cursor reaches Department.
Enter a 4-digit department number for this mailbox. This department number is for informational
purposes only, and has no use at the present time. The cursor moves to the Attend Ext field.
15. Enter the telephone
key.
extension number serving as attendant
for this mailbox, then press the RETURN
16. Do NOT enter anything in the Spell Name field. The system will fill in this field after the mailbox has
been saved if there are characters in the Name Last & First fields.
17. When all fields are complete, press the F5 key to save the screen. The system prompts for confirmation. Press Y to save the information,
and N to return to the screen and change something.
18. To start a new mailbox,
press the F3 key, and answer Y.
NOTE: If the system is off-line,
the auto-increment
feature can be used when adding
mailboxes.
After the screen clears, press the RETURN key. Programming
for the next
Sequential mailbox will appear.
3.12
INFOSTARIVXZ
System Administrator’s
Manual
revised 7191
Mailboxes
[MAILBOX
cMpt-1
*
II
BOX t-
NAME LAST
STREET...
P.O.BOX..
IV,....
LIIX.....
STATE....
TELEPHONE -
FIRST....
ZIP:
-
DEPARTMENT........[
I SPELL NAYE........[
-]
:[F3]Clear
[FG]D~~
[FS]Save
-GUEST
BOXESSECRETARY
GUEST
2
GUEST
3
GUEST
4 .-J
GUEST
5 : I
GUEST
6 :GUEST
7 :GUEST
8 :-J i
-I
GUEST
Q
--
ATR/CRT TYPE......[-].......NEW
OUT DIAL ALLOWED..[-]
y/n
OUT DIAL AREA CODE[
USER TUTORIAL.[-]
CCR INPUT........[-]
-1
ATTEND EXT
I
[F7]Scroll
Figure 3-7
3.3.3 MODIFYING
SCREEN]
[FI]Find
Mailbox
[FQ]Prev
[Esc]Quit
:
Set-up Screen
MAILBOXES
From the Main Menu press the Fl key, then press 2. The Mailbox
sor should be in the Cmp field.
NOTE:
[FlO]Next
Set-up screen appears. The cur-
The F9 and FIO keys can be used to scroll back and forth
through
the records.
1. Enter EXC for the company. The cursor moves to Box.
2. Enter the mailbox number to be modified. The system prompts for confirmation.
you “Information
not found,” the mailbox number entered does not exist.
3. Enter Y. The present programming
4. Using either the RETURN
If the system informs
for this mailbox appears.
key or the ARROW
keys, move the cursor to the field to be changed,
5. Press the Fl key to clear the field.
6. Enter the new information,
and press the RETURN
key if the value does not fill the field.
7. Program the remaining fields with the values desired for this mailbox. The cursor moves to the next
field when a field is full. If the desired value does not fill a field, press the RETURN key.
8. When all fields are complete, press the FS key. The system prompts for confirmation.
the information,
and N to return to the screen and change something.
9, Press the ESCAPE
INFOSTARIVX2
Press Y to save
key to return to the Main Menu.
3.13
Mailboxes
3.3.4
DELETE A MAILBOX
You may delete any #of the mailboxes.
From the Main Menu press the Fl key, then press 2. The Mailbox
sor should be in the Cmp field.
NOTE:
Set-up screen appears. The cur-
The F9 and FlO keys can be used to scroll back and forth
through
the records.
1. Enter EXC for the company. The cursor moves to Box.
2. Enter the mailbox number to be deleted. The system prompts for confirmation.
you “Information
not found,” the mailbox number entered does not exist.
3. Enter Y. The present programming
If the system informs
for this mailbox appears.
4. Press the F6 key. The system prompts for confirmation.
5. Press Y. The mailbox messages are deleted.
6. Press Y again. The mailbox is deleted.
7. Press the ESCAPE key to return to the Main Menu.
3.14
INFOSTARIW2
System Administrator’s
Manual
revised 7191
Mailboxes
Class
of Service Configuration Sheet
,
Date
CLASS OF SERVICE [-I
/ -I--
-
Name[
1
A) MAXIMUM NUMBER OF MESSAGES......................6
0
t
1
B) MAXIMUM MESSAGE LENGTH.........................12
0
[
]
SECONDS
[
]
SECONDS
[
]
SECONDS
C) MAXIMUM SILENCE DURING RECORDING ..............
...4
D) MINIMUM MESSAGE LENGTH .........................
..O
E) GREETING MAX LENGTH.............................6
0
[
]
SECONDS
F) SPECIFIED
0
I
]
DAYS
0
1
1
DELIVERY TIME UP TO...................6
G) MAXIMUM SPECIFIED
DELIVERY TIME MESSAGES........2
H) REVIEW METHOD FIFO/LIFO
I)
........................
GUESTS 1-9 ....................................
..l
t -1
...4
[ -1
lFIF0
BLIFO
J) KEEP NEW MESSAGES...............................3
0
1
]
DAYS
K) KEEP SAVED MESSAGES.............................1
0
1
]
DAYS
L) PERSONAL GROUPS.................................1
8
1
1
5
[
1
‘M) DESTINATION.....................................2
N) OK TO SEND MESSAGE TO SYSTEM GROUP LIST ........
..Y
1-1
Y/N
0) NOTIFICATION
..Y
[ -1
Y/N
..O
E-1
DAYS
L-1
DAYS
OF AUTOMATIC MESSAGE ERASE ........
P) AUTOMATIC ALERT OF MESSAGE ERASE IN ADVANCE ....
Q) NOTIFICATION
OF NON RECEIPT OF MESSAGE AFTER ... ..l
R) END OF RECORDING ALERT IN ADVANCE...............1
0
S) TYPE OF OUTDIALING .............................
T) SEND MSG TAG (1:CONF
..O
2:PRE 3:PROOF 4:SDT)
U) MWI RESET OPTION ...............................
This
INFOSTARIVX2
System Administrator’s
revised 7191
page
IN..123
4
..l
may be copied
1
]
SECONDS
1-1
t
1 0IJ-T [
1
I-1
as needed.
3.15
Manual
Mailboxes
Mailbox Configuration Sheet
Company
-
(EXC)
Date
* The system assigns
a temporary
password
here for reference.
This
3.16
password
after
the
mailbox
page may be copied
is created.
-/-.J--
You may enter
that
as needed.
INFOSTARIVX2
System Administrator’s
Manual
ro11iroA 7/o 1
Section 4 - System Administration
,
4.1 INTRODUCTION
In addition to the programming necessary to make the system function, the system administrator
program both system and personal group lists. This section also includes instructions for on-line
gramming.
4.2 ON-LINE
can
pro-
PROGRAMMING
Many of the system administrator’s programming activities can be accomplished while the system is
running and processing calls. The programming screens listed on the On Line Programming Menu can
be accessed.
To reach any of these programming screens, press the F8 key while the system is running. A menu
appears on the bottom of the screen. See Figure 4-l. From this menu, press the key for the desired
programming screen, e.g., C for the Mailbox Set-up screen. When you have completed your programming, press the Z key to return to the Run Dialogue screen.
----._..-
ver
I
[A]
2.0
SETUP
ON LINE
[ON
[B]
LINE
PROGRAMMING
PARAMETERS
II ci‘j
MENU]
Parameters
[N] Functions
I
05/1O/Ql
Figure 4-l
On-line
Programming
Screen
4.3 SYSTEM GROUP LISTS
For sending messages to the same group of people on a regular basis, group lists save time and effort.
Group lists allow subscribers to record a message once, and send it simultaneously to multiple destinations. Messages are recorded and sent like any other messages and may have the same delivery options like priority, confidential, etc.
As system administrator you may establish up to 50 system group lists. System group lists, like personal group lists established by individual subscribers, enable subscribers to send the same message to
multiple mailboxes by simply entering the group list number as a destination for a message. System
group lists, unlike personal group lists, can be shared by many subscribers and can accommodate
INFOSTARIW2
4.1
System Administration
many more mailbox numbers.
lists are numbered 30-79.
Access to system group lists is granted by class of service. System group
The system administrator is responsible for recording a name or title for each system group list. This
is accomplished using the system administrator’s mailbox. The members of the group list can be entered using the system administrator’s mailbox (see the System Administrator’s
Mailbox section), or
using the monitor and keyboard.
4.3.1
ESTABLISHING
A SYSTEM GROUP LIST
System group lists are numbered
30-79.
There are no pre-programmed
system group lists.
From the Main Menu press the Fl key, then press 9. A second menu appears. See Figure 4-2. Press
1. The System Group programming screen appears. See Figure 4-3.
Yon JUN 10
-
2
3
4
5
5
7
1001
MAIN MENU -
GROUP MEMBERS
PERSONAL GROUPS
GROUP MEMBERS
CALL REPORT LOG
CALL COUNT (CALL)
CALL COUNT (TIME)
Copyright
(C)
1000
EXECUTONE Information
Figure 4-2
1. Enter EXC for the company.
Systems.
All
rights
reserved.
Group List Menu
The cursor moves to Group.
2. Enter the number of the group you are establishing, and press the RETURN key. The system informs
you that the group does not exist, “Information
not found.” Attempting to enter an existing group
number results in a message “Information
found display it (y/n) ?”
3. Press the RETURN
key.
4. Enter a name for the group in the Name field.
5. Press the F5 key to save the screen, then press Y to confirm.
6. Press the ESCAPE key. The Group List menu appears.
7. Press 2. The System Group Members
8. Enter EXC for the company.
screen appears. See Figure 4-4.
The cursor moves to Group.
9. Enter the number of the group you just established, and press the RETURN key. The cursor moves to
the first member position, and displays the name of the group (from the Name field of the previous
screen).
4.2
INFOSTARIVX2
System Administrator’s
Manual
ToViPDa
7/Q
1
System Administration
10. Enter the mailbox numbers that are to be members of this group, pressing the RETURN
one. If you make a mistake use the backspace key to correct it. If you notice a mistake
programmed mailbox, use the arrow keys to move to it. Press Fl to erase the mailbox
over. After the mailbox has been entered, the mailbox number and the last name of
appear at the lower left edge of the screen.
key after each
in a previously
field and start
the subscriber
11. When all the desired mailboxes have been entered, press the F5 key (save), then press Y to confirm.
12. To enter another group, move the cursor to Group, press the Fl key, and enter the new group to be
programmed. The group must have already been established using the System Group programming
screen.
13. To return to the Main Menu, press the ESCAPE key, then press 8.
[SYSTEM
COMPANY:
CROUP:
MEMBERS:
NAME:
=[F3]Clear
[FB]Save
HEADER
SCREEN]
-
[FB]D~~
Figure 4-3
INFOSTARIVX2
System Administrator’s
revised 7191
GROUP
[F7]Scroll
[FI]Find
[Fg]Prev
System Group Programming
[FlO]Next
[Esc]Quit
Screen
4.3
Manual
System Administration
~~YSTEM CROUP MEMBERS SCREENS
NAME :
I51
A
B
c
D
E
------
,
171
,
-I
t’31
,
tB1
-I-
-I-
-I-
-l-l-l-
q--(-!E
-l-
--~
---------------
F --
G -H --
I -J -Y
---IL -Y -N -0 -P -Q -R -S -J. -I-
= [FB]Clear
-l-l-l-
___(__I__l=
[F5]
Figure 4-4
4.3.2
tB1
-I
Save
[Esc]Quit
[FB]D~~
System Group Members
Programming
I
Screen
MODIFY A SYSTEM GROUP LIST
System group lists are numbered
30-79.
From the Main Menu press the Fl key, then press 9. A second menu appears. Press 2. The System
Group Members programming screen appears.
1. Enter EXC for the company.
The cursor moves to Group.
2. Enter the number of the group you wish to modify, and press the RETURN key. The system displays
the members of the group. The cursor moves to the first member position.
3. To add a member, move the cursor to the next empty position, and enter the mailbox numbers that are
to be members of this group, pressing the RETURN key after each one.
To delete a member,
cleared.
move the cursor to the desired mailbox,
the press the Fl key. The field is
4. When all the desired changes have been made, press the F5 key (save), then press Y.
5. To return to the Main Menu, press the ESCAPE key, then press 8.
4.3.3 ERASE AN ENTIRE SYSTEM GROUP LIST
System group lists are numbered
30-79.
From the Main Menu press the Fl key, then press 9. A second menu appears. Press 1. The System
Group programming screen appears.
1. Enter EXC for the company.
The cursor moves to Group.
2. Enter the number of the group you wish to erase, and press the RETURN
confirmation.
Press Y.
3. Press the F6 key (delete), then press RETURN.
key. The system prompts for
The system prompts to delete the record.
4. Press the Y key to confirm.
4.4
INFOSTARIKX2
System Administrator’s
Manual
revised 7191
System Administration
5. To return to the Main Menu, press the ESCAPE
key, then press 8.
4.4 PERSONAL GROUP LISTS
As system administrator you may establish personal group lists for subscribers. The number of group
lists a subscriber may have is programmed by Class of Service up to 19. Personal group lists enable
subscribers to send the same message to multiple mailboxes by simply entering the group list number
as a destination for a message. Personal group lists are numbered 11-29.
The individual subscriber is responsible for recording a name or title for each personal group list. The
members of the group list can be entered using the subscriber’s mailbox (see the Mailbox section), or
using the monitor and keyboard.
4.4.1
ESTABLISHING
A PERSONAL GROUP LIST
Personal group lists are numbered
11-29. There are no pre-programmed
personal group lists.
From the Main Menu press the Fl key, then press 9. A second menu appears. Press 3. The Personal
Group programming screen appears. See Figure 4-5.
1. Enter EXC
for the company.
The cursor moves-to Box.
2. Enter the mailbox number this list is being established for, then press the RETURN
moves to Group.
key. The cursor
3. Enter the number of the group you are establishing, and press the RETURN
key. The system informs
you that the group does not exist, “Information
not found.” Attempting to enter an existing group
number results in a message “Information
found display it (y/n) ?”
4. Enter a name for the group in the Name field.
5.
Press the RETURN
key.
6. Press the F5 key to save the screen, then press Y to confirm.
[PERSONAL CRoup HEADER SCREENER
COMPANY: _
BOX:
MEMBERS: NAME:
[FB]Clear
[FS]Save
[FB]Del
Figure 4-5
INFOSTARIKY2
Croup:
I
[FII]Scroll
[FB]Find
[FQ]Prev
Personal Group Programming
[FlO]Next
[Esc]Quit
Screen
4.5
System Administration
CMP:
A ----_B ----c -----
D
E
F
G
H
cI
J
K
L
Y
N
0
P
Q
R
S
T
BOX:
rrj-,,
[21
,
[PERSONAL GROUP MEMBER SCREEN]
GROUP:
NAME:
[31
, [41
, 151 , ISI
, [71
---------------------
--
1
--
l
-----
-----
---------------------------------p--p
---------
------I-
[31
,
[aI
~--- I
[FS]Run
Figure 4-6
Press the ESCAPE
Or Save
Personal Group Members
[Esc]Quit
[FB]D~~
Programming
‘;
Screen
key. The Group List menu appears.
8. Press 4. The Personal
9. Enter EXC
l
-----
k : [FJ]Clear
7.
--
Group Members
for the company.
screen appears. See Figure 4-6.
The cursor moves to Box.
10. Enter the mailbox number this list is being established for, then press the RETURN
moves to Group.
key. The cursor
11. Enter the number of the group you just established, and press the RETURN
key. The cursor moves to
the first member position, and displays the name of the group (from the Name field of the previous
screen).
12. Enter the mailbox numbers that are to be members of this group, pressing the RETURN
one. If you make a mistake use the backspace key to correct it. If you notice a mistake
programmed mailbox, use the arrow keys to move to it. Press Fl to erase the mailbox
over. After the mailbox has been entered, the mailbox number and the last name of
appear at the lower left edge of the screen.
key after each
in a previously
field and start
the subscriber
13. When all the desired mailboxes have been entered, press the FS key (save), then press Y to confirm.
14. To enter another group, move the cursor to Group, press the Fl key, and enter the new group to be
programmed. The group must have already been established using the Personal Group programming
screen.
15. To return to the Main Menu, press the ESCAPE
4.6
key, then press 8.
INFOSTARIVX2
System Administrator’s
Manual
revised 7191
System Administration
4.4.2
MODIFY A PERSONAL GROUP LIST
From the Main Men,u press the Fl key, then press 9. A second menu appears. Press 4. The Personal
Group Members programming screen appears.
1. Enter EXC
for the company. The cursor moves to Box.
2. Enter the mailbox number this list is being modified
moves to Group.
for, then press the RETURN
key. The cursor
3. Enter the number of the group you wish to modify, and press the RETURN
key. The system displays
the members of the group. The cursor moves to the first member position.
4. TO add a member, move the cursor to the next empty position, and enter the mailbox numbers that are
to be members of this group, pressing the RETURN
key after each one.
To delete a member,
cleared.
move the cursor to the desired mailbox,
the press the Fl
key. The field is
5. When all the desired changes have been made, press the F5 key, then press Y.
6. To return to the Main Menu, press the ESCAPE
4.4.3
key, then press 8.
ERASE AN ENTIRE PERSONAL GROUP LIST
From the Main Menu press the Fl key, then press 9. A second menu appears. Press 3. The System
Group programming screen appears.
1. Enter EXC
for the company.
The cursor moves to Box.
2. Enter the mailbox number this list is being erased for, then press the RETURN
to Group.
3. Enter the number of the group you wish to erase, and press the RETURN
confirmation. Press Y.
4. Press the F6 key (delete),
then press RETURN.
key. The cursor moves
key. The system prompts for
The system prompts to delete the record.
5. Press Y.
6. To return to the Main Menu, press the ESCAPE
INFOSTARIVX2
System Administrator’s
revised 7191
key, then press 8.
4.1
Manual
Section
, 5 - System Administrator
Mailboxes
5.1 lNTRQDUCTlON
The system administrator mailboxes allow access to special features. These non-standard
mailboxes
have a unique main menu that provides options which are dedicated to the system administrator’s
needs and functions.
NOTE:
System administrator’s
mailboxes
5.2 SYSTEM ADMINISTRATOR’S
cannot
OPTIONS
From the Main Menu of the system administrator’s
l
e
e
l
o
o
0
l
receive or send messages.
mailbox,
there are options to:
Select a standard sign-on (opening) greeting, or record a custom system greeting for the system
Create or erase a broadcast message
Add/Delete mailboxes
Reset mailbox passwords
Record greetings for any mailbox in the system
Reset message waiting indicators
Manage group distribution lists
Set system date and time
A system administration mailbox is accessed in the same manner as a regular mailbox. Use of these
special functions is as easy as using any of the system’s standard subscriber features. Upon entering a
system administrator mailbox, you are prompted by the system for the keys that you need to dial.
5.3 SYSTEM GREETINGS
The sign-on greeting is the first announcement callers hear when they reach the system. The callers
may have dialed the system’s access number directly or may have been forwarded to the VX2 system
when the persons they called are busy or away from their desks. (On integrated systems, callers forwarded to the system hear a subscriber’s personal greetings.)
The INFOSTAWVX2
is shipped with the following standard sign-on greeting:
“Good Morning (Afternoon or Evening). You have reached the INFOSTAIUVX
voice processing system. Dial the mailbox number of the person you are calling. If you are a subscriber, dial pound.”
In addition, the system administrator may want the option of recording several different greetings for
each time of the day to provide callers with information and instructions. The greeting list is composed of five selections:
Greeting
Greeting
Greeting
Greeting
Override
1
2
3
4
Greeting
INFOSTARIVX
System Administrator’s
revised 7191
5.1
Manual
System Administrator
Mailbox
The first four greetings can be programmed to play on any day of the week, and between certain
hours. The fifth greeting
is designed to override the programming of the first four greetings and is de,
signed to deliver urgent information to the caller. The fifth greeting can be programmed to play on
only one day, and plays all day. This programming is accomplished on the Company Parameters
screen.
53.1
SAMPLE GREETINGS
Greeting
1:
“Good Morning. This is the XYZ Publishing Company. Please dial the number
son you’re calling. If you have a mailbox on this system, please dial pound.”
Greeting
of the per-
2:
“Good Afternoon. You have reached the XYZ Publishing Company. Please dial the number
of the person you’re calling. If you have a mailbox on this system, please dial pound.”
Greeting
3:
“Good Evening. You have reached the XYZ Publishing Company. Please dial the number of
the person you’re calling. If you have a mailbox on this system, please dial pound.”
NOTE: While the above examples contain
ings have been programmed
for different
5.3.2
the same message and instructions,
times of the day.
the record-
RECORDING SYSTEM GREETINGS
Should you wish to customize the system greeting to meet your organization’s individual
can record your own system sign-on using a system administrator mailbox as follows:
n
1
Greetings A
0
2
Record -
1
2
Greeting 1 --) Record the
#
greeting, then press cl
Greeting 2
3
Greeting 3
4
Greeting 4
5
Override
Greeting
n
0
0
n
n
needs, you
-e System replays
greeting
If you choose to record a customized greeting, you should remember to tell subscribers to “dial the
[#I key (pound key) on your dial pad.” This is important for new subscribers who might get confused
about how to enter their own mailboxes instead of leaving a message for someone else.
Outside callers who have never encountered a voice message system before should
structions on what to do when they reach the system. Since mailbox numbers are
be the same as the extension numbers, a caller can leave a message in the correct
ing the extension number. Customizing the system sign-on greeting permits you to
directions to the outside caller, e.g., “Please enter the last 3 digits of the number
press “0” for operator assistance.”
be given clear ingenerally assigned to
mailbox by re-dialgive more explicit
you are calling, or
Once-you have recorded a customized sign-on greeting, you still have the option of returning
standard sign-on greeting or recording a new customized greeting at any time.
5.2
to the
INFOSTARIVX:!
System Administrator
53.3
Mailbox
PLAYING SYSTEM GREETINGS
You may play any of the system greetings at any time.
11-1 -
m
Listen
--c
R
1
Greeting 1 +
02
Greeting 2
173
Greeting 3
cl4
Greeting 4
cl5
Override
Greeting
The greeting
is played
5.3.4 ERASING SYSTEM GREETINGS
You may erase any of the system greetings at any time.
-P cl1
n - q Erase
Greeting 1
cl2
Greeting 2
53
Greeting 3
cl4
Greeting 4
cl5
Override
Greeting
5.4 BROADCAST
MESSAGE
‘As system administrator you have the ability to automatically send a message to every subscriber on
the system. Broadcast messages, unlike regular messages, are not delivered into the main part of subscribers’ mailboxes. Instead, the broadcast message is played automatically after subscribers enter their
access codes.
5.4.1
SENDING A BROADCAST
MESSAGE
To send a broadcast message, dial:
Subscribers cannot save a broadcast message, nor can they skip listening to the broadcast message.
The message can be replayed after the subscriber has heard it all the way through, but the subscriber
must erase the broadcast message in order to continue on to any of the system’s standard features.
Because a broadcast message is not delivered into a subscriber’s regular mailbox, this type of message
does not reduce the total number of messages that a mailbox can accommodate.
Broadcast messages appear in the mailboxes of new subscribers who were added to the system after
the original broadcast was sent.
INFOSTARIKX2
System Administrator’s
revised 7191
5.3
Manual
System Administrator
5.42
LISTENING TO A BROADCAST
Mailbox
MESSAGE
The system may only have one broadcast message effective at any time. To listen to the existing
broadcast message, dial:
5.4.3 TO ERASE A BROADCAST
MESSAGE
The system gives you the opportunity to erase a broadcast message whenever the information
message becomes out-dated or you have a new message to send.
To erase a broadcast
a
+
a
Erase
in the
message dial:
System confirms broadcast
message has been erased.
-
An existing broadcast message is deleted automatically
when a new one is recorded.
Since broadcast messages cannot be interrupted or skipped by subscribers, they should be used sparingly. The maximum length of a broadcast message is limited to one minute and cannot be adjusted.
In many instances, a large group distribution list may be a better vehicle for sending a message.
5.5 MAILBOX
ADMINISTRATION
If it is inconvenient to stop the system to add or delete a mailbox, the system administrator’s mailboxes can be used to add/delete mailboxes. The information needed on the Mailbox Set-up screen
can then be added at a later time. The system administrator’s mailboxes can also be used to reset a
forgotten mailbox access code.
5.5.1
RESET ACCESS CODES
If a subscriber forgets their access code, or if a subscriber no longer has access to the system, the system administrator can reset the access code of a mailbox without having to delete the mailbox and its
messages.
II
Mailbox
Administration
3
5.52
-cl
Reset
-)
Access code
Ll
Dial mailbox
+
number to reset
ADD MAILBOXES
To add a mailbox to the system using the system administrator’s
3
cl
Mailbox
Administration
Dial attendant
extension number
5.5.3
-
2
cl
+
$dibox
-
Dial mailbox
me
EtAb:,ailldd
-
3
5.4
-
Dial class of +
service
mailbox:
In)ial;pion
+
a
+
Dial department
number
DELETE MAILBOXES
To delete a mailbox using the system administrator’s
cl
Dial new
access code
Mailbox
Administration
-Cl
3
Delete +
mailbox
mailbox:
Dial mailbox
+
number to delete
#
Ll
To confirm
$
cl
To cancel
and continue
INFOSTARIVX2
System Administrator’s
Manual
..-..:..-2 ?!n 1
System Administrator
Mailbox
5.5.4 RECORDING MAILBOX GREETINGS
Should you wish to record greetings for certain mailboxes (including
record a greeting using a system administrator mailbox as follows:
e
-ma0
3
-
Mailbox
Greetings
Enter mailbox
number
-
0
2 Record -
1 Greeting 1 +
n
0 2 Greeting 2
03
4
7
NOTE: For subscriber mailboxes,
greeting
mailbox name. Greeting 3 is the temporary
Record the
greeting, then press
you can
#
cl
Greeting 3
CI Greeting
05 Greeting
cl6 Greeting
El
subscribers’ mailboxes),
4
5
6
Greeting 7
1 is the mailbox
greeting.
greeting.
Greeting
2 is the
5.5.5 RESET MESSAGE WAITING INDICATOR
The system administrator can reset the message waiting indicator of a mailbox. The system dials the
appropriate code (turn on if there are new messages in the mailbox, turn off if there are no new messages in the mailbox).
3
cl
Mailbox
Administration
9
-0
Reset MWI
Dial mailbox
number to reset
5.6 SYSTEM GROUP LISTS
As system administrator, you may establish up to 50 system group lists. System group lists, like personal group lists established by individual subscribers, enable subscribers to send the same message to
multiple mailboxes by simply entering the group list number as a destination for a message. System
group lists, unlike personal group lists, can be shared by many subscribers and can accommodate
many more mailbox numbers. Access to system group lists is granted by class of service. System group
lists are numbered 30-79.
5.6.1
LIST GROUP MEMBERS
The members
4
cl
of a system group can be listed using the system administrator’s
System Group Lists
1
Ll
5.6.2 ESTABLISHING
-) Dial group +
List
number
Members
mailbox.
Name and members
of group are played.
GROUP LISTS
System distribution list numbers range from 30 to 79 (numbers 11 through 29 are reserved for personal distribution lists). If you are creating a new list, it is a good idea to verbally record the name of the
system distribution list. Like a personal distribution list, the recorded name of the system distribution
INFOSTARIKY2
System Administrator’s
revised 7191
5.5
Manual
System Administrator
Mailbox
list plays to subscribers when they enter the list’s number as the destination
send their messages. ,
You should record and distribute the system distribution
phone directory or as a separate document.
0
4
;%st;rn Group --)
0
2
+
InW&r)up
+
to which they wish to
lists either as part of your organization’s
tele-
Record
Rename group
list
2
cl
5.6.3 ERASE GROUP LIST
If a system group list is no longer needed, it may be erased.
0
4
z;;;m
Group -
3
cl
Group + Dial group --) Group list is erased
;ge
number
5.6.4 MODIFY GROUP LIST
When the time comes to add or remove mailbox numbers from a system group list, or if you would
like to record a new name for an.existing group dial the following.
0
4
z;;;m
Group +
4
cl
-
E~~VFP
-
1
R
0
2
Add or Erase Mailboxes
Rename group
list
*
cl
En?
5.7 SET DATE AND TIME
The system administrator’s
05
5.6
Set date --)
and time
mailbox can be used to set the system date and time.
Follow prompts to set
system date and time
INFOSTARIKX2
System Administrator
Mailbox
To Enter The System Administrator’s mailbox:
Dial #, the mailbox number and access code.
Greetings
System
Administrator
Main Menu
System
Greetings
q
Greeting
1
Greeting
2
Greeting
3
Greeting
4
1
Override
Greeting
Listen
Broadcast
Message
0
2
c
1
Record
c2
Erase
c3
Reset
Access
q
3
Delete
Mailbox
0
Set Time
and Date
q5
0
0
7
0
Greeting
8
a
Greeting
9
a
Mailbox
Greetings
1
Name
q1
2
Mailbox
0
Temporary
a
No Answer
04
Busy
n
3
Listen
8
Record
9
1
01
02
cl
3
t
0
1
Establish Group 2
0
List
Add/Erase
Member
Rename
Group
n
1
2
cl
2
5
6
out
Group Lists
List Members
4
;,oyw
Erase
Reset
MWI
System
Group Lists
n
0
Record Mailbox Greetings
System
6
Codes cl
Add Mailbox
Mailbox
Administration
I-=
Greeting
Record
q
q
q
q
qs
q
n
Greeting
7
cl7
Greeting
8
m
Greeting
9
Enter time
INFOSTARIVXZ
System Administrator’s
Manual
revised 2192 - sqftware version 3
5.7
Section 6 - Operation
,
6.1 INTRODUCTION
The INFOSTAR”NX2
is designed to meet the needs of a wide range of users. This section provides
a detailed reference guide on the system’s voice messaging features. Within each description of a feature is a short guide to using the feature. The guide contains the dial pad key to press (for example,
cl’ )VPl us any other steps required for the feature.
of options. These choices are listed vertically.
Some features present the subscriber with a choice
6.2 GENERAL OPERATION
There are a number of general rules of operation
scriber or outside caller is using.
6.2.1
that apply no matter what part of the system a sub-
SYSTEM PROMPTS
The INFOSTAWVX:!
communicates to subscribers and outside callers via prompts. These prompts
outline a caller’s choices at any given point or give helpful explanations about the system.
As subscribers become more familiar with the system, they know which keys to press without hearing
the entire prompt. At these times they can press the correct key and interrupt the prompt.
It is also possible to “key ahead,” i.e., enter several commands very quickly without waiting for the
system to respond. For example, when the system first answers, subscribers enter q . their mailbox
numbers and passwords to advance to the Main Menu.
The system does not allow interruption of certain prompts. For example, the system does not permit
interruption of a recorded name when it is played after entering a destination. This prevents subscribers from sending a message to the wrong destination.
6.2.2
IF NO RESPONSE FROM THE USER
The system is programmed to respond when any of the 12 keys on a DTMF dial pad are pressed. If
no key is pressed in response to a prompt the system assumes the user is confused. The system repeats the user’s options through a prompt. If there is still no response, the system automatically transfers a non-subscriber to an attendant, or politely disconnects a subscriber from the call.
6.2.3 IF TOO MANY ERRORS
The system counts the number of errors (incorrect key presses) that a user makes. If the count exceeds a certain number (usually 3) the caller is politely disconnected.
6.2.4 WHY THE SYSTEM TRANSFERS USERS AUTOMATICALLY
There are three reasons for an automatic
l
transfer to an attendant:
In the telephone answering mode, callers might not be able to respond to the system’s prompts
because they have rotary dial phones. Help is needed from someone who can enter touch-tones
for them.
0 Callers could be confused about what to do. Getting a brief explanation
l
often helps.
The VX2 tries to get people to use the system efficiently so that many people can have access to
its lines. People who continually take too long to respond to prompts might cause other callers to
encounter busy signals. They should be encouraged to get help before using that part of the system.
INFOSTARIVXZ
System Administrator’s
revised 7191
6.1
Manual
Operation
6.2.5 ALLOWABLE TlME BETWEEN KEYS WHEN ENTERING NUMBERS
There are a number, of places in the system where numbers must be entered: mailbox numbers, group
list numbers, phone numbers, and times, for example. The system waits a few seconds between numbers, and if no additional key is entered in the allowable time, the system assumes that there are no
more digits. The system then responds based on the digits it received. If, for example; when entering
mailbox 563 as a destination, if there is too long a pause between the 6 and 3, the system will think
that the destination is system group list 56. The system always confirms the destination and gives the
subscriber a chance to correct any mistake (using IZl to cancel the last input).
6.2.6 THE IXl KEY AS A NUMBER TERMINATOR
For the person who does not want to wait for the system’s timer to automatically signal the end of a
number, the •I key can be entered to mark the end of an entry-even though it is not required. This
step is useful for entries with a variable number of digits, such as access codes.
6.2.7 THE •I KEY AS A RECORDING TERMINATOR
When the system does not know how long an action will take (e.g., recording a message or personal
greeting), the system requires use of a q key to indicate the end of the action. If the system hears a
certain amount of silence, it assumes that the •j key was inadvertently omitted. The system reminds
the caller to press lJ!l if the desired action has been completed. (If there is a very noisy telephone
circuit or loud background noise, the system may think that the person is still talking.)
6.2.8
DIALING IXI TO HANG UP
When subscribers end a system session, they should dial the W key as many times as it takes for the
system to say “Exiting the system. Good-bye.” The system is always listening for silence on the line
and hangs up automatically when it realizes that no one is there. It can hang up a few seconds faster
if subscribers dial q . Saving a few seconds of connect time for each subscriber results in higher system availability for all users.
6.3 FIRST TIME USE
The system teaches new subscribers the basics during their first sessions by means of a new user tutorial. The first time a mailbox is used, the subscriber must go through the entire tutorial. Every new
subscriber is given a mailbox number and a temporary access code. When new subscribers enter their
mailboxes for the first time, the system helps them establish permanent access codes, and record their
names for the mailboxes.
6.4 SPECIAL SYSTEM NOTICES
As soon as subscribers enter their mailboxes, they may hear certain system notices that are played
automatically.
6.4.1
BROADCAST
Broadcast messages are recorded by the system administrator and are sent to all subscribers. These
messages contain important announcements about the system (e.g., “The following system enhancements will be available to all subscribers effective . ..“) or the company (e.g., “Tomorrow will be a
half-day holiday.“).
Subscribers must listen to broadcast messages.
6.4.2
ERASED MESSAGE NOTICES
An erased message notice informs a subscriber that a message was automatically erased, or is about to
be erased. An erased message notice may be skipped. Subscribers cannot save these messages and
skipping them simply saves subscribers from having to listen to the entire notice.
6.2
INFOSTARIVXZ
System Administrator’s
Manual
revised 7191
Operation
6.4.3 CONFIRMATION NOTICES
Subscribers may request.confirmation
There are two types of confirmation
from the system regarding the status of messages they sent.
notices:
0 A positive confirmation
of receipt. This notice indicates that the recipient has listened to at least
part of the message sent. This notice is generated only if the original message was sent with the
“proof of delivery” option.
* A notification of an undelivered message.
recipient’s mailbox for X days and that it
determined on a per class of service basis
ated only if the original message was sent
Confirmation
This notice indicates that a message has resided in the
has not been listened to. The number of days (“X”) is
by the system administrator.
This notice may be generwith the “notification
of non-delivery”
delivery option.
notices may be skipped.
6.5 MESSAGE PLAYBACK FEATURES
The system provides subscribers with a wide range of capabilities to facilitate playing and responding
to messages in their mailboxes. Messages in subscriber mailboxes come from several places: from nonsubscribers who leave messages in the telephone answering mode, from other subscribers, or from special limited-use subscribers called guest users.
6.5.1
ORDER OF REVIEW
Messages are presented to the subscriber in the following order: broadcast messages, confirmation
messages, new messages (priority messages first), skipped messages, and saved messages. The oldest
messages within each category are played first (but can be changed to newest messages first using the
Mailbox Set-up screen).
After the last new message has been presented to the subscriber, the system searches the mailbox to
see if there are any remaining new messages to be reviewed. In particular, if new messages arrive during message review, they are presented in the same order as before (priority, normal, etc.) but are
labeled “skipped.”
Thus, if a new priority message arrives after the subscriber has passed priority messages during message playback, this new message is played after all other new messages and is labeled
skipped.
6.5.2
After
FEATURES AVAILABLE WHILE LISTENING TO MESSAGES
subscribers elect to play their messages, they have a number
of options:
Replay the message
0 Save the message
o Erase the message
l
Reply to the message
0 Obtain envelope information
l
Send a copy of the message to another
l
l
Rewind 5 seconds
Pause and restart
l
Forward
l
Skip through
l
subscriber
5 seconds
messages
Review previous message
0 Cancel message review
l
INFOSTARWX2
System Administrator’s
6.3
Manual
Operation
6.5.3
REVIEW A MESSAGE
l
Listen to the message.
l
Replay, reply, or send a copy of the message (if desired).
.
Erase or save the original message.
1
Replay the message
5
Get envelope info
6
Send a copy
R
R
1
Listen to
the message -
--)
0
R
6.5.4
cl
2
-3
Save
Erase
cl
R
4
Reply
*R-t #
R*
Confirm
erase
Cancel
WHILE LISTENING TO A MESSAGE
Any feature that is available after a message has been reviewed can be used while listening to the
message. In addition to those features, a message can be skipped or the review can be canceled. If
you attempt to erase a message before it is finished playing, the system prompts for confirmation.
Skipping
a Message
Subscribers with limited time may use the skip feature to scan through their messages, or to look for
an important message from a certain person. There are two variations on this form of message scanning:
l
Listen to the first few seconds of each message, then skip to the next message. Repeat this process for each message.
0 Listen to message envelope information as soon as each message begins to play, then skip to the
next message. It is not necessary to listen to the entire envelope.
NOTE: The envelope information
secretary access code.
for messages may also be scanned
through
use of the
A subscriber may skip to the next message at any time by dialing q twice. Skipping a message means
that it retains its original place in the new message queue. It is available for review as a skipped message during this session or as a new message in a subsequent session.
R1 -
During Review-
El-Et
-
[#I pl
-
Listen to envelope info
Next Message
-
Em-
Next Message
The system plays skipped messages (if any) after new messages and before saved messages. After dialing IL to play, subscribers may skip to saved messages directly by dialing @I and Fl closely together.
NOTE: If a message is skipped, and the sender does a “check
considered undelivered
and can be erased by the sender.
Cancelling
receipt,”
the message is
Play of Messages
A subscriber may cancel message playing while listening to messages by dialing I33 Any message not
completely reviewed remains in the new message queue. If a subscriber forgets to dial q to cancel
play and just hangs up, all partially listened to messages also remain in the new message queue.
6.4
INFOSTARIKXZ
System Administrator’s
Manual
revised 7191
Operation
6.5.5
PLAYBACK CONTROLS
As subscribers become more and more comfortable leaving voice messages, the length and complexity
of messages increases: Sometimes an important phone number is embedded in a three-minute message. As subscribers become more experienced, they will want to control the playback of the messages
they receive.
The system playback controls are designed to give exactly that flexibility. With playback controls, a
subscriber can scan through a three or five minute message to find a phone number without listening
to the whole message. After dialing [II to listen to a message, subscribers have the playback controls
listed below:
1
cl
Rewind to the beginning
of the message
Rewind 5 seconds
7
cl
8
Li
Pause and restart the message
Dg
Forward
m
m
6.56
5 seconds
Skip to the next message
EXPERT MODE FEATURES
There are a number
of features which help to automate the review of messages:
l
Skip to saved messages
l
Automatically
play all messages and mark them as skipped.
l
Automatically
play ah messages and save them
l
Automatically
play all messages and erase them
l
Automatically
scan the envelope information
l
Play previous message
for all messages.
The auto mode can be changed back to the normal mode at any time by dialing
q m.
Skip to saved messages
If subscribers wish to bypass the new messages in their mailbox,
go directly to their saved messages.
0
a
-
[“I
F1
-
~-;~;~ssages
-
1 Replay the message
n
0
they can skip the new messages and
Get Envelope info 6
Send a copy
3
Erase
q
Reply
2
Save
0
Ll
0 Return to
cl normal mode
INFOSTARWX2
System Administrator’s
revised 7191
6.5
Manual
Operation
Auto Listen/Skip
When messages are listened to using Auto Listen/Skip, the system plays aU messages one after the
other until interrupted by the subscriber. Messages listened to in this fashion are considered skipped,
and appear as new messages the next time the subscriber listens to messages.
a
-
E) 1’1 -
f$tz$ages
-
I
01
Replay the message
n
Get Envelope info 6
Send a copy
0
R
Return to
normal mode
R
Erase
3
cl
q
2
cl
Reply -
f$tEzages
Save
Auto Listen/Save
When messages are listened to using Auto Listen/Save, the system plays all messages one after the
other until interrupted by the subscriber. Messages listened to in this fashion are saved after they are
played.
IIJ
-
F11’1
-c
,“hi;tgezages
-
cl1
Replay the message
n
Get Envelope info -
0
6
Send a copy
3
cl
Ifl
Erase
Reply -
2
R
f&tgezages
Save
o Return to
R normal mode
Auto Listen/Erase
When messages are listened to using Auto Listen/Erase, the system plays all messages one after the
other until interrupted by the subscriber. Messages listened to in this fashion are erased after they are
played. After Auto Listen/Erase is selected, the system plays a message to remind the subscriber that
messages will be automatically deleted after being played.
a
-
F]
/-i-l -
,“hiiEzages
4
I
cl
Replay the message
a
Get Envelope info 6
cl
Send a copy
3
R
m
2
R
Erase
Reply -
L&tzezages
Save
0 Return to
cl normal mode
6.6
INFOSTARIW2
System Administrator’s
Manual
revised 7191
Operation
Auto Scan Envelope
information
The envelope information of all messages can be played without listening to the messages themselves.
While the envelope information is playing any of the playback commands can be used. The envelope
information can be interrupted and the message played, saved, replied to, etc. After the interruption,
the system then continues playing envelope information for the remaining messages.
1 Play message
cl
- q
n - PIF[ - ~~~&~~
Send
3
cl
a COPY
-
B
o Return to
normal mode
Play previous
Reply
2
cl
c1
Erase
-
K$z$ages
Save
message
During message review, a subscriber may backup and play the previous message.
1 Play message
cl
Listen to
the messages
Listen
t0
preViOUS
--c
6
Send
3
a copy
cl
-a
,, Return to
cl normal mode
D
4
2
D
Erase
Reply
Save
6.5.7 AFTER LISTENING TO A MESSAGE
Replaying a Message
At the end of a message (when the system prompts with the “After
replay that message in its entirety.
cl1
-
End of message -
01
-
Listening”
menu)
a subscriber
can
Message replays
Save
If the message needs to be acted on later, it may be saved. Saved messages are kept in a separate
queue. They will be played after new messages. The procedures for returning a message to storage
and for storing a new message are the same.
cl1
-
End of message -
cl2
-
Message is saved
Erase
If the message does not require action, it should be erased. Erasing messages keeps the mailbox clear
and reduces the need for additional system storage capacity.
0
1
-
End of message -
-NOTE:
B
-
#
Confirm
*
Cancel
erase -
Once a message has been erased, it cannot
INFOSTARIVX2
System Administrator’s
Message is erased
{ :
be retrieved.
6.7
Manual
Operation
Reply to a Message
A subscriber can send a reply to a message by dialing one key. If the message has been copied from
another subscriber, the reply can be sent to the person who originally sent the message, or to the person who sent the copy of the message. Replies may only be sent to messages from subscribers received in the voice mail mode. Therefore,
subscribers should
sending messages, so recipients may conveniently
reply.
enter their
At the end of
the message
02
Reply to
originator
1
cl
cl2
03
*
cl
Envelope
own mailbox
Message + #
c1
Acceptable
Listen to
0
tIl
reply
Erase and
re-record
Continue
recording
Cancel
reply
before
To send
your reply
For delivery
options
Information
Sometimes a subscriber wants to know details about a message: who sent it, the date and time it was
delivered, and whether it is priority and/or confidential. This information is called the envelope information. It can be obtained immediately after the message ends by dialing 03. After playing envelope
information, the system automatically returns the subscriber to the point at which envelope information was requested.
cll-
At the end of the message
5
cl
--c Listen to envelope
mformation
-
Return to options
menu
The time and date stamp on a new message always relates to message delivery.
For messages sent with one or more introductions,
or the person who originated the message.
NOTE:
To skip envelope
Send a Copy to Someone
information
the system prompts for your choice of the sender
and return
to message review,
dial •l twice.
Else
A subscriber may wish to send a copy of a message to another subscriber. In this situation, the subscriber may record introductory remarks and then send the remarks plus a copy of the message to
another subscriber. Copies may be sent to one or more subscribers, including group distribution lists.
A subscriber may send copies of messages that are received in either the voice mail mode or telephone answering mode.
6.8
INFOSTARIVX2
System Administrator’s
Manual
revised 7191
Operation
Sending
a Copy with Dial-By-Name
Subscriber may use Dial-By-Name
’
cess is as follows:
At end of -pJ--11J
message
2
R
when sending a copy of a message to another subscriber. The pro-
Send with --)
comments
Send without
comment
Record your
comments
Check New Messages
If a subscriber attempts to exit from his or her mailbox before listening to at least two seconds of
each new message, the system gives the subscriber a gentle reminder. The system states: “Check your
mailbox for new messages.” This reminder keeps subscribers from accidentally skipping or forgetting
about important new messages. The system prompts to play the new messages or to exit.
6.6 MESSAGE SENDING FEATURES
Subscribers may send messages to a variety of destinations including themselves, other subscribers, a
list of subscribers or any combination of these. To send a message:
l
Record the message.
l
Enter the destination(s).
l
Send the message.
6.6.1 RECORDING A MESSAGE
Message
Length
indication
Near the end of the allowed recording time (determined by class of service), a subscriber hears two
beeps. About 10 seconds remain for completing the message. This time can be adjusted using the
Class of Service programming
screen. At the end of the allowed time for recording, the system
“If
this
message
is
acceptable,
dial pound . ..”
prompts ,
Entering
the Destination
A destination can be an individual subscriber’s mailbox number or a personal or system group distribution list number. Messages may be sent to any of these individually or in combination with other
destinations.
02
-w
cl
1
2
cl
03
*
cl
Listen to
message
Erase and
re-record
Continue
recording
Cancel
message
list
After the destination has been entered, the system provides name verification of the address by playing the mailbox name or the name of the group list. The subscriber may cancel the destination by
dialing q . If the destination is correct, the subscriber may either specify delivery options (see Section
6.6.2 - Delivery Options) or send the message by dialing IZl.
INFC’STARlVX2
System Administrator’s
revised 7191
6.9
Manual
Operation
Dial-By-Name
Have you ever recorded a message and realized you forgot your mailbox directory? This experience
can be extremely frustrating for subscribers who end up hanging up, losing the message they recorded,
looking for a directory and then restarting the whole process. Dial-By-Name allows subscribers to easily send messages without
memorizing
mailbox numbers.
After the subscriber finishes recording the message, dial q twice to spell a name. As soon as the system finds an exact match for the name, the name is played to confirm the destination. The procedure
for addressing a message by name follows:
cl2 cl
1
2
cl
03
0*
Listen to
message
Erase and
re-record
Continue
recording
Cancel
message
When subscribers and callers spell a name to reach a destination instead of entering a number, the
system tracks the amount of time between letters entered. If no additional key is entered gthin the
allowable time span, the system responds with up to four destination options. For example, if the subscriber entered Smith, and four Smiths existed within the company, all four Smiths would be mentioned as possible destinations (e.g., For Jan Smith, dial one. For John Smith, dial two, etc.). If more
than four options exist, the system prompts the caller to continue spelling the name. If no mailbox
name matches the letters entered, the system prompts the caller to spell the name again.
If a caller or subscriber is spelling a name and dials @I, the system assumes that the destination
should be the exact match of the letters entered to that point. For example, imagine that three
Smiths, Jane, Jan and Janie, exist within your company. If the caller dials 76484526 q (i.e.,
SMITHJAm),
the system assumes that Jan Smith is the exact destination. If the caller dialed the
touch tone keys associated with SMITHJAN
and paused, the system would offer all three Smiths as
possible destinations. If the caller enters m before an exact match (e.g., SMITHJlliD), the system
gives the caller up to four destination options.
Group
Distribution
Lists
Both system and personal group distribution lists allow subscribers to send the same message to many
subscribers at one time if class of service allows access to these lists. Each list has a unique number
that is entered as a destination.
When sending to a large list, there may be a short delay before the system confirms that the message
has been sent to all destinations.
Sending
the Message
Messages are sent to subscriber mailboxes by dialing q . Once a message has been sent, there is no
way to cancel it. However, if you use the Check Delivery feature before the message is listened to, the
message can be erased. See Check Delivery.
When all destinations
6.10
have been entered,
dialing &I returns the subscriber to the Main Menu.
INFOSTARlKX2
System Administrator’s
Manual
revised 7191
Operation
6.6.2
DELIVERY OPTIONS
Delivery options allow subscribers to have a greater degree of control over the messages they send.
These options appeaf after the subscriber has selected a destination.
2 --t Record your . . . --) Delivery
cl
message
1
I
options
1
Confidential
2
Priority
3
Proof of delivery
Specify
delivery time
Cancel
Ll
cl
cl
4
cl
*
cl
1
1
cl
2
cl
Proof of
delivery
Notification of
non-delivery
A subscriber may select delivery options after the destination is entered and before the message is
sent. Once selected, a delivery option may be cancelled by dialing its number again (e.g., dialing El
the first time marks a message priority; dialing q again removes the priority marking). It is, therefore,
possible to have different delivery options for different destinations.
Confidential
A subscriber may mark a message confidential
of the message to any other subscriber.
and thereby prevent the recipient
from sending a copy
Priority
A subscriber may mark a message for priority delivery. New priority messages will be presented for
review after broadcast messages, but ahead of non-priority messages in the recipient’s mailbox.
Proof of Delivery
If it is important for
be requested. When
sent a short message
notice appears before
Notification
a subscriber to know precisely when a message is received, proof of delivery may
the recipient listens to the message, the subscriber who sent the message will be
giving the date and time the recipient listened to the message. The confirmation
the main menu in the subscriber’s mailbox.
of Non-delivery
Subscribers may request that the system notify them if messages they sent are not listened to within a
pre-set period of time. If the allotted time period passes and a message remains unheard, the sender
receives an “notification
of non-delivery”
with the name of the intended recipient. The time interval
used for the notification of non-delivery feature is specified by the system administrator on the Class
of Service programming screen.
NOTE: Messages may be marked
not both.
for proof of delivery,
or notification
of non-delivery,
but
For purposes of proof of delivery, and notification of non-delivery,
a message is considered “received” as soon as the recipient listens to any part of the message.
Use of this option on too many messages may result in a subscriber’s mailbox becoming inundated
with confirmations. It should only be used when it is essential to know exactly when a message has
been received.
INFOSTARIVXZ
System Administrator’s
6.11
Manual
Operation
Specified
Delivery
Time
Subscribers may tell the system to deliver messages at a specific time in the future. This feature is especially useful for reminder messages or when information must be released at a specific time in the
future.
The system first asks whether the subscriber wishes to specify a date (e.g., “January 31”) or just the
day of the week within the next week (e.g., UWednesday”). A subscriber can dial [Tl to specify a specific date, or Iz] to specify a day in the coming week.
Enter
delivery time
#
cl
--) More
Send
message
destinations
To enter the delivery time:
If over a week:
If within a week:
Dial cl’ then:
l
Select month
(Jan = 1, July = 7,
Dee = 12, etc.)
l
Select date
(1 to 31)
Dial cl2 then:
l
Spell out day, using
the first two letters
(Sunday = 78,
Friday = 37, etc.)
OR
Set the hour and the minutes as either 3 or 4 digits.
l
Set 2:00 as 1’1101
e Set lo:15
Press El’
m
asFIIoi
111151
for AM or 0 2
for PM.
Since most people are not familiar with 24-hour (military) time, the system only accepts time in
12-hour clock format. Subscribers must specify the time for future delivery in the time zone of
the system’s
location.
Subscribers’ classes of service determine whether or not they may specify delivery time for messages
and the number of days in advance that messages may be sent.
Different
Delivery
Options
Can Apply to Different
Destinations
When sending to multiple destinations, the option(s) assigned to the previous destination (e.g., confidential, priority, proof of delivery and specify delivery time) apply to the next destination. To cancel a
previous option, dial the number of that option again before sending the message to the next destination. This action turns the option off. In this way, the same message can be sent to two people with it
and to a third as “priority” and “congoing to one person as “priority,” to another as “confidential,”
fidential.” Any combination of the options is possible.
6.12
INFOSTARIKY2
System Administrator’s
Manual
revised 7191
Operation
6.6.3
SEND TO GUEST MAILBOXES
Guest mailboxes
allow. a subscriber to send messages to people who are not subscribers.
Guests subscribers always have the following destination numbers:
Guest 2: aa
Guest 3: [“I
. . .. . . . . . .. . . .. . . .. ..
131
Guest 9: ml
Messages may not be sent to guest destinations if the subscriber has not yet assigned the guest access
codes. In this situation, the system prompts the subscriber to assign an access code or to cancel the
destination. To send a message to a guest mailbox, use the following procedure:
2 --c Record your . . . +
cl
-I
1
message
Destination
mailbox:
r]
1’1 Guest 2
[Fl F[
-
D$;;y
-
a
g;fage
Guest 3
El’0
9 Guest 9
See Personal
Options for more information
on establishing access codes for guest mailboxes.
6.7 CHECK DELIVERY
The system gives subscribers an opportunity to determine
received. The check delivery feature of the system allows
directing the system to play any messages from themselves
specified subscriber’s mailbox. This after-the-fact method
greater flexibility and convenience to the subscriber.
4
cl
l
Select Check Delivery from the Main Menu.
l
Identify
+
the recipient
Enter mailbox
number
#
cl
+
whether or not their messages have been
subscribers to check for proof of delivery by
which have not been saved or erased in a
of confirmation generally provides much
by entering his or her mailbox number,
or by spelling their name.
Number of messages
that have not been heard-
cl
--) Spell
name
Plays
message -)
1
Replay
3
Erase
cl
After entering the mailbox number,
being checked.
-
5
R
Envelope Info
#
cl
Continue
Next
message
the system confirms the name of the person whose mailbox is
The total number of messages not listened to will be given. If a message has not been received, the
system plays back any unheard messages in the mailbox, and gives the subscriber an opportunity to
erase the messages.
NOTE: For purposes of “check delivery,” a message is considered received after the recipient has acted on the message (saved or erased it). If the recipient has listened to the message, but has skipped it, check delivery will still report the message as undelivered,
and
-you may still erase the message.
INFOSTARIKX2
System Administrator’s
revised 7191
6.13
Manual
Operation
6.8 PERSONAL OPTIONS
The system has a variety of other powerful features which are accessed by subscribers from the Personal Options Menu. These features allow subscribers to tailor the system to their requirements.
6.8.1
GREETINGS AND NAME
Name
Subscribers record their names the first time their mailbox is used. The recording of the name will be
used: (1) to verify destinations, (2) as part of a system-generated personal greeting, or (3) as verification when someone is creating or editing-group lists. Recorded names may be changed by subscribers
at any time.
Greetings -
EM3
2
cl
Record a
1
cl
Name +
Record your --) #
cl
name
Check to make sure that all subscribers’ names are clearly recorded without excessive amounts of “silence” before or after the names.
Mailbox
Greeting
A mailbox greeting is played to callers who enter a system mailbox in the telephone answering mode.
This greeting enables subscribers to give callers information about their schedules land to encourage
callers to leave detailed messages.
Greetings -
El-El
q2
Record +
2 Mailbox
Cl
greeting
The maximum length of personal greeting is determined
tem administrator.
What is a Good Mailbox
-
Record your
mailbox greeting
+
#
cl
by a class of service parameter
set by the sys-
Greeting?
A good mailbox greeting encourages callers to leave detailed messages (not just name and phone
number) and gives them additional information that might be needed. It should present the kind of
professional image that is appropriate for your particular organization. All of the following could be
appropriate, depending on the situation:
“Hi, this is Dennis Smythe. I’m sorry I’m not available, but if you leave me a detailed message along with your name and phone number, I’ll be prepared to help you when I call you
back.”
“Hello, this is Jim Creet. I’m out of town this week, but will call in at least once a day to
pick up my messages. Please leave me a detailed message. If it is an emergency and you
must talk to someone immediately, dial zero and someone will help you.”
Standard
System
Greeting
If a personal greeting is not allowed by the subscriber’s class of service, or if a mailbox greeting has
not been recorded, the system uses the subscriber’s recorded name and creates a standard system
greeting. If the mailbox greeting is erased and not re-recorded, the system plays the standard greeting.
El-El
Greetings --)
3
cl
Erase
The standard system greeting may be chosen at any time by subscribers who have personal greetings
allowed by class of service.
6.14
INFOSTARIVX;!
System Administrator’s
Manual
revised 7191
Operation
6.8.2
TEMPORARY GREETING
As customers and subscribers begin to appreciate the speed of information flow with voice mail, it is
important to warn them when it may take longer then usual to respond to messages. The temporary
greeting allows subscribers to give a special notice to outside callers and subscribers. The temporary
greeting plays in place of the mailbox greeting when calls are answered in the telephone answering
mode. The temporary greeting is played after the mailbox owner’s name when selected as a destination by another subscriber. The greeting should emphasize that the subscriber will not be checking in
for messages frequently. It might be used to direct callers to someone who could help them.
The prompting for telephone answering is slightly different if the caller has a temporary
lers hear the temporary greeting and are then prompted with the usual prompts.
greeting. Cal-
When subscribers enter their mailboxes while a temporary greeting is in effect, they hear a message
from the system that a temporary greeting is in effect. The system prompts subscribers to listen to the
2
greeting cl’ , retain the greeting cl
, or deactivate the greeting
To establish a temporary
greeting, from the main menu, dial:
El-El
0
Greetings -
2
Record -
3 a
cl
cl
3
.
Record your
greeting
0
3
Deactivate your
temporary greeting
6.8.3 ACCESS CODES
There is one access code that is associated with each subscriber mailbox. Each access code may be
from 1 to 9 digits long. The system administrator can program a minimum and maximum length for
mailbox access codes. Zero should not be used as the first digit. An initial, temporary access code
is given to each subscriber and is used to enter the system for the very first time; it should not be
used again.
To change access codes, subscribers use the Personal Options menu.
01
2
cl
Secretary
--)
access code
Guest 2
access code
Guest 9
access code
Delete an Access Code
cl
9
INFOSTARIVX2
Guest 9
access code
6.15
Operation
6.8.4 NOTES ABOUT ACCESS CODES
All access codes should represent numbers that are easy for the user to remember yet not easily
guessed by other people. This is especially true for personal access codes. Subscribers should be
strongly discouraged from using birthdays, addresses, employee numbers, social security numbers, etc.,
since these numbers could be readily guessed by others. Subscribers should also be encouraged to
change their access codes frequently. However, since access codes are associated with a given mailbox
number, other subscribers may have the same access code(s) without any effect.
6.8.5
GROUP DISTRIBUTION LISTS
For sending messages to the same group of people on a regular basis, a group distribution list saves
time. Group lists allow subscribers to record a message once and send it simultaneously to multiple
destinations. Messages are recorded and sent like any other message and may have delivery options
like confidential, priority, etc.
H
-
a
2’
-)
11J
f$-nbers
2
Establish
list
Erase
list
Modify
list
0
3
Ll
4
cl
-
~~~&l~\11-29)-)
Each subscriber, depending on his or her class of service, may be allowed to create and use up to 19
lists of up to 25 subscribers each. In addition, subscribers may be given access to system group lists.
These lists have names that are recorded by the subscriber or, in the case of system group lists, by
the system administrator. The lists also have numbers that are used as destinations when sending messages. Personal group lists are numbered from 11 to 29 and system group lists are numbered from 30
to 79. An example of a personal group list might be:
Regional Managers
11
Kevin Jones
Dan Smith
Jim Fields
3922
3267
3721
Group lists may NOT be linked together,
lists in succession, if required.
Listing
but subscribers may send the same message to several group
Members
If a subscriber forgets the names of a particular
a
+
m
@-gp-
D
E;t,,,rs
+
denial&
list, the names of a list may be listened to.
-
z;$z;
(11-29)
a
Delete mmber
Play previous
name
7
cl
Establishing
a
--c B
a Personal
2~
-
a
Group List
f$tablish
+
EtDt;;
(11-29)
-
zoprdname
m
-
a
&tcbOox-rase
2
cl
+
+
Rename group
list
*- When
II done
6.16
INFOSTARIVXZ
System Administrator’s
Manual
revised 7191
Operation
Erasing
Existing
Lists
Subscribers may erase an entire personal group distribution
list.
q - a GgvI a $=e+ EzAial&
(11-29)
Modifying
Existing
Lists
By selecting to modify a list, a subscriber can either add or delete a particular person’s mailbox from
the list or ask the system to rename the group list. If a subscriber’s mailbox is already on the list, entering the number again will remove it. If it is not on the list, the mailbox will be added. The recorded name of a list can be changed or re-recorded at any time without affecting the contents of the
list.
Group-,
n - a lists
a4 z;dify- E:Af-;;+ m fi;;;;xfyse - I*I 2;
(11-29)
2
cl
Rename group --) Record
#
list
new name a
6.9 OUTDIAL
The system uses the optional outdial feature to call subscribers and notify them that a new message
has been received in their mailbox. Subscribers can control how they want this feature to work. A
subscriber specifies:
The telephone number where they can be reached. This number may be a telephone system (or
Centrex) extension, a local or long distance telephone number, or the telephone number and
dialing sequence of a pager.
l
NOTE:
outdial
will be
longer
.
If the telephone number is a PBX extension, be aware of call forwarding.
The
call should not be call forwarded
back to the VX2. Otherwise, the outdial message
recorded as a new message. Make certain the timer for call forward - no answer is
than the VX2’s timer for an unanswered
call (default value is 4 rings).
l
An alternate telephone
number.
l
The type of message that causes an outdial call. A subscriber can specify either all new messages,
or only priority new messages. In addition, a subscriber can limit outdialing to messages from a
member of a group list, or from a particular mailbox.
0 How long the system waits after the message has been received before placing the outdial call.
l
A schedule of when the system is allowed to call the subscriber.
o The number
of times the system is to attempt to reach the subscriber.
A subscriber controls the outdial feature via telephone
Personal Options menu.
using the message notification
portion
of the
Each mailbox user may establish 2 outdial schedules and an override schedule for weekdays and for
weekends. Schedules 1 and 2 can be programmed to accommodate time gaps in the same day. For
example, I want the system to call me at home from 6:00 am to 8:00 am and then again from 6:00
pm to 8:00 pm. Schedule 3 is the override schedule.
INFOSTARIVX2
System Administrator’s
revised 7191
6.17
Manual
Operation
When a subscriber selects outdialing (4 under Personal Options) the system tells the user if outdial is
active. If a user has activated Schedule 3 (the override schedule), the system will tell the user that
.
too.
The
can
tain
ing
system allows each mailbox user to specify up to 9 outdial bins (numbered l-9), each of which
contain an extension number, telephone number, or pager sequence. Each outdial bin may conup to 46 digits. A mailbox user may enter a pause (required in some pager sequences) by enter*.
A user may specify an alternate bin number. If the system fails to reach a user at the primary bin
destination after the programmed number of attempts, it will automatically attempt to notify the user
at the alternate bin destination using the same number of attempts. If after this, the system still has
not reached the user, no further attempts are made.
6.9.1 OUTPIAL BINS
The first task in creating an outdial schedule is to program the telephone numbers where you can be
reached. These numbers can be extensions on a PBX (or Centrex), a telephone number, or the telephone number and dialing sequence of a pager. These numbers are stored in system memory in locations called outdial bins. You may store up to 9 telephone numbers. These bins are labeled 1
through 9.
Do not include the dial access code (e.g., 9) needed to reach an outside line in an outdial bin. This
information is already programmed into the system.
CREATING
AN OUTDIAL BIN
cl
3
Pager
To create an Outdial bin:
1. From the main menu, press
q
for personal options.
2. Press El for message notification,
3. Press a
then press El for bin number maintenance.
to add a bin number.
4. Dial the desired bin number
(l-9).
5. Dial the type of number to be added (1 - external telephone number or voice pager, 2 - extension
number, or 3 - pager).
6. Dial the telephone
number.
Use the
7. If the number is correct, press
6.18
q
q
to insert a pause.
when prompted.
INFOSTARIVX2
System Administrator’s
Manual
revised 7191
Operation
REVIEW
AN OUTDIAL
BIN
To review the contents of an outdial bin:
1. From the main menu, press m for personal options.
2. Press El for message notification,
3. Press
q
to review a bin number.
4. Dial the desired bin number
ERASE
then press El for bin number maintenance.
AN OUTDIAL
Bin
Maim.
(l-9).
BIN
Erase
(l-9)
To erase an outdial bin:
1. From the main menu, press a
for personal options.
2. Press El for message notification,
3. Press
q
to erase a bin number.
4. Dial the desired bin number
MODIFY
AN
then press El for bin number maintenance.
OUTDIAL
(l-9).
BIN
Bin
Modify
Maint .
(l-9)
To modify the contents of an outdial bin:
1. From the main menu, press n
for personal options.
2. Press El for message notification,
3. Press u
then press El for bin number maintenance.
to modify a bin number.
4. Dial the desired bin number (l-9).
The system plays the current contents of the bin. If the contents
are correct, dial El. If the contents are not correct, dial El. The system will prompt for new information.
6.9.2
OUTDIAL ADMINISTRATION
The outdial administration selection is used to program the schedules used by outdial when attempting
to reach ‘a subscriber. Each subscriber can program an outdial schedule for weekdays and a schedule
for weekends. Both the weekday and weekend schedule can be divided into 2 schedules (schedule 1
and schedule 2). This allows you to program gaps in the day. The schedules are allowed to overlap.
INFOSTARIKX2
System Administrator’s
6.19
Manual
Operation
In addition, there is an override schedule (schedule 3) for weekdays and one for weekends. When
the override schedule is programmed, it takes the place of schedules 1 and 2.
Each schedule is programmed
with:
a start and stop time
l
0 the outdial bin number containing
o the number
(optional)
l
the type of message (all or priority)
l
how long after a message has been received to place the outdial
l
message senders who cause an outdial (subscribers in a particular
number, or any new message.)
ADD AN OUTDIAL
Weekday
Outdial
Admin
Dial start
time
1
cl
2
tl
which causes an outdial
-
group list, a specific mailbox
SCHEDULE
a-a-a+12_)-,II_)
+.
number where a subscriber can be reached
of times to attempt to reach a subscriber
o an alternate bin number
-
the telephone
Add
Dial stop -)
time
All
messages
Priority
messages
2
cl
Weekend
Dial bin
number
-.
a
Schedule 1 -
j21
Schedule 2
cl3
Override
schedule
U
--t Dial number
of attempts
Dial how long
+
to wait before
placing the outdial
call.
a
Dial alternate
bin number
-
Dial a group list,
mailbox number, or
# for all subscribers.
To add an outdial schedule:
1. From the main menu, press
q
for personal options.
2. Press El for message notification,
3. Press a
then press El for outdial administration.
to add a schedule.
4. Press El for a weekday schedule, or press i-3 for a weekend schedule.
5. Dial the number of the schedule to be programmed
Wake up is not used at this time.
(1, 2, or 3 - override schedule). Schedule 4 -
6. Dial the time when you will start accepting calls as a 3-digit or 4-digit number in 24-hour
(i.e., military time). For example, 2 p.m. is enter as 1400.
clock format
7. Dial the time when you will stop accepting calls as a 3-digit or 4-digit number in 24-hour
(i.e., military time). For example, 8 p.m. is enter as 2000.
clock format
8. Dial the desired bin number
(l-9).
9. Dial the number of attempts to reach you (this number must be at least 1).
10. Dial an alternate bin number if desired, press El for no alternate,
6.20
.
or press El to skip.
INFOSTARIVX;!
System Administrator’s
Manual
revised 7191
Operation
11. Press El for all messages, or press lizI for only priority
messages.
12. Dial how long th,e system is to wait after receiving a non-priority message before outdialing to you. Dial
1-9 for hours, or lo-99 for minutes. Dial 00 for immediate notification. (The system skips this step if
requested notification is for priority messages only.)
13. Dial how long the system is to wait after receiving a priority message before outdialing to you. Dial 1-9
for hours, or lo-99 for minutes. Dial 00 for immediate notification.
14. Dial a group list number,
REVIEW AN OUTDIAL
a mailbox number,
for all subscribers.
SCHEDULE
~-~+~-~-~
Weekday
Outdial
Admin
q
or
Review
2
--)
Weekend
5
a
Schedule 1
2
Cl
Schedule 2
53
Override
schedule
To review an outdial schedule:
1. From the main menu, press @ for personal options.
2. Press El for message notification,
3. Press
q
then press El for outdial administration.
to review a schedule.
4. Press El for a weekday schedule, or press a
for a weekend schedule.
5. Dial the number of the schedule to be reviewed (1, 2, or 3 (override schedule)).
up is not used at this time.
Schedule 4 - Wake
ERASE AN OUTDIAL SCHEDULE
~-~-~-~-.~
Weekday
Outdial
Admin
Erase
5
2
-
111 Scl-dule
Weekend
5
2
53
1
Schedule 2
Override
schedule
To erase an outdial schedule:
1. From the main menu, press
q
2. Press El for message notification,
3. Press a
for personal options.
then press El for outdial administration.
to erase a schedule.
4. Press El for a weekday schedule, or press a
for a weekend schedule.
5. Dial the number of the schedule to be erased (1, 2, or 3 (override schedule)).
not used at this time.
Schedule 4 -Wake
up is
MODIFY AN OUTDIAL SCHEDULE
n-~-~+~-,~
Weekday
Outdial Modify
Admin
2
5
+
n
Weekend
5
Schedule 1
2
5
3
INFOSTARIKX2
System Administrator’s
revised 7191
Schedule 2
Override
schedule
6.21
Manual
Operation
To modify an outdial schedule:
1. From the main menu, press @ for personal options.
2. Press El for message notification,
3. Press
q
then press El for outdial administration.
to modify a schedule.
4. Press El for a weekday schedule, or press a
for a weekend schedule.
5. Dial the number of the schedule to be modified (1, 2, or 3 (override schedule)). Schedule 4 - Wake
up is not used at this time. The system plays the schedule, and request confirmation for each entry.
Press EL if the entry is correct, or press El and change the entry as needed.
6.9.3 TURN OUTDIAL ON/OFF
Once the desired outdial schedules have been programmed, outdial can be turned on and off whenever desired. Outdial On/Off is a toggle. If outdial is on, this procedure turns it off. If outdial is off, this
procedure turns it on.
pJ+J-n
Activate/Deactivate
To turn outdial on or off:
1. From the main menu, press a
2. Press El for message notification,
for personal options.
then press El.
6.9.4 ANSWERING AN OUTDIAL CALL
When the system places an outdial call, it waits until it detects that the call has been answered. As
soon as the call is answered the system plays, “This is the (recorded company name) voice mail system with a message for (recorded mailbox name). If you are an operator, please transfer this call to
(recorded mailbox name). If (recorded mailbox name) cannot be reached at this number, please dial
star, and please have (recorded mailbox name) call the (recorded company name) voice mail system.
If you are (recorded mailbox name), dial your access code now.”
NOTE: The system uses your recorded name as part of the outdial greeting. If your name is
not recorded, the system will use your mailbox number as part of the greeting. For this
reason, make certain you have recorded your name for your mailbox.
Dial your access code, then press H and listen to
your
messages.
NOTE: If an outdial call is answered and whoever answers the call dials am in response to
the outdial greeting (indicating the called party is not at that number),
the system automatically turns off outdial. A message is then left in the subscriber’s mailbox that outdial
has been turned off. Outdial remains off until the subscriber turns it back on. See Section
-9.5.3 - Turn Outdial On/Off.
6.22
INFOSTARIVX2
System Administrator’s
Manual
revised 7191
Operation
6.9.5 THINGS TO KNOW ABOUT THE OUTDIAL SCHEDULE
When a call is received in a your mailbox, the system first checks to see if outdial notification is
turned on. If it is, the system checks to see if you are using the mailbox (no outdials will be made if
you are using your mailbox when a message is received). If not, the system checks your outdial schedule to determine if the message received matches the message type (priority, all, from a group list,
etc.) of a schedule. The system then determines when to begin the outdial process.
If there is nothing programmed for “normal message call after” or “priority message call after” (depending upon the type of message), the system queues the outdial process immediately and follows the
schedule(s) in effect at the time (weekday, weekend, schedule 1, etc.).
If there is a value programmed for “normal message call after” or “priority message call after,” that
value is added to the time the message is received and then compared to the schedule start and stop
times. If the time falls within the schedule, the outdial process is queued for the delayed delivery
time. If the time falls outside of the start and stop time, the system queues the outdial for the next
scheduled time you are available for an outdial call based on all outdial schedules for the mailbox.
If you retrieve all new messages from your mailbox while an outdial is in queue, the outdial attempt
will be canceled.
The system knows an outdial was successful when your mailbox access code is dialed. If the system
was not successful on an outdial attempt, the system waits five minutes before the next attempt, until
the number of attempts programmed on the schedule is reached. The system then repeats the process
for an alternate bin if one is programmed. If after all attempts the system was not successful in reaching you, a message is left in your mailbox informing you of the failed attempts to outdial to you.
NOTE: If the system is dialing a pager number
the number of times programmed
for attempts,
access code is entered.
6.10
(Tel Type 3)) the system will call the pager
or until the mailbox is accessed and a valid
RETURN TO ATTENDANT
Many systems are configured to allow callers to be transferred from the system to persons who can
assist them (e.g., telephone system attendant, department secretary, etc.). The system also automatically returns callers to attendants if they make too many consecutive mistakes.
The system allows you to establish different attendants for different subscribers. When outside callers
enter a subscriber’s mailbox and wish to reach an attendant, they dial q . The call is transferred to
the attendant who serves the called subscriber.
6.11
TELEPHONE
ANSWERING MODE
We’ve just seen how powerful a tool the system is for subscribers, but what about non-subscribers?
How do they use the system to leave messages for subscribers?
6.11 .I
SHORTCUT FOR NON-SUBSCRIBERS
Non-subscribers who know the desired mailbox number and who do not require a two-way conversations, may call the system’s access number (i.e., the system’s phone number), enter the appropriate
mailbox number, and leave a message. Once they have entered the mailbox number, they can dial q
to skip the personalized greeting.
6.11.2
CALLS FORWARDED TO THE SYSTEM
The-system can answer phones that are forwarded to it. Some system subscribers may want their
phones answered by the system, while other subscribers may want their phones answered by a secre-
INFOSTARIW2
System Administrator’s
6.23
Manual
Operation
tary. That choice is up to each individual
the PBX or Centrex.
Station
subscriber and is controlled
by the forwarding
patterns in
Identificatiok
Certain systems will be interfaced with the telephone system and the system will not know the identity
of the phone that was forwarded to it. On interfaced systems, when the system answers the phone,
the caller is prompted to enter the number of the person called. The caller then must give the system
the identity of the extension originally called. Except where two or more persons share an extension,
mailbox numbers and extension numbers should always be the same for interfaced units.
If the call went to an attendant first, the attendant should advise the caller of the called party’s mailbox number. In this way the caller knows what to enter if the call is forwarded to the system.
The system is integrated with some types of telephone systems and automatically knows the identity
of the called party. In this instance, callers immediately hear the personal greetings of the persons
they are trying to reach.
Greeting
Played
Once the identity of the forwarded phone is known to the system, the system plays the subscriber’s
personal greeting. The system is then prepared to record a message from the caller. Dialing q during
the personal greeting cancels entry into this mailbox and allows the caller to enter another mailbox
number (or W for subscriber entry). Dialing •I during the personal greeting skips the greeting and
takes the caller directly to the recording tone.
Recording
Messages
and Reviewing
the Recording
Upon hearing the tone, a caller should begin recording a message. Dialing W before any other key
erases the message and instructs the caller to re-record the message. Dialing q immediately sends the
message and tells the system to transfer the caller to an operator, if available. If callers forget to dial
a key at the end of their messages and just hang up, their messages are still sent.
If the caller dials
q at the end of his or her message, the following choices are given.
“If this message is acceptable, dial pound. To listen to your message, dial one. To erase and
re-record, dial two. To continue recording, dial three. To cancel dial star.”
The caller can listen to the message a number of times and can keep modifying it, as desired. These
options give the caller the ability to get the message just right and help eliminate the fear that a few
people have about “talking to machines.”
If the caller hangs up at any time while recording and reviewing their message, whatever was recorded
will be sent.
Options
After
Sending
a Message
After callers leave messages for subscribers in the telephone answering mode, they are presently given
the options of disconnecting or leaving messages for other subscribers. In particular, callers are presented with the following options:
“To disconnect,
dial star. To continue,
dial pound.”
If the caller dials &/, he or she will be asked for a new mailbox number.
6.11.3 TRANSFER TO OPERATOR
If a caller wishes to reach someone, and not leave a message, they can dial zero while the greeting is
playing. When a caller dials q QJ,
the system plays a prompt instructing the caller to enter an extension
number or press zero to reach an operator.
6.24
INFOSTARIW2
System Administrator’s
Manual
revised 7191
Operation
Command
Summary
I
.
While
listening
Repeat
After
m
Repeat
Reply
1
listening
Sender
B
Orlglnator
Save
Save
El
Erase
El
Erase
EHEI
EIEI
Reply
El
Reply
El
Envelope
a
Envelope
a
Orlglnator
COPY
Subscribers
ci;ml#erm;lbor
access
‘code
-L
Main
g
0
Expert
mode
El
h\tsag*
H
t
Send
0
Check
Delivery
El
Box
Status
El
1
(
Q
Mailbox
Group
El
Spell
El
II
l Delivery
Options
Number/
List
x
cl
name
El
Cancel/
Rerecord
El
Options
El
El
Personal
Options
@
Priority
Proof
of
Delivery
Time
Cancel
3
1
t
Personal
ootlons
I
Greetings
1
3
CJ
Prevlous
message
El
auto
0
*
Skip
message
El
Sklp new
messages
El
Options
Confidential
Specified
Delivery
Auto scan
envelope
Mass
delete
a
I
mode
2
I
El
Send
El
Proof
of Delivery
El
Delivery
verification
El
Undelivered
message
notification
El
El
El
Hang-w
@
Transfer
0
0
Check
Erase
Envelope
1
Listen
Outdialing
El
(Contlnued
) next page.)
f?-J
l-3
1-1
1
I
J
x
cl
name
Q
Notification
Delivery
Enter
mailbox
number
Replay
Access
codes
Erase
1 Access
Llsten
Erase
y
’
I ,
Group
Mallbox
Greeting
El
’ Temporary
Greeting
a
More
Greetings
El
1 Deactivate
1 More
El
No Answer
Busy
Personal
Guest
(Z-9)
El
list
II-4
El
El
L-J
out
q
Greetings
codes
on
1
2
cl
El
aI
Start
again
Spell
Forward
I
Options
I-
Listen
1
El
Options
Menu
0
El
Pause1
Resume
Cancel
Expert
El
I
El
Rewind
I
1
q/
4
El
El
Enter
guest
number
(2-9)
Enter
list
number
(11-29)
El
q
021892
INFOSTARIVXZ
System Administrator’s
Manual
revised 2192 - software version 3
1
6.25
Operation
Command
Bin #
On/Off
Outdial
Administratlon
El
Cancel
El
f=l
Verify
Correct
{ %ker
t
El
Cancel
@I
El
El
-
1
El
Modify
El
type
El
Erase
Bin #
Maintenance
Outdlal
III
Add
Outdialing
1
I
Review
r
Summary
Cancel
HI
~
1
Schedule
I
--I
Dial the tlme you wish
to start
receiving
calls
In 24-hour
clock
1 ::;a’,
e.g;.
2pmIs
Schedule
Weekday
m
Weekend
El
Cancel
Schedule
1
Schedule
2
Overrlde
Schedule
El
Cancel
El-
1
El
El
Dlal the
to stop
time you
recelvlng
wish
calls
El
L--J
Dial the
number
used
bin
to be
Dial the number
of
attempts
to reach
you.
Minimum
of 1,
Dial an alternate
bin
number
to dial In the
event
of no answer.
Dial 0 or # to skip.
Messages
-
Dial how
receiving
message
long after
a non-priority
to outdial
l
*
Dlal how
recelvlng
message
long after
a prlorlty
to outdlal
l
*
I
‘*
021892
6.26
NOTE:
Dial
Dial
Dial
l-digit
2-digit
00 for
From
Enter
group
list or mailbox
El
All subscribers
#
cl
I
I
(l-9)
for how
long
after
In hours
(10-99)
for how
long
after
In minutes
immediate
outdial.
INFOSTARIVX2
System Administrator’s
Manual
revised 2192 - software version 3
Section 7 - Auto Attendant
7.1 INTRODLjCTlON
This section explains how to setup and use the system’s automated attendant,
route themselves to extensions on the PBX without operator assistance.
which allows callers to
The system’s automated attendant feature may be used to answer calls to a company’s main number
(or alternate main number). Depending upon how the automated attendant is set up, callers may then
be directed to either enter an extension number, spell a subscriber’s name, enter a subscriber’s mailbox number, or spell a subscriber’s name to reach a mailbox.
The automated attendant allows calls to be routed to the appropriate telephone system extension, or
system mailbox, without operator assistance. Automated attendant can help eliminate the bottleneck of
calls at the attendant console during peak traffic hours, and allows callers to reach the destination
they need very quickly. If a caller is unfamiliar with extension numbers, the automated attendant can
be programmed to prompt callers to spell the person’s name and then connect the call. Auto attendant can be used to:
0 Answer all calls to a company’s/departments
main number.
Answer overflow calls from the operator.
l
0 Answer calls from employees and frequent callers on an alternate number.
0 Answer calls to the main number when the switchboard
7.2 HOW CALLERS USE AN AUTOMATED
is unattended.
ATTENDANT
The VX2 system must be attached to a telephone system or Centrex using extension appearances in
order for the automated attendant feature to function. The extension is connected to a VX2 port programmed for automated attendant tasks.
Once callers reach the automated attendant, they simply dial the appropriate extension or mailbox
number. If callers are unfamiliar with extension or mailbox numbers on your system, you can create
an automated attendant that allows callers to spell the name of a person.
Callers may be given the option of reaching an attendant (operator) if they require “live” assistance.
Callers are transferred to an attendant when they press “0” on their touch-tone key pads. Callers using rotary dial telephones are automatically transferred to an attendant after a brief time-out period.
NOTE: All calls transferred
from the VX2 system back to the telephone
ferred unsupervised
and unscreened.
7.3 SETTING UP AN AUTOMATED
An automated
l
attendant
system are trans-
ATTENDANT
may be set up in several different
ways.
The system ports can be programmed for automated attendant tasks. With this method, when the
system answers, a caller is greeted with the either a standard automated attendant greeting, or
with a customized system greeting.
0 Individual mailboxes can be set up with automated attendant tasks. This method is usually used
for calls which are forwarded from a telephone system extension to a specific mailbox. The mail-
INFOSTARWX2
System Administrator’s
7.1
Manual
Auto Attendant
box can then greet the caller with the automated
departmental automated attendants.
l
Custom Call Routing can be used to perform
Regardless of which method
Attendant.
attendant
automated
greeting. This is useful for setting up
attendant
tasks.
is used there are two basic steps are required to set up an Automated
0 Program the system’s ports or mailboxes for Automated
Attendant
use.
o Create greetings which give callers dialing instructions.
7.4 PROGRAM SYSTEM PORTS
Each of the system ports can be programmed to route the call to the voice mail task, auto attendant
tasks, or to Custom Call Routing tasks. There are three types of auto attendant tasks. The first accepts only dialed extensions numbers. The second permits the caller to chose between dialing by extension number or dialing by name. The third permits the caller to dial a mailbox number or spell the
name of a mailbox holder. This programming is accomplished on the Run DiaZogue screen.
To change the tasks on the Run Dialogue screen, if the system is running, the system must be taken
off-line. If the system is not running, from the Main Menu, press the F3 key, then press 1. The system is taken off-line by pressing F4 then F7 and then the ESCAPE key. When the ESCAPE key is
pressed, system message processing stops. The system prompts for confirmation to stop running. Press
Y. The Dialogue screen appears.
1 [T][AuToS
OOOl]
[WAITIP JG
3 II
I I
LEFT
NC
] 1104
[WAITING
I I
-
i-1 [
05 t --i
[-I [
06 1-
--‘1
11 L-1 1w-
-.
07
[-I[- 1
(b;'p--j//gll--1
InfoStar
Figure 7-l
-j
’ II 221
1 I I I-1 [.-
’ II 23
I
--
1 I I L-1 _I
’ II 24
02/04/81
Vx2
Run Dialogue Screen Programmed
1
For Auto Attendant
-4
I
’I
12:09
With Spell By Name
At the top of the screen in the left comer is a place to enter the run code. This is a 3-digit
used to define which Line Set-up screen to use.
NOTE:
instead
7.2
The F9 and FlO keys can be used to scroll back and forth
of entering information
to find a record.
through
code
the records
INFOSTARIVX2
System Administrator’s
Manual
revised 7191
Auto Attendant
1.
If the screen is blank, enter the 3-character run code for your application (this is usually EXC) . The
system prompts for confirmation.
Press Y. The present programming is displayed.
2.
Move the cursor to the larger of the two fields for the port to be made an auto attendant
3.
Press the Fl key to clear the field.
port.
o If the port is to be used for “dial extension number”, enter AUTO 1 0001. If the port is to be
used for “dial extension number or spell subscriber’s name”, enter AUTOS OOOl.If the port is to
be used for “dial mailbox number or spell subscriber’s name”, enter AUTOM 0001.
NOTE:
The programming
for a standard
voice mail port is TIME1
4.
Then press the RETURN
5.
Move the cursor to the next port to be programmed,
NOTE:
Program
0001.
key.
only the ports that have hardware
6.
When all ports have been programmed,
7.
Press Y when the system prompts for confirmation.
and repeat the process.
(telephone
interface
boards)
installed.
press the F5 key to save the information.
Press the RETURN
key to start the system.
7.5 RECORD A GREETING
The sign-on greeting is the first announcement callers hear when they reach the system. This greeting
must contain information on how the caller is to proceed, and reassurance that if they do not dial
anything, the call will be transferred to someone who can help. Until custom greetings are recorded,
the system uses a standard greeting. The standard greeting used depends upon which of the tasks is
programmed for the port.
‘The system plays the following
or spell subscriber’s name” :
standard sign-on greeting for “ T AUTOS
“Good Morning (Afternoon or Evening), to call an extension,
now. Or, to spell a subscriber’s name, dial 1.”
The following standard sign-on greeting is used for “T AUTO1
“Good Morning (Afternoon or Evening),
calling. To reach an operator, dial 0.”
0001 - dial extension
number
dial the extension number
0001 - dial extension
dial the extension number
The system plays the following standard sign-on greeting for “T AUTOM
or spell subscriber’s name” :
number only” :
of the person you are
0001 - dial mailbox
number
“Good Morning (Afternoon or Evening). Dial the mailbox number of the person you are
calling. If you are a subscriber, dial pound.”
After the caller dials the extension number,
the system plays:
“Please hold while I transfer your call.”
If a caller waits more than 3 seconds before dialing, the system plays the following message, then
transfers the call.
“I will transfer you to an operator,
INFOSTARIVX2
System Administrator’s
revised 7191
please hold.”
7.3
Manual
Auto Attendant
The system administrator may want the option of recording several different greetings for each time of
the day to provide callers with information and instructions. The greeting list is composed of five se.
lections:
Greeting
Greeting
Greeting
Greeting
Override
1
2
3
4
Greeting
The first four greetings can be programmed to play on any day of the week, and between certain
hours. The fifth greeting is designed to override the programming of the first four greetings and is designed to deliver urgent information to the caller. The fifth greeting can be programmed to play on
only one day, and plays all day. This programming is accomplished on the Company Parameters
screen.
[COMPANY
COMPANY
CODE
)
PARAMETERS
SCREEN]
Data
EXC
Found
MAILBOX
MAILBOX
LENGTH.........4
EXTENSION
MAX LENGTH...4
[4]
[4]
1..7
ACCESS
[4]
1..9
l..Q
ACCESS CODE MAX LENGTH....4
[S]
1..9
3ROUP
[2]
1..4
SYSTEM GROUP RANGE....30:79
PERSONAL GROUP RANCE..11:29
[
[
1ST
CODE
SYSTEM
MAX
LENGTH..2
MANAGER
BOX....[0005000]
2ND SYSTEM MANAGER BOX....[
1ST
2ND
GENERAL
CODE
YIN
LENGTH....4
DELIVERY
BOX........[
-1
[FS]Save
[F6]Del
[F7]Scroll
Company
[FI]Find
[FB]P~~V
TRANS
[FlO]Next
[-]
[Esc]Quit
:
Parameters Screen
SAMPLE GREETINGS
Greeting
1:
“Good Morning. This is the XYZ Publishing Company.
son you’re calling. To reach an operator, press zero.”
Greeting
Please dial the number of the per-
2:
“Good Afternoon. You have reached the XYZ Publishing Company.
of the person you’re calling. To reach an operator, press zero.”
Greeting
Please dial the number
3:
“Good Evening. You have reached the XYZ Publishing Company.
the person you’re calling. To reach an operator, press zero.”
7.4
791
291
GREETING......[
GREETING......[
Figure 7-2
7.51
11
-1
SCREEN
[FB]Clear
30
Please dial the number of
INFOSTARIVX2
System Administrator’s
Manual
revised 7191
Auto Attendant
7.5.2
RECORDING SYSTEM GREETINGS
Should you wish to customize the system greetings to meet your organization’s individual
can record your owh system sign-on using a system administrator mailbox as follows:
0
1
Greetings +
2
cl
Record
-)
n
I
2
cl
Greeting 1 --) Record the
greeting, then press
Greeting 2
q3
Greeting 3
cl
Greeting 4
4
05
0
#
t
needs, you
System replays
greeting
Override
Greeting
NOTE: Outside callers who have never encountered
an auto attendant
before should be
given clear instructions on what to do when they reach the system. Customizing the system
sign-on greeting permits you to give more explicit directions to the outside caller, e.g.,
“Please enter the last three digits of the number you are calling, or press zero for operator
assistance. ”
Once you have recorded a customized sign-on greeting, you still have the option of returning
standard sign-on greeting or recording a new customized greeting at any time.
7.5.3
to the
PLAYING SYSTEM GREETINGS
You may play any of the system greetings at any time.
m
+
m
Listen
+
.
7.5.4
a
Greeting 1 +
n2
Greeting 2
q
3
Greeting 3
cl4
Greeting 4
05
Override
Greeting
F;lf;,;ting
ERASING SYSTEM GREETINGS
You may erase any of the system greetings at any time.
D
-
a
Erase
INFOSTARIKX2
+
a
Greeting 1
cl
2
Greeting 2
cl3
Greeting 3
04
Greeting 4
cl5
Override
Greeting
7.5
Auto Attendant
7.6 PROGRAM A MAILBOX
FOR AUTOMATED
ATTENDANT
A group of mailbox types are available to use a mailbox as a starting point for automated attendant.
A mailbox can be used as a starting point if a call is forwarded from the telephone system directly to
a mailbox, or if the mailbox is a destination from a Custom Call Routing plan.
The mailbox type defines the function of a mailbox. Create a mailbox with the desired mailbox type
using the Mailbox Set-up screen. The following box types can be used as starting points for automated
attendant:
Type 400
calls to mailboxes with this type are routed to the starting point for Auto Attendant without spell by name. This is equivalent to “T AUTO1 0001” on the Run Dialogue screen.
Type 401
calls to mailboxes with this type are routed to the starting point for Auto Attendant with
spell by name. This is equivalent to “T AUTOS 0001” on the Run Dialogue screen.
Type 402
calls to mailboxes with this type are routed to the starting point for non-subscriber voice
mail. However, it prompts the caller to spell the subscribers name instead of asking for
the mailbox number. This is equivalent to “T AUTOM 0001” on the Run DiaZogue
screen.
Type 403
calls to mailboxes with this type are routed to the starting point for Auto Attendant.
However, the mailbox personal greeting is played instead of the system greeting.
Type 404
calls to mailboxes with this type are routed to the starting point for Auto Attendant with
spell by name. However, the mailbox personal greeting is played instead of the system
greeting.
Type 405
calls to mailboxes with this type are routed to the starting point for non-subscriber
voice
mail using spell by name. However, the mailbox personal greeting is played instead of the
system greeting.
NOTE: If mailbox types 403, 404, or 405 are used, the sign-on greeting giving callers
instructions
must be recorded using the mailbox greeting. The system greetings (standard
or customized)
are not played with these type mailboxes.
7.7 RECORDING
A MAILBOX
GREETING
If mailbox types 400, 401, or 402 are used, either the standard system greeting or a customized greeting is played when a call is sent to mailboxes with these types. See Section 7.5 - Record A Greeting.
To record a greeting for mailbox types 403, 404, or 405 the PersonaI Opfions menu of the mailbox is
used. After the mailbox is created, access the mailbox and record an appropriate greeting.
El-m
Greetings +
2
Ll
Record --)
2
Cl
Mailbox
greeting
The maximum length of a mailbox greeting is determined
system administrator.
7.6
-
Record your
--) #
cl
mailbox greeting
by a class of service parameter
set by the
INFOSTARIVX;!
System Administrator’s
Manual
revised 7191
Auto Attendant
7.8 TEST THE APPLICATION
Before allowing external callers and employees to use this application,
application is tested:
make sure each step of the
Call the system, and make certain the appropriate greeting is played. Enter an extension and see that
the system transfers the call to the appropriate phone. When the phone rings, pick up the phone and
ensure that the call is transferred.
If you encounter
problems,
contact your local support representative.
7.9 TRAIN SUBSCRIBERS
Once the application
attendant application
Formal training
l
AND OUTSIDE CALLERS
is completed, it is critical to train callers and employees about the system’s auto
before they first encounter it. Options for training include:
session
l
Voice messages to inform
l
Memos
employees
or letters
In each form of training it is important
application. Often, if callers understand
participate.
to emphasize the benefits the caller will obtain from the new
the benefits of a new process, they are much more willing to
Explain the benefits of automated attendant to both employees and outside callers bfore implementing the system. Outside callers should be informed that automated attendant allows them to reach a
person more quickly, without waiting on hold.
INFOSTARIVX2
System Administrator’s
revised 7191
7.7
Manual
Auto Attendant
AUTOMATED ATTENDANT
T AUTO1 0001
4
Caller dials:
or
{ Yes
1
t
r
or
l
n
O-
.
Call is transferred to the
extension programmed as
Operator on the Company
Parameters screen.
or
I
dials
nothing
I
Call is transferred to extension using
the transfer sequence found on the
PBX Parameters screen followed by
the number entered by the caller.
dialed less than
extension
number
-
I
Yes
/
7.8
INFOSTARIEY2
System Administrator’s
Manual
revised 7191
Auto Attendant
AUTOMATED ATTENDANT
T AUTOS 0001
Call is transferred to extension using
the transfer sequence found on the
PBX Parameters screen followed by
1 the number entered by the caller.
dialed less than
length of extension
+Yes
Caller is prompted to
. spell the name of the
person being called.
tl1
I or
#
cl
Caller enters voice
mail task as a
subscriber.
+I
I
or
I
*
-
cl
A
I
or
,
Caller enters voice
mail task as a
non-subscriber.
~-
No
INFOSTARIW
Call is transferred to the
extension programmed as
c Operator on the Company
Parameters screen.
7.9
Auto Attendant
AUTOMATED ATTENDANT
T AUTOM 0001
4
Zaller di als:
1
mailbox
number
dialed less than
1No
or
cl
Caller is informed
maibox does not
exist and is
transferred to the
operator.
I1
1
or
1
1
#
cl
or
i
*
n
or
I
n
0
Call is transferred to the
extension programmed as
Operator on the Company
Parameters screen.
or
I
dials
nothinc I
Yes
y
7.10
INFOSTARIKX2
System Administrator’s
Manual
revised 7/91
Section 8 - Custom Call Routing
8.1 INTRODUCTION
Voice messaging and automated attendant are basic functions of the INFOSTAR/VX2.
The real power
of the system is provided by Custom Call Routing or CCR. Using CCR, the VX2 system can answer a
call, play a greeting (providing a list of destinations), and then wait for the caller to press a digit. The
caller uses the dial pad of a DTMF telephone to select a destination. Based on the digit the caller
presses, CCR then routes the call to the appropriate destination. CCR can be programmed to route
the call even if the caller does not press a digit. CCR allows you to combine the call routing capabilities of your telephone system and the capabilities of the VX2 with single digit dialing. For example,
have you ever called a company and were answered by a message similar to the one below. This is
CCR at work.
“Thank you for calling ABC Company. If you would like to place an order, press
one. If you wish to ask a question about an order already placed, press two. If
you wish to leave your name and address to receive a catalog, please press three.
If you wish to speak with an operator, please press zero or stay on the line.”
With a properly designed Custom Call Routing plan, your callers are promptly and courteously answered. They can then be routed to specific people, departments, prerecorded messages (bulletin
board mailboxes), or subscriber mailboxes. Custom Call Routing can be used in a variety of ways:
0 As an automated attendant
ber or department.
to answer calls and transfer the caller to the desired extension num-
0 As a departmental answering position to direct callers to specific people, to leave messages for
specific people, or to recorded information of interest to the caller.
l
As a directory to present callers with a menu of choices for listening to messages on different
topics.
l
To circumvent unique problems integrating
8.2.4 - Special Considerations.
the VX2 with certain telephone
systems. See Section
These are only a few of the ways in which CCR can be used. A Custom Call Routing plan can be
simple or complex depending on your business requirements. There are two basic components to
CCR:
This is where the destinations are programmed for each digit a caller may dial. CCR
Mailboxes are programmed by the system administrator using the monitor and keyboard. Each CCR
Mailbox has 7 messages/greetings/menus
associated with it.
CCR Mailbox
Menu This is the recorded greeting used to give instructions/choices
to the caller. There is one menu
for each CCR Mailbox. Menus are recorded using the system administrator’s mailbox and the monitor
and keyboard.
NOTE: When creating the CCR plan, the first greeting (menu) is always programmed
record one message one. Use the next six messages in the first record before proceeding
I
the next CCR record.
INFOSTARIVX2
System Administrator’s
revised 7191
in
to
8.1
Manual
Custom Call Routing
The following
steps are used to create a CCR plan:
Design the routing plan and menus (greetings)
@ Program the plan into the system
l
Record greetings for each menu
l
Program the system to use the CCR plan
o Test the routing plan.
l
8.2 DESIGNING THE ROUTING PLAN
The first decision you need to make is where you wish to route callers. Once you know where calls
are to go, you can design a plan which permits a caller to reach the destination in the shortest, yet
most logical, manner. A greeting/menu must be recorded for each CCR Mailbox used in the plan. A
menu may include up to 12 choices, one for each digit of the DTMF dial pad of a telephone. However, you may wish to limit the choices to 9, and leave the digits q ,m and @ for specific uses. See
Section 8.2.4 - Special Considerations before deciding to use digits a, q and @ in a menu. The
next decision is on which days and at what times CCR is to be active, and how calls are to be handled when CCR is not active. CCR can be turned on/off based on the day of the week and the time
of day.
Once you have decided on the destinations available to a caller, it is best to draw a general diagram
of the CCR plan. As the plan develops you can go back and add specific information. Use boxes to
represent mailboxes/extension
numbers and menus, and lines to represent call flow. For example:
“Thank you for calling ABC Company. If you would like to place an order, press one. If you wish
to ask a question about an order already placed, press two. If you wish to leave your name and
address to receive a catalog, please press three. If you wish to speak with an operator, please
press zero or stay on the line.”
New Orders
q1
Order Inquiry
2
cl
Customer
Service
Catalog
Operator
8.2.1 WHERE TO ROUTE CALLERS?
There are 3 basic destinations
available:
Q CCR can transfer a call back to a number in the telephone system. This can be an extension
number or an other number valid in the telephone system (e.g., a hunt group number).
Q CCR can route a call to a mailbox within the VX2 system. This mailbox can be a subscriber
mailbox, a bulletin board mailbox, or any other special application mailbox. The function of the
mailbox is defined using the Mailbox Type. See Section 8.3.1 - Mailbox Types for more details.
a CCR can send the call to another CCR Mailbox. A call is routed to another CCR Mailbox when
you wish to have more than one menu presented to a caller.
NOTE: CCR can route calls to any valid number in the telephone system not just an extension number. If the telephone system is so equipped, calls can be routed to hunt groups,
.
ACD groups, etc.
8.2
INFOSTARIKY2
System Administrator’s
Manual
revised 7191
Custom Call Routing
8.2.2 HOW DO CALLS GET TO CCR?
Calls can reach CCR either directly from the Run Dialogue screen when the screen is programmed
with one of the CCR starting points as a task, or calls can be transferred (or forwarded) to specific
mailboxes programmed with one of the CCR mailbox types (e.g., mailbox type 301).
8.2.3 WHEN SHOULD CCR BE ACTIVE?
The next decision to make is when should a CCR mailbox be active. Do you want your calls answered
by CCR all the time, or just on certain days of the week or time of day? How do you want your calls
answered if the CCR mailbox is not active? Do you want one CCR menu played on one day and
another CCR menu played on another day? The Open and Other Times Goto fields of the CCR Mailbox screen are used to program when each CCR mailbox is active and what to do when it is not active. The Other Times Goto field is programmed with the same 3 basic destinations as in Section 8.2.1
- Where to route callers?
8.2.4
SPECIAL CONSIDERATIONS
SUBSCRIBERS
AND FORWARDED
CALLS
When CCR is in use, all calls to the system are answered by CCR. The main CCR menu is played and
the call is routed based on the digits dialed into the VX2. This is fine if all you want the system to do
is answer your outside line calls. What about your voice mail subscribers and calls forwarded from
the telephone system to an extension’s mailbox? A means must be provided for these calls to reach
the voice mail functions of the system. This is why it was suggested that the a and q digits not be
used as choices on the main CCR menu. In order to be consistent with the operation of the Auto Attendant function of the system, it is suggested that the a digit be used to route callers to the nonsubscriber voice mail function and the q digit be used to route callers to the subscriber voice mail
function. This is accomplished by creating a type 12 mailbox and assigning this mailbox number as the
destination for q . Create a type 11 mailbox and assign this mailbox number as the destination for q ,
It is only a suggestion that these digits be used for this function. If your telephone system cannot send
these digits to the VX2, you may use any digits that the telephone system can send.
SOLUTIONS
TO INTEGRATION
PROBLEMS
Suppose you wished to use the system as an Automated Attendant and retain the voice mail function,
but your telephone system cannot send a a before dialing the mailbox number. However, your telephone system can be programmed to send a digit other than q . Select the digit to be used route a
call to the voice mail function, for example, use 9. Answer calls using CCR instead of auto attendant.
On the main CCR Mailbox
Q Program the digit 9 to route calls to the voice mail function
type 12 (non-subscriber
voice mail) as the destination.
using a mailbox created with mailbox
IJ Program the digit that is the same as the leading digit in the telephone system extension number
with a mailbox number created with mailbox type 14. For example, if your telephone system extension numbers begin with a 5, program the digit 5 on the CCR Mailbox screen to a mailbox
destination which is a type 14 mailbox.
Q Program the remaining digits on the CCR Mailbox
route calls to the telephone system attendant.
NOTE: Remember
attendant
function.
INFOSTARIVXZ
System Administrator’s
to record your greeting
screen as needed. For example, program 0 to
for the CCR menu to indicate
the automated
8.3
Manual
Custom Call Routing
OPERATOR
The a digit on each,CCR Mailbox screen should be programmed to route the caller to an extension
in the telephone system. This extension would normally be the system attendant, or someone who can
help a caller.
CALLER DIALING ERRORS
CCR also allows you to define where a caller should be routed if they make too many mistakes dialing, or if they do not dial anything at all. The CCR Mailbox screen is used to define how many dialing errors is too many (usually 2 or 3) and what to do with the call next. If the caller does not dial
anything, they are either using a rotary telephone, using a telephone which does not send DTMF after
a connection is made, or are confused about what to dial. These calls should be routed immediately
to someone who can help.
MULTIPLE
STARING
POINTS
The first 14 CCR Mailboxes can be used to start a CCR plan and should be reserved as starting
points. Why have different starting points for CCR? So that a company can provide different menus
(and choices) to callers based on circumstances outside the VX2. Suppose several departments in a
company wish to use CCR to greet their callers with a department greeting and menu rather than a
company greeting. Using multiple starting points for CCR, this can be accomplished. One extension in
each of the departments can be forwarded to a mailbox which is programmed for a mailbox type between 301 and 3 14 (see Section 8.3.1 - Mailbox Types for more details). Each department can design their own CCR plan without interfering with other departments.
NOTE: If you design a CCR plan which is going to use more than one menu, remember
CCR Mailboxes
1 to 14 are starting points and should not be used as destinations
from
another CCR menu. Use CCR mailbox 15 and above to be the second, third, etc. menu.
This is so the starting points are available should you wish to use them in the future, and so
a call is not accidently routed to the starting point for a different
CCR plan.
8.25
SUGGESTIONS
The following
suggestions may help in the design of your routing plan:
@ Keep the number of menus to a minimum. If a caller has to press too many digits to reach a
destination, they may hang up in frustration.
8 Give clear but short instructions
in a menu greeting.
B Give the caller a way to exit CCR and reach an operator.
o Make certain a caller can reach someone if they cannot dial DTMF
digits.
The configuration sheet at the end of this chapter can be used to help plan your CCR plan. Make as
many copies of this sheet as needed to design the plan.
8.3 CREATE THE REQUIRED MAILBOXES
After you have designed the CCR plan, create any additional mailboxes you require. For example, to
use bulletin board mailboxes, these mailboxes must be created using mailbox types 201, 202, or 203.
Mailboxes are created using the Mailbox Set-up screen. Create mailboxes to use as destinations for @
and a. You may wish to use mailbox numbers outside the range of your subscriber mailboxes for
these-special purpose mailboxes. See Section 3 - Mailboxes for detailed information on creating mailboxes.
8.4
INFOSTARIVX2
System Administrator’s
Manual
revised 7191
Custom Call Routing
8.3.1 MAILBOX TYPES
The Mailbox Type defines the function of a mailbox. A number of mailbox types have been added to
the system since software release 1.3.3. The following is a complete list of box types in the system:
Type 1
is a regular subscriber mailbox.
Type 2
is a subscriber mailbox, however, after the mailbox greeting is played, there are no
system prompts, just the tone to begin recording.
Type 3
is a subscriber mailbox with prompts, however, the system greeting is played before the
mailbox greeting. This is used for DID calls to notify the caller of company reached in
addition to the subscriber’s greeting.
Type 4
is a subscriber mailbox, however, the system greeting is played before the mailbox
greeting, there are no system prompts, just the tone to begin recording. This is used for
DID calls to notify the caller of company reached in addition to the subscriber’s
greeting.
Type 5
is a subscriber mailbox, however, after the mailbox greeting is played, the caller is given
a choice of dialing 1 to leave a message, or 0 to reach the operator. If nothing is
dialed, the caller is transferred to the operator.
Type 10
is a system administrator
Type 11
calls to mailboxes with this type are routed to the voice mail entry point for subscribers.
This type is used with Custom Call Routing.
Type 12
calls to mailboxes with this type are routed to the voice mail entry point for
non-subscribers.
This type is used with Custom Call Routing.
Type 13
routes calls to the entry point for auto attendant
system introduction.
Type 14
this is a special type used when Custom Call Routing is to be used as an auto attendant.
The DTMF digit used in CCR to reach a mailbox with this type is taken as the leading
digit in the extension number. The system waits for the remaining digits to be dialed
(based on the number of digits in an extension number from the PBX Parameters
screen) then transfers the call to that extension.
Type 15
this is a special type to be used when CCR is to route callers to a specific mailbox. The
DTMF digit used in CCR to reach a mailbox with this type is taken as the leading digit
in the mailbox number. The system waits for the remaining digits to be dialed (based
on the number of digits in a mailbox number from the PBX Parameters screen) then
routes the call to that mailbox.
Type 200
this is a listen only mailbox (bulletin board mailbox). Calls to mailboxes with this type
hear the mailbox greetings, and are then disconnected. The mailbox greetings are
played in order (greeting 1, greeting 2, etc.)
Type 201
this is a listen and reply mailbox (bulletin board mailbox). Calls to mailboxes
type hear the mailbox greeting, and are then prompted to leave a message.
Type 202
this is a listen and transfer mailbox (bulletin board mailbox).
this type hear the mailbox greeting, and are then transferred
programmed as attendant for the mailbox.
Type 300
calls to mailboxes with this type are routed to the CCR beginning with CCR Mailbox
Message 1. This is equivalent to “T CCRBl 0001” on the Run Dialogue screen.
mailbox.
spell by name, however,
with this
Calls to mailboxes with
to the extension
NOTE: Mailbox types 300 and 301 are identical. Type 300 is retained
ward compatibility
with previous software releases.
lNFOSTARIVX2
System Administrator’s
revised 7/91
there is no
to maintain
1
back-
8.5
Manual
Custom Call Routing
Type 301
calls to mailboxes with this type are routed to the CCR beginning with CCR Mailbox
Message 1. This is equivalent to “T CCRBX 0001” on the Run Dialogue screen.
1
Type 302
calls fo mailboxes with this type are routed to the CCR beginning with CCR Mailbox
Message 1. This is equivalent to “T CCRBX 0002” on the Run Dialogue screen.
2
Type 303
calls to mailboxes with this type are routed to the CCR beginning with CCR Mailbox
Message 1. This is equivalent to “T CCRBX 0003” on the Run Dialogue screen.
3
Type 304
calls to mailboxes with this type are routed to the CCR beginning with CCR Mailbox
Message 1. This is equivalent to “T CCRBX 0004” on the Run Dialogue screen.
4
Type 305
calls to mailboxes with this type are routed to the CCR beginning with CCR Mailbox
Message 1. This is equivalent to “T CCRBX 0005” on the Run Dialogue screen.
5
Type 306
calls to mailboxes with this type are routed to the CCR beginning with CCR Mailbox
Message 1. This is equivalent to “T CCRBX 0006” on the Run Dialogue screen.
6
Type 307
calls to mailboxes with this type are routed to the CCR beginning with CCR Mailbox
Message 1. This is equivalent to “T CCRBX 0007” on the Run Dialogue screen.
7
Type 308
calls to mailboxes with this type are routed to the CCR beginning with CCR Mailbox
Message 1. This is equivalent to “T CCRBX 0008” on the Run Dialogue screen.
8
Type 309
calls to mailboxes with this type are routed to the CCR beginning with CCR Mailbox
Message 1. This is equivalent to “T CCRBX 0009” on the Run Dialogue screen.
9
Type 310
calls to mailboxes with this type are routed to the CCR beginning with CCR Mailbox
Message 1. This is equivalent to “T CCRBX 0010” on the Run Dialogue screen.
10
Type 311
calls to mailboxes with this type are routed to the CCR beginning with CCR Mailbox
Message 1. This is equivalent to “T .CCRBX 0011” on the Run Dialogue screen.
11
Type 312
calls to mailboxes with this type are routed to the CCR beginning with CCR Mailbox
Message 1. This is equivalent to “T CCRBX 0012” on the Run Dialogue screen.
12
Type 313
calls to mailboxes with this type are routed to the CCR beginning with CCR Mailbox
Message 1. This is equivalent to “T CCRBX 0013” on the Run Dialogue screen.
13
Type 314
calls to mailboxes with this type are routed to the CCR beginning with CCR Mailbox
Message 1. This is equivalent to “T CCRBX 0014” on the Run Dialogue screen.
14
Type 400
calls to mailboxes with this type are routed to the starting point for Auto Attendant
without spell by name. This is equivalent to “T AUTO1 0001” on the Run Dialogue
screen.
Type 401
calls to mailboxes with this type are routed to the starting point for Auto Attendant with
spell by name. This is equivalent to “T AUTOS 0001” on the Run Dialogue screen.
Type 402
calls to mailboxes with this type are routed to the starting point for non-subscriber
voice
mail. However, it prompts the caller to spell the subscribers name instead of asking for
the mailbox number. This is equivalent to “T AUTOM 0001” on the Run Dialogue
screen.
Type 403
calls to mailboxes with this type are routed to the starting point for Auto Attendant.
However, the mailbox personal greeting is played instead of the system greeting.
Type 404
calls to mailboxes with this type are routed to the starting point for Auto Attendant with
spell by name. However, the mailbox personal greeting is played instead of the system
greeting.
Type 405
calls to mailboxes with this type are routed to the starting point for non-subscriber voice
mail using spell by name. However, the mailbox personal greeting is played instead of
the system greeting.
8.6
INFOSTARIVX2
System Administrator’s
Manual
revised 7191
Custom Call Routing
8.4 CCR MAILBOX
SCREEN
Once the CCR plan has been designed, the CCR Mailbox screen is used to enter the plan into system
programming. Each CCR Mailbox can have 7 messages associated with it. Each message is a CCR
menu. When a call is routed to a CCR mailbox from either the Run Dialogue screen, or from a mailbox with a CCR mailbox type (300-314), it is routed to the first message/menu of a CCR Mailbox.
Each CCR Mailbox screen is divided into the following main areas:
CMP
This field is used to program the 3-character company code this Mailbox
is for. At present, program EXC in the CMP field.
CCR and MSG#
In the upper left comer is a box to enter the CCR mailbox number and
message number. Each record can have seven messages (menus) associated with it.
OPEN
This field is used to program when the CCR menu (mailbox and message
number) is active. This field can be programmed for any day(s) of the
week and any time. The day of the week is programmed as a single digit
where Sunday is 1, Monday is 2, Tuesday is 3, etc. The From and To
time is programmed in 24-hour clock format (i.e., military time), e.g., 2
p.m. is 14:O0. If the Open field is left blank, the menu is active at all
times. If the menu is to be active 24 hours a day but only on certain days,
program the From and To time as 0O:OO to 23:59.
OTHER TIMES GOT0
Program where you wish calls to be routed when the CCR menu is not
active. The same destination choices are available for Other Times Goto as
for the Get Input area. See the Get Input description for valid entries.
NOTE: If there is an entry in the OPEN field, you must program a destination for OTHER TIMES GOTO. Otherwise, the system will disconnect the
call when the CCR mailbox is not active.
[CCR
CCR[ -1
CMP 1-l
MSG
MUST
BE
HEARD
MAILBOX
OPEN
OTHER
MSG#LI
(Y/N)
[41
L-1
[71[-I[
I*1
I-1
[-
IL-1
-1
L-1
[C]
[Y]
[GOT0
GOT0
[ -1
TIMES
[-:m
[-] [
COT0
-
iTI;
FROM/TO
tN1
GET
[II L-1[-3
SCREEN]
INPUT
[21 L-1I-1
L-1
[31
L-1
1
[Sl[-I[
-1
i-1
[Sl
i-1
[ -I[-1
L-1
[31
l-1
1 -1
L-1
[Sl[-1
1 L-1
co1
1-I
[ -1
L-1
[#I
NEXT CCR
MAILBOX
BOX
[D]
[E]
DIAL
DIAL
-1
[ -1
I-l
I-1
E-1 [ -11-I
EXT.
EXT.
SCREENED
NOT SCREENED
TIME
TIME
OUT
OUT
ERRORS
MAX
MAX
: [F~]~LEAR
WRONG KEY
ERRORS
[-]
[FSISAVE
ERRORS.
[ -1
[FB]DEL
Figure 8-l
INFOSTARlKX2
System Administrator’s
. . [-]
[-I
[F7]scRo~L
MAX
MAX
[FI]FIND
CCR Mailbox
ERRORS......[-]
[-]
[ -I[-1
[FS]PREv
Programming
[FIo]NEXT
[ESC]QUIT
=
Screen
8.7
Manual
Custom Call Routing
[CCR MAILBOX SCREEN]
CCR[ -1
CMP
1-l
OPEN [ -1
L:OTHER TIMES GOT0 [-I[
Kx# t-II
-1
[N]
MSG KUST BE HEARD (Y/N)
-
:
] FROM/TO
L-1
GET INPUT
[II [-I I-1
[-I
t41[-1[[71[-I[
-1
[*I L-1 [ -1
121 i-1 I-
II-I
1I-1
L-1
[511-l I[81i-1 [-1
I L-1
i-1
L-1
LOI L-1 [ -1
i-1
[C] GOT0 NEXT CCR BOX
[Y] GOT0 MAILBOX
MAX WRONG KEY ERRORS...[-]
MAX ERRORS I-][ -1
t-1
= [FB]cLEAR
[FB]SAVE
[FE]DEL
Figure 8-2
[31[-I[
-1
[el L-1I-1
L-1
L-1
IQ1 L-1 1-1
L-1
[#I [-I[ -1
I-1
[D] DIAL EXT. SCREENED
[E] DIAL EXT. NOT SCREENED
ERRORS
MAX TIME OUT ERRORS......[-]
MAX TIME OUT [-I[ -1
[F~]SCROLL
[FB]FIND
CCR Mailbox
[Fg]PREv
Programming
[FIOINEXT
t-1
[ESC]QUIT
:
Screen
MSG MUST BE HEARD
Enter a Y in this field if you wish the entire menu/greeting to be played
before the system listens for DTMF input. Enter an N if the caller can
interrupt the menu/greeting and begin dialing at any time.
GET INPUT
This area is where the routing choices are programmed for each dialed
digit. If a caller presses a digit for which there is no entry programmed,
the system plays the message, “You have pressed an incorrect key,” and
repeats the menu/greeting. This area consists of three fields. Valid entries
in the first field are C - another CCR menu, M - a mailbox, or E - a
number in the telephone system. E is an unscreened, unsupervised transfer. The second field is the destination extension number/mailbox
number.
The third field is only used if the destination is another CCR menu. Enter
the message number of the destination CCR mailbox in the third field.
Examples:
[Cl
[Ml
[El
[OOOOOOll
[0003004]
[0003025]
[3] routes the call to CCR Mailbox 1 message/menu 3.
[-I routes the call to mailbox 3004.
[-I routes the call to 3025 in the telephone system.
NOTE: CCR can route calls to any valid number in the telephone system
not just an extension number. If the telephone system is so equipped, calls
can be routed to hunt groups, ACD groups, etc. Enter the digits CCR is to
dial in the second field.
NOTE: The 4th destination,
same transfer as E.
MAX WRONG
MAX ERRORS
8.8
KEY
D is not used at this time and performs
Enter the number of times a caller can press an incorrect
routed in the MUX wrong key errors field.
the
key before being
Enter the destination to route a caller who causes a MUX wrong key error.
The same destination choices are available as for the Get Input area. See
the Get Input description for valid entries.
INFOSTARIVX2
System Administrator’s
Manual
revised 7191
Custom Call Routing
Enter the number of times a caller can cause a time out (by not pressing a
key within 5 seconds of the end of the menu greeting) before being routed
to the Max time out destination.
MAX TIME OUT ERRORS
,
Enter the destination to route a caller who causes a Max time out error.
The same destination choices are available as for the Get Input area. See
the Get Input description for valid entries.
MAX TIME OUT
NOTE: If there is no destination programmed
for MAX ERRORS or MAX TIME OUT, the
caller is transferred
to the telephone system number programmed
as operator on the Company Parameters
screen.
8.4.1 ADDING A CCR MAILBOX
From the Main Menu press the Fl key, then press 4. The CCR Mailbox screen appears. See Figure
8-2. If there is an existing CCR Mailbox, it is displayed. Press F3, and then Y to clear the screen. If
there are no existing records, the screen is blank.
1. Enter EXC for the company.
The cursor moves to CCR.
2. Enter the number of the CCR Mailbox to be programmed,
moves to Msg #.
and press the RETURN
key. The cursor
3. Enter the number of the message (menu/greeting) to be programmed (always start with message 1).
The system should display the message, “Information
not found, press 4
to continue.”
4. Press the RETURN
key.
5. Enter the days this CCR Mailbox/message # is to be active (enter 1 for Sunday, 2 for Monday,
the record is to be active at all times, leave the field blank.
6. Enter the start and stop times this CCR Mailbox/message
enter 2 p.m. as 14:OO).
7. Enter the destination
8. Use the RETURN
# is to be active in 24-hour
etc.). If
clock format (e.g.
to route calls when this record is NOT active.
key to move the cursor to Msg Must Be Heard.
9. Enter a Y if the caller must listen to the entire greeting/menu before dialing. Enter an N if the caller can
interrupt the greeting/menu and begin dialing. The cursor moves to Get Znput.
10. Enter the letter code (C, M, or E) for this dialed digit. The cursor moves to the next field.
11. Enter the number of the mailbox, extension, or CCR mailbox (depending upon the letter code used),
then press the RETURN key. The cursor move to the next field.
12. If a CCR mailbox was entered in the previous step, enter the message number to route the call to.
Otherwise, press the RETURN key.
13. Program the remaining
dialed digits.
14. When all desired fields are complete, press the F5 key to save the information. The system prompts
for confirmation.
Press Y to save, or N to return to the screen and change something.
15. To start a new record, press the F3 key, and answer Y.
ZNFOSTARIVX2
System Administrator’s
revised 7191
8.9
Manual
Custom Call Routing
8.4.2 MODIFYING A CUSTOM CALL RECORD
From the Main Menu press the Fl key, then press 4. The CCR Mailbox
screen appears. See Figure
8-2. If there is an existing CCR Mailbox, it is displayed. The cursor should be in the Cmp field. If
this is not the record to be modified, press F3, and then Y to clear the screen.
NOTE: The F9 and FIO keys can be used to scroll back and forth through
instead of entering the company, CCR mailbox, etc. to find a record.
the records
1. Enter EXC for the company. The cursor moves to CCR.
2. Enter the number of the CCR Mailbox to be modified,
to Msg #.
3. Enter the number of the message (menu/greeting)
message, “Information
found, display it?”
4. Press the RETURN
5. Use the RETURN
and press the RETURN
to be modified.
key. The cursor moves
The system should display the
key.
key to move the cursor to the field to be modified,
and enter your changes.
6. When all desired fields are changed, press the F5 key to save the information. The system prompts for
confirmation.
Press Y to save, or N to return to the screen and change something.
7. To clear the screen, press the F3 key, and answer Y.
8.4.3
DELETE A CUSTOM CALL RECORD
From the Main Menu press the Fl key, then press 4. The CCR Mailbox screen appears. See Figure
8-2. If there is an existing CCR Mailbox, it is displayed. The cursor should be in the Cmp field. If
this is not the record to be deleted, press F3, and then Y to clear the screen.
NOTE: The F9 and FlO keys can be used to scroll back and forth through
instead of entering the company, CCR mailbox, etc. to find a record.
1. Enter EXC for the company.
The cursor moves to CCR.
2. Enter the number of the CCR Mailbox to be deleted, and press the RETURN
to Msg #.
3. Enter the number of the message (menu/greeting)
found, display it?”
sage, “Information
4. Press the RETURN
the records
key. The cursor moves
to be deleted. The system should display the mes-
key.
5. Press the F6 key to delete, and then press Y to confirm.
NOTE: The recorded greeting associated with a CCR Mailbox/message
number is NOT
deleted when the record is deleted. The recording must be deleted using the System Administrator’s
mailbox.
8.10
INFOSTARIVX2
System Administrator’s
Manual
revised 7/91
Custom Call Routing
8.5 RECORDING
A MENU/GREETING
The greeting for each menu is recorded using both the system administrator’s
Mailbox screen. To record a greeting:
NOTE:
The system must be on line before recording
If you have been programming
on line begin with step 4.
the system off line, perform
the greetings
mailbox and the CCR
for the CCR menus.
the first 3 steps. If the system is already
1. From the Main Menu press the F3 key, then press 1. The Run Dialogue screen appears.
2. Press the FS key, and then press Y to confii.
3. Press the RETURN
key to put the system on line.
4. Press the F8 key. The On Line Programming
5. Press the I key. The CCR Mailbox
menu appears.
screen appears.
6. Select the CCR menu (CCR Mailbox and message number) to be recorded. The F9 and FlO keys can
be used to scroll through the CCR Mailboxes.
Or, you can press F3, and then Y to clear the screen. Enter EXC for the company, enter the CCR
Mailbox number, press the RETURN key, and enter the number of the message (menu/greeting) to
be recorded. The system should display the message, “Information found, display it?” Press the Y key.
7. Call the system from a nearby touch tone telephone.
8. When the system answers, press H.
9. Enter the system administrator’s
mailbox number
and access code.
10. Press a for greetings and q for record. The system is ready to record the greeting for the CCR
Mailbox and message number displayed on the monitor.
11. Record the greeting, then press a.
To record the next greeting, change the CCR menu (Mailbox number and message number) being
displayed on the monitor, and record the next greeting. It is not necessary to exit the system and enter the system administrator’s mailbox for each greeting. Just change the record being displayed on
the monitor and follow the voice prompts to record a greeting.
8.6 PROGRAM THE SYSTEM TO USE CCR
After the CCR plan has been programmed into the system and all the greetings have been
is time to route your calls to CCR and test the design. Calls can reach CCR either directly
Run Dialogue screen when the screen is programmed with one of the CCR starting points
calls can be transferred (or forwarded) to specific mailboxes programmed with one of the
box types (e.g., mailbox type 301).
INFOSTARlVX2
System Administrator’s
recorded, it
from the
as a task, or
CCR mail-
8.11
Manual
Custom Call Routing
8.6.1
RUN DIALOGUE SCREEN
To program
the Run Dialogue with the starting point of your CCR plan:
1. Take the system off line (press F4, F7, and then ESCAPE).
DOWN PROCESS (Y/N)?”
The system prompts “START
SHUT-
2. Press the Y key. The system displays the Run Dialogue screen.
3. Using the RETURN key to
be used to clear a field.
Enter T CCRBX 0001 to
Enter T CCRBX 0002 to
Enter T CCRBX 0003 to
move the cursor, enter the desired starting point for CCR. The Fl key may
route calls to CCR Mailbox
route calls to CCR Mailbox
route calls to CCR Mailbox
1 message 1.
2 message 1.
3 message 1, etc.
NOTE: T CCRBl 0001 may also be used to route calls to CCR Mailbox
maintain
backward compatibility
with older software releases.
1 message 1 to
4. Enter the new starting point for each of the system ports that are to route calls to CCR.
5. When all the ports have been programmed, save the information by pressing F5 and then Y. If you
wish to place the system on line, press the RETURN key. Otherwise, press the ESCAPE key.
8.6.2
SPECIFIC MAILBOXES
If you are using mailboxes to route calls to CCR (e.g., departmental CCR), create the necessary mailboxes using the Mailbox Set-up screen. The mailbox type is used to define the CCR starting point.
Mailbox type 301 routes calls to CCR Mailbox 1 message 1. Type 302 routes calls to CCR Mailbox 2
message 1. Type 303 routes calls to CCR Mailbox 3 message 1, etc.
When using mailboxes to start CCR, the Run Dialogue screen is normally
T TIME1 0001, or one of the auto attendant starting points.
programmed
for
8.7 TEST THE ROUTING PLAN
Call the system, listen to each of the menus you have created, and dial each of the choices on each
menu. Make certain your call is routed to the desired destination.
NOTE: Certain telephone systems may not allow internal calls to be transferred.
system is like this, use outside line calls to test the CCR plan.
8.12
If your
INFOSTARIVX2
System Administrator’s
Manual
revised 7191
Custom Call Routing
8.8 EXAMPLE 1
Let’s take the example that was described on the first two pages of this section, fill in the details and
then program it into the system. This is the diagram from page 8.2.
“Thank you for calling ABC Company. If you would like to place an order, press one. If you wish
to ask a question about an order already placed, press two. If you wish to leave your name and
address to receive a catalog, please press three. If you wish to speak with an operator, please
press zero or stay on the line.”
New Orders
0
1
Order Entry
2
Order Inquiry
2
cl
Catalog
03
Operator
0
cl
db
A
Customer
Service
Type 201 Mailbox
Listen & Reply
2
Operator
-
The telephone system used in this example has 4-digit extension numbers, three digit hunt groups,
and 4-digit ACD (Automated Call Distribution) groups. Calls are transferred to the Order Entry department by dialing the hunt group pilot number 401. The Customer Service department is in an ACD
group. Calls are transferred to this ACD group by dialing 4701. The extension number for the operator is 3001. Mailbox 2001 is to be used for Catalog requests. Mailbox 2002 is to be used for the after
hours announcement.
Incoming calls on selected outside lines are routed directly to the system (to
CCR). Let’s also add a selection to reach a Customer Service Supervisor who is at extension 3303.
The system is to be programmed to answer calls on all ports using the CCR menu described above
during the company’s business hours, Monday through Friday, 8:00 AM to 4:30 PM. After hours,
and on weekends, calls are to be routed to a general announcement
containing the company’s business hours and other general information.
The voice mail function of the system is to be retained.
Mailbox numbers 2011 and 2012 are selected for the B and a functions.
Using this information,
the diagram is now changed to:
“Thank you for calling ABC Company. If you would like to place an order, press one. If you wish
to ask a question about an order already placed, press two. If you wish to leave your name and
address to receive a catalog, please press three. To reach a suoervisor. olease Dress four. If
you wish to speak with an operator, please press zero or stay on the line.”
Order Inquiry
Catalog
Supervisor
Operator
Ordstry
2
cl
A
- hunt group 401
Customer
4
cl
0
Service - ACD group 4701
Type 201 Mailbox
Listen & Reply
a
0
Non-subscriber
*
voice mail cl
subscriber a-E-11
#
voice mail
INFOSTARlVX2
System Administrator’s
revised 7191
2
E
2
Supervisor-
Operator
extension
Mailbox 2001
3303
- ext. 3001
Type 12 Mailbox
-
Mailbox 2012
8.13
Manual
Custom Call Routing
8.8.1 CREATE THE MAILBOXES
Aside from subscriber mailboxes, the following special purpose mailboxes must be created. Use the
Mailbox Set-up screen to create:
o Mailbox
l
Mailbox
number 2001 with a type of 201. This is the listen and reply bulletin board mailbox.
number 2002 with a type of 200. This is the listen only bulletin board mailbox.
0 Mailbox number 2011 with a type of 11. This is to route callers to the starting point for subscriber voice mail.
0 Mailbox number 2012 with a type of 12. This is to route callers to the starting point for nonsubscriber voice mail.
8.8.2
CREATE THE CCR MAILBOXES
This example requires a
Main Menu press the Fl
MaiZbox screen appears.
F3, and then Y to clear
1. Enter EXC
single CCR
key, then
See Figure
the screen.
for the company.
Mailbox
press 4.
8-2. If
If there
to be created. If the system is off line system, from the
If the system is on line system, press F8, then I.The CCR
there is an existing CCR Mailbox, it is displayed. Press
are no existing records, the screen is blank.
The cursor moves to CCR.
2. Enter 1 for CCR, and press the RETURN
key. The cursor moves to Msg #.
3. Enter 1 for the message number. The system should display the message, “Information
press +-J to continue.”
4.
Press the RETURN
not found,
key.
5. Enter 23456 (Monday-Friday)
for the days this CCR Mailbox/message
# is to be active.
6. Enter OS:00 for the start time and 16:30 for the stop time this CCR Mailbox/message
24-hour clock format.
#is to be active in
7. Enter M 0002002 for the destination to route calls when this record is not active. This is the listen only
mailbox for the after hours announcement.
8.
Use the RETURN
key to move the cursor to Msg Must Be Heard.
9. Enter an N. The cursor moves to Get Input.
10. Enter E 0000401
for digit 1. This routes calls to the telephone
11. Enter E 0004701
for digit 2. This routes calls to the telephone system number 470 1 (an ACD group).
12. Enter M 0002001
for digit 3. This routes calls to mailbox 2001 (the listen & reply mailbox).
13. Enter E 0003303 for digit 4. This routes calls to the telephone
14. Enter M 0002012
15. Enter E 0003001
16. Enter M 0002011
system number 401 (a hunt group).
system number 3303 (an extension).
for digit * . This routes calls to mailbox 20 12 (non-subscriber
voice mail).
for digit 0. This routes calls to the telephone system number 3001 (an extension).
for digit #. This routes calls to mailbox 20 11 (subscriber voice mail).
17. Enter 2 for Max Wrong Key Errors.
18. Enter 1 for Max Time Out Errors.
19.- Leave both Max Errors and Max Time Out blank. The calls are routed to the telephone system operator.
8.14
INFOSTAR/VX2
System Administrator’s
Manual
revised 7191
Custom Call Routing
20. Press the F5 key to save the information, The system prompts for confirmation.
to return to the screen and change something.
Press Y to save, or N
,
[CCR
CCR[OOOOOOl]
MSG
MUST
BE
HEARD
MAILBOX
MSG#[l]
(Y/N)
SCREEN]
OPEN
OTHER
111 [El [00’304011[-1
121 [El
[41
[51 f-1 I-
[00033031[-1
1 [7lLl[[*I
IL1
[Ml
[C]
[M]
[0002Ol21
GOT0
GOT0
GOT0
[08:00
- 16:30]
[ld][OOO2002][-]
[31
[Ml [000~00~1
L-1
FROM/TO
tN1
*...
[El
[-2345'31
TIMES
V&
[00047011
l-1
I I-1
1 [3lLl[-
t-1
NEXT CCR
MAILBOX
[Ol
1 Ll
[El
BOX
[00030011
I-1
[D]
[E]
EXT.
EXT.
DIAL
DIAL
161 I-1 [1 [gl
[#I
I-1
1 L-1
I-
I I-1
[Ml [00020111
1
r-1
SCREENED
NOT SCREENED
ERRORS
MAX WRONG KEY ERRORS...[2]
MAX ERRORS
[-I[
-1
= [F~IcLEAR
[F~]SAVE
[FB]DEL
[F~]SCROLL
Figure 8-3
8.8.3
t-1
MAX TIME
MAX TIME
[FB]FIND
OUT
OUT
ERRORS......[l]
[-I[
-1
[F~]PREv
Example CCR Mailbox
t-1
[FIO]NEXT
[ESC]QUIT
=
Screen
RECORD GREETINGS FOR THE BULLETIN BOARD MAILBOXES
Mailbox 2001 is the bulletin board mailbox to be used by customers requesting catalogs. Mailbox
2002 is the bulletin board mailbox to be used as the after hours greeting.
NOTE:
The system must be on line to record
the greetings.
To record bulletin board greetings for a mailbox, call the mailbox as a subscriber,
access code, and follow the prompts to record a greeting.
enter the mailbox’s
Record a greeting similar to the following for mailbox 2001, “To receive an ABC Company catalog,
at the tone, please leave your full name, mailing address, city, state, and zip code. A catalog will be
mailed to you.”
Record a greeting similar to the following for mailbox 2002, “Thank you for calling ABC Company.
Our business hours are 8:00 AM to 4:30 PM Monday through Friday.”
8.8.4
RECORD THE CCR MENU
If you have been programming
on line begin with step 4.
the system off line, perform
the first 3 steps. If the system is already
1. From the Main Menu press the F3 key, then press 1. The Run Dialogue
screen appears.
2. Press the FS key, and then press Y to confirm.
3. Press the RETURN
key to put the system on line.
4. Press the F8 key. The On Line Programming
INFOSTARIVX2
System Administrator’s
screen appears.
8.15
Manual
Custom Call Routing
5. Press the I key. The CCR Mailbox
6. Select CCR Mailbox
CCR Mailboxes.
screen appears.
1 and message number
1. The F9 and FlO
keys can be used to scroll through the
7. Call the system from a nearby touch tone telephone.
8. When the system answers, press @.
9. Enter the system administrator’s
mailbox number and access code.
10. Press q for greetings and m for record. The system is ready to record the greeting for the CCR
Mailbox and message number displayed on the monitor.
11. Record a greeting similar to the following,
then press
q.
“Thank you for calling ABC Company. If you would like to place an order, press one. If you wish to
ask a question about an order already placed, press two. If you wish to leave your name and address to
receive a catalog, please press three. To reach a supervisor, please press four. If you wish to speak with
an operator, please press zero or stay on the line.”
8.8.5
PROGRAM RUN DIALOGUE SCREEN
Program the Run Dialogue with the starting point for this example:
1. Take the system off line (press F4, F7, and then ESCAPE).
DOWN PROCESS (Y/N)?”
The system prompts “START
2.
Press the Y key. The system displays the Run Dialogue screen.
3.
Using the RETURN
message 1. The Fl
4.
Enter the new starting point for each of the system ports.
5.
When all the ports have been programmed, save the information
RETURN
key, to place the system on line.
key to move the cursor, enter T CCRBX
key may be used to clear a field.
to route calls to CCR Mailbox
1
by pressing F5 and then Y. Press the
[T][CCRBX oool]
01 [WAITING
]
-HD:~LEFT
-
i-1 [
05 [ -
I /I09L-1[t-
-i
1--;
-3
[-I[/I 10 t
-
I-1 [-
-
I I I I-1 [111 14 t
-
ll[_1[lI
I I 17i-1 [-[
-
1 L-1 [111 18 [
-
I
l-1 [111 19 [
-
1 L-1 [111 20 1
~
1 1I r-1 [L--
-
I II L-1[-
-
1 I I f-1 [-
13 [
6
I I L-1 [-
dh;]Iii-t--j
InfoStar
Vx2
II
I
L-1[
f-1 [
! II 11 t-3
II 12
111 15 [
111 16 i
II
II
I 1
-
1I
-
1I
1 J
II
1125
$$#I
[pp]1(23
i
~
~~
]I124
1
[
02/04/91
I
Figure 8-4
8.16
0001
SHUT-
Example CCR Mailbox
]I
12:29
Screen
INFOSTARIVX2
System Administrator’s
Manual
revised 7191
Custom Call Routing
8.9 EXAMPLE 2
This example shows a CCR plan using hunt groups, extension numbers, bulletin board mailboxes, and
other CCR menus as destinations. The telephone system administrator at a large car dealership wishes
to design a Custom Call Routing plan. He wishes to route calls for new car sales, used car sales, parts
department, and service department. The sales force in new car sales is divided by make of car (remember, this is only an example). The dealership sells three makes of cars: Chrysler, Ford, and GM
(this is only an example). Calls for the parts department can be divided into pricing and availability
calls, and calls checking on orders. All calls to the service department go to one extension. The system administrator also wishes to record directions on how to reach the dealership.
The CCR plan is to be in effect during business hours only. At other times, the callers are to be directed to a mailbox and requested to leave a message.
A general diagram would begin like the following:
New Car 1
Sales O--l
New Cars sales menu
Used Car 2
Sales cl
Used Car Sales hunt group
uu
i-
Service m
I
Operator
q
+
2
Service
+
ff
Operator
extension
8.9.1 DESIGNING THE PLAN
The telephone system used in this example has 4-digit extension numbers 3001-3199, and three digit
hunt groups. Calls are transferred to the New Car Sales department by dialing the hunt group pilot
number:
Chrysler 402
Ford 403
GM 404.
The Used Car Sales department is hunt group 401. The parts department pricing extension is 3140.
The extension to check on an order is 3145. The service, department extension is 3 155. The extension number for the operator is 3001. Mailbox 2001 is to be used for travel directions. Mailbox 2002
is to be used for the after hours announcement.
Incoming calls on selected outside lines are routed
directly to the system (to CCR).
The system is to be programmed to answer calls on all ports using the CCR menu described above
during the company’s business hours, Monday to Friday 7:00 AM to 10:00 PM and Saturday
8:00 AM to 7:00 PM. After hours, and on Sundays, calls are to be routed to a general announce-
INFOSTARIKX2
System Administrator’s
revised 7191
8.17
Manual
Custom Call Routing
ment containing the company’s business hours and other general information. The voice mail function
of the system is to be retained. Mailbox numbers 2011 and 2012 are selected for the q and q func,
tions.
Using this information,
the diagram is now changed to:
New Cars sales menu
CCR 1 Msg# 3
-
1
Chrysler cl 1
hunt group 402
d&d
New Car 1
Sales 0
Ford cl2
mm
hunt group 403
cg-igj-g
GM a
hunt group 404
--
t
Used Car Sales hunt group - 401
(reserved)
Parts
n
4
-4
cl
coh,“d”,l B
-+-
ff
extension
3140
ff
extension
3145
Y
Service 0-f
Directions
at-1
Operator
0
%
2
Service extension
$ii~~~~,~ailbox
0
Operator
I-
extension
Non-subscriber
voice mail
suy;trib;;
8.18
3155
Mailbox 2001
3001
Type 12 Mailbox
of\
Type 11 Mailbox
1
-
Mailbox 2012
Mailbox 2011
INFOSTARIW2
System Administrator’s
Manual
revised 7191
Custom Call Routing
8.92
WHY HAVE TWO MAIN MENUS DOING THE SAME THING?
ABC Cars has two different working hour schedules: one for weekdays, and one for Saturday. Using
the Open and Other’Times Goto fields on the CCR Mailbox screen this schedule shift can be programmed into the system. The first CCR menu will be open (active) Monday to Friday 7:00 AM to
1O:OO PM. When the first menu is not active (other times go to), a call will be routed to the next
CCR menu. The second CCR menu will be open on Saturday 8:00 AM to 7:00 PM. The same greeting and choices will be used for the second menu as the first menu. When the second menu is not
active (other times go to), a call will be routed to the after hours mailbox.
8.9.3
GREETINGS
Appropriate greetings must be designed for each of the menus to inform callers about how to reach
the destination they desire. Start with CCR 1 Msg# 1. This is the starting point for the task
T CCRBX 0001 on the Run Dialogue screen. Something similar to the following may be used.
Main Greeting
(CCR 1, Msg# 1 and CCR 1, Msg# 2) :
“Welcome to ABC Cars. If you wish new car sales, press one. For used car sales, press
two. For parts department, press four. For service, press five. For directions to ABC Cars,
press six. To reach an operator, press zero. If you are using a rotary telephone, please stay
on the line and someone will assist you.”
New Car Sales Greeting (CCR 1, Msg# 3) :
“New Car Sales. For information
For GM cars, press three.”
on Chrysler cars, press one. For Ford cars, press two.
Parts Greeting (CCR 1, Msg# 4):
“Parts Department. For information on the price of a part or availability,
check on an order previously, placed press two.”
8.9.4
press one. To
PLAN SUMMARY
‘NOW that the plan has designed, the following
is an outline of the steps needed to make the system
carry out this plan.
l
Create the special mailboxes
needed: 2001, 2002, 2011, and 2012.
0 Program the CCR menus: CCR 1 Msg# 1, CCR 1 Msg# 2, CCR 1 Msg# 3, and CCR 1 Msg# 4.
o Record mailbox greetings for the directions
(2001) and after hours (2002) mailboxes.
0 Record the greetings for the CCR menus.
o Program the Run Dialogue screen to use CCR.
8.9.5 CREATE THE MAILBOXES
Aside from subscriber mailboxes, the following special purpose mailboxes must be created. Use the
Set-up screen to create:
Mailbox
@ Mailbox
number
0 Mailbox
number 2002 with a type of 200. This is the listen only bulletin board mailbox.
0 Mailbox number
er voice mail.
l
2001 with a type of 200. This is the listen only bulletin board mailbox.
2011 with a type of 11. This is to route callers to the starting point for subscrib-
Mailbox number 2012 with a type of 12. This is to route callers to the starting point for nonsubscriber voice mail.
INFOSTARIVX2
System Administrator’s
8.19
Manual
Custom Call Routing
8.9.6 PROGRAMMING THE CCR MAILBOX SCREEN
MAIN GREETING/MENU
This example requires several CCR Mailboxes to be created.
system is off line system, from the Main Menu press the Fl
system, press F8, then I.The CCR Mailbox screen appears.
CCR Mailbox, it is displayed. Press F3, and then Y to clear
cords, the screen is blank.
1. Enter EXC for the company,
First, create the main CCR menu. If the
key, then press 4. If the system is on line
See Figure 8-2. If there is an existing
the screen. If there are no existing re-
The cursor moves to CCR.
2. Enter the number of the record to be programmed
The cursor moves to Msg #.
(in this case it is 1)) and press the RETURN
key.
3. Enter the number of the message (menu/greeting) to be programmed (in this case it is 1). The system
should display the message, “Information
not found, press +
to continue.” Press the RETURN
key.
4. Using the RETURN
key to move around the screen, enter the information
shown in Figure 8-5.
5. When all desired fields are complete, press the FS key to save. The system prompts for confirmation.
Press Y to save the information, and N to return to the screen and change something. We will record
the message for this menu later.
6. To start a new record, press the F3 key, and answer Y.
[CCR MAILBOX SCREEN]
CCR[OOOOOOl]
[07:00 - 22:00]
OPEN [23456-l
OTHER TIMES COT0 [C][OOOOOOl][2]
YSG#[l]
MSG MUST BE HEARD (Y/N)
[Nl
[1][c][0000001][3]
[21 [El [4o1 -1
[4][c][ooooool][4]
[~1[~1[3I55~1[~1
[71[-I[
-1
Ll
[El L-1 [-
[*I [Ml Iooo2ol21t-3
Ll
131 L-1 1-1
It-1
tOI [El [3001-l
[Ql[-l[
i-1
-1
MAX WRONG KEY ERRORS...[O]
MAX ERRORS [-I[ -1
i-1
ERRORS
MAX TIME OUT ERRORS....
MAX TIME OUT [-I[
[FB]DEL
Figure 8-5
[F7]scRoLL
CCR Mailbox
[FB]FIND
Ll
[#I t~l[OOO20~~1 I-1
[D] DIAL EXT. SCREENED
[E] DIAL EXT. NOT SCREENED
[F~]SAVE
L-1
[81 [Ml [000~00~1 L-1
[C] GOT0 NEXT CCR BOX
[M] COT0 MAILBOX
E [F~IcLEAR
FROM/TO
[FQ]PREV
[FIOINEXT
[ESC]QUIT
=
For Weekday Main Greeting
What this screen tells the system to do is:
If a call is answered during Monday to Friday 07:OO AM to 10:00 PM, play the record 1 message 1
greeting and wait for the caller to dial something. If the call is after hours, route the call to the next
CCR menu (CCR 1 Msg# 2).
If the caller presses a 1, route the call to CCR record 1 message 3. Each message is another menu.
If the caller presses a 2, route the call to 401 in the telephone
8.20
.
system (the hunt group for Used Cars)
INFOSTARIVX;!
System Administrator’s
Manual
revised 7191
Custom Call Routing
If the caller presses a 4, route the call to CCR record 1 message 4. Each message is another menu.
If the caller presses a, 5, route the call to telephone
system extension 3 155.
If the caller presses a 6, route the call to mailbox 2001 (listen only bulletin
directions).
If the caller presses a 0, route the call to telephone
tor.
board containing
travel
system extension 3001 which is the system opera-
If the caller presses a *, route the call to the entry point for non-subscriber
voice mail
If the caller presses a #, route the call to the entry point for subscriber voice mail.
SATURDAY
GREETING/MENU
Next we program the CCR menu for use on Saturdays. The only difference on this menu is that when
this CCR menu is not active, calls are routed to the after hours mailbox - 2002.
1. Enter EXC for the company.
The cursor moves to CCR.
2. Enter the number of the record to be programmed
The cursor moves to Msg #.
(in this case it is 1) , and press the RETURN
key.
3. Enter the number of the message (menu/greeting) to be programmed (in this case it is 2). The system
should display the message, “Information
not found, press 4
to continue.” Press the RETURN
key.
4. Using the RETURN
key to move around the screen, enter the information
shown in Figure 8-6.
5. When all desired fields are complete, press the F5 key to save. The system prompts for confirmation.
Press Y to save the information, and N to return to the screen and change something. We will record
the message for this menu later.
6. To start a new record, press the F3 key, and answer Y.
[CCR MAILBOX SCREEN]
[1][c][0000001][3]
[21[El[401-
[4][c][0000001][4]
[51 [El [3155-l
[71 f-1 [ -1
I-1
[*I [Ml tooo~o~~lt-3
181I-1 [-
MAX WRONG KEY ERRORS...[P]
MAX ERRORS [-I[ -I[-1
[FS]CLEAR
[F~]SAVE
[FB]DEL
Figure 8-6
INFOSTARIVX2
System Administrator’s
revised 7191
L-1
1 r-1
tOliE [3ooI~lt-l
[C] GOT0 NEXT CCR BOX
[Y] GOT0 MAILBOX
q
1 L-1
1 L-1
[31[-1[-
181 [Ml [000~00~1 L-1
101i-1 I-
I I-1
t~lt~ltooo2oIIlt-1
[D] DIAL EXT. SCREENED
[E] DIAL EXT. NOT SCREENED
ERRORS
MAX TIME OUT ERRORS....
MAX TIME OUT [-I[
[~7]scRo~~
CCR Mailbox
[FB]FIND
[FQ]PREV
[FIOINEXT
[ESC]QUIT
:
For Saturday Main Greeting
8.23
Manual
Custom Call Routing
NEW CAR SALES
Now we have to program
a CCR record for New Car Sales.
1. Enter EXC for the company. The cursor moves to CCR.
2. Enter the number of the record to be programmed
cursor moves to Msg #.
(in this case 1). and press the RETURN
key. The
3. Enter the number of the message (menu/greeting) to be programmed (in this case 3). The system
should display the message, “Information
not found, press I
to continue.” Press the RETURN
key.
4. Using the RETURN
key to move around the screen, enter the information
shown in Figure 8-7.
5. When all desired fields are complete, press the F5 key to save. The system prompts for confirmation.
Press Y to save the information, and N to return to the screen and change something. We will record
the message for this menu later.
6. To start a new record, press the F3 key, and answer Y.
[CCR MAILBOX SCREEN]
ccs[0000001]
YSC#[3]
MSG MUST BE HEARD (Y/N)
I [11[~1[4G2-
I [41[-I[
[711-I[
-1
OPEN [ -1
t -:OTHER TIMES GOT0 [-I[
Ii _1 1 [21[El[403Ll
1 [51 Ll I-
1t-1 1 [31[El[404
-1
I-1 I
I-1 1
-1
t-1
t-1 1 [#I i-1 [-1
L-1
IL1
-I[-]
1 [elLl[
-1
I
1 [81[-1[-
I[-1
I
=[F3]cLEAR
I IQlLl[
I
I l-1 1 [Ol [El [3001-l
[C] COT0 NEXT CCR BOX
[M] GOT0 MAILBOX
[D] DIAL EXT. SCREENED
[E] DIAL EXT. NOT SCREENED
MAX WRONG KEY ERRORS...[2]
MAX ERRORS [-I[ -IL1
ERRORS
MAX TIME OUT ERRORS....
MAX TIME OUT [-I[
[FB]SAVE
Figure 8-7
] FROM/TO
1L-1
[Nl
I
[*I[-I[-
:
-
[FG]DEL
[F~]~cR~LL
CCR Mailbox
[F8]iwm
[Fs]PREv
[FIO]NEXT
[ESC]QUIT
:
For New Car Sales Greeting/Menu
What this screen tells the system to do is:
If the caller presses a 1, route the call to 402 (hunt group) in the telephone
system.
If the caller presses a 2, route the call to 403 (hunt group) in the telephone
system.
If the caller presses a 3, route the call to 404 (hunt group) in the telephone
system.
If the caller presses a 0, route the call to telephone
tor.
8.22
system extension 3001 which is the system opera-
INFOSTARIVX2
System Administrator’s
Manual
revised 7191
Custom Call Routing
PARTS
DEPARTMENT
And finally the Parts department:
,
1. Enter EXC for the company.
The cursor moves to CCR.
2. Enter the number of the record to be programmed
The cursor moves to Msg #.
(in this case it is 1) , and press the RETURN
key.
3. Enter the number of the message (menu/greeting) to be programmed (in this case it is 4). The system
should display the message, “Information
not found, press 4
to continue.” Press the RETURN
key.
4. Using the RETURN
key to move around the screen, enter the information
shown in Figure 8-8.
5. When all desired fields are complete, press the F5 key to save. The system prompts for confirmation.
Press Y to save the information,
and N to return to the screen and change something. We will record
the message for this menu later.
[CCR MAILBOX SCREEN]
CCR[OOOOOOl]
OPEN [ -1
L:OTHER TIMES COT0 [-][ -1
MSG#[I]
MSC MUST BE HEARD (Y/N)
-
:
] FROM/TO
L-1
[Nl
GET INPUT
I [I]IE][314o
-I[-]
1 [41[-I[-
[-I [-1
[*I t-1 t-1
[71
1 [21[El[3145- I LI T
1I-1 1 151Ll It-1 [81f-1 [-1
t-1
MAX WRONG KEY ERRORS...[2]
MAX ERRORS I-][ -1
t-1
q
[F3]cLEAR
[FJ]SAVE
[FB]DEL
Figure 8-8
LI [III
IL1 1 I~l[-l[L-1 [Ql [-I [-1
[Ol [El [3001-1
[C] COT0 NEXT CCR BOX
[M] GOT0 MAILBOX
131
t-1
[D] DIAL EXT.
[E] DIAL EXT.
[#I I-][
I I-1 I
-1
SCREENED
NOT SCREENED
ERRORS
MAX TIME OUT ERRORS......[l]
MAX TIME OUT [-I[ -1
[F~]~cR~LL
CCR Mailbox
[FB]FIND
L-1
t-1
[m]PREv
[F~O]NEXT
[-I
[ESC]QUIT
=
For Parts Greeting/Menu
What this screen tells the system to do is:
If the caller presses a 1, route the call to telephone
system extension
3140.
If the caller presses a 2, route the call to telephone
system extension
3145.
If the caller presses a 0, route the call to telephone
tor.
system extension 3001 which is the system opera-
INFOSTARIVX2
System Administrator’s
8.23
Manual
Custom Call Routing
8.9.7 RECORD GREETINGS FOR THE BULLETIN BOARD MAILBOXES
Mailbox
Mailbox
2001 is the bulletin board mailbox used to give customers directions to reach ABC Cars.
2002 is the bulletin board mailbox to be used as the after hours greeting.
NOTE:
The system must be on line to record
the greetings.
To record bulletin board greetings for a mailbox, call the mailbox as a subscriber, enter the mailbox’s
access code, select Personal Options, and follow the prompts to record an appropriate greeting.
8.9.8 RECORD THE CCR MENU/GREETINGS
After the system has been programmed, a greeting must be recorded for each of the record/messages.
The greeting for each menu is recorded using both the system administrator’s mailbox and the CCR
Mailbox programming screen of the record/message number. Use the diagram of the plan to keep
track of which greetings belong with each CCR menu. To record a greeting:
If you have been programming
on line begin with step 4.
the system off line, perform
the first 3 steps. If the system is already
1. From the Main Menu press the F3 key, then press 1. The Run Dialogue screen appears.
2. Press the F5 key, and then press Y to confirm.
3. Press the RETURN
key to put the system on line.
4. Press the F8 key. The On Line Programming
5. Press the I key. The CCR Mailbox
6. Select CCR Mailbox
CCR Mailboxes.
screen appears.
screen appears.
1 and message number 1. The F9 and FlO keys can be used to scroll through the
7. Call the system from a nearby touch tone telephone.
8. When the system answers, press
q.
9. Enter the system administrator’s
mailbox number
and access code.
10. Press a for greetings and q for record. The system is ready to record the greeting for the CCR
Mailbox and message number displayed on the monitor.
11. Make certain CCR 0000001 Msg# 1 is displayed on the screen. Record a greeting similar to the following, then press El.
“Welcome to ABC Cars. If you wish new car sales, press one. For used car sales, press
two. For parts department, press four. For service, press five. For directions to ABC Cars,
press six. To reach an operator, press zero. If you are using a rotary telephone, please stay
on the line and someone will assist you.”
12. Display CCR 0000001 Msg# 2 on the screen. Record a greeting similar to the following (yes, it is the
same greeting as the Msg# l), then press a.
“Welcome to ABC Cars. If you wish new car sales, press one. For used car sales, press
two. For parts department, press four. For service, press five. For directions to ABC Cars,
press six. To reach an operator, press zero. If you are using a rotary telephone, please stay
on the line and someone will assist you.”
8.24
INFOSTARIVX2
System Administrator’s
Manual
revised 7191
Custom Call Routing
13. Display CCR 0000001 Msg# 3 on the screen. Record a greeting similar to the following, then pressm.
“New Car Sales: For information
For GM cars, press three.”
on Chrysler cars, press one. For Ford cars, press two.
14. Display CCR 0000001 Msg# 4 on the screen. Record a greeting similar to the following, then press a.
“Parts Department. For information on the price of a part or availability,
check on an order previously, placed press two.”
press one. To
At this point the system is programmed for CCR operation. The last task to be accomplished is to
program the system ports to route calls to Custom Call Routing rather than normal voice mail. This is
accomplished on the Run Dialogue screen.
8.9.9 PROGRAM RUN DIALOGUE SCREEN
Program the Run Dialogue with the starting point for this example (T CCRBX 0001):
1. Take the system off line (press F4, F7, and then ESCAPE).
DOWN
The system prompts “START
SHUT-
PROCESS (Y/N)?”
2. Press the Y key. The system displays the Run Dialogue
screen.
3. Using the RETURN key to move the cursor, enter T CCRBX
message 1. The Fl key may be used to clear a field.
0001 to route calls to CCR Mailbox
1
4. Enter the new starting point for each of the system ports.
5. When all the ports have been programmed, save the information
RETURN key, to place the system on line.
by pressing F5 and then Y. Press the
i-1 1
[-I[
23
24
t --i
t -3
02/04/91
Figure 8-9
INFOSTARIKX2
System Administrator’s
revised 7191
Run Dialogue Screen Programmed
12:29
For CCR
8.25
Manual
Custom Call Routing
8.10
EXAMPLE 3 - CCR AS AN AUTO ATTENDANT
Custom Call Routing can also perform the same tasks as the automated attendant feature by using special
mailbox types. Let’s take Example 2 and modify it such that if the caller knows the extension number of the
person they want to reach, they can dial it as soon as the VX2 system answers the call.
In Example 2, digit 3 was reserved on the main menu. This was because 3 is the leading digit in the
telephone system extension numbers. There are three modifications to be made:
A mailbox
l
must be created to accept the input to CCR and route it to the auto attendant
0 The main CCR menu must be programmed
with the new mailbox.
0 The main CCR menu greeting must be changed so callers know they can dial an extension
ber.
8.10.1
tasks.
num-
CREATE THE MAILBOX
Create a mailbox with a mailbox type of 14. This is a special type used when Custom Call Routing is
to be used as an auto attendant. The DTMF digit on the CCR menu used to reach this type mailbox
is taken as the leading digit in the extension number. The system waits for the remaining digits to be
dialed (based on the number of digits in an extension number from the PBX Parameters screen) then
transfers the call to that extension. This example will use mailbox 2014 as the type 14 mailbox.
8.10.2
MODIFY THE FIRST CCR MAILBOX
If the system is off line system, from the Main Menu press the Fl key, then press 4. If the system is
on line system, press FS, then I.The CCR MaiZbox screen appears. CCR 1 Msg# 1 should appear. If
not, use the F9 or FlO key to display CCR 1 MS@ 1. Add mailbox 2014 to both the weekday main
menu (CCR 1, Msg# 1) and the Saturday main menu (CCR 1, Msg# 2).
key to move the cursor to the digit 3 field, and enter M 2014, then press the
1. Use the RETURN
RETURN key.
2. Press the F5 key to save the information. The system prompts for confirmation.
to return to the screen and change something.
Press Y to save, or N
[CCR MAILBOX SCREEN]
CCR[OOOOOOl]
MSC#[l]
MSG MUST BE HEARD (Y/N)
OPEN [23456
]
OTHER TIMES-&TO
[07:00
- 22:00]
[C][OOOOOOl][2]
FROM/TO
[Nl
GET INPUT
[l][c][ooooool][3]
[21[El[4oI
[43[c][ooooool][4]
[51 [El [3155-l
l-1
[61 [Ml [000~00~1 Ll
[al [-I[ -1
L-1
IDI L-1 [ -1
[Ol [El [3ccl-1
l-1
[#I [Ml [00020~~1 i-1
[71[-I[
-1
L-1
[*I WI [00020~21 l-1
[C] GOT0 NEXT CCR BOX
[M] GOT0 MAILBOX
[D] DIAL EXT. SCREENED
[E] DIAL EXT. NOT SCREENED
MAX WRONG KEY ERRORS...[2]
MAX ERRORS [-I[ -I[-1
MAX TIME OUT ERRORS....
MAX TIME OUT [-I[
c [F~IcLEAR
[F~]SAVE
Figure 8-10
8.26
[FG]DEL
[F7]scRoL~
[F8]FIND
[m]PREv
Weekday Main Menu With Mailbox
I-1
'jFY
[FIOINEXT
[ESC]QUIT
:
2014 Added
INFOSTARIVX2
System Administrator’s
Manual
revised 7191
Custom Call Routing
8.10.3
CHANGE THE CCR MENU/GREETINGS
The weekday and Saturday greeting must be recorded with instructions including dialing an extension
number. The greetirig for each menu is recorded using both the system administrator’s mailbox and
the CCR Mailbox programming screen of the record/message number.
If you have been programming
on line begin with step 4.
the system off line, perform
the first 3 steps. If the system is already
1. From the Main Menu press the F3 key, then press 1. The Run Dialogue
screen appears.
2. Press the F5 key, and then press Y to confirm.
3. Press the RETURN
key to put the system on line.
4. Press the F8 key. The On Line Programming
5. Press the I key. The CCR Mailbox
6. Select CCR Mailbox
CCR Mailboxes.
screen appears.
screen appears.
1 and message number 1. The F9 and FlO keys can be used to scroll through the
7. Call the system from a nearby touch tone telephone.
8. When the system answers, press a.
9. Enter the system administrator’s
q
10. Press
Mailbox
11.
mailbox number
and access code.
q
for greetings and
for record. The system is ready to record the greeting for the CCR
and message number displayed on the monitor.
Make certain CCR 000000 1 Msg# 1 is displayed on the screen. Record a greeting similar to the following, then press m.
“Welcome to ABC Cars. If vou know the extension number of the Derson vou are calline,
dial it now. If you wish new car sales, press one. For used car sales, press two. For parts
department, press four. For service, press five. For directions to ABC Cars, press six. To
reach an operator, press zero. If you are using a rotary telephone, please stay on the line
and someone will assist you.”
12
Display CCR 0000001
Msg# 2 on the screen. Record a greeting similar to the following
same greeting as the Msg# l), then press
q
(yes, it is the
.
“Welcome to ABC Cars. If vou know the extension number of the person you are calling,
dial it now. If you wish new car sales, press one. For used car sales, press two. For parts
department, press four. For service, press five. For directions to ABC Cars, press six. To
reach an operator, press zero. If you are using a rotary telephone, please stay on the line
and someone will assist you.”
INFOSTARIVX2
System Administrator’s
8.27
Manual
Custom Call Routing
CCRMAILBOX[
1 [
, RECORD MESSAGE
OPEN [
#
1 r: -
DAYS
OF
THE
WEEK
FROM
-
: 1
TO
DESTINATION
MUST HEZARENTIRE GREETING u
(Y or N)
WRONG KEY ERRORS u
TIME OUT ERRORS
When caller
dials:
1
cl
0
cl
Route call to:
Description - Where the call is routed & why
uL---lu
C,M,D,E
5
UUU
6
LlL--Ju
pi-J
U
(Ll-IU
C - Go to next CCR
M - Go to mailbox
(
box
D - Transfer
E - Transfer
to extension
to extension
screened
not screened
GREETING/MESSAGE:
8.28
INFOSTARIVX2
System Administrator’s
Manual
revised 7191
Section 9 - Outdial
.
9.1 INTRODUCTION
The system uses the optional outdial feature to call subscribers and notify them that a new message
has been received in their mailbox. Subscribers can control how they want this feature to work. A
subscriber specifies:
0 The telephone number where they can be reached. This number may be a telephone system (or
Centrex) extension, a local or long distance telephone number, or the telephone number and
dialing sequence of a pager.
NOTE:
outdial
will be
longer
If the telephone number is a PBX extension, be aware of call forwarding.
The
call should not be call forwarded back to the VX2. Otherwise, the outdial message
recorded as a new message. Make certain the timer for call forward - no answer is
than the VX2’s timer for an unanswered
call (default value is 4 rings).
An alternate telephone
l
number.
0 The type of message that causes an outdial call. A subscriber can specify either all new messages,
or only priority new messages. In addition, a subscriber can limit outdialing to messages from a
member of a group list, or from a particular mailbox.
0 How long the system waits after the message has been received before placing the outdial call.
0 A schedule of when the system is allowed to call the subscriber.
0 The number
of times the system is to attempt to reach the subscriber.
9.2 MAILBOX
USER
A subscriber controls the outdial feature via telephone
Personal Options menu.
using the message notification
portion
of the
Each mailbox user may establish 2 outdial schedules and an override schedule for weekdays and for
weekends. Schedules 1 and 2 can be programmed to accommodate time gaps in the same day. For
example, I want the system to call me at home from 6:00 am to 8:00 am and then again from 6:OO
pm to 8:OO pm. Schedule 3 is the override schedule.
When a subscriber selects outdialing (4 under Personal Options) the system tells the user if outdial is
active. If a user has activated Schedule 3 (the override schedule), the system will tell the user that
too.
The
can
tain
ing
system allows each mailbox user to specify up to 9 outdial bins (numbered l-9), each of which
contain an extension number, telephone number, or pager sequence. Each outdial bin may conup to 46 digits. A mailbox user may enter a pause (required in some pager sequences) by enter*.
A user may specify an alternate bin number. If the system fails to reach a user at the primary bin
destination after the programmed number of attempts, it will automatically attempt to notify the user
at the alternate bin destination using the same number of attempts. If after this, the system still has
not reached the user, no further attempts are made.
INFOSTARlVX2
System Administrator’s
revised 7191
9.1
Manual
Outdial
9.3 SYSTEM ADMINISTRATIQN
As system administrator, you program each mailbox to allow outdialing using the Mailbox Set-up
screen. You can also setup and/or review the outdial schedule for a subscriber via the monitor and
keyboard using the Mailbox Bin Number screen and Outdial Schedule screen. You should record the
company name which is used as part of the outdial greeting. This is accomplished using the system
administrator’s mailbox.
9.3.1
RECORDING THE COMPANY NAME FOR OUTDIAL GREETING
You should record the company name which is used as part of the outdial greeting using a system administrator mailbox. As soon as an outdial call is answered the system plays, “This is the (recorded
company name) voice mail system with a message for (recorded mailbox name). If you are an operator, please transfer this call to (recorded mailbox name). If (recorded mailbox name) cannot be
reached at this number, please dial star, and please have (recorded mailbox name) call the (recorded
company name) voice mail system. If you are (recorded mailbox name), dial your access code now.”
If there is no recorded Company name, or if the name has been erased, the greeting is still played,
but without the Company name, “This is the voice mail system with a message for (recorded mailbox
name). If you are an operator, please transfer this tail to (recorded mailbox name). . .”
To record the Company
cl
1
Greetings -
2
name:
Record -
cl
9.3.2
7
L-l
Company
Name
--) Record the
name, then press
0
#
-m System replays
name
PLAYING THE COMPANY NAME
You may play the company name at any time.
0
1
Greetings -
1
Listen
-
cl
9.3.3
7
FaiEany
cl
+
System plays
company name
ERASING THE COMPANY NAME
You may erase the company name at any time.
e
1
Greetings -
3
0
Erase
-
7
0
9.4 SYSTEM PROGRAMMING
Company
Name
FOR OUTDIAL
The programming of the outdial schedule can be done either by the mailbox user via telephone, or by
the system administrator using the monitor and keyboard. The Mailbox Bin Number screen is used to
program the users’ telephone numbers. The Outdial Schedule screen is used to program the user’s
schedule. The Outdial Parameters screen is used to program the maximum number of retires and the
time between retries. The Mailbox Set-up screen is used to allow each mailbox to use the outdial feature. The PBX Functions screen is used to tell the system which port(s) to use for outdial calls.
NOTE: The instructions given are for programming
the system off line. Each of the screens
mention in the preceding paragraph
can be programmed
on line.
9.2
INFOSTARIKY2
System Administrator’s
Manual
revised 7191
Outdial
9.4.1 BBX FUNCTIONS SCREEN - OUTDIAL
The PBX Functions screen
is used to integrate the message waiting indication (MWI) and outdial fea.
tures. There are several screens are already defined for certain telephone systems. These systems are
listed in Section 2.3 Auto Integration. If you are connecting the VX2 system to a telephone system
not listed, this screen should be created (using the same 3-character PBX code as used for MWI) for
use with outdial.
The PBX Functions screen is used to designate which ports are to be used to place outdial calls. If no
screen is programmed (for OCL), or if there are no entries in the Use Port field, outdial will use all
ports in the system to place outdial calls. If the Use Port field is to be programmed, up to 4 ports can
be programmed to place outdial calls.
NOTE: It may not be desirable to leave the Use Ports field blank for a system with large
group lists whose members are programmed
for outdial. One message to such a group list
would utilize every port in the system to place outdial calls.
From the Main Menu, press the F4 key, then press 3. The PBX Functions screen appears. See Figure
9-1. The ESCAPE key can be used at any time while in this screen to return to the Main Menu.
[PBX FUNCTION SCREEN]
I
[FB]Clear
PBX CODE
FUNCTION
DTMF
SET ON...,...
SET OFF..,...
DATA
SET ON .......
SET OFF ......
[F5]Save
Figure 9-l
IDS
OCL II
FLAGS ........
L-1 i-1 L-1 I-1 [-I
USE PORT ....
[3-l
[FG]D~~
[F'I]Scroll
Example PBX Functions
Ll
14-I L-1 L-1
[FB]Find
[F9]Prev
[FlO]Next
[Esc]Quit
Screen Using Ports 3 and 4 For Outdial
At the top of the screen in the left corner is a place to enter the telephone system code. This is a
3-character code used to define which telephone system the VX2 system is being integrated with. This
code must be the same code used on the Line Set-up screen and the PBX Parameters screen (System
code and PBX code are the same thing).
NOTE:
The F9 and FlO keys can be used to scroll back and forth
1. -Enter the 3-character
moves to Function.
ZNFOSTARIVX2
System Administrator’s
through
system (PBX) code. For example, IDS for the EXECUTONE
the records.
IDS. The cursor
9.3
Manual
Outdial
2.
3.
Enter OCL. The system prompts for confirmation. Press Y. The present PBX Functions programming
is displayed.
,
Press the down arrow key until the cursor reaches Use Port.
4.
Enter the port number(s) which are to be used for outdial. Press the RETURN
no ports are entered, the system uses all ports for outdial.
5.
Press the FS key to save the screen. The system prompts for confirmation.
correct. Press N to cancel the request to save the information.
key after each entry. If
Press Y if all information
is
NOTE: In software versions prior to release 2.0, if a change is made to a PBX Function
screen, and the change is saved, the corresponding
PBX Parameter screen must also be
saved (even if no changes were made to this screen).
9.4.2
MAILBOX SET-UP SCREEN
The Mailbox Set-up screen must be programmed for each mailbox that is to use the outdial feature.
Access the screen from the Main Menu (with the system off line) by pressing Fl and then 2. For
each mailbox to use outdial, program the OUT DIAL ALLOWED field to Y (yes). See Figure 9-2.
CAUTION:
Do NOT use the CONTROL
Mailbox
Set-up screen.
and C key combination
[MAILBOX
BOX[ -1
CMP
L-1
to move around
the
SCREEN]
I
SET BY [-I
gzg-
.NEW USER TUTORIAL.[-]
CCR INPUT........[-]
DEPARTMENT........[
SPELL NAME........[
q [FB]Clear
[Fb]Save
-1
[FB]Del
GUEST
GUEST
GUEST
7 [II
: t-i_
ATTEND EXT
i
[F7]Scroll
Figure 9-2
[FB]Find
Mailbox
[F9]Prev
[FlO]Next
[Esc]Quit
:
Set-up Screen
9.4.3 MAILBOX BIN NUMBER SCREEN
ADDING A BIN NUMBER
The Mailbox Bin Number screen is used to program the user’s telephone numbers. There
to be programmed on the screen. From the Main Menu press the Fl key, press 8, press
press 2. The Mailbox Bin Number screen appears. See Figure 9-3. If there is an existing
displayed. Press F3, and then Y to clear the screen. If there are no existing records, the
blank.
9.4
are 5 fields
7, then
record, it is
screen is
INFOSTARIVX2
System Administrator’s
Manual
revised 7191
Outdial
1. Enter EXC for the company.
The cursor moves to Mailbox.
2. Enter the mailbox number to be programmed,
and press the RETURN
key. The cursor moves to Bin.
3. Enter the number (1-9) of the outdial bin to be programmed. The system should display the message,
“Information
not found, press RETURN to continue.” If the system displays the bin number, or
displays “Information
found, display it Y/N?” the bin has already been programmed, select another.
4. Press the RETURN
key. The cursor moves to Tel Number.
5. Enter the telephone number exactly as it is to be dialed. Do not include a PBX access code to reach an
outside line. This is programmed on the PBX Parameters screen. Enter a ‘0” (comma) for a pause.
NOTE: If this outdial bin is used to call a pager (beeper), enter the exact dialing
required to activate the beeper just as you would dial it manually.
sequence
NOTE: If this outdial bin is used to call a VOICE pager, use Tel Type 1 instead of 3. If you
use Tel Type 3, the system will not play the outdial greeting to the voice pager.
[MAILBOX
BIN NUMBER SCREEN]
BIN NUMBER [Ol]
TEL NUMBER [5559137
TEL TYPE...[l]
TEL TYPES:
= [FS]Clear
[I]
[2]
[3]
[FJ]Save
1
External
Internal
Beeper.
[F6]Del
Number.
Ext. Number.
[F'I]Scroll
Figure 9-3
6. Press the RETURN
Mailbox
[FB]Find
[FQ]Prev
Bin Number
[FlO]Next
[Esc]Quit
Screen
key. The cursor moves to Tel Type.
7. Enter the type of telephone number entered in the previous step. Enter a 1 if the telephone number is
an external number or a voice pager. Enter a 2 if the number is an extension on the PBX (or Centrex)
the VX2 is connected to. Enter a 3 if this number is to access a pager.
8. When all desired fields are complete, press the F5 key. The system prompts for confirmation.
to save the information, or N to return to the screen and change something.
Press Y
9. To start a new record, press the F3 key, and answer Y.
INFOSTARIVX2
System Administrator’s
revised 7191
9.5
Manual
Outdial
[MAILBOX BIN NUMBER SCREEN]
This
Is an example
, for a display
pager.
the type
of pager.
of a possible
The sequence
dialing
varies
Pager
dial-up
Pauses
answer.
p-,vary.
sequence
depending
number.
to wait for
The number
Pager
BIN NUMBER [02]
TEL NUMBER [18005552121
TEL TYPE..-.[3]
/
,.,,.I,,,
needed
upon
the'pager
of pauses
ID number
company to
needed can
followed
by
1
44335#2036552200#
\,
\
TEL TYPES:
= [FS]Clear
[F5]Save
Figure 9-4
[l]
[2]
[3]
External
Internal
Beeper.
[F6]Del
Mailbox
Number.
Ext. Number.
[F7]Scroll
Number
usually
[FS]Find
Bin Number
to display
on the pager,
the number to the /VX2.
[Fg]Prev
[FlO]Next
Screen Programmed
[Esc]Quit
For A Pager
MODIFY OR DELETE A BIN NUMBER
From the Main Menu press the Fl key, press 8, press 7, then press 2. The programming screen appears. See Figure 9-3. The cursor should be in the Company field. If this is not the record to be modified, press F3, and then Y to clear the screen.
NOTE:
instead
The F9 and FlO keys can be used to scroll back and forth
of entering the company, mailbox, etc. to find a record.
1. Enter EXC for the company.
through
the records
The cursor moves to Mailbox.
2. Enter the mailbox number to be modified,
and press the RETURN
key. The cursor moves to Bin
Number.
3. Enter the bin number to be modified.
display it?”
The system should display the message, “Information
found,
4. Press the Y key.
5. To delete the record, press the F6 key, and then press Y to confirm.
To modify the record, use the RETURN key to move the cursor to the field to be modified, and enter
your changes. Use the Fl key to clear the field. When all desired fields are changed, press the FS key.
The system prompts for confirmation. Press Y to save the information, or N to return to the screen and
change something.
6. To clear the screen, press the F3 key, and answer Y.
9.6
INFOSTARlVX2
System Administrator’s
Manual
revised 7191
Outdial
9.4.4
OUTDIAL SCHEDULE
The Outdial Schedule screen is used to program the user’s schedule. Each subscriber can have an outdial schedule for weekdays and a schedule for weekends. Both the weekday and weekend schedule
can be divided into 2 schedules (schedule 1 and schedule 2). This allows you to program gaps in the
day. The schedules are allowed to overlap. In addition, there is an override schedule (schedule 3) for
weekdays and one for weekends. When the override schedule is programmed, it takes the place of
schedules 1 and 2.
[OUT DIAL
SCHEDULE SCREEN]
COMPANY: EXC
MAILBOX: 0003769
SCHEDULE NUM......
NOTIFICATION FLAG.
rN.T-
[l]
[l]
1:WD 2:WE
l:ON
0:OFF
Crp/Box-NNYCA-PMCA-
-1
Override
Outdial
5 [FS]CIear
Sched-From-Until-Binl1st lo:oo
16:oo
2nd -:- -
1 [GOI[OOlHr
L-1
1 f-1
L-1
L-1
Status...[-]
Canceled
t-1
[Fb]Save
Override
Wakeup
l:ON
[~6]~el
is divided
:
:
-:-
:
AtteIIIDt-
[II
[- ]
1
[FB]Find
[Fg]Prev
[FlO]Next
into fields:
This is the 3-character
MAILBOX
Enter the mailbox number this schedule is for.
NUM
NOTIFICATION
FLAG
[Esc]Quit
Out Dial Schedule Screen
COMPANY
SCHEDULE
Bin27
O:OFF
[F'I]Scroll
Figure 9-5
The screen
WD WEEK DAYS
WE WEEK ENDS
N.T NOTIFICATION TYPE
NMAC NORMAL MESSAGE CALL AFTER
PMAC PRIORITY YESSACE CALL AFTER
company code. Enter EXC.
Enter a 1 if this is a weekday schedule. Enter a 2 if this is a weekend
schedule.
Enter a 1 to activate the schedule. Enter a 0 to deactivate the schedule.
N.T.
The type of message (all or priority) which causes an outdial.
1 for all messages. Enter a 2 for priority messages.
GrplBox
Message senders who cause an outdial (subscribers in a particular
group list, a specific mailbox number, or any new message). Enter a
mailbox number, group list number, or leave blank for any new message.
NCMA
Normal Message Call After - how long after a message has been received to place the outdial call. Enter a single digit l-9 to indicate
hours. Enter two digits lo-99 to indicate minutes. Enter 00 to call
immediately.
INFOSTARIKX2
Enter a
9.7
Outdial
PCMA
,
Sched
From Until
Priority Message Call After - how long after a priority message has
been received to place the outdial call. Enter a single digit 1-9 to indicate hours. Enter two digits lo-99 to indicate minutes. Enter 00 to
call immediately.
The
time
each
used
start and stop time during which to attempt an outdial. Enter the
in 24-hour clock format (e.g, 2 pm is 14:OO). This is entered for
of the 2 schedules and the override schedule. Wakeup is not
at this time.
Bin1
The outdial bin number containing
scriber can be reached.
Attempt
The number of times to attempt to reach a subscriber.
from 1 to 9. Enter at least 1.
Bin2
An alternate bin number containing the telephone number where a
subscriber can be reached. Leave blank for no alternate.
the telephone
number where a subEnter a number
Override
Status
This field is used both to indicate and to change the status of the
override schedule. A 1 in this field indicates the override schedule is
on for this SCHEDULE NUM. A 0 in this field indicates the override
schedule is off.
Outdial
Canceled
This field is used both to indicate and to change the status of the outdial feature. If an outdial call is answered and whoever answers the
call dials a * in response to the outdial greeting (indicating the called
party is not at that number), the system automatically turns off outdial. A message is then left in the subscriber’s mailbox indicating that
outdial has been turned off. This message remains in the subscriber’s
mailbox until outdial is turned back on. Outdial remains off until the
subscriber turns it back on. See Section 9.5.3 - Turn Outdial OnlOff.
A Y in this field indicates outdial has been canceled.
ADDING A SCHEDULE
From the Main Menu press the Fl key, press 8, press 7, then press 1. The screen appears. See Figure 9-6. If there is an existing record, it is displayed. Press F3, and then Y to clear the screen. If
there are no existing records, the screen is blank.
1. Enter EXC for the Company.
The cursor moves to Mailbox.
2. Enter the mailbox number to be programmed,
and press the RETURN
key. The cursor moves to
Schedule Num.
3. Enter either 1 (weekdays) or 2 (weekend).
found, press RETURN to continue.”
4. Press the RETURN
The system should display the message, “Information
key. The cursor moves to Notification
not
Flag.
5. Enter either 1 (on) or 0 (off). The cursor moves to N. T (notification
type).
6. Enter either 1 (all messages) or 2 (only priority messages). The cursor moves to Grp/Box.
7. If the system is to outdial only when a message is received from members of a select group list or from
an individual mailbox, enter the group list number or mailbox number. If the system is to outdial
regardless of who sent the message, leave this field blank. Then press the RETURN key. The cursor
moves to NMCA.
9.8
INFOSTARIVXZ
System Administrator’s
Manual
revised 7191
Outdial
8. Enter the amount of time the system is to wait after receiving a message before outdialing. Enter a
single digit l-9 for hours or two digits lo-99 for minutes. Enter 00 to cause an outdial as soon as a
message is received. If the notification type is programmed for priority messages, this field is ignored.
The cursor moves to PCMA.
9. Enter the amount of time the system is to wait after receiving a priority message before outdialing.
Enter a single digit 1-9 for hours or two digits lo-99 for minutes. Enter 00 to cause an outdial as soon
as a message is received. The cursor moves to the time schedule.
10. Enter the time the system can start placing outdials for this schedule in 24-hour
pm is 14:OO).
clock format (e.g., 2
11. Enter the time the system is to stop placing outdials for this schedule in 24-hour
cursor moves to Binl.
clock format. The
12. Enter the bin number containing the telephone number to be used for this schedule. The cursor moves
to Attempt.
13. Enter the number of times (l-9)
to Bin2.
the system is to attempt an outdial. Enter at least 1, The cursor moves
14. Enter the alternate bin number containing
15. Continue
NOTE:
ules.
programming
If an override
the remainder
the telephone
number to be used for this schedule.
of this schedule.
schedule is programmed,
it takes the place of the 1st and 2nd sched-
16. When all desired fields are complete, press the F5 key. The system prompts for confirmation.
to save the information,
or N to return to the screen and change something.
Press Y
17. To start a new record, press the F3 key, and answer Y.
[OUT DIAL
SCHEDULE SCREEN]
11
COMPANY: EXC
MAILBOX: 0003769
SCHEDULE NUM......
NOTIFICATION FLAG.
N.T-
[l]
[l]
1:WD 2:WE
l:ON
0:OFF
Crp/Box-NNMCA-PMCA1 tool [oO]Hr
-1
Sched-From1st lo:oo
2nd -:-
I-1 L-1
I Ll L-1 Override -:Wakeup
Override
Outdial
k : [FS]Clear
Status.
Canceled
[F5]Save
l:ON
F6]Del
INFOSTARIVX2
System Administrator’s
revised 7191
Until16:oo
Binl1011
-:-
L-1
-I-
:
:
L-1
[- ]
Attempt5
_
_
Bina-
1021
t-i
III
0:OFF
[F7]Scroll
Figure 9-6
WD WEEK DAYS
WE WEEK ENDS
N.T NOTIFICATION TYPE
NMAC NORMAL MESSAGE CALL AFTER
PMAC PRIORITY MESSAGE CALL AFTER
[FB]Find
[FQ]P~W
[FlO]Next
[Esc]Quit
Out Dial Schedule Screen
9.9
Manual
Outdial
MODIFYING
A SCHEDULE
From the Main Menu press the Fl key, press 8, press 7, then press 1. The programming screen appears. See Figure 9-6. The cursor should be in the Company field. If this is not the record to be modified, press F3, and then Y to clear the screen.
NOTE: The F9 and FlO keys can be used to scroll back and forth
instead of entering the company, mailbox, etc. to find a record.
1. Enter EXC for the Company.
through
the records
The cursor moves to Mailbox.
2. Enter the mailbox number to be programmed,
and press the RETURN
key. The cursor moves to
Schedule Num.
3. Enter either 1 (weekdays)
found, display it?”
or 2 (weekend).
The system should display the message, “Information
4. Press the Y key.
5. Use the RETURN key to move the cursor to the field to be modified,
key is used to clear the field.
and enter your changes. The Fl
6. When all desired fields are changed, press the F5 key. The system prompts for confirmation.
to save the information, or N to return to the screen and change something.
Press Y
7, To clear the screen, press the F3 key, and answer Y.
DELETE
A SCHEDULE
From the Main Menu press the Fl key, press 8, press 7, then press 1. The programming screen appears. See Figure 9-6. The cursor should be in the Company field. If this is not the record to be deleted, press F3, and then Y to clear the screen.
NOTE:
instead
The F9 and FlO keys can be used to scroll back and forth
of entering the company, mailbox, etc. to find a record.
through
the records
1. Enter EXC for the Company. The cursor moves to Mailbox.
2. Enter the mailbox number to be programmed,
and press the RETURN
key. The cursor moves to
Schedule Num.
3. Enter either 1 (weekdays)
found, display it?”
or 2 (weekend).
The system should display the message, “Information
4. Press the Y key.
5. Press the F6 key, and then press Y to confirm.
9.10
INFOSTARIVX2
System Administrator’s
Manual
revised 7191
Outdial
9.4.5
OUTDIAL PARAMETERS SCREEN
The Outdial Parameters screen is used to program the maximum number of retires and the time between retries for outdial calls which receive a busy signal or there is no answer. The Outdial Parameters screen is programmed by Class of Service and not by mailbox number. To reach this screen from
the On Line Programming menu, press the Fl key.
The screen
is divided
into fields:
CLASS OF SERVICE
This is the class of service the screen is to be programmed
for.
STATUS
This is the response the system gets when attempting
dial call.
MAX RETRIES
This is the maximum number of times the system will attempt to call a
subscriber when the associated status is received.
DELAY BETWEEN TRIES
This is the how long in seconds the system waits before attempting
another outdial call to a subscriber when the associated status is received.
to place an out-
[OUT DIAL PARAMETERS SCREEN]
CLASS OF SERVICE........[lOO]
[Status]
BUSY...............
NO ANSWER..........
OPERATOR INTERCEPT.
NO DIAL TONE.......
ANSWRING MACHINE...
q
[FB]Clear
[FB]Save
[FG]Del
[Max Retries]
[Delay
Between
Tries]
1-l
[FII]Scroll
Figure 9-7
ADDING OUTDIAL PARAMETERS
-
[0005]
[FB]Find
[FB]Prev
[FlO]Next
[Esc]Quit
:
Out Dial Parameters Screen
TO A CLASS OF SERVICE
From the Main Menu press the Fl key, press 8, press 7, then press 4 (or press Fl from the On Line
Programming menu). The screen appears. See Figure 9-7. If there is an existing record, it is displayed. Press F3, and then Y to clear the screen. If there are no existing records, the screen is blank.
1. Enter the desired 3-digit class of service. The system should display the message, “Information
found, press RETURN
to continue.”
2.
Press the RETURN
key. The cursor moves to Max Retries for Busy.
3. Enter the desired maximum number of retries for this class of service, then press the RETURN
The cursor moves to Delay Between Tries for Busy.
INFOSTARIVX2
System Administrator’s
not
key.
9.11
Manual
Outdial
4. Enter the desired delay between tries in seconds for this class of service, then press the RETURN
The cursor moves to Max Retries for No Answer.
key.
5. Enter the desirei maximum number of retries for this class of service, then press the RETURN
The cursor moves to Delay Between Tries for No Answer.
key.
-6. Enter the desired delay between tries in seconds for this class of service, then press the RETURN
key.
7. When aU desired fields are complete, press the F5 key to save the screen. The system prompts for
confirmation. Press Y to save the information, or N to return to the screen and change something.
8. To start a new record, press the F3 key, and answer Y.
MODIFYING
OUTDIAL PARAMETERS
OF A CLASS OF SERVICE
From the Main Menu press the Fl key, press 8, press 7, then press 1. The programming screen appears. See Figure 9-6. The cursor should be in the Class of Service field. If this is not the record to
be modified, press F3, and then Y to clear the screen.
NOTE:
The F9 and FIO keys can be used to scroll back and forth
through
the records.
1. Enter the desired class of service. The system should display the message, “Information
it? ”
found, display
2. Press the Y key.
key to move the cursor to the field to be modified,
key is used to clear the field.
3. Use the RETURN
and enter your changes. The Fl
4. When all desired fields are changed, press the F5 key to save the screen. The system prompts for
confirmation.
Press Y to save the information, or N to return to the screen and change something.
5. To clear the screen, press the F3 key, and answer Y.
9.12
INFOSTARIVXZ
System Administrator’s
Manual
revised 7191
Outdial
9.5 SUBSCRIBER PROGRAMMING
9.5.1
OUTDIAL BINS
The first task in creating an outdial schedule is to program the telephone numbers where you can be
reached. These numbers can be extensions on a PBX (or Centrex), a telephone number, or the telephone number and dialing sequence of a pager. These numbers are stored in system memory in locations called outdial bins. You may store up to 9 telephone numbers. These bins are labeled 1
through 9.
Do not include the dial access code (e.g., 9) needed to reach an outside line in an outdial bin. This
information is already programmed into the system.
CREATING
AN OUTDIAL
BIN
a - Ifl- B -a - E$tz- a E$&enumber
- :2&r
Bin
Add
Maint .
(l-9)
2
cl
R
3
Extension
number
Pager
To create an Outdial bin:
1. From the main menu, press
q
for personal options.
2. Press ELI for message notification,
3. Press
q
then press El for bin number maintenance.
to add a bin number.
4. Dial the desired bin number
(l-9).
5. Dial the type of number to be added (1 - external telephone
number, or 3 - pager).
6. Dial the telephone
number.
number or voice pager, 2 - extension
Use the B to insert a pause.
7. If the number is correct, press @ when prompted.
REVIEW AN OUTDIAL
BIN
~-~-p-J-~-c
Dial bin
number
Review (l-9)
Bin
Maint .
To review the contents of an outdial bin:
1. From the main menu, press m for personal options.
2. Press El for message notification,
3. Press n
then press El for bin number maintenance.
to review a bin number.
4. Dial the desired bin number
INFOSTARIKY2
System Administrator’s
revised 7191
(l-9).
9.13
Manual
Outdial
ERASE AN OUTDIAL BIN
To erase an outdial bin:
1. From the main menu, press
q
for personal options.
2. Press El for message notification,
3. Press
q
then press ia for bin number maintenance.
to erase a bin number.
4. Dial the desired bin number
MODIFY AN OUTDIAL
(l-9).
BIN
B-I”I-I’+J
-+f~Dkil&i;
Bin
Modify
Maint .
(l-9)
To modify the contents of an outdial bin:
1. From the main menu, press
q
for personal options.
2. Press El for message notification,
then press El for bin number maintenance.
3. Press m to modify a bin number.
4. Dial the desired bin number (l-9).
The system plays the current contents of the bin. If the contents
are correct, dial El. If the contents are not correct, dial El. The system will prompt for new information.
9.5.2
OUTDIAL ADMINISTRATION
The outdial administration selection is used to program the schedules used by outdial when attempting
to reach a subscriber. Each subscriber can program an outdial schedule for weekdays and a schedule
for weekends. Both the weekday and weekend schedule can be divided into 2 schedules (schedule 1
and schedule 2). This allows you to program gaps in the day. The schedules are allowed to overlap.
In addition, there is an override schedule (schedule 3) for weekdays and one for weekends. When
the override schedule is programmed, it takes the place of schedules 1 and 2.
Each schedule is programmed
with:
l
a start and stop time
l
the outdial bin number containing
l
the number of times to attempt to reach a subscriber
l
an alternate bin number
l
the type of message (all or priority)
l
how long after a message has been received to place the outdial
l
message senders who cause an outdial (subscribers in a particular
number, or any new message.)
9.14
the telephone
number where a subscriber can be reached
(optional)
which causes an outdial
group list, a specific mailbox
INFOSTARIVX2
System Administrator’s
Manual
revised 7191
Outdial
ADD AN OUTDIAL SCHEDULE
~+~-~Y~+~
Weekday
Outdial
Admit-t
Add
2
R
+
m
Schedule 1 -
2
Weekend
cl
Schedule 2
?I Override
Cl
Dial start -c Dial stop
+ time
time
-1
5
2
cl
Dial bin
number
schedule
--) Dial number
of attempts
All
--) Dial how long
messages
to wait before
placing the outdial
Priority
call.
messages
Dial alternate
--) bin number
-
Dial a group list,
mailbox number, or
# for all subscribers.
To add an outdial schedule:
1. From the main menu, press
q
for personal options.
2. Press El for message notification,
3. Press a
then press El for outdial administration.
to add a schedule.
4. Press Ll for a weekday schedule, or press El for a weekend schedule.
5. Dial the number of the schedule to be programmed
Wake up is not used at this time.
(1, 2, or 3 - override schedule). Schedule 4 -
6. Dial the time when you will start accepting calls as a 3-digit or 4-digit number in 24-hour
(i.e., military time). For example, 2 p.m. is enter as 1400.
clock format
7. Dial the time when you will stop accepting calls as a 3-digit or 4-digit number in 24-hour
(i.e., military time). For example, 8 p.m. is enter as 2000.
clock format
8. Dial the desired bin number
9. Dial the number
(l-9),
of attempts to reach you (this number must be at least 1) ,
10. Dial an alternate bin number if desired, press El for no alternate,
or press El to skip.
11. Press El for all messages, or press El for only priority messages.
12. Dial how long the system is to wait after receiving a non-priority message before outdialing to you. Dial
l-9 for hours, or lo-99 for minutes. Dial 00 for immediate notification. (The system skips this step if
requested notification is for priority messages only.)
13. Dial how long the system is to wait after receiving a priority message before outdialing to you. Dial l-9
for hours, or lo-99 for minutes. Dial 00 for immediate notification.
14. Dial a group list number,
INFOSTARIVX2
a mailbox number,
or @ for all subscribers.
9.1s
Outdial
REVIEW AN OUTDIAL
SCHEDULE
•-~-~+~--)
Weekday
Outdial
Admin
Review
2
+
a
Weekend
0
0
Schedule 1
2
Ll3
Schedule 2
Override
schedule
To review an outdial schedule:
1. From the main menu, press
2. Press a
3. Press
q
q
for personal options.
for message notification,
then press El for outdial administration.
to review a schedule.
4. Press El for a weekday schedule, or press El for a weekend schedule.
5. Dial the number of the schedule to be reviewed (1, 2, or 3 (override schedule)).
up is not used at this time.
ERASE AN OUTDIAL
SCHEDULE
~-+.~-~-~~~
Weekday
Outdial
Admin
Schedule 4 - Wake
Erase
2
cl
Weekend
-)
a
0
Schedule 1
2
03
Schedule 2
Override
schedule
To erase an outdial schedule:
1. From the main menu, press a
for personal options.
2. Press El for message notification,
3. Press
q
then press El for outdial administration.
to erase a schedule.
4. Press El for a weekday schedule, or press El for a weekend schedule.
5. Dial the number of the schedule to be erased (1, 2, or 3 (override schedule)).
not used at this time.
MODIFY AN OUTDIAL
Schedule 4 - Wake up is
SCHEDULE
~+~+~+~+~
Weekday
Outdial Modify
Admin
2
cl
Weekend
--) a
Schedule 1
2
cl
cl3
Schedule 2
Override
schedule
To modify an outdial schedule:
1. From the main menu, press n
2. Press m for message notification,
9.16
for personal options.
then press El for outdial administration.
INFOSTARIVXZ
System Administrator’s
Manual
revised 7191
Outdial
3. Press m to modify a schedule.
4. Press El for a weekday schedule,
or press a
for a weekend schedule.
5. Dial the number of the schedule to be modified (1, 2, or 3 (override schedule)). Schedule 4 - Wake
up is not used at this time. The system plays the schedule, and request confirmation for each entry.
Press El* if the entry is correct, or press El and change the entry as needed.
9.5.3 TURN OUTDIAL ON/OFF
Once the desired outdial schedules have been programmed, outdial can be turned on and off whenever desired. Outdial On/Off is a toggle. If outdial is on, this procedure turns it off. If outdial is off, this
procedure turns it on.
pJ+J-a
Activate/Deactivate
To turn outdial on or off:
1. From the main menu, press
q
2. Press El for message notification,
for personal options.
then press El.
9.5.4 ANSWERING AN OUTDIAL CALL
When the system places an outdial call, it waits until it detects that the call has been answered. As
soon as the call is answered the system plays, “This is the (recorded company name) voice mail system with a message for (recorded mailbox name). If you are an operator, please transfer this call to
(recorded mailbox name). If (recorded mailbox name) cannot be reached at this number, please dial
star, and please have (recorded mailbox name) call the (recorded company name) voice mail system.
If you are (recorded mailbox name), dial your access code now.”
NOTE: The system uses your recorded name as part of the outdial greeting. If your name is
not recorded, the system will use your mailbox number as part of the greeting. For this
reason, make certain you have recorded your name for your mailbox.
Dial your access code, then press
q
and listen to your messages.
q
NOTE: If an outdial call is answered and whoever answers the call dials a
in response to
the outdial greeting (indicating
the called party is not at that number), the system automatically turns off outdial. A message is then left in the subscriber’s mailbox that outdial
has been turned off. Outdial remains off until the subscriber turns it back on. See Section
9.5.3 - Turn Outdial On/Off.
INFOSTARlVX2
System Administrator’s
revised 7191
9.17
Manual
Outdial
9.5.5 THINGS TO KNOW ABOUT THE OUTDIAL SCHEDULE
When a call is received in a your mailbox, the system first checks to see if outdial notification is
turned on. If it is, the system checks to see if you are using the mailbox (no outdials will be made if
you are using your mailbox when a message is received). If not, the system checks your outdial schedule to determine if the message received matches the message type (priority, all, from a group list,
etc.) of a schedule. The system then determines when to begin the outdial process.
If there is nothing programmed for “normal message call after” or “priority message call after” (depending upon the type of message), the system queues the outdial process immediately and follows the
schedule(s) in effect at the time (weekday, weekend, schedule 1, etc.).
If there is a value programmed for “normal message call after” or “priority message call after,” that
value is added to the time the message is received and then compared to the schedule start and stop
times. If the time falls within the schedule, the outdial process is queued for the delayed delivery
time. If the time falls outside of the start and stop time, the system queues the outdial for the next
scheduled time you are available for an outdial call based on all outdial schedules for the mailbox.
If you retrieve all new messages from your mailbox while an outdial is in queue, the outdial attempt
will be canceled.
The system knows an outdial was successful when your mailbox access code is dialed. If the system
was not successful on an outdial attempt, the system waits five minutes before the next attempt, until
the number of attempts programmed on the schedule is reached. The system then repeats the process
for an alternate bin if one is programmed. If after all attempts the system was not successful in reaching you, a message is left in your mailbox informing you of the failed attempts to outdial to you.
NOTE: If the system is dialing a pager number
the number of times programmed
access code is entered.
9.18
for attempts,
(Tel Type 3)) the system will call the pager
or until the mailbox is accessed and a valid
INFOSTARIVX2
System Administrator’s
Manual
revised 7191
Section 10 - System Administration
10.1
Reports
INTWODUCTION
The optional System Administration
reports are designed to help system administrators analyze data
and monitor subscriber’s usage so they can operate their systems at optimum performance
and plan
for additional capacity (ports and hours).
Reports are accessed via the system monitor. Statistics are retained in the system for one month and
are then deleted. The reports can be viewed on the system monitor, printed to the system printer, or
written to a disk.
10.1.1
SYSTEM ADMINISTRATION
MAILBOX
DIRECTORY
REPORTS
(L REPORT)
The Mailbox Directory report provides a listing of the mailboxes programmed in the system. This listing is by mailbox number and includes the mailbox holder’s name, the programmed extension number, department number, class of service, number of subscriber accesses to date, and the date the
mailbox was created.
MAILBOX
SUMMARY
(M REPORT)
The Mailbox Summary report provides a usage report for each mailbox. This report contains the number of incorrect access codes entered for a mailbox, the total number of connect minutes for a mailbox, the total number of mailbox connects, the current number of messages in a mailbox, and the last
time a mailbox was entered using the access code.
UNINITIALIZED
MAILBOX
(N REPORT)
The Uninitialized Mailbox report provides a listing of mailboxes which have been created, but have
never been initialized by a subscriber. This report contains the mailbox number and the subscriber’s
name and department,
and the date the mailbox was created.
SYSTEM
GROUP
LIST
(0
REPORT)
The System Group List report provides a listing of the members of each of the system group lists established. This listing is by group number, and members.
PERSONAL
GROUP
LIST
(P REPORT)
The Personal Group List report provides a listing of the members of each of the personal group lists
for each mailbox. This listing is by mailbox number, group number, and members.
PORT
STATISTICS
BY PORT
(Q REPORT)
The Port Statistics report is a port by port listing of the number of times the port is used (number of
inbound subscriber accesses, number of inbound non-subscriber
accesses, outdial, and total), the
amount of time (inbound, outdial, and total) each port is in use, the number of transfers, and the
percentage of time each port was busy.
SYSTEM
PORT
STATISTICS
(R REPORT)
The System Port Statistics report provides a summary of port activity for the reporting period. This
report includes the number of subscriber accesses, non-subscriber
accesses, total number of accesses,
number of outdial attempts, the time spent on inbound and outdial calls, and total time on calls. The
INFOSTARIKY2
System Administrator’s
10.1
Manual
System Administration
Reports
report also lists the number of transfers out of the system, the number of times all ports were busy,
percent all ports busy, average time all ports were busy, total connect time for all ports, and the average connect time for all ports.
HOURLY
PORT
STATISTICS
(S REPORT)
The Hourly Port Statistics report provides the number of connections to the system, the number of
connect minutes, the number of ports busy, and the time busy for the system in increments of one
hour.
OUTDIALING
DETAIL
(T REPORT)
The Outdialing Detail report provides a listing of each outdial call placed by the system, date/time,
number dialed, mailbox, type of outdial, duration, and successful/unsuccessful attempts of outdialed
calls.
10.1.2
CALL STATUS REPORTS
MONTHLY
CALL
COUNT
(OA
REPORT)
The Monthly Call Count screen lists the number of calls answered by the system for each day in a
specific month. Daily, day of the week, and monthly totals are displayed.
MONTHLY
CALL
DURATION
(OB
REPORT)
The Monthly Call Duration screen tells the system administrator the total connect time (in hours,
minutes, and seconds) of calls to the system in a specific month. Daily, day of the week, and monthly
totals are displayed.
DAILY
CALL
COUNT
(OC
REPORT)
The Daily Call Count screen tells the system administrator how many calls were made to the system
in a 24-hour period on a specific day. Hourly totals are displayed.
10.2
GENERATING
A REPORT
This process allows a’system administrator to review each of the reports and decide which reports to
print on a regular basis. Each of the reports is accessed from the On Line Programming Menu. The
following steps are used to access a report:
1. From the Run Dialogue
screen, press the F8 key.
2. The system will prompt “Enter your access code [CMP####...]
.” Type EXC and enter the system
administrator access code (up to nine characters). The screen displays asterisks as you enter the access
code.
3. Press the Enter key. The On Line Programming
Menu appears.
NOTE: The On Line Programming
Menu consists of two pages. The first ,page provides
access to the Call Status reports OA, OB, OC. The second page provides access to the
System Administration
reports L-T.
10.2
INFOSTARIVX2
System Administrator’s
Manual
revised 2192 - software version 3
System Administration
10.2.1
Reports
SELECTING A REPORT
Press the PAGE Uq or PAGE DOWN key to select the desired On Line Programming
lect a report, press one of the following:
From the first page of the On Line Programming
[OA]
Monthly
Call Count
[OB]
[OC]
Monthly
Call Duration
Daily Call Count Report
Menu:
Report
rver 3.01
-COMPANIES
[A] Setup
[B] Parameters
-MAILBOX
[C] Setup
[D] Status
[E] Link
[F] Ext. Access Code
[Cl Type
[H] Out Dial Sched.
[I] C.C.R
[J] Class Of Service
[ON LINE
[L]
PROGRAMMING MENU]
Personal
Groups
[N] P.B.X Functions
-CALLS STATUS
[OB] Duration
[OC] Hourly
Count
[PgDn]
lnroztar
Menu. To se-
Next
QUEUE
[&A] M.W.I
[QB] out Dial
[QC] Agent Status
[QD] Specified
Time
[QE] Group Deliv.
Q.
MISC.
[S] Line Set Up
[T] Bin Numbers
[U] D.N.1.S Table
[V] Message Info
[Wl Out Dial Param.
[Esc]Quit
vx2
12/16/91
Figure 10-l
INFOSTARIVX2
System Administrator’s
Manual
revised 2192 - sqftware version 3
On Line Programming
17:23
Menu
10.3
System Administration
From the second page of the On Line Programming
WI
WI
WI
[Ol
PI
[Ql
[RI
[W
Dl
Mailbox
Menu:
Directory
Mailbox
Summary
Uninitialized
Mailbox
System Group
List
Personal Group List
Port Statistics
System Port Statistics
Hourly Port Statistics
Outdial
Statistics
[PgUp]
InfoStar
Prev
[Esc]Quit
Vx2
12/16/91
Figure 10-2
10.4
Reports
On Line Programming
17:24
Menu
INFOSTARIVX;!
System Administrator’s
Manual
revised 2192 - software version 3
System Administration
10.3
DISPLAYING
Reports
A REPORT ON THE SCREEN
1. After selectinga report to review, press the designated letter(s). For example, to display the Mailbox
Directory report, press L. To display the Monthly Call Count report, press 0 and then A. The Call
Status Reports display immediately. The System Administration
reports have to be processed by the
system before they are displayed.
2. Some of the reports (M, Q, R, S, & T) prompt for a start and end date. Press the Enter key if the start
and end dates listed are the ones you desire, or enter the start and end dates as 2-digit month, day,
and year, and then press the Enter key. For example, enter 021392-021792.
Enter
Start
Date-End
Date
(MMDDYY-MMDDYY)
),
[021792-0217921
3. When the system has finished processing the report, the screen displays, “Report complete.”
key to continue. The report screen appears with the cursor in the [Opr] bracket.
Press any
\
f
File
Spec[\RPT\REPORT.DSP
] Opra]P:Print
C:Com
F:File
Page[-]
4. Press the S key. The report displays on the screen and the cursor moves to the [Page] bracket.
5. Use the UP and DOWN arrow keys to scroll through the report, or enter a specific page number and
press the Enter key to view a specific page of the report.
6. When you have finished reading the report, press the Esc key to return to the On Line Programming
Menu.
10.4
PRINTING THE REPORTS
10.4.1 CALL STATUS REPORTS
1. After selecting a report to print, press the designated letters. For example, to print the Monthly
Count report, press 0 and then A. The report is displayed.
Call
2. Press the ALT and P keys at the same time. The system prompts for Report parameters. CMP is the
3-character company code (usually EXC), YY is the last 2 digits for the year, and MM is 2 digits for
the month. PRG should be left 000. The system defaults to the report parameters for the report displayed on the screen.
Enter
Report
Parameters[CMP,YY,MM,PRG]
),
[EXC,92,01,000]
3. Press the Enter key to print the report, or enter a new year and/or month and then press the Enter
key. The system then asks if you are ready to print:
Set
4. Make certain the printer
The
Printer
is on-line,
. . .
Ready
To
Print..?
(y/n)
has paper, and the top of form is where you wish.
5. Press the Y key. The report will begin to print. If you press N (No), the system returns you to the report
_ screen.
6. When the report is finished printing,
INFOSTARIVX2
System Administrator’s
the screen displays “Done.”
Press the Esc key.
10.5
Manual
System Administration
10.4.2
SYSTEM ADMINISTRATION
Reports
REPORTS
1. After selecting a report to print, press the designated letter. For example, to print the Mailbox Directory report, press L.
2. Some of the reports (M, Q, R, S, & T) prompt for a start and end date. Press the Enter key if the start
and end dates listed are the ones you desire, or enter the start and end dates as 2-digit month, day,
and year, and then press the Enter key. For example, enter 021392-021792.
Enter
Start
Date-End
Date
(MMDDYY-MMDDYY) ),
[021792-0X792]
3. When the system has finished processing the report, the screen displays, “Report complete.”
key to continue. The report screen appears.
Press any
f
File
] Opra]P:Print
s~~c[\RPT\REP~RT.DsP
4. The cursor will highlight the [Opr] bracket.
C:Com F:File
Page[-]
Press the P key, for print.
5. The screen displays:
File
] Opr[l]P:Print
S~~~[\RPT\REPORT.DSP
Press
Set The Printer
6. Make certain the printer
is on-line,
Working
[Esc]
...
C:Com F:File
Page[-]
...
To Abort
Ready
To Print..?
(y/n)
has paper, and the top of form is where you wish.
7. Press the Y key. The system displays: “Working” which will flash across the screen, and the report will
begin to print. If you press N (No), the system displays, “Ok” and the cursor moves to the [Page]
bracket. To display the report, press the LEFT arrow key and press S. To leave the report and return
to the On Line Programming screen, press the Esc key.
8. While the report is printing,
you can press the Esc key to abort the printing
process.
NOTE: A local printer is attached to the parallel printer port of the VX2. For additional
information,
refer to the Installation
section of the INFOSTARWX2
Technical Manual.
10.6
INFOSTARIKX2
System Administrator’s
Manual
revised 2192 - sqftware version 3
System Administration
,‘-
10.4.3
Reports
A WORKING EXAMPLE
Let’s say that the system administrator would like
grammed in the system. This list will also provide
programmed
extension number, department, class
and the date the mailbox was created. This is the
1. From the Run Dialogue
to see a listing of all the mailboxes that are prosuch information
as the mailbox holder’s name, the
of service, number of subscriber accesses to date,
Mailbox Directory report.
screen, press the F8 key.
2. The system will prompt “Enter your access code [CMP####...]
.” Type EXC and enter the system
administrator access code (up to nine characters). The screen displays asterisks as you enter the access
code.
3. Press the Enter
key. The On Line Programming
4. The Mailbox Directory
DOWN
is on the second page of the On Line Programming
Menu, so press the PAGE
key.
5. Press the L key for Mailbox Directory
prompt
Menu appears.
“Report
report. When the system is finished formatting,
the screen will
completed.”
6. Press any key.
NOTE: Administration
system.
Reports
M, N, R, S, and Q may take longer to format
on a larger
7. The cursor will highlight the [Opr] bracket. If you wish to view the report first, press the S key. Press
the PAGE UP or PAGE DOWN key to scroll through the report.
f
‘I
File
S~~C[\RPT\REPORT.DSP
] Opr[l]P:Print
C:Com F:File
Page[-]
8. When you are ready to print, press the LEFT arrow key, to move the cursor back to the [Opr] bracket.
9. Press the P key, for print, or the Esc key to return to the On Line Programming
displays:
Menu. The screen
/
File
Spec[\RPT\REPORT.DSP
] Oprfi]P:Print
Press
Set
10. Make certain the printer
The Printer
is on-line,
Working
[ESC]
...
INFOSTARIVX2
System Administrator’s
Manual
revised 2192 - software version 3
Page[-]
...
To Abort
Ready To Print..?
(y/n)
has paper, and the top of form is where you wish.
11. Press the Y key. The system displays: “Working”
_begin to print.
12. While the report is printing,
C:Com F:File
which will flash across the screen, and the report will
you can press the Esc key to abort the printing
process.
10.7
System Administration
Reports
10.5 COPYING A FILE TO A DISK
The System Administration
1. After
reports (L through
T) can be copied to a disk.
selecting a report to copy to a disk, press the designated letter. For example,
Directory report, press L.
to display the
Mailbox
2. Some of the reports (M, Q, R, S, & T) prompt for a start and end date. Press the Enter key if the start
and end dates listed are the ones you desire, or enter the start and end dates as 2-digit month, day,
and year, and then press the Enter key. For example, enter 021392-021792.
I
Enter
Start
Date-End
Date
(MMDDYY-MMDDYY) ),
[021792-0217921
3. When the system has finished processing the report, the screen displays, “Report complete.”
key to continue. The report screen appears.
File
Spec[\RPT\REPORT.DSP
] Opra]P:Print
4. The cursor will highlight the [Opr] bracket.
C:Com F:File
Press any
Page[-]
Press the F key, for file.
5. The screen displays:
File
Spec[\RPT\REPORT.DSP
] Opr[1]P:Print
Press
Enter
File
Working
[Esc]
Name ),
C:Com F:File
Pagel-
.
To Abort
[
I
6. Enter a file name of your choice. File names can consist of up 8 characters (letters or numbers), a
period, and 3 additional characters called an extension. Select a file name that is meaningful to you
and indicates the contents of the file. For example, BOXDIR.292 or BOX.DIR. If you wish to copy the
report to a floppy disk in the A drive (the floppy disk drive) precede the file name with A followed by a
colon (:). For example, A:BOX.DIR
copies a report called BOX.DIR to a floppy disk in the A drive.
7. After you have entered the file name, press the Enter key. When the report has been copied to the
disk, the following is displayed:
Hit
1 file(s)
Any Key
copied/moved.
8. Press any key to exit to the top of the command
line.
9. Press the Esc key again to return to the On Line Programming
10.8
Menu.
INFOSTARIVX2
System Administrator’s
Manual
revised 2192 - software version 3
System Administration
10.6
MAILBOX
Reports
DIRECTORY REPORT (L REPORT)
The Mailbox Directory report provides a listing of the mailboxes programmed
port is a summary of the information
found on the Mailbox Set-up screen.
in the system. This re-
1006.1 ACCESSING THE MAILBOX DIRECTORY REPORT
1. From the second page On Line Programming
Menu, press the L key.
“Report
2. When the system is finished processing the report,
3. The cursor will highlight
the [Opr] bracket.
completed”
is displayed.
Press the S key for screen, P for print,
Press any key.
or F for file.
4. If you pressed S, the Mailbox Directory report appears. Use the Page Up or Page Down keys to scroll
through the report. To print the report, see printing instructions on the following page. To copy the
report to a file, see the instructions on the following page.
5. To exit the Mailbox
10.6.2
Directory,
press the Esc key. The On Line Programming
SCREEN DEFINITIONS
MAILBOX
This column is the 7-digit
pany code.
#
Is the extension number
Up screen.
EXT#
SUBSCRIBER
NAME
mailbox
number preceded
programmed
Defines the Department
cos
Defines the Class Of Service field.
DATE
This is the number
number
for each mailbox on the Mailbox
field.
was created.
0
MAILBOX
DIRECTORY
REPORT
0
0
0
0
Set-
taken from the Mail-
0
0
com-
of subscriber accesses to date.
Provides the date the mailbox
QPENED
by the 3-character
This is the Last and First Name fields for each mailbox
box Set-up screen.
DEPT
TO
Menu appears.
0
MAILBOX#
EXT#
EXC0003001
EXC0003002
EXC0003003
EXC0003004
EXC0003005
EXC0003006
EXC0003007
EXC0003008
3001
3002
3003
3004
3005
3006
3007
3008
SUBSCRIBER
LAST
LAST
LAST
LAST
LAST
LAST
LAST
LAST
NAME
FIRST
FIRST
FIRST
FIRST
FIRST
FIRST
FIRST
FIRST
DEPT#
COS
0001
0001
0001
0001
0001
0001
0001
0001
100
100
100
100
100
100
100
100
0
-
DATE
21
2
1
11
31
6
9
15
OPENED
02/05/91
02/05/91
02/05/91
02/05/91
02/05/91
02/05/91
02/05/91
02/05/91
0
0
0
0
0
-
Figure 10-3
INFOSTARIVX2
System Administrator’s
TO
Mailbox
Directory
Report
10.9
Manual
System Administration
10.6.3
Reports
PRINTING THE MAILBOX DIRECTORY REPORT
1. While in the Mailbox
Press the LEFT
Directory
ARROW
report, you will notice that the cursor highlights the [Page] bracket.
key to re-highlight the [Opr] bracket. Press the P key.
f
File
] Opra]P:Print
Spec[\RPT\REPORT.DSP
2. The system will display “Working..
3. The system will prompt
C:Com F:File
Page[-]
.Press Esc to abort. ”
“Set The Printer...Ready
to Print..?
(y/n)”
4. Press Y (Yes), the printer will begin printing the report. If you press N (No), the system will prompt
“Ok” and you will have to re-enter the Mailbox Directory by pressing the S key in the [Opr] bracket
once again.
10.6.4
COPYING THE MAILBOX DIRECTORY REPORT TO A DISK
1. While in the Mailbox Directory report, you will notice that the cursor highlights the [Page] bracket.
Press the LEFT ARROW
key to re-highlight the [Opr] bracket. Press the F key.
File
Spec[\RPT\REPORT.DSP
] Opra]P:Print
C:Com F:File
Page[-]
1
2. Enter a file name of your choice. File names can consist of up 8 characters (letters or numbers), a
period, and 3 additional characters called an extension. Select a file name that is meaningful to you
and indicates the contents of the file. For example, BOXDIR.292 or BOX.DIR. If you wish to copy the
report to a floppy disk in the A drive (the floppy disk drive) precede the file name with A followed by a
colon (:) . For example, A:BOX.DIR
copies a report called BOX.DIR to a floppy disk in the A drive.
3. After you have entered the file name, press the Enter key. When the report has been copied to the
disk, the following is displayed, “ 1 file(s) copied/moved.”
4. Press the Esc key again to return to the On Line Programming
10.10
Menu.
INFOSTARIVX2
System Administrator’s
Manual
revised 2192 - software version 3
System Administration
10.7
The
ber
box,
time
MAILBOX
SUMMARY
Reports
REPORT (M REPORT)
Mailbox Summary report provides a usage report for each mailbox. This report contains the numof incorrect access codes entered for a mailbox, the total number of connect minutes for a mailthe total number of mailbox connects, the current number of messages in a mailbox, and the last
a mailbox was entered using the access code.
10.7.1
ACCESSING THE MAILBOX SUMMARY REPORT
1. From the On Line Programming
Menu, press the M key.
2. Press the Enter key if the start and end dates listed are the ones you desire, or enter the start and end
dates as 2-digit month, day, and year, and then press the Enter key. For example, enter
021392-021792.
Enter
Start
3. The screen will prompt
Date-End
Date
(MMDDYY-MMDDYY)
“Processing Please Wait...
4. The cursor will highlight the [Opr] bracket.
),
[021792-0217921
Report completed.”
Press any key.
Press the S key for screen, P for print,
or F for file.
5. If you pressed S, the Mailbox Summary report appears. To print the report, see printing instructions
on the following page. To copy the report to a file, see the instructions on the following page.
6. The cursor will highlight the [Page] bracket. Use the Page Up or Page Down keys to scroll through the
report, or type the numerical page you wish to review and press Enter.
7. To exit the Mailbox
10.7.2
Menu appears.
REPORT DEFINITIONS
This column is the 7-digit
pany code.
MAILBOX
SUBSCRIBER
#BAD
Summary report, press the Esc key. The On Line Programming
NAME
number preceded
by the 3-character
of bad access code attempts.
CONN
The total connect time for each mailbox.
#CONN
The number
#MSGS
Defines the number
LAST
Last time the mailbox
of connections
made to each mailbox.
of messages currently
in a specific mailbox.
was entered using the access code.
0
0
0
0
MAILBOX
SUMMARY REPORT
================================================================================
FROM 02/13/92
TO
02/17/92
0
================================================================================
MAILBOX#
SUBSCRIBER
NAME
#BAD
ACCS
0
CONN
KONN
#MSGS
LAST
0
0
0
com-
This is the Last and First Name fields for each mailbox taken from the Mailbox Set-up screen.
Defines the number
ACCS
mailbox
EXC0003001
EXC0003002
MCPHILLIPS
CORB
DENNIS
JOHN
0
0
Figure 10-4 Mailbox
Summary
0:oo
0:oo
1
18
80
45
02/17
02/17
0
1
INFOSTARIVX2
System Administrator’s
Manual
revised 2192 - software version 3
Report
10.11
System Administration
10.7.3
Reports
PRINTING THE MAILBOX SUMMARY REPORT
1. While in the Majlbox
Press the LEFT
Summary report, you will notice that the cursor highlights the [Page] bracket.
ARROW
key to re-highlight
the [Opr] bracket.
S~~~[\RPT\REPORT.DSP
]
2. The system will display “Working...Press
Esc to abort.”
File
3. The system will prompt
“Set the printer...Ready
Opra]P:Print
to Print..?
Press the P key.
C:Com
F:File
Page[-]
(y/n)”
4. Press Y (Yes), the printer will begin printing the report. If you press N (No), the system will prompt
“Ok” and you will have to re-enter the Mailbox Summary by pressing the S key in the [Opr] bracket
once again.
10.7.4 COPYING THE MAILBOX SUMMARY REPORT TO A DISK
1. While in the Mailbox
Press the LEFT
Summary report, you will notice that the cursor highlights the [Page] bracket
ARROW
key to re-highlight
the [Opr] bracket.
Press the F key.
f
File
Spec[\RPT\REPORT.DSP
]
Oprd]P:Print
C:Com
F:File
Page[-]
2. Enter a file name of your choice. File names can consist of up 8 characters (letters or numbers), a
period, and 3 additional characters called an extension. Select a file name that is meaningful to you
and indicates the contents of the file. For example, BOXSUM.
or BOX.SUM. If you wish to copy
the report to a floppy disk in the A drive (the floppy disk drive) precede the file name with A followed
by a colon (:). For example, A:BOX.SUM
copies a report called BOX.SUM to a floppy disk in the A
drive.
3. After you have entered the file name, press the Enter key. When the report has been copied to the
disk, the following is displayed, “ 1 file(s) copied/moved.”
4. Press the Esc key again to return to the On Line Programming
10.12
Menu.
INFOSTARfVX2
System Administrator’s
Manual
revised 2192 - software version 3
System Administration
,’
10.8
UNINITIALIZED
MAILBOX
Reports
REPORT (N REPORT)
The Uninitialized Mailbox report provides a listing of mailboxes which have been created, but have
not been used for the first time by a subscriber. This report contains the mailbox number, and the
subscriber’s name and department,
and the date the mailbox was created.
10.8.1 ACCESSING THE UNINITIALIZED MAILBOX REPORT
1. From the On Line Programming
2. The screen will prompt
Menu, press the N key.
“Processing Please Wait...Report
3. The cursor will highlight the [Opr] bracket.
completed.“
Press any key.
Press the S key for screen, P for print,
or F for file.
4. If you pressed S, the Uninitialized Mailbox report appears. To print the report, see printing instructions on the following page. To copy the report to a file, see the instructions on the following page.
5. The cursor will highlight the [Page] bracket. Use the Page Up or Page Down keys to scroll through the
report, or type the numerical page you wish to review and press Enter.
6. To exit the report, press the Esc key. The On Line Programming
10.8.2
REPORT DEFINITIONS
This column is the 7-digit
pany code.
MAILBOX#
SUBSCRIBER
NAME
mailbox number preceded
This is the Department
OPENED
The date the mailbox was created.
UNINITIALIZED
MAILBOX#
EXC000003006
EXC000003007
com-
SUBSCRIBER
MCPHILLIPS
CORB
field.
MAILBOX
NAME
DENNIS
JOHN
Figure 10-S Uninitialized
INFOSTARIVX;
System Administrator’s
by the 3-character
This is the First and Last Name fields for each mailbox taken from the Mailbox Set-up screen.
DEPT
0
Menu appears.
REPORT
DEPT#
OPENED
0036
0032
Mailbox
11/18/91
11/18/91
0
Report
10.13
Manual
System Administration
10.8.3
Reports
PRINTING THE UNINITIALIZED MAILBOX REPORT
1. While in the Uninitialized
Press the LEFT’ARROW
Mailbox report, you will notice that the cursor highlights the [Page] bracket.
key to re-highlight
the [Opr] bracket.
Press the P key.
f
\
File
Spec[\RPT\REPORT.DSP
2. The system will display “Working..
3. The system will prompt
] Oprd]P:Print
C:Com F:File
Page[-]
*Press Esc to abort.”
“Set the printer...Ready
to Print..?
(y/n)”
4. Press Y (Yes), the printer will begin printing the report. If you press N (No), the system will prompt
“Ok” and you will have to re-enter the Uninitialized Mailbox report by pressing the S key in the [Opr]
bracket once again.
10.8.4 COPYING THE UNINITIALIZED MAILBOX REPORT TO A DISK
1. While in the Uninitialized
Press the LEFT ARROW
File
Mailbox report, you will notice that the cursor highlights the [Page] bracket.
key to re-highlight
Spec[\RPT\REPORT.DSP
the [Opr] bracket.
] Oprd]P:Print
Press the F key.
C:Com F:File
Page[-]
I
2. Enter a file name of your choice. File names can consist of up 8 characters (letters or numbers), a
period, and 3 additional characters called an extension. Select a file name that is meaningful to you
and indicates the contents of the file. For example, UNBOX.292 or UNINIT.BOX.
If you wish to copy
the report to a floppy disk in the A drive (the floppy disk drive) precede the file name with A followed
by a colon (:). For example, A:UNINIT.BOX
copies a report called UNINIT.BOX
to a floppy disk in
the A drive.
3. After you have entered the file name, press the Enter key. When the report has been copied to the
disk, the following is displayed, “ 1 file(s) copied/moved.”
4. Press the Esc key again to return to the On Line Programming
10.14
Menu.
INFOSTARIVX2
System Administrator’s
Manual
revised 2192 - software version 3
System Administration
10.9
Reports
SYSTEM GROUP LIST REPORT (0 REPORT)
The System Group List report provides a listing of the members
tablished.
10.9.1 ACCESSING
of each of the system group lists es-
THE SYSTEM GROUP LIST REPORT
1. From the On Line Programming
2. The screen will prompt
Menu, press the 0 key.
“Processing please wait...Report
3. The cursor will highlight the [Opr] bracket.
completed.”
Press any key.
Press the S key for screen, P for print,
or F for file.
4. If you pressed S, the System Group List report appears. To print the report, see printing instructions on
the following page. To copy the report to a file, see the instructions on the following page.
5. The cursor will highlight the [Page] bracket. Use the Page Up or Page Down keys to scroll through the
report, or type the numerical page you wish to review and press Enter.
6. To exit the report, press the Esc key. The On Line Programming
10.9.2
Menu appears.
REPORT DEFINITIONS
GROUP#
The group number
MEMBERS
Lists the mailbox numbers
and any name programmed
of the members
for the group list.
of the group list.
-
0
0
SYSTEM
CROUP
LIST
REPORT
0
0
0
GROUP
#:
MEMBERS:
0
0
0
0
-
GROUP #:
MEMBERS:
EXC00030
0003001
0003008
0003015
0003022
0003002
0003009
0003016
0003023
0003003
0003010
0003017
0003024
0003004
0003011
0003018
EXC00050
0003001
0003008
0003015
0003022
0003029
EVERYONE
0003002
0003009
0003016
0003023
0003030
ON THE
0003003
0003010
0003017
0003024
0003031
SYSTEM
0003004
0003011
0003018
0003025
0003032
0003005
0003012
0003019
0003006
0003013
0003020
0003007
0003014
0003021
0
0
0003005
0003012
0003019
0003026
0003033
0003006
0002013
0003020
0003027
0003034
0
0003007
0003014
0003021
0003028
0003035
0
0
-
Figure 10-6 System Group List Report
INFOSTARIVX2
System Administrator’s
Manual
revised 2192 - software version 3
10.15
System Administration
Reports
10.9.3 PRINTING THE SYSTEM GROUP LIST REPORT
1. While in the System Group List report, you will notice that the cursor highlights the [Page] bracket.
Press the LEFT
I
File
ARROW
key to re-highlight
the [Opr] bracket.
] Opra]P:Print
Spec[\RPT\REPORT.DSP
Press the P key.
C:Com
F:File
Page[-]
I
2. The system will display “Working..
3. The system will prompt
*Press Esc to abort.”
“Set the printer...Ready
to Print..?
(y/n)”
4. Press Y (Yes), the printer will begin printing the report. If you press N (No), the system will prompt
“Ok” and you will have to re-enter the System Group List report by pressing the S key in the [Opr]
bracket once again.
10.9.4 COPYING THE SYSTEM GROUP LIST REPORT TO A DISK
1. While in the System Group List report, you will notice that the cursor highlights the [Page] bracket.
Press the LEFT ARROW key to re-highlight the [Opr] bracket. Press the F key.
3
f
File
Spec[\RPT\REPORT.DSP
] Opra]P:Print
C:Com
F:File
Page[-]
2. Enter a file name of your choice. File names can consist of up 8 characters (letters or numbers), a
period, and 3 additional characters called an extension. Select a file name that is meaningful to you
and indicates the contents of the file. For example, SYSGRP.292 or SYS.GRP. If you wish to copy the
report to a floppy disk in the A drive (the floppy disk drive) precede the file name with A followed by a
colon (:). For example, A:SYS.GRP copies a report called SYS.GRP to a floppy disk in the A drive.
3. After you have entered the file name, press the Enter key. When the report has been copied to the
disk, the following is displayed, “ 1 file(s) copied/moved.”
4. Press the Esc key again to return to the On Line Programming
10.16
Menu.
INFOSTARIVX2
System Administrator’s
Manual
revised 2192 - software version 3
System Administration
10.10
Reports
PERSONAL GROUP LIST REPORT (P Report)
The Personal Group List report provides a listing of the members of each of the personal group lists
established for each mailbox.
10.10.1 ACCESSING THE PERSONAL GROUP LIST REPORT
1. From the On Line Programming
2. The screen will prompt
3. The cursor will highlight
Menu, press the P key.
“Processing
Records...Report
the [Opr] bracket.
completed.”
Press any key.
Press the S key for screen, P for print,
or F for file.
4. If you pressed S, the Personal Group List report appears. To print the report, see printing instructions
on the following page. To copy the report to a file, see the instructions on the following page.
5. The cursor will highlight the [Page] bracket. Use the Page Up or Page Down keys to scroll through the
report, or type the numerical page you wish to review and press Enter.
6. To exit the Personal Group List report, press the Esc key. The On Line Programming
10.10.2
REPORT DEFINITIONS
MAILBOX
#
This column is the 7-digit mailbox number
pany code, that contains the group list.
GROUP #
The group number
MEMBERS
Lists the mailbox numbers
preceded
and any name programmed
Menu appears.
by the 3-character
com-
for the group list.
of the members of the group.
0
PERSONAL
GROUP
LIST
REPORT
0
0
0
0
0
MAILBOX
#:
GROUP #:
MEMBERS:
EXC003001
000011
0003001
0003008
0003002
0003009
0003003
0003004
0003005
0003006
0003007
MAILBOX
#:
GROUP
#:
MEMBERS:
EXC003002
000024
0003001
0003008
0003002
0003009
0003003
0003004
0003005
0003006
0003007
0
-
Figure 10-7 Personal Group List Report
INFOSTARIVX2
10.17
System Administration
10.10.3
Reports
PRINTING THE PERSONAL GROUP LIST REPORT
1. While in the Personal Group List report, you will notice that the cursor highlights the [Page] bracket.
Press the LEFT
File
ARROW
key to re-highlight
Spec[\RPT\REPORT.DSP
2. The system will display “Working...Press
3. The system will prompt
the [Opr] bracket.
] Opra]P:Print
Press the P key.
C:Com F:File
Page[-]
Esc to abort.”
“Set the printer...Ready
to Print..?
(y/n)”
4. Press Y (Yes), the printer will begin printing the report. If you press N (No), the system will prompt
“Ok” and you will have to re-enter the Personal Group List report by pressing the S key in the [Opr]
bracket once again.
10.10.4
COPYING THE PERSONAL GROUP LIST REPORT TO A DISK
1. While in the Personal Group List report, you will notice that the cursor highlights the [Page] bracket.
Press the LEFT
File
ARROW
key to re-highlight
Spec[\RPT\REPORT.DSP
the [Opr] bracket.
] Opra]P:Print
Press the F key.
C:Com F:File
Page[-]
2. Enter a file name of your choice. File names can consist of up 8 characters (letters or numbers), a
period, and 3 additional characters called an extension. Select a file name that is meaningful to you
and indicates the contents of the file. For example, PERGRP.292 or PER.GRP. If you wish to copy the
report to a floppy disk in the A drive (the floppy disk drive) precede the file name with A followed by a
colon (:) . For example, A:PER.GRP copies a report called PER.GRP to a floppy disk in the A drive.
3. After you have entered the file name, press the Enter key. When the report has been copied to the
disk, the following is displayed, “ 1 file(s) copied/moved.”
4. Press the Esc key again to return to the On Line Programming
10.18
Menu.
INFOSTARIVX2
System Administrator’s
Manual
revised 2192 - software version 3
System Administration
10.11
PORT STATISTICS
The Port
(number
tal), the
for total
Reports
BY PORT REPORT (Q REPORT)
Statistics By Port report is a port by port listing of the number of times the port is used
of inbound subscriber accesses,number of inbound non-subscriber
accesses, outdial, and toamount of time (inbound, outbound, and total) each port is in use, the percent of time busy
reporting period, and the number of transfers.
10.11.1
ACCESSING THE PORT STATISTICS
1. From the On Line Programming
2. The system prompts:
Menu, press the Q key.
Enter start date-end
3. The screen will prompt
BY PORT REPORT
“Processing
date (MMDDYY-MMDDYY)
Please Wait...Report
4. The cursor will highlight the [Opr] bracket.
[120591-12059
completed.”
Press any key.
Press the S key for screen, P for print, or for F for file.
5. If you pressed S, the Port Statistics By Port report appears. To print the report, see printing instructions on the following page. To copy the report to a file, see the instructions on the following page.
6. The cursor will highlight the [Page] bracket. Use the Page Up or Page Down keys to scroll through the
report, or type the numerical page you wish to review and press Enter.
7. To exit the report, press the Esc key. The On Line Programming
10.11.2
REPORT DEFINITIONS
PORT#
The port number.
#SUBS
The number
#NON-SUBS
Lists the number
#OUT
The number
TOTAL#
The total number
%BUSY
The percentage
#XFR
The number
of transfers.
connect time in minutes.
MIN
IN
The inbound
MIN
OUT
The outbound
TOTAL
Menu appears.
of subscriber accesses.
of non-subscriber
of outbound
accesses.
attempts.
of accesses.
of time that the port was busy.
connect time in minutes.
The total connect time in minutes.
MIN
-
0
0
0
0
0
0
0
-
0
PORT STATISTICS
BY PORT
================================================================================
FROM 12/05/91
TO 12/05/91
================================================================================
PORT#
1
2
3
4
5
6
7
8
9
10
#SUBS
0
0
0
0
0
0
0
0
0
0
#NON-SUBS
2
1
1
1
1
1
1
1
1
1
#OUT
%BUSY
TOTAL#
0
0
0
0
0
0
0
0
0
0
2
1
1
1
1
1
1
1
1
1
1.06
1.04
1.04
1.03
1.03
1.02
1.01
1.01
1.00
0.99
#XFR
0
0
0
0
0
0
0
0
0
0
0
MIN
15
15
14
14
14
14
14
14
14
14
IN
MIN
OUT
0
0
0
0
0
0
0
0
0
0
TOTAL
15
15
14
14
14
14
14
14
14
14
MIN
0
0
0
0
0
-
Figure 10-B Port Statistics Report
INFOSTARIVX2
System Administrator’s
Manual
revised 2192 - sqftware version 3
10.19
System Administration
10.11.3
PRINTING THE PORT STATISTICS
Reports
BY PORT REPORT
1. While in the Port Statistics report, you will notice that the cursor highlights the [Page] bracket. Press
the LEFT
ARROW
key to re-highlight
2. The system will display “Working..
3. The system will prompt
the [Opr] bracket.
Press the P key.
.Press Esc to abort.”
“Set the printer.. .Ready to Print..?
(y/n)”
4. Press Y (Yes), the printer will begin printing the report. If you press N (No), the system will prompt
“Ok” and you will have to re-enter the Port Statistics report by pressing the S key in the [Opr] bracket
once again.
File
] Opra]P:Print
Spec[\RPT\REPORT.DSP
10.11.4 COPYING THE PORT STATISTICS
C:Com
F:File
PageE-
BY PORT REPORT TO A DISK
1. While in the Port Statistics report, you will notice that the cursor highlights the [Page] bracket. Press
the LEFT
File
ARROW
key to re-highlight
Spec[\RPT\REPORT.DSP
the [Opr] bracket.
Press the F key.
] Oprd]P:Print
C:Com
F:File
Page[-]
2. Enter a file name of your choice. File names can consist of up 8 characters (letters or numbers), a
period, and 3 additional characters called an extension. Select a file name that is meaningful to you
and indicates the contents of the file. For example, PORT.292 or PORT. If you wish to copy the report
to a floppy disk in the A drive (the floppy disk drive) precede the file name with A followed by a colon
(:). For example, A:PORT copies a report called PORT to a floppy disk in the A drive.
3. After you have entered the file name, press the Enter key. When the report has been copied to the
disk, the following is displayed, “ 1 file(s) copied/moved.”
4. Press the Esc key again to return to the On Line Programming
10.20
Menu.
INFOSTARIVX2
System Administrator’s
Manual
revised 2192 - software version 3
System Administration
10.12
SYSTEM PORT STATISTICS
Reports
REPORT (R REPORT)
The System Port Stgtistics report provides a summary of port activity for the reporting period. This
report includes the number of subscriber accesses, non-subscriber
accesses, total number of accesses,
number of outdial attempts, the time spent on inbound and outbound calls, and total time on calls.
The report also lists the number of transfers out of the system, the number of times all ports were
busy, %Busy, Avg. All Busy, Time All Busy, and Avg. Conn. Min.
10.12.1
ACCESSING THE SYSTEM PORT STATISTICS
1. From the On Line Programming
2. The system prompts:
“Enter
3. The screen will prompt
REPORT
Menu, press the R key.
start date-end
date (MMDDYY-MMDDYY)
[ 120591-1205911.”
“Processing please wait . . . Report completed.”
4. The cursor will highlight the [Opr] bracket.
Press any key.
Press the S key for screen, P for print,
5. If you pressed S, the report appears. To print the report, see instructions
copy the report to disk, see the instructions on the following page.
or F for file.
on the following page. To
6. The cursor will highlight the [Page] bracket. Use the Page Up or Page Down keys to scroll through the
report, or type the numerical page you wish to review and press Enter.
7. To exit the report, press the Esc key, the On Line Programming
10.12.2
Menu appears.
REPORT DEFINITIONS
#SUBS
The number
of subscriber accesses in the system.
#NON-SUBS
The number
of non-subscriber
#OUTGOING
The number
of outgoing attempts.
#TOTAL
#INBOUND
MIN
#OUTBOUND
#TOTAL
Defines the total number
CONN
MIN
MIN
The total inbound
accesses.
of connects.
connect time in minutes.
The total outbound
(outdials)
connect time in minutes.
Total connect time in minutes.
0
0
0
0
0
0
0
SYSTEM PORT STATISTICS
==========================================--------==--------------------------==
FROM 12/05/91
TO 12/05/91
===========================================================--------------------0
#SUBS
#NON-SUBS
#OUTGOING
#TOTAL
CONN
#INBOUND
MIN.
#OUTBOUND
MIN.
#TOTAL
MIN.
#XFRS
19
0
19
258
#TIMES
ALL BUSY
%BUSY
AVG.
ALL BUSY
TIME
ALL BUSY
AVG.
CONN MIN.
0
0
0.00
0o:oo
0
0
13:35
0
0
258
0
0
0
-
0
-
Figure 10-9 System Port Statistics Summary
INFOSTARIVX2
System Administrator’s
0
Report
10.21
Manual
System Administration
0
SYSTEM
PORT
Reports
0
STATISTICS
================================================================================
0
0
FROM 12/05/9i
TO 12/05/91
================================================================================
0
#SUBS
#NON-SUBS
#OUTGOING
#TOTAL
CONN
#INBOUND
MIN.
#OUTBOUND
MIN.
#TOTAL
MIN.
#XFRS
0
0
0
0
19
0
19
258
0
258
0
#TIMES
ALL BUSY
%BUSY
AVG.
ALL BUSY
TIME
ALL BUSY
AVG.
CONN MIN.
0
0.00
0o:oo
0
0
0
13:35
0
0
0
-
0
-
Figure lo-10
#XFRS
#TIMES
The number
ALL BUSY
System Port Statistics Summary Report
of transfers made by the VX2.
Defines how many times the ports are all busy during the day.
%BUSY
The percentage
AVG. ALL BUSY
Defines the average time in minutes of how long all the ports were busy.
TIME ALL BUSY
Defines the total time in minutes of how long all ports were busy.
AVG. CONN MIN.
Defines the length in minutes of an average call.
10.12.3
of time that all ports were busy.
PRINTING THE SYSTEM PORT STATISTICS
REPORT
1. While in the System Port Statistics report, you will notice that the cursor highlights the [Page] bracket,
Press the LEFT
ARROW
key to re-highlight
2. The system will display “Working..
3. The system will prompt
the [Opr] bracket.
Press the P key.
.Press Esc to abort.”
“Set the printer...Ready
to Print..?
(y/n)”
4. Press Y (Yes), the printer will begin printing the report. If you press N (No), the system will prompt
“Ok” and you will have to re-enter the System Port Statistics report by pressing the S key in the [Opr]
bracket once again.
10.12.4
COPYING THE SYSTEM PORT STATISTICS
REPORT TO A DISK
1. While in the System Port Statistics report, you will notice that the cursor highlights the [Page] bracket.
Press the LEFT
ARROW
key to re-highlight
the [Opr] bracket.
Press the F key.
2. Enter a file name of your choice. File names can consist of up 8 characters (letters or numbers), a
period, and 3 additional characters called an extension. Select a file name that is meaningful to you
and indicates the contents of the file. For example, SYSPORT.292 or PORT.SYS. If you wish to copy
the report to a floppy disk in the A drive (the floppy disk drive) precede the file name with A followed
by a colon (:). For example, A:SYSPORT.292 copies a report called SYSPORT.292 to a floppy disk in
the A drive.
3. After you have entered the file name, press the Enter key. When the report has been copied to the
d&k, the following is displayed, “ 1 file(s) copied/moved.”
4. Press the Esc key again to return to the On Line Programming
10.22
Menu.
INFOSTARIKX2
System Administrator’s
Manual
revised 2192 - software version 3
System Administration
10.13
HOURLY PORT STATISTICS
Reports
REPORT (S REPORT)
The Hourly Port Statistics report provides the number of connections to the system, the number
connect minutes, the number of ports busy, and the time busy for the system by hour.
10.13.1
ACCESSING
THE HOURLY PORT STATISTICS
1. From the On Line Programming
2. The screen will prompt
of
REPORT
Menu, press the S key.
“Processing records...
3. The cursor will highlight the [Opr] bracket.
Report completed.”
Press any key.
Press the S key for screen, P for print,
or F for File.
4. If you pressed S, the Hourly Port Statistics report appears. To print the report, see instructions
following page. To copy the report to disk, see the instructions on the following page.
on the
5. The cursor will highlight the [Page] bracket. Use the Page Up or Page Down keys to scroll through the
report, or type the numerical page you wish to review and press Enter.
6. To exit the report,
10.13.2
press the Esc key. The On Line Programming
Menu appears,.
REPORT DEFINITIONS
HOURS
Reporting
#CONN
Defines the number
period broken
down in one 24-hour
of connections
period.
made for each hour.
#CONN
MIN
Defines in minutes the total connect time for each hour.
PORTS
BUSY
Lists the number
TIME
BUSY
of times all ports were busy.
How long (in minutes)
all ports were busy.
0
'
0
0
0
0
0
0
HOURLY
PORT STATISTICS
============================================================-------------------FROM 12/05/91
TO 12/05/91
=============================================================------------------=
HOURS
#CONN
#CONN
0o:oo
to 01:oo
0
0
01:oo
to 02:oo
0
0
02:oo
to 03:oo
0
0
03:oo
to 04:oo
0
0
04:oo
to
05:oo
to 05:oo
06:oo
00
00
ot3:oo
07:oo
0a:oo
09:oo
to
to
to
to
07:oo
0a:oo
09:oo
lo:oo
19
0
0
0
Figure 10-l 1 Hourly
INFOSTARIKX2
System Administrator’s
Manual
revised 2192 - sqftware version 3
258
0
0
0
0
MIN
PORTS
BUSY
0
0
0
0
00
0
0
0
0
TIME
BUSY
0
0
0
0
0
0
0
0
0
0
0
0
0
0
0
Port Statistics Report
10.23
System Administration
10.13.3
Reports
PRINTING THE HOURLY PORT STATISTICS
REPORT
1. While in the Hourly Port Statistics report, you will notice that the cursor highlights the [Page] bracket.
Press the LEFT
I
File
ARROW
key to re-highlight
Spec[\RPT\REPORT.DSP
the [Opr] bracket.
] Oprd]P:Print
Press the P key.
C:Com F:File
Page[-]
I
2. The system will display “Working.,
3. The system will prompt
*Press Esc to abort.”
“Set the printer...Ready
to Print? (y/n)”
4. Press Y (Yes), the printer will begin printing the report. If you press N (No), the system will prompt
“Ok” and you will have to re-enter the Hourly Port Statistics report by pressing the S key in the [Opr]
bracket once again.
10.13.4
COPYING THE HOURLY PORT STATISTICS
REPORT TO A DISK
1. While in the Hourly Port Statistics report, you will notice that the cursor highlights the [Page] bracket.
Press the LEFT
ARROW
key to re-highlight
the [Opr] bracket.
Press the F key.
f
File
Spec[\RPT\REPORT.DSP
] Oprd]P:Print
C:Com F:File
PageE-
2. Enter a file name of your choice. File names can consist of up 8 characters (letters or numbers), a
period, and 3 additional characters called an extension. Select a file name that is meaningful to you
and indicates the contents of the file. For example, HSYSPORT.292 or HOUR.SYS If you wish to
copy the report to a floppy disk in the A drive (the floppy disk drive) precede the file name with A
followed by a colon (:). For example, A:HSYSPORT.292
copies a report called HSYSPORT.292 to a
floppy disk in the A drive.
3. After you have entered the file name, press the Enter key. When the report has been copied to the
disk, the following is displayed, “ 1 file(s) copied/moved.”
4. Press the Esc key again to return to the On Line Programming
10.24
Menu.
INFOSTARlVX2
System Administrator’s
Manual
revised 2192 - software version 3
System Administration
10.14
OUTDIALING
Reports
DETAIL REPORT (T REPORT)
The Outdialing
Detqil report provides a detailed listing of each outdial call placed by the system. The
Detail report will ONLY be operational if outdial calls have been placed.
Outdialing
10.14.1 ACCESSING THE OUTDIAL DETAIL REPORT
1. From the On Line Programming Menu, press the T key for Outdial Detail Report report. The system
prompts: Enter start date-end date (MMDDYY-MMDDYY)
[02 1892-02 18921.
2. The screen will prompt
“processing
please wait... report completed.
Press any key.
3. The cursor will highlight the [Opr] bracket. Press the S key for screen, the P key for print, or the F key
for file.
4. If you pressed S, the Outdialing Detail report appears. To print the report, see instructions
following page. To copy the report to disk, see the instructions on the following page.
on the
5. The cursor will highlight the [Page] bracket. Use the Page Up or Page Down keys to scroll through the
report, or type the numerical page you wish to review and press Enter.
6. To exit the report, press the Esc key. The On Line Programming
10.14.2
REPORT DEFINITIONS
DATE
The month
TIME
The time of day when the call was placed.
PORT
Defines the port used for the outdial call.
NUMBER
Menu appears.
DIALED
and day the outdial call was made.
The first 20 characters
NOTE: An outdial
the first twenty.
. MAILBOX
number
of the number
dialed.
could contain up to 46 characters,
The company
code and mailbox number
but this report
ONLY shows
which placed the outdial call.
TYPE
Defines three types of outdial:
Number,
and (3) Beeper.
DURATION
The duration
S/U
Defines outdial as Successful or Unsuccessful.
For example, if a mailbox has
initiated an outdial to a person, the fact that the person entered in their correct password, and received their message is considered a successful call.
NOTE:
Outdials
to beepers are always considered
0
OUTDIALING
DATE
02/18
TIME
14:03
PORT
01
(2) Internal
Extension
NUMBER
DIALED
12012626279
successful.
DETAIL
MAILBOX
EXC0003769
0
REPORT
TYPE
DURATION
1
00:56
0
S/U
0
s
0
0
Figure lo-12
INFOSTARIVX2
System Administrator’s
Number,
in hours and minutes of the phone call.
0
0
(1) External
Outdialing
Detail Report
10.25
Manual
System Administration
10.14.3
Reports
PRINTING THE OUTDIALING DETAIL REPORT
1. While in the Ou@ialing Detail report, you will notice that the cursor highlights the [Page] bracket.
Press the LEFT ARROW
key to re-highlight the [Opr] bracket. Press the P key.
2. The system will display “Working..
3. The system will prompt
.Press Esc to abort.”
“Set the printer...Ready
to Print..?
(y/n)”
4. Press Y (Yes) the printer will begin printing the report. If you press N (No), the system will prompt
“Ok” and you will have to re-enter the Outdialing Detail report by pressing the S key in the [Opr]
bracket once again.
,
File
] Oprd]P:Pri.nt
Spec[\RPT\REPORT.DSP
C:Com
F:File
Page[-]
I
10.14.4
COPYING THE OUTDIALING DETAIL REPORT TO A DISK
1. While in the Outdialing
Press the LEFT
ARROW
Detail report, you will notice that the cursor highlights the [Page] bracket.
key to re-highlight
the [Opr] bracket.
Press the F key.
I
File
Spec[\RPT\REPORT.DSP
] Opra]P:Print
C:Com
F:File
Page[-]
1
2. Enter a file name of your choice. File names can consist of up 8 characters (letters or numbers), a
period, and 3 additional characters called an extension. Select a file name that is meaningful to you
and indicates the contents of the file. For example, OUTDIAL.292.
If you wish to copy the report to a
floppy disk in the A drive (the floppy disk drive) precede the file name with A followed by a colon (:) .
For example, A:OUTDIAL.292
copies a report called OUTDIAL.
to a floppy disk in the A drive.
3. After you have entered the file name, press the Enter key. When the report has been copied to the
disk, the following is displayed, “ 1 file(s) copied/moved.”
4. Press the Esc key again to return to the On Line Programming
10.26
Menu.
INFOSTARIVX2
System Administrator’s
Manual
revised 2192 - software version 3
System Administration
IO.15
CALL
Reports
STATUS REPORTS
There are three Call Status reports located on the first page of the On Line Programming
MONTHLY
CALL
COUNT
(OA
Menu.
REPORT)
The Monthly Call Count screen tells the system administrator how many calls the system took on a
daily basis in a specific month, with monthly and day of the week totals.
MONTHLY
CALL
DURATION
(OB
REPORT)
The Monthly Call Duration screen tells the system administrator the total connect time (in hours,
minutes, and seconds) the system took each day in a specific month.
DAILY
CALL
COUNT
(OC
REPORT)
The Daily Call Count screen tells the system administrator
a 24-hour period on a specific day.
NOTE: The system stores the Call Status Reports
activated.
how many calls were made to the system in
for 90 days from the time the system was
10.16
MONTHLY
CALL COUNT (OA REPORT)
10.16.1
ACCESSING THE MONTHLY CALL COUNT REPORT
1. From the On Line Programming
report.
2. The Monthly
Menu, press the 0 and then the A key for the Monthly
Call Count screen appears.
3. To exit the report, press the Esc key. The On Line Programming
[MONTHLY
CMP:[EXC]
YEAR:[Ql]
CALL
COUNT
Menu appears.
SCREEN]
MONTH:[OQ]
20
67
18
39
54
TOTAL:
[ALT+P]
: [FI]Clear
Call Count
198
print
[FJ]Save
[FG]Del
[F7]Scroll
Figure lo-13
Monthly
INFOSTARIKX2
System Administrator’s
Manual
revised 2192 - software version 3
[FB]Find
[FQ]Prev
Call Count Report
[FlO]Next
[Esc]Quit
(OA Report)
10.27
System Administration
10.16.2
Reports
PRINTING THE MONTHLY CALL COUNT REPORT
1. Press the ALT
and P keys simultaneously
to print the current OA report for that month.
2. To review any month, move the cursor to the desired month. Press the F9 key. Press the Enter key.
Press the ALT and P keys simultaneously to print the selected month of your choice.
3. To print ALL of the OA reports that the system has stored, at the date prompt type: EXC, 91 ,* * *
The reports will print.
4.
To exit the OA report,
press the Esc key. The On Line Programming
Menu appears.
NOTE: The three asterisks displayed in the printing sequence above, are used only if you
need to print ALL monthly reports that are captured within the system.
10.17
MONTHLY CALL DURATION (OB REPORT)
10.17.1 ACCESSING THE MONTHLY CALL DURATION REPORT
1. From the On Line Programming
report.
2. The Monthly
Call Duration
Menu, press the 0 and then the B key for the Monthly
report appears.
3. To exit the report, press the Esc key. The On Line Programming
CMP:[EXC]
-[SUN]
-
YEAR:[91]
[MON]
-
::
3
-:-:-
: -I0:13:08
11
12
::::
26
25
-:-:-
-:-.-
-:-:-
31:50:41
14
21
[FS]Save
[FG]Del
[F7]Scroll
28
Monthly
-:
i:oa:29
Call Duration
:::
:-
16
_:
: -:-:-
:::
:-
23
-:
: -:-
29
--:-.-:-.-
[F9]Prev
Report
: --
--I--
::
[Fa]Find
:
22
0:44:13
0:44:13
104:52:05
9
0:15:50
15
0:02:34
-:_
2
-:-:-
: -:-
print
Figure lo-14
10.28
_.
[SAT+--
1
a
: -:-
-:-:0:32:26
::
0:00:54
0:00:54
::
[FRI
1
0:21:42
27
: -:-
[THR]
I
20
1:04:09
1:04:09
Menu appears.
SCREEN]
:: -:-:-
19
0:19:ia
0:19:ia
::
[ALT+P]
[FB]Clear
::::
18
18
24
6
104:51:11
13
-::: -:-
17
-I-.-:-I-.-:-
=
[MONTHLY
CALL DURATION
MONTH:[ll]
[WED]
[TUEI
::
: -:5
30:46:32
4
10
Call Duration
: -:-
30
-:-:-
-:-
-:-:-
0:15:50
TOTAL:
[FlO]Next
:
:-
78:24:28
[Esc]Quit
=I
(OB Report)
INFOSTARIVX;
System Administrator’s
Manual
revised 2192 - software version 3
System Administration
/’
10.17.2
Reports
PRINTING THE MONTHLY CALL DURATION (OB) REPORT
1. Press the ALT , and P keys simultaneously
to print the current OB report for that month.
2. To review any month, move the cursor to the desired month. Press the F9 key. Press the Enter key.
Press the ALT and P keys simultaneously to print the selected month of your choice.
3. TO print ALL of the OB reports that the system has stored, at the date prompt type: EXC, 91 ,* * *
The reports will print.
4.
To exit the OB report, press the Esc key. The On Line Programming
Menu appears.
NOTE: The three asterisks displayed in the printing sequence above, are used only if you
need to print ALL monthly reports that are captured within the system.
10.18
DAILY CALL COUNT (OC REPORT)
10.18.1
ACCESSING THE DAILY CALL COUNT REPORT
1. From the On Line Programming
report.
Menu, press the 0 and then the C key for the Daily Call Count
2. The Daily Call Count report appears.
3. To exit the report, press the Esc key. The On Line Programming
[DAILY
CMP:[EXC]
YEAR:[91]
MONTH:[ll]
CALL
COUNT
SCREEN]
DAY:[04]
[AMI-
[PM1-
Hour
Hour
oo:oo-01:oo
01:00-02:50
02:00-03:oo
03:00-04:oo
04:00-05:oo
05:00-of3:oo
06:00-07:OO
07:00-00:oo
08:00-09:OO
09:00-1o:oo
10:00-11:oo
11:00-12:oo
12:00-13:00
13:00-14:oo
14:00-15:oo
15:00-16:oo
16:00-17:oo
17:00-18:00
18:00-19:OO
19:00-20:oo
20:00-21:oo
21:00-22:oo
22:00-23:00
23:00-24:00
[
[ -1
[
Calls
pri. nt
[F5
Save
[FG]Del
Figure lo-15
INFOSTARIVX2
System Administrator’s
[F7]Scroll
[FB]Find
111
II
21
31
I
-1
[FS]Prev
Daily Call Count Report
IIII
[
[
[
[
[
[
[ -j
[
[
[
[
[
TOTAL....[
[ALT+P]
= [F3]Clear
Menu appears.
[FlO]Next
[Esc]Quit
(OC Report)
10.29
Manual
System Administration
10.18.2
Reports
PRINTING THE DAILY CALL COUNT (OC) REPORT
1. Press the AL+ and
* P keys simultaneously
to print the current OC report for that month.
2. To review any month, move the cursor to the desired month. Press the F9 key. Press the Enter key.
Press the ALT and P keys simultaneously to print the selected month of your choice.
3. To print ALL of the OC reports that the system has stored, at the date prompt
The reports will print.
4.
To exit the OC report,
press the Esc key. The On Line Programming
type: EXC, 91 ,* * *
Menu appears.
NOTE: The three asterisks displayed in the printing sequence above, are used only if you
need to print ALL monthly reports that are captured within the system.
10.30
INFOSTARIKf2
System Administrator’s
Manual
revised 2192 - software version 3