1
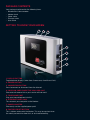
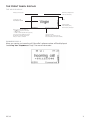
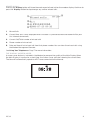
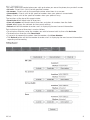
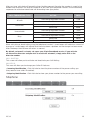
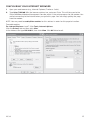
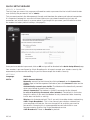
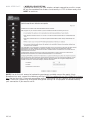
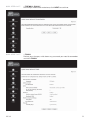
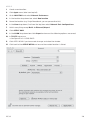
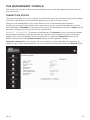
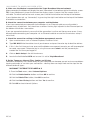
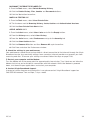
HOME MODEM
virginbroadband.com.au
V3.3.3
A
PACKAGE CONTENTS
Your package should contain the following items:
• Broadband at Home modem
• Modem stand
• Power cable
• Ethernet cable
• User Guide
GETTING TO KNOW YOUR MODEM
1
2
3
4
5
6
7
8
1. DISPLAY BUTTON
Toggle between displays (wake from Screensaver, view Missed Calls).
2. POWER BUTTON
3. CONNECTION BUTTON
Press to connect or disconnect from the Internet.
4. YOUR SIM CARD INSIDE THE SIM CARD SLOT
Please do not remove this or your service will not work!
5. TELEPHONE PORT
Plug your home telephone into this.
6. ETHERNET PORT (LAN)
This connects your computer to the Modem.
7. POWER ADAPTER
Please only use the supplied power pack!
8. FACTORY RESET BUTTON
This is hidden underneath the Modem. This may be required when
the admin password has been lost, or for troubleshooting.
TABLE OF CONTENTS
GETTING TO KNOW YOUR MODEM
2
FEATURES
2
SPECIFY A PASSWORD
17
SIMPLE SETUP
2
SETTINGS
17
INSTANT PROTECTION
2
ADDITIONAL SECURITY
2
MINIMUM REQUIREMENTS
2
GETTING TO KNOW YOUR MODEM
FRONT PANEL DISPLAY
2
3
THE MAIN DISPLAY
3
INCOMING CALLS
3
MISSED CALLS
4
THE DISPLAY SCREEN SAVER
4
SETTING UP YOUR MODEM FOR
TELEPHONE AND INTERNET
QUICK SET UP WIZARD
17
YOUR FIRST TIME ONLINE
23
CONFIGURING YOUR EMAIL
23
OUTLOOK EXPRESS
23
OUTLOOK 2003
23
OUTLOOK 2007
24
WINDOWS MAIL (VISTA)
24
APPLE MAIL
25
CHECKING YOUR USAGE
25
CONFIGURING YOUR WIRELESS CONNECTION
26
USING WIRELESS
26
5
WINDOWS XP
26
CONNECTING THE MODEM
5
WINDOWS VISTA
27
POSITIONING THE MODEM
5
APPLE
28
USING YOUR TELEPHONE
7
CONNECTING YOUR PHONE
7
GENERAL PHONE USE
7
MAKING CALLS
7
SETTING UP VOICEMAIL
7
RETRIEVING VOICEMAIL
7
CALL WAITING
7
MANAGING TELEPHONE FEATURES
8
MISSED CALLS
8
INCOMING CALLS
8
OUTGOING CALLS
8
TELEPHONE SETTINGS
8
CALL FORWARDING
9
CALL WAITING
CALLER ID
THE MANAGEMENT CONSOLE
29
CONNECTION STATUS
29
CONNECT / DISCONNECT
LOGIN STATUS
SMS SCREEN
30
TELEPHONE SCREEN
30
CONNECTIONS SETTINGS
30
SYSTEM SETUP
30
ADVANCED SCREEN
30
LOG OUT
30
COMMON
TROUBLESHOOTING STEPS
RESTORING FACTORY DEFAULT SETTINGS
31
10
CHANGING THE TIME ZONE
31
11
CONFIGURING YOUR HOME NETWORK
11
USING THE ETHERNET CABLE
11
CONFIGURING YOUR ETHERNET
NETWORK ADAPTOR
12
UNABLE TO MAKE OR RECEIVE CALLS
31
UNABLE TO ACCESS WEBSITES
33
SLOWER CONNECTION THAN EXPECTED
35
GLOSSARY
36
SPECIFICATIONS
38
39
40
WINDOWS VISTA
13
GUIDELINES FOR SAFE
AND EFFICIENT USE
APPLE
14
MY PASSWORDS
CONFIGURING YOUR INTERNET BROWSER
31
10
CONNECTING TO
VIRGIN BROADBAND
WINDOWS XP
29
30
12
15
FOR FIREFOX
16
FOR SAFARI
16
virginbroadband.com.au
V3.3.3
1
GETTING TO KNOW YOUR MODEM
FEATURES
The Virgin Broadband At Home Modem provides home phone functionality, along with wireless
broadband Internet. Simply plug your modem in, connect your phone and computer, and you’ll be
making calls and you could be surfing the Internet within minutes. The Modem supports advanced
mobile technologies including compatibility with GSM and 3G mobile networks and support for GPRS,
EDGE, UMTS and HSDPA.
SIMPLE SETUP
The Modem provides you with a quick installation and setup that gets you easily and quickly
connected to the Internet; using an Internet browser (e.g. Microsoft® Internet Explorer 6.0, 7.0,
Firefox® or Safari®) and most personal computers, including Windows® and Macintosh®. The ‘Quick
Setup Wizard’ introduces you to the basic settings that need to be configured for use with the mobile
network.
INSTANT PROTECTION
The Modem provides a hardware firewall and supports Network Address Translation (NAT). This
network service hides the computers in your network so they cannot be easily accessed from outside
your network (the Internet) until a request is made.
ADDITIONAL SECURITY
The Modem supports both Wired Equivalent Privacy (WEP) and WiFi Protected Access (WPA and
WPA2) security encryption to protect your network. Security logs keep you aware of potential
security risks and intrusion attempts. You can view logs through the security section of the
Management Console.
MINIMUM REQUIREMENTS
Ethernet Port if connecting via Ethernet cable.
Wireless Networking Adapter if connecting wirelessly.
Compliant Internet Browser such as Microsoft Internet Explorer 6, Mozilla Firefox 2 and Safari 2 or
later versions of each.
MAC OSX (10.4 OR ABOVE)
• APPLE™ COMPUTER WITH AN INTEL®, POWERPC G3, G4 OR G5 PROCESSOR
• 512MB OF RAM
WINDOWS XP
• PENTIUM™ 300MHZ PROCESSOR OR EQUIVALENT • 128MB OF RAM
WINDOWS VISTA HOME BASIC
• 1 GHZ 32-BIT (X86) OR 64-BIT (X64) PROCESSOR • 512 MB OF RAM
WINDOWS VISTA HOME
PREMIUM/ ULTIMATE
• 1 GHZ 32-BIT (X86) OR 64-BIT (X64) PROCESSOR • 1 GB OF RAM
V3.3.3
2
THE FRONT PANEL DISPLAY
THE MAIN DISPLAY
Indicates a missed call
How many computers are
connected wirelessly
Connected to the
Virgin Mobile network
Clock
Signal strength.
Like a mobile phone,
the more bars, the better
This is your connection method.
• HSDPA is a very fast connection
• UMTS is fast
• GPRS is slower (around dial-up speeds).
If you can only get GPRS, try moving
the modem to another area in your
home, or closer to a window
Connection status.
When this says “Connected” you
have an internet connection available.
INCOMING CALLS
When you receive an incoming
coming call, the caller’s phone number will be displayed
displayed:
See Using Your Telephone
hone on Page 7 for more information.
V3.3.3
3
MISSED CALLS
Pressing the Display
ay button will show the most recent missed call on the modem display.
di
Continue to
press the ‘Display’’ button to step through any further missed calls.
1.
Missed Calls
2.
net
Current time (this is only displayed when the clock is synchronised with the network
after your
first internet connection).
3.
Current Call/Total number of missed calls
4.
Phone number of missed call.
5.
Date and time of last missed call from that phone number. You can clear the missed calls using
the Modem Management Console.
See Using Your Telephone on Page 7 for more information.
THE DISPLAY SCREEN SAVER
A screen saver feature is included in the Modem to preserve the quality of the Main Display. When
the Main Display is inactive for a short time, the Screen Saver activates showing the current time.
The time will automatically update to AEST once connected to the Internet.
V3.3.3
4
SETTING UP YOUR MODEM FOR TELEPHONE AND INTERNET
CONNECTING THE MODEM
1
2
3
1.
Plug in the power cable (black) and turn the power on. The Modem will power up within 45
seconds.
2.
Unplug your telephone from the wall socket, and plug it directly into the Modem. You can use a
typical corded or cordless home telephone.
3.
For your first time internet setup, please use the Ethernet Cable. Plug one end into the middle
socket on the Modem and the other into a spare Ethernet (LAN) port on your computer.
POSITIONING THE MODEM
Position the Modem to ensure the following:
1.
Strong Mobile network signal: The Modem’s display will show your network signal strength. You
may find that placing the Modem near a window will ensure the best network reception. Don’t be
afraid to try it in a few different locations.
V3.3.3
5
2.
Broadband connection type: HSDPA (3.5G) and UMTS (3G) are the two broadband connection
types available with the Modem. A GPRS (2.5G) connection will not provide broadband Internet
speeds. If your modem is connecting with GPRS, try moving it to another location within your
home. The Modem’s internal antenna is directional; rotating the Modem on its axis may improve
your connection.
When the Modem is repositioned, wait 10-15 seconds for the signal strength and connection type
to update. You may need to push the display button (far left button on top of the modem) if the
Modem screen saver is active.
If your connection type is consistently reported as GPRS, despite your repositioning efforts,
please contact Virgin Broadband Support on 1300 555 100 for further assistance.
3.
Strong Wireless (WLAN) signal: For best results, make sure the Modem is in a central position in
your home, within a relatively equal distance of all wireless devices. The Modem should not be
closer than 30cm from any one wireless device.
4.
A Power Outlet is within easy reach.
5.
The Modem’s front panel Display is in sight and the Buttons and Connectors are within easy reach.
6.
The Modem is at least 20 cm away from you.
7.
The Modem is out of direct sunlight and away from heat sources, power lines, fluorescent
lighting fixtures and electrical noise such as radios, transmitters and broadband amplifiers.
8.
Water or moisture cannot enter the case of the Modem.
V3.3.3
6
USING YOUR TELEPHONE
CONNECTING YOUR PHONE
The Virgin Broadband Modem is very easy to use with your telephone handset. Just follow our simple tips.
DO
DON’T
Plug your telephone directly into the Virgin
Broadband Modem.
Plug your modem into telephone wall sockets.
Use Cordless phones if you want more than
one telephone on the service.
Have any ADSL filters connected to the
telephone cable.
Use fax machines with this service.
They will not work.
GENERAL PHONE USE
This section is for the general use of your telephone handset such as Making Calls, Voicemail
and Call Waiting.
MAKING CALLS
As with a standard telephone line, you should hear a dial tone when you pick up your telephone
handset. If you hear a dial tone, you’re ready to make calls!
Note: You may notice a short delay before the number you have dialled rings. This is normal for calls
made through a mobile phone network. If you wish, you can speed up the dialling process by pressing
the # key after the desired number.
SETTING UP VOICEMAIL
To activate your free Virgin Voicemail service, just dial 212 from your phone. You will be guided
through the setup process, including recording your personal Voicemail message. To disable your
Virgin Voicemail service, refer to the Call Forwarding section on Page 9 of this guide.
RETRIEVING VOICEMAIL
Whenever you receive a new Voicemail message, the dial tone on your phone will be changed to a
stuttered sound. If you have this stuttered dial tone, simply dial 212 to retrieve your new messages,
and the dial tone will be reset to normal.
CALL WAITING
When someone tries to call you whilst you are already on a call, you will hear a Call Waiting tone (two
short beeps) in the background on your call.
To end your current call and answer the new one, press the following combination of buttons
on your phone: Recall, 1, #
To put your current call on hold and answer the new one, press the following combination of buttons
on your phone: Recall, 2, #
This combination can also be used to switch back to your original call.
V3.3.3
7
MANAGING TELEPHONE FEATURES
This section will explain how to manage the various telephone features available within the Virgin
Broadband Modem Management Console. Please connect your Modem to the computer and complete
the Quick Setup Wizard before attempting to change the telephone features.
THE MANAGEMENT CONSOLE – TELEPHONE
Log in to the Modem Management Console and click on the Telephone option in the left hand menu.
For instructions on accessing the Modem Management Console, see Page 29 of this guide.
The Telephone section of the Management Console is split into 7 sections. They are: Missed Calls,
Incoming Calls, Outgoing Calls, Telephone Settings, Call forwarding, Call Waiting and Caller ID.
MISSED CALLS
This is the area where you can see and clear any missed calls. Simply click on the CLEAR LOG button
to clear the log and remove the missed calls icon from the display screen of the modem.
INCOMING CALLS
This is the area where you can see and clear any Incoming Calls. Simply click on the CLEAR LOG
button to clear the log.
OUTGOING CALLS
This is the area where you can see and clear any Incoming Calls. Simply click on the CLEAR LOG
button to clear the log.
TELEPHONE SETTINGS
This is the area where you can change the way in which the telephone dials numbers.
• International Dialling Code – This is the code needed to dial International Numbers. This field
should always show 0011 as we are in Australia. You can ignore this area.
• Dialling Timeout – When you have finished dialling your number, the network waits for a few
seconds to ensure you have finished. This number sets the amount of seconds the network will wait
after the last number you pressed before it actually starts dialling.
• Use # to end dialling – This is the code to end the dialling with #. This tells the modem that when
the # key is pressed to ask the network to dial the number.
• Call Log – With this enabled, your modem will record the Incoming, Outgoing and Missed calls
details. You can access that information from the other tabs.
V3.3.3
8
CALL FORWARDING
This area is where you control where your calls go to when you are on the phone, busy or don’t answer.
• All calls - Diverts ALL CALLS to the specified number.
• No answer - Diverts calls to the specified number when there is no answer.
• Unreachable - Diverts calls to the specified number when your phone is unreachable.
• Busy - Diverts calls to the specified number when your phone is busy.
The functions at the top of this page include:
• Deactivate all will deactivate all diversions
• Clear all numbers will deactivate all diversions and clear all numbers from the fields
• Check all will query the network for the current settings
• Refresh will tell the modem to make sure it is displaying the most current information
Each individual type of diversion is used as follows:
• To activate a diversion, enter the number you wish to forward calls to, then click Activate.
• To deactivate a diversion, click Deactivate.
• If you wish to remove the number from the modem, click Clear Number.
• The Refresh button will tell the modem to make sure it is displaying the most current information
regarding call forwarding.
V3.3.3
9
After you have activated call forwarding from the Management Console, the number is saved in the
modem and diversions can also be turned on or off from your telephone handset. Use the following
sequences to activate or deactivate call forwarding from your phone:
CALL FORWARDING TYPE
All calls
No answer
Unreachable
Busy
All types
ACTION
CODE
Activate to registered number
*21#
Deactivate
#21#
Activate to registered number
*61#
Deactivate
#61#
Activate to registered number
*62#
Deactivate
#62#
Activate to registered number
*67#
Deactivate
#67#
Deactivate
#002#
When activating or deactivating using the telephone handset, 2 short beeps will indicate a successful
change, or 3 short beeps will indicate that there has been a problem and no change has been made.
After the beeps the dial tone will return as normal.
By default, voicemail is already set up on your Virgin Broadband service. If you activate
an alternative diversion and you wish to reactivate voicemail, simply enter 212 as the
diversion number.
CALL WAITING
This screen will allow you to activate and deactivate your Call Waiting.
CALLER ID
This area will allow you to change your Caller ID features
• Incoming Identification - Click Activate to show the phone number of the person calling you
(they need to have caller ID enabled).
• Outgoing Identification - Click Activate to show your phone number to the person you are calling.
V3.3.3
10
CONNECTING TO VIRGIN BROADBAND
Your Virgin Broadband Modem can allow you instant access to the Internet. In most cases your
computer is already configured to run the Internet and changes won’t need to be made.
Simply follow the directions below:
1.
Connect your computer to the Virgin Broadband Modem using the supplied Ethernet cable or
your computer’s Wireless Network Adaptor. See Configuring Your Home Network.
2.
Check that the connection status on the Modem’s Main Display Panel says “Connected”. If it
doesn’t, press the Connect Button on the top right of the Modem to connect.
3.
Open your Internet web browser (e.g. Internet Explorer). You should be online and ready to surf
the web! See Your First Time Online on page 23.
CONFIGURING YOUR HOME NETWORK
We recommend you do your first time setup using the Ethernet cable. Remember, the WiFi is turned
off by default.
USING THE ETHERNET CABLE
1.
Plug the supplied Ethernet cable into your computer and then into your Virgin Broadband
Modem if you have not already done so.
2.
Open your Internet browser and try to access the Management Console on the Virgin Broadband
Modem by typing http://192.168.1.1 in your Internet browser.
You should see the Welcome to Virgin Broadband page and then be able to continue with the Quick
Setup Wizard.
V3.3.3
11
CONFIGURING YOUR ETHERNET NETWORK ADAPTOR
This step should only be done IF you cannot access the Management Console (http://192.168.1.1)
otherwise please proceed to Quick Setup Wizard on page 17.
WINDOWS XP - Go to Control Panel and choose Network Connections.
1.
If you do not see an icon with just the name Network Connections, then click Switch to Classic
View on the left of the Control Panel screen.
2.
Right click on your Local Area Network Adaptor and choose Properties from the menu that
appears
3.
Select the item Internet Protocol and click on the Properties button.
4.
Make sure the following are selected:
a. Obtain an IP address automatically
b. Obtain a DNS server automatically
5.
Click on OK to close the Internet Properties
6.
Click on OK to close the Local Area Network Connection Properties
V3.3.3
12
WINDOWS VISTA - Go to Control Panel and choose Network and Sharing Centre
1.
Click on the line that says View Network status and tasks.
2.
On the left of the window, click on the line that says Manage network connections
3.
Right click on your Local Area Network Adaptor and choose Properties from the menu that
appears
4.
Select the item Internet Protocol Version 4 and click on the Properties button.
5.
Make sure the following are selected:
a. Obtain an IP address automatically
b. Obtain a DNS server automatically
6.
Click on OK to close the Internet Properties
7.
Click on OK to close the Local Area Network Connection Properties
V3.3.3
13
APPLE MAC 10.4 – If you do not connect automatically then create a new Location
1.
Click Apple Mac 10.4 menu (blue icon top left)
2.
Go to LOCATION and select Network Preferences
3.
In the location drop down box select New location
4.
Name the location (virgin - “you-can-make-something-up-yourself-here”)
5.
In the Show drop down (2nd from the top) box select Network Port Configurations
6.
Untick everything except Built- in Ethernet/Airport
7.
Click APPLY NOW
8.
In the SHOW drop down box click BUILT IN ETHERNET and ensure the following options are
correct
9.
In TCP /IP tab ensure that Configure IPv4 = USING DHCP
10. In ETHERNET tab ensure that Configure = AUTOMATICALLY
11. Click APPLY NOW if you have made changes and close the window
12. Click back to the APPLE MENU and ensure the created location is ticked
V3.3.3
14
CONFIGURING YOUR INTERNET BROWSER
1.
Open your web browser (e.g., Internet Explorer, Firefox or Safari).
2.
Type http://192.168.1.1 in the browser address bar, and press Enter. This will take you to the
Virgin Broadband Modem Management Console, which is the setup program for the modem. You
are not connecting to the Internet when you go to this page. You are simply getting the page
from the modem.
NOTE: You may need to enable/allow cookies for this address in order for this page to function.
To enable cookies:
For Internet Explorer 6 and 7: Click Tools, Internet Options.
Click the Privacy tab and then click Sites
In the Address box type 192.168.1.1, then click Allow. Click OK twice to exit.
V3.3.3
15
FOR FIREFOX: Click the Tools menu and then Options.
Click the Privacy tab, in the Cookies section click Exceptions: type 192.168.1.1 and click Allow. Click
Close and then OK.
FOR SAFARI: Click Safari from your Menu Bar and click Preferences. Under the Security tab, go to
Accept Cookies and select: Only from sites you navigate to.
V3.3.3
16
QUICK SETUP WIZARD
SPECIFY A PASSWORD
The first time you access this page you will need to create a password for the in-built Administrator
user (initially the password is set as admin).
This password controls the Management Console and therefore the phone and Internet connection.
It is important to keep this secure at all times. Make sure you choose something that you will
remember and write it down in a secure place. If you forget this password, you will need to restore
the modem to factory default settings (see page 31).
Once you have selected a password, click on OK and you will be directed to the Quick Setup Wizard page.
Your modem is pre-configured by Virgin Broadband in all aspects except your wireless security. We
recommend you leave most settings as you find them except for wireless security.
SETTINGS
Language:
Australia
UMTS:
UMTS Connect Method:
Manually: connect to the Internet by clicking Connect on the Connection
Status page in the Management Console or press the Connect Button on the
Modem.
Automatically connect upon traffic: The Modem will automatically connect
when you attempt to access the Internet.
Always Connected: The modem is ALWAYS connected to the Internet
In case of inactivity, disconnect after (minutes): The default is 0 minutes.
Keep this setting if you want the Modem to stay connected. Note: Incoming
traffic does not count as activity.
Wireless:
Wireless: Un-ticked by default. Tick if you wish to enable wireless networking.
SSID: Virgin Broadband – This is the name of your wireless network that
your computer will look for. You can change this to anything you want to
personalise. Changing this is recommended to avoid confusion in case
someone nearby also has the Virgin Broadband service.
SSID Broadcast: Ticked as Enabled by default
V3.3.3
17
Wireless encryption: Encryption: The default is no encryption – Please input the following setting
to secure your network:
Encryption: WEP
Key Type: ASCII 128bit (13Characters)
Pre-Shared Key: (Type in a 13 character password of numbers, letters or both)
Firewall policy:
Typical security (maximum security can cause problems with browsing)
QSW: STEP 1 of 7
- Welcome to the Quick Setup Wizard
Please read the instructions and when ready, click NEXT to continue.
QSW: STEP 2 of 7
- Language
No changes can be made here, click NEXT to continue.
V3.3.3
18
QSW: STEP 3 of 7
- UMTS
This page is for setting when you want the modem to connect to the Internet.
Choose a setting that is good for you and then click NEXT to continue
QSW: STEP 4 of 7
- WIRELESS
Here you can turn on the wireless functionality of the modem. If you choose
to enable wireless, you really should configure security for the wireless
network after this in Step 5. If you do not have a wireless adaptor or network
card in your computer then leave the Wireless Enabled option un-ticked and
click NEXT to continue.
V3.3.3
19
QSW: STEP 5 of 7
- WIRELESS ENCRYPTION
To setup the security for your wireless network connection use this screen
IF you have enabled the wireless functionality in STEP 4. When ready, click
NEXT to continue.
NOTE: Due to the vast amount of networking equipment available around the world, Virgin
Broadband can only support the following settings: WEP Encryption with an ASCII 128bit Pre-shared
Key. We find that this is the most compatible setting. Feel free to use any settings you like. However,
Virgin Technical Support may change the encryption settings for the purpose of troubleshooting
your connection if you need to call in.
V3.3.3
20
QSW: STEP 6 of 7
- FIREWALL POLICY
No changes need to be made here, click NEXT to continue.
QSW: STEP 7 of 7
- FINISH
Review your changes, write down any password you need to remember
and click FINISH
V3.3.3
21
BROWSER RELOAD - You will need to click OK to confirm all changes and have them saved
to the modem.
V3.3.3
22
YOUR FIRST TIME ONLINE
The first time you connect, you will be taken to a special Virgin Broadband Signup Page to activate
your broadband service. Please fill in the online form using the Primary Account Holder’s details.
The Virgin Broadband Signup Page will then allow you to create your first email address. This will
become the primary email address that Virgin Broadband will send notifications to.
You can also have 4 additional email addresses available. To create these additional email addresses,
simply give us a call on 1300 555 100.
CONFIGURING YOUR EMAIL
You can access your email via our web mail page, at: webmail.virginbroadband.com.au
Your Username is your full email address including the “@virginbroadband.com.au” part.
Simply enter your Username and your Email Password to send and receive email. You can access
this from any Internet connection.
You may choose to configure your e-mail in your choice of e-mail program. For Microsoft Windows
users, we have included a CD at the back of this guide that will help configure your e-mail.
Alternatively, if you would prefer to set up your e-mail programs manually, here are the steps and
settings you’ll need:
OUTLOOK EXPRESS – To setup Outlook Express follow these steps:
1.
In Outlook Express, click on the Tools menu and select Accounts.
2.
Click the Add button and select Mail.
3.
Enter the Display Name you would like to be displayed to others when you send them an email,
then click Next.
4.
Enter the email address you created when you activated your broadband service, then click Next.
5.
On the E-Mail Server Names screen, enter the following settings and click Next:
a. My incoming mail server is a: POP3.
b. Incoming Mail Server: mail.virginbroadband.com.au
c. Outgoing Mail Server: smtp.virginbroadband.com.au
6.
In the Internet Mail Logon screen section, enter the following settings and click Next.
a. Your full email address (including the @virginbroadband.com.au) as the Account name.
This is case sensitive.
b. Enter the password you specified when you created the email address.
c. Leave “Remember password” ticked, “Log on using Secure Password Authentication”
un-ticked and click Next.
7.
Click Finish to complete your mailbox setup.
You have now completed setting up your mailbox and are ready to start sending and receiving e-mail!
OUTLOOK 2003 – To setup Outlook 2003 follow these steps:
1.
In Outlook 2003, click on the Tools menu and select E-mail Accounts.
2.
Select the Add a new e-mail account option and click Next.
3.
Select POP3 and click Next.
4.
Enter your User Information and the following Server Information:
a. Your Name: Enter the Display Name you would like to be displayed to others
b. Email Address: Your full email address you created during signup
c. Incoming mail server (POP3): mail.virginbroadband.com.au
V3.3.3
23
d. Outgoing mail server (SMTP): smtp.virginbroadband.com.au
e. User Name: Your full email address you created during signup.
f. Password: The password you created with your first email address.
5.
Click Next to continue.
6.
Click Finish to save the settings and then Close to exit the Internet Accounts Screen.
You have now completed setting up your mailbox and are ready to start sending and receiving e-mail!
OUTLOOK 2007 – To setup Outlook 2007 follow these steps:
1.
In Outlook 2007, click on the Tools menu and select Accounts Settings.
2.
Select the E-mail tab option and click New.
3.
In the Add New E-mail Account window, tick Manually configure server settings then click Next
4.
Enter your User Information and the following Server Information:
5.
Your Name: Enter the Display Name you would like to be displayed to others when you send
them an email
a. Email Address: Your full email address you created during signup
b. Incoming mail server (POP3): mail.virginbroadband.com.au
c. Outgoing mail server (SMTP): smtp.virginbroadband.com.au
d. User Name: Your full email address you created during signup.
e. Password: The password you created with your first email address.
6.
Click Next to continue.
7.
Click Finish to save the settings.
You have now completed setting up your mailbox and are ready to start sending and receiving e-mail!
WINDOWS MAIL (VISTA) - To setup Windows Mail follow these steps:
1.
In Windows Mail, click on the Tools menu and select Accounts.
2.
Click the Add button.
3.
Select E-mail Account and click Next.
4.
Enter a Display Name and click Next.
5.
Enter your Virgin Broadband E-mail address and click Next.
6.
Ensure that POP3 is selected in the Incoming e-mail server type field and enter the following
server details:
a. Incoming mail: (POP3 or IMAP) server: mail.virginbroadband.com.au
b. Outgoing e-mail server: (SMTP) name: smtp.virginbroadband.com.au and then click Next.
7.
Enter your full email address in the E-mail username field. Enter your password and click Next.
8.
Click Finish.
9.
Click Close to save the settings and access your email
You have now completed setting up your mailbox and are ready to start sending and receiving e-mail!
V3.3.3
24
APPLE MAIL - To setup Apple Mail follow these steps:
1.
In Apple Mail client, click File menu and select Add Account and then Continue on the next
screen.
2.
On the New Account page, enter the following information:
a. POP, Virgin Broadband, Full Name and Virgin Broadband email address, then click
Continue.
3.
Enter the following in the Incoming Mail Server screen:
a. Incoming Mail Server: mail.virginbroadband.com.au
b. User Name: Your full Virgin Broadband email address
c. Password: Your Virgin Broadband Email password, then click Continue.
4.
Leave the default settings and click Continue.
5.
Enter the following Outgoing Mail Server: smtp.virginbroadband.com.au and click Continue
6.
Leave the default settings and click Continue.
7.
Confirm that the settings are correct and click Continue.
8.
Click Done.
You have now completed setting up your mailbox and are ready to start sending and receiving e-mail!
CHECKING YOUR USAGE
You can access your usage here: http://mybroadbandusage.virginbroadband.com.au
You will need to enter your full email address and password to access this page.
V3.3.3
25
CONFIGURING YOUR WIRELESS CONNECTION
USING WIRELESS
Your computer must have a Wireless Network Card or adapter in order to connect wirelessly.
Note: By default, your Broadband At Home connection is unsecured. An unsecured Wireless
connection may be vulnerable to use by others in the local area that are able to detect it. We
recommend that you consider using Wireless Security Settings. Please see the Configuring your
Broadband Modem instructions on page 12.
WINDOWS XP
Click Start; choose Control Panel then Network Connections.
Look for your wireless network connection.
1.
Right click over this and select View Wireless Networks
2.
Select the network “Virgin Broadband” and click Connect. If you have enabled wireless security,
you will be prompted to enter your password.
3.
Close any open windows, and open your Internet web browser (e.g. Internet Explorer).
You should be online and ready to surf the web!
V3.3.3
26
WINDOWS VISTA
Click Start; choose Control Panel then Click on the line that says View Network status and tasks
1.
On the left of the window, click on the line that says Connect to a network
2.
Select the network “Virgin Broadband” and click Connect. If you have enabled wireless security,
you will be prompted to enter your password.
3.
You computer will then ask you what type of network this new connection will be. Choose Public
and then Close.
4.
Close any open windows, and open your Internet web browser (e.g. Internet Explorer).
You should be online and ready to surf the web!
V3.3.3
27
APPLE
1.
Create a new location:
2.
Click Apple menu (blue icon top left)
3.
Go to LOCATION and select Network Preferences
4.
In the location drop down box select New location
5.
Name the location (e.g. Virgin Broadband, you can personalise this)
6.
In the Show drop down (2nd from the top) box select Network Port Configurations
7.
Untick everything except Built- in Ethernet/Airport
8.
Click APPLY NOW
9.
In the SHOW drop down box click Airport and ensure the following options are correct
10. In TCP/IP tab ensure
a. Configure IPv4 = USING DHCP
11. Click APPLY NOW if you have made changes and close the window
12. Click back to the APPLE MENU and ensure the created location is ticked
V3.3.3
28
THE MANAGEMENT CONSOLE
This section will give you an overview of the different areas of the Management Console that you
may want to use.
CONNECTION STATUS
This page will display your signal strength and connection type. You will need to login to the modem
using the LOGIN button on the bottom left before you can see all the menu icons.
After you have completed the Quick Setup Wizard in the Virgin Broadband Management
Console, you will get the Connection Status page every time you go to the Management Console
(http://192.168.1.1). Remember: The default username for the Management Console is admin and the
password is the one you set during the Quick Setup Wizard.
CONNECT / DISCONNECT - To connect to the Internet, click Connect, or press the connect button
on the top of the Modem. To disconnect from the Internet, click Disconnect or press the connect
button on the top of the Modem. When the connection is established Connected shows on the
Modem display and on the Connection Status page in the Management Console.
Automatic refresh off is set by default. You can change this if you would like the information to
update on your screen more frequently but you can also achieve this by clicking the Refresh button.
V3.3.3
29
LOGIN SCREEN
This screen will allow you to login to the Management Console.
1.
From the Connection Status page click Login on the left side bar.
2.
Enter the user name admin and password to login to the Management Console.
Remember that the username and password are case sensitive.
3.
Click ‘OK’. The ‘Connection Status’ page is displayed, and the left sidebar shows the options
available.
SMS SCREEN
This feature is currently not available.
TELEPHONE SCREEN
From the telephone screen you will be able to setup and manage the features for your Virgin
Broadband telephone
CONNECTIONS SETTINGS
This area contains important network connection settings
SYSTEM SETUP
This area contains the general setup sections for the modem
ADVANCED SCREEN
This area contains the advanced setup sections for the modem
LOG OUT
This will log you out of the Management Console
V3.3.3
30
COMMON TROUBLESHOOTING STEPS
RESTORING TO FACTORY DEFAULT SETTINGS
You can restore the factory default settings for the Modem when you want to build a new network
from scratch, or for troubleshooting purposes.
Note: The Modem will be restored to its factory default values. All personal settings and records on
the modem are deleted and you will need to re-specify a password.
While the modem is turned on:
1.
Locate the small hole on the bottom of the modem labelled: reset defaults
2.
Insert something pointy into the hole, the modem will turn off and then on again.
3.
When the modem is on again you can restart the setup if needed.
CHANGING THE TIME ZONE
By default, the modem clock is updated by the network the first time you connect to the Internet
and will be checked every 24 hours or each time you turn the modem on thereafter (unless you’ve
changed this).
The default time zone is “Australia/Sydney (GMT+ 10:00)”, this can however, be changed as follows...
1.
Log in to the Modem Management Console (http://192.168.1.1/).
2.
Click on System Setup in the left hand menu
3.
Find and click on the Date and Time icon.
4.
Where it says Time Zone select your local time zone.
5.
Click Apply then log out.
I AM UNABLE TO MAKE AND/OR RECEIVE PHONE CALLS.
A. Check the physical connections of your phone and Modem.
1.
Make sure the Modem is connected to a power point using the supplied power adapter, and
the power is turned on. If the Modem is turned on, the display screen should be lit up. If it’s not,
try pressing the power button, which is the centre one on the top of the Modem.
2.
Ensure your phone is connected directly to the Modem using the appropriate socket. The phone
socket is the second from the bottom on the right hand side of the Modem.
3.
DO NOT under any circumstances connect the Modem to your existing landline wall socket. This
may cause permanent damage to the Modem.
4.
Check the phone cord to ensure that it is plugged in securely at both ends and is not worn or
damaged in any way.
5.
If you are using a cordless phone, ensure its base station is connected to the power and turned
on. Additionally, ensure that your cordless handset is sufficiently charged.
V3.3.3
31
B. Ensure that the Virgin Broadband At Home Modem has sufficient network signal.
The display screen on the Modem includes a signal indicator, just like a mobile phone! This will tell
you the strength of the network signal being received by the Modem.
If the Modem has a weak signal or no signal at all, we recommend moving it to different locations in
your home to find the best position. Placing the Modem near a window or external doorway should
allow it to pick up a stronger signal. Don’t be afraid to experiment a bit!
C. Make sure your phone is set to “Tone” dial, NOT “Pulse” dial.
Some older style phones have a switch allowing you to set the phone to Tone or Pulse dialling. This
switch is generally found on the bottom or the back of the phone, and should be labelled clearly. The
Virgin Broadband At Home Modem only supports Tone dialling.
D. Restart the Virgin Broadband At Home Modem.
Turn the Modem off at the power point for approximately two minutes. Turn it back on and allow the
Modem to start-up and re-establish a connection with the network.
E. Check the Telephone settings in the Modem’s management console.
1.
2.
3.
Make sure you have connected the Modem to your computer.
Open a web browser such as Internet Explorer, Firefox or Safari.
Type 192.168.1.1 into the address bar of your browser and press the enter key to load that address.
4.
If this is the first time you have accessed the Modem management console, you will be prompted
to create a password. Otherwise, log in using the username ‘admin’ and the password you
created the first time you logged in.
5.
Click on the System Setup icon in the left hand menu.
6.
Click on the Telephone icon.
7.
Click on the Telephone Settings tab.
8.
Ensure that the Dialling Timeout value is greater than 0 (generally 3-5 is recommended).
F. Try using a different phone with the Modem.
There may be an issue with your current phone or its compatibility with the Virgin Broadband At
Home Modem. In order to determine if this is the cause of your issue, we suggest trying a different
phone. If you don’t have a spare phone, perhaps you can borrow one from a friend, family member or
neighbour. It should only take a few minutes!
G. Contact Virgin Broadband Support.
In order to further diagnose and resolve this issue, please contact Virgin Broadband support on
1300 555 100 between 7am and 11pm, 7 days a week.
V3.3.3
32
I AM UNABLE TO ACCESS ANY WEB SITES.
A. Make sure the Modem is connected to the Virgin Broadband Internet network.
When connected, the Modem will display the word ‘Connected’ in the bottom right of the display screen.
TIP: If your Modem only shows the time on the display screen, it means that the screen saver is
activated. To switch back to the main screen, press the left hand button on the top of the Modem.
If your Modem does not say ‘Connected’, try pressing the right hand button on the top of the Modem
to establish a connection.
B. Check the connection between your computer and the Modem.
If you have connected your computer to the Modem via an Ethernet cable, ensure the cable is
secured firmly at both ends. You should see a solid or flashing light adjacent to the Ethernet port on
the Modem to indicate a connection.
If you are connected wirelessly, ensure that the connection is active and there are no errors. It may
be worthwhile connecting your computer via an Ethernet cable to ensure that the wireless setup is
not at fault.
C. Check the connection settings in the Modem management console.
1. Open a web browser such as Internet Explorer, Firefox or Safari.
2.
Type 192.168.1.1 into the address bar of your browser and press the enter key to load the address.
3.
If this is the first time you have accessed the Modem management console, you will be prompted
to create a password. Otherwise, log in using the username ‘admin’ and the password you
created the first time you logged in.
4.
Click on Quick Setup in the left hand menu.
5.
Locate the field labelled APN and ensure it is set to: VirginBroadband
D. Delete Temporary Internet Files, Cookies and History
Sometimes temporary files stored locally on your computer can become corrupt and cause problems
viewing web pages or can slow your connection – clearing them can help! Here are the steps for the
different browser types:
MICROSOFT INTERNET EXPLORER 6.X
1. From the Tools menu, select Internet Options.
2. Click the Delete Cookies button and then OK to confirm.
3. Click the Delete Files button, then OK to confirm.
4. Click the Clear History button and then Yes to confirm.
5. Click OK to close Internet Options.
V3.3.3
33
MICROSOFT INTERNET EXPLORER 7.X
1. From the Tools menu, select Delete Browsing History.
2. Click the Delete History, Files, Cookies and Passwords buttons.
3. Click the Yes button to confirm.
MOZILLA FIREFOX 2.X
1. From the Tools menu, select Clear Private Data.
2. Tick the boxes next to Browsing History, Cache, Cookies and Authenticated Sessions.
3. Click the Clear Private Data Now button.
APPLE SAFARI 2.X 1
1. From the Safari menu, select Clear Cache and click the Empty button.
2. From the History menu, select Clear History.
3. From the Safari menu, select Preferences and go to the Security tab.
4. Click the Show Cookies button.
5. Click the Remove All button and then Remove All again to confirm.
6. Click Done and close the Preferences window.
E. Check the settings in your web browser.
Your web browser should be set up to establish a direct connection to the Internet through the Virgin
Broadband service. Any remaining settings from a previous Internet provider may prevent you from
accessing web sites. To ensure your settings are correct follow the steps on pages 12-16.
F. Restart your computer and the Modem.
Turn the Modem off at the power point for approximately two minutes. Turn it back on and allow the
Modem to start-up and re-establish a connection with the network. Whilst the Modem is powered
down, shut down all open applications and restart your computer.
G. Contact Virgin Broadband Support.
In order to further diagnose and resolve this issue, please contact Virgin Broadband support on
1300 555 100 between 7am and 11pm, 7 days a week.
V3.3.3
34
THE CONNECTION IS SLOWER THAN EXPECTED.
A. Make sure that your computer meets the minimum system requirements for
Virgin Broadband At Home.
To ensure the best experience with your Virgin Broadband service, we recommend that your
computer meets the minimum system requirements as outlined on the packaging your modem came
in. If it does not meet these requirements, you may want to contact Gizmo on 1300 275 449 or your
local computer technician for advice on upgrading.
B. Check the type of connection your Modem is establishing.
The Virgin Broadband At Home Modem supports the following three connection technologies: GPRS,
UMTS and HSDPA. In order to obtain Broadband Internet speeds, the Modem needs to establish a
connection using either UMTS or HSDPA. GPRS connections will only provide speeds similar to dial
up Internet connections.
To determine the connection technology being used by your Modem, refer to the bottom left of
the Modem display screen. If it says UTMS or HSDPA, you’re good to go! If it says GPRS, then try
repositioning the modem to improve your signal strength – generally near a window or high up will
give you better results. If you have attempted several positions in your home and are still unable to
move from a GPRS signal, please contact us on 1300 555 100.
TIP: If your Modem only shows the time on the display screen, it means that the screen saver is
activated. To switch back to the main screen, press the left hand button on the top of the Modem.
C. Delete Temporary Internet Files, Cookies and History
Sometimes temporary files stored locally on your computer can become corrupt and cause
problems viewing web pages or can slow your connection – clearing them can help! See page 35
for instructions.
D. Check the settings in your web browser.
Your web browser should be setup to establish a direct connection to the Internet through the Virgin
Broadband service. Any remaining settings from a previous Internet provider may prevent you from
accessing web sites. To ensure that your settings are correct follow the steps on pages 12-16.
E. Does this only effect downloads from Peer to Peer or File-sharing applications?
In order to ensure all customers can enjoy the best possible service, Peer to Peer (P2P) traffic will
be ‘shaped’; that is to say only a percentage of the total speed will be available for P2P applications.
P2P file downloads may take longer than files of equivalent size downloaded direct from a website or
server.
So, whilst P2P services can still be used, they may run rather slowly. Virgin Broadband is therefore
not really suitable for customers wanting to do a lot of P2P file transfers.
F. Restart your computer and the Modem.
Turn the Modem off at the power point for approximately two minutes. Turn it back on and allow the
Modem to start-up and re-establish a connection with the network. Whilst the Modem is powered
down, shut down all open applications and restart your computer.
G. Contact Virgin Broadband Support.
In order to further diagnose and resolve this issue, please contact Virgin Broadband support on
1300 555 100 between 7am and 11pm, 7 days a week.
V3.3.3
35
GLOSSARY
802.11b
A Wireless Local Area Network (WLAN) standard. Provides a transmission speed of up to 11Mbps in
the 2.4 GHz band.
802.11g
A WLAN standard. Provides transmission speeds of up to 54Mbps (typically 22 Mbps) in the 2.4 GHz
band. Is considered a successor of, and is compatible with, 802.11b. Enables high speed data access
from up to 100 meters distance from the base station.
Access Point
Used in WLANs to connect multiple wireless devices to one network.
Administrator
The Administrator (admin) has full access privileges to make changes to the Virgin Broadband
Management Console.
APN
Access Point Name. The name or address a mobile device can use to allow it to access the Internet
DHCP
Dynamic Host Configuration Protocol. The Dynamic Host Configuration Protocol is used to configure
IP addresses automatically and dynamically. Instead of a fixed IP address, DHCP clients receive their
IP address from a central DHCP server or in this case from the modem.
DNS
Domain Name System. Internet service that is used to assign IP addresses to the corresponding
readable domain name and vice versa. www.virginbroadband.com is easier to remember than
202.139.186.150
Dynamic DNS
Dynamic Domain Name System. Provides assignment of dynamic IP addresses to fixed domain
names. So if the server which is hosting the website is using DHCP, it may have varying IP’s, this will
point the changing IP to the fixed website.
Ethernet
The most widely used local area network (LAN) access method defined by the IEEE as the 802.3
standard.
Firewall
Technology in the form of hardware or software that controls the flow of data between a private
and an unprotected network (LAN and Internet, respectively) or protects an internal network from
attacks from the Internet.
Firmware
Pre-installed software required for the Modem to operate.
FTP
File Transfer Protocol (FTP) is a commonly used protocol for exchanging files over any network that
support TCP/IP such as the Internet or your network at home.
GPRS
General Packet Radio Service (2.5G). An enhancement to the GSM mobile communications system
that supports data packets. GPRS enables continuous flows of IP data packets over the system for
such applications as Web browsing and file transfer.
GSM
Global System for Mobile Communications (2G). A digital cellular phone technology that is used
around the world, except for Japan and Korea. Operating in the 900MHz and 1.8GHz bands around
the world and the 1.9GHz PCS band in the US.
V3.3.3
36
HSDPA
High Speed Down-link Packet Access (3.5G). An enhancement to 3G technology that increases the
down-link speed 1.8Mb.
HTTP
Hypertext Transfer Protocol is a service protocol that allows us to view websites all around the world
on our own computers.
IP address
The IP address identifies every device connected to the Internet or most networks through a unique
address. For example 192.168.1.2.
Pass-phrase
A pass-phrase is used as an encryption password and is generally longer than an ordinary password
and may contain letters and numbers. For example a WEP or WPA pass-phrase.
LAN
Local Area Network. Local computer network that is usually limited by geography. For example a
single house, building, office block, school or business. This can then be linked to other networks or
the Internet.
NAT
Network Address Translation (NAT). Method to convert (mostly Private/Home) IP addresses of a
network to other (mostly public) IP addresses of another network.
Network adapter
Another word for Network card. The network card is the device that establishes the connection
between the network (wireless or wired) and the computer
Port
Describes an interface between the operating system, applications and the Internet. Think of a Port
as if it’s a part of a Highway, different Ports are like different specialised lanes on that highway that
handle certain traffic, eg Email, webpages, file transfer, plus many many more.
SSID
Service Set Identifier; network name in WLAN which allows stations/computers in the WLAN to find
the correct access point. This is called the Network Name on the MAC OS
TCP/IP
Transmission Control Protocol / Internet Protocol; this is the transport protocol on which the data
transmission on the Internet is based.
UMTS
Universal Mobile Telecommunication System (3G). A global standard for third generation mobile
technology. UMTS in its initial phase offers bit rates of up to 384 kbps, both up-link and down-link.
URL
Uniform Resource Locator is an Internet address, such as www.virginbroadband.com.au
WAN
Wide Area Network is a network mainly working across great geographical distances.
WEP
Wired Equivalent Privacy; describes a 64 or 128 bit encryption process used for wireless LANs.
WLAN
Wireless Local Area Network is a remote technology for wireless networking.
WPA
Wi-Fi Protected Access is a 256-bit encryption method for a WLAN.
WPA2
A more secure version of WPA with implementation of the 802.11i standard.
V3.3.3
37
SPECIFICATIONS
UMTS
FDD UMTS, 850/1900/2100 MHz, HSDPA
LAN
Ethernet 10BaseT/100BaseT, Auto MDIX
WLAN
IEEE 802.11 b/g WLAN
Security
64 bit and 128 bit WEP Encryption WPA/WPA2 Encryption Port and URL Filter DMZ Support Firewall,
three predefined levels VPN tunnelling, PPTP, Ipsec, L2TP
Display
Monochrome 128 x 64 Pixel OLED display Status information, Missed/Incoming calls, current time
(hours:minutes), clock synchronization over the Internet (NTP), Signal strength, Number of WLAN
connections, Screen saver
Buttons
On/Off, Connect/disconnect, UMTS Display information, Restore factory defaults
Connectors
Power connector RJ-45 Ethernet RJ-11 POTS telephone SIM card holder, External antenna connector
(GSM/UMTS)
User Interface
Device configuration with local web browser (no software installation required)
Power adapter
Input 110-240V, 50-60Hz Output 5V DC, 2.4A
Dimensions
150 x 100 x 32 (W x H x D in mm)
Weight
255g, excluding power adapter Operating Environment Indoors 0 °C – 60 °C Humidity 5% – 95%
V3.3.3
38
GUIDELINES FOR SAFE AND EFFICIENT USE
The modem contains sensitive electronic components. For safe and efficient use, please follow these
guidelines:
The Modem is intended for use only when powered by the external power supply it comes with. The
use of any other power supplies may cause permanent damage to the Modem. Please contact Virgin
Broadband for a replacement power supply. Do not connect the POTS (phone) line on the Modem to a
telecommunication network outlet (wall mounted phone sockets)! The equipment could be damaged,
and there is a risk of electrical shock!
Only use the Modem indoors and in a dry location (don’t try stationing it outside for better reception).
Do not use this product near water, for example, near a bathtub, wash bowl, kitchen sink, or laundry
tub, in a wet basement or near a swimming pool, or any other area where moisture may form.
This device is suitable for use within Australia, using 240V mains power, with the supplied 5V power
pack provided. Use of any other power source may damage the modem! Do not install this product
in direct sunlight. Slots and openings in the enclosure are provided for ventilation and to ensure
reliable operation of the device and to protect it from overheating so these openings must not be
blocked or covered. The openings should never be blocked by placing the product on a bed, sofa, rug,
or other similar surface. This product should never be placed near or over a radiator or anything that
generates heat. This product should not be placed in a built-in installation such as a bookcase or rack
unless it has proper ventilation. Unplug the product from the wall outlet before cleaning. Do not use
liquid cleaners or aerosol cleaners. Never spill liquid of any kind on the product. Use a damp cloth for
cleaning. CAUTION! There is risk of fire and electrical shock!
WARNING:
THIS EQUIPMENT WILL BE INOPERABLE WHEN MAINS POWER FAILS.
COPYRIGHT
Copyright © 2007, Option Version 2.1.1 Information about Option Modem may change without prior
notice. Information published in this user guide is accurate at the time of publication. Although
all security precautions were taken during the creation of this user guide, Option is not liable
toward persons or organisations for losses or damages caused either directly or indirectly due to
instructions contained in this user guide.
All brands and registered brands are property of their respective owners. Service may be changed,
added or deleted.
The content of this user guide was accurate at the time of publication.
V3.3.3
39
MY PASSWORDS
Having trouble remembering all of your passwords? Here’s a little cheat sheet you can use to jot
down your usernames and passwords in case you forget!
Make sure your passwords are secure at all times!
USERNAME
PASSWORD
Your phone number ________________________
6 digit PIN ________________________________
MY ACCOUNT
(where you can log in online
to check bills, request number
porting etc)
YOUR MODEM’S
MANAGEMENT
CONSOLE
E-MAIL ADDRESS 1
(Primary)
(use this to access your
usage information)
(Default username: admin)
[email protected]
E-MAIL ADDRESS 2
[email protected]
E-MAIL ADDRESS 3
[email protected]
E-MAIL ADDRESS 4
[email protected]
E-MAIL ADDRESS 5
[email protected]
WIRELESS SECURITY
V3.3.3
Encryption type: (eg) WEP/WPA/WPA2
40
V3.3.3
41
WARNING
THIS EQUIPMENT WON’T WORK IF
THERE IS A MAINS POWER FAILURE.
Please recycle me
virginbroadband.com.au
DY9055 DEC 07