1
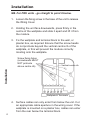
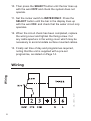
5. Electrical connections are simplified by using a Wiring
Centre. However, if this is not used, the wallplate
terminal identification is as shown.
Water
Heating
Mains Supply
(via 3 amp fuse)
ON
ON
COM
1
2
3
N
L
5
6
If the system being controlled is 230Vac then terminals
3 and L must be linked with insulated cable capable
of carrying full load current. Whilst the unit does not
require an earth connection, a terminal is provided on
the wallplate for earth continuity purposes.
7. Find out from the user whether the unit is required to
operate in 7-day mode (factory preset) or weekday/
weekend mode (5/2 day). To convert to 5/2 day
mode remove the small two-way connector from the
pins towards the left of the recess on the rear of the
module, then press the button marked R/S under the
flap to RESET the unit.
8. Ensure all dust and debris are cleared from the area.
Plug the module into the wallplate by locating it onto
the wallplate and, when flush with it, sliding it down,
ensure the hook at the top of the wallplate engages
with the slot at the back of the module.
9. Before setting the programme, check the unit and circuit.
Set the rocker switch to WATER & HEATING. Press the
SELECT button until the bar in the display lines up with
the word ON. Adjust the remote thermostats to check the
system operates correctly.
Installation
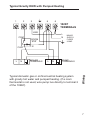
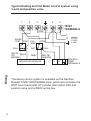
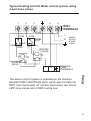
6. Referring to the wiring diagrams on page 6-9, connect
the unit as shown.
5