1
User Manual
Edocx Version 1.12
Build 2.3.5302.31902
Windows 7
Getting Started .......................................................... 2
Installing Edocx ............................................................................................. 4
Windows.................................................................................................................................................................... 4
Run Edocx without installing ..................................................................................................................................... 6
Logging in .................................................................................................... 7
Boxes ...................................................................... 8
Adding a Box ................................................................................................. 9
Refresh the Box list ........................................................................................ 9
Renaming a Box ............................................................................................. 9
Editing access to a Box .................................................................................. 10
Subscribe to notifications ............................................................................... 19
View access log............................................................................................ 19
Deleting a Box ............................................................................................. 10
Example Box Layout...................................................................................... 11
Files...................................................................... 12
Edocx Box and Local Computer Sides .................................................................
Add/create a new Folder in a Box .....................................................................
Adding a File to a Box ....................................................................................
Changing Permissions on a File ........................................................................
File Editing .................................................................................................
12
13
13
13
14
Checking Files Out ................................................................................................................................................... 14
Checking Files In ...................................................................................................................................................... 15
Clearing a Check Out ............................................................................................................................................... 15
Attach to current Outlook message ........................................................................................................................ 16
File Highlighting ....................................................................................................................................................... 17
Version History ............................................................................................ 19
Deleting a File ............................................................................................. 18
Users and Security ..................................................... 19
Adding a User ..............................................................................................
Changing Permissions on a Box ........................................................................
Changing your Password .................................................................................
Password Recovery .......................................................................................
24
24
24
24
Other Settings .......................................................... 25
Finding the current version of Edocx .................................................................
Updating Edocx............................................................................................
Searching for Files ........................................................................................
Changing the Default Start-up Directory .............................................................
Logging Out of Edocx.....................................................................................
Software not behaving properly .......................................................................
Have an idea for us?......................................................................................
1
26
26
20
26
26
26
26
| 23
Getting Started
Thank you for downloading and using Edocx. We are delighted that you have chosen to join a growing
community of users who recognise that Edocx is the way of the future in data management.
Edocx differs from other cloud storage companies in that storage is only part of the bundle, the whole of
which is designed to act as a completely customisable tool for sharing and tracking documents according to
your individual needs.
The purpose of off-site storage is to provide a layer of redundancy that contributes to a disaster recovery
solution. On-site storage is effective only if you can access your data undamaged. If your premises are
destroyed by a disaster, or your backup device is stolen, it is highly likely that you will either have corrupt
data or no backup data at all.
Off-site storage also allows access via an Internet connection. Mobility is very rapidly becoming an
important part of business plans, with the ability to access files on the fly anywhere via laptops, tablets and
mobile devices being crucial.
No matter where you store your data, if it has value to you, you must have a well thought out plan to
protect it properly and to be able to access it in the event of a disaster. Utilising the cloud can be a part of
that plan, but understanding the terms of service is of utmost importance. If you are uncomfortable with
cloud storage, find alternative methods to achieve the desired results. You may trade time for convenience,
but your peace of mind is highly relevant to the development of a comprehensive backup and disaster
recovery solution.
Edocx is a quantum leap forward in combining cloud computing with seamless ease-of-access on the fly,
whilst giving you peace of mind that your files are well organised, and most importantly, securely stored in
Australia.
The essence of Edocx lies in its simplicity. All you need is an active internet connection to get started. Once
installed on your computer, simply open Edocx and you are ready to start uploading, storing and sharing
files.
Lost your files? Computer isn’t working for your presentation? iPad has run out of battery? No problem;
simply connect any computer or smartphone to the internet and you can access all files uploaded to Edocx.
If you cannot install Edocx on your device, you can run the web page version of Edocx, Edocx Web, and still
have access to all your files.
Never worry about confusing yourself with multiple file copies. With Edocx, any file that is being edited by
another user is clearly labelled and locked for editing. Multiple users can view a document, and re-upload
it to Edocx. There will be a list of versions in the file’s history, with details of who last edited it, when it was
edited, and the current version number.
2
| 23
If you are concerned about running out of space, we have increased data storage bolt-ons which are
available on demand. Currently, we are offering space upgrades that range from 5GB to 100GB which can
be added to your original subscription’s allocation.
Edocx has been created as a minimal fuss solution for file sharing and collaboration, so there is no need to
download or install updates. Every time you log in, Edocx will fetch and implement any updates required,
so you will always be using the most current version. If Edocx ever does need a manual update, we will
provide easy instructions on how to implement the update.
For more information on the most up to date pricing, details and future implementation plans, go to
edocx.com.au.
3
| 23
Installing Edocx
Windows
If you have not already downloaded Edocx, you can do so here:
• Edocx for Windows: http://edocx.com.au/
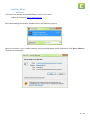
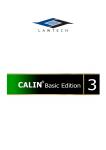
After downloading the installer, double-click on the installer to open it.
When the installer is run, a similar security warning should appear to the one below. Click Run or Allow to
continue the installation.
4
| 23
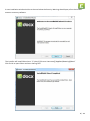
A new installation window similar to the one below the Security Warning should open, after the installer
extracts necessary software.
The installer will install Edocx here: “C:\Users\{{Current Username}}\AppData\Roaming\Edocx”
Click Finish to open Edocx and start sharing files.
5
| 23
Windows (cont.)
You have now successfully installed Edocx. You can access it from your desktop, or the Start Menu.
Location in the Start Menu
(Windows 7)
Desktop Shortcut
Run Edocx without installing
If you are not able to install Edocx, and need to upload or transfer files across, download and click Run or
Open and start using Edocx straight away.
• Edocx: https://edocx.com.au
This way, if you are on a locked down machine, or without administrator privileges, you will not
have to install any files and can run Edocx straight away.
6
| 23
Logging in
After opening Edocx, you will be greeted with a similar login box as below. Simply type in your email
address and password to access your Edocx account. If you have forgotten your password, please look
under Password Recovery.
You may experience a delay from the first time you open Edocx to go to the Box list. This is because Edocx
is meant to be a dynamic, easy-to-install program that requires minimal space, so it automatically fetches
updates for the most current version – you will need an internet connection to use and update Edocx. The
second time you login on the same computer, Edocx will load faster.
7
| 23
Boxes
Boxes are where files are stored on Edocx. You can make an infinite number of Boxes, and can specify
which Users can see which Box. If you would like to understand more about Users, please look under Users
and Security.
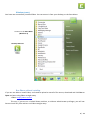
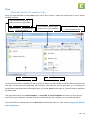
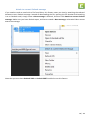
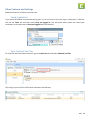
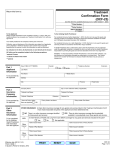
After logging into Edocx, the first page that it opens to is your current list of Boxes, known as the Box list. If
you are starting a new Edocx account, your Box list will be blank. To start, click the Create Box button to
make a new box. If you have other users – called Users, who have allowed you access to their Boxes, they
will appear here. For more information on Users, read Users and Security.
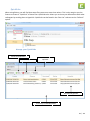
Below is an example of a Box list.
Creates a new box
Logs out and closes Edocx
(you can also do this from the File menu)
Displays the boxes that you have
made, and any other User’s box who
has allowed you to view or edit
Searches for a file in all boxes
you are able to access
Refreshes the box list
Lists the Users you have
added (other users)
This is the box list. This is what first shows after you log
into Edocx. You can see that the logged in user has
access to two other users’ boxes.
Mitchell and Margaret may have created other boxes
that the logged in user is not able to see.
Currently logged in user
8
| 23
Adding a Box
To add a Box, locate the Create Box button up the top left of Edocx. After clicking on it, a new Box will be
created under your name.
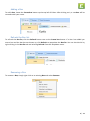
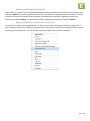
Refresh the Box list
To refresh the Box list, click the Refresh button next to the Create box button. If a User has added you
onto a box and the box has not shown up, click Refresh to repopulate the Box list. You can also do this by
right-clicking in the Box list tab and selecting Refresh from the dropdown menu.
Renaming a Box
To rename a Box, simply right-click on an existing Box and select Rename.
9
| 23
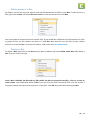
Editing access to a Box
By default, you are the only user able to view and edit documents and files in your Box. To edit access to a
box, right-click the Box and select Edit user access to view who has access to the Box.
You are not able to set permissions for specific files. If you would like a different set of permissions for a file
or group of files, you will need to put them in a new Box. Note that the user also has to have a Edocx
account to access the Box. For more information, look under the Users and Security.
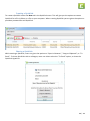
Deleting a Box
To delete a Box, right-click on the Box that you want to delete, and select Delete entire box. Only delete a
Box if you are sure it is empty.
Once a Box is deleted, the Box and any files within the Box are purged irreversibly – there is no way to
restore them. You should only delete a Box if you are sure you have removed all files. You will receive a
reminder prompt warning that the process is irreversible. Click OK to proceed with deleting the Box.
10
| 23
Example Box Layout
A box contains files and folders, but is also associated with a list of users (Users). When you are setting up
your boxes, you should bear in mind that each box is assigned to a set of users.
Below are examples of how you could organise your Boxes and Folders for you to get an idea. A Folder is
the same as a Folder on your computer, with the ability to store and organise files in.
John vs. Smith Case (Box)
• Evidence (Folder)
• Affidavits (Folder)
o Plaintiff (Sub-folder)
o Defendant (Sub-folder)
• Accessible to instructing solicitors and barrister
Paul’s Dictations (Box)
• Dictations In (Folder)
• Dictations Out (Folder)
• Accessible to Paul and his P.A.
Financial Statements (Box)
• Quarterly reports (Folder)
• Cashflows (Folder)
• Accessible to Board members and accountant
11
| 23
Files
Edocx Box and Local Computer Sides
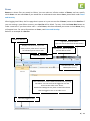
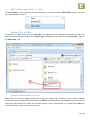
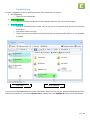
Once you have decided on what Files to put into a Box, create or open the specific Box to see a similar
window as below.
Goes back/forward through a
folder tree for the opened Box
Name of the currently opened Box
access for this box
Edocx Box
Goes back/forward through a
folder tree on your computer
Closes the current tab and
shows the previous tab
Local Computer
On the left-hand side, is the Box you are currently in. When you first create a new Box, Edocx will open the
new Box. The Box (the left-hand side) will be empty, and ready for you to store files in it. Anything you
would like to upload and access through Edocx, or let your Users have access to, you will need to upload to
the Edocx side.
The right-hand side is your Local Computer, or Local side. By Local Computer we mean any files you can
access from your computer, whether they be stored locally on your computer or on a networked drive.
If you would like to change where the Local side automatically opens to, look under Changing the Default
Start-up Directory.
12
| 23
Add/create a new Folder in a Box
To add a Folder in a Box, right-click on the whitespace in any Box and select New Folder. Folders can have
files and subfolders in them.
Adding a File to a Box
To add a file to a Box, locate it on the Local side – the right-hand side. Navigate to the location where you
would like to put the file in Edocx, on the Edocx side, and drag the file or files from the Local side – right, to
the Edocx side – left.
Changing Permissions on a File
Edocx does not currently support permission changes on singular files. However, you are able to change
the permissions for a specific box. Remember that Boxes are assigned to a set of Users. If you would like to
change the permissions on a single file, consider moving it into a separate box. To change which Users can
access which Box, read Editing Access to a Box.
13
| 23
File Editing
When you are in a Box, you will notice that Edocx has two panes. The left-hand side is the current Box that
you are viewing, or the Edocx side, while the right-hand window is the Local side.
If you open uploaded files on the Edocx side, you will only open a read-only copy. To edit your files on
Edocx, we have incorporated a system where you can Check out a file, edit it, and Check in your changes to
update the uploaded version on Edocx.
Files can be highlighted to show who is working on each file. This highlighting is shown in the Edocx
application, for both the local and remote sides. Mousing over any checked out file will give you more
information, for instance, the date and time it was checked out. Check the File Highlighting section for
more details.
Checking Files Out
Checking a file out allows you to edit it without actually removing it from the box. Edocx will make a copy
onto your computer that you can edit and Check in after editing. To Check out a file, right-click on a file in a
Box, and select Check out. This will copy the file onto the directory currently viewed on the Local side. This
file is now saved to your computer, and is an editable copy of the version on Edocx.
14
| 23
Checking Files In
After you have finished editing your file, and you would like to save it back on Edocx, you have three
options on the Local side for Checking In a file:
Check In
o This action updates the file on Edocx with the saved version on your computer
Check In with a different name
o When you Check In a file with a different name, you will be prompted to enter a name
before the file is checked in. Once selected, the file will be checked in under the new name
Upload and keep checked out
o This function of Check In lets you keep working on your document, but updates the copy in
Edocx with the saved changes on your computer.
Clearing a Check Out
The Clear Check out option removes the read-only lock on a file that is checked out. You will be prompted
before you clear a check-out. This will remove the highlighting from the file and let others be able to edit
the file.
15
| 23
Attach to current Outlook message
If you need to send an email with a file from Edocx, this feature saves you time by attaching the selected
document to an Outlook message. Instead of downloading the file, opening the file location and attaching
it to an Outlook email, simply create a New message in Outlook, and then click Attach to current Outlook
message. Make sure you have Outlook open, and have created a New message, otherwise Edocx cannot
attach the message.
Note that you must have Outlook 2010 or Outlook 2007 installed to use this feature.
16
| 23
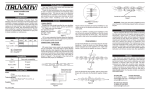
File Highlighting
For easy recognition of who is working on what, files can have three colours:
No highlighting
o The file is not checked out
Green highlighting
o The file is checked out by you on the computer that you are currently working on
Blue highlighting
o The file is checked out by another user, or by you on a computer that you are not currently
working on
o You cannot check in the file
o The file cannot be checked out until the other person checks the file back in, or the checkout
is cleared
Edocx Box
Local Computer
If you have multiple Users that can access your Boxes, Edocx will not only list who has edited the file, but it
will also tell you who it is currently Checked out by. Mouse over the highlighted file for more information.
17
| 23
Deleting a File
If you would like to delete a file on the Edocx side, right-click and select Delete. To delete a file on the Local
side, right-click on the file and select Delete. Deleting a file on the Edocx side, the left, moves it to the
Trash folder, while on the Local side, the file is moved to the Recycle Bin.
18
| 23
Features
Subscribe to notifications
To be notified when a file is edited or uploaded in a box, you can right-click on a box, and select Subscribe
to notifications.
You will receive an email from Edocx describing the changes made in the box.
View access log
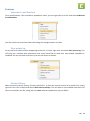
To see who and what has been happening to the files in a box, right-click and select View access log. This
will bring up a window with information that shows what files at what time were edited, uploaded or
modified. You are only able to do this if you are the owner of the box.
Version History
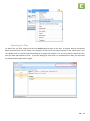
Edocx stores the version history for each specific file. To view the version history for a specific file, simply
right-click on a file in Edocx and select Show version history. This will open a new window with the list of
who has checked in the file, along with the Users who has updated the copy on Edocx.
19
| 23
Searching for Files
To search for any files, simply click on the Search tab and type in any term to search. Keep in mind that
Edocx searches only for file names, not contents of files. Once you have entered in the search term, you
can double-click on the file you are looking for to open the location. You are only able to search for files
that you have permission to view – if you are looking for a file that is in someone else’s box, you will need
to contact them to gain access rights.
20
| 23
Quicklinks
When using Edocx, you will find that some files you access more than others. This is why we give you the
feature to create a “Quicklink” of these files. Quicklinks also allows you to share your documents with other
colleagues by sending them a Hyperlink. Quicklinks can be found in the “Box List” tab next to the “Refresh”
option.
Manage your Quicklinks
Create new Quicklink
Remove Quicklink
Enable/Disable
Quicklink
Shareable Hyperlinks
Previously created Quicklinks
21
| 23
Creating a Quicklink
To create a Quicklink select the New tab in the Quicklink menu. This will give you the option to create a
Quicklink for a file in Edocx or a file on your computer. When creating Quicklink you are given the option to
provide a password for said Quicklink.
Sharing a Quicklink
While creating a Quicklink, users are given the options to “Open in Browser”, “Copy to Clipboard”, or “To
Email”. To share Quicklinks with a colleague, users can either select the “To Email” option, or share the
Quicklink Hyperlink.
22
| 23
Removing and disabling Quicklinks
Edocx makes it simple to remove existing Quicklinks. Simply highlighting the Quicklink you no longer want
and select Remove. This will not delete the file, but only render the shared Quicklinks unusable. If you do
not want to remove the Quicklink but make the shared Quicklinks unusable, highlight the required
Quicklink and select Disable. To reactivate Quicklinks, highlight the Quicklink and select Enable.
Make a QuickLink from a file existing in a box
For convenience when creating Quicklinks, we allow users create them when searching through files in
their respective Boxes. This is done by right clicking on the file you would like to create a Quicklink for and
selecting “Create Quicklink”. This can be done in both the Edocx Box and Local computer.
23
| 23
Users and Security
Remember that when you are setting up your boxes, each box is assigned to a set of users (Users). By
having Users on your User List, you can set specific permissions for the files in each Box. Owners of boxes
are able to assign Read Only or Read/Write Access. Every subscription to Edocx can have as many Users as
they like.
You are able to assign which Users can view which boxes. So if you were a business owner, you could have
a set up similar to this:
A box for your personal documents and files (Personal) that only you have access to
A box for company documents and dictations (called P.A.), that you and your P.A. have access to
A box for quarterly reports and cashflows (called Financial Statements), accessible by the board
members and the accountant
Adding a User
If you would like another “user” to view or edit files in a box, you can add them as a User. Go into the Box
where you would like the new user, click on the Users tab next to the Checked out files tab, and select
Add.
If they are signed up for Edocx, they will receive a notification in Edocx, regarding your invitation. However,
if they do not have a subscription for Edocx, they will receive an introductory email welcoming them to
Edocx, and have access to that Box at no cost to them.
Changing Permissions on a Box
To change the permissions on a box, look under Editing access to a Box. If you need to add a user to the
User list, look under Adding a User.
Changing your Password
Go to https://edocx.com.au/recover to change your password and follow the prompts.
Password Recovery
Go to https://edocx.com.au/recover to recover your password and follow the prompts.
24
| 23
Other Features and Settings
Additional features of Edocx are listed here.
Saved Credentials
If you would like Edoxc to automatically log you in, you can have it save your log in credentials. To do this,
click on the Tools tab and then select Keep me logged in. You will know when Edocx has saved your
credentials, as the box next to Keep me logged in will be checked.
View Checked Out Files
To view files that have been check out, go to the Box list tab and select Checked out files.
This will give you a full list of files that have been checked out.
25
| 23
Finding the current version of Edocx
To find out what the current version of Edocx is, open Edocx and log in. After logging in, click on the Help
dropdown menu and select About Edocx. This will then show you the current version and build of Edocx.
This manual is current as of the version listed on the front page.
Updating Edocx
Edocx has been engineered to update automatically – however it will need a connection to the internet to
download the patch. Every time you login, Edocx will query the server to check your version against the
current version, and will download and implement any files or data if need be.
* If Edocx ever does need a manual update, we will provide instructions on how to implement the
update.
Settings
The below settings are located under File > Settings…
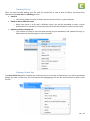
Changing the Default Start-up Directory
To change the default start-up directory – where the Local Side opens up to, open the File dropdown menu
and then choose Settings. Now select the Folders tab on the Edocx Settings window. This will show the
default for where the Local Side will open and save files to. To change this, click on the Browse button with
the folder icon and browse to where you would like Edocx to open at when you login, or alternatively type
in a directory of your own.
We suggest making a folder in your My Documents folder named Edocx Checkouts, and you set this as the
default start-up directory, so that all the files that you Check Out are located in one folder, not spread
across your hard drive.
Logging Out of Edocx
If you are finished with your Edocx session and you wish to log out of your account, click the X in the top
right-hand corner of Edocx. This will bring you back to the Login Screen.
To log back in, either re-enter your credentials, or reopen Edocx at a later time.
Software not behaving properly
If you think you have found a situation where the software is not behaving as it should, please email
[email protected] with a brief description. This will create a ticket in our helpdesk so we can follow
up with you, and we will respond to you as soon as possible.
Please include how you believe you came across this confliction, what you were doing at the time, and
when you did encounter it. All submissions will further the development of Edocx.
Have an idea for us?
Do you have a feature request, or an idea on how we could improve? Send us an email at
[email protected] and we will submit it to our upcoming feature list.
26
| 23
© 2014
Edocx. All Rights Reserved.
27
| 23