1
iG
Internel
.\
..r
* =€*=:r--
Fl::'i]:":1.t1i]li:::.=..:.::.:::..::..:.:.::.:.....:::::.:-*.Es;ji$*BE..Effi
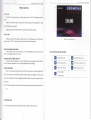
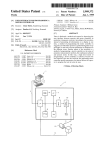
Network Phone Camera
-Skypecam
User Manual
B+-:iBls..?$iij
I
lS::.lt'=:j:-.:::.:::-:..,.,::,r:,:.=:..:i=::i==++,W:.F* -i;Fj={i,*
Re.d and undentand thoroEghly this safety awaretrBs & instructiotr before using .Dd keep it
for future refereoce,the dwice is @[ed Sk]?ecam in this tert
Safety Precaution:
Do not place heavy obj@t on the Sk,?ecm.
Do not let uy solid or liquid fall into or infiltate the Skypecm.
Do not disassemble, repair or replace the parts ofthe Slq?ecm by youself
Using environment:
ud use tho Slq.pecam between 0.C md 40 t.Avoid direct sulight or stay away
from heat.
Do not install the Skypecm in damp mvironment.
Do not expose the Skypecm in smoky or dusty environment.
Do not drcp the Skypecam md avoid strongly collision.
Please insw the Skypecam level installation in a stable workplace ad prevent the Skypecam to be
Please place
dropped
Please install in well-ventilated place. Do not block the vents.
The Skypecam only cm be ued within the range ofrated input
ad
output.
Netuo*
Phone Canera Use,
m
ffi
'
1
Product Introduction
Gontents
l.l
j
t Product lntroduction
2.2 The froDt pmel md retr pmel
Product Overuiew
The Skypecam series is a type of excellent intelligflt hore prcduo specially designed for
.
.........................
.............................................-........4
ability and remote control ability. It introduces wireless leming cods tehmlogr md
4.1 Main menu
navigation...--. .-----.
-......,.-
............... 10
It cm realire
5
Remoteaccess&videoca||s................,...
wirels
the video call not only between two Slq?ecam, but also among smart phone,
......................18
After inserting U disk or Micrc SD to
'
You
Skypecam,
it
can realize simultaneou stonge
ad
cm seach video files intelligent on the device and playback video on the screen directly.
Remote monitor
It cm achieve remote monitor by using mobile APP to dial 3C number
Wireless alam
It infoduces wireless leming code md wireless detectorto construct
email
alm
function is supported.
alm
system, @d also
2.3 The front and rear panel key function
2 Openaackage inspection and cable connection
2.l Opef, package check
Firt,
pleme check whether there is any visible damage to the package appeilance. The
pru{tive
material used for the package ofthe Skypecam cm sustain most accidental cJashes during
the
msponation.
Then, please open the box and get fid ofthe plastic protective coating. Check whether there is
any visible damage to the Skypecam appearance.
2.2 The front panel and rear panel
The key flmction specification in the front panel and the interlbce specification in the
red pmel
ue described in details in the manual,
Please check carefully the product model in the bottom plate or in the
rea panel film whether
is accordmt with the model you ordered.
The label in the bottom plate or in the real pmel is very important for after-sales service, please
protect it carcfully.
Please provide the product model and serial number in
the label before you contact our after-sales.
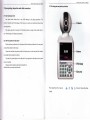
Key area
Piolot lamp:From left to right ffe:
Alm)
d*
ff
*a
ft
{N"t*o.t,
Defence,Recording,
Neilo*
2.4 The rearnnnel
The front button opeEtion function
\u
1
Buttoo
name
!{umber button
Mark
0-9
Phone Canera tlser Mnhual
Fuoction
*
Input the
+
Short press
nmber key duing user input shte
to decrese the volume during video call or
playing state
i:*;4*i
2
+
Shofr
+
Long press to record/stop recording duing mmual record
+
ple$ to delete text duing edit shte
Short press to increase the volume duing video call or
playing state
3
4
Ctrl shifr/
defense
Dial/preview
L#;
***
+
Short press to switch input method during edit state
+
Long piess to do defense/cmcel operation
+
+
Short press to dial video call dwing stmdby state
*
Hmg up call duing video call
+
Back to above level menu and exit
+
Remove dle cwsor by up md
Long press to enter real-time prcview during stmdby
mode
5
Hang up/Exit
ffi
ffi*E$t
^,
6
Di16ction bufron
cment state
doM
buttons when the
Main
7
menu/confim
key
trffi
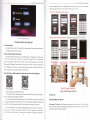
@ Power switch @ Power interface @ USB interface @ 3C smart cad interface
main menu or submenu is popped
+
Add or decrease trMber duing edit state
4
Changethe setinginthemenu
+
Play last or next video file by up md doM bufions
+
Move the cusor by left md right buttons when the main
durins the Dlavback state
sffi
sffi
@ Network interface @ WIFI mt interface @ Learning code indicator @ Leming button
menu or submenu is popped
4
Play in the multilow or multi-fast video dudng the
playback shte
+
Confim
+
Enter main menu
@Micro
SD card
interface @Earphone interface
Nilark
\.r'.rk
Phoke Canen User .rldnu.;
3 Basic operation
3-l Tum on
P.us rhe po$er supply and
tum on the power supply swilch to "ON,', the Skypecam enters the
ii i:3m.
Suggest using the stable input voltage and power input
ilpple with less interference to make
sure the Skypecam power supply.
Suggest using the LIPS to protect the power supply under allowable condirjons
3.2 Turn
off
Check and confim the recording is stopped before turn off the Skypecam, tum off the power
supply switch to "OFF", or pull the rear panel pou,er switch that caD switch power.
Picture 3.
Auto resume after power failure
If
thc Skypecam is shut dou,n abnormally, it cm automatically backup video md resume
previous working status after power failure.
lnsert the U disk or Micro SD card
Please make sure the Skypecam is not in recording state before inserting the U disk or Micro
will loss or storage equipment will be damaged.
SD card, otherwise infbrmation
Replace the battery
Please save the setting
infomation and
tm
off the power supply switch before replacing the
banery. The Skypecam uses button battery. Please check the system time regularly,
ifthe time is not
corect, you need replace the baftery Suggest replacing the battery every year and using the same
Ilpe battery.
\ote:
The setting infonnation must be saved beforo rcplacing the battery otheNise
inlbmation will
lose.
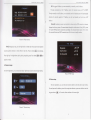
3.3 Standby state
Tum on the Skypecam and enter standby state, the system standby is shown
as
below:
lcons meaning under standby state:
I Login interf'ace
Phane Cuntetd l,tst Mdnutl
Net||ark Pha"e Cdilera User )!onm-
\?trork l'hane (:a"lerd lher Mdhral
4.2 General setup
4
P_ss :unon
u
, the system
Main menu
main menu is shoun as belotr. You can operatc and set each flmction
i: rhi: menu.
Picture 4.2 Cencral setup interface
Set the basic parameters of the system, please click lmain menul> [general] to enter the
general setup inte.face,
(Time setupl Ser rhe.)srent dare and lirne.
Picture 4.1 Main menu interlace
(Language setup) Set the system language.
(Video format) According to PAL or NTSC used in different areas, set the video fomat ofthe
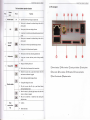
4.1 Main menu navigation
system.
Main menu
General
Function Overuiew
(Access password) Set the password of network remote monitoa, the password only can bc
numbers; You must set access password for the system in the first time, otheNise the remote
Set the basic pararneters
ofthe system
monitor can not be used.
Update and mairrtain system and show rclated inlbrmation
System
4.3 System setup
ofthe system
Play
Scarch and play video liles
Network
Set the basic parameters
ofthe network
Alarm
Set the basic parameters
ofthe almm
Record
Set
dili'ercnt record modes
Update and maintain the system, please click [main menu]> lsystem] to enter the general setup
inter{ace
Pt.n.
Picture
4.i
System seup
iilerface
(Restore factory) Re.lore.).ren ro laulor) .ctrir s.
I Fast retrieval ) Enrer the video playback interl'ace, you can search system r ideo
updated. There are two ways: local update and cloud update. Local update: Copy the update
U disk or Micro SD card, then inscft U disk or Micro SD card, Press update
butlon*5..to
updatc after systen delect rhe update file,the system
ltv
LL,1tt]
Picture 4.4 Video retrieval
ISystem update)You can update and maintain the system when there is system software need to be
press
l)lil?tu
will
tilc ofrhe dar
afterpresssearchbutton$Sl directly.Ifthereisnovideo,it*illshow"novideofilelbund"-
file to
buttonffiand
then
reboot up ailer tinish
updating. Could update: Under net\\,ork siate, press the update buttonffil,then the system will
aLL'rnrli(dll) derecl uhether thcrr
i. filc ileed to be Lpdct(d.
Pr<.. hglq-
-q.
.he
automatically upbad and updaie al'ter detect the new veNion .'I'he system will reboot up
.1.ren urll
a11er
firiish
updating.
[3c IDI
The 3C
lD number will be shown here alier insefr 3C srnart card to the dcvice.
(Version information
I
'fhe cuflent system version iDtbrmation is shown.
4.4 Play
Picture 4.5 Video retrieval
1
[Accurate retrieval) Move the cursor ro adjusr the stating and ending lime, the \\indo* \\ill
Search and play vidco files, you can click lrnain menu]> fplay] to enter the video playback
pop-up the video Iile list which conforms to searching condition alier press search buron
interf'ace.
press up-down
button
q
md left-right
toplay.
$1,
buttons to move the cursor to select the larget 1ile, then press
\.iork
( lP
)
Set system IP address. ) ou can
automalicali) r.:
Through automalicalil :et the IP address.
I
detemine the net\\ork seqment of IP address. rou
s: ia
IP
Ph.nr anln.n
s.r rhe
i)sl!-r \:1 3::.rnrli.
hrough manuall) set the IP address. vou can manuall\
address.
rsDll]
I
P
Ii{.-Mnnrnl
address.
f,cc.is ro IP by DHCP;
3.]jia:! !\ irem
.r:ir ::tc =::;..\
\\
ill automatically
!e: rhe last one of lP
)
\ r::i o: \\ ]Fl :--:re:rirrn lLr lnremet.
irri ..ai.i.i: L :::-: \\ IFI. sysrem
uill search WlFl and set the connection accordingly, the connacred i::a-3: ::.3 ii s ::{\\n
after successful access, md WIFI connection icon will be sho\n in srmJtr i:::::-:
I lnternet) According to access way to net\\ ork to chtrrse
Equipped u,ith wire, system
will connect intemet firough
the \\
Pictuie 4.6 Video retrieval
(Playl During play
s1ate, press
left-right buftons to futish
l'as1
lbrward and rewind operation
and press up dou,n buttons to switch different video files. Press the
Press
ilght key for single-frame playing during stop-playing
button.Jato \t()f
state. Press
Jila) ing.
bufton.*1._or #n.can
adjust the volume.
4.5 Network setup
Set
netsork parameters, you can click lmain menu]> [network] to enter the network setup interface.
Picture
,1.8
WIFI setup
4.6 Alarm setup
Set alann parameterc, you can
click lmain menu]> [alarm] to enter the alam setup interf'acc.
You need pre-staft the defence system before using alarm lunction, system enter defence saate after
long press
Picture 4.7 Network setup
button
JUL
in
15 seconds, defence
indicator will constanl light.
::.tr..::
Pibne CnDwa L'\er Mdilu.l
4.7 Recording setup
Set different record modes. \'ou can click lme:: ::::
intert'ace. You can set three record modest
manual-air
> :-:!_:i- :.- er!3r lhe record setup
L:;:::::.
.-::.i-'aa!
LED indicator will
blink during record state.
Picture 4.9 Alarm sctup
(Send e-mailI When thcre is alarm or alam linkage ofcapture images, you can sencl spccific
alm
inlbrmation or capture images to given
eflail
address.
E-Mail Alarm
Picture 4.1
I Record setup ( 1 )
(Alarml When motion detection or outsido alam triggers, system *ill autturr:ic:.i l:
i1
record stale; Record timirrg indicates lhat record duralion alier lrigger lhe alarm.
Picture 4. i 0 Email alarm
IMotion detectionl This option is turned on and when the system dctects the mobile signal thar
rcached a preset sensitivity by anal),zing the video image, motion delection alarnr
rviil be bootcd.
(Screen capturel You can choose the quetity ofsystem autonutic screen capture when alann
appears, the images
(
Buzer)
will
be saved in U disk or Micro SD card.
You can set the alarm durat jon of system speake r when alarrr appears_
Pictue 4.1
1
Record setup (2 )
(Timed) You can set the record time, syslem will automatically enter record state during this
Neh"a)k Phone Qtkru
'..:.
tiso Mdnudl
ali.'r a::i: Ja-:a: :r:i::.
helher lhe nel\\'ork oi r::r!: : ::r ::: :: : - :::
\ ou can make remote monilor lo lhis Skypecail
moritor fai1s. please check \\
l:Ncw Uscr lD
Picturc 4.12 Record setup (3 )
5 Remote
monitor and video call
5.1 Remote monitor
You need cofect1y connect to tl]e net\\'ork bclbrc remote monitor For network setup, pleasc sec
-1.5 [Main menu) > (nctwork selup)
Remote monitor between two devices
The intcmet abnormal connection icon of standby interface \vill disappear alier norrnal access
lo fie intemet, and the systetn is online statc. Example: u,hen using dcvice A to nlake relnotc
Reeiste r and
:
ti,"a!
t !1
]f
ords:
Stepl:Iq)ut Pa5s$ord
vd"udl
the remote
I#
HffiH ffi
E-I
E--'Il'
2:Steps of the Rcmote Monitor: ForExample: Sklpec:: iC
rronito. to device B(the 3C lD is 1001), you need set rernote monitor passlvord fbr devicc B(see
[\,lain menu) > [generall ).And sel de!ice A as follorvs: press ,,1001#,,and dial it, the clialog box
\ill be poppcd up to remind you of entering acccss passrvord, press confirnt button aller enter
passu ord, then device
Losin
- P)ait
::s:r
I
.f \:
\i++
L
il
--'__-
A can makc rctnote monitor to device B.
ffi
ffi
Using cell phone or tablet computer to make remote monitor to the Skypecam
Install the Skypecam App Softu.are(sricctv02)
( I ): Smad Phone with the"Barcode scanner",Please Scan
QR code b ger tlte App(sricctvo2)for
runinu our Skypecam, then do*,nload and install it.
(2): Smaft Phone *,ithout rhe "Barcode scanner":For Android system: please search ..sricctvO2,'i.
i r,ur soosle search engine. Find out the APP "sriccrv02", then doq,nload and install it.For iOS system:
rrch as:iPhone. iPad. Please search"sricctvO2"in the App Store, then dounload and install it.
Boot up the application alier normally installing Skypecam client soliwarc to cell phone or
::t,ler conrputer ctc. click on thc dial screen and enter the 3C lD as required, then olick rcrnoie
:ir.iror bulton arld rhe dialog box will be popped Ltp to rcrnind you ol entering acccss password.
Step5 :Coiurect Succeed
Steps of the Remote Monitor
5.2 Video call
Video call between two devices
Dial among WAN netlvork: Alter Skypecam connecting to intemcr nomallr. th.'icon ol standby
will disappear. the Skypecam is online stale. lhen I ou can makc r ideo
lC lD ol th( uther d<\ rc(.
abnormal network connection
cdlls aner dial the
r:::gL\\nen\ork.lirsodcr.icesinsameLA\-\.oucanlnakevideocallsatterdialthelast
- -.
::.1:,lJress.F.rrmplc:thelpaddressofde\iccAordcviceBinLANis:192_l6g.l.l0
..iL'\r.c.\caDdial..ll k)makc\idcocall$ithdericeR
- s r g mobile devices such as cell phone or tablet computer to make video calls with
i-e
device
3.,1
up the application after nornrally installing Sricctr02 or Skypccam clicnt soiitarc to cell
click on the dial screen and enterthe JC ID as required. ciick rideo
tufton to make vidco call qirh the Skypecam; Ifrhe rideo call fails, please check \\heiher the
:: ::i rrr tablel computer etc.
::.-
1al\\ork of mobilc device is nomrl
r)
Step i
:liput Sk!?san
]C ID NO-
Step:: Chck
\ids
Call Buftotr
Step4:Connect Succeed
Steps
of the Cideo
call
Stal:ComeMg
\ztu-otk Phore Canerd Uset Mah"al
6 Wireless learning code
6.1 Wireless detector leam code to match the Stypecam
In order to trigger the alm, all the wireles det{tfrs EN l@r @d. b ffih the Skypecam.
The specific operation d follows: FiNt press device lming brnm, *lE 6e red lamp of s'Holor
LED lights up, then trigger the wireless detector that need b bc Er{ied b ErMir a signat, if the
red lamp of two-color LED fl4hes which indicatd lming is s6,
afta rE laning wceedwhen the wireles detector is triggercd thm the red lmp of eoola LED ritt bc lidred up.
Analogouly, the device cu lem 4 different-code wirels detc-tqs
6.2 Remote controller learn code to match the Skypecam
In order to control the device nomally md make or cmcel the defqce, all thc m
molla
must leiln code to match the Sk)?ecam. The specific opemtion c follms Frl qdffy gs
device leming button twice, when the blue lmp of two-color LED lights l4L tha F6 rI brffi
of remote contoller to transmit a signal, if the blue lamp of twmolor LED flads rtich irrli:
leaming is success, after the leaming succeed, when press any buttoN of ffi
ffillsrba
lb
blue lmp of two-color LED will be lighted up. Analogously, the Skypw o lc-n ,l
differcnt-code remote controlleN.
7 FAQ and Maintenance
7,1 FAQ
Ifthe problems ae not listed, please contact local service or call the HQ seruie, we will ry the
best to serye
you.
The Skypecam cantrot boot up normally.
Possible reasons
re
as
follows:
l.The power supply is wong.
2.Switch power supply line is not in good comectio n.
3.Switch power supply is damaged.
4.The progrm updating is wrong.
5.The front pmel is damag€d.
The Skypecam reboots automatically or stops workitrg after b@t up r
Possible reasons
ae
as
follows:
ffr Eitrlt6
Netuolt Phote Cailqa
l-Ib ipr
voltage is not stable or too
lfb pwq
3fMtal
of
sitch
Uset
l.It
power supply is low.
lst
S-The
hrewae of the
is no&m active
2.lt is not m active
Yid@ signal is not stable
43ad
W
tund
low
3.The audio
ndiator or too much dust or bad
ming
circmstmce of the Slqpecam.
4.The
ttr
umd
lins rc
PbE CMra Usq
M@ual
am.
box.
damged.
hadwrc ofrhe Skypecm
is
dmagpd
Skypecam is damaged.
The tiEc is wmtrg,
System catr not detect USB or Micro SD csrd
ae
Possible remons
l
as
The USB or Micro SD card line is not in good connection
2.The
crd
Po$ible re6o6
e
as
follows:
l.Sefting is wong.
follows:
2.The battery is in bad connection or the voltage is t@ low3.The oscillation is damaged.
slot is damaged
3.The storage equipment is damaged
4.The USB port of main
bord
is
dmaged
The motion detect is trot wrong.
Possible recons tre as follows:
I can not fitrd the video
Possible reasons
ae
as
lile
in local playback mode.
follows:
l.The storage equipment is dmaged.
2.The query condition is
l
The motion detect dsa setting is not corect.
2.The sensitivity is too low.
3
.Limited by some hedwile edition.
mong.
3.The video files to look up arc covered.
The image is not clear or there is no image itr tretwork
4.The recording is not on.
state,
Possible reasons
The local video is not clear.
'
Possible remons
ae
as
follows:
1.The image quality is too bad.
2.The reading
progm
ae
as
follows:
l.Network is not stable.
2.The user
mchine is resouce limited.
3.The user has no suneillmce
puniew.
is mong, bit rute is low md firll screen mosaic during playback.
Nomally the problem will be solved after reboot up the Sklpecm.
Network contrection is not stable.
3.The stomg€ equipment is damaged.
Possible reasons
4.The hard disk is dmaged.
1.Net'ilork is not stable.
ee
as
follows:
2.lP address is conflicted.
There is no audio signal itr the suneillatrce window.
Possible reoons
ae
as
follows:
3.MAC address is conflicted.
4.The network cad of the computer or the computer is bad.
preYifl
or vilco
ft PL!,L..I
Cdnen Usel Mahtal
T2hnane
Plc e
the
fh.
dut in the
danp
umal ming
Plee
Skypcam in dry environment so that the Sklpecam can work long-tem and stably.
circuit botrd will cause short-circuit which will interfoes the Sk,?ecam
or dmages the Sk)?ecam.
keep the grounding well done to prevent the video or audio signal interfered and the
Factory Name:
Factory Add:
Sales Service Point:
Skypecm liom static or inductive electicity.
Please keep the Skypecm away from the heat resource.
Please keep the
Please check
Skfpecm ventilated for better heat radiator
md maintain th€ system rcgulaly.
This mmual only for the basic operation, please refer to the electonic mmual CD-ROM for
detailed opemtion.
If
you have doubt or dispute for product description, all
Product
Product Model
Product Color
Purchase Date
Customer Name
Equipment updated in real time, there is no notice ifupgraded.
will be subjected to
the ultimate
interpretation of the company.
Customer Phont
Customer Add
Fault Phenomenon:
The manual is for the number ofproducts for reference, the specific operation ofeach product is not
e
exhaustive;
if
ID
Product Name
you have my difiicult pioblems, plede contact the compmy customer setrice
department.
Processing Method:
Customer Sign
Date
Maintenance Man sigl
Date