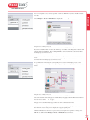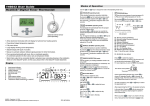
1
Heat Link ® Design Suite 2.0 L7180 May 30, 2005 Heat Link ® Table of Contents HeatLink www.HeatLink.com Introduction.....................................................................................................................................3 Getting Started ................................................................................................................................4 Design Suite Orientation ................................................................................................................7 Start Menu.......................................................................................................................................8 Budget Menu .................................................................................................................................18 HeatLoss Menu..............................................................................................................................24 HeatLink Design Suite Online Help/Guide ................................................................................30 HeatLink Design Suite Online Product Guide ...........................................................................31 Project Design Considerations.....................................................................................................33 HeatLoss Sheet ..............................................................................................................................35 Analysis Sheet................................................................................................................................51 Material List Sheet........................................................................................................................61 Summary Sheet .............................................................................................................................66 Quote Sheet....................................................................................................................................69 Appendix I: HeatLoss calculation formulas ..................................................................................73 Appendix II: R-value of Typical Materials for Standard Contruction...........................................74 Appendix III: R-value of Typical Materials Floor Coverings .......................................................75 Appendix IV: Friction Losses Through Pipe Fittings and Valves..................................................76 Appendix V: Some Factors Affecting Radiant Floor Heating Design ..........................................77 Questions........................................................................................................................................80 Software Disclaimer The information delivered by this software is specific for use with HeatLink® products only. Any substitutes or alternatives must furnish their own details of design for performance comparison. HeatLink® makes no warranties on this software. In no event shall HeatLink® be liable for any damages, loss of profits and opportunities, or any other incidental or consequential damages arising out of the use of this software. 2 Heat Link ® www.HeatLink.com Introduction 1. It creates budget price quote with minimal user input, enhancing productivity by cutting down tremendous time required in any price quotation process. 2. It provides a good indication on pipe sizing as well as pump sizing. 3. It allows user to run/evaluate multiple projects simultaneously. 4. It is modular; appropriate library file will be loaded automatically in accordance to the type of file being opened. You can unload the library file you do not need at any time. 5. It allows incorporation of your own material list in any price quote created. 6. It allows suggested piping and wiring schematic drawings to be zoomed in and out for details before being sent to a printer. 7. It has the management features you need to open, close and copy project file seamlessly. 8. It exposes its resources, such as R Value lookup or calculation without first running any project file. 9. It fully integrates your Microsoft Office applications including Outlook and Internet Explorer. You must have installed Microsoft Outlook and Internet Explorer to fully exploit the new features. HeatLink Why should you upgrade to HeatLink Design Suite v2? 10. It allows user’s full control over the work environment, such as warning message and error detection. 11. It allows product description to be output to a printer. 12. It allows project or job specification to be output to a color capable printer. 13. It adjusts itself automatically to print report to the right length without wasting paper. 14. It imposes no more stoppage to your file opening process by double clicking on a file name. 15. It has the latest product reference numbers (SKU#) from HeatLink. 16. It has the latest product pricing from HeatLink. It offers so many new features and enhancements that the list above hardly exhausts them all in one place. Where can you get HeatLink Design Suite v2? HeatLink Design Suite v2 can be downloaded from HeatLink Website at: http://www.heatlink.ca/pro If you are a registered user, you must log in and navigate to the software Web page to download the software by selecting the Software link on the left hand side of the screen. You will find 3 hyperlinks allowing you to download the respective software optimized for different version of Microsoft Office and Outlook: HLDS2000, HLDS2002 and HLDS2003. Alternately, you can approach your local HeatLink representative for a copy of the software if you have no access to the Internet. 3 Heat Link ® www.HeatLink.com HeatLink Getting Started Microsoft Office Version Compatibility You must be running Microsoft Office and Microsoft Outlook of the same version number in order to fully exploit all the new features delivered by HeatLink Design Suite. In addition, you must have installed Microsoft Internet Explorer. By default, Internet Explorer is loaded along with the installation of Windows operating system. If you are running Office 2002 and Outlook 2002, you will need the Design Suite optimized for version 2002. If you are running Office 2000 and Outlook 2000, you will need the Design Suite optimized for version 2000. Office applications with Outlook of different version number are currently not supported. Zipped/Compressed If HeatLink Design Suite is downloaded from HeatLink Website at: http://www.heatlink.ca/pro you will find the application comes in a zipped file. You need to unzip it to extract the multiple files before you can install it. The zipped file is self extracting if you mouse double click on its file name. Upon unzipping itself, all the application files will be extracted to the following location on your computer by default: C:\HLDSv2\ where C:\ is your local boot drive on your computer. Install/Setup Installing HeatLink Design Suite can be made easy with the setup utility provided. Look for the file MyInstall.xls in the files distributed (through download from HeatLink Website or your local HeatLink representative). Before you run MyInstall.xls to install the application, the macro security level of your Microsoft Excel 2000 or Microsoft Excel 2002 (XP) application must be lowered from High to Medium. Follow the steps below to change macro security, in Excel: 1. Select Tools on menu bar. 2. Highlight Macro on the drop down menu. 3. Choose Security… on the popup menu. 4. Click the Security Level tab if it is not chosen by default. 5. Click the radio button beside Medium if High is chosen by default. To begin the software install or setup, follow the steps below. 4 1. Double click on the file name MyInstall.xls. You should be able to find this file among the files distributed. 2. lick the Enable macro button when prompted to allow macro execution. 3. Follow up the self-explanatory steps on screen. 4. Make sure to read the entire license agreement by scrolling it down to the very end. 5. Check the I accept the license agreement box. Or else, the setup process will not continue. 6. Key in the serial number provided when prompted. Or else, the setup process will not continue. The serial number was provided to you when you downloaded the software from HeatLink Website or given to you from your local HeatLink representative. 7. Click the Finish button to complete the setup process when it becomes visible. 8. Click the Yes button to run HeatLink Design Suite v2 now when prompted. If you selected No, you would need to follow the extra steps below to invoke the Design Suite in Excel. Heat Link ® www.HeatLink.com a. HeatLink b. c. d. Run Excel. Open a blank workbook if none is there yet by selecting File on the menu bar and then New from the drop down menu. Choose Tools on menu bar and then Add-Ins… on the drop down menu to show Add-Ins window. Click the Browse button to open the Browse window. Select the drop down arrow beside the Look in: combo box to navigate to the destination folder as indicated in the setup process, eg. C:\Documents and Settings\userID\Application Data\Microsoft\AddIns\HeatLink Design Suite v2 You should find the Look in: combo box at the top of the window. e. f. g. Highlight All Files (*.*) on the selection list when you click the drop down arrow beside the Files of type combo box in the Browse window. You should find the Files of type combo box at the bottom of the window. Highlight HeatLinkWiz.lib file on the file list and then click OK. You should see the box beside HeatLink Suite Wizard is checked. Click OK again to dismiss the Add-Ins window. If Excel is running on screen now, you should see that HeatLink Start is the last menu item on the Excel menu bar. Why the setup/install utility is preferred? We strong suggest you run MyInstall to setup HeatLink Design Suite v2 on your computer for the following benefits: 1. To ensure only the applicable library files are copied to the right place on your computer. 2. To ensure all the supporting files are copied over to your computer. 3. To completely delete previously installed application files (of version 1 and/or version 2 if you do a re-installation of version 2). 4. To detect if you have installed Adobe Distiller on your computer so that you can make use of the unique print feature provided by the software. 5. To eliminate the redundancy of HeatLoss Guide menu in the popup menu window when you right click on a worksheet in Excel. This redundancy is caused by abnormal exit of Excel when using HeatLink Design Suite v1. You may run MyInstall anytime again to re-install HeatLink Design Suite v2 on your computer. 5 Heat Link ® www.HeatLink.com HeatLink Why are you given a serial number? You will be provided (when software was downloaded from HeatLink Website or by your local HeatLink representative) a serial number to do a full install. You enter the serial number when prompted during the setup process, ie when running ‘MyInstall’. The serial number will entitle you to 1. A 30 day free trial period before you decide to activate the software for good. 2. Technical support on using the software by registering with HeatLink Canada. 3. Activate the software. You can activate your copy of software on line at http://www.heatlink.ca/pro or fax in the completed registration form to HeatLink Canada at (403) 250-1155. Find the file ‘hldsregform.txt’ among the distributed files for a blank registration form if you have missed it during the setup process. Exploiting Adobe Acrobat feature – changing printout to PDF file If you have installed Adobe Acrobat on your computer, HeatLink Design Suite v2 will exploit its feature to allow you to turn the report printing to PDF file. You may have installed Acrobat Reader on your computer. However, the Acrobat Reader alone does not provide the necessary function that HeatLink Suite must use. To check if you have fully installed Acrobat software and configure Acrobat to work with HeatLink Design Suite, follow the steps below. 6 1. In Windows, mouse click the Start button in the lower left corner of your screen and then select Control Panel (see the picture on left). 2. Select Printers and Faxes (if you are running Windows 2000 or XP) or Printers (if you are running Windows 98). 3. Acrobat has been fully installed on your PC if you see Acrobat Distiller icon. 4. If Acrobat Distiller is installed, right click Acrobat Distiller to display its shortcut menu. Select Printing Preferences… (if you are running Windows 2000 or XP) or Properties (if you are running Windows 98). Select Adobe PDF Settings tab. Uncheck the box beside Do not send fonts to Distiller. Heat Link ® www.HeatLink.com HeatLink Design Suite Orientation When you first start up HeatLink Design Suite, you see HeatLink Start menu item at the end of the Excel menu bar. A drop down menu as shown below will display when HeatLink Start menu item is selected. Sub menus: Project – it groups the commands you need to create new project, open previously saved project, close project and copy currently open project. Reference – it groups the commands you initiate to look up R-Values of commonly used construction materials, to calculate R-Values of composite materials, to find weather data (outdoor design temperature) of most cities and an online manual related to floor heating design issues. Exit – terminates HeatLink Design Suite in Excel. You will see that the box beside HeatLink Suite Wizard is unchecked in the Add-Ins window popped up when you select Tools/Add-Ins… on the menu bar. Options – for access to user’s settings and product database. About – to show the current version of HeatLink Design Suite, access HeatLink Website and user’s registration number. HeatLink Menu Commands Pending whether you are running Budget or HeatLoss library, you will find the following menu items at the end of the Excel menu bar. Note that if you have closed all the work files without explicitly closing the libraries, Budget and or HeatLoss menu will become disabled. Sub menus: Tools – it groups the commands you need to create quote (price quote), customize the current budget project, print sheet (send report to printer) and size pipe and pump for your budget project. Resources – it groups the commands allowing you to look up and print the related schematic drawings and specification for the budget project. Sub menus: Tools – it groups the commands you need to create quote (price quote), optimize the current floor heating design, print sheet (send report to printer). Resources – it groups the commands allowing you to look up and print the related schematic drawings and specification for the floor heating project. 7 Heat Link ® www.HeatLink.com HeatLink HeatLink Start Menu Commands HeatLink Start is the very first menu item on the menu bar that you will see when you first start up HeatLink Design Suite. It allows you to create new project or open previously saved project. In addition, it allows you to access its internal resources. HeatLink Start 4 Project Select HeatLink Start 4 Project 4 New to create a new project. You will see the HeatLink Suite Get Started window show up on screen, allowing you to specify the project type to create by mouse clicking any of the icons: Budget, HeatLoss and HeatGain (unavailable in v2). You may position your mouse momentarily on any of the icons to display its project type. Left icon – Middle icon – Right icon – Budget project HeatLoss project HeatGain project (not available in HeatLink Design Suite v2) Note that you can click the Help button in the Create New Budget window for help when you are creating a new budget project. Select HeatLink Start 4 Project 4 Open to display Open Suite File window, allowing you to list and open any type of HeatLink Suite files of extension: .hbg, .hhl and .hhg. You can open HeatLink Suite file by mouse double clicking on any file name with extension either .hbg, .hhl or .hhg. In doing so, HeatLink Design Suite with the appropriate library will start automatically provided that HeatLink Design Suite has been loaded in Excel in the first place, ie HeatLink Suite Wizard has been checked in the Excel AddIns window. You can find it when you select in Excel Tools then AddIns… on the menu bar. You can also use Excel File 4 Open... to open HeatLink files. However, you have to drop down the File of types: combo box found at the bottom of the Open window to select All Files (*.*) to allow you to see files with extension of either .hbg, hbg, .hhl or .hhg. 8 Heat Link ® www.HeatLink.com Close will not be available if none of HeatLink Suite libraries is running. HeatLink Select HeatLink Start 4 Project 4 Close to display HeatLink Suite Close window, allowing you to close any of the running libraries. Position the mouse over the icon momentarily to display its help tip to help identify the name of the running library. For the picture shown on the left and below, both Budget and HeatLoss library are running in this example. You will be prompted to confirm if you are sure to close the library. If you have still work files open for the library you want to close, you will be prompted if you need to save these work files before proceeding. Select HeatLink Start 4 Project 4 Copy to display HeatLink Suite Close window, allowing you to make copy of any of the running work files. If you are running multiple libraries simultaneously, select the Project Type to display all its work files you have opened. Then select the work project to copy. You have to give it a new project name for the copy, or else you will be prompted. The feature comes in handy. For instance, you are looking at a multi-storey apartment building. You created a project file for the main level. Instead of creating project file for each of the other levels, you copy the main level project file and rename the copy to the other level, such as Level One. You then make changes to the new copy. Now you have project file for the main level and level one respectively. This saves you time by eliminating all the work necessary to create a new project for Level One and all the other levels. 9 Heat Link ® HeatLink www.HeatLink.com Select HeatLink Start 4 Project 4 Close to display HeatLink Suite Close window, allowing you to close any of the running libraries. Position the mouse over the icon momentarily to display its help tip to help identify the name of the running library. For the picture shown on the left and below, both Budget and HeatLoss library are running in this example. Close will not be available if none of HeatLink Suite libraries is running. You will be prompted to confirm if you are sure to close the library. If you have still work files open for the library you want to close, you will be prompted if you need to save these work files before proceeding. Select HeatLink Start 4 Project 4 Copy to display HeatLink Suite Close window, allowing you to make copy of any of the running work files. If you are running multiple libraries simultaneously, select the Project Type to display all its work files you have opened. Then select the work project to copy. You have to give it a new project name for the copy, or else you will be prompted. The feature comes in handy. For instance, you are looking at a multi-storey apartment building. You created a project file for the main level. Instead of creating project file for each of the other levels, you copy the main level project file and rename the copy to the other level, such as Level One. You then make changes to the new copy. Now you have project file for the main level and level one respectively. This saves you time by eliminating all the work necessary to create a new project for Level One and all the other levels. The New Project Name To Identity The Copy text box will show as soon as you select a work file in the Select Open Project To Copy list box. 10 Heat Link ® www.HeatLink.com HeatLink Start 4 Reference HeatLink The Design Suite keeps an archive of R factors (thermal resistance values) of most standard construction materials. You can access these R Values and use them in your project design easily. Select HeatLink Start 4 Reference 4 R Value to display the R-Value of Standard Materials window as shown below. Position your mouse anywhere over the house picture and mouse click the part of the house of which the R Values you want to look up. For instance, mouse click the window to look up the R-Values of most windows construction as shown in the picture above. If not sure, position your mouse momentarily over the house image to bring up the help context box. If you are currently working with a HeatLoss project file, the OK button and the Location Selection box will become visible. In that case, select from the list box the material of which the R-Value you want to use. To place the selected R-Value in the Heatloss worksheet, mouse click the highlighted dash button near the bottom of the window to shrink down the R-Value Of Standard Materials window. Then position your mouse and mouse click in the Heatloss worksheet the input cell where you want the selected R-Value to be placed and click the button just below the close button of the window on top to restore the R-Value Of Standard Materials box and then the OK button to complete the action. 11 Heat Link ® HeatLink www.HeatLink.com You often need to look up the R-Value (or thermal resistance factor) of composite assemblies made up of standard construction materials. The Design Suite provides you with a ready means at your finger tips of computing the R factor of composite structures. In addition, the calculated figure can be placed in your HeatLoss project Heatloss sheet where the R-Value applies with a couple of mouse clicks. Select HeatLink Start 4 Reference 4 R Value Calc to display the Composite Material RValue Calculator window as shown below. In the Select materials from list box, choose materials that apply to the composite assembly or structure of which the R-Value you want to calculate. Click the Add button to put the selected materials in the list box on the right. If materials were added to the box on the right by mistake, select the materials that you want to remove from calculation and click the Remove button. Click the Calculate button to compute the R-Value of the composite materials that appear in the box on the right. Make sure to click the Calculate button to update the result after you added or removed materials from the lists. If you are currently working with a HeatLoss project file, the OK button and the Location Selection box will become visible. In that case, your can use the calculated R-Value in the HeatLoss worksheet directly. To place the selected R-Value in the Heatloss sheet, mouse click the highlighted dash button near the bottom of the window to shrink down the Composite Material R-Value Calculator window. Then position your mouse and mouse click in the Heatloss worksheet the input cell where you want the computed R-Value to be placed and click the button just below the close button of the window on top to restore the Composite Material R-Value Calculator window and then the OK button to complete the action. 12 Heat Link ® www.HeatLink.com Select HeatLink Start 4 Reference 4 Weather to display the Weather window as shown below. HeatLink You can access and look up the outdoor design temperatures used by the Design Suite. If you want to change your project location for whatever reason, you can use this feature anytime to update the outdoor design temperature. Drop the Country combo box arrow to bring on a list from which you can select the country, such as Canada and USA. Then drop the State/Prov combo box arrow to bring on a list from which you can select the state or province. Finally, drop the City combo box arrow to display a list from which you can select the city where the project is found. If you are currently working with a HeatLoss project file, the Use Data button will become visible. In that case, your can update the city designation and its outdoor design temperature in the HeatLoss worksheet directly by clicking on that button. 13 Heat Link ® www.HeatLink.com HeatLink The Design Suite keeps a resourceful knowledge base specifically related to radiant floor heating design. If you come across an interesting issue during your design process, you can look up the topics in the manual for suggestions and guidance. Select HeatLink Start 4 Reference 4 Manual to display the Reference Manual window as shown below. Drop the Topic: combo box arrow to select the subject you like to look up. The More Info and More Idea buttons in the top right corner will be visible pending the subject selected. Clicking either one of them will bring on additional info and or idea concerning with the current subject. To switch back to the subject topic content before you click on the More Info or Idea button, mouse click the Topic: again. HeatLink Start 4 Exit Select HeatLink Start 4 Exit to unload HeatLink Design Suite in one easy step. It unloads HeatLink Design Suite from Excel. The box beside HeatLink Suite Wizard in the Excel Add-Ins window will be unchecked. If any of the Suite libraries and its related work files are still running when this command is issued, the Design Suite will prompt you to save the files before proceeding. After you executed this command, you have to load HeatLink Design Suite in Excel before you can use it again. To load the Design Suite application, run Excel if Excel is not running yet. Make sure a workbook/worksheet is opened. Select Tools, then Add-Ins… Check the box beside HeatLink Suite Wizard in the Add-Ins window to load the application. 14 Heat Link ® www.HeatLink.com HeatLink Start > Options Select HeatLink Start 4 Options 4 Settings to display the user Options window as shown below. HeatLink You have full control over the work environment when using the Design Suite. Enable input error checking and Enable warning message only apply to heatloss related projects while the other options apply to all Design Suite project files. The first four options are checked and enabled by default. It is advisable to leave these setting enabled or checked at all times. Enable product suggestion allows the application to recommend to you other HeatLink products pertinent to your project so that you can include them in your price quote whereas the Enable product description lookup option permits you to access and print the HeatLink product catalogue from the material/product worksheet. The last option allows your own products to be incorporated in the material list generated by the Design Suite if it is checked. The application keeps your materials in its own internal database. If the product database maintained by the application is empty when you check this option, you will be prompted to create one immediately. 15 Heat Link ® www.HeatLink.com HeatLink You can build up your own product database in Design Suite so that you can include your materials in every price quote generated by the application. Select HeatLink Start 4 Options 4 Product Database to display the User Product Database window as shown below. Use the Build tab to build up your product database one item at a time. For the picture shown above, there have been 2 items loaded in the database and the second item is currently displayed. To view the items in the database, click the scroll bar up/down arrow and drag its tab. The item# will be updated accordingly. To add item to the database, fill in the text boxes. The Description and Unit Price must not be left blank; they are essential to identify your products. Then click the Add button to actually put it in the database. To delete a particular item from the database, use the scroll bar to move to that item and click the Delete button to actually remove it from the database. To edit a particular item in the database, use the scroll bar to move to that item and type over its Description, Reference #, Unit and Unit Price. Click the Restore button to undo the changes you made to any particular item in the database. For instance, you used the scroll bar to go to Item 2. You then changed the description from An Excellent Model Hot Water Tank to Radiator. You then realize you have made a mistake. In that case, click the Restore button to cancel the changes you made. Click the OK button to update the database and close the window or the Cancel button to dismiss the window without updating the database. Use the Import tab to build up your product database by batch. If you have built up your own products list using Excel worksheet, Design Suite will create its internal database in one easy step. Just follow the description on screen on how it can be accomplished. To incorporate your own products in any of the price quote generated by HeatLink Design Suite, you have to check the Incorporate my products in the quoted material list in the user Options. See HeatLink Start 4 Options 4 Settings. 16 Heat Link ® www.HeatLink.com HeatLink Start 4 About HeatLink Select HeatLink Start 4 About to display the HeatLink Suite Window as shown below. Click the About tab to learn which version of HeatLink Design Suite is currently running. The registration# can be looked up in the Registration tab. If you need technical support, you need to note the build# as well as the registration#. In addition, you need the registration# to activate the application if you have not done so yet. To activate your Design Suite, you can log on to the Profession web page on HeatLink Website: http://www.heatlink.ca Or complete the form found in the file: hldsregform.txt and fax it to HeatLink Canada at (403) 250-1155 hldsregform.txt is one of the files you downloaded or distributed by your local HeatLink representative. 17 Heat Link ® www.HeatLink.com HeatLink Budget Menu Commands Budget menu item on the menu bar becomes visible when you have created a budget project or opened a previously saved budget project file. Budget 4 Tools HeatLink Design Suite Budget library will generate a price quote based on your inputs to creating a project. Select Budget 4 Tools 4 Create Quote to display the Create Quote window as shown below. Click the drop-down arrow of the Select Budget Project combo box to choose which budget project you want to create a price quote for. If you decide to include just the final price without showing discounts and product list prices in the price quote, uncheck the box beside Show price discounts and product list prices in the Details tab. HeatLink Design Suite is able to look into the Contacts list maintained by Microsoft Outlook to extract the particulars of the party that the price quote is to sent to. Click the Quote To tab for details as shown below. 18 Heat Link ® www.HeatLink.com HeatLink To look up any particular contact in your OutLook Contacts list, put in either the First Name or Last Name or both for the person you want to look up. Or you can search by the Company name. Use the < or > button to scroll through the matches if there are any. The < and > buttons are enabled only if multiple contacts match the search criteria. The particulars of the person you choose will be transferred to the price quote for you automatically. To complete the price quote, you need to fill in your own particulars in the Quoted By tab. You will be informed of where the price quote is to be found when you click the OK button. 19 Heat Link ® HeatLink www.HeatLink.com Home owner may change his or her requirements after you completed a price quote. Instead of creating another project for that, you just need to customize the existing project and create another price quote based on the new requirements. Select Budget 4 Tools 4 Customize to display the Customize Budget window as shown below. Select one of the open projects you want to customize by pulling down the Select Budget Project combo box. Follow the step by step as guided by the Next> button to tweak the project based on the new requirements. Click the Help button to bring on the Help window if you need information on any of the input fields. Mouse click on any part of the picture shown in the Help window to jump to the related section. After you customized the project, you can create another price quote based on your changes to the project by following the steps as outlined in the Budget 4 Tools 4 Create Quote section above. 20 Heat Link ® www.HeatLink.com You can send print to any connected printer or turn it to PDF file if you have installed Adobe Acrobat. HeatLink Select Budget 4 Tools 4 Print Sheet to display the Print Sheet window as shown below. Drop the Select Budget Project combo box to select the budget project to print. If you have installed Adobe Acrobat, the PDF Copy is enabled. Checking the box beside will turn the printout to PDF file. The resulting PDF files can be found in the same folder where the budget project file was saved. Hold down the Shift or Control key when you do multiple selections in the Choose Sheets To Print list box. Click the Print button to send sheet(s) to printer or to be saved as PDF files in the folder where the budget project file was saved. To get indication on how big the system pump is necessary for the budget project, select Budget 4 Tools 4 Size Pipe and Pump to display the Pipe & Pump Sizing window as shown below. Drop the Select Budget Project combo box to select the budget project to work with. Select the material of the main pipes to manifolds by dropping down the Material combo box. You can choose either PEX or Copper. The pipe size is automatically suggested based on the estimated water flow. Put down the main lengths to the farthest manifold from the system pump on each level and then click the System Pump icon to display the suggested pump size. Click the OK button to turn it to a report so that you can print it on a printer or change it to PDF file as outlined in the Budget 4 Tools 4 Print Sheet section above. 21 Heat Link ® www.HeatLink.com HeatLink Budget 4 Resources HeatLink Design Suite keeps a library of piping and wiring schematic drawings. You can make reference to the suggested schematics pertinent to your project by selecting Budget 4 Resources 4 Schematic to display the Schematic Drawing window as shown below. Drop the Select Budget Project combo box to select the budget project to work with. Select the Basic (simple) radio button if you want to pull out the suggested schematics (piping and wiring) for radiant heating system without reference to other applications. Select any item in the Other (complex) list box for radiant heating system together with other applications. The check boxes directly underneath The highlighted application has: label indicate what the other applications are. Note that you cannot change the check boxes. Click the Show button to display the HeatLink Schematic window along with a separate window showing the schematic drawing as shown below. You cannot close the separate schematic drawing window since its close button has been disabled. To close it, you have to click the Close button in the HeatLink Schematic window. Select the Piping or Wiring radio button to display the piping schematic and wiring schematic accordingly. Click the Print Preview button to show you how the print looks like when it is sent to a printer. Click the Print button to send it to a printer by selecting which printer the print is sent to if you have multiple printers connected. Occasionally the separate schematic window may become hidden. It will become visible again if you click any of the buttons other than the Close button. 22 Heat Link ® www.HeatLink.com HeatLink HeatLink Design Suite keeps a library of the install specifications. You can make reference to the suggested specification pertinent to your project by selecting Budget 4 Resources 4 Specification to display the Job Specification window as shown below. Drop the Select Project combo box to select the budget project to work with. The Dry and Wet check box will be enabled or disabled according to the install type specified in your budget project. Click the OK button to display the HeatLink Job Specification window along with a separate window showing the job specification as shown below. You cannot close the separate job specification window since its close button has been disabled. To close it, you have to click the Close button in the HeatLink Job Specification window. Drop the Type combo box to display the specification type (Wet or Dry) to show. Click the Print Preview button to show you how the print looks like when it is sent to a printer. Click the Print button to send it to a printer by selecting which printer the print is sent to if you have multiple printers connected. Occasionally the separate job specification window may become hidden. It will become visible again if you click any of the buttons other than the Close button. 23 Heat Link ® www.HeatLink.com HeatLink HeatLoss Menu Commands HeatLoss menu item on the menu bar becomes visible when you have created a HeatLoss project or opened a previously saved HeatLoss project file. HeatLoss 4 Tools HeatLink Design Suite Budget library will generate a price quote based on your inputs to creating a project. Select HeatLoss 4 Tools 4 Create Quote to display the Create Quote window as shown below. Click the drop-down arrow of the Select HeatLoss Project combo box to choose which heatloss project you want to create a price quote for. If you decide to include just the final price without showing discounts and product list prices in the price quote, uncheck the box beside Show price discounts and product list prices in the Details tab. HeatLink Design Suite is able to look into the Contacts list maintained by Microsoft Outlook to extract the particulars of the party that the price quote is to sent to. Click the Quote To tab for details as shown below. 24 Heat Link ® www.HeatLink.com HeatLink To look up any particular contact in your OutLook Contacts list, put in either the First Name or Last Name or both for the person you want to look up. Or you can search by the Company name. Use the < or > button to scroll through the matches if there are any. The < and > buttons are enabled only if multiple contacts match the search criteria. The particulars of the person you choose will be transferred to the price quote for you automatically. To complete the price quote, you need to fill in your own particulars in the Quoted By tab. You will be informed of where the price quote is to be found when you click the OK button. 25 Heat Link ® HeatLink www.HeatLink.com HeatLoss provides a project overview of your input parameter and summarizes your radiant floor heating design in a convenient place. Before you create a price quote for your Heatloss project, it is always advisable to tweak your system design parameters to see how the system responds to your changes, such as water temperature on heat shortages. Select HeatLoss 4 Tools 4 Optimize to display the Optimize Project window as shown below. The Optimize Project applies to the currently active HeatLoss project only, i.e. the Excel file that you are presently working with. Click the Update button to commit all the changes you have made to the project and close the Optimize Project window. The Update button will only be enabled when you have made change to any of the input parameters. Click the Cancel button to undo all the changes you have made to the project and close the Optimize Project window. After you optimized your project, you can let HeatLink Design Suite generate a price quote by following the steps as outlined in the HeatLoss 4 Tools 4 Create Quote section above. 26 Heat Link ® www.HeatLink.com You can send print to any connected printer or turn it to PDF file if you have installed Adobe Acrobat. HeatLink Select HeatLoss 4 Tools 4 Print Sheet to display the Print Sheet window as shown below. Drop the Select HeatLoss Project combo box to select the HeatLoss project to print. If you have installed Adobe Acrobat, the PDF Copy is enabled. Checking the box beside will turn the printout to PDF file. The resulting PDF files can be found in the same folder where the budget project file was saved. Hold down the Shift or Control key when you do multiple selections in the Choose Sheets To Print list box. Click the Print button to send sheet(s) to printer or to be saved as PDF files in the folder where the budget project file was saved. 27 Heat Link ® www.HeatLink.com HeatLink HeatLoss 4 Resources HeatLink Design Suite keeps a library of piping and wiring schematic drawings. You can make reference to the suggested schematics pertinent to your project by selecting HeatLoss 4 Resources 4 Schematic to display the Schematic Drawing window as shown below. Drop the Select HeatLoss Project combo box to select the heatloss project to work with. Select the Basic (simple) radio button if you want to pull out the suggested schematics (piping and wiring) for radiant heating system without reference to other applications. Select any item in the Other (complex) list box for radiant heating system together with other applications. The check boxes directly underneath The highlighted application has: label indicate what the other applications are. Note that you cannot change the check boxes. Click the Show button to display the HeatLink Schematic window along with a separate window showing the schematic drawing as shown below. You cannot close the separate schematic drawing window since its close button has been disabled. To close it, you have to click the Close button in the HeatLink Schematic window. Select the Piping or Wiring radio button to display the piping schematic and wiring schematic accordingly. Click the Print Preview button to show you how the print looks like when it is sent to a printer. Click the Print button to send it to a printer by selecting which printer the print is sent to if you have multiple printers connected. Occasionally the separate schematic window may become hidden. It will become visible again if you click any of the buttons other than the Close button. 28 Heat Link ® www.HeatLink.com HeatLink HeatLink Design Suite keeps a library of the install specifications. You can make reference to the suggested specification pertinent to your project by selecting HeatLoss 4 Resources 4 Specification to display the Job Specification window as shown below. Drop the Select Project combo box to select the heatloss project to work with. The Dry and Wet check box will be enabled or disabled according to the install type specified in your budget project. Click the OK button to display the HeatLink Job Specification window along with a separate window showing the job specification as shown below. You cannot close the separate job specification window since its close button has been disabled. To close it, you have to click the Close button in the HeatLink Job Specification window. Drop the Type combo box to display the specification type (Wet or Dry) to show. Click the Print Preview button to show you how the print looks like when it is sent to a printer. Click the Print button to send it to a printer by selecting which printer the print is sent to if you have multiple printers connected. Occasionally the separate job specification window may become hidden. It will become visible again if you click any of the buttons other than the Close button. 29 Heat Link ® www.HeatLink.com HeatLink HeatLink Design Suite Online Help/Guide Dependent on where you are when you are working with any heatloss project file (not budget project file), the HeatLink Design Suite will intelligently provide you with appropriate help and guide. If you feel lost or want to find out more about what to do with any particular input field, you can ask Design Suite for guidance. Note that you can click the Help button in the Create New Budget window for help when you are creating a new budget project. To bring on the Design Suite help guide, follow the steps below: Position the mouse at the input field you need help. Right click the mouse to display the context (or shortcut) menu as shown on the left. Select the HeatLoss Guide menu at the bottom to display the Help Guide window as shown below. The Help Guide displays helpful hints related to the currently selected input field. The four buttons on the right side of the Help Guide window are respectively (from top to bottom): Bonus Info (more information related to the selected input) Bonus Idea (bonus idea for the selected input) Online Manual (you can look up the related issue from the manual) Online Reference (access the related tools for the input) They are enabled or disabled dependent on the concerned subject. After viewing the bonus info or idea, you can go back to the original guide note by mouse clicking the Guide Note: label in the top left corner of the Help Guide window. 30 Heat Link ® www.HeatLink.com HeatLink Design Suite Online Product/Material Guide To access HeatLink product catalogue, go to the Material List sheet if you are working on a heatloss project file or the Product sheet if you are working on a budget project file. Then mouse right click on any of the stock numbers to display the HeatLink Product window as shown below. HeatLink The Design Suite keeps in its internal memory an archive of HeatLink product catalogue for your reference. A separate window bearing the title – HeatLink Product Description will display the details about the product of the selected stock number as shown below. You cannot close the HeatLink Product Description window since its close button has been disabled. To close it, you have to click the Close button in the HeatLink Product window. In the HeatLink Product window, you can: 1. 2. 3. Drop the Product combo box to select other stock number to show its product details. Click the Print Preview button to show you how the print looks like when it is sent to a printer. Click the Print button to send it to a printer by selecting which printer the print is sent to if you have multiple printers connected. Occasionally the HeatLink Product Description window may become hidden. It will become visible again if you click any of the buttons other than the Close button in the HeatLink Product window. 31 Heat Link ® HeatLink www.HeatLink.com This page is intentionally blank 32 Heat Link ® Project Design Considerations www.HeatLink.com If you lack detailed project information, Heatloss will make heat loss calculation easy for you, as it follows most typical industry standards. HeatLink To begin your heat loss calculation and radiant in-slab system design, a set of architectural plans is helpful. Information, such as floor area, ceiling height and window area, must be known for each room in order to conduct a reasonable heat loss calculation. Radiant floor heating design is an iterative process; below are the steps you would likely come across in your design process. 1. Estimating your heating requirements The room or area heating requirements must be determined using heat loss calculations. 2. Determine required heat output The heat loss of any given area must be replaced with the heat output provided by the radiant floor. Only ‘net’ floor area is used in determining the required heat output. The net area is calculated by subtracting from the total square footage all cabinets, fixtures and other non heat producing areas. 3. PEX pipe selection and spacing Most residential and light commercial applications are best designed with 1⁄2” oxygen-barrier or non oxygenbarrier pipes. However, certain applications may warrant the use of 3/8” or 5/8” tubing. Pipe spacing in a radiant floor heating installation directly affects the heat output, required supply water temperature and occupant comfort of the area. 4. Supply water and floor surface temperatures To keep supply water temperature and floor surface temperature from exceeding recommended figures, consider choosing a flooring of low R-value and reducing the heat loss of an area (i.e. increased insulation, better quality windows). 5. PEX piping and loop requirements Loop lengths in excess of the recommended may result in uneven or improper heat outputs and return water temperatures below acceptable design parameters. All loops in a multi-loop area should be kept as equal in length as possible to simplify system balancing. 6. Flow rate, pressure drops and heating requirement The system flow rate and heating requirement are the summations of all the individual loops and the system pressure drop is the maximum value of all these loops. You use these data to size a circulator for your installation. 33 Heat Link ® Project Design Considerations HeatLink www.HeatLink.com 34 1. Always use a separate distribution manifold header for a garage. 2. For piping embedded in concrete (i.e. wet installation), you may not need to provide specific floor heating to hallways or corridors when hot water piping to the surrounding rooms passes through these areas. 3. For piping in-between joist or under subfloor (i.e. dry installation), make sure the zones/rooms are squares or rectangles. Check the joist setup of the structure as pipe spacing is very much dependent on the joist setup. Heat Link ® HeatLoss Sheet www.HeatLink.com HeatLink Introduction 1. Zoning Most people prefer the bathroom to be warmer for showers and baths, and the bedroom to be a little cooler while sleeping. Zoning refers to separating the application into different areas of thermostatic control. A separate thermostat works in conjunction with a zone valve that opens and closes upon heating demand to allow the flow of hot water through a piping circuit. In essence, zone controls use the input information from the zone thermostats to deliver heat where necessary. HeatLoss makes zoning design easy for you. 2. Floor Finish Be aware that the floor finish in a room always has impact on your floor heating system. Not only must it be able to withstand the heat transmitted from the piping through the thermal mass, its R-value plays an equally important role in your system design. Floor finish of a low R-value can conduct heat more than those of high R-value. Consequently, the floor finish R-value has a bearing on the temperature of the heating fluid running underneath. The lower the R-value of a floor finish, the lower the supply water temperature is required to offset a given heat loss. Heatloss helps you easily select floor finish in a room. Due to its tendency to expand and contract under wide temperature variation, wood flooring has low exposure limits to temperatures. Worth considering in your system design with wood flooring are, 2 a. 2 b. Hardwoods (i.e., oak and maple) are a better choice over softwoods (ie. pine). Prefinished floating wood floor systems are an excellent alternative to traditional wood flooring. 2 c. The narrower the wood board, the less shrinkage that will occur. 2 d. Quartersawn flooring expands and contracts only 30% that of plainsawn flooring. 35 Heat Link ® HeatLoss Sheet www.HeatLink.com HeatLink Area rugs with padding over radiantly heated hardwood floors should be avoided. Supply water temperature must be raised to overcome the increased resistance to heat flow. At high supply water temperature, wood flooring will experience gapping and possible cupping. However, if the design heating load is less than 20 BTU/hr/ft2, area rugs can be used without much concern. Area rugs with padding can be installed without adverse effect over ceramic tile floor so long as the design heating load is less than 25 BTU/hr/ft2. Area rugs with padding over linoleum or vinyl tiles should be avoided because the glue mastic is most likely to break down due to the high temperatures under the padding. 3. Ceiling Height Ceiling height is used to determine room volume and exterior wall area. When a vaulted ceiling is present, an average height is preferred as opposed to taking the ceiling height at the peak or where the vault begins. For example, if a room has a vaulted ceiling beginning at 8’-0” and peaking at 12’-0”, the average ceiling height to use in calculations will preferably be 10’-0”. When designing a commercial floor heating project, such as warehousing facility, unless it is absolutely necessary, it is not required that the full ceiling height be used. It is sufficient to take the ceiling height at 1/2 of the actual height when the ceiling is 30 ft. high or over. 4. Area The area of different envelope components of a building has a direct bearing on heat lost calculation. The envelope is composed of the parts of the building exposed to colder than inside temperatures (yellow outline as shown). Items include: 4 a. 4 b. 4 c. 4 d. 4 e. 36 Floors exposed to unheated space or cooler room temperatures. Walls exposed to unheated space or cooler room temperatures. Ceilings exposed to unheated space or cooler room temperatures. Doors exposed to unheated space or cooler room temperatures. Windows. Heat Link ® HeatLoss Sheet www.HeatLink.com 5. R-values 5 a. 5 b. 5 c. 5 d. 5 e. 5 f. Ceiling insulation. Wall insulation. Floor insulation. Doors (only those exposed to unheated room or area). Windows and skylights. Floor finish. HeatLink R-value is the measurement of a material resistance to heat conduction. High R-value means more resistance to heat flow. When designing a radiant floor heating system or calculating heat loss, specific R-value of the following is to be determined: R-values of some typical windows and doors can be found under the Reference section of the HeatLoss menu. You can also find the R-value of materials commonly installed in any standard construction in the Appendix II and III of this user manual. 6. Infiltration Heat leaves a building by air leakage through imperfections of the building envelope, such as gaps and cracks around sashes and frames of windows and doors. One of the practical approaches to quantify this heat loss is to select a rate at which the interior air volume of the building (or an individual room) is exchanged with outside air. See the Introduction of Appendix A sheet for more details. Heatloss offers assistance in the selection of air leakage rate dependent on the number of walls having windows or exterior doors. It also makes provision to account for other air leakage related heat losses for commercial project due to, perhaps, frequent use of door openings, such as revolving doors. This infiltration loss is in addition to the air leakage heat loss inherently related to the quality of a building construction as described above. 37 Heat Link ® HeatLoss Sheet www.HeatLink.com HeatLink 7. Pipe Size Pipe size is determined primarily by the size of the project. Typically, residential applications make use of 1/2" PEX pipe while 5/8" or 3/4" pipes are often best suited for commercial ones. Heatloss allows you to use a default pipe size for the entire project or a specific size for a given room. The selected pipe size will have a bearing on the loop circuit length in your radiant heating system design. Does it make sense to increase pipe size in radiant floor slabs to get more heat output? See Section A of Appendix V for a discussion about this issue. 8. Pipe Spacing Pipe spacing refers to the distance between the PEX pipes in a given loop circuit. It can vary from one room or zone to another of a given project. Pipe spacing has direct bearing on your application in the following ways. 8 b. 8 c. 8 d. 8 a. The closer the pipe spacing, the lower the supply water temperature required to offset a given heat loss or to produce a given heat output. Floor finish of low R-values requires a closer pipe spacing to avoid noticeably warmer floor directly above the piping, e.g., tile as opposed to carpet. Pipe spacing can be used to change the average floor surface temperature by decreasing or increasing the spacing in the design phase. Both the pipe spacing and how far the pipe is underneath the floor surface are directly related to the surface temperature variance. (See Section B of Appendix V for a discussion about pipe depth in concrete slab.) If you have no idea of what pipe spacing to begin with, Heatloss will select for you a pipe spacing appropriate to the type of floor covering you have selected. Increasing pipe spacing may still produce the required heat output with the use of a higher supply water temperature. Though this can produce the benefit of reduced material requirements and system cost, the room comfort will likely suffer as floor surface temperature becomes uneven. 38 Heat Link ® HeatLoss Sheet www.HeatLink.com 9. Supply Water Temperature 1. 2. 3. 4. Installation type (i.e. poured or in-between-joists). Room heat loss. Pipe spacing. Floor finish type, i.e., its R-value HeatLink To establish proper supply water temperature for an installation, take into consideration of the following points: HeatLoss provides helpful hints when designing a supply water temperature for your project. The relatively low supply water temperatures of radiant heating systems necessitates the use of a tempering or mixing valve to lower the output of a heat source, such as a conventional boiler. HeatLink has made available two and four way thermostatic and manual mixing valves to provide precise temperature control. Thermostatic mixing valves maintain desired output temperature regardless of input temperatures and flow rates. This is done by thermostatically varying the mixture percentages from the hot and cold ports. Manual mixing valves maintain a fixed percentage of mixture from the hot and cold ports, resulting in output water temperatures that parallel any input variations. These mixing valves together with electronic mixing controllers have greatly enhanced radiant floor heating systems. Injection mixing controllers enable supply water temperature to vary with outdoor temperature with the objective of meeting the required heat load of a building at any time. In essence, these devices regulate efficiently the system output – the heat. HeatLoss allows you to select an injection mixing control appropriate to your application. Furthermore, HeatLink expands the control horizon by bringing you StatLink® - a control device running on 24 Vac, making thermostat wiring seamless. StatLink® can be expanded for wiring multiple thermostats, making your wiring work less burdensome. For better degree of energy efficiency and comfort, a StatLink® setback module can be considered. StatLink® works in perfect harmony with any standard injection controller. HeatLoss lets you specify StatLink® easily. 39 Heat Link ® HeatLoss Sheet www.HeatLink.com HeatLink 10. Use of Anti-freeze – Glycol If PEX piping is likely exposed to temperatures below 32oF for long periods, use of anti-freeze to protect the fluid from freezing and bursting the HeatLink® piping will be necessary. The recommended anti-freeze to use is inhibited propylene glycol. To your advantage, HeatLink® glycol has been premixed with Molybdate, a corrosion inhibitor vital to your hydronic heating system. Under no circumstances should you try automotive ethylene glycol which contains silicates detrimental to any pump seals. The addition of glycol to a system increases the system piping pressure head (∆P) and requires a higher flow rate (gpm) to transfer the same amount of heat to offset a given heat loss. Do’s and Don’ts • • • • Do not use galvanized pipe or fittings with glycol solution. The zinc will react with glycol inhibitors. Use a suitable boiler system cleaner to flush cutting oils, flux and etc., prior to filling the installation with glycol solution. It is recommended not to permanently connect to pressure reducing valve. If there is a leak, the addition of make-up water will dilute the glycol, and may render the piping susceptible to freezing. However, other alternate safety devices as per the local codes in your area should be consulted. Do not use chromate water treatment. It reacts with glycol. HeatLoss makes it easy for you to incorporate glycol solution in a system design. You can select glycol concentration between 0 and 50% to see the impact on the system flow rate and piping friction loss due to its presence. 11. Border Zones The border zone of a room refers to the floor area that extends around the perimeter of the room and toward its center at a given distance from the wall (typically 3’). A border zone is considered in radiant floor heating for two reasons: 40 11 a. To reduce or eliminate heat shortage, 11 b. To provide greater comfort. Heat Link ® HeatLoss Sheet www.HeatLink.com Border zones provide greater comfort and eliminate or reduce supplemental heat by increasing the floor temperature and heat output along outside walls with windows where most heat loss takes place. HeatLink HeatLoss makes consideration of border zones easy for you. You just need to decide the zone footage and HeatLoss will take care of the rest; pipe spacing and maximum circuit length will be selected pending the size of PEX pipe you selected. Step By Step Entry Line (3) Enter a room name. Any legitimate name to identify the room being evaluated (e.g. kitchen/nook – for a combined area). Line (4) Room Number is automatically entered once the Room Name is entered. You may override it. Note that after you make a change to it, the auto fill-in feature will be lost. Line (5) Enter a Manifold Number for this room or Zone to be connected (identification number is used for internal calculation and can be used on the loop circuit layout plan). Line (6) Select an appropriate type of thermostat from the pull down menu if a thermostat is to be installed in this room. Line (7) Enter a number for the zone or room thermostat. One or more rooms can be on a single thermostat. Each thermostat selected is an individual zone. Any adjacent room to be a part of this zone is to have the same zone number. In this case, do not select thermostat on Line 6 for this adjacent room. However, if you select no thermostat on Line 6 and do not indicate a number on Line 7, the loops calculated for this adjacent room will be considered running on ‘Reset’, i.e., being taken care by the injection mixing controller only. Line (9) Select Y for Yes from the pull down menu if the distribution manifold is equipped with a single zone valve that is controlled by a thermostat. Line (10) Select a floor finish from a pull down menu. 41 Heat Link ® HeatLoss Sheet HeatLink www.HeatLink.com Line (12) Enter an average height of all the exposed walls. The adjacent columns will be defaulted to this entry. Of course, it can be overridden if the exposed wall height is different in other rooms. Line (13) Enter the perimeter length of all the exposed walls or walls next to unheated area (e.g. garage, storage, crawl space, etc). Line (14) Enter a room length (if the room is rectangular or square). Line (15) Enter a room width (if the room is rectangular or square). Line (16) The room square footage will be calculated automatically if the room length (Line 13) and the room length (Line 14) have been entered. This cell can be written over by typing in a total square footage should the area be of an irregular shape. Line (17) Line (18) Enter the actual flat surface square footage of an exposed ceiling. Some rooms may have a partial exposure. The ceiling footage may not be the same as the floor footage; a ceiling may be a cathedral type that has a larger square footage than the floor footage of a given room. Bedroom 6 ft Outside W Wall Kitchen 10 ft Outside Wall W Exposed wall = 6’ + 10’ = 16 feet. 17 Enter the actual flat surface square footage of an exposed floor. If the floor is a cantilever type, use that portion of the surface area, not the complete floor area. Enter a total square footage if the complete floor is over a crawl space. (See note in the help box for its connection to Line 23 below.) 18 42 Living Room Heat Link ® HeatLoss Sheet www.HeatLink.com HeatLink Cell (D19) Enter R-value of the insulation in the roof or attic. The following columns will be defaulted to this value. You can override it if the R-value is different in other rooms. Cell (D21) Enter R-value of the insulation in the wall structure. The following columns will be defaulted to this value. You can override it if the R-value is different in other rooms. Line (23) If room floor is partially or entirely over an unheated area, select an appropriate floor type from the pull down menu. Choose BF for basement floor, SOG for slab on grade or OCS for over a crawl space. (This selection is linked to area entry on Line 18.) You can use OCS for a floor that is cantilever type or over an unheated area. See applicable R-value in Appendix II. Be sure to override the default exposed area with the actual square footage in Line 18. Cell (D25) Enter R-value of the crawl space. The following columns will be defaulted to this value. You can override it if the R-value is different in other rooms. Cell (D26) Enter R-value of the insulation under the concrete slab. The following columns will be defaulted to this value. You can override it if the R-value is different in other rooms. Cell (D28) Enter R-value of the insulation around of the slab perimeter. The new Canadian Building code/2003 requires a minimum of R5 insulation throughout the entire floor area. Perimeter only will no longer be acceptable. Line (30) Enter the average wall height below grade. Cell (D31) Enter R-value of the insulation in the wall structure. The following columns will be defaulted to this value. You can override it if the R-value is different in other rooms. Buried wall 43 Heat Link ® HeatLoss Sheet HeatLink www.HeatLink.com 44 Cell (D33) Enter R-value of fixed type glass windows. The following columns will be defaulted to this value. You can override it if the R-value is different in other rooms. Line (34) Enter the square footage of all fixed type windows in the room. Cell (D36) Enter R-value of hinged type glass windows. The following columns will be defaulted to this value. You can override it if the R-value is different in other rooms. Line (37) Enter the square footage of all hinged type windows in the room. Cell (D39) Enter R-value of metal or wood exterior doors. The following columns will be defaulted to this value. You can override it if the R-value is different in other rooms. Line (40) Enter the square footage of all metal or wood exterior doors exposed to unheated area in the room. Cell (D42) Enter R-value of any glass or overhead exterior doors. The following columns will be defaulted to this value. You can override it if the R-value is different in other rooms. Line (43) Enter the square footage of all glass or overhead exterior doors exposed to unheated area in the room. Cell (D45) Enter R-value of any skylight windows. The following columns will be defaulted to this value. You can override it if the R-value is different in other rooms. Line (46) Enter the square footage of all skylight windows in the room. Heat Link ® HeatLoss Sheet www.HeatLink.com HeatLink Line (48) Enter a value for the infiltration factor. Please read the suggestion in the help box. This figure is used to estimate the heat loss due to the quality of the building. Line (49) Enter a value for the commercial air leakage factor. This figure is used to estimate the heat loss due to, perhaps, frequent use of door openings, such as revolving doors. It is in addition to Line 48 above. Please read the suggestion in the help box. Line (50) Enter the square footage of all the non-heating areas in the room, such as cabinets, appliances, toilets, bath tub vanities, fireplaces and etc. Any area that you cannot run piping underneath will contribute to ‘No Heat’ areas. Line (51) The room temperature will be defaulted from cell L56. However, you can override it if a different room temperature is required for the room. Line (52) Net Area will be calculated automatically from subtracting the value on Line 50 from Line 16. This area will be used to calculate the required piping. Line (53) The calculated room heat loss appears here based on your inputs. Cell (E56) The heat loss of all the rooms is totaled and reported here. Cell (E57) Output in this cell is the heat loss due to mechanical ventilation, if there is any. Cell (F57) Enter the volume of air displaced in the entire structure in cfm (cubic feet per minute). It is used to estimate the heat loss due to mechanical ventilation. Read the suggestions in the help box for guideline. Cell (E58) Reported in this cell is the total heat loss, due to construction as well as mechanical ventilation. 45 Heat Link ® HeatLoss Sheet HeatLink www.HeatLink.com Cell (H56) Output in this cell is the total area footage of all the rooms. Cell (H57) Output in this cell is the total heat producing area (net) of all the rooms. Cell (H58) Output in this cell is the total non-heat producing area of all the rooms. Cell (J56) Choose one of the injection mixing controls from the pull down menu. Cell (J57) Choose Yes or No for StatLink® control from the pull down menu. See StatLink® control in the Introduction of this sheet. Cell (J58) Choose Yes or No for Setback module to go with StatLink® from the pull down menu. See Setback module in the Introduction of this sheet. Cell (J59) Choose Yes or No for Indoor Sensor in your design from the pull down menu. Indoor sensor is different than a thermostat in that 1. it provides additional resistance input via a thermistor to an injection mixing controller. It is necessary for indoor reset control that increases or decreases supply water temperature based on indoor temperature in conjunction with outdoor temperature. Indoor reset is capable of quickly compensating for rapidly changing heat loss conditions in conjunction with outdoor reset control. 2. either indoor sensor or thermostat is to be used but not both. 46 Cell (L56) Enter designed indoor air temperature during winter in oF. The room temperature on Line 51 will be defaulted to this entry. Cell (L57) Enter your designed outdoor air temperature, oF. It is defaulted to a temperature according to your selection of city upfront. It is ideal to keep the outside temperature at the coldest figure expected for the area in winter. You can consult other sources for this design parameter. For instance, in Calgary, temperature would dip down to -35oF in a cold snap while the average temperature during winter would be only -5oF. Cell (L58) The temperature differential between the inside and outside temperatures shows up here. This differential will be used for the heat loss calculations. Cell (L59) Select the percentage of glycol to be used in your installation from the pull down menu. See Use of Anti-freeze – Glycol in the Introduction of this sheet. Heat Link ® HeatLoss Sheet www.HeatLink.com Enter the supply water temperature you desire for the system, in oF. It normally ranges from 100oF to 140oF. Temperature exceeding 160oF is rare. Cell (P57) Enter your designed temperature drop (∆T) between the supply and return. This value has a commanding impact on the system flow rate. A small value means water must flow faster while a larger value means a slower flow to offset a given heat loss. The value is copied onto Line 68 where it can be overridden. This ∆T normally falls in a range from 10 to 20oF. Cell (P58) Select a pipe size from the pull down menu. This size will be copied onto Line 70 where it can be overridden depending on the room being evaluated. HeatLink Cell (P56) For instance, you use 1/2” piping for every room except the garage where you decide to use 5/8” piping instead. So you change the value on Line 70 to 5/8” for the garage. Larger pipe results in smaller friction loss and the system may end up requiring a smaller head pump. Line (61) Select a choice from the pull down menu. Only when you specify Y to ‘Floor Heat’ will the HeatLoss update the bill of materials accordingly for your project. Only a heat loss load (no bill of materials) will be computed for the other options (i.e. select FC from the pull down menu if fan coil is to be used, R for radiator board, or N if no heat necessary). Line (62) Select a choice from the pull down menu to specify wet or dry installation. The option you select will affect the bill of materials accordingly. For wet installation using tie straps, choose WC. For wet installation with pipes cradled on tracking that is stapled to the sub-floor, choose WT. For wet installation with pipes cradled on tracking that is stapled to the insulation Styrofoam, choose WS. Choose D for dry installation (i.e. pipe in-between-joists). For Wet installation, you may not need to provide specific floor heating to hallways or corridors when piping to the surrounding rooms passes through these areas. For Dry installation, make sure the zones/rooms are squares or rectangles. Also check the joist setup of the structure as pipe spacing is very much dependent on the joist setup. 47 Heat Link ® HeatLoss Sheet HeatLink www.HeatLink.com Line (64) Enter a distance between the room and the manifolds located elsewhere, in feet. It is used to calculate the pipe leader length (this distance will be multiplied by 2 automatically to account for the supply and return pipes) which is added to the maximum loop length on Line 73. Line (65) Enter the thickness of cement above the pipes. The thickness of cement has a direct bearing on the performance of your installation. (See a discussion about this subject in Appendix III.) A 1-3/8” cement underlayment pour is quite common in residential and light commercial projects. Line (66) Enter the thickness of a subfloor in inches. It applies only to dry installation. The following columns will be defaulted to this entry that can be overridden if the sub-floor thickness is different in other rooms. Note that after you change this default entry, the program default on this line will be lost. Line (67) It is defaulted to either 80 or 85oF dependent on your entry on Line 6. You may override this program default. Note that after you change this default entry, the program default on this line will be lost. The maximum allowable temperature for high traffic area is 88oF. See Line 79 for less traffic area. You should look up the computed floor surface temperature on Line 76 in the Analysis sheet. This maximum floor surface temperature can be raised by 1 or 2oF if floor covering is carpet or a pipe in-joists installation is being considered. In any event, the local codes in your area should take precedence over our suggestion. Line (68) This temperature drop is defaulted to your entry in Cell P57. You can override this program default. Note that after you change this default entry, the program default on this line will be lost. The temperature drop has a direct bearing on the water flow rate in the piping. Line (69) This entry is defaulted to either oxy or non oxy dependent on your entry on Line 62. If you have selected D on Line 62, the entry on this line is non oxy to avoid potential noise problem due to pipe expansion and contraction. Note that after you change this default entry, the program default on this line will be lost. If the local codes in your area dictate the use of oxygen barrier pipe only, you have to override the program default. 48 Heat Link ® HeatLoss Sheet www.HeatLink.com The entry is defaulted to your input in Cell P58. You can override the program default. Note that after you change this default entry, the program default on this line will be lost. Line (72) This entry is defaulted to either 6” or 12” (8” for dry systems) dependent on your entries on Line 62 and Line 10. It can be overridden for areas, such as bathrooms and kitchens, to a spacing of no more than 6 inches. This entry is preferably left unchanged until you need to reduce the heat shortage as reported in the Analysis sheet. HeatLink Line (70) 6” OC pipe spacing in areas with floor finish of hardwood, tile or linoleum is suggested to avoid possible hot and cold spots. Do you know why? How is the R-value of these materials compared to that of carpet? Line (73) Dependent on your input in Cell P58, the computed maximum loop length in feet is reported here. There is an additional pipe length added to the loop – your entry on Line 64. You may override this calculated value. Note that after you change this cell entry, the program default in this cell will be lost. 49 Heat Link ® HeatLoss Sheet HeatLink www.HeatLink.com Line (75) Enter border zone square footage here should a major heat shortage be reported in the Analysis sheet. See the Border Zones in the Introduction of this sheet for more details. The pipe spacing in border zone is normally defaulted to 3” for 1/2” PEX and 6” for 5/8” PEX. Line (76) It is defaulted to 3” for 1⁄2” PEX and 6” for 5/8” PEX. Note that after you change this default entry, the program default on this line will be lost. If you override the program default, enter a pipe spacing of no less than 6 times the diameter of the pipe you have selected for the room. Line (77) The computed maximum loop length is reported here. The maximum loop length in the border zone is shorter than its counterpart in the non-border zone. 50 Line (78) The same as Line 68. Line (79) The same as Line 67 but for the border zone. Maximum allowable floor temperature in the border zone is limited to 95oF. Heat Link ® Analysis Sheet www.HeatLink.com This worksheet outputs a detailed analysis of your heat loss calculation based on all your previous inputs so that you can take necessary actions to tweak your system design by changing your entries in the Heatloss sheet. In essence, it is a ‘read only’ sheet as no user entry is necessary. HeatLink Introduction The reported heat output may not exactly match the design heating load of the room or building; it may be greater or less than the design heating load. If lesser, you must make some modification(s) to boost heat output. You may consider: a. Raising the supply water temperature, b. Increasing the circuit’s flow rate, c. Reducing piping spacing, d. Adding border zones, e. Choosing a floor covering of lower R-value. f. Adding supplemental heat emitters: fan coil and radiator, g. Adding more underside insulation, h. A combination of the above. If your heat output is greater than the design load of a room or building, you may consider lowering the flow rate to your installation using a balancing valve (globe valve), or possibly increasing the pipe spacing. 1. Heat Output Shortage Look into those rooms that show heat shortages in meeting the design heating load and see if the reported heat loss is reasonable. Should you decide to reduce the pipe spacing to boost heat output, take note of the suggested minimum pipe spacing below. PEX Pipe 1/2" 5/8" 3/4" Minimum Spacing 3" 6" 12" 51 Heat Link ® Analysis Sheet HeatLink www.HeatLink.com Your installation type has a direct bearing on the pipe spacing. For instance, in a WC type installation, wire mesh spacing will have a direct impact on pipe spacing; wire mesh usually has two sizes of spacing: 6” and 12”. Should your installation type be either WT or WS, the tracking used will have a dominant impact on pipe spacing; tracking can cradle pipes at a spacing of multiple of 3” (i.e., 3”, 6”, 9” and 12”). For a Dry installation, structural joist spacing will dictate the pipe spacing of your design. In a typical dry residential application, 1/2” pipe is normally used. Pipes should be arranged at 8” spacing for 16” on centre joists, 6” spacing for 24” on centre joists, and 6” spacing for 19” centre joists (if a 3rd pipe is required in a 16” joist spacing, use 5” pipe spacing). Other spacing can be achieved with different joist setup. Use of heat transfer plates in a dry installation enhances response time, distributes heat more evenly and allows lower supply water temperature. A joist heating system without use of heat transfer plates (i.e. a suspended piping system utilizing only sealed air pocket below sub-floor) would be limited to 20 BTU/hr/ft2 and a total floor finishing R-value of 2.0 or less. For HeatLink systems, use of heat transfer plates is mandatory 2. Pipe Spacing Piping in rooms, like bathrooms, or areas where the floor finish is either tile, vinyl or linoleum, or hardwood should be of spacing no more than 6” apart in order to avoid hot and cold spots on hard surface floor coverings. However, you may consider a pipe spacing of more than 6” in areas or rooms where minimal traffic is expected. It should be noted that increasing pipe spacing, in most cases, will still produce the required heat output with the use of a higher supply water temperature. While this can provide the benefit of reduced material requirements and system cost, the occupant comfort will likely suffer as floor surface temperatures become uneven. Moreover, high supply water temperature has a negative impact on wood structures. 3. Recommended Flow Rates The general range of pipe friction loss used for design of hydronic systems occurs between 1 and 4 ft/100 ft. In addition, flow velocity must be considered. Too high flow velocity will cause noise in piping. And too low flow velocity will be unable to move any air bubbles possibly entrained in the water. To strike a balance between friction loss and flow velocity for a typical radiant floor heating system, the following is suggested. Based on 100 ft length of PEX pipe, pipe 52 PEX Size USgpm Pressure Head (water) 1/2” 5/8” 3/4” 1 1.7 2.8 4.0’ 4.0’ 4.0’ Heat Link ® Analysis Sheet www.HeatLink.com For a given length of pipe, one will experience high pressure head (∆P) at faster flow. Therefore, for a given pressure head, higher flows are possible for shorter length of pipe loops. Change in ∆P is proportional to (change in gpm)2 HeatLink In general, a change in system ∆P is accompanied by a change in the system’s flow rate in the following relationship. To change the flow rate of a loop circuit, you can consider reducing the design ∆T (the temperature differential between supply and return) of the loop, as high ∆T always results in low flow rate or vice versa. For a hydronic heating system, ∆T and flow rate are related in the following. (BTU / hr) gpm = for water with 0% glycol 500 • (∆T) In the presence of propylene glycol, replace 500 with 470 for 30%, 450 for 40% and 430 for 50%. 4. System Pressure Head You should always check the computed pressure head your installation has to overcome in Cell H107 in this Analysis sheet. Together with the friction loss of the pipe mains to the manifold headers, you can size your system pump based on this pressure head. It is suggested that this system pressure head be ideally kept low, preferably not exceeding 15’ head (water) for residential installation. To lower this pressure head, you can consider reducing your system flow by increasing the design temperature differential ∆T of your installation. See the discussion above on the relationships between flow rate, pressure head and design temperature differential of a radiant floor heating system. Remember that presence of glycol in your installation has a bearing on the system pressure head. You system circulator will pump harder to move viscous glycol. 53 Heat Link ® Analysis Sheet www.HeatLink.com HeatLink Step By Step Output 54 Line (23) The Room Name transferred directly from the Heatloss sheet. Line (24) The room Reference Number transferred directly from the Heatloss sheet. Line (25) Indicates whether or not the room has floor heating transferred directly from the Heatloss sheet. Line (26) Displays either Floor heat, Radiator, Fan coil or No heat dependent on your entry on Line 61 of the Heatloss sheet. Line (27) Indicates whether it is a dry or wet installation, transferred from the Heatloss sheet. WC = wet installation using tie straps, WT = wet installation with pipes cradled on tracking that is stapled to the sub-floor, WS = wet installtion with pipes cradled on tracking that is stapled to Styrofoam, D = dry installation. Line (29) Indicates thickness of concrete topping transferred from the Heatloss sheet. Line (30) Displays either Carpet, Plush carpet, Vinyl, Wood, Tile or Concrete, transferred directly from the Heatloss sheet. Line (31) The gross area footage of the entire room transferred directly from the Heatloss sheet. Line (32) Net heat producing area transferred directly from the Heatloss sheet. Line (38) The PEX pipe size you have selected for the room transferred directly from the Heatloss sheet. Line (40) PEX pipe spacing (inch) you have selected in the Heatloss sheet. Heat Link ® Analysis Sheet www.HeatLink.com The computed amount of heat required to meet the design heating load of the space. Line (42) The actual heat output delivered by your design parameters and piping. This value is limited by the floor surface temperature you have selected in the Heatloss sheet. You can consider changing the floor surface temperature and the supply water temperature in the Heatloss sheet to tweak this actual heat output. Line (43) It is the actual heat output delivered by the heat producing area, i.e., the net area in the Heatloss sheet plus the heat output generated by the border zone if there is any. Line (44) If you declare this room as no floor heat area on Line 62 in the Heatloss sheet, the heat loss of this room will show up here. Or else, it shows nothing. Line (45) This is how much BTU/hr the radiant floor heating falls short of the design heating load. HeatLink Line (41) To eliminate or reduce output shortage, consider in the Heatloss sheet: • Reducing the pipe spacing, • Raising the supply water temperature to a maximum of 145 ˚F. • Adding border zones, • Adding other heat emitters, such as radiators or hot water coils. A roughin piping is to be provisioned for future consideration. Line (48) The border zone area transferred from the Heatloss sheet. Line (53) The heat output delivered by the border zone. This value is limited by the floor surface temperature you have selected in the Heatloss sheet. Line (55) The computed floor surface temperature for the border zone corresponding to your border zone inputs in the Heatloss sheet. If it exceeds 95oF, you will need to reduce it by making changes to your border zone entries in the Heatloss sheet. What possible measures can we follow to achieve it? Would change to pipe spacing and supply water temperature help? 55 Heat Link ® Analysis Sheet HeatLink www.HeatLink.com 56 Line (59) The computed flow rate in each loop circuit in the border zone. Line (65) The computed maximum friction loss experienced by the loop circuits of this border zone. Line (66) The computed total pipe length in the border zone. Both the supply and return leader lengths are included. Line (68) Indicates the number of loops required in this border zone. Line (69) This is the manifold group number for the border zone. Each border zone manifold is balanced separately from the others. Line (70) A reference number is given to this border zone. You may use it on the layout drawings for future reference. Line (71) The PEX pipe spacing you have selected in the Heatloss sheet. Line (72) The computed loop length to be used in this border zone based on your border zone inputs in the Heatloss sheet. Line (73) This is the dial setting to be set on the TwistSeal (55 mm or 40 mm) return manifold module suggested by HeatLoss. (Note: HeatLoss frees you of the tedious work on flow balancing among loop circuits.) Heat Link ® Analysis Sheet www.HeatLink.com HeatLink Line (76) Reported here is the computed floor surface temperature of the room (outside the border zone). If it exceeds 88 ˚F, you will need to reduce it by tweaking your entries in the Heatloss sheet, such as lowering the floor surface temperature and or the supply water temperature. Note: the local codes in your area should take precedence over our suggestion. Line (80) It is the computed flow rate of each loop circuit. See note in the Introduction about changing the flow rate of a loop circuit. Line (85) The computed friction loss through the loop circuit and the manifold modules the loop is connected to when the dial setting on the return module is set at 12. Line (88) It is transferred directly from the Heatloss sheet. Line (89) It is transferred directly from the Heatloss sheet. Line (90) The computed total pipe length of this particular room shows up here. Line (95) It is the number of loop circuits computed for this particular room (not including any border zone, if there is any in the room). 57 Heat Link ® Analysis Sheet HeatLink www.HeatLink.com Line (96) This is the manifold group number transferred directly from the Heatloss sheet. Each manifold header is to be balanced separately from the others. Line (97) A reference number transferred directly from the Heatloss sheet. You may use it for future reference on any layout plans. Line (98) The PEX pipe spacing transferred directly from the Heatloss sheet. Line (99) It is the computed average loop length for this particular room (not including the border zone if there is any in the room). Line (100) It is the dial setting that the TwistSeal return module is supposed to set for flow balancing among the loop circuits. Line (102) If you specified no floor heat to this room in the Heatloss sheet, length of baseboard radiator is computed and suggested here based on the room’s heat loss. Line (104) If you call for floor heat and the radiant heating falls short of the room’s design heating load, length of baseboard radiator is computed and suggested here based on the room’s heat output shortage. HeatLoss assumes a radiator output of 560 BTU/hr/ft in the calculation. 58 Heat Link ® Analysis Sheet www.HeatLink.com HeatLink Cell (E105) The temperature differential between the indoor and outdoor of the room is reported here, based on your inputs in the Heatloss sheet. Cell (E106) The average water temperature of your design is reported here. One half of your design temperature drop (∆T) is subtracted from your design supply water temperature. Cell (E107) Your system’s flow rate to offset the design heating load of all the rooms is computed and reported here. Cell (H105) The loop circuits of all the rooms are tallied and reported here. Cell (H106) The lengths of loop circuits of all the rooms that call for floor heating are tallied and reported here. This total length does not include the main pipes to the supply and return manifolds. Cell (H107) The maximum pressure head (ft head water) to overcome in the system is computed and reported here. It is preferably not to exceed 15’ head (water) for residential installation. See this sheet’s Introduction for more details. Cell (L105) The total actual heat output delivered by your floor heating installation in all rooms is tallied and reported here. Cell (L106) All the heat shortages due to floor heating are tallied and reported here. These shortages must be made up by other heating means. If you use electric radiators instead of boiler water to make up these shortages, it should be netted off from the total boiler make-up in Cell Q106. Cell (L107) The volumes of all floor heating pipes in all rooms (border and non-border zones) are tallied and reported here. 59 Heat Link ® Analysis Sheet HeatLink www.HeatLink.com Cell (Q105) The heat loss of all rooms not calling for floor heating are tallied and reported here. If you use electric baseboard radiators instead of boiler water to make up these heat losses, it should be netted off from the total boiler make-up in Cell Q106. Cell (Q106) The summation of all the cell entries in Cells L105, L106 and Q105. Cell (Q107) The BTU/h required for ventilation (bringing air of outside temperature to room condition) in the building is calculated and reported here. Cell (E158) The total area footage related to your installation designated Dry only (in-between-joists) in the Heatloss sheet. Cell (H158) The total area footage related to your installation designated WC (wet installation using tie straps) only in the Heatloss sheet. Cell (L158) The total area footage related to your installation designated WT (wet installation using pipe tracking stapled to subfloor) only in the Heatloss sheet. Cell (P158) The total area footage related to your installation designated WS (wet application using pipe tracking stapled to insulation Styrofoam) only in the Heatloss sheet. Cell (Q158) Reported here is the total required BTU/hr for all the rooms you have evaluated. It is actually the summation of cell entries in Cells Q106 and Q107, i.e., the boiler make-up BTU/hr plus the BTU/hr to meet the mechanical ventilation needs. 60 Heat Link ® Material List Sheet www.HeatLink.com HeatLoss summarizes for you a bill of materials in the Material List sheet based on your design specifications (i.e. the entries you input in the Heatloss sheet). Categories of materials include PEX pipes, mixing devices and controls, fittings, accessories, manifolds and other miscellaneous radiant heating products. HeatLink Introduction 1. PEX Pipe Based on the computed number of loops and their corresponding loop lengths in the Analysis sheet, the numbers of coils of each PEX pipe size needed are determined. To minimize waste, try to group circuits together to get near the coil length in stock. 3/8”, 1/2”, 5/8”and 3/4” HeatLink PEX coils are commonly stocked in 300’, 450’ 500’ and 1000’ lengths. (Please refer to our current product catalogues.) 2. Water Temperature Mixing Controls Output from the Analysis sheet are the quantity and size of mixing devices needed for your system specifications. It is worth noting that 2 a. One mixing device is needed for every supply water temperature necessary. 2 b. Mixing devices are to be sized according to the amount of flow passing through and the pressure drop across them under the design condition. 3. Pipe Fittings PEX pipe fittings are always needed to make a transition from the PEX to the manifolds or the distribution system. HeatLink offers standard compression fittings to accommodate PEX transitions to manifolds. The number of fittings needed for your installation is based on the output from the Analysis sheet (note that each circuit requires two fittings, one at each end - supply and return). 4. Pipe Installation Accessories PEX pipe installation requires standard accessories that provide pipe protection as well as system performance. Accessories include pipe fasteners, pipe elbows, and heat transfer plates. 4 a. Pipe Fasteners They include pipe tracking, tie straps and etc. 4 b. Pipe Elbows Elbows are used on the pipe when it enters and exits a concrete slab. 4 c. Heat Transfer Plates Heat transfer plates are used in joist space installations to help conduct and transfer heat from the heating pipe to the underside of a floor. 61 Heat Link ® Material List Sheet www.HeatLink.com HeatLink 5. Distribution Manifolds HeatLink 40 mm and 55 mm TwistSeal manifolds are selected based on your system flow rate. Based on the computed number of circuits of all the rooms evaluated, HeatLink TwistSeal manifolds matching your design specifications are suggested. Generally, the following points apply regardless of the type of manifold selected: 5 a. Each manifold header includes a supply manifold and a return manifold. 5 b. Isolation valves are to be installed on the supply and return manifolds. 5 c. An air vent (either automatic or manual) should be located at each manifold station on the return manifold for air removal. 5 d. The number of modules a supply or return manifold contains is equal to the number of circuits served by the manifold header. Always use a separate distribution manifold header for a garage Step By Step Output You will find on this list of materials a partial listing of the HeatLink line of products, their corresponding stock/part numbers (SKU#) and shipping unit. Visit our Website at www.heatlink.com or contact your HeatLink area representative for a complete listing of HeatLink radiant heating products. The recommended quantity shown on the list in Column H (Qty) is directly transferred from the Analysis sheet based on your entries in the Heatloss sheet. 62 Heat Link ® Material List Sheet www.HeatLink.com HeatLink Extra space is made available at the bottom of material list for you to place other items related to your installation for price quotation. These extra items of your own will be transferred to your quote in the Quote sheet. 63 Heat Link ® Material List Sheet HeatLink www.HeatLink.com You can change the quantities or add other items related to your installation to this Material List if you need to. Since this Material List sheet is for your own reference and upon which you build a price quote for the installation your customer is requesting, HeatLoss makes it easy for you in this regard. Incorporated in the Material List sheet are two price adjustors for price discount and mark-up purpose. Cell (O1) This default price discount rate is applied to all the products you are quoting for the installation. Cell (O2) You can use this entry to do a mark-up or further discount on the product price for the job you are quoting. This entry is applied to all the products on the list of materials. Should you need a price mark-up and no discount on the product prices, enter 0 in Cell O1 and a positive percentage in Cell O2 or vice versa. When you prefer not to use the ‘universal’ price discount and or mark-up rate in Cells O1 and O2, you can override the program defaults by entering a different price discount rate in Column L or mark-up in Column M (or both) next to the products that these special rates are applicable to. Note that after you change the default entries in these two columns, the program default will be lost. HeatLoss provides you with great flexibility in price adjustments on HeatLink products you are quoting for your job or project. See the example below and take note of the discount rates in Column L and M for the product# 89010, #12345 and #34567 64 Heat Link ® Material List Sheet www.HeatLink.com HeatLink The discounted price or marked up price is shown in Column O. The total price (discounted or marked up or both) will be transferred to and reported in your Quote sheet. See the quote below corresponding to the materials list above. 65 Heat Link ® Summary Sheet HeatLink www.HeatLink.com Introduction HeatLoss generates a short report in the Summary sheet breaking down the analysis of your system specification in the Heatloss sheet on a room-by-room and manifold-by-manifold basis. In essence, it is a condensed report compiled from the Analysis sheet, giving you a quick overview of what your installation is like. Should you need to modify your system design, you can go back to the Heatloss sheet and tweak your entries there and/or make changes (only limited to a few places) in this Summary sheet. (See a partial view of the Summary sheet below.) HeatLoss can intelligently suggest 40 mm (#78200) or 55 mm (#78400) TwistSeal manifold dependent on your system flow rate. Of course, you can override this program suggestion. However, HeatLoss will not comply with your overriding if the flow rate to the manifold of your choice does not support it. As a word of caution, your overriding program suggestion on either 40 mm or 55 mm TwistSeal is final; any subsequent change(s) to your entries in the Heatloss sheet will not cause HeatLoss to revert back to its previous suggestion. Leave the TwistSeal selection to the last minute until you have tweaked all your entries in the Heatloss sheet to your satisfaction and foresee no more other changes to your system design. 66 Heat Link ® Summary Sheet www.HeatLink.com HeatLink Suggesting either 40 mm TwistSeal or 55 mm TwistSeal dependent upon the computed flow rate to a manifold header is a nice feature of HeatLoss. The cost saving and price competitive benefit are apparent, as you do not need to quote an oversized manifold when the flow rate is easily handled by a compact version. Another nice feature of HeatLoss is to let you upgrade 40 mm TwistSeal Mini to 55 mm TwistSeal because of product stock/part logistic issues. For instance, for a particular floor heating installation, HeatLoss recommends five 55 mm TwistSeal and one 40 mm TwistSeal Mini. You may find it would be more convenient to order just six 55 mm TwistSeal instead. HeatLoss is able to make an intelligent choice on suggesting the right TwistSeal for you. It is also your responsibility and discretion to make the right choice to use 55 mm TwistSeal over the program suggested 40 mm TwistSeal Mini. Step By Step Entry & Output Row 38 to 65 / Column N:: Length of Mains (ft) Enter the length of your main pipes (both supply and return) to the related manifolds. Your entry here will allow HeatLoss to suggest an appropriate pipe size (reported in Column O) and compute the total friction loss of these main pipes (reported in Column P) for you. If you know the length of the system mains to the manifold headers, entering their pipe lengths in this column will allow HeatLoss to compute the friction head your installation has to overcome so that you can size a right pump for your system. To account for the pipe fittings, such as valves, tees and bends, see chart in Appendix IV for their equivalent length of straight pipe. Pipe fittings’ equivalent length should be added to their respective lengths of mains in this column for calculation of main pipe friction loss. 67 Heat Link ® Summary Sheet www.HeatLink.com HeatLink Row 38 to 65 / Column R:: Manifold Type Should you decide to override the program recommended TwistSeal in this column, highlight the cell corresponding to the concerned manifold shown in Column B and select an item from the pull down menu to override program recommendation. Your selection will update the flow settings accordingly in Column O between Row 5 and Row 32. Leave the TwistSeal selection overriding to the last minute until you have finetuned all your entries in the Heatloss sheet and see no more other changes to your system design. Overriding program selection is final; any subsequent change(s) to your entries in the Heatloss sheet will not cause HeatLoss to revert back to its previous recommendation on TwistSeal. Cell (F69) This is the boiler make-up BTU/hr transferred directly from the Analysis sheet. Your heating source should be of a rating no less than this value. Cell (F71) Reported here is the friction head your installation has to overcome; it is the maximum value of the manifolds’ total ∆P in Column Q between Row 38 and Row 65. If you have entered length of mains in Column N including all the related pipe fittings, this cell value will be the pressure head to size a circulator for your installation. Cell (K71) Output in this cell is the total flow rate of your installation; a summation of the cell values in Column E between Row 38 and Row 65. You use this flow rate to size a circulator for your radiant floor heating system. 68 Heat Link ® Quote Sheet www.HeatLink.com The Quote sheet easily lets you generate a price quotation based on the list of materials applicable to your installation, including those specific items of your own (as displayed in the Material List sheet). HeatLoss outputs a price quote in this Quote sheet, ready to print and forward to your customer or client. HeatLink Introduction The Quote sheet consists of two pages: 1. Page 1 is an itemized list of materials extracted directly from the Materials List sheet. 2. Page 2 is your quote template spelling out other details, such as materials suggested but not included in your quote, a breakdown on the area of the installation and quantity of recommended corrosion inhibitor and antifreeze (if antifreeze has been factored in your system design). You can modify this template to your liking. Step By Step Entry & Output 1. Page 1 The Project Name: in Cell E13 and Prepared by: in Cell H8 are copied from the Heatloss sheet. You may override the program default. Note that after you change these cell entries, the program default in these cells will be lost. 69 Heat Link ® Quote Sheet HeatLink www.HeatLink.com Cell (E8) Enter the company name of your customer. Cell (E9) Enter the address of your customer. Cell (E10) Enter the name of the person you quote is addressed to. Cell (E11) Enter the business phone number of your customer. Cell (E12) Enter the business fax number of your customer. Cell (H10) Enter your job reference number for the installation you are quoting. Cell (K13) Output here is your quoted price before any government taxes; it is transferred directly from the Material List sheet. 2. Page 2 70 Cell (E80) Replace the red X’s with the heat shortages reported for all those WT designated rooms in the Analysis sheet. Cell (E83) Replace the red X’s with the heat shortages reported for all those WS designated rooms in the Analysis sheet. Cell (E86) Replace the red X’s with the heat shortages reported for all those D designated rooms in the Analysis sheet. Heat Link ® Quote Sheet www.HeatLink.com Replace the red X’s with the heat shortages reported for all those WC designated rooms in the Analysis sheet. Cell (E96) Glycol concentration is transferred directly from your entry in Cell L59 in the Heatloss sheet. See Use of Anti-freeze – Glycol in the Introduction of the Heatloss sheet for more details. Cell (G97) Output in this cell is your required glycol quantity in the main pipes only if you have made entries to the lengths of pipe mains Column N between Row 38 and Row 65 in the Summary sheet. Cell (K97) Reported in this cell is your required glycol quantity in the loop circuits (of total volume as reported in Cell L107 of the Analysis sheet) based on your specified glycol concentration in Cell E96. Cell (E98) Specify Molybdate content in your installation. Entered for you is HeatLink’s suggested concentration. You may override this suggested value but it should not be less than 0.625%. HeatLink Cell (E89) Molybdate is a corrosion inhibitor agent; it is vital to any hydronic heating system. Its concentration must be maintained in your installation at all times. See Section C of Appendix IV for more details. Cell (G99) Output in this cell is your required Molybdate quantity in the main pipes only if you have made entries to the lengths of pipe mains Column N between Row 38 and Row 65 in the Summary sheet. Cell (K99) Reported in this cell is your required Molybdate quantity in the loop circuits (of total volume as reported in Cell L107 of the Analysis sheet) based on your specified glycol concentration in Cell E98. Cell (G103) Reported in this cell is the friction head of your installation that must be overcome; it is transferred directly from Cell F71 of the Summary sheet. Cell (I103) Output in this cell is the total flow rate of your installation; it is transferred directly from Cell K71 of the Summary sheet. Cell (G114) Replace the red X’s with the date when job information was delivered to you. 71 Heat Link ® Appendix I www.HeatLink.com HeatLink Introduction Calculating heat loss is the starting point to approach the design of any radiant floor heating system. Heat loss from a building comes about in two ways: 1. by conduction; via all surfaces that are warm on the inside and cold on the outside, 2. by air leakage; via infiltration of cold air through cracks and gaps of windows and doors. Heat loss calculation is an estimate of the rate (measured in BTU/hr) at which a building or room loses heat at the outdoor design temperature. It is impossible to calculate the exact heat loss rate due to the vast details of a building to be considered. 1. By Conduction Heat flows through a solid object when there is temperature differential (∆T) across the object. The heat flow rate (Q) depends on the thermal conductivity (K), thickness (∆x) and area (A) of the object in the following: K Q = ( ) ∞A ∞(ΔQ T )= ( K ) ∞A ∞(ΔT ) Δx K Δx Q = ( ) ∞A ∞(ΔT ) As we are more interested in heat loss reduction Δx than the thermal conductivity of a material, we usually express Δx Δxthermal resistance of a material. = R -value, the = R -value, the thermal resistance of a material. K Δx K = R -value, the thermal resistance of a material. K Hence, the heat flow rate becomes 1 Q=( ) ∞AQ∞(=Δ(T ) 1 ) ∞A ∞(ΔT ) Rvalue 1Rvalue Q=( ) ∞A ∞(ΔT ) Rvalue The greater the R-value of a material, the less heat flows through it for a given area and temperature differential across it. It means that for a given heat output Q and area A, high ∆T is necessary for large thermal resistance, i.e., high R-value. 72 Heat Link ® Appendix I www.HeatLink.com Floor covering R-value ∆T (oF) No pad 1.00 30.0 With pad 1.88 56.4 HeatLink Now you can see why a floor covering of high R-value has an adverse impact on the supply water temperature of a radiant floor heating system. For instance, it is determined that a heat output of 30 BTU/hr/ft2 is needed to achieve desirable comfort in a room. You are now choosing a floor covering between carpet without rubber pad (R-value = 1.00) and with rubber pad (R-value = 1.88). To simplify calculation, let us consider only the floor finish here and neglect anything else. If floor surface temp. is 85 oF, supply water temp. will be 110.0 oF 141.4 oF If other things (such as air space) are factored in, the supply water temperature of your installation with carpet and rubber pad flooring will be more likely to exceed an installation limit than the one without the rubber pad. 2. By Air Leakage A building has many imperfections through which air leaks, such as cracks and gaps around windows and doors, electrical outlets and fireplaces. Air leakage heat loss is estimated using air volume (room Volume) displaced in an hour at a temperature differential (∆T) between indoor and outdoor conditions. Q = 0.018 • ((ACH ACH)) • (Volume)) • ((∆T ACH ∆T)) where ACH = air change per hour ∆T 73 Heat Link ® Appendix II HeatLink www.HeatLink.com Appendix I� R-value of Typical Materials for Standard Construction (oF ft2 hr)/BTU Windows & Doors Ceilings Standard double glass window, fixed 1.54 Ceiling below unheated room 1.67 Standard double glass window, hinged 1.10 Ceiling below unheated room & R-20 18.9 Low-e glass window, fixed 2.38 Ceiling below unheated room & R-30 30.3 Low-e glass window, hinged 1.82 Ceiling below unheated room & R-40 38.5 Solid wood door 1.40 Ceiling-roof combination & R-20 20.4 Metal fibre core door 1.19 Ceiling-roof combination & R-30 28.6 Wood frame double glass door 1.11 Metal frame double glass door 1.06 Overhead garage door 1.01 Walls Floors & Perimeter (see note below) Frame: Floor: Siding, gypsum board & R-20 19.2 Over an unheated space 3.21 Siding, gypsum board & R-30 25.0 Carpet floor over an unheated space 4.59 Cement: Over an unheated space & R-20 19.2 Above grade, 8-12" unfinished cement 1.96 Carpet floor over an unheated space & R-20 20.8 Above grade, 8-12" cement & R-20 20.8 Over an unheated space & R-30 27.0 2-5' below grade, 8-12" unfinished cement 6.80 Carpet floor over an unheated space & R-30 28.6 2-5' below grade, 8-12" cement & R-20 25.0 Basement/Slab floor 35.7 5-8' below grade, 8-12" unfinished cement 9.80 Perimeter: 5-8' below grade, 8-12" cement & R-20 27.8 Concrete slab on grade, no edge insulation 1.23 Concrete slab on grade, 1" edge insulation 2.44 Concrete slab on grade, 1.5" edge insulation 3.70 Concrete slab on grade, 2" edge insulation 4.76 Residential ACH ( for each room) [new construction only] Commercial ACH (for each area) [provision for other related infiltration loss] Windows/outside doors on 1 side 0.05 Areas with 1 or 2 outside walls 0.50 Windows/outside doors on 2 side 0.15 Areas with 3 or 4 outside walls 0.65 Windows/outside doors on 3 side (entrance halls) 0.30 Sun rooms, windows on 3 sides 0.40 For slab on grade area having exterior exposure, use perimeter factor. For areas not having exterior exposure, use floor factor (e.g. basement slab). Page 53 of 62 74 Heat Link ® Appendix III www.HeatLink.com HeatLink Appendix II� R-value of Typical Floor Covering (oF ft2 hr)/BTU Flooring Thickness R-value Carpet* 1/8 0.68 1/4 1.00 1/2 1.40 3/4 1.80 1 2.20 1/8 0.22 1/4 0.44 1/2 0.88 1/4 1.00 1/2 2.00 Rubber pad Urethane Vinyl (Linoleum) Ceramic tile Hardwood 0.21 1/8 0.22 1/4 0.44 3/8 0.45 3/4 1.00 Plywood 1.25 *multiply R-value by 1.5 for wool carpet Page 54 of 62 75 Heat Link ® Appendix IV www.HeatLink.com HeatLink FRICTION LOSSES THROUGH PIPE FITTINGS & VALVES SIZE OF PIPE (Inches) GATEVALVE WIDE OPEN 1/4 CLOSED 1/2 CLOSED 3/4 CLOSED GLOBE VALVEWIDE OPEN ANGLE VALVEWIDE OPEN CHECK VALVEWIDE OPEN ORDINARY ENTRANCE TO PIPE LINES STRAIGHT PIPE IN FEET (EQUIVALENT LENGTH) 5.00 19.00 9.00 5.00 2.00 .46 7.00 26.00 12.00 6.00 3.00 .60 9.00 36.00 16.00 8.00 4.00 .75 STD. 90∞ ELBOW MEDIUM SWEEP 90∞ ELBOW LONG SWEEP 90∞ ELBOW .74 1.00 1.40 .65 .86 1.15 .50 .70 .90 1/8" 1/4" 3/8" .14 .21 .27 .85 1.25 1.80 1/2" 3/4" 1" 1-1/4" 1-1/2" 2" 2-1/2" 3" 3-1/2" .41 .55 .70 .92 1.07 1.38 1.65 2.04 2.10 2.10 2.90 3.40 4.80 5.60 7.00 8.40 10.00 12.50 12.00 14.00 18.00 24.00 28.00 36.00 41.00 52.00 60.00 44.00 59.00 70.00 96.00 116.00 146.00 172.00 213.00 246.00 17.60 23.30 29.70 39.10 45.60 58.60 70.00 86.90 100.00 7.78 10.30 13.10 17.80 20.10 25.80 30.90 38.40 52.00 5.18 6.86 8.74 11.50 13.40 17.20 20.60 25.50 24.00 .90 1.40 1.60 2.50 3.00 3.50 4.00 5.00 5.50 1.60 2.30 2.70 3.60 4.50 5.40 6.50 8.50 10.0 1.55 2.06 2.62 3.45 4.03 5.17 6.17 7.67 8.50 1.10 1.50 2.00 2.50 2.90 3.60 4.40 5.50 6.30 4" 2.40 14.00 70.00 285.00 116.00 57.00 27.00 6.50 12.0 9.50 7.20 Use the smaller diameter in the column for pipe size. d D = Smaller diameter Larger diameter ABRUPT CONTRACTION SIZE OF PIPE (Inches) 45∞ ELBOW SQUARE 90∞ ELBOW CLOSE RETURN BENDS STD. TEE STD. TEE d D 1/4 ABRUPT ENLARGEMENT d D 1/2 d D 3/4 d D 1/4 d D 1/2 d D 3/4 STRAIGHT PIPE IN FEET (EQUIVALENT LENGTH) 1/8" 1/4" 3/8" .40 .50 .65 1.60 2.30 3.00 2.00 3.00 4.00 .50 .70 .90 1.60 2.30 3.00 .40 .50 .65 .30 .40 .50 .16 .22 .29 .74 1.00 1.40 .46 .62 .83 .16 .22 .29 1/2" 3/4" 1" .83 1.10 1.40 4.00 5.00 6.00 5.00 6.00 7.00 1.00 1.40 1.80 3.10 4.10 5.30 .80 1.00 1.50 .60 .80 1.00 .36 .48 .62 1.60 2.30 2.70 1.20 1.40 1.60 .36 48 .62 1-1/4" 1-1/2" 2" 1.84 2.15 2.76 8.00 9.50 13.00 9.00 11.00 14.00 2.30 2.70 3.50 6.90 8.10 10.30 1.70 2.00 2.50 1.40 1.60 2.00 .83 .97 1.30 3.60 4.50 5.40 2.30 2.70 3.50 .83 .97 1.30 2-1/2" 3" 3-1/2" 3.29 4.09 4.50 15.00 18.00 20.00 16.00 19.00 22.00 4.10 5.10 6.30 12.30 15.30 20.00 3.00 4.00 4.50 2.50 2.90 3.40 1.50 1.80 2.10 6.50 8.00 10.00 4.00 4.80 5.60 1.50 1.80 2.10 4" 5.00 23.00 25.00 7.20 23.00 5.00 4.00 2.40 12.00 6.40 2.40 NOTE: 1/8" to 4" are standard pipe sizes. 76 Heat Link ® Appendix V www.HeatLink.com A. Does Pipe Size Make a Difference in Radiant Floor Heating Design? HeatLink When the heat output of your radiant heating design with 1/2" pipe does not meet the required design heating load, one of your possible immediate reactions would be to use a larger diameter pipe to boost the heat output. You expect that there would be more heat out of a 5/8" pipe than a 1/2" pipe (i.e. thermal output increases with pipe size). If that is the case, how much will it be? And is it worth using large size pipe to boost heat output? To verify if it makes sense to increase the pipe size in radiant floor slabs to pump up heat output, a study(1) was conducted using PEX pipe of size ranging from 3/8" to 3/4" spaced at 12" OC in a 4” thick concrete slab with 1" insulation underneath, different supply water temperatures of 80, 100, and 120oF were tested. In this study, the slab was finished with 3/8” laminated hardwood flooring of 0.43 R-value and an indoor temperature was kept at 70oF. Heat Output Relative to 1/2" PEX Pipe Water Temp 80oF 100oF 120oF 3/8” PEX 0.973 0.972 0.990 1/2” PEX 1.000 1.000 1.000 5/8” PEX 1.070 1.063 1.059 3/4” PEX 1.080 1.070 1.116 Drawn from this study are the following, 1. The heat output difference between 3/8" and 1/2" pipe is barely noticeable over the water temperatures tested. 2. The discrepancy between 1/2" and 5/8" pipe is relatively bigger. The output is slightly higher at the low water temperature than at the higher water temperature; it is 6.4% more heat than the one using 1/2” on the average. If the slab finish is bare concrete instead, this average gain will increase to 9%. 3. The difference between 5/8" and 3/4" pipe is small. The average increase is 2.4% though it is slightly higher at the higher water temperature than at the lower water temperature. Based on (1) and (3) above, it is hardly justifiable to boost only heat output by using 1/2" pipe over 3/8" or 3/4" over 5/8" pipe. The slight gain in heat output by using larger size pipe in these cases can be equally accomplished by a slight change to your system supply water temperature, pipe spacing, pipe depth below floor surface or floor finish resistance, i.e., its R-value. However, using a larger size pipe does lower the flow resistance of your installation in these cases. It can make a big difference in pump sizing under certain circumstances. 77 Heat Link ® Appendix V HeatLink www.HeatLink.com The 6 to 9% output gain dependent on flooring type in using 5/8" over 1/2" pipe can prove beneficial under certain circumstances despite higher capital cost upfront, particularly when low supply water temperature is essential to maximize the efficiency of your heat source, such as condensing boiler, geothermal heat pump and solar energy collector. For a given heat output, the marginal gain in output by using 5/8" instead of 1/2" pipe can help lower the supply water temperature of your installation by a couple of degrees, though the gain in heat source efficiency from this temperature reduction may be small. As a system designer, you have to justify using 5/8" pipe over 1/2" pipe by comparing the reduced operating cost over the entire life of your installation to the difference in capital cost of using these pipes. B. Does the depth of radiant heating pipe in a concrete slab make any difference? As you would expect, the thermal output of an in-slab radiant heating system does depend on how deep the piping is in a concrete slab. To verify this dependency, a study(2) was conducted to demonstrate the effect of pipe depth on heat output for a 4” thick, bare concrete slab operating with 100oF water, and resting on 1 inch of extruded polystyrene insulation. PEX piping on 12” OC spacing Depth below surface Heat output (BTU/hr/ft ) 2 Relative to 1” below surface 1” 2” 3” 24.9 23.5 21.5 100% 94.4% 86.3% Though the results may seem trivial, several points can be drawn from this study. 1. Due to the concrete thickness, the thermal resistance increases as the piping goes deeper in the slab. Therefore, higher supply water temperature is necessary to push the heat energy through this increased resistance to achieve a given rate of heat output. High supply water temperature will not be ideal 78 • when low supply water temperature is essential to maximize the efficiency of your heat source, such as condensing boiler, geothermal heat pump and solar energy collector. • when concrete slab and floor covering are susceptible to high slab temperature. See the Floor Finish in the Introduction of the Heatloss sheet for more details. Heat Link ® Appendix V www.HeatLink.com 3. Whether there is under-slab insulation or not, the closer the piping is to the bottom of the slab, the greater the underside heat loss. HeatLink 2. It is important to know that what affects the efficiency of a radiant floor heating system is the back and edge losses, which are mostly influenced by the surface temperature of the radiant piping. The higher the pipe surface temperature due to high supply water temperature, the higher the back and edge losses. 4. The further away the piping is to the surface of the slab, the bigger the thermal mass above it. As you can imagine, warm-up time in response to a call for heat is longer and so is the cooling time after heat input is called off by system control. Reference (1) John Siegenthaler P.E., ‘Does Tube Size Matter?’, October, 2001, PM Magazine. (2) John Siegenthaler P.E., ‘To Lift Or Not To Lift’, November 2002, PM Magazine. C. Corrosion due to oxygen diffusion in radiant floor heating system A 3⁄4” non oxygen barrier PEX pipe filled with water that is low in oxygen can absorb approximately 3 to 4 mg oxygen per liter of water per day at 104°F. Oxygen barrier (EVOH) PEX pipe of the same size produced to DIN 4726 industry standard that requires oxygen diffusion of no more than 0.1 mg per liter per day at 104°F is able to obstruct oxygen diffusion to an effectiveness of 98% compared to the non barrier pipe. However, 1. Oxygen diffusion increases considerably with increasing water temperature. At 140°F, for example, the increase is about 16 folds compared to that at 104°F (i.e. it is 1.6 mg/litre per day for PEX pipe produced to DIN 4726 standard). 2. Though oxygen absorbed in water decreases as pressure decreases, the absorbing capacity of water for oxygen does not decrease significantly. At 30 psi, for instance, it is 12.8 mg/litre per day at 104°F and 9.4 mg/litre per day at 140°F. 3. The aggressiveness of oxygen increases by 4 folds at 140°F as compared to 104°F. Corrosion of metallic components accelerates and leads to leaks eventually. 4. Oxygen in the system accounts for the formation of ferrous oxide hydrate (concentrated with H2O), a thick gray-brown sludge blocking and restricting flow through the piping in a closed system. 5. Most boilers are of cast iron. Given the facts above, corrosion damage cannot be eliminated by using oxygen barrier PEX pipe alone. Other means must be introduced to the system to inhibit oxygen aggressiveness. HeatLink recommends the use of Molybdate inhibitor in closed loop system. Molybdate is environmentally acceptable and thermally stable. To be effective, it must be present in the system in a concentration of 100 – 150 ppm. For better detail on water quality in hydronic systems, please request a copy of INFO 29.1 from your HeatLink area representative. 79 Heat Link ® Questions www.HeatLink.com HeatLink 1. You are asked these floor heating related questions on the phone. “I have hardwood flooring everywhere in my house. What water temperature do I run? How far apart should I put the pipes?” The best response to these questions is a. I can’t tell because water temperature and pipe spacing are to be answered by a professional. b. For a hardwood flooring, you should use 6” spacing and run water temperature at 150oF. c. I need to do a heat loss calculation for each room of your house before I can answer your questions. d. You’ve got me. I will call HeatLink to find out for you. 2. A 1” wooden rod and a 1” steel pipe were placed outside on a snowy day. If you were to grab both of these, which one would be warmer? a. The wooden rod is warmer. b. The steel pipe is warmer. c. None of them is warmer. d. None of the above. 3. “My house is already framed. My wife is now nagging me to put in floor heating in place of forced air. Oh… By the way, I will use hardwood flooring in my 8 ft ceiling house. I know there are quite a few ways to do it. Which one should I use?” The best advice to your customer is a. A 1-1/2” underlayment pour on top of piping stapled to the subfloor. b. Install piping in plywood sleepers and aluminum underlayment system on top of the subfloor. c. Install piping in between the floor joists below the subfloor. d. Install piping in between the floor joists with aluminum heat transfer plates below the subfloor. 4. A customer calls in, complaining that the floor heating system you installed is running amok and that he feels like walking on hot iron after he replaced his 1/4” carpet flooring to 3/8” hardwood in the house. What are you going to tell your customer? a. Your floor heating system warranty has just expired. b. You need to replace either the mixing controller or the mixing valve or both. c. You need to place a service call with your boiler dealer. d. Nothing serious; you just need to lower the supply water temperature setting on your mixing controller. 80 Heat Link ® Questions www.HeatLink.com 5. HeatLink You recently put in floor heating in the main floor of your dream home. The floor is nicely carpeted except both the kitchen and the nook where tile flooring is used instead. The system is very simple: it relies on a thermostat that controls a modulating valve to a heat exchanger on the boiler side and a pump maintains water flow through PEX loops. Piping (1/2” PEX) is at 6” spacing in both the kitchen and the nook and 12” otherwise. For some reason, the tile feels cooler than a bare foot would prefer whenever heat input is interrupted by the thermostat. Why? a. The piping should have been at 3” spacing instead of 6” in both the kitchen and the nook. b. The system pump is undersized, i.e., insufficient flow in the circuits. c. The tiled floor area releases heat from the slab faster than the carpeted area. d. You forgot to put in a mixing controller to modulate the water temperature. 6. What would be the best remedy to the problem as described in Question (5) above? a. Order a mixing controller (either #31320 or #30360) from HeatLink. b. Replace the system pump with one of higher pressure head and more flow capacity. c. Replace the tiled floor area with carpet. d. Keep the pump running even heat input is interrupted by the thermostat. 7. Radiant heating piping is installed on a suspended floor deck to heat the room below and above. The thermal resistance of the flooring in the room above is equalized to that of the ceiling finish in the room below. The space above the floor is a living room with plenty of south-facing windows, and the space below is a heated basement. The design room temperatures in these rooms are the same. For convenience, the room thermostat is in the living room. Will the system perform as expected? a. Yes, it will deliver to expectation because the rate of upward heat flow is as much as the downward one due to equal thermal resistance upward and downward. b. No, the room below would be underheated while the room above comfortably controlled. c. No, the room below would be underheated while the room above overheated. d. No, the room below would be overheated while the room above underheated. 8. What can be benefited from a radiant floor heating system running on a higher water temperature differential between supply and return? a. The system flow rate is lower. b. The system pressure head is lower. c. The size and operating cost of the distribution circulator would be reduced. d. All of the above. 81 Heat Link ® Questions www.HeatLink.com HeatLink 9. What will be your concerns in running a radiant floor heating system on a high temperature differential between supply and return? a. Noticeable differences in floor surface temperature from one area of the room to another, particularly when people walk barefoot on the floor. b. High water temperature near the beginning of the circuits may cause problems with flooring, such as embrittlement of vinyl, shrinkage of wood or discoloration in carpet. c. Residual air bubbles possibly entrained in the system can not be delivered to the air vents because the flow velocity is so low. d. All of the above. A radiant floor heating system is installed in a 20’ x 20’ room that has a heat loss of 25 Btu/hr/ft2 at a desired room temperature of 70oF. The room has a carpeted floor and is over a heated area. HeatLink HeatLoss shows that the room will have heat shortage if the floor surface temperature is below 85oF. Try question 10 to 14 below for this floor heating design. 10. If the room flooring is changed to hardwood from carpet, which of the following will be true? a. The room’s heat loss remains the same. b. There will be no heat shortage. c. The floor surface temperature will be higher. d. None of the above. 11. Which of the following floor construction will change the required floor surface temperature? a. A thick concrete slab. b. A thin gypcrete slab. c. A frame floor. d. None of the above. 12. If the room flooring is changed to tile from carpet, which of the following will be true? a. The radiant floor heating system’s supply water temperature can be lowered. b. The floor surface temperature 85oF remains. c. The room’s heat loss remains the same. d. All of the above. 82 Heat Link ® Questions www.HeatLink.com 13. Which of the following statement is true? b. Heat energy moves from hot to cold. c. Floor coverings are part of the floor construction. Floor construction dictates the path (in the direction of least thermal resistance) that the heat energy will take from the radiant floor heating system to the floor surface. HeatLink a. The room’s design heating load is dictated by the room construction, not floor covering. d. All of the above. 14. Given that the R-value of air and tile are 0.68 (oF ft2 hr)/BTU and 0.22 (oF ft2 hr)/BTU respectively and the piping is running between joists, what would be the supply water temperature? (ignore the thermal resistance of PEX pipe) a. 124.5oF b. 107.5oF c. 100.0oF d. 140.0oF 15. What would you suggest to a customer who is putting in his house a radiant floor heating system that relies on a geothermal heat pump? a. A tighter pipe spacing. b. Low thermal resistance of floor covering. c. Use of 5/8” instead of 1/2” PEX. d. All of the above. 83 Heat Link ® Canada Manufactured by polytech PRODUCTS Inc. Head Office: 4603E - 13th Street N.E. Calgary, Alberta, T2E 6M3 Phone: (403) 250-3432 Fax: (403) 250-1155 Toll Free: 1-800-661-5332 Mississauga Office: 1555 Bonhill Road, Unit #7 Mississauga, Ontario, L5T 1Y5 Phone: (905) 795-8289 Fax: (905) 795-0210 Toll Free: 1-800-661-5332 Heat Link ® China Room 404, Chit Lee Commercial Building 30-36 Shaukiwan Road, Shaukiwan, Hong Kong Phone: 852-25107333 Fax: 852-25107208 Heat Link ® Ireland Cappincur, Tullamore, Co. Offaly Phone: (0506) 24062 Fax: (0506) 24063 Freephone: 1800-311338 Heat Link ® México ADOLFO PRIETO 1759 - C Col. Del Valle C.P. 03100 México D.F. Phone: (52-55) 5534-4241 Heat Link ® (52-55) 5524-9850 U.S.A. Inc. 89 - 54th Street S.W. Grand Rapids, Michigan, 49548 Phone: (616) 532-4266 Fax: (616) 532-9322 Toll Free: 1-800-968-8905 www.HeatLink.com L7180 Printed in Canada © polytech PRODUCTS Inc.