1
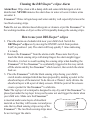
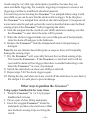
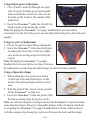
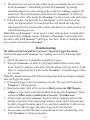
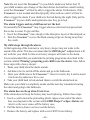
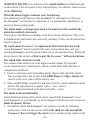
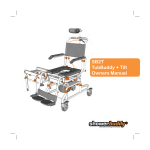
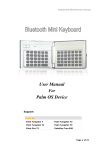
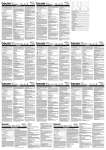
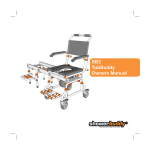
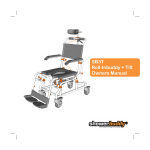
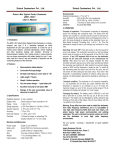
AND
The joy of a dry night’s sleep
Instructions
IMPORTANT
Please read these instructions before use
These instructions apply to both the DRI Sleeper® eclipse alarm
and the DRI Eclipse™ alarm (USA market only).
In the context of these instructions reference to the
DRI Sleeper® eclipse also includes the DRI Eclipse™.
Congratulations on the purchase of your DRI Sleeper® eclipse wireless
bedwetting alarm.
Successful treatment with the DRI Sleeper® eclipse takes from a few weeks to a
few months. For the best results work with your child. Teach him or her how the
alarm works and practise what to do when the alarm is triggered.
In the early stages of treatment it also pays to help your child wake up when the
alarm sounds. Always encourage your child and acknowledge their progress.
Keep using the DRI Sleeper® eclipse EVERY NIGHT until your child has
achieved 14 consecutive nights without wetting the bed. Your child can then stop
using the alarm.
–1–
DRI Sleeper® eclipse Alarm
panty liner with Urosensor™
inserted inside hand-cut slit
the alarm base I on 0 off pairing button
panty liner with Urosensor™
inserted inside hand-cut slit
the Urosensor™
volume
adjustment
control
battery compartment
with slide-out drawer
panty liner with Urosensor™
inserted inside hand-cut slit
–2–
Cleaning the DRI Sleeper® eclipse Alarm
Alarm Base: Wipe clean with a damp cloth and some mild detergent or skin
disinfectant. NEVER immerse the alarm base in water or locate it where urine
can enter it.
Urosensor™: Rinse in liquid soap and water and dry well especially between the
two black sensing strips.
Note: Do not use chlorine-based detergents or cleaners or put the Urosensor™ in
the washing machine or dryer as this will irreparably damage the sensing strips.
How to use your DRI Sleeper® eclipse
1. Place the alarm on a bedside table near your child’s bed. Switch the
DRI Sleeper® eclipse on by moving the ON/OFF switch from position
0 (off) to position 1 (on). The alarm will beep quickly 5 times indicating
it is ready.
2. Remove the Urosensor™ from the alarm cradle. Please note that if you
touch the black sensing strips with damp fingers the alarm might trigger.
Therefore, it is best to avoid touching the sensing strips when handling the
Urosensor™. If the Urosensor™ is accidentally triggered in this way switch
off the alarm and dry the Urosensor™ which resets it, then switch the alarm
back on.
3. Place the Urosensor™ with the black sensing strips facing your child’s
crotch inside a minipad which has been prepared by making a pocket in the
absorbent layers of the material. To do this cut a 25mm (1 inch) slit into the
absorbent layers with a pair of sharp scissors. With the point of the scissors
create a pocket for the Urosensor™ to slide into.
Note: The top layer of a minipad is designed to stay dry and if the Urosensor™ is
placed just under the top layer it may not become wet and trigger the alarm when
your child wets. Make sure the Urosensor™
is inserted under some layers of absorbent
material so that they will become wet and press
onto the two black sensing strips on top of the
Urosensor™. The two black sensing strips must
be wet to trigger the alarm.
–3–
Avoid using the very thin type of minipad or pantyliner because they can
cause unreliable triggering. For example, triggering in response to sweat or not
triggering at all due to insufficient absorbent material.
It is useful to practise locating the Urosensor™ in a minipad before using it with
your child so you can be sure that the alarm is able to trigger. To do this place
the Urosensor™ in a minipad then switch on the alarm and pour 2-3 teaspoons of
warm water onto the pad and see how the water is absorbed down onto the black
sensing strips of the Urosensor™ before triggering the alarm.
4. Stick the minipad into the crotch of your child’s underwear making sure that
the Urosensor™ is near where the urine will be passed.
5. When the alarm is triggered make sure your child gets out of bed promptly,
turns the alarm off and goes to the bathroom.
6. Remove the Urosensor™ from the minipad and wash it in liquid soap or
detergent.
Note: Do not use chlorine-based detergents or soaps as these will irreparably
damage the sensing strips.
7. Dry the Urosensor™ well, especially between the two black sensing strips.
This resets the Urosensor™. If the Urosensor™ is not dried well it will not
reset and the alarm will not trigger when there is another bedwetting event.
Insert the Urosensor™ in a new, dry minipad.
8. Switch the alarm back on when your child gets into bed.
9. Repeat steps 5-8 if the alarm triggers again.
10.During the day, and when not in use, switch off the alarm base to save battery
life and put it in a safe place to prevent damage.
ng alarm
Urosensor™
Other ways to position the Urosensor™
Using a paper handkerchief or some tissue
1. Wrap the Urosensor™ in ½ a 2-3 ply paper
handkerchief or tissue.
2. Put on a pair of close fitting underpants
3. Insert the wrapped Urosensor™ inside the
underpants just above the crotch area. Make
sure the black sensing strips are facing the
crotch.
–4–
Using double-gusset underpants
1. Cut a 25mm (1 inch) slit through one layer
only of a pair of double-gusset underpants,
down towards the crotch area. The cut can
be made on the inside or the outside of the
underwear.
2. Insert the Urosensor™ inside the slit with the
black sensing strips facing the crotch.
Note: Wrapping the Urosensor™ in a paper handkerchief or tissue before
inserting it into the slit in the gusset can also help bedwetting to be detected more
quickly.
Using two pairs of underpants
1. Put on two pairs of close fitting underpants.
2. Insert the Urosensor™ in between both pairs
of underpants above the crotch area. Make
sure the black sensing strips are facing the
crotch.
Note: Wrapping the Urosensor™ in a paper
handkerchief or tissue before inserting it between
the underpants can also help the bedwetting to be detected more quickly.
Using a disposable diaper
1. With a sharp pair of scissors cut a 25mm
(1 inch) slit in the absorbent layers on the
inside of the pull-up diaper near the crotch
area.
2. With the point of the scissors create a pocket
for the Urosensor™ to slide into.
3. Insert the Urosensor™ inside the pocket with
the black sensing strips facing the crotch.
Note: As with the minipad, it is important that the Urosensor™ is inserted under
some absorbent layers. However, disposable diapers tend to be highly absorbent
so wrapping the Urosensor™ in a paper handkerchief or tissue, and inserting it
with the sensing strips facing the crotch area between the body and the diaper
–5–
can help the moisture reach the Urosensor™ before it is absorbed by the diaper.
Diapers that include an absorbent gel layer should be avoided as these will not
result in sufficient moisture getting to the Urosensor™ to enable it to trigger.
‘Priming’: preparing your child to use the alarm
To help your child use the alarm it is recommended that you practise what to do
when the alarm triggers during the night. This is called ‘Priming’.
Priming is based on a strategy called Prospective Memory which is setting
something up in the brain that has to be remembered in the future. In order
to prime your child’s brain to wake to the sound of the alarm, it is a matter of
practising what she or he needs to do when the alarm goes off.
Before your child settles down to go to sleep have him or her lie in bed
pretending to be asleep. Switch the alarm on and trigger it by putting something
metal across the black sensing strips on the orange Urosensor™. Ask your child
to get up, switch the alarm off and go to the bathroom.
Practise this three or four times so that your child’s brain is more ready to
respond when she or he hears the alarm.
At the outset you may also need to get up when the alarm sounds in the night
to ensure your child follows this procedure. Also, depending on your child’s
age, you may need to assist him or her in preparing the Urosensor™ for re-use.
We recommend that parents do this every night until the child is successfully
responding to the feeling of a full bladder and waking to go to the bathroom
before the alarm sounds. This may take a week or two, but in the end it will be
worth it.
How to pair the Urosensor™ with an alarm base
When you purchase a new Urosensor™ you will need to pair it with your existing
alarm base. If you purchase a replacement or additional alarm base, you will also
need to pair that with the existing Urosensor™.
To pair your devices follow these instructions:
1. Switch on the alarm base, and using a thin probe (such as the end of a
paper-clip or very small screwdriver), press the pairing button marked Z
(see diagram in the section entitled DRI Sleeper® eclipse Alarm).
–6–
2. The alarm base will start to beep slowly at one second intervals as it ‘listens’
for the Urosensor™ . Immediately activate the Urosensor™ by putting
something metal across the sensing strips so that it is sending a signal to the
alarm base. When the alarm base detects the new Urosensor™ it will beep
rapidly five times. This means the Urosensor™ is now paired to the alarm base.
3. If the alarm does not detect the new Urosensor™ it will continue to beep
slowly for approximately 75 seconds and then will sound one long beep
indicating that it has not been able to detect the device. It is then necessary to
repeat the pairing process.
Note: Only one Urosensor™ can be used at a time with an alarm. A single alarm
base cannot detect multiple sensors. Whichever Urosensor™ is last paired with
the alarm, only that Urosensor™ will trigger the alarm. However, multiple alarm
bases can be used with one Urosensor™.
Troubleshooting
My child wets the bed and the Urosensor™ does not trigger the alarm.
Test that the alarm and Urosensor™ are working correctly by following these
steps:
1. Switch the alarm on. It should beep rapidly five times.
2. Wrap the Urosensor™ in half a 2-3 ply paper handkerchief or some toilet
tissue. Stand 2-3 metres (yards) away from the alarm with your back to it and
drip ½-1 teaspoon of warm water on the Urosensor™. It should trigger within
2-3 seconds.
Note: Be careful not to touch the black sensing strips with your fingers as damp
skin can trigger the alarm.
3. If the alarm triggers then it is working correctly. The issue will be how the
Urosensor™ is being placed.
4. Read instructions 3 & 4 of the section on How to use your DRI Sleeper®
eclipse, or experiment with other methods of locating the Urosensor™ in the
section on Other ways to position the Urosensor ™ in underwear.
5. Always make sure the Urosensor™ has been dried completely between the
sensing strips after it has triggered the alarm to ensure that it will reset and
be able to trigger the alarm again. If it is not dried completely it will not reset
and won’t be able to trigger the alarm if your child wets the bed.
6. Always make sure that the alarm is turned back on after a bedwetting event
if the Urosensor™ is being used again.
–7–
Note: Do not insert the Urosensor™ in you child’s underwear before bed. If
your child wanders out of range of the alarm before bed and has a small wetting
event the Urosensor™ will not be able to trigger the alarm. Furthermore, if the
Urosensor™ is not washed and dried properly after such an event it will not be
able to trigger the alarm if your child wets the bed during the night. Only put the
Urosensor™ in your child’s undergarments once they go to bed.
The alarm triggers and my child has not wet the bed.
Occasionally the Urosensor™ may trigger when no urine has been passed and
this is due to sweat. To prevent this:
1. Insert the Urosensor™ more deeply in the absorptive layers of the minipad; or,
2. Turn the Urosensor™ over so the black sensing strips are facing away from
the crotch.
My child sleeps through the alarm.
At the beginning of the treatment a very heavy sleeper may not wake to the
sound of the alarm. This does not mean that the DRI Sleeper® eclipse alarm will
not work for your child. In time even heavy sleepers will wake to the alarm.
It is recommended that you undertake the priming programme described in the
section entitled ‘Priming’: preparing your child to use the alarm. Also, follow
these steps with a heavy sleeper:
1. Wake your child when the alarm sounds.
2. Ask him or her to switch off the alarm and go to the bathroom.
3. H
ave your child remove the Urosensor™, rinse it in water, dry it and re-insert
it in clean dry underwear for re-use.
4. Take your child back to bed and ask them to switch the alarm back on.
Make sure your child is completely awake and the next day remembers hearing
the alarm and going to the bathroom.
The alarm does not beep when I turn it on.
If the alarm does not beep the battery may need replacing. Follow these steps:
1. Insert a coin between the protruding plastic ridges at one end of the alarm
base (see diagram in the section entitled DRI Sleeper® eclipse Alarm) and
twist it so the cover comes off the battery case.
2. Pull the battery drawer out to reveal the battery.
3. Remove the battery and replace with a new CR2354 coin battery.
–8–
warning: DO NOT leave batteries where small children can find them and
swallow them. This can lead to severe internal injury. See advisory under section
entitled Batteries.
When the alarm triggers it misses every fourth beep.
This indicates that the battery in the Urosensor™ is running low. In this case
the Urosensor™ will need to be replaced as it is a permanently sealed device to
prevent wetness getting inside.
The alarm makes a strange noise when it is turned on or the sound of the
alarm has suddenly decreased.
This is due to interference or damage to the Piezo buzzer during use. This is not
a manufacturing fault and is not covered by warranty. In this case the alarm base
must be replaced.
My replacement Urosensor™ or replacement Alarm base does not work.
A new Urosensor™ must be paired with your existing alarm base, and your
existing Urosensor™ must be paired with a new or second alarm base. Follow the
instructions in the section on How to pair the Urosensor™ with an alarm base.
The sound of the alarm is too loud.
The volume of the alarm is set to the highest sound volume. If required it
can be turned down by adjusting the volume control knob inside the battery
compartment as follows:
1. Insert a coin between the protruding plastic ridges at the end of the alarm
base (see diagram in the section entitled DRI Sleeper® eclipse Alarm) and
twist it so the cover comes off the battery case.
2. Take a small Phillips screwdriver and insert it in the volume adjustment knob
(next to the impression of a speaker with a + and – arrow).
3. Turn the adjustment knob in the direction of the – arrow.
The alarm works intermittently.
Intermittent functioning of the alarm can be caused if the Urosensor™ is not
located properly or, occasionally, by electromagnetic interference (see section on
Radio Frequency Device).
1. Test that the alarm and Urosensor™ are working correctly by following
instructions 1 and 2 in the section entitled My child wets the bed and the
Urosensor™ does not trigger the alarm. Carry out this testing regime in the
–9–
child’s bedroom where the alarm is being used. If the alarm triggers then it is
working correctly and is not being affected by electromagnetic interference.
The issue will be how the Urosensor™ is being placed or your child is not
waking to the sound of the alarm. See section on My child sleeps through
the alarm.
2. Read instructions 3 & 4 of the section on How to use your DRI Sleeper®
eclipse, or experiment with other methods of locating the Urosensor™ in the
section on Other ways to position the Urosensor ™ in underwear.
i. Always make sure the Urosensor™ has been dried completely between
the sensing strips after it has been triggered to ensure that it will reset to
trigger again. If it is not dried completely it will not reset.
ii. Always make sure that the alarm is turned back on after a bedwetting
event if the Urosensor™ is being used again.
3.If the alarm does not trigger when it is tested in your child’s bedroom there
may be a source of electromagnetic interference, e.g. a night light, baby
monitor or i-pod docking station. Test the alarm in another room in the
house which does not have any wireless electronic devices. If the alarm
triggers successfully try removing all potential sources of electromagnetic
interference in your child’s room.
RADIO FREQUNCY DEVICE
DRI Sleeper® eclipse Alarm uses a radio frequency signal which complies with
the requirements of the Radio and Telecommunications Terminal Equipment
(R&TTE) regulations Directive 1999/5/EC dated 9 March 1999.
Electromagnetic fields from non-complying equipment in the home can
sometimes be strong enough to interfere with the DRI Sleeper® eclipse function
even though the alarm includes features to protect it from most electromagnetic
interference. Examples of potential sources of electromagnetic interference
include night lights, baby monitors, cordless phones, dimmable lights, i-pod
docking stations, remote controlled door chimes and doors.
BATTERIES
Batteries are provided free of charge and come included with the DRI
Sleeper® eclipse alarm. The battery in the alarm unit is a CR2354 coin battery.
Replacement batteries should be available at local electronic and photographic
– 10 –
stores. The battery in the Urosensor™ is permanently sealed to prevent wetness
entering the Urosensor™. It cannot be replaced. When this battery expires a
replacement Urosensor™ can be purchased at www.dri-sleeper.com.
Battery life will depend on usage. The battery in the alarm base should last
3 months with nightly use if the alarm is triggered twice a night, provided the
alarm is turned off when it is not in use. The battery in the Urosensor™ should
last 12 months with nightly use if it triggers the alarm twice a night.
warning: Batteries should NOT be accessed by small children and should
only be replaced by adults. If a battery is accidentally swallowed by a child
please go to your local hospital emergency centre IMMEDIATELY.
Do not allow your child to eat or drink anything or use nose or ear drops until
examined by a doctor.
Always dispose of batteries in an environmentally responsible and safe way.
MANUFACTURER
Anzacare Limited
P O Box 400
Waikanae 5250
NEW ZEALAND
www.dri-sleeper.com
WARRANTY
The manufacturer will replace any alarm which fails due to manufacturing fault
within 6 months of purchase (proof of purchase date must be provided).
Contact [email protected] if you have a warranty claim.
This warranty does not cover batteries or misuse of or accidental damage
to the alarm. Repairs are not undertaken for hygiene reasons. In the event
that your alarm needs repair due to accidental damage or misuse we replace
instead of repairing. You may obtain a price for a replacement by emailing
[email protected].
– 11 –
DRISLEEPENG
Updated 23/1/14