1
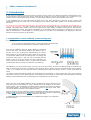
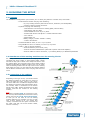
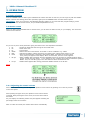
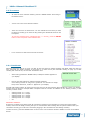
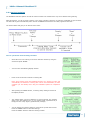
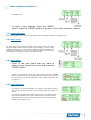
Manual
FalseStart
Version: 2012v1
Table of Contents
PREFACE......................................................................................................2
1. Introduction............................................................................................3
1.1 Optimization of the audibility of the starting shot.............................................................3
2. BUILDING THE SETUP..............................................................................4
2.1 Contents.....................................................................................................................4
2.2 Attachment of the starting modules onto the starting blocks..............................................4
2.3 Connection of the cable(s).............................................................................................4
2.4 Connections of the front and rear panel of the FalseStart box............................................5
2.4.1 Front panel...........................................................................................................5
2.4.2 Rear panel............................................................................................................5
3. OPERATION.............................................................................................6
3.1 Basic principle..............................................................................................................6
3.2 Status screen..............................................................................................................6
3.2.1 Adjusting the sound volume....................................................................................6
3.3 The menus..................................................................................................................7
3.3.1 Test blocks............................................................................................................7
3.3.2 St.(art) training.....................................................................................................8
3.3.3 Status disp(lay).....................................................................................................9
3.3.4 Race result...........................................................................................................9
3.3.5 Race name...........................................................................................................9
3.3.6 Start Offic(ial).......................................................................................................9
3.3.7 Print react(ion times)...........................................................................................10
3.3.8 Print delay..........................................................................................................10
3.3.9 Pr(inter). on/off...................................................................................................10
3.3.10 Sound preferences.............................................................................................11
3.3.11 Displ(ay) light....................................................................................................11
3.3.12 Meas(uring). Pref(erences)..................................................................................11
3.3.13 Prog(ram) names...............................................................................................12
3.3.14 Total reset.........................................................................................................12
3.4 The start...............................................................................................................12
3.5 The print-out.........................................................................................................12
3.6 The printer................................................................................................................13
3.6.1 Replacing paper...................................................................................................13
3.7 Automatic shutdown...................................................................................................13
www.timetronics.be
TimeTronics NV
Lammerdries-Oost 23B
B-2250, Belgium
Tel +32 (0)14 23 19 11
Fax +32 (0)14 23 20 24
VAT BE0440 224 404
HR Turnhout 64540
KBC Bank 414-4191871-52
SWIFT : KREDBE22
IBAN : BE64 4144 1918 7152
2012v1 Manual FalseStart II
PREFACE
Welcome to the "FalseStart II" user manual.
May we recommend you to gently leaf through the entire manual first, just to have an initial idea of how the book is
structured. As we cannot possibly explain all details simultaneously, this might help you a bit in understanding and tracing
things back. Of course, the table of contents will also help you in doing so.
Please note that all pictures are examples, the delivered version can be different than shown in this manual please inform
yourself before purchase.
If you, after reading this document, have any further question regarding the operation or service of this or any other
TimeTronics equipment, please contact your local distributor or TimeTronics directly, by email: [email protected], or call
us at +32 (0) 14 23 19 11
Please also contact us if you have any remarks or advise regarding this user manual: [email protected].
Good luck with FalseStart II and thank you for your confidence in the TimeTronics products and services.
The editors.
© Copyright 2012 TimeTronics. All rights reserved.
TimeTronics
Lammerdries 23b
B-2250 Olen
Belgium
Tel.: +32 (0) 14 23 19 11
Disclaimer
Under no circumstances shall TimeTronics be liable for any loss, damage or expense suffered or incurred with respect to
any defective product. In no event shall TimeTronics be liable for any incidental or consequential damages that you may
suffer directly or indirectly from use of any product. Windows, Windows XP and Windows VISTA are registered trademarks
of Microsoft Corporation.
2
2012v1 Manual FalseStart II
1. Introduction
In T&F races the athletes have become faster and faster and the result of one athlete meticulously approximates to the
result of another. This progress goes hand in hand with the evolution in science and technique. As a consequence, time
measurement in track and field races should be very accurately performed up to one thousandth of a second.
A very significant part of a race (particularly at sprint races) is the start. Sometimes, a detection of such a start is still
visually perceived by the human eye. The development of our system, False Start, enables us to electronically detect a
false start.
An athlete causes a FalseStart whenever he or she starts before 100 thousandths of a second after the starting shot (=
current IAAF regulation). The IAAF considers this limit of 100 thousandths as being the fastest human reaction time
possible. This means that a starter in the current system has to judge whether an athlete starts sooner or later than the
100 thousandths of a second, thus causing a FalseStart or not. An athlete can be privileged (e.g. letting him run at a start
after 65 thousandths) or handicapped (e.g. shooting back at a start after 105 thousandths). By applying an electronic
detection, these inaccuracies can be avoided.
1.1 Optimization of the audibility of the starting shot
It is possible that:
a) The sound of the starting shot does not reach all athletes simultaneously.
b) The sound of the starting shot reaches the athletes too late.
At a start of 8 athletes, where all starting blocks are positioned
next to each other, the distance between the athlete in lane 1
and the one in lane 8 amounts to approximately 8.5 meters.
When looking at the time difference with respect to the moment
at which both athletes hear the starting shot, and taking into
account the sonic speed (= 343 m/s), we can conclude that the
athlete in lane 8 hears the starting shot 2.5 hundredths of a
second later than the athlete in lane 1 provided that the starter
is positioned at the far left side from the track (see drawing).
This difference may even become larger at races such as the 400 meters, at which the starting blocks are positioned at
least 7.5 meters from each other. The athlete in lane 8 would hear the starting shot 14.4 hundredths later than the athlete
in lane 1, on condition of course that the starter would take place close to the athlete in lane 1, which would rather be
unfair.
The starter could in fact position himself at an equal distance to each athlete, in other words in the centre of an imaginary
circle which is drawn over the starting blocks. Consequently he will be about 31 meters apart from each athlete so that all
athletes will simultaneously hear the starting shot 9 hundredths of a second too late.
That is why this virtual distance between starter and athlete will have to be reduced. We
bring the sound to each athlete by using a microphone and an amplifier at the central
starter position, and a loudspeaker into EACH starting modules (mounted at the back of
each starting block). All connections are made by means of one single cable, which
connects all starting modules to the FalseStart system.
What we certainly want to emphasize is that the FalseStart detection system remains an
auxiliary TOOL for the starter, to ASSIST him. It still remains the starter’s responsibility
to make the final decision when it comes to defining a false start.
In subsequent parts you will encounter a more elaborate description of our FalseStart
detection system.
3
2012v1 Manual FalseStart II
2. BUILDING THE SETUP
2.1 Contents
The FalseStart II configurations (two versions; 8 or 10 lanes) are packed in a wooden case, and contain:
· 1 metal enforced wooden carrying case containing:
- 8 (or 10) starting modules (with built-in sensors, electronics, and loudspeaker)
- 2 ‘dummy’ starting module connectors
· 1 synthetic carrying case containing:
- 1 start detector to be mounted on starting pistol (with 3m cable)
- 1 start button (with 3m cable)
- 1 short FScable for 100m: 8 (or 10) lanes
- 1 headset with built-in microphone + headset extension cable
- 1 user manual
- 3 Spare paper roll
- Battery charger (110VAC…220VAC->12VDC)
- 1 T-shirt “TimeTronics”
· 1 medium FScable for 200m, on reel : 8 (or 10) lanes
· 1 long FScable for 400 m or 4x400m, on reel: 8 (or 10) lanes
· 1 caddy = case on wheels containing:
- 2 built-in batteries (each 12 Vdc, 7 Ah)
- 1 built-in electronic FalseStart box (with built-in printer and sound amplifier)
- 2 built-in cables on reel for connection ; a) to starting blocks, b) to MacFinish photofinish
2.2 Attachment of the starting modules onto the starting blocks
All starting modules, as delivered in a carrying case, are
equipped with velcro straps on their bottom plates. Simply
tear off the loop part of those velcro straps and stick it onto
the starting block. The hook part of the velcro straps remains
attached underneath the starting module. Now you can easily
stick the starting module onto the loop velcro on the starting
block. After the races, you can again pull the starting modules
off the blocks and store them in the carrying case until next
event.
2.3 Connection of the cable(s)
Depending on the type of race, you should connect
the starting modules to each other by means of
either the cable for 100m, 200m or (4x) 400m.
The three cables are of a different length and also
the distance in between their branch points varies.
The number, which is mentioned on the branch
points of the cable, should correspond to the lane
number (and thus the number on the starting
module).
Note:
All starting modules MUST be connected. If not,
the circuit (of all loudspeakers connected in series)
will be open and no sound signal will be heard.
In case you do not want to use all starting
modules delivered (for example you have a track
with 6 lanes instead of 8), you should plug
‘dummy’ connectors into the ‘open’ connectors on
the cable. That way, the circuit remains closed,
which is necessary!
4
2012v1 Manual FalseStart II
2.4 Connections of the front and rear panel of the FalseStart box
2.4.1 Front panel
At the front panel of the FalseStart box, there are in fact only two
connections: the ‘headset’ connection in which the headset (or the
extension cable of the headset) is plugged and the ‘Starting Pistol’
connection in which the cable of the start detector is plugged. The
start detector is a small blue aluminum box, containing the built-in
start sensor, and a LED light to signal the starter the ready-or-not
status of the FalseStart system. The start detector itself should be
mounted on the pistol’s barrel as such that the distance to the pistol’s
cylinder amounts to maximum 10cm.
Further on the front panel you will find a printer, a display unit and
other operating buttons, the function of which will be explained later
on in this manual.
2.4.2 Rear panel
There are 5 connections on the rear panel.
1.
Battery 12V DC Connection
In this connection, a connector coming from the battery is permanently plugged. On the front of the caddy you can
see a connector to charge the battery.
2.
Serial RS232 Connection
This is a connection that you can use in case you want to connect a personal computer to the system, to read the
power curves of all athletes, and display them in a graphical waveform. Only used by specialists.
3.
Speaker Connection
Used to connect AN EXTRA, (OPTIONAL) loudspeaker set. For example at the start of a 1500 meters race, the
starter is not going to make use of the starting modules with built-in loudspeakers. In order to bring the sound of his
voice and the starting pistol directly to the athletes, he can use a separate loudspeaker that can be plugged in this
connection.
4.
MacFinish Connection
This connection is used when connecting the system to the MacFinish photo finish and timing system. You will find
the same connection on the front of the caddy.
5.
Starting Blocks Connection
The extension cable to the starting blocks is plugged in here, which leads to the various cables connecting the
starting modules (see page 5). You will find the same connection on the front of the caddy.
5
2012v1 Manual FalseStart II
3. OPERATION
3.1 Basic principle
Push the ‘POWER’ button to start up the FalseStart box. Before the start of each race, do not forget to push the ‘READY’
button. Then fire the starting pistol. After operation, again push the ‘POWER’ button to switch off the system.
OPTIONALLY, there are 14 menus in the FalseStart program helping you to create and alter program settings, printer
settings, select race and starter names, etc (for detailed explanation see 3.3).
3.2 Status screen
When you start up the FalseStart box for the first time, you will enter the status screen (on your display). This is how the
status screen looks like:
As you can see, there are 8 parameters giving the starter more race-dependent information.
1.
2.
3.
4.
5.
6.
Nr
Ra
Ht
OFFIC.
Batt.
Pistol
7.
MF sys
8.
FS sys
:
:
:
:
:
:
Number of starts that have been given since total reset.
Name of the race.
Heat number.
Reflects the name of the starter. Thus ‘Offic.1’ can be modified to e.g. ‘JOHN’.
Indicates the battery voltage. Recharge your battery when voltage drops below 11,5 Volt.
When the start detector is plugged in the ‘Starting Pistol’ connection on the front panel,
Conn.(ected) will appear on the display. When not connected, the word ‘Loose’ appears.
: WAIT or READY: Only important when the FalseStart system is connected to a MacFinish photo finish.
system. In that case, the starter is only entitled to give a starting shot when the MacFinish system is
READY. Then, the red LED (light) on the start detector will be illuminated as well.
: READY status appears after having pressed the ‘READY’ button on the FS-box.
NOTE :
3.2.1 Adjusting the sound volume
When in the status screen, you can adjust the speaker’s sound volume by pressing one of the tiny arrows
on the front panel:
When pressing the upper arrow, the speaker’s sound volume will be
increased. When pressing the lower arrow, the sound volume will be
decreased.
On your display: the following window may thus appear indicating the
percentage of the sound volume:
After a number of seconds, this window closes down automatically.
6
2012v1 Manual FalseStart II
3.3 The menus
•
To enter the menu selection window, press the ‘ENTER’ button when being in
the Status Screen:
•
You are now in the menu selection window:
•
There are 14 menus to choose from. You can indicate the menu that you want
to select by scrolling up or down the list, pressing the directional arrows on the
front panel.
To enter the indicated menu (indicated by the “>>” arrows), press the ‘ENTER’
button on the front panel of the FalseStart box.
•
Let us now have a closer look at each of the menus.
3.3.1 Test blocks
Obviously before the start of an event, we want to test and check our starting modules and cables. Make sure that you
have connected ALL starting modules to each other in a closed circuit (see schematic drawing on page 5)! To start
checking this closed circuit, we need this ‘Test Blocks’ menu.
•
When having pressed the ‘ENTER’ button, subsequent window appears on
your display:
•
Now we can start testing our starting modules as follows:
Go to starting module #1 and give it a gentle kick. You will hear one single
beep. At the same time, number ‘1’ appears on your display:
Proceed with starting module #2. Again give it a kick. Now you will hear 2 beeps (plus indication of number 2 on display),
meaning that the amount of beeps MUST correspond with the number as indicated on the starting module (= lane
number). In other words:
•
•
•
•
•
•
starting
starting
starting
starting
starting
etc.
module
module
module
module
module
#1
#2
#3
#4
#5
>
>
>
>
>
1
2
3
4
5
beep
beeps
beeps
beeps
beeps
IMPORTANT CONTROL:
If there are no beeps at all, please check all connections. Should you have forgotten to connect one single starting
module, there won’t be beeps, meaning that you are not allowed to start working with the system!! Please insert your
connectors correctly (you must hear a click when plugging in the connectors into the starting modules).
To leave the menu, press the ‘ENTER’ button to return to the menu selection window or ‘READY’ to return to the Status
Screen.
7
2012v1 Manual FalseStart II
3.3.2 St.(art) training
The FalseStart Detection System can also be used to measure the reaction time of up to 10 athletes during training.
With this function, you do not need a ‘starter’ (your coach or another volunteer) to press the pushbutton to give the start.
The start will be given automatically and it will use a RANDOM time between the ‘ready’ signal and the start.
The scheme below will give you an idea of how it works.
How to operate the ‘Start Training’ function?
•
Select the menu ‘St. Training’ in the menu selection window by using the
arrows and press ‘ENTER’.
•
You now enter the following display window:
•
Press one of the arrows to switch to ‘Training ON’.
Note: when shutting down the FalseStart System, the ‘Training’ function will
automatically be switched to ‘Training OFF’. This is done deliberately to avoid
confusion (for the official) when using the FalseStart System for competition
again.
•
After pressing the ‘ENTER’ button, a ‘Training delay’ setting is showed on
the display window:
•
The ‘Training delay’ can be set between 10 and 32 seconds. The ‘Training
delay’ is the time between the ‘on your marks’ signal (represented by 3
beeps) and the ‘ready’ signal (represented by 2 beeps).
•
You can change the ‘Training delay’ by means of the up and down arrows.
Press the ‘ENTER’ button to save the settings:
Press the ‘READY’ button to start the training function.
8
2012v1 Manual FalseStart II
•
A possible result:
•
To start a new training, press the ‘READY’
button. Press the ‘ENTER’ button to go back to the menu selection window.
3.3.3 Status disp(lay)
When selecting this menu you return to the Status Screen as already explained on paragraph 3.2.
3.3.4 Race result
The ‘Race Result’ menu displays the start results of the previous race. Only
the three fastest reaction times will appear on the display (no room enough
to display all lanes). This means that the athlete causing the FalseStart will
definitely be on display. If you want to view all start results, you will have to
make a print-out on paper (see later). A possible example:
3.3.5 Race name
•
Scroll to the race name that you want to
select via the directional arrows and press the
‘ENTER’ button.
•
Suppose we selected the 100m race. After having pressed the ‘ENTER’
button, the Status Screen will automatically appear and you will notice that
the name of the race will have changed to ‘100m’ and the heat number will
be reset to ‘1’:
3.3.6 Start Offic(ial)
•
In this menu, you choose the starter(s) or name(s) of the starter(s) that is
(are) going to operate the system. You can choose from a from a list of 10
names.
•
Just indicate the name of the starter through the up and down arrows
and press the ‘ENTER’ button. In the ‘Status Screen’, the selected name
will be listed. How to enter names will be described under the ‘Program
Names’ menu (chapter 3.3.13).
9
2012v1 Manual FalseStart II
3.3.7 Print react(ion times)
•
When selecting ‘Print React’ in your menu selection window (and pressing
the ‘ENTER’ button),
•
you now enter the following display window:
•
Here you can also choose the race of which you would like to print the
reaction times. For that, scroll with your arrows to make a selection.
•
To print out all reaction times on paper via the built-in printer, press the
‘ENTER’ button.
•
To cancel, press the ‘READY’ button. This will take you back to the ‘Status
Screen’.
3.3.8 Print delay
•
With this menu you can print out the delay (=waiting) time of the
starter. The delay time is the period between the last vocal sound of the
starter trough the microphone (normally the “Ready” command) and the
starting shot.
•
First use the arrow buttons to choose the number of races to print, and
press ‘ENTER’ to start printing or ‘READY’ to cancel the printing. A possible
example of what you may see on the paper print-out. In this example, the
starter waited for 1.56 seconds in between his last vocal sound and the
starting shot.
•
A list covering all starts (including the name of the starters) can thus be
printed on the right side you can find an example:
3.3.9 Pr(inter). on/off
•
These are the printer preferences. When selecting this menu, you enter
the following display window:
•
This means that standard the printer will start printing the start results immediately after each start.
•
In case you do not want the printer to do that, in other words to shut the printer down, press the lower scroll arrow
to switch to ‘Printer OFF’. Then press ‘ENTER’ to save your settings.
10
2012v1 Manual FalseStart II
3.3.10 Sound preferences
Here we choose our start methods. When selecting this menu, you enter subsequent
display window:
•
When selecting ‘Traditional’, the starter will give the start in a traditional way, meaning with one pistol for the
starting shot and another pistol to stop the race (of course, only in case of a false start).
•
When selecting ‘Pistol Start’, the starter uses one starting pistol and in case of a false start, a number of alarm
beeps will be heard through the starting modules.
•
When selecting ‘Modern Start’, the starting shot is given by means of a push button transmitting a beep signal
through all loudspeakers. In case of a false start, the race is stopped by a number of beeps through all loudspeakers.
3.3.11 Displ(ay) light
In this menu, you can toggle between switching on
and off the backlighting in your display window.
When operating outdoors, you should only switch the light on during night of evening races, but for indoor events this may
be helpful always. Just toggle by means of the scroll arrows on the front panel.
3.3.12 Meas(uring). Pref(erences)
When selecting this menu, you enter the following display window:
In here, the standard IAAF settings relating to the fastest possible reaction time
of a human being is entered. Currently, this reaction time is set to 100
thousandths of a second. If the IAAF decides to change this number, you can
easily increase or decrease this number by pressing the up or down arrows on
the front panel of the FalseStart box. (Upper arrow to add, lower arrow to
subtract.)
When pressing the ‘ENTER’ button, a ‘Sensitivity’ setting is displayed on the
display window:
This ‘Sensitivity’ is related to the sensitivity of the starting modules’ sensors. In fact, the sensitivity number is closely
related to the explosivity of the athletes in question.
ADVICE:
•
•
•
For top athletes, we recommend to decrease the sensitivity of the starting modules since these top athletes can
already rock the modules (they simply exert more power on the blocks!) when getting ready to start. During this
period their muscles can “vibrate”, because of the high force applied. This should NOT give problems, if you do not
increase the sensitivity of the system too much.
Again add or subtract this number by means of the scroll arrows.
Press the ‘ENTER’ button to save the settings.
11
2012v1 Manual FalseStart II
3.3.13 Prog(ram) names
•
In this menu you can change or enter the name(s) of the starter(s).
•
By means of the up & down arrows you can scroll through the alphabet
in climbing or descending order. To fix the chosen character, press the
‘ENTER’ button. Automatically, the blinking block will move to the right,
to the following character. Decimal points, blanks, marks, numbers, etc.
can be found before character ‘A’.
3.3.14 Total reset
In this menu you can reset your entire system. The message on the display
speaks for itself:
3.4 The start
•
Before each race, always press the ‘READY’ button!
•
You are now in the ‘Status Screen’ in which you can verify vital information (Have I selected the correct race? Is my
battery voltage still sufficient? Is my starting pistol connected well? Is the MacFinish operator ready? Is the
FalseStart system put into ‘ready’ position?).
•
If everything is OK, the starter can start the race.
•
After the start of the race, immediately the starter can see the fastest 3 reaction times (plus indication of lane and
signal) on the display unit. If the starter selected the printer to print the start results automatically after each
starting shot, first the print-out will be printed and then the results will appear on the display unit.
•
In case of a FalseStart (an athlete reacted too soon after the starting shot
or an athlete reacted even before the starting shot), the starter will hear 7
alarm beeps through his headphone.
3.5 The print-out
Both starter delay times and reaction times can be printed
out on paper via the built-in printer.
In 3.3.8 we have seen how a print-out of starter delay
times can look like.
Now, how would a print-out of the reaction times look like?
Let us comment on an example:
12
2012v1 Manual FalseStart II
3.6 The printer
3.6.1 Replacing paper
•
Sometimes you will have to replace the roll of paper inside the
printer. The red led underneath ‘Paper’ will illuminate warning
the operator of the lack of paper. To replace the paper roll, you
must first open the printer. To do so, press both knobs on each
side of the printer’s panel and pull the panel out of the
FalseStart box:
•
Now you are looking at the internal structure of the printer.
This structure needs to be pulled to the front until you see the
empty roll of paper underneath:
•
Now replace the empty roll by a new roll of paper but make
sure that the roll is positioned like this:
•
Now insert the paper in the crack like this:
•
At the same time, press the ‘FEED’ button on the printer’s front
panel until the paper roll comes sticking out sufficiently. Next,
again attach the front panel of the printer (again keep the
knobs pressed) and make sure that the paper enters the open
crack on the printer’s panel.
3.7 Automatic shutdown
If the starter does not use the system for more than ten minutes, the system will
shut itself down automatically (to save battery power). The system will start an
audible countdown, which can be interrupted by pushing whatever button on the
front panel. On the display you will see the following:
Good Luck with your operation and use of this FalseStart system !
If you have whatever question or advise to us concerning this user manual.
Please contact us by email on
[email protected]
13
2012v1 Manual FalseStart II
© Copyright 2012 TimeTronics. All rights reserved.
TimeTronics
Lammerdries 23b
B-2250 Olen
Belgium
Tel. : +32 (0) 14 23 19 11
Fax : +32 (0) 14 23 20 24
14


![English [2014v1]](http://vs1.manualzilla.com/store/data/005775879_1-a83e57144a66539570f80a48a6e80397-150x150.png)
![English [2012v1]](http://vs1.manualzilla.com/store/data/005947215_1-83afe423bc1815c8427a220bc0eb1bc7-150x150.png)
![English [2012v1]](http://vs1.manualzilla.com/store/data/005857990_1-ba5aca9850e0a37c2eb2dd5a5d355973-150x150.png)
![English [2012v1]](http://vs1.manualzilla.com/store/data/005994732_1-5b50c16b769d7d14a751f578cdbfd574-150x150.png)
![English [2012v1]](http://vs1.manualzilla.com/store/data/005770981_1-8c196de42073f8db3e58cd387e9490be-150x150.png)


![English [2015v1]](http://vs1.manualzilla.com/store/data/005829431_1-1fdc30543d444fb0915a40c3aab945a8-150x150.png)