1
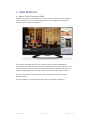
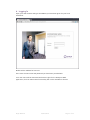
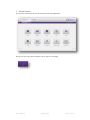
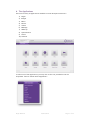
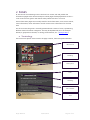
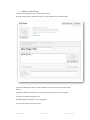
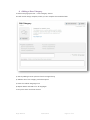
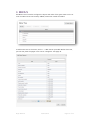
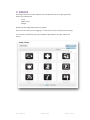
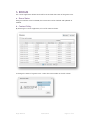
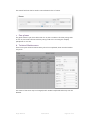
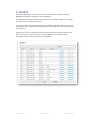
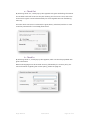
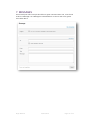
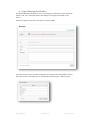
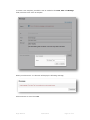
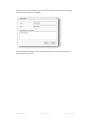
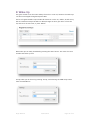
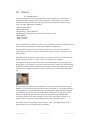
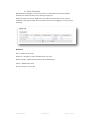
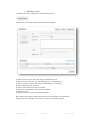
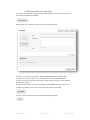
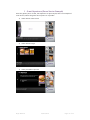
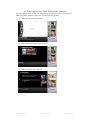
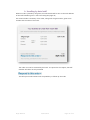
Otrum Enterprise
Enterprise Web v4.2
Contents
1.
User Manual ......................................................................................................................................... 4
a.
About Otrum Enterprise Web .................................................................................................. 4
b.
Logging In ........................................................................................................................................ 5
c.
Home Screen ................................................................................................................................... 6
d.
The Applications ............................................................................................................................ 7
2.
Pages ....................................................................................................................................................... 8
a.
Terminology .................................................................................................................................... 8
b.
The Page List ................................................................................................................................... 9
c.
Adding a New Page ....................................................................................................................10
d.
Adding a New Category ...........................................................................................................11
3.
Menus ...................................................................................................................................................12
4.
Images ..................................................................................................................................................13
a.
Icons .................................................................................................................................................14
b.
Matrix Icons ...................................................................................................................................15
c.
Images .............................................................................................................................................16
5.
Rooms ...................................................................................................................................................17
a.
Room Status ..................................................................................................................................17
b.
Content Policy ..............................................................................................................................17
c.
Pass phrase ....................................................................................................................................18
d.
Technical Maintenance .............................................................................................................18
6.
Guests ...................................................................................................................................................19
a.
Check Out .......................................................................................................................................20
b.
Check In...........................................................................................................................................20
7.
Messages .............................................................................................................................................21
a.
Urgent Message Notification .................................................................................................22
b.
Normal Messages........................................................................................................................25
8.
Wake Up...............................................................................................................................................26
9.
System Events ....................................................................................................................................27
10.
Stores ...............................................................................................................................................28
a.
Introduction ...................................................................................................................................28
b.
Store Overview .............................................................................................................................29
c.
Adding a store ..............................................................................................................................30
d.
Adding products to the store .................................................................................................31
e.
Adding options to the product ..............................................................................................32
f.
Guest Experience (Room Service Example) .......................................................................33
Nigel Bateson
02/01/2014
Page 2 of 55
g.
Guest Experience (Table Reservation Example) ...............................................................36
h.
Handling by hotel staff .............................................................................................................39
11.
Statistics ..........................................................................................................................................42
12.
System Configuration ................................................................................................................46
a.
Employee Management............................................................................................................47
b.
Room Status Codes ....................................................................................................................47
c.
Content Policies ...........................................................................................................................48
d.
Maintenance Types.....................................................................................................................50
e.
Maintenance Status Types .......................................................................................................50
f.
Text Resources..............................................................................................................................51
g.
View Bill Configuration ..............................................................................................................51
h.
Minibar ............................................................................................................................................52
i.
Flight Info Configuration ..........................................................................................................52
j.
Weather Location Management............................................................................................52
k.
Movie Management ...................................................................................................................53
l.
Advertisement Configuration .................................................................................................54
m.
Full Screen Advertisements .....................................................................................................55
Nigel Bateson
02/01/2014
Page 3 of 55
1. USER MANUAL
a. About Otrum Enterprise Web
Together with your Otrum Enterprise in-room interactive solution, Otrum provides
hotel staff with an easy to use web application for the configuration, setup and
monitoring of the system installation.
This intuitive web application can be accessed from any web enabled device
connected on the same network as the Otrum Enterprise server. Alternatively, if your
Otrum Enterprise server is available via a public IP (Internet) address, then you can
access the web application from any internet connection, either fixed or mobile.
In some circumstances, you will need to use a suitable browser on the Otrum
Enterprise server.
The web address for your web application will be provided at installation.
Nigel Bateson
02/01/2014
Page 4 of 55
b. Logging In
Open your web browser and type the address you have been given for your local
installation:
Bookmark this address for later use.
Then enter the user name and password you have been provided with.
Your user name will be associated with access rights for the Enterprise Web
application, for that reason some functionality will not be available to all users.
Nigel Bateson
02/01/2014
Page 5 of 55
c. Home Screen
This is your home screen for the Otrum Enterprise web application.
At any time you can press the home icon to return to this page:
Nigel Bateson
02/01/2014
Page 6 of 55
d. The Applications
There are currently 10 applications available in Otrum Enterprise version 4.2
1) Pages
2) Images
3) Menu
4) Rooms
5) Guests
6) Message
7) Wake Up
8) System Events
9) Stores
10) Statistics
To select one of the applications, you may click on the icon provided or use the
‘dropdown’ function called “Select Application”:
Nigel Bateson
02/01/2014
Page 7 of 55
2. PAGES
In this section the marketing team in the hotel can create, edit and publish the
information pages within Otrum Enterprise. These pages are displayed both on the inroom TV and on the guest’s own device when paired with the in-room TV.
These information pages are normally used for hotel information, room service menus,
travel information, chain information and of course tourist information for the local
area.
On the TV screen the guest is normally presented with a matrix of icons, representing
different hotel information categories. This may be alphabetical (as in the example
below) or grouped into themes; i.e. Dining, Entertainment, etc… (Example Here)
a. Terminology
There are some specific terms used in the page creation, these are explained below:
Matrix Icon
Heading
Description
Description Text Goes Here…
Icon
Heading
Sub-Header
Text
Nigel Bateson
02/01/2014
Page 8 of 55
b. The Page List
NOTE: Before you begin to create new pages, it is advisable to upload all needed
artwork first. Please see the section starting on page 13
When you enter the ‘Pages’ application, you will be presented with a list of hotel info
pages available in the system today. If this is the first time you are logging in it will of
course be empty. In this tool you must enter the pages, and the categories to which
they belong.
Title: This is your own name for the page – not shown to the guest
State: Pages are either in DRAFT or PUBLISHED state
Published Languages: Quite simply, which language versions are available
To edit an existing item, click on the name of the item in the left column. The Search
function is a handy tool to take you to a page or category very quickly.
Each page must belong to a category, i.e.
Category = Room Service Menu
Pages = Breakfast, Lunch, Dinner
Or
Category = Hotel Information
Pages = Restaurant, Spa, Bars
Nigel Bateson
02/01/2014
Page 9 of 55
c. Adding a New Page
To add a new page press the “+ New Page” button:
This will load an empty template, where you can complete the available fields:
1) Start by adding both the Icon and the Matrix Icon (both chosen from the image
library)
2) Add the header, sub-header, text, description and images for one language
3) Press the “Publish Language” link
4) Repeat STEP 2 and STEP 3 for all languages
To exit press “Save and Close” button
Nigel Bateson
02/01/2014
Page 10 of 55
d. Adding a New Category
To add a new page press the “+ New Category” button:
This will load an empty template, where you can complete the available fields:
1) Start by adding the Icon (chosen from the image library)
2) Add the title of the category, and a description
3) Press the “Publish Language” link
4) Repeat STEP 2 and STEP 3 for all languages
To exit press “Save and Close” button
Nigel Bateson
02/01/2014
Page 11 of 55
3. MENUS
The Menus tool is used to configure the layout and order of the guest menu on the inroom TV. Menu items can be easily added, removed or sorted as needed.
To add a new item to the menu, use the “ + Add” button provided. Within this menu,
you can also place the pages in the correct ‘categories’. See page 11
Nigel Bateson
02/01/2014
Page 12 of 55
4. IMAGES
The Images section is used to upload, view and delete the three image types used
within Otrum Enterprise:
-
Icons
-
Matrix icons
-
Images
(Please see the image descriptions on page 8)
If this is the first time you are logging in to this section, then the library will be empty.
You can select each library using the dropdown provided on the right side of the
screen.
Nigel Bateson
02/01/2014
Page 13 of 55
a. Icons
When adding a new Icon, please use the image type PNG, with the size 96x96.
To delete an icon – just select it from the library, and use the delete function provided.
Nigel Bateson
02/01/2014
Page 14 of 55
b. Matrix Icons
When adding a new Matrix Icon, please use the image type PNG, with the size 140
x 207.
To delete a matrix icon – just select it from the library, and use the delete function
provided.
Nigel Bateson
02/01/2014
Page 15 of 55
c. Images
When adding a new image, please use the image type PNG, with the size 450 x 300 for
hotel information pages or 194 x 280 for the ordering tool images.
To delete an image – just select it from the library, and use the delete function
provided.
Nigel Bateson
02/01/2014
Page 16 of 55
5. ROOMS
The ‘rooms’ application allows hotel staff to see and edit the status of the guest room.
a. Room Status
Using an interface to the local PMS, the room status can be checked and updated as
needed.
b. Content Policy
By selecting the ‘rooms’ application, a list of all rooms is shown.
To change the status of a guest room – select the room number in the left column
Nigel Bateson
02/01/2014
Page 17 of 55
The search field can also be used to narrow down the list of rooms
c. Pass phrase
If a guest wishes to pair their tablet with the TV, but is unable to find the paring code
on the TV, the hotel staff can send the pairing code to the TV using the “Display
passphrase on TV” link.
d. Technical Maintenance
If there are open technical maintenance jobs to be completed, these are also listed at
this point:
The status of the items may be changed, and if needed completed tasks may even be
deleted.
Nigel Bateson
02/01/2014
Page 18 of 55
6. GUESTS
The Guests application is primarily for those hotels which do not have a Property
Management System interfaced to Otrum Enterprise.
The application gives the hotel user the opportunity to perform a check-in or a checkout process on any of the guest rooms.
It is very important that the Otrum Enterprise software is informed when the room has
a new guest, and in that respect old guests must be checked out, and new guests must
be checked in.
Typically, the check-out process will clear all personal guest information and turn off
the TV. The check-in process will turn on the TV Welcome, and further enable
chargeable services to be accessed by the new guest.
Nigel Bateson
02/01/2014
Page 19 of 55
a. Check Out
By selecting check-out, a small pop up box appears with guest and billing information.
This enables hotel staff to be sure they are checking out the correct room, and at the
same time the guest can be billed manually for the chargeable services used during
their stay.
Once the Check-out button is selected, the guest history is deleted, and the in-room
TV will be powered off if not already powered off .
b. Check In
By selecting check-in, a small pop up box appears, which can then be populated with
guest information.
Name and Language must be entered correctly, followed by the content policy. For
more information regarding the content policy, please see page 48
Nigel Bateson
02/01/2014
Page 20 of 55
7. MESSAGES
Otrum Enterprise offers a simple but effective guest communication tool, to be found
under the ‘Message’ icon. Messages are delivered both to the TV and to the guests
own tablet device.
Nigel Bateson
02/01/2014
Page 21 of 55
a. Urgent Message Notification
The Urgent Message Notification tool is an emergency notification system, which will
power on all TVs in occupied rooms, and display an emergency message on the
screen.
Select the ‘Urgent’ check-box if you wish to send an UMN.
For fast activation, use a pre-defined template by selecting the ‘Use Template’ option.
From this location, old templates can be deleted by selecting the ‘x Delete’ option.
Nigel Bateson
02/01/2014
Page 22 of 55
To create a new template, just add the text as needed to the From, Title and Message
fields, and then select ‘Save as template’
When you select Send – the browser will display the following message,.
Select Deactate to cancel the UMN.
Nigel Bateson
02/01/2014
Page 23 of 55
When deactivating the message, you will need to complete the Deactivate message
text which will be shown to the guest.
The deactivation message will be presented to the guest on their TV, and they can
then use the TV as normal.
Nigel Bateson
02/01/2014
Page 24 of 55
b. Normal Messages
Normal messages will be sent immediately to the selected rooms, unless it is during
the ‘silent’ period setup within the Enterprise server.
The Message tool also allows the hotel to ‘broadcast’ a message to all occupied rooms
simultaneously. To do this, just check the box ‘Send message to all occupied rooms’.
Unlike UMN, this will not power on the TV in the guest room.
If Group names have been used from/in the PMS, then the messages tool in Otrum
Enterprise can be used to target a specific group of guests within the hotel. Just select
the Add Group option to select the appropriate PMS group.
Messages are a perfect tool for promoting activities and events in the hotel!
Nigel Bateson
02/01/2014
Page 25 of 55
8. Wake Up
The guest is able to set their own wakeup from the in-room TV, however the wake-ups
can also be managed through Enterprise Web.
The list of registered wake-ups includes all alarms set via the TV / Tablet, as well as any
alarms created via Enterprise Web. To delete/change an alarm, just select it from the
list, and enter the new time, or press ‘Delete’
New wake-ups can easily be added by pressing the ‘New’ button. Just enter the room
number and wake-up time
Group wake-ups can be set by pressing ‘Group’, and selecting the PMS Group name
from the available list.
Nigel Bateson
02/01/2014
Page 26 of 55
9. System Events
Otrum Enterprise keeps an accurate log of in-room events, this can help when fault
finding or when discussing billing issues with guests.
To filter the list, you can select a date window by selecting the ‘Showing all events’
text, and selecting a date range. This range can later be cleared to show all events.
It is also possible to search for a room number, event type, etc... using the search field.
Nigel Bateson
02/01/2014
Page 27 of 55
10. Stores
a. Introduction
The stores selection allows the configuration of the ordering tool solution within
Otrum Enterprise. The ordering tool allows guests to send requests to the email
addresses of the hotel staff, the ordering tool can be configured to deliver a large
variety of guest applications. Examples:
- Room Service orders
- Table Reservation
- Spa Booking / Activity Booking
- Housekeeping (more pillows / more towels / refresh room)
- Refill Minibar
- Airport Transfer
- Book next stay
A store is defined as a collection of items of a similar nature, where all orders from that
store would be forwarded to the same email address or address list.
From the guest perspective, the process of browsing a store, selecting items and
confirming the order will all work in a similar way across the stores, allowing for fast
familiarisation.
From the hotel’s perspective, the process of creating a store and its contents will also
be quite similar from store to store, even if the content is very different.
The number of stores is unlimited, and the stores themselves may be placed on the
guest menu in any location in the menu structure hierarchy. Stores can also be placed
at different locations, and at a different menu depths compared to other stores. Stores
may also be accessible via ‘teasers’ linked to colour-keys in the TV menu. (See page
54)
For each store the setup can specify whether or not the individual items should be
added to a virtual shopping cart when the order is complete, or if the order should be
sent immediately once an individual item is selected. When ordering food and drink
for example. It is typical to use the ‘shopping cart’ approach, as the guest normally
wants to order two or more items in the same batch. When you consider table
reservation however, the order should be sent as soon as the guest confirms it, as
there is rarely the need to reserve multiple restaurants in the same batch.
If the guest exits the store before confirming the order – all pending orders from
within the store are lost, and must be re-selected.
Nigel Bateson
02/01/2014
Page 28 of 55
b. Store Overview
NOTE: Before you begin to create new stores, it is advisable to upload all needed
artwork first. Please see the section starting on page 13
When you enter the ‘Stores’ application, you will be presented with a list of stores
available in the system today. If this is the first time you are logging in it will of course
be empty.
Overview:
Store = Name of the Store
Products = Number of items available within the store
Revenue Code = PMS revenue code for automated billing
Status = Published or Draft
In Use in menus = Yes or No
Nigel Bateson
02/01/2014
Page 29 of 55
c. Adding a store
To create a new store, simply select the New Store button:
A new store can then be created using the empty template:
1) Select a menu icon for the store, using the Add Icon button.
2) Enter a title for the store, e.g. “Table Reservation” or “Room Service”
3) Select a revenue code for the store for PMS billing (0 = no billing)
4) Enter a description for the store
5) Enter e-mail recipients of the store orders
6) Select the ‘shopping cart’ functionality if needed
7) Save your store
8) Publish the store to have it available for guests
Note: Each store and the products within each store has support for translations.
Simply press the “Translate store” button to open the translation engine.
Nigel Bateson
02/01/2014
Page 30 of 55
d. Adding products to the store
To create a new product, simply select the New product button. There is no limit to
the number of products available.
A new product can then be created using the empty template:
1) Select an image for the product, using the Add Image button. (194 x 280)
2) Enter a title for the product, e.g. “Ceasar Salad” or “Continental Breakfast”
3) Enter a price for the product (can be 0 if required, with all prices in the Options)
4) Save your product
5) Activate the product to have it available for guests OR create the option first
To delete a product within the store use the delete button provided:
To return to the store overview use the Close button provided:
Nigel Bateson
02/01/2014
Page 31 of 55
e. Adding options to the product
To create a new option, simply select the Add Options button, there is no limit to the
number of options available.
Example:
Within each option, we can then specify choices, for example:
There is no limit to the number of choices per option. Options can be re-ordered or
deleted using the icons provided. Each option can be configured with a price change
per choice, both positive and negative – leave as 0 if there is no change.
A choice selection can be made ‘optional’ using the check-box at the top of the
window. In the case the user is not forced to make a selection. (Example above)
Press OK to save the changes
Nigel Bateson
02/01/2014
Page 32 of 55
f. Guest Experience (Room Service Example)
From the guest’s point of view, the experience is quite simple; here is an example of
room service, where the guest has 3 options on a product.
1) Guest selects room service
2) Guest selects burger
3) Guest proceeds to options
Nigel Bateson
02/01/2014
Page 33 of 55
4) Guest selects “no Cheese” (Option 1)
5) Guest adds a beer for 3.99 (Option 2)
6) Guest says No to dessert (Option 3)
7) Final order added to ‘shopping cart’
Nigel Bateson
02/01/2014
Page 34 of 55
8) Order Confirmed
9) Room number used to confirm order
Nigel Bateson
02/01/2014
Page 35 of 55
g. Guest Experience (Table Reservation Example)
From the guest’s point of view, the experience is quite simple; here is an example of
table reservation, where the guest has 3 options on each product.
1) Guest selects Table Reservations
2) Guest selects the Fine Dining restaurant
3) Guest continues to the options
Nigel Bateson
02/01/2014
Page 36 of 55
4) A table for 3 is selected (Option 1)
5) Thursday is the selected day (Option 2)
6) 19:00 is the selected time (Option 3)
7) Reservation request is sent to the hotel
Nigel Bateson
02/01/2014
Page 37 of 55
10) Room number used to confirm order
Nigel Bateson
02/01/2014
Page 38 of 55
h. Handling by hotel staff
When an order is placed by the guest, the order details will be sent to the mail address
of the staff members given in the store setup (See page 30)
The email includes a summary of the order, along with the guest name, guest room
number and the name of the hotel.
The order can now be reviewed by the hotel. To respond to the request, the staff
member will select the link provided:
This will open a web browser with the possibility to follow up the order
Nigel Bateson
02/01/2014
Page 39 of 55
Using the web based response page, the hotel staff can chose to:
A) Reject the order (Guest will receive a rejection message)
B) Confirm the order (Guest with receive a confirmation message)
With either option, the Staff member can choose to write a custom message for the
guest. The guest will receive the rejection, confirmation and custom message within
the Messages application on their TV or smart device.
Nigel Bateson
02/01/2014
Page 40 of 55
If a PMS Revenue Code has been specified for the store, product billing will
occur when the order is confirmed
Nigel Bateson
02/01/2014
Page 41 of 55
11. Statistics
Otrum Enterprise offers a powerful and useful statistical analysis tool to enable simple
measurement and tracking of the interactive TV performance.
The application makes it possible to measure many factors, including but not limited
to:
-
VOD Revenues
-
Pay TV revenues
-
Top performing movies
-
TV Channel Viewing
-
Advertisement Performance
Any date range can be selected, however ‘quick date ranges’ include:
-
Current week
-
Current month
-
Year to date
-
Last 7 days
-
Last 4 weeks
-
Last 12 months
Below is an example of the revenue performance:
Nigel Bateson
02/01/2014
Page 42 of 55
Below is an example of the occupancy statistics:
This example shows the top performing VOD titles:
Nigel Bateson
02/01/2014
Page 43 of 55
To see an accurate report of VOD viewing, times and room numbers, use the export to
CSV/XLS function
Nigel Bateson
02/01/2014
Page 44 of 55
This example top performing TV channels:
This example shows the impressions of the advertising campaigns:
NOTE: All data from any search can be exported in XLS or CSV format using the icons
provided.
Nigel Bateson
02/01/2014
Page 45 of 55
12. SYSTEM CONFIGURATION
The system configuration can also be controlled through the Enterprise Web
application.
The configuration options allow the system admin staff to setup the solution to meet
the needs of the hotel. Your login rights will determine the options you have available
from this list.
Nigel Bateson
02/01/2014
Page 46 of 55
a. Employee Management
Setup of housekeeping staff, their system language and their preferred radio station
for background music in the room. Use a different PIN code for each employee, there
is no limit on the number of registered employees. This setup applies to both the TV
housekeeping tools, and the Tablet/Smartphone housekeeping tools.
b. Room Status Codes
Setup of the matching room status codes found in the PMS. This ensures that the
housekeeper sends the correct status to the PMS when working on a guest room.
Nigel Bateson
02/01/2014
Page 47 of 55
c. Content Policies
On check-in, the front desk can allocate different content policies to the guest room,
this setup is used to configure the behaviour of content blocking and pricing. The
content policy can be set from the PMS VIP codes, or be permanently allocated based
on the room number.
Permanent configuration can be set – i.e. if business rooms are to receive a set
discount at all times.
Each content policy includes a name, PMS Mapping and blocking status. In addition a
discount parameter can be set for HSIA, VOD and PAY TV.
Nigel Bateson
02/01/2014
Page 48 of 55
Content policies can also be set on a permanent basis for certain rooms.
Free VOD vouchers can be enabled for those rooms or guests who are entitled
Once a voucher has been used, the guest must then pay as normal.
Nigel Bateson
02/01/2014
Page 49 of 55
d. Maintenance Types
This tool allows you to build a guest room inventory. The inventory is then used by the
housekeepers to report broken or faulty items in the room.
e. Maintenance Status Types
When a housekeeper reports a faulty item, they must choose from a list of possible
problems, i.e. broken, damaged, fixed, etc. This list is configured here.
Nigel Bateson
02/01/2014
Page 50 of 55
f. Text Resources
This is a small translation tool to enable simple translation of system text into different
languages.
g. View Bill Configuration
This setup window is used to match the transaction codes in the PMS with the real
descriptions to appear on the guest’s folio when they use the ‘view bill’ function.
Nigel Bateson
02/01/2014
Page 51 of 55
h. Minibar
Use this tool to build the minibar inventory, including the revenue codes for the PMS,
the prices and the total quantity of each item normally found in the minibar.
i. Flight Info Configuration
Airport arrivals and departure information can be provided on a subscription basis for
the guest. The Flight Info Configuration tool allows the setup of which airports shall be
included.
j. Weather Location Management
Weather forecast for multiple cities can be made available to the guest. This is a
subscription based service from Otrum.
The Weather Location Management tool allows the setup of which cities are to be
included.
Nigel Bateson
02/01/2014
Page 52 of 55
k. Movie Management
The Movie Management tool allows for the configuration of the movies to be
promoted on the Otrum Enterprise main menu.
Otrum Enterprise will automatically create the artwork and insert the price. The hotel
only must select which movies are to be highlighted in the menu by selecting YES or
NO in the ‘Promote’ column.
Nigel Bateson
02/01/2014
Page 53 of 55
l. Advertisement Configuration
With Otrum Enterprise and later, the hotel has full control over the TOP and BOTTOM
advertisements on the right side of the main menu.
6 Options are available for either position:
Any of the 6 options can be added to either the upper or lower window at any time.
Each item in the playlist has its own duration, which can be set as the new item is
added to the playlist.
Nigel Bateson
02/01/2014
Page 54 of 55
m. Full Screen Advertisements
One of the most powerful guest communication tools are the advertisements running
on the right side of the TV Menu.
The advertisements are built from a ‘spot’ or teaser which runs on the Main Menu,
which when selected triggers a full screen advertisement.
Too add new material, just select the ‘+ New Advertisement’ button. Use PNG file
format, Spot = 260x250, Full Screen=1280x620
To delete material, just select the item from the list, and press the ‘x delete’ button.
The artwork can also be renamed if needed.
Nigel Bateson
02/01/2014
Page 55 of 55