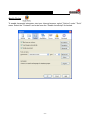
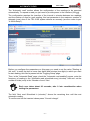
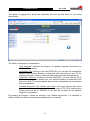
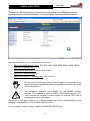
1
User Manual - rev.2 - 09/11 TELECOORDINOMETER TEL-310S (product code: 0TEL3103GS0) TEL-310S “Firmware Version: 2.0.0.2 Web Page Version: 1.4” COMPANY WITH QUALITY SYSTEM CERTIFIED BY DNV ISO 9001:2008 INDEX TEL-310S Warnings Pag.5 Notes on system utilisation Pag.6 Waste disposal Pag.6 System Description Pag.7 Symbology Pag.9 Standard Supply Pag.9 Accessories Pag.10 Identification Plate Pag.12 TEL-310S Installation Pag.13 TEL-310S Power Supply Pag.20 Description SUS unit Pag.21 Local Operations Pag.24 Errors Codification Pag.25 Reset Pag.26 Hardware Reset (Button) Pag.26 Software Reset (Button) Pag.26 Software Reset (Control) Pag.26 Restore Pag.27 Communication Pag.27 Communication with TELNET Pag.27 HTTP WEB Interface Pag.31 Initial page Pag.33 -2- TEL-310S Home Page Pag.34 Current Values Pag.36 Automatic Read Pag.37 Logging Setup Pag.39 Logging Data Pag.41 Serial Port Setup Pag.43 4-20mA Setup Pag.44 Ethernet Setup Pag.47 Diagnostic Pag.49 TEL-310 Server Pag.50 Software Installation Pag.50 Connection Pag.50 RS485 (Optional) Pag.51 USB Pag.53 BLUETOOTH Pag.54 Bluetooth Device Association Pag.55 TELNET Pag.58 Program Ending Pag.59 TEL-310 Upgrade Pag.60 Control List Pag.62 Standard Configuration Pag.91 -3- TEL-310S Ordinary Maintenance Pag.92 Troubleshooting Pag.93 Measurement Problems Pag.94 Assistance Pag.97 Advanced Section Pag.98 Appendix n°1 (Print diagnostic) Pag.98 Appendix n°2 (technical features) Pag.104 Appendix A Appendix B Appendix C Appendix D Appendix E Appendix F Appendix G Appendix H Appendix I Appendix L -4- WARNINGS TEL-310S To ensure a safe and efficient functioning, please read the following instructions carefully before use. Any unauthorized modification is considered a total responsibility of the user. In addition to the standards listed above, the user must comply with the existing legislation on safety and health of employees in the workplace. Check the product for damages caused by transport. Verify that your package includes all standard accessories and any accessories required. In case, contact the manufacturer The use of the equipment shall be done only after the proper connection and following the configuration needed; so the user must carefully perform all the operations described herein. SISGEO will not be liable for inconveniences, damages, accidents, etc.. due to lack of knowledge (or non-application) of the requirements contained in this manual. The use, any possible maintenance or repair of the equipment is allowed only to skilled and authorized operators. These operators must be physically, professionally and intellectually capable. For information or orders of spare parts always specify the data reported on the identification plate showing the serial number inside each device. When replacing parts, use only ORIGINAL SPARE PARTS. The manufacturer reserves the right to make changes, in case of any manufacturing or commercial need, without notice. It will attempt to ensure that user manuals are updated in order to reflect functional product revisions. -5- NOTES ON SYSTEM UTILISATION TEL-310S Use connectors and ports Never force a connector into a port. Check for possible obstructions in the port. If the connector and port do not connect easily, they probably do not match. Make sure the connector matches the port and have positioned the connector correctly in relation to the port. In order to make a proper connection always refer to the instructions described in this manual. WASTE DISPOSAL TEL-310S According to the European standard 2002/96/CE, the disused instrument must be disposed in a correct way. The recyclable materials are recovered, in order to avoid the environmental damage. For more information please contact your waste disposal service or the instrument retailer. -6- SYSTEM DESCRIPTION TEL-310S The system TEL-310S Telecoordinometer is mainly composed by three devices: TEL-310S OPTICAL SENSOR UNIT “SUS” Sensor for detecting the position of one or two steel wires of the pendulum with 2mm (product code: 0TEL310SUS0) diameter. TEL-310S POWER UNIT “PWS” (product code: 0TEL310PWS0) Box containing the components necessary to provide proper power to the CUS TEL-310S CONTROL UNIT “CUS” (product code: 0TEL310CUS0) Box containing the electronic components for the SUS power and device management and LAN, RS485, USB, Bluetooth and 420mA communication interfaces. The following diagram shows a minimal system: SUS CUS TEL-310S OPTICAL SENSOR UNIT TEL-310S CONTROL UNIT PWS TEL-310S POWER UNIT CONNECTION CABLE TEL-310 - PC Main Power Supply 100-240Vac 50-60Hz, 0,5VA -7- TEL-310S The automatic reading system TEL-310S detects the position of one or two wires of the pendulum. The pendulum, straight or reverse, is generally used for measurements of horizontal movements in concrete structures such as dams and buildings of a certain height (such as towers and bell towers). The instrument is characterized by a high resolution, long-term stability and validation of measurements performed by the auto diagnosis. In case of flooding each unit of the system (SUS, CUS, PWS) is able to withstand up to a pressure of 0.5 bar for 30 minutes without damaging the system. In the event of flooding the system will stop the execution of the measures set. The IP68 protection is ONLY ensured when each connector panel of the unit CUS and PWS is closed with its cap or when its flying leads is connected. -8- SYMBOLOGY TEL-310S Here are the symbols used in this manual to alert the reader: Attention! Risk of electric shock. Attention! This operation must be executed by specialized personnel. Pay particular attention to the following information. STANDARD SUPPLY TEL-310S Following a brief description of the components present in each unit: TEL-310S OPTICAL SENSOR UNIT (product code: 0TEL310SUS0): - Biaxial optical sensor, nominal range 150x60mm - Stepper linear motor - Sensor to detect water - IP68 submersible cover - IP68 SUS-CUS double cable, 5m (cable “1” and “2” - appendix A) TEL-310S CONTROL UNIT (product code: 0TEL310CUS0): - Motherboard, auxiliary board and motor driver board - LAN, USB, RS485 and 4-20mA communication port - IP68 aluminium box - USB cable, 3m (cable “4” appendix A) - Ethernet cross-cable, 3m (cable “3” appendix A) - Software for management and communication TEL-310S POWER UNIT (product code: 0TEL310PWS0): - IP68 aluminium box - 100-240V power supply cable, 3m - IP68 PWS-CUS cable, 5m (cable “6” appendix A) ADJUSTABLE SENSOR SUPPORT (product code: 0TEL310ANS0): - SUS mounting bar - Adjustable support - Wall bracket support NOTE: mounting kit for TEL-310S POWER UNIT and for TEL-310S CONTROL UNIT not furnished. CUS and PWS units are housed in aluminum boxes prepared for fixing to the wall using four M6 screws (not supplied). -9- ACCESSORIES TEL-310S Listed below are the accessories available for TEL-310S Telecoordinometer: TEL-310S BLUETOOTH (product code: 0TEL310BT0): - Internal Bluetooth module - 2.4 GHz omni-directional antenna, IP68 ADJUSTABLE SENSOR SUPPORT (product code: 0TEL310ANS0): - SUS mounting bar - Adjustable support - Wall support TEL-310S CALIBRATION / MOUNTING KIT (product code: 0TEL310CAL0): - SUS calibration template - SUS positioning template “SUS” optical sensor unit control template Drilling template to mount the "ANS" support The 0TEL310CAL0 kit includes a drilling template for the wall where the “ANS” support will be placed, and a template to be placed on the “SUS” optical sensor unit for a possible functional check on field (pendulum’s wire simulation). To create a RS485 multi-node network: PREASSEMBLED IP68 CABLE, 3m (product code: 0TEL310XC53): (cable “5” - appendix A) - IP68 male connector - RS485 communication cable 3m lenght - Two cable splicing kit 2-TWISTED PAIR CABLE (product code: 0WE104VWK0) - 2-twisted pair cable TEL-310S RS485 MODULE TO PC (product code: 0TEL310X485)): - USB/RS485 opto-isolated module for PC - Communication cable RS485 with DB9 connector, 3m lenght - 10 - TEL-310S To manage 4-20mA measures (for ex. with our data acquisition system ADK-100): PREASSEMBLED IP68 CABLE, 3m (product code: 0TEL310XC83): (cable “8” - appendix A) - IP68 male connector - Connection cable 3m lenght - Two cable splicing kit 2-TWISTED PAIR CABLE (product code: 0WE104VWK0) - 2-twisted pair cable Cables “5” and “8” are supplied with 3m lenght; arrange to make the joints perfectly watertight with the 0WE104VWK0 cable, in order to ensure the IP68 protection. - 11 - IDENTIFICATION PLATE TEL-310S TEL-310S system has two types of identification plate. One of these reports the product registration serial number . This type of plate is present in all the units. It is important to communicate this information when requesting information concerning the TEL-310S The second type of plate is found under the aluminum box cover of PWS and CUS unities and on SUS unity cover. ATTENTION: Follow the requirements on the plates. Failure to comply with these requirements could result in damage to the device and danger to the operator. - 12 - TEL-310S INSTALLATION TEL-310S For a detailed description of the system installation, refer to the manual of the pendulums. 0TEL310ANS0 adjustable support The “ANS” adjustable support (0TEL310ANS0) has been developed to support and fix the “SUS” optical sensor unit (0TEL310SUS0) of the new TEL-310S telecoordinometer. The support is fixed to the wall through two M16 threaded bars, of 370 mm. length (supplied). Once the “SUS” optical sensor unit is fixed to the support, it is possible to adjust the settings in order to place the pendulum’s wire in the chosen position within the instrument measuring range. - 13 - TEL-310S Needed conditions to use the “ANS” adjustable support if you have to monitor the direct pendulum’s wire d To fix the “SUS” optical sensor unit through the “ANS” support, it is necessary that the direct pendulum’s wire is at a distance of d=230 mm. from the wall. To achieve that, the direct pendulum’s tank has to be placed at a distance of D=20 mm. from the wall: in this way is guaranteed that the pendulum’s wire is exactly at the center of the “SUS” optical sensor unit. D Needed conditions to use the “ANS” adjustable support if you have to monitor the inverted pendulum’s wire To fix the “SUS” optical sensor unit to the wall through the “ANS” support, it is necessary that the inverted pendulum’s wire is at a distance of d=230 mm. from the wall. To achieve this result, it is necessary to build a niche and a shelf. The niche should have the following approximate dimensions: height 650mm, length 800mm and width 200mm. In this way you can be sure that the pendulum’s wire is exactly at the center of the “SUS” optical sensor unit. d - 14 - TEL-310S Positioning of the “SUS” optical sensor unit The TEL-310S telecoordinometer has the following measuring range: • X axis: 145mm (150mm nominal), • Y axis: 60mm. To use the “ANS” adjustable support you must have the “X” axis parallel to the wall: so it is not possible to fix the “SUS” optical sensor unit perpendicular to the wall using the “ANS” adjustable support. Asse X Asse Y Fixing the “ANS” adjustable support to the floor Since the “ANS” support is articulated, it can be fixed to the floor; this can be useful in case the pendulum’s wire is too far from the walls. - 15 - TEL-310S Using the “ANS” adjustable support for the pendulum optical manual readout The pendulum readout fixing plate has four holes so it can be fixed, through screws, to the “ANS” adjustable support. Necessary conditions to use the pendulum optical manual readout fixed on the “ANS” adjustable support, are the same already mentioned for the “SUS” optical sensor unit. “SUS” optical sensor unit removal for maintenance It is possible to use the pendulum optical manual readout instead of TEL-310S “SUS” optical sensor unit without any regulation of the “ANS” support. It is also possible to start the pendulum’s monitoring with the pendulum optical manual readout and then automate the readings with TEL-310S telecoordinometer , without changing its initial zero. Measuring range of the "SUS" optical sensor unit - 16 - Measuring range of the pendulum optical manual readout TEL-310S Influence from atmospheric conditions Any factor (water, mud etc.) that could dirty the internal part of the “SUS” optical sensor unit’s cover can influence the TEL-310S correct functioning. So it is essential to protect properly the “SUS” optical sensor unit from weather conditions, leaving anyway the access possibility for cleaning/maintenance. In any case, TEL-310S has an auto-diagnostics able to alert the user for the maintenance. Inverted pendulum’s tank rovescio Structure (open) containing the optical unit Pendulum’s wire Structure (closed) containing the optical unit Optical unit Sample solution used to protect the instrument (old TEL-310) from weather conditions. - 17 - TEL-310S Installation 3 2 1 4 5 6 7 The SUS unit wall mounting runs with the use of positioning jig (optional), to pierce the wall making two holes for the threaded anchors M16x370mm (1) and two holes for M8 screw (2). For a correct use the jig has to be handled taking up the reference (3). The cross-reference (4) indicates the theoretical position of the pendulum wire. Once the wall is pierced, fix the two supports provided. The first (5) by means of the two threaded anchors with lenght 370mm and the second (6) with M8x55mm screws. The SUS unit is fixed to the support by four M8 screws (7). Once the unit is fixed the support must be regulated so that the wire falls to therange center and the level indicates the correct alignement of the system. - 18 - TEL-310S If the pendulum wire to monitor is not near a vertical wall, the SUS unity could be fixed to the floor using the same positioning jig described above to execute the holes for the two M16 x 370mm threaded anchors. Again it is useful to use the cross reference (4) indicating the theoretical position of the pendulum wire. If you have to install the SUS unity at a certain height above the floor or at a certain distance from the wall is necessary to create a structure in carpentry. Fix the SUS, CUS and PWS unities in a dry place without dust; avoid direct sunlight on SUS unity. To facilitate the correct installation, connection cables “1” and “2” between SUS and CUS unities are 5m length and the connection cable “6” between CUS and PWS unities is 5m length (see appendix A) To fix the two boxes (CUS and PWS) there is a predisposition on them for the fixing with chemical or mechanical dowels for screw with 6mm of diameter. To use the box predisposition it is necessary to make the holes in the wall with distance 310x180mm; you can use the same box as a template. With this type of fixing it is necessary to remove the cover, so it is strongly recommended to follow the procedure described in this manual to close the cover once the box is fixed. It is advisable to analyze the workplace in order to evaluate the best solution. - 19 - TEL-310S POWER SUPPLY TEL-310S The TEL-310S Telecoordinometer is powered by PWS unity. That unit powers the electronic present into the CUS unity which in turn provides power (12 e 24 V ) to the engine and to the optical drive of the SUS unit. Make sure that the power supplied to the system meets the operating range of the product (100-240V – 50-60Hz, 0,5VA). In order to power the TEL-310S Telecoordinometer make sure, only after making the connections described above, to have set the magnetothermic-differential switch present in the PWS unit in ON position: 1. connect CUS and PWS unities with the 4 poles flying cable supplied (cable “6” appendix A); 2. connect (cable “1” - appendix A) the SUS unit to the CUS unit connector identificated as MOTOR with the 4 poles flying cable supplied ; 3. connect with the 10 poles flying cable supplied (cable “2” - appendix A) SUS unit to the connector identificated as SENSOR SIGNALS present in CUS unit; 4. connect the cable with Shuko 90° plug (Franco-German) to the related socket. Basing on the system architecture chosen, you should ensure the connection of other cables refers to appendix “A” for more information. Connect CUS unit to a system with ground protection. CUS plug is the means of disconnection therefore it must be always reachable. - 20 - CUS UNIT DESCRIPTION TEL-310S Motherboard picture 1) Display led 7 segments 2) Button to select the function (S) 3) Button to activate the function (G) 4) Button to Display Last Error (E) 5) Button to Reset the Software (R) 6) Button to Reset the Hardware 7) LAN connector 8) USB connector 9) RS485 connector 10) 4÷20mA Lines Connector 11) Power connector 12) Terminal Motor Controller 13) 2GB SD Memory 14) Bluetooth Module (optional) 15) Clock Battery Backup - 21 - TEL-310S Engine control board picture 16) Terminal controls to motherboard 17) Power supply 18) Engine terminal 19) Programming connector - 22 - TEL-310S 21 20 Auxiliary board picture 20) 10 pins connector signals 21) 10 pins flat cable connector Firmware The mother card has at least 2 GByte microSD memory, the maximum number of recordable acquisitions is 11100000. Files already present in SD memory card must not be altered. Editing files on SD card may make it impossible to access with HTTP. - 23 - LOCAL OPERATIONS TEL-310S On the motherboard inside the CUS unit there is an interface with two-digit 7segment LED and some buttons to allow you to perform diagnostic tests without a PC. There are four push-buttons, from left to right: S: Select the function; pushing this button repeatedly, all available functions are shown. G: Go; start selected function E: Error; shows TEL310 error state (related to the last run) or the current measure operation, if any. R: Reset; reset TEL-310 aborting any running operation (this is a software reset). The following commands are available: Off: no function selected GO Go: Start a reading di Di: Start a diagnostic reading L1 L1: Switch on LED1 into the SUS unit L2 L2: Switch on LED2 into the SUS unit O1 o1: Switch off LED1 into the SUS unit O2 o2: Switch off LED2 into the SUS unit A0 A0: Switch off current generator A A1 A1: Set the 4mA current generator A A2 A2: Set the 10mA current generator A A3 A3: Set the 20mA current generator A B0 B0: Switch off current generator B B2 B2: Set the 4mA current generator B B3 B3: Set the 10mA current generator B B4 B4: Set the 20mA current generator B - 24 - ERRORS CODIFICATION TEL-310S The system performs a series of tests to determine conditions that prevent the proper functioning of equipment. In particular are checked: temperature, LED functioning, photo-transistor operation, the engine block, the trolley block, proximity detection, dirty glass, auxiliary board operation, presence of water, presence of light on photo-transistor. Errors that may be reported for actions triggered by pushing the E key are: e0 No error detected E1 Run aborted by user E2 Not used E3 Not used E4 Motor controller error (CUS unit) E5 Unit overheating (CUS unit) E6 Water detected (SUS unit) E7 Motor blocked (SUS unit) E8 Not used (SUS unit) E9 Photodetector on X' axis fault (SUS unit) Ea Photodetector on Y 'axis fault (SUS unit) Eb External light detected on X' axis photodetector (SUS unit) Ec External light detected on Y' axis photodetector (SUS unit) Ed Dirty glass for X' axis photodetector (SUS unit) Ee Dirty glass for Y' axis photodetector (SUS unit) ef Missing connection with auxiliary board (CUS unit) The error codification reported in this table is the same even in the management software. TEL-310S system performs two diagnostic runs on reboot. TEL-310S system can be configured to perform even two automatic diagnostic runs per day; refer to the “DR” command. - 25 - RESET TEL-310S Three different types of reset are defined: one hardware reset and two software resets. HARDWARE RESET (BUTTON) TEL-310S Pressing the reset button on the motherboard (see figure below) you start a low level reset of the microprocessor and all its activities. The date and time in the internal clock and the options set in the unit configuration are not influenced. After the button pressing the TEL-310S will make again the two diagnostic runs. Button for the hardware reset RESET SOFTWARE (BUTTON) TEL-310S On the motherboard there is a reset button (R button) controlled by the software. It interrupts all pending operations without reinitialize the unit, so start up operations are not performed (DHCP Search, Diagnostic Run, etc.). RESET SOFTWARE (COMMAND) TEL-310S This reset is performer by sending the command “KO” The “KO” command can be end either by WEB pages that from TELNET. It performs a new initialization of all operations including DHCP renew, the broadcast Discovery and runs diagnostics. Sending this command stops any notice or process. - 26 - RESTORE TEL-310S The unit restore operations restores the unit to the factory configuration. To access the restore function: disconnect the power supply, hold down the button S,G e E and restore the power the display will show “rE” flashing. Release the keys within a few seconds; the display after 10 seconds, will show the characters “00” flashing and TEL-310S is reset. COMMUNICATION TEL-310S The TEL310S system allows the connection in the following ways: 1) 2) 3) 4) 5) TELNET HTTP (WEB pages interface) RS485 USB BLUETOOTH The communication ports (USB, Ethernet, RS485, 4-20 mA and Sensor Signals) are protected by double insolation. TELNET and HTTP are protocols on Ethernet physical connection. The USB, RS485 and BLUETOOTH modalities require the installation of “TEL310SERVER” program (included in the CD). All procedures require a login. The system performs an automatic logout if it does not receive commands for a period exceeding 10 minutes. The USB, Bluetooth and RS485 modalities cannot be used simultaneously. Check periodically for firmware and software updates on SISGEO website (www.sisgeo.com) in the section reserved for the product TEL-310S. COMMUNICATION WITH TELNET TEL-310 TELNET is a standard connection system to obtain a remote console using a TCP/IP connection on port 23. Connect the Ethernet cross cable (cable “3” - appendix A) between the PC and the CUS unit. To make a connection via TELNET type “TELNET aaa.aaa.aaa.aaa” from a command line where “aaa.aaa.aaa.aaa” is the IP address associated to the system. - 27 - TEL-310S Alternatively you can use programs like “PuTTY”. For the examples below we used the program “PuTTY” (an alternative to TELNET software) free downloadable at www.putty.org address. Once got the connection the login is required. The login is “TEL310” (uppercase or lowercase), while the password is set in the system (default 12345678). Once made the login the system is set in standard mode. To switch to Advanced mode type the command PW=XXXX where XXXX (password 6823) is the advanced password. Refer to the command section for more details. In Microsoft Windows operating systems (Vista and Seven excluded), to access the TELNET program, select in the start menu “All Programs | Accessories | Command Prompt”. Once obtained a command shell, type TELNET followed by the TEL-310S address. - 28 - TEL-310S In the operating systems Microsoft Windows Vista and Windows Seven, the TELNET program is not enabled by default. If, trying to start, you will get a message like the following: "TELNET" is not recognize as internal or external command, an executable program or a batch file. follow the steps described below to activate the program: Microsoft Windows Vista Select Control Panel from the Start menu; with Vista select the Classic View option and double click the Programs icon. In the Programs and Features group click Turn Windows features on or off. You will be asked to confirm the request and after a few tens of seconds you'll see a list of programs. Check the “TELNET Client” item and click the OK button. - 29 - TEL-310S Windows will ask you to wait for the configuration of functionality required, this may take several minutes. When Windows has completed the transaction, you should be able to launch the implementation of the TELNET program. Microsoft Windows Seven Select "Control Panel" from the Start menu of Windows Seven; select the option "Display by Category" on the right of Control Panel and click on "Install new programs" in the group “Programs”. Click on “Enable or disable Windows features” present on the left of the screen. If you access in Windows with administrative privileges you can simply confirm the possible task that appears. If the access has been done with user limited privileges will be necessary to insert a user name and password of administrative level. After a few tens of seconds you'll see a list of programs. Click on “TELNET Client” and then click on the OK button. Windows will ask you to wait for the end of the requested functionality configuration; this may take several minutes. When Windows has completed the transaction, you should be able to launch the execution of the TELNET program. - 30 - HTTP WEB Interface TEL-310S Connect the furnished cross Ethernet cable (cable “3” - appendix A) between the PC and CUS unit. TEL310 system can be query with a standard Internet Browser (IE8,Firefox,Safari). For the correct functioning is necessary to enable the execution of Javascript code. Here are the procedures to control and possibly runs the Javascript code in the two most popular Internet browser (IE8 and Firefox). Microsoft Explorer To enable Javascript interpreter, open Internet Explorer, select “Tools” at the top right of the page and select “Internet Options”. Select the “Security” tab and make sure that “Internet” is selected as the area to view and modify the settings. Click “Customize level…” and be sure that in the list “Security Settings”, in the group “Scripting” the item “Active Scripting” is “Enable”. - 31 - Mozilla Firefox To enable Javascript interpreter, start your Internet browser, select "Options" under "Tools" menu. Select the "Contents" and make sure the "Enable JavaScript" is checked. - 32 - INITIAL PAGE TEL-310S Typing the IP address of the telecoordinometer you access the home page. The default IP address is 192.168.1.100. After few seconds you will be redirected to the Home Page. If you do not wish to wait click on the active link “here” on the page. If you have an Internet connection: Press on “SISGEO” logo in the top left side and you will be redirected to SISGEO website, Click on “TEL-310S” image at the top right side and you will be redirected to SISGEO website in the section dedicated to the TEL-310S. - 33 - HOME PAGE TEL-310S Pressing the “Back” key you will be always redirected to the Home Page; we recommend to use only the sections on the left of the web pages. After a few seconds you will se the home page. On the left of the home page there are sections that allow the control system. You must login to allow the operation of those sections. Login section shows the date and time in the system and status of login. There are three possible login status: “NOT LOGGED IN”,”LOGGED IN STANDARD MODE” and “LOGGED IN ADVANCED MODE”. The login in STANDARD MODE allows viewing all pages, download data, but does not allow any kind of configuration change. The login in ADVANCED MODE incorporates the functions of the STANDARD MODE and allows more complete control of configurations in these web pages (network card settings, acquisition settings, 4-20mA setting, etc.). The system remains logged for 10 minutes from the receipt of the last command. In this page you can also change your login password. To change password please log in ADVANCED MODE and insert in "Set password" and "Repeat password" your new password choice. It is possible to change only the STANDARD MODE password. The ADVANCED MODE password can not be changed. - 34 - TEL-310S To read and access the following pages you must have performed a STANDARD MODE or ADVANCED MODE login. After the execution of the first run, we recommend to change your login password using the appropriate function. The “ADVANCED MODE” password should be communicated only to qualified personnel, seeing that it authorizes the execution of all commands provided; in later chapters, for each command, it is cleared whether access to ADVANCED MODE or STANDARD MODE are required. - 35 - TEL-310S CURRENT VALUES The "Current Values" section shows the values of the last reading done. If you have not done a reading, the system reports some whitespaces instead of the readings. The values are automatically updated at about every 30''. If this do not happens, press the refresh button to force the values update. There is also a text box where you can enter the number of runs which will be performed by the system. In the event that a number of runs which is more than one is selected, the saved result will be the average of the single runs. Pressing the “Go” key you can perform the runs set. The command “go” does not save the readings taken. Table rows have the following meaning: Position is the absolute position in millimeters . Reference is the reference point set by the user in millimeters. Offset is the difference between the position and the reference in millimeters. - 36 - AUTOMATIC READ TEL-310S The “Automatic read” section allows the configuration of the readings to be executed automatically. To request a read you just need to provide power to the interface (24V ). The configuration requires the insertion of the interval in minutes between two readings and the number of runs for each reading; this last parameter is the maximum number of attempts (runs) done if the TEL-310S system detects an anomaly (see the codes to par. “4-20mA Setup”). Before you configure the parameters on this page you need to set the value "Starting at (hh: mm)" to enter the time in hours (two digits) and minutes (two digits) in which you want to start reading; this field is present on the "Logging Setup" page. Then, in the “Automatic Read” page, check the “Automatic read enabled” square, enter the frequency of reading in the “Automatic read scheduled every (minutes)” field and set the number of trials (runs) in the “Number of runs” field. Each race takes about 90 seconds, take it into consideration when setting the parameters. The field “Next read Scheduled in (minutes):” shows the remaining time until the next automatic reading. To confirm and set the inserted values press “Commit change”. - 37 - TEL-310S In case of planned acquisitions, they will be executed according to the start date and time set and any possible automatic reading is postponed to the end of the planned acquisitions. The readings taken with the "Automatic read" have the only purpose of having a valid read immediately available when a value is requested through the interface 4-20 mA. Automatic readings can not save data. The command “Commit change” needs the ADVANCED MODE login. - 38 - LOGGING SETUP TEL-310S The "Logging Setup" section allows you to set the rhythm of acquisitions and the time of the first acquisition. The button “Set time” synchronize the time of the TEL-310S with that of the connected computer. You can also configure a time server (SNTP) for the time synchronization; as the time server returns the time according to Greenwich time (for the Italian and Central European time zone it must be set 60) it will be necessary to set the time zone in minutes. The scheduling of acquisitions may be delayed by the presence of automatic readings. In any case the reading which is done before is the one that has the previous date and time. In the field “Logging scheduled every (minutes)” you have to insert the interval between one acquisition and the subsequent one. In the field “Starting at (hh:mm)” you have to insert the time express in hours (two digits) and minutes (two digits) in which you want to start the acquisition. In the field “Number of runs” you have to insert the quantity of runs to make at each set frequency. If you select a number of runs which is more than one the saved result will be the average of the single runs. The field “Next Recording scheduled At:” displays the day and hour of the next planned acquisition. - 39 - TEL-310S If there is no acquisition configured in the field “Next Recording scheduled At:” some dashes will be displayed. To determine the automatic acquisition insert in the field “Number of runs” the value “0” (zero) and press, then, the button “Commit changes”. The readings made by this section are stored in the SD memory of the CUS unit and are available for viewing and / or download in the page “Logging Data”. The command “Commit change” needs the login in ADVANCED MODE. - 40 - LOGGING DATA TEL-310S The section “Logging data” allows the download, the view and the delete of the stored acquisitions. The table on this page is composed by: - Total recorded: indicates the number of readings collected and stored on CUS unit SD memory. - Acquisition File: clicking on the link DATA.CSV you can see the acquisitions directly in the Internet browser or download and save them on your PC by pressing the green arrow to download (we recommend this last operation). - Diagnostic Summary: clicking on the link DIAG.CSV you can view the list of periodic diagnostic runs directly into your Internet browser or download it and save it on your PC by pressing the green arrow to download (we recommend this last operation). - Detailed Diagnostic (For SisGeo Use Only): as for the previous two items you can view or download the log file. In the case of TEL-310S malfunctions please send this file to SISGEO; in fact that file contains all the detailed diagnostic information. By pressing the buttons “Delete all readings” and “Delete diagnostics” it is possible to delete respectively all the acquisitions and diagnostic runs stored. - 41 - TEL-310S Here below the example of the DATA.CSV file structure containing the acquisitions. DATE 17/09/2009 TIME 14:15:21 RESULT E0 AAX 74.164 AAY 30.677 ABX ABY RAX 74.164 RAY 30.677 RBX RBY The “.csv” file is a text file whose columns are separated by commas. Here below you can find the meaning of each column: DATE: Date in which the reading is saved. TIME: Hour in which the reading is saved. RESULT: The result of the run (for error codes see the ST codes command). AAX: Absolute X axis value, wire A. AAY: Absolute Y axis value, wire A. ABX: Absolute X axis value, wire B. ABY: Absolute Y axis value, wire B. RAX: Value compared to the X axis reference , wire A. RAY: Value compared to the Y axis reference , wire A. RBX: Value compared to the X axis reference , wire B. RBY: Value compared to the Y axis reference , wire B. For the proper import in spreadsheet programs (Microsoft Excel, OpenOffice, LotusNotes etc.) verify that the "International Settings" of your operating system have: the decimal separator set to '.' (Point) and not to ',' (Comma), the list separator set to ‘,’ (Comma). Viewing and downloading data on this page can be made with a STANDARD MODE login. For deleting files using the buttons described above it is necessary a login in Advanced Mode. - 42 - SERIAL PORT SETUP TEL-310S The section “Serial port setup” allows the configuration of the RS485 serial port together with the serial parameters; it is also possible to set the RS485 address. Here below there is a list of configurable parameters: Baud rate (9600 default value): 300, 600, 1200, 2400, 4800, 9600, 19200, 38400 Data bits (8 default value): 7, 8 Parity (None default value): None, Odd, Even Stop bits (1 default value): 1, 2 Address for RS485 (1 default value): from 0 to 255. For the correct functioning of the communication it is necessary to not modify the default parameters of Baud rate (9600), Data bits (8), Parity (N) and Stop bits (1). The parameter “Address (for RS485)” set the RS485 interface address. This address in case of RS485 network with multiple TEL310S must be set uniquely for each system so that the TEL-310S is addressed and then reachable. The award of the same address, in a RS485 network, will cause communication errors resulting in the inability to communicate with TEL-310S. The command “Commit change” needs of ADVANCED MODE login . - 43 - TEL-310S 4-20 mA SETUP The section “4÷20 mA setup” allows you to configure the number of runs to make in response to a read request of the 4-20 mA interface. To request a reading it is enough to supply power to the interface (24V ). The typical application of this interface is the connection with a multiplexer board of our data acquisition unit ADK-100. You can configure conversion curves between physic readings and electrical signal in mA output. To do this, just set both the axis X and Y the displacement values that should correspond to an output signal of 4 mA and to a signal of 20 mA. For each TEL-310S system is furnished a calibration certificate in which you can find the linear and polynomial sensitivity factors. Once executed a reading, demanded by giving power to the 4-20 mA interface, on the two 4-20 mA lines will be set the currents corresponding to the millimeters measured. For example, if you set as shown in figure the conversions between mm and current, and the reading reported a X value of 75 mm and an Y value of 60 mm, the corresponding current will be 12.276 mA and 20 mA. - 44 - TEL-310S The TEL310S has two 4-20mA lines. The power imposition on the proper connector order the reading execution. At the end of a reading the two 4-20mA lines are set depending on the reading X and Y executed. If you have problems during the reading, the values in the table below will be set on 420mA lines. If in the configuration is required the execution of multiple runs, the reading will be the average of the readings of individual runs. While reading, the two lines alternately oscillate between the state X = 0 mA, Y = 1 mA and the state X = 1mA, Y = 0 mA. If errors are detected during the acquisition readings on the two lines will have stable values between 1 and 3 mA. Here the combination of the values in case of error. 4÷20mA X 4÷20mA Y Description 1 1 Reading not performed 1 2 Connection to the auxiliary board failed 1 3 Light presence on the X’ photodiode 2 1 Light presence on the Y’ photodiode 2 2 Led X' failure 2 3 Led Y' failure 3 1 Aborted by the user 3 2 Dirty glass 3 3 Unspecified error The command “Commit change” needs a login in ADVANCED MODE. - 45 - TEL-310S Reading TEL-310S axes 4mA – 0mm Y 20mA – 60mm 4mA – 0mm X 20mA – 145mm READ VALUES: 4mA or 0mm for both the axes. READ VALUES: 20mA or 145mm (axis X) and 60mm (axis Y) - 46 - ETHERNET SETUP TEL-310S The section “Ethernet setup” allows to configure the parameters for the TCP/IP connection. Changing these parameters may cause the system to disconnect from the network. Consult your network administrator to obtain the configuration parameters. Below there is a list of configurable fields: MAC address: this address is fixed and it is set unambiguously, factory, for every motherboard of the CUS unit so that in the network it will not possible to find two TEL-310S with the address. Having two or more TEL-310S with the same address same network would cause malfunctions to the whole network. Use DHCP: checking this field you enable the search for a DHCP server. The DHCP server assigns network addresses to all devices on the network that have enabled this function. If your network does not have a DHCP server you need to assign a static IP address. For the proper allocation of the network address please contact the network administrator. IP, Subnet mask, Gateway, First DNS and Second DNS: these parameters are the settings of your network card. They must be properly allocated in order to connect a TEL-310S to a network or connect a computer to a TEL-310S. The command “Commit change” needs a login in ADVANCED MODE. - 47 - at the same same of the TEL-310S By default, the TEL-310S has a network address configured in the following way: IP ADDRESS: SUBNET MASK: GATWAY: 192.168.1.100 255.255.255.0 192.168.1.1 It is therefore necessary that the PC with which you are connecting to, have the network card configured with the same class of addresses (for example IP ADDRESS: 192.168.1.5, SUBNETMASK: 255.255.255.0, GATWAY:192.168.1.1). The DHCP function, having by default a static address, is disabled. By checking the box "use DHCP" this function will start. At each re-start the TEL-310S will seek a DHCP server which assigns a valid address. After a few minutes, if no address is assigned to the TEL-310S, the address 169.254.0.1 will be automatically set. - 48 - DIAGNOSTICS TEL-310S The section “Diagnostics” allows you to make test on the equipment. In particular, in addition to buttons for the run executions, there is a text box where you can specify a command to be sent to the TEL-310S. Check in the chapter 'Command List' the commands available. Pressing the "Reset" button you restart the TEL-310S. To perform any operation, you have to make another login from the home page (see also the paragraph "Reset"). The command “Execute” needs a login in ADVANCED MODE. - 49 - TEL310SERVER TEL-310S The program TEL310SERVER supplied on CD allows the connection to the TEL-310S system simulating the web interface. The connection can be done in the following ways: RS485, USB, BlueTooth and TELNET. It is not possible simultaneously. to establish more than one connection The program should not be closed so that the communication remains active. SOFTWARE INSTALLATION TEL-310 The program supplied on CD must be installed by launching the "setup.exe" file on the CD. At the end of the installation you will see an icon on your desktop called TEL310SERVER; the software will be installed in this directory: c:\Program Files\sisgeo\TEL310SERVER (for Windows XP) c:\Program Files\sisgeo\TEL310SERVER (for Windows Vista and Seven) The operating systems Windows Vista and Seven have introduced some new safety standards. One of these is the UAC "User Access Control which is useful to check the privileges of the users registered on the computer and to prevent the execution of damaging software. A first application of this control can be seen with the numerous requests for confirmation to the operations performed on the computer. An other restriction is in the path \Program Files and consequently these restrictions are applied also to the programs installed in this directory. The easiest way to circumvent this restriction is to install the software in a different location (e.g. on a second partition disk or by creating a folder directly under C:\). CONNESSIONE TEL-310 The connection can be done in 4 ways: RS485, USB, BLUETOOTH and TELNET. - 50 - RS485 (OPTIONAL) TEL-310S RS485 network CUS #1 CUS #2 CUS #n RS485/USB Converter PC/Laptop The picture above shows an example of RS485 network. On each CUS unit there are two RS485 connectors. These connectors are in parallel to allow a "in-out" with the RS485 communication cable (cable “5” - appendix A). - 51 - TEL-310S Start the program TEL310 SERVER. To start the connection, select the communication port "Port" and the RS485 address “Address”. The TEL-310S system must be configured with the following parameters: Speed=9600, Data=8, Parity=None, Stop=1 (default parameters). To get the connection press on “Link” button. Once connected you can press on the “Start” button. This will automatically open your Internet browser set as default, connected on port 8080. The program should not be closed so that the communication remains active. - 52 - USB TEL-310S Connect the furnished USB cable (cable “4” - appendix A) between the PC and the CUS unit. Start the program TEL310 SERVER. After connecting the TEL-310S system to a USB port, select TEL310 from the list called "Device". If the words TEL310 did not appear, press the "Refresh" button. To get the connection press on “Link” button. Once connected you can press on the “Start” button. This will automatically open your Internet browser set as default, connected on port 8080. The program should not be closed so that the communication remains active. - 53 - BLUETOOTH (OPTIONAL) TEL-310S For the proper functioning, the TEL-310S system must have been previously associated to the computer. To pair the device follow the instructions of the operating system in use. The code (Key) for pairing the device is preset to “574832”. If the words TEL310 does not appear press the "Refresh" button” To get the connection press on “Link” button. Once connected you can press on the “Start” button. This will automatically open your Internet browser set as default, connected on port 8080. The program should not be closed so that the communication remains active. - 54 - BLUETOOTH DEVICE ASSOCIATION TEL-310S To install a Bluetooth device under Microsoft Windows operating system is of course necessary that the computer hardware is equipped with a Bluetooth system. In this case the toolbar at the bottom right will display the Bluetooth icon. Click on the icon with the right mouse button and select the menu item Add Bluetooth Device. Check that the TEL-310S is turned on, mark the checkmark "My device is set up and ready to be found" into the window and click the Next button. - 55 - TEL-310S After a few seconds you will see a list of available devices, in which should appear the TEL-310S. Select it and click on Next button. You must select the item Use the passkey found in the documentation and enter the telecoordinometer Bluetooth password; the default password is: 574832. Click on Next button and wait for Windows to complete the installation. In case of multiple TEL-310S devices with Bluetooth connection, you should rename each TEL-310S in order to distinguish them (eg. modify “TEL-310” with “TEL-310_1”). 56 TEL-310S At the end you will see a confirmation window. Using the external Bluetooth keys the connection can be seen from the operating system as a virtual serial connection. I twill be thus assigned a virtual COM to the device. In this case the connection following the normal procedure described in the previous pages might be impossible, because Bluetooth connection is seen as a RS232 serial connection. In this case, to establish a Bluetooth connection, you should select in software TEL310SERVER the RS485page, check the field "no address" and select the virtual COM port that the system has given (visible in the Bluetooth association phase or in “Device Manager” in the “System” menu of the operating system in use). 57 TELNET TEL-310S Connect the furnished Ethernet cross cable (cable “4” - appendix A). Start the program TEL310 SERVER. The TELNET connection requires entering the IP address of the system and the password for the standard login. The program automatically searches the system using a UDP broadcast (this function is not present in Microsoft VISTA and SEVEN operating system). Any possible firewall must allow the use of 23TCP port. To get the connection press on “Link” button. Once connected you can press on the “Start” button. This will automatically open your Internet browser set as default, connected on port 8080. The program should not be closed so that the communication remains active. 58 END OF THE PROGRAM TEL-310S To end the program is necessary to interrupt the server with the "Stop" button and close the connection with the "Unlink" button. 59 TEL310 UPGRADE TEL-310S Check regularly for updates on SISGEO website in the section related to the product in object. The program TEL310Upgrade allows the upgrading of web pages and firmware. TEL310Upgrade software is present in the installation CD. Within a LAN network in which Brodcast UDP packets are entitled, it is possible to use the "Find & Update" button to find the Telecoordinometer (Windows XP). However, you can type the IP address to establish a connection (Windows Vista and Seven). The Firmware Upgrade section allows you to upgrade the firmware contained into the motherboard of the CUS unit. At the end of the TEL-310S upgrading there will be a re-start. The WEB Upgrade section allows you to update the web pages contained into the motherboard of the CUS unit. It should be specified a directory containing the files to update. Attention is not possible to perform a partial update of the pages. The update of the pages can take several minutes. Wait for the confirmation message before stop the communication. 60 TEL-310S For both the updates (WEB pages and firmware) is required to indicate, by pressing the "Browse" button, the location of the files to update. After selecting a location, click on "Upload Firmware" or "Upload Web Pages" and the firmware and WEB pages will be respectively updated. Updates should be executed one by one. At the end of the update a message will confirm the completion of the transaction. The firmware update preserves the configurations set. The firmware update is a very delicate operation and must be performed by qualified personnel. The disconnection or the failure of power during the update can irremediably affect the functioning of the device. 61 TEL-310S CONTROL LIST Access to the system is governed by the insertion of a password. There are two password: Standard and Advanced. Below is a summary table of the available commands depending on the entered password. We recommend the use of commands that require Advanced Password only to qualified personnel Commands that do not require passwords: LG,? Commands that require Standard Passwords: PW,GO,DD,KO,ST,DP,DD,TP,AA,AB,AC,RA,RB,RC,VR,??,TI Commands that require Advanced Password: 0A,0B,0C,SY,P1,P2,P3,C0,C1,C2,C3,C4,XX,XY,XA,XB,XR,BT,CX,CA,LP,AD,DA,DX,XR,B T,DY,OP,?B,?1,WE,WA,WM,WG,W1,W2,PE,PN,RR,RN,SC,SD,SG,TS. Below is a list of commands executable on the TEL-310S system. LG Command: LG Category: Management Syntax: LG=PPPPPP,AAAAAA Prerequisites: None Description: The LG command makes the login to the telecoordinometer. The only commands accepted by the telecoordinometer without a login are: LG e ?. PPPPPP is the password for the standard access (max 16 characters) AAAAAA is the password for the advances access In the case of access via TELNET, the LG command is invoked automatically by TELNET access. 62 TEL-310S Example: Performs a standard login: LG=12345 Performs an advanced login: LG=12345,666 Related Commands: PW PW Command: PW Category: Management Syntax: PW=AAAAAA Default value: 6823 Prerequisites: Standard login Description: The PW command enables the advanced controls functionality. AAAAAA is the password for the advances access. Example: Enables the advanced commands PW=666 Related commands: LG ? Command: ? Category: Management Syntax: ? Prerequisites: None Description: The command ? Show the TEL310 current status. Example: ? TEL310 63 TEL-310S VR LP AD DA DX DY WE WA WM WG W1 W2 TI RR PE OP P0 P1 P2 P3 P4 C0 C1 C2 C3 C4 0A 0B 0C PN RN TS LG SC AA AB RA RB 1.0.0 9600,8,1,0 1 1 1.000000,150.000000 1.000000,60.000000 00:04:A3:00:00:0A 10.0.0.15 255.255.255.0 10.0.0.138 217.22.224.51 217.22.224.52 26/06/2008 14:24:30 0 0 0:0 0 0 19200,10000,0 2.247420,-3.981127 20.000000,15.000000 25.000000,53.000000 123.000000,53.000000 147.681000,61.509998 0.000000,0.000000 278.933990,0.000000 5219.207031,0.000000 15289.030273,0.000000 18255.410156,0.000000 0.000000,0.000000 0.000000,0.000000 0.000000,0.000000 -1 06/02/2136 06:28:15 ,-120 1 6 NAN,NAN NAN,NAN NAN,NAN NAN,NAN Related commands: None GO Command: GO Category: Measurement Syntax: GO=n Prerequisites: Standard Login Default value: 1 Description: 64 TEL-310S The GO n command executes a reading composed by n runs; if the n parameter is omitted, the system performs the reading making a run. The system also accepts a syntax that previews a space instead of the equal. This command does not save the readings taken. Example: Performs a reading composed by two races GO=2 Related commands: ST,AA,AB,RA,RB DD Command: DD Category: Measurement Syntax: DD Prerequisites: Standard login Description: DD command activate a diagnostic reading. Example: DD Related commands: ST,DL KO Command: KO Category: Management Syntax: KO Prerequisites: Standard login Description: Reset the system. After this command any possible link will be interrupt. Example: Related commands: ST 65 TEL-310S ST Command: ST Category: Management Syntax: ST Prerequisites: Standard login Description: Returns the state of the current reading or, if not performing a reading, of the last reading performed. The possible conditions are: : ST=OFF : ST=IDLE : ST=HOME : ST=RUN,F,n : ST=RUN,R,n : ST=READY,E0: ST=READY,E1: ST=READY,E4: ST=READY,E5: ST=READY,E6: ST=READY,E8: ST=READY,E9: ST=READY,EA: ST=READY,EB: ST=READY,EC: ST=READY,ED: ST=READY,EE: ST=READY,EF: No outstanding operation, low power No outstanding operation Moving to home position Performing cycle N, forward run Performing cycle N, backwards run Runs performed correctly Runs aborted by user Motor controller error Temperature out of range Water detected Moving head is blocked Photodiode on x' axis broken Photodiode on y' axis broken External light detected on x' receiver External light detected on y' receiver Glass is dirty for x' beam Glass is dirty for y' beam Aux board does not answer Example: ST ST=READY,H Related commands: GO,DD DP Command: DP Category: Diagnostic Syntax: DP Prerequisites: Advanced login Description: The DP command prints a detailed report of the last performed run. To enable recording of the detailed log the VE=1 command must be issued first. 66 TEL-310S Example: DP LAST.LOG Related commands: DD DL Command: DL Category: Diagnostic Syntax: DL Prerequisites: Advanced login Description: The DL command prints the log of the periodic diagnostic runs. Example: DL LAST.LOG Related commands: DD,DR TP Command: TP Category: Diagnostic Syntax: TP Prerequisites: Standard login Description: Returns the temperature in Celsius (ºC) measured inside the CUS unit. Example: TP TP= 22.5 C Related commands: AA Command: AA Category: Measurement 67 TEL-310S Syntax: AA Prerequisites: Standard login Description: Returns the absolute X and Y coordinates for the A wire. Example: AA AA= 10.23,34.12 Related commands: GO,DD,AB,AC AB Command: AB Category: Measurement Syntax: AB Prerequisites: Standard login Description: Returns the absolute X and Y coordinates for the B wire. Example: AB AB=12.43,56.33 Related commands: GO,DD, AA,AC AC Command: AC Category: Measurement Syntax: AC Prerequisites: Standard Login Description: Returns the absolute X and Y coordinates for the C reference pin. Example: AC AC=14.23,65.44 Related commands: GO,DD,AA,AB RA Command: RA 68 TEL-310S Category: Measurement Syntax: RA Prerequisites: Standard login Description: Returns the X and Y coordinates of the A wire relative to the reference position set with the 0A= command. Example: RA >RA=12.34,35.46 Related commands: RB,RC,0A RB Command: RB Category: Measurement Syntax: RB Prerequisites: Standard login Description: Returns the X and Y coordinates of the B wire relative to the reference position set with the 0B= command. Example: RB >RB=12.34,35.46 Related commands: RA,RC,0B RC Command: RC Category: Measurement Syntax: RC Prerequisites: Standard login Description: Returns the X and Y coordinates of the C reference pin relative to the reference position set with the 0C= command. Example: RC >RC=12.34,35.46 69 TEL-310S Related commands: RA,RB,0C 0A,0A= Command: 0A,0A= Category: Measurement Syntax: 0A=x,y Default value: 0,0 Prerequisites: Advanced login Description: 0A reports and 0A= sets the reference position for the A wire . If the value is omitted, the current value is returned. Example: 0A=1.34,4.67 Sets the value 0A >0A=1.34,4.67 Shows the current value Related commands: LG,PW,RA 0B,0B= Command: 0B,0B= Category: Measurement Syntax: 0B=x,y Default value: 0,0 Prerequisites: Advanced login Description: 0B reports and 0B= sets the reference position for the B wire. If the value is omitted, the current value is returned. Example: 0B=1.34,4.67 Sets the value 0B >0B=1.34,4.67 Shows the current value Related commands: LG,PW,RB 70 TEL-310S 0C,0C= Command: 0C,0C= Category: Measurement Syntax: 0C=x,y Default value: 0,0 Prerequisites: Advanced login Description: 0C reports and 0C= sets the reference position for the C reference pin. If the value is omitted, the current value is returned. Example: 0C=1.34,4.67 Sets the value 0C >0C=1.34,4.67 Shows the current value Related commands: LG,PW,RC VR Command: VR Category: Management Syntax: VR Prerequisites: Standard login Description: The VR command reports the version of the firmware currently installed in the system. Example: VR >VR=1.0.0 Related commands: SY STORE / RESTORE Command: SY STORE / RESTORE Category: Management Syntax: SY STORE / RESTORE Prerequisites: Advanced login Description: 71 TEL-310S The SY command is used to manage configurations. Any change made to TEL310 configuration is temporary and will be lost when power goes off or system is reset. To make the changes permanent, issue the SY STORE command. SY RESTORE reloads the last saved configuration; this command may terminate the current connection, in case connection parameters have been changed. It is recommended to issue a KO command to reset the TEL310 after any of the SY commands. Example: SY STORE Related commands: LG,PW P1..P3= Command: P1..P3= Category: Measurement Syntax: P1=x,y Default value: P1=19.0,17.0 P2=23.0,53.0 P3=119.0,52.0 Prerequisites: Advanced login Description: Sets the physical values for calibration points (see calibration procedure). Never use this command to not compromise the functionality of the system. Example: P1=12.4,24,5 Related commands: LG,PW C0..C4 Command: C0..C4 Category: Measurement Syntax: C0=x,y Default value: C0=0.0,0.0 C1=1769.94616,2817.21264 C2=2149.887695,5288.284180 C3=11268.550781,15374.665039 C4=14788.234375,18372.693359 Prerequisites: Advanced login 72 TEL-310S Description: Sets the stepper values for the calibration points (see calibration procedure). Never use this command to not compromise the functionality of the system. Example: C0=34,24 Related commands: LG,PW CX Command: CX Category: Measurement Syntax: CX Prerequisites: Advanced login Description: Sets the stepper values for the calibration points (see calibration procedure) getting them from the last run performed. Never use this command to not compromise the functionality of the system. If there are not three wires during the last run, an error is generated. Example: CX Related commands: LG,PW,GO,CA,C0..C4 CA Command: CA Category: Measurement Syntax: CA=X Prerequisites: Advanced login 73 TEL-310S Description: Calculates a new calibration based on the values entered with P1..P3, C0..C4 and CX commands. The X parameter refers to the number of points in the calibration; currently only CA=5 is supported. Never use this command to not compromise the functionality of the system. Example: CA=5 Related commands: LG,PW,P1..P3,C0..C4,CX LP Command: LP Category: Management Syntax: LP=S,B,T,P Default value: LP=9600,8,1,N Prerequisites: Advanced login Description: Sets parameters for the RS485 port (S = Speed, B= data bits, T= Stop bits, P = Parity (N=None,O=Odd,E=Even). Example: LP=9600,8,1,N Related commands: LG,PW,AD AD Command: AD Category: Management Syntax: AD=A Default value: AD=1 Prerequisites: Advanced login Description: The AD command sets the address for the RS485 port; valid addresses are in range from 01 to 99. 74 TEL-310S Example: AD=1 Related commands: LG,PW,LP DA Command: DA Category: Measurement Syntax: DA=R Default value: DA=1 Prerequisites: Advanced login Description: Sets the number of cycles to measure when a reading is required by the 4÷20mA port. Example: DA=2 Set number of cycles to 2. Related commands: LG,PW DX Command: DX Category: Management Syntax: DX=x1,x2 Default value: DX=0.0,145.0 Prerequisites: Advanced login Description: The DX command sets the wire X coordinates that match the 4mA and the 20mA output values; the values set here are used to calculate the output current to represent the measured wire position. Example: Related commands: LG,PW,DY,DA DY Command: DY Category: Management Syntax: DY=y1,y2 75 TEL-310S Default value: DY=0.0,60.0 Prerequisites: Advanced login Description: The DY command sets the wire Y coordinates that match the 4mA and the 20mA output values; the values set here are used to calculate the output current to represent the measured wire position. Example: DY=5.3,15.4 Related commands: LG,PW,DX,DA OP Command: OP Category: Management Syntax: OP=OF,Dl,OP Default value: OP=38000,10000,0 Prerequisites: Advanced login Description: Sets the steps overflow values, the delay between steps in microseconds and the options. OF = maximum number of steps for a run DI = delay between steps in microseconds OP = options flags If it is set to zero, the dirty glass control is executed; if it is set to 1 the SUS unit dirty glass control is disabled. Example: OP=19200,10000,0 Related commands: LG,PW ?B Command: ?B Category: Management Syntax: ?B 76 TEL-310S Prerequisites: Advanced login Description: The ?B command makes a DUMP of the CUS unit configuration memory in hexadecimal format. Example: ?B HEX DUMP 5A 5A 0A FF 00 0A E0 33 D9 00 00 00 A3 00 00 31 30 20 20 20 20 01 00 01 00 00 16 00 00 70 35 36 37 00 00 00 00 00 00 10 27 00 00 00 00 8B 43 00 A3 45 00 6E 46 00 8E 46 00 0F 40 C9 A0 41 00 C8 41 00 F6 42 00 13 43 3D 15 3C 14 0F 40 27 98 3C C9 00 00 00 00 00 00 00 00 00 00 00 00 00 00 00 00 00 00 00 00 16 00 0A 20 00 01 43 42 38 00 00 00 00 00 00 00 00 CA 00 00 00 0A 29 98 CA 00 00 00 00 00 00 00 00 E0 00 54 20 40 00 00 31 00 00 00 05 00 00 00 00 00 7E 70 54 54 76 1A 97 7E 00 00 00 00 00 00 0F 8A 34 00 45 20 80 00 00 32 00 00 00 00 00 00 00 00 00 C0 41 42 42 42 3A BC C0 00 00 00 00 00 00 FF D9 00 00 4C 20 25 80 80 33 00 00 00 00 8D A8 1F D2 BB 00 00 00 56 CC D0 7A 00 00 00 00 00 00 00 Related commands: FF 16 00 04 33 20 08 3F 3F 34 00 00 4B 00 77 19 E4 9E D5 00 00 00 AE 33 D5 37 00 00 00 00 00 00 00 LG,PW,? ?? Command: ?? Category: Management 77 TEL-310S Syntax: ?? Prerequisites: Standard login Description: Displays the online help for the current operating mode; if the unit is in standard login the procedure corresponds to ?1 command, otherwise the advanced help is shown. Example: ?? ADVANCED COMMAND SUMMARY 0A=, 0B= : Record reference points for relative coordinates (RA, RB) SY : System commands: STORE setup, RESTORE setup P1=...P3= : Enter physical coordinates for calibration points C0=...C4= : Enter counts for calibration points CX : Get counts for calibration points from last GO executed CA=n : Perform calibration using data from P1, P2, P3, and GO AD=n : Set unit address (0..99) LP=bd,b,s,p : Set local port params: baud, data and stop bits, parity (N, O, E) DA=n : Set number of runs for measures output on DA channels DX=x1,x2 : Set value corresponding to DA minimum and maximum for X range DY=y1,y2 : Set value corresponding to DA minimum and maximum for Y range OP=of,dl,op : Set overflow value for steps, delay between steps in us, options WE=MAC4,MAC5 : Set Mac address (only byte 4 and 5) WA=IP1,IP2,IP3,IP4 : Set IP address (all zeroes for DHCP) WM=IP1,IP2,IP3,IP4 : Set subnet mask WG=IP1,IP2,IP3,IP4 : Set default gateway W1=IP1,IP2,IP3,IP4 : Set first DNS W2=IP1,IP2,IP3,IP4 : Set second DNS PE=nn xxxx : Perform periodic reading with n runs every xxxx minutes RR=nn xxxx hh:mm : Perform periodic recording with n runs every xxxx minutes starting at time hh:mm TI=DD/MM/YY hh:mm:ss: Set date and time TS=sntpurl mmmm : Set network time provider and time zone in minutes DD : Perform a diagnostic only run with maximum check XX=nnn : Set X axis LED power (0 to 255) XY=nnn : Set Y axis LED power (0 to 255) XA=nnnnn : Set current output on first 4÷20 mA line (0..65535) XB=nnnnn : Set current output on second 4÷20 mA line (0..65535) ? : Print all configuration parameters ?B : Dump configuration in binary format ?? : Print this help ?1 : Print standard help Related commands: LG,PW,?1,?B,? ?1 Command: ?1 Category: Management Syntax: ?1 Prerequisites: Advanced login Description: Shows the online help for the standard operating mode. Example: ?1 COMMAND SUMMARY GO, GO.n : Perform 1 or n KO : Reset unit ST : Query unit Status AA, AB, AC: Query coordinates of A, B or C (calibration) wires 78 TEL-310S RA, RB, RC: Query offset of A, B or C (calibration) wires from 0A, 0B or 0C RA, RB, RC: Query reference values for A, B or C (calibration) wires VR : Get firmware version VE=n : Start (n=1) or stop (n=0) verbose mode PW nnnn : Enter password enabling advanced commands ?? : Print this help Related commands: LG,PW,?? WE= Command: WE= Category: Ethernet Syntax: WE=mm.mm.mm Default value: WE=00,00,250 Prerequisites: Advanced login Description: This command sets the last three digits of the MAC address. Two different systems of any type connected to the same network MUST have different MAC addresses. The system must be restarted before the change takes effect. Example: WE=23.15.106 Related commands: LG,PW,WA,WG,WM,W1,W2 WA= Command: WA= Category: Ethernet Syntax: WA=aaa.aaa.aaa.aaa Default value: WA=192.168.1.100 Prerequisites: Advanced login Description: Sets the IP address of the TEL310 unit; each of the four aa numbers must be in range from 0 to 255. To enable DHCP enter command WA=0,0,0,0. The system must be restarted before the change takes effect. Example: WA=10.0.0.44 Sets the IP address to 10.0.0.44 Related commands: LG,PW,W1,W2,WM,WG,WE 79 TEL-310S WM= Command: WM= Category: Ethernet Syntax: WM=aaa.aaa.aaa.aaa Default value: WM=255.255.255.0 Prerequisites: Advanced login Description: The WM command sets the LAN subnet mask. Each of the four aa numbers must be in range from 0 to 255. The system must be restarted before the change takes effect. Example: WM=255.255.255.0 Sets the subnet mask to 255.255.255.0 Related commands: LG,PW,W1,W2,WM,WG,WE,WA WG= Command: WG= Category: Ethernet Syntax: WG=aaa.aaa.aaa.aaa Default value: WG=192.168.1.1 Prerequisites: Advanced login Description: The WG command sets the Gateway for the external LAN access; each of the four aa numbers must be in range from 0 to 255. The system must be restarted before the change takes effect. Example: WG=10.0.0.138 Sets the Gateway to 10.0.0.138 Related commands: LG,PW,W1,W2,WM,WA,WE 80 TEL-310S W1= Command: W1= Category: Ethernet Syntax: W1=aaa.aaa.aaa.aaa Default value: WG=0.0.0.0 Prerequisites: Advanced login Description: The W1 command sets the primary DNS address for Internet access; each of the four aa numbers must be in a range from 0 to 255. The primary DNS is needed only if the NTP protocol for clock synchronization is used. The system must be restarted before the change takes effect. Example: W1=10.0.0.138 Sets the primary DNS to 10.0.0.138 Related commands: LG,PW,W2,WG,WM,WA,WE W2= Command: W2= Category: Ethernet Syntax: W2=aaa.aaa.aaa.aaa Default value: WG=0.0.0.0 Prerequisites: Advanced login Description: The W2 command sets the secondary DNS address for Internet access; each of the four aa numbers must be in a range from 0 to 255. The secondary DNS is only needed if the NTP protocol for clock synchronization is used. The system must be restarted before the change takes effect. Example: W2=10.0.0.138 Sets the secondary DNS to 10.0.0.138 Related commands: LG,PW,W1,WG,WM,WA,WE 81 TEL-310S WP= Command: WP= Category: management Syntax: WP=PPPPPP Default value: WP=12345678 Prerequisites: Advanced login Description: The WP command sets a new password for the system Only the Standard login password can be changed. Example: PW=12345 Related commands: LG,PW PE,PE= Command: PE,PE= Category: Measurement Syntax: PE=R SS Default value: PE=0 0 Prerequisites: Advanced login Description: The PE command sets the number of cycles for automatic readings and the delay between readings. R is the number of cycles for each reading and SS is the delay in minutes between readings. If the PE command is issued without parameters, the currently set values are displayed. To disable automatic readings issue the command PE=0 0. Example: PE=2 60 Sets the system to perform a reading composed of two cycles every 60 minutes. 82 TEL-310S Related commands: LG,PW,PN PN Command: PN Category: Measurement Syntax: PN Prerequisites: Advanced login Description: The PN command shows the minutes remaining before the next automatic reading. Example: PN > 120 Related commands: LG,PW,PE RR,RR= Command: RR,RR= Category: Measurement Syntax: RR[=R SS HH:MM Default value: RR=0 0 0:0 Prerequisites: Advanced login Description: The RR command sets acquisition parameters: R is the number of cycles for each measure, SS is the interval between acquisitions in minutes and HH:MM is the time for the first acquisition. The RR commands, without parameters, shows the current settings. Example: RR=2 60 12:00 Programs the system to perform a reading composed of two cycles every 60 minutes starting at 12:00. Related commands: LG,PW,RN,SC,SG,SD,TI DR,DR= Command: DR,DR= Category: Periodic Diagnostic Measurement 83 TEL-310S Syntax: DR=HH:MM Default value: Configured to not perform diagnostic runs Prerequisites: Advanced login Description: The DR command sets the periodic diagnostic reading (DD). HH:MM is the time of the day at which the reading is performed. The DD command without parameters displays the current settings. The results of the daily diagnostic runs are saved in a file named DIAG.CSV. This is an example for the generated file. DATE,TIME,RESULT,MINX,MINY 27/03/2009,15:18:12,E0,98.413,96.825 27/03/2009,15:30:15,E0,100.000 ,98.413 27/03/2009,15:43:50,ED,100.000,100.000 27/03/2009,15:57:09,ED,100.000,98.413 27/03/2009,16:11:14,E0,100.000 ,98.413 27/03/2009,16:50:07,E0,100.000 ,100.000 27/03/2009,16:53:32,E0,100.000 ,100.000 27/03/2009,17:04:53,E0,100.000 ,100.000 27/03/2009,17:07:16,EC,0.000,0.000 27/03/2009,17:26:50,E0,100.000,100.000 27/03/2009,17:46:20,E0,100.000 ,100.000 30/03/2009,09:28:20,E0,100.000 ,100.000 30/03/2009,10:00:19,E0,100.000 ,100.000 30/03/2009,10:56:13,E0,100.000 ,100.000 30/03/2009,11:07:01,EC,0.000,0.000 30/03/2009,11:15:53,E0,100.000,100.000 30/03/2009,11:31:56,E0,100.000,100.000 30/03/2009,11:40:18,E0,100.000,100.000 30/03/2009,13:05:58,E0,100.000,100.000 30/03/2009,13:37:24,E0,100.000 ,100.000 01/04/2009,12:56:47,E0,100.000 ,100.000 01/04/2009,15:31:51,E0,100.000 ,100.000 01/04/2009,15:37:36,E0,100.000 ,100.000 01/04/2009,15:50:11,E0,100.000 ,100.000 01/04/2009,15:58:36,E0,100.000 ,100.000 01/04/2009,17:48:18,E0,100.000 ,100.000 01/04/2009,17:52:38,E0,100.000 ,100.000 02/04/2009,09:47:41,E0,100.000 ,100.000 02/04/2009,10:14:52,E0,100.000 ,100.000 02/04/2009,10:45:17,E0,100.000 ,100.000 The first two columns are the date and time of the diagnostic runs. The Result column contains the error code reported for each run (See Error codes paragraph). For a description for MixX and MinY see appendix n°1. To correctly import this file in a spreadsheet (Excel, OpenOffice, Lotus Notes, etc.) check that the decimal separator in the international settings of the operating system is set to '.' (full stop) and not ',' (comma). Example: DR=12:00 Programs the system to perform a reading composed of two cycles every 60 minutes starting at 12:00. 84 TEL-310S Related commands: LG,PW,DL,TI RN Command: RN Category: Measurement Syntax: RN Prerequisites: Advanced login Description: The RN command shows the date and time for the next acquisition; if no acquisition is scheduled “NEVER” is reported. Example: RN > 11/08/08 18:00:00 Related commands: LG,PW,RR,SC,SD,SG SC Command: SC Category: Measurement Syntax: SC Prerequisites: Advanced login Description: The SC command shows the number of recorded readings. Example: SC >5 Related commands: LG,PW,SD,SG SD Command: SD Category: Measurement Syntax: SD Prerequisites: Advanced login Description: The SD command deletes stored acquisitions. 85 TEL-310S Example: SD Related commands: LG,PW,SG,SC SG Command: SG Category: Measurement Syntax: SG Prerequisites: Advanced login Description: The SG command shows the stored acquisitions. Example: SG DATE,TIME,RESULT,AAX,AAY,ABX,ABY,RAX,RAY,RBX,RBY 20/06/2008,10:02:40,E0,26.605,5.654,124.601,5.599,26.605,5.654,124.60,15.599 20/06/2008,10:45:11,E0,2.247,-3.981,2.247,-3.981,2.247,-3.981,2.247,-3.981 The DATA.CSV file is a text file with columns separated by commas. Here below the meaning of each column: DATE : Date in which the reading is saved TIME : Hour in which the reading is saved RESULT : The result of the run (for error codes see the ST command codes ) AAX : Absolute value X-axis A wire AAY : Absolute value Y-axis A wire ABX : Absolute value X-axis B wire ABY : Absolute value Y-axis B wire RAX : Value compared to the reference X-axis A wire RAY : Value compared to the reference Y-axis A wire RBX : Value compared to the reference X-axis B wire RBY : Value compared to the reference Y-axis B wire To correctly import this file in a spreadsheet (Excel, OpenOffice, Lotus Notes, etc.) check that the decimal separator in the international settings of the operating system is set to '.' (full stop) and not ',' (comma). Related commands: LG,PW,SC,SD TI,TI= Command: TI,TI= Category: Management 86 TEL-310S Syntax: TI[=DD/MM/YY HH:mm:SS] Prerequisites: Login standard Description: The TI commands sets data and hour of the system: DD is the day, MM the month (1 to 12), HH the hour, mm the minute and SS the second The TI command without parameters shows the system data and time. The system ignores daylight saving time. Example: TI=11/08/08 12:20:30 Sets date and hour of the system TI > 11/08/08 12:20:30 Shows date and hour of the system Related commands: LG,TS TS,TS= Command: TS,TS= Category: Management Syntax: TS=TTTTT ZZZ Default value: Not configured Prerequisites: Advanced login Description: The command TS=TTTTTT ZZZ sets the time server used for synchronizing the system internal clock; TTTTTT is the name of the NTP server, ZZZ is the difference for the local time zone to Greenwich in minutes. The TS command, without parameters, shows the current settings The synchronization is performed every 24 hours. ZZZ is positive for zones east of Greenwich and negative for zones west of Greenwich. Example: TS=ntp1.inrim.it -120 Sets NTP server to ntp1.inrim.it and time zone two hours west of Greenwich. Related commands: LG,PW,TI 87 TEL-310S XX,XX= Command: XX,XX= Category: Diagnostic Syntax: XX=NNN Prerequisites: Advanced login Description: The XX=NNN command sets X axis LED to the specified intensity level (0 is minimum and 255 is the maximum light). The XX command without parameters reports the value detected by the corresponding phototransistor; this value is in a range from 0 to 1023, where 1023 means dark and 0 is the maximum detected light. Example: XX=128 Sets X axis LED to maximum. XX > 140 Returns the value detected by the phototransistor. Related commands: LG,PW,XX XY,XY= Command: XY,XY= Category: Diagnostic Syntax: XY=NNN Prerequisites: Advanced login Description: The XY=NNN command sets Y axis LED to the specified intensity level (0 is minimum and 255 is the maximum light). The XY command without parameters reports the value detected by the corresponding phototransistor; this value is in a range from 0 to 1023, where 1023 means dark and 0 is the maximum detected light. Example: XX=128 Set X axis LED to maximum. XX > 830 Returns the value detected by the phototransistor. Related commands: LG,PW,XX 88 TEL-310S XA= Command: XA= Category: Diagnostic Syntax: XA=NNNNN Prerequisites: Advanced login Description: The XA command sets the value generated on the 4÷20 mA current output A; the NNNNN value must be in a range from 0 to 65535. Example: XA=13107 Sets A output to about 4mA Related commands: LG,PW,XR,XB XB= Command: XB= Category: Diagnostic Syntax: XB=NNNNN Prerequisites: Advanced login Description: The XB command sets the value generated on the 4÷20 mA current output B; the NNNNN value must be in a range from 0 to 65535. Example: XB=13107 Sets B output to about 4mA. Related commands: LG,PW,XR,XA XR Command: XR Category: Diagnostic Syntax: XR Prerequisites: Advanced login Description: Switches off the LEDs and resets current outputs A and B to zero. Example: 89 TEL-310S Related commands: BT,BT= Command: BT,BT= Category: Communication Syntax: BT=NNN Prerequisites: Advanced login, Bluetooth Module installed Description: The BT command initializes the Bluetooth module, If the NNN parameter is present, module name is set to NNN. A PC will not detect the name change until the module is deleted from its list and associated again. The pairing code (Key) for the device is set to “574832”. Example: BT TEL310A Sets the BT name of the unit to TEL310A and initializes the Bluetooth module. Related commands: LG,PW 90 STANDARD CONFIGURATION TEL-310S The system is preconfigured with a standard configuration. This configuration is as follows: MAC (the last two values can change) 00:04:A3:00:00:XX IP 192.168.1.100 NET MASK 255.255.255.0 GATEWAY 192.168.1.1 DNS1 0.0.0.0 DNS2 0.0.0.0 DHCP Disabled NetBIOSName TEL310 RS485 Speed 9600 RS485 Bits 8 RS485 Parity None RS485 Stop 1 RS485 Address 1 DX 145 DY 60 Password STANDARD MODE Password ADVAMCED MODE 12345678 6823 LogStep 0 LogRuns 0 LogStartHH 0 LogStartMM 0 AutomaticTime 0 AutomaticRuns 0 OptionStep 38000 OptionDelay 10000 OptionFlags 0 Calibration 5 points NTPSERVERNAME “” NTPTIMEZONE 0 Periodic Diagnostic Readings (ore) None 91 ORDINARY MAINTENANCE TEL-310S There are no special maintenance for TEL-310S Telecoordinometer. Periodically check that the transparent surfaces placed in the SUS reading unit are always clean, free of condensate or waste water. For its cleaning use a soft cloth without using any detergent. Be especially careful not to mark the transparent surfaces placed in the reading area. If it is necessary to remove the cover of the SUS unit, please follow the operational sequence for both the removal and for the closing. When closing the cover make two times the draught following the numbering on the screws: this will prevent the plastic cover deformation and guarantee the IP68 protection. TORQUE-WRENCH 4.5Nm Before doing this operations, make sure that no TEL-310S readings are set, otherwise into SUS unit it might be moving mechanical parts. These operations must be performed by qualified personnel only: presence of dangerous voltages. Before the reposition and closing of SUS, CUS and PWS cover unit, it is necessary to manually lay off an adequate amount of silicone grease on the seals. 92 TEL310S TROUBLESHOOTING Follow the instructions below to solve the problems that should occur. Problems when accessing with a Browser The initial page of the TEL310 is not displayed. Check that the TEL310 is switch on and connected to the Ethernet. If your browser window was not opened by TEL310 server, check the address you are using for connecting to TEL310 Server, using a Telnet connection. Pages are not displayed Check that JavaScript execution is enabled in your browser correctly. Communication problems with TEL310 Server. The initial page of the TEL310 is not displayed. Check that TEL310 is on and connected. Depending on the type of connection you are using: • RS485 • USB • Bluetooth (optional) • Telnet (Ethernet) go to the relevant section. Pages are not displayed Check that JavaScript execution is enabled in your browser. correctly. RS485 communication The initial page of the TEL310 is not displayed. Check that the selected COM port is the one actually connected to the TEL310. Check that the RS485 adapter you are using is set in halfduplex mode (transmission controlled by RTS). Check the address of the TEL310 (using a different connection). Check the connection cable (cable “5” - appendix A). TELNET communication The TEL310 unit is not Check the TEL-310S IP address. listed in the list of available To update the list click on the Refresh button. units in TEL310 Server. 93 TEL310S USB communication The TEL310 unit is not Check that the USB peripheral is recognized by the listed in the list of available computer (detaching and reconnecting the cable, you should units in TEL310 Server. hear a beep, if the computer has a speaker and if it is enabled). Check the connection cable (cable “4” – appendix A). Bluetooth communication The TEL310 unit is not Check that the Bluetooth device is properly installed on your listed in the list of available computer. units in TEL310 Server. Check that TEL310 is listed among the Bluetooth peripherals by clicking with the left mouse button on the Bluetooth icon in the toolbar and select the option “Show Bluetooth Devices”. In case add it, following instructions in the manual. MEASURAMENT PROBLEMS TEL-310S TEL310 has a display: pushing the third pushbutton an error code is displayed. These error codes match the codes displayed by the browser; possible error codes and corrective actions are reported in the following table. 94 TEL310S E0 Measure was correctly completed E1 Measure was aborted by user E2 UNUSED E3 UNUSED E4 Motor controller error Check that the mechanical system is not blocked. Check connections between the main card and the motor controller board into CUS unit. E5 Box overheating Let the system cool down before attempting a measure again. E6 Water detected E7 Motor blocked Remove water from measure well. Check that the measure mechanical system into the SUS unit is not blocked. Check that the system inverts motion when the head reaches the point closer to the motor. Contact the support. E8 UNUSED E9 X' photo detector fault EA Y' photo detector fault EB Light on X' photo detector EC Light on Y' photo detector ED Glass dirty for X' Check that the plexiglas shell of SUS unit is clean. Contact the support. Check that the plexiglas shell of SUS unit is clean. Contact the support. Check that the SUS unit is not hit directly by sunlight or by a strong light. Check that the SUS unit is not hit directly by sunlight or by a strong light. Check that the plexiglas shell of SUS unit is clean beam EE Glass dirty for Y' Check that the plexiglas shell of SUS unit is clean beam EF No communication with aux board Check for the connection between mother board and aux board. Contact the support. 95 TEL-310S Here is the list of codes when using the interface 4-20mA: 4÷20mA X 4÷20mA Y Descrizione 1 1 Reading not performed 1 2 No communication with aux board 1 3 Light presence on the photodiode X ' 2 1 Light presence on the photodiode Y ' 2 2 Led X' fault 2 3 Led Y' fault 3 1 Aborted by user 3 2 Dirty glass 3 3 Unspecified error 96 ASSISTANCE TEL-310S Sisgeo S.r.l. is aware of the importance covered by the after-sales assistant service, therefore Sisgeo Technical Support is structured to offer the following services: Repairs and maintenances During the warranty period we assure that the equipment supplied is free from defects in materials for a standard and appropriate use. Repairs and/or recalibrations should always be carried out at SISGEO factory or by personnel trained and authorized by SISGEO. In case of repair and/or recalibration please send us the device and every accessory in the container provided, in order to prevent damage from shocks during transport. This procedure involves the filling out of the form on our website "www.sisgeo.com" to the link "assistance - repairs"; once inserted the request, a confirmation with the related authorization code will be sent to the e-mail address indicated. Note: the material has to be packed properly and sent in door to door basis (freight to client charge) to: SISGEO S.r.l. Via F. Serpero, 4/F1 - 20060 MASATE (MI) Attn. to Technical Assistance Office Tel. +39-02-95764130 - Fax: +39-02-95762011 - e-mail: [email protected] Phone Assistance Telephone support for installation, configuration of equipment, measurement systems and Software. Technical assistance on site for the supplied instrumentations Technical support for the installation of monitoring systems with its commissioning and start-up, through the add of specialized technician’s teams. Training Possibility of training at our Factory or at site related to the installation procedures, the system configuration and the use of measurement systems. 97 ADVANCED SECTION TEL-310S APPENDIX n°1 (Diagnostic Print) TEL-310S When a new measure is requested (for example issuing the GO command) the TEL310 system performs a series of forward and reverse runs to fulfill the request: the measure reported is the average of a set of readings performed in successive runs. Some information are saved in LAST.LOG file after each forward or reverse run. First the type of run is written, forward or reverse, followed by the zero based index of the cycle and by the number of cycles that will be averaged. FORWARD RUN: 0/1 First TEL310 sets the intensity of the beam used to measure the positions of the wires and of the reference pins. The beams should be strong enough to be clearly detected, but not so strong to saturate the detectors. Two LEDs (Light Emitting Diodes) and two photo-transistors are into the SUS unity arm, labeled 1 and 2 in the image below. LEDS 1 2 RECEIVERS Values reported by the photo-detectors are inverted: 0 matches a light saturated detector and 550 matches total darkness. 98 TEL-310S Reported values are: BEAM: the number of the light beam. Beam light: the intensity of the beam (0 means off and 255 is maximum intensity). Dark: measured signal on the photo-transistor when the light beam is off. Dark threshold: calculated threshold above which the beam is considered obstructed (by a pin or a wire). Record threshold: calculated threshold that separated darkness (values above) from light (values below) Light threshold: calculated threshold below which a light beam is considered non obstructed. Light: measured signal on the photo-transistors when the beam is non obstructed. BEAM: 1 Beam light 0=min: Dark : Dark threshold : Record threshold: Light threshold : Light : 75 1023 834 644 454 265 When, during the movement of the SUS unit measure head, the light beam crosses a pin or a wire, the photo- transistor is progressively obscured (received light decreases), so that the value reported by the photo-transistor follows a curve similar to the one in the next image. For each pin or wire both the entering edge (when the light beam is progressively obstructed) and the exiting edge (when the light beam reappears). 99 TEL-310S Around each edge sixteen values are collected, one for each step of the stepper motor; for the entering edge of PIN 1 the recorded values are: STEP Measure STEP Measure STEP Measure STEP Measure 1959 562 1960 573 1961 583 1962 594 1963 606 1964 612 1965 627 1966 637 1967 648 1967 658 1969 667 1970 676 1971 686 1972 695 1973 703 1974 711 Interpolating these values, an ideal entry position is calculated (the value 1967.409302 reported below) as well as an exit position (2168.267334) and the central position of the pin or wire (2067.838379). PIN: 1 Entering: 1959 562, 573, 583, 594, 606, 612, 627, 637, 648, 658, 667, 676, 686, 695, 703, 711 Exiting: 2160 730, 714, 703, 692, 682, 671, 660, 650, 640, 630, 620, 610, 601, 591, 581, 573 Enter : 1967.409302 Exit : 2168.267334 Position: 2067.838379 The same values are calculated for each pin or wire and for each of the two light beams. PIN: 2 Entering: 9335 546, 557, 569, 581, 594, Exiting: 9537 735, 723, 712, 701, 688, Enter : 9343.410156 Exit : 9545.158203 Position: 9444.284180 PIN: 3 Entering: 16737 572, 582, 592, 601, 611, Exiting: 16939 726, 716, 705, 693, 682, Enter : 16744.935547 Exit : 16947.439453 Position: 16846.187500 BEAM: 2 Beam light 0=min: 81 Dark : 1020 Dark threshold : 832 Record threshold: 644 Light threshold : 456 Light : 268 PIN: 1 Entering: 233 572, 580, 589, 600, 606, Exiting: 460 712, 702, 693, 684, 676, Enter : 241.422012 Exit : 467.759369 Position: 354.590698 PIN: 2 Entering: 9413 583, 591, 599, 608, 616, Exiting: 9639 607, 619, 632, 645, 658, 670, 683, 696, 709, 721, 734 675, 663, 651, 639, 626, 615, 604, 592, 580, 570, 560 621, 630, 640, 650, 659, 669, 679, 689, 695, 707, 717 672, 661, 650, 641, 632, 622, 613, 604, 596, 585, 576 617, 626, 635, 645, 654, 663, 673, 684, 693, 702, 703 665, 655, 646, 638, 623, 620, 612, 601, 592, 576, 573 624, 623, 641, 649, 657, 665, 673, 681, 689, 700, 705 100 TEL-310S 709, 702, 693, 685, 677, 669, 660, 651, 644, 628, 624, 615, 605, 600, 588, 581 Enter : 9421.000000 Exit : 9647.194336 Position: 9534.097656 PIN: 3 Entering: 18591 604, 609, 615, 619, 624, 632, 636, 640, 646, 652, 660, 664, 669, 676, 681, 688 Exiting: 18810 687, 682, 676, 670, 665, 660, 655, 649, 644, 639, 633, 628, 621, 616, 610, 603 Enter : 18598.876953 Exit : 18818.386719 Position: 18708.632813 All these data are recorded for each forward or reverse run. REVERSE RUN: 1/1 BEAM: 1 Beam light 0=min: 75 Dark : 1023 Dark threshold : 834 Record threshold: 644 Light threshold : 454 Light : 265 PIN: 3 Entering: 17087 721, 712, 701, 689, 679, Exiting: 16884 561, 575, 598, 600, 610, Enter : 17095.107422 Exit : 16892.160156 Position: 16993.632813 PIN: 2 Entering: 9687 731, 716, 705, 693, 681, Exiting: 9484 549, 561, 573, 584, 596, Enter : 9694.635742 Exit : 9492.357422 Position: 9593.496094 PIN: 1 Entering: 2311 722, 708, 697, 684, 677, Exiting: 2108 559, 571, 583, 593, 604, Enter : 2318.805420 Exit : 2116.576416 Position: 2217.690918 BEAM: 2 Beam light 0=min: 81 Dark : 1020 Dark threshold : 832 Record threshold: 644 Light threshold : 456 Light : 268 PIN: 3 Entering: 18959 680, 677, 671, 666, 661, Exiting: 18739 609, 615, 618, 624, 628, Enter : 18966.513672 Exit : 18746.185547 Position: 18856.349609 PIN: 2 Entering: 9790 703, 696, 687, 680, 664, Exiting: 9562 669, 658, 647, 638, 629, 619, 610, 601, 592, 583, 573 618, 629, 639, 648, 657, 667, 677, 686, 695, 705, 714 669, 657, 644, 633, 621, 609, 597, 587, 576, 564, 552 609, 620, 633, 645, 658, 670, 682, 695, 707, 720, 732 666, 655, 645, 636, 626, 616, 606, 597, 589, 579, 570 616, 626, 635, 645, 656, 665, 674, 683, 692, 701, 709 655, 646, 645, 640, 636, 629, 623, 617, 611, 605, 600 634, 639, 644, 650, 656, 660, 668, 674, 680, 685, 692 662, 653, 644, 636, 628, 617, 608, 597, 590, 582, 573 101 TEL-310S 582, 590, 598, 606, 615, 623, 623, 638, 647, 655, 663, 670, 680, 687, 696, 702 Enter : 9797.399414 Exit : 9570.223633 Position: 9683.811523 PIN: 1 Entering: 612 708, 696, 687, 678, 670, 660, 652, 644, 633, 625, 614, 606, 595, 588, 580, 572 Exiting: 383 576, 586, 596, 604, 613, 621, 630, 640, 648, 657, 665, 677, 685, 694, 704, 714 Enter : 619.337036 Exit : 390.958649 Position: 505.147827 At the end data is normalized for each run, forcing PIN 1 position to be 0,0. The number of values reported on each line matches the number of forward and reverse runs performed. NORMALIZED PIN 1: Beam 1: 0.000000, 0.000000 Beam 2: 0.000000, 0.000000 PIN 2: Beam 1: 7376.445801, 7375.805176 Beam 2: 9179.506836, 9178.664063 PIN 3: Beam 1: 14778.349609, 14775.941406 Beam 2: 18354.042969, 18351.201172 For each pin or wire the average, the minimum, the maximum and the standard deviation are calculated. Beam 1: Average 1 0.000000 2 7376.125488 3 14777.145508 Minimum 0.000000 7375.805176 14775.941406 Maximum 0.000000 7376.445801 14778.349609 Std.Dev 0.000000 0.320313 1.204102 Beam 2: Average 1 0.000000 2 9179.085938 3 18352.621094 Minimum 0.000000 9178.664063 18351.201172 Maximum 0.000000 9179.506836 18354.042969 Std.Dev 0.000000 0.421387 1.420899 All values reported so far are in beam coordinates; these coordinates are different from the Cartesian X and Y coordinates, the latter being calculated from the former using the calibration parameters. 102 TEL-310S LEDS Coordinate 1 oo rd i na te 2 1 2 Coordinate Y C Coordinate X RECEIVERS All points with the same value for the coordinate 1 intercept light beam 1 at the same time; all points with the same value for the coordinate 2 intercept light beam 2 at the same time. X-coord 2.247425 74.811020 147.777328 Y-coord -3.981127 29.565916 62.653637 When first started and periodically during operation, the TEL310 performs runs with LEDS off; this is done to verify that there are not strong light sources interfering with the measure. DARK RUN STATISTICS Beam: Average 1 100.000000 2 100.000000 Minimum 100.000000 100.000000 Maximum 100.000000 100.000000 Std.Dev 0.000000 0.000000 The difference between darkness and light found should to be greater than 80. 103 APPENDIX n°2 (TECHNICAL FEATURES) TEL-310S POWER SUPPLY Main Power Supply: 100-240V , 50-60Hz, 0.5VA Electronic power supply: 12V , 0.9A Motor power supply: 24V , 4.3A CONSUMPTIONS: During acquisition 190mA@ 24V 320mA@ 12V During stand-by 40mA@ 24V : 150mA@ 12V ENVIRONMENTAL CONDITIONS Operating temperature -10°C +60°C Storage temperature -20°C +70°C Humidity 30-100% (with container closed) Noise level emitted < 74dBA Max height of use 3000m PHYSICAL CHARACTERISTICS SUS dimensions 630 x 280 h165 (mm) CUS dimensions 330 x 345 h111 (mm) PWS dimensions 330 x 250 h111 (mm) SUS unit weight 11.200 Kg CUS unit weight 4.800 Kg PWS unit weight 5.800 Kg SUS material Aluminum and ABS CUS and PWS housing material Aluminum Protection IP 68 TECHNICAL CHARACTERISTICS Nominal measuring range 0-150 mm X axis / 0-60 mm Y axis Real measuring range 0-145 mm X axis / 0-60 mm Y axis Resolution 0.005 mm Digital precision and repeatability ±0.007 mm (X axis) / ±0.012 mm (Y axis) Analogic precision and repeatability ±0.002 mA (X axis) / ±0.003 mA (Y axis) Communication 10Mbs Ethernet 10 base T, USB 2.0, RS485 4-20 mA interface Present Overvoltage category II Pollution degree 2 Measuring period (1 run) 90’’ Data storage 2GB RESOURCES NEEDED TO PC Spreadsheet programs Microsoft Excel, Open Office or LotusNotes Internet Browser Internet Explorer 8, FireFox or Safari, TEST Electromagnetic compatibility EN 61326-1 (2006),EN 301 489-17(v 1.3.2),EN 300 328(v1.7.1) Safety requirements EN 61010-1 (2001) Environmental EN 60529:1991 + A1:2000 104 105 106 107 Via F.Serpero, 4/F1 – 20060 MASATE (MI) Tel. +39-02-95764130 – Fax +39-02-95762011 – e.mail: [email protected] www.sisgeo.com 108