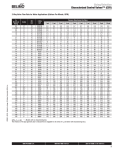
1
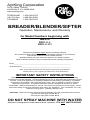
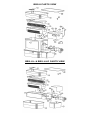
Seal with tape. Do not staple.
Thank you for your business!
We trust you will find this new
Breader/Blender/Sifter
to be quiet, efficient, and durable.
Please return this completed page.
The owner is required to return this product
registration information immediately.
The model and serial numbers are stamped on the nameplate
located next to the machine’s controls.
Double sifter tables have two different serial
numbers - please list both. Please print clearly.
-------------------------------------------------------------------------------Second Fold Line--------------------------------------------------------------------------Place
stamp
here
AyrKing Corporation
2013 Cobalt Drive
Louisville, KY 40299-2417
USA
----------------------------------------------------------------First Fold Line------Seal with tape------Do not staple-------------------------------------------------------------
Store Name:
Store I.D.#:
Address:
City:
State/Province/Region:
Country:
Postal Code:
Telephone:
Fax:
Store Owner:
Model:
Serial Number(s):
This page intentionally left blank.
AyrKing Corporation
2013 COBALT DRIVE
LOUISVILLE, KY 40299 USA
www.ayrking.com
TELEPHONE
USA Toll free
FACSIMILE
1-502-266-6270
1-866-266-6290
1-502-266-6274
BREADER/BLENDER/SIFTER
Operation, Maintenance, and Warranty
for Model Numbers beginning with:
BBS-U
BBS-U-L
BBS-U-LD
Read this manual thoroughly before operating machine.
The model and serial numbers are on the data plate mounted on the machine.
Record the model and serial numbers below.
Breading tables with two machines will have two serial numbers.
Refer to these numbers in any correspondence with AyrKing Corporation.
Model _______________________________________________________________
Serial Number(s) ______________________________________________________
Note: All procedures listed on these pages are general use guidelines.
Please refer to your company procedures for exact instructions.
IMPORTANT SAFETY INSTRUCTIONS
Read all instructions before operating. When using electrical appliances, basic safety
precautions must be followed. Use this appliance only for its intended use as described in this
manual. Verify that appliance is properly installed and electrically grounded by a qualified
technician in accordance with local electrical codes. Do not attempt to repair or replace
electrical components. A qualified technician should complete all servicing to these
components. Before performing any service, disconnect the machine’s power supply. Never
wear loose-fitting or hanging garments while using any appliance. Ties, necklaces, etc. may
catch on moving parts…possibly causing injury.
CAUTION - Risk of fire and/or electrical shock. Replace only with manufacturer's cord set:
120 volt unit uses part number B119
240 volt unit uses part number B419
DO NOT SPRAY MACHINE WITH WATER
Machine is designed to shed water & dust; however, IT IS NOT WATER PROOF.
OPERATION
(Numbers in parenthesis refer to parts view drawings)
ASSEMBLY:
•
•
•
•
•
•
Begin each day with all components clean and thoroughly dry.
Place lug (8 or 2) in bottom rails, tight against backstop.
Place dough ball pan (9) in rails underneath motor compartment.
Install dough ball chute (6) into slots inside sifter enclosure. [chute not included in BBS-EC-L models]
Position sifter screen (5) so that the end with pivot pin is located away from the motor compartment.
Install brush (4), mating end with square hole onto square drive coupling (12) and press brush towards
motor until opposite end of brush shaft clears pivot pin located on sifter screen (5). Center brush
shaft hole on pivot pin then release brush. Rotate brush by hand to assure proper installation.
• Place brush cover/lug support (3), flat side up, over brush (4) so that brush cover hole is away from
motor compartment.
• Place lug with hole (2) into sifter enclosure, aligning lug hole with brush cover (3) hole. Install lug plug
(1) over hole in lug.
BLENDING:
• Place flour and spices in top lug (2). Press start button (16). While brush (4) is in motion, remove lug
plug (1) and push breading slowly through lug hole.
• Replace lug plug (1) over hole in top lug (2). After breading has passed through sifter screen (5) and
brush (4) has stopped rotating, remove bottom lug (8) and pour breading into top lug (2). On models
that have a bottom lug with hole (2) and lug plug (2), simply interchange the top and bottom lugs.
• Replace proper lug (8 or 2) tightly against backstop. Repeat steps for second blending of breading.
SIFTING:
• Sifting is required after dough balls form during hand breading of product. Press start button (16).
While brush (4) is in motion, remove lug plug (1) and push breading slowly through lug hole.
• Replace lug plug (1) over hole in top lug (2). After breading has passed through sifter screen (5) and
brush (4) has stopped rotating, remove bottom lug (8) and pour breading into top lug (2). On models
that have a bottom lug with hole (2) and lug plug (2), simply interchange the top and bottom lugs.
• Replace proper lug (8 or 2) tightly against backstop. Occasionally empty dough ball pan (9) into trash.
Repeat above steps as often as needed.
DAILY CLEANING
(Numbers in parenthesis refer to parts view drawings)
• Always disconnect power supply when servicing or cleaning machine.
NEVER SPRAY
MOTOR COMPARTMENT WITH WATER.
• Remove top & bottom lugs (2 & 8), lug plug (1), brush cover (3), brush (4), sifter screen (5), dough ball
chute (6) (if equipped), and dough ball pan (9). Take all items to wash sink.
• Clean table and sifter enclosure with a towel soaked in detergent/water solution. Be sure to clean all
crevices. Wipe off soapy solution using water rinsed towel until all surfaces are clean. Soak towel in
sanitizing solution (or bleach/water solution) and wipe all surfaces thoroughly.
• In wash sink, spray all removed items with hose to dislodge any breading. Soak all components in
dish washing detergent and water solution.
• NEVER soak or rinse brush (4) in hot water, it may damage bristles. Use warm water only. Brush can
be cleaned by using a round brush to remove soil.
• After cleaning brush (4), rinse detergent solution and soak in sanitizing solution for five minutes.
• After soaking, remove the brush (4) and shake away excess moisture. Place brush on square post
(27) located on top of table, by standing on end. Allow to fully air-drying before reinstalling brush (4).
• Clean the sifter screen (5) and brush cover (3) in the detergent/water solution with a towel or scrub
pad if required. Rinse off detergent solution. Soak items in sanitizing solution for one minute.
• Rinse dough ball chute (6) and dough ball pan (9) and replace in sifter. Reinstall sifter screen (5).
Place brush cover (3) on tabletop. Allow all components to thoroughly dry before re-using.
• Clean the lugs (2 & 8) and lug plug (1) in sink with towel or scrub pad if required. Rinse off detergent
solution. Place items in sanitizing solution and soak for one minute. Place items upside down on
tabletop to air-dry. Allow all components to thoroughly dry before re-using.
BBS-U PARTS VIEW
BBS-U-L & BBS-U-LD PARTS VIEW
PARTS LIST
EACH ITEM HAS DIFFERENT PART NUMBERS DEPENDING ON THE SIFTER MODEL
ITEM
1
2
3
4
5
6
7
8
9
10
11
12
13
14
19
20
21
22
23
24
26
27
28
PART # DESCRIPTION [NOMINAL SIZE]
B101
LUG PLUG, PLASTIC
B302
B302G
B102
B105
B118
B110
LUG WITH HOLE, WHITE PLASTIC – [26”(660mm) X 16”(406mm)]
LUG WITH HOLE, GRAY PLASTIC – [26”(660mm) X 16”(406mm)]
LUG WITH HOLE, ALUMINUM – [26”(660mm) X 16”(406mm)]
8”(203mm) DEEP PAN WITH HOLE, STAINLESS – [20”(508mm) X 12”(305mm)]
6”(152mm) DEEP PAN WITH HOLE, STAINLESS – [20”(508mm) X 12”(305mm)]
4”(102mm) DEEP PAN WITH HOLE, STAINLESS – [20”(508mm) X 12”(305mm)]
B201
B201C
B200
B150
B160
B202
L202
B202C
B203
B121
BRUSH COVER/LUG SUPPORT
BRUSH COVER/LUG SUPPORT WITH 4” HIGH COLLAR (BBS-U-L)
BRUSH COVER/LUG SUPPORT WITH PANELS (BBS-U-3814 & BBS-M-3314)
SIFTER BRUSH ASSEMBLY, BLACK BRISTLES (B148 FOR BBS-M-3314)
SIFTER BRUSH ASSEMBLY, WHITE BRISTLES
SIFTER SCREEN
SIFTER SCREEN FOR BBS-U-L
SIFTER SCREEN WITH COLLAR FOR BBS-U-3927
DOUGH BALL CHUTE (NOT REQUIRED ON BBS-U-L)
INSTRUCTION LABEL (B120 FOR BBS-M-3314, MANUAL SIFTER)
B303
B303G
B103
LUG WITHOUT HOLE, WHITE PLASTIC – [26”(660mm) X 16”(406mm)]
LUG WITHOUT HOLE, GRAY PLASTIC – [26”(660mm) X 16”(406mm)]
LUG WITHOUT HOLE, ALUMINUM – [26”(660mm) X 16”(406mm)]
B106
8”(203mm) DEEP PAN WITHOUT HOLE, STAINLESS- [20”(508mm) X 12”(305mm)]
B304
B104
B127
B117
B207
B206
L206
B404
B403
B405
B530
B531
B400
B401
B402
DOUGH BALL PAN, PLASTIC – [9”(229mm) X 13”(330mm)]
DOUGH BALL PAN, STAINLESS - [6”(152mm) X 12”(305mm)]
DOUGH BALL PAN, STAINLESS - [10”(254mm) X 12”(305mm)]
PARALLEL SHAFT GEAR MOTOR - 115/230 VOLT, 50/60 Hz
MOTOR COMPARTMENT SEAL
DRIVE COUPLING ASSEMBLY FOR BBS-U
DRIVE COUPLING ASSEMBLY FOR BBS-U-L & BBS-U-LD
LOCK WASHER – MOTOR ASSEMBLY
BOLT - MOTOR ASSEMBLY
SCREW - MOTOR COVER
CIRCUIT BOARD TIMER RELAY - 120/240 VOLT, 50/60 Hz
CONTROL PANEL OVERLAY
FLAT WASHER - MOTOR COVER
LOCK WASHER - MOTOR COVER
ACORN NUT - MOTOR COVER
B119
B319
B419
B419E
B145
POWER CORD, NEMA 5-15 PLUG - 120V USA & CANADA [96” (2438mm)]
COILED POWER CORD,NEMA 5-15 PLUG 120V USA & CANADA [24” 610mm)]
POWER CORD, NEMA 6-15 PLUG - 240V [96” (2438mm)]
POWER CORD, BRITISH 10A/250V PLUG WITH 10A FUSE [96” (2438mm)]
RECEPTACLE–UNIVERSAL 120/240V THREE-PRONG MALE WITH NOISE FILTER
B219
B325
B325G
B125
B107
BRUSH POST (LOCATED ON TOP OF TABLE)
LUG COVER, WHITE PLASTIC – [26”(660mm) X 16”(406mm)]
LUG COVER, GRAY PLASTIC – [26”(660mm) X 16”(406mm)]
LUG COVER, ALUMINUM – [26”(660mm) X 16”(406mm)]
PAN COVER, STAINLESS – [20”(508mm) X 12”(305mm)]
PARTS NOT SHOWN IN DIAGRAMS
ALL ITEMS ARE NOT LISTED IN THIS MANUAL. CONTACT AYRKING FOR ASSISTANCE.
GENERAL PARTS AND ACCESSORIES
B313
RECTANGULAR WIRE BASKET WITH HANDLE & FRONT HOOK FOR ½ SIZE PAN
B122
ROUND, STAINLESS STEEL WIRE DIP BASKET
B123
ROUND, STAINLESS STEEL DIP POT
B109
PLASTIC DRIP TRAY WITH ROUND HOLE TO FIT INSIDE B123
B124
ROUND, STAINLESS STEEL DIP POT LID
B126
RECTANGULAR, STAINESS STEEL WIRE FEATHERING BASKET
B129
RECTANGULAR, STAINLESS STEEL WIRE BASKET FOR 2/3 SIZE PAN
B132
RECTANGULAR, STAINLESS STEEL WIRE BASKET FOR ½ SIZE PAN
B146
P-SHAPED PLASTIC CLIP TO AFFIX POWER CORD TO SIFTER
B171
USER’S MANUAL
B240
5” (127mm) CASTER, LOCKING
B242
5” (127mm) CASTER, NON-LOCKING
B243
BULLET FOOT ASSEMBLY
PARTS SPECIFIC TO BBS-M-3314
B204
BEARING BLOCK, EXTERNAL - 1/2”(13mm) THICK
B205
BEARING BLOCK, INTERNAL – 1” (25mm) THICK
B208
SPRING DRIVE COUPLING WITH HOLLOW SHAFT
B209
ARMATURE WITH SOLID SHAFT
B210
HANDLE WITH MOUNTING HARDWARE
PROBLEM SOLVING GUIDE
Many problems have a simple solution. Please use this guide to help resolve operational
difficulties. Contact AyrKing Corporation if unable to correct any problem.
PROBLEM
POSSIBLE SOLUTIONS
Flour on floor.
Push bottom lug tight against backstop. Check dough ball pan level, empty if full.
Dough balls
in sifted
breading.
Check installation of dough ball chute (if equipped). Check proper position of
brush cover. Check dough ball pan level, empty if full. Check that pivot pin end of
screen is positioned tight against sifter enclosure. Inspect screen for damage,
replace if necessary.
Excessive
flour in dough
ball pan.
When brush is new (first few days of operation) this is normal until brush
develops a set. For first few days push flour into brush area slower. Verify that
holes in brush cover and in top lug are at opposite end of screen from motor
compartment. Brush may be wore out, replace with new brush.
Brush and/or
screen
clogged with
flour. Brush
not in proper
contact with
screen.
Make certain that the brush and sifter screen are thoroughly dry before use.
Check brush for flattened bristles. If evident, wash brush in hot water and
air-dry on brush post in vertical position. (Never lay brush in flat position to dry).
This is recommended only as a procedure to straighten flattened bristles. Usually
bristles should not be subjected to hot water. If this fails to cure the problem,
replace brush. (Note: daily cleaning and thorough, proper drying extend brush
life). Brush may be wore out, replace with new brush.
Dough balls in
sifter screen.
Motor will not
operate.
Check dough ball pan, empty if full. Check dough ball chute for obstructions.
Check power source (plug, circuit breaker, frayed wires, etc.). Verify proper
mechanical motion of start push button. Have qualified technician check
operation of components.
ELECTRICAL SCHEMATICS
TERMS AND CONDITIONS
DAMAGED SHIPMENTS
Notify carrier in event of damaged shipments, whether apparent at time of delivery or concealed
damage discovered after unpacking. File complaint with the carrier as the customer will be
responsible for collection of damage claims. AyrKing retains no liability for damaged goods
once the goods ship from our dock.
RETURNS
No returns will be accepted without written approval from AyrKing. All returned shipments must
be freight prepaid and are subject to handling or re-stocking charges.
WARRANTY
AyrKing Corporation warrants that the AyrKing Breader/Blender/Sifter shall be free from original
defects in workmanship and material provided the same has been properly stored, installed,
serviced, maintained, and operated. AyrKing Corporation extends this warranty to the original
purchaser only. This warranty specifically covers the mechanical and electrical components that
constitute the drive system of the machine.
This warranty provides non-prorated replacement of defect components and labor coverage.
This warranty begins on the date of initial use or 60 days from the date of shipment from our
factory, whichever occurs first. The parts warranty is in effect for the period of 12 months. The
labor warranty is in effect for the period of 90 days.
The end user is required to register ownership of this product with AyrKing Corporation by
returning the warranty card supplied with the machine. This warranty shall be null and void if
the product is not immediately registered with AyrKing Corporation.
Notify AyrKing Corporation of any performance failure. Specify model and serial number of the
product when contacting AyrKing. AyrKing personnel will assist in evaluating the cause of
failure, ship any necessary replacement components, and authorize a service agency call.
Replacement components will be provided and shipped at no cost (via least expensive route) to
the end user provided that the end user returns the defective component within two weeks (if
required by AyrKing). AyrKing reserves the right to test and evaluate the failed component to
determine whether the failure is covered by this warranty. If AyrKing does not receive defective
components within two weeks of replacement component shipment (if required by AyrKing) or if
the failure is determined not to be covered under this warranty, AyrKing will invoice the end user
for the replacement component, shipping costs, and labor charges if applicable.
AyrKing Corporation is not responsible for any damages due to removal or any expenses
incurred for installation of replacement component including but not limited to travel time, fuel
charges, etc. AyrKing Corporation is not liable for any other expenses or costs due to the nonperformance of the product including shipping costs on the mandatory return of defective
product or component. The buyer assumes all risks and liability for results of use of product.
This warranty does not apply to products that have been misused, subjected to negligence or
accident, or altered/repaired in any way so as to affect the product’s performance or reliability.
The brush assembly is excluded from warranty coverage. Nor does this warranty apply to any
peripheral components such as lugs, plugs, pans, pots, baskets, or other items that may be
bundled in a package with the Breader/Blender/Sifter.
11/09