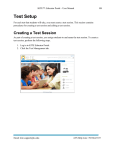
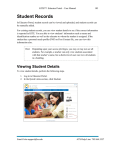
1
Educator Portal:
User Manual
October 2013
Table of Contents
Welcome to KITETM ........................................................................................................................ 1 Required Software ..................................................................................................................... 1 Supported Browsers................................................................................................................... 1 Getting Help .............................................................................................................................. 1 KITE User Manual Organization .............................................................................................. 2 A Note About Graphics ....................................................................................................... 2 Version Information ............................................................................................................ 2 Logging In ....................................................................................................................................... 3 Resetting a Password ....................................................................................................................... 4 Test Setup ........................................................................................................................................ 5 Creating a Test Session ............................................................................................................. 5 Adding Students to a Test Session ...................................................................................... 7 Editing a Test Session ............................................................................................................... 9 Test Tickets ................................................................................................................................... 12 Administering a Test ..................................................................................................................... 14 Monitoring a Test Session ............................................................................................................. 18 Manually Ending a Test Session ................................................................................................... 21 Test Results ................................................................................................................................... 24 Student Records ............................................................................................................................. 27 Viewing Student Details .......................................................................................................... 27 Customizing the Student Records List .................................................................................... 31 Users .............................................................................................................................................. 34 Adding Users ........................................................................................................................... 34 Creating a User File (CSV) ............................................................................................... 34 Loading a User File ........................................................................................................... 36 Validating Users ................................................................................................................ 37 Resending an Email for Validation ................................................................................... 38 User Roles ............................................................................................................................... 39 Assigning User Roles ........................................................................................................ 39 Changing User Roles ......................................................................................................... 40 Finding an Imported User Account ......................................................................................... 41 Personal Needs and Preferences .................................................................................................... 43 Understanding the PNP GUIs and Enhancements................................................................... 43 General Interface ............................................................................................................... 43 Alternate Interface ............................................................................................................. 43 Entering a Student’s PNP ........................................................................................................ 44 First Contact Surveys .................................................................................................................... 51 Enabling First Contact Surveys ............................................................................................... 51 ATS Help Line: 785.864.3537
Email: [email protected]
Creating a First Contact Survey .............................................................................................. 52 Editing a Survey ...................................................................................................................... 55 Uploading a KIDS File .................................................................................................................. 57 Rosters ........................................................................................................................................... 58 Creating a Roster ..................................................................................................................... 58 Loading a Roster File .............................................................................................................. 60 Enrollment or Test Data ................................................................................................................ 63 Creating an Enrollment or Test File ........................................................................................ 63 Enrollment and/or Test File Format ........................................................................................ 64 Enrollment and Test File Columns .................................................................................... 64 Comprehensive_Race ........................................................................................................ 68 Current_Grade_Level ........................................................................................................ 69 Exit_Withdrawal_Type ..................................................................................................... 69 First_Language .................................................................................................................. 70 Primary_Disability_Code .................................................................................................. 71 Loading an Enrollment or Test File......................................................................................... 72 Email: [email protected]
ATS Help Line: 785.864.3537
KITE™: Educator Portal – User Manual
1
Welcome to KITETM
The Kansas Interactive Testing Engine® is used to deliver standardized tests. The two facets of
KITETM you will use the most often are the Educator Portal to assign students to test sessions
and the KITE Client that students use to take the tests. The icons for both systems are below.
Educator Portal — green, yellow, and blue
KITE Client — red, yellow, and blue
Required Software
In addition to the Educator Portal, you should have the following software available:
1. Microsoft Excel, or similar (used to create comma-separated values [CSV] roster file to
upload student information)
2. Adobe Reader, or similar (used to view test tickets in PDF format)
3. A supported browser (see below).
Supported Browsers
We support several versions of browsers, as follows:
•
•
•
•
Firefox 23.0 and 22.0 – supported and recommended
Firefox 10.0.5 – supported
Internet Explorer 8 – supported
Safari 6.0.5 – supported
Getting Help
Common tasks you will perform and some troubleshooting is described in this manual, but if you
need additional help, call or email the help desk:
Phone:
785-864-3537
Email:
[email protected]
Email: [email protected]
ATS Help Line: 785.864.3537
2
KITE™: Educator Portal – User Manual
KITE User Manual Organization
The KITE User Manual is divided by subject. Feel free to select different chapters to assemble a
user guide for use at your organization.
A Note About Graphics
Every effort was made to make the graphics in this manual match what you will see when you
log in to KITE. In some cases, graphics were edited to show more information, for example, if a
screen displays twelve columns in a scrolling window, we usually changed the column widths to
show all twelve columns on one screen shot.
Version Information
This manual is designed for the KITE release in October 2013.
ATS Help Line: 785.864.3537
Email: [email protected]
KITE™: Educator Portal – User Manual
3
Logging In
To log into Educator Portal, perform the following steps:
1.
2.
3.
4.
Open a supported web browser.
Navigate to http://educator.cete.us.
In the Username field, type your username (your email address).
In the Password field, type your password.
Note: The password is case sensitive.
5. Click Sign In.
Email: [email protected]
ATS Help Line: 785.864.3537
4
KITE™: Educator Portal – User Manual
Resetting a Password
To reset a forgotten password, perform the following steps:
1. Log into the Educator Portal at http://educator.cete.us.
2. On the Sign In Screen, click Forgot Password.
3. Enter the username (email address) in the Username field.
4. Click Submit.
5. Within an hour, you will receive an email from [email protected] to reset your password.
Hint: Be sure to check your Junk or Spam email folders.
ATS Help Line: 785.864.3537
Email: [email protected]
KITE™: Educator Portal – User Manual
5
Test Setup
For each test that students will take, you must create a test session. This section contains
procedures for the following:
•
•
Creating a test session
Editing a test session
Creating a Test Session
As part of creating a test session, you assign students to that test session. To add a new test
session (and assign students to tests), perform the following steps:
1. Login to KITE.
2. Click the Test Management tab.
3. Click Add New Test Session.
4. On the Select Assessment screen, ensure that the Assessment Details tab is selected.
Email: [email protected]
ATS Help Line: 785.864.3537
6
KITE™: Educator Portal – User Manual
5. Click Next.
Note: You can filter the tests using the Assessment Program, Testing Program and
Assessment fields on the left side of the screen (circled below).
6. In the Test Search Results box, click the radio button next to the appropriate test.
7. Click Next.
ATS Help Line: 785.864.3537
Email: [email protected]
KITE™: Educator Portal – User Manual
7
Adding Students to a Test Session
Note: You can type in the blank fields underneath the field names to filter the
students by grade or educator name.
8. Click the checkbox to the left of all the students you want to add to the test session.
9. Click Next.
Email: [email protected]
ATS Help Line: 785.864.3537
8
KITE™: Educator Portal – User Manual
10. Type a short but descriptive test session name.
Note: You will not be able to delete or rename the test session, so you should
determine a naming scheme that works for your location.
11. Click Save.
ATS Help Line: 785.864.3537
Email: [email protected]
KITE™: Educator Portal – User Manual
9
Editing a Test Session
After creating a test session, you can view and edit the names of students that are in that test
session. To add and remove a student’s name from a test session, perform the following steps.
1. While in the Educator Portal, click Test Management.
2. Locate the test you need to edit.
Email: [email protected]
ATS Help Line: 785.864.3537
10
KITE™: Educator Portal – User Manual
3. Click on the name of the test.
The View/Edit Test Session window appears.
Note: Students currently registered for the test appear at the top of the screen,
highlighted, under Enrolled Students.
4. To add a student’s name to the session, locate the appropriate student in the Other
Students section.
ATS Help Line: 785.864.3537
Email: [email protected]
KITE™: Educator Portal – User Manual
11
5. Click the box next to the student’s name.
6. After making all of your changes, click Save.
Email: [email protected]
ATS Help Line: 785.864.3537
12
KITE™: Educator Portal – User Manual
Test Tickets
After a test has been created and students have been added to the test, you can print test tickets.
To print test tickets, perform the following steps.
1. Login to KITE.
2. Click the Test Management tab.
3. Locate your test session.
4. Click the PDF icon next to the name of the test.
ATS Help Line: 785.864.3537
Email: [email protected]
KITE™: Educator Portal – User Manual
13
5. Click the radio button next to Save File.
6. Click OK.
Hint: You can always reopen the saved file in case students forget their login
information.
7. Open the PDF file to print the student credentials (aka test tickets).
Note: Be sure to allow time before the test to cut the test tickets apart. The PDF
prints with eight tickets on each page.
Email: [email protected]
ATS Help Line: 785.864.3537
14
KITE™: Educator Portal – User Manual
Administering a Test
When the test tickets are ready, you can administer the test. If you do not have test tickets, be
sure to contact the person who is in charge of making them. The test tickets are printed from a
PDF file and contain the student logins and passwords.
Note: For questions about the KITE Client refer to the KITE Client manual. The
instructions below walk you through only the basics steps.
To administer the test, perform the following tasks:
1. Distribute the test tickets (with login and password information) to the students.
2. Have the students open the KITE Client on their computer desktops.
3. Have the students click Other Assessments.
ATS Help Line: 785.864.3537
Email: [email protected]
KITE™: Educator Portal – User Manual
15
4. Instruct the students to enter the login information from their test ticket.
5. Instruct the students to click TAKE A TEST.
Note: The Practice First button leads students to practice tests if they are available.
Email: [email protected]
ATS Help Line: 785.864.3537
16
KITE™: Educator Portal – User Manual
6. If you have a choice of environment (in the blue bar), show the students the correct one.
7. From the list, show the students the test they should take.
8. Tell the students to click the Take Test button.
9. Have the students read the test instructions.
Hint: Some tests have more instructions at the beginning than others.
ATS Help Line: 785.864.3537
Email: [email protected]
KITE™: Educator Portal – User Manual
17
10. When the students are finished reading, they should click the green button to start the
test.
Note: The green button may say either Next or Begin depending upon the settings
of the test.
Hint: The Go Back button returns to the screen where you can select a test.
Email: [email protected]
ATS Help Line: 785.864.3537
18
KITE™: Educator Portal – User Manual
Monitoring a Test Session
You can monitor a test session if at least one student on the roster has started taking the test. To
monitor a test session, perform the following steps.
1. While in the Educator Portal, click Reports.
2. Under the Test bullet and Test Management, click View Test Sessions.
3. From the list of test sessions, click the name of the test session you want to monitor.
ATS Help Line: 785.864.3537
Email: [email protected]
KITE™: Educator Portal – User Manual
19
4. Click the Monitor button.
5. Use the table below to interpret the screen that appears.
Email: [email protected]
ATS Help Line: 785.864.3537
20
KITE™: Educator Portal – User Manual
Note: The End Test Session button will close this test session to all students,
including any who haven’t finished the test. Use only if you are sure you
need to end a test session.
Column Heading
Description
Name
The name column displays both the student’s first and last
name.
Status
This displays the status of the test. Possible entries are
Complete—Student has finished the test and/or selected
Review/End to submit answers and end the test session.
Unused—Student has not yet logged in.
In Progress—The student has logged in but has not
completed the testing.
Numbered Columns
Each numbered column corresponds to a question on the
test. If the student has selected a response for the question,
the student’s choice will appear in the column. If the student
has not selected an answer, the column will display a
hyphen (-).
Score
The score displays the number of correct answers followed
by the total number of questions.
Score %
The score percentage (%) shows the percent of questions
correctly answered.
6. When you have finished, use the menus at the top of the screen to move to another
location in KITE.
ATS Help Line: 785.864.3537
Email: [email protected]
KITE™: Educator Portal – User Manual
21
Manually Ending a Test Session
If a student is taking a test and gets disconnected, you might need to end that test session
manually. To manually end a test session, perform the following steps.
1. While in the Educator Portal, click Reports.
2. In the Test bullet under Test Management, click View Test Sessions.
Email: [email protected]
ATS Help Line: 785.864.3537
22
KITE™: Educator Portal – User Manual
3. From the list of test sessions, click the name of the test session you want to monitor.
4. Click the Monitor tab.
5. On the Monitor Test Session window, click the End Test Session button.
ATS Help Line: 785.864.3537
Email: [email protected]
KITE™: Educator Portal – User Manual
23
6. Verify that the test session ended.
Email: [email protected]
ATS Help Line: 785.864.3537
24
KITE™: Educator Portal – User Manual
Test Results
Roster reports contain testing results for each student on a roster. These reports are not generated
until at least one student has completed the test session.
To access roster reports, perform the following steps:
1. Log into the Educator Portal.
2. Click Reports.
3. Under Test Results in the Test bullet, click Roster Reporting.
ATS Help Line: 785.864.3537
Email: [email protected]
KITE™: Educator Portal – User Manual
25
4. Click the triangle next to the appropriate roster name to view available reports.
5. Click the PDF icon to open a report.
Note: At least one student must have completed the test session in order to generate
the report. The system displays a message if this has not occurred.
Email: [email protected]
ATS Help Line: 785.864.3537
26
KITE™: Educator Portal – User Manual
6. Choose Open.
7. Click OK.
8. The report displays the names of the students who have taken the test, their ID numbers,
their raw score (the number of questions correct followed by the total number of
questions on the test), and the percentage received.
9. Use the table below to interpret the report.
Field Name
Definition
Student Name
The student’s name
Local Student ID
The local student ID number
Raw Score
The number correct followed by the total number of
questions on the test
% Correct
The percentage of correct answers.
10. To print a copy, from the File menu, click Print.
ATS Help Line: 785.864.3537
Email: [email protected]
KITE™: Educator Portal – User Manual
27
Student Records
You can view student details to see if the correct information is in KITE. You will be able to see
the student information like name and identification number as well as the educator to whom the
student is assigned. If the student has a PNP or First Contact file, you will be able to view this
information also.
Hint: Depending upon your access privileges, you may or may not see all of the
students. For example, teachers can only view students associated with their
names, but a district-level user could view all students in a building.
Viewing Student Details
To view student details, perform the following steps:
1. On the Reports page under Student Information, click Student Records.
Email: [email protected]
ATS Help Line: 785.864.3537
28
KITE™: Educator Portal – User Manual
2. Use the Group By drop-down list to organize the list of students.
3. Use the following table when sorting the list of students.
Selection
Description
Remove Grouping
Clears the filter and returns the list to its original order.
Roster
Groups the student records by the roster on which they were
uploaded. A roster upload number is automatically assigned by
the system.
Student
Groups the student records by the student’s state ID number.
Teacher
Groups the student records by their teacher’s name.
4. Click the checkbox next to the student you want to view.
ATS Help Line: 785.864.3537
Email: [email protected]
KITE™: Educator Portal – User Manual
29
5. At the bottom of the screen, click View Student Detail.
6. Use the arrows at the bottom of the student detail window to move between students.
Note: The information in these records is filled from the uploaded CSV file, or the
uploaded Kansas Individual Data on Students (KIDS) file.
Email: [email protected]
ATS Help Line: 785.864.3537
30
KITE™: Educator Portal – User Manual
7. When you are finished, click the Click to close Detail button.
ATS Help Line: 785.864.3537
Email: [email protected]
KITE™: Educator Portal – User Manual
31
Customizing the Student Records List
Note: Although there are other columns available, we suggest you keep the default
setup unless you are specifically looking for other types of information.
If you need to change the columns in the Student Record Report, perform the following steps.
1. On the Student Record Report screen, click Choose Columns.
Email: [email protected]
ATS Help Line: 785.864.3537
32
KITE™: Educator Portal – User Manual
2. On the Select columns window, determine which columns you wish to add or remove.
3. To remove a column from the report, click the – sign next to the column.
4. To add a column to the report, click the + sign next to the column.
ATS Help Line: 785.864.3537
Email: [email protected]
KITE™: Educator Portal – User Manual
33
5. To reorganize columns, drag and drop the columns into the order you prefer.
6. When you have finished, click Ok to save your changes.
Note: You can resize the columns, but use caution as changes can make the report
difficult to read.
The table below lists the default column titles and their definitions.
Column Titles
Definitions
State ID
The student’s state-assigned ID number.
First Name
The student’s legal first name.
Last Name
The student’s legal last name
Roster
The name given to the roster.
School ID
The school’s ID number.
Educator State ID
The educator’s state license ID number.
Educator First Name
The educator’s legal first name.
Educator Last Name
The educator’s legal last name.
Access Profile
Indicates whether or not the student’s Personal Needs and
Preferences or Personal Needs Profile (PNP) have been set.
Currently used by Dynamic Learning Maps (DLM).
First Contact
Indicates whether or not the first contact form has been completed.
Currently used by Dynamic Learning Maps (DLM).
Email: [email protected]
ATS Help Line: 785.864.3537
34
KITE™: Educator Portal – User Manual
Users
Sometimes, problems arise because a user cannot see the information they expect to see. Often
this occurs because of a problem with their roles. If they are a new user, they may need to be
validated or have roles assigned; existing users may need to have their roles updated.
Adding Users
Users are entered into the system using a data file in the CSV (comma separated values) format.
All users (educators, test coordinators, principals, superintendents, etc.) can be included on one
CSV file.
Hint: A CSV user file template is available at http://ksassessments.org/kite.
Note: Note all columns in the CSV template require data. However, all columns in
the CSV template must be included in the file.
Hint: We recommend maintaining one user file.
Creating a User File (CSV)
To create a user file, perform the following steps.
1. Open a spreadsheet program that can save data in the CSV format.
2. On the first row of the spreadsheet, enter the column headings from the following table.
Note: All of the column headings are required for KITE to accept the CSV file. The
“Req?” column indicates whether or not a column must contain information
for each user to ensure a successful file upload. Columns with “No” in the
table below can be blank for a user.
Column Heading
Format
Req?
Description
Legal_First_Name
Alphanumeric
Yes
The user’s first name.
Legal_Last_Name
Alphanumeric
Yes
The user’s last name
ATS Help Line: 785.864.3537
Email: [email protected]
KITE™: Educator Portal – User Manual
Column Heading
Educator_Identifier
Format
Req?
Alphanumeric
No
Description
The user’s identification number. For
educators, this is usually their state
license number.
Note:
Email
Alphanumeric
Yes
35
If a user will not be assigned to
students, leave this field blank.
For example, a district
supervisor would not need an
educator identifier.
The user’s email address.
Note:
Information about creating a
password will be sent to this
email address and it will
become the user’s login name.
Organization
Numeric
Yes
Use the numeric code assigned by the
state (or other organization) for
districts, buildings, etc.
Organization_Level
Alphanumeric
Yes
Enter the user’s level, e.g., DT
(district), SCH (school/building), etc.
Note:
A user should have only one
organization level.
3. Type the information for each user into the CSV file.
Note: Use a new line (row) for each user.
4. Verify that you have all of the column headings in your file, even if some columns are
blank.
5. Save your file in a location you can access later.
Hint: The file can be given any name that helps identify the information it contains.
Note: Save as a CSV file. The system will only load files saved in CSV format.
Email: [email protected]
ATS Help Line: 785.864.3537
36
KITE™: Educator Portal – User Manual
Loading a User File
After saving the CSV user file, you need to upload the file into KITE. To load a user file,
perform the following steps:
1. Select the Reports tab.
2. Under the Data Upload heading, choose CSV File Upload.
3. Select User from the dropdown list.
ATS Help Line: 785.864.3537
Email: [email protected]
KITE™: Educator Portal – User Manual
37
Note: If you are attempting to upload a file and you do not see the correct option
listed, your account permissions may need to be changed. Contact your test
coordinator.
4. Click the Browse button to find the CSV file on your computer.
A browser window appears.
5. Locate the CSV file you created.
6. Single-click the file name to select it.
7. Click Open.
The filename appears next to the Browse button.
Note: Verify that the file has a .csv file extension. Filenames with extensions ending
in .xls or .xlsx will be rejected.
8. Click Upload.
The confirmation message indicates the number of records uploaded.
Hint: Each line in the CSV file is one record.
Validating Users
After you upload the users, they will appear under the Pending Users list. Before users can work
with the Educator Portal, they need to validate their account. Each user automatically receives an
email from [email protected] with a link. They should follow that link to set their password and
login. Users appear in the Active User list after they set a password and login.
To determine if a user is validated, perform the following steps.
1. Within the Educator Portal, select the Reports tab.
2. Under the KITE Management System Tools heading, select Account Management.
3. Click the Users tab.
Sections for New, Active, and Pending users appear.
Email: [email protected]
ATS Help Line: 785.864.3537
38
KITE™: Educator Portal – User Manual
Hint: Users who have not replied to the email appear under Pending Users.
4. Locate the new user.
Resending an Email for Validation
KITE logins are connected to email addresses, and each user must activate their email address
individually. After the user is loaded into KITE, they receive an email from [email protected] with a
link. They should follow that link to set their password and login.
After a user has activated their user ID, they can be assigned roles (access privileges).
If a user is having difficulty logging on to KITE, you can use the steps below to resend their
email invitation. To resend an invitation, perform the following steps.
1. Within the Educator Portal, select the Reports tab.
2. Under the KITE Management System Tools heading, select Account Management.
3. Click the Users tab.
Sections for New, Active, and Pending users appear.
Hint: Users who have not replied to the email appear under Pending Users.
4. Locate the new user.
Note: If the user is listed under “Pending”, you need to resend an email.
5. On the Users tab, click the checkbox by the user’s name.
6. Click the Resend Email button.
7. Contact your user and ask them to watch for the email.
ATS Help Line: 785.864.3537
Email: [email protected]
KITE™: Educator Portal – User Manual
39
User Roles
After users are entered into the system, you must assign each one a role within the Educator
Portal. The roles determine the tasks the user can perform.
Assigning User Roles
To assign user roles, perform the following steps:
1. Within the Educator Portal, select the Reports tab.
2. Under the KITE Management System Tools heading, select Account Management.
3. Click the Users tab.
Sections for New, Active, and Pending users appear.
Hint: Recently uploaded users appear under New Users.
4. Locate the new user.
5. Click the Add Roles button.
The Assign Roles to User dialog box appears.
6. Choose the correct role for the user (only one role should be chosen).
For the Kansas Assessment Program, the defined roles are:
KAP Role
Description
Teacher
A teacher account. Teachers access only those students
linked to their account by a roster uploaded and the Kansas
Individual Data on Students (KIDS) system.
Building User
A person in a building who needs access to all students in
that building.
Building Test Coordinator
The test administrator for a building.
Building Principal
The principal for a building.
District User
District personnel who need access to all students in that
district.
District Test Coordinator
The test coordinator for the district.
District Superintendent
The district superintendent.
7. Click Save.
The selected role is now the user’s current role.
Email: [email protected]
ATS Help Line: 785.864.3537
40
KITE™: Educator Portal – User Manual
Changing User Roles
Sometimes, you will need to change the user roles. To change user roles, perform the following
steps:
1. Within the Educator Portal, select the Reports tab.
2. Under the KITE Management System Tools heading, select Account Management.
3. Click the Users tab.
Sections for New, Active, and Pending users appear.
Hint: Existing users appear under Active Users.
4. Click the Add Roles button.
The Assign Roles to User dialog box appears.
5. Choose the correct role for the user (only one role should be chosen).
6. Click Save.
The selected role is now the user’s current role.
ATS Help Line: 785.864.3537
Email: [email protected]
KITE™: Educator Portal – User Manual
41
Finding an Imported User Account
Many email addresses were imported from the Management Tool into Educator Portal. If you
had an account with the Center for Educational Testing and Evaluation (CETE) at
http://mgmt.cete.us, you should have an account in Educator Portal.
Note: The login for the Educator Portal is not the same login that was previously
used for the Management Tool. The Management Tool is available ONLY for
administering KELPA and the science portion of the Kansas Alternate
Assessments as well as for reviewing historical data.
To find an imported account, perform the following steps:
1. Log into the Educator Portal at http://educator.cete.us.
2. On the Sign In Screen, click Forgot Password.
3. Enter the username (email address) in the Username field.
4. Click Submit.
Email: [email protected]
ATS Help Line: 785.864.3537
42
KITE™: Educator Portal – User Manual
5. Within an hour (often much sooner), you should receive an email from [email protected] to
activate your account.
Hint: Be sure to check your Junk or Spam email folders.
6. If necessary, double-check the spelling of your email address and try again.
Note: If KITE still does not recognize your username, contact your school’s
administrator so your account information can be uploaded into the
Educator Portal.
ATS Help Line: 785.864.3537
Email: [email protected]
KITE™: Educator Portal – User Manual
43
Personal Needs and Preferences
Personal Needs and Preferences also known as a Personal Needs Profile (PNP) are the part of a
student’s record that controls the types of accommodations that will be presented in the student’s
test. You may set PNP by editing individual student records.
Understanding the PNP GUIs and Enhancements
Before you set PNPs, you should understand the different graphic user interfaces (GUIs) that
exist within the KITE Client—the General user interface and the Alternate user interface.
Depending upon the user interface that the student will use, some enhancements are not available
or function slightly differently. For example, in the general interface, the student has a toolbar
they can use to select an enhancement, but the alternate interface does not include a toolbar.
General Interface
The General interface is the one in which most student assessments are delivered, and it includes
a toolbar where a student can access enhancements, including masking, auditory background,
spoken, magnify, color overlay, invert color, and color contrast.
Note: If the student will use the general interface, you have a choice to have
enhancements appear automatically (“Activate by Default”) or appear at the
selection of the student.
Alternate Interface
The Alternate interface is designed for students who are part of the Dynamic Learning Maps
(DLM) program.
Note: The Alternate interface does not include a toolbar, so any enhancements the
student will need should be checked “Activate by Default”.
Email: [email protected]
ATS Help Line: 785.864.3537
44
KITE™: Educator Portal – User Manual
Entering a Student’s PNP
To enter the PNP of a student, perform the following steps.
1. Log into Educator Portal.
2. Click the Reports tab.
3. Under Student Information, click Student Records.
4. On the Student Record Report, locate the student record you wish to update.
ATS Help Line: 785.864.3537
Email: [email protected]
KITE™: Educator Portal – User Manual
45
5. Drag the scroll bar at the bottom of the page all the way to the right.
6. In the Access Profile column, click NO SETTINGS.
Note: The PNP window has four tabs: 1) Summary, 2) Display Enhancements, 3)
Language & Braille, and 4) Audio & Environment Support.
Email: [email protected]
ATS Help Line: 785.864.3537
46
KITE™: Educator Portal – User Manual
7. To edit a student’s PNP, click the Edit Settings button.
8. Alternatively, to edit a student’s PNP, click the Display Enhancements tab..
ATS Help Line: 785.864.3537
Email: [email protected]
KITE™: Educator Portal – User Manual
47
9. Use the following table to set PNP in the Display Enhancements tab personal needs and
preferences.
Display
Enhancements
Definition
Magnification
Magnification allows you to choose
amount of screen magnification
during testing. You can choose
between a magnification of 2x, 3x,
4x, or 5x.
Overlay Color
The overlay color is the background
color of the test. The default color
is white; you may select an
alternate color if needed.
Invert Color
Choice
The invert color choice will cause
the test background to appear black
with white lettering. Use Contrast
Color to change the display to a
different color scheme.
Masking (General
UI only)
The masking section allows the
student to cover parts of the test.
“Answer masking” covers the
answers when the question is first
presented. “Custom masking”
allows the student to choose what
they would like masked.
Contrast Color
The contrast color section allows
you to choose from several
background and lettering color
schemes.
Email: [email protected]
Screen
ATS Help Line: 785.864.3537
48
KITE™: Educator Portal – User Manual
10. After you have made your changes, click Save.
The message “Profile attributes saved successfully” appears.
Note: The features on the Language & Braille tab are currently unavailable.
11. Click the Audio & Environment Support tab.
ATS Help Line: 785.864.3537
Email: [email protected]
KITE™: Educator Portal – User Manual
49
12. Use the following table to set PNP in the Audio & Environment Support section.
Audio &
Environment
Support
Definition
Auditory
Background
(General UI Only)
The computer plays white noise
during the test.
Spoken Audio
The graphic to the right indicates
which features are currently
available.
Screen
For Voice Source, you can specify
synthetic.
Using Spoken Preference, you can
indicate which elements of a
question should be read to the
student. Choosing NonVisual
means that everything on the
screen will be read.
Email: [email protected]
ATS Help Line: 785.864.3537
50
KITE™: Educator Portal – User Manual
Audio &
Environment
Support
Switches
Definition
Note:
Screen
Activate by Default does not
change how a switch works
with the system.
• Scan Speed (seconds) – The
number of seconds that a
particular item or row will be
highlighted and available for
selection before the system
moves to the next item or row.
The scan speed must be equal to
or greater than the value entered
under “Automatic Scan-Initial
Delay”.
• Automatic Scan-Initial Delay –
Allows you to specify how the
system interacts with a switch.
The “Value in seconds”
determines how long the system
waits to begin highlighting items.
The “Manual Override” button
allows you to specify that the
system will wait for the test taker
to select the switch before
highlighting begins.
• Automatic Scan Repeat
Frequency – Determines how
many times the system will
repeat the process of highlighting
items/rows on the screen.
Breaks
Currently unavailable.
Additional Testing
Time
Currently unavailable.
13. After you have made your changes, click Save.
The message “Profile attributes saved successfully” appears.
14. To close the window, click the x at the top of the screen.
15. After you have entered the student’s PNP, the link next to the student changes to
CUSTOM.
ATS Help Line: 785.864.3537
Email: [email protected]
KITE™: Educator Portal – User Manual
51
First Contact Surveys
The First Contact Survey (FCS) is used to report information about the characteristics of students
who participate in an alternate assessment based on alternate achievement standards. The survey
collects data about student demographics, sensory perception, motor skills, expressive and
receptive language, computer access, use of alternate communication devices, academic skills,
and engagement with and attention to instruction. This information is being collected as part of
the Dynamic Learning Maps (DLM®) project.
Enabling First Contact Surveys
Before you can complete an FCS for a student, you must first upload a roster file with the
student’s information, including DLM status. For each FCS you plan to complete, the
corresponding student should have TRUE in the DLM_Status column of the roster.
Note: You can find the instructions for uploading the student roster CSV file
elsewhere in this manual.
Note: If the DLM_Status column in the Roster file is blank or FALSE, you will not
be able to access the FCS for that student.
Email: [email protected]
ATS Help Line: 785.864.3537
52
KITE™: Educator Portal – User Manual
Creating a First Contact Survey
Once you have logged in to the Educator Portal, you can create an FCS for a student. To do so,
perform the following steps.
1. Click the Reports tab.
2. Under Student Information, click Student Records.
ATS Help Line: 785.864.3537
Email: [email protected]
KITE™: Educator Portal – User Manual
53
3. On the Student Record Report screen, locate the student for whom you wish to create an
FCS.
4. Move the scroll bar at the bottom of the page all the way to the right side of the screen.
5. Click the First Contact link associated with that student.
If this is the first time accessing this student’s FCS, the link will read NOT STARTED.
Note: Once you have started and saved the survey, you can go back and edit it at
any time.
Email: [email protected]
ATS Help Line: 785.864.3537
54
KITE™: Educator Portal – User Manual
6. On the welcome page of the survey, verify that the name of the student at the top of the
page is the one with which you wish to work.
7. Read the welcome page to see what information the survey requires.
8. To begin the survey, click the Start Survey button.
Note: Each page of the survey will have one or more questions. Additional
questions may appear depending on how you answer the first question(s), so
make sure to scroll down and complete everything on each tab.
9. On each survey screen, click Next to move to the next section.
ATS Help Line: 785.864.3537
Email: [email protected]
KITE™: Educator Portal – User Manual
55
Note: As you answer the questions on each tab, you will see the orange dots in the
tabs turning blue. This shows your progress. Orange means incomplete,
while blue means you have completed all the questions on that tab.
10. When you have finished answering questions, click Submit Survey.
Note: If you have not finished the survey, you will see the following message.
You can return at any time to complete the survey.
Hint: If you have to leave the survey before finishing it, you will see “In Progress”
in the First Contact column of the Student Record Report.
Editing a Survey
If you leave a survey before finishing it, you can edit it at a later time. To edit a survey, perform
the following steps.
1. From inside of KITE, click the Reports tab.
2. Under Student Information, click Student Records.
3. On the Student Record Report screen, locate the student whose FCS you wish to edit.
Email: [email protected]
ATS Help Line: 785.864.3537
56
KITE™: Educator Portal – User Manual
4. Click In Progress.
5. On the welcome screen, click the Edit Survey button.
6. Continue answering the survey questions until finished.
Note: When all of the dots at the top of the screen are blue, you are finished
answering the survey.
7. Click the Submit Survey button.
Hint: On the Student Record Report, the First Contact link will now read
“Complete.”
Note: If you need to make changes to the FCS, you can do so by clicking the
Complete link.
ATS Help Line: 785.864.3537
Email: [email protected]
KITE™: Educator Portal – User Manual
57
Uploading a KIDS File
The webservice upload link uploads information from the Kansas Individual Data on Students
(KIDS) system. You will only have access to the webservice upload if you have the correct
permissions within Educator Portal. To upload a KIDS file, perform the following steps.
1. From inside KITE, click Reports.
2. Under Data Upload, click Webservice Upload.
3. Click Upload.
The system displays a message and sends an email with results of the data transfer. If any items
are rejected, an Excel document will be attached to the email.
Email: [email protected]
ATS Help Line: 785.864.3537
58
KITE™: Educator Portal – User Manual
Rosters
Rosters are usually created using a spreadsheet program that can save in CSV (comma-separated
values) format. The resulting CSV file can be saved and edited as information changes.
Hint: A CSV roster file template is available at http://ksassessments.org/kite.
Note: Not all columns in the CSV template require data. However, the columns
must be included in the file.
Hint: You can have more than one roster, and each roster can have a range of 16,000 (one to six thousand) students.
Creating a Roster
To create a roster, perform the following steps:
1. Open a spreadsheet program that can save data in the CSV format.
2. On the first row of the spreadsheet, enter the column headings from the following table.
Note: All of the column headings are required for KITE to accept the CSV file.
The “Req?” column indicates whether or not a column must contain
information for each student to ensure a successful file upload. Columns with
“No” in the table below can be blank for each student if the information is
unavailable.
Column Heading
Attendance_School_
Program_Identifier
Format
Alphanumeric;
10
Req?
Yes
Description
Your building number (building
numbers are typically four digits) or
other assigned location identifier.
Note:
Course_Section
ATS Help Line: 785.864.3537
Alphanumeric;
30
Yes
The number must match one in
your organization, or the file
upload will fail.
Use course sections to group students
into rosters so they are easily
identifiable when a test session is
created.
Email: [email protected]
KITE™: Educator Portal – User Manual
Column Heading
Format
Req?
59
Description
Current_School_Year
YYYY
Yes
The ending year of the current school
year (e.g., for the 2013–2014 school
year, enter 2014).
DLM_Status
Blank
TRUE
FALSE
No
TRUE enables Dynamic Learning
Maps and the First Contact Survey for
the student.
Note:
If the student will use Dynamic
Learning Maps (DLM), enter
TRUE.
Educator_First_
Name
Alphanumeric;
40
No
Educator’s first name.
Educator_Identifier
Numeric; 10
Yes
The educator number may match the
number that is associated with a KITE
user profile (e.g., the teacher ID
number or employee number), but if it
does not match an existing number,
KITE will create an educator in the
system (separate from a user).
Educator_Last_Name
Alphanumeric;
40
No
Educator’s last name.
Enrollment_Status
Numeric; 2
No
You can leave this field blank to default
to “enrolled”, or use 01 for audited.
Local_Student_
Identifier
Alphanumeric;
20
No
Student’s state ID number or student’s
school ID number. If no number is
entered, the system will create one.
Residence_District_
Identifier
Alphanumeric;
10
No
District ID number (e.g., D0123).
State_Course_
Identifier
Alphanumeric
Yes
This helps identify the course without
categorizing the course (use
Course_Section to group students).
State_Student_
Identifier
Alphanumeric;
10
Yes
The student’s state ID number.
State_Subject_Area_
Code
N/A
No
The subject area code assigned by the
state.
Student_Legal_First_
Name
Alphanumeric;
60
Yes
The student’s first name.
Student_Legal_Last_
Name
Alphanumeric;
60
Yes
The student’s last name.
No
The student’s middle name.
Student_Legal_
Middle_Name
Email: [email protected]
ATS Help Line: 785.864.3537
60
KITE™: Educator Portal – User Manual
Note: A roster can have a maximum of 6,000 (six thousand) students.
3. Type the information for each student into the CSV file.
Note: Use a new line (row) for each student.
4. Verify that you have all of the column headings in your file, even if some columns are
blank.
5. Save your file in a location you can access later.
Hint: The file can be given any name that helps identify the group of students it
contains.
Note: Save the roster as a CSV file. The system will only load files saved in CSV
format.
Loading a Roster File
After saving the CSV roster file, you need to upload the file into KITE. To do so, perform the
following steps:
1. Login to KITE.
2. Click the Reports tab.
3. Under Data Upload, click CSV File Upload.
ATS Help Line: 785.864.3537
Email: [email protected]
KITE™: Educator Portal – User Manual
61
4. From the Update Record Type dropdown list, select Roster.
Note: If Roster is not displayed in the menu, check with your test administrator to
get permission to upload this file type.
5. Click the Browse button to find the CSV file on your computer.
A browser window appears.
6. Locate the CSV file you created.
7. Single-click the file name to select it.
8. Click Open.
The filename appears next to the Browse button.
Note: Verify that the file has a .csv file extension. Filenames with extensions ending
in .xls or .xlsx will be rejected.
Email: [email protected]
ATS Help Line: 785.864.3537
62
KITE™: Educator Portal – User Manual
9. Click Upload.
The confirmation message will indicate the number of students uploaded and any error
messages.
ATS Help Line: 785.864.3537
Email: [email protected]
KITE™: Educator Portal – User Manual
63
Enrollment or Test Data
An enrollment file is used to upload demographic information for each student. Test files are
used for managing the Adequate Yearly Progress (AYP) assessments for No Child Left Behind
(NCLB).
Note: A test file uses the same format as an enrollment file.
Creating an Enrollment or Test File
To create the file, perform the following steps.
1. Open a spreadsheet program that can save data in the CSV format.
2. On the first row of the spreadsheet, enter the column headings for the file.
Note: The columns are listed right after this procedure because of the amount of
data that you can enter.
3. Type the information into the CSV file.
Note: Use a new line (row) for each individual.
4. Verify that you have all of the column headings in your file, even if some columns are
blank.
5. Save your file in a location you can access later.
Hint: The file can be given any name that helps identify the information it contains.
Note: Save the file as a CSV file. The system will only load files saved in CSV
format.
Email: [email protected]
ATS Help Line: 785.864.3537
64
KITE™: Educator Portal – User Manual
Enrollment and/or Test File Format
Use the tables on the next several pages to compile your enrollment (and/or test) information.
Some of the fields with limited or complex entry structures are explained at the end of this
section.
Note: All of the column headings are required. The “Req?” column indicates
whether or not a column must contain information to ensure a successful file
upload. Columns with “No” in the table below can be blank.
Enrollment and Test File Columns
Column Heading
Attendance_School_
Program_Identifier
Format or
Type; Number
Alphanumeric;
10
Req?
Yes
Definition
Your building number (building
numbers are typically four digits) or
other assigned location identifier.
Note:
The number must match one in
your organization, or the file
upload will fail.
Course_Section
Alphanumeric
Yes
Use course sections to group students
into rosters so they are easily
identifiable when a test session is
created.
Current_School_Year
YYYY; 4
Yes
The ending year of the current school
year (e.g., for the 2013–2014 school
year, enter 2014).
DLM_Status
Blank
TRUE
FALSE
No
TRUE enables Dynamic Learning
Maps and the First Contact Survey for
the student.
Note:
Educator_Identifier
ATS Help Line: 785.864.3537
Numeric
Yes
If the student will use Dynamic
Learning Maps (DLM), enter
TRUE.
The educator number may match the
number that is associated with a KITE
user profile (e.g., the teacher ID
number or employee number), but if it
does not match an existing number,
KITE will create an educator in the
system (separate from a user).
Email: [email protected]
KITE™: Educator Portal – User Manual
Column Heading
Format or
Type; Number
Req?
65
Definition
State_Course_
Identifier
Alphanumeric
Yes
This helps identify the course without
categorizing the course (use
Course_Section to group students).
State_Student_
Identifier
Numeric; 10
Yes
The student’s state ID number.
Student_Legal_
First_Name
Alphanumeric;
60
Yes
The student’s first name.
Student_Legal_
Last_Name
Alphanumeric;
60
Yes
The student’s last name.
Test_Subject
Alphanumeric;
10
Yes
The subject of the test, for example,
Math, ELA, etc.
Test_Type
Alphanumeric; 2
G = General;
M = Modified;
A = Alternate
Yes
Indicates which type of test the student
will take.
AYP_School_
Identifier
Alphanumeric;
10
No
The unique number that has been
assigned to the school building by the
state.
Comprehensive_
Race
Numeric; 5
No
General racial category (or categories)
that most clearly reflects the
individual’s recognition of his or her
racial background.
Note:
Current_Grade_Level
Numeric; 2
00-18
No
Selected:
rd
08 = 3 grade
th
10 = 5 grade
th
16 = 11 grade
See the section that follows for
more information.
The grade level or primary instructional
level at which a student enters and
receives services in a school or an
educational institution during a given
academic session.
Note:
See the section that follows for
more information.
Date_of_Birth
MM/DD/YYYY;
10
No
The date (month, day, and year) on
which the student was born.
District_Entry_Date
MM/DD/YYYY;
10
No
The date (month, day, and year) on
which the student enrolls and begins to
receive instructional services in a
school district.
Educator_First_
Name
Alphanumeric
No
The educator’s first name.
Email: [email protected]
ATS Help Line: 785.864.3537
66
KITE™: Educator Portal – User Manual
Column Heading
Format or
Type; Number
Req?
Definition
Educator_Last_Name
Alphanumeric
No
The educator’s last name.
Enrollment_Status
Numeric
00 = Enrolled
01 = Audited
No
The student’s status in the course.
Exit_Withdrawal_
Date
MM/DD/YYYY;
10
No
The month, day, and year of the
student’s last day of membership or
the day on which the student
graduated.
Exit_Withdrawal_
Type
Numeric; 2
No
The circumstances under which the
student exited the district or school.
Note:
First_Language
Alphanumeric; 2
No
See the section that follows for
more information.
The code for the primary language or
dialect (not ethnicity) of the student
according to the student’s home
language survey.
Note:
See the section that follows for
more information.
Funding_School
Alphanumeric;
10
No
The unique number assigned by the
state that indicates the location where
the student is counted for state funding
and/or for the Principal’s Building
Report. If a district does not have a
school for an educational level (e.g.,
does not have a high school) or has
preschoolers who are not assigned to
a school, the district central office
building number should be used.
Gender
Numeric; 1
0 = Female
1 = Male
No
The student’s gender.
Generation_Code
Alphanumeric;
10
No
The part of the student’s name used to
denote the generation in his/her family,
e.g., Jr., Sr., III, etc.
Gifted_Student
Alpha; 5
TRUE
FALSE
No
Indicates whether or not the student
has an active Individual Education
Plan (IEP) for giftedness.
Local_Student_
Identifier
Alphanumeric;
20
No
The unique alphanumeric code
assigned to the student by the school
or local education agency.
ATS Help Line: 785.864.3537
Email: [email protected]
KITE™: Educator Portal – User Manual
Column Heading
Primary_Disability_
Code
Format or
Type; Number
Alpha; 2
Req?
No
Definition
Indicates whether or not the student
has an active Individual Education
Plan (IEP) under the Individuals with
Disabilities Education Act (IDEA—Part
B).
Note:
Qualified_for_504
Numeric; 1
Blank
1
2
No
67
See the section that follows for
more information.
Indicates whether or not the student
has a physical or mental impairment
that substantially limits one or more
major life activities, has a record of
such impairment, or is regarded as
having such impairment.
• Blank = Not qualified for 504 during
the current school year.
• 1 = Currently a qualified student.
• 2 = Not currently qualified, but was
qualified previously.
Residence_District_
Identifier
Alphanumeric; 5
No
The unique number that has been
assigned to the district by the state.
The Resident District Identifier
identifies the parent organization for a
school.
School_Entry_Date
MM/DD/YYYY;
10
No
The date on which the student enrolls
and begins to receive instructional
services in a school. If the student
should leave and then re-enroll, this
date should reflect the most recent
enrollment date.
Special_
Circumstances_
Transfer_Choice
Alphanumeric; 1
Blank
1-4 (see
definition)
No
Indicates whether or not the student’s
transfer into or out of the district was
related to provisions of federal law.
MM/DD/YYYY;
10
No
Special_Ed_
Program_Ending_
Date
Email: [email protected]
• Blank = No transfer under these
provisions
• 1 = Transfer using “improvement
choice” provision.
• 2 = Transfer using “unsafe school”
provision (within the same district).
• 3 = Student applied to transfer, but
was denied.
• 4 = Student was offered the choice
to transfer, but declined the transfer.
Date student exits special education,
based on a determination by the IEP
team.
ATS Help Line: 785.864.3537
68
KITE™: Educator Portal – User Manual
Column Heading
Format or
Type; Number
Req?
Definition
State_Entry_Date
MM/DD/YYYY;
10
No
The date on which the student enrolls
and begins to receive instructional
services in the state. If the student
should leave the state and then reenroll in school, this date should reflect
the most recent enrollment date.
State_Subject_Area_
Code
Alphanumeric;
10
No
Used to indicate the subject matter
code used by the state.
Student_Legal_
Middle_Name
Alphanumeric;
60
No
The student’s middle name
Comprehensive_Race
The Comprehensive_Race field is different from most of the other fields in the system. The
values are five digits long, composed of ones and zeros, and at least one of the five numbers
must be a one. The numbers can be used to indicate up to five racial heritages.
st
1 Digit
1 = White
0 = No
2
nd
rd
Digit
1 = Native
Hawaiian or Other
Pacific Islander
th
3 Digit
1 = Black or African
American
4 Digit
1 = Asian
0 = No
0 = No
0 = No
th
5 Digit
1 = Native
American or Alaska
Native
0 = No
The table below lists some example entries.
Example
Values
Definition
10000
Student identifies one race: White
01000
Student identifies one race: Native Hawaiian or Other Pacific Islander
00100
Student identifies one race: Black or African American
00010
Student identifies one race: Asian
00001
Student identifies one race: Native American Indian or Alaska Native
10100
Student identifies two races: 1) White and 2) Black or African American
01010
Student identifies two races: 1) Native Hawaiian or Other Pacific Islander
and 2) Asian
10001
Student identifies two races: 1) White and 2) Native American or Alaska
Native
ATS Help Line: 785.864.3537
Email: [email protected]
KITE™: Educator Portal – User Manual
69
Example
Values
Definition
11010
Student identifies three races: 1) White, 2) Native Hawaiian or Other Pacific
Islander, and 3) Asian
01111
Student identifies four races: 1) Native Hawaiian or Other Pacific Islander, 2)
Black or African American, 3) Asian, and 4) Native American or Alaska
Native
11111
Student identifies all five races: 1) White, 2) Native Hawaiian or Other Pacific
Islander, 3) Black or African American, 4) Asian, and 5) Native American or
Alaska Native
Current_Grade_Level
Entry
Definition
Entry
Definition
00
Birth-2 years old, includes Special
Education Infant/Toddler
10
Fifth Grade
01
3-Yr-Old Preschooler
11
Sixth Grade
02
4-Yr-Old Preschooler
12
Seventh Grade
03
5-Yr-Old Preschooler
13
Eighth Grade
04
Four-Year-Old At-Risk
14
Ninth Grade
05
Kindergarten
15
Tenth Grade
06
First Grade
16
Eleventh Grade
07
Second Grade
17
Twelfth Grade
08
Third Grade
18
Not Graded
09
Fourth Grade
Exit_Withdrawal_Type
Entry
Definition
Entry
Definition
1
Transfer to public school, same
district
13
Reached maximum age for
services
2
Transfer to public school, different
district, same state
14
Discontinued schooling
3
Transfer to public school, different
state
15
Transfer to accredited or nonaccredited Juvenile Correctional
Facility—educational services
provided
Email: [email protected]
ATS Help Line: 785.864.3537
70
KITE™: Educator Portal – User Manual
Entry
Definition
Entry
Definition
4
Transfer to an accredited private
school
16
Moved within the US, not known to
be continuing
5
Transfer to a non-accredited
private school
17
Unknown
6
Transfer to home schooling
18
Student data claimed in
error/never attended
7
Matriculation to another school
19
Transfer to an adult education
facility (i.e., for GED completion)
8
Graduated with regular diploma
20
Transferred to a juvenile or adult
correctional facility—no
educational services provided
9
Completed school with other
credentials (e.g., District-Awarded
GED)
21
Student moved to another country,
may or may not be continuing
10
Student death
98
Unresolved exit
11
Student illness
99
Undo a previously submitted exit
record
12
Student expulsion (or long-term
suspension)
First_Language
Note: English with another language background (ESL) is 44.
Entry
Blank
Definition
Entry
Definition
English
24
Hindi
1
Chinese (Mandarin or Cantonese)
25
Urdu
2
Dinka (Sudanese)
26
Swahili
3
French
27
Nepali
4
High German
28
American Sign Language (ASL)
5
Hmong
29
Serb
6
Khmer (Cambodian)
30
Croatian
7
Korean
31
Turkish
8
Lao
32
Karen languages (e.g., Burma,
Myanmar)
10
Filipino or Tagalog (Philippines)
33
Haitian/Haitian Creole
ATS Help Line: 785.864.3537
Email: [email protected]
KITE™: Educator Portal – User Manual
Entry
Definition
Entry
71
Definition
11
Russian
34
Gujarati
13
Spanish
35
Punjabi
14
Vietnamese
36
Pashto
15
Arabic
37
Dari
16
Other
38
Quiche
17
Somali
39
Mam
18
Thai
40
Ilokano
19
Portuguese
41
Visaya
20
Farsi (Iranian)
42
Low German
21
Chuukese (e.g., Marshall Island,
Micronesian)
43
Other Signed Language
22
Bosnian
44
English—with other language
background
23
Burmese
45
Native American Languages
Primary_Disability_Code
Entry
Blank
Definition
Entry
Definition
None
MR
Mental retardation
AM
Autism
ID
Intellectual disability
DB
Deaf/blindness
OH
Other health impairment
DD
Developmentally delayed (ages 39 only)
OI
Orthopedic impairment
ED
Emotional disturbance
SL
Speech/language disability
HI
Hearing impairment
TB
Traumatic brain injury
LD
Specific learning disability
VI
Visual impairment
MD
Multiple disabilities
Email: [email protected]
ATS Help Line: 785.864.3537
72
KITE™: Educator Portal – User Manual
Loading an Enrollment or Test File
To load a file, perform the following steps:
1. Select the Reports tab.
2. Under the Data Upload heading, choose CSV File Upload.
Note: If you are attempting to upload a file and you do not see the correct option
listed, your account permissions may need to be changed. Contact your test
coordinator.
3. Select Enrollment from the dropdown list.
Note: If you are loading a Test file, select Test from the dropdown list.
4. Click the Browse button to find the CSV file on your computer.
A browser window appears.
5. Locate the CSV file you created.
6. Single-click the file name to select it.
ATS Help Line: 785.864.3537
Email: [email protected]
KITE™: Educator Portal – User Manual
73
7. Click Open.
The filename appears next to the Browse button.
Note: Verify that the file has a .csv file extension. Filenames with extensions ending
in .xls or .xlsx will be rejected.
8. Click Upload.
The confirmation message indicates the number of records uploaded.
Hint: Each line in the CSV file is one record.
Email: [email protected]
ATS Help Line: 785.864.3537