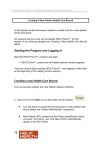
1
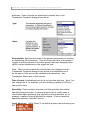
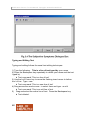
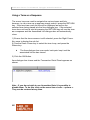
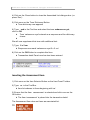
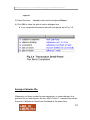
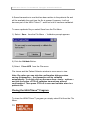
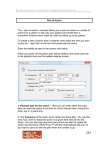
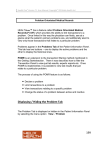
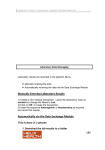
Health One Version 7.1 User Manual. Copyright 2011Helix Health Ltd Transactions & Items In this session we apply some of the techniques learnt so far. Our patient, John Test, has visited the surgery complaining of a painful lump on his neck. We assume that he is the first patient of the day and you have not yet started the HEALTHone™ program. Starting the Program and Logging In Start the HEALTHone™program and login. HEALTHone™ opens and the Patient selector window appears. If you are unsure about starting HEALTHone™and logging in refer back to the beginning of the previous session. Opening John Test’s Health Care Record We practiced this in the previous session: 1) If the Surname filter is not currently selected (cursor flashing) click once in the white box above the Surname column heading. Surname filter is now selected 2) Type Te The list of patients reduces to display only those whose surname begins with ‘Te’’ 3) Select John Test in the patient list. 4) Click on the Select button. 50 The Health Care Record (HCR) for John Test opens. Health One Version 7.1 User Manual. Copyright 2011Helix Health Ltd Creating a New Transaction To record the visit of John Test we need to add a page to the medical chapter of his HCR. To do this we simply create a new Medical Chapter Transaction. The new transaction will be added to the end of his file. 1) Click once on the Create Medical Transaction button on the Transaction Panel Toolbar. (See reference sheet). The Transaction Properties dialogue box appears – see Fig.3.1 Transaction Attributes In the previous session we mentioned that each transaction has a set of 51 Health One Version 7.1 User Manual. Copyright 2011Helix Health Ltd attributes. Some of those are specified at creation time in the Transaction Properties dialogue box above. Responsible: Specifies the name of the person responsible for creating or maintaining this transaction. This list shows the name of the person logged on and the names of any other people that have delegated their right to create transactions to the logged on user. Note: There is also an attribute called Author (not displayed on the Transaction Properties dialogue box) which is automatically set to be the name of the person who validates the transaction – see Transaction Status later in this session. Date of event: Automatically set to the current date and time. Note: You can change this if, for example, you are updating a patient’s HCR at a later point in time. Speciality: This is another drop down list that specifies the medical speciality being recorded. In general practice this is useful when a consultants report pertaining to a speciality is being recorded, or, for example, a patient is being admitted to hospital. In most cases the speciality would be ‘General Practice’. Legal Structure: HEALTHone™ can define a person as performing one 52 Health One Version 7.1 User Manual. Copyright 2011Helix Health Ltd or more roles in a practice. If this were the case you would select the current role here. Usually, a person only performs one role, i.e. Physician, and this box can be ignored. Comment: This new box gives the user additional flexibility in tagging transactions. You can insert any free text you like here. Alternatively you can use an associated list of preferred terms that can be defines using the configuration tool. Problem: The concept of problems was mentioned in the previous session. This is where a transaction is declared as being related to an existing problem. Note: This can be completed later when the reason for the visit is known. 2) Complete the Transaction Properties dialogue box by observing the lists for the attributes and then setting their values as follows: Type Contact Name Consultation Responsible Your name Date of event Current date and time Speciality general practice Legal Structure Physician/general practice Problem None 3) Click on the OK button. New transaction is completed and appears at the end of John Test’s medical chapter. See Fig.3.2. It is printed in Bold and Italic (see the Transaction Status information box below) 53 Health One Version 7.1 User Manual. Copyright 2011Helix Health Ltd Shortcut to Creating a New Transaction It is possible to create new transactions directly from the patient selector. Below is a screen shot of the patient selector: 54 Health One Version 7.1 User Manual. Copyright 2011Helix Health Ltd Shortcut to Creating a New Transaction The three consultation types available are the first three transaction names that have been defined in the configuration tool. You can change the consultation types, and the icons associated with each, by opening the configuration tool. The first three consultation types in the list are those available in the patient selector of HEALTHone™. You can move a name on this list up or down by clicking on the name and dragging it to your preferred position in the list. 55 Health One Version 7.1 User Manual. Copyright 2011Helix Health Ltd The Item Selector HEALTHone™ items are accessed via the Item Selector window –this displays a dictionary of all the items in HEALTHone™. Clicking on the Item Selector Button on the Item Panel Toolbar, illustrated below, will display the selector window (see fig 3.3). Inserting Items 56 Health One Version 7.1 User Manual. Copyright 2011Helix Health Ltd 1) Ensure that the newly created transaction is selected in the Transaction Panel and then click once on the Item Selector Button. Item Selector dialogue box appears. 2) Click on the Sorted option. Tick (called a Check Mark) appears in the Sorted option check box and the list is sorted into alphanumeric order. 3) Uncheck the Sorted option by clicking on it once again. 4) If the Synchronous option is unchecked – check it now by clicking on it. 57 Health One Version 7.1 User Manual. Copyright 2011Helix Health Ltd 5) If the Leading option is unchecked –check it now. Type: as Only Items that begin with ‘as’ are displayed 6) Uncheck the Leading option. All Items that contain the letters ‘as’ together anywhere in their name are displayed. 7) Delete the as in the Find box. Full list of items appears once more 8) Uncheck the Synchronous option. 9) Refresh button activates Type in capitals: IC Nothing happens 10) Click once on the Refresh button. All Items that contain the letters ‘IC’ together anywhere in their name are displayed. 11) Check the Synchronous option. Refresh Button de-activates – screen stays the same because Synchronous is active and filtering on ‘IC’. 12) Check the Match Case option. Only Items that have upper case (capital) IC anywhere in their name are displayed. 13) Uncheck the Match Case option. Now we will locate the first item needed to record this visit of John Test. Firstly, set the Item Selector options as follows: 58 Health One Version 7.1 User Manual. Copyright 2011Helix Health Ltd Match Case Leading Sorted Synchronous = Unchecked. = Checked = Unchecked = Checked. We need to locate the Item: subjective symptoms 1) Delete the IC in the Find box and type su All items beginning with ‘su’ are now displayed. 2) The Item subjective symptoms should already be selected, if not, select it now by clicking on it once. 3) Click on the OK button The Item Selector box closes and the Item ‘subjective symptoms’ is added to the transaction detail panel and its associated list appears. We will look at the Associated List in more detail later. To continue: 4) Click once on the Associated List Close button. Associated List box closes and Subjective Symptoms dialogue box is active. Showing/Hiding the Item Attributes Panel 1) To show or hide the Item Attributes panel click on the illustrated button once. Click again to close. The Item box should now appear as in Fig.3.4 59 Health One Version 7.1 User Manual. Copyright 2011Helix Health Ltd Typing and Editing Text Typing and editing follows the usual text editing techniques: 1) Type the following: This is a line of text typed by your name 2) Press the Backspace key repeatedly to delete your name and the text ‘typed by’ Text now reads ‘This is a line of text’ 3) Use the Left Cursor key to move the flashing insert cursor to before the l of line. Type: new Text now reads ‘This is a new line of text’ 4) Drag across the words a new to select them and type: an old 5) 60 Text now reads ‘This is an old line of text. Drag and select the entire line of text. Press the Backspace key. Text deleted. Health One Version 7.1 User Manual. Copyright 2011Helix Health Ltd The Item Dialogue Box Term Lists HEALTHone™ is designed to keep the amount of typing necessary to maintain a patient’s record to a minimum. This is achieved by selecting terms from various sources and supplementing these with typing if necessary. The three most common sources of terms are: The Term Dictionary A complete list of terms known to HEALTHone™ The Associated List A list of terms related to the current Item. The Permanent List A list not related to a specific item that expresses degree, intensity, size etc as opposed to a particular complaint. To display a list you click on its illustrated button on the Item dialogue box toolbar. There are a number of good reasons to use lists as opposed to typing: Firstly It saves you time because it is quicker to choose a response from a list than type it yourself. Secondly It’s easier, there is no need to remember the spelling of complicated medical terminology. 61 Health One Version 7.1 User Manual. Copyright 2011Helix Health Ltd Thirdly It is more consistent, you are more likely to express a condition in a similar manner using terms from a list as opposed to typing a response. This can become very important when analysing your patients later and locating occurrences of a particular illness or condition. Using the lists takes a little effort at the beginning but very quickly becomes far more efficient than typing. In short, we encourage you to use the lists wherever possible. The Term Dictionary OK, now to continue with John Test: 1) Click once on the Term Dictionary Button Term Selector Window appears 2) Ensure that only the Leading and Synchronous options are checked. 3) Type: nec List reduces to only terms beginning with ‘nec’ 4) Select the term: neck pain 5) Click on the OK button. ‘Neck pain’ inserted as a response and the selector window closes. The Permanent List John Test describes the pain as acute. To record this we use the Permanent List: 1) Click once on the Permanent List Button. Permanent List appears. 2) Select the term: acute, press the RETURN key Acute sub-list appears 3) Ensure that acute is still selected and click on the Insert button. 62 Item response now reads ‘neck pain acute’ Health One Version 7.1 User Manual. Copyright 2011Helix Health Ltd Selecting / Deleting a Term A term selected from one of the lists is treated by HEALTHone™ as a complete unit, i.e. the term acute can only be deleted entirely not as individual letters a c u t e. 1) Press the Backspace key until the term acute is deleted The ENTIRE term ‘acute’ is deleted. 2) Click once anywhere in the neck pain The entire phrase ‘neck pain’ becomes highlighted to indicate that it is selected To cancel a selection: 3) Press the Right Cursor key to move the Insert Cursor away from the selected term. ‘neck pain’ is no longer selected. Associated Lists Many Items have a list of common terms associated with them which is displayed in the Associated List Selector dialogue box. 1) Click once on the Associated List Button. Associated List dialogue box appears. 63 Health One Version 7.1 User Manual. Copyright 2011Helix Health Ltd List Options These are identical in meaning to the Item Selector dialogue box and the only new objects are the List Type selector and History Box. The list type selector provides an alternative way to display the Permanent List we used a moment ago. 64 Health One Version 7.1 User Manual. Copyright 2011Helix Health Ltd The History Option Box To use the History box you need to understand how the list is structured. List Structure This particular item, subjective symptoms, has terms associated with it which themselves have a list associated with them. You will know when a term has a list of its own because the icon illustrated will appear to the left of it. As an example, take the term ‘common’ and the further selection of one its terms ‘sore throat’. 65 Health One Version 7.1 User Manual. Copyright 2011Helix Health Ltd The History Box notation displays the name and level of the current list being viewed. The more sub-lists you select the higher the level number will become. In addition the History Box can be used to move easily to a different level by clicking on the down arrow to its right and selecting the level required. Navigating the List: 66 Health One Version 7.1 User Manual. Copyright 2011Helix Health Ltd 1) Click once on the term: common to select it and then press the Right Cursor Key once. Sub-List for ‘common’ term appears and History Box displays ‘0:common’ 2) Use the Down Cursor key to select the term sore throat, now press the Right Cursor key once again. Sub-List for ‘sore throat’ term appears and History Box displays ‘1:sore throat’ 3) Press the Left Cursor key once to return to the list 0:common. 4) Press the Left Cursor key again to return to the full list of associated terms. 5) Spend a little time experimenting with the Up, Down, Left and Right cursor keys to see their effect. 6) Click once on the Close button Associated List dialogue box closes 7) Click once again on the Associated List Button to re-open the dialogue box. 67 Health One Version 7.1 User Manual. Copyright 2011Helix Health Ltd Using a Term as a Response The cursor keys are used to navigate the various terms and lists, however, to use a term as a response simply select it press the RETURN key. If the term has a sub-list this will be displayed as well as the selected term being placed into the Item dialogue box. If the selected term does not have a sub-list pressing the RETURN key will use the term as a response and the Associated List dialogue box will automatically close. 1) Ensure that the term common is still selected, press the Right Cursor Key once to display the sub list. 2) Use the Down Cursor key to select the term lump, and press the Return key. The Item dialogue box now reads ‘neck pain lump’ and the associated list box has closed. 3) Click the OK Button. Item dialogue box closes and the Transaction Detail Panel appears as shown: Note : If you do not wish to use Associated lists it is possible to disable them. To do this click on the menu item « tools – options ». They can be restored at any time. 68 Health One Version 7.1 User Manual. Copyright 2011Helix Health Ltd Automatic Item Selector Display The Subjective Symptom Item is now complete. Next, we will record the Objective Findings. To place another Item into this transaction for John Test we would normally click on the Item Selector Button on the Item Panel Toolbar, however, HEALTHone™ will automatically assume you are searching for an item as soon as you type! It will also display the dialogue box with the list filtered on what was typed. 1) Type an: o The Item Selector dialogue box appears with the items beginning with ‘o’ already displayed. When you are familiar with HEALTHone™ you will realise that this is an advantage because it saves you time, however, at first it can be confusing. 2) Click once on the Cancel button. The Item Selector dialogue box closes. More Items Inserting the Objective Findings Item 1) Click once on the Item Selector Button on the Item Panel Toolbar. 2) Type: ob in the Find Box Item list reduces to those beginning with ‘ob’ 3) Ensure that the Item objective findings is selected and click once on the OK button. The Item ‘objective findings’ is placed into the transaction detail panel and its associated list box opens automatically. The term we require is not in the Associated List but in the Term Dictionary: 69 Health One Version 7.1 User Manual. Copyright 2011Helix Health Ltd 4) Click on the Close button to close the Associated List dialogue box. (or press ‘Esc’). 5) Click once on the Term Dictionary Button. Term dictionary now appears 6) Type: seb in the Find box and select the term sebaceous cyst, click on OK Term ‘sebaceous cyst’ entered as a response and the dictionary closes. We will now supplement this term with additional text: 7) Type: 2 x 2 cm Response now reads ‘sebaceous cyst 2 x 2 cm’ 8) Click on the OK Button to complete this Item. Transaction detail Panel now has two items entered. Inserting the Assessment Item 1) Click once on the Item Selector Button on the Item Panel Toolbar. 2) Type: as in the Find Box Item list reduces to those beginning with ‘as’ 3) Ensure that the Item assessment is selected and click once on the OK button. The Item ‘assessment’ is placed into the transaction detail. The Assessment Item does not have an associated list. 70 Health One Version 7.1 User Manual. Copyright 2011Helix Health Ltd 4) Use the Item Dictionary to enter the term sebaceous cyst as a response. 5) Type: back of 6) Use the Item Dictionary to enter the term neck as a response. Response now reads ‘ sebaceous cyst back of neck’ 7) Click once on the OK button. More Items The Assessment Item is now completed and your screen should appear as in Fig.3.5 below: Lastly, we will complete this session by inserting the Plan of Action Item: Inserting the Plan of Action Item 1) Click once on the Item Selector Button on the Item Panel Toolbar. 2) Type: pl in the Find Box Item list reduces to those beginning with ‘pl’ 71 Health One Version 7.1 User Manual. Copyright 2011Helix Health Ltd 3) Select the Item plan of action and click once on the OK button. The Item ‘plan of action’ is placed into the transaction detail panel and its associated list box opens automatically. Skipping a Term as a Response This time we wish to use a term from a sub-list but omit the term the list belongs to: 4) In the Find Box type: pr . Ensure the term procedure is selected and press the Right Cursor key once. The sub-list for ‘procedure’ is displayed but the term is not placed in the Item dialogue as a response. 5) In the Find Box type: ex , and ensure that the term excision is selected. Press the Return key. The sub-list term ‘excision’ appears as a response and the associated list box closes. 6) Type: shelled out successfully Click on the OK button. Inserting a Repeat Item Sometimes, for presentation purposes or because there is a great deal of typing required as a response or because there is more than one condition to be recorded, it may be necessary to use more that one item of the same name. You can use as many items of the same name as you require in a transaction. HEALTHone™ has a quick procedure to do this; simply select the item to be repeated and type an =. 1) Ensure that the newly created plan of action: item is selected in the transaction detail panel. Press: = (equals key) A new ‘plan of action’ item is created and its associated list appears. 2) The first term follow up is the one we require. Press the Return key. 72 The term ‘follow up’ is used as a response and its sub list Health One Version 7.1 User Manual. Copyright 2011Helix Health Ltd appears. 3) Select the term 1 week in the sub-list and press Return. 4) Click OK to close the plan of action dialogue box. Your completed transaction should now appear as in Fig. 3.6. Saving a Patients File Whenever you have created a new transaction or made changes to a patients file you should save the file. HEALTHone™ transactions can be Saved or Validated or Saved and Validated at the same time. 73 Health One Version 7.1 User Manual. Copyright 2011Helix Health Ltd A Saved transaction is one that has been written to the patients file and will be available the next time the file is opened, however; it will not become part of the HEALTHone™ audit trail until it has been validated. To save a patients file you select Save from the File Menu. 1) Select Save from the File Menu - Validation prompt appears. 2) Click the Validate Button. 3) Select Close HCR from the File menu. File closes and the Patient Selector window is once more in view. Note: By option you can skip the confirmation dialogue when saving a transaction – the transaction will be validated automatically. To do this click on the menu item « tools – options » and tick the option «CTRL+S validates transactions without confirmation». Then press CTRL+S to save and validate when in a patients file. Closing the HEALTHone™ Program To close the HEALTHone™ program you simply select Exit from the File Menu. 74 Health One Version 7.1 User Manual. Copyright 2011Helix Health Ltd 1) Select Exit on the File menu Close dialogue box appears. 2) Click on the Yes button or simply press the RETURN key. HEALTHone™ program closes and you are returned to the desktop. 75 Health One Version 7.1 User Manual. Copyright 2011Helix Health Ltd Summary Guide Create a new Medical Transaction Click on the New Medical Transaction button on the TRANSACTION PANEL Toolbar. Complete the transaction properties box. Insert a new Item If you know the name of the item you require simply type its name when the transaction detail panel is active. Otherwise, click on the Item Selector button on the ITEM PANEL Toolbar and select the required item from the list. Display / Change the attributes of an item. First ensure that the item is open for editing by selecting it and pressing the RETURN key. Now click on the attributes panel button to display these. Click once again on the same button to hide these. To display the term dictionary when editing an item. Click once on the blue book on the item dialogue box toolbar or type Ctrl + T To re-display the associated list when editing an item If an item has an associated list it will automatically open when the item is opened for editing. To re-display it once closed click once on the associated list button on the item dialogue box toolbar or type Ctrl + A To display the permanent dictionary when editing an item. Click once on the permanent list button on the item dialogue box toolbar or type Ctrl + P To navigate an associated list 76 Health One Version 7.1 User Manual. Copyright 2011Helix Health Ltd If the term required has no sub list of its own simply press RETURN to include it as a response. If the term has a sub list of its own, you can: Press RETURN – include term and display sub list. Press right arrow to exclude term and display sub list. Click on the term with the Right mouse key to display a menu. Now click on SELECT to include the term without displaying the sub list. Press left arrow to return to the term from a sub list. Repeat an Item Select it and press the equals key. Save a patients file Select the menu sequence File / Save Own Notes 77