1
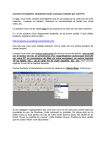
mp3DirectCut
Version 2.x - User Manual
Introductionmp
3DirectCut is a frame based editor for MPEG audio (Layers 2 and 3). You can cut, copy, paste or change
the volume without re-encoding anything of the file. This makes mp3DirectCut very fast and prevents
loss of audio quality. The program enables easiest navigation even on large files and gives you a
visualisation of the MP3 audio data. It can handle Cue sheets allowing to split a file at cue positions. And
you can also directly record and encode an MP3 from your audio input device.
Quick guides
General usage
Open a file: File > Open, or use Drag+drop. Prelisten with [Play] / [Stop] or Spacebar. Navigate through
the track: Cursor left/right, Page up/down, Mousewheel, click into map area (below audio graph),
Scrollbar, or Ctrl+click into graph.
Cutting a part of audio
Where the part to be removed begins: drag the selection start with the left mouse button in the audio
graph, or press [Set begin] or B to set the selection beginning to the yellow play position. Where the cut
shall end click/drag with the right mouse button in the graph, or press [Set end] or N. To prelisten the cut
press [=>I...I=>]. Adjust the selection with the right mouse button or the keys 1-4. To cut press [Cut] or
Del. Use normal play to control the Cut. Save the file: File > Save all audio.
Extracting a part of audio
Where the part shall begin: make a selection by dragging with the left mouse button in the audio graph, or
press [Set begin] or B to set the selection beginning to the yellow play position. At the end of the wanted
part click/drag with the right mouse button, or press [Set end] or N. To prelisten the range use the buttons
[I=>..] and [..=>I] or the keys F6 and F7. Adjust the selection with the right mouse button or the keys 1-4.
Save the selected range: File > Save selection.
Split into multiple files
At a wanted split position add a point selection: only click (not drag) with the left mouse button into the
audio graph. To create the split point press [Cut] or Del. All split points must have a dotted line! (If for
some reason the line is not dotted: highlight the point by placing the yellow play position after it, press
Ctrl+Q to set the "Cue flag".) Adjust a split point by dragging the gray handle with the right mouse button.
To jump to a split point press [>I] or [I<]. To load a Cue sheet (a file which contains split points), open the
cue sheet file, not the audio file. If the program does not find the audio file for a Cue sheet, open the audio
file and then select Special > Load Cue sheet over current audio file. To split the track select File > Save
split.
Fade in/out
At the end of the wanted fade-in-range create a point selection: only click (not drag) with the left mouse
button into the audio graph. The selection must be a dotted line! Press [Cut]. With the left mouse button
drag the gray handle at the track beginning from 0.0 down to e.g. -48.0 dB. Play from the track beginning
with [Rew] and [Play]. Same procedure for fade out: create a point some seconds before the end of the
track, drag the gray handle at the track end. You can always adjust the points by dragging the handle (left
mouse button = volume, right = position). You can also use multiple points for complex fade curves.
Basic settings
At first to be able to playback files the program needs an MP2/3 decoder. This can be either a system
installed MP3 ACM Codec (Windows since XP contains it by default) or the mpglib.dll which needs to be
in the program's or in Windows' folder. For AAC playback you need the free libfaad2.dll in the program
folder or system path. The libfaad2.dll needs the MSVC 9.0 runtimes.
Switch to your prefered decoder in the Devices settings (Settings > Configure > Devices). In the Output
device section you can select a Wave device and adjust the amount of frames being decoded to each play
buffer between 'fast' (1 frame) and 'reliable' (8 frames). On slower machines set a higher value. For a fast
response of the graphics select a lower value. The default is 4.
The program language can be adjusted in the Operation Tab (Settings > Configure > Operation). In the
list select your language if present. The language files must be in a sub directory "Languages" of the
mp3DirectCut folder. If no language is selected or found, the program looks also into its own folder for
one (!) language file. So you also can enable your language without keeping the subfolder (but then it
does not appear in the list).
Fullscreen view is not recommended. It takes more CPU, but there is no information benefit, as the
resolution of the mpeg graph is much lower than the display resolution on fullscreen.
Navigation
As mp3DirectCut is designed to handle large files, there are many ways to reach a position:
Scrollbar
With the slider you can move along a file. The arrow buttons (or keys: Shift+Left/Right) move a single
MPEG frame backwards or forward.
[<<<] [<<] [>>] [>>>]
(or keys: Left/Right and Page up/down)
These buttons are user definable. You can set the amount of frames to skip back/forward in the
configuration window between 10 and 10.000 for [<<<] and [>>>] and between 1 and 1.000 for [<<] [>>].
For 44 kHz tracks, 38 frames means about 1 second, 383 skip 10 seconds.
Mouse
You can directly jump to any file position by left clicking into the map area below the audio graph.
Ctrl+Mouse
If you hold down the Ctrl key while clicking into the audio graph the cursor jumps to the shown audio
position.
[I..<<] [>>..I]
These buttons set the play cursor to the beginning or the end of the selection if present.
List Menu and [I<] [>I]
Let you choose the active edit point and set the play cursor to it's beginning.
Position field
You can enter a position by time or percentage into the edit field and apply the value by pressing Enter or
Tab.
Audio editing
General
Editing a file or compilation of file fragments means to create different parts of audio content. Each time
you cut or set a cue/gain point, your track will be devided into more parts. Every edit point is the
beginning of a new part. Each part together with its function is shown in the List menu.
Like in other editors, editing begins by making a selection. A selection can be an audio range or only a
single position point (dotted line). Ranges can be used to cut, copy or paste. A point selection is for
creating cues or points of volume change.
Make a selection
You have these ways:
Buttons [Set begin] and [Set end]
These buttons set the beginning or the end of the selection to the current position.
Mouse
You can point/drag a selection by using the left and the right mouse button. How the buttons behave
can be set in the preferences: Method 1: Left button sets the beginning of the selection (by clicking or
dragging), the right button sets the end. Method 2: Left button makes a new selection and enlarges it.
The right button moves beginning or end (depending on which is nearer).
Note: to make a large selection you should at first point to one end of the selection and then jump to where
the other end should be and set it there. It is not possible to drag a long selection by moving the mouse over
the windows boarders.
Selection field
You can enter beginning, end or length of the selection by numbers. Take care not to delete the
symbols, otherwise the values cannot be read from the field correctly.
Part structure
At each edit point an independent audio part begins. Parts can even be from different audio files. Each
part can have information about a volume change or whether it is a cue.
If you cut a selection the range disappears and is not longer known by the program. But an edit point
remains at the cut position and you can restore the cut range every time by using the edit button.
The buttons Cut and Edit
The Cut button splits the current audio part into two parts. If there was a selection range, it will be cut. If
the selection had a length of zero, the Cut function only splits the part. The split point can be used to
create a volume change (see below) point or a cue.
If a split point should work as a cue (e.g. for creating a Cue sheet), its cue flag must be set. The program
sets it automatically on creating a split point or loading a Cue sheet. Edit points with cue flag are shown
as dotted line. To set or remove a cue flag manually, press Ctrl+Q or check/uncheck 'Cue' in the part
properties dialog (Edit menu).
With the Edit button you can remove existing edit points. This means that two parts will be joined. If the
edit point was a cut, the removed audio range will be restored.
Note: editing a point is not possible if it was created by paste. In this case the audio data between two parts is not
continouus and there is nothing to restore. To remove such insertions select them and use the function 'Remove
selected elements' in the Edit menu.
Edit menu: Cut, Copy, Paste
While the Cut button does not copy the cut range to the clipboard, Cut and Copy from the Edit menu do.
The copied information can be pasted to any new position (current or selection). Copy and Paste can
handle multiple files and parts and work completely non-destructive. This means that no audio data is
copied but only access informations.
Volume changes
To change the volume, simply create one or more edit points (from zero length selections, see above).
Then you can directly change the gain by dragging the gray handles with the left mouse button.
Alternatively the gain of the highlighted edit point can be changed by the keys Ctrl+Up/Down. To move
an edit point, drag it with the right mouse button.
Audio ranges with a modified volume are shown in the color of edit points. The gain sign of the edit point
shows the volume change in dB.
Note: Volume change works only with Layer 3. As the data remains encoded, volume changes can only be made in a
resolution of 1.5 dB steps.
Using the Gain dialog is not recommended, because it is obsolete. Only for special purposes it may be
useful, e.g. to make a silence. Fades should be be created with the drag method, or at least with the
'Create simple fade' function.
Change or remove existing edit points
For simply moving a cue or volume change point, drag it with the right mouse button (or use
Alt+Left/Right for the highlighted point).
To edit an existing cut, move to its position to highlight it. After pressing [Edit] the cut range or the split
point will become the selection and will be deleted. After changing positions hit [Cut] again to store the
changes in the new cut. If the edit point had title names or a volume change, these data will be kept with
the selection and also stored to the new cut.
The Trim function allows directly changing the boundaries of an existing cut without converting it to a
selection. With the keys Ctrl+1/2/3/4 you can shift audio data on the left or right side of the cut in or out.
Prelisten and save
Normal play already is a prelisten mode because every cut and every gain modification is played as it will
be saved. In addition there are some buttons to prelisten the selection boundaries:
[=>I..] or F5 - play region* to the selection beginning
[I=>..] or F6 - play region* from the selection beginning
[..=>I] or F7 - play region* to the selection end
[..I=>] or F8 - play region* from the selection end
[=>I...I=>] or F9: play the selection as cut (region* before and after the selection)
To play the selection looped press F4.
* The prelisten time can be adjusted in the Settings dialog. Default is two seconds.
In play mode, two of the prelisten buttons change their function to provide Fast Play. The buttons show
the symbols [>> -] and [>> +] and can be used to adjust the speed of Fast Play in small steps. For faster
operation it's recommended to use F7 and F8.
'Save complete audio...' saves the complete shown audio data as edited.
'Save selection...' saves or only the range of the selection.
'Save split...' creates seperate files for every range between two cues.
Note: You should check the output file(s) before deleting the original.
Pause detection
This function sets cues or cuts to gaps of definable length and level. The settings must be adjusted
carefully because the results can be very different.
The Level and the Duration sliders adjust at which audio level and gap duration thresholds a pause will be
detected. Offset is the number of frames at the pause end which the cue will be shifted to the left or right.
Cut whole pause means that not only a cue at the pause end will be created but a cut over the whole pause
(beginning of cut slightly right shifted) if the pause is long enough. Don't use the Cut option when you
want to create only a Cue sheet!
The value of 'After a pause detection skip' can be used to speed up the detection process. If a pause is
found, the program jumps further the entered amount of seconds. E.g. if you know that all of the tracks of
your CD image are 3 minutes or longer, you could set this value to 150 seconds.
Recording
For recording MP3 directly, you need either an ACM Codec with encoding capability or the Lame
Encoder DLL (available through the homepage of the Lame project). It is important to choose a base
filename. Your recordings will be saved under this name. Note that there will be no query for overwriting
existing files! If you select 'Add date & time' each recorded file will have a date and time stamp in its
filename.
To initialize recording, press [Rec]. Then you can see the audio input level on the VU meter. After
pressing [Play] the file starts being written. With selected 'Append data' in the recording settings an
existing file will not be deleted and you can make multiple recordings to one file. But take care not to use
different bitrates or samplerates in one file. On appending in VBR mode you will only see the time of the
current recording in round brackets.
While the recording you can set up to 40 cues by pressing [Set begin]. The number and position of the last
cue is shown in the range field.
The value of 'Buffer' shows how much data is waiting to be encoded by the codec. If it grows, the codec
is not fast enough to encode MP3 in realtime. The unencoded buffer portion should not be over 10% for
more than some seconds. On modern systems it should be always 0%.
If you launch mp3DirectCut with '/rec' in the command line, it will start the recording immediately with
the encoding settings of your last session. You can use this option for automated recordings. See more
under Command line options.
More features
The Margin button shows the room between the highest gain and the maximum of 0 dB since play or
record was started. It helps to see how much gain reserve is left e.g. when you record something. Pressing
the button resets the display to seek for the next lowest margin.
The Normalize function seeks the whole file (or the selection) for the highest gain. If there is room to the
maximum of 0 dB, it suggests the corresponding gain raise. Scanning the file may be slow, because for
searching peaks it must be temporarily decoded.
Auto cue lets you split large tracks into small segements of the same length. This is especially useful for
listening to long tracks (e.g. audio books) on hardware players with missing or slow seek capability. Auto
cue affects either the whole file, if nothing was selected, or just the selection. After setting the cues you
can call 'Save split...' and choose a destination for writing the file series.
Project files and Cue Sheets
An mp3DirectCut project file (*.mpd) contains a complete edit state with every part and their volume, cut
and cue informations. If you work with large files and make a lot of cuts you should frequently save your
work to a project file.
Cue Sheets (*.cue) contain a link to an audio file and time indexes (cues). Cuts and gain settings cannot
be saved to a Cue sheet. A Cue sheet can't even be saved if the audio file has been edited in the length at
the same time. When loading a cue sheet the program reads titles and artist names and shows them in the
graph area. If you split a file by using a Cue sheet you can create filenames with titles and ID3v1.1 tags
for each file.
Keyboard shortcuts
Page up/down
Arrow left/right
Arrow up/down
Ctrl+Left/Right
Home
End
Shift+Left/Right
Shift+Up/Down
Space
Ctrl+Up/Down
Delete or C
P
S
E
B
N
R
1...6
Ctrl+1...4
Ctrl+5/6or Alt+Left/Right
Ctrl+D
Ctrl+J
Ctrl+L
Ctrl+O
Ctrl+P
Ctrl+Q
Ctrl+S
Ctrl+F4
Shift+Ctrl+A
Shift+Ctrl+P
F4...F9
F7, F8
F11
F12
Backspace
Move back/forward defineable large step (<<< / >>>)
Move back/forward defineable small step (<< / >>>)
Jump to beginning/end of selection
Jump to previous/next part
Jump to track beginning
Jump to track end
Move one frame backwards/forward
Zoom in/out
Play/Stop
Change gain of current edit point
Cut
Play
Stop
Delete/edit current point
Set selection beginning to current position
Set selection end to current position
Activate recording (then start with Space)
Selection fine adjustment
Trim current point
Move current point
Toggle play decoder (ACM/mpglib)
Toggle keeping ID3v2 tag
Enter selection field
Open file
Enter position field
Toggle Cue flag
Save Project or Cue sheet
Close file
Auto cue
Pause detection
Prelisten (jump to chapter)
While play: Fast Play speed (dec/inc)
Settings
Encoding settings
Margin reset
More shortcuts are shown in the tooltips and in the menus.
Command line options
Usage:
mp3DirectCut.exe <filename> <option(s)> <destination>
As <filename> every file type known by mp3DirectCut is possible (MP3, MP2, Project files, Cue sheets).
Usually this is simply for a file to be opened. In your operating system settings you can associate
mp3DirectCut to one or more of these file types and with different options. Then you can open the
program easily by any file of that type. It is also possible to drag files of known types over mp3DirectCut.
If you use the <filename> parameter together with /rec you can set an individual record filename that
differs from the base filename of the recording settings.
The following options can be used to let the program perform an action immediately. After finnishing, the
program quits.
Note: adjustments for Normalize, Auto cue, Encoder settings and so on cannot be given over the command line. They
must be made before in the normal program environment.
Examples:
mp3DirectCut "artist - song.mp3"
mp3DirectCut track01.mp3 /normalize /overwrite
mp3DirectCut audiobook.mp3 /autocue d:\split
mp3DirectCut album.cue /split
mp3DirectCut /rec
mp3DirectCut other_recname.mp3 /rec
Options:
/normalize
/autocue
/split
/pausesplit
/save
/overwrite
/rec
/localini
Normalizes the file up to 0 dB. Higher or lower levels cannot be set in the command line.
Splits the given file into segments of the time set in the Autocue dialog. Also for the Split
operation the current settings from normal program usage are applied. <destination> can
be an existing folder to save the split files to.
Needs a Cue sheet or Project file and splits the audio file(s). If a <destination> folder is set,
the split files will be saved there. The other Split settings must be adjusted in the normal
program environment.
Runs the pause detector and splits the given file at the found pause positions. For the
performed Pause detection and Save split operations, the current settings are applied. You
can change them by normal program usage. <destination> can be an existing folder for the
result files.
Opens and saves the file. Simple re-save can be used to eliminate incomplete frames or
unwanted headers.
Replaces the original file on /save or /normalize. The current "Keep date of source file"
setting is valid (it can be set in the program environment). If /overwrite is not set, the given
file extension will be appended once more.
Starts recording immediately. This feature is especially made for timer recordings. In a
scheduler usually you can also set a duration time after which the program will be
terminated. For multiple timer recordings be sure to check 'Add date and time' or 'Append
data' in the recording settings, otherwise previous recordings will be overwritten. If a
filename is given before the /rec option and 'Add date and time' or 'Append data' is not (!)
selected, the program records into a file of that name.
Regulary the program tries to write the settings into its own folder. If this fails, e.g.
because of missing rights, the settings are stored in the user's Application data folder. This
option prevents the program from reading from or writing to the user profile. This may be
useful in special cases, e.g. if local settings are needed when the program is running from a
removable drive.
Copyright (c) 2000-2012 Martin Pesch