1
COPYRIGHT NOTICE
Copyright (C), 1981 by CHANG LABORATORIES. Al 1 Rights Reserved
No part of this publication may be reproduced,
Worldwide.
transmitted, transcribed, stored in a retrieval system, or
translated into any human or computer language, in any form or by
any means, electronic, mechanical, magnetic, optical, chemical,
manual, or otherwise, without the express written permission of
Chang Laboratories, 10228 North Stelling Road, Cupertino,
California 95014, USA.
TRADEMARK
MicroPlan and ProfitPlan are trademarks of Chang Laboratories,
Inc.
DISCLAIMER
Chang Laboratories makes no re pre sen ta tions or warranties with
respect to the contents hereof and specifically disclaims any
implied warranties of merchantibility or fitness for any
Further, Chang Laboratories reserves the
particular purpose.
and to make changes from time to
publication
this
revise
to
right
without obligation of Chang
hereof
time in the content
Laboratories to notify any person or organization of such
revision or changes.
References are made throughout this manual to the Control Program
Monitor, commonly known as CP/M. CP/M is a trademark of Digital
Research of Pacific Grove, California.
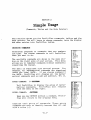
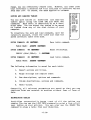
CONTENTS
Introduction
Section 1: Getting Started
(What-If Analysis)
L o ad 'i n g P r o f i t P 1 a n • • • • • • • • • • • • • • • • • • •
Doing a Simple Projection ••••••••••••
Correcting Mistakes in Typing ••••••••
Entering Descriptions ••••••••••••••••
Entering Values ••••••••••••••••••••••
Doing What-If Analysis •••••••••••••••
Generating a Report ••••••••••••••••••
1•1
1.2
1.3
1.3
1.4
1.7
1.8
WORKING WITH TABLES
Section 2: Simple Usage
(Commands, Tables and the Data Pointer)
Choosing Commands •••••••••••••••••••• 2.1
Using Help ••••••••••••••••••••••••••• 2.2
The ProfitPlan Table ••••••••••••••••• 2.2
Moving the Table ••••••••••••••••••••• 2.3
Escape Sequence •••••••••••••••••••••• 2.4
The Data Pointer ••••••••••••••••••••• 2.4
Changing the Data Pointer •••••••••••• 2.5
Entering a Row or Column of Data ••••• 2.5
Setting Ranges ••••••••••••••••••••••• 2.6
Entering Individual Values ••••••••••• 2.7
Doing Computations on Rows or Columns 2.9
Storing Commands for What-If Analysis 2.11
More What-If •••••••••••••••••••••••• 2.11
Computing Order ••••••••••••••••••••• 2.14
Section 3: Report Generator
(Formatting, Saving, Retrieving
and Printing Tables)
Entering Descriptions •••••••••••••••• 3.1
Setting Row Options •••••••••••••••••• 3.3
Looking at Row Settings •••••••••••••• 3.4
Setting Column Options ••••••••••••••• 3.5
Looking at Column Options •••••••••••• 3.5
Entering Data •••••••••••••••••••••••• 3.6
Printing Reports ••••••••••••••••••••• 3.7
Looking at Report Options ••••••••••• 3.11
Customizing Reports for Printers •••• 3.11
Printing Table Descriptions ••••••••• 3.12
Cancel 1 ing Reports • • • • • • • • • • • • • • • • • • 3 .13
Changing Descriptions ••••••••••••••• 3.13
Saving and Loading Tables ••••••••••• 3.14
Maintaining Tables •••••••••••••••••• 3.14
Changing Disk Drives •••••••••••••••• 3.15
Interfacing with Word Processors •••• 3.15
I
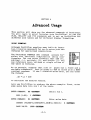
Section 4: Advanced Usage
Using Formulas •••••••••••••••••••••••
Referencing Table Values •••••••••••••
Writing Formulas •••••••••••••••••••••
Trying Formulas • • • • • • • • • • • • • • • • • • • • • •
Using the Plug Command •••••••••••••••
Using the Fix Command ••••••••••••••••
Using Nullify ••••••••••••••••••••••••
Working with Different Size Tables •••
Designing Display Formats ••••••••••••
4.1
4.2
4.2
4. 3
4.4
4.4
4.5
4.5
4.6
APPENDICES
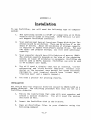
Appendix A: Installation
Installation ••••••••••••••••••••••••••
Protection Against Distribution •••••••
Configuration Issues ••••••••••••••••••
Possible Errors •••••••••••••••••••••••
A.1
A.2
A.3
A.4
Appendix B: Command Reference
How to Use Reference •••••••••••••••••• B.1
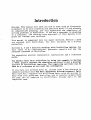
Introduction
Welcome. This manual will show you how to work with an electronic
worksheet to do your planning and analysis work. If you already
do computerized planning, you will appreciate the simplicity of
solving problems in ProfitPlan. If you are a newcomer to planning
on a computer, the step-by-step approach of this manual will
guide you through your problems.
This manual is organized into two major sections. Section 1 gets
you started with ProfitPlan. You will actually do a 5-year
projection.
Sections 2, 3 and 4 describe working with Profi tPlan tables. You
will learn to do computations, generate reports and use the
advanced commands in ProfitPlan.
The appendices provide installation instructions and a reference
guide.
You should start with ProfitPlan by doing the example in Section
1. Then, glance through the remaining sections to get a general
picture of ProfitPlan features. The remaining sections can be
used as a reference as you need the information.
If you have not already done so, please take a few minutes to
complete and mail your End User Agreement Acknowledgement Card.
This card wi 11 register you with Chang Labs, give you access to
help with your problems, and allow you to receive newsletters
telling you of updates to ProfitPlan. Please mail in the
completed card.
getting started
SECTION 1
Getting Started
(What-if Analysis)
This first section will get you started using ProfitPlan.
You
will load ProfitPlan, produce a 5-year projection, and do what-if
analysis.
LOADING PROFITPLAN
If you purchased the ProfitPlan diskette from an authorized
ProfitPlan dealer, then they can help you set up the ProfitPlan
diskette to match your microcomputer system. (Of course, a quick
glance through Appendix A will also show you how to set up the
Prof i tPlan diskette.)
To load ProfitPlan:
1.
Be sure your computer is turned on.
2.
Insert the ProfitPlan diskette into the disk drive slot.
3.
Type PP on the keyboard and press RETURN.
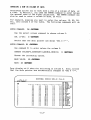
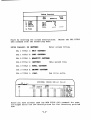
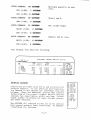
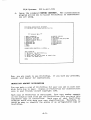
The screen will first show a display similar to the following:
ProfitPlan Version 1.0
Copyright (C), 1981 by Chang Laboratories, Inc.
Purchased from: CHANG LABS
Copy Number: DEMO 1/81
Of course, the dealer and copy number will vary with the individual licensed copy.
-1.1-
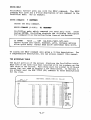
Next, Profi tPlan will show the follow ing displ ay:
ROW
1
MODE=NORMAL
<--
ORDER=R/C ROW=l-50
COL=l-2 0
1 FORMAT:
2 DATA:
ROW
----1--- ----2--0.0
-- ----3--0.0
-- ----4--0.0
-- ----5--0.0
-- 43 MATH:
0.0
PRINT:
1
0.0
0.0
0.0
2
3
4
0.0
0.0
0.0
o.o
5
6
o.o
0.0
0.0
0.0
0.0
0.0
0.0
0.0
7
8
9
10
11
12
0.0
0.0
0.0
0.0
0.0
0.0
0.0
o.o
o.o
13
14
15
o.o
o.o
0.0
0.0
0.0
16
17
0.0
0.0
0.0
0.0
0.0
0.0
o.o
0.0
0.0
0.0
0.0
0.0
0.0
0.0
o.o
o.o
0.0
0.0
0.0
0.0
0.0
0.0
0.0
0.0
0.0
0.0
0.0
o.o
o.o
0.0
0.0
0.0
0.0
0.0
0.0
0.0
0.0
0.0
5 UTILITY:
6 COMPUTE
7 HELP
0.0
0.0
0.0
0.0
0.0
0.0
0.0
0.0
9 STOP
10 ROW RANGE
11 COL RANGE
12 ORDER
13 SET DRIVE
14 SET UP
15 SET CRT
o.o
o.o
0.0
0.0
0.0
8
16
17
18 FORMAT:
19
ROWS:
20 ROW TITLE
Now, Profi tPlan is ready to solve your probl ems.
DOING A SIMPLE PROJECTION
Let's do a simpl e 5-yea r proje ction . Prepa re the follow ing
repor t
in Profi tPlan .
5-year project ion
l 2 l I • I 5 II
$1,000 growing at 10• per year
1
1
3
2
•al••
coat of good a
45• of aalea
3
•alee and adain
20• Of aale•
4
re•earch and dev
con•tan t $300 per year
5
total coat•
'
groH prof it
aua all coat•
ale• lea• total coat a
You will proce ed throu gh the follow ing steps :
1. Enter title s for each row of the 5-yea r proje ction .
2. Enter or compu te value s for each row.
3. Make a chang e and watch Profi tPlan autom atica lly do whatif analy sis.
4. Print a repo rt.
-1.2-
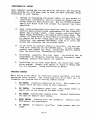
CORRECTING MISTAKES IN TYPING
Before starting, you need a few words on correcting typing
errors. When you make a mistake in typing, several options are
available.
1.
Backspacing can be used to correct errors if you have not yet
pressed the RETURN key. On different keyboards, this key may
be labelled DEL, RUB, R.UBOUT or another similar label. (For
specific details, look in Appendix A.) For example:
ENTER COMMAND:'
30 <DBL> 1 <RETURN>
The above sequence
31 instead.
2.
allows
you
to
correct
30
and
enter
You can cancel a command if the RETURN has been entered and
you realize that you have entered an incorrect entry or
command.
On different keyboards, the cancel key may be
labelled with HOME, CAN or another similar label. (For specific details, look in Appendix A.) Throughout this manual,
this key will be the <CAN> key even though your terminal may
use a different key.
ENTER COMMAND: 31 <RETURN>
VALUE:
ENTER COMMAND:
<CAR>
32 <RETURN>
Cancel command 31 and enter 32 instead.
ENTERING DESCRIPTIONS
The following description takes you step by step through the 5
year projection.
Follow along on the computer by entering all
information in BOLD TYPE.
The first step is to enter titles for each row of the projection.
ENTER COMMAND: 20 <RETURN>
Command 20 allows you to enter titles for each row.
RETURN key is on the right side of the keyboard.
ROW-1 TITLE;
The
SALES <RETURN>
Profi tPlan asks for the description for row 1.
Type in
sales.
Notice that after you hit RETURN, the entry is moved
to row 1 of the table.
-1.3-
ROW-2 TITLE:
COST OF GOODS <RETURN>
ProfitPlan now asks for the description for row 2. Type in
cost of goods.
ROW-3 TITLE:
SALES AND ADMIR <RETURN>
ProfitPlan continues to ask for row descriptions.
Notice
this description is clipped in the middle of the word ADMIN.
Don't worry, ProfitPlan will remember the full description,
even though it only has room on the screen to display the
first 12 letters.
ROW-4 TITLE:
RESEARCH ARD DEVELOPllENT <RETURN>
ROW-5 TITLE:
TOTAL COSTS <RETURN>
ROW-6 TITLE:
GROSS PROFIT <RETURN>
This is the last row description.
ROW-7 TITLE:
<CAN>
Cancel tells ProfitPlan to stop prompting. (Notice that you
do not need to press the RETURN key after the cancel
command.)
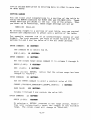
ROW 1 (SALES) <-F.NTER r.oMMAND:
MODE•NORMAL
ORDER=R/C ROW=l-50
COL=l-20
ROW
1
2
3
4
5
6
7
SALES
COST OF GOOD
SALES AND AD
RESEARCH AND
TOTAL COSTS
GROSS PROFIT
----1---o. o ----2---o.o ----3---o.o ----4---o.o ----5---oo
o.o
o.o
o.o
o.o
o.o
o.o
o.o
o.o
o.o
o.o
o.o
o.o
o.o
o.o
o.o
o.o
o.o
o.o
o.o
o.o
o.o
o.o
o.o
o.o
o:o
o.o
o.o
o.o
o.o
o.o
1
2
3
4
FORMAT:
DATA:
MATH:
PRINT:
5 UTILITY:
6 COMPUTE
7 HELP
8
9 STOP
10 ROW RANGE
ENTERING VALUES
Now, enter values for each row of the table.
Notice that the
'data pointer' on the second line of the display has a left
pointing arrow to the words 'ROW 1 (SALES) <--'. This means
ProfitPlan is ready to accept data for row 1. Tell ProfitPlan
that sales will start at $1,000 and grow at 10% per year.
ENTER COMMAND:
31 <RETURN>
Command 31 allows you to enter the sales assumption$ into
ProfitPlan.
-1.4-
CHOOSE (VALUES=O,CO NSTANT=l,GRO W=2,INCR=3):
2 <RETURN>
ProfitPlan asks you to choose the type of input.
GROW option.
BASE VALUE:
1000
Select the
<aETORN>
Type in 1000.
ProfitPlan asks for the base value.
that dollar signs and commas should not be typed in.
RATE:
10
Notice
<RETURN>
After
Type in 10%.
ProfitPlan asks for the percentage rate.
computed
row 1 contains the
notice that
you key RETURN,
The values start with 1,000 and grow by 10% per year.
sales.
MODE=NORMAL
ROW 2 (COST OF GOODS) <-F.N'T'ER r.nMMAND·
ROW
SALES
COST OF GOOD
SALES AND AD
RESEARCH AND
TOTAL COSTS
6 GROSS PROFIT
1
2
3
4
5
7
ORDER=R/C ROW=l-50
COL=l-20
1 FORMAT:
----5-------4-------3-------2-------1---1,464.1
1,331.0
1,210.0
1,100.0
1, 000. 0
o.o
o.o
o.o
o.o
o.o
o.o
o.o
o.o
o.o
o.o
o.o
o.o
o.o
0.0
0.0
o.o
o.o
o.o
o.o
o.o
o.o
o.o
o.o
o.o
o.o
o.o
o.o
o.o
0.0
o.o
2 DATA:
3 MATH:
4 PRINT:
5 UTILITY:
6 COMPUTE
7 HELP
B
9 STOP
10 ROW RANGE
Notice that the 'data pointer' has been automatical ly increased
to 'ROW 2 (COST OF GOODS) <--'. ProfitPlan is ready to accept
data for row 2. Calculate cost of goods as 45% of sales.
ENTER COMMAND:
53 <RETURN>
Command 53 allows you to compute cost of goods as a constant
(K) percentage of sales.
VALUE:
0.45 <RETURN>
ProfitPlan asks for a percentage.
ROW (l-50):
Enter as 0.45.
1 <RETURN>
ProfitPlan asks for a row number. Tell ProfitPlan to use the
Check that the cost of goods results
sales figures in row 1.
in row 2 is correct.
Again, notice that the 'data pointer' has automa ti cal 1 y changed
Calculate sales and
to 'ROW 3 (SALES AND ADMIN) <--'.
administrativ e costs as 20% of sales.
-1.5-
ENTER COMMAND:
53 <RETURR>
Use command 53 again,
as 20% of sales.
VALUE:
to calculate sales and admin expenses
0.20 <RETURN>
ROW ( 1-50):
·1 <RETURN>
Now, enter research and development cost of $300 per year.
ENTER COMMAND:
31 <RETURN>
To enter R&D costs of $300 per year, use command 31 again.
CHOOSE (VALUES=O,CONSTANT=l,GROW=2,INCR=3):
1 <RETURN>
ProfitPlan asks you to choose the type of input.
select the CONSTANT option.
BASE VALUE:
This time,
300 <RETURN>
ProfitPlan asks for the constant value.
that row 4 shows 300 in al 1 columns.
Type in 300.
Notice
The 'data pointer' now points to 'ROW 5 (TOTAL COSTS) <--'. To
calculate total costs, add the cost of goods, sales & admin
and R&D expenses in rows 2 through 4. The SUM command will do
this computation.
ENTER COMMAND:
55 <RETURN>
To compute total costs,
use command 55 to sum several rows.
BEGIN ROW (1-50): 2 <RETURN>
Tell ProfitPlan to start with row 2, cost of goods.
END (2-50):
4 <RETURN>
Tell ProfitPlan to end with row 4, R&D expenses. Notice that
ProfitPlan computes the sum for each column of the table.
Finally, gross profit is sales less total costs.
TRACT command to calculate gross profits.
ENTER COMMAND:
Use the SUB-
42 <RETURN> ·
Command 42 allows you to subtract one row from another.
-1.6-
1 <RETUIUf>
ROW (1-50):
ProfitPlan asks for the first row number.
Enter 1 for sales.
5 <RETUIUf>
ROW (.1-50) :
ProfitPlan asks for the second row.
Enter 5 for total costs.
After the RETURN, ProfitPlan calculates the gross profits.
Now, you are finished. The 5-year projection should look like the
fol lowing :
ROW
7
MODE•NORMAL
<--
ORDER=R/C ROW=l-50
COL=l-20
M :
ROW
1 SALES
2 COST OF GOOD
3 SALES AND AD
4 RESEARCH AND
5 TOTAL COSTS
6 GROSS PROFIT
----1-------2-------3-------4-------5---1, 000. 0
1,100.0
1,210.0
1,331.0
1,464.1
450.0
200.0
300.0
950.0
50.0
495.0
220.0
300.0
1,015.0
85.0
544.5
242.0
300.0
1,086.5
123.5
599.0
266.2
300.0
1,165.2
165.9
658.8
292.8
300.0
1,251.7
212.4
2 DATA:
3 MATH:
4
5
6
7
PRINT:
UTILITY:
COMPUTE
HELP
8
9 STOP
DOING WHAT-IF ANALYSIS
As you prepared the 5-year projection, ProfitPlan not only computes the figures, but memorizes the commands required to do the
projection. Now, you can make changes and watch ProfitPlan automatically recalculate the entire 5-year projection.
Suppose that the first year R&D expenses will be $500, not $300.
Change the value and ask ProfitPlan to do a new projection.
ENTER COMMAND:
32
(RETURN>
Command 32 allows you to change the value for any entry of
the table.
ROW (1-50):
4
<RETURN>
ProfitPlan asks for a row number.
COL (1-20):
1
Enter 4 for R&D expenses.
<RETURN>
ProfitPlan asks for a column number. Enter 1 for year 1.
VALUE:
500 <RETURN>
ProfitPlan asks for a new value.
Enter 500.
Notice that the
500 replaces the old value in column 1 of the R&D figures.
-1.7-
ENTER COMMAND:
6 <RETURN>
You tell ProfitP lan to comput e using the new assump tions.
In a few second s, the new 5-year projec tion should look like the
follow ing:
ROW
1 (SALES) <--
ROW
1
2
3
4
5
6
SALES
COST OF GOOD
f:,'\.LES AND AD
RESEARCH AND
TOTAL COSTS
GROSS PROFIT
MODE•NORMAL
ORDER•R/C ROW•l-50
COL•l-20
----1-------2-------3-------4-------5---1, 000. 0
1,100.0
1,210.0
1,331.0
1,464.1
450.0
200.0
500.0
1,150.0
-150.0
495.0
220.0
300.0
1,015.0
85.0
544.5
242.0
300.0
1,086.5
123.5
599.0
266.2
300.0
1,165.2
165.9
658.8
292.8
300.0
1,251.7
212.4
2
3
4
5
6
7
DATA:
MATH:
PRINT:
UTILITY:
COMPUTE
HELP
8
9 STOP
GENERATING A REPORT
Before moving on, let's get a report to carry away.
ENTERING COMMAND:
72 <RETURN>
Comman d 72 al lows you to set some title inform ation before
printin g a report.
PAGE NUMBER (0-999 ):
1 <RETURN>
Profit Plan asks for a page number . This will be printe d on
the upper right hand corner of the report.
DATE (YEAR AS YY):
<RETURN>
ProfitP lan asks for date inform ation.
ROW-RANGE BEGIN (1-50):
Skip it for now.
1 <RETURN>
ProfitP lan asks for the row range for this report.
to print rows 1 through 6.
END (1-50):
You want
6 <RETURN>
After keying RETURN, notice that the row range on the top
line of your display now says: 'ROW=l -6'.
COL-RANGE BEGIN (1-20):
1 <RETURN>
Profit Plan asks for the column range.
column s 1 through 5.
-1.8-
You want to print
END (1-20):
TITLE 1:
5 <RETURN>
5-YBAR PROJECTION <RETURN>
ProfitPlan asks for
TITLE 2:
a title.
Type in '5-year projection'.
<RETURN>
ProfitPlan allows 3 lines of title information.
1 ine for now.
TITLE 3:
Just use one
<RETURN>
SET PAPER; HIT RETURN.
<RETURN>
Make sure your printer is on and ready to print.
In a few seconds,
printer.
you will get the following report on your
Pa!!'e 1
5-YEAR PROJECTION
----1---- ----2---- ----3---- ----4---- ----5---1
2
3
4
5
6
SALES
COST OF GOODS
SALES AND ADMIN
RESEARCH AND DEV
TOTAL COSTS
GROSS PROFIT
1,000.0
450 .o
200.0
500.0
1,150.0
-150. 0
1,100.0
495.0
220.0
300.0
1'015. 0
85 .o
1,210.0
544.5
242.0
300.0
1,086.5
123.5
1,331.0
598.9
266.2
300.0
1,165.1
165.8
Congratulations, you have just produced your
ProfitPlan.
If you want to stop now, type
9 <RETURN>.
-1.9-
1,464.1
658.8
292.8
300.0
1,251.6
212.4
first report in
work ing with table s
SECTION 2
Simple Usage
(Commands, Tables and the Data Pointer)
This section shows you the ProfitPlan commands, tables and the
data pointer. You will learn to choose commands, move the display
and make entries into ProfitPlan tables.
CHOOSING COllMANDS
ProfitPlan responds to commands that are numbers
You choose commands to tell ProfitPlan
you type.
what you want to do.
The available commands are shown in the menu winThis menu
dow on the right side of your screen.
allows you to remember commands without constantly
consulting the manual.
For
The menu is organized into several groups.
example, all mathematical commands are organized
If you choose command 3
under the label MATH:.
for MATH:, ProfitPlan will display all the mathematical commands such as add and subtract. Try it.
ENTER COMMAND:
3 <RETURN>
8
9 STOP
10 ROW RANGE
11 COL RANGE
12 ORDER
13 SET DRIVE
14 SET UP
15 SET CRT
16
17
18 FORMAT:
ROWS:
19
20 ROW TITLE
4
Tell ProfitPlan to display the group of matheProfitPlan will respond
matical commands.
with the menu on the right.
ENTER COMMAND:
1 FORMAT:
2 DATA:
3 MATH:
4 PRINT:
5 UTILITY:
6 COMPUTE
7 HELP
<RETURN>
When you key RETURN without a command, ProfitPlan will return to the original menu.
A
:
41 ADD
42 SUBTRACT
43 lfUVf I PLY
44 DIVIDE
45 NEGATE
46 INVERSE
47 INTEGER
48 ROUND
49 CUMULATE
50 ABSOLUTE
51 ADD K
52 SUB K
53 MULT K
54
DIV K
55 SUM
Examine each group of commands. These group
commands are easy to identify because they all end
with a colon(:).
-2.1-
56 GET
57 FLOOR
58 CEILING
59
USING HELP
ProfitPla n further aids you with the HELP command. The HELP
command will give you a 3-line descriptio n of any command in the
ProfitPlan menu. Try an example.
ENTER COMMAND:
7 <RETURN>
Choose the help command.
WHICH COMMAND (1-150):
31 <RETURK>
ProfitPla n asks which command you need help with. After
keying RETURN, ProfitPlan displays the following descriptio n
for command 31 on the bottom three lines of the screen.
31 ENTER
value ••• CAN (up,down ,right,left ,can)
Enters values into table. Constant, grow, increase options
allow quick entry. Cursor keys allow individua l data entry.
Of course,the HELP command only gives a 3-line descriptio n. For
a comprehen sive descriptio n, you can always consult this manual.
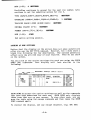
THE MICROPLAN TABLE
The major portion of the screen displays the ProfitPla n table.
Each row of the table has been labelled with row numbers on the
left side of the screen. Following each row number is 12 blank
spaces that are used to display a row descriptio n. In Section 1,
you already used the ROW TITLE (20) command to enter descriptio ns
for the rows.
ROW
ROW
1
2
3
4
5
6
7
8
9
10
11
12
13
14
15
16
17
1
MODE=NORMAL
<--
ORDER=R/C ROW=l-50
COL•l-20
1
FORMAT:
2 DATA:
----1-------2-------3-------4-------5---3 MATH:
O.O
O.O
0.0
0.0
O.O 4 PRINT:
0.0
O.O
O.O
o.o
0.0
0.0
0.0
O.O
0.0
0.0
O.O
o.o
o.o
o~o
0.0
0.0
O.O
0.0
O.O
o.o
0.0
O.O
O.O
O.O
O.O
O.O
O.O
o.o
o.o
o.o
O.O
0.0
-2.2-
0.0
0.0
0.0
o.o
0.0
0.0
0.0
0.0
0.0
0.0
O.O
o.o
o.o
o.o
0.0
0.0
0.0
0.0
0.0
o.o
0.0
0.0
0.0
0.0
0.0
0.0
O.O
o.o
o.o
o.o
0.0
0.0
0.0
0.0
0.0
5 UTILITY:
6 COMPUTE
7 HELP
o.o
8
0.0
0.0
0.0
0.0
0.0
0.0
0.0
9 STOP
10 ROW RANGE
11 COL RANGE
12 ORDER
13 SET DRIVE
14 SET UP
15 SET CRT
o.o
o.o
o.o
0.0
0.0
16
17
18 FORMAT:
19
ROWS:
20 ROW TITLE
Each column of the table is also labelled with column numbers
with dashes on both sides. You can use COL TITLE (25) command to
enter a two line column description of 20 spaces each.
llOVING THE TABLE
However, ProfitPlan
ProfitPlan displays 17 rows and 5 columns.
allows up to 500 rows and 99 columns for each of your tables.
Physical limitations of the screen allow only a portion of the
table to be displayed at any time.
Escape commands allow you to see different parts of the table.
For example:
<ESC> 2
(e.g., if the top line
Displays the next 10 rows.
shows row 1, the new display shows row 11).
<ESC> 8
Displays the previous 10 rows. (e.g., if the bottom
1 ine shows row 50, the new display shows row 40).
<ESC> 6
Displays the next 4 columns. (e.g., if the first
column shows 1, the new display shows column 5).
<ESC> 4
Displays the previous 4 columns. (e.g., if the last
column shows 20, the new display shows column 16).
<ESC> 5
Displays the original screen with row 1, column 1 in
the upper left corner.
For terminals with cursor keys (keys with arrows), the cursor
keys replace the numbers. Try an example:
<BSC> 6
ENTER COMMAND:
Notice that the ESC key does not appear on the screen after
The 6 after the ESC causes the display to
you press it.
change.
ROW
'li"N'l'~R
1
MODE=NORMAL
<--
COL•l-2a
l"'OUUANO·
ROW
1
2
3
4
5
6
7
ORDER=R/C ROW=l-5a
----5---a.a
a.a
a.o
0.0
o.o
0.0
0.0
----7-------6---a.a
a.o
a.a
a.o
0.0
o.o
0.0
0.0
a.a
o.o
0.0
0.0
0.0
0.0
~--8----
a.o
o.a
a.o
0.0
o.o
0.0
0.0
1 FORMAT:
2 DATA:
MATH:
4 PRINT:
5 UTILITY:
6 COMPUTE
7 HELP
8
9 STOP
10 ROW RANGE
3
----9---a.o
a.a
a.a
O.a
o.o
0.0
0.0
You can also use the GOTO (36) command to position the screen at
a specific portion of the table. For example, to see the results
-2.3-
at row 40, column 10 of the table, you can use the GOTO command
and specify row 40, column 10. ProfitPlan will position row 40,
column 10 is the upper left corner of the screen.
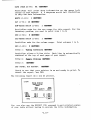
ESCAPE SEQUENCE
Because these commands are always preceeded by the escape key,
they are called escape sequence commands.
For terminals without cursor keys, the choice of numbers is to
accommoda te a numeric keypad available with most keyboards .
On
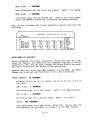
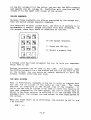
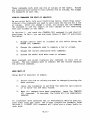
the keypad, these keys would be organized as follows:
[]~Lm
51 [!§] ~
To use escape sequence.
LJ] [ii] LS]
1. Press the ESC key.
2. Select a numeric key.
[Q]CJD
MlcroPlan Escape Sequence
A keypad card has been prepared for you to help you remember
which keys to use.
Escape sequences can be
ProfitPla n prompts for a
on the screen, you can
display without affecting
used at any time.
For example, when
row number and the row you want is not
enter an escape sequence to move the
your work.
THE DATA POINTER
Most of ProfitPla n's commands allow you to enter or compute data
for one row or column of the table at one time.
The 'data
pointer' is displayed on the second line of the display.
It
tells you the row or column to be used to store the results of
your next computati on. (In this manual, the row or column that is
shown in the data pointer is referred to as the current row or
column.) Note, the current row and column is also highlighte d on
the screen.
When you first start up in ProfitPlan ,
1 as fol lows:
ROW 1
<--2.4-
the pointer is set to row
Once you have entered the description for row 1, the description
of the current row is also displayed.
CHANGING THE DATA POINTER
You can make changes to values in the table by moving the data
pointer to the row or column you want to change. Several options
make it easy for you to move the pointer.
1.
2.
The cursor keys (i.e. keys with directional arrows on the keytops) can be used to
move the data pointer. For example, the up
key moves the data pointer to the previous
row and the down key moves the data
pointer to the next row.
The command SELECT ROW (33),
to select a specific row.
allows you
The command SELECT COL (34),
to select a specific column.
al lows you
30 DATA:
31 ENTER
32 CHANGE
33 SELECT ROW
34 SELECT COL
35 FORMULA
36 GOTO
37 PLUG
38 FIX
39 NULLIFY
40
MATH:
4-1 ADD
42 SUBTRACT
3.
4.
43 MULTIPLY
44 DIVIDE
45 NEGATE
46 INVERSE
After any command which changes the contents of your table, the pointer automatically changes to the next row or
column of your table.
47 INTEGER
48 ROUND
49 CUMULATE
For example:
ENTER COMMAND:
ROW (1-50):
33 <RETURN>
1
Select row 1.
<RETURN>
ENTER COMMAND:
<"" >
Move to row 2.
ENTER COMMAND:
<+>
Move to row 3.
ENTER COMMAND:
<+>
Move back to row 2.
ENTER COMMAND:
34 <RETURN>
Select column 1.
COLUMN (1-20):
ENTER COMMAND:
1 <RETUIUO
<+>
Move to column 2.
To change from row to column mode, you must use the SELECT COL
command. The cursor keys will not allow you to change modes.
Similarly, to switch: from column to row mode, you must use the
SELECT ROW command.
-2.5-
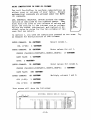
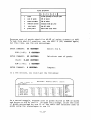
ENTERING A ROW OR COLOllN OF DATA
ProfitPlan allows you to work with a row or a column of data at
a time. In Section 1, you used the ENTER command to enter values
for several rows of the 5-year projection. The ENTER command can
also be used to enter a column of data, as well.
For example, suppose you want to enter the values, 10, 20, 30,
etc., into column 3 of the table. The fol lowing commands will do
this:
ENTER COMMAND:
34 <RETURN>
Use the select column command to choose column 3.
COL (1-20):
3 <RETURN>
Notice that the data pointer now shows 'COL 3
<--'.
ENTER COMMAND: 31 <RETURN>
Use command 31 to enter values for column 3.
CHOOSE (VALUES=O,CONSTANT=l,GROW=2,INCR=3):
3 <RETURN>
Choose the increasing option.
BASE VALUE:
10 <RETURN>
RATE: 10 <RETURN>
Your display will show the following in column 3. Also, notice
that the data pointer has automaticall y changed to 'COL 4 <--'.
COL 4 <-ENTER l"nMMAND~
llODE•NORMAL
ORDER•R/C ROW•l-50
COL•l-20
ROW
1
2
3
4
5
6
7
8
9
10
11
12
13
14
15
16
17
----1---- ----2---- ----3---- ----4---- ----5---0.0
0.0
10.0
0.0
0.0
0.0
0.0
20.0
0.0
0.0
0.0
0.0
30.0
0.0
0.0
0.0
0.0
40.0
0.0
0.0
0.0
0.0
50.0
O.O
0.0
0.0
0.0
60.0
0.0
0.0
0.0
0.0
70.0
0.0
0.0
0.0
0.0
80.0
O.O
0.0
0.0
O.O
90.0
0.0
0.0
0.0
0.0
100.0
0.0
0.0
0.0
0.0
110.0
0.0
0.0
0.0
0.0
120.0
0.0
0.0
0.0
0.0
130.0
0.0
0.0
0.0
0.0
140.0
0.0
0.0
0.0
0.0
150.0
0.0
0.0
0.0
0.0
160.0
0.0
0.0
0.0
0.0
170.0
0.0
0.0
-2.6-
30
31
32
33
34
35
36
37
38
39
40
41
42
43
44
45
46
47
48
49
DATA:
ENTER
CHANGE
SELECT ROW
SELECT COL
FORMULA
GOTO
PLUG
FIX
NULLIFY
MATH:
ADD
SUBTRACT
MULTIPLY
DIVIDE
NEGATE
INVERSE
INTEGER
ROUND
CUMULATE
ENTERING INDIVIDUAL VALUES
You can also enter values one at a time into the table. The
VALUES option of the ENTER command allows you to selectively
enter values.
In this mode, the data pointer is set to one position of the
table. This position is highlighted on your display. You can use
the cursor keys (i.e. the keys with arrows on them) to position
the data pointer to the value you wish to change.
Any new value
you enter will change the value in the current position.
Profi tPlan has an option to allow you to quickly enter a series
of values into a row or column. For example, suppose you want to
enter the following data into row 1.
-1-
ROW 1:
100
-3100
-2100
-
-40
-5100
-7300
-6300
The following commands will do this:
ENTER COMMAND:
ROW (1-50):
ENTER COMMAND:
Select row 1.
33 <RETURN>
1 <RETURN>
Enter data command.
31 <RETURN>
CHOOSE (VALUES=O,CONSTANT=l,GROW=2,INCR=3):
<RETURN>
ROW 1, COL 1 VALUE:
100 <RETURN>
ROW 1, COL 2 VALUE:
<RETURN>
ROW 1, COL 3 VALUE:
<RETURN>
ROW 1, COL 4 VALUE:
<+>
the data
By keying
pointer skips a column.
ROW 1, COL 5 VALUE:
<RETURN>
A 100 is entered.
ROW 1, COL 6 VALUE:
300 <RETURN>
ROW 1, COL 7 VALUE:
<RETURN>
The prior value, 300,
automatically used.
ROW 1, COL 8 VALUE:
<CAN>
End entry mode.
By keying RETURN, the previous value i~ used.
.,...,
is
Notice ~hat while in the row mode, each RETURN key causes the
data pointer to automatically move to the next column. In the
column mode, each RETURN key moves the data pointer to the ne t
row. Therefore, depending on your problem, you should select t~e
-2.7-
row or column mode prior to entering data in order to save time
on de. ta entry.
SETTING RANGES
You can limit your computations to a section of the table by
using the RANGE commands for ROWS (92) and COLUMNS (93). These
range settings are shown in the top line of the screen. When
you start up in ProfitPlan, these range settings are set as:
ROW=l-50
COL=l-20
By setting ranges to a section of your table, you can control
entries and computations to affect only a portion of the table.
For example, suppose row 10 is extraordinary income of your
budget. For your purpose, you want to enter values of 100 for
periods 3,4 and 5 and the value of 0 for all other periods.
ENTER COMMAND:
33 <RETURN>
Use command 33 to select row 10.
10 <RETURN>
ROW (1-50):
ENTER COMMAND:
11 <RETURK>
Set the column range using command 11 to columns 3 through 5.
BEGIN (1-20):
END
3 <RETURN>
5 <RETURN>
(3-20):
After you key RETURN,
changed to 'COL=3-5'.
ENTER cmntAND:
notice that the column range has been
31 <RETURN>
Use the ENTER command to enter a constant value of 100.
CHOOSE (VALUES=O,CONSTANT=l,GROW=2,INCR=3):
1 <RETURN>
100 <RETURN>
BASE VALUE:
Columns 3 through 5 now contain the value 100.
ENTER COMMAND:
1.1 <RETURN>
BEGIN (1-20):
<RETURN>
By entering a RETURN response to the range prompt, ProfitPlan will automatically reset the ranges to the maximum
range.
The column range will change to 'COL=l-20'.
-2.8-
40
41
42
43
44
45
46
47
48
49
50
51
52
53
54
55
56
57
58
DOING COMPUTATIONS ON ROWS OR COLUMNS
You tell ProfitPlan to perform computations on
either rows or columns of your table.
Simple
mathematical commands are grouped under the MATH:
(3) commands.
ADD, SUBTRACT, MULTIPLY, DIVIDE perform the computations as indicated by the command names. They
work with two rows or two columns of values and
store the results in the current row or column.
Values are added, subtracted, multiplied or divided, value by value for the two columns or two
rows that you select.
MATH:
ADD
SUBTRACT
MULTIPLY
DIVIDE
NEGATE
INVERSE
INTEGER
ROUND
CUMULATE
ABSOLUTE
ADD K
SUB K
MULT K
DIV K
SUM
GET
FLOOR
CEILING
59
In section 1, you used the subtraction command on two rows.
an example for multiplication of t~o columns.
ENTER COMMAND:
COL (1-20):
ENTER COMMAND:
Select column 1.
34 <RETURN>
1 <RETURN>
Enter values for col 1.
31 <RETURN>
CHOOSE (VALUES=O,CONSTANT=l,GROW=2,INCR=3):
BASE VALUE:
RATE:
3 <RETURN>
1 <RETURN>
1 <RETURN>
ENTER COMMAND:
Enter values for column 2.
31 <RETURN>
CHOOSE (VALUES=O,CONSTANT=l,GROW=2,INCR=3):
BASE VALUE:
ENTER COMMAND:
1 <RETURN>
100 <RETURN>
Multiply columns 1 and 2.
43 <RETURN>
COL (1-20):
1 <RETURN>
COL (1-20):
2 <RETURN>
Your screen will show the following:
COL 4 <-ENTER COMMAND:
MODE=NORMAL
ORDER=R/C ROW=l-50
COL=l-20
ROW
1
2
3
4
5
6
7
----1---- ----2---- ----3---- ----4---- ----5---1.0
100.0
100.0
0.0
0.0
2.0
100.0
200.0
0.0
0.0
3.0
100.0
300.0
0.0
0.0
4.0
100.0
400.0
0.0
0.0
5.0
100.0
500.0
0.0
0.0
6.0
100.0
600.0
0.0
0.0
7.0
100.0
700.0
o.
-2.9-
40
41
42
43
44
45
46
47
48
MATH:
ADD
SUBTRACT
MULTIPLY
DIVIDE
NEGATE
INVERSE
INTEGER
ROUND
Try
ADD K, SUB K, MULT K, DIV K perform similar computations.
Instead of working with two rows or columns, these commands work
with one row or column and a constant. The constant that you
supply for these commands will be added to, subtracted from,
multiplied by and divided into each value of the row or column
number that you also supply.
For example, divide all of column 3 above by the value 100.
ENTER COMMAND:
VALUE:
54 <RETDllR>
Divide column 3 by 100.
100 <RETOB1'>
COL (1-20):
3 <RETDllR>
Column 4 of the screen would have the same values as column 1 of
the screen.
The command SUM computes the sum of values for a range of rows or
columns.
You have already used the summation command to
calculate the sum for a group of rows. For exercise purposes, sum
the first four columns of the above example.
ENTER COMMAND:
55 <RETURN>
BEGIN COL (1-20):
END (1-20):
Sum 4 columns.
1 <RETURlf)
4 <RETUllll)
The remaining math commands do the following computations:
45 NEGATE
Negates values. (i.e., negative values become
positive and positive values become negative.)
46 INVERSE
Computes inverse. (i.e., 1/x)
47 INTEGER
Drops
any fractional portions of values and
converts values to whole numbers.
48 ROUND
Rounds values to the nearest whole number.
49 CUMULATE Computes cumulative totals of values.
50 ABSOLUTE Converts all negative values to positive values.
56 GET
Gets values from another row or column.
57 FLOOR
Sets a minimum value for a row or column.
58 CEILING
Sets a maximum value for a row or column.
-2.10-
These commands work with one row or column of the table. Values
are computed and stored in the current row or column. You might
try examples on your own.
STORING COMMANDS FOR WHAT-IF ANALYSIS
As you enter data into your ProfitPlan table, ProfitPlan memorizes all the commands you used to calculate the values for a row
After you change a value, you simply use the COMPUTE
or column.
(6) command to see the impact of that change on the remaining
rows and columns of the table.
In Section 1, you used the CHANG& (32) command to ask what-if
questions. In fact, you can ask many types of what-if questions
including:
1.
Change entire rows or columns of the table using the
ENTER (31) command.
2.
Change the commands used to compute a row or column.
3.
Change the values associated with commands.
4.
Extend the model with more rows or columns.
Each command you enter replaces any command in that row or
The new command used to compute the new values replaces
column.
the previous command.
MORE WllAT-IF
Doing what-if analysis is simple.
1.
Select the row or column you want to change by moving the
data pointer.
2.
Issue the commands to perform the desired calculation
or to enter the new data values.
3.
When all changes have been completed, issue the COMPUTE
(6) command. In seconds, the table will be completely
updated.
To illustrate more advanced use of ProfitPlan's what-if ability,
take some time and enter the 5-year projection example from
Section 1. A RESET (64) command will give you a clean table to
work with.
-2.11-
5-year projection
1
I 2 I l I • I s II
1
••l••
2
con of good•
t5t of ••lH
l
aalH and adain
20t Of HlH
•
reaearch and dev
con•tant
tl,000 1rovin1 at 10' per year
5
total con•
6
groH prof it
noo
per year
•ua all coat•
Mlea leaa total co•t•
Suppose cost of goods should be 42.5% of sales instead.of 45%.
To ask this what-if question, use the MULT K (53) command again;
but this time, use the new percentage.
ENTER COMMAND:
33 <RETURN>
2 <RETURN>
ROW ( 1-50):
ENTER COMMAND:
VALUE:
Select row 2.
53 <RETURN>
Calculate cost of goods.
0.425 <RETURN>
1 <RETURN>
ROW ( 1-50):
ENTER COMMAND:
6 <RETURN>
Compute.
In a few seconds, you would get the following:
ROW 1 (SALES) <-rnMMA.ND·
MODE=NORMAL
ORDER=R/C ROW=l-6
COL•l-5
ENTER
1 FORMAT:
ROW
1 SALES
2 COST OF GOOD
3 SALES AND AD
4 RESEARCH AND
5 TOTAL COSTS
6 GROSS PROFIT
7
----1-------2-------3-------4-------5---1, 000. 0
1,100.0
1,210.0
1,331.0
1,464.1
425.0
200.0
300.0
925.0
75.0
o.o
46i.5
220.0
300.0
987.5
112.5
o.o
514.3
242.0
300.0
1,056.3
153.8
o.a
565.7
266.2
300.0
1,131.9
199.1
o.o
622.2
292.8
300.0
1,215.1
249.0
o.o
DATA:
3 MATH:
4 PRINT:
5 UTILITY:
6 COMPUTE
7 HELP
2
8
9 STOP
10 ROW RANGE
As a second example, suppose cost of goods starts at 45% of sales
and drops to 41% by year 5. To make this change, enter the cost
of goods percentage as row 10 of the table and calculate cost of
goods using the precentages in row 10.
-2.12-
ENTER COMMAND:
33 <BBTOllll)
ROW (1-50):
ENTER COMMAND:
Select row 10.
10 <RBTUBll>
Enter percentag es.
31 <RET1JBlll>
CHOOSE (VALUES=O,CONSTANT=l,GROW=2,INCR=3):
BASE VALUE:
RA TE:
3 <RBTUIUf>
0.45 <BETUBR>
-0. 01 <BETUIUO
ENTER COMMAND:
ROW (1-50):
ENTER COMMAND:
Select row 2.
33 <BBT1JBlll>
2 <RBTOllR>
Calculate percentag e.
43 <RETUBK>
ROW (1-50):
10 <BETURR>
ROW (1-50):
1 <RETUBN>
ENTER COMMAND:
Compute new results.
6 <BETURR>
The screen will show the following:
ROW 1 (SALES)
ENTER COMMAND·
ROW
1
2
3
4
5
6
7
SALES
COST OF GOOD
SALES AND AD
RESEARCH AND
TOTAL COSTS
GROSS PROFIT
lfODE•NORMAL
<--
ORDER•R/C ROW•l-6
COL•l-5
40 KATH:
41 ADD
SUBTRACT
43 MULTIPLY
44 DIVIDE
45 NEGATE
46 INVERSE
47 INTEGER
48 ROUND
49 CUMULATE
----1-------2-------3-------4-------5---42
1,000.0
1,100.0
1,210.0
1,331.0
1,464.1
450.0
200.0
300.0
950.0
50.0
o.o
484.0
220.0
300.0
1,004.0
96.0
o.o
520.3
242.0
300.0
1,062.3
147.7
o.o
559.0
266.2
300.0
1,125.2
205.8
o.o
600.3
292.8
300.0
1,193.1
271.0
o.o
COMPUTING ORDER
When the COMPUTE command is used, ProfitPlan will compute for all
rows of the row range. You can also compute for all columns of
the column range by setting the computing order using the ORDER
(12) command.
-2.13-
ORDER allows you to choose among four options:
1. ROW/ONLY
Compute only rows.
2. COL/ONLY
Compute only columns.
3. ROW/COL
Compute all rows; then all columns.
4. COL/ROW
Compute all columns; then all rows.
The ORDER command displays the current computing order on the top
line of the screen. Initially, it is displayed as 'ORDER=R/C'.
This is an abbreviation for option 3, rows then columns.
Suppose you have added a total column to the 5-year projection.
You want ProfitPlan to compute this total everytime you use the
COMPUTE command. By choosing option 3 of the ORDER command as
follows:
ENTER COMMAND:
12 <RETURR>
Set computing ORDER.
(ROW/ONLY=l,COL/ONLY=2,ROW/COL=3,COL/ROW=4):
3 <RETORB>
ProfitPlan will perform computations for all rows, then all
columns for all future COMPUTE commands. Notice that the computing order in the top line of your screen has been set to
'ORDER=R/C' •
-2.14-
Section 3
Report Generator
(Formatting, Saving, Retrieving and Printing Tables)
This section shows you how to prepare tables for printing
reports. You will learn to format tables, print tables and save
and retrieve tables.
ProfitPlan has a sophisticate d built-in report generator. This
report generator allows you to customize your reports to suit
most of your detailed requirements .
Features include financial
reporting of trillion dollar figures with penny accuracy, automatic page control for reports that are wider than can fit on your
printer, and individual column widths.
Most of the features described in this section only affect the
printed copy of reports. As you set the various row, column and
global options, you will not see the impact of these settings on
the copy of your table that is shown on the screen.
However,
when you use the REPORT command, all the details will be printed.
ENTERING DESCRIPTIONS
The commands to format the
under FORMAT: (1). By choosing
get the menu on the right.
table are grouped
the command 1, you
Formatting commands allow you to enter row and
column description s, change individual row or
column format options, and insert or delete new
rows or columns by reordering.
18
19
20
21
22
23
24
25
26
27
FORMAT:
ROIS:
ROW TITLE
SET TYPE
SHOW ROWS
REORDER
COLS:
COL TITLE
SET TYPE
SHOW COLS
28 REORDER
29
.
In Section 1, you used the ROW TITLE command to enter row descriptions. A similar command allows you to enter a 2-line column
description of 20 spaces each. Each line of the column description is automaticall y right justified in the column. If only one
line of description is supplied, it is always printed on the
lower line of the two lines of title.
If your description s are
longer than the column width, your descriptions will be truncated
to allow the description to fit the column space alloted.
To illustrate the formatting capabilities , lets prepare a simple
inventory report.
-3.1-
Takinl Inventory
Unit
Co•t
Total
Co•t
QuantitJ
beadinl line
10
300.0
20
150.0
5
200.0
It•s:
2. Desks
3. Chairs
Shelves
1
'·a. Total
----- -----
-----
Start by entering the column descriptions.
(25) command from the formatting menu.
Choose the COL TITLE
Enter column titles.
ENTER COMMAND: 25 <RETURIO
COL 1 TITLE 1: UNIT <RETURN>
co~ 1 TITLE 2:
COST <RETURB>
COL 2 TITLE 1: QUANTITY <RETURN>
Skip second line.
COL 2 TITLE 2: <RETURN>
COL 3 TITLE 1: TOTAL <RETURN>
COL 3 TITLE 2: AllOURT <RETUBB>
COL 4 TITLE 1:
ROI
ROW
1
2
3
4
5
6
1
<CAN>
End title entry.
MODE•NORllAL
<-UNIT
COST
----1---o. o
o.o
o.o
o.o
o.o
o.o
QUANTITY
----2----
o.o
o.o
o.o
o.o
o.o
o.o
ORDER•R/C ROW•l-50
COL•l-20
TOTAL
AMOUNT
18 FORMAT:
----3---o.o ----4---o.o ----5---o.o
o.o
o.o
o.o
o.o
o.o
o.o
o.o
o.o
o.o
o.o
o.o
o.o
o.o
o.o
o.o
19
ROWS:
20 ROI TITLE
21 SET TYPE
22 SHOW ROWS
23 REORDER
24
COLS:
25 COL TITLE
26 SET TYPE
Since you have already used the ROW TITLE (20) command for rows,
you might enter the row descriptions for the inventory pr0blem
now.
-3.2-
SETTING ROW OPTIONS
Using the SET TYPE (21) comma nd, you can set many optio ns
for
formattin~ indivi dual rows of your repor
t. You can specif y headings, subti tles, and footno tes in additi on to norma l data
rows.
You can tell Profit Plan to under line a row and/o r leave traili
ng
blank s and speci fy the numbe r of decim al place s for row value
s.
You can also print value s with the dolla r sign or perce ntage
sign
forma ts.
In the inven tory examp le, set the follow ing forma tting option
s.
1. Row 1 is a headin g. (i.e. do no print value s.)
2. Under line row 4.
ENTER COMMAND:
21 <RETURN>
Comma nd 21 allow s you to set optio ns on each row. For each
optio n, if yo~ press the RETURN key witho ut a respo nse,
Profit Plan assum es the previo us settin g for an option should
remain unchan ged.
ROW (1-50) :
1 <RETURN>
To change row 1 into a headin g, selec t row 1.
TYPE (DATA =O,SUB T=l,HE ADING =2,NOT E=3,0M IT=4): 2 <RETURN>
Each row of the table may be sever al types .
By selec ting
type 2, headi ng, you tell Profi tPlan that no numbe rs are to
be printe d with this row. (The other choice s allow you to set
center ed subti tles (1), footno tes (3), or to omit a row when
the repor t is printe d (4).)
UNDERLINE
(NONE=O,DASH=l,EQUAL=2,STARS=3):
<RETURN)
Each row of Profi tPlan can be under lined with dashe s, equal
signs or stars.
TRAILING BLANK LINES (9=NEW PAGE):
<RETURN)
Each row can have up to 8 traili ng blank lines.
A value of 9
tells Profi tPlan to skip to a new page follow ing this row.
DECIMAL PLACES (0-3): <RETURN>
Each row of the repor t can have a speci al numbe r of decim al
places .
FORMAT (OFF= 0,[%]= 1,($]= 2):
<RETURN>
Each row can have its own specia l forma t.
dollar sign forma t or the % sign forma t.
-3.3-
Rows can have the
ROW (1-50):
4 <RETURN>
ProfitPlan continues to prompt for the next row number. Lets
continue to set the underline option for row 4.
TYPE (DATA=O,SUBT=l,HEAD=2,NOTE=3,0MIT=4):
<RETURR>
UNDERLINE (NONE=O,DASH=l,EQUAL=2,STARS=3):
TRAILING BLANK LINES (9=NEW PAGE):
DECIMAL PLACES (0-3):
(RETURR>
<RETURN>
<RETURN>
FORMAT (OFF=0,[%)=1,($)=2):
ROW (1-50):
1
<RETURR>
<CAN>
End option setting session.
LOOKING AT ROW SETTINGS
Notice that the display on the screen does not show underlines
after you use the SET TYPE command. However, row 1 does show a
blank line following the row description.
The options generally
affect only the printed copy of your reports. They do not show
on the screen.
You can look at the option settings for each row using the SHOW
ROWS (22) commands. Your display will look similar to the
following:
ENTER
ROI 1 (ITEMS:) <-COMMAND;
ROW
TYPE
1 ITEMS:
2 DESKS
3 SHELVES
4
5
6
7
TOTAL
head
data
data
data
data
data
data
MODE•NORMAL
ORDER•R/C
LINE LINES SIZ MAT COMMAND
ROl•l-6
COL•l-3
PARAMETERS
- ENTER
dash
- SUM
18 FORMAT:
19 ROIS:
20 ROI TITLE
ROIS 2 TO 4
21 SET TYPE
22 SHOW ROIS
23 REORDER
24 COLS:
25 COL TITLE
26 SET TYPE
SHOW ROWS displays the option settings as well as the commands
that have been memorized for each row.
SHOW ROWS only displays
those rows that are on your screen. To view other rows, you can
move the table using the escape commands and then issue the SHOW
ROWS command again.
To recover the display, use any escape sequence. (e.g. ESC ESC)
-3.4-
SETTING COLDllN OPTIONS
Using the SET TYPE command (26) for columns, you can set options
for formatting individual columns. You can control individual
column width, set decimal places, and specify column format.
In the
places.
option.
invento~y
example, set column 2 to show zero decimal
The following example allows you to set this column
ENTER COMMAND:
26 <RETUBB>
Command 26 allows you to set options for each column. For
each option, if you press the RETURN key without a response,
ProfitPlan assumes the previous setting for an option should
remain unchanged.
COLUMN (1-20): 2 <RETURN)
Select column 2.
COLUMN WIDTH (4-20):
<RETURN>
Column width are generally 10 spaces wide.
column to a different width.
DECIMAL PLACES (0-3 ):
You can set each
0 <RETURN>
You set column l's decimal place setting to zero decimals.
Note that column setting always overide row settings.
FORMAT (OFF=0,[%]=1 ,[$]=2):
<RETURN>
Each column can also have its own special format. Columns
can have the dollar sign format or the % sign format.
COLUMN (1-20): <CAB>
Column options override row options. That is, if row 1 has been
set to show 2 decimal places and column 1 has been set to show 0
decimal places, then the value in column 1, row 1 will show 0
dee imal pl aces.
LOOKING AT COLUllN SETTINGS
Notice that the display on the screen does not change after the
SET TYPE command.
The options only affect printed reports.
You
can look at the option settings for each column using the SHOW
COLS (27) command.
ENTER COMMAND:
27 <RETDR1'>
Look at column option setting.
-3.5-
Your display will look similar to the following:
MODE•NORMAL
ROW 1 (ITEMS:) <-ENTER COMMAND:
COLUMN
WIDTH
1 UNIT COST
2 QUANTITY
3 TOTAL AMOUNT
4
5
8
7
SIZ MAT
10
10
1
0
10
1
10
1
10
10
1
1
10
1
ORDER•R/C
ROW•l-8
COMMAND
ENTER
ENTER
MULTIPLY
COI..•1-3
PARAMETERS
19
COL•l
20
21
22
23
COL•2
24
25
26
FORMAT:
ROWS:
ROW TITLE
SET TYPE
SHOW ROIS
REORDER
COLS:
COL TITLE
SET TYPE
ENTERING DATA
Before showing you the report options, let's enter the data for
the inventory problem.
ENTER COMMAND:
1 <RETURN>
COL (1-20):
ENTER COMMAND:
Select column 1.
34 <RETURN>
Enter unit cost.
31 <RETURN>
CHOOSE (VALUES=O,CONSTANT=l,GROW=2,INCR=3): 0 <RETURN>
ROW 1, COL 1 VALUE:
0 <RETURN>
ROW 2, COL 1 VALUE:
300.0 <RETURN>
ROW 3, COL 1 VALUE:
150.0 <RETURN>
VALUE:
200.0 <RETURN>
ROW 4, COL
ROW
5,
1
COL 1 VALUE:
ENTER COMMAND:
<CAN>
Enter quantity.
31 <RETURN>
CHOOSE (VALUE=O,CONSTANT=l,GROW=2,INCR=3): 0 <RETURN>
ROW 1, COL
2
VALUE:
0 <RETURN>
ROW 2, COL 2 VALUE:
10 <RETURN>
ROW 3, COL 2 VALUE:
20 <RETURN>
ROW 4, COL 2 VALUE:
5 <RETURN>
ROW 5, COL 2 VALUE:
<CAN>
-3.6-
ENTER COMMAND:
43 <RETUBB>
COL ( 1-20 ):
Mult iply quan tity by unit
cost .
1 <RETURN>
COL ( 1-2 0): 2 <RETURN>
ENTER COMMAND:
33 <RETURN>
ROW (1-50 ):
ENTER COMMAND:
5 <RETURN>
11
BEGIN (1-20 ):
END
(3-20 ):
ENTER COMMAND:
Sele ct row 5.
<RETURN>
Set colum n rang e.
3 <RETURN>
3 <RETURN>
55 <RETURN>
BEGIN (1-50 ):
END (2-50 ):
Comp ute sum by rows .
2 <RETURN>
4 <RETURN>
Your displ ay will show the follo wing :
~ODE=NORMAL
ROW 6 <-ENTER COMMAND:
ROW
1 ITEMS:
2 DESKS
3 CHAIRS
4 SHELVES
5
TOTAL
6
UNIT
COST
QUANTITY
300.0
150.0
200.0
10.0
20.0
5.0
ORDER=R/C ROW=l-5 0
COL=l-2 0
TOTAL
AMOUNT
----1---- ----2---- ----3---- ----4---- ----5---o.o
o.o
o.o
o.o
3,000.0
3,000.0
1,000.0
7,000.0
0.0
o.o
o.o
0.0
o.o
o.o
o.o
o.o
o.o
o.o
o.o
PRINTING REPORTS
Prof itPla n prov ides many bell s and whis tles for
prin ted repo rts.
In the prev ious desc ripti ons,
you learn ed to set optio ns for indiv idua l rows and
colum ns. There ~re addt iona l optio ns that cont rol
form attin g of the over all repo rt. Repo rt opti ons
inclu de row desc ripti on widt h settin~, colum
n
widt h, numb er of colum ns per page , decim al plac es,
and othe r featu res.
The OPTIONS (71) comm and allow s you to set optio
ns
that cont rol gene ral table form attin g. An exam ple
illus trate s the featu res:
-3.7 -
1B FORMAT:
19
ROWS:
20 ROW TITLE
21 SET TYPE
22 SHOW ROWS
23 REORDER
24
COLS:
25 COL TITLE
26 SET TYPE
60
UT I LI TY:
61 LOAD TBL
62 SAVE TBL
f53 CLR DATA
64 RES ET
65 REDISPL AY
66 LrST TBLS
67 ERASE TBL
68 PRINT TBL
69
70
PRINT:
71 OFT IONS
72 TITLES
73 REPORT
74 SHOW OPTS
75 SAVE REP
76
77
78
79
ENTER COMMAND:
71 <RETURR>
Select options command. For each option, if you press the
key without providing a response, ProfitPlan assumes
RETURN
the previous setting for an option should remain unchanged.
10 <RETURN>
ROW DESCRIPTION WIDTH (4-30):
Normally, the area saved for printing row description is 20
character positions. You can set the row description area to
accommodate your specific report.
COLUMN WIDTH (4-20):
<RETURN>
Usually, column widths are set to 10 character positions.
You can use the SET TYPE (26) command for columns to set
individual columns. The remaining columns wi 11 use the
setting provided here.
NUMBER OF COLUMNS PER PAGE (1-20):
<RETURN>
For
Ordinarily, ProfitPlan prints 10 columns per page.
example, if you need to print 15 columns for a report, then
Profi tPlan prints the first 10 columns on page 1 and the next
5 columns on page 2. Profi tPl an automatical ly repeats the
row titles, report titles and column titles for each page.
NUMBER OF DECIMAL PLACES (0-3 ):
<RETURN>
Normally, all values are printed with 1 decimal place. You
can control decimal places for individual rows and columns
using the SET TYPE commands.
OMIT ZERO ROWS (NO=O,YES=l):
<RETURN>
Sometimes, it is desirable to automaticall y skip the printing
of any row that contains all zero values. Normally, this
option is turned off.
SUPPRESS ZEROS (NO=O,DASH=l,BLANK=2):
2 <RETURN)
Sometimes, instead of printing values in your table as 0.0,
the report would be more readable if all zeros in your table
would be replaced by a blank or a dashed line. Normally, all
values are printed.
PRINT ROW DESC AFTER WHICH COLUMN (0-9):
<RETURN>
Instead of printing the row descriptions on the far left side
of the report, clarity may be enhanced by printing the row
descriptions in tbe middle of the report. For example, for
financial balance sheets, the prior year end balances are
printed to the left of row descriptions while quarterly
Another example would
projections are printed to the right.
appear on the
variances
monthly
where
reporting
be variance
-3.8-
left while year-to-date variances are printed on the right.
Normally, row descriptions are printed on the far left.
NEGATIVE NUMBERS (-N=O,N-=1,(N)=2):
<RETUJlB)
Negative numbers are normally displayed with a negative sign
proceeding the number. For accounting purposes, it may be
desirable to show negative values either with a trailing
negative sign or in parenthesis.
PAGE CONTROL (OFF=O,FF=l,PAUSE= 2):
<RETURN>
If a report extends over several pages, ProfitPlan normally
skips three blank lines between pages and continues to print
the next page without intervention.
You can request
ProfitPlan to issue a page eject (FF) between pages, so that
each page appears on a new sheet of paper, or to pause
between pages to allow a new sheet of paper to be inserted
into the printer.
<RETURN>
OMIT COMMAS (NO=O, YES=l ):
Normally, ProfitPlan prints all numbers with commas to
separate every three digits of large numbers.
To accomodate
wide reports, the comma option can be turned off to save
space.
DOUBLE SPACE (NO=O,YES=l):
<RETUBB>
ProfitPlan reports are normally single spaced.
request that all data rows be double spaced.
OMIT LINE NUMBERS (NO=O,YES=l)=
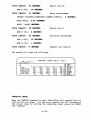
You can
<RETURN>
Line numbers are printed on reports so that you can reference
between printed reports and the table.
On final presentations, it may be desirable to omit both row and column
numbers in the printed report.
The TITLES command (72) allows you to set title information and
report ranges prior to printing a report.
ENTER COMMAND:
72 <RETUBll>
Select titles command. This command will accept title information and print your report. For each option, if you press
the RETURN key without providing a response, ProfitPlan
assumes the previous setting for an option should remain
unchanged.
PAGE NUMBER (0-999):
<RETURN>
ProfitPlan will print a page number on the upper right corner
of your report. A 0 response tells ProfitPlan that no page
number should be printed.
-3.9-
81 <RETURN>
DATE (YEAR AS YY):
ProfitPlan will print date information on the upper left
corner of your report. A 0 response would tell ProfitPlan
to skip the date information.
1 <RETURN>
MONTH (1-12):
DAY (1-31): 15 <RETURN>
ROW-RANGE BEGIN (1-50):
1 <RETURN>
ProfitPlan asks for the row range for this report. For the
inventory problem, you want to print rows 1 to 6.
6
END (1-50):
<RE~UBR>
COL-RANGE BEGIN (1-20):
1 <RETURN>
ProfitPlan asks for the column range.
3 <RETURN>
END (1-20):
TITLE 1:
Print columns 1 to 3.
Taking Inventory <RETURN>
ProfitPlan allows a 3-line title. Each line is automatically
centered at the top of each page of your report.
TITLE 2:
Sample Problem <RETURN>
TITLE 3:
<RETUBR>
<RETURN>
SET PAPER; HIT RETURN.
Check to see that your printer is on and ready to print. To
cancel the report, key CAN.
The following report will now be printed.
1/U/81
Taktn1 IRventor1
a..ple Probl(.000)
UNIT
COST
JTBMS:
DISKS
CHAIRS
SHILYIS
TOTAL
300.0
uo.o
aoo.o
TOTAL
QUANTITY
AMOUNT
10
3,000.0
5
1,000.0
ao
3,ooo.o
7,000.0
You can also use the REPORT (73) command to get printed copies
of your table without having to provide the title information.
-3.10-
LOOKING AT REPORT OPTIONS
Report options and titles do not affect the screen.
These
settings control the appearanc e of printed output.
You can
review your current options using the command SHOW OPTS (74).
ENTER COMMAND:
74 <RETURN>
ROI 1 (ITEMS:) <-ENTER COMMAND:
UNIT
ROW
COST
--REPORT
DATE:
Look at report options.
KODE•NORMAL
QUANTITY
ORDER•R/C
ROW•l-6
COL•l-3
TOTAL
AMOUNT
18 FORMAT:
OPTIONS: ----1---- ----2---- ----3---- ----4---- ----5---1/15/81
PAGE:
0
TITLE 1: Taking Inventory
TITLE 2: Sample Problem
TITLE 3: ($000)
ROW DESCRIPTION WIDTH: 10
(NO•O,YES•l)
COLUMN WIDTH: 10
OMIT COMMAS: 0
NUMBER OF COLUMNS ·pEft PAGE: 5
OOUBLE SPACE: 0
NUMBER OP DECIMAL PLACES: 1
OMIT LINE NUMBERS 1
OMIT ZERO ROWS (NO•O,YES•l): O
SUPPRESS ZERO VALUES (NO•O,DASH•l,BLANK•2): 2
PRINT ROW DESCRIPTION AFTER WHICH COLUMN: 0
NEGATIVE NUMBERS (-N=O,N-•l,(N)= 2): O
PAGE CONTROL (OFF•O,PF•l,PAU SE=2): 0
19 ROWS:
20 ROI TITLE
21 SET TYPE
22
SHOW ROWS
23 REORDER
24 COLS:
25 COL TITLE
26 SET TYPE
27 SHOW COLS
28 REORDER
29
30
DATA:
31 ENTER
32
CHANGE
33 SELECT ROW
34
SELECT COL
35 FORMULA
36 GOTO
37 PLUG
CUSTOMIZING REPORTS FOR PRINTERS
ProfitPla n works with all brands of printers.
Technica lly,
ProfitPla n prints all reports to the CP/M LST: device.
Therefore , if you need to interface your system with a particula r
printer for printing ProfitPla n reports, you should check your
system manuals for details.
(This include baud rate settings and
cable requireme nts.)
You can print reports that are 80 columns wide or even reports
that are 256 columns wide.
The report width is limited by the
printer and controlla ble through ProfitPlan options.
To select the report width, you use the row title width, column
width and number of columns options in the OPTIONS command.
The
width of printed reports in ProfitPla n is simply calculate d as
follows:
Report Width
=
Row Title Width + Column Width x # of Columns
If you set the options to a width that is greater than can be
handled by your printer, then the printed results would not be
meaningfu l.
Therefore , you should set options appropria tely for
your printer.
-3.11-
PRINTING TABLE DESCRIPTIONS
You can print a copy of your table, complete with row settings,
row commands, column settings, column commands, report options
and title information. These reports help you to remember the
structure of your models.
The PRINT TBL command produces a copy of your table. The sample
report for the inventory example is shown below.
Table:
MicroPlan Version 3.00
50 x 20
TABLE NAME=demo2
TITLE SECTION:
PAGE:
1/15/ 81
DATE:
ROW RANGE:
1 TO
5
COL RANGE:
0
3
1 TO
TITLE 1: Taking Inventory
TITLE 2: MicroPlan sample problem
TITLE 3: X
ROW SECTION:
ROW
TYPE
1 Items:
2 Desks
3 Chairs
4 Shelves
5 Total
head
data
data
data
data
UNDER BLANK DEC FOR
LINE LINES SIZ MAT COMMAND
PARAMETERS
--------- --------------
dash
- SUM
ROWS 2 TO 4
COLUMN SECTION:
COLUMN
1 unit cost
2 quantity
3 total amount
COLUMN DEC FOR
WIDTH SIZ MAT
10
10
10
COMMAND
PARAMETERS
MULTIPLY
COL=l
1
0
1
REPORT OPTIONS SECTION:
ROW DESCRIPTION WIDTH: 10
COLUMN WIDTH: 10
NUMBER OF COLUMNS PER PAGE: 10
NUMBER OF DECIMAL PLACES: 1
OMIT ZERO ROWS (NO=O,YES•l): 0
SUPPRESS ZERO VALUES (NO=O,DASH=l,BLANK=2): 2
PRINT ROW DESCRIPTION AFTER WHICH COLUMN: 0
NEGATIVE NUMBERS (-N=O,N-=1,(N)=2): 0
PAGE CONTROL (OFF=O,FF=l,PAUSE=2): 0
OMIT COMMAS (NO=O, YES=l): 0
DOUBLE SPACE (N0=-0, YES=l): 0
OMIT LINE NUMBERS (NO=O,YES=l): 0
-3.12-
COL=2
CANCELLING REPORTS
Once the report starts printing, you may want to cancel the
report because you immediately notice an error in the option
setting or in the reported values.
You can cancel reports by
using the CAN key.
After pressing the CAN key, your report will
stop printing and ProfitPlan will print a message that the report
has been cancelled.
CHANGING DESCRIPTIONS
The ROW TITLE and COL TITLE commands can also be used to change
row and ~ol umn descriptions. These commands can be used to
correct typing errors or to supply new titles. The new
descriptions you supply simply replace the old descriptions of
the table.
You can insert a new row (23) or column (28) using the REORDER
commands. Insertions require two steps:
1.
Enter the new row description in any not used row or
column.
2.
Use the REORDER command to position the new row or column
in its proper position.
For example, lets insert a new row into the inventory example for
cabinets. You want row 4 to show cabinets at a unit cost of 225.0
and quantity of 15. The following commands does this:
ENTER COMMAND:
23 <RETURN>
Reorder rows.
OLD NUMBER (1-50):
10 <RETURN>
NEW NUMBER (1-50):
4 <RETURN>
Row 4 now shows a line of zeros. You can select row 4, enter the
title 'cabinets', enter the data and recalculate your results.
When you add new lines to your table, ProfitPlan automatically
maintains the command references for existing rows and columns.
For example, if the command for row 4 is to add row 2 and row 3
and you have inserted a new row 1, ProfitPlan will automatically
change the command logic for the new row 5 to add the new row 3
and row 4.
In the previous inventory example, ProfitPlan automatically
includes the new row when a new total is calculated for the items
in the inventory list.
You can also remove rows or columns using the REORDER commands.
By positioning the row you wish to delete outside of the row
-3.13-
range, you can effectively remove rows. However, any other rows
that reference a deleted row will continue to retrieve values
from that row. Of course, the same applies to columns.
60
SAVING AND LOADING TABLES
You can save tables on diskettes and load the
tables again using the LOAD TBL and SAVE TBL
commands.
Each table is identified by an 8 character name. You can direct the tables to be saved
or loaded from any of the disk drives of your
computer.
To illustrate the save and load commands, save the
inventory example, reset the table and load the
saved inventory table from disk.
ENTER COMMAND:
67
68
69
70
71
72
73
74
75
76
77
PRINT:
OPTIONS
TITLES
REPORT
SHOW OPTS
SAVE REP
78
79
ASSETS <RETURN>
Reset ProfitPlan.
64 <RETURN>
VERIFY (NO=O,YES=l):
ENTER COMMAND:
65
66
UTILITY:
LOAD TBL
SAVE TBL
CLR DATA
RESET
REDISPLAY
LIST TBLS
ERASE TBL
PRINT TBL
Save table command.
ENTER COMMAND: 62 <RETURN>
TABLE NAME:
61
62
63
64
1 <RETURN>
Load table command.
61 <RETURN>
TABLE NAME:
ASSETS <RETURN>
The following information is saved for each table:
1.
Report options and titles.
2.
Range settings and compute order.
3.
Row descriptions, options and commands.
4.
Column descriptions, options and commands.
5.
Table values.
Generally, all relevant parameters are saved so that you can
continue from one session to another without fear of loss of
data.
MAINTAINING TABLES
ProfitPlan automatically keeps track of all the tables you
create. You can use the LIST TBLS command to print a list of all
your tables on your printer.
You can also use the ERASE.TBL
command to erase a table from your diskettes.
-3.14-
Whenever you use a load or save command, you have the option to
examine the contents of a diskette by hitting the RETURN key in
response to the ProfitPlan request for a filename.
By issuing a
series of RETURN keys, you can examine the contents of a diskette
one table at a time.
ProfitPlan will display the names of available tables, the report
title informati on and the table size informati on on line 2 of
your screen.
This helps you to keep track of your tables.
CHANGING DISK DRIVES
To save tables on a specified disk drive, use the command SET
DRIVE (13) to specify the drive name. ProfitPla n will use that
drive as the data drive for all subseque nt load and save
operation s.
The SET DRIVE command will also allow you to change diskettes
during a ProfitPlan session. Whenever you change diskettes , you
should always issue a SET DRIVE command.
INTERFACING WITH WORD PROCESSORS
ProfitPlan reports can be saved in a file for insertion into text
produced on your word processin g software.
The SAVE REP (75)
command allows you to print reports into a file instead of a
printer.
The SAVE REP command is identical to the REPORT command. This
means all OPTIONS and TITLES will be included in the report. By
saving the report in a file, you can include Profi tPlan reports
in the body of text from a word processor , enhance reports using
a word processor editor, or SPOOL reports to printers.
Since the saved reports are normal CP/M files, ProfitPla n will
work with any word processing software.
-3.15-
SECTION 4
Advanced Usage
This section will show you the advanced commands of ProfitPlan .
You will learn to enter formulas into ProfitPla n, to use the
PLUG, NULLIFY and FIX commands and to set up ProfitPla n for
different size tables and for different display formattin g.
USING FORMULAS
Although ProfitPlan supplies many built-in formulas, it may be necessary for you to enter your own
formulas for specialize d computati ons.
The ProfitPlan FORMULA (35) command accepts formulas and performs computat ion using your
formulas. You can enter formulas that add (+),
subtract (-), multiply (*), and divide (/). You
can reference rows, columns or single values of
the table in formulas.
31 BNTBR
32 CllAllGI
33 SILICT ROW
34 SILBCT COL
35 PORIUJLA
38 GOTO
37 PLUG
311 PII
39
As an example, suppose that cost of goods has a fixed and a
variable componen t. Cost of goods is 45% of sales plus a $300
constant expense.
If row 1 contains sales data, you can enter
the formula:
.45
*
Ll + 300
to calculate the desired results.
Lets use ProfitPla n to produce the above example. First, enter
some sales data into row 1 of the table.
ENTER COMMAND:
ROW (1-50):
ENTER COMMAND:
33 <RETURN>
1
Select row 1.
<RETURN>
31 <RETURN>
Enter sales data.
CHOOSE (VALUES=O,CONSTANT=l,GROW=2,INCR=3):
BASE VALUE:
1000 <RETURN>
-4.1-
3 <RETURN>
RATE:
100 <RETURN>
ENTER COMMAND:
FORMULA:
Use the formula command.
35 <RETURN>
.45*L1+300 <RETURN>
Check your results against the following:
MODEaNORMAL
ROW 3 <-ENTER COMMAND:
ROW
1
2
3
4
5
6
7
ORDER=R/C ROWal-50
COL=l-20
----2-------1-------5-------4-------3---1,100.0
1, ooo. o
1,400.0
1,300.0
1, 200. 0
750.0
0.0
o.o
o.o
o.o
o.o
795.0
o.o
o.o
o.o
o.o
o.o
840.0
0.0
o.o
o.o
o.o
o.o
885.0
o.o
o.o
o.o
o.o
930.0
0.0
o.o
o.o
0.0
30 DATA:
31 ENTER
32 CHANGE
33 SELECT ROW
34 SELECT COL
35 FORMULA
6 GOTO
7 PLUG
8 FIX
0
REFERENCING TABLE VALUES
You can reference any row or column of the table by preceeding
the row or column number by the letter L. For example, you would
reference row 7 as L7 or column 19 as L19.
ProfitPlan automatical ly distinguishe s between row and column
references by looking at the data pointer. If the data pointer
If the
points to a row, then all line references are to rows.
to
are
references
line
data pointer points to a column, then all
columns.
Single value
You can also reference single values in the table.
references are formed by preceeding the row and column number
For example, to reference the value in row 1,
with the letter V.
To reference row
column 1, enter Vl,1 as part o.f your formula.
(Note
reference.
8, column 19 of the table, enter VS, 19 as the
part
a
also
is
that the comma between the row and column number
of the formula.)
Of course, you can always use constants in your formulas.
Constants are numbers such as .45 and 300 in the previous
example. (Negative numbers such as -1.0, cannot he used in
ProfitPlan. To enter negative numbers, you can enter it as an
expression such as (0-1.0).)
WRITING FORMULAS
You combine table references and constants with mathematica l
The valid operations consist of
operators to form formulas.
addition (+), subtraction (-), multiplicat ion(*) and division
( /).
-4.2-
Sample formulas include:
Ll
Equivalent to GET command.
Ll-L2-L3
Subtract line 2 and 3 from line 1.
L3/L2
*
L3/V3,l
100
Equivalent to the RATIO command.
*
Calculate line 3 as a percent of the value in
the 1st column of row 3.
100
Vl,1
Set current row or column to the value in
row 1, column 1.
In a complex formula, multiplication and division is performed
prior to addition and subtraction. For example, in the formula:
L3 + 2
*
Ll
Line 1 wi 11 be multiplied by 2 before adding the values from line
3.
If your intent is to add 2 to every value of L3 before
multiplying by the values in line 1, you can use parentheses.
For example:
*
(L3 + 2)
Ll
would clearly specify your intent.
TRYING FORMULAS
The easiest way to learn is by doing.
Try the examples above in
ProfitPlan. After entering all the formulas, the table should
look similar to the following:
ROW
8
MODE=NORMAL
<--
ORDER=R/C ROW=l-50
COL=l-20
ENTER COMMAND:
ROW
1 ENTERED
2 .45*Ll+300
3 Ll
4 Ll-L2-L3
5 L3/L2*100
6 L3/V3,1*100
7 Vl 1
----1-------2-------3-------4-------5---1, 000. 0
1,100.0
1,200.0
1,300.0
1,400.0
750.0
1,000.0
-750.0
133.3
100.0
1 000.0
795.0
1,100.0
-795.0
138.4
110.0
1 000.
840.0
1,200.0
-840.0
142.9
120.0
1 000.
-4. 3-
885.0
1,300.0
-885.0
146.9
130.0
1 0
930.0
1,400.0
-930.0
150.5
140.0
0
30
31
32
33
34
35
36
37
38
DATA:
ENTER
CHANGE
SELECT ROW
SELECT COL
FORMULA
GOTO
PLUG
FIX
USING THE PLUG COMMAND
Sometimes, it is useful to relate various entries of your table
in a formula and store the single valued result in a specific
entry of your table.
For example, you might calculate summaries
at the bottom of your report.
The PLUG command allows you to specify a formula, evaluates the
formula and stores the result in any cell of your table.
PLUG is
different from normal ProfitPlan commands in that it works with
individual cells as opposed to a row or a column at a time.
PLUG formulas are similar to formulas as described above;
however, these formulas cannot have references to an entire row
or column (i.e. no Ln references).
PLUG formulas can only
reference individual table values (i.e. Vr,c) or constants.
The results from PLUG commands can be placed anywhere on your
table.
Note that the PLUG command will also be saved in the
current row or column of your table. Therefore, before using the
PLUG command, posit ion the data pointer to a row or column that
is not being used. After the PLUG command, the PLUG command will
be memorized as part of that row or column.
When you update a table, PLUG commands stored in tables will
behave just like normal ProfitPlan commands. PLUG calculations
will also be automatically updated.
To illustrate the use of PLUG, suppose you want to do a special
weighted profit margin. The formula is the sum of profits for
the first three years divided by the sales for the first three
year. The following commands illustrate this calculation:
33 <RETURN>
ENTER COMMAND:
ROW (1-50):
Select empty row.
50 <RETURN>
37 <RETURN>
ENTER COMMAND:
Plug result in row 50, col 1.
ROW (1-50):
50 <RETURN>
COL (1-20):
1 <RETURN>
FORMULA:
(V6,l+V6,2+V6,3)/(Vl,l+Vl,2+Vl,3)*100 <RETURN>
The calculated result would be displayed in row 50, column 1.
USING THE FIX COMMAND
The FIX command will recalculate the current row or column. It
allows you to manually recalculate a row or column.
-4.4-
Sometimes, the calculation order required to correctly update
values is more complex than the simple row/column order that is
permitted by the ORDER command. FIX can be used to manually
supplement these calculations.
For example, if you add a total column and a percentage profit
row to the 5-year projection example from Section 1, then none of
the compute ORDER options correctly calculates the percentage
profit for the total column. The correct order is to do rows,
then the total column, and finally the row of profit margins.
The FIX command can quickly remedy these situations.
After using
COMPUTE for updating the rows and columns, you use FIX as follows
to perform an extra calculation on the profit margins:
1. Position the data pointer to the profit margin row.
2. Use the FIX command to recalculate the profit margins.
USING NULLIFY
ProfitPlan automatically memorizes commands as part of your
table. Sometimes, you need to eliminate the command without
changing the data associated with a row or column. The NULL I FY
command does this.
NULLIFY will prompt to verify that the
current row or column should be nullified. In effect, NULLIFY
will cancel the automatic update feature of ProfitPlan for a
specific row or column.
WORKING WITH DIFFERENT SIZE TABLES
ProfitPlan table sizes cau be changed to accomodate a variety of
problems. For example, by choosing a 5 column format, you can
have up to 200 rows available. This format could handle a full
income statement, cash flow and balance sheet in a single table.
With 60 columns in your table, you can do a 5 year, monthly
projection of cashflows for a real estate development project.
The SETUP (14) command allows you to select table sizes. After
specifying the number of columns you need, Profi tPlan automa tical ly calculates the maximum number of rows for the table.
ProfitPlan also resets all options to permit you to proceed with
a new problem.
The size of ProfitPlan tables depends on the memory available.
Generally, you can store 1,000 to 1,200 data values in a single
table. Of course, SETUP automatically calculates the limits.
When you load a ProfitPlan table, if the new table has different
dimensions compared to the current table, ProfitPlan allows two
options:
-4.5-
1. Use the dimensions of the new table.
2. Use the dimensions of the current table.
In the latter case, ProfitPlan only loads those rows and columns
This option, in effect, changes the
that are in common.
For example, you can use this
dimensions of the new table.
Of
option to add extra rows and columns to an existing table.
limited
still
is
table
any
in
available
space
total
the
course,
by memory.
When you try to squeeze a larger table into a smaller table, the
In particular, if you have changed
results may be unpredictable.
rows or columns using the REORDER command, the new table will
have pro bl ems.
DESIGNING DISPLAY FORMATS
Normally, ProfitPlan shows 5 columns and 17 rows on your screen.
Each number has 1 decimal position, each column is 10 spaces and
the row title uses 15 spaces.
The SET CRT (15) command changes the display parameters. For
example, you can have 2 columns each 10 spaces wide with 25
This allows financial reports to show
spaces for the row title.
up to trillion dollar figures with penny accuracy. ProfitPlan
numbers are accurate to 14 digits.
You can al so design the display to show 10 columns 5 characters
wide. This displays more columns, but each number must be pretty
(Large numbers that require more space will be displayed
small.
as 3 stars. ***)
For an 80 column screen, 65 spaces are available for the table
After subtracting the space required for the row title,
area.
ProfitPlan calculates the number of columns depending on the size
of the columns. Note that all columns will be the same size. Of
course, the printed report can have individually set column
widths.
The SET CRT command does not change any of the values in the
Therefore, feel free to experiment with this command and
table.
design screens to suit your needs.
-4.6-
APPENDIX A
Instal l a ti on
To use ProfitPlan ,
system:
you will need the following type of computer
1.
The operating system is CP/M* or compatib le with CP/M.
Version 2.0 or later is required. CP/M Version 1.4 will
not support ProfitPlan correctly .
2.
Your system must have at least one floppy disk drive. Two
drives would be preferred . They can be either 8" or the
small 5" drives.
About 120 kilobytes of storage capacity
is required to handle ProfitPlan 's system files.
For your
own table and program storage, you wi 11 need additiona l
capacity.
3.
Your computer should have 64 kilobytes of memory (RAM).
The minimum quantity depends on the size of the operating
system. At least 48 kilobytes is necessary . ProfitPlan can
also be used in MP/M; however, ProfitPlan can only be used
in 48 kilobyte user banks.
4.
You will need a display that has at minimum, 'cursor
addressin g' and 'clear screen' features.
Consult your
dealer or the terminal user manual for these features.
(Optimall y, your terminal should have 'cursor keys',
'function keys' and a numeric keypad.)
5.
You need a printer for printing reports.
INSTALLATION
You should keep the original diskette issued by CHANG LABS as a
backup diskette.
The following procedure will help you set up a
ProfitPlan diskette.
1.
Follow the instructio ns that come with your computer and
create a system diskette.
You will need the system
utilities as well.
2.
Insert the ProfitPlan disk in the B drive.
3.
Copy all ProfitPla n files
following command:
-A.1-
to
your diskette
using
the
CP/M Systems:
4.
PIP A:=B:*.* [V]
The custom ization
Issue the command CUSTOM <RETURN>.
program allows you to taylor ProfitP lan to theterm inal
you are using.
ProfitPlan installation procedure
(C) COPYRIGHT 1981 Chang Laboratories Inc.
***
Terminal Menu
***
B
D
F
H
A ADDS (VIEWPOINT)
C BEEHIVE 157/160/162
E HAZELTINE 1420/1520
G HEWLETT PACKARD 2621A/P
I LEAR SIEGLER
K TELEVIDEO 912
M TE LEVI DEO 950
0 WYSE
Q OTHER
J
L
N
P
BEEHIVE 150/152
DEC VTlOO
HAZELTINE 1400/1410/15 00
IBM 3101
SOROC 120/140
TELEVIDEO 920
TELEVIDEO 910
ZENTEC
PLEASE ENTER SELECTION (1 LETTER): a
ADDS VIEWPOINT
1. Backspace: Use BACK SPACE key.
2. Cancel: Use HOME key.
3. Scrolling: Use ESC followed by numeric key.
4. Cursor: Use ARROW keys.
DONE.
Now, you are ready to use ProfitPl an.
consult your dealer for instruct ions.
If you have any problem s,
PROTECTION AGAINST DISTRIBUTION
You can make a copy of ProfitP lan for your own use in case your
Copies of ProfitP lan for distrib ution
disk fails due to wear.
copyrigh t laws.
violate
even to your friends
Your copy number appears
Each copy of ProfitPl an is serializ ed.
Only you have this
tPlan.
Profi
on the display each time you use
your ProfitP lan
of
copy
Each
registe rd copy of ProfitP lan.
Therefo re, it
cation.
diskette would als6 show your copy identifi
copy of
tered
un-regis
an
would be easy to identify the source of
ProfitPl an.
-A.2-
CORFIGURATION ISSUES
Each comput er system has its own peculi ar feature s. The followin~
notes provide you with some aids in case you have problem s using
ProfitP lan on your system .
1.
Instead of display ing the proper table, if your screen is
compl etely unread able, this is caused by select ing the
wrong termin al specif icatio ns. Run the CUSTOM progra m
again and make sure the proper equipm ent has been
specif ied.
2.
Each termin alman ufactu rer suppli es specia l keys that
perform specia lized tasks indepe ndent of the compu ter.
These may includ e reset, clear screen and other keys.
While using ProfitP lan, you should avoid these keys. The
effect of these keys on Profi tPlan is unpred icable . If
by chance you do hit these keys and your table has been
distor ted, the comman d REDISPLAY (115) will clear the
screen and redisp lay the ProfitP lan table.
3.
If you have an unusua l brand of termin al, you may not
find your termin al on the CUSTOM menu.
In such cases,
contac t your dealer for help.
Author ized dealer s should
have the ProfitP lan 'Custom ization Notes' .
4.
Profi tPlan suppor ts Functi on Keys.
Profi tPlan can be
program med to recogn ize functio n keys as freque ntly used
comman ds. Contac t your dealer for suppor t.
5.
ProfitP lan can be used under MP/M, the multi- user operating system . Contac t your dealer or write to Chang Labs
for our docume nt, "Using ProfitP lan on MP/M".
POSSIBLE ERRORS
When using Profit Plan on diske tte based system s, you may
encoun ter some errors .
The follow ing list will help you to
recogn ize the problem and to rectify common errors:
1.
ME ERROR. Disket te direct ory is full.
This means you
cannot store any more files on this disket te.
2.
DW ERROR.
No disket te space left.
This means there is
space left on the disket te for more files.
3.
OM ERROR. Insuff icient memory error.
and specify smalle r size tables .
4.
BDOS ERROR.
Problem with the disket te.
CP/M manual for assista nce.
5.
OF ERROR.
large.
Arithm etic overflo w.
-A.3-
Restar t ProfitP lan
Consu lt your
Some number was too
APPENDIX B
Command Reference
This command reference provides a short description for every
command.
HOW TO USE REFERENCE
Each command is organized by its menu grouping. You get the
command number, command name, argument structure and a
description.
ProfitPlan memorizes your commands for what-if analysis. Commands
are automaticall y memorized in your tables.
In the sections below, the following notation is used to describe
how ProfitPlan treats each command:
T
means this command can be stored in your tables.
Of course, if no letter is given, ProfitPlan will not memorize
that command in tables.
-B.1-
1 FORMAT:
Display format commands. Enter row & column titles, set row or
column print options, look at options and move rows or columns.
2 DATA:
Display data entry commands. Enter data, move the data pointer
fix, nullify and goto commands.
3 MATH:
Display math commands. Arithmetic, cumulate, negate, get,
ceiling, floor, and row and column summations.
4 PRINT:
Display print commands. Set report options, titles and print
reports. Reports can be sent to disk files.
5 UTILITY:
Display utility commands. Save/load tables, re-dimension table
size, select drive, reset and redisplay screen.
6 COMPUTE
Set mode to compute. Re-compute your table to update for any
changes in the data.
command
7 HELP
Explains each command. Describes the commands and explains usage.
verify
9 STOP
Clears the display and exits to CP/M. The current table is not
automatically saved.
rowl TO row2
10 ROW RANGE
Set row range on status line (top line). Impacts calculations,
printed reports, and general data manipulation.
coll TO col2
11 COL RANGE
Set column range on status line (top line). Impacts
calculations, printed reports and general data manipulation.
order
12 ORDER
Set the computing order for your table. Select ROW/ONLY,
COL/ONLY, ROW/COL or COL/ROW.
drive
13 SET DRIVE
Select drive for saving and loading your files. Normally, the
current drive is used for saving and loading files.
number-of-columns number-of-rows
14 SET UP
Redimension tables to a different number of rows and columns.
Generally, each table can have up to about 1000 entries.
decimal-places row-width col-width
15 SET CRT
Set display parameters. You can control the row title area,
the column widths, and the number of decimal places.
-B.2-
FORllAT COllllANDS
18 FORMAT:
Display format commands. Enter row & column titles, set row or
column print options, look at options and move row or columns.
19 ROWS:
Row section of format commands.
20 ROW TITLE title ••• CANCEL
(DOWN, UP, CANCEL)
Enter or change row titles. Each title entered is placed in
the current row. The cursor keys move the current row pointer.
21 SET TYPE
row option ••• CANCEL
Allows you to specify the type of row, underlining, decimal
places, spacing and special formatting for each row.
22 SHOW ROWS
Display the current options for each row. Also shows the
commands stored for each row.
23 REORDER
old-row new-row
Move old-row into the position new-row. Use this command to
insert new rows or delete rows from your table.
24 COLS:
Column section of format commands.
25 COL TITLE titlel title2 ••• CAN (RIGHT, LEFT, CANCEL)
Enter or change col titles. Each title entered is placed in
the current col. The cursor keys move the current col pointer.
26 SET TYPE
column option ••• CANCEL
Allows you to specify the column width, decimal places and
special column formatting for each column.
27 SHOW COLS
Display the current options for each column. Also shows the
commands stored for each column.
28 REORDER
old-column new-column
Move old-column into the position new-column. Use this command
to insert new columns or delete columns from your table.
-B.3-
DATA ENTRY COllllANDS
30 DATA:
Display data entry commands. Enter data, move the data pointer
fix, nullify and goto commands.
31 ENTER (T) value ••• CAN (UP, DOWN, RIGHT, LEFT, CANCEL)
Enter values into table. Constant, grow and increase options
allow quick entry. Cursor keys allow individual data entry.
row, column <-- value
32 CHANGE
Change one value in your table.
33 SELECT ROW row
Move the data pointer to a new row of the table. Also, use the
up and down cursor keys to move the data pointer.
34 SELECT COL column
Move the data pointer to a new column of the table. Also, use
the right and left cursor keys to move the data pointer.
RESULT <-- formula
Use a formula. Formulas may reference a row or column (Ln),
values (Vr,c) or positive constants in the formula.
35 FORMULA (T)
row column
36 GOTO
Position the display screen with row,column in the upper left
corner of your terminal.
row, column <-- formula
37 PLUG (T)
Use a formula to calculate results for a particular cell. The
formula may reference table values (Vr,c) or constants.
38 FIX
Re-computes the current row or column. Use cursor keys to move
the data pointer to the right row or column before using FIX.
row/col
39 NULLIFY (T)
Nullify command associated with a row or column. The data in
the table is not affected.
-B.4-
MATHEMATICAL
COIOIAN~
40 MATH:
Display math commands. Arithmetic, cumulate, negate, get,
floor, ceiling and row and column summations.
41 ADD (T)
RESULT <-- row/coll + row/col2
Add two rows or columns of values.
42 SUBTRACT (T)
RESULT <-- row/coll - row/col2
Sutract the second row/col from the first row/col.
43 MULTIPLY (T)
RESULT <-- row/coll * row/col2
Multiply two rows or columns of values.
44 DIVIDE (T)
RESULT <-- row/coll / row/col2
Divide the first row/col by the second row/col.
45 NEGATE (T)
RESULT <-- - (row/col)
Negate a row or column of values.
46 INVERSE (T)
RESULT <-- 1 / (row/col)
Compute the inverse for a row or column of values.
47 INTEGER (T)
RESULT <-- INT(row/col)
Compute the integer part of a row or column of values by
dropping the fractional portion of a number.
48 ROUND (T)
RESULT <-- INT(row/col + 0.5)
Round a row or column of values to the nearest whole number.
49 CUMULATE (T)
RESULT(t) <-- RESULT(t-1) + row/col(t)
Compute cumulative sums for a row or column. Cumulate prompts
for year zero value. Use for ending balance calculations .
50 ABSOLUTE (T)
RESULT <-- ABS(row/col)
If a value is negative, the result is positive. If the value
is positive, the result is positive.
51 ADD K (T)
RESULT <-- row/col + value
Add a constant amount to a row or column.
52 SUB K (T)
RESULT <-- row/col - value
Subtract a constant amount from a row or column.
53 MOLT K (T)
RESULT <-- row/col * value
Multiply a row or column by a constant amount.
54 DIV K (T)
RESULT <-- row/col / value
Divide a row or column by a constant amount.
55 SUM (T)
RESULT <-- SUM( row/coll THROUGH row/col2 )
Sum a group of rows or a group of columns.
-B.5-
llATBEllATICAL COllllANDS
••• continued
56 GET (T}
RESULT <-- row/col
Get the values from a row or column.
RESULT <-- MAX(row/col, value)
If row/col is less than value, then the RESULT is value.
Otherwise RESULT is row/col.
57 FLOOR (T)
RESULT <-- MIN(row/col, value)
If row/col is greater than value, then the RESULT is value.
Otherwise RESULT is row/col.
58 CEILING {T)
UTILITY COllllANDS
60 UTILITY:
Display utility commands. Load, save, list, print, erase,
clear and r~set tables. Also redisplay screen.
61 LOAD TBL
filename
Load your table from your diskettes. On prompting for filenames, the available files will be shown.
62 SAVE TBL
filename
Save your table on diskettes. The descriptions, data, logic,
and all print options will be saved as part of the file.
63 CLR DATA verify
Clear all data from your table. Row and column titles, and
table logic will be maintained.
64 RESET
verify
Reset table values, row and column titles, table logic,
program steps.
65 REDISPLAY
Clear the screen and redisplays your table, menu and status
information. No data will be changed.
66 LIST TBLS
Print a list of the tables you have on your current diskette.
Listing will go to the printer.
67 ERASE TBL filename
Erase a table from your current diskette.
68 PRINT TBL
Print a description of your model. Listing will include row
tables, options,' table commands and global options.
-B.6-
PRINT COIOIANDS
70 PRINT:
Display print commands. Set report options, titles and print
reports. Resports can be sent to disk files.
option •••
Global report options. Row title width, column width, number
of columns, negative numbers, commas, line numbers, zeros, etc
71 OPTIONS
page date row-range col-range 3-line-ti tle
dates, row and column ranges and a 3 line
number,
Set page
follow.
will
report
title. A
72 TITLES
73 REPORT
Print report on your printer.
set prior to printing report.
Report options, title should be
74 SHOW OPTS
Display report options and title informatio n.
filename
75 SAVE REP
Print report to a disk file. Interface with word processor s,
or spool output to printer.
-B.7-