1
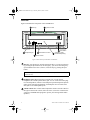
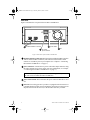
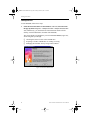
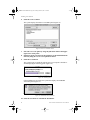
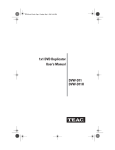
TeacFirewireCDRW.book Page 1 Tuesday, March 6, 2001 1:39 PM
FireWire (IEEE 1394)
CD-RW Drive
User’s Manual
CD-RW5120i
12X10X32
TeacFirewireCDRW.book Page 2 Tuesday, March 6, 2001 1:39 PM
TeacFirewireCDRW.book Page i Tuesday, March 6, 2001 1:39 PM
Safety Precautions
TEAC CD Rewritable (CD-RW) Drives are high-precision electronic devices. Do not use
them in any manner other than as specified in this manual. Please read this manual in its
entirety before you begin the installation procedure. Use of controls, adjustments, or
performance of procedures other than those specified herein may result in hazardous
radiation exposure.
To prevent fire or shock, do not expose the unit to moisture or rain.
To prevent electrical shock, do not attempt to disassemble the CD-RW Drive. Refer
servicing to authorized personnel.
The CD-RW Drive utilizes a laser beam that can be harmful to the eyes. Do not disassemble
the cabinet or unit. Do not attempt to look through the front panel or into the unit while the
power is turned on.
A user who changes or modifies the unit or operating procedures specified herein without
express written approval by the manufacturer will void user authority to operate the
equipment.
Specifications and features subject to change without notice or obligation.
FCC Radio Frequency Interference Regulations
Warning: This equipment generates, uses, and can radiate radio frequency energy and if
not installed and used in accordance with the instructions contained in this manual, may
cause harmful interference to radio and television communications. This equipment has
been tested and found to comply with the limits for a Class B digital device pursuant to
Subpart J of Part 15 of the FCC Rules. These limits are designed to provide reasonable
protection against harmful interference in a residential installation. However, there is no
guarantee that interference will not occur in a particular installation. To ensure compliance
with FCC rules, the cable that connects the unit to the computer must be a shielded interface
cable.
Note: Connecting this device to peripheral devices that do not comply with Class B
requirements or using an unshielded peripheral cable could result in interference to radio
or television reception. To ensure that the use of this product does not contribute to
interference, use a shielded interface cable.
If this equipment does cause harmful interference to radio or television reception (which
can be determined by turning the equipment off and on), the user may try to correct the
interference by one or more of the following measures:
• Reorient or relocate the receiving antenna.
• Move the device and the receiver further apart.
• Connect the equipment to an electrical outlet on a different circuit than the receiver.
• Consult the dealer or an experienced audio television technician.
Also, the following booklet may prove helpful: How to Identify and Resolve Radio-TV
Interference Problems. It is available from the U.S. Government Printing Office,
Washington, D.C. 20402, stock number 004-000-00345-4.
The user is cautioned that any changes or modifications not expressly approved by TEAC
America, Inc. could void the user’s warranty.
TEAC FireWire CD-RW Drive User’s Manual
i
TeacFirewireCDRW.book Page ii Tuesday, March 6, 2001 1:39 PM
Copyright and Trademark Information
• TEAC is a trademark of TEAC Corporation.
• IBM PC is a registered trademark of International Business Machines Corporation.
• Windows, Windows 95, Windows 98, Windows Me, Windows 2000 Professional, and
Windows NT are trademarks or registered trademarks of Microsoft Corporation.
• iMac DV, Power Macintosh G3 and G4 are trademarks or registered trademarks of Apple
Computer, Inc.
• Adobe and Acrobat are trademarks of Adobe Systems, Inc.
• Adaptec is a trademark of Adaptec, Inc.
• Firewire is a trademark of Apple Computer, Inc.
• All other trademarks and registered trademarks are the property of their respective
owners.
© Copyright 2001 TEAC America, Inc. All rights reserved. TEAC America, Inc. reserves
the right to modify product offerings or specifications without advance notice. No part
of this publication may be produced in any format without the express written permission
of TEAC America, Inc.
Registration Information
There is no need to register any portion of this kit. TEAC provides 100% support for the
drive and the Adaptec software. Refer to “Appendix C. Technical Support” on page 42 if
you wish to contact TEAC.
Product Warranty Information
This TEAC CD-RW Drive features a one year warranty from the date of purchase. Please
keep your receipt as proof of purchase.
About This Manual
This TEAC FireWire IEEE1394 CD-RW Drive User’s Manual explains how to install and
operate the TEAC FireWire CD-RW Drive. It is divided into the following main sections:
Chapter 1. Introduction: This chapter introduces the FireWire CD-RW drive and
describes shipping package contents and recommended system requirements.
Chapter 2. Connecting the FireWire CD-RW Drive: This chapter explains how to connect
the FireWire CD-RW drive to your computer and to audio equipment. It also includes an
important section on updating the Firewire/IEEE 1394 driver in Windows 98SE using the
included Update Module CD-ROM disc.
Chapter 3. Installing Software on Windows Systems: This chapter explains how to
install the pre-mastering and other software included on the TEAC FireWire CD-RW
Software CD-ROM for Windows systems.
Chapter 4. Installing Software on Macintosh Systems: This chapter explains how to
install the pre-mastering software included on the TEAC FireWire CD-RW Software CDROM for Macintosh systems.
Appendix A. About CD-R and CD-RW Discs: This appendix contains information about
media, formats, and loading and ejecting discs.
Appendix B. Specifications: This appendix provides technical specifications for the
TEAC FireWire CD-RW drive.
Appendix C. Technical Support: This appendix provides technical support listings for
TEAC in North America.
ii
TEAC FireWire CD-RW Drive User’s Manual
TeacFirewireCDRW.book Page iii Tuesday, March 6, 2001 1:39 PM
Table of Contents
Safety Precautions . . . . . . . . . . . . . . . . . . . . . . . . . . . . . . . . . . . . . . . . . . . . . . . . i
FCC Radio Frequency Interference Regulations . . . . . . . . . . . . . . . . . . . . . . . . . i
Copyright and Trademark Information . . . . . . . . . . . . . . . . . . . . . . . . . . . . . . . . ii
Registration Information . . . . . . . . . . . . . . . . . . . . . . . . . . . . . . . . . . . . . . . . . . . ii
Product Warranty Information . . . . . . . . . . . . . . . . . . . . . . . . . . . . . . . . . . . . . . ii
About This Manual . . . . . . . . . . . . . . . . . . . . . . . . . . . . . . . . . . . . . . . . . . . . . . . ii
List of Figures . . . . . . . . . . . . . . . . . . . . . . . . . . . . . . . . . . . . . . . . . . . . . . . . . . . v
Chapter 1. Introduction . . . . . . . . . . . . . . . . . . . . . . . . . . . . . . . . . . . . . . . . . . 1
About FireWire . . . . . . . . . . . . . . . . . . . . . . . . . . . . . . . . . . . . . . . . . . . . . . . . . . 1
Recommended System Requirements . . . . . . . . . . . . . . . . . . . . . . . . . . . . . . . . . 1
For Windows systems: . . . . . . . . . . . . . . . . . . . . . . . . . . . . . . . . . . . . . . . . . . . 1
For Macintosh systems: . . . . . . . . . . . . . . . . . . . . . . . . . . . . . . . . . . . . . . . . . . 2
FireWire CD-RW Package Contents . . . . . . . . . . . . . . . . . . . . . . . . . . . . . . . . . . 2
IEEE 1394 Update Module . . . . . . . . . . . . . . . . . . . . . . . . . . . . . . . . . . . . . . . 2
For Windows systems: . . . . . . . . . . . . . . . . . . . . . . . . . . . . . . . . . . . . . . . . . . 2
For Macintosh systems: . . . . . . . . . . . . . . . . . . . . . . . . . . . . . . . . . . . . . . . . . . 2
Front Panel . . . . . . . . . . . . . . . . . . . . . . . . . . . . . . . . . . . . . . . . . . . . . . . . . . . . . . 4
Rear Panel . . . . . . . . . . . . . . . . . . . . . . . . . . . . . . . . . . . . . . . . . . . . . . . . . . . . . . 6
Chapter 2. Connecting the FireWire CD-RW Drive . . . . . . . . . . . . . . . . . . . 7
Drive Orientation . . . . . . . . . . . . . . . . . . . . . . . . . . . . . . . . . . . . . . . . . . . . . . . . . 7
Connecting the CD-RW Drive to the Computer System . . . . . . . . . . . . . . . . . . . 7
Connecting to Audio Equipment . . . . . . . . . . . . . . . . . . . . . . . . . . . . . . . . . . . . 10
How to proceed with this installation: . . . . . . . . . . . . . . . . . . . . . . . . . . . . . . . . 11
Installing the FireWire/IEEE 1394 Driver Update Module for Windows 98SE 11
High Speed Recording Guidelines (Enabling DMA) . . . . . . . . . . . . . . . . . . . . 12
Windows 2000 . . . . . . . . . . . . . . . . . . . . . . . . . . . . . . . . . . . . . . . . . . . . . . . . 12
Windows 98SE and Windows ME . . . . . . . . . . . . . . . . . . . . . . . . . . . . . . . . . 13
Windows Drive Detection . . . . . . . . . . . . . . . . . . . . . . . . . . . . . . . . . . . . . . . . . 13
Chapter 3. Installing Software on Windows Systems . . . . . . . . . . . . . . . . . 15
Installing Easy CD Creator and DirectCD Software . . . . . . . . . . . . . . . . . . . . . 16
About the Reference Guides, ReadMe Files, and Help Files . . . . . . . . . . . . . . 21
About Online Registration . . . . . . . . . . . . . . . . . . . . . . . . . . . . . . . . . . . . . . . . . 21
About Web Checkup . . . . . . . . . . . . . . . . . . . . . . . . . . . . . . . . . . . . . . . . . . . . . 21
Starting Easy CD Creator . . . . . . . . . . . . . . . . . . . . . . . . . . . . . . . . . . . . . . . . . 22
Using Easy CD Creator . . . . . . . . . . . . . . . . . . . . . . . . . . . . . . . . . . . . . . . . . . . 22
CD Copier . . . . . . . . . . . . . . . . . . . . . . . . . . . . . . . . . . . . . . . . . . . . . . . . . . . . . 23
Copying (Duplicating) Discs Using CD Copier . . . . . . . . . . . . . . . . . . . . . . . 23
Using your CD-RW Drive as Source and Target . . . . . . . . . . . . . . . . . . . . . . 24
Creating a CD from a CD Image in Easy CD Creator . . . . . . . . . . . . . . . . . . 24
Creating an Image File . . . . . . . . . . . . . . . . . . . . . . . . . . . . . . . . . . . . . . . . . . 24
TEAC FireWire CD-RW Drive User’s Manual
iii
TeacFirewireCDRW.book Page iv Tuesday, March 6, 2001 1:39 PM
Creating a CD from the CD Image File: . . . . . . . . . . . . . . . . . . . . . . . . . . . . . 25
Creating an Audio CD from Multiple Discs . . . . . . . . . . . . . . . . . . . . . . . . . . 25
Extracting Audio Tracks to Wave Files . . . . . . . . . . . . . . . . . . . . . . . . . . . . . 26
Creating a Music CD from WAV, MP3, and WMA files . . . . . . . . . . . . . . . 26
Starting DirectCD . . . . . . . . . . . . . . . . . . . . . . . . . . . . . . . . . . . . . . . . . . . . . . . 28
Using DirectCD . . . . . . . . . . . . . . . . . . . . . . . . . . . . . . . . . . . . . . . . . . . . . . . . . 29
Formatting a Disc with Direct CD . . . . . . . . . . . . . . . . . . . . . . . . . . . . . . . . . 29
Ejecting a DirectCD Disc (ISO 9660 Closed Session Format) . . . . . . . . . . . 30
Writing Additional Data to a DirectCD Disc . . . . . . . . . . . . . . . . . . . . . . . . . 31
Uninstalling Programs . . . . . . . . . . . . . . . . . . . . . . . . . . . . . . . . . . . . . . . . . . . . 31
Chapter 4. Installing Software on Macintosh Systems . . . . . . . . . . . . . . . . 33
Installing Toast Software . . . . . . . . . . . . . . . . . . . . . . . . . . . . . . . . . . . . . . . . . . 34
Starting Toast . . . . . . . . . . . . . . . . . . . . . . . . . . . . . . . . . . . . . . . . . . . . . . . . . . . 37
Appendix A. About CD-R and CD-RW Discs . . . . . . . . . . . . . . . . . . . . . . . . 39
Handling Discs . . . . . . . . . . . . . . . . . . . . . . . . . . . . . . . . . . . . . . . . . . . . . . . . . 39
Recommended Media . . . . . . . . . . . . . . . . . . . . . . . . . . . . . . . . . . . . . . . . . . . . 39
Disc Formats . . . . . . . . . . . . . . . . . . . . . . . . . . . . . . . . . . . . . . . . . . . . . . . . . . . 40
Loading and Ejecting Discs . . . . . . . . . . . . . . . . . . . . . . . . . . . . . . . . . . . . . . . . 40
Appendix B. Specifications . . . . . . . . . . . . . . . . . . . . . . . . . . . . . . . . . . . . . . . 41
Appendix C. Technical Support . . . . . . . . . . . . . . . . . . . . . . . . . . . . . . . . . . . 42
iv
TEAC FireWire CD-RW User’s Manual
TeacFirewireCDRW.book Page v Tuesday, March 6, 2001 1:39 PM
List of Figures
Figure 1. FireWire CD-RW Drive Kit Package Contents . . . . . . . . . . . . . . . . . . 3
Figure 2. Front Panel of the FireWire CD-RW Drive . . . . . . . . . . . . . . . . . . . . . 4
Figure 3. Rear Panel of the FireWire CD-RW Drive . . . . . . . . . . . . . . . . . . . . . 6
Figure 4. Connecting the Power Cable and Power Adapter Block . . . . . . . . . . . 8
Figure 5. Connecting the Power and FireWire Cables to the CD-RW Drive . . . 9
Figure 6. Unplug Icon . . . . . . . . . . . . . . . . . . . . . . . . . . . . . . . . . . . . . . . . . . . . 10
Figure 7. Secondary IDE Channel Properties Panel . . . . . . . . . . . . . . . . . . . . . 12
Figure 8. Properties Panel . . . . . . . . . . . . . . . . . . . . . . . . . . . . . . . . . . . . . . . . . 13
Figure 9. Close Program Panel . . . . . . . . . . . . . . . . . . . . . . . . . . . . . . . . . . . . . 16
Figure 10. Adaptec Easy CD Creator/DirectCD Main Installation Panel . . . . . 17
Figure 11. InstallShield Setup Panel . . . . . . . . . . . . . . . . . . . . . . . . . . . . . . . . . 17
Figure 12. Welcome Panel . . . . . . . . . . . . . . . . . . . . . . . . . . . . . . . . . . . . . . . . 18
Figure 13. DirectCD Installation Support Warning . . . . . . . . . . . . . . . . . . . . . 18
Figure 14. Software License Agreement Panel . . . . . . . . . . . . . . . . . . . . . . . . . 18
Figure 15. Choose Destination Location Panel . . . . . . . . . . . . . . . . . . . . . . . . . 19
Figure 16. Setup Complete Panel . . . . . . . . . . . . . . . . . . . . . . . . . . . . . . . . . . . 19
Figure 17. Main Installation Panel . . . . . . . . . . . . . . . . . . . . . . . . . . . . . . . . . . 20
Figure 18. Reboot System Request Panel . . . . . . . . . . . . . . . . . . . . . . . . . . . . . 20
Figure 19. Easy CD Creator Welcome Panel . . . . . . . . . . . . . . . . . . . . . . . . . . 22
Figure 20. DirectCD Wizard Panel . . . . . . . . . . . . . . . . . . . . . . . . . . . . . . . . . . 28
Figure 21. Adaptec Toast Software Icon . . . . . . . . . . . . . . . . . . . . . . . . . . . . . . 34
Figure 22. Toast Main Installation Panel . . . . . . . . . . . . . . . . . . . . . . . . . . . . . 34
Figure 23. Continuation Panel . . . . . . . . . . . . . . . . . . . . . . . . . . . . . . . . . . . . . . 35
Figure 24. Read Me/Registration Panel . . . . . . . . . . . . . . . . . . . . . . . . . . . . . . . 35
Figure 25. Toast 4.1.2 Installer Panel . . . . . . . . . . . . . . . . . . . . . . . . . . . . . . . . 36
Figure 26. Installing Panel . . . . . . . . . . . . . . . . . . . . . . . . . . . . . . . . . . . . . . . . . 36
Figure 27. Installation Successful Panel . . . . . . . . . . . . . . . . . . . . . . . . . . . . . . 36
Figure 28. Toast Folder . . . . . . . . . . . . . . . . . . . . . . . . . . . . . . . . . . . . . . . . . . . 37
Figure 29. Toast Main Panel . . . . . . . . . . . . . . . . . . . . . . . . . . . . . . . . . . . . . . . 37
Figure 30. How to Handle Compact Discs (CD-R and CD-RW) . . . . . . . . . . . 39
Figure 31. Ejecting the Disc Tray . . . . . . . . . . . . . . . . . . . . . . . . . . . . . . . . . . . 40
TEAC FireWire CD-RW Drive User’s Manual
v
TeacFirewireCDRW.book Page vi Tuesday, March 6, 2001 1:39 PM
vi
TEAC FireWire CD-RW Drive User’s Manual
TeacFirewireCDRW.book Page 1 Tuesday, March 6, 2001 1:39 PM
Chapter 1. Introduction
Thank you for purchasing a TEAC FireWire CD-RW Drive kit.
The TEAC FireWire CD-RW Drive can write to CD-R media at up to12X speed,
write to CD-RW media at up to 10X speed, and read at a maximum of 32X speed
(It is also capable of operating at slower speeds, if preferred.)
CD-R discs enable you to create audio or data discs for permanent archival
storage. They cannot be overwritten. You can overwrite CD-Rewritable (CD-RW)
discs, typically up to 1,000 times.
The TEAC FireWire CD-RW Drive is an external peripheral device designed for use
with IBM PC compatible or Apple Macintosh computers that feature a FireWire (IEEE
1394) port. It features a hot-swappable FireWire interface and a powered tray for
convenient disc loading. (Please refer to “Appendix B. Specifications” on page 41 for
detailed information.)
About FireWire
IEEE 1394 is an industry standard serial communications interface protocol
published by the Institute of Electrical and Electronics Engineers. It is commonly
referred to as “FireWire.”
FireWire allows for extremely high-speed connections between personal
computers and peripherals or electronic devices (such as digital video cameras,
etc.). Currently, FireWire can attain data transfer rates of up to 400 Mbits per
second.
FireWire connections do not require bus termination. You can connect up to 17
FireWire devices in a serial daisy chain, or up to 63 devices using a branching
configuration.
Recommended System Requirements
For Windows systems:
❑
❑
❑
❑
❑
❑
❑
IBM PC-compatible computer: Pentium II 300MHz or higher
64MB of RAM
Available FireWire/IEEE 1394 interface port
Windows 98SE/Me or Windows 2000 Professional (Full installation, no
upgrades; Windows 95 and NT 4.x are not supported.)
800MB available hard disk space for CD image creation
CD-ROM drive (DAE support for CD to CD copy)
80MB available hard disk space for premastering software installation
TEAC FireWire CD-RW Drive User’s Manual
1
TeacFirewireCDRW.book Page 2 Tuesday, March 6, 2001 1:39 PM
For Macintosh systems:
❑
❑
❑
❑
❑
❑
❑
❑
Apple iMac DV, iBook, Power Macintosh G3, G4 or higher; 233 MHz or
higher
64MB of RAM
Available FireWire/IEEE 1394 interface port
Mac OS 9.0.4 or higher
Mac FireWire driver version 2.1 or higher
50MB available hard disk space for premastering software installation
800MB available hard disk space for CD image creation
CD-ROM drive (DAE support for CD to CD copy)
FireWire CD-RW Package Contents
The TEAC FireWire CD-RW Drive kit includes the following items (see
Figure 1 on page 3).
❑
TEAC FireWire CD-Rewritable (CD-RW) External Drive
❑
❑
❑
❑
❑
❑
Blank CD-R disc
Blank CD-RW disc (high-speed 4x to 10x)
FireWire/IEEE 1394 interface cable
AC power cable and transformer (two pieces)
TEAC FireWire CD-RW Drive User’s Manual (this booklet)
Three CD-ROM discs containing the following software:
IEEE 1394 Update Module
❑
Module to update IEEE 1394 Drivers for Windows 98SE
For Windows systems:
❑
❑
Adaptec Easy CD Creator premastering software (Version 4.03a or
higher)
Adaptec Direct CD drag & drop software (Version 3.03a or higher)
For Macintosh systems:
❑
2
Adaptec Toast premastering software (Version 4.1.2)
TEAC FireWire CD-RW User’s Manual
TeacFirewireCDRW.book Page 3 Tuesday, March 6, 2001 1:39 PM
Five discs:
• two CD-RW premastering software discs
• two blank discs
• one driver update disc
User’s Manual
FireWire interface cable
TEAC FireWire CD-RW Drive
AC power cable
and transformer
Figure 1. FireWire CD-RW Drive Kit Package Contents
Note: If any of the items above is missing from your kit upon purchase, please
contact your vendor immediately for replacement.
TEAC FireWire CD-RW Drive User’s Manual
3
TeacFirewireCDRW.book Page 4 Tuesday, March 6, 2001 1:39 PM
Front Panel
Figure 2 illustrates the front panel of the CD-RW Drive.
disc tray
power-on LED
eject button
headphone jack
LED status indicators
emergency eject
mechanism opening
volume control
Figure 2. Front Panel of the FireWire CD-RW Drive
disc tray: Use the disc tray to load CDs into the drive. You can open the tray
by pressing the Eject button. (In an emergency, you can use the emergency
eject mechanism. See item 5, below.) Close the tray by pressing the Eject
button.
Note: Do not push in the tray to close it; press the Eject button to extend or
retract the tray.
headphone jack: When listening to an audio CD, you can connect
headphones or external speakers to this jack. Use a 3.5 mm stereo mini-plug.
For external speakers, connect a stereo adapter to split the output into separate
cables for the left and right channels. Such adapters convert a male stereo
mini-jack to two female phono jacks.
volume control: The volume control adjusts the volume. Turn the control to
the right to increase the volume, left to decrease. (Lower the volume before
you start a CD-ROM audio program to protect your hearing and the audio
speakers.)
4
TEAC FireWire CD-RW User’s Manual
TeacFirewireCDRW.book Page 5 Tuesday, March 6, 2001 1:39 PM
LED status indicators: Two LED lights on the front panel indicate the
following operations as follows:
Operation
At tray loading
At tray eject
During write/erase
During CD playback
During seek/data transfer
During starting
Self-diagnosis error or
starting error
Left LED indication
off
off
blinks green (slow)
off
off
off
off
Right LED indication
blinks green (fast)
blinks green (fast)
off
blinks green (slow)
lights green
blinks green (medium)
blinks green (slow)
emergency eject mechanism: If the Eject button fails, you can turn off the
power to the CD-RW drive and insert a small, thin rod (such as a straightened
paper clip) into the emergency eject mechanism opening and press firmly to
eject the disc.
Caution: Do not attempt to use the emergency eject mechanism when
either the Power or Busy indicator is lit or you may seriously
damage the disc or the CD-RW drive.
eject button: Press this button to open or close the disc tray. (DirectCD disables
the manual Eject button and relies on software commands to eject the disc.
Refer to DirectCD Help for more information.)
Power-on LED: This LED is lit when the power to the drive is on, and unlit
when power is switched off.
TEAC FireWire CD-RW Drive User’s Manual
5
TeacFirewireCDRW.book Page 6 Tuesday, March 6, 2001 1:39 PM
Rear Panel
Figure 3 illustrates the rear panel of the FireWire CD-RW Drive.
power switch
FireWire interface connector
fan
DC power
input connector
Figure 3. Rear Panel of the FireWire CD-RW Drive
FireWire interface connectors (2): Connect the included FireWire interface
cable to either FireWire connector. (The other end of the interface cable
connects to a FireWire port on your computer. See “Chapter 2. Connecting
the FireWire CD-RW Drive” on page 7.)
power connector: Connect the AC power cable to this input connector. Plug
the other end into an AC power outlet. (For more information, see “Chapter
2. Connecting the FireWire CD-RW Drive” on page 7.)
Caution: To ensure proper operation, use only the original AC power cable
that came with your TEAC FireWire CD-RW drive.
power on/off switch: This switch turns the power to the FireWire drive on or
off.
fan vent: The cooling system of your drive is equipped with a heat sensor. It
is normal that the fan does not turn on until the unit requires cooling. Do not
impede air flow from the fan vent, or the FireWire drive may overheat.
6
TEAC FireWire CD-RW User’s Manual
TeacFirewireCDRW.book Page 7 Tuesday, March 6, 2001 1:39 PM
Chapter 2. Connecting the FireWire CD-RW Drive
This chapter explains how to connect the TEAC FireWire CD-RW drive to an
IBM PC compatible or Apple Macintosh computer. It also explains how to install
the appropriate software driver.
Drive Orientation
Locate the FireWire CD-RW drive on a stable, flat surface. You can use the drive
in a horizontal or vertical orientation. In a horizontal orientation, the eject button
should be located on the right side of the unit.
To position the drive in a vertical orientation, set the drive on the side that features
four small rubber pads (the right side of the unit as you look at the front panel).
The eject button should be located near the bottom of the unit.
Connecting the CD-RW Drive to the Computer System
This section explains how to connect the TEAC FireWire CD-RW drive to an
IBM PC compatible or Apple Macintosh computer that features a FireWire port.
Follow the steps below and refer to your computer's documentation for
information specific to your system.
1.
2.
For the initial installation, turn off your computer and all connected
peripheral devices.
Depending on your operating system:
Macintosh users: The IEEE 1394 port is integrated into your system. Skip to
step 3.
Windows users: Install your FireWire/IEEE 1394 interface card (card not
included with kit). Follow the instructions provided by the interface card
manufacturer, then return to this procedure.
3.
Assemble the two-piece power cable/adapter by connecting the power
cable and the power adapter block.
The power cable is shipped in two pieces: (a) one piece includes a male plug
and a two-pin female connector; (b) the other piece includes an adapter block
and a cylindrical four-pin male connector. Insert the two-pin female
connector into the power adapter block. (Refer to Figure 4.)
TEAC FireWire CD-RW Drive User’s Manual
7
TeacFirewireCDRW.book Page 8 Tuesday, March 6, 2001 1:39 PM
two-pin female connector
to AC outlet
(b) power adapter block
(a) power cable
to drive
Figure 4. Connecting the Power Cable and Power Adapter Block
4.
Connect the power cable to the CD-RW drive.
To do so, insert the circular four-pin male connector into the power input
connector on the rear panel of the CD-RW drive. Refer to Figure 4 on page 8
and Figure 5 on page 9.
5.
6.
7.
8.
Insert the male plug of the power cable into an AC power outlet.
Turn on the power to the FireWire CD-RW drive using the power switch
on the rear panel.
Start the computer.
Insert the FireWire interface cable into either FireWire port on the rear
panel of the CD-RW drive.
Refer to Figure 5 on page 9.
9.
Connect the other end of the FireWire interface cable to a FireWire port
on your computer.
Note: If you are connecting the cable to a FireWire hub, use a FireWire hub
that features an AC Power adapter.
8
TEAC FireWire CD-RW Drive User’s Manual
TeacFirewireCDRW.book Page 9 Tuesday, March 6, 2001 1:39 PM
Connection Sequence
1. Connect power cable to drive.
2. Connect power cable to AC outlet.
3. Start computer.
4. Install device driver software.
5. Connect FireWire cable to drive.
6. Connect FireWire cable to computer.
FireWire interface
FireWire cable
AC power cable
AC power input
connector
Figure 5. Connecting the Power Cable and FireWire Cable to the CD-RW Drive
TEAC FireWire CD-RW Drive User’s Manual
9
TeacFirewireCDRW.book Page 10 Tuesday, March 6, 2001 1:39 PM
Notes:
Windows 98SE and Mac Users: You can plug the FireWire cable into your
computer, or unplug it from the computer while the computer is running (this is
called a “hot plug”). However, do not unplug the cable from the drive while the
computer is running, or you may damage the drive or the computer.
Windows Me/2000 Professional Users: Before you disconnect the drive while
the computer is running, you need to disable the connection by clicking on the
Unplug icon in the Systray (see Figure 6):
Figure 6. Unplug Icon
All Users: Before you disconnect the cable from the computer's FireWire port,
remove any inserted discs from the TEAC FireWire CD-RW drive.
Do not connect the FireWire drive while the computer is in sleep or suspend
mode, or while the CD-RW drive is transferring data.
Connecting to Audio Equipment
The FireWire CD-RW drive outputs a line-level audio signal from the headphone
jack on the front panel. You can connect headphones or external poweredspeakers to the headphone jack, which accepts a 3.5mm stereo mini-plug.
Alternatively, if your computer contains a sound card that features audio output
jacks, you can connect the external powered-speakers to the audio connectors of
the computer.
Note: If you connect external powered-speakers to a sound card (on the rear
panel of the PC), the system disables the sound output from the headphone jack
on the front panel. In this case, connect the headphones to the headphone jack
on the speaker system (if available).
10
TEAC FireWire CD-RW Drive User’s Manual
TeacFirewireCDRW.book Page 11 Tuesday, March 6, 2001 1:39 PM
How to proceed with this installation:
How to proceed with this installation:
Depending on your operating system, you may continue with this installation as
follows:
❑
Mac users: Continue with “Chapter 4. Installing Software on Macintosh
Systems” on page 33.
❑
Windows users: Continue with “Installing the FireWire/IEEE 1394 Driver
Update Module for Windows 98SE” on page 11 (below).
Installing the FireWire/IEEE 1394 Driver Update Module for Windows
98SE
If you are using Windows 98SE, use the Update Module CD-ROM disc included
with your kit to upgrade update the FireWire drivers.
1.
2.
3.
4.
5.
6.
Insert the TEAC 1394 Update Module CD-ROM disc into your computer’s CD-ROM drive.
Click the Start button and select Run.
Click the Browse button and select your CD-ROM drive.
Select and run the file 242975usa8.exe from the English folder.
Follow the menu-driven instructions to upgrade the Firewire/IEEE 1394
drivers in Windows 98SE.
Restart your system.
TEAC FireWire CD-RW Drive User’s Manual
11
TeacFirewireCDRW.book Page 12 Tuesday, March 6, 2001 1:39 PM
High Speed Recording Guidelines (Enabling DMA)
High Speed Recording Guidelines (Enabling DMA)
To optimize your drive performance and avoid system lockup conflicts, especially
when recording to CD-R disc at 12X speed, you need to exercise the following
options to enable DMA on your system.
Windows 2000
To enable DMA on your Windows 2000 system:
1.
2.
3.
4.
5.
Right-click My Computer and select Properties.
Click Hardware, then select Device Manager.
Click IDE/ATA/ATAPI Controllers,.
Click Secondary Controller Properties.
Click Advanced Settings.
See Figure 7.
6.
Click Current Transfer Mode and select “DMA if available.”
Figure 7. Secondary IDE Channel Properties Panel
12
TEAC FireWire CD-RW Drive User’s Manual
TeacFirewireCDRW.book Page 13 Tuesday, March 6, 2001 1:39 PM
Windows 98SE and Windows ME
Windows 98SE and Windows ME
To enable DMA on your Windows 98SE or ME system:
1.
2.
3.
4.
5.
Right-click My Computer.
Select Properties.
Click Device Manager, then double-click the CD-ROM icon.
Double-click on your original CD-ROM drive reference.
Click the Settings tab.
See Figure 8 on page 13.
6.
7.
8.
9.
10.
Check the DMA box.
Click OK.
Repeat step 4 for your hard drive in the Disk Drives section.
Close the System Properties window.
Restart your system.
Figure 8. Properties Panel
Windows Drive Detection
Windows 98SE, Me, and 2000 Professional will detect the TEAC CD-RW
FireWire drive as a typical CD-ROM drive. For the drive to be recognized
accordingly as a CD-RW drive, you must now install the Adaptec premastering
software. Please continue with “Chapter 3. Installing Software on Windows
Systems” on page 15.
TEAC FireWire CD-RW Drive User’s Manual
13
TeacFirewireCDRW.book Page 14 Tuesday, March 6, 2001 1:39 PM
Windows 98SE and Windows ME
14
TEAC FireWire CD-RW Drive User’s Manual
TeacFirewireCDRW.book Page 15 Tuesday, March 6, 2001 1:39 PM
Chapter 3. Installing Software on Windows Systems
Please make sure that the TEAC FireWire CD-RW drive is properly installed as
per the instructions in Chapter 2, beginning on page 7.
Before you can record data onto CD-R or CD-RW discs using your TEAC
FireWire CD-RW Drive, you must first install Adaptec Pre-Mastering software
onto your computer’s hard disk.
The kit includes a CD-ROM that contains the following recording software
applications for Windows 98SE, Windows Me, and Windows 2000-Professional
systems.
❑
Adaptec Easy CD Creator, Version 4.03a or higher
Easy CD Creator is a full-featured premastering software application that
enables you to create audio CDs and data CDs.
❑
Adaptec DirectCD, Version 3.03a or higher
DirectCD is a “drag & drop” software application that allows you to read and
write to your CD-RW as if it were a standard floppy or removable hard drive.
It also provides the tools necessary to format the media.
An installation procedure for these applications is provided in “Installing
Easy CD Creator and DirectCD Software” on page 16.
TEAC FireWire CD-RW Drive User’s Manual
15
TeacFirewireCDRW.book Page 16 Tuesday, March 6, 2001 1:39 PM
Installing Easy CD Creator and DirectCD Software
Installing Easy CD Creator and DirectCD Software
Note: Before you install any portion of the Adaptec software package, disable
any applications that may be running in the background, including anti-virus
software, screen savers, schedulers, etc. This will ensure the proper installation
of the Adaptec software. To do so, press CTL-ALT-DEL on your keyboard. The
Close Program panel will display a list of all current programs in memory
(Figure 9). With the exception of “Explorer” and “Systray,” select each
program, then click the End Task button. Then proceed with the installation
below.
Figure 9. Close Program Panel
Follow the steps below to install Easy CD Creator and DirectCD software on your
computer’s hard disk. The installation procedure for each application is nearly
identical.
1.
Insert the TEAC CD-RW software suite for Windows CD-ROM into
your computer’s CD-ROM drive or into the TEAC FireWire CD-RW
drive.
If the Autoplay function is enabled, the main installation panel (Figure 10)
should appear on your desktop.
If the main installation panel does not appear on your desktop, double-click
the My Computer icon, then double-click the icon for the CD-ROM drive.
The system displays the Adaptec Easy CD Creator/DirectCD main installation
panel (Figure 10).
16
TEAC FireWire CD-RW Drive User’s Manual
TeacFirewireCDRW.book Page 17 Tuesday, March 6, 2001 1:39 PM
Installing Easy CD Creator and DirectCD Software
Select the program
you wish to install
using the left mouse button.
Figure 10. Adaptec Easy CD Creator/DirectCD Main Installation Panel
2.
If you would like to select a language other than English for the installation procedure, click the Language: English button.
You can select one of the following languages: Dutch, English, French,
Italian, Spanish, or Svenska. Click the OK button to return to the installation
process.
3.
On the main installation panel (Figure 10), click the left mouse button
on the name of the application program you wish to install:
Select Easy CD Creator or DirectCD drag & drop software. The system begins
to install the software and displays the following panel:
Figure 11. InstallShield Setup Panel
The system then displays a Welcome panel (Figure 12 on page 18) specific to
the application you are installing:
TEAC FireWire CD-RW Drive User’s Manual
17
TeacFirewireCDRW.book Page 18 Tuesday, March 6, 2001 1:39 PM
Installing Easy CD Creator and DirectCD Software
The Welcome panel is
specific to the application
you are installing.
Figure 12. Welcome Panel
Note: When installing DirectCD, the system will display a message about
CD-R/CD-RW support (see Figure 13). The TEAC CD-RW supports
“packet writing.” Therefore, click the Yes button to install DirectCD.
Figure 13. DirectCD Installation Support Warning
4.
Close any Windows programs that may be running, then click the Next
button.
The system displays a Software License Agreement (Figure 14).
Figure 14. Software License Agreement Panel
18
TEAC FireWire CD-RW Drive User’s Manual
TeacFirewireCDRW.book Page 19 Tuesday, March 6, 2001 1:39 PM
Installing Easy CD Creator and DirectCD Software
5.
Please read the License Agreement and click the Yes button if you agree
to its terms.
The system displays the Choose Destination Location panel (Figure 15),
which lets you specify a directory in which to install the application by
clicking the Browse button and viewing the file structure. Alternatively, you
can accept the default directory.
Figure 15. Choose Destination Location Panel
6.
Click Next.
The system quickly displays a sequence of panels as the installation proceeds,
pausing at the following Setup Complete panel (Figure 16):
Figure 16. Setup Complete Panel
7.
Click the Finish button to conclude the setup.
The system again displays the main installation panel (Figure 17 on page 20).
TEAC FireWire CD-RW Drive User’s Manual
19
TeacFirewireCDRW.book Page 20 Tuesday, March 6, 2001 1:39 PM
Installing Easy CD Creator and DirectCD Software
Figure 17. Main Installation Panel
8.
Do one of the following:
❑ If you wish to continue and install another program (e.g., Easy CD
Creator or DirectCD), return to Step 3 on page 17.
❑ If you have installed all programs, or if you wish to use the program you
just installed immediately, click the Exit button.
The system displays the following Setup Complete panel (Figure 18):
Figure 18. Reboot System Request Panel
9.
Click the Finish button to restart your system.
Once the system reboots, the application(s) you installed will be ready for
use.
20
TEAC FireWire CD-RW Drive User’s Manual
TeacFirewireCDRW.book Page 21 Tuesday, March 6, 2001 1:39 PM
About the Reference Guides, ReadMe Files, and Help Files
About the Reference Guides, ReadMe Files, and Help Files
For detailed information on Easy CD Creator and DirectCD, refer to the Reference
Guides (Acrobat PDF files) included on the CD-RW software suite CD-ROM.
(Adobe Acrobat Reader 4.0 is included on the CD-ROM and loads automatically.)
Also, be certain to review the ReadMe files for Easy CD Creator and the Help files
for DirectCD.
These PDF files comprise the user documentation for the applications. The files
are entitled:
❑
Adaptec Easy CD Creator Quick Reference Guide (16 pages)
You can open this guide by selecting:
Start-->Programs-->Adaptec Easy CD Creator 4-->Quick Reference Guide
You can access the ReadMe file by selecting:
Start-->Programs-->Adaptec Easy CD Creator 4-->ReadMe
❑
Adaptec DirectCD Reference Guide (12 pages)
You can open this guide by selecting:
Start-->Programs-->Adaptec DirectCD -->Reference Guide
You can access the Help file by selecting:
Start-->Programs-->Adaptec DirectCD -->DirectCD Help
About Online Registration
There is no need to register any portion of this kit. TEAC provides 100% support
for the drive and the Adaptec software. Refer to “Appendix C. Technical Support”
on page 42 if you wish to contact TEAC.
About Web Checkup
Web Checkup is primarily a feature of the Easy CD Creator Deluxe Version
software. The Adaptec software bundled with the TEAC CD-RW kit is a
“standard” version. Therefore, the Web Checkup feature will not work unless you
eventually upgrade to the Deluxe version. For now, you may disable this feature.
TEAC FireWire CD-RW Drive User’s Manual
21
TeacFirewireCDRW.book Page 22 Tuesday, March 6, 2001 1:39 PM
Starting Easy CD Creator
Starting Easy CD Creator
To start Easy CD Creator, follow these steps:
1.
Click the left mouse button on the Windows Start icon, and select from
the pop-up menu: Programs-->Adaptec Easy CD Creator 4-->CreateCD.
The system displays the Welcome panel for Easy CD Creator (Figure 19),
which enables you to create audio or data discs, as well as perform other
related functions. (Alternatively, you can double-click the Create-CD
shortcut on the desktop.)
Figure 19. Easy CD Creator Welcome Panel
Using Easy CD Creator
The Welcome panel for Easy CD Creator enables you to:
❑
Create audio discs
❑
Create data discs
❑
Use CD Copier to copy discs (additional CD-ROM or DVD-ROM drive
required)
❑
Use Jewel Case Creator to help you design and print jewel case cover art
❑
Upgrade to a deluxe version of Easy CD Creator
For information on using Easy CD Creator, refer to the Quick Reference Guide in
PDF format on the CD-ROM or to the ReadMe file (for more information, see
“About the Reference Guides, ReadMe Files, and Help Files” on page 21).
22
TEAC FireWire CD-RW Drive User’s Manual
TeacFirewireCDRW.book Page 23 Tuesday, March 6, 2001 1:39 PM
CD Copier
CD Copier
This section explains how to use the CD Copier software.
Copying (Duplicating) Discs Using CD Copier
A note from TEAC and Adaptec:
Easy CD Creator is designed to assist you in reproducing material for which you
own the copyright or for which have obtained permission to copy from the
copyright owner. Unless you own the copyright or have permission to copy from
the copyright owner, you may be violating copyright law and subject to pay
damages and other remedies. If you are uncertain about your rights, contact your
legal advisor.
Also, check the end-user license on any commercial CDs to determine whether
the license permits you to make copies. For example, some game disc licenses
specifically exclude any kind of copying; it is therefore illegal to copy them for
personal use.
1.
Select the following menu option:
Start > Programs > Adaptec Easy CD Creator 4 > Features > CD Copier
(Alternatively, you can run CD Copier from the Create CD icon on your
desktop.)
2.
3.
4.
Insert the original data or audio CD from which you want to make copies into your CD-RW or CD-ROM drive.
On the Source and Destination tab, select the drive containing the original CD in the COPY FROM drop-down box.
Select the destination drive that contains the blank CD in the RECORD
TO drop-down box.
The destination drive refers to your CD-Recorder.
5.
Click Copy to begin recording a copy of your CD.
TEAC FireWire CD-RW Drive User’s Manual
23
TeacFirewireCDRW.book Page 24 Tuesday, March 6, 2001 1:39 PM
Using your CD-RW Drive as Source and Target
Using your CD-RW Drive as Source and Target
1.
2.
3.
Select the CD-RW drive in both the COPY FROM and RECORD TO
drop-down boxes.
Insert the disc from which you want to copy in the CD-RW drive.
Click Copy to begin the copy process.
The program will write the disc information temporarily onto your hard drive.
Once the information is on the hard drive, the program ejects the disc and
prompts you to insert a blank disc.
4.
Click the Retry button to begin recording to the blank disc.
Note: Please bear in mind that you need at least 800MB of free space on
your hard disk to write the information from the source disc. The system
deletes this information from your hard drive after the process is complete.
Creating a CD from a CD Image in Easy CD Creator
To create a data CD from a CD image, you first need to create the CD image, then
record the CD image to a disc. You can create the image from your CD-ROM
drive or CD-RW drive.
The process of creating a CD from a CD image may save you time when you wish
to create multiple CD copies of the same information. This process enables you to
write the CD image once to your hard disk, then record it several times to different
discs.
Creating an Image File
1.
Select the following menu option:
Start > Programs > Adaptec Easy CD Creator 4 > Features > Easy CD Creator
(Alternatively, you can run Easy CD Creator from the Create CD icon in the
desktop, and select the type of disc you want to create (e.g., data, audio, etc.).
2.
3.
4.
Insert a blank CD into the drive you want to use as source.
Click the small arrow next to the New button on the toolbar.
Select the type of disc you want to create from the drop-down list (audio,
data, etc.).
24
TEAC FireWire CD-RW Drive User’s Manual
TeacFirewireCDRW.book Page 25 Tuesday, March 6, 2001 1:39 PM
Creating a CD from the CD Image File:
5.
6.
7.
In the Explorer section, select the data file, folder, or disc from which you
want to record, then click the Add button. Repeat this step until the Data
CD Layout contains all the information that you want to record.
From the File menu, select Create CD Image.
Type a filename for the image file.
The system creates the image file in the My documents folder by default. You
can, however, select a different location in which to save the file.
8.
9.
In the Save As Type box, select CD Image Files (*.cif)
Click Save.
Creating a CD from the CD Image File:
1.
2.
3.
Insert a blank disc into the CD-RW drive.
From the File menu, select Create CD from CD Image.
Select the image file (*.cif file) you just created, and click Open.
The system displays the CD Creation Setup dialog box.
4.
If necessary, change the CD Creation Setup settings and click OK.
Creating an Audio CD from Multiple Discs
1.
Select the following menu option:
Start > Programs > Adaptec Easy CD Creator 4 > Features > Easy CD Creator
(Alternatively, you can run Easy CD Creator from the Create CD icon on the
desktop, select AUDIO, then AUDIO CD.)
2.
3.
4.
5.
6.
7.
8.
9.
Place the discs from which you want to copy in the desired order from
disc 1 to disc n, where n is the last disc from which you want to record.
Insert the first disc (which we will call disc 1) in your CD-ROM drive.
Select the tracks you want to record from disc 1, then click the ADD button to list those tracks in the CD Layout.
Remove disc 1, then insert disc 2.
Repeat steps 3 to 5 until you do the same with disc n.
Remove disc n, then insert disc 1.
Insert a blank CD-R disc in your CD-RW drive.
Click the Create CD button and change the CD Creation Setup if necessary.
The program prompts you to remove disc 1 and insert disc 2 to continue
recording.
10. Follow the instructions to record the remainder of your disc.
TEAC FireWire CD-RW Drive User’s Manual
25
TeacFirewireCDRW.book Page 26 Tuesday, March 6, 2001 1:39 PM
Extracting Audio Tracks to Wave Files
Extracting Audio Tracks to Wave Files
1. Select the following menu option:
Start > Programs > Adaptec Easy CD Creator 4 > Features > Easy CD Creator
(Alternatively, you can run Easy CD Creator from the Create CD icon in the
desktop, select AUDIO, then AUDIO CD.)
2.
3.
Insert your original audio disc in either drive.
In the Explorer section, select the drive with audio disc.
The system lists all tracks on the right side of the screen.
4.
5.
Right-click on the track you want to convert to a wave file.
Select the option to Extract to File.
By default, the system saves the file in the My Documents folder. You can
always change the location to save the files.
6.
7.
8.
9.
Key in a name for the file in the file name box.
In the Save As Type box, select WAV file (*.WAV).
In the Format box, select PCM 44,100 Hz, 16 Bit, Stereo (CD quality).
Click Save.
Creating a Music CD from WAV, MP3, and WMA files
Easy CD Creator enables you to create a music CD that can be played on your
home or car stereo CD player, and on every computer that has a CD-ROM or
CD-Recorder drive. Unlike a data CD, a music CD is used for playing back music
and not for data storage.
To create a music CD:
1.
Select the following menu option:
Start > Programs > Adaptec Easy CD Creator 4 > Features > Easy CD Creator
2.
3.
4.
26
From the File menu, select New CD Layout, then Audio CD.
Insert a blank CD into your CD-Recorder (the destination drive).
To add WAV, MP3, and WMA files to the music CD layout:
❑
In the Explorer section on the Audio Layout, select the folder where your
files are located. A list of all audio files in the folder appears on the right
side Source section.
❑
Select the audio file (hold down the Ctrl or Shift key to select multiple
files) in the Source section, then click the + Add button on the tool bar.
The system adds the file to the music CD layout.
TEAC FireWire CD-RW Drive User’s Manual
TeacFirewireCDRW.book Page 27 Tuesday, March 6, 2001 1:39 PM
Creating a Music CD from WAV, MP3, and WMA files
Note: You can add any combination of music tracks, WAV, MP3, or
WMA files to a music CD project. Up to 99 tracks and files, or up to
650 MB (74-minute CD) or 700 MB (80-minute CD) of tracks and files
can be added to a music CD project.
5.
Click the Create CD button on the tool bar.
The system displays the CD Creation Setup dialog box.
6.
7.
8.
(Optional) Click the Advanced button to view audio recording options.
(Optional) Click the Help button to view detailed option explanations.
Click OK to start the recording session.
TEAC FireWire CD-RW Drive User’s Manual
27
TeacFirewireCDRW.book Page 28 Tuesday, March 6, 2001 1:39 PM
Starting DirectCD
Starting DirectCD
To start DirectCD, follow these steps:
1.
Click the left mouse button on the Windows Start icon, and select from
the pop-up menu: Programs-->Adaptec DirectCD-->Adaptec DirectCD Wizard. (Alternatively, you can double-click the Create-CD shortcut on the
desktop, click the Data button, and then click DirectCD.)
The system displays an introductory screen for DirectCD Wizard (Figure 20),
which will guide you through:
❑
❑
❑
Checking the status of a disc in the CD-RW drive
Preparing a CD-R or CD-RW disc for reading or writing
Managing the final data when ejecting a DirectCD disc
Figure 20. DirectCD Wizard Panel
28
TEAC FireWire CD-RW Drive User’s Manual
TeacFirewireCDRW.book Page 29 Tuesday, March 6, 2001 1:39 PM
Using DirectCD
Using DirectCD
For information on using DirectCD, refer to the following sections and to the user
documentation in PDF format on the CD-ROM or refer to the Help file (see
“About the Reference Guides, ReadMe Files, and Help Files” on page 21).
You may also access Help information by clicking the Help button on the
DirectCD Wizard panel (Figure 20).
Formatting a Disc with Direct CD
1. Insert a blank CD-R or CD-RW disc in the drive.
After a few seconds, the system displays the following message: “Please
select the type of CD you wish to create.”
2.
Click DATA, then DIRECTCD.
If nothing happens on the screen after about 15 seconds, click the DirectCD
icon in the systray (right bottom corner in the task bar).
(Alternatively, you can run DirectCD from the Create CD icon in your
desktop, or open the program using Start > Programs > Adaptec DirectCD >
DirectCD Wizard.)
The system displays the DirectCD Wizard, which guides you step-by-step in
preparing the CD so you may write data directly to it.
3.
Click Next.
The system displays the Format Disc window. If you are formatting a CD-RW
disc that has been formatted before, you can select either Quick format or Full
format.
4.
Click Next.
The system displays the Name Your Disc window.
5.
Type a name for your disc in the Name Your Disc window.
The name can be up to 11 characters in length.
6.
7.
Select the Compression option if you are using a CD-RW disc and you
want to enable data compression on the disc.
Click Finish.
The system begins to format the disc. It displays the DirectCD Disc Ready
window when disc formatting is complete.
8. Click OK.
The DirectCD disc is ready for writing.
TEAC FireWire CD-RW Drive User’s Manual
29
TeacFirewireCDRW.book Page 30 Tuesday, March 6, 2001 1:39 PM
Ejecting a DirectCD Disc (ISO 9660 Closed Session Format)
Ejecting a DirectCD Disc (ISO 9660 Closed Session Format)
If you want your CD-R DirectCD disc to be readable on other computers that use
standard CD-ROM drives, you must format the disc as an ISO 9660 closed session
disc by specifying an option during the disc eject function.
To do so, follow these steps:
1.
2.
3.
4.
5.
6.
7.
8.
Right-click the CD icon on the Windows taskbar.
Select Properties from the drop-down list box.
Click the DirectCD Wizard tab.
Select the Enable standard CD-ROM compatibility Eject option.
Click APPLY, then click OK.
Right-click the CD icon on the Windows taskbar.
Select the appropriate option:
❑
To leave the disc as it is so that it can be read and written through drive
letter access in the future, or…
❑
Organize the disc so that it can be read in most standard CD-ROM
drives.
Click Finish.
Note: To make the disc readable on a standard CD-ROM drive, the disc is
closed as an ISO 9660 format. This format information requires 22 MB of
space on the disc for the first session, and 13MB for each additional session.
Only CD-R discs can be closed as an ISO 9660 format. CD-RW discs do not
support the ISO format.
When DirectCD finishes closing the disc to an ISO 9660 format, the disc is
ejected from the drive and, if the Display Disc Ejected notification option is
selected in the DirectCD Wizard Options, the system displays the Disc Ejected
message box.
30
TEAC FireWire CD-RW Drive User’s Manual
TeacFirewireCDRW.book Page 31 Tuesday, March 6, 2001 1:39 PM
Writing Additional Data to a DirectCD Disc
Writing Additional Data to a DirectCD Disc
Once you format a CD-R or CD-RW disc, you can add more data to it until the
disc is full. To do so, follow these steps:
1.
Insert the DirectCD disc into your CD-R or CD-RW drive.
After a few moments the system displays the DirectCD Disc Ready window.
Note: To be able to re-write to CD-R discs, you must specify the disc as
rewritable. To do so, right-click the CD icon on the Windows taskbar, then
click the Make Writable option.
2.
Click OK and continue writing more data to your CD.
Uninstalling Programs
❑
To uninstall Easy CD Creator, select:
Start-->Programs-->Adaptec Easy CD Creator 4-->Uninstall.
❑
To uninstall DirectCD, select:
Start-->Programs-->Adaptec DirectCD-->Uninstall DirectCD.
The system displays the Control Panels window. Use the Add/Remove
Programs utility. For additional information, refer to your Windows
documentation.
❑
You can uninstall both programs from the Add/Remove Program object in
the Control Panel.
TEAC FireWire CD-RW Drive User’s Manual
31
TeacFirewireCDRW.book Page 32 Tuesday, March 6, 2001 1:39 PM
Writing Additional Data to a DirectCD Disc
32
TEAC FireWire CD-RW Drive User’s Manual
TeacFirewireCDRW.book Page 33 Tuesday, March 6, 2001 1:39 PM
Chapter 4. Installing Software on Macintosh Systems
Please make sure that the TEAC FireWire CD-RW drive is properly installed as
per the instructions in Chapter 2, beginning on page 7.
Before you can record data onto CD-R or CD-RW discs using your TEAC CDRW Drive, you must first install TEAC/Adaptec Toast Software for Macintosh
onto your Macintosh computer’s hard disk.
The kit includes a CD-ROM that contains the Adaptec Toast recording software
for Macintosh systems. Toast is a full-featured premastering software application
that enables you to create audio and data CD-R and CD-RW discs.
TEAC FireWire CD-RW Drive User’s Manual
33
TeacFirewireCDRW.book Page 34 Tuesday, March 6, 2001 1:39 PM
Installing Toast Software
Installing Toast Software
Note: Before you install Toast, disable any applications that may be running in
the background, including anti-virus software, screen savers, schedulers, etc.
This will ensure the proper installation of the Adaptec software.
Follow the steps below to install Toast software on your Macintosh computer’s
hard disk.
1.
Insert the TEAC/Adaptec Toast Software for Macintosh CD-ROM into
your computer’s CD-ROM drive.
After the system loads the disc, it displays the Adaptec Toast 4.1.2 icon on
the Macintosh desktop (Figure 21).
Figure 21. Adaptec Toast Software Icon
2.
Double-click the Adaptec Toast icon.
The system displays the Adaptec Toast 4.1.2 main installation panel
(Figure 22).
Figure 22. Toast Main Installation Panel
3.
Double-click the installer in your desired language.
The system displays a continuation panel (Figure 23 on page 35).
34
TEAC FireWire CD-RW Drive User’s Manual
TeacFirewireCDRW.book Page 35 Tuesday, March 6, 2001 1:39 PM
Installing Toast Software
Figure 23. Continuation Panel
4.
Click the Continue button.
Toast 4.1.2 installs an English language version of the software.
Toast-F installs a French (Français) version; Toast-D installs a German
(Deutsch) version. The system then displays a license agreement.
5.
Please read the License Agreement, and if you agree to its terms, click
the Accept button.
The system displays a Read Me/Registration panel (Figure 24).
Figure 24. Read Me/Registration Panel
TEAC FireWire CD-RW Drive User’s Manual
35
TeacFirewireCDRW.book Page 36 Tuesday, March 6, 2001 1:39 PM
Installing Toast Software
6.
Click the Continue button.
The system displays the Toast 4.1.2 Installer panel (Figure 25).
Figure 25. Toast 4.1.2 Installer Panel
7.
8.
9.
Select the Full Install option by using the pull-down menu in the upperright corner of the panel.
If desired, specify a location on the hard drive as the installation destination by using the Install Location pull-down menu.
Click the Install button.
The system begins to install the software onto your computer’s hard drive
while displaying the following panel (Figure 26):
Figure 26. Installing Panel
If the installation is successful, the system then displays an Installation
successful panel (Figure 27).
Figure 27. Installation Successful Panel
10. Click the Quit button to conclude the installation.
36
TEAC FireWire CD-RW Drive User’s Manual
TeacFirewireCDRW.book Page 37 Tuesday, March 6, 2001 1:39 PM
Starting Toast
Starting Toast
To start Toast, follow these steps:
1.
Double-click the Toast 4.1.2 folder icon.
The system opens the Toast 4.1.2 folder (Figure 28 on page 37).
Toast
Figure 28. Toast Folder
2.
Double-click the Adaptec Toast 4.1.2 application icon.
The system loads the Toast software and displays the main panel (Figure 29).
Figure 29. Toast Main Panel
For information on using Toast, refer to the user’s guide in the
documentation.pdf file in the Toast 4.1.2 folder.
TEAC FireWire CD-RW Drive User’s Manual
37
TeacFirewireCDRW.book Page 38 Tuesday, March 6, 2001 1:39 PM
Starting Toast
38
TEAC FireWire CD-RW Drive User’s Manual
TeacFirewireCDRW.book Page 39 Tuesday, March 6, 2001 1:39 PM
Appendix A. About CD-R and CD-RW Discs
This appendix explains how to handle, load, and eject CD-R and CD-RW discs. It
also lists recommended media and supported disc formats.
Handling Discs
❑
❑
❑
Handle compact discs only by their edges to avoid getting fingerprints on the
surface. Do not touch the disc’s data surface (unlabeled side).
Do not place discs in direct sunlight, or in locations subject to high humidity,
high temperatures, or dusty conditions.
If cleaning the disc becomes necessary (erratic operation or visible dust or
smudges), gently wipe the surface of the disc from the center to the outside
edge. Do not use benzene, alcohol, thinner, or other solvents.
wipe disc surface from
center to outside edge
handle discs
by their edges
Figure 30. How to Handle Compact Discs (CD-R and CD-RW)
Recommended Media
One blank TEAC CD-R disc and one blank CD-RW rewritable disc are included
in the package with your CD-RW.
For optimal performance, make sure to use 74 or 80-minute CD-R media rated for
12X speed recording. CD-RW media should be “high-speed” rated (usually 4X to
10X speed). Use media from TEAC or the following manufacturers:
Disc Type
Manufacturer
Disc Type
Manufacturer
CD-R
Taiyo Yuden
Mitsui Toatsu Chemical
Mitsubishi (Verbatim)
Ricoh
TDK Electronics
Kodak
Fuji Film
Hitachi (Maxell)
Pioneer
Sony
Maxell
PVC
CD-RW
Mitsubishi (Verbatim)
Ricoh
Note: You may purchase additional TEAC media online at www.shopteac.com.
TEAC FireWire CD-RW Drive User’s Manual
39
TeacFirewireCDRW.book Page 40 Tuesday, March 6, 2001 1:39 PM
Disc Formats
The TEAC FireWire CD-RW drive supports the following disc formats:
Disc Format
Data Capacity
CD-DA
CD-ROM Mode 1
CD-ROM XA Mode 2 (Form 1)
CD-ROM XA Mode 2 (Form 2)
CD-R
CD-RW
CD-I
Video-CD
CD Extra/CD-Plus
CD-TEXT
Multi-session Photo CD
74 or 80 minutes
650MB or 700MB
650MB or 700MB
738MB or 794MB
650MB or 700MB
650MB or 700MB
650MB or 700MB
650MB or 700MB
650MB or 700MB
650MB or 700MB
650MB or 700MB
Loading and Ejecting Discs
To load a disc, first open the disc tray by pressing the Eject button on the front of
the drive. Place the disc on the disc tray with its label side facing up. Then press
the Eject button again to retract the disc tray back into the drive.
To eject a disc, press the Eject button on the front of the drive to extend the disc
tray (see Figure 31). Remove the disc from the disc tray and place it in its
protective case. Press the Eject button again to retract the disc tray back into the
drive.
Press the Eject button
to extend and retract
the disc tray.
Figure 31. Ejecting the Disc Tray
40
TEAC FireWire CD-RW Drive User’s Manual
TeacFirewireCDRW.book Page 41 Tuesday, March 6, 2001 1:39 PM
Appendix B. Specifications
The following table lists the product specifications for TEAC FireWire CD-RW
drive.
Model
CD-RW5120i
Interface
FireWire/IEEE 1394
Transfer Rate
Read: 32X maximum (4800KBps)
Write to CD-R: 12X (1800KBps)
Write or Rewrite to CD-RW: 10X speed (1,500KBps)
Access Time
85 msec (1/3 Stroke)
Buffer Size
4MB
Write Methods
Track at Once; Disk at Once; Multi-Session; Incremental
Disc Types
8cm/12cm; Audio CD; CD-ROM Mode-1; Mode-2 (Form1,
Form2); CD-ROM XA; CD-R; CD-RW; Video-CD; CD Extra/CDPlus; CD-I; CD-DA; CD-ROM; CD-TEXT.
Write Verification
Running Optimum Power Control to dynamically adjust laser
write power
Logical Recording
Format
IS09660; UDF & CDR-FS Packet Write
Disc Loading
Power Tray (caddy not required)
Front Panel
Built-in Headphone Jack, Volume Control Knob, and Power
Eject Button
MTBF
100,000 POH
Dimensions
6.48¨(W) x 2.00¨(H) x 11.25¨(D)
Weight
3.53 lbs
Power Requirement
120VAC
Analog Audio
Headphone
Line-Out
0.65 ± 0.3Vrms at 32Ω
0.78 ± 0.3Vrms at 47KΩ
Headphone Jack
3.5mm diameter stereo mini-headphone jack
Installation
(External) Horizontal, plus or minus 10°
Operating Temperature
5° C to 40° C (41° F to 104° F)
Storage Temperature
-30° C to 60° C (-22° F to 140° F)
Operating Humidity
20% to 80% (non-condensing)
Storage Humidity
10% to 80% (non-condensing)
Safety Standards
UL
TEAC FireWire CD-RW Drive User’s Manual
41
TeacFirewireCDRW.book Page 42 Tuesday, March 6, 2001 1:39 PM
Appendix C. Technical Support
For technical support, please contact the TEAC Service and Support Center:
North America
TEAC America, Inc. (USA)
Technical Support
Telephone: (323) 727-4860 • Fax: (323) 869-8751
Monday - Friday 8:00 a.m. - 5:00 pm
http://www.teac.com/dspd
E-mail: [email protected]
42
TEAC FireWire CD-RW Drive User’s Manual
TeacFirewireCDRW.book Page 1 Tuesday, March 6, 2001 1:39 PM
TeacFirewireCDRW.book Page 2 Tuesday, March 6, 2001 1:39 PM
TEAC America, Inc.
7733 Telegraph Road
Montebello, CA 90640
Telephone: (323) 727-4860 • Fax: (323) 869-8751