1
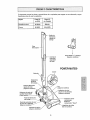
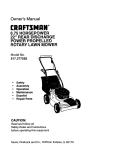
Owner's Manual
Manual Del Propietario
Vacuum Cleaner
Aspiradora
Model, Modelo
116.22812
116.22813
CAUTION:
Read and follow all
safety and operating
instructions before first
use of this product,
CUIDADO:
Lea y siga todas las
instrucciones de operaci6n
y seguridad antes del use de
este preducto.
Sears, Roebuck and Co., Hoffman Estates, IL 60179 U.S.A.
www.sears.com
Part No. CO 1ZBPV30UOO-8192046
Printed in U,S,Ao
Impreso en EUA
Important Safety Instructions
Parts and Features .................
Assembly
Instructions
.......
............
Canister
Care
.........................
3
4-5
6.7
Power-Mate ® Care
USe
................................
14
Bag Changing
Cleaning Exterior and Attachments .....
Motor Safety Filter Changing ...........
Exhaust Filter Changing ..............
14
15
15
16
.......................
Before Using Your New Vacuum .......
2
Kenmore Vacuum Cleaner Warranty .... 2
.....................
16
8
How to Start ..............................
Belt Changing and Agitator Cleaning ,_ 17-18
Light Bulb Changing .................
18
Agitator Servicing ..................
t9
Agitator Assembly ..................
19
8
Vacuuming Tips ......................
9
Suggested Pile Height Settings ..........
9
Dirt Sensor .......................
10
Attachments .....................
11
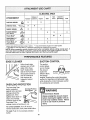
Attachment Use Chart ....................
12
Performance Features .............
12-13
How Your Vacuum Works ................
14
Troubleshooting
Please read this guide. It will help you assembie
the safest and most effective way.
Requesting
Or Service
..................
Assistance
..................
20
Back Cover
and operate your new Kenmore vacuum in
For more information about vacuum cleaner care and operation, call your nearest Sears store,
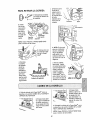
You will need the complete model and serial numbers when requesting information. Your vacuum's model and serial numbers are located on the Model and Serial Number Plate.
Use the space below to record the model number and serial number of your new Kenmore
vacuum,
Model No.
Serial No.
Date of Purchase
Keep this book and your sales check (receipt) in a safe place for future reference.
LIMITED ONEYEAR
WARRANTY
ON KENMORE
VACUUM
CLEANER
This warranty is for one year from the date of purchase, and includes only private household
vacuum cleaner use° During the warranty year, when this vacuum cleaner is operated and
maintained according to the owner's manual instructions, Sears wiil repair any defects in
material or workmanship free of charge°
This warranty excludes vacuum bags, be_ts, light bulbs, and filters, which are expendable
and become worn during normal use.
For warranty service,
the United States.
return this vacuum cleaner to the nearest
parts
Sears Service Center in
This warranty applies only while this product is in use in the United States. This warranty gives
you specific legal rights, and you may also have other rights which vary from state to state.
Sears, Roebuck
and Co., D!817 WA, Hoffman Estates, IL 60179
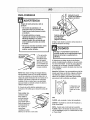
WARNING
Your safety is important to us, To reduce the risk of fire, electrical shock, injury
to persons or damage when using your vacuum cleaner, follow basic safety precautions including
the following:
tured hose. The hose contains electrical
Read this manual before assembling or
wires. Replace if cut or worn. Avoid picking
using your vacuum cleaner.
up sharp objects.
Use your cleaner only as described in this
manual. Use only with Sears recommended
attachments_
To reduce the risk of electrical shock - Do
not use outdoors or on wet surfaces.
Disconnect electrical supply before servicing or cleaning out agitator area, Failure to
do so could result in electrical shock or
brush suddenly starting.
Always turn cleaner off before connecting
or disconnecting the hose or Power-Mate _,
Always turn cleaner off before unplugging.
Do not unplug by pulling on cord. To
unplug, grasp the plug, not the cord.
Hold plug when rewinding onto cord reelo
Do not allow plug to whip when rewinding.
Do not use with damaged cord or plug. If
cleaner is not working as it should, has
been dropped, damaged, left outdoors, or
dropped into water, return it to a Sears
Service Center.
Do not
handle,
around
cleaner
heated
pull or carry by cord, use cord as a
close door on cord, or pull cord
sharp edges or corners. Do not run
over cord. Keep cord away from
surface&
Do not leave cleaner when plugged in.
UnphJg from outlet when not in use and
before servicing°
Do not allow to be used as a toy. Close
attention is necessary when used by or
near children.
Do not use with any opening blocked; keep
free of dust, lint, hair and anything that may
reduce air flow.
Keep hair, loose clothing, fingers, and all
parts of body away from openings and moving parts,
Do not use cleaner without dust bag and/or
filters in place
Always change the dust bag after vacuuming carpet cleaners or freshener, powders
and fine dust. These products clog the bag,
reduce airflow and can cause the bag to
bursL Failure to change bag could cause
permanent damage to the cleaner.
Do not use the cleaner to pick up sharp
hard objects, stoa!! toys, pins, paper clips,
etc. They may damage the cleaner or dust
bag.
Do not pick up anything that is burning or
smoking, such as cigarettes, matches, or
hot ashes.
Do not use cleaner to pick up ftammable or
combustible liquids (gasoline, cieaning fluids, perfumes, etc.), or use in areas where
they may be present. The fumes from these
substances can create a fire hazard or
explosion.
Use extra care when cleaning on stairs, Do
not put on chairs, tables, etc. Keep on floor..
Do not handle plug or cleaner with wet
hands.
You are responsible for making sure that
your vacuum cleaner is not used by anyone
unable to operate it properly
Do not put any objects into openings.
Do not operate the cleaner with a punc-
Do not operate without exhaust
exhaust filter cover installed.
SAV
THES
filter or
iNSTRUCTIONS
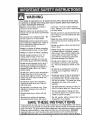
Proper assembly and safe use of your vacuum cleaner are your responsibilities, Your cleaner
is intended only for household use. Read this Owner's Manual carefully for important use and
safety information. This guide contains safety statements under warning and caution symbols.
Please pay special attention to these boxes and follow any instructions given° WARNING
statements alert you to such hazards as fire, electrical shock, burns and personal injury.
CAUTION, statements alert you to such hazards as pe[s0nal iniury and/o,r property damaqe,
3
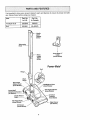
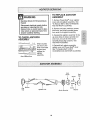
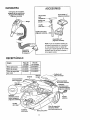
It is importantto knowyourvacuumcleaner'spartsandfeaturesto ensureits properandsafe
use.Reviewthesebeforeusingyourcleaner.
Item
Part No.
In U.S.
Part No.
in Canada
HeadlightBulb
Belt
20-5240
20-5201
596181
20-40979
-t---
andle
Quick
Telescoping
Wand
11l[ _
_[
_
Wand
Length
Power.Mate Jr. _
Caddy
(Some Models)
Power-Mate®
Flange
lit
Belt
Wand
Swivel
Wand Quick
Release
Pedal
Power.Mate®
Model/SerialNumbers
(On Bottom)
Handle Release
Pile Height Pedal
(Some Models)
Dirt Sensor
(Some Models)
Lens
(Some Models)
dlcator
Protector
Reset Button
Edge Cleaner
(Not Shown)
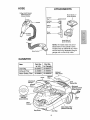
HOSE
ATTACHMENTS
3-Way On/Off Switch
Off/Floor/Carpet
(Some Models)
Power-Mate
Jr. _"
(Some Models)
Crevice
Tool
_
Brush
_
Dusting
Brush
Fabric
Brush
_*-
Handi-Ma
(Some
te Jr: _
Models)
NOTE: All modets have one set of
attachments in the canister. Some
models have an additional set, which
can be kept in the accessory bag for
garage use or other dirty areas..
Hose Swivel
CANISTER
Item
Part No.
in U.S.
Part No.
In Canada
Dust Bag
Exhaust Filter
20-50557
20-86880
20-50557C
20-86880C
Motor Safety Filter
20-86883
20-86883C
Cover
_,
Attachment
Exhaust
Filter Cover
Exhaust
Ftlter _
Cord
Canister
Bag/Hose Check
(Some Models)
Performance
Indicator
(Some Models)
Cord
Hood
Motor Safety Filter
(Behind Dust Bag)
Bag Holder
•
WARNING
Electrical
Shock Hazard
DO NOT plug into electrical supply
until assembly is complete, Failure
to do so could result in electrical
shock or injury.
,
i
I
i!11!'1
Handle
m
,INI
Handle _
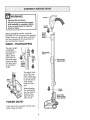
Before assembling vacuum, check the
PACKING LIST on the cover of the separate
Repair Parts List, Use this list to verify that
you have received all the components of
your new Kenmore vacuum,
Quick
Release
Button
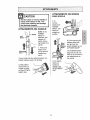
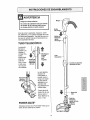
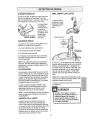
WAN D - TELESCOPING
The wand length
is adjustable
and requires no
assembly. To
adjust, simply
the
pushwand
downadjust
on
button and slide
the upper wand
to the desired
height.
(
Telescoping
Wand
1
,_,/
Wand
Length
Adjust
Hand
Above
This
Tab
Wand Length
Adjust Button
m
Button
The swivel, located on the Power°
Wand
Swivel
\
Mate®, allows you
to turn the handle
to the left side to
reach farther
under low furniture.
When adjusting
the wand length
you may have to
hold the PowerMate®with your
hand or foot.
POWER-MATE+
Insert wand into Power-Mate® until the wand
button snaps into ptace.
Release Pedal
(Some Models)
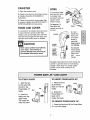
CANISTER
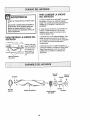
1, Open the canister
HOSE
hood.
2. Check to see that the dust bag is properly installed. See BAG CHANGING for
instructions.
3. Check to see that the motor safety filter
is properly installed. See MOTOR SAFETY
FILTER CLEANING for instructions.
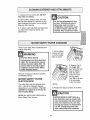
HOOD AND COVER
It is normal for the canister hood and cover
1o Line up the hose
latch tab and notch
in canister hood
and insert hose into
canister until it
snaps in place_
Hose
Latch
Tab
To remove', Lift
hose latch tab
Notch__
upward and pul! up
on hose_
2. Insert
handle into
wand until
lock button
to come off when opened further than
needed. Line up the hinge slots, insert the
hood and cover hinges into the slots, and
close the hood and/or cover to reinstall
CAUTION
Never open canister hood with the
cover open. This will help to
prevent damage from occurring
to
the canister hood and/or cover.
Handle
Button
Handle
Quick
Release
(Some
To store: Disconnect
==
snaps in
place,, Be
sure hose is
not twisted,
To remove:
Press handle
quick release
button and
pull
up on
handle.
hose from wands and
canister to prevent stress on hose during
storage. Store hose in a loosely coiled
position so the hose covering is not
stressed.
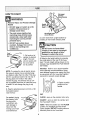
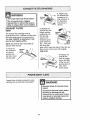
1o Align the tab
on the wand with
the slot in the
Power-Mate Jr,®
caddy.
2. Press the
caddy onto the
upper wand.
The caddy wilt
snap into place
1, Place the front
of the PowerMate Jr.®into the
caddy.
2, Rotate the
Power-Mate Jr,®
back until it
snaps into place,
TO REMOVE POWER'MATE
JR.®
1, Press the latch and lift the Power-Mate
Jr.®out of the caddy,
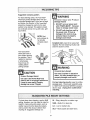
HOW TO START
Pile Height
Indicator
WARNING
Personal Injury and Product Damage
Hazard
Handle
• DO NOT plug in if switch is in ON
position. Personal injury or
damage could result.
, The cord moves rapidly when
rewinding. Keep children away
and provide a clear path when
rewinding the cord to prevent
personal injury°
,
Pile Height Pedal
(some Models)
3. Lower wand from upright position by
pressing on the handle release pedal
DO NOT use outlets above
counters. Damage from cord to
items in surrounding area
coulldoccur.
Cord
Rewind
1. Pull cord out of
canister to desired
length, The cord
will not rewind until
the cord rewind
bar is pushed.
NOTE: To reduce the risk of electric shock,
this vacuum cleaner has a polarized plug;
one blade is wider than the other. This plug
will fit in a polarized outlet only one way, If
the plug does not fit fully in the outlet,
reverse the plug_ If it still does not fit, contact a qualified electrician to install the proper outlet, Do not change the plug in any
way.
2. Plug the polarized
Volt outlet located
near the floor
cAuTioN
DO NOT leave the Power-Mate
®
running in one spot in the upright
position for any length of time.
Damage to carpet may occur.
....
ul,
4. Select a pile height setting by pressing
the small pedal on the rear of the PowerMatee.The pile height setting shows on the
indicator_ See SUGGESTED PILE HEIGHT
SETTINGS,,
Attention:
Refer to your carpet manufacturers cleaning recommendations°
Some
more delicate carpets may require that they
be vacuumed with the Power-Matee agitator
turned off, to prevent carpet damage.
_OFF
%.
FLOOR
_PET
5oSelect a switch
position on the
handle.
power cord into a 120
OFF
To rewind: Unplug
the cleaner. Hold
the plug while
rewinding to prevent damage or
injury from the
moving cord, Push
cord rewind bar.
FLOOR - turns on the canister
motor only.
CARPET - turns on both the canister
the Power-Mate® motors.
and
NOTE - When this switch is in the FLOOR
position, the headlight and dirt sensor
(some models) DO NOT function since no
electricity flows to the Power-Matee,
Suggested
sweeping
pattern°
For best cleaning action, the Power-Mated
should be pushed straight away from you
and pulled straight back. At the end of each
pull stroke, the direction of the Power-Mate®
should be changed to point into the next
section to be cleaned. This pattern should
be continued across the rug with slow, gliding motions.
NOTE: Fast,
jerky strokes do
not provide
complete cleaning.
Personal
Injury
Damage Hazard
and
Product
• DO NOT run over power cord
with POWER-MATE%
Personal
injury or damage
could result.
= DO NOT pull plug from wall by
the power cord. if there is
damage to the cord or plug,
personal injury or property
damage could result.
Carpeted stairs need to be vacuumed
regularly. For best cleaning results, fully
close the suction control.
Suction
Control
The hose swivel
ailows the hose to
turn without moving
the canister° This is
helpful for cleaning
in small areas.
Check hose for
twisting before
pulling canister.
E
•
CAUTION
Product Damage Hazard
Use care if the Power-Mate ° and
wand is left in the upright position as
it may tip over easily. Property
damage can occur if tipped.
For best deep down cleaning, use the XLO
setting. However, you may need to raise the
height to make some jobs easier, such as
scatter rugs and some deep pile carpets,
and to prevent the vacuum cleaner from
shutting off. Suggested settings are:
R
Personal
Injury Hazard
Use care if canister is placed on
stairs, if it falls, personal injury or
property damage could result.
For best cleaning results, keep the airflow
passage open° Check each assembly area
in HOW YOUR VACUUM WORKS occasionally for clogs. Unplug from outlet before
checking.
HI - Shag, deep pile, or scatter rugs.
MED - Medium to deep pile.
LO _- Low to medium pile.
XLO - Most carpets and bare floors.
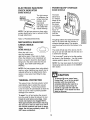
Thedirt sensorlightsystemis mountedon
the Power-Mate
snozzlenearthe resetbutton.
It consistsofa seriesof threeredlightsand
onegreenlight
Thelightsgive
youan indicationof the
amountof dirt
particlesthat
arepassing
Dirt Sensor
(Some Models)
1. Remove the
wands by pressing the quick
release pedal and
lifting up on the
wands
°U
thru the sensor
on its way to
the dust bag.
INITIAL START UP
When the Power-Mate_ is first started, the following light sequences
ond time frame:
occurs in a two sec-
1, All three reds come one
2. Two reds are one
3. One red is on.
4. One green is on and will remain on until
the Power-Mate_ nozzle is placed in use.
NOTE: If the nozzle is on a surface that has
2, As indicated by the illustration, the two dirt
sensor elements are located on the inside of
dirt on it, dirt will be picked up by the vacuum
and one or more red Iights might stay on.
the swivel, approximately 31/2inches/90 mm
down, (note the arrows). Each element
should be cleaned periodically. To reach the
sensor elements, use a small brush such as
a bottle brush. Brush each sensor element
several times to remove dust and dirL
IN OPERATION
When the Power-Mates is being moved back
and forth on the floor, the lights will change
from one configuration to another as more
dirt or less dirt is being vacuumed. As long as
one or more red lights are on, dirt is passing
through the wand to indicate that the surface
still needs cleaning,
NOTE: Looking down inside the swivel you
will see a ring° The sensor elements are
located just slightly below this ring°
When the green tight stays on as the PowerMate® is moved back and forth over an area,
the sensor is not seeing enough dirt to warrant further cleaning of that area,
3. Reinstall the wands after cleaning the sensors.
NOTE: Dirt sensor tights DO NOT function in
the FLOOR setting.
CLEANING
CAUTION
LENS
Although the dirt sensor feature in your
Kenmore Power-Mate® is designed for years of
trouble free use, the passage of dirt through
the air passage system can coat the lens
causing the green light to come on and stay
on - never switching to red. When this happens the lens must be cleaned.
The residue
of the water or cleaners
will accelerate the recoating of the
lenses and make cleaning necessary
sooner.
t
10
t
,i
i,
, _ _ t
E
ATTACHMENTS ON WANDS
•
CAUTION
SOME
DO NOT attach or remove handle or
wands while cleaner is ON. This
1.To
remove
wands from
POWERMATE 'v, lock
wands in
could cause sparking and damage
the electrical contacts°
ON HANDLE
ATTACHMENTS
NOTE: If the
POWERMATE '_is
attached, turn
cleaner off
before remov-
straight-up
position.
_
ing handle from
wands
_ma
1o Press lock
button, then
Telescoping
_
pU{I to remove
Wand
V
handle from
wand..
=1
_
/
_
=== _
m=
=/
Wand
Quick
Release
Pedal
2. Press wand quick
release pedal with
foot and pull the
wands straight up out
of POWER-MATE ®,
The POWER-MATE ®
plug and cord do not
have to be removed to
use attachments on
the wands.
If your model has the optional feature of a
handle release, press it in similarly,
3. Put attachments on
wands as
needed. See
ATTACHMENT
USE.
2. Slide attachments firmly on
handle as needed. See ATTACHMENT USE.
MODELS
\
11
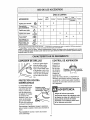
Furniture*
x
x
x
FABRIC BRUSH
x
FLOOR BRUSH
x
X
x
(Some Models)
X**
Power.Mate ®
x
x
Handi-Mate Jr.=
(Some Models)*"
PowePMate Jr,®
(Some Models)*'*
X
X
X
'Always clean attachments before using on fabrics "* 3-way OnlOff switch should be in FLOOR position
"** Handi-Mate Jr" and Power-Mate Jr.2 altachment instructions are included with the products
NOTE: When separating wands, depress Iock, bu!ton completely before Rullinc_ wands apart. If
wand lock button is d ff cut to eepress, pusn the two wanes more [ignuy _ogetner to line up
the lock button with the hole. Depress lock button and then pu wan_s aparL
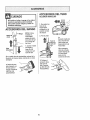
The suction
control allows
Active brush edge
cleaners are on both
sides of the PowerMate®. Guide either
side of the Power-Mate_
you to change
the vacuum
suction for
different fabric
along base-boards or
next to furniture to
suction
suction
and carpet
weights. Opening the control decreases
suction for draperies and lightweight rugs,
while closing the control increases suction
for upholsteries and carpets.
help remove dirt
trapped at carpet
edges.
OVERLOAD PROTECTOR
The Power-Mate®has
built-in
protection
against motor and belt
Overload Protector
WARNING
Reset Button
damage should the
agitator jam. if the
agitator slows down or
stops, the overload
protector shuts off the
PoNer-Mate®_
Th e
canister motor will continue to run_
Personal
Injury
i i iil,,llr '1
Hazard
Always unplug the vacuum cleaner
before cleaning the agitator area as
brush may suddenly restart,
Failure
to do so can result in personal
injury,
To correct problem: Turn off vacuum,
remove obstruction, then press reset button.
To reset: Push in the overload protector
button°
12
ELECTRONIC BAG/HOSE
POWER-MATE s STORAGE
CHECK
SOME
SOME
INDICATOR
MODELS
The lower
wand has a
"U" shaped
flange in the
area where
The light comes
on whenever the
airflow becomes
blocked, dust
Electronic
Bag/Hose
bag needs
changing or canister safety filter
needs c{eaning,
Check_
the power
cord attaches. The base
has a %"
NOTE; The light may come on when using
certain attachments, due to reduced airflow
through attachment
shaped slot
near the
front caster
Refer to TROUBLESHOOTING.
The flange allows the wands and PowerMate®to be stored with the canister to
MECHANICAL
BAG/HOSE
CHECK INDICATOR
SOME
MODELS
conserve storage space. The canister
must be stored on end for this feature to be
used.
MODELS
The wand will slip out of the slot as it is lifted up for use and will slide into the slot as it
is lowered for storage.
When the unit is running, the indicator window will be green if there are no clogs.
When the indicator turns completely red
there is a need to check the dust bag for
being full or the other areas that may be
clogged, See HOW YOUR VACUUM
WORKS.
The Power-Mate® must be in the flat position
as shown in the illustration° Use the handle
release pedal to place it in this position
NOTE; You may save space by lowering the
telescoping wand as shown in the ASSEMBLY section
NOTE: Red may appear when using attachments or when cleaning new carpet, due to
reduced airflow by the attachments themselves or new carpet fuzz filling the bag
quickly_
THERMAL
pCAUTION
revent ti_ over, never leave
er-Mate _' on or in the upright
position with the wand fully
extended. Moving the wand to a
lower position and turning the
handle to one side will make the
Power-Mate ® more stable and less
PROTECTOR
This vacuum has a thermal protector which
automatically trips to protect the vacuum
from overheating° The thermal protector
turns the motor off automatically to allow the
motor to cool in order to prevent possible
damage to the vacuum.
likely
To reset: Turn off and unplug the vacuum
from the outlet to allow the vacuum to cooL
Check for and remove any clogs. Also
check and replace any clogged filters,
Wait approximately
50 minutes and plug
the vacuum in and turn back on to see if
the thermal protector has reset, in some
cases, the unit may suddenly restart. DO
NOT leave unattended.
13
to tip over.
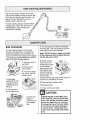
The vacuum cleaner creates suction that
picks up dirt. Rapidly moving air carries the
dirt to the dust bag through the airflow passages. The dust bag lets the air pass
f(
//f
./_/
through, while it traps the dirt,,
Z/i
For best cleaning results, keep the airflow _y
passage open. Check the starred areas .._',_
/
outlet before checking.
occasionally for clogso Unplug from/!/
_
_,
/
/,
/!
Moto,
t!t!
Filter
s_r_ry\
Exhaust
Fl_.r
:i;:
BAG CHANGING
7. The red bag mount will flip forward after
removing bag.. This will prevent the lid from
closing until a new bag is installed,
For best cleaning results, the dust bag
should be changed often. The electronic/
mechanical bag/hose check indicator will
come on when the bag needs to be changed
or the airflow is blocked° NOTE: See PARTS
Note: DO NOT bend or crease the middle
of the cardboard when installing the bag
into the bag mount slots.
AND FEATURES for Bag Number.
8. Rotate red bag
mount down and
I. Unplug cord from
wail outlet.
install bag into slots
per instructions
pushing down until
the cardboard tab
2. Remove hose
from canister.
=
3. Pull hood release
locks into position
and the holes align°
Tuck the bag
securely into the bag cavity so that none of it
is able to be pinched by the hood,
out and up, then lift
canister hood.
4. Disengage
cardboard tab from
red bag mount by
pulling away and
lifting up,
9. Close and latch canister hood.
10. Reinstall hose.
................
,.....
11. Plug cord into wall outlet,
5. Pull bag out of
the red bag mount.
Mot°r__._,_'JJ_>,___M_t:
| 7//
Safety_._/////_/-/7//
Filter-*':/,////////////
",-.
(_dBag
CAUTION
NEVER REUSE A DUST BAG. Very
fine materials, such as carpet freshener, face powder, fine dust, plaster,
soot, new carpet lint, etc. can clog
the bag and cause it to burst before
it is full and may cause damage to
vacuum motor. Change bag more
often when vacuuming these materials.
6. Check and
replace, if
necessary, the
motor safety
fiiter_
Mount
4
............................
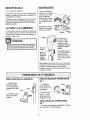
1. Unplug cord from wall outleL DO NOT
drip water on cleaner.
CAUTION
2. Clean exterior using a clean, soft cloth
that has been dipped in a solution of mild
liquid detergent and water, then wrung dry
Wipe dry after cleaning_
Do not use attachments
if they
are wet. Attachments
used in
dirty areas, such as under a
refrigerator,
should not be used
on other surfaces until they are
washed.They
could leave marks.
3. To reduce static electricity and dust buildup, wipe outer surface of cleaner and
attachments
Check motor safety filter occasionally
change when dirty.
..................
and
1. Lift the rubber
retainer and pull
out motor safety
filter as shown.
Electrical Shock Hazard
Unplug power cord from electrical
outlet. Do not operate the cleaner
without the motor safety filter. Be
sure the filter is dry and properly
installed to prevent motor failure
andlor electrical shock,
2. Replace the filter, rough side
out, facing the dust
bag, by sliding it
back into place
under the ribs in
Remove the bag as outlined in the BAG
CHANGING section.
MOTOR SAFETY
ELECTROSTATIC
the bag cavity,
Tuck filter in so that
FILTER
it fits completely
under the rubber
retaine_
This white filter must be replaced when
dirty. It should be replaced regularly
depending on use conditions. The filter
CANNOT be washed as it will lose its
dust trapping
Replace the bag as outlined in the BAG
ability.
•
CAUTION
NOTE: See PARTS AND FEATURES for
Motor Safety Filter Number
NEVER REUSE A DUST BAG. Very
fine materials, such as carpet freshener, face powder, fine dust, plaster,
soot, new carpet lint, etc. can clog
the bag and cause it to burst before
it is full. Change bag more often
when vacuuming these materials.
15
_
WARNING
i
2. Slightly push
the exhaust filter
=, ,i , unllu
cartridge to the
side, as shown in
the illustration,
and pull up to
remove.
Fire andtor Electrical Shock Hazard
Do not operate with a clogged
exhaust filter or without the exhaust
filter or exhaust filter cover installed.
i
EXHAUST
HEPA
FILTER
3. Replace the
exhaust filter cartridge, carefully
positioning it so
that the side
shown in the
The exhaust fitter cartridge must be
replaced when dirty, Replace the filter when
the entire surface area is covered evenly°
The filter CANNOT be washed as it will
lose its dust trapping
illustration goes
down under the
ability,
NOTE: See PARTS AND FEATURES for
Exhaust Filter Number
1. Pull up on
the exhaust ill-
Exhaust
Filter
_
AM/.*
ter cover tO
Cover_....._..._._;_/,._
./
Exhaust
ribs. Then push
the other side
down until it snaps into place° Place the new
filter into the motor cover with the grey
edge down.
t
I
4. Replace the
exhaust filter
the motor cover
remove
from
_
and
lay aside°
Exhaust
cover by engaging the two tabs
on the rear and
pushing down in
front until it
snaps closed.
Always follow all safety precautions when
cleaning and servicing the Power-Mate ®.
. WARNING
Electrical
Hazard
Shock
Or Personal
Injury
Disconnect
electrical supply before
servicing
or cleaning the unit.
Failure to do so could result in electrical shock or personal injury from
cleaner suddenly starting°
16
E
CAUTION
,
i i ,,llllul
nn,
When you remove the end caps, a
small metal washer on each end
may come off. DO NOT lose these
two metal washers.
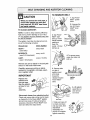
TO CLEAN AGITATOR:
i
NOTE: In order to keep cleaning efficiency
high and to prevent damage to your vacuum, the agitator must be cleaned every time
the belt is chancle&
The agitator must also be cleaned
ing to the following schedule:
Use
Clean Agitator
HEAVY
-
every week
2. Unscrew the
two (2) PowerMate® cover
screws,
3. Turn PowerMate _ right
side up, Press
handle release
accord-
Vacuum
1. Turn PowerMate® upside
down.
pedal and
lower the
swivel, Lift rear
latches up.
(used daily)
MODERATE
-
every month
4, To remove cover,
(used 2-3 times/week)
LIGHT -
grasp the sides and
pull out.
every 2 months
(used 1 time/week)
Remove any dirt or debris in the belt path
area or in the brush roller area.
Carefully remove any string or debris
located on the agitator, end caps, washers or agitator shaft.
5. Depress tabs
on rear of
agitator cover
and rotate
forward to
release from the
Power-Mate ®
base.
IMPORTANT
washers
the end
See the
ed view
Replace
rect
and
caps.
explodfor corthe
cleaner from
Agitator
Cover
6. Lift agitator
assembly out
and remove
worn belt.
assembly.
Disconnect
Tabs
electrical
outlet,
Check and remove hair, string and lint buildup frequently in the Power-Mate ® agitator
and end cap areas, if build-up becomes
excessive, disconnect Power-Mate ® from
wand and follow the steps below.
End Cap
/
7. Slide end caps off
to check and clean
end cap areas. See
AGITATOR
ASSEMBLY for
picture of complete
agitator assembly.
17
End Cap
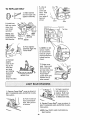
TO REPLACE
5. Line up
front of
cover and
base. Rest
BELT
1. Slide washers
and end caps onto
agitator assembly,
front edge of
cover on
base as
shown.
_L__
\
_.
Cover
2. Install new
belt over motor
drive, then
over brush
Base
[
Top View
sprocket,
NOTE: See
PARTS AND
FEATURES for
Belt Number
Motor
Brush Drive
Sprocket
End Cap Agitator
3. Place agitator
assembly back into
Power-Mate®o
6, NOTE: On dirt
sensor models
be sure that the
board is upright
and the wires are
tucked back as
shown.
4. Reinstall
agitator
cover by Iining up the
front tabs
and slots
and rotating
downward
until the
latches
7. Rotate cover
back. Press cover
firmly until side
and rear tabs snap
into place. Turn
Power-Mate ®
Agttafor Cover
upside down and
replace two (2)
cover screws,
snap into placeo
Push In
And Turn
1. Remove Power-Mate ® cover as shown in
BELT CHANGING AND AGIfATOR CLEANING section,
Push In
And Turn
2. Push in and turn
bulb counterclockwise, then pull out
to remove,
3. Push in and turn
bulb clockwise, to
replace, Bulb must
not be higher than
15 Watts(130 Volts).
4. Reinstall Power-Mate e cover as shown in
BELT CHANGING AND AGITATOR CLEANING section,
NOTE: See PARTS AND FEATURES
Bulb Number
18
for
!
._
TO REPLACE AGITATOR
ASSEMBLY
WARNING
1. Remove Power-Mate ® cover, agitator
cover, belt and agitator assembly. See
"To Remove Belt" in BELT CHANGING
AND AGITATOR CLEANING°
Electrical Shock Or Personal Injury
Hazard
Disconnect electrical supply before
servicing or cleaning the unit.
Failure to do so could result in elec-
2, Remove end caps, washers, screws,
end brush, and brush sprocket pieces
from ends of old agitator assembty
trical shock or personal injury from
cleaner suddenly starting.
!1
ii1'!11111 i'"
TO CHECK AGITATOR
ASSEMBLY
-_=:_-----___
When brushes
_)}_
...........
,_._._._;_-_
_{_:;;
sprocket pieces align properly,
AGITATOR ASSEMBLY.
::_:;_t,_:
.............
See
4. Reinstall belt, agitator assembly,
agitator cover and Power-Mate e cover°
See "To Replace Beft" in BELT
CHANGING AND AGITATOR CLEANING.
__._ are worn to the
level of the base
support bars,
replace the
agitator
assembly_
Base Support
3. Reassemble agitator assembly. To Iine
up screw holes in dowel, sprocket and
end brush, be sure all of the brush
Bars
End
Brush
End
Screw
Washer
End
Cap
Agitator
Unit
Brush
19
Sprocket
Washer
Cap
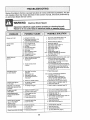
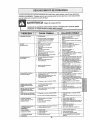
Review this table to find do-it-yourself solutions for minor performance problems, Any service needed, other than those described in this owner's manual, should be performed by
an authorized Sears Service Center.
WARNING
...................ii
7-
.......
Electrical Shock Hazard
,i
.....
i,rr',,
ii, i'll
, i,
,
Disconnect electrical supply before servicing or cleaning the unit.
Fadure,to do ,s,ocould result in electrical,shock or persona!,,,,in,jury.
............
Cleaner won't start.
3.
Poor jab of dirt
_lck-up,
Cleanerstarts but
cuts off,
Unpluggedat waltoutlet,
Trippedcircuit breaker/blownfuse
at household
service panel
Loosehose electricalconnections.
1. Fullor cloggeddustbag
2, Clogged aidlow passages
3, Dtrtylillers
4,, Wrong pile haight setting
5° Open suction control
6, Hole in hose
7o Worn Power-Mate
= agitalor
B. Wornor brokenbelt
go Dirty agile!or or end caps
10, Canisterhoodopen.
Changebag, (paget4)
Clear airflow passages,(page t4)
Changefilters, (page 15-! B)
Adjust selling. (page g).
Adiustcontrot,(page 12)
Replacehose
Changeagitator,(page lg),
See BELTCHANGINGAND AG]TATOR
CLEANING,(pages 17-18)
10. Close and larch hood.
1. Hose or hoedelectricalconnections
2 Trippedoverloadprotectorin
Power.Mete
=
Power-Mate
®connections
unplugged
Wornor brokenboll
3, Dirty agitatororendcaps
4, Trippedovcdcad protectorin
Power.Mate®
Any,some, or elt red lights
in dirt sensor burnand never
turn green.
1. Check conoacttans_reconnecthose ends.(page 7)
2, R_move any itemsthai may be caught
or jammed, thenreset tf cteanerstarts
and stops again,cleanagilalorand endcaps,
thenreset, (pages 12, 17-18)
3_ Turnoff and unplug thevacuumfrom outlet and
waif approximately
50 minutesand plug thevacu_
um In, turn backon toseeif the protectorhas
reset, (page 13) Changedustbag, clear aidlow
blockage, (page 14)
1o Pluginfirmly,(page6}
Switchnol inCARPETposition,
Constant green light an
tn dirt sensor,
3, Reconnecthose ends, (page 7),
1,
2.
3
4.
5,
6,
7
B& g.
Tdppcdoverloadprotector
in canister
Power-Mate_ will not
run when attached..
1. PtugIn firmly,push ON!OFFswitchto ON
2_ Reset oimuifbreaker or replacefuse
2 & 3. See BELTCHANGINGAND AGITATOR
CLEANING.(pages17-18)
4_ Check agitatorarea far excessive lint
build-up or jamming.Clean agitatorend
endcaps,thenreset, (pages12.17-18)
5. Move switchto CARPETposition, (pageB}.
Dirt passageJsclogged
2o Lensesare dirty
1, Check tarclogs inair passages,(page 14)
2, Clean lenses, (page 10),
Dirt passageis clogged
1 Chock forclogs in alr paasages,(page 14)
No green or red dirt
sensor lights,
1. Swilch not in CARPETposition
2, No power tosensor board.
1_ Move switchto CARPETposition, (pageB)
2, Take1oyournearest Scars Service
Center.
EleettantrJMechenical
Bag/Hose Check Indicator
activates.
1. Fullor c_oggaddust bog
2. Dtrty lttlo_'s
3, Blocked aidlow passage
4, Cerlaln
altachment
tools
1. Changebag, lpage 14).
2. Change ftllers, (page 15..16}
3 Clearblockage ]rametdtowpaSSage.(page 14)
4, ThlsIsnormalLight
shouldgooli
when toolis removed,
Cleanerpicks Up moveable
rugs -or- Power-Mate(_
;uohea toe hard,
I Wrong pile
height setting
2. Suctiontoostrong
1 Adjust setflng, (pageg)
2, Open suction
confml.
(page12)
Light won't work.
1. Burnedout lightbulb.
I. Change light bulb. (page 1B),
Cardwon'frewiad.
1. blrly powercord
2. Cordjammed,
1. CleanthopeweJ-cord.
2 Pull out cordand rowlnd
Cleaner leaves marks on carpet,
1, Wrongvacuumingpattern.
1, SeeVACUUMINGTIPS, (page9)
20
Antes de usar su asptradora nueva .....
Garantia de la aspiradora de Kenmore
Instrucciones importantes de
seguridad ...............................
Piezas y caracteristicas ............
lnstrucciones
de
ensamblamiento
...............
Use
..............................
Para comenzar
Sugerencias para aspirar ..............
Sugerencias sobre el ajuste de nivel de
peto de ta alfombra ...................
Detector de tierra ......................
Accesorios ..........................
Uso de los accesorios ..................
Caracterfsticas de rendimiento ..........
.........................
Funcionamiento
de su aspiradora
......
1
,, I
2
3-4
5-6
7
7
8
8
9
10
11
1 t-12
Cuidado del receptdculo
Cambio de la boisa
..............
13
13
..................
Umpieza del exterior y de los accesorios ... 14
Cambio det fittro de seguridad del motor °.. 14
Cambio del fittro de escape .............
15
Cuidado
de la Power-Mate = ............
15
Cambio de la correa y limpieza
del agitador .......................
Cambio de la bombilla ................
16-17
17
Cuidado del agitador .................
Ensambfedel agitador ................
I8
18
Reconocimiento
tnformaci6n de
assistancia
de probtemas
o servicio
....
.........
19
Posterior Cubierta
13
Por favor lea esta guia que le ayudara a assembtar y operar su aspiradora nueva de Kenmore en una manera
m#,ssegura y effectiva.
Para mas informaci6nacerca del cuidado y operaci6n de esta aspirador, llame a su tiendaSears mas cercana.
Cuando prequnte pot informaci6nusted necisitar_ el n_lmerocompleto de serie y modeto de la aspiradora que
est,. Iocado en ta ptaca de los n_meros de modelo y sede.
Use el espacio de abajo para registrar el nL_merode modelo y serie para su nueva aspiradora de Kenmoreo
Numero de Modelo
NQmerode Serie
Fecha de Compra __
Matenga este Ubroy su recibo en u lugar seguro para referenciasfuturas.
GARANT{ALIMtTADADE UN AI_O DE LA ASPIRADORA KENMORE
Esta garantia es por un aRodesde la fecha de compra, e incluye solamenle el uso de la aspiradora en hogares
privadosDurante el aSo de garantia, cuando la aspiradora es operada y mantenida de acuerdo af manual de
instruccionesdel dueSo, Sears reparar_ cualquier defecto en materiales o fabricaci6n fibre de cargo,
Esta garantia exc]uye las bolsas de colecci6n, correas, lamparillas,y filtros, 1ascuales son partes gastables que
se deterioran con el uso normal
Para el servicio de garant{a,retorne esta aspiradora al Centro de Servicio Sears m_s cercano en los
Estados Unidos.
Esta garant{ase aplica sofamente mientras este producto est#_en uso en los Estados Unidos. Esta garantfa le
da a usted derechos legales especificos, y usted puedetener tambi_n otros derechos los cuales varian de
estado a estado
Sears, Roebuck and Co., D/817WA, Hoffman Estates, IL 60179
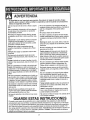
ADVERTENCIA
Su seguridad es muy importante para nosotrosoPara reducir el riesgo de tncendio, choque
eldctrlco, lesi6n corporal o dafioa al utilizar su aspiradora, act_e de acuerdo con precauciones
bdstcas de seguridad, entre elias:
No use la aspiradorasi la manguera est&rata. La
Lea este manua!antes de armar o utilizar su aspiradora.
mangueracontiene alambres el_ctricos.
C_mbielasi
est,.
rata
o
desgastada.Evite
aspirar
objetes
Use su aspiradera[_nicamenteen la forma descfita
agudos
en este manual Use _nicamentecon accesodos
recomendadosper Sears,
No coloque objetos en las aberturas
Para reducirel riesgo de cheque el_ctrico,no use
No utilice ta aspiradorasi alguna abertura est_ blosu aspiradoraal airs fibren[ sabre superficiesmojaqueada;mant_ngatafibrede potvo,pelusa, cabellos
das
y cualquieracosa que podr[a disminuirel flujo de
Desconecte el cord6n el_ctricoantes de componer
airs
o limpiarel ,_readel agitador. De to contrario,et
Mantenga el cabel]o,ropa suelta, dedosy todastas
cepitto podria arrancarde form imprevistao podda
partes de! cuerpoalejados de las aberturasy piezas
producirseun cheque et_ctrico..
mec&nicas.
Stempredebe apagar fa aspiradoraantes de
No use taaspiradorasin tenet instalada ta botsa
conectar o desconectar la manguerade ta Powerpara polvo y/o los filtres.
Mate®
Cambie siempre la botsa para polvo despu_s de
Siempre debe apagar su aspiradoraantes de desaspirar iimpiadoresde atfombraso desodorantes,
consctarla.
talcosy pobos fines. Estos productosatascanla
No desconecte la aspiraderatirando del cord6n
balsa, reducenel fiuje de airs y puedencausar que
el_ctrico.Para deeconectafla,hale el enchufe,no el
_sta se tampa Sine cambia ia balsa podria ocasiocord6n.
nar daSo permanentsa la aspiradora.
Sujete el enchufecon la mane al enroltarel cord6n
No use la aspiradorapara Ievantarobjetos agudos,
ef_ctrico.Para descenectarla,hale en enchufe,no e[
cord6n,
juguetes pequefies,alffieres,sujetapapeles,etc,
PodriandaSar faaspiradorae la balsa para pobo.
No use ta aspiradorasi el cord6noei enchufeest#.
daSado.Si la aspiradorano est_funcionandoadeNo levante ningunacosa que se est_ quemandoo
cuadamenteo si se ha dejadocaer, est_ daBada,se
emitiendohumo, come eigarrillos,ceriIloso cenizas
ha dejado expuestaa la intemperieo se ha dejado
calientes.r
caer en agua, devu61vataa un Centre de serviciode
No use la aspiradorapara aspirar IfquidosinflamaSears.
bles o combustibles(gasolina, I[quidospara limNo hateni transports ta aspiradoraper el cord6n; no
pieza, perfumes,etc.) ni la use en tugaresderide
use el cord6ncemo mange;no cierre puertas sabre
_stos poddan estarpresentes Losvaperes de estas
eI cerd6n; no hale el cord6n sabre rebordesagudos
sustaneiaspueden erear un peligro de incendioo
ni esquinas.Ne pass la aspiradorasabre ei cord6n.
explosi6n
Mantengae[ cord6n alejado de superficiescalientes.
Tenga cuidadoespecial a] utitizarla aspiradoraen
No abandonela aspiradoracuandoeste conectada.
escalones.No _aceloque sabre si]las, mesas, etc.
Descon_ctelacuando no la est_ usandoy antes de
Mant_ngalaen el piso
dade servicio.
Usted es responsablede asegurarque su aspiraNo permita que sea utilizada come juguete Se
dora ne sea utilizadaper ninguna personaque ne
requieretenetmayor cuidadocuando sea utilizada
puedamanejadacorrectamente.
en la proximidadde niSoso per nifios
No opere sin el fittro de escape ni ta cubierta del illNo toquela aspiradorani el enchufecon tas manes
fro
de escape instatados.
mejadas.
GUARDE ESTAS INSTRUCC
El armada y use seguro de su aspiradora son su respensabifidad_Esta aspiradora ha side dise_ada
exclusivamentepara use dom_sticeoLa aspiradora debera almacenarse en un lugar seco yen el interior
Lea este Manual del propietario detenidamente, pues centiene informaci6n importante sabre seguridad y
use Esta quia contiene informaci6n sabre seguridad debajo de simbolos de advertiencia cuidade. Per
favor ponga atenci6n especial a estas instrucciones dadas. Advertencia: Este informaci6n le aiertar& con
e! poligre de fuege, cheques electricos,quemadas y lesiones, Cuidado" Este informaci6n le alertara a
peligros ,comelesion,esy daSesde propiedad,
................................
Esimportante
conocer
}aspiezas
y caractefisticas
desuaspiradora
para asegurar su uso adecuado y seguro,
Examinelas antes de usar su aspiradora,
Objeto
Pieza N_-,
en EUA
Bombilla de iaror
20-5240
Correa
20-5201
Pieza N_.
en Canadd
596181
L
20-40979
•_
Bot6n de
liberact6n
r_pida de/
mango
telesc6pico
Control de
extensi6n
Power-Mate Jr, ®y bandeja
(Algunos modelos)
adjustable
del tubo
POWER-MATE@
Correa
Rebord_
Dispositivo
giratorio
Pedal
de libe_:lcml
n
r&pida det tubo
(Algunos modalos
NOmeros de serie del
modelo Power-Mate _
(Parte
{
_
_]
J
(Atgunos modelos)
de pelo de/a a/fombra
(Algunos modelos)
inferior)
Pedal de liberact6n
del man
Pedal de seteeci6n de nivef
de pe!o de la alfombra
(Algunos modelos;
Indicador de polvo
(Algunos modelos)
Protector
contra
sobrecargas
Bot6n de
restauracion
Ltmpiador
"Reset"
de orlllas
(No se muestra)
MANGUERA
ACCESORIOS
lnterruptor de encendldo/
apagado de tres poslclones
(Apagado/Plso/Alfombra)
(Algunos modelos)
Power-Mate Jr. ®
(Algunos modelos)
Herramienta
Ceplllo para
Mango
_
('_"_
cep,xo
para telas "-'-_-_
_'-_
_
cepH/oparaplsos
_.-LII
[/['-J2L_/FF_
(Algunos modelos)--_
_
_"
_
HandI.Mate Jr,"
(Algunos modelos)
NOTA:Todos los modelos cuentan con
un juego de accesorios en el recept&culo, Unos modetos tienen un juego adicional que se puede guardar en Ia bolsa
accesaria para el uso para la basura u
otros lugares sucios.
Dlsposltlvo
giratorio de
la manguera
RECEPTP,CULO
Pleza N".
en EUA
ObJeto
Part N°.
en Canadd
Boisa,para polvo
20-50557
20-50557C
Filtro de escape ........
20-86880
20-86880C
Filtro de seguridad
del motor
20_'86883
'20-86883C
,,,,,
Filtro de
Cubierta
del
fi/tro de escape
Almacenamiento
para accesorlos
del cord6n el_cfrtco
Tapa del
electr6nlco para
la bolsa/manguera
modelos)
mecdnlco para la
bolsa/ manguera
(Algunos modelos)
el_ctrico
Pestillo
de la ta
Sujetador
de la bolsa
FIItro de segurldad
del motor (Detrds
de la botsa para potvo)
Botsa para polvo
A"DvERTENCIA
Peligrode choque el_ctrico
No conecte ia aspiradora hasta que termtne
de armada°De Io contrario podria causar
un choque el_ctrico o lesi6n corporal.
iin_
nl'l iiii
Bot6n
ii, i,
m
Antes de armar la aspiradora, chequee la LISTA
DE EMBALAJE en ta cubierta separada de ta Lista
de Partes para Reparaci6no Use esta lista para verificar que ha recibido todas las componentes de su
nueva aspiradora Kenmore,
m
Bot6n
de_
liberacl6n
r_plda
del mango --*-
TUBO TELESCOPlCO
La extensi6n
del tubo es
ajustable y no
requeire el
montaje Para
ajustar,
empuje hacia
abajo en el
bot6n del
tubo y mueva
el tubo super
riora la posiciOndedeada
l
m
Control de
extensl6n
adjustable
del tubo
Dtsposlt/ve
glratorio
del mango
\
la mano
arriba
esta
lenglJeta
Tubo
lelesc6pico
--
m
Control de ex"tanst6n
aJustabla del tubo
m
La parte giratoria,
situada en el
Power-Mate_, le
permite mover el
mango a la izquierda para pasarla
aspiradora a una
extensi6n m&s
targa debajo de los
muebles bajos,
Cuando ajuste la
!ongitud de fa vara
hay que tenetel
Power-Mate%on la
m
J
_--.----
Bot6n del
tubo
mano o el pie,
POWER-MATE
tntroduzca los tubosen la Power-Mate_ hasta que el
botOndel tuboquede fijo en posici6n
Ilberacl6n
r_plda del tubo
(Algunos
modelos)
RECEPTACULO
MANNGUERA
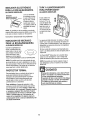
1, Abra la tapa del recept_.culo.
2. Examine la bolsa para polvo este instalado correctamante Consu{telas instrucciones de instalaci6n en
la CAMBIO DE LA BOLSA,,
3. Examine el filtro de seguddad del motor este instafado correctamante. Consutte las instrucciones de
instataci6n en LIMPIEZA DEL FILTRO DE SEGUR1DAD DEL MOTOR
1. Alinee la pestar_ade
sujeci6n de ta manguera
y la ranura de la cubierta del recept_cu!o e
introduzca la manguera
en ef recept_culo basra
qua quede fija en posici6n
c
LA TAPAY LA CUBIERTA
Es normal qua ta tapa del recept_culo se desprenda
al set abierta mas de Io necesariooPara colocar nuevamentela tapa, alinee tas ranuras de la bieagra, ins_rtelas y cierre la tapa.
Para retirar: Levante el
pestilio de la manguera
y tire de la manguera
sujecl6n
de la
manguera
.onu;
. cu,o.o0........
Nunca debe abrir la capucha de] contenedor
estando la tapa abierta. As[ se evitar_ daSos
a la capucha dal contenedor y/o a la tapa.
Bot&n
2, tntroduzca el
mango en el tube
hasta que el bot6n
quede en posici6n.
Asegurese de que la
manguera no est_
torcida,
del
ii iiiii .............
1
m
Bot6n de
liberaci6n
r&pida
mango
de!
(Algunos
mr)delos
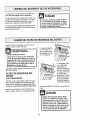
Para retirar: Oprima
el bot6n de liberaci6n
r_pida del mango
para liberar el mango
y tire del mango hacia
ardba
Para Guardar: Para prevenir la precibn de ta mangua
mientras se guarda, desuna la mangua del tubo de la
aspiradoraoGuarde la magua en una posicibn
enrollada y flojamente de tal manera qua la tapa de la
mangua no se estire.
PARA ACOPLAR LA BANDEJA
!, Alinee la pestaSa de la varilla
con la ranura de la
bandeja Power-Mate
Jr,®.
2, PresJoneta bandeja en la varilla
superior,
Tab.
s,o\ \
PARA INTRODUCIR
JR. ®
POWER-MATE
t. Coloque la
parte frontal del
Power-Mate,Jr.® an
la bandeja.
2. Gire el PowerMateJr. ® hac{a
atr_.s hasta qua
encaje an su sitio.
PARA SACAR EL POWER-MATE
JR. ®
1. Presione el dispositivo de retenci6n y saque
el Power-MateJro®de la bandeja.
PARA COMENZAR
•
Indlcador de nlvel
de pelo de la alfombra
ADVERTENCIA
Peligro de lesi6n personal y daSo al
producto
° NO enchufe la aspiradora si el
interruptor est&en la posici6n ON.
Podria causar lesi6n personal o dafio
at producto.
• El cord6n el_ctrico se mueve
r_pidamente durante el enrollamiento.
Mantenga alejados a los nt_.osy
asegure espacio libre suficiente para
evitar lesiones personales al enrollar
el cord6n.
NO use los enchufes Iocalizados sobre
los muebles. Los objetos cercanos
podrian resultar daSados.
Almacenamlento
del cord6n
1.Tire del cord6n
para sacarlo del
recept&culohasta
tener la Iongit_d
deseada, Etcord6n
no se enrollar_hasta que oprima la barra para enrollarlo.
NOTA: Para reducir et riesgo de cheque el_ctrico,
esla aspiradora cuenta con una clavija potarizada,
uno de los contactos es m_s ancho que et otrooLa
clavija s6lo puede introducirse de una manera en el
enchufe,Si la clavija no cabe bien en el enchufe,
invi_rtala_Si a0n no cabe, llame a un electricfsfa
para que lnstaleun enchufe correcto. No attere la
clavija de ninguna manera,
Pedal de
Ilberaci6n
Pedal de seleccl6n
de nlvel de pe/o
de la alfombra
(A/gunosmodelos)
3. Baje el tubodesde ta posici6n vertical pisando et
pedal de liberaci6n del mango,
E. €o,o,,oo
NO deje la Power-Mate" funcionando en
posici6n vertical en un lugar durante ning_n
espaclo de tiempo: se puede daSar la
alfombra.
4. Seleccione una altura de pelode la atfombra
usando el pedalpequefioubicado en la parte posterior de la Power-Mate® El nivet de pelo la alfombra
se muestra en el indicador, Consulte SUGERENCtAS SOBRE EL AJUSTE DE NIVEL DE PELO DE
LA ALFOMBRA.
Atenci6n: Refi_rase afas recomendaciones det fabricantepara limpiar su alfombra.Algunas alfombras
m_s deiicadas pueden requerir el use de la aspiradora con et agitador Power-Mate_'desconectado
para prevenir que la alfombra sea daSada.
_GFF
FI,DOR
,.,._ARp_"Ir
f--..
2. Conecte el cord6n el_ctricopotarizado en un
enchufe de 120 voltios que se encuentre cerca del
piso.
Para enrollar: desconecte la aspiradora, Sujete el
enchufe mientras
enroflael cord6n
para impedir daSo o
lesi6n corporal por el
movimiento del corm
d6n, Optima el
control para
rebobinar et cord6n
electrico con la mane o con el pie.
t --
:
5. Seieccione una
posici6n del interruptor en el mango,
OFF
FLOOR - s61oenciende el motor del recept_,culo.
CARPET - enciende los motores del recept_,culoy
de fa Power-Mate®_
NOTA - Cuando este control est& en la posici6n
FLOOR, el farot y el indicador de polvo (unos modelos) no funcionan porque no Ia efectricidad no fluye
al Power-Mate®
ADVERTENClA
Paraobtener
lameieracciOn
defmpieza
serecomienda
empujar
laPower-Mate
®endirecci6n
direcIamenle
opuesta
a usledyjalar]a en lnea recta, AI
Peligro de lesion personal y daffo al
producto
final de cada pasada de regreso, cambie la direcciOnde la Power_Matee hacia la siguiente secciOna
fmpiar. Continue as[ a tray,s de toda la afombra de
una manera lenta y desfzante.
• No atropelle el cordon el(_ctrico con la
Power-Mat®CoHay un peligro de
lesir_n corporal o unos dafios de
pesesiones.
• No tire del cordon elOctrico de la pared
para desenchufario, Si hay danes en
el cordon el#ctrico o e! enchufe, hay
un peigro de lesion corporal o unos
daffos de poseslenes,
NOTA: las pasadas r_pidas y
ialonadas no
Iogran una limpieza completa.
El disposltivo giratofio
de la manguera permit®que _sta gire sin necesidad de mover el
recept_cuIo. Eslo es
muy t)tt para limpiar en
&reas pequeflas. AsegQresede que la manguera no est_ torcida
antes de jalar el recept_cu!o.
%'Z 6F
/
, iiii,
j lq
ql
,i
Control
de
Los escalones alfombrados requieren limpieza
periOdica,Cierre per complete el control de aspiraci6n para Iograr los mejores resutados de timpieza.
[
ADVERTENOIA ......
Peligro de lesi6n personal
!
. '*cuIDADO
Peligro de lesion personal y dafio at
producto
Tonga cuidado si el Power-Mate®y la
manguera se dejan en posiciOnvertical
pues peuden caerse f,_cilmente. Si se
volt®anpeude haber dafio de propiedad.
Use eI ajuste XLO (bajo) para obtener la mejor tmpieza a fondo. Per otra parte, quiz£s se requiem etevar el nivel para Iacilitar algunas tareas, come pot
ejemp}ocuando se trata de tapetes y atgunas afombras de pelo targo,y para impedir qua la aspiradora
se apague Se sugieren los siguientes ajustes:
Tenga cuidado si cotoca el recept_culo
sobre escalones. Si se cae, podria causar
lesion personalo dafio a la propiedad.
i
ii i,ii
i
i1,111,11
iii
Mantenga el paso de air®abierto para Iograr los
mejores resultados de limpiez& Examine de vez
en cuando cada una de las &teas de union en FUNCIONAMIENTO DE SU ASP1RADORApara asegurarse de que no estOnbloqueadas. Descenecte ta
aspiradora antes de revisar.
HI -Pelo muy largo y suelto, tapetes, allombras
muy acojinadas.
MED -Pelo re®dianea largo
LO - Pelo corto a mediano.
XLO - La mayoria de las alfombras y pisos
descubiertos.
ALGUNOS MODELOS
PARA LIMPIAR LAS LENTES
Et sistema indicador del detector de tierra est_ montado en la bequilta de FaPower-Mate®,cerca del
botSn de restablecimiento Consiste en una serie de
tres indicadoresluminosos rojos y uno verde
_ador
de polvo
(Algunosmodelos)
Las tuces indican
la cantidad de
partlculas de tierra qua est_.n
pasando a trav_s
del detector al ser
transportadas
hacia la bolsa
para polvoo
--Ui
1oRetire los tubes
oprimiendo el pedal
de liberaci6n r_.pida
y levantando los
tubes.
ARRANQUE INICIAL
La primera yes qua arranca ta Power-Mate®ocurre
siguiente en un perfodo de 2 segundos:
I. Los tres indicadoresrojos se encienden.
2. Dos indicadoresquedan encendidos.
3. Un indicadorqueda encendido
4. ELindicador verde est& encendido y permanece
encandido basra el memento en qua comience a
usar Ia Power-Mate®'
NOTA: Si ta boquiIla est& sobre una superficie que
tiene ter[a, _sta ser& aspirada per la aspiradora y
posibLementese queden encendidos algunos de Ios
indicadores rojoso
EN OPERACION
Cuando desliza la Power-Mate®per el piso, tos indicadores cambian de una a otra configuraci6n segun
si fa aspiradora recoge mucha o poca tierra. Si uno
o varies indicadores rojos permanecen encendidos,
significa que la aspiradora sigue levantado tierra,
_sta sigue pasando a trav_s del tube, y que necesita continuar aspirando la superficie
Cuando se queda encendido el indicadorverde
mientras desliza la Power-Matee sobre una zona
determinada, significa qua el detector no est,.
detectando tierra y qua la zona ya est& lipia.
NOTA: Las luces del detector de tierra no funcionan
cuando se selecciona el ajuste para pisos descubiertos FLOOR,
LIMPtEZA DE LA LENTE
Aunque la funci6n de detecciSn de tierra de ta
Power-Mate®de Kenmoreest& diseSada para
brindar touches aSos de funcionamiento interrumpido, el paso de tierra a trav6s det sistema de tas vIas
de aire puede causar una escama en la renle,
haciendo qua se encienda y contin0e encendidoe!
]ndicador verde, sin cambiar nunca a rojo. Cuando
esta suceda, tiene qua limpiar la lente_
2. Come seve en el diagrama los dos indicadores
de polvo estdn colocados dentro de la articutaci0n
giratoria, aproxirnadamente3 Y2pulgadas o 90
mm abajo, Observe las flechas). Para itegar a los
elementos del detector, use un cepillo pegueSo,
come per ejemplo para botellas Cepilfe cada
detector varias veces para eliminar la tJerray el
polvo
NOTA: Si mira hacia dentrodel dispositivo giratorio pedrO,ver un anillo El elementodetector est,.
justamentedebajo de dicho anilto
3. Vuelva a instalar lostubes despu6e de limpiar
los detectores.
E
•
CUIDADO
No utilice nunca agua ni soluci6n
limpiadora para limpiar las lentes. El
residue del agua o del limpiador
causard que las lentes se cubran de
tlerra rods rapido, requirtendo limpieza
con mayor frecuencia.
i
,!
i!1!1[11,11
ACCESORIOS
ALGUNOS
NO instale ni retire el mango ni los tubos
cuando la aspiradora est_ encendida.
Esto podria causar chispas y da5ar los
contactos el_ctricos°
.............
ii
i
iiii ,i
i
Tubo
telesc6pico
col6quefos en ta
posici6n vertical
P°wer'Mate®'
de
bloqueo,
NOTA:Si tiene
inslaladata
Power-Mate®,
apague fa aspiradora antes de quitar el mango de
los tuboso
=,=ram
___
"V
de
W
Pedalde
=== _
liberaci6n
r_pidadel
ubo
=/
de btoqueo y
luegotire
delquimango para
tarlo del tubo
Si su modelo tiene la caracter_sticaopcional de la
liberaci6n del mango r_pida, ins_rtala de un modo
semejante
2. Destice el accesorio deseado con
firmeza sobre el
mango. Consult®la
USO DE LOS
ACCESORtOS
l
2. Pise e! pedal
1, Optima el bot6n
=_
MODELOS
1. Para retirar los
tubos de la
ACCESORIOS DEL MANGO
Bot6n de
clerre
DEL TUBO
3oColoque el
accesorio des®ado sobre el
tube. Consulte
ta USO DE LOS
ACCESORIOS.
,#jl_'_ Ib'
10
liberaci6n r_.pidadel
tuboy tire del tubo
hacia arriba para
desprenderlo de la
Power-Mate
No es necesario
retirar el enchule y
cord6n el_etrico de
la Power-Mate®
para usar los
accesorios del tube.
/_REA A LIMPIAR
Entre
ACCESORIO
Meubles* cojinee'
Pleas
Pisos
descubterto,,dfombrados/
Corlinas* Escalonee
Parades
Aftombms
Cepillo para sacudir
X
Herram'ienta .................
pare hendiduras
X
Cepillo para telas
X
X
X
X
X
CepiUopare pisos
X**
Power-Mate®
Handi-MateJr.=
X
"
(Atgunosmodelos)**"
X
X
X
PowePMate Jr?
X
[Algunos modelos)***
• Siernpraltmp_ los aceesoriosantes de user sobm tales "" E_interrupterde 3 posicianesdabs 8star en ta posic_SnFLOOR(piso deseubieflo)
"" La HandI-MateJr = y la Fewer-MateJr _ _nctuyensue propias instruceionespareusa de accesortos
NOT.A:Cuando separe _ostubas oprirn,acamp!eta.monteet bot6n de btoqu.eoantes de sepa_artos par compfeto, _i sete otTicuttaop_imirel Dot6n, jume m_.stos JuDaspara minear el bo[6n con el oriticio, uprirna el ootSny
eespu_s separe =astubas.
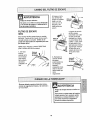
LIMPIADOR DE
El controlde
aspimci6n le
permite carnbiar la poten-
Active los cepil!oslimpiadares de oritlas a cada
lade de la Power-Mate®,
Paso la Power-Mate®junto
alas parades o junto a los
rnuebles para ayudar a elirninar ta tierra acurnulada
en las orillas de la alfornbra.
cia de aspireasplracl6n
asplracl6n
ci6n de la aspiradora dependiendode_
grosor de la tela o aifombra, La aspiraci*Snse
disrninuye,
pare lirnpiar cortinas y tapetes figsros, abriendo el control; pare aspirar rnuebles y
alfombras, el control debe cerrarse para aumentar ia aspiraci6n.
PROTECTOR CONTRA
SOBRECARGAS
La Power-Mate®cuenta
con protecci6n incorporate conira da_o del
motor y la correa en
case de atascamiento
c{e]agitado_ S} el agiledor funciona rn_s
despacio o pare, el pro*
lector de sobrecarga
para Ia Power-Mate®,
El motor del recept_.culo
continuar_,funcionando_
Protector contra
1
sobrecargasBot6n de]
•
res,auracl6n "Re_, "3.
_
ADVERTENCIA
Peligro de lesiones personales
Desconecte siempre la aspiradora antes
de limptar las dreas de la agitador puss
_stos podfian arrancar de manera
imprevlsta. El ha hacerlo, podria resultar en lestones personales.
Para resolver el problema: Apague la aspiradora,
quite et residuey apriete et bot6n para encender de
nusvo
Para restablecer: Opdma el bot6n de{ protector
centre sobrecarga
'!'1
PARA LA BOLSA/MANGUERA
TAPAY ALMACENAMIENTO
PARA POWER'MATEs
ALGUNOS
ALGUNOS MODELOS
INDICADOR ELECTRONICO
MODELOS
lndlcador
eleotr6nlco para la
[3 ]uzse enciende
en cualquier momento que se bbquee el
ftujo de airs, cuando
la bolsa se ffene o
cuando sea necesario cambiar el _tro de
seguddad dei recept_culo.
NOTA: Es posible que la luz tambi6n se encienda
cuando utitice ciertos accesorios debido a que el flujo de airs se reduce a! pasar per el accesorb
Consuite
el solucionador
Et tube inferior tie_
ne un reborde en
formade "U" en fa
zona de fijaci6n del
cord6n el_ctrice. La
base tiene una ranura an forms de
"U" cerca de la parte frontal del recept_cufo,
de problemas.
La ranura permite atmacenar los tubes y ra PowerMates con el tube para economizar et espacio requerido psra su slmscenamiento, Para usar esta caracteristica es necesario almacenar e! recept&culo
en {orma vertical
INDICADOR DE MECANlCO
PARA LA BOLSAJMANGUERA
ALGUNOS
rvlODELOS
Cuando la aspiradora funciona, la ventana del indicador est,. en rojo es necesario revisar si la bolsa de
polvo est6 Itena o haya
residues en otros tugares,
V_ase FUNCIONAMIENTO DE SU ASPIRADORA.
El tube se sale de fa ranura al ser levantado para
ussrto y se desliza dentro de @stsal bajario para atmacenado,
La Power-Mates debe estar en ls posici6n tlana
come se ve en el diagrama, Use ef mango del
pedal de tiberaci6npara moverla a esta posici6n.
NOTA: Es posible que la luz roja encienda al usar
las herramientas o al usar la aspiradora en la albmbra nueva porque el flujo de airs ss reducido per las
mismas herramientas o la pelusa de una alfombra
nueva que Ilena ta bolsa r&pidamente.
NOTA: Se puede usar menos espacio si baja el
tube telesc6pico come se muestra en ta secci6n
MONTAJE,
•
PROTECTOR TERMAL
CUiDADO
iiii
I
ii
i
,i ,_,1
Para evitar volcaduras, nunca deje la PowerMates encendida o en posici6n vertical con
et tubo completamente extendido.
Ajustando el tubo a una posfci6n m_s baja_
girando el mango a un lado, la Power-Mate_
se hallarden una posici6n robs estsble y
serd rods dif|cil que se vuelqueo
Esta aspiradora tiene un protectortermai que se
ajusta autom_ticamente para proteger a ta
aspiradora del sobrecalentamiento.E! protector
termal apaga el motor autom_,licamentepara
permitir que el motor se enfr[e a tin de evitar
posibles dares a taaspiradora,
Para restablecer: Apague ta aspiradora y desenchule el cord6n def tomacordente para permitir
que la aspiradora se enfde, Busque y saque fas
obstrucclones, si es necesarioo Examine tambi_n
y reemplaoe cualquier filtro obstruido. Espere
aproximadamente 51)minutes y enchufe ta aspiradors y volt_ela para ver si el protector del
motor se ha reajustado, En algunos cases, la
unidad puede velvet a arrancar sObitamente, NO
LA DEJE desatendida.
--
12
I
in
i iii,
La aspiradora crea succi6n o aspiraci6n que levanta
la tierra La tierraes impulsada a trav_s de las v[as
de flujo aire hasta la bo{sa por una r_pida corfiente
de aire. La bolsa para polvo permite el flujo de aire,
_,,_
/"f (,.,...J.._
/,,) ..f-_
\
,,,/tt.'/"
'
pero atrapa la tierra
/_/,,'
Para [ograrlos mejores resu[tados de limpieza,
/_/
manlenga abiertas Ias vias de aire, Examine
.,/_,_"
peri6dicamente las _,reasindicadas con aste- ._',,._y
riscos para asegurarse de que no• est_n bloo-Z. 7
/
J'l
_
oo ooooc,o,o,
ooodo
,ooo,o
:::
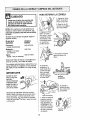
CAMBIO
,
....
DE LA BOLSA
Filt.o de
.................
Flltra de
_
esc/ape
...............
7. Examiney limpie et filtro de seguridad del motor.
El montaje rojo de la bolsa se inclinar_ hacia
adelante despu_s de que retire la bolsa. Esto
impedir&que la tapa se cierre antes de instalar una
boisa nueva
La bolsa debe cambiarse seguido para lograr los
mejores resultados de limpieza. El indicadorelectr6nico / mec;_nicode la botsa o de manguera
enciende cuando se necesita carnbiar
NOTA: V_ase PIEZAS y CARACTER[STICAS
para el numero de la bolsa.
NOTA: NO doble ni pliegue el centre del
cart6n al instalar ia bolsa en las ranuras del
montaje de ta bolsa_
1. Desconecte el cord6n
et_ctrico de la clavija de la
pared,
2, Quite la manguerade la
aspiradora_
3. Tire del pestiUode la tapa
hacia fuera y hacia arfiba;
luego levante la tapa det
recept_culo
8. Gire hacia abajo e]
soporte para la bo[sa
roja y para insertarla
bolsa en las ranuras
empuje hacia abajo
hasta que las leng_etas _,
de cart6n encierren
,_..
seguramente en las
posiciones apropiadas corn se ve en el diagrama.
4. Destrabe la pesta_a
de cart6n del montaje
rojo de la botsa empujando hacia afuera y
tirando hacia arriba,
9. Baje Ia cubierta del recept&culoy cierre el
pestillo,
10, Reinstale ta rnanguera o
5. Saque la boisa del
montaje rojo,
11, Conecte el cord6n eI_ctricoen ta clavija de la
pared.
FIItro de
del
del
oo
6. Revisey
cambie, cuando
sea necesario, el
filtro de seguridad
def motor
rojo
13
NUNCA REUTtLICE UNA BOLSA PARA
POLVOoLos materiales muy fines, tales
come desodorantes para alfombras,talco
facial, polvo fine, yeso, hollin, pelusa de
alfombras nuevas, etc. pueden atascar la
bolsa y causar que se rompa antes de que
est_ Ilena y puede dafiar el motor de ta
aspiradora. Cambie la bolsa m_s seguido
cuande aspire este tipo de materiales.
I, Desconecte
etcordSn
ot_ctrbo
delaclavija
dola
paredNOchoreeagua sobre la asptradora.
•
2. Limpie ei exterior conun trape suave y limpio, que
ha side exprimido despu_s de remojar on una seluci6n de agua y detorgente Ifquido ligero.Seque e!
exterior con un trapo seco despu6s de limpiar.
cuIDADo
....
No use los accesorios sl est&n mojados,
Los accesorios que se utilicen en _reas
sucias, debajo del refrigerador, no deben
usarse en otras superficies sin antes set
lavadosoPodrlan dejar marcas.
3, Limpie la superficie exterior det recopt_.culoy do
los accesorios para reducirla etectdcidad ost_tioay
la acumulaci6n de polvo.
,,
,,,
,,,
,
Examine el filtro de seguridad del motor do vez en
cuandoy cambio cuando est_ sucio.
ADVERTENCIA
i,ll
i,
i
1. Lovante e! dispositivo de retenciSn de
gema y saque el tittro
de seguridad come se
ve en el diagramao
i,ii
Peligro de cheque el_ctrico
Desenchufe el cordon de la corriente el_ctrica. No opere la aspiradora sin el filtro de
seguridad del motor. Aseg_urese de que el
flltro est6 seco e instalado adecuadamente
i para fmpedir que el motor falle y/o que se
I pr°duzca un cheque el_ctrico.
Para qu_tarla boJsa,siga las instrucciones en CAMBtO DE LA BOLSAo
FILTRO DE SEGURIDAD DEL
MOTOR
ELECTROSTATICO
Disposi¢ivo de
retenci6rt de goma
Esle filtro se tiene que cambiar cuando est_ sucio
Debe eambiarse periSdicamente seg_n las condiciones de usoo Et filtro no se puede lavar pues
prderia su capacidad para atrapar altrapar polvo.
Dispositivode
retention
de goma
2, Reemplaco el fillro,
con el lade &spero
hacia afuera, en
direcciSn de Is bolsa
del polvo, desliz_,ndolo
en su lugar dentro de
fas costillas de la
cavidad para la bolsa,
Meta e( fiftro para que
quepa per complete
debaio del dispositivo
de retenci6n de goma.
3. V6ase CAMBIO DE LA BOLSA para cambiar la
boisa.
NOTA: V_ase PIEZAS y CARACTERISTICAS
para el ntJmero dei filtro de seguridad dol motor_
CUIDAD'O....
NUNCA REUT1LICEUNA BOLSA PARA
POLVO.Los materiales muy fines, tales
come desodorantes para alfombras, talco
facial, potvo fine, yeso, hollin, pelusa de
alfombras nuevas, etc., pueden atascar la
bolsa y causar que se rompa antes de que
estd tlena. Cambie la bolsa m_s seguido
cuando aspire este tipo de materiales_
,11
14
! !! i! i1,11,,,1,11
A'DVERTENCIA
2. Empuje ef cartucho del filtro fittro
escape con cuidado
hacia a un tado
cemo se ve en el
diagmma y tire
hacia arriba para
sacarto
*
Peligro de choque el_ctrico
No opere con un flltro de escape bloqueado
o sin el filtm de escape o la cubierta del fiF
tro de escape instaladoso
FILTRO DE ESCAPE
HEPA
Este cartucho del filtro escape tlene que cambiar
est_ sucio, Cambie e! filtro cuando eI _rea superficial est_ cubierta por compfeto. El flltro no se
puede lavar pues prdeda su capacldad para atrapar altrapar polvo.
Ftltro de
_
NOTA: V_ase PIEZAS y CARACTERiSTICAS
para el n_Jmerodel fittro de escape°
1,Tire hacia
arflba la
cubierta det [iiire de escape
pare sacarla
de la cubierta
del motor y
colSqueta a un
lado
Cublerta
del tiltro
4. Reemplace la
cubierta del filtro
de escape
posicionanado las
dos leng_etas
traseras y
empujaando hacia
abaio en ]a parte
trasera basra que
cierre
seguramente
!
Siempre deber_n seguirse todas las precauclones de se_uridad ai limpiar y dar servicio a
ta Power*Mate ,
Filtro de
3. Cambie el cartucho
del filtro escape,
coloc_,ndolocon cuidado para que et lado
mostrado en el diagrama corra debajo de las
costillas, Luego, empuje hacia abajo el otto
lado hasta que encierre
seguramente, Cotoque
el nuevo filtro en la
cubieda deI motor con
el filo plomo hacia
abajo
del filtro
ADVERTENClA
,I Inl nuul
n
Peligro de choque el_ctrico o lest6n corporal
Desconecte la unidad antes de limpiarla
o darls servic|ooDe Io contrario podrfa
producirse un choque el_ctrico o causar lest6n corporal si la aspiradora
arranca de manera imprevista.
15
,ll,p'l
E
•
PARA RETIRAR LA CORREA
cuIDADo
1. Co_oqueta PowerMate'_ con la parle
interiorhacia arriba,
Puede que al retlrar los soportes del
ceplllo se desprenda una pequefia
arandela de metal de cada extreme.
NO plerda estas arandelas.
I
IIII
i1,11,,,11
,
2, Quite los dos (2)
tornitlos en la cub[erla
de ]a Power-Mate_.
i iiiiiilffl,ii
NOTA: Para mantener una alta eficiencia de
fimpieza y evitar el dafio a la aspiradora,
qua limpiar __&gj.t_dor carla vez qua se camJ2L_
3. Coloque ta PowerMate® en [a posF
ci6n vertical. Apriete
el pedai dei mango
de liberaci6n y baje
ta articulaci6n giratoria,Levante Ios
pestillos traseros
laco_.
Tambi_n hay qua limptar el agltador segt_n el
siguiente horario:
Frecuente (usada diradamente)
cada semana
Moderado .(usada 2 o 3 veces
per semana)
cada mes
Llgero (usada 1 vez per semana)
cada 2 mesas
--
4. Para quitar la cubierta,
agarre los Iados y tire
afuera_
Retire todo indicio de basura o suciedad de la
zona de la correa y del rodilio del cepilloo
Con cuidado quite lae tapas y quite el hilo o los
restos ubicados en el agitador, en los soportes
del cepillo, en las arandelas o en el ejo del agitator,
5, Apriete las
leng_etas en la
parte trasera de la
cubierta del agitader y gire hacia
adeiante para liberar de la base de
la Power-Mate_o
IMPORTANTE
Cambie las arandolas y luego las
soportes.
Vea la perspectiva
despiezada para
seguir el orden correcto de colocaci6n de las plazas,
Leng_efas
de/agitador
6_ Levante la
unidad del agitador y quite _acerrea gastada
Desconecte la asplradora. Examine frecuente.
mente et cepillo y_as _reas de soporte del mismo
de la Power-Mate y elimine rode cabello, hito y
Tapa del exfremo
7, Retire los tapas de{
extremes;examiney
timpie tas _reas de
tapa del extremoo En
la ENSEMBLE DEL
AGITADOR se proporciona una itustraci6n
de lode e_ensamble
del agitador,
pelusa acumulada,Si _a acumulaciSn es excesiva,
separe la Power-Mate del tube y reatice los pasos
a continuaci6n.
'16
Tapa del
extreme
5. Alinee la parle
frontal de la
cubierta con la
base. Coloque
la cublerta sobre
et borde
delantero de la
base corno se
muestra.
PARA RETIRAR LA CORREA
(_
_)
y los tapas dei extremo en
et
1. ensamble
Reinstale las arandelas
_
\
nueva sobre
det motor y
luegosobre
la rueda dentada del
cepitlo,
Vista superior
da
_.,./ v
\
dentadada
Tapadel
\ del cepillo
extremo Agitador
NOTA:V_ase PIEZAS y CARACTER[STICAS
para el numero de la correa.
6. NOTA: En los rnodelos con el indicador
de polvo, asegQrese
de que la plancha
est_ vertical y los
cordonesest_n rnelidos corno se ve en el
diagrama.
3. Coloque otra vez
la unidad del agitador e_ la PowerMate ,
4, Retnstafe
la cubierta
del agitador,
alinee las
JengOetas
delanteras y
las ranurasy
gire hacia
abajo haStE
que los pestitfos encierren
segurarnente.
Vista lateral
7. Rote la cubierta
hacia atr,_s. Apriete
con poca tuerza hasta
que las leng_etas laterales y traseras
encierrensegurarnente_Coloque ta
Power-Mate® con la
parle inferior hacia arribay inserle los dos (2)
tornittos en la cubierta.
Cublertadel agltador
!
Empuje hacla
1. Quite la cubierta de la Power-Mate® corno se
describe en ta secci6n CAMBIO DE LA CORREAY
LIMPIEZA DEL AGITADOR
EmpuJeh'acla
adentroy glre
2. Empuje hacia adem
troy gire la bornbilla en
et sentido sontrario El
de tas agujas del reloj,
luego tire hacia afuera
para sacar.
3. Ernpuje hacia
adentro y gire en el
sentido contrario El de
las agujas del reloj
para reernplacer_ La
bombilla no debe ser
m_,sde 15 vatios( 130
voltios/).
4. Reinstale fa cubierta de la Power-Mate® como
se describe en la secci6n CAMBtO DE LA CORREA Y LIMPIEZA DEL AGITADOR.
NOTA: V_ase PIEZAS y CARACTERiSTICAS
para el numero de la bombiFla,
'17
_
PARA CAiVIBIAR LA UNIDAD
DEL AGITADOR
ADVERTENClA
1_Quite fa cubiertade ta Power_Mate
e, la cubierta
del agitador, la correa y ia unidad del agitador.
V_ase "ParaCambiar La Correa" en la secci6n de
CAMBIO DE LA CORREAY LIMPIEZA DEL
AGITADOR
Peligro de ehoque el_ctrico o lesi6n corporal
Desconecte la unidad antes de limplarla o
dad° servicio. De io contrario podrfa producirse un choque el_ctrico o causar
lesi6n corpora/si la aspiradora arranca de
manera imprevista,
I
I
I1[
2. Quite tas lapas del extreme, las arandelas, los
tornillos, el ceptLIodel extremo y las coronas
dentadas para el cepil]o de los extremos de la
untdad del agitador vieja.
ii,
PARA REVISAR LA UNIDAD DEL
AGITADOR
__
"--
3. Ensamble otra vez la unidad dal agitador. Para
alinear los huecos para tornillosen la clavija, la
corona dentada y el cepillo de extremo, aseg0rese
de que todas tas coronas dentadas atinee
correctarnente
tados los ceptltos aE
n}vel de tas barras
de soporte en la
base, cambie la
Cuando
est_n
gasunidad del
agitadot.
4oReinstale la correa,ta unidad del agitador, la
cubierta detagitador y la cubierta de Power-Male o
V_ase "Paracambiar la correa" en la secci6n
CAMBIO DE LA CORREAY LIMPIEZA DEL
AGITADOR,
Barra de soporte
de la base
Tapadel
oo.,,,o
Arandela
Terntllo i
Tapa del
extremo
Unidad del agitador
Rueda dentada
del eepillo
18
Arandela
Consulte
estelabia pare enconlrar soluciones que usted mismo puede realizer cuando tenga problemas
menores de rendimiento Cualquier servicio que necesite aparte de otros descdtos en este manual tienen
queser hechos per un Centre de servicfode Sears,
,Ul
,,, i
i
i
Ull,,i,i
i
,ll,lll
ADVERTENCIA Pe,g,o
decheque etdctrico
Desconecte la aspiradora antes de darle servic{o o Iimpiarla. De Io contrario podn'a
produclrse un cheque eldctricoo causar tesi6n corporal,
i
,i
i
1, Est_ dascenectBda
L_ aeptradem no offence.
Cortacircuitoa botado o lucibls quemado
an el tablom d_ sarv_ciod_ Ja fes}doeeie
3. Conexlones et_,ctdeasde le menguera
suellas,
No aspire
satte|soloriamente.
2
4o
5
B_
7,
8r
9
10,
La aspfrodora _rranoa,
peru seepage,
BOISepera polvoilena o alascada
Vies de flute do airs alaseedac
Filtmssucioe
AJustelncorreelo dB nivelde pelode
iaalternbra
Conlrol de a_ptrecten abierlo
Manguera rote.
Ag{ladorde ta Power-Male®deegastadee
Cetm;_ dasgastada o rata
Agiladar o tepeedelextreme de _sle Busies
Tape del reeeplficutoBbierla.
1. Conexlonee et_ctrtces de lamengueta a
de iatape
Protectorcount:re
eobmca[gee de tB
Power-Male©botado
Protector de sobmee_gabolado
en el _ecapt_eulo
L8 PewePMate _ oe fuactotte
cuando oatti lnclatede.
Coneeloblen. oprtma r.;eleelarde encendk_l
apagado e la pocicionON
2, Restablezce el _rtaclr_uitee o eambieel
tumble
3. Vtmlvae canceler los exFemoc de tomanguere,
(p_gtna B),
_r
Conextoeesd_ IBPower.,M_ie®deeconectadae
2, Cortes desgas|ade
0 rata
3_ Agiledor
e tapesdelext:_emos
de 6clssueloe
4 Pmteo_r _nlta eebmeargeede Ie
Power.,Male®
bet,ado
Eli_lefruplor no eslaen la pesie_6n
CARPEI_
1,,
2.,
3.
4.
Cembie labolsa, {p_gino 13)
Limpie lee vies d_ Ilujo de aim, (pfigino t3)
Cambte e! liltme, {pdglne
14-15)
Ajuete eln_veL(p,tg{ea 10)
5.
5,
7,
& 9.
Aiuele el central, (p>ae 1 t)
Cambie la manguera
Camble la egilador,(p_gina 1B),
Co_auile CAMBIO DE LA CORREA Y LPAPIEZA
DEL AGITADOR, {pfigin_,e16-I7)
10, Ctetre bienla laps,
eleelflcas, vuelvaa conI1 Examine lee conexlones
eclat los extremes d_ la menguem. (p,_gina B)
2 Retire cualquim'obieto etorado o elaecado,
luegomelablezeaSlie ecphadom m'ranca
pare
ce vuelvea apa_ar, t_mpie et agilader y Ioc
topes del extremes de (tale, luego matablezea.
(pflginBs
11.1B-17}
3. Apague laaspimdofay dosanehu_eelcord6n
del tomaeotdenle y espem apmxlmadamonla 50
mlnuloe y eocbule la espimdom y votffiela pare
vet ci et pmlector del molar so he reaiuetado,
(pfigiea 11} Cambie la boles pate pairs, deeblO
quee toe VPade llu_ de otto. (p.,Igina
13t
I Coeectobien. (pfig_na5).
2 & 3. CoeeuitBCAMBIO DE LA CORREA Y LIMPiEZA
DEL AGSTADOFI,(p_,ginas 1647)
4 Examine el ,!tea del agilador pare determiner el
hayaeumulac_enexceeiva o blequeodo peluea
Limpte el agitador y los tapes d'_l
extremes. {ueg(_
reslablazce, (pf_gteas1 f. 18-t7)
5 Ponga el inlerruplor B_la posietdnCARPET.
(pfigfna 7).
Indieader verde encendldo
eoni[nuemento en el de(eotQr
de t|erra.
La via de pace da lierra ole balsa
de polYP eet_ bloqueada
2, Lente eucta,
1 Determine _i eaten bloqueadas ias vlas de elm,
(p_gIna 13)
2. Limpie leelenles, (p_gina 9).
AIgunos o todoc los Jadfeedores
mjoa de{ detector de tterm
second[dos y nunee cambtnn a
verde.
I. Hay un objelo
atmpedo qua esl_vibtando
en el are_ de lareels
1. Determine si est_n blaqueedas ice vies de eke, '_
(p_glna14)
No ae enefenden los fndtcaderes
verde orojo de datecct6n de tlerra,
I
El tntenupler no est,. en la postei_e CARPET
1. Ponga el Interrupteur ala poslei6n
CARPET.
(p_gina 7),
Acuda aI Cenlrr_de Servicie do Seats m_s car
core,
2., No hay euniatro de energ$aalleblero
delector
2
El indicador electrenlco!
mec_nlco de la boise y de le
manguero funelona
1
2.,
3,
4
1.
2,
3,
4
La aephadora levantatapetee -,.o-o- ee d(ffct_empujar a
POWER.MATE=.
de pelede laaltombm
1. Ajusle Ineerrecta de elvel
2, Asplmeiendemaciadopetente
1. A_uslo el nivet, (pAgiea
8),
2 Abra et eonlml de aspiracidn, (p_gin_ _ 1)
La luz no futlctona.
1, Bombillalurid;de,
t.
El oord_n no ao sere{to,
1. Cofden ei_c[rico susie
2. Cord6n alaccade.
I Utopia etcordon elfietrico
2. Tire del cOtdeny decpu_s eer611ele.
La asptradora dole marcac
en la elfombre.
I.
1. ConsultsSUGERENClAS PARA ASP1RAR.
(p_,ginaB),
Bolea parepone llano
o ataeeada
Filtmesuclo,
Vies de flute
de airs alaecadea
Ciertee accesorles
Eslilo de limpieza incorreeta
19
Camble la balsa. (p_g_na13),
Cambie e! lllims, (p_,gina1445)
Desbloquee Iaa vtac de ttuio_ aim, (p_gina 13)
Esloes normal Elindlcadot
dabs setnorma_
cuando
la hermmienta eslfi quilada.
Cembie le hornbills, (pfiglna 17).
I
it fixed, at your home or ours!
Your Home
For repair - in your home - of all major brand appliances,
lawn and garden equipment, or heating and cooling systems,
no matter who made it, no matter who sold it!
For the replacement
parts, accessories
and
owner's manuals that you need to do-it-yourself.
For Sears professional
installation of home appliances
and items like garage door openers and water heaters.
1-800-4-MY-HOME
(1-800-469-4663)
www.sears.com
_
Anytime, day or night
(U.S.A. and Canada)
www,sears,ca
Our Home
For repair of carry-in products like vacuums, lawn equipment,
and electronics, call or go on-line for the nearest
Sears Parts and Repair Center.
1-800-488-1222
Anytime, day or night (U,&A. only)
www,sears.com
To purchase a protection agreement (U.S.A.)
or maintenance agreement (Canada) on a product serviced by Sears:
1-800-827-6655
(us,A.)
Para pedir servido de reparacbn
a domtcilio, y para ordenarpiezas:
1.888.SU-HOGAR m
(1-888-784-6427)
1-800-361-6665
(Canada)
Au Canada pour service en fran£_4=qis:
1-800-LE-FOYER Mc
(1_
www.sears°P_.,a
SEAR
©Sea_ Roebu_and
Co.
® Registered Trademark i TM Trademark I sMService Mark of Sears, Roebuck and Co,
® Marca Reglstrada / T_ Marca de Fsbfica t 8MMarce de Servtcio de Sears, Roebuck and Co,
r,c
' Marque de commerce ! Mr_Marque depos6e de Sears, Rcebuck end Co,