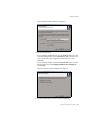
1
4.02
INSTALLATION & ADMINISTRATION GUIDE
The Avid|DS 4.02 Installation & Administration Guide was written by
Patrick Bayne, Geneviève Laberge, Sylvain Labrosse, and Dominic Mercier
and edited by Liven Tam. Formatting, layout, and illustrations by
Luc Langevin and Jim Royal.
© 1999–2001 Avid Technology, Inc. All rights reserved. Avid, the Avid|DS Logo,
and Softimage are registered trademarks, and Equinox and MediaDock are
trademarks of Avid Technology, Inc. QuickTime and the QuickTime logo are
trademarks used under license from Apple Computer, Inc. InstallShield is a
registered trademark of InstallShield Software Corporation. All other
trademarks contained herein are the properties of their respective owners.
The Avid|DS application uses JScript and Visual Basic Scripting Edition from
Microsoft Corporation. The Avid|DS application contains portions of
imaging code owned and copyrighted by Pegasus Imaging Corporation,
Tampa, FL.
This document is protected under copyright law. The contents of this
document may not be copied, duplicated or distributed in any form, in whole
or in part, without the express written permission of Avid Technology, Inc.
This document is supplied as a guide for the Avid|DS product. Reasonable
care has been taken in preparing the information it contains. However, this
document may contain omissions, technical inaccuracies, or typographical
errors. Product specifications are subject to change without notice and should
not be considered commitments by Avid Technology, Inc. Avid Technology,
Inc. does not accept responsibility of any kind for customers’ losses due to the
use of this document.
This document may contain confidential and proprietary information of Avid
Technology, Inc. and Softimage Co. and/or other third parties which is
protected by copyright, trade secret and trademark Law and may not be
provided or otherwise made available without prior written authorization.
Warranties and Liabilities
NEITHER SOFTIMAGE CO. NOR AVID TECHNOLOGY, INC. MAKE ANY
WARRANTIES, EXPRESS OR IMPLIED, INCLUDING WITHOUT
LIMITATION, ANY WARRANTIES OF MERCHANTABILITY OR FITNESS
FOR A PARTICULAR PURPOSE, IN THIS DOCUMENT WITH RESPECT
TO THIRD PARTY PRODUCT(S) CERTIFIED OR OTHERWISE MADE
AVAILABLE FOR USE WITH SOFTIMAGE PRODUCTS. ALL
WARRANTIES ARE PROVIDED BY THE ORIGINAL SUPPLIER(S) OF
SUCH THIRD PARTY PRODUCT(S).
FCC Notice
This device complies with Part 15 of the FCC Rules. Operation is subject to
the following two conditions:
1. This device may not cause harmful interference.
2. This device must accept any interference received, including interference
that may cause undesired operation.
This equipment has been tested and found to comply with the limits for a
Class A digital device, pursuant to Part 15 of the FCC Rules. These limits are
designed to provide reasonable protection against harmful interference when
the equipment is operated in a commercial environment. This equipment
generates, uses, and can radiate radio frequency energy and, if not installed in
accordance with the instruction manual, may cause harmful interference to
radio communications. Operation of this equipment in a residential area is
likely to cause harmful interference in which case the user will be required to
correct the interference at his own expense.
Canadian ICES-003
This Class A digital apparatus meets all requirements of the Canadian
Interference-Causing Equipment Regulations.
Cet appareil numérique de la classe A respecte toutes les exigences du
Règlement sur le matériel brouilleur du Canada.
European Union Notice
Declaration of Conformity (According to ISO/IEC Guide 22 and EN 45014)
Application of Council
Directives:
73/23/EEC, 89/336/EEC.
Standards to which
Conformity is Declared:
EN60950:1992 + A1 + A2 + A3 + A4 + A11
CISPR 22:1985 / EN55022:1988 Class A
EN55024:1998 + A1
Manufacturer’s Name:
Avid Technology, Inc.
1925 Andover Street
Tewksbury, MA 01876, USA
European Contact:
Nearest Avid Sales and Service Office or
Avid Technology Sales Ltd.
Sandyford Business Center
Unit 3,
Dublin 18, Ireland
Type of Equipment:
Information Technology Equipment
Product Name:
Products for the Windows NT Operating
System: Avid|DS
Base Model Numbers:
None
Product Options:
All
Year of Manufacture:
2001
Products for the Windows NT Operating System: products were tested in a
typical Avid|DS configuration.
I, the undersigned, hereby declare that the equipment specified above
conforms to the above Directives and Standards.
George R. Smith, Director of Hardware Design and Development
Australia and New Zealand EMC Regulations
John Kells, Australian Operations Manager
Avid Technology (Australia) Pty Ltd.
Unit B
5 Skyline Place
French Forest NSW 2086
Australia
Phone: 61-2-8977-4800
Taiwan EMC Regulations BSMI Class A EMC Warning
Warnings
To reduce the risk of electrical shock, do not attempt to open the equipment
unless instructed. Do not use a tool for purpose other than instructed.
Document No. 0130-04914-01 0601
Printed in Canada.
Contents
Contents
Before You Start . . . . . . . . . . . . . . . . . . . . . . . . . . . . . . . . . . . . . . . . . .7
Where to Find Information . . . . . . . . . . . . . . . . . . . . . . . . . . . . . . . . . . .8
About This Guide . . . . . . . . . . . . . . . . . . . . . . . . . . . . . . . . . . . . . . . . . . .9
Who Should Use This Guide? . . . . . . . . . . . . . . . . . . . . . . . . . . . . . . . .9
Document Conventions . . . . . . . . . . . . . . . . . . . . . . . . . . . . . . . . . . .10
Avid|DS Support . . . . . . . . . . . . . . . . . . . . . . . . . . . . . . . . . . . . . . . . . . .11
Licensing Support . . . . . . . . . . . . . . . . . . . . . . . . . . . . . . . . . . . . . . . .11
Training Support . . . . . . . . . . . . . . . . . . . . . . . . . . . . . . . . . . . . . . . . .11
Hotline Support . . . . . . . . . . . . . . . . . . . . . . . . . . . . . . . . . . . . . . . . .11
E-mail Support . . . . . . . . . . . . . . . . . . . . . . . . . . . . . . . . . . . . . . . . . .12
Avid|DS Mailing List . . . . . . . . . . . . . . . . . . . . . . . . . . . . . . . . . . . . . .12
Web Support . . . . . . . . . . . . . . . . . . . . . . . . . . . . . . . . . . . . . . . . . . . .12
Chapter 1
Uninstalling Avid|DS . . . . . . . . . . . . . . . . . . . . . . . . . . . . . . . . . . . . .13
Uninstalling Avid|DS . . . . . . . . . . . . . . . . . . . . . . . . . . . . . . . . . . . . . . . .15
Removing Plug-ins . . . . . . . . . . . . . . . . . . . . . . . . . . . . . . . . . . . . . . .15
Removing Avid|DS. . . . . . . . . . . . . . . . . . . . . . . . . . . . . . . . . . . . . . . .16
Removing the PICVideo MJPEG Codec . . . . . . . . . . . . . . . . . . . . . . .17
Chapter 2
Reinstalling the Avid|DS Hardware Drivers . . . . . . . . . . . . . . . . .19
Verifying the Installed Drivers . . . . . . . . . . . . . . . . . . . . . . . . . . . . . . . .21
Reinstalling the Hardware Drivers . . . . . . . . . . . . . . . . . . . . . . . . . . . .22
Displaying Hidden Files . . . . . . . . . . . . . . . . . . . . . . . . . . . . . . . . . . .22
Upgrading the System BIOS . . . . . . . . . . . . . . . . . . . . . . . . . . . . . . . .23
Reinstalling the WACOM Tablet Driver. . . . . . . . . . . . . . . . . . . . . . .24
Reinstalling the Intense 3D Wildcat Driver . . . . . . . . . . . . . . . . . . . .25
Reinstalling the Merging Mykerinos Audio Driver . . . . . . . . . . . . . .28
Reinstalling the Avid Startup Write Cache Service . . . . . . . . . . . . . .29
Reinstalling the Avid Equinox PCI Driver . . . . . . . . . . . . . . . . . . . . .29
Reinstalling the Avid Equinox Break-Out-Box Driver . . . . . . . . . . . .31
Reinstalling the Windows 2000 Drivers . . . . . . . . . . . . . . . . . . . . . . .33
Confirming a Successful Reinstall . . . . . . . . . . . . . . . . . . . . . . . . . . .35
Chapter 3
Installing Avid|DS . . . . . . . . . . . . . . . . . . . . . . . . . . . . . . . . . . . . . . . .37
Installing Avid|DS . . . . . . . . . . . . . . . . . . . . . . . . . . . . . . . . . . . . . . . . . .39
Installing the License Server . . . . . . . . . . . . . . . . . . . . . . . . . . . . . . . .45
Installing and Removing Fonts . . . . . . . . . . . . . . . . . . . . . . . . . . . . . . .47
Installing and Removing Type 1 Fonts. . . . . . . . . . . . . . . . . . . . . . . .47
Installing and Removing TrueType Fonts . . . . . . . . . . . . . . . . . . . . .47
Installation & Administration Guide • 5
Contents
Chapter 4
Installing the License File . . . . . . . . . . . . . . . . . . . . . . . . . . . . . . . . . 49
Requesting a License File . . . . . . . . . . . . . . . . . . . . . . . . . . . . . . . . . . . . 51
Installing the License File. . . . . . . . . . . . . . . . . . . . . . . . . . . . . . . . . . . . 52
Verifying that the Software Protection Key Driver is Installed . . . . 52
Problems with Licensing . . . . . . . . . . . . . . . . . . . . . . . . . . . . . . . . . . . . 53
Chapter 5
Managing Your Avid|DS Workstation . . . . . . . . . . . . . . . . . . . . . . 57
Folders Installed On Your System . . . . . . . . . . . . . . . . . . . . . . . . . . . . . 59
The DS_v4.02 Folder . . . . . . . . . . . . . . . . . . . . . . . . . . . . . . . . . . . . . . 59
The DS Archives Folder. . . . . . . . . . . . . . . . . . . . . . . . . . . . . . . . . . . . 60
The DS Projects Folder . . . . . . . . . . . . . . . . . . . . . . . . . . . . . . . . . . . . 60
The DSPresets Folder . . . . . . . . . . . . . . . . . . . . . . . . . . . . . . . . . . . . . 60
The VideoStorage Folder . . . . . . . . . . . . . . . . . . . . . . . . . . . . . . . . . . 60
The Projects\Audio Folder . . . . . . . . . . . . . . . . . . . . . . . . . . . . . . . . . 61
The DSSystem Folder . . . . . . . . . . . . . . . . . . . . . . . . . . . . . . . . . . . . . 61
Managing User Accounts. . . . . . . . . . . . . . . . . . . . . . . . . . . . . . . . . . . . 62
How Avid|DS Uses User Accounts . . . . . . . . . . . . . . . . . . . . . . . . . . . 62
Managing User Accounts . . . . . . . . . . . . . . . . . . . . . . . . . . . . . . . . . . 62
Drive Maintenance. . . . . . . . . . . . . . . . . . . . . . . . . . . . . . . . . . . . . . . . . 66
Defragmenting your Drives . . . . . . . . . . . . . . . . . . . . . . . . . . . . . . . . 66
About Striping . . . . . . . . . . . . . . . . . . . . . . . . . . . . . . . . . . . . . . . . . . . . 68
Creating a Stripe Set . . . . . . . . . . . . . . . . . . . . . . . . . . . . . . . . . . . . . . . 69
Striping the Drives . . . . . . . . . . . . . . . . . . . . . . . . . . . . . . . . . . . . . . . 71
Creating an Emergency Repair Disk . . . . . . . . . . . . . . . . . . . . . . . . . . . 76
Index . . . . . . . . . . . . . . . . . . . . . . . . . . . . . . . . . . . . . . . . . . . . . . . . . . . 77
6 • Avid|DS
Before You Start
Installation & Administration Guide • 7
Before You Start
Where to Find Information
The Avid®|DS package includes a comprehensive set of learning materials. With this
Roadmap, you’ll know where to find the information you need to get up and running
quickly and effectively.
Start with the Workstation Setup Guide to prepare your site for Avid|DS and
assemble your workstation.
Use the Installation & Administration Guide if you need to reinstall and license any
of the components, or for tips on the daily maintenance of your system.
Refer to the Release Notes for feature limitations and workarounds.
You can join the Avid|DS Discussion Group, a worldwide network of Avid|DS users
exchanging ideas and techniques by e-mail. To subscribe, send an e-mail to
[email protected] with the following text in the body of your message:
subscribe ds.
Comments?
We’d appreciate any comments or suggestions you may
have about this guide or any other piece of our
documentation. Just send them to: [email protected].
8 • Avid|DS
About This Guide
About This Guide
This guide provides information on installing Avid|DS, upgrading from
previous versions of Avid|DS, and the daily administration and management
of your Avid|DS workstation. Following these guidelines can help ensure the
successful operation of your system.
Who Should Use This
Guide?
This guide is intended for anyone who is installing an Avid|DS system for the
first time, upgrading a system, or responsible for the daily management and
administration of the system.
New to Users
The Avid|DS workstation comes with the software and drivers already installed.
As a new user or someone who’s just received a new Avid|DS system, you do not
have to install the Avid|DS software. You should read the following chapters:
• Chapter 4: Installing the License File on page 49.
• Chapter 5: Managing Your Avid|DS Workstation on page 57.
Existing Users
If you already have an Avid|DS system and need to upgrade or reinstall, use
the following procedures.
To upgrade Avid|DS
1. Verify the hardware drivers—see Verifying the Installed Drivers on page 21.
2. Uninstall Avid|DS—see Chapter 1: Uninstalling Avid|DS on page 13.
3. Upgrade the hardware drivers—see Reinstalling the Hardware Drivers on
page 22.
4. Install the new version of Avid|DS—see Chapter 3: Installing Avid|DS on
page 37.
5. Install the License—see Chapter 4: Installing the License File on page 49.
To reinstall Avid|DS
1. Verify the hardware drivers—see Verifying the Installed Drivers on page 21.
2. Uninstall Avid|DS—see Chapter 1: Uninstalling Avid|DS on page 13.
3. Upgrade the hardware drivers—see Reinstalling the Hardware Drivers on
page 22.
4. Install the new version of Avid|DS—see Chapter 3: Installing Avid|DS on
page 37.
Installation & Administration Guide • 9
Before You Start
System Administrators
System administrators are typically responsible for the maintenance of the
Avid|DS system and should consult the following chapters.
• Chapter 2: Reinstalling the Avid|DS Hardware Drivers on page 19.
• Chapter 5: Managing Your Avid|DS Workstation on page 57.
Document
Conventions
This guide uses the following symbols and conventions:
Bold
Bold is used for menu commands, dialog box and property
editor options, and file/folder names.
>
The greater than (>) sign indicates menu commands (and
subcommands) in the order that you choose them. For example,
File > Import means to open the File menu and then choose the
Import command. This applies to menus from the main menu bar
and pop-up menus that appear when you right-click on the interface.
Notes are reminders or contain important information.
Tips are useful bits of information, workarounds, and shortcuts that
you may find helpful in a particular situation.
Warnings are used when you can lose or damage information or
equipment, such as deleting data, or not being able to easily undo an
action. Warnings always appear before you attempt a task!
10 • Avid|DS
Avid|DS Support
Avid|DS Support
Technical support for Avid|DS is provided by your Avid reseller working
together with Avid|DS Customer Service. Immediate assistance for any technical
issue is available through our hotline, e-mail, and web support services.
Licensing Support
You must contact your reseller to request a license for your Avid|DS system.
You can do this directly or through the license request form provided at
http://www.softimage.com/licensing/request.
Training Support
If you’re interested in Avid|DS training, you’ll find a complete overview of
courses, education centers, and training programs at http://avid.com/education.
Hotline Support
Avid resellers provide first line support for Avid|DS according to their specific
geographical area and time zone. Working as an extension of Avid|DS
Customer Service, these fully trained agents provide the most efficient and
effective support possible to all our customers. Contact information for your
Avid reseller is available through the Avid Reseller Locator at
http://avid.com/cgi/locator.
You can also reach Avid|DS Customer Service at the following hours and
telephone numbers:
North America
Avid|DS Customer Service
3510 St-Laurent Boulevard
Montreal (Quebec) Canada
H2X 2V2
Hours
9:00 am to 9:00 pm (Eastern)
2:00 pm to 2:00 am (GMT)
Hotline assistance is also available 24 hours a day, 7 days a week for an
additional fee.
U.K. and International
Avid|DS Customer Service Europe
Pinewood Studios
Pinewood Road
Iver Heath, Buckinghamshire SL0 0NH
Hours
9:00 am to 6:00 pm (GMT)
4:00 am to 1:00 pm (Eastern)
Installation & Administration Guide • 11
Before You Start
Support Telephone and Fax Numbers
Worldwide
Tel: 514 845 2199
Fax: 514 845 8252
North America
Tel: 800 387 2559
Fax: 514 845 8252
U.K. and International
Tel: + 44 1 753 650 670
Fax: + 44 1 753 658 503
E-mail Support
You can contact Avid|DS Customer Service at any time by sending e-mail to
[email protected].
Avid|DS Mailing List
If you have an e-mail account, you can join the worldwide network of Avid|DS
users exchanging ideas. The mailing list has proven to be quite useful for
users, with a constant stream of new subscribers.
To subscribe, send an e-mail to [email protected] with the
following text in the body of your message: subscribe ds. You can get further
information on using the automated list server by e-mailing
[email protected] with “help” as your message.
The discussion group is provided for technical exchanges between customers.
Although Avid|DS Customer Service is not provided through these
discussions, we do contribute.
Web Support
12 • Avid|DS
The Avid|DS Support and Download sections at
http://avid.com/support/ds_support provide quick access to a wide range of
resources from the Avid|DS teams and user community. Downloads,
including presets, drivers, and Quick Fix Engineering (QFE), provide the
latest solutions for using with your Avid|DS system. Online documentation,
tutorials, and Knowledge Base articles ensure you get the most out of your
work with Avid|DS. It's like having a dedicated Avid|DS Customer Service
engineer sitting at your desk!
Chapter 1
Uninstalling Avid|DS
Installation & Administration Guide • 13
Chapter 1 • Uninstalling Avid|DS
In This Chapter...
This chapter describes how to uninstall Avid|DS. Follow the instructions in
this section if you need to reinstall or upgrade Avid|DS.
Uninstalling Avid|DS . . . . . . . . . . . . . . . . . . . . . . . . . . . . . . . . . . . . . . . 15
14 • Avid|DS
Uninstalling Avid|DS
Uninstalling Avid|DS
When you first receive your Avid|DS workstation, all the software you need to
run Avid|DS is already installed and tested. You should follow the instructions
in this chapter only if you are reinstalling or upgrading Avid|DS.
Removing Plug-ins
Before you remove the Avid|DS software, you must first remove any plug-ins
that were installed on your system.
If you uninstall Avid|DS before uninstalling the plug-ins, the
uninstall procedure will fail.
To remove plug-ins
1. Go to Start > Settings > Control Panel > Add/Remove Programs.
2. Click Change or Remove Programs.
3. In the Currently Installed Programs list, check for any of the following
plug-ins:
• Boris FX (Artel Software, Inc.)
• Monsters (5D Ltd)
• Primatte (Photron USA)
• Tinder (The Foundry)
• Ultimatte (Ultimatte Corporation)
Installation & Administration Guide • 15
Chapter 1 • Uninstalling Avid|DS
4. Select the plug-ins installed on your system (one at a time) and click
Change/Remove. Repeat this step until they’re all removed.
5. Remove all Avid|DS native plug-ins:
• Dual Audio Channel Switcher
• Tone Generator
If you cannot uninstall some plug-ins, continue with the next one
until completion, and then manually delete the Plug-In folder. Use the
Windows 2000 Find utility to help you locate any Plug-In folders.
Removing Avid|DS
Once you’ve finished removing the plug-ins, you can uninstall the
Avid|DS software.
To remove Avid|DS
1. Go to Start > Programs > Avid Products > Avid|DS v4.02 > Setup.
2. Select the Remove option and click Next.
The Confirm File Deletion dialog box is displayed.
16 • Avid|DS
Uninstalling Avid|DS
3. Click Yes.
The Avid|DS files are removed from your system, and the Maintenance
Complete dialog box is displayed.
4. Click Finish.
If you’re prompted to restart the system, do so immediately to
properly register the software to the operating system.
Removing the
PICVideo MJPEG Codec
The standard definition version of Avid|DS 4.02 uses the PICVideo MJPEG
codec to provide software-based video compression. The Avid|DS Setup
program installs the codec automatically but cannot uninstall it. To uninstall
the standard definition version of Avid|DS 4.02, use the following procedure
to remove the PICVideo MJPEG codec.
To remove the PICVideo MJPEG codec
1. Go to Start > Settings > Control Panel > Sounds and Multimedia.
2. Select the Hardware tab.
3. In the list of devices, select Video Codecs.
4. Click Properties.
5. Select the Properties tab.
6. Select the PICVideo MJPEG Codec.
7. Click Remove.
8. When prompted, click Yes to remove the codec.
Installation & Administration Guide • 17
Chapter 1 • Uninstalling Avid|DS
18 • Avid|DS
Chapter 2
Reinstalling the Avid|DS Hardware
Drivers
Installation & Administration Guide • 19
Chapter 2 • Reinstalling the Avid|DS Hardware Drivers
In This Chapter...
This chapter describes how to reinstall the hardware drivers for your
Avid|DS workstation.
Verifying the Installed Drivers. . . . . . . . . . . . . . . . . . . . . . . . . . . . . . . . 21
Reinstalling the Hardware Drivers . . . . . . . . . . . . . . . . . . . . . . . . . . . . 22
20 • Avid|DS
Verifying the Installed Drivers
Verifying the Installed Drivers
You can use System Diagnostics utility to verify that you have the correct
hardware drivers installed and determine which, if any, need to be reinstalled.
To verify the list of installed drivers
1. Go to Start > Programs > Avid Products > Avid|DS v4.02 > Customer
Service > System Diagnostic.
The System Diagnostic utility is displayed.
2. In the Machine Serial number box, enter the serial number of your
workstation and click Run.
You should see something similar to the following:
3. If, for any of the listed drivers, the version found does not match the
version expected, you need to update that driver—see Reinstalling the
Hardware Drivers on page 22.
Installation & Administration Guide • 21
Chapter 2 • Reinstalling the Avid|DS Hardware Drivers
Reinstalling the Hardware Drivers
When you first receive your Avid|DS workstation, all the software you need to
run Avid|DS is already installed and tested. You should not remove or modify
the installed software.
You should follow the instructions in this chapter only if you need to update,
reinstall, or reconfigure specific system software components, or if you need
to reinstall Avid|DS.
For specific details on hardware drivers, refer to the accompanying vendor
documentation and the Readme file that comes with each driver. The Readme file
is a good place to look for information on the version of the drivers you’re using.
You can get the drivers from the Avid|DS Drivers CD that comes with your
workstation. Updated and improved versions of these drivers are posted to the
Avid|DS web site. For more information, see Web Support on page 12.
If any of the necessary drivers are not present on the Avid|DS Drivers
CD, contact Avid|DS Customer Service.
Reinstalling the drivers is a very sensitive process. Make sure you
follow all the instructions carefully and do not skip any steps. You
also need to be logged on as Administrator when reinstalling drivers.
Displaying Hidden
Files
During the course of reinstalling the drivers, you’ll browse through different
file folders on the Avid|DS Drivers CD and the system drive. Because of this, it’s
important that the browser windows do not hide any files or file extensions.
To show all files
1. Go to Start > Settings > Control Panel > Folder Options.
2. Select the View tab.
22 • Avid|DS
Reinstalling the Hardware Drivers
3. In the Advanced Settings list, select the Show hidden files and folders option.
4. Deselect the Hide file extensions for known file types option and click OK.
Upgrading the
System BIOS
If you have to upgrade the system BIOS, contact IBM to obtain the correct
BIOS. Once you’ve received the correct BIOS, follow the instructions included
with it to create a bootable BIOS diskette. After you’ve created the BIOS
diskette, you can upgrade the system BIOS.
To update the system BIOS
1. Insert the BIOS diskette in the A: drive and restart the workstation.
2. When prompted, enter the following settings:
• Your country: U.S., or <the country you’re in>
• Update system serial number: No
• Update system model: No
• Enable enhanced security: No
• Show different logos at startup: No
3. When you’re finished, remove the diskette and restart the workstation.
Installation & Administration Guide • 23
Chapter 2 • Reinstalling the Avid|DS Hardware Drivers
Reinstalling the
WACOM Tablet Driver
The WACOM tablet driver is necessary if you want to use the WACOM tablet
to operate Avid|DS. You must remove older versions of the WACOM driver
before installing the latest version. Once you’ve removed the old WACOM
driver, you can install the latest version.
You should always install the WACOM tablet driver before installing
Avid|DS. Installing this driver after Avid|DS causes a conflict that
prevents Avid|DS from using the COM ports.
To remove the old WACOM driver
1. Go to Start > Settings > Control Panel > Add/Remove Programs.
2. Select Change or Remove Programs.
3. In the Currently Installed Programs list, select Wacom Tablet Driver.
4. Click Add/Remove.
5. When prompted to confirm file deletion, click Yes.
6. When removal is completed, click OK.
7. Restart the workstation.
To install the latest WACOM driver
1. On the Avid|DS Drivers CD, open the \drivers\wacom\driver folder.
2. Double-click on the WSetup.exe file.
3. In the WinZip Self-Extractor, click Setup.
4. If you get an error message from Windows at this point, exit Setup and
restart it.
5. At the Software License Agreement, click Yes.
6. At the Information window, click Next.
7. Click Next to accept the default destination.
8. Select Automatically search available ports, and click Next.
9. Click Next and then Finish to complete the installation and let the SelfExtractor close itself.
10. When completed, use the tablet to trigger the driver.
11. Go to Start > Settings > Control Panel > Wacom Tablet to set up the
tablet and accessories to your personal preferences.
To view the WACOM Tablet Properties help file, you must manually
copy the Manual.pdf and Help.pdf files to the Wacom folder. The
default location of this folder is C:\Program Files\Wacom.
You will need the Adobe Acrobat Reader to view the PDF
documents. You can install the Acrobat Reader from the Avid|DS
Drivers CD under \utils\acreader\acr40\rs40eng.exe.
24 • Avid|DS
Reinstalling the Hardware Drivers
Reinstalling the
Intense 3D Wildcat
Driver
The Intense 3D Wildcat driver controls the Wildcat 4210 graphics card. This
card processes the input from the Avid Equinox™ PCI card, handles Open GL
acceleration for the 3D DVE, and outputs a video signal to the dual monitors.
You do not need to remove older versions of the driver from your
workstation before you install the new version.
To install the Intense 3D Wildcat driver
1. On the Avid|DS Drivers CD, open the \drivers\wildcat\driver folder.
2. Double-click on the setup.exe file and proceed with a default installation.
Configuring the Intense 3D Wildcat Driver
Once you’ve installed the driver, you need to configure the display properties
to take full advantage of the card’s features.
To configure the Intense 3D Wildcat driver
1. Right-click on the desktop and choose Properties.
2. Select the Settings tab.
The following dialog box is displayed.
Installation & Administration Guide • 25
Chapter 2 • Reinstalling the Avid|DS Hardware Drivers
3. Select monitor 1 and specify the following settings:
Parameter
Description
Display
Plug and Play monitor...
Colors
True Color (32 bit)
Screen Area
1280 by 1024 pixels
Use this device as the Primary
monitor
Selected
Extend my Windows desktop onto
this monitor
Selected
4. Select monitor 2 and specify the following settings:
Parameter
Description
Display
Plug and Play monitor...
Colors
True Color (32 bit)
Screen Area
1280 by 1024 pixels
Use this device as the Primary
monitor
Deselected
Extend my Windows desktop onto
this monitor
Selected
5. Click Advanced, and then click the Wildcat Configuration tab.
The following dialog box is displayed.
26 • Avid|DS
Reinstalling the Hardware Drivers
6. For Maximum number of displays, select 2.
7. Click Config Wizard, and then click Next.
8. If you’ve already saved a configuration, select it, and go to step 12.
9. Otherwise, select <New Configuration> and click Next.
The New Configuration Setup dialog box is displayed.
10. Specify the following settings and click Next.
Parameter
Setting
Name of your new configuration
Avid|DS 4.02 (recommended)
Existing configuration
Default 128 Plane Settings
11. Use the following settings as you continue:
Parameter
Setting
Antialiased Line Quality Configuration
Best
Display List Compile Configuration
Fastest Execution
Plane Set Configuration
Plane Set 128
Object Caching Configuration
10% (default)
Accumulation Buffer Configuration
Frame Buffer Memory
Superscene Antialiasing
(none)
Superscene Antialiasing Enable
No
Installation & Administration Guide • 27
Chapter 2 • Reinstalling the Avid|DS Hardware Drivers
12. Click Next.
The Wildcat Configuration Summary is displayed.
13. Click Finish, and then click OK.
The configuration is now complete.
Reinstalling the
Merging Mykerinos
Audio Driver
The Merging Mykerinos audio driver is for the Mykerinos audio card, which
handles the audio input and output for Avid|DS. You must remove older versions
of the Merging Mykerinos drivers before you can install the latest version.
To remove the old Merging Mykerinos driver
1. Go to Start > Settings > Control Panel > Add/Remove Programs.
2. Select Change or Remove Programs.
3. In the Currently Installed Programs list, select VS3 Runtime.
4. Click Add/Remove.
5. When prompted to confirm file deletion, click Yes.
6. When removal is completed, click OK.
To install the latest Merging Mykerinos driver
1. On the Avid|DS Drivers CD, open the \drivers\mkerinos\driver folder
and double-click on the Vs3rt32.exe file.
2. Proceed with a default installation.
3. When the installation is complete, restart the workstation.
4. On the Avid|DS Drivers CD, open the \drivers\mkerinos\driver folder.
5. Run the Setup.bat file to copy the Vs3core.out file to the C:\Program
Files\Common Files\Merging Technologies\VS3 folder.
28 • Avid|DS
Reinstalling the Hardware Drivers
Reinstalling the Avid
Startup Write Cache
Service
The Avid Startup is a write caching utility that improves the performance of
your video storage array.
You do not need to remove older versions of the driver from your
workstation before you install the new version.
To install the Avid Startup write cache service
1. On the Avid|DS Drivers CD, open the \drivers\wrtcache\driver folder
and double-click on the Setup.exe file.
2. Proceed with a default installation. You can choose to overwrite the
currently installed version.
3. When you’re finished, restart the workstation.
Reinstalling the Avid
Equinox ™ PCI Driver
The Avid Equinox PCI card processes video capture and playback I/O for the
VTR and transfers video to the Wildcat graphics card. It is not necessary to
remove the older version of the Avid Equinox PCI driver before installing the
current version.
To install the Avid Equinox PCI driver
1. Right-click on My Computer and choose Manage.
The Computer Management window is displayed.
2. Using the tree (left), select Device Manager and open System Devices.
3. Right-click on Avid Equinox PCI and choose Properties.
The Avid Equinox PCI Properties dialog box is displayed.
4. Select the Driver tab and click Update Driver.
The Update Device Driver Wizard is displayed.
5. Click Next.
Installation & Administration Guide • 29
Chapter 2 • Reinstalling the Avid|DS Hardware Drivers
The Install Hardware Device Drivers dialog box is displayed.
6. Select the Display a list of the known drivers... option and click Next.
The Select a Device Driver dialog box is displayed.
7. Click Have Disk.
The Install From Disk dialog box is displayed.
8. Click Browse and go to the \drivers\equinox\driver folder on the
Avid|DS Drivers CD.
9. Click Open.
10. In the Install From Disk dialog box, click OK.
11. In the Select a Device Driver dialog box, select Avid Equinox PCI and
click Next.
30 • Avid|DS
Reinstalling the Hardware Drivers
12. Click Next again to start the installation.
13. When the installation is complete, click Finish to close the wizard.
14. In the Controller Properties dialog box, click Close.
Reinstalling the Avid
Equinox Break-Out-Box
Driver
The Avid Equinox Break-Out-Box (BOB) is an I/O device that converts the
serial digital video signals used by the HD and SD video equipment and the
20-bit wide data stream used by the Avid Equinox PCI card.
It is not necessary to remove the older version of the Avid Equinox BOB driver
before installing the current version.
To install the Avid Equinox BOB driver
1. Right-click on My Computer and choose Manage.
The Computer Management window is displayed.
2. Using the tree (left), select Device Manager and open Sound, video and
game controllers.
3. Right-click on Avid Equinox Break-Out-Box and choose Properties.
The Avid Equinox Break-Out-Box Properties dialog box is displayed.
4. Select the Driver tab and click Update Driver.
The Update Device Driver Wizard is displayed.
5. Click Next.
The Install Hardware Device Drivers dialog box is displayed.
Installation & Administration Guide • 31
Chapter 2 • Reinstalling the Avid|DS Hardware Drivers
6. Select the Display a list of the known drivers... option and click Next.
The Select a Device Driver dialog box is displayed.
7. Click Have Disk.
The Install From Disk dialog box is displayed.
8. Click Browse and go to the \drivers\dbob\driver folder on the Avid|DS
Drivers CD.
9. Click Open. In the Install From Disk dialog box, click OK.
10. In the Select a Device Driver dialog box, select Avid Equinox Break-OutBox and click Next.
11. Click Next again to start the installation.
12. When the installation is complete, click Finish to close the wizard.
13. In the Controller Properties dialog box click Close.
32 • Avid|DS
Reinstalling the Hardware Drivers
Reinstalling the
Windows 2000 Drivers
Some of the drivers are installed by Windows 2000, namely the Adaptec SCSI
and ADI Soundmax MIDI drivers. These drivers should not have to be
upgraded. However, if these drivers become corrupted, then you’ll have to
reinstall them.
To reinstall the Windows 2000 drivers
1. Go to Start > Settings > Control Panel > Add/Remove Hardware.
The Add Remove Hardware wizard is displayed.
2. Click Next.
The Choose a Hardware Task dialog box is displayed.
3. Select the Add/Troubleshoot a device option and click Next.
Windows searches for new hardware and then the Choose a Hardware
Device dialog box is displayed.
Installation & Administration Guide • 33
Chapter 2 • Reinstalling the Avid|DS Hardware Drivers
4. Select the device that you want to reinstall and click Next.
5. Windows automatically locates and installs the driver.
Enabling the MIDI Port
Before the MIDI controller can work, you must enable the workstation’s MIDI
port through the workstation’s BIOS.
To enable the MIDI port
1. Remove all disks from the drives and restart the workstation.
2. While the workstation is starting up, press the F1 key.
After a few moments, the Configuration/Setup Utility menu is displayed.
3. Choose Devices and I/O Ports and press Enter.
The Devices and I/O Ports menu is displayed.
4. Choose Audio Setup and press Enter.
The Audio Setup menu is displayed.
5. Choose Game/MIDI Port, and use the left and right arrow keys to select
IRQ 5.
6. Press Esc to exit Audio Setup.
7. Press Esc again to exit Devices and I/O Ports.
8. Choose Save Settings and press Enter.
9. When prompted, press Enter to confirm your choice.
10. From the Configuration/Setup Utility menu, choose Exit Setup and
press Enter.
11. At the confirmation prompt, choose Yes, exit Setup Utility and press Enter.
The workstation restarts and the MIDI driver is installed.
34 • Avid|DS
Reinstalling the Hardware Drivers
Confirming a
Successful Reinstall
Using the System Diagnostic utility, you can verify that the correct versions of
the drivers were installed.
To confirm a successful reinstall of the drivers
1. Go to Start > Programs > Avid Products > Avid|DS v4.02 > Customer
Service > System Diagnostic.
The System Diagnostic utility is displayed.
2. In the Machine Serial number box, enter the serial number of your
workstation and click Run.
You should see something similar to the following:
The green LEDs show that all the drivers are up to date.
Installation & Administration Guide • 35
Chapter 2 • Reinstalling the Avid|DS Hardware Drivers
36 • Avid|DS
Chapter 3
Installing Avid|DS
Installation & Administration Guide • 37
Chapter 3 • Installing Avid|DS
In This Chapter...
This chapter describes how to install Avid|DS and install/remove fonts.
Installing Avid|DS . . . . . . . . . . . . . . . . . . . . . . . . . . . . . . . . . . . . . . . . . . 39
Installing and Removing Fonts . . . . . . . . . . . . . . . . . . . . . . . . . . . . . . . 47
38 • Avid|DS
Installing Avid|DS
Installing Avid|DS
Once all of the hardware drivers are installed, you can install the current
version of Avid|DS.
Before you install the current version of Avid|DS, make sure that you’ve
removed any previous versions of Avid|DS from your workstation.
To install Avid|DS, you must log on to an account that has
Administrator privileges.
To install Avid|DS
1. From the Avid|DS CD, open the \DS\DSSetup folder.
2. Double-click on the Setup.exe file.
3. In the Avid|DS Setup dialog box, click Next.
4. In the License Agreement dialog box, read the End User License
Agreement and click I Accept to accept the terms of the agreement and
continue the installation.
5. In the Customer Information dialog box, enter your name and company
name, and click Next.
6. In the Reseller or Dealer Information dialog box, enter the requested
information and click Next.
The Select Installation Folder dialog box is displayed.
Installation & Administration Guide • 39
Chapter 3 • Installing Avid|DS
7. Do one of the following:
• Click Next to accept the default folder, or
• Click Browse to specify a folder in which to install Avid|DS, then click
Next.
The Setup Type dialog box is displayed.
40 • Avid|DS
Installing Avid|DS
8. Select one of the following types of installation:
• Avid|DS RP Only to install only Avid|DS RP. You won’t be able to run
Avid|DS, only the remote processor.
• Compact Installation to install Avid|DS and Avid|DS RP without any
optional components.
• Complete Installation to install Avid|DS and all the optional
components.
• Custom Installation to install only the Avid|DS components that
you select.
9. Select the Complete Installation option and click Next.
The Hardware Setup dialog box is displayed.
10. Verify that the hardware matches your workstation’s configuration:
• Video devices: Avid Equinox Video Subsytem
• Audio devices: Mykerinos Audio Card
• Accessories: Supported OpenGL Graphics Card
11. If the hardware options don’t match your workstation’s configuration,
click Manual Settings, and select the correct hardware options.
12. Click Next.
Installation & Administration Guide • 41
Chapter 3 • Installing Avid|DS
The Storage Setup dialog box is displayed.
13. Specify the following and click Next.
• Video Storage: \D: Select the actual drive letter for your video storage
configuration.
• Audio Storage: \F: Select the actual drive letter for your audio storage
configuration.
• Projects Storage: \F: Select the actual drive letter for your projects and
presets storage configuration.
• Archives Storage: \F: Select the actual drive letter for your archives storage
configuration.
• Interactive Cache: \D: Select the actual drive letter for your interactive
cache storage configuration.
42 • Avid|DS
Installing Avid|DS
The Licensing Information dialog box is displayed.
14. Do one of the following:
• If you’re installing Avid|DS RP only, select the License Server option, and
enter the following in the text box: 744@machine_name (machine_name
is the network name of the computer that will be the license server).
Click Next.
• If you’re installing Avid|DS, select the Local License File option, enter the
following in the text box: C:\Softimage\flexlm\Licenses\Softimage.lic
and click Next.
The Color and Cursor Schemes dialog box is displayed.
15. Select the schemes that you want to install and click Next.
Installation & Administration Guide • 43
Chapter 3 • Installing Avid|DS
The Start Copying Files dialog box is displayed.
16. Review your installation settings and if you’re satisfied, click Next.
A progress indicator is displayed as the Avid|DS files are copied to
your system.
If you’re installing Avid|DS, you are prompted to install the license server
once all the files have been copied to your system.
If you’re installing an Avid|DS RP only, the following dialog box is
displayed once all the files have been copied to your system.
17. Click Finish to complete the installation.
44 • Avid|DS
Installing Avid|DS
Installing the License
Server
The setup program automatically starts the Softimage Licensing Setup program
to install the license server. If you’re setting up an Avid|DS workgroup, you must
install the license server on one of the client workstations.
If you’re installing Avid|DS RP, the Softimage Licensing Setup
program will not automatically start.
To install the license server
1. When prompted, click OK to start the Softimage Licensing Setup.
2. In the Welcome dialog box, click Next.
3. In the License Agreement dialog box, read the License Agreement and
click Yes to accept the terms and conditions.
You are prompted to enter your name and the name of your company.
4. Enter the requested information. Click Next and then click Yes to confirm.
5. In the Softimage Licensing Setup dialog box, click Complete Install.
You are prompted to select a folder in which to install the license server.
Installation & Administration Guide • 45
Chapter 3 • Installing Avid|DS
6. Select Avid Products and click Next.
The program files are copied to your hard drive, and the following dialog
box is displayed. You need to enter the license keys from the license file,
which you should have already received by e-mail—see Requesting a
License File on page 51.
7. If you already have an existing license file, click Existing License, select the
file, and copy the new license keys into the file.
8. Do one of the following:
• If you’re setting up a new license file, click New License, and copy the
license keys into the file.
• Otherwise, click Enter Keys Later.
Your installation is now complete.
46 • Avid|DS
Installing and Removing Fonts
Installing and Removing Fonts
Avid|DS supports the following typeface formats:
• Type 1
• TrueType (PC-formatted)
Avid|DS does not require any additional software to access TrueType fonts,
but does require Adobe Type Manager (ATM) software to access Type 1 fonts.
Included in the \Fonts folder of the Avid|DS CD are 500 fonts from the
Bitstream typeface library.
Installing too many fonts on your workstation can noticeably degrade
computing performance. Keep the number of fonts installed on your
workstation to the minimum necessary to complete your projects.
Installing and
Removing Type 1 Fonts
Type 1 font support in Avid|DS is available only if you have the Adobe Type
Manager or Adobe Type Manager Deluxe software (version 4.0 or later)
installed and active. Consult the documentation that came with the Adobe
Type Manager or Adobe Type Manager Deluxe software for instructions on
how to install and remove Type 1 fonts.
Installing and
Removing TrueType
Fonts
TrueType font support in Avid|DS does not require any additional software.
To install TrueType fonts
1. Go to Start > Settings > Control Panel > Fonts.
The Fonts window is displayed.
2. From the File menu, choose Install New Font.
The Add Fonts dialog box is displayed.
3. Use the Folders and Drives lists to navigate to the folder that contains the
TrueType fonts that you want to install. On the Avid|DS CD, they’re in the
\Fonts folder.
The available TrueType fonts in the selected folder appear in the List of
Fonts list.
Installation & Administration Guide • 47
Chapter 3 • Installing Avid|DS
4. Select the fonts to install from the List of Fonts list, as follows:
• To select a single font, click the name of the font.
• To select a range of fonts, click the name of the first font. Then Shift-click
the last font in the range.
• To select all fonts in the directory, click Select All.
• To switch the selection of a font, press the Ctrl key and click a font name.
5. (Optional) You can use the selected fonts from their current folder by
deselecting the Copy fonts to Fonts folder option. This will save disk
space on your local workstation.
By default, fonts will be added to your workstation’s local disk space. If
you are adding several fonts, consider using the fonts from their current
locations to save local disk space.
6. Click OK.
The selected fonts are installed on your system.
7. If Avid|DS is currently running, restart it to access the newly
installed fonts.
To remove TrueType fonts
1. Go to Start > Settings > Control Panel > Fonts.
The Fonts window is displayed.
2. Select the fonts to remove.
3. Press Delete.
You are prompted to confirm the deletion of the selected fonts.
4. Click Yes.
5. Close the Fonts and Control Panel windows.
6. If Avid|DS is currently running, restart it to update the list of
available fonts.
48 • Avid|DS
Chapter 4
Installing the License File
Installation & Administration Guide • 49
Chapter 4 • Installing the License File
In This Chapter...
This chapter describes how to request, install, and troubleshoot the license file
on an Avid|DS workstation.
Requesting a License File . . . . . . . . . . . . . . . . . . . . . . . . . . . . . . . . . . . . 51
Installing the License File. . . . . . . . . . . . . . . . . . . . . . . . . . . . . . . . . . . . 52
Problems with Licensing . . . . . . . . . . . . . . . . . . . . . . . . . . . . . . . . . . . . 53
50 • Avid|DS
Requesting a License File
Requesting a License File
To run Avid|DS, you must have a license file, as well as a software protection
key (Flexid dongle) connected to your parallel port.
If you’re a new customer, you must request a license. When the
license is issued, you will receive a copy by e-mail.
To request a license file
• Open your Internet browser and go to
http://www.softimage.com/licensing/request to submit a license request.
You must provide all the information requested in order to obtain
your license in a timely manner.
Avid|DS Customer Service does not generate permanent licenses.
However, if your license is incorrect or if you haven’t received it
within 72 hours of your request, Avid|DS Customer Service can
generate a limited one-week license. However, it is mandatory that
your reseller validate the request.
Installation & Administration Guide • 51
Chapter 4 • Installing the License File
Installing the License File
The license information stored in the software protection key (dongle) must
match the information stored in the license file for the software to be
operational. If the information does not match, Avid|DS will not start or
function properly.
Verifying that the
Software Protection
Key Driver is Installed
You must have the software protection key (dongle) driver installed and
running before you install the license file.
To verify that the dongle driver is installed and running
1. Right-click on My Computer and choose Manage.
The Computer Management window is displayed.
2. Use the tree (left) to navigate to System Tools > System Information >
Software Environment > Drivers.
3. Scroll down the list until you find the Parallel, DS1410D, and Sentinel
devices, and verify that for each the following is true:
• State: Running
• Status: OK
To install the license file
1. Copy the obtained license file to a diskette with the file name Softimage.lic.
2. Copy the Softimage.lic file from the diskette to
C:\Softimage\Flexlm\Licenses\Softimage.lic.
3. To verify that the license file was properly installed, start Avid|DS.
If Avid|DS starts and displays no error messages, the license is working
properly. If not, see Problems with Licensing on page 53.
52 • Avid|DS
Problems with Licensing
Problems with Licensing
Before you can start Avid|DS, your system needs a software protection key
(dongle) and a license file. If the dongle identification number matches the
information in the license file, Avid|DS will start.
If the licensing components are not properly set up, Avid|DS will not start and
an error message is displayed. If this occurs, perform the following
troubleshooting steps. If startup problems persist, contact your reseller.
To verify that the dongle is properly installed
1. Make sure that the dongle is attached to the base unit's parallel port (LPT1)
and secured with the locking screws—refer to The Software Protection Key
on page 53 of the Avid|DS 4.02 Workstation Setup Guide.
2. Right-click on the My Computer icon and choose Manage.
The Computer Management window is displayed.
3. Use the tree (left) to navigate to the System Tools > System Information >
Software Environment > Drivers folder.
4. Scroll down the list until you find the Parallel, DS1410D, and Sentinel
devices, and verify the following for each device:
• State: Running
• Status: OK
Installation & Administration Guide • 53
Chapter 4 • Installing the License File
To verify the file extension of the license file
1. Go to Start > Settings > Control Panel > Folder Options.
2. Select the View tab.
3. From the Advanced Settings list, select the Show hidden files and
folders option.
4. Deselect the Hide file extensions for known file types option, and click OK.
5. Open the C:\Softimage\Flexlm\Licenses folder, and verify that the license
file is named: Softimage.lic.
6. If the file name extension is anything other than “.lic”, right-click on the
file, choose Rename, and change the file name extension to .lic.
54 • Avid|DS
Problems with Licensing
To verify the environment setting for the license file
1. Go to Start > Settings > Control Panel.
2. Double-click on System.
The System Properties dialog box is displayed.
3. Select the Advanced tab.
4. Click Environment Variables.
The Environment Variables dialog box is displayed.
Installation & Administration Guide • 55
Chapter 4 • Installing the License File
5. From the System Variables list, select LM_LICENSE_FILE.
Its value should be: C:\Softimage\Flexlm\Licenses\Softimage.lic.
6. If it is not, click Edit.
The Edit System Variable dialog box is displayed.
7. Enter the following path in the Variable Value text box:
C:\Softimage\Flexlm\Licenses\Softimage.lic . Click OK.
8. In the Environment Variable dialog box, click OK.
9. In the System Properties dialog box, click OK to finish.
To verify that the license number matches the dongle
identification number
1. Go to Start > Programs > Avid Products > Avid|DS v4.02 > Customer
Service > System Diagnostic.
2. In the Machine Serial nb text box, enter the serial number of your
workstation, and click Run.
Dongle identification number
The value displayed in the Software Profile box, under License Phys, is
your workstation's dongle identification number (for example,
Phys: FLEXID=8-5xxxxxxxxxxx).
3. Compare this value with the value in your system's Softimage.lic file,
which is located in the C:\Softimage\Flexlm\Licenses folder. If they’re not
the same, contact your reseller or Avid|DS Customer Service.
56 • Avid|DS
Chapter 5
Managing Your Avid|DS
Workstation
Installation & Administration Guide • 57
Chapter 5 • Managing Your Avid|DS Workstation
In This Chapter...
This chapter contains information on your Avid|DS workstation and general
guidelines on its maintenance and administration.
Folders Installed On Your System . . . . . . . . . . . . . . . . . . . . . . . . . . . . . 59
Managing User Accounts. . . . . . . . . . . . . . . . . . . . . . . . . . . . . . . . . . . . 62
Drive Maintenance. . . . . . . . . . . . . . . . . . . . . . . . . . . . . . . . . . . . . . . . . 66
About Striping . . . . . . . . . . . . . . . . . . . . . . . . . . . . . . . . . . . . . . . . . . . . 68
Creating a Stripe Set . . . . . . . . . . . . . . . . . . . . . . . . . . . . . . . . . . . . . . . 69
Creating an Emergency Repair Disk . . . . . . . . . . . . . . . . . . . . . . . . . . . 76
58 • Avid|DS
Folders Installed On Your System
Folders Installed On Your System
When you install Avid|DS, seven folders are created to hold various system
files, project files, as well as media and cache files:
Folder
Description
Location
DS_v4.02
Contains the files required to run
Avid|DS
C:\Program Files\Avid\DS_v4.02
DS Archives
Contains information on archived
projects
F:\DS Archives
DS Projects
Contains the projects, sequences,
and clips that you create in Avid|DS
F:\DS Projects
DSPresets
Contains customized effects that
you can use in Avid|DS when
creating graphics, transitions,
compositing, etc.
C:\Program Files\Avid\DS_v4.02\DSPresets
VideoStorage
Contains the video media and
cache files that you capture and
bring into Avid|DS
D:\VideoStorage
Projects\Audio
Contains the audio media and
cache files that you capture and
bring into Avid|DS
F:\Projects\Audio
DSSystem
Contains system files
C:\Program Files\Avid\DS_v4.02\DSSystem
The DS_v4.02 Folder
The Avid|DS executable and the various .DLL files required by the application
are in the C:\Program files\Avid\DS_v4.02 folder.
Do not move or modify any of the folders in the DS_v4.02 folder.
The DS_v4.02 folder contains several folders of which the following may be
of interest:
Folder
Description
Command Maps
Contains the command maps for the different views and
layouts in Avid|DS
DSPresets
Contains customized effects that you can use in Avid|DS
when creating graphics, transitions, compositing, etc.
Help
Contains all the files required to use the online help, which
provides reference information on property editors, dialog
boxes, parameters, interface elements, and tasks
Preferences
Contains the user preferences and customized layouts,
toolbars, and key maps
Installation & Administration Guide • 59
Chapter 5 • Managing Your Avid|DS Workstation
The DS Archives Folder
The DS Archives folder is used by Avid|DS to keep track of archived projects.
The DS Projects Folder
The DS Projects folder contains the projects that you create with Avid|DS. Each
time you create a new project, you are prompted to select a location for the
project folder. Although you may store project folders anywhere on a local disk,
it is easier to manage projects if they’re all stored in the DS Projects folder.
The project folder contains the clips and sequences associated with a project.
Each project folder also contains a System folder.
Do not move, delete, or modify the contents of the System folder.
The System folder should also be hidden. To hide specific file types,
choose Options from the View menu in Windows Explorer.
The System folder contains the following information:
• Source models: These data structures allow Avid|DS to manage the
relationship between clips, sequences, and their media. Each time you
capture media from a new source, Avid|DS creates a corresponding source
model, which tracks the time span, quality, and location of the different
media files captured from that source. When you play back a clip from that
source, Avid|DS consults the appropriate source model to locate the media.
• Dsprojectinfo: This file contains information about the project format
and other project preference settings. For more information on project
preferences, refer to Creating a New Project on page 31 of the Avid|DS 4.0
User's Guide.
The DSPresets Folder
The DSPresets folder contains presets, which you can use to define effects,
transitions, graphics tools, and so on. The presets that are shipped with
Avid|DS are stored in this folder by default.
Avid|DS also creates a DSPresets folder in each project folder. This lets you
store user presets that are specific to a particular project with that project. You
can also specify, as part of your user preferences, locations for your own and
shared workgroup presets.
The VideoStorage
Folder
60 • Avid|DS
The VideoStorage folder contains individual folders for each project. Each
folder contains the video media and cache files for that project. Each folder's
name is generated by the software and is based on a unique identification
string (called a GUID) that identifies each project.
Folders Installed On Your System
The Projects\Audio
Folder
The Projects\Audio folder contains individual folders for each project. Each
folder contains the audio media files for that project.
You should not delete audio or video media files or folders from the
Windows 2000 Explorer. If you want to delete a media file, use the
Purge or Delete command in Avid|DS. For more information on
deleting clips and/or purging media, refer to Managing Media on
page 49 of the Avid|DS 4.0 User's Guide.
The DSSystem Folder
The C:\Program Files\Avid\DS_v4.02\DSSystem folder contains system files
and several folders used by Avid|DS.
Folder
Description
DSSystem
Contains the autosave files, viewer and test pattern bitmaps, some
critical Avid|DS system files, and the crash log. Before modifying
anything in this folder, contact Avid|DS Customer Service.
Rsrc
A resource folder for the 3D database
SoftDB
Contains the 3D database used by the 3D Warp effect
Installation & Administration Guide • 61
Chapter 5 • Managing Your Avid|DS Workstation
Managing User Accounts
Avid|DS makes full use of the Windows 2000 operating system. This includes
multiple user accounts with your Avid|DS presets, layouts, and preferences
preserved on an individual basis.
How Avid|DS Uses User
Accounts
When you log on to a Windows 2000 workstation, you are accessing an
environment associated with your user name. When you set any personal or
project preferences while logged on, Avid|DS saves them to your user profile.
For example, when you customize the Avid|DS desktop, the layouts that you
create are saved with your user name. The next time you log on to that
workstation, it recalls your previous settings.
Managing User
Accounts
When you first receive your Avid|DS system, the Windows 2000 operating system
is already installed, and an administrator account is set up with a blank password.
You can change your password, and create and modify user accounts by
accessing the Windows 2000 Computer Management console. The Computer
Management console lets you define security features, such as permissions,
rights, accounts, user groups, and audit policies.
To create a user account
1. Right-click on My Computer and choose Manage.
The Computer Management console is displayed.
2. Use the tree (left pane) to navigate to System Tools > Local Users and
Groups > Users.
3. From the Action menu, choose New User.
The New User dialog box is displayed.
62 • Avid|DS
Managing User Accounts
4. Enter the new user information and click Create.
5. Repeat the previous step until you’re finished adding new users, and then
click Close.
The new user accounts are displayed in the Computer Management console.
To modify an account
1. In the Computer Management console, navigate to System Tools > Local
Users and Groups > Users.
2. Double-click on the user account you want to edit.
The <username> Properties dialog box is displayed.
Installation & Administration Guide • 63
Chapter 5 • Managing Your Avid|DS Workstation
3. Select the General tab to specify password options.
4. Select the Member Of tab to add the user to groups.
All Avid|DS users must be members of the Power Users group.
5. Select the Profile tab to specify and edit user profiles and logon scripts.
6. Click OK when you’re finished.
Creating Power Users
All users must be set up as Power Users in Windows 2000 so that they can
use Avid|DS.
To add a user to the power user group
1. From the <username> Properties dialog box, select the Member Of tab.
The following is displayed.
2. Click Add.
64 • Avid|DS
Managing User Accounts
The Select Groups dialog box is displayed.
3. In the upper pane, select Power Users and click Add.
4. Click OK.
5. In the <username> Properties dialog box, click OK.
To delete an account
1. In the Computer Management console, navigate to System Tools > Local
Users and Groups > Users.
2. Right-click on an account and choose Delete.
Installation & Administration Guide • 65
Chapter 5 • Managing Your Avid|DS Workstation
Drive Maintenance
To prevent problems, you should keep at least 10% of the disk space on each
drive free at all times. Keep in mind that during video media archiving, drive D:,
the Video Storage drive, is used to store files for any alpha material in the project.
When you run Avid|DS, it creates two interactive cache files on the Video
Storage drive. These two files (DS_interactive_cache.tmp and
DS_interactive_cache.tmp.lowres) can use up as much as 500 megabytes
of your video storage area, and are mandatory for Avid|DS.
If there isn’t enough available space for these files to be created, the system
performance will drop dramatically. You may even experience a system
failure. You should regularly purge unnecessary media files from the system
to allow Avid|DS to work properly. For more information, refer to Purging
Media on page 55 of the Avid|DS 4.0 User’s Guide.
Defragmenting your
Drives
Performing a defragmentation on the disk drives helps to maintain your
system’s performance. The following is a suggested defragmentation schedule:
Drive
Frequency
C:\ (System disk)
Once a month, if required
D:\ (VideoStorage)
Once a week if workload is minimal; every day if workload
is intensive
F:\ (Projects/Audio)
Once a month if workload is minimal; once a week if
workload is intensive
You can use the Windows 2000 Disk Defragmenter utility to defragment your
disk drives.
Do not defragment your drives while using Avid|DS to capture,
output, or process media.
66 • Avid|DS
Drive Maintenance
To defragment the drives
1. Right-click on My Computer and choose Manage.
The Computer Management console is displayed.
2. Use the tree (left) to navigate to Storage > Disk Defragmenter.
3. Right-click on the disk you want to defragment and choose Defragment.
Installation & Administration Guide • 67
Chapter 5 • Managing Your Avid|DS Workstation
About Striping
Striping is the process of configuring hard drives to allow the system to see
two or more drives as a single drive. When you transfer files to striped drives,
the files are split between the drives, and the data transfer rate increases.
Striping is required to work with uncompressed and high video resolutions.
Keep in mind the following when striping drives:
• Avid|DS requires at least eight drives striped together to sustain real-time
performance.
• You cannot stripe hard drives of different sizes. For example, you can
stripe eight 36-GB drives or eight 18-GB drives, but you cannot stripe four
36-GB drives and four 18-GB drives together.
• Striping drives deletes any material on them.
• Striping is cumulative. For example, when you stripe eight 36-GB drives,
you can create an approximate 288-GB partition.
• If one drive in a set becomes damaged or inoperable, the data on the
remaining drives are lost.
• The capability for striping drives is built into the Windows 2000
operating system.
68 • Avid|DS
Creating a Stripe Set
Creating a Stripe Set
In Windows 2000, the disks in a stripe set must be dynamic disks. Since disks
are not usually shipped in this format, you may need to upgrade your disks
before you can stripe them. The Disk Manager in the Computer Management
console automatically detects whether your disks need to be upgraded to
dynamic disks.
If you attempt to create a stripe set from non-Avid drives, Avid
makes no representation that the stripe set will perform to Avid
specifications for your application or sequence. Consequently,
Avid|DS Customer Service will not be able to support any system
issues caused by the non-Avid drives or the stripe set.
To upgrade to dynamic disks
1. Right-click on My Computer and choose Manage.
The Computer Management console is displayed.
2. Use the tree (left) to navigate to Storage > Disk Management.
If the disks in your storage array are not dynamic, the Write Signature and
Upgrade Disk Wizard is displayed.
3. Click Next.
The Select Disks to Upgrade dialog box is displayed.
Installation & Administration Guide • 69
Chapter 5 • Managing Your Avid|DS Workstation
4. Select the disks that need to be upgraded and click Next.
The Completing the Write Signature and Upgrade Disks Wizard is
displayed.
5. Verify your selections and click Finish.
70 • Avid|DS
Creating a Stripe Set
Striping the Drives
Once the disks in your storage array have been upgraded to dynamic disks,
you can create the stripe set.
To create a stripe set
1. Right-click on My Computer and choose Manage.
The Computer Management console is displayed.
2. Use the tree (left) to navigate to Storage > Disk Management.
3. Right-click on any of the disks in the stripe set and choose Create Volume.
The Create Volume Wizard is displayed.
4. Click Next.
The Select Volume Type dialog box is displayed.
Installation & Administration Guide • 71
Chapter 5 • Managing Your Avid|DS Workstation
5. Select Striped Volume and click Next.
The Select Disks dialog box is displayed.
6. In the All available dynamic disks box, select each of the disks in the stripe
set and click Add>>.
7. When you’re finished, click Next.
The Assign Drive Letter or Path dialog box is displayed.
72 • Avid|DS
Creating a Stripe Set
8. Select the appropriate drive letter for your video storage (normally D:)
and click Next.
The Format Volume dialog box is displayed.
Installation & Administration Guide • 73
Chapter 5 • Managing Your Avid|DS Workstation
9. Select Format this volume as follows and specify the following settings:
Parameter
Setting
File system to use
NTFS
Allocation unit size
Default
Volume label
Video
Perform a Quick Format
Selected
Enable File and Folder Compression
Deselected
10. Click Next
The Completing the Create Volume Wizard is displayed.
74 • Avid|DS
Creating a Stripe Set
11. Verify your settings and click Finish.
Your video storage drives are striped and formatted.
Installation & Administration Guide • 75
Chapter 5 • Managing Your Avid|DS Workstation
Creating an Emergency Repair Disk
An emergency repair disk can be used to recover from a system failure in
which the operating system has become corrupted. You should create a repair
disk after any addition to the system, be it software or drivers.
To create an emergency repair disk
1. Go to Start > Programs > Accessories > System Tools > Backup.
The Backup utility window is displayed.
2. Click Emergency Repair Disk.
You are prompted for a blank formatted diskette.
3. Insert the diskette into drive A: and click OK.
4. Follow the onscreen prompts to create the emergency repair disk.
5. When you’re finished, remove the diskette from the drive, label it, and
store it in a safe place.
You can make duplicates of the diskettes or save their contents on another
storage device for added security.
76 • Avid|DS
Index
Index
Numerics
3D Wildcat driver 25
A
accounts, managing 62
Avid Equinox Break-Out-Box,
reinstalling driver 31
Avid|DS
discussion group 8
installing 39
managing workstation 57 to 76
uninstalling 15
B
BIOS, upgrading 23
BOB (Break-Out-Box) driver 31
Break-Out-Box (Avid) driver 31
C
conventions, document 10
customer service 11
D
defragmenting drives 66, 67
schedule 66
deleting user accounts 65
discussion group 8, 12
Disk Defragmenter 66
disk, emergency repair 76
document conventions 10
dongle 51
drive maintenance 66
defragmenting 66
drivers
Avid Equinox Break-Out-Box 31
BOB (Break-Out-Box) 31
confirming successful reinstall 35
displaying hidden files 22
Equinox Break-Out-Box 31
hardware, reinstalling 22 to 35
hidden files, displaying 22
Intense 3D Wildcat,
reinstalling 25
Merging Mykerinos,
reinstalling 28
Mykerinos, reinstalling 28
reinstalling 22 to 35
successful reinstall, confirming 35
system BIOS, upgrading 23
verifying 21
WACOM tablet, reinstalling 24
Windows 2000, reinstalling 33
DS Archives folder 59, 60
DS Presets folder 59, 60
DS Projects folder 59, 60
Dsprojectinfo 60
source models 60
DS System folder 59
DS_v4.01 folder 59
Dsprojectinfo 60
DSSystem folder 61
Rsrc 61
SoftDB 61
G
GUID 60
H
e-mail support 12
emergency repair disk 76
Equinox Break-Out-Box driver,
reinstalling 31
hardware drivers
Avid Equinox BOB (Break-OutBox) 31
BOB (Break-Out-Box) 31
confirming successful reinstall 35
displaying hidden files 22
Equinox Break-Out-Box 31
hidden files, displaying 22
Intense 3D Wildcat,
reinstalling 25
Merging Mykerinos,
reinstalling 28
Mykerinos, reinstalling 28
reinstalling 22 to 35
successful reinstall, confirming 35
system BIOS, upgrading 23
verifying 21
WACOM tablet, reinstalling 24
Windows 2000, reinstalling 33
hidden files, displaying 22
hotline support 11
F
I
files, hidden 22
Flexid 51
folders, installed 59
DS Archives 59, 60
DS Presets 59, 60
DS Projects 59, 60
DS System 59
DS_v4.01 59
DSSystem 61
Projects\Audio 59, 61
Rsrc 61
SoftDB 61
VideoStorage 59, 60
fonts
installing 47
removing 47
TrueType 47
Type 1 47
Installation and Administration
Guide 8
installing
Avid|DS 39
fonts 47
license server 45
Intense 3D Wildcat driver 25
E
L
license
dongle 51
Flexid 51
installing 52
problems 53
requesting 51
server, installing 45
support 11
technical support 11
troubleshooting 53
Installation & Administration Guide • 77
Index
verifying software protection key
driver 52
license server, installing 45
list, mailing 12
M
mailing list 12
maintaining drives 66
defragmenting 66
managing Avid|DS workstation 57
to 76
managing user accounts 62
Merging Mykerinos audio drive,
reinstalling 28
MIDI port, enabling 34
models, source 60
Mykerinos audio driver,
reinstalling 28
P
phone support 11
plug-ins, removing 15
Power Users group 64
problems, license 53
Projects\Audio folder 59, 61
R
reinstalling hardware drivers 22 to
35
3D Wildcat 25
Avid Equinox Break-Out-Box 31
BOB (Break-Out-Box) 31
Break-Out-Box (BOB) 31
Equinox Break-Out-Box 31
Intense 3D Wildcat 25
Merging Mykerinos 28
Mykerinos 28
tablet, WACOM 24
WACOM tablet 24
Wildcat 25
Windows 2000 33
Release Notes 8
removing
Avid|DS 4.01 16
fonts 47
plug-ins 15
78 • Avid|DS
TrueType fonts 47
Type 1 fonts 47
repair disk 76
requesting license 51
Rsrc folder 61
S
server, license 45
service, write cache 29
SoftDB folder 61
source models 60
striping 68
support 11
e-mail 12
hotline 11
licensing 11
mailing list 12
phone 11
training 11
web 12
system BIOS, upgrading 23
system folder
Dsprojectinfo 60
source models 60
T
technical support 11
telephone support 11
training support 11
troubleshooting, license 53
TrueType fonts
installing 47
removing 47
Type 1 fonts
installing 47
removing 47
U
uninstalling
Avid|DS 4.01 15, 16
fonts 47
plug-ins 15
TrueType fonts 47
Type 1 fonts 47
user accounts
adding user 64
creating 62
deleting 65
managing 62
modifying 63
V
verifying installed drivers 21
VideoStorage folder 59, 60
W
WACOM tablet driver,
reinstalling 24
web support 12
Wildcat driver 25
Windows 2000 driver 33
Workstation Setup Guide 8
write cache service 29