1
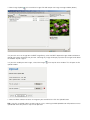
Version 2 - Released March 2007
BMT Group
“Where will our knowledge take you?”
User Manual
Content Management System
admin.bmt.org
Contents
1. Overview of the Content Management System (CSM)............................................................................. 3
2. Logging in to the BMT CMS....................................................................................................................... 3
3. Today – the first screen of the CMS.......................................................................................................... 3
4. Organising your web pages....................................................................................................................... 4
a. Changing the order of pages................................................................................................................... 4
b. Deleting pages......................................................................................................................................... 4
c. Pages that cannot be deleted.................................................................................................................. 4
d. The difference between section pages and sub pages.......................................................................... 4
e. Adding a new section page to your site.................................................................................................. 4
f. Adding a new page to a section of your site (a sub page)...................................................................... 4
g. Adding a new sub page to your site (a sub-sub page)........................................................................... 4
5. Editing pages.............................................................................................................................................. 5
a. Page editor options.................................................................................................................................. 5
b. Page Editor Fields (Editor Tab)................................................................................................................ 6
c. Useful Editor tools.................................................................................................................................... 7
d. Adding text to a page.............................................................................................................................. 8
i. Pasting text from Microsoft Word
ii. Text formatting tools
iii. Headings and Sub Headings
iv. Text Columns
e. Adding tables to a page.......................................................................................................................... 9
f. Adding images to a page....................................................................................................................... 10
g. Adding video, flash and other media to a page.................................................................................... 13
h. Adding downloads to a page................................................................................................................ 14
i. Adding Meta data to a page................................................................................................................... 15
j. Adding forms to a page.......................................................................................................................... 16
k. Previewing and activating pages........................................................................................................... 18
l. Reverting to previous versions of pages (version control)...................................................................... 19
6. Services and Capabilities........................................................................................................................ 20
a. Editing the Services and Capabilities page........................................................................................... 20
b. Using Services from the Central List..................................................................................................... 20
c. Adding your own services....................................................................................................................................... 20
d. Previewing and activating services........................................................................................................ 21
e. Maintaining service categories.............................................................................................................. 21
7. Adding news to your site......................................................................................................................... 22
8. Adding Documents & Resources to your site........................................................................................ 23
9. Contact Page............................................................................................................................................ 24
10.Clients Area.............................................................................................................................................. 25
a. Assigning usernames and passwords to your clients........................................................................... 25
b. Adding and removing files to client areas............................................................................................. 25
c. Client access to the site......................................................................................................................... 25
11.Careers
.............................................................................................................................................. 26
a. Editing the careers page........................................................................................................................ 26
b. Adding a job to your site........................................................................................................................ 26
12.Miscellaneous Options ........................................................................................................................... 27
a. URL Editor and Add URL....................................................................................................................... 27
b. Promo Editor.......................................................................................................................................... 27
13.Search Engine Optimisation.................................................................................................................... 28
a. Page Titles.............................................................................................................................................. 28
b. Page Content......................................................................................................................................... 28
c. Images................................................................................................................................................... 28
d. Meta data............................................................................................................................................... 28
1. Overview of the Content Management System (CMS)
The BMT Content management System (CMS) is a browser based interface that allows you to add and edit
content to your website, including text, images and other media.
You can add as many sections and pages to your site as you wish and have the ability to preview, activate and deactivate pages as you create them.
There are a number of pre-defined areas of your website that cannot be removed. The main ones being: Services
& Capabilities, News, Documents & Resources and Contacts. While these pages cannot be removed from your
site, the content on them can be changed.
The BMT CMS supports most major web browsers and can be accessed from any computer with an Internet
connection. The Safari browser on Macintosh computers is not supported.
To access the CMS you will need a username (usually your email address) and a password. BMT head office or IT
will provide you with these.
2. Login
In a web browser go to the following address: admin.bmt.org
Login using your email address and the password.
3. Today (the first screen of the CMS)
The first screen that you see after logging in will display a summary of activity on your site and will warn you if any
items are missing or out of date. For example if there are no services listed on your site or no new news articles
written in the last 30 days, a warning will appear. In such cases convenient links will appear next to these warnings
so you can quickly add new content.
On the left hand side of the Today page you will find quick links to the main areas of the CMS.
4. Organising your web pages
The Pages screen of your CMS displays all of the sections, pages and sub-pages that appear on your website.
The order in which the pages appear in this list is exactly the same as they appear on your website.
a. Changing the order of your pages
The order of your pages can be easily changed by using the up and down arrows next to the page names.
b. Deleting pages
Pages can be deleted by clicking the delete icon (waste basket) next to the page names. Deleting a section or
page that contains sub-pages will also delete the sub-pages. Any downloads associated with these pages will
also be deleted.
c. Pages that cannot be deleted
There are some sections of your site that you cannot delete. These are pre-defined pages that are required on all
BMT websites. The delete icon next to these pages will be de-activated. Editing these pages is explained in more
detail later in this manual.
d. The difference between section pages and sub pages
It is important to note that each section of your site is actually a page. We call it a section because it appears
as one of the main buttons in your sites navigation. When a visitor to your site clicks on one of these buttons (a
section) they will see this page first. A list of any sub-pages will also if they exist.
e. Adding a new section page to your site
NOTE: Please note that what ever you enter for page names will appear in the navigation of your website. It is
therefore important that the use of capitals and lowercase is consistent with the rest of the site (sentence case).
i. On the left hand side of the Pages screen click the Add New Section link.
ii. On the following screen, enter a name for the section; click the Insert Section button and then the Continue link.
iii. The section you added will now appear in the list on the Pages screen of your CMS but not on your website. It
will only appear on your website after you have added content and activated it.
iv. On the Pages screen, select the section page to edit it. Please refer to the next section of this manual for
instructions of how to add and edit page content.
f. Adding a new page to a section of your site (a sub page)
i. On the left hand side of the Pages screen click the Add New Page link.
ii. On the following screen, first select the section of your site in which you wish the page to appear.
iii. Enter a name for the new page, click the Insert Page button and then the Continue link.
iv. The page you added will now appear in the list on the Pages screen of your CMS but not on your website. It will
only appear on your website after you have added content and activated it.
v. On the Pages screen, select the page to edit it. Please refer to the next section of this manual for instructions of
how to add and edit page content.
g. Adding a new sub page to your site (a sub-sub page)
Adding a new sub page to your site works in the same way as adding a page only this time you will need to select
which section and page it belongs to.
5. Editing Pages
On the Pages screen, select a section page, page or sub page to edit it. You will see a number of tabs, which
allow you to edit the various elements of your pages.
a. Page Editor options
Editor Tab: This is the main part of the page editor and is where you give the page a name, a title and add text
and images.
Downloads Tab: This is where to add downloads to you page. There is no limit to the number of downloads you
can add to a page and once added they will appear as part of the layout.
Meta Data Tab: Meta tags are mainly used by search engines and can greatly improve your search engine rank
and listings. Any information you enter here will be embedded in your page and will not be seen by most of your
site visitors. It is therefore not essential that your pages contain Meta data but we do strongly advise it.
Background Tab: allows you to change the background colour of your page (only available in some designs).
Properties Tab: This screen allows you to Activate or De-activate your page, see who created or last edited it and
view a preview. You can also divert your page to a different page or web address should you need to.
NOTE: A page will not appear on your website until you have activated it. This allows you to add content and
preview the page while you are working on it. To activate a page select the Properties tab in the Page Editor and
select the Activate link.
b. Page Editor Fields (Editor Tab)
The three elements that make up this part of the Page editor are:
Page Title; although this does not appear anywhere within the layout of your website, it is a very important
element of your pages. The Page Title appears at the top of your visitor’s web browsers and is the name used in
the browser’s history and bookmarks.
Search Engines and the Page Title; the Page Title is used by search engines when displaying a link to your
website and if used correctly, a good descriptive Page Title can help improve your search engine ranks. Try to be
as informative as possible when entering Page Titles and make sure they relate to the actual content on the page.
For example the Page Title for your Contacts page might be: BMT Your Company Name - Contacts, Map and
Directions. While this may seem long, it contains several good keywords that will be used by search engines.
Nav Title; this is the name of your page and will appear in the main navigation of your website. The Nav Title will
appear on your website exactly as you enter it so it’s important that the use of capitals and lowercase is consistent
with the rest of the site (sentence case).
Page Content; this is where you add content to your pages. The list of icons and editing features for editor should
be familiar from using software like Microsoft Word. There are obvious options such as Text Alignment, Bullets,
Bold, Italic, Underline and Text Colour and some less obvious or website specific options that we will cover in this
manual. If you require help with any options that we do not cover here, click on the Help icon
in the Editor.
c. Useful Editor Tools
Full Screen Mode; expands the Page Content field to make it easier to work with long pages.
Preview; shows you how your page will look when it appears on your website (please note that some
elements are for demonstration purposes only).
Re-Size Window; in the lower right of the editor allows you to re-size the editor.
Help; information about all of the tools in the page editor.
Right-Click Menu; right clicking on items within the Page Content Editor quickly displays a list of options. This
can be particularly useful when working with tables.
Path; selecting any of the elements in the lower left of the editor can help you select different parts of your text.
In the example below, by clicking anywhere in the bold part of the text and then selecting strong in the path
highlighted the bold text.
d. Adding text to a page
You can type text directly into the Page Content field or paste it from another source such as Microsoft Word or
Note Pad.
i. Pasting text from Microsoft Word into your page
It is important to note that Word uses it’s own code to format text which can conflict with the code in your website.
This can result in the wrong fonts being used and a lack of consistency across your pages. If you wish to copy and
paste text from Word, please use the special tool available to do so. After you have copied your text in Word, click
to insert the text in your page.
the Paste From Word tool
The example below shows how the same text copied from Word can look very different. The first paragraph was
pasted using the Paste From Word tool and the second without. The second example uses fonts that are not part
of the BMT Corporate Guidelines.
ii. Text formatting tools
As well as being able to format text using common tools such as Bold, Italic and Text Colour, there are extra
options available to make sure the look and feel of your site remains consistent with the BMT corporate guidelines.
Text Colour; allows you to colourise text and has been limited to the BMT colour palette.
Custom Characters; allows you to insert special characters and symbols.
iii. Headings and Sub Headings
Format Menu; several pre-defined formats for headings and sub-headings can be used from this menu. Do this
by selecting your text and choosing an option from the menu.
Heading 1 should always be used for the main titles on your pages. Heading 2 and 3 can be used as sub
headings.
iv. Text Columns
Styles Menu; any items starting with TEXT in this menu can be used to format your text into columns. For example
TEXT-columnText280 forces a paragraph of text into a column 280 pixels wide – this is for use on the ‘Open Style’
home page.
e. Adding tables to a page
There are many formatting options for inserting tables, many of which become available once you have inserted a
table on the page.
Insert Table; allows you to insert and format a table. The following options are available:
Columns; specify the number of columns required.
Rows; specify the number of rows required.
Cell Padding; is the amount of space (in pixels) between the edges of the table cells and the content inside.
Cell Spacing; is the amount of space (in pixels) between each cell in the table.
Alignment; allows you to specify left, centre and right alignment.
Border; specified in pixels will apply a border to the edges of both the table and cells
Width & Height; can be specified in either pixels or percentage. In most cases we recommend using
percentages, as these will stretch the table to the width of your page. To specify a percentage you must enter a
percentage symbol with a number e.g. 100%
Table Formatting Options; once you have created a table these options allow you to further format rows, cells
and table properties.
f. Adding images to a page
Images can be added to your page directly from your computer hard drive or from the BMT image library.
When you add new images to your site they will be uploaded to your own image library and are available to use as
many times as you wish.
Images in the BMT image library can be used on any BMT website and cannot be deleted.
Insert Image; selecting this tool opens a new window where you can either add your own images or use
images from the BMT image library.
i. Selecting Insert Image
in the Page Editor opens a new window (below).
ii. Select Image Upload
at the end of the Image URL field to open the image manager window (below).
iii. If you wish to use an image from the BMT image library, select the BMT Corporate Images folder and browse
through the images to find the one you want. Selecting any image will display a preview on the right hand side of
the window. Skip to stage vii.
iv. If you wish to add your own images, select New Image
upload window.
in the top left of the window. This will open the file
v. Select the Browse button to locate an image on your hard drive then click the Upload button.
TIP: If you wish to upload more than one image at a time, selecting the Add Upload button will produce an extra
upload field where the previous step can be repeated.
vi. Once your image has been uploaded click on the Select Image for Use link to return to the image manager
window where your image will now be ready for use.
vii. Select the image you just uploaded to view a preview then select the Use This Image link that appears
underneath the image preview. This will close the image manager window and return you to the image properties
window.
viii. Enter a description for your image in the Image Description field. This is an optional field but we recommend
that it is used. An image description helps blind people and text based web browsers understand the content of
your page and is used by search engines so can help improve your search engine ranks.
ix. If you know how you want the image to appear on your page there are several formatting options available by
selecting the Appearance and Advanced tabs. If not then your image can be manipulated afterwards.
x. Clicking the Insert button will return you to the Page Editor screen where you will see that your image has been
inserted.
TIP: You can manipulate your images by selecting and re-sizing them or by right clicking on them and changing
the image properties.
TIP: Unfortunately, in Microsoft Internet Explorer there is no way to re-size an image and easily retain its
proportions. This can result in images looking stretched. At present the easiest way to achieve this is by using the
Firefox web browser. This is free to download at getfirefox.com and works in the same way as Internet Explorer.
g. Adding video, flash and other media to a page
Adding video, flash animation and other media such as sound files to your page is a very similar process to
adding images. The types of files that can be added to your pages include: Flash, Quicktime, Shockwave,
Windows Media and Real Media.
When you add new media files to your site they will be uploaded to your own image/media library and are available
to use as many times as you wish.
Insert Media; use this tool to add video, flash and sound files to your pages.
i. Selecting Insert Media
in the Page Editor opens a new window (below).
ii. Due to the differences between adding media files and images, it is very important that you first select a media
type from the drop down menu.
iii. When adding flash, shockwave or video to a page, it is very important that you specify the dimensions for your
media. This usually means that you need to know the dimensions before you start.
TIP: Typical dimensions for video on websites is 320 pixels by 240 pixels.
at the end of the File field to open the media manager window.
iii. Select Media Upload
iv. Once the media manager window is open, upload your files in exactly the same way as an image (please refer
to stage iii of the previous section of this manual for step-by-step instructions).
v. If you are familiar with the type of media files you are using there are several formatting and advanced options
available by selecting the Advanced tab in the Insert Media window. These settings can be specified before or after
you have added your media to a page.
h. Adding downloads to a page
Adding downloads to a page differs from adding images and media because they appear in a pre-defined place
in your website layout.
For the ‘Open style’ web design, downloads appear in the right hand column of the layout. If you do not add any
downloads to a page this column is used to display news articles.
For the ‘Corporate and Structured style’ web designs, downloads appear underneath your main page content.
i. On the Pages screen of the CMS, select the Downloads tab to add and remove downloads.
ii. Name; it is important that you give your download a descriptive name as this will appear on your site. The file
name itself will not appear on your site because it may not be informative enough.
TIP: Try to be as descriptive as possible when entering a name for your files. For example ‘BMT launches new
website - case study’ is far more useful to your visitors than ‘Case Study’.
iii. File; use the Browse button to select a document from your computer hard drive then select Save Changes to
upload the file and follow the Continue link to complete the process.
iv. The file you added will now appear in the list of Current Page Downloads. If your page has been activated the
download will also appear on the public version of the page.
v. Repeat the process to add more downloads or select the waste basket icon next to any you wish to remove.
i. Adding Meta data to a page
The Meta data you add to your pages is called the Meta Description tag. This is mainly used by search engines
and can help improve your search engine rank. Any information you enter here will be embedded in your page and
will not be seen by most of your site visitors. It is therefore not essential that your pages contain Meta data but we
do strongly advise it.
The following example shows how Amazon uses the Meta Description tag to control what appears on Google. The
other important thing to notice here is the page title (highlighted in blue) – please refer to section 5b of this manual
for further information about page titles.
If no Meta Description tag is present, search engines will often use the first few lines of the visible text that appears
on a web page as the description of the site. If on the other hand the Meta Description tag is present the contents
of this tag will be used instead. This lets you control the description of your site in the search engine results.
Try to use any important keywords that appear in the main text of your page and try to write it in such a way that will
tempt potential visitors to click on the link to your web site. It should be thought of as a marketing tool as well as a
Search Engine Optimisation tool.
A maximum of 200 characters should be used for the Meta Description tag. Do not repeat words although you
may use various forms of words like using plural or singular or using a different tense. Try to write it as an actual
sentence, instead of making it a series of keywords. Limit this tag to one good descriptive sentence. If you are
using two sentences, make sure that they are short.
i. On the Pages screen of the CMS select the Meta Data tab and enter a description.
j. Adding forms to a page
When editing a general page, for example ‘Home’, you will see an additional tab named ‘Page Form’. Selecting
this will enable you to add a form to your page and have the results emailed to you. Example usage of this would
be if you wanted to add a contact form to your website so people could fill it out and you could receive an email
with the details.
To add a form to any general page login into your BMT CMS, select to edit a general page and then select the
‘page form’ tab. You will then see a page which asks for some details. There are 2 things you must do before any
other:
i. Setup your ‘Email To’ field. At the top of a page it asks you who you wish the email to be sent to. You must enter
this in or else your form will error.
ii. A return url. You must specify where you want the user to go to after they have pressed to submit the form.
Details on this are below.
Return Url
The return url must be set so that the user is sent somewhere to notify them there form has been submitted. For
example you may wish to forward the user to a page that simple says ‘thanks for you comments, we’ll get back to
you soon!’.
To specify a return url following these instructions:
i. First create the page where you want the user to go to after they submit the form. Leave this page inactive so it
doesn’t appear in your websites navigation.
ii. If you select the properties tab of this page you’ll see at the bottom a preview url. Copy this url as you’ll need it in
a minute
iii. Go to edit the page where you wish to place a form.
iv. Select the ‘page form’ tab
v. At the bottom under ‘Add New Element’ in the first field place the preview url you just copied. In the drop down
box select ‘_returnUrl’, leave the order number as 1.
vi. Select to save the form
Creating Your Form
If you have followed the above instructions then you have now entered the email address you wish to send the
email to, setup a page that you want the user to go to after they press submit and you should have a form element
showing that says the url and ‘_returnUrl’ as the type. If you don’t then you’ve missed a step from above, if you
have then continue below.
You can now setup all the form elements you want to appear on your form. For example you may wish to have one
element that collects the persons name, another for email and so forth. To add a new element go to the bottom of
the page and you will see the add new element option:
The add new element area allows you to specify 3 things. In the first box you need to place the title of the element.
For example if you wish to collect the person name then enter ‘Name’ here. Next to this is a drop down box which
allows you to select which element type you want the element to be. Apart from the ‘_returnUrl’ type which you
used earlier you have 3 options:
i. Text: This allows the user to enter information on one line. Its it’s a name, email address, telephone number,
product code etc then this is the option for you.
ii. Checkbox: This allows the user to place a tick in a box is they agree to something. For instance you may enter
as the title of the element ‘Join Our Mailing List?’ which you want them to tick the box if they agree to it.
iii. Textarea: This allows the user to enter a lot of text in a box rather than a line like the ‘text’ type is. For example if
you are asking for an address or additional comment you may wish to use this option.
The third box along allows you to specify an order for the element. For instance if you were adding an element you
wish to appear in 2nd in you form element list you place a 2 here.
At present you can add a maximum of 20 form elements on any page. If you require more than this please contact
your site administrator.
Once you have added your form elements you may have a screen that looks like this:
k. Previewing and activating pages
By default any page that you add to your site is not active. This means that a page can be edited and previewed
prior to it being visible on your website. It also means that if you do not finish creating a page in one go, you can
come back to it at a later date to finish and make active.
i. On the Pages screen of the CMS select the Properties tab.
ii. Page Status; tells you whether the page is active or not. To activate it and make it visible on your website select
the Activate Your Page link. Similarly select the Deactivate Your Page link to stop visitors viewing the page.
iii. Page Url; provides a link so you can view a preview of your page before you make it live. Select this link to view
the preview.
iv. Alternative URL; allows you to re-direct your visitors directly to a different web page. This can be another
page within your own site or a link to an external site. Regardless of whether you added any content to your page,
entering a web address here will bypass your it entirely and take visitors directly to the Url you enter.
NOTE: Enter the full web address including http:// for example: http://www.bmt.org/
l. Reverting to previous versions of pages (Version Control System)
A version control system manages multiple versions of the same unit of information. For example you may have
updated your homepage several times via the CMS since BMT launched your site - each of these are incremental
version’s which in a version control system get stored as a page history and would allow you to revert back to any
of these version’s should you need.
As of the mid July 2007 a version control system has been put in place on your general pages to enable you to
revert back to older versions should you need to. Therefore any update’s you have made recently will have started
to build up a page history.
Viewing Your Page History
To view the version’s we have for you page log into your BMT CMS and select to edit a page e.g. ‘home’. You will
now see an additional tab on the page editing menu named ‘page version’, selecting this will show you all versions
we have for your page. An example is shown below:
As you can see each version tells you the date and time the version is from along with the options to view the
version and use the version.
Selecting to ‘View Version’ will take you to a screen showing you the content of the old page so you can make sure
that it is this one you require to revert back to.
Selecting to ‘Use Version’ will revert back to the version you have selected, removing all existing data from the
page and replacing it with the older page content.
6. Services and Capabilities
Services and Capabilities is a pre-defined section of your site and cannot be removed. This page can be edited in
the same way as any normal page and has the addition of a list of services and capabilities that can individually
created or selected from a central repository.
a. Editing the Services and Capabilities page
i. On the Pages screen of the CMS select Services & Capabilities. On the left hand side of the next page you will
see a number of options now available.
ii. Selecting the Edit Services Page link will allow you to edit your main Services & Capabilities page in the same
way as any other page. For detailed instructions on editing pages, please refer to section 6 of this manual paying
attention to section 6di - Pasting text from Microsoft Word.
b. Using Services from the Central List
i. Your Services; shows you a list of the services currently on your site. This page is split into two areas; Services
You’ve Created is a list of services that you’ve created and Services You’re Using lists the services that are owned
and maintained by another BMT company.
ii. Central Service List; before creating a new service for your site, it is worth looking through the list of services
added by other BMT companies. From this list you have two options:
Use; lets you use someone else’s service exactly as they have entered it. Selecting this option adds a service
directly to your site.
NOTE: If you are using services that are maintained by another BMT company, it is still possible for that company
to edit and change them. It is therefore possible that when a service is changed it may no longer be relevant for
your site.
Use & Edit; creates a copy of someone else’s service and lets you to edit it to more suit your company. As well as
saving you a lot of time this option helps to maintain a consistency across all of the BMT websites.
c. Adding your own services
i. On the left hand side of the Services & Capabilities page of the CMS, select Add New Service.
ii. Enter a Title for your service. This is used to form a list of services on your site.
iii. Adding a service is very similar to adding a normal page on your site. The main difference is the addition of the
category and summary fields.
Category; this field is used to categorise your services. If you have already added a service(s) to your site you will
find the categories you entered in the drop down menu. If you require a service to appear in the same category as
another it is important that you select the category from this list.
If you do not require categorisation; you must enter a category for a service however if you do not require
categorisation this can still be achieved. If you are entering the first service for your site, enter a category anyway
(enter something sensible here just in case you require categories at a later date). For any subsequent entries
selecting the same category each time will prevent your services from being split into categories.
Summary; the summary field is used to display a short description of your service when it appears in a list on your
site.
The example below shows how the Title and Summary fields are displayed on your site.
Description; this is the field where you enter the main content (description and images) for your service. Using
this field is identical to adding a normal page. For detailed instructions on editing pages, please refer to section 6
of this manual paying attention to section 6di - Pasting text from Microsoft Word.
Downloads; you can add as many downloads to your services as you wish. However when you first add a
service, you only have the opportunity to add three downloads. You can add more at a later date by editing the
service and uploading one document at a time.
Download Name; it is important that you give your download a descriptive name as this will appear on your site.
The file name itself will not appear on your site because it may not be informative enough.
TIP: Try to be as descriptive as possible when entering a name for your files. For example ‘BMT launches new
website - case study’ is far more useful to your visitors than ‘Case Study’.
Browse; use this button to select the file you wish to include from your computer hard drive.
d. Previewing and activating services
By default, when you add a new service to your website, it is not active. This allows you to preview and further edit
it before it becomes live.
Preview URL; once you have added a service, select it from your list of services to enter the editing screen. At the
bottom of the screen you will see a URL. Selecting this URL will allow you to see a preview of the service as it will
appear on your site.
Status; when you are happy for the service to appear on your website, select Activate Service. If you have already
activated the service, this link will change to De-Activate to allow you to stop it from being seen on your site.
e. Maintaining service categories
When you add different categories to your services & capabilities page, you have the option of adding a
description to each one of them. If you add a description for a category, it will appear above the list of services on
your site.
Adding a description is optional and if one is not entered it will not affect your website layout.
7. Adding News to your site
The News section of your site is a pre-defined area that cannot be removed. As well as your own company news,
Market Sector and BMT Group news will also appear on your news pages.
By default, if you do not add any news to your site, Market Sector and BMT Group news will appear in the main list
on your news page however as soon as you add your own news this will be replaced.
i. On the pages screen of the CMS select news to enter the news area of your site. The first screen you see will
display a list of news articles you have already added.
ii. On the left hand side of this page select Add New News.
iii. Adding a news article is very similar to adding a normal page to your site with the addition of a few fields.
Date; by default the current date is inserted into this field. You cannot enter a date directly here but instead use a
pop up calendar by selecting the icon next to the field. News is displayed on your site by order of date so the most
recent one appears at the top of the list. If you wish to change the order of your news you can change the date.
Description; enter your news article here in the same way as any normal page. For detailed instructions on editing
pages, please refer to section 6 of this manual paying attention to section 6di - Pasting text from Microsoft Word.
Divisional; selecting this option flags your news article to owners of Market Sector websites. The items can then
be selected for use in BMT Market Sector news. This means that your news article may appear on BMT Market
Sector websites as well as many other BMT websites under the Market Sector news.
Internal; selecting this option flags your news article for use on the BMT intranet and means that it will not be
displayed on your website or in any Market Sector news.
Downloads; you can add up to 10 downloads for a news article. It is important that you give your download a
descriptive name as this will appear on your site. The file name itself will not appear on your site because it may
not be informative enough.
TIP: Try to be as descriptive as possible when entering a name for your files. For example ‘BMT launches new
website - case study’ is far more useful to your visitors than ‘Case Study’.
Add News; unlike other parts of the CMS, news articles become live on your site as soon as you have selected
the Add News button.
8. Adding Documents & Resources to your site
The Documents & Resources section of your site is a pre-defined area that cannot be removed. By default, if you
do not add any resources to your site, BMT Corporate items will be displayed, however as soon as you add your
own resource this will be replaced.
Adding documents & resources is very similar to adding normal pages to your site. The main difference is the way
it appears on your website where they are displayed as a list.
i. On the Pages screen of the CMS, select Documents & Resources where you will see a list of items you have
already added to your site.
ii. On the left hand side of this page select Add New Resource.
Category; this field is used to categorise your resources. If you have already added a resource(s) to your site
you will find the categories you entered in the drop down menu. If you require a resource to appear in the same
category as another it is important that you select the category from this list.
If you do not require categorisation; you must enter a category for a resource however if you do not require
categorisation this can still be achieved. If you are entering the first resource to your site, enter a category anyway
(enter something sensible here just in case you require categories at a later date). For any subsequent entries
selecting the same category each time will prevent your items from being split into categories.
Title; enter the name of your resource here being as descriptive as possible.
Description; the description is used in two places on your site, first in the list that appears on the main
Documents & Resources page of your site and again when a visitor selects View from that list.
As the description is used to form a list on your site, it is a good idea to keep it reasonably short. Adding a lot of
text here will result in the list getting very long.
Downloads; it is important to give your documents a descriptive name as this will appear on your site. The file
name itself will not appear on your site because it may not be informative enough.
TIP: Try to be as descriptive as possible when entering a name for your files. For example ‘BMT launches new
website - case study’ is far more useful to your visitors than ‘Case Study’.
9. Editing Contact information on your site
The Contacts page of your site is a pre-defined area that cannot be removed. It is similar to a normal page of your
site with the addition of a map displaying your office location(s).
i. On the Pages screen of the CMS, select Contact. You will now see several options on the left hand side of the
screen.
ii. Edit Contacts Page; editing this page is similar to editing a normal page of your site however please bear in
mind that anything you enter here will appear underneath a map displaying your office location(s).
iii. Add New Office; select this option to add your office(s) to the map on the contacts page.
Title; this should be the name of your company
Description; the information you enter here will be displayed as part of your interactive map. When visitors select
your office on the map, a balloon will appear displaying this information. We suggest entering your office address.
Image; if you choose to add an image for your office it will appear along side any text you enter in the description
field and become part of your interactive map.
Choosing a location; the map included on this page allows to you pin point the exact location of your office. To
do this, use the zoom and move tools in the top left of the map until you have found your location (you can also
click and drag anywhere on the map to move it around).
Once you have found your office, click on the map to place a marker at your offices location. If you make a
mistake, selecting the same marker again removes it.
NOTE: The last marker you click is used for the longitude and latitude fields (long & lat) so if the last one you click
is in order to remove it, these fields will be empty. It is therefore a good idea to remove any unwanted markers
before adding one for the final location.
Driving; select this option if you wish to allow your visitors to get directions to your office. When someone uses
this facility they will be open Google Maps in a new browser window where their directions will be displayed. It is
worth noting that your visitor will be leaving your site.
10. Clients Area
The clients area of your site is a password protected part of your site that allows you and your clients to add files
and downloads for private use. Once you have set up a username and password for a client they can log in to
your site to download any files you place there and upload their own files for you to use.
a. Assigning usernames and passwords to your clients
i. Select Clients Area in the main navigation of your CMS displays and when the page loads, select Add New Client
on the left hand side.
Email (Username) and Password; we recommend using a persons email address as a username because it is
easy for them to remember and is unique. Anything can be entered here so if you’d prefer to use something else
that’s ok.
If you require more than one person to access the same client area, this is easily achieved. Rather than entering
an email address as the username enter something more ambiguous. You can then give these details to as many
people as you wish.
Activate; in order for a client to access their private area their account must be activated. If you wish to disallow
them access but not remove them entirely from the system, uncheck this box.
b. Adding and removing files to client areas
Once you’ve added a client to the system, you can add files to their area.
i. In the Clients Area of your CMS select Your Website Clients on the left hand side. On the next screen select Add
Files for the relevant person.
ii. The following screen will display any files that have you have previously added to this client area or any files that
the client has uploaded for you.
iii. To add a new file, select the New Media button at the top of the screen, select the file from your computer hard
drive and click Upload.
TIP: If you wish to upload more than one file at a time, selecting the Add Upload button will produce an extra
upload field where the previous step can be repeated.
iv. To remove a file, select it from the list and on the right hand side of the screen you will see the option to either
download the file or delete it.
NOTE: clients logging into the site will only see the option to download files. Even if they have uploaded a file, they
will not be able to delete it.
c. Client access to the site
Clients can access their area of your site by adding /clients to the end of your web address for example: www.bmt.
org/clients.
i. Clients should login to the site using the username (or email) and password that you have created.
ii. They will see a list of files that you have uploaded and have the ability to upload their own files.
iii. To download a file, they must first select it from the list. The option to download it will then appear on the right
hand side of the page.
iv. Uploading a file is exactly the same process as described above.
NOTE: Once a client has uploaded a file they cannot delete it. Only CMS users can delete files.
11. Careers
The Careers page of your site is a pre-defined area that cannot be removed. Any jobs that you add to this part of
the site will form a list of current vacancies along with jobs with BMT worldwide.
a. Editing the careers page
In the Careers section of the CMS select Edit Careers Text on the left hand side if you wish to add content to the
first careers page. By default the careers page contains some introductory text about the various opportunities
available throughout BMT worldwide. Any content you add to this page will appear above this text.
b. Adding a job to your site
In the Careers section of the CMS select Add New Job on the left hand side. Adding a career is similar to adding
other pages on your site although some fields have a different effect.
Title; enter a job title in this field.
Category; this field is used to categorise your jobs. If you have already added a job(s) to your site you will find the
categories you entered in the drop down menu. If you require a job to appear in the same category as another it is
important that you select the category from this list.
If you do not require categorisation; you must enter a category for a job however if you do not require
categorisation this can still be achieved. If you are entering the first resource to your site, enter a category anyway
(enter something sensible here just in case you require categories at a later date). For any subsequent entries
selecting the same category each time will prevent your items from being split into categories.
NOTE: March 2007 - The category field is not currently being used on BMT websites. Please use this field anyway
as it might be used in the future.
Expiry Date; by default the current date is inserted into this field. As soon as this date has passed your job will
no longer be displayed on your site. If the job has expired but you wish to display it for longer, come back to this
screen and edit the date.
NOTE: You cannot enter a date directly into this field but instead use a pop up calendar by selecting the icon next
to it. Jobs are displayed on your site by order of expiry date so the closer a job is to expiring the higher up the list it
will appear. If you wish to change the order of your jobs you can change the date.
Summary; the summary field is used to display a short description of your job in a list on your site.
Description; enter your job details here in the same way as any normal page. For detailed instructions on editing
pages, please refer to section 6 of this manual paying attention to section 6di - Pasting text from Microsoft Word.
Private; selecting this option means that your job will only appear on your website. Leaving it unchecked means
that your job will appear on all BMT sites and increase your chances for filling the role.
Downloads; it is important to give your documents a descriptive name as this will appear on your site. The file
name itself will not appear on your site because it may not be informative enough.
TIP: Try to be as descriptive as possible when entering a name for your files. For example ‘BMT launches new
website - case study’ is far more useful to your visitors than ‘Case Study’.
12. Miscellaneous Options
There are several options available in this section of the CMS. Some of these options only apply to certain styles of
design.
a. URL Editor and Add URL
This enables you to create easy to use and remember web addresses. You may wish to advertise a certain part
or page of your site and want people to be able to access it as quickly as possible for example www.bmt.org/
casestudies.
NOTE: When creating new directories, please bear in mind that your site already uses several that are pre-defined.
These directories include:
Careers
Clients
Contact
Directory
Documents & Resources
Legal
Locations
News
Rss
Search
Services & Capabilities
Sitemap
Directory; enter the name of the directory you wish to create for example to create www.bmt.org/casestudies,
enter casestudies in this field.
URL; this is the actual web address that people will get to when they enter your new quick address. Enter the full
Url (including http://) of the page where you wish this directory to send your visitors.
Type; there are two types for forwarding available, on the whole we recommend using Non-Framed which simply
forwards visitors on to a different web address. Framed does the same thing but masks the address from your
visitors.
For example using the Non-Framed method www.bmt.org/casestudies might forward people to www.bmt.org/Doc
uments%20&%20Resources/?/394/case%20Studies/index.asp. Using the Framed method visitors would never see
the long address above but instead always see www.bmt.org/casestudies.
NOTE: Please give careful consideration when using the Framed method above as there are several
disadvantages. If a visitor enters your site through a quick address e.g. www.bmt.org/casestudies as they move
around the site they will not see the addresses of individual pages but instead always see the quick address for
the entire visit. If they then bookmark a certain page they will in fact bookmark www.bmt.org/casestudies which
may not the page they wanted. Framed pages can cause other problems and in particular are not very search
engine friendly.
b. Promo Editor
This is specifically for the ‘Open Style’ web design and allows you to place a banner graphic on your home page.
The graphic or image will appear underneath the navigation on the left hand side of your site.
Title; is used for your reference only.
Image; any image you add here will be shrunk or stretched to fit correctly in the space beneath the navigation of
your site.
URL; if you wish to turn the banner into a link to another part of your site, enter the web address here.
13. Search Engine Optimisation
a. Page Titles
Page titles are used by search engines when displaying a link to your website and if used correctly, a good
descriptive Page Title can help improve your search engine ranks. Try to be as informative as possible when
entering Page Titles and make sure they relate to the actual content on the page. For example the Page Title for
your Contacts page might be: BMT Your Company Name - Contacts, Map and Directions. While this may seem
long, it contains several good keywords that will be used by search engines.
Please refer to section 5b for instructions about entering page titles.
b. Page Content
The most important part of your website for search engines is the text content of your pages. Search engines work
by copying the text from all of your pages and storing it in their databases. When someone performs a search, any
keywords found on your pages will be returned. The websites with the most successful search engine ranks are
often the ones with a lot of text content, regardless of how the site looks graphically.
Please refer to section 5b for instructions about entering page content.
c. Images
Images can help with search engine optimisation. When adding images to your pages give careful consideration
to your Image Descriptions. If for example you where adding an image of two people working at a computer, your
image description might be Two people working at a computer at the BMT head office. This not only helps blind
people understand the content of your site but also adds several keywords to your site for search engines.
Please refer to section 5f viii for instructions about image descriptions.
d. Meta data
Meta data is used by search engines and can help improve your search engine rank. You can add Meta data to
any of your pages by using the Page editor > Meta Data tab.
The following example shows how Amazon uses the Meta Description tag to control what appears on Google. The
other important thing to notice here is the page title (highlighted in blue).
If no Meta Description tag is present, search engines will often use the first few lines of the visible text that appears
on a web page as the description of the site. If on the other hand the Meta Description tag is present the contents
of this tag will be used instead. This lets you control the description of your site in the search engine results.
Try to use any important keywords that appear in the main text of your page and try to write it in such a way that will
tempt potential visitors to click on the link to your web site. It should be thought of as a marketing tool as well as a
Search Engine Optimisation tool.
A maximum of 200 characters should be used for the Meta Description tag. Do not repeat words although you
may use various forms of words like using plural or singular or using a different tense. Try to write it as an actual
sentence, instead of making it a series of keywords. Limit this tag to one good descriptive sentence. If you are
using two sentences, make sure that they are short.
Please refer to section 6I for instructions about Meta data.