1
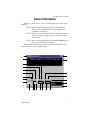
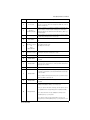
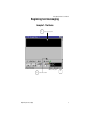
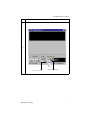
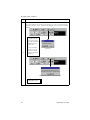
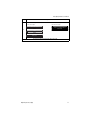
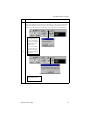
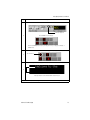
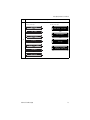
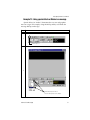
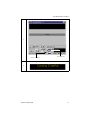
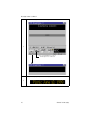
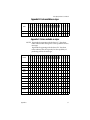
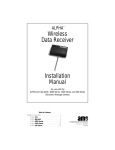
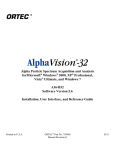
Messaging Software
User Manual
Copyright © 1999 Adaptive Micro Systems
Form No. 9701-0202A
6/30/99
i
NOTE:
Messaging Software User Manual for BetaBrite Version 1.1 and
Alpha Messaging Software Version 1.0
NOTE:
Due to continuing product innovation, specifications in this
document are subject to change without notice.
Copyright © 1999 Adaptive Micro Systems, Inc. All rights reserved.
The distinctive appearance of this product is a Trade Dress of Adaptive Micro Systems, Inc.
BETA-BRITE, BIG DOT, and SMART ALEC are trademarks of Adaptive Micro Systems, Inc. registered in
the United States Patent and Trademark Office.
Alec, ALPHA, AlphaLert, AlphaNET, AlphaNET plus, AlphaNET plus II, ALPHAVISION, Automode,
Director, EZ KEY II, EZ95, PagerNET, PrintPak, PPD, Solar, and TimeNet are trademarks of Adaptive
Micro Systems, Inc.
Visit our Internet World Wide Web site:
http://www.ams-i.com or e-mail us at [email protected]
ii
Messaging Software User Manual
General Information ..................................................................... 1
Screen layout and overview ......................................................................................... 2
Beginning text messaging .............................................................. 5
Example 1- The Basics................................................................................................. 5
Example 2- Creating your first message ...................................................................... 6
Example 3- Using upper and lowercase in a 1 and 2-line message............................ 12
Example 4- Editing the text of an existing message ................................................... 15
Example 5- Reviewing your messages....................................................................... 17
Example 6- Turning messages on and off.................................................................. 18
Example 7- Zooming in and out of a message ........................................................... 20
Advanced Text Messaging ............................................................. 22
Example 8- Using fonts and colors in a message....................................................... 22
Example 9- Making text flash ..................................................................................... 26
Example 10- Aligning or justifying text in a message................................................. 28
Example 11- Speeding up or slowing down messages .............................................. 30
Example 12- Using special effects or Modes in a message........................................ 37
Example 13- Inserting animations, time, and date in a message................................ 40
Example 14- Adding a Header to your message......................................................... 45
Appendixes .............................................................................. 50
Appendix A- Special effects or Modes available on a sign.......................................... 50
Appendix B- Fonts available on signs........................................................................ 51
Appendix C- Colors available on signs ....................................................................... 51
Appendix D- Animations available on signs ............................................................... 52
iii
Messaging Software User Manual
iv
Messaging Software User Manual
General Information
Messaging Software allows you to send messages to your sign using a
computer.
NOTE: Items or features that are grayed out in the software
either are not supported by your type of sign, or not
available in the software.
NOTE: Items appearing throughout the manual in italics indicate
software, or screen emphasis. This is what you will see
on the screen.
NOTE: Items appearing throughout the manual in bold indicate
that you are to perform a function.
After you install the Messaging Software and start it up, this is what
should appear on your computer screen:
X
A
W
B
V
U
T
S
C
D
R
Q
E
P
F
G
O
General Information
N M
L
K
J
i
H
1
Messaging Software User Manual
Screen layout and overview
Letter
Name
A
Quit
Description
Quits out of the messaging software.
B
Scroll Bar
When you type more text than will fit in the line windows that show on the
screen, you can use the scroll bar to move up and down within the entire
message. Either drag the scroll box, click in the scroll bar, or click on the
up-and down arrows.
C
Preview this message
Sends the current message to the sign. No other messages show on the sign
during preview.
D
Send All messages
Sends all available messages which are turned on. This also updates already
running messages. When you are done previewing the current message,
click OK.
E
On/off button
Use this button to indicate that this message will or will not be sent to the
sign when all messages are transmitted or updated.
F
Text Preview window
Shows how the text will appear with the chosen character attributes. If text in
the message is highlighted, the text preview reflects how that text appears. If
no text is actually highlighted, the text review shows how the next typed will
appear.
G
Status Bar
Shows that this Help system can be displayed by pressing F1. Also shows
the number of the current message-in the order of creation-and the total
number of messages.
Allows you to select one of several fonts for selections of text. Options
include various widths, shadowing effect, and serif or sans-serif text.
H
2
Listed in order of
appearance on screen:
Text styles (font) icon
Text color icon
Text flashing icon
Allows you to select one of several colors for selections of text. The colors
available depend on the type of sign you have.
The top row(s) of colors are variations of red, yellow, and green.
The bottom row has, in order:
Horizontal Rainbow
Diagonal Rainbow
Mixed colors (Each character is a different color.)
Autocolor (Each line is shown using colors that cycle through all available
colors
I
Text Size
Options for height of text: “5” high, “7” high, “10” high, and “16” high (this
will depend upon your sign type. “5”, “7”, “10”,“16”, and “24” indicate the
number of rows of LED lights that are used for a character. Only upper case
is available for “5” high, while both upper- and lowercase are available for
“7’, “10”,“16”, and “24” high. The default is “7” high.
J
Cut
Copy
Paste
Removes the selection from the message and places it on the Clipboard.
Copies the selection to the Clipboard.
Inserts the contents of the Clipboard where the cursor is, and replaces any
selection. This command is available only if you have already cut or copied
a selection.
General Information
Messaging Software User Manual
Letter
Name
Description
K
Zoom control
Shows the lines of the message at the selected percentage of full size so you
can zoom out to see more lines of the message at a smaller size, or into see
fewer lines at a larger size.
L
Listed in order of
appearance:
Animation/time/date
Allows you to include one of several preset animations in the display of the
sign. (For example, selecting Cherry Bomb displays a firecracker with a
burning fuse. When the fuse burns down, the bomb explodes.) Allows you
to include time/date.
M
Header/body
Defines a selection (one or more lines) in a message to be used as a header.
The header line(s) will appear above of that message.
N
Pause duration
Indicates the amount of time the message will be shown for reading on the
sign.
O
Listed in order of
appearance on screen:
Left
Center
Right justification
P
Special effects modes
Q
New message
R
Navigational Bar
First- When you have more than one message, this button will show the first
one created.
S
Navigational Bar
Previous-When you have more than one message and you are looking at
any of the messages, except the first one, this button will show the previous
message by order of creation.
T
Message indicator
U
Navigational Bar
Left- Align text on the left.
Center- Aligns text in the center.
Right- Aligns text on the right.
Modes are special effects applied to the way the messages are presented.
They change the way a line of text appears on a sign.
Creates a new (blank) message.
Indicates what message you are currently on and or viewing.
Next- When you have more than one message, and you are looking at any of
the messages, except the last one, this bottom will show the next message
by order of creation.
Note: If you begin a new message here, and you are on your last message, a
new message will be created at the end.
V
Navigational Bar
Last- When you have more than one message, this button will show the last
one created.
This set of one or more windows shows the contents of the message,
including text and graphics. What you see is what you get.
Note: If your sign has a “R” after its’ model type, then the sign has only red
color capabilities and the message will appear in red. (Example, 4120R).
W
Message Window
Note: To delete text from the message, highlight the text and press the
Delete/backspace key on your keyboard.
Note: To delete the entire message, first delete all the contents of the
message, then press the Delete/backspace key on your keyboard once more.
General Information
3
Messaging Software User Manual
4
Letter
Name
X
Title Bar
Description
Indicates the sign model type.
General Information
Messaging Software User Manual
Beginning text messaging
Example 1- The Basics
1
Type a message here.
Click to make green.
3
Beginning text messaging
2
Click on Send All
5
Messaging Software User Manual
Example 2- Creating your first message
For the first message that you create, you will be using the “5” high
font.
Step
Description
Click on the New message icon.
1
New message icon
6
Beginning text messaging
Messaging Software User Manual
Step
Description
Using the Text size drop down arrow, select the “5” high font.
2
Select the “5” high font
Beginning text messaging
Text size drop down arrow
7
Messaging Software User Manual
Step
Description
Click on the Text color icon. A list of available colors will appear. Select the Light red color.
3
Text color icon
Light red color
List of available colors
8
Beginning text messaging
Messaging Software User Manual
Step
Description
Type, THIS IS YOUR FIRST MESSAGE
4
Beginning text messaging
9
Messaging Software User Manual
Step
Description
Click on the Preview this message icon to display the message on the sign . A Info #1 screen will appear
if you have programmed other messages into the sign, Click on Yes or No to send the other messages,
and your new message to the sign. A reminder screen will appear once you have clicked on Send All.
Click OK.
Note: When you preview
the message on the sign,
all of the other messages
that you have programmed
will be displayed unless
you Click on No.
5
Note: If you want all the
messages to stay on the
sign, Click on Send All
instead of the Preview this
Message icon.
Info #1 Screen
Click OK to have all active messages sent to the sign.
Note: A message is active if the Set
message On/off button is green
10
Beginning text messaging
Messaging Software User Manual
Step
Description
This is how the message will look on the
one-line series signs:
THIS IS YOUR
THEN
6
This is how the message will look on the
two-line series signs:
THIS IS YOUR FIRST
MESSAGE
FIRST
THEN
MESSAGE
You’ve just created a message and sent it to the sign.
Beginning text messaging
11
Messaging Software User Manual
Example 3 - Using upper and lowercase in a 1 and 2-line
message
This section shows you how to create messages on your signs using
the default “7” high font.
Step
Description
Click on the New message icon
1
New Message icon
Using the Text size drop down arrow, select the default “7” high font.
2
Select the “7” high font
Text size drop down arrow
Using the Shift key on your keyboard when necessary, type This is the second message
3
12
Beginning text messaging
Messaging Software User Manual
Step
Description
Click on the Preview this message icon to display the message on the sign . A Info #1 screen will appear
if you have programmed other messages into the sign, Click on Yes or No to send the other messages,
and your new message to the sign. Do not click on the confirmation screen until the message has
appeared on the sign. A reminder screen will appear once you have clicked on Send All. Click OK.
4
Note: When you preview
the message on the sign,
all of the other messages
that you have programmed
will be displayed unless
you Click on No.
Note: If you want all the
messages to stay on the
sign, Click on Send All
instead of the Preview this
Message icon.
Info #1 Screen
Click OK to have all active messages sent to the sign.
Note: A message is active if the Set
message On/off button is green.
Beginning text messaging
13
Messaging Software User Manual
Step
Description
This is how the messages will look on
the one-line series signs:
This is the
THEN
5
This is how the messages will look on the
two-line series signs
This is the
second message
second
THEN
THEN
THIS IS YOUR FIRST
MESSAGE
message
THEN
THIS IS YOUR
THEN
FIRST
THEN
MESSAGE
14
Beginning text messaging
Messaging Software User Manual
Example 4- Editing the text of an existing message
After typing in a message, you may want to add or remove text from
it. The following is an example of this common situation.
In this example, we’ll change the first message to say: “This is your
first message, but now it’s longer”:
Step
Description
Using the Navigational arrows, locate the first message that you created, and using you keyboard, type a
comma after the word Message. Then, type, BUT NOW IT’S LONGER.
Navigational
Arrows
1
Type a comma
after the word
message, and
type, BUT NOW
IT’S LONGER
Beginning text messaging
15
Messaging Software User Manual
Step
Description
Display the message on the sign by either:
•
Clicking on the Preview this message icon to display the message on the sign.
•
Clicking on Send All which will display the message until it’s deleted
(shown below).
2
Preview this message icon
Click on Send All
This is how the messages will appear on the
the one-line series signs:
This is the
THEN
This is the
second message
second
THEN
THEN
THIS IS YOUR FIRST
MESSAGE, BUT NOW IT’S
message
THEN
3
This is how the messages will appear on
two-line series signs:
THIS IS YOUR
THEN
THEN
LONGER
FIRST
THEN
MESSAGE, BUT NOW
THEN
IT’S
THEN
LONGER
16
Beginning text messaging
Messaging Software User Manual
Example 5- Reviewing your messages
This example will show you how to review messages. This example
will use the first and second message that you created.
Step
Description
Using the Navigational arrows, locate the first message that you created.
1
Navigational arrows
Using the Navigational arrows, locate the second message that you created.
2
Beginning text messaging
17
Messaging Software User Manual
Example 6- Turning messages on and off
Turning messages on and off to the sign indicates whether or not the
message will be transmitted to the sign. To turn a message off from the
sign, you must do the following:
Step
Description
Use the Navigational arrows to locate your first message, and click on the Set messages On/Off button
until it changes to red.
Set messages On/off button
Navigational arrows
1
When the Set messages On/off button is green, the message is on
When the Set messages On/off button is red, the message is off
Note: To update the sign so that this message does not appear on the sign after you have turned it
off, click on the Send All icon to update the message status to the sign.
Click on the Send All icon. The sign will now update and the message that you have turned off will not
appear.
2
Send All icon
Note: Click on the Send All icon to update the message, otherwise the
message will still appear on the sign.
18
Beginning text messaging
Messaging Software User Manual
Step
Description
This is how the message will appear on the
one-line series signs:
This is the
3
THEN
This is how the message will appear on the
two-line series signs:
This is the
second message
second
THEN
message
Beginning text messaging
19
Messaging Software User Manual
Example 7- Zooming in and out of a message
NOTE: Zoom is used only for viewing messages on a computer
screen, not on the sign.
The Messaging Software has a Zoom feature which allows you to
view a message at a closer range on the computer screen.
Step
Description
Using the Navigational arrows, locate the second message that you created. Look at the Zoom control
area, notice that this message was created while being at the 75% viewing capacity.
1
Zoom Control
Navigational Arrows
Note: This is how the message will appear on your computer screen at 75%.
The message will not appear this way on the sign.
Highlight the message, and select the Zoom control range to 50%.
2
Note: This is how the message will appear on your computer screen at 50%.
The message will not appear this way on the sign.
20
Beginning text messaging
Messaging Software User Manual
Step
Description
Highlight the message, and select the Zoom control range to 100%
3
Note: This is how the message will appear on your computer screen at 100%.
The message will not appear this way on the sign.
Beginning text messaging
21
Messaging Software User Manual
Advanced Text Messaging
Before attempting this section, make sure you’re familiar with the
previous examples in the “Beginning text messaging” section of this
manual.
Example 8- Using fonts and colors in a message
In this example, we’ll create a message that uses different colors and
fonts.
NOTE: Only those colors/fonts which are available for the
particular sign will appear. Check with your sign model
for color/font capabilities
Step
Description
Click on the New message icon, a new screen will appear. Use the “7” high font for this example.
1
Select the “7” high font
New message icon
22
Advanced Text Messaging
Messaging Software User Manual
Step
Description
Click on the Text styles (font) icon, the fonts available for the message height will appear.
Text styles (font) icon
2
List of available fonts for sign type.
Note: Font availability depends upon your sign type. Check your sign type for a listing of
available fonts.
Click on the Sans Serif font T, this is how the font will appear when you type on the first line of the sign.
Sans Serif font T
3
Using your Shift key when necessary, type, Welcome to the
4
Message reflects the Sans Serif font that we selected in step 3
Now, we will change the color for the second line of the message.
Advanced Text Messaging
23
Messaging Software User Manual
Step
Description
Click on the Text color icon, a list of the available colors will appear.
Text color icon
5
List of available colors
Note: Color capabilities depend upon your sign type. Check your sign type for a listing of color
capabilities.
Click on the color Brown. The next line of text that you type will appear in this color.
6
Brown color
Press the Enter key on your keyboard and using the Shift key when necessary, Christmas Party
7
Display the message on the sign by either:
•
Clicking on the Preview this message icon to display the message on the sign.
•
Clicking on Send All which will display the message until it’s deleted
(shown below).
8
Preview this message icon
Click on Send All
24
Advanced Text Messaging
Messaging Software User Manual
Step
Description
This is how the messages will appear on the
one-line series signs:
Welcome
THEN
to the
THEN
Christmas
THEN
This is how the messages will appear on the
two-line series signs:
Welcome to the
THEN
Christmas
THEN
15
Party
Party
THEN
This is the
THEN
second
THEN
This is the
second message
THEN
message
Advanced Text Messaging
25
Messaging Software User Manual
Example 9- Making text flash
In this message, we’ll use the message you previously created in
“Example 8- Using fonts and colors in a message” on page to make the
message flash.
Step
Description
Locate the message that you created in Example 8.
1
Press the Enter key on your keyboard..
2
Click on the Text flashing icon.
Text flashing icon in the off position
3
The Text flashing icon will change to Yellow to indicate that it has been turned on.
Text flashing icon in the on position
Type, 1999
4
This line will flash on and off
26
Advanced Text Messaging
Messaging Software User Manual
Step
Description
Display the message on the sign by either:
•
Clicking on the Preview this message icon to display the message on the sign.
•
Clicking on Send All which will display the message until it’s deleted
(shown below).
5
Preview this message icon
Click on Send All
This is how the message will appear on the
one-line series signs:
Welcome
This is how the message will appear on the
two-line series signs:
THEN
Welcome to the
Christmas Party
to the
THEN
THEN
Christmas
THEN
6
Party
THEN
1999
THEN
This is the
second message
1999
THEN
This is the
THEN
second
THEN
message
Advanced Text Messaging
27
Messaging Software User Manual
Example 10- Aligning or justifying text in a message
In this message, we’ll create a message that is left aligned.
NOTE: This feature is only available on the Director series signs.
NOTE: Items or features that are grayed out in the software
either are not supported by your type of sign, or not
available in the software.
Step
Description
Click on the New message icon. A new screen will appear.
1
New message icon
28
Advanced Text Messaging
Messaging Software User Manual
Step
Description
Click on the Text color icon. The list of colors will appear. Select the Light green color icon.
Text color icon
2
List of available colors on the Director
LIght green color
Click on the Left justification icon.
3
Left justification icon
Type, Today’s meeting cancelled
4
Display the message on the sign by either:
•
Clicking on the Preview this message icon to display the message on the sign.
•
Clicking on Send All which will display the message until it’s deleted
(shown below).
5
Preview this message icon
Send All icon
Advanced Text Messaging
29
Messaging Software User Manual
Example 11- Speeding up or slowing down messages
Speeding up and slowing down a message refers to how long the sign
will hold the message. In the first example we’ll speed up the message by
creating a message that is held on the sign for 1 second.
In the second example we’ll slow the message down and have it held
on the sign for 3 seconds.
Step
Description
Click on the New message icon.
1
New message icon
30
Advanced Text Messaging
Messaging Software User Manual
Step
Description
Using the Pause duration drop down arrow, select the 1second for the message. (This is how long the
message will remain on the sign.)
2
Pause duration drop-down arrow
Select the 1 sec. This is how long the message
will remain on the sign for.
Click on the Text styles (font) icon, the fonts available for the message height will appear.
Text styles (font) icon
Fonts available for “7” high font
3
Note: Font availability depends upon your sign type. Check your sign type for a listing of
available fonts.
Advanced Text Messaging
31
Messaging Software User Manual
Step
Description
Click on the Sans Serif 7 font.
4
Sans Serif “7” high font
Click on the Text color icon. A list of the available colors will appear. Select the Brown color icon.
Text color icon
List of available colors
5
Brown color icon
Note: Color capabilities depend upon your sign type. Check your sign type for a listing of color
capabilities.
Using your Shift key when necessary type, Reminder, 401k meeting on 9/20/99
6
Display the message on the sign by either
•
Clicking on the Preview this message icon to display the message on the sign.
•
Clicking on Send All which will display the message until it’s deleted
(shown below)
7
Preview this message icon
Click on Send All
Each line of your message will appear on the screen for one second, and then the next message will appear.
32
Advanced Text Messaging
Messaging Software User Manual
Step
Description
This is how the message will appear on the
one-line series sign:
Reminder, 401K
THEN
meeting on
THEN
9/20/99
THEN
Welcome to the
THEN
This is how the message will appear on the
two-line series signs:
Reminder, 401K
meeting on 9/20/99
THEN
Welcome to the
Christmas Party
THEN
1999
8
Christmas
THEN
Party
THEN
This is the
second message
THEN
1999
THEN
This is the
THEN
second message
Now, let’s create a message that will remain on the sign for 2 seconds.
Click on the New message icon.
9
New message icon
Advanced Text Messaging
33
Messaging Software User Manual
Step
Description
Using the Pause duration drop down arrow, select the 2 second Pause duration.
10
Pause duration drop down arrow
Select 2 sec. This is how long the
message will remain on the sign
34
Advanced Text Messaging
Messaging Software User Manual
Step
Description
Click on the Text color icon and select the Light green color. Using your Shift when necessary type,
Profit Sharing meeting postponed until 9/20/99
Text color icon
Light green color
11
Display the message on the sign by either:
•
Clicking on the Preview this message icon to display the message on the sign.
•
Clicking on Send All which will display the message until it’s deleted
(shown below)
12
Preview this message icon
Click on Send All
Advanced Text Messaging
35
Messaging Software User Manual
Step
Description
This is how the message will appear on the
one line series signs:
Profit sharing
THEN
meeting
This is how the message will appear on the
two-line series signs:
Profit sharing
meeting postponed
THEN
THEN
postponed
THEN
until 9/20/99
THEN
Reminder, 401K
until 9/20/99
THEN
Reminder, 401K
meeting on 9/20/99
THEN
THEN
meeting
13
THEN
Welcome to the
Christmas Party
THEN
on 9/20/99
THEN
Welcome to the
THEN
Christmas
THEN
1999
THEN
This is the
second message
Party
THEN
1999
THEN
This is the
THEN
second message
36
Advanced Text Messaging
Messaging Software User Manual
Example 12- Using special effects or Modes in a message
Special effects (or “modes”) determine the way text and graphics
move on a sign. For example, using the Roll up mode, we’ll make the
message Roll up on the sign.
Step
Description
Click on the New message icon to create a new message.
1
New message icon
Using the Special effects drop down arrow, select the Roll up mode.
2
Special effects drop down arrow.
Select the Roll up mode for this example.
Advanced Text Messaging
37
Messaging Software User Manual
Step
Description
Type, Hello
3
Display the message on the sign by either:
•
Clicking on the Preview this message icon to display the message on the sign.
•
Clicking on Send All which will display the message until it’s deleted
(shown below)
4
Preview this message icon
Click on Send All
38
Advanced Text Messaging
Messaging Software User Manual
Step
Description
This is how the message will appear on the
one-line series signs:
Hello
THEN
Profit sharing
This is how the message will appear on the
two-line series signs:
Hello
THEN
THEN
meeting
THEN
postponed until
THEN
Profit sharing
meeting postponed
THEN
until 9/20/99
9/20/99
THEN
Reminder, 401K
THEN
meeting
5
THEN
on 9/20/99
THEN
Welcome to the
THEN
Reminder, 401K
meeting on 9/20/99
THEN
Welcome to the
Christmas Party
THEN
THEN
Christmas
THEN
Party
THEN
1999
THEN
This is the
second message
1999
THEN
This is the
THEN
second message
Advanced Text Messaging
39
Messaging Software User Manual
Example 13- Inserting animations, time, and date in a message
Animation is a pre-programmed Graphic which can be used and
displayed with messages.
Now, we’ll do an example using Animation and text in a message.
NOTE: Graphic abilities are not available on all sign models.
Check your sign for graphic capabilities.
Step
Description
Click on the New message icon.
1
New message icon
Click on the Animation/time/date icon, a list of the available animations will appear.
2
Animation/time/date icon
40
List of available
animations for the sign
Advanced Text Messaging
Messaging Software User Manual
Step
Description
Click on Fireworks. The graphic will appear on the first line of the message on the sign.
3
By selecting Fireworks, this is the graphic
that will appear in your message
Use your Shift key when necessary and type, Coming soon: Improved health care plan
4
Advanced Text Messaging
41
Messaging Software User Manual
Step
Description
Display the message on the sign by either:
•
Clicking on the Preview this message icon to display the message on the sign.
•
Clicking on Send All which will display the message until it’s deleted
(shown below).
5
Preview this message icon
Click on Send All
42
Advanced Text Messaging
Messaging Software User Manual
Step
Description
This is how the messages will appear on the
one line series signs:
This is how the messages will appear on the
two-line series signs:
THEN
Coming Soon:
THEN
THEN
Improved health
THEN
care plan
THEN
Hello
THEN
Coming Soon:
Improved
THEN
health care plan
THEN
Profit sharing
THEN
meeting
THEN
6
postponed until
THEN
9/20/99
Hello
THEN
Profit sharing
meeting postponed
THEN
THEN
Reminder,
THEN
until 9/20/99
THEN
401k meeting
THEN
on 9/20/99
THEN
Reminder, 401K
meeting on 9/20/99
THEN
Welcome to the
Christmas Party
THEN
1999
THEN
Advanced Text Messaging
43
Messaging Software User Manual
Step
Description
Welcome to the
THEN
Christmas
THEN
This is the
second message
THEN
Party
6
THEN
1999
THEN
This is the
THEN
second message
44
Advanced Text Messaging
Messaging Software User Manual
Example 14- Adding a Header to your message
NOTE: The Header function is available on multi-line signs only.
Check your sign for Header availability.
A Header can be used to title the message.
Step
Description
In this example, we’ll create a message with a Header.
Header
Body
Coming Events:
Improved
THEN
Header
Body
Coming Events:
Charity Fund Raiser
Click on the New message icon.
1
New message icon
Advanced Text Messaging
45
Messaging Software User Manual
Click on the Header/body icon which will take you to the Header set-up screen.
Header/body icon
Header/body set-up screen
2
46
Advanced Text Messaging
Messaging Software User Manual
Using the drop-down arrow, select the “7” high font
3
Drop-down arrow
Select the “7” high font
Using the Shift key on your keyboard when necessary, type Coming events:
4
Advanced Text Messaging
47
Messaging Software User Manual
Click on the Header/body icon to return to the Message screen.
5
Click on the Header/body icon to return to
the Message screen as shown below
Using the Shift key on your keyboard when necessary, type Picnic June 12, 1999
6
48
Advanced Text Messaging
Messaging Software User Manual
Display the message on the sign by either:
•
Clicking on the Preview this message icon to display the message on the sign.
•
Clicking on Send All which will display the message until it’s deleted
(shown below).
7
Preview this message icon
Click on Send All
This is how the message will appear on the two line signs:
8
Advanced Text Messaging
Coming Soon:
Picnic June 12, 1999
49
Messaging Software User Manual
Appendixes
7200C
7160C
7120C
7080C
4240R
4240C
4200R
4200C
4160R
4160C
4120R
4120C
4080C
330C
320C
220C
215R
215C
210C Module
Modes
Big Dot
Appendix A- Special effects or Modes available on a sign
Automode
✓ ✓ ✓ ✓ ✓ ✓ ✓ ✓ ✓ ✓ ✓ ✓ ✓ ✓ ✓ ✓ ✓ ✓ ✓ ✓
Flash
✓ ✓ ✓ ✓ ✓ ✓ ✓ ✓ ✓ ✓ ✓ ✓ ✓ ✓ ✓ ✓ ✓ ✓ ✓ ✓
Hold
✓ ✓ ✓ ✓ ✓ ✓ ✓ ✓ ✓ ✓ ✓ ✓ ✓ ✓ ✓ ✓ ✓ ✓ ✓ ✓
Interlock
✓ ✓ ✓ ✓ ✓ ✓ ✓ ✓ ✓ ✓ ✓ ✓ ✓ ✓ ✓ ✓ ✓ ✓ ✓ ✓
Rotate S
✓ ✓ ✓ ✓ ✓ ✓ ✓ ✓ ✓ ✓ ✓ ✓ ✓ ✓ ✓ ✓ ✓ ✓ ✓ ✓
Rotate C
✓ ✓ ✓ ✓ ✓ ✓ ✓
Roll Up
✓ ✓ ✓ ✓ ✓ ✓ ✓ ✓ ✓ ✓ ✓ ✓ ✓ ✓ ✓ ✓ ✓ ✓ ✓ ✓
Roll Down
✓ ✓ ✓ ✓ ✓ ✓ ✓ ✓ ✓ ✓ ✓ ✓ ✓ ✓ ✓ ✓ ✓ ✓ ✓ ✓
Roll Left
✓ ✓ ✓ ✓ ✓ ✓ ✓ ✓ ✓ ✓ ✓ ✓ ✓ ✓ ✓ ✓ ✓ ✓ ✓ ✓
Roll Right
✓ ✓ ✓ ✓ ✓ ✓ ✓ ✓ ✓ ✓ ✓ ✓ ✓ ✓ ✓ ✓ ✓ ✓ ✓ ✓
Roll In
✓ ✓ ✓ ✓ ✓ ✓ ✓ ✓ ✓ ✓ ✓ ✓ ✓ ✓ ✓ ✓ ✓ ✓ ✓ ✓
Roll Out
✓ ✓ ✓ ✓ ✓ ✓ ✓ ✓ ✓ ✓ ✓ ✓ ✓ ✓ ✓ ✓ ✓ ✓ ✓ ✓
Scroll
✓ ✓ ✓ ✓ ✓ ✓ ✓ ✓ ✓ ✓ ✓ ✓ ✓ ✓ ✓ ✓ ✓ ✓ ✓ ✓
Slide
✓
Snow
✓ ✓ ✓ ✓ ✓ ✓ ✓ ✓ ✓ ✓ ✓ ✓ ✓ ✓ ✓ ✓ ✓ ✓ ✓ ✓
Sparkle
✓ ✓ ✓ ✓ ✓ ✓ ✓ ✓ ✓ ✓ ✓ ✓ ✓ ✓ ✓ ✓ ✓ ✓ ✓ ✓
Spray
✓ ✓ ✓ ✓ ✓ ✓ ✓ ✓ ✓ ✓ ✓ ✓ ✓ ✓ ✓ ✓ ✓ ✓ ✓ ✓
Starburst
✓ ✓ ✓ ✓ ✓ ✓ ✓ ✓ ✓ ✓ ✓ ✓ ✓ ✓ ✓ ✓ ✓ ✓ ✓ ✓
Switch
✓ ✓ ✓ ✓ ✓ ✓ ✓ ✓ ✓ ✓ ✓ ✓ ✓ ✓ ✓ ✓ ✓ ✓ ✓ ✓
Twinkle
✓ ✓ ✓ ✓ ✓ ✓ ✓ ✓ ✓ ✓ ✓ ✓ ✓ ✓ ✓ ✓ ✓ ✓ ✓ ✓
Wipe Up
✓ ✓ ✓ ✓ ✓ ✓ ✓ ✓ ✓ ✓ ✓ ✓ ✓ ✓ ✓ ✓ ✓ ✓ ✓ ✓
Wipe Down
✓ ✓ ✓ ✓ ✓ ✓ ✓ ✓ ✓ ✓ ✓ ✓ ✓ ✓ ✓ ✓ ✓ ✓ ✓ ✓
Wipe Left
✓ ✓ ✓ ✓ ✓ ✓ ✓ ✓ ✓ ✓ ✓ ✓ ✓ ✓ ✓ ✓ ✓ ✓ ✓ ✓
Wipe Right
✓ ✓ ✓ ✓ ✓ ✓ ✓ ✓ ✓ ✓ ✓ ✓ ✓ ✓ ✓ ✓ ✓ ✓ ✓ ✓
Wipe In
✓ ✓ ✓ ✓ ✓ ✓ ✓ ✓ ✓ ✓ ✓ ✓ ✓ ✓ ✓ ✓ ✓ ✓ ✓ ✓
Wipe Out
✓ ✓ ✓ ✓ ✓ ✓ ✓ ✓ ✓ ✓ ✓ ✓ ✓ ✓ ✓ ✓ ✓ ✓ ✓ ✓
50
✓ ✓
✓ ✓ ✓ ✓ ✓ ✓ ✓ ✓ ✓ ✓ ✓ ✓ ✓ ✓ ✓
Appendixes
Messaging Software User Manual
7200C
7160C
7120C
7080C
4240R
4240C
4200R
4200C
4160R
4160C
4120R
4120C
4080C
330C
320C
220C
215R
215C
Fonts
210C Module
Big Dot
Appendix B- Fonts available on signs
5 High font
✓ ✓ ✓ ✓ ✓ ✓ ✓ ✓ ✓ ✓ ✓ ✓ ✓ ✓ ✓ ✓ ✓ ✓ ✓ ✓
7 High font
✓ ✓ ✓ ✓ ✓ ✓ ✓ ✓ ✓ ✓ ✓ ✓ ✓ ✓ ✓ ✓ ✓ ✓ ✓ ✓
Appendix C- Colors available on signs
Red
Light Red
7200C
7160C
7120C
7080C
4240R
4240C
4200R
4200C
4160R
4160C
4120R
4120C
4080C
330C
320C
220C
215R
215C
210C Module
Colors
Big Dot
NOTE: Sign models appearing with the letter “C” after their
name indicates that the sign has color capabilities for the
messages.
Sign models appearing with the letter “R” after their
name indicates that the sign only has the capability of
producing red for the messages.
✓ ✓ ✓ ✓ ✓ ✓ ✓ ✓ ✓ ✓ ✓ ✓ ✓ ✓ ✓ ✓ ✓ ✓ ✓ ✓
✓
✓
✓ ✓
Green
✓ ✓ ✓
Light
Green
✓
Amber
✓ ✓ ✓
Brown
✓
✓
✓ ✓
Orange
✓
✓
✓ ✓
Yellow
✓
✓
✓ ✓
✓
✓ ✓ ✓ ✓ ✓
✓
✓
✓
✓ ✓ ✓ ✓
✓
✓
✓
✓ ✓ ✓ ✓
✓ ✓
✓ ✓ ✓ ✓ ✓
Rainbow 1
✓ ✓ ✓
✓ ✓ ✓ ✓ ✓
✓
✓
✓
✓ ✓ ✓ ✓
Rainbow 2
✓ ✓ ✓
✓ ✓ ✓ ✓ ✓
✓
✓
✓
✓ ✓ ✓ ✓
Mixed
Colors
✓ ✓ ✓
✓ ✓ ✓ ✓ ✓
✓
✓
✓
✓ ✓ ✓ ✓
Autocolor
✓ ✓ ✓
✓ ✓ ✓ ✓ ✓
✓
✓
✓
✓ ✓ ✓ ✓
Appendixes
51
Messaging Software User Manual
Appendix D- Animations available on signs
7200C
Beta Brite 1036
7160C
7120C
7080C
4240C
4240R
4200C
4200R
4160C
4160R
4120C
4120R
330C
4080C
320C
220C
215R
215C
Big Dot
Animations
210C Module
NOTE: Sign models appearing with the letter “C” after their
name indicates that the sign has color capabilities for the
messages.
Sign models appearing with the letter “R” after their
name indicates that the sign only has the capability of
producing red for the messages.
Welcome
✓ ✓ ✓ ✓ ✓ ✓ ✓ ✓ ✓ ✓ ✓ ✓ ✓ ✓ ✓ ✓
✓
Slot
Machine
✓ ✓ ✓ ✓ ✓ ✓ ✓ ✓ ✓ ✓ ✓ ✓ ✓ ✓
✓
✓
Trumpet
✓
✓
No
Smoking
✓ ✓ ✓ ✓ ✓ ✓ ✓ ✓ ✓ ✓ ✓ ✓ ✓ ✓
✓
Don’t Drink
✓ ✓ ✓ ✓ ✓ ✓ ✓ ✓ ✓ ✓ ✓ ✓ ✓ ✓
✓
✓
Fish
Fireworks
✓
✓
✓ ✓ ✓ ✓ ✓ ✓ ✓ ✓ ✓ ✓ ✓ ✓ ✓ ✓ ✓ ✓
✓
Balloons
✓
✓
✓
Cherry
Bomb
✓ ✓ ✓ ✓ ✓ ✓ ✓ ✓ ✓ ✓ ✓ ✓ ✓ ✓ ✓ ✓
✓
Time/Date
✓ ✓ ✓ ✓ ✓ ✓ ✓ ✓ ✓ ✓ ✓ ✓ ✓ ✓ ✓ ✓
✓ ✓ ✓ ✓
Running
Animal
Thank You
✓
52
✓ ✓ ✓ ✓ ✓ ✓ ✓ ✓ ✓
✓ ✓ ✓ ✓ ✓ ✓ ✓ ✓ ✓ ✓ ✓ ✓ ✓ ✓
✓
News Flash
Turbo Car
✓ ✓
✓
✓
✓ ✓
✓
✓
✓ ✓ ✓ ✓ ✓ ✓ ✓ ✓ ✓
Appendixes