1
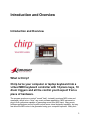
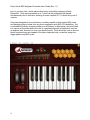
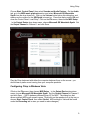
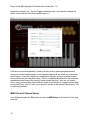
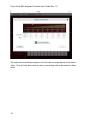
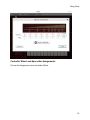
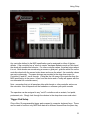
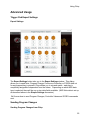
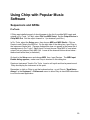
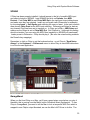
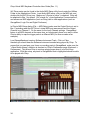
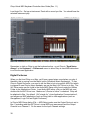
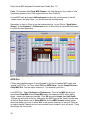
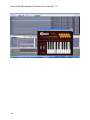
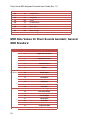
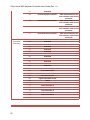
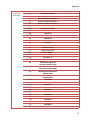
Chirp Virtual MIDI Keyboard Controller
User Guide (Rev 1.1)
Table of Contents
Introduction and Overview ............................................................................................... 3
Introduction and Overview ........................................................................................... 3
Features and Specifications ............................................................................................ 5
Chirp Features ............................................................................................................. 5
Minimum Computer Requirements .............................................................................. 6
Using Chirp ..................................................................................................................... 7
Chirp Installation .......................................................................................................... 7
Installing Chirp ......................................................................................................... 7
Installing Chirp on Windows ..................................................................................... 7
Configuring Chirp in Windows XP ............................................................................ 8
Configuring Chirp in Windows Vista ......................................................................... 9
Installing Chirp on Mac ........................................................................................... 10
Configuring Chirp on the Mac ................................................................................ 10
MIDI Port and Channel Setup ................................................................................ 12
Basic Usage .............................................................................................................. 13
Using Chirp ............................................................................................................ 14
Tooltips .................................................................................................................. 14
Setting Up Chirp Preferences................................................................................. 15
Changing Piano Key Mappings .............................................................................. 15
Velocity Ranges ..................................................................................................... 17
Changing the Default Velocity Key Assignments ................................................... 17
Controller Wheel and Space Bar Assignments ...................................................... 19
Trigger Pad Setup .................................................................................................. 21
Saving or Recalling Your Setups............................................................................ 23
All Notes Off Button................................................................................................ 23
Keyboard Shortcuts................................................................................................ 24
Help Menu .............................................................................................................. 24
Advanced Usage ....................................................................................................... 25
Trigger Pad Expert Settings ................................................................................... 25
Sending Program Changes .................................................................................... 25
Sending Specific Controller Values ........................................................................ 26
Sending SYSEX Messages .................................................................................... 27
Using Chirp with Popular Music Software ..................................................................... 29
Sequencers and DAWs ............................................................................................. 29
ProTools ................................................................................................................. 29
Reason ................................................................................................................... 30
SONAR .................................................................................................................. 33
GarageBand ........................................................................................................... 33
Cubase ................................................................................................................... 35
Ableton Live ........................................................................................................... 36
Logic Pro ................................................................................................................ 37
Digital Performer .................................................................................................... 38
Project 5 V2 ........................................................................................................... 39
ACID Pro ................................................................................................................ 40
iii
Chirp Virtual MIDI Keyboard Controller User Guide (Rev 1.1)
Notation ..................................................................................................................... 41
Sibelius .................................................................................................................. 41
Encore .................................................................................................................... 42
Samplers and Soft Synths ......................................................................................... 43
GigaStudio ............................................................................................................. 43
Applications ................................................................................................................... 45
Ideas for Using Chirp ................................................................................................. 45
Troubleshooting ............................................................................................................ 47
Technical Support for Chirp ....................................................................................... 47
Top Issues FAQ ......................................................................................................... 47
Appendix ....................................................................................................................... 49
MIDI Note Values for Drum Sounds &endash; General MIDI Standard ..................... 49
MIDI Note Values for Drum Sounds &endash; General MIDI Standard ..................... 50
MIDI Note Values for Continuous Controllers - General MIDI Standard .................... 53
MIDI Loopback Drivers .............................................................................................. 58
Trademarks and Notices ............................................................................................ 59
iv
Information in this document is subject to change without notice and does not represent
a commitment on the past of Tanager AudioWorks, Inc. The software described in this
document is furnished under a license agreement. The software may be used or copied
only in accordance with the terms of the agreement. It is against the law to copy this
software on any medium except as specifically allowed in the agreement. No part of
this document may be reproduced or transmitted in any form or by any means,
electronic or mechanical, including photocopying and recording, for any purpose without
the express permission of Tanager AudioWorks, Inc.
Copyright © 2008 Tanager AudioWorks, Inc. All rights reserved.
Chirp Software Copyright © 2008 Tanager AudioWorks, Inc. All rights reserved.
Visit Tanager AudioWorks on the web at www.tanageraudioworks.com.
1
Introduction and Overview
Introduction and Overview
What is Chirp?
Chirp turns your computer or laptop keyboard into a
virtual MIDI keyboard controller with 18 piano keys, 10
drum triggers and all the control you'd expect from a
piece of hardware.
The program produces no actual "sound" itself - instead it produces MIDI notes and
messages, which in turn ”drive” any music software application, MIDI instrument or
plug-in soft synthesizer capable of generating sound from MIDI input. Many music
software applications and soft synths include some virtual keyboard capability, but very
few allow the MIDI notes to be generated using your computer keyboard. Many limit
3
Chirp Virtual MIDI Keyboard Controller User Guide (Rev 1.1)
input to a mouse click, which makes chord entry and real-time playing virtually
impossible. Chirp accommodates up to 7 notes on the keyboard to be played
simultaneously and in real-time, allowing for even complex 9/11/13 chord entry over 2
octaves.
Chirp was designed to be a low latency controller capable of both supply MIDI notes
and displaying played notes from any music application with MIDI I/O capabilities. We
envisioned the primary computer platform as a Windows or Mac laptop, and most likely
in a remote environment where the use of a physical keyboard is impractical, such as
an airplane seat, bus seat (or even your desk at work!) Chirp allows the user to choose
which computer keys are mapped to the piano keyboard keys, as well as assign the
trigger pads to any MIDI event.
4
Features and Specifications
Chirp Features
Ports
•
•
16 Channel Virtual MIDI Input/Output Port (installs via driver on Windows or Mac
and appears in any MIDI music host application)
Piano Keyboard and Trigger Pads assignable to different MIDI Channels
Keyboard
•
•
•
•
•
High resolution photo-realistic display - large and small display sizes available
18 to 21 notes mapped to computer keyboard keys for generating MIDI data with
assignable velocities
18 to 21 on-screen keys to display incoming MIDI note data
Note velocity controlled by graphical slide or preset values assigned to top row
number keys
Graphical octave control allows access to all 127 defined MIDI notes
Controls
•
•
•
•
•
2 programmable continuous controller wheels operated with the mouse or glide
pad - assignable to any continuous controller
Space Bar assignable as on/off pedal (damper/sustain, etc)
10 trigger pads assignable to any MIDI event (on a different channel than the
keyboard keys)
"All Notes Off" Panic button
Ability to send note data even when Chirp is not the focused application
MIDI Data Capable From Continuous Controller Wheels
•
•
Control every MIDI continuous controller defined in the latest MIDI Specification
Pitch bend and Mod wheel set up as default controllers; user can define any
combination
5
Chirp Virtual MIDI Keyboard Controller User Guide (Rev 1.1)
MIDI Data From Trigger Pads
•
•
•
•
•
Note On/Off with assignable velocity
Program Change messages
Specific Controller Values
SYSEX Messages
Default mapping to GM Drums on MIDI Channel 10 for most commonly used
drum sounds
Minimum Computer Requirements
Chirp's computer requirements are driven by the Adobe AIR Framework. Here's what
you'll need:
PC Minimum Requirements
•
•
•
•
•
Intel® Pentium® III 1GHz or faster processor
Windows XP with Service Pack 2; Windows XP Tablet PC Edition; or Windows
Vista® Home Premium, Business, Ultimate, or Enterprise including 64 bit
editions; Microsoft® Windows® 2000 with Service Pack 4; Windows 2003 Server
512MB of RAM
Microsoft .NET 1.1 Framework or later installed (available from Windows Update
website.)
A MIDI Sound Source, or the built-in Microsoft GS Soft Synthesizer
Any Digital Audio Workstation, synthesizer or sampler software capable of
producing sound from incoming MIDI data
Mac Minimum requirements
•
•
•
•
•
6
Intel Core™ Duo 1.83GHz or faster processor; PowerPC® G4 1GHz or faster
processor
Mac OS X 10.4.11 or Mac OS X 10.5.2
512MB of RAM
MIDI Sound Source or built in Quicktime MIDI Synthesizer
Any Digital Audio Workstation, synthesizer or sampler software capable of
producing sound from incoming MIDI data
Using Chirp
Chirp Installation
Installing Chirp
The installation process will install up to 3 items on your computer - a MIDI Driver (on
the PC), the Chirp application itself, and Adobe AIR. (Chirp (like SongFrame and
Chorducopia from Tanager AudioWorks) is written in the new Adobe Integrated Runtime
(AIR) environment. The first beta version of Adobe AIR was released in March 2007 as
a next generation programming environment. Version 1.0 of AIR was released on
February 25th, 2008. Similar to JAVA, it provides support for both PC and Mac. In
addition, it provides the rich user interface experience of Flash combined with the
potential for stand-alone web/desktop applications.)
Chirp appears to your computer just like a hardware MIDI interface. Your music
software application will "see" Chirp when you go to the MIDI setup menu in that
program and look at installed MIDI ports and instruments - "Chirp MIDI In" and "Chirp
MIDI Out" should show up in those menus.
Installing Chirp on Windows
When you install Chirp, you'll need to have an internet connection. The Chirp for
Windows installer file will do several things - it will download the latest version of the
Chirp software, check to see if you have the required Adobe AIR framework installed on
your PC (and if not installs it), and check to see if you have a MIDI Loopback driver
installed on your PC. If not it offers to download one. While any loopback driver will work
fine, including LoopBe1 or the older MIDI Yoke driver, the installer directs you to install
Hurchalla Maple.
Installation Process
Double click on the Chirp Installer zip file (if you received it via EMAIL or Download.)
This will allow you to extract the Chirp_Webinstall_Win.exe installation program. Double
click on that file and the Chirp installation will begin. You will be prompted to agree to
the End User License Agreement, then enter your name, EMAIL address and serial
number. CDROM Installations - If you are installing Chirp from a CD - it will begin
automatically,and then it will check for the latest installer file from our server.
Unfortunately it does this after you enter the info, so when it downloads the new installer
file, you may find yourself having to enter your name and serial again - sorry for the
inconvenience. We wanted your Chirp to be fresh!
7
Chirp Virtual MIDI Keyboard Controller User Guide (Rev 1.1)
Once this is entered, you'll be taken to a screen informing you that Chirp is about to
download the necessary installation files. Click on Continue. The total file size being
downloaded is approximately 37Mb. Click Continue once the files are downloaded.
Next, the installer will check to see if your PC has Adobe AIR installed. If it finds AIR, it
will prompt you that it is already installed - click Close. If it needs to install AIR, it will
direct you to do so - this is a quick installation.
Next, the Installer will tell you that Chirp for Windows requires a MIDI Loopback Driver.
(A loopback driver is a piece of software that directs the MIDI output of one program to
the MIDI input of another.) If you know you already have one installed on your PC, you
can click Finish. If you are not sure or are certain you don't have one installed - click Get
Driver. The installer will take you to get the Hurchalla Maple driver (but if you had a
preference you could install any other one.) Follow the Maple Driver prompts - click
Next and then accept the agreement.
The driver installer requires the 1st reboot of your computer - go ahead and restart. You
may notice that there is a “Chirp Is Finished” screen behind the Maple installation
screen - ignore it. When the computer comes back from the re-start, you will see
another screen telling you that Chirp is finished installing and it requires a re-start. Yes,
sorry - a second re-start is required here. Once the computer comes back from this you are finished. We promise.
You'll know you have everything installed properly if you run Chirp, click on File -> MIDI
Setup and in the 1st drop down menu (Output Device) you see both the Microsoft GS
Wavetable SW Synth and an entry called Chirp MIDI Out. If you select the Microsoft
SW Synth, you should be able to hear piano sounds if you play the labeled computer
keyboard keys. (If not see the next section.) Just a note - setting this to Chirp MIDI Out
directs the MIDI notes to any software application which has its MIDI Input set to “Chirp
MIDI In.” This is the setting you'll use with your DAW or sequencer. Refer to the manual
for more details on setup with popular DAW and music applications.
A Windows side note - for some strange reason, Windows PC's have a slight delay
when you first start playing notes after you load Chirp - it goes away after you play a few
notes. We had a team of scientists look at the issue and the report back was “beats the
hell out of us.” Not to worry. While we're on the topic - a bit about computer keyboards.
Unless you have a fancy gaming keyboard, most computer keyboards are wired in a
row/column switch matrix - there are certain key combinations that may not work
together (hence some chords you won't be able to play.) This is completely dependent
on the computer manufacturer and beyond the scope of what we can help with. As you
launch Chirp, every now and then Adobe AIR will check to see
if there is a newer version when you launch Chirp - and if it finds one it installs it (similar
to the Adobe Flash player.) This is quick and painless.
Configuring Chirp in Windows XP
8
Using Chirp
Choose Start, Control Panel, then select Sounds and Audio Devices. On the Audio
tab, go to the MIDI music playback section and select Microsoft GS Wavetable
Synth from the drop down box. Click on the Volume button below this dialog box and
make sure the volume for the SW Synth is turned up. Close that dialog, select OK and
close the Control Panel. Load Chirp. Click on the File menu, then choose MIDI Setup.
In the Output Device drop-down menu, choose Microsoft GS Wavetable Synth. Set
the Output Channel to Channel 1 and click Save.
Play the Chirp keyboard with either the computer keyboard keys or the mouse - you
should hear a piano sound coming from your computer speakers.
Configuring Chirp in Windows Vista
IClick on the File menu, then choose MIDI Setup. In the Output Device drop-down
menu, choose Microsoft GS Wavetable Synth. Set the Output Channel to Channel 1
and click Save. (VISTA behaves differently than XP for MIDI. The dialog box that
allows a default MIDI synth sound is gone. Right click on the speaker icon in the tray or
choose Start, Control Panel, then select Sound. MIDI settings in Vista will be found
under the Recording tab in case you need to make changes.)
9
Chirp Virtual MIDI Keyboard Controller User Guide (Rev 1.1)
Play the Chirp keyboard with either the computer keyboard keys or the mouse - you
should hear a piano sound coming from your computer speakers.
Installing Chirp on Mac
When you install Chirp, you'll need to have an internet connection. The Chirp for Mac
installer file will do two things - it will download the
latest version of the Chirp software, and also download the Adobe AIR framework on
which Chirp relies.
Installation Process
Double click on the Chirp Installer zip file (if you received it via EMAIL or Download.)
This will allow you to extract the Chirp_Webinstall_Mac.exe installation program.
Double click on that file and the Chirp installation will begin. You will be prompted to
agree to the End User License Agreement.
CDROM Installations - If you are installing Chirp from a CD - it will tell you that it's going
to copy the installation file from the CD to the hard disk (since the installer needs to
write information and it can't do that to a CD.) Do this and double click the
Chirp_Webinstall_Mac file.
Next, it will check for the latest installer file from our server. You'll need to first agree to
the license agreement before it checks, and after it downloads the new installer file, you
may find yourself having to agree again - sorry for the inconvenience. We wanted your
Chirp to be fresh!
The installer will now download the necessary installation files. The total file size being
downloaded is approximately 37Mb. Next, you'll be prompted to enter your serial
number. Once this is done, it will begin installing files. The installer will now take you to
the Adobe AIR web site - click Download Now and install this file; Chirp requires this on
your Mac. Fear not - this is a quick installation! You'll be taken to a Finish Up screen click Quit at this point; your Chirp is installed. No re-start is necessary.
Configuring Chirp on the Mac
Chirp Mac should work from the Mac keyboard once its loaded. The Mac automatically
connects Chirp to the built-in Quicktime MIDI Synth. Press the keyboard keys and you'll
hear a piano sound - press the drum trigger pad keys (z,x,c,v, etc) and you'll hear
drums. Simple as that.
10
Using Chirp
To route the MIDI data to your favorite DAW or sequencer program, Chirp utilizes the
Mac's IAC Driver found under the Audio-MIDI Setup Utility. Be sure to open this utility,
double click the IAC Driver icon and check the box saying Device is Online. Chirp will
show up as “Bus 1” in your music software applications.
One more thing – under Universal Access in the System Preferences menu on your
Mac, be sure to check the box at the bottom of the dialog that says Enable access for
assistive devices. This option is required in order for the Send Notes Always
capability in Chirp to operate properly.
In Chirp, select the File menu and choose MIDI Setup at the bottom of the list. Make
sure to set the Output Device to match the IAC Driver's Port (Bus 1 in this case.) Set
the output channel to Channel 1 (or whatever channel you would like the Chirp
11
Chirp Virtual MIDI Keyboard Controller User Guide (Rev 1.1)
keyboard to transmit on.) Set the Trigger channel as well - the default is channel 10
(which is the channel most drum synths listen on.)
A bit about computer keyboards. Unless you have a fancy gaming keyboard where
every key is wired independently, most computer keyboards are wired in a row/column
switch matrix - there are certain key combinations that may not work together (hence
some chords you won't be able to play.) This is completely dependent on the keyboard
manufacturer and beyond the scope of what we can help with. Also, as you launch
Chirp, every now and then Adobe AIR will check to see if there is a newer version when
you launch Chirp - and if it finds one it installs it (similar to the Adobe Flash player.) This
is quick and painless.
MIDI Port and Channel Setup
Load Chirp and select the File menu and choose MIDI Setup at the bottom of the drop
down list.
12
Using Chirp
Any MIDI device installed on your computer should show up in these menus. Use the
Output Device drop-down menu to select the MIDI port that Chirp should send its MIDI
keyboard data to, and use the Output Channel menu to select the MIDI channel Chirp
will transmit on. If you just plan on using Chirp to make sounds without a host music
application - keep the Output Device set to your internal synth sound. To use Chirp to
send MIDI data to a host digital audio workstation application set the Output Device to
Chirp MIDI Out. You can designate a specific channel for Chirp to transmit its data on,
or leave the Output Channel un-selected. In your DAW application, choose Chirp
MIDI In as the Input Device. Most DAWs will allow you to select "MIDI Omni" or "All" to
listen for data on any channel - you can choose this or select a specific channel
matching your setting in Chirp's Output Channel setting.
Input Device and Input Channel should be set up if you wish to see MIDI note data
from another MIDI application or port to be displayed on the Chirp keyboard display. In
your host application, set the output port to Chirp MIDI Out and choose a channel. For
more DAW or synth-specific set up and usage information, see the Using Chirp With
Popular Music Software section.
Basic Usage
13
Chirp Virtual MIDI Keyboard Controller User Guide (Rev 1.1)
Using Chirp
Once configured properly, Chirp is simple to use. The various keys and controls are
mapped by default to the following computer keyboard keys (irrelevant of case):
Key
#
Note
Computer Keyboard
Mapped Key
1
2
3
4
5
6
7
8
9
10
11
12
13
14
15
16
17
18
19
20
21
F
F#/Gb
G
G#/Ab
A
A#/Bb
B
C
C#/Db
D
D#/Eb
E
F
F#/Gb
G
G#/Ab
A
A#/Bb
B
C
C#/Db
A
W
S
E
D
R
F
G
Y
H
U
J
K
O
L
P
;
[
.
]
\
Keys 19,20 and 21 are considered "extended" since they are not physically aligned to
the piano keyboard as the other key mappings are. They can be enabled in the
Keyboard -> Preferences menu. (Entering more complex chords in the key of C may
require these to be on.)
The Keyboard Menu also allows the user to remove the computer key labels from the
Chirp graphical interface. This may be desirable if the MIDI In mode is being used to
watch a piano being played by externally supplied MIDI data (where the computer key
maps are irrelevant.) Choose Hide Labels to remove the labels.
To quit Chirp, simply click on the "X" in the upper right in Windows or the upper left on
the Mac. You can also choose Quit in the Keyboard menu.
Tooltips
14
Using Chirp
Chirp lets the user know what specific MIDI notes or controller values are mapped to the
keyboard at any time. Hover your mouse over any control or key and wait a moment Chirp will display that note number, note value or controller value as a Tooltip. This is
an ideal way to determine exactly which MIDI note numbers are being sent to an
external synth or sound module.
Setting Up Chirp Preferences
Chirp allows the user to specify the default octave, number of active keys (18,19,20 or
21) and the default display size of the application. Return to the Factory Settings at any
time by hitting Restore Defaults. The default octave is mapped so the 1st C note
(mapped to the computer's G key by default) is Middle C (MIDI Note 60.)
The Stay on Top checkbox forced Chirp to always be displayed even when it is not the
focused application. The "Send Notes Always checkbox will allow the Chirp keyboard
keys to work even when Chirp is not the focused application. Be certain that your
focused application (your sequencer, DAW or whatever) doesn't also use those
keyboard keys as shortcuts. If they do, try re-mapping the Chirp keys in the Assignment
-> Key dialog box.
Changing Piano Key Mappings
15
Chirp Virtual MIDI Keyboard Controller User Guide (Rev 1.1)
If you are unhappy with the default computer keyboard mappings, Chirp allows you to
define your own and save your settings away. Your definitions need to conform to a
rules:
•
•
Key mappings must be a single key - no key combinations are allowed (i.e
Ctrl+M.)
Keys are mapped next to each other, and valid key sets are:
• F1 through F12
• `,1,2,3,4,5,6,7,8,9,0,-,=
• Q,w,e,r,t,y,u,i,o,p,[,],\
• A,s,d,f,g,h,j,k,l,;,’
• Z,x,c,v,b,n,m,,,.,/
Select Assignments and choose Key to change key mappings.
You can always return to the Factory Settings by choosing restore Defaults - this is the
case with all assignable parameters in Chirp. Chirp will force you to enter mappings per
the list above - click on the 1st box (with "A" in it) and enter the letter "Q" - the rest of the
keys will automatically fill in with the valid key set.
16
Using Chirp
Velocity Ranges
The Velocity slider controls the velocity of a MIDI note - this represents how hard or fast
the note was played on a real piano keyboard. Higher values sound like they were
struck harder, and lower values represent gently pushing the key down. Since the PC
keyboard is not capable of representing real key velocity and pressure like a MIDI
keyboard controller can, we have to "tell" the host application how hard the notes should
have been struck. You can grab the slider with your mouse and set the velocity where
you'd like it - or just hit a number key on your computer and the velocity will jump to a
preset. These presets are user definable - look in the Assignment menu and select
Velocity to make these whatever you want.
Velocity
Range
1 - 15
16 - 30
31 - 45
46 - 60
61 - 75
76 - 90
91 - 105
102 127
Default
Key
1
2
3
4
5
6
7
8
Terminology and Loudness
Extremely soft
Pianissimo (Very Soft)
Piano (Soft)
Mezzo Piano (Moderately soft)
Mezzo Forte (Moderate)
Forte (Loud)
Fortissimo (Very Loud)
Extremely Loud
Keep in mind that some MIDI modules and synthesizers produce different timbres when
notes vary in velocity - make sure to play with striking a note at a variety of velocity
values on the synth you are using to see if this is the case.
Changing the Default Velocity Key Assignments
Chirp ships with the computer's top row number keys pre-assigned to specific velocity
settings. To create your own velocity mappings, simple select the Assignments menu
and choose Velocity from the drop down list. The Velocity Assignment dialog will
open up. Enter any velocity level you wish for each number key. Note - if you wish to
use other keys instead of the number keys, enter that key in the Map field. Chirp allows
any unmapped key to be used. Previously mapped keys cannot be used.
17
Chirp Virtual MIDI Keyboard Controller User Guide (Rev 1.1)
The scale will automatically change to show the new key mappings as shown below.
Note - Chirp will only allow velocity values in ascending order to be entered in these
fields.
18
Using Chirp
Controller Wheel and Space Bar Assignments
Choose the Assignment menu and select Wheel.
19
Chirp Virtual MIDI Keyboard Controller User Guide (Rev 1.1)
20
Using Chirp
Any controller defined in the MIDI specification can be assigned to either of the two
wheels. If the controller has a "return to center" hardware behavior such as Pitch bend,
the wheel will emulate this behavior. For other controller values, the wheel stays where
it is set. Both wheels are moved using a mouse or glide pad - grab the white line on the
controller wheel with the mouse button down and move the wheel - the controller values
are sent continuously. The same choices are provided in the drop down menu for
Controller #1 and #2 - scroll through. (Chirp has the full name of the controller from the
MIDI specification in the menu - hover over the choice and a Tooltip will appear with the
non-truncated full controller name.)
Note - remember that not all samplers allow pitch bends or other controller actions on
the note data - this all depends on the hardware or software synth patch sounds.
The spacebar can be assigned to any "on/off" controller such as sustain, foot pedal,
portamento, etc. Simply look through the choices in the drop-down menu and select.
Trigger Pad Setup
Chirp offers 10 programmable trigger pads mapped to computer keyboard keys. These
can be used to send not only MIDI Note data on a different channel than the piano key
21
Chirp Virtual MIDI Keyboard Controller User Guide (Rev 1.1)
mappings (ideal from drum triggers) but any specific MIDI event. These include Note
data, Program Changes, specific Continuous Controller values, or even manufacturerspecific System Exclusive (SYSEX) MIDI data.
There are two setup views - Simple Settings and Expert Settings. Simple Settings
allows the user to map computer keyboard keys to specific Note data. For each trigger
pad, there are two data fields the user can manipulate - Note and Velocity. Refer to
your MIDI Hardware of Soft Synthesizer manual for more details on what values to use.
If you are mapping to drum sounds, we included a table which may help you determine
what sounds map to which MIDI Note values. The default trigger mappings are all set
to a Velocity of 90 and the following drum sounds:
Key
Z
X
C
V
B
N
M
22
Drum Sound
Kick
Snare
Side Stick
Closed Hi-Hat
Open Hi-Hat
High Tom
Mid Tom
Using Chirp
Comma Floor Tom
Period Ride Cymbal
Crash Cymbal
/
As long as you are transmitting the Triggers on the appropriate MIDI Channel for your
Drum Synth or external module (usually Channel 10) you should be able to get up and
running quickly with these key mappings.
Saving or Recalling Your Setups
Chirp has the capability to save the complete setup of the controller in a file - including
the key mappings, trigger pad mappings, controller wheel mappings and the MIDI port
setup. This is extremely convenient since the setup of Chirp will change often
depending on the host sequencing or synthesizer software (or hardware) used.
To save your setup, select the File Menu and select Save. Use the Open selection to
set up Chirp from a previously saved file. Each setup or assignment menu offers a
Restore Defaults choice which brings Chirp back to the factory default setup.
All Notes Off Button
23
Chirp Virtual MIDI Keyboard Controller User Guide (Rev 1.1)
Occasionally MIDI notes get "stuck" through a variety of circumstances. The Chirp
display will show one or more keys in a depressed state when this occurs. To reset all
notes, hit the panic button (exclamation point) icon in the upper right of the Chirp
display. All notes will return to the OFF state.
Keyboard Shortcuts
Chirp has several useful keyboard shortcuts programmed in. These are:
Shortcut
CTRL N
CTRL O
CTRL W
CTRL S
CTRL Q
CRTL L
CTRL M
CTRL-SHIFT
K
CTRL-SHIFT
T
CTRL SHIFT
V
CTRL-SHIFT
W
CTRL H
Command
New
Open
Close
Save
Quit
Toggle
Labels On/Off
MIDI Setup
Key
Assignment
Triggers
Assignment
Velocity
Assignment
Wheel
Assignment
Help
(On the Mac, use the Apple/Command key in place of CTRL.)
Help Menu
The Help Menu allows the Help system to be loaded by selecting Chirp Help.
The Community selection takes you to the Tanager AudioWorks Forum on the web.
This is an open forum discussing Tanager products as well as recording and
songwriting topics.
The Support selection takes you to the Support page on the Tanager AudioWorks
website where Technical Support information can be found.
24
Using Chirp
Advanced Usage
Trigger Pad Expert Settings
Expert Settings
The Expert Settings button take you to the Expert Settings window. This dialog
allows you to send Note, Program Change, Continuous Controller or SYSEX data out
for any mapped key is pressed. Chirp allows you to mix and match - each key is
completely assignable independent from the others. Depending on which MIDI data
type is selected, there will be one or two data fields available. (MIDI Note data is set up
as described above in the Simple Settings discussion.)
We'll cover how to send Program Changes, Controller Values and SYSEX commands
next.
Sending Program Changes
Sending Program Changes from Chirp
25
Chirp Virtual MIDI Keyboard Controller User Guide (Rev 1.1)
Select the Pgm choice in the pull down menu. One data field appears for assignment to
a specific Program Change Message. Your synthesizer or external sound module
manual should contain a table of Program Change numbers and specific sounds or
patches for these choices. Consult this table for General MIDI program change
definitions if the synth you are using is mapped to GM standards (such as the "Microsoft
GS Wavetable SW Synth" supplied with most Windows computers.)
Program Change Overview
Program Change and Bank Change messages allows a user to change the sound or
"patch" of a synthesizer or sound module. The General MIDI (or GM) specification
defined 128 unique sounds - these are shown in the table in the Appendix for reference.
"Banks" were created allowing unique collections of Programs - the idea being each
Bank could hold up to 128 different patches. Most modern synthesizers or sound
modules contain many Banks, each containing 128 unique sounds. The programs
within these banks most often will NOT relate at all to the GM Patch list. The
organization of these Banks are manufacturer-specific; some synths group Banks by
sound type (piano, guitars, drums etc) and some merely use them as a collection of
sounds. Banks are often named "A", "B", "C", "GM", etc; while the naming of Patches
has apparently become a creative endeavor, deviating far from a description of the
actual sound. Some synths will have patch names such as "Clean Strat" - far more
descriptive than names like "Ice Cream Sunshine" which you will find all too often. You
will need to have the patch and bank listing for your particular synthesizer handy to
utilize the Program Change messages from Chirp. Chirp will only transmit the MIDI
Program number and not the patch names.
For most soft synths, Bank change messages will not be necessary; the Program
Change messages programmed into the Chirp Trigger Pads will allow fast changes to
instrument sounds.
Sending Specific Controller Values
As in sending Program Changes, select the Assignment menu and choose Trigger
from the drop down menu. Make sure to click the Expert Settings button to enter
Expert Settings mode. For any trigger pad, click the box with the drop-down menu and
select Control. The two data boxes can now be used to send a specific Controller
Value. The top box is used for the Controller Value (see the table in the Appendix for a
quick reference), and the lower box is used to hold the specific value you'd like to send.
Use the controller wheels for controllers "continuous" in nature such as Pitch bend or
Modulation. Use these for On/Off controllers (#64 - 68 for example) or ones that require
a specific value to be sent (such as Effects Depth, Chorus Depth, etc.)
26
Using Chirp
RPN/NRPN Messages
The MIDI Specification defines two commands used by manufacturers to send device
specific controller information. These are the:
•
•
RPN - Registered Parameter Number (Common controllers "registered" with the
MIDI Manufacturer's Association and included in the MIDI Spec)
NRPN - Non-Registered parameter Numbers (manufacturer-specific controller
messages.)
Consult the user manual of the specific synthesizer or MIDI device for RPN or NRPN
values and their associated function.
Sending SYSEX Messages
SYSEX (or System Exclusive) MIDI Messages allow any manufacturer to create their
own custom commands to control some aspect of a MIDI device. Unlike RPN and
NRPN controller commands which conform to a specific message format, SYSEX
messages can be whatever the manufacturer defined them to be.
SYSEX messages are sent in Hex format. Every SYSEX message starts with a Hex F0
and ends with an F7 (End SYSEX) byte. After the F0 byte, the message contains a
Manufacturer's ID byte - these values are defined by the MIDI Manufacturers
Association (MMA) and can be found in the General MIDI specifications. Most
synthesizer or external hardware devices that allow a user to send SYSEX messages
usually have a "parameter assignment table" or other reference tool detailing the format
of available SYSEX commands.
SYSEX is sent by assigning a Trigger Pad a particular SYSEX message. Select the
Assignment menu and select Trigger. Click on Expert Settings. Instead of just Note
values and velocity assignments shown in the Simple Settings dialog, you can now
choose a command type to send. Pick a trigger pad to program and click on the drop
down menu and choose SYSEX. One data field will be shown - you will type the
SYSEX command here. Chirp takes care of the F0 and F7 bytes for you, so your
SYSEX message will almost always begin with the Manufacturer's ID. Refer to your
device manual for more help.
We'll provide an example here, but remember SYSEX message format and content is
manufacturer specific. We made sure to set the Chirp MIDI Out (Keyboard - >
Preferences) to the port and channel our XV-88 was on. Then, we programmed a
trigger pad in Chirp to send a SYSEX command to our Roland XV-88 Synthesizer
27
Chirp Virtual MIDI Keyboard Controller User Guide (Rev 1.1)
setting the CHORUS TYPE of PERFORMANCE COMMON to DELAY (DT1.) The XV88 manual provided the command structure in Hex values as follows:
F0 - Exclusive Status (Start SYSEX)
41 - Roland ID
10 - Device ID (17)
00 10 - Model ID (XV-88)
12 - Command ID (DT1)
10 00 04 00 - Address
02 - Data
6A - Checksum
F7 - End SYSEX
Since Chirp takes care of the 1st and last bytes, we type into the Chirp SYSEX data
field (with no spaces) 4110001012100004026A and hit Save. When that trigger pad is
now clicked, that command is sent to the Roland XV-88.
28
Using Chirp with Popular Music
Software
Sequencers and DAWs
ProTools
If Chirp was installed properly it should appear in the list of possible MIDI inputs and
outputs in Pro Tools. In Chirp, select File then MIDI Setup. Set the Output Device to
Chirp MIDI Out. Set the output channel to 1 (or whatever you'd like.)
In Pro Tools, select the Setup menu, then choose MIDI and MIDI Studio. Click on
Create to add Chirp to the MIDI list. On the right side of the dialog box, type Chirp in
the Instrument Name field. (Tanager Audioworks does not appear in the preset list of
manufacturers in Pro Tools.) Select Input Port and choose Chirp MIDI In, and select
output Port and choose Chirp MIDI Out. Leave all the channel buttons alone below these should all be blue (or selected.)
Go back to the Setup menu and choose MIDI then Input Devices. The MIDI Input
Enable dialog appears; make sure Chirp is checked in this dialog box.
Create an Instrument Track in Pro Tools. Insert a soft synth and load a preset sound.
Chirp should play the instrument at this point.
Remember to click on Chirp to get the keyboard active - or set Chirp to "Send Notes
Always" in the Keyboard -> Preferences menu to allow Chirp to send MIDI data when
is not the focused application.
29
Chirp Virtual MIDI Keyboard Controller User Guide (Rev 1.1)
Reason
If Chirp was installed properly it should appear in the list of possible MIDI inputs and
outputs in Reason. In Chirp, select File then MIDI Setup. Set the Output Device to
Chirp MIDI Out. Set the output channel to 1 (or whatever you'd like.)
To use Chirp with Reason you'll first need to ensure that Reason is set to "see" Chirp.
Load Reason and select Edit then Preferences (Reason -> Preferences on the Mac.)
Select Keyboards and Control Surfaces from the drop-down menu at the top of the
page. Select Add and choose <Other> in the Manufacturer drop-down menu. In the
Model dialog, select MIDI Control Keyboard. In the Name field, you can type "Chirp."
Chirp MIDI In should be a choice in the MIDI Input drop-down menu. Select it and hit
OK. You can now "X" out of the Preferences dialog box. Make sure an instrument
sound is loaded in Reason. Click on Chirp and play it - you should hear that instrument
sound. Every time you click on a different track in the Reason Sequencer, you should
hear that sound play using Chirp.
A note on programming the Chirp Trigger Pads with Reason's Redrum Drum machine.
ReDrum assigns MIDI note numbers to each of its 10 Modules (or drum sounds on
each vertical control section.) The first module (usually loaded with a bass drum) is MIDI
note number 36. Each subsequent module to the right increments by one (37,38,39,
etc.) Set up the trigger pads in Chirp so that the left most pad is MIDI Note 36, and
continue mapping all pads to match the drum modules in Reason.
30
Using Chirp with Popular Music Software
Remember to click on Chirp to get the keyboard active - or set Chirp to "Send Notes
Always" in the Keyboard -> Preferences menu to allow Chirp to send MIDI data when
is not the focused application.
31
Chirp Virtual MIDI Keyboard Controller User Guide (Rev 1.1)
32
Using Chirp with Popular Music Software
SONAR
If Chirp has been properly installed, it should appear in the list of possible MIDI input
and output choices in SONAR. Load SONAR and click on Options, then MIDI
Devices. Find Chirp MIDI In and Chirp MIDI Out in the input and output dialog boxes
and make sure they are selected. Insert any soft synth track (Dimension for example)
by choosing Insert -> Soft Synths and selecting the one you want. In the track controls
area choose Chirp Omni as the MIDI input selection. Dimension will listen for data on
any channel Chirp has been set to transmit on. In Chirp, go to File -> MIDI Setup and
make sure the Output is set to Chirp MIDI Out. Set Channel to 1 (although this setting
should not matter if you are using the MIDI Omni capability in SONAR just mentioned.)
Load a preset in Dimension - Chirp should play it. (Be sure the octave setting matches
the Preset's key mappings.)
Remember to click on Chirp to get the keyboard active - or set Chirp to "Send Notes
Always" in the Keyboard -> Preferences menu to allow Chirp to send MIDI data when
is not the focused application.
GarageBand
When you first load Chirp on a Mac, you’ll hear a grand piano sound when you play it
&endash; this is coming from the Mac’s built-in Quicktime Music Synthesizer. To use
Chirp in GarageBand, you need to tell the Mac to look at a specific MIDI Port which is
mapped to see Chirp’s output &endash; we use the Mac’s IAC Driver to do this. The
33
Chirp Virtual MIDI Keyboard Controller User Guide (Rev 1.1)
IAC Driver setup can be found in the Audio-MIDI Setup utility found under the Utilities
Folder in the Applications Folder. Load Audio-MIDI setup, click on the MIDI tab, and
double click the IAC Driver icon. Make sure ”r;Device is online” is checked. Chirp will
be attached to Bus 1 by default. (IAC stands for ”r;Inter-Application Communications”,
and allows one MIDI application (such as Chirp) talk to other applications (such as
GarageBand, Logic Pro and Digital Performer.)
In Chirp’s MIDI Setup dialog (File -> MIDI Setup) make sure the Output Device is set to
Bus 1 (matching what the IAC Driver’s virtual MIDI port was named) and the Output
Channel is on Channel 1. Do the same for the Input Channel settings. GarageBand
listens to all MIDI channels at the same time, so unfortunately there is no way to utilize
Chirp’s ability to map the trigger pads to a different MIDI (for drum sounds as an
example.)
Load GarageBand and create a Software Instrument Track. Click on Chirp
&endash;you should hear the Software Instrument sounds being played by Chirp. To
ensure that you can keep your focus on recording parts in GarageBand, make sure the
”r;Send Notes Always” selection is checked on Chirp’s Preferences page (Keyboard ->
Preferences.) This allows Chirp to continue playing even when it is not the focus
application. With this setup, any track in GarageBand that is highlighted should be able
to be played with Chirp.
34
Using Chirp with Popular Music Software
Remember to click on Chirp to get the keyboard active - or set Chirp to "Send Notes
Always" in the Keyboard -> Preferences menu to allow Chirp to send MIDI data when
is not the focused application.
Cubase
If Chirp was installed properly it should appear in the list of possible MIDI inputs and
outputs in Cubase. In Chirp, select File then MIDI Setup. Set the Output Device to
Chirp MIDI Out. Set the output channel to 1 (or whatever you'd like.)
Load Cubase and select the Devices menu. Click on Device Setup at the bottom of
the list. Click on MIDI Port Setup located under the MIDI folder on the top left. Chirp
MIDI In should appear as a MIDI Input port (in yellow) and Chirp MIDI Out should show
up further down the list as a MIDI output (in blue.) Create an Instrument Track, and in
the track controls panel to the left load a soft synth or other sound source onto that
track. Choose Chirp MIDI In as the MIDI source. Chirp should play the sound loaded
on that track.
Remember to click on Chirp to get the keyboard active - or set Chirp to "Send Notes
Always" in the Keyboard -> Preferences menu to allow Chirp to send MIDI data when
is not the focused application.
One more thing about Cubase 4 - you may experience an issue where you think you
have everything set up properly, but when you try recording all the notes end up
bunched up at the beginning of the MIDI Track. To fix this, you need to go to the
Devices -> Device Setup menu; at the bottom of the list of MIDI input and output ports,
you'll need to check the box that says " Use System Timestamp for Windows MIDI
Inputs" as shown below. Steinberg places this menu item there to overcome some
issues with the DirectSound drivers associated with MIDI in Windows. This link
http://knowledgebase.steinberg.de/95_1.html can tell you more.
35
Chirp Virtual MIDI Keyboard Controller User Guide (Rev 1.1)
Ableton Live
If Chirp was installed properly it should appear in the list of possible MIDI inputs and
outputs in Ableton Live. In Chirp, select File then MIDI Setup. Set the Output Device
to Chirp MIDI Out. Set the output channel to 1 (or whatever you'd like.)
Load Ableton Live. In the Options menu, select Preferences at the bottom of the list.
Select the MIDI/Sync tab. If Chirp is properly installed, it will show up in the MIDI Ports
section of the dialog box. Chirp MIDI In should be selected and "on" for one of the
inputs, and Chirp MIDI Out should be shown as an output choice further down the list.
Turn this On only if you want to see MIDI note data shown graphically on the Chirp
keyboard as it plays.
In an empty MIDI track, drag in a plug-in instrument, load a patch, and arm the track for
recording with the button at the bottom. You should hear the sound as you play Chirp.
36
Using Chirp with Popular Music Software
Remember to click on Chirp to get the keyboard active - or set Chirp to "Send Notes
Always" in the Keyboard -> Preferences menu to allow Chirp to send MIDI data when
is not the focused application.
Logic Pro
When you first load Chirp on a Mac, you’ll hear a grand piano sound when you play it
&endash; this is coming from the Mac’s built-in Quicktime Music Synthesizer. To use
Chirp in Logic Pro, you need to tell the Mac to look at a specific MIDI Port which is
mapped to see Chirp’s output &endash; we use the Mac’s IAC Driver to do this. The
IAC Driver setup can be found in the Audio-MIDI Setup utility found under the Utilities
Folder in the Applications Folder. Load Audio-MIDI setup, click on the MIDI tab, and
double click the IAC Driver icon. Make sure ”r;Device is online” is checked. Chirp will
be attached to Bus 1 by default. (IAC stands for ”r;Inter-Application Communications”,
and allows one MIDI application (such as Chirp) talk to other applications (such as
GarageBand, Logic Pro and Digital Performer.)
In Chirp’s MIDI Setup dialog (File -> MIDI Setup) make sure the Output Device is set to
Bus 1 (matching what the IAC Driver’s virtual MIDI port was named) and the Output
Channel is on Channel 1. Do the same for the Input Channel settings.
37
Chirp Virtual MIDI Keyboard Controller User Guide (Rev 1.1)
Load Logic Pro. Set up an Instrument Track with a sound you like. You should hear the
selected instrument play.
Remember to click on Chirp to get the keyboard active - or set Chirp to "Send Notes
Always" in the Keyboard -> Preferences menu to allow Chirp to send MIDI data when
is not the focused application.
Digital Performer
When you first load Chirp on a Mac, you’ll hear a grand piano sound when you play it
&endash; this is coming from the Mac’s built-in Quicktime Music Synthesizer. To use
Chirp in Digital Performer, you need to tell the Mac to look at a specific MIDI Port which
is mapped to see Chirp’s output &endash; we use the Mac’s IAC Driver to do this. The
IAC Driver setup can be found in the Audio-MIDI Setup utility found under the Utilities
Folder in the Applications Folder. Load Audio-MIDI setup, click on the MIDI tab, and
double click the IAC Driver icon. Make sure ”r;Device is online” is checked. Chirp will
be attached to Bus 1 by default. (IAC stands for ”r;Inter-Application Communications”,
and allows one MIDI application (such as Chirp) talk to other applications (such as
GarageBand, Logic Pro and Digital Performer.)
In Chirp’s MIDI Setup dialog (File -> MIDI Setup) make sure the Output Device is set to
Bus 1 (matching what the IAC Driver’s virtual MIDI port was named) and the Output
Channel is on Channel 1. Do the same for the Input Channel settings.
38
Using Chirp with Popular Music Software
Load Digital Performer. The IAC Driver should be shown in Digital Performer as a MIDI
input. Create a MIDI Track and an Instrument Track. Load any of the supplied soft
synths on the Instrument track and make sure the output is set for the appropriate audio
device. On the MIDI Track, set the output to the name of the soft synth you just loaded.
If the Multi Record mode is off (unchecked and found in the Studio Menu) then DP will
listen on all MIDI channels for track input &endash; Chirp should play the soft synth
sound at this point.
Remember to click on Chirp to get the keyboard active - or set Chirp to "Send Notes
Always" in the Keyboard -> Preferences menu to allow Chirp to send MIDI data when
is not the focused application.
Project 5 V2
If Chirp was installed properly it should appear in the list of possible MIDI inputs and
outputs in Project 5. In Chirp, select File then MIDI Setup. Set the Output Device to
Chirp MIDI Out. Set the output channel to 1 (or whatever you'd like.)
Load Project 5. Go to the Options menu, and select MIDI Devices at the top of the list.
If Chirp installed correctly, Chirp MIDI In should be listed as an Available MIDI Input
Device in the 1st box. Click on the small right arrow to add it to the Active MIDI Input
39
Chirp Virtual MIDI Keyboard Controller User Guide (Rev 1.1)
Ports. Do the same with Chirp MIDI Output in the 2nd dialog box if you wish to "see"
notes being played on the Chirp keyboard driven from Project 5.
Load a MIDI track and select Add Instrument on the track controls pane to the left.
Load a sound, and play Chirp - you should hear that sound playing.
Remember to click on Chirp to get the keyboard active - or set Chirp to "Send Notes
Always" in the Keyboard -> Preferences menu to allow Chirp to send MIDI data when
is not the focused application.
ACID Pro
If Chirp was installed properly it should appear in the list of possible MIDI inputs and
outputs in ACID Pro. In Chirp, select File then MIDI Setup. Set the Output Device to
Chirp MIDI Out. Set the output channel to 1 (or whatever you'd like.)
Load ACID Pro. Select Options then Preferences. Click on the MIDI tab and you
should see Chirp MIDI In and Chirp MIDI out in the respective MIDI In/Out dialog
boxes - make sure these are checked. Click OK and select Insert then Soft Synth.
Choose any soft synth in the list. Make sure the MIDI Input in the Track Controls area
of the Soft Synth track is set to Chirp MIDI In, and the MIDI Channel setting further
down that dialog box is set to either ALL or the specific channel you set up in Chirp as
an output channel Make sure you have a preset sound loaded in your soft synth. Chirp
should play the sound now.
40
Using Chirp with Popular Music Software
Remember to click on Chirp to get the keyboard active - or set Chirp to "Send Notes
Always" in the Keyboard -> Preferences menu to allow Chirp to send MIDI data when
is not the focused application.
Notation
Sibelius
If Chirp was installed properly it should appear in the list of possible MIDI inputs and
outputs in Sibelius. In Chirp, select File then MIDI Setup. Set the Output Device to
Chirp MIDI Out. Set the output channel to 1 (or whatever you'd like.)
Load Sibelius. Click on File, then select Preferences. Select Input Devices - if Chirp
installed properly then Chirp MIDI In should be listed as a possible input device. Check
the box in front of it and then click OK. Chirp should produce note data when played.
Remember to click on Chirp to get the keyboard active - or set Chirp to "Send Notes
Always" in the Keyboard -> Preferences menu to allow Chirp to send MIDI data when
is not the focused application.
41
Chirp Virtual MIDI Keyboard Controller User Guide (Rev 1.1)
Encore
If Chirp was installed properly it should appear in the list of possible MIDI inputs and
outputs in Encore. In Chirp, select File then MIDI Setup. Set the Output Device to
Chirp MIDI Out. Set the output channel to 1 (or whatever you'd like.)
Load Encore. Go to the Setup menu, and select MIDI Setup. You will see MIDI Out
and MIDI In setup dialogs there - if Chirp was installed properly it should show up in
both drop-down menus. Select Chirp MIDI In in the MIDI In setup section. Select
Chirp MIDI Out if you wish to see note data played by Encore on the Chirp.
42
Using Chirp with Popular Music Software
Samplers and Soft Synths
GigaStudio
If Chirp was installed properly it should appear in the list of possible MIDI inputs and
outputs in GigaStudio. In Chirp, select File then MIDI Setup. Set the Output Device to
Chirp MIDI Out. Set the output channel to 2 (we noticed on out setup that the Chirp
MIDI output channel was linked to the Instruments in the MIDI Mixer offset by -1. So the first Instrument track set up in Giga wouldn't play, but when we set an Instrument up
in the 2nd space, we could play it with Chirp on MIDI Channel 1. An Instrument on the
3rd space worked with Chirp Channel 2, and so on.)
Load GigaStudio. In the File menu, select System Settings. At the bottom of this dialog
box is the MIDI Port Configuration setup controls. Choose Chirp MIDI In from the list in
the drop-down menu in one of the empty MIDI Input assignments. Hit OK. Load an
instrument in the 2nd position and play Chirp - you should hear the instrument playing.
43
Chirp Virtual MIDI Keyboard Controller User Guide (Rev 1.1)
44
Applications
Ideas for Using Chirp
While you will likely not play your next piano recital using Chirp, you can utilize it
effectively for creating all kinds of MIDI parts. Besides chord entry, we often use Chirp
to just enter any MIDI notes in time and note duration with the part we are trying to
create, and then use the DAW Piano Roll view to drag the notes in place. We find this
method quite effective, especially in creating string and orchestral parts where the
biggest challenge in a cramped space (like and airplane seat) is just getting MIDI data
into the DAW in time.
In notation tools, we make use of the chord entry ability in Chirp. Most notation entry is
step-oriented, and this allows us to quickly enter chord parts.
We will regularly update this manual with ideas our users supply us!
45
Chirp Virtual MIDI Keyboard Controller User Guide (Rev 1.1)
46
Troubleshooting
Technical Support for Chirp
We want to be absolutely sure that you get the most out of Chirp, which is why we went
to the effort of providing setup instructions for the popular music applications. But - as
anybody who has ever fooled around with music and MIDI hardware & software knows,
this stuff can be tricky and downright frustrating at times! MIDI and other drivers don't
always play nice together, and the sheer number of variables involved with these
computer platforms, installed hardware and software can cause all kinds of problems. If
you followed the instructions in this manual and still are having problems getting your
setup to work, please contact us! We have set up 3 methods for getting the support you
need.
•
•
•
•
First, consult the Tanager AudioWorks KnowledgeBase at
http://www.tanageraudioworks.com/Support/ . We collect all issues and reply
there so all users have visibility.
If you can't find the answers to your questions there - contact us using the Tech
Support form at the bottom of the page on
http://www.tanageraudioworks.com/Support/.
The Tanager AudioWorks Community is our discussion forum - it is possible
other users may have had similar issues and posted it there. Click on this link to
get there - http://discussion.tanageraudioworks.com/index.php
EMAIL us directly at [email protected].
Top Issues FAQ
Here are some issues that crop up from time to time with our Chirp customers.
Platform Issue
Solution
Windows
Chirp not operating
properly after it has
been installed.
Mac
Cannot get the "Send
Notes Always" feature
to work properly.
Make sure you have installed the Microsoft
.NET Framework (V1.1 or later). This is
available from the Microsoft .NET
Framework Solutions Center page at
http://support.microsoft.com/?scid=ph;enus;548
Under Universal Access in the System
Preferences menu on your Mac, be sure to
check the box at the bottom of the dialog
that says Enable access for assistive
devices. This option is required in order for
the Send Notes Always capability in Chirp
47
Chirp Virtual MIDI Keyboard Controller User Guide (Rev 1.1)
Windows +
Cubase 4
Notes end up
"bunched up" at the
start of the track after
you record a MIDI or
Instrument track.
Windows 64
Bit Vista
Chirp will not operate.
48
to operate properly.
To fix this, you need to go to the Devices ->
Device Setup menu; at the bottom of the list
of MIDI input and output ports, you'll need to
check the box that says " Use System
Timestamp for Windows MIDI Inputs" as
shown below. Steinberg places this menu
item there to overcome some issues with the
DirectSound drivers associated with MIDI in
Windows. This link
http://knowledgebase.steinberg.de/95_1.html
can tell you more.
Chirp is not currently compatible with the 64
bit version of Vista.
Appendix
MIDI Note Values for Drum Sounds &endash; General
MIDI Standard
Midi Note 35 36 37 38 39 40 41 42 43 44 45 46 47 48 49 50 51 52 53 54 55 56 57 58 59 60 61 62 63 64 65 66 67 68 69 70 Note Name B0 C1 C#1 D1 D#1 E1 F1 F#1 G1 G#1 A1 A#1 B1 C2 C#2 D2 D#2 E2 F2 F#2 G2 G#2 A2 A#2 B2 C3 C#3 D3 D#3 E3 F3 F#3 G3 G#3 A3 A#3 GM Drum Sound Acoustic Kick Drum Kick Drum 1 Side Stick/Rim Shot Acoustic Snare Hand Clap Electric Snare Low Floor Tom Closed Hi‐Hat High Floor Tom Pedal Hi‐Hat Low Tom Open Hi‐Hat Low‐Mid Tom Hi‐Mid Tom Crash Cymbal 1 High Tom Ride Cymbal 1 China Cymbal Ride Cymbal Bell Tambourine Splash Cymbal Cowbell Crash Cymbal 2 Vibraslap Ride Cymbal 2 Hi Bongo Low Bongo Mute Hi Conga Open Hi Conga Low Conga High Timbale Low Timbale High Agogo Low Agogo Cabasa Maracas 49
Chirp Virtual MIDI Keyboard Controller User Guide (Rev 1.1)
71 72 73 74 75 76 77 78 79 80 81 B3 C4 C#4 D4 D#4 E4 F4 F#4 G4 G#4 A4 Short Whistle Long Whistle Short Guiro Long Guiro Claves Hi Wood Block Low Wood Block Mute Cuica Open Cuica Mute Triangle Open Triangle MIDI Note Values for Drum Sounds &endash; General
MIDI Standard
Group Pianos Chromatic Percussion
Organs Guitars 50
Program # 1 2 3 4 5 6 7 8 9 10 11 12 13 14 15 16 17 18 19 20 21 22 23 24 25 Sound (Patch) Acoustic Grand Piano Bright Acoustic Piano Electric Grand Piano Honky‐Tonk Piano Electric Piano 1 Electric Piano 2 Harpsicord Clavinet Celesta Glockenspiel Music Box Vibraphone Marimba Xylophone Tubular Bells Dulcimer Drawbar Organ Percussive Organ Rock Organ Church Organ Reed Organ Accordian Harmonica Tango Accordian Acoustic Guitar &endash; Nylon Appendix
26 Basses Strings Ensemble Brass Reed 27 28 29 30 31 32 33 34 35 36 37 38 39 40 41 42 43 44 45 46 47 48 49 50 51 52 53 54 55 56 57 58 59 60 61 62 63 64 65 Strings Acoustic Guitar &endash; Steel Strings Electric Guitar &endash; Jazz Electric Guitar &endash; Clean Electric Guitar &endash; Muted Overdriven Guitar Distortion Guitar Guitar Harmonics Acoustic Bass Electric Bass &endash; Finger Electric Bass &endash; Picked Fretless Bass Slap Bass 1 Slap Bass 2 Synth Bass 1 Synth Bass 2 Violin Viola Cello Contrabass Tremelo Strings Pizzicato Strings Orchestral Harp Timpani String Ensemble 1 String Ensemble 2 Synth Strings 1 Synth Strings 2 Choir Aahs Voice Oohs Synth Voice Orchestra Hit Trumpet Trombone Tuba Muted Trumpet French Horn Brass Section Synth Brass 1 Synth Brass 2 Sprano Sax 51
Chirp Virtual MIDI Keyboard Controller User Guide (Rev 1.1)
Pipe 66 67 68 69 70 71 72 73 74 75 76 77 78 79 80 Alto Sax Tenor Sax Baritone Sax Oboe English Horn Bassoon Clarinet Piccolo Flute Recorder Pan Flute Blown Bottle Skakuhachi Whistle Ocarina Group Synth Leads Synth Pads Synth Effects 52
Program # 81 82 83 84 85 86 87 88 89 90 91 92 93 94 95 96 97 98 99 100 101 102 103 Sound (Patch) Lead 1 ‐ Square Lead 2 &endash; Sawtooth Lead 3 &endash; Calliope Lead 4 &endash; Chiff Lead 5 &endash; Charang Lead 6 &endash; Voice Lead 7 &endash; Fifths Lead 8 &endash; Bass + Lead Pad 1 &endash; New Age Pad 2 &endash; Warm Pad 3 &endash; Polysynth Pad 4 &endash; Choir Pad 5 &endash; Bowed Pad 6 &endash; Metallic Pad 7 &endash; Halo Pad 8 ‐ Sweep FX 1 &endash; Rain FX 2 &endash; Soundtrack FX 3 &endash; Crystal FX 4 &endash; Atmosphere FX 5 &endash; Brightness FX 6 &endash; Goblins FX 7 &endash; Echoes Appendix
Ethnic Percussive
Sound Effects 104 105 106 107 108 109 110 111 112 113 114 115 116 117 118 119 120 121 122 123 124 125 126 127 128 FX 8 &endash; Sci‐Fi Sitar Banjo Shamisen Koto Kalimba Bagpipe Fiddle Shanai Tinkle Bell Agogo Steel Drums Woodblock Taiko Drum Melodic Drum Synth Drum Reverse Cymbal Guitar Fret Noise Breath Noise Seashore Bird Tweet Telephone Ring Helicopter Applause Gunshot MIDI Note Values for Continuous Controllers - General
MIDI Standard
High Resolution Continuous Controllers (MSB and LSB Pairs) Controller # 0 1 2 3 4 Controller Name Bank Select Coarse (MSB) Notes Switches between groups of sound banks in a synth or module. Modulation Wheel Coarse (MSB) Usually adds some sort of vibrato effect to the note being played. Breath Control Undefined Foot Controller Can be used to control a variety of effects such as an 53
Chirp Virtual MIDI Keyboard Controller User Guide (Rev 1.1)
54
5 Portamento Time 6 Data Entry 7 Channel Volume 8 Balance 9 10 Undefined Pan 11 Expression 12 Effect Control 1 13 Effect Control 2 14 15 16 Undefined Undefined General Purpose Controller 1 17 General Purpose Controller 2 18 General Purpose Controller 3 19 General Purpose Controller 4 20 21 22 23 24 Undefined Undefined Undefined Undefined Undefined organ’s swell pedal. Portamento is defined as the time it takes for the pitch of a note to slide up or down to the pitch of another note. Provides the ability to send a RPN or NRPN data value to a synth or sound module. Controls the main volume of a MIDI channel. Adjusts the volume of stereo elements of a sound without affecting the Pan position. Pans a mono sound between left (0) and right (127). 64 is the Center position. Acts as a percentage of the volume controller (#7) &endash; controls. Operation depends on the device or soft synth being controlled. Operation depends on the device or soft synth being controlled. Operation depends on the device or soft synth being controlled. Operation depends on the device or soft synth being controlled. Operation depends on the device or soft synth being controlled. Operation depends on the device or soft synth being controlled. Appendix
25 26 27 28 29 30 31 32 33 34 35 36 37 38 39 40 41 42 43 44 45 46 Undefined Undefined Undefined Undefined Undefined Undefined Undefined Bank Select Fine (LSB) Switches between groups of sound banks in a synth or module. Modulation Wheel Fine (LSB) Adds more definition to the main controller value for this parameter. Breath Control Fine (LSB) Adds more definition to the main controller value for this parameter. Undefined Foot Controller Fine (LSB) Adds more definition to the main controller value for this parameter. Portamento Time Fine (LSB) Adds more definition to the main controller value for this parameter. Data Entry Channel Volume Fine (LSB) Adds more definition to the main controller value for this parameter. Balance Fine (LSB) Adds more definition to the main controller value for this parameter. Undefined Pan Fine (LSB) Adds more definition to the main controller value for this parameter. Expression Adds more definition to the main controller value for this parameter. Effect Control 1 Adds more definition to the main controller value for this parameter. Effect Control 2 Adds more definition to the main controller value for this parameter. Undefined 55
Chirp Virtual MIDI Keyboard Controller User Guide (Rev 1.1)
47 48 Undefined General Purpose Controller 1 49 General Purpose Controller 2 50 General Purpose Controller 3 51 General Purpose Controller 4 Low Resolution Continuous Controllers 52 53 54 55 56 57 58 59 60 61 62 63 64 65 66 67 68 69 70 71 72 73 74 75 76 Undefined Undefined Undefined Undefined Undefined Undefined Undefined Undefined Undefined Undefined Undefined Undefined Damper Pedal On/Off (Sustain)
Portamento On/Off Sustenuto On/Off Soft Pedal On/Off Legato Footswitch On/Off Hold 2 Sound Controller 1 Sound Controller 2 Sound Controller 3 Sound Controller 4 Sound Controller 5 Sound Controller 6 Sound Controller 7 Adds more definition to the main controller value for this parameter. Adds more definition to the main controller value for this parameter. Adds more definition to the main controller value for this parameter. Adds more definition to the main controller value for this parameter. 56
Appendix
Low Resolution Continuous Controllers 77 78 79 80 81 82 83 84 85 86 87 88 89 90 91 92 93 94 95 96 97 98 99 100 101 102 103 104 105 106 107 108 109 110 111 112 113 Sound Controller 8 Sound Controller 9 Sound Controller 10 General Purpose Controller 5 General Purpose Controller 6 General Purpose Controller 7 General Purpose Controller 8 Portamento Control Undefined Undefined Undefined Undefined Undefined Undefined Reverb Send Level Effects 2 Depth Chorus Send Level Effects 4 Depth Effects 5 Depth Data Entry +1 Data Entry ‐1 (NRPN) Non‐Registered Parameter Number (LSB) (NRPN) Non‐Registered Parameter Number (MSB) (RPN) Registered Parameter Number (LSB) (RPN) Registered Parameter Number (MSB) Undefined Undefined Undefined Undefined Undefined Undefined Undefined Undefined Undefined Undefined Undefined Undefined 57
Chirp Virtual MIDI Keyboard Controller User Guide (Rev 1.1)
114 115 116 117 118 119 120 121 122 123 124 125 126 127 Undefined Undefined Undefined Undefined Undefined Undefined All Sound Off Reset All Controllers Local Control On/Off All Notes Off Omni Mode Off + All Notes Off
Omni Mode On+ All Notes Off
Poly Mode On/Off + All Notes Off Poly Mode Off + All Notes Off MIDI Loopback Drivers
In order to communicate with other software applications on your system, Chirp requires
a piece of software called a MIDI Loopback driver. This is software that routes incoming
and outgoing MIDI messages to different destinations on your machine, either software
ports or external hardware devices.
Macintosh users do not need to install anything, OSX comes with a built in loopback
driver called "IAC" (standing for Inter-Application Communication). It simply needs to be
turned on and named in Audio/MIDI setup - found in Applications/Utilities. There are
more detailed instructions in the Chirp Installation section.
Microsoft Windows users need to have a MIDI Loopback driver installed on their
system. There are several freeware and shareware options, as well as more expensive
versions. We have tested Chirp on Windows with the Maple driver by Jeff Hurchalla;
others available are LoopBe and MIDI Yoke.
To use any of these other drivers simply install them and select the driver in Chirp
File>MIDI Settings.
Links to drivers:
Maple:
http://www.hurchalla.com/Maple_driver.html
LoopBe: http://www.nerds.de/en/loopbe1.html
MIDI Yoke: http://www.midiox.com/index.htm?http://www.midiox.com/myoke.htm
58
Appendix
Trademarks and Notices
•
•
•
•
•
•
•
•
•
•
•
•
•
•
•
•
Chirp and Chorducopia is a trademarks or registered trademarks of Tanager
Audioworks, Inc.
Adobe and Adobe AIR are either the registered trademark or trademark of Adobe
Systems Incorporated in the United States and/or other countries.
Java is a trademark or registered trademark of Sun Microsystems.
Pro Tools is a registered trademark of Avid Technology, Inc.
SONAR and Project 5 are trademarks of Twelve Tone Systems, Inc.
Logic and GarageBand are registered trademarks of Apple Computer, Inc.
Cubase is a registered trademark of Steinberg Media Technologies GmbH.
Digital Performer and MachFive are registered trademarks of Mark of the Unicorn
Inc.
Reason is a registered trademark of Propellerhead Software.
Ableton and Ableton Live are trademarks of Ableton AG.
ACID is a registered trademark of Sony Creative Software, Inc. in the United
States and other countries.
Sibelius is a registered trademark of Sibelius Software Limited.
Encore is a registered trademark of GVOX, Inc.
GigaStudio is a registered trademark of Tascam, Inc.
Apple, the Apple logo, Mac, the Mac logo, Mac OS, Macintosh and QuickTime
are trademarks of Apple Computer, Inc., registered in the U.S. and other
countries.
Windows, Windows 2000, Windows XP and DirectX are registered trademarks of
Microsoft Corporation in the United States and other countries.
All other product and company names are trademarks or registered trademarks of their
respective holders.
•
•
•
The materials available in this document and the Tanager AudioWorks web site
are subject to these license terms, as well as any specific guidelines contained
herein. If you download any materials from the Tanager AudioWorks web site,
you agree to be bound by these license terms as well as the specific guidelines
related to the materials you wish to download.
You may not sell, alter, modify, license, sublicense, copy, or use these materials
in any way other than has been specifically authorized by Tanager AudioWorks
in the permissions and trademark guidelines described herein.
You acknowledge that Tanager AudioWorks reserves the right to revoke the
authorization to view, download, and print the materials available in this
document or its web site at any time, and for any reason; and such authorization
shall be deemed to be discontinued immediately upon the removal of these
materials from the document or web site.
59
Chirp Virtual MIDI Keyboard Controller User Guide (Rev 1.1)
•
•
•
60
You acknowledge that any rights granted to you constitute a license and not a
transfer of title. You do not obtain any ownership right, title, or other interest in
Tanager AudioWorks copyrighted materials or trademarks by downloading,
copying, or otherwise using these materials.
TANAGER AUDIOWORKS SHALL NOT BE LIABLE TO YOU OR ANY OTHER
PARTY FOR ANY LOSS OF REVENUE OR PROFIT OR FOR INDIRECT,
INCIDENTAL, SPECIAL, CONSEQUENTIAL, OR OTHER SIMILAR DAMAGES,
WHETHER BASED ON TORT (INCLUDING, WITHOUT LIMITATION,
NEGLIGENCE OR STRICT LIABILITY), CONTRACT, OR OTHER LEGAL OR
EQUITABLE GROUNDS EVEN IF TANAGER AUDIOWORKS HAS BEEN
ADVISED OR HAD REASON TO KNOW OF THE POSSIBILITY OF SUCH
DAMAGES.
ANY MATERIALS ARE PROVIDED ON AN "AS IS" BASIS. TANAGER
AUDIOWORKS SPECIFICALLY DISCLAIMS ALL EXPRESS, STATUTORY, OR
IMPLIED WARRANTIES RELATING TO THESE MATERIALS, INCLUDING BUT
NOT LIMITED TO THOSE CONCERNING MERCHANTABILITY OR FITNESS
FOR A PARTICULAR PURPOSE OR NON-INFRINGEMENT OF ANY THIRDPARTY RIGHTS REGARDING THE MATERIALS.


![[English] 1 MB](http://vs1.manualzilla.com/store/data/005724727_1-d0907da86b06d0402fef0dce028404c5-150x150.png)