1
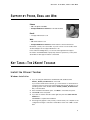
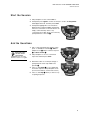
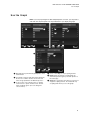
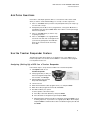
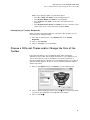
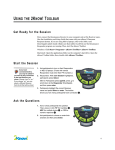
RESOURCE GUIDE for use with 2Know! Inside: Support by Phone, Email and Web������������3 2Know! Toolbar Key Tasks.........................3 Renaissance Receiver Key Tasks���������������9 Frequently Asked Questions.....................10 For More About the Receiver...................12 Dear Educator/Administrator, Congratulations! You have taken a positive step toward accelerating learning by purchasing a NEO 2. With a NEO 2, you can provide students with the advanced technology they need for essential practice in reading and writing, science, maths, keyboarding and even social studies. NEO 2 truly is a solution you can use all day, every day in your classroom. NEO 2 includes the 2Know! Classroom Response System for daily assessment of student understanding. As you begin implementing NEO 2 for informative assessment, this booklet will be your handy resource guide. You will find information about support and tips for accessing downloadable content, plus software and hardware key tasks, frequently asked questions and more. We would love to hear about your success using NEO 2 in the classroom. You can email your stories to [email protected]. We look forward to hearing from you! Sincerely, The NEO 2 Team Renaissance Learning S UPPOR T BY P HONE, E MAIL AND WEB S UPPORT BY P HONE , E MAIL AND W EB Phone • UK: +44 (0)20 7184 4000 • Europe, Middle East and Africa: +44 870 120 0718 Email • [email protected] Web • UK: www.renlearn.co.uk • Europe, Middle East and Africa: www.renlearn.com/neointernational Elsewhere, contact your local reseller. If you do not have a local reseller, email Technical Support at [email protected]. In the online Knowledge Base, you can search through technical support information and find detailed, step-by-step answers to questions you may have about NEO 2. Visit support.renlearn.com/techkb. K EY T ASKS —T HE 2K NOW ! T OOLBAR Install the 2Know! Toolbar Windows I nstall ation 1. If you are using the UK Software and Manuals CD, double-click the 2Know!_Toolbar_Installer.exe file on that CD. If you need to download the software, go to www.renlearn.co.uk/renaissancezone/neo2crsresources/neo2crssoftwaredownloads and click the link for your operating system. Then, double-click the 2Know!_Toolbar_Installer.exe file that you downloaded. 2. In the installation wizard that opens, click Next > on the Welcome panel. 3. Click Install on the next panel. 4. If you want to start the 2Know! Toolbar right away, tick the Launch 2Know! Toolbar box. Click Finish to complete the installation. 5. A message may appear to tell you that you must restart your computer for the configuration changes to take effect. Click Yes to restart now or No to restart later. 3 K E Y TA S K S — T H E 2 K N O W ! TO O L B A R Start the 2Know! Toolbar and Get Ready for the Session 6. Connect the Renaissance Receiver to your computer and set the Receiver network name. (See the NEO materials you received.) 7. Make sure that neither AccelTest nor the Renaissance Responder program (used with Accelerated Maths) is running. Then, start the 2Know! Toolbar by clicking StartAll Programs2Know! Toolbar2Know! Toolbar. 8. Read the license; then, tick the I agree box and click OK to start the program. Maci nt osh Install at ion 1. If you are using the UK Software and Manuals CD, double-click the 2Know!_Toolbar_2.1_Mac.dmg file on that CD. To download the software, go to www.renlearn.co.uk/renaissancezone/neo2crsresources/neo2crssoftwaredownloads and click the link for your operating system. Then, double-click the 2Know! _Toolbar_2.1_Mac.dmg file that you downloaded. 2. Double-click 2Know! Toolbar Installer in the window that opens. 3. Enter the administrator user name and password for the computer and click OK. (If you are not the administrator, you may or may not have rights that allow you to install the program.) 4. Click Install in the installation assistant. The program will be installed. (If the computer must be restarted after installation, the program will notify you; click OK.) 5. When the installation is finished, click Restart if the computer must be restarted. If not, click Quit. 6. Connect the Renaissance Receiver to your computer and set the Receiver network name. (See the NEO materials you received.) 7. Make sure that neither AccelTest nor the Renaissance Responder program (used with Accelerated Maths) is running. If the program window opened after installation, double-click 2Know! Toolbar in that window. If the program window is not open, then open the Applications folder on the computer’s hard drive. Then, open the 2Know! Toolbar folder. Double-click 2Know! Toolbar. 8. Read the license; then, tick the I agree box and click OK to start the program. Start the 2Know! Toolbar and Get Ready for the Session Make sure the Renaissance Receiver is connected to your computer (see the NEO User Manual) and set the Receiver name (see page 9 of this document). Make sure that neither AccelTest nor the Renaissance Responder program (used with Accelerated Maths) is running. Then, start the 2Know! Toolbar. Windows: Click Start Programs 2Know! Toolbar 2Know! Toolbar. Macintosh: Open the Applications folder on the computer’s hard drive. Open the 2Know! Toolbar folder, and double-click 2Know! Toolbar. 4 K E Y TA S K S — T H E 2 K N O W ! TO O L B A R Start the Session Start the Session 1. Ask participants to turn on their NEO 2s. 2. Participants press applets, use the arrow keys to scroll to the Responder SmartApplet in the list, and then press enter. 3. Participants highlight the correct Receiver/ Network name and press enter. (Participants who have connected to a Receiver before can simply confirm that they want to stay connected.) The toolbar shows you how many participants have connected A. A Ask the Questions Responder users can also answer short-answer questions if they are using firmware version 3.x or higher. 1. Ask or show participants the question. Then, press or click T/F for true/false A, ABC for multiple choice B, 123 for numeric response C or Short Answer D. 2. Ask participants to choose or enter their responses and then press enter. A C D B 3. Watch the toolbar to see the percentage of participants who have responded to the question E. E 4. Press or click Graph F to see a graph that shows the responses the participants chose. (For more information, see the next section.) 5. Press or click Stop G when you want to stop accepting responses. G F 5 K E Y TA S K S — T H E 2 K N O W ! TO O L B A R Use the Graph Use the Graph Note: If you are projecting the toolbar and participants can see it, you may want to wait until after all participants have responded before you display the graph. C C A A B F D F E C D E A B F D A The bars show you how many participants chose each answer. B For numeric-response and short-answer questions, the five most common answers are shown, and others are grouped below in “Other Responses”. C To choose the correct answer, press or click the circle next to it to put an X in that circle. The bar next to it will turn green. (You can change the correct answer.) E D Press or click Stop to stop accepting answers. E Reset deletes all answers so participants can answer the question again (or another question of the same type). F Close takes you back to the toolbar. If you have not stopped accepting answers, the toolbar will stop accepting them when you close the graph. 6 K E Y TA S K S — T H E 2 K N O W ! TO O L B A R Ask Pulse Questions Ask Pulse Questions Use Pulse to ask simple questions with no correct answer. This can be useful when you want to check understanding of a concept or to take a quick vote. 1. Press or click Pulse when you want to ask participants if they are ready to go on to the next concept. 2. Participants press Y, G, J or T for yes/green/true, or they press N, R or F for no/red/false; then, they press enter. Watch the toolbar to see the percentage who have responded. 3. Press or click Stop when you want to stop accepting responses. 4. Press or click Graph to see a graph like the one shown. The red circle on the right shows you how many participants chose No. The green circle on the left shows how many chose Yes. Use the Teacher Responder Feature The 2Know! Toolbar options allow you to designate one of your NEO 2s as a teacher responder. You can then use that NEO 2 to control the toolbar program from anywhere in the room. Assigni ng (Setti ng Up) a NEO 2 as a Teacher Responder Follow these steps to set up and use a NEO 2 as a teacher Responder: 1. Click Options and choose Teacher Responder. 2. If the program tells you that you have not assigned a Responder to the teacher, click Assign. 3. Start the NEO 2 and open the Responder SmartApplet. 4. Join the session. 5. Enter the PIN that the toolbar program shows you, and press Enter. 6. When the toolbar program shows the ID, click Close. 7. The NEO 2 will list your options. To ask a question, follow these steps: a. Press A (to select Ask Question), then press Enter. b. Press the letter for the question type and press Enter. c. After participants answer, press A (to select Stop), then press Enter to stop receiving responses. If you want to see a graph, press B (for Show Graph) and press Enter. To minimise the toolbar or maximise it again, press C and then Enter. 7 K E Y TA S K S — T H E 2 K N O W ! TO O L B A R Choose a Different Theme and/or Change the Size of the Toolbar While you are viewing a graph, you have these options: • Press A (for Stop), then Enter to stop receiving responses. • Press B (Close Graph), then Enter to close the graph. • Press C (Reset), then Enter to reset (start over) and receive new responses. • Press D (Enter correct answer), then Enter to choose or enter the correct answer. Then, enter or select the answer and press Enter. Unassigning a Teacher Responder When you want to stop using a NEO 2 to control the toolbar program, you can unassign it by following these steps: 1. In the 2Know! Toolbar, press or click Options and choose Teacher Responder. 2. Press or click Unassign. 3. Press or click Close to close the window. Choose a Different Theme and/or Change the Size of the Toolbar Follow the steps below to choose a different theme, which changes the appearance of the toolbar. Use the large-size themes on your computer so you can see the toolbar as you move around the room. Use the small sizes on interactive whiteboards to make the most of the whiteboard space. If you want to ask short answer questions, be sure to choose a theme that includes “w/Short Answer” in its name. 1. Press or click Options and choose Themes to see the window shown. A B 2. Press or click the theme type and size you want A. As you select each theme, you can see what it looks like on the right side of the window. 3. Press or click OK B. 8 K E Y TA S K S — R E N A I S S A N C E R E C E I V E R Get Softwa re Update s 1. Press or click Options and choose Software Updates. 2. If you want to allow weekly software updates, make sure the Weekly check for software update box is ticked. (It is ticked when you first install the program.) 3. If you want to check for updates now, press or click Check Now. 4. Press or click Close. V i e w 2 K n o w ! T o o l b a r I n s t r u c ti o n s w h i l e U s i n g t h e T o o l b a r To open instructions while using the 2Know! Toolbar, press or click Options and choose Getting Started. View the Toolbar Version and Other Information Press or click Options and choose About 2Know! Toolbar. The information window will open; you can close it by clicking the window. K EY T ASKS —R ENAISSANCE R ECEIVER To connect your Renaissance Receiver to your computer, see the NEO User Manual, the SmartOption Mobile Lab Setup for NEO 2 instructions or other NEO 2 instructions that you have received. Default Administrator PIN The default administrator PIN is 1234. This PIN is required when you use the Renaissance Wireless Server Utility program on your computer. On the Server Settings tab of the utility, you can also click Renaissance Place Settings to set your Renaissance Place address if you want to use NEO 2’s Responder, Accelerated Reader, or MathsFacts in a Flash RP SmartApplets with Renaissance Place. For more information, see the NEO User Manual. Changing Administrator PIN and Renaissance Receiver Name (Recommended) 1. Open the Renaissance Wireless Server Utility program and go to the Server Settings tab. 2. Click Set Administrator PIN. 3. Enter and confirm the new PIN; then, click OK. 4. Click OK when program states that the PIN is updated. 5. Delete the name in the Network Name field, and type a new name (e.g., Room 245 or Mrs. Smith’s class). 6. Click Update Network Settings; then, click OK when the program states that the settings have been updated. 9 F REQUENTLY A SKED Q UESTIONS F REQUENTLY A SKED Q UESTIONS Below are answers to the most commonly asked questions concerning the 2Know! Classroom Response System and NEO 2. For more information, please see the contact information at the beginning of this guide. Can 2Know! be installed on a network? 2Know! is meant to be installed and used on individual computers in a classroom environment. Should I be concerned about the technical requirements and setup for 2Know!? All that is required is the 2Know! Toolbar program and a computer that meets the requirements you will find at www.renlearn.co.uk/renaissancezone/neo2crsresources/neo2crsuserguides. Setup is easy. Even those with limited computer experience can set it up and have it running in as little as five minutes. Our technical staff is also available should you have any questions. Does the 2Know! Classroom Response System work with interactive whiteboards? Yes. You can also display all your presentations. Will 2Know! work with a laptop? Yes. You simply need a USB port for the Receiver. No AC adapter is needed. When students use their NEO 2s with the 2Know! Toolbar, they have multiple Renaissance Receivers to choose from, and they are all named “Renaissance Receiver”. Why is this happening? This means that multiple Renaissance Receivers that do not have unique names are within range of the Responders or NEO 2s. To change the name of a Receiver, see page 9. Enter a name that is unique. For example, if the teacher’s name is John Smith, give the network the name “Smith’s Receiver”. How many Renaissance Responders or NEO 2s can be used with one Receiver at the same time? Up to 300 can be used with one Renaissance Receiver. What is the range of a Renaissance Receiver (how far away from the Renaissance Receiver can a student with a Responder or NEO 2 be for 2Know! to work)? Up to 45 metres. 10 F REQUENTLY A SKED Q UESTIONS Will students have to point the Responders or NEO 2s directly at the Renaissance Receiver in order to get their responses accepted? No. 2Know! uses Radio Frequency (RF) technology, which is not blocked by lineof-sight obstructions. The answer is recorded as long as the device is within the range of the receiver (up to 45 metres). What radio technology does 2Know! use? 2Know! operates in the public 2.4 GHz band, the frequency used by WiFi, Bluetooth and other wireless devices. The system uses standard IEEE 802.15.4 modulation and communication protocols to avoid interference with other devices operating in the same area. Will the system hop to an open channel? Renaissance Receivers and responders include logic to select a clear channel from the 15 available channels when the Renaissance Receiver is started. How does the Renaissance Receiver handle interference? The system uses Direct Sequence Spread Spectrum (DSSS) in addition to Carrier Sense Multiple Access with Collision Avoidance (CSMA-CA) in order to communicate when other wireless devices are near. Will the radio frequency (RF) technology of 2Know! interfere with my wireless network? No. The system is designed to work in a “noisy” environment without interfering with other wireless technology. Do the NEO 2s have an automatic shut-off feature? Yes. In most SmartApplets, NEO 2 will shut off after 4 minutes of inactivity. In the Responder SmartApplet, it will shut off after 30 minutes of inactivity, and in the Accelerated Reader™ SmartApplet it will shut off after 10 minutes of inactivity. 11 FOR MORE A BOUT THE R ENAISSANCE RECEIVER F OR M ORE A BOUT THE R ENAISSANCE R ECEIVER Refer to the NEO User Manual or other NEO materials you have received to find the steps you need to follow to connect the Renaissance Receiver and to change settings in the Renaissance Wireless Server Utility. If you have a problem with your Renaissance Receiver, refer to the manual and the Renaissance Learning Knowledge Base. If this does not solve your problem, then call the business which sold you the Receiver or contact Technical Support (see page 3). Many problems can be solved by email or over the phone. If the unit needs to be returned to the factory for repair, it must be assigned a Return Material Authorisation (RMA) number before it is returned. To obtain an RMA number, contact Technical Support (see page 3) with the following information: • A detailed description of the problem. • The serial number of the unit. • The name and the address to which the unit should be returned. 12 2Know!, 2Know! Classroom Response System, Accelerated Maths, Accelerated Reader, AccelTest, MathsFacts in a Flash, NEO, NEO 2, NEO Manager, Renaissance Learning, Renaissance Place, Renaissance Receiver and Renaissance Responder are trademarks of Renaissance Learning, Inc., and its subsidiaries, registered, common law or pending registration in the United States and other countries. R44566