1
General User’s Manual
Thai CDC
Establishing a New Client/Donor/Partner
Communications & Project Tracking Tool
Team #: 01
12/05/11
Contents
Logging In/Out......................................................................................................................................... 1
Accessing Help and Training .................................................................................................................... 1
Contacts .................................................................................................................................................. 1
Adding Contacts............................................................................................................................... 1
Editing Contacts ............................................................................................................................... 2
Deleting Contacts............................................................................................................................. 2
Mass Deleting Contacts ................................................................................................................... 3
Checking Storage Usage .......................................................................................................................... 4
Filtering Contacts .................................................................................................................................... 5
Printing Contact Views ............................................................................................................................ 8
Donations ................................................................................................................................................ 9
Adding Donations ................................................................................................................................ 9
Editing Donations .............................................................................................................................. 11
Deleting Donations ............................................................................................................................ 11
Sending Mass Emails ............................................................................................................................. 12
Creating and Editing Mass Email Templates ........................................................................................... 15
Creating Letterhead ........................................................................................................................... 15
Editing letterhead .............................................................................................................................. 19
Creating E-mail Template................................................................................................................... 22
Edit Templates ................................................................................................................................... 27
Outcome Tracking ................................................................................................................................. 29
Volunteer Tracking ................................................................................................................................ 33
Volunteer Campaign via Volunteer Wizard ........................................................................................ 33
Modifying volunteer skills and availability picklist for contacts and leads ........................................... 36
Modifying skills needed under Volunteer Job ..................................................................................... 40
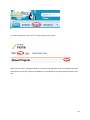
Logging In/Out
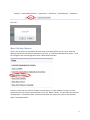
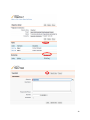
To log in, go to www.salesforce.com and click the “Login” button in the upper right corner.
Next, enter your username and password and click “Login”.
To log out of the system click on your name in the upper right corner. This will bring up a dropdown
menu with “Logout” at the bottom. Click on “Logout”.
Accessing Help and Training
As this manual only covers some of the functionalities of Salesforce, more information can be found
either at http://success.salesforce.com/, or by accessing the “Help & Training” documentation by
clicking on this button in the upper right corner.
Contacts
Adding Contacts
In order to add a contact, click on the “Contacts” tab.
Next to “Recent Contacts” click on “New”.
1
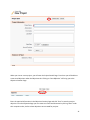
Fill in all available contact information and then click the “Save” button. Note that if no organization
name is specified, a new organization with the same name as the contact will be created. The contact
will be assoaicated with this new organization of one person.
Editing Contacts
In order to edit an existing contact, open the contact’s page. This can be done in two ways.
1. One is by clicking on the “Contacts” tab and then finding the contact using a View (see Filtering
Contacts below for information about how to create views.
2. The other way to find a contact is by typing in the contact’s name in the search bar at the top
left of the page.
After searching for the contact by name, click on the contact’s name. Next, click on the “Edit” button.
This will allow you to change the contact’s details. After editing the contact details, click on the “Save”
button.
Deleting Contacts
In order to delete a contact navigate to the contact’s page in one of the two ways described in Editing
Contacts above. Next, click on the “Delete” button.
2
Click “OK”.
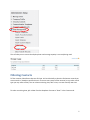
Mass Deleting Contacts
There is also an option to mass delete contacts rather than deleting them one at a time. Note that
deleting contacts will also delete any donations, activities, or notes associated with that contact. To do
this navigate to the contacts page and click on “Mass Delete Contacts”.
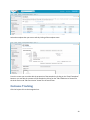
From this screen you can search for contacts to mass delete. In order to delete a contact, slect the
check box next to the contact name and then click on the “Delete” button. This will move the contact to
the Recycle Bin. If instead you want to permanently delete the contact, then click on the checkbox
under “Permanently delet”.
3
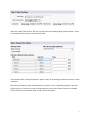
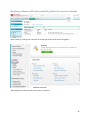
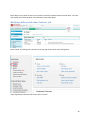
Checking Storage Usage
With nonprofit donation version of Salesforce there is a storage limit of 1GB of data storage and 16GB
for file storage. In order to check how much of this storage capacity is currently used navigate to the
“Setup” menu. Then select “Data Management” and “Storage Usage”.
4
This will take you to a screen that displays how much storage capacity is currently being used.
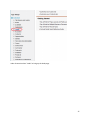
Filtering Contacts
To filter contacts, Salesforce makes use of Views. A View is basically a selection of whatever records you
want to work on, based on specified criteria. There are many ways to filter contacts (or any other record
type you may want to filter). You can select an existing view, edit a view, or create a totally new view.
To select an existing view, pick a View from the dropdown list next to “View:” in the Contacts tab.
5
If the view you currently want to use has already been preselected, just click “Go!”
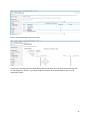
To edit a view, select any view then click the “Edit” link beside the “Go!” button.
If you plan to save the view as a new view, edit the “View Name” and the “View Unique Name” fields.
6
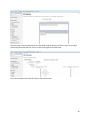
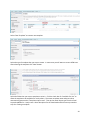
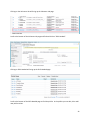
Under the “Specify Filter Criteria” tab, you may select the corresponding fields you want to filter. Select
a view operator and a value to use the operator with.
In the example above, making the operator “equals” means I’ll be viewing all contacts that haven’t made
a donation.
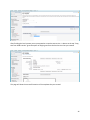
Next, select the fields you want to be displayed in the View list. This is especially important if you want
to print the list or if you want to select a contact based on certain fields. Select a field from “Available
Fields” and click the arrow below “Add” to add a field to the display.
7
In this example, I added the “Email Bounced Reason” and “Email Bounced Date” to see if the contact
hasn’t been receiving Emails.
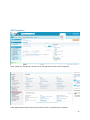
After selecting the Fields you want to display, you can choose who can use the View under “Restrict
Visibility”
You may then save the View if you just want to edit the parameters of the existing View by clicking Save,
or save the View as a new View by clicking the Save As button next to Save.
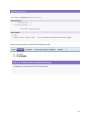
Printing Contact Views
In order to print a view of contacts, select the view you want to print and click “Go!”.
8
In the upper right hand corner click the printer icon.
Next, click on “Print this page”.
Donations
Adding Donations
The best way to add donations is by selecting the contact that the donation is from and adding the
donation to that contact. This is the ideal way to add a donation to a contact because it will
automatically associate the donation with that contact. If donations are added via the “Donation” tab,
then it is more difficult to associate that donation with the contact.
Begin by navigating to the contact’s page in one of the two ways described in the Editing Contacts
section above.
Once on the contact page scroll down to the “Donations” section and click on the “New Contact
Donation” button.
9
Select the appropriate donation type and click “Continue”.
Fill in the correct information for the donation. Note, a donation name will automatically be generated
that consistes of the name of the contact and the donation date. The contact’s organization will also
automatically be associated with the donation. This means that the donation will appear on the
contact’s page as well as the organization’s page in the future. Also note that the “Lead Source” field
refers to how the donor found out about Thai CDC. The “Contact” field does not need to be filled out as
the donation is alreay associated with a contact.
Once the donation information has been entered, click the “Save” button.
10
Editing Donations
In order to edit a donation you need to navigate to that donation. This can be done in two ways.
1. Navigate to the contact associated with the donation. Scroll down to the “Donation” section
and click on “Edit” next to the donation you want to edit.
2. Click on the “Donations” tab and use the Views to find the donation you want to edit. Then click
the “Edit” text next to that donation.
Finally edit the donation and click on the “Save” button to save your changes.”
Deleting Donations
Deleting donations can be done by navigating to the donation with either of the two ways described in
Editing Donations above. Next, click on the “Del” text next to the donation you want to delete. Then
click “OK”.
11
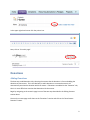
Sending Mass Emails
In order to send a mass email, first navigate to the “Contacts” tab. Then under the “Tools” section click
on the link “Mass Email Contacts”.
Select a View that contains all the contacts you want to mass email and click the “Go!” button. Note,
this step requires that you have already created a View that contains all the contacts you want to email.
See Filter Contacts above for how to create a View.
12
You can also select or deselect contacts to email individually via the checkboxes on the left side of each
name. Once you have all the contacts you want to email selected click the “Next” button on the bottom
right.
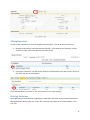
On the following page, select the folder that contains the mass email template you want to use. Next,
select the correct email template. You can preview the email template by clicking on the “Preview” text.
Note, this step requires that you already have a proper email template created. To create a new email
template see the Creating and Editing Mass Email Templates setion below. Once you have selected the
correct template click on the “Next” button.
On the next screen give the Mass email a name. Note, this name is the name the mass email will be
stored under in Salesforce, not the subject line of the email. You can select to either send the email now
or schedule the delivery for another time. Once you have done this, click the “Send” button to send the
mass email.
13
After sending the email, you should see the following screen.
14
Creating and Editing Mass Email Templates
Creating Letterhead
Select “Setup” by clicking your username at the top right of the screen and clicking Setup.
Under Administration Setup in the left hand column select “Communication Templates”.
15
Under Communication Templates select “Letterheads” to bring up the letterheads page.
16
Select “New Letterhead” to create a new letterhead.
Click the check box for “Available For Use” to allow the letterhead to be available for use by others.
Then enter a label for the letterhead and press tab to automatically generate a unique letterhead name.
Lastly enter a short description for the letterhead and click save to create the letterhead.
17
Select the logo or other properties for the letterhead using the buttons provided. After you are done
customizing the letterhead click “Save” to save the changes to the letterhead.
This screen indicates the successful creation and customization.
18
Editing letterhead
Select “Setup” by clicking your username at the top right of the screen and clicking Setup.
Under Administration Setup in the left hand column select “Communication Templates”.
19
Under Communication Templates select “Letterheads” to bring up the letterheads page.
20
Click on the letterhead that you want to edit.
If you want to edit the properties of the letterhead instead of the contents of the letterhead then click
on “Edit Properties” button. If you want to edit the contents of the letterhead then click on “Edit
Letterhead” button.
21
Creating E-mail Template
Select “Setup” by clicking your username at the top right of the screen and clicking Setup.
Under Administration Setup in the left hand column select “Communication Templates”.
22
Under Communication Templates select “Email Templates” to bring up the email templates page.
23
Select “New Template” to create a new template.
Select the type of template that you want to create. In most cases you will want to create a HTML text.
After selecting the template click “Next” button.
Select the folder that you want to template to exist in. Click the check box for “Available For Use” to
allow the template to be available for use by others. Then enter template name and press tab to
automatically generate the “Template unique name”. Then pick an email layout type from the Email
Layout dropdown list. Lastly enter a short description for the letterhead and click next to proceed to
step 3 in creating a template.
24
Now you can add content to your template.
Salesforce provides field that you can use to automatically populate your templates. For example to
automatically fill in a contact’s first name, in the template you should have “{!Contact.FirstName}”.
25
After finishing the html content you are prompted to create the text version. A button at the top “Copy
text from HTML version” gives the option of copying text from the html version that you created.
This page will show the successful creation of the template that you created.
26
Edit Templates
Select “Setup” by clicking your username at the top right of the screen and clicking Setup.
Under Administration Setup in the left hand column select “Communication Templates”.
27
Under Communication Templates select “Email Templates” to bring up the email templates page.
28
Select the template that you want to edit by clicking of the template name.
From this screen you can either edit the properties of the template by clicking on the “Email Templates”
button or you can edit the contents of the template by clicking on the “Edit HTML Version” button for
the html version and “Edit Text Version” button for the text version.
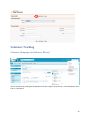
Outcome Tracking
Click the Projects link on the Navigation bar.
29
To create a new Project, click “New”. To view projects, select a View.
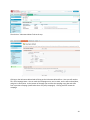
When you click “New”, the general fields for a project will be displayed. Enter the required information
and click Save to save the project to the database, or Save & New to save the project and create a new
one.
30
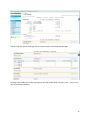
When you view or save a project, you will enter the Project Details Page. From here you will be able to
create new Objectives under the Objectives tab. Clicking on “New Objective” will bring you to the
Objective Creation Page.
Enter the required information in the Objective Creation Page and click “Save” to save the project
objective. From the Objective Page you can create new Tasks and Outcomes by clicking “New” under
their respective tabs, similar to how objectives were created for projects.
31
32
Volunteer Tracking
Volunteer Campaign via Volunteer Wizard
Go into volunteers by clicking the drop down menu that is right most at the top. In the drop down menu
click on “Volunteers”.
33
Then click on “Volunteers Wizard” tab at the top.
Clicking on the Volunteers Wizard tab will bring up the Volunteers Wizard form. Here you will need to
fill in the Campaign Name. You can make the campaign active, set its status, set the start and end date,
and give it a description. At the bottom of the page you can have the campaign copy jobs and shifts
from a previous campaign (useful when there are yearly campaigns). Clicking save will create the
campaign.
34
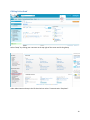
After clicking save you the campaign will be created and you will be displayed this page.
Scrolling to the middle of the campaign page you will find a table called “Volunteer Jobs”. Here you can
edit the campaign job details.
35
Modifying volunteer skills and availability picklist for contacts and leads
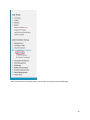
Select “Setup” by clicking your username at the top right of the screen and clicking Setup.
Under App Setup in the left hand column select “Customize”.
36
Under Customize select “Leads” to bring up the leads page.
37
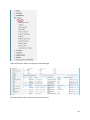
Under Leads select “Fields” to bring up the lead fields page.
Select the field you want to edit by click on the field name.
38
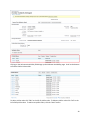
Clicking on the Volunteer Availability field brings up the Volunteer Availability page. Scroll to the bottom
to find the Picklist Values table.
To edit a picklist value click “Edit” to the left of picklist value. To delete a picklist value click “Del” to the
left of the picklist value. To add a new picklist value, click the “New” button.
39
Note: Make sure to have the same set of choices in both the Lead and Contact picklist fields. You must
also modify one of these picklists in the Volunteer Job custom object.
Modifying skills needed under Volunteer Job
Select “Setup” by clicking your username at the top right of the screen and clicking Setup.
Under App Setup in the left hand column select “Create”.
40
Under Customize select “Objects” to bring up the objects page.
Scroll to the bottom of the objects and find and click on “Volunteer Job”.
41
Clicking on the Volunteer Job will bring up the Volunteer Job page.
Scroll to the bottom of the Volunteer Job page and find and click on “Skills Needed”.
Clicking on Skills Needed will bring up the Skills Needed page.
Scroll to the bottom of the Skills Needed page to find the picklist. In the picklist you can edit, del or add
new picklist values.
42


![ShowMan User Manual [PDF Format]](http://vs1.manualzilla.com/store/data/005637930_1-31cd6ced5af6c2a7a337ddd38fc92d65-150x150.png)