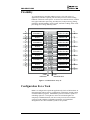
1
^1 USER MANUAL ^2 PMAC2 ^3 Programmable Multi-Axis Control ^4 3Ax-602413-xUxx ^5 January 30, 2003 Single Source Machine Control Power // Flexibility // Ease of Use 21314 Lassen Street Chatsworth, CA 91311 // Tel. (818) 998-2095 Fax. (818) 998-7807 // www.deltatau.com Copyright Information © 2003 Delta Tau Data Systems, Inc. All rights reserved. This document is furnished for the customers of Delta Tau Data Systems, Inc. Other uses are unauthorized without written permission of Delta Tau Data Systems, Inc. Information contained in this manual may be updated from time-to-time due to product improvements, etc., and may not conform in every respect to former issues. To report errors or inconsistencies, call or email: Delta Tau Data Systems, Inc. Technical Support Phone: (818) 717-5656 Fax: (818) 998-7807 Email: [email protected] Website: http://www.deltatau.com Operating Conditions All Delta Tau Data Systems, Inc. motion controller products, accessories, and amplifiers contain static sensitive components that can be damaged by incorrect handling. When installing or handling Delta Tau Data Systems, Inc. products, avoid contact with highly insulated materials. Only qualified personnel should be allowed to handle this equipment. In the case of industrial applications, we expect our products to be protected from hazardous or conductive materials and/or environments that could cause harm to the controller by damaging components or causing electrical shorts. When our products are used in an industrial environment, install them into an industrial electrical cabinet or industrial PC to protect them from excessive or corrosive moisture, abnormal ambient temperatures, and conductive materials. If Delta Tau Data Systems, Inc. products are exposed to hazardous or conductive materials and/or environments, we cannot guarantee their operation. 3A0-602413-363 Contents Chapter/Paragraph Title Contents ....................................................................................................................................... i Figures........................................................................................................................................ xi Tables ........................................................................................................................................ xii 1 ................................................................................................. Introduction 2-1 PMAC Overview ................................................................................................................................ 2-1 Flexibility........................................................................................................................................ 2-2 Configuration For a Task................................................................................................................ 2-2 PMAC2 Is a Computer ................................................................................................................... 2-3 Manual Layout .................................................................................................................................... 2-3 Conventions Used in This Manual.................................................................................................. 2-4 Organization ................................................................................................................................... 2-4 Safety Summary.................................................................................................................................. 2-5 Keep Away From Live Circuits...................................................................................................... 2-5 Live Circuit Contact Procedures..................................................................................................... 2-5 Electrostatic Sensitive Devices ....................................................................................................... 2-6 Magnetic Media .............................................................................................................................. 2-6 Related Technical Documentation ...................................................................................................... 2-6 Technical Support ............................................................................................................................... 2-6 By Telephone.................................................................................................................................. 2-6 By FAX and E-Mail........................................................................................................................ 2-6 PMAC2 User’s Manual – 15 March 1997 i 3A0-602413-363 Bulletin Board Service (BBS)......................................................................................................... 2-8 2 ........................................................................Basic Motor Setup on PMAC2 3-1 Controlling Motors.............................................................................................................................. 3-1 Hardware Setup................................................................................................................................... 3-1 PMAC2 Parameter Setup .................................................................................................................... 3-2 Parameters to Set Up Global Hardware Signals ............................................................................. 3-2 Parameters to Set Up Per-Channel Hardware Signals .................................................................... 3-3 Parameters to Set Up Motor Operation........................................................................................... 3-6 Activating the Motor .................................................................................................................. 3-6 Does PMAC Commutate the Motor? ......................................................................................... 3-6 Command Output Address ......................................................................................................... 3-7 Position-Loop Feedback Address............................................................................................... 3-7 Velocity-Loop Feedback Address .............................................................................................. 3-7 Flag Address............................................................................................................................... 3-8 Power-Up Mode ......................................................................................................................... 3-8 Commutation Parameters ........................................................................................................... 3-8 3 ................................................... Setting Up PMAC2 for Direct PWM Control 4-1 Introduction......................................................................................................................................... 4-1 Direct PWM Control Of Amplifiers ................................................................................................... 4-2 Digital Current Loop Principle of Operation ...................................................................................... 4-2 Frames of Reference ....................................................................................................................... 4-2 Working in the Field Frame............................................................................................................ 4-3 Analog Loops in the Stator Frame .................................................................................................. 4-3 Digital Loops in the Field Frame .................................................................................................... 4-4 Hardware Setup................................................................................................................................... 4-5 PWM Signal Outputs...................................................................................................................... 4-7 ADC Interface Signals .................................................................................................................... 4-7 PWM/ADC Phase Matching........................................................................................................... 4-7 ii PMAC2 User’s Manual – 15 March 1997 3A0-602413-363 Amplifier Enable and Fault Interface ............................................................................................. 4-8 Supplemental Flags......................................................................................................................... 4-8 Other Signals .................................................................................................................................. 4-8 PMAC2 Parameter Setup .................................................................................................................... 4-9 Parameters to Set up Global Hardware Signals .............................................................................. 4-9 PWM Frequency Control: I900, I906......................................................................................... 4-9 Phase Clock Frequency Control: I901........................................................................................ 4-9 Servo Clock Frequency Control: I902...................................................................................... 4-10 Hardware Clock Frequency Control: I903, I908............................................................................... 4-10 PWM Deadtime Control: I904, I908 ........................................................................................ 4-11 Parameters to Set Up Per-Channel Hardware Signals .................................................................. 4-11 Parameters to Set Up Motor Operation......................................................................................... 4-11 Commutation Enable: Ix01....................................................................................................... 4-11 Command Output Address: Ix02.............................................................................................. 4-13 Current Feedback Address: Ix82 ............................................................................................. 4-14 Current Feedback Mask Word: Ix84 ........................................................................................ 4-14 PWM Scale Factor: Ix66 .......................................................................................................... 4-15 Servo Loop Output Limit: Ix69 ................................................................................................ 4-15 Continuous Current Limit: Ix57 ............................................................................................... 4-17 Integrated Current Limit: Ix58 ................................................................................................. 4-17 Commutation Cycle Size: Ix70, Ix71 ....................................................................................... 4-17 Commutation Phase Angle: Ix72.............................................................................................. 4-17 Commutation Feedback Address: Ix83 .................................................................................... 4-18 Using Direct PWM for Brush Motor Control ................................................................................... 4-19 Hardware Connection ................................................................................................................... 4-20 I-Variable Setup............................................................................................................................ 4-20 Testing PWM and Current Feedback Operation ............................................................................... 4-21 Introduction .................................................................................................................................. 4-21 Purpose ......................................................................................................................................... 4-23 Preparation.................................................................................................................................... 4-23 Position Feedback and Polarity Test............................................................................................. 4-25 PWM Output & ADC Input Connection....................................................................................... 4-25 PWM/ADC Phase Match ......................................................................................................... 4-26 Synchronous Motor Stepper Action ......................................................................................... 4-27 Current Loop Polarity Check.................................................................................................... 4-27 Troubleshooting........................................................................................................................ 4-27 Voltage Six-Step Test ................................................................................................................... 4-28 What To Look For.................................................................................................................... 4-28 Executing the Test .................................................................................................................... 4-28 Action To Take......................................................................................................................... 4-29 Example.................................................................................................................................... 4-29 Cleaning Up.................................................................................................................................. 4-31 Debugging .................................................................................................................................... 4-31 Establishing Basic Current Loop Operation...................................................................................... 4-32 PMAC2 User’s Manual – 15 March 1997 iii 3A0-602413-363 Purpose ......................................................................................................................................... 4-32 Digital Current Loop Gains .......................................................................................................... 4-32 Preparation.................................................................................................................................... 4-33 Executing the Current-Loop Test.................................................................................................. 4-35 Clean-Up....................................................................................................................................... 4-35 4 ........................................... Setting Up PMAC2 for Sine-Wave Output Control 5-1 How to Set Up the Commutation Scheme .......................................................................................... 5-1 Hardware Setup................................................................................................................................... 5-1 DAC Output Signals ....................................................................................................................... 5-1 Amplifier Enable and Fault Interface ............................................................................................. 5-2 Encoder Feedback........................................................................................................................... 5-2 Supplemental Flags......................................................................................................................... 5-2 Other Signals .................................................................................................................................. 5-2 PMAC2 Parameter Setup .................................................................................................................... 5-3 Parameters to Set Up Global Hardware Signals ............................................................................. 5-3 Phase Clock Frequency Control: I900, I901............................................................................... 5-3 Servo Clock Frequency Control: I902........................................................................................ 5-4 Hardware Clock Frequency Control: I903, I907................................................................................. 5-4 DAC Strobe Control: I905, I909 ................................................................................................ 5-4 Parameters to Set Up Per-Channel Hardware Signals .................................................................... 5-5 Encoder Decode Control: I9n0 ................................................................................................... 5-5 Output Mode Control: I9n6 ........................................................................................................ 5-5 Output Inversion Control: I9n7 .................................................................................................. 5-5 Parameters to Set Up Motor Operation........................................................................................... 5-5 Commutation Enable: Ix01......................................................................................................... 5-5 Command Output Address: Ix02................................................................................................ 5-6 Commutation Cycle Size: Ix70, Ix71 ......................................................................................... 5-6 Commutation Phase Angle: Ix72................................................................................................ 5-7 Commutation Feedback Address: Ix83 ...................................................................................... 5-8 Establishing Basic Output Operation .................................................................................................. 5-8 Executing the Test ........................................................................................................................ 5-10 Verifying Basic Operation ............................................................................................................ 5-10 Evaluating the Polarity Match ...................................................................................................... 5-10 iv PMAC2 User’s Manual – 15 March 1997 3A0-602413-363 5 ..........................Setting Up PMAC2 Commutation (Direct PWM or Sine Wave) 6-1 Operation of the Digital Current Loops .............................................................................................. 6-1 Confirming Commutation Polarity Match .......................................................................................... 6-1 Synchronous Motor Test................................................................................................................. 6-1 Asynchronous Motor Test .............................................................................................................. 6-2 Correcting Polarity Mismatch, Synchronous and Asynchronous Motors....................................... 6-2 Establishing A Phase Reference (Synchronous Motors Only).................................................................................. 6-3 Purpose ........................................................................................................................................... 6-3 Preparation...................................................................................................................................... 6-4 Current Command Six-Step Test .................................................................................................... 6-5 Direction Balance Fine Phasing Test.............................................................................................. 6-6 Preparation.................................................................................................................................. 6-6 Executing the Test ...................................................................................................................... 6-7 Using the Test Results for Absolute Sensor ............................................................................... 6-8 Using the Test Results for Incremental Index Pulse................................................................... 6-9 Using Hall-Effect Sensors for Phase Reference ............................................................................. 6-9 Preparation................................................................................................................................ 6-10 Executing the Test .................................................................................................................... 6-10 Using the Test Results .............................................................................................................. 6-12 Overall Procedure Summary .................................................................................................... 6-14 PLC-Based Hall-Effect Reference............................................................................................ 6-14 Power-On Phasing Search ............................................................................................................ 6-15 Two-Guess Phasing Search ...................................................................................................... 6-16 Stepper-Motor Phasing Search ................................................................................................. 6-16 Custom Phasing Search Methods ............................................................................................. 6-17 Final Phase Correction with Index Pulse ...................................................................................... 6-21 What To Do Next.............................................................................................................................. 6-21 6 ......................................... Setting Up PMAC2 For Velocity or Torque Control 7-1 PMAC2 User’s Manual – 15 March 1997 v 3A0-602413-363 Single Output Command..................................................................................................................... 7-1 Hardware Setup................................................................................................................................... 7-1 DAC Output Signals ....................................................................................................................... 7-1 Amplifier Enable and Fault Interface ............................................................................................. 7-2 Encoder Feedback........................................................................................................................... 7-2 Supplemental Flags......................................................................................................................... 7-2 Other Signals .................................................................................................................................. 7-2 PMAC2 Parameter Setup .................................................................................................................... 7-2 Parameters to Set Up Global Hardware Signals ............................................................................. 7-2 Servo Clock Frequency Control: I900, I901, I902............................................................................... 7-2 Hardware Clock Frequency Control: I903, I907................................................................................. 7-3 DAC Strobe Control: I905, I909 ................................................................................................ 7-4 Parameters to Set Up Per-Channel Hardware Signals .................................................................... 7-4 Encoder Decode Control: I9n0 ................................................................................................... 7-4 Output Mode Control: I9n6 ........................................................................................................ 7-4 Output Inversion Control: I9n7 .................................................................................................. 7-4 Parameters to Set Up Motor Operation........................................................................................... 7-5 Commutation Enable: Ix01......................................................................................................... 7-5 Command Output Address: Ix02................................................................................................ 7-5 7 ........................................ Setting Up PMAC2 For Pulse-and-Direction Control 8-1 Pulse-And-Direction Format Input ..................................................................................................... 8-1 Hardware Connection ......................................................................................................................... 8-1 Signal Timing...................................................................................................................................... 8-2 Parameter Setup .................................................................................................................................. 8-3 Parameters to Set Up Global Hardware Signals ............................................................................. 8-3 PFM Clock Frequency Control: I903, I907, I993................................................................................ 8-3 PFM Pulse Width: I904, I908, I994 ........................................................................................... 8-5 Parameters to Set Up Per-Channel Hardware Signals .................................................................... 8-6 Output Mode Control: I9n6 ........................................................................................................ 8-6 Output Inversion Control: I9n7 .................................................................................................. 8-6 PFM Direction Inversion Control: I9n8 ..................................................................................... 8-6 Encoder Decode Control: I9n0 ................................................................................................... 8-6 Parameters to Set Up Basic Motor Operation................................................................................. 8-7 Activation and Mode: Ix00, Ix01 ............................................................................................... 8-7 Command Output Address: Ix02................................................................................................ 8-7 Encoder Conversion Table ......................................................................................................... 8-8 vi PMAC2 User’s Manual – 15 March 1997 3A0-602413-363 Feedback Addresses: Ix03, Ix04............................................................................................... 8-12 Scale Factors: Ix08, Ix09.......................................................................................................... 8-12 Output (Frequency) Limit: Ix69 ............................................................................................... 8-12 Parameters to Set Up Motor Servo Gains ..................................................................................... 8-12 Proportional Gain: Ix30............................................................................................................ 8-13 Derivative Gain: Ix31 ............................................................................................................... 8-13 Velocity Feedforward Gain: Ix32............................................................................................. 8-13 Integral Gain: Ix33, Ix34 .......................................................................................................... 8-13 Acceleration Feedforward Gain: Ix35 ...................................................................................... 8-13 Notch Filter Parameters: Ix36 - Ix39 ........................................................................................ 8-13 Testing the Setup............................................................................................................................... 8-15 Preparing for the Test ................................................................................................................... 8-15 Executing the Open-Loop Test ..................................................................................................... 8-15 Troubleshooting the Open-Loop Test........................................................................................... 8-15 Executing the Closed-Loop Test................................................................................................... 8-17 Troubleshooting the Closed-Loop Test ........................................................................................ 8-17 8 ............................................................Using PMAC2 with MACRO Interface 9-1 Introduction......................................................................................................................................... 9-1 Hardware Setup................................................................................................................................... 9-1 Parameter Setup .................................................................................................................................. 9-2 Ring Configuration ......................................................................................................................... 9-2 I995: MACRO Role/Status......................................................................................................... 9-2 I996: MACRO Node Activation................................................................................................. 9-2 I1000: MACRO Node Auxiliary Function Enable.............................................................................. 9-3 I1001: MACRO Ring Check Control......................................................................................... 9-3 I1002: MACRO Node Protocol Type Control............................................................................ 9-3 I1003: MACRO Auxiliary Timeout Control .............................................................................. 9-3 Ring Cycle Frequency Control ....................................................................................................... 9-4 Feedback Processing in Encoder Conversion Table ....................................................................... 9-4 Type 0 Nodes.............................................................................................................................. 9-4 Type 1 Nodes.............................................................................................................................. 9-5 Both Protocol Types ................................................................................................................... 9-5 Feedback Address I-variables: Ix03, Ix04 .................................................................................... 9-11 E. Command Output Address I-variables: Ix02............................................................................ 9-11 Flag Address I-variables: Ix25...................................................................................................... 9-15 Commutation Position Feedback Address: Ix83........................................................................... 9-17 PMAC2 User’s Manual – 15 March 1997 vii 3A0-602413-363 Commutation Cycle Size: Ix70, Ix71............................................................................................ 9-19 Current Loop Feedback Address: Ix82 ......................................................................................... 9-19 9 ......................................................... Setting Up PMAC2 for MLDT Feedback 10-1 Introduction....................................................................................................................................... 10-1 Interface Type............................................................................................................................... 10-1 Signal Formats .............................................................................................................................. 10-1 Hardware Setup................................................................................................................................. 10-2 PMAC2 Hardware-Control Parameter Setup .................................................................................... 10-3 PFMCLK Frequency: I903 & I907............................................................................................... 10-3 PFM Output Frequency: Mn07..................................................................................................... 10-3 PFM Pulse Width: I904 & I908.................................................................................................... 10-5 FM Format Select: I9n6................................................................................................................ 10-5 MLDT Feedback Select: I9n0....................................................................................................... 10-5 PMAC2 Conversion Table Processing Setup.................................................................................... 10-6 Method and Address: Entry First Line.......................................................................................... 10-6 Bits Enabled: Entry Second Line.................................................................................................. 10-7 Maximum Change: Entry Third Line ........................................................................................... 10-7 Table Result Register.................................................................................................................... 10-7 Example ........................................................................................................................................ 10-7 PMAC2 Servo Loop I-Variable Setup .............................................................................................. 10-8 Position Loop Feedback Address: Ix03 ........................................................................................ 10-8 Velocity Loop Feedback Address: Ix04 ....................................................................................... 10-8 Master Position Address: Ix05...................................................................................................... 10-8 Absolute Power-Up Position Address: Ix10 ................................................................................. 10-8 Example ........................................................................................................................................ 10-9 Scaling the Feedback Units............................................................................................................... 10-9 Motor Units................................................................................................................................... 10-9 Axis User Units............................................................................................................................. 10-9 viii PMAC2 User’s Manual – 15 March 1997 3A0-602413-363 10 ...................................................... PMAC2 General Purpose I/O Use 11-1 JIO Port ............................................................................................................................................. 11-1 Hardware Characteristics.............................................................................................................. 11-1 Suggested M-Variables................................................................................................................. 11-1 Direction Control .......................................................................................................................... 11-2 Inversion Control .......................................................................................................................... 11-3 Alternate Uses............................................................................................................................... 11-3 Multiplexer Port (JTHW).................................................................................................................. 11-3 Hardware Characteristics.............................................................................................................. 11-4 Suggested M-Variables................................................................................................................. 11-4 Direction Control .......................................................................................................................... 11-4 Inversion Control .......................................................................................................................... 11-5 Alternate Uses............................................................................................................................... 11-5 JANA Port......................................................................................................................................... 11-6 Hardware Characteristics.............................................................................................................. 11-6 Multiplexing Principle .................................................................................................................. 11-6 Analog Data Table........................................................................................................................ 11-7 Servo Feedback Use ................................................................................................................... 11-13 Absolute Power-On Position ...................................................................................................... 11-14 11 ................................. Using the Position Compare Feature on PMAC2 12-1 Software-Configurable Hardware Registers ..................................................................................... 12-1 Principle of Operation....................................................................................................................... 12-2 Scaling and Offset of Position Compare Registers ........................................................................... 12-3 Initial Setup....................................................................................................................................... 12-3 Setting Up for a Single Pulse Output............................................................................................ 12-3 Setting Up for Multiple Pulse Outputs.......................................................................................... 12-4 Example.................................................................................................................................... 12-5 Converting from Motor and Axis Coordinates.................................................................................. 12-5 PMAC2 User’s Manual – 15 March 1997 ix 3A0-602413-363 12 .............................. Using the PMAC2 to Interrupt the Host Computer 13-1 Programmable Interrupt Controller (PIC) ......................................................................................... 13-1 Interrupt Controller Structure............................................................................................................ 13-1 PIC Registers .................................................................................................................................... 13-2 Interrupt Source Signals.................................................................................................................... 13-3 x PMAC2 User’s Manual – 15 March 1997 3A0-602413-363 Figures Figure Title Figure 1-1. PMAC2 Block Diagram ........................................................................................ 2-1 Figure 1-2. PMAC2 Gate Array IC.......................................................................................... 2-2 Figure 2-1. PMAC2 Gate Array IC Clock Control .................................................................. 3-3 Figure 2-2. PMAC2 Gate Array IC Output Channel................................................................ 3-4 Figure 2-3. PMAC2 Gate Array IC Encoder/Flag Channel ..................................................... 3-5 Figure 2-4. PMAC2 Gate Array IC Input Channel .................................................................. 3-5 Figure 2-5. DSP Gate Command Output Registers.................................................................. 3-7 Figure 3-1. PMAC/PMAC2 Commutation with Analog Current Loop ................................... 4-4 Figure 3-2. PMAC2 Commutation with Digital Current Loop ................................................ 4-5 Figure 3-3. Digital PWM Generation (Per Phase) ................................................................. 4-16 Figure 3-4. PMAC2 Digital Current Loop ............................................................................. 4-33 Figure 4-1. PMAC/PMAC2 Commutation with Analog Loop ................................................ 5-2 Figure 4-2. Hall-Effect Waveforms With Zero Offset ............................................................ 6-13 Figure 9-1. RPM Signal Format............................................................................................. 10-2 Figure 9-2. DPM Signal Format............................................................................................. 10-2 Figure 11-1. Compare Function .............................................................................................. 12-4 Figure 11-2. Setup For Multiple Pulses .................................................................................. 12-5 PMAC2 User’s Manual – 15 March 1997 xi 3A0-602413-363 Tables Table Title Table 3-1. PWM Command Output Addresses (Y-registers) ................................................. 4-13 Table 3-2. MACRO Ix02 Values ............................................................................................ 4-13 Table 3-3. ADC Current Feedback Addresses (Y-registers)................................................... 4-14 Table 3-4. MACRO Ix82 Values ............................................................................................ 4-14 Table 3-5. Commutation Position Feedback Addresses (X-registers) ................................... 4-18 Table 3-6. MACRO Type 0 Or Type 1 Protocol Ix83 Values ............................................... 4-19 Table 3-7. Mapping The Image Registers.............................................................................. 4-23 Table 3-8. Commutation Polarity Match Sample Test............................................................ 4-29 Table 3-9. Commanded direct current registers ...................................................................... 4-34 Table 3-10. Actual direct current registers.............................................................................. 4-34 Table 4-1. DAC An Command Output Addresses (Y-registers)............................................... 5-6 Table 4-2. MACRO Command Output Registers .................................................................... 5-6 Table 4-3. Commutation Position Feedback Addresses (X-registers) ...................................... 5-8 Table 4-4. MACRO Commutation Feedback Registers........................................................... 5-8 Table 5-1. Phase Position Angle Registers ............................................................................... 6-4 Table 5-2. Direct Integrator Output Registers........................................................................... 6-6 Table 5-3. Quadrature Integrator Output Registers................................................................... 6-7 Table 5-4. The Values Of M124 Through M128 For Each Position....................................... 6-11 Table 6-1. DACnA Command Output Addresses (Y-registers)................................................ 7-5 Table 6-2. Type 0 MACRO Ix02 values ................................................................................... 7-5 Table 6-3. Type 1 MACRO Ix02 values ................................................................................... 7-6 Table 7-1. C Command Register Addresses ............................................................................. 8-7 Table 7-2. Ix02 Required Values ............................................................................................. 8-8 Table 7-3. Counters and Timer Sets Addresses ........................................................................ 8-9 Table 7-4. Configuration Of The Encoder Conversion Table ................................................... 8-9 Table 8-1. Setup Words For Each Node ................................................................................... 9-5 Table 8-2. Command Outputs To MACRO Registers ............................................................ 9-12 Table 8-3. Commutation Position Feedback Address ............................................................. 9-17 Table 10-1. The A/D Converter Data Table............................................................................ 11-7 Table 10-2. Cycling Through All 8 Pairs Of ADCs In Unsigned Mode ................................. 11-9 Table 10-3. Values Of Ix10 To Be Used For Each Input...................................................... 11-14 xii PMAC2 User’s Manual – 15 March 1997 3A0-602413-363 2 Introduction PMAC Overview The Delta Tau Data Systems, Inc. Programmable Multi-Axis Controller2 (PMAC2) is a family of high-performance servo motion controllers capable of commanding up to eight axes of motion simultaneously with a high level of sophistication. Through the power of a Digital Signal Processor (DSP), PMAC2 offers a price/performance ratio for multi-axis control that was not previously available. Motorola's DSP56002 is the CPU for PMAC2, and it handles all the calculations for all eight axes. There are six hardware versions of PMAC2: the PMAC2-PC, the PMAC2-PC Ultralite, the PMAC2-Lite, the PMAC2-VME, the PMAC2-VME Ultralite, and the MiniPMAC2. These cards differ from each other in their form factor, the nature of the bus interface, and in the availability of certain I/O ports. All versions of the card have virtually identical on-board firmware, so PMAC2 programs written for one version will run on any other version. Any version of PMAC2 may run as a standalone controller, or it may be commanded by a host computer, either over a serial port or over a bus port. ANALOG Option INPUT/OUTPUT I/O BUFFERS I/O BUFFERS EXTRA SRAM 16Kx24 PARAMETER STORAGE 12/12A MACRO I/O ASIC SERIAL DISPLAY HANDWHEEL COMPARE I/O BUFFERS I/O BUFFERS DRIVERS SERIAL COMMUNICATIONS INTERFACE Option 16 FLASH 512Kx8 FIRMWARE & USER BACKUP DPRAM 8Kx16 INTERFACE COMMUNICATIONS BUS INTERFACE Option 2 4-AXIS SERVO ASIC INPUT/ OUTPUT BUFFERS 4-AXIS SERVO ASIC INPUT/ OUTPUT BUFFERS MACHINE PORT 1 WATCHDOG TIMER MACHINE PORT 2 CPU 24-BIT 40/60/80 MHz DSP56002 MACHINE PORT 3 Data & Address Busses SRAM 128Kx24 ACTIVE MEMORY MACHINE PORT 4 EXPANSION 8/16 12-BIT ADCs MULTIPLEXER Option 1 BUS PORT Figure 1-1. PMAC2 Block Diagram PMAC2 User’s Manual – 15 March 1997 2-1 3A0-602413-363 Flexibility As a general purpose controller, PMAC2 can serve in a wide variety of applications, from those requiring sub-microinch precision to those needing hundreds of kilowatts or horsepower. Its diverse uses include robotics, machine tools, paper and lumber processing, assembly lines, food processing, printing, packaging, material handling, camera control, automatic welding, silicon wafer processing, laser cutting, and many others. 6 ENCODER 1 OUTPUT1 A,B,C FLAG 1 ADCIN1 A,B ENCODER 2 OUTPUT2 A,B,C FLAG 2 ADCIN2 A,B ENCODER 3 OUTPUT3 A,B,C FLAG 3 ADCIN3 A,B ENCODER 4 OUTPUT4 A,B,C FLAG 4 ADCIN4 A,B ENCODER/FLAG STATUS & CONTROL OUTPUT/ADCIN CONTROL 9 2 3 9 2 3 9 2 3 9 6 2 6 2 6 2 6 2 2 24-Bit DATA BUS 2 6-Bit ADDRESS BUS Figure 1-2. PMAC2 Gate Array IC Configuration For a Task PMAC2 is configured for a particular application by choice of the hardware set (through options and accessories), configuration of parameters, and the writing of motion and PLC programs. Each PMAC2 possesses firmware capable of controlling eight axes. The eight axes can be all associated together for completely coordinated motion; each axis can be put in its own coordinate system for eight completely independent operations; any intermediate arrangement of axes into coordinate systems is also possible. 2-2 PMAC2 User’s Manual – 15 March 1997 3A0-602413-363 The PMAC2 CPU communicates with the axes through specially designed custom gate array ICs, referred to as DSPGATES. Each of these ICs can handle four analog output channels, four encoders as input, and four analog-derived inputs from accessory boards. One PMAC2 can utilize from one to four of these gate array ICs, so specifying the hardware configuration amounts to counting the numbers and types of inputs and outputs. Up to 16 PMAC2 may be ganged together with complete synchronization, for a total of 128 axes. PMAC2 Is a Computer It is important to realize that PMAC2 is a full computer in its own right, capable of standalone operation with its own stored programs. Furthermore, it is a realtime, multitasking computer that can prioritize tasks and have the higher priority tasks pre-empt those of lower priority (most personal computers are not capable of this). Even when used with a host computer, the communications should be thought of as those from one computer to another, not as computer to peripheral. In these applications, the ability to run multiple tasks simultaneously, properly prioritized, can take a tremendous burden off the host computer (and its programmer!), both in terms of processor time, and of task-switching complexity. Manual Layout This manual provides a quick step-by-step guide for the beginner setting up a typical system, as well as explaining how to use the various features available on PMAC2. It is organized by subject (safety, I/O, servos, trajectories, etc.) to allow quick access by the area of concern. The subjects are ordered by the typical sequence of events a user will go through to set up a system. The manual organizes the commands in alphabetical order, and the variables, registers, jumpers and connectors in numerical order. There is extensive crossreferencing between the chapters. Any variable, command, register, jumper, or connector mentioned in chapter 2 is covered in more detail in the appropriate reference chapters. As you read through the chapters, you may well find topics or depth of coverage that you do not need at the time. Simply skip these chapters and proceed to a chapter that is of more immediate use to you. This manual assumes the system integrator who is responsible for this installation knows the basics of working in a Microsoft® Windows environment and has more than a basic understanding of electronics, machine tool technology, and the PMAC2 motion control board. If any questions about a particular aspect of the installation arise, do not attempt the task until a thorough understanding is gained. Feel free to contact Delta Tau Data Systems, Inc. technical support at any time during installation. Refer to the Technical Support section below for information on contacting our technical support department. PMAC2 User’s Manual – 15 March 1997 2-3 3A0-602413-363 Conventions Used in This Manual The following conventions are used throughout the manual: <ENTER> <CTRL+F4> OPEN PROGRAM Italic text inside arrows is used to represent keyboard keys or key combinations. Mono-spaced is used for code listings. Information which, if not observed, may cause serious injury or death. Information which, if not observed, may cause damage to equipment or software. A note concerning special functions or information of special interest. Electrostatic Sensitive Device. Use ESD control measures when handling, packing, and shipping (reference Appendix A). Organization Chapter 1 - Introduction: This section gives a brief explanation of what PMAC2 does, the layout of the manual, general safety recommendations, related technical documentation, and product support information Chapter 2 - Basic Motor Setup on PMAC2: This chapter provides hardware and software configuration to specify a specific mode of operation Chapter 3 - Setting Up PMAC2 for Direct PWM Control: This chapter details how to perform digital current loop closure to manually set up hardware and software features properly. Chapter 4 - Setting Up PMAC2 for Sine-Wave Output Control: This chapter provides information on how to set up the commutation scheme if PMAC2 is performing the commutation for a motor, but not the digital current loop. Chapter 5 – Setting Up PMAC2 Commutation (Direct PWM or Sine Wave): This chapter details how to confirm the results of the synchronous motor polarity match tested in previous sections, as well as how to test the polarity for asynchronous induction motors. Chapter 6 - Setting Up PMAC2 For Velocity or Torque Control: This chapter explains velocity or torque commands, typically encoded as an analog signal voltage level, required when PMAC2 is not performing the commutation for a motor. Chapter 7 – Setting Up PMAC2 For Pulse-and-Direction Control: This chapter details the procedures for commanding stepper-motor drives that require pulse-anddirection format input, or stepper-replacement servo drives either in open-loop or in closed-loop fashion. 2-4 PMAC2 User’s Manual – 15 March 1997 3A0-602413-363 Chapter 8 - Using PMAC2 with MACRO Interface: This chapter describes the MACRO (Motion and Control Ring Optical) ring interface between PMAC2 and drives and I/O modules, and how it can greatly simplify the wiring of a motion control or I/O system. Chapter 9 - Setting Up PMAC2 for MLDT Feedback: This chapter details providing direct interface to magnetostrictive linear displacement transducers (MLDTs), to provide absolute position information in rugged environments. Chapter 10 – PMAC2 General Purpose I/O Use: This chapter describes the JIO port’s 32 discrete digital I/O lines and provides information for configuring them individually for input or output using an inverting or non-inverting format. Chapter 11 – Using the Position Compare Feature on PMAC2: This chapter explains the position compare feature on PMAC2 and describes how it provides a very fast and very accurate compare output function based on the actual position counter. Chapter 12 - Using the PMAC2 to Interrupt the Host Computer: This chapter describes the procedures that allow PMAC2 to interrupt the host computer over the PC bus using any of eight built-in programmable interrupt controller (PIC) signals. Safety Summary The following are general safety precautions not related to any specific procedures and therefore may not appear elsewhere in this publication. These are recommended precautions that personnel must understand and apply during many phases of operation and maintenance. Keep Away From Live Circuits Do not replace components or make adjustments inside equipment with power applied. Under certain conditions, dangerous potentials may exist when power has been turned off due to charges retained by capacitors. To avoid casualties, always remove power and discharge and ground a circuit before touching it. Live Circuit Contact Procedures Never attempt to remove a person from a live circuit with your bare hands. To do so is to risk sure and sudden death. If a person is connected to a live circuit, the following steps should be taken: a. Call for help immediately b. De-energize the circuit, if possible. c. Use a wood or fiberglass hot stick to pull the person free of the circuit. d. Apply cardiopulmonary resuscitation (CPR) if the person has stopped breathing or is in cardiac arrest. PMAC2 User’s Manual – 15 March 1997 2-5 3A0-602413-363 e. Obtain immediate medical assistance. Electrostatic Sensitive Devices Various circuit card assemblies and electronic components may be classified as Electrostatic Discharge (ESD) sensitive devices. Equipment manufacturers recommend handling all such components in accordance with the procedures described in Appendix A. FAILURE TO DO SO MAY VOID YOUR WARRANTY. Magnetic Media Do not place or store magnetic media (tapes, discs, etc.) within ten feet of any magnetic field. Related Technical Documentation MANU AL NUMB ER MANUAL TITLE 3A0-602204-363 PMAC & PMAC2 Software Reference 3A0-602598-363 PMAC2-PC and PMAC2-Lite Hardware Reference Manual 3A0-602415-363 PMAC2-PC Ultralite Hardware Reference Manual 3A0-602413-363 PMAC2-VME Hardware Reference Manual 3A0-602643-363 PMAC2-VME Ultralite Hardware Reference Manual Technical Support Delta Tau is happy to respond to any questions or concerns you have regarding PMAC. You can contact the Delta Tau Technical Support Staff by the following methods: By Telephone For immediate service, you can contact the Delta Tau Technical Support Staff by telephone Monday through Friday. Our support line hours and telephone numbers are listed below. By FAX and E-Mail You can FAX or E-Mail your request or problem to us overnight and we will deal with it the following business day. Our FAX numbers and E-Mail addresses are listed below. Please supply all pertinent equipment set-up information. 2-6 PMAC2 User’s Manual – 15 March 1997 3A0-602413-363 PMAC2 User’s Manual – 15 March 1997 2-7 3A0-602413-363 Bulletin Board Service (BBS) You can also leave messages on one of our Bulletin Board Services (BBSs). The BBSs are provided for our Customers, Distributors, Representatives, Integrators, et al. We invite you to use this service. You can download & upload files and read posted bulletins and Delta Tau newsletters. Messages may be left for anyone who is a member/user of the Bulletin Board System(s). All you need is a modem and Procomm-Plus or similar communications program. Many Download-Upload Protocols such as Z-Modem are supported. World Headquarters Delta Tau Data Systems, Inc. 9036 Winnetka Avenue Northridge CA, 91324 Eastern U.S. Office Delta Tau Data Systems, Inc. 10754 Decoursey Pike Ryland Heights, KY 41015 European Office Delta Tau Data Systems International Industrieweg 175, Suite 7 3044 AS Rotterdam, Netherlands Support Hot Line Monday through Friday 8:30am to 4:30pm PST Voice: (818) 998-2095 FAX: (818) 998-7807 BBS: (818) 407-4859 E-Mail: [email protected] Support Hot Line Monday through Friday 8:30am to 4:30pm EST Voice: (606) 356-0600 FAX: (606) 356-9910 BBS: (606) 356-6662 E-Mail: [email protected] Support Hot Line Monday through Friday 8:00am to 4:00pm GMT Voice: 31-10-462-7405 FAX: 31-10-245-0945 BBS: TBD E-Mail: [email protected] BBS Settings: Baud Rates: 1200 to 19.2 8 - data bits, 1 - stop bit, No Parity 2-8 PMAC2 User’s Manual – 15 March 1997 3A0-602413-363 3 Basic Motor Setup on PMAC2 Controlling Motors PMAC2 has many modes for controlling motors. A major part of the initial setup of a PMAC2 is the hardware and software configuration to specify a specific mode of operation. The commonly used modes of operation are: ♦ Analog command of velocity-mode drives ♦ Analog command of torque-mode drives ♦ Analog command of sine-wave input drives ♦ Direct-PWM control of power-block drives ♦ Pulse-and-direction command of stepper or stepper-replacement servo drives Hardware Setup The machine interface ports on the PMAC2 itself are not designed to be connected directly to drives, encoders, flags, etc. Almost always an interface board is required. Delta Tau provides a family of 2-axis interface boards (the ACC-8 family) that cover most common interfaces; large-volume users may want to design and build their own interface boards optimized for their own purposes. The interface boards currently available from Delta Tau are: ♦ ACC-8E: Dual analog output per axis for velocity, torque, or sinewave commands; encoder, hall, and optically isolated flag feedback; DIN-rail mountable ♦ ACC-8F: Direct PWM output; serial digital current feedback; encoder, hall, and optically isolated flag feedback; DIN-rail mountable ♦ ACC-8FP: Direct PWM output; serial digital current feedback; encoder, hall, and optically isolated flag feedback; panel-mountable PMAC2 User’s Manual – 15 March 1997 3-1 3A0-602413-363 ♦ ACC-8K1: Fanuc C/S-Series interface; direct PWM output, analog current feedback; encoder, hall, and optically isolated flag feedback; DIN-rail mountable ♦ ACC-8K2: Kollmorgen IPB interface; direct PWM output, analog current feedback; encoder, hall, and optically isolated flag feedback; DIN-rail mountable ♦ ACC-8S: Pulse-and-direction output; encoder feedback by option only; optically isolated flag feedback; DIN-rail mountable There is a single flat-cable connection from the 100-pin JMACHn connector on the PMAC2 to the matching connector on the ACC-8 board. The details of the connection between the ACC-8 board and the drives, encoders, hall sensors (if any), and flags are covered in the appropriate ACC-8 manual and the Hardware Setup section for each mode description, below. PMAC2 Parameter Setup Several PMAC2 I-variables must be specified for proper operation of the card in the desired operating modes. This section simply lists the important variables; details of how to set them up are covered in the appropriate section of the User’s Guide, and in the I-Variable Specification of the Software Reference. Parameters to Set Up Global Hardware Signals I-variables in the range I900-I909 (I990-I999 for a PMAC2 Ultralite) control operation of PMAC2 global and multi-channel hardware operation. These variables form the control registers of the DSPGATE1 & 2 ASICs on the PMAC2. I900 (I992 for an Ultralite) controls the maximum possible phase frequency (MaxPhase) for the card, and the PWM frequency for channels 1-4. I901 (I997 for an Ultralite) controls the phase clock frequency for the card, the rate at which commutation and current-loop updates are done, by specifying the divide-down from MaxPhase. I902 (I998 for an Ultralite) controls the servo clock frequency for the card, the rate at which command position interpolation and the position/velocity servo algorithms are executed. I903 controls the hardware clock frequencies for channels 1-4; I907 controls the hardware clock frequencies for channels 5-8; I993 controls the hardware clock frequencies for supplementary channels 1* and 2* (the only channels on an Ultralite). These almost never need to be changed from the default. I904 controls the PWM deadtime and PFM pulse width for channels 1-4; I908 does the same for channels 5-8; I994 does the same for supplementary channels 1* and 2* (the only channels on an Ultralite). I905 controls the DAC strobe signal for channels 1-4; I909 does the same for channels 5-8. 3-2 PMAC2 User’s Manual – 15 March 1997 3A0-602413-363 20 MHz x6 Phase Locked Loop 120 MHz PWM Count PWM Up/Down Counter SIGN DIR 16 MAX PHASE PWM Max Count PWM Dead Time/ PFM Pulse Width 24 Data DT/PW 8 40 MHz 1 3 6 Address 16 Encoder Sample Clock Control n=0-7 PFM Clock Control 1 n 2 SCLK n=0-7 DAC Clock Control 1 n 2 n=0-7 PFMCLK 1 n 2 DACCLK 1 n 2 n=0-7 ADC Clock Control Int/Ext Phase Clock Int/Ext Servo Clock Phase Clock Control Servo Clock Control n=0-15 1 n+1 n=0-15 ADCCLK PHASE 1 n+1 External Phase SERVO External Servo Figure 2-1. PMAC2 Gate Array IC Clock Control Parameters to Set Up Per-Channel Hardware Signals Each machine interface channel n on the PMAC2 has several setup I-variables to configure the outputs and the feedback for that channel. These variables form part of the control word for the channel in the DSPGATE1 ASIC. The ten’s digit of the I-variable specifies which channel is being controlled; for example I910 controls the encoder decode for Channel 1. The generic reference for the variable uses the letter n for the channel digit; I9n0 refers generally to the encoder decode variable for Channel n, where n = 1 to 8. Usually a given Channel n is used for the PMAC2 Motor x of the same number (i.e. n = x), but this does not have to be the case. (These variables are not active on Ultralite versions of PMAC2, because the Ultralite boards have a MACRO ring interface instead of the local machine interface channels.) The most important of these variables are I9n0 and I9n6. I9n0 specifies the encoder decode for channel n, quadrature or pulse-and-direction, including the direction sense. I9n6 specifies which output signal modes are used for Channel n: DAC for analog control, PWM (pulse width modulation) for direct powerblock control, and/or PFM (pulse frequency modulation) for stepper motor PMAC2 User’s Manual – 15 March 1997 3-3 3A0-602413-363 control. Refer to the instructions for setup of the specific mode you are using, below, or the I-variable specification in the Software Reference for details. PWM Frequency/ Deadtime Control * OUTPUT SELECT 24 Data A,B 6 Address Pulse Width Output A Modulator Command Value DAC Shift Register Pulse Width Modulator Output B Command Value Output C Command Value C PWMATOP PWMABOT DACCLK DAC PWMBTOP PWMBBOT DAC Shift Register DACSTROB DAC Pulse Width Modulator PWMCTOP PWMCBOT Pulse Frequency DIR Modulator PULSE DAC Frequency/ Strobe Control * PFM Frequency Control * * To encoder/Timer input multiplexer Indicates that one register controls all output channels on IC Figure 2-2. PMAC2 Gate Array IC Output Channel 3-4 PMAC2 User’s Manual – 15 March 1997 3A0-602413-363 EQU Q S T AENA T Hall Sensor Decode Digital Delay Filter U V W =? Compare A Position =? Compare B Position S Compare Auxiliary Flags (Subcount, Hall, Fault Code) Auto-Increment Channel Status USER -LIM +LIM HOME Digital Delay Filter Flag Capture Control Channel Control CTRL 24 Data Capture Flags FAULT INDEX B A 6 Address Flag Capture Position CTRL D.D.F. Index Gating Digital Delay Filter CTRL MUX Encoder Inputs Pulse Phase Capture Position CTRL CTRL Decode Control Servo Capture Position Counter (to 40MHz) Timers Dir Time Between Last 2 Counts (to 40/120MHz) Time Since Last Count (From Pulse Generator) Servo Phase Clock Clock Figure 2-3. PMAC2 Gate Array IC Encoder/Flag Channel 24 Data ADC Input Value A ADC Shift Register A ADC Input Value B ADC Shift Register B ADCINA ADCINB 6 Address ADC Frequency Control ADCCLK * ADC Strobe Control * ADCSTROBE PHASE CLOCK that one register controls * Indicates all ADC input channels on IC Figure 2-4. PMAC2 Gate Array IC Input Channel PMAC2 User’s Manual – 15 March 1997 3-5 3A0-602413-363 Parameters to Set Up Motor Operation Each Motor x has setup I-variables to permit specific software configuration of that motor’s control algorithms. The hundred’s digit of the I-variable specifies which motor is being configured; for example I100 activates or de-activates Motor 1. The generic reference for the variable uses the letter x for the motor digit; Ix00 refers generally to the activation variable for Motor x, where x = 1 to 8. Most of the software configuration of a motor involves setting proper values for these variables, as explained in the following sections. This section has a quick survey of the key variables, and the variables that are common to all modes. Activating the Motor The Ix00 motor activation parameter must be set to 1 for any motor that is to be used on PMAC2. It should be set to 0 for any motor that is not used, so PMAC2 will not waste computation time on that motor. Does PMAC Commutate the Motor? The Ix01 commutation enable parameter must be set to 1 if PMAC2 is performing the commutation and/or digital current loop for the motor. It must be set to 0 for any motor if PMAC2 is performing neither the commutation nor digital current loop for the motor. 3-6 PMAC2 User’s Manual – 15 March 1997 3A0-602413-363 Command Output Address Ix02 specifies the address(es) of the register(s) to which PMAC2 writes the command output(s) for the motor. The default values of Ix02 contain the address of the A command register in DSPGATE1. For the machine interface channel n, where n = x; these values are suitable for analog output modes with and without commutation, and for direct PWM control. OUTPUT1 A,B,C CLOCK CONTROL ADCIN1 A,B MACRO RING READ REGISTERS (48) ENCODER/FLAG1 6 2 12 8 8 MACRO RING SHIFT REGISTERS 2 OUTPUT2 A,B,C ADCIN2 A,B 6 DEDICATEDHARDWARE USE OF I/O PINS 2 12 MACRO RING WRITE REGISTERS (48) ENCODER/FLAG2 OUTPUT/ADCIN CONTROL 2 MACRO RING STATUS & CONTROL ENCODER/FLAG STATUS & CONTROL 2 I/O & PIN USE CONTROL 24-Bit DATA BUS 2 GENERAL I/O 60 GENERALPURPOSE USE OF I/O PINS 7-Bit ADDRESS BUS Figure 2-5. DSP Gate Command Output Registers Position-Loop Feedback Address Ix03 specifies the address of the register PMAC2 reads for the position-loop feedback for the motor. This is almost always the address of a processed feedback data register in the encoder conversion table. With the default conversion table, the default values of Ix03 specify the processed data for Encoder n, where n = x; these values are suitable for most applications, regardless of the command output mode. Refer to the User’s Guide section on the encoder conversion table for more information. Velocity-Loop Feedback Address PMAC2 User’s Manual – 15 March 1997 3-7 3A0-602413-363 Ix04 specifies the address of the register PMAC2 reads for the velocity-loop feedback for the motor. It works just like Ix03, and contains the same address as Ix03 unless dual feedback is used for the motor. Flag Address Ix25 specifies the address of the register PMAC2 uses for its flag information. The flags used are HOMEn, PLIMn, MLIMn, USERn, FAULTn, AENAn, CHCn, CHTn, CHUn, CHVn, and CHWn. The default values of Ix25 specify the flag register for machine interface channel n, where n = x. Power-Up Mode Ix80 specifies whether PMAC will try to control the motor immediately on power-up/reset, performing a phasing search if necessary; or whether it will put the motor in a killed state on power-up/reset and await a command to enable the motor. Commutation Parameters If Ix01 is set to 1, variables Ix70 to Ix84 for the motor must be set properly to perform the commutation and/or current loop closure in the PMAC2. The settings of these variables are explained in one of the following sections: Setting Up PMAC2 for Direct PWM Control, or Setting Up PMAC2 for Sine-Wave Output Control. 3-8 PMAC2 User’s Manual – 15 March 1997 3A0-602413-363 4 Setting Up PMAC2 for Direct PWM Control Introduction The instructions given in this section are for the first-time setup with an otherwise unknown interface. For a given interface to the drive, motor and feedback device, many parts of the setup will simply be taken from a list, and will not have to be tested, or tested as thorougly as described in this chapter. A list of configurationspecific settings should come with the manual for each particular interface or One of PMAC2's important new features is the ability to close motor current loops digitally. That is, the current control loop is closed by using digital computation operating on numerical values in registers rather than by using analog processing operating on voltage levels with op-amps. The digital techniques bring many advantages: ♦ There is no need for pot tweaking or personality modules ♦ There is no drift over temperature or time ♦ Computer analysis and autotuning are possible ♦ Gain values are easily stored for backup and copying onto other systems ♦ Adaptive techniques are possible. When performing digital current loop closure on the PMAC2, several hardware and software features must be set up properly to utilize the digital current loop and direct PWM outputs correctly. The following section details how to perform this setup manually. Delta Tau has new expert system PC software running under Microsoft Windows to walk you through this setup step-by-step, vastly simplifying the process. PMAC2 User’s Manual – 15 March 1997 4-1 3A0-602413-363 drive. Subsequent versions of the same setup should be even easier. Direct PWM Control Of Amplifiers This section explains how to set up PMAC2 for direct PWM control of amplifiers. In this mode, PMAC2 performs all of the control tasks for the motor, including commutation and digital current loop closure. The amplifier performs only the power conversion task. In this mode, PMAC2 outputs PWM voltage commands for each phase of the motor. If you are not using PMAC2 to perform this task for any of your motors, you may skip this section. Simply make sure that Ix82 is set to 0 for all of your activated motors, so PMAC2 will not try to close the current loop for them. Digital Current Loop Principle of Operation Traditionally, motor phase current loops have been closed in analog fashion, with op-amp circuits creating phase voltage commands from the difference between commanded and actual phase current signal levels. These analog phase voltage commands are converted to PWM format through analog comparison to a saw tooth waveform. PMAC2 permits digital closure of the motor current loops, mathematically creating phase voltage commands from numerical registers representing commanded and actual current values. These numerical phase voltage commands are converted to PWM format through digital comparison to an up/down counter that creates a digital saw tooth waveform. The analog current measurements must be converted to digital form with ADCs before the loop can be closed. Frames of Reference A very important advantage of the digital current loop is its ability to close the current loops in the field frame. To understand this advantage, some basic theoretical background is required. In a motor, there are three frames of reference that are important. The first is the stator frame, which is fixed on the non-moving part of the motor, called the stator. In a brushless motor, the motor armature windings are on the stator, so they are fixed in the stator frame. The second frame is the rotor frame, which is referenced to the mechanics of the moving part of the motor, called the rotor. This frame, of course, rotates with respect to the stator. For linear brushless motors, this is actually a translation, but because it is cyclic, we can easily think of it as a rotation. The third frame is the field frame, which is referenced to the magnetic field orientation of the rotor. In a synchronous motor such as a permanent-magnet brushless motor, the field is fixed on the rotor, so the field frame is the same as 4-2 PMAC2 User’s Manual – 15 March 1997 3A0-602413-363 the rotor frame. In an asynchronous motor such as an induction motor, the field slips with respect to the rotor, so the field frame and rotor frame are separate. Working in the Field Frame The physics of motor operation are best understood in the field frame. A current vector in the stator that is perpendicular to the rotor field (that is, current in the stator that produces a magnetic field perpendicular to the rotor magnetic field) produces torque. This component of the stator current is known as quadrature current. The output of the position/velocity loop servo algorithm is the magnitude of the commanded quadrature current. For diagnostic purposes on PMAC2, the O command can be used to set a fixed quadrature current command. A current vector in the stator that is parallel to the rotor field induces current in the rotor that changes the magnetic field strength of the rotor (when the stator and rotor field are rotating relative to each other). This component of the stator current is known as direct current. For an induction motor, this is required to create a rotor magnetic field. For a permanent-magnet brushless motor, the rotor magnets always produce a field, so direct current is not required, although it can be used to modify the magnetic field strength. On PMAC2, parameter Ix77 for motor x determines the magnitude of the direct current. Analog Loops in the Stator Frame In an amplifier with an analog current loop, the closure of the loops on the stator windings must be closed in the stator frame. The current measurements are in the stator frame and analog circuitry has no practical way to transform these. In such a system, the current commands must be transformed from the field frame in which they are calculated to the stator frame, and converted to voltage levels representing the individual stator phase current commands. These are compared to other voltage levels representing the actual stator phase current measurements. As the motor is rotating, and/or the field is slipping, these current values, command and actual, are AC quantities. Overall loop gain and system performance, are reduced at high frequencies (high speeds). The back EMF phase voltage, which acts as a disturbance to the current loop, is also an AC quantity. The current loop integral gain or lag filter, which is supposed to overcome disturbances, falls well behind at high frequencies. PMAC2 User’s Manual – 15 March 1997 4-3 3A0-602413-363 Magnetization Current Ix77 ' Id I a' Direct Current Command + DAC - dq Phase A Current Loop abc ' Iq va PWM Ia to Torque Command from Position/ Velocity Servo Va PI I b' + DAC Quadrature Current Command Vb PI - vb PWM E Ib Q - Phase B Current Loop - - Vc vc PWM + Balance Loop PMAC AMPLIFIER Figure 3-1. PMAC/PMAC2 Commutation with Analog Current Loop Digital Loops in the Field Frame In an system with a digital current loop, it is possible to close the current loops in the field frame (not all such systems do, however). Instead of transforming the current commands from field frame to stator frame before closing the loop, the actual current measurements are transformed from stator frame to field frame. In the field frame, a direct-current loop is closed, and a quadrature current loop is closed. This produces a direct-voltage command, and a quadrature-voltage command; these are transformed back into the stator frame to become phase-voltage commands, which are implemented as PWM values. The direct and quadrature current values are DC quantities, even as the motor is rotating and the field is slipping. Therefore, the high-frequency limitations of the servo loop are irrelevant. This provides significantly improved high-speed performance from identical motors and power electronics. Magnetization + Id Current Direct Current Ix77 Command PI + Vd - Va va PWM dq to abc P Vq Vb Vc vb PWM vc PWM Direct Current Loop Θ Torque Command Iq + from Position/ Quadrature Velocity Servo Current Command or 'O' Command PI + Id - P Iq Ia abc to dq Ib ADC ADC ia ib Quadrature Current Loop 4-4 PMAC2 User’s Manual – 15 March 1997 E 3A0-602413-363 Figure 3-2. PMAC2 Commutation with Digital Current Loop PMAC2 has a PI (proportional-integral) digital current loop. There is only one set of gains, which serves for both the direct current loop and the quadrature current loop. Tuning is best done on the direct current loop, because this will generate no torque, and therefore no movement. The current-loop autotuner in the PMAC Executive program uses the direct current loop to tune. This is valid even for permanent-magnet brushless motors where no direct current will be used in the actual application. It is important to remember that current loop performance is not load-dependent, so the motor does not need to be attached to the load during the tuning process (for position/velocity loop tuning, the load does need to be attached). Hardware Setup Usually the hardware connection between PMAC2 and the digital amplifier is made with integrated cables, either directly to the amplifier, or to an interface board. The following section details the individual signal line connections for those users who do not have an integrated connection solution. If you have a pre-designed connection system, refer to the appropriate manual for connection information. The connection between PMAC2 and the direct PWM digital amplifier is almost always made through an interface board. Typically this interface board works for 2 axes, connecting with a short 100-strand flat cable to one of PMAC2’s machine connectors. The interface board has connectors to the amplifiers, to the position feedback sensors, and to any flags used (overtravel limits, home, etc.). Existing Delta Tau boards for this style of connection at the time of this writing are: ♦ ACC-8F PWM Interface (requires A/D converters in the amplifier) ♦ ACC-8K1 Fanuc C- & SSeries Drive Interface ♦ ACC-8K2 Kollmorgen IPB Drive Interface All of the digital amplifier interface lines on PMAC2 itself are digital 5V signals. There is no optical isolation on PMAC2; any optical isolation must be provided on an interface board or in the amplifier. PMAC2 User’s Manual – 15 March 1997 4-5 3A0-602413-363 4-6 PMAC2 User’s Manual – 15 March 1997 3A0-602413-363 PWM Signal Outputs When PMAC2's digital current loop is used, the format of the output commands is virtually always digital pulse-width-modulated (PWM) signals. For each machine interface channel, PMAC2 has 3 pairs of top and bottom PWM signals, which can be used for the half-bridges of a 3-phase motor. Each of these 6 output signals is a differential line-driver pair, for a total of 12 PWM pins. These pins are named: ♦ PWMATOPn+PWMATOPn-(Phase A top transistor command) ♦ PWMABOTn+PWMABOTn-(Phase A bottom transistor command) ♦ PWMBTOPn+PWMBTOPn-(Phase B top transistor command) ♦ PWMBBOTn+PWMBBOTn-(Phase B bottom transistor command) ♦ PWMCTOPn+PWMCTOPn-(Phase C top transistor command)PWMCBOTn+PWMCBOTn-(Phase C bottom transistor command) where n is the PMAC2 channel number. These pins have alternate uses as DAC signals and pulse-and-direction outputs; PMAC2 parameters are used to configure them as PWM outputs (see below). ADC Interface Signals The actual phase current information is almost always brought in from serial The on- analog-to-digital converters (ADCs). For a multi-phase motor, this information is brought back for two of the phases, what PMAC calls the A and board B phase. These ADCs are not on the PMAC2; they are either in the amplifier, multiplexed or on the interface board. Four digital interface signals are required for each Option 12 pair of ADCs; the two serial inputs, an output clock, and an output strobe. ADCs are not Each of these signals is differential, for a total of 8 pins. These pins are suitable for named: current-loop feedback. ♦ ADC_DAAn+ADC_DAAn-(Phase A ADC serial input data) ♦ ADC_DABn+ADC_DABn-(Phase B ADC serial input data) ♦ ADC_CLKn+ADC_CLKn-(ADC clock output) ♦ ADC_STBn+ADC_STBn-(ADC strobe output) where n is the PMAC2 channel number. While each channel has its own pins for the clock and strobe outputs, the signals are actually common for 4 channels (1-4 and 5-8). PWM/ADC Phase Matching The current data brought back into PMAC2's Phase A input must be for the motor phase commanded by PMAC2's Phase A PWM output, whatever this phase is called on the motor and drive. The current data brought back into PMAC2 User’s Manual – 15 March 1997 4-7 3A0-602413-363 PMAC2's Phase B input must be for the motor phase commanded by PMAC2's Phase B PWM output, whatever this phase is called on the motor and drive. This may mean that PMAC2's name for the phase may not match the motor's and drive's name for the phase. For example, for a motor/drive system that proivides current feedback on Phases A and C, PMAC2's PWM Phase B outputs would be connected to the drive's Phase C PWM inputs, the drive's Phase C current feedback would be connected to PMAC2's Phase B ADC inputs, and PMAC2's Phase C outputs would be connected to the drive's Phase B PWM inputs. Amplifier Enable and Fault Interface There is an amplifier enable/disable output and an amplifier fault input for each motor. Both signals are differential, for a total of 4 lines: AENAn+, AENAn-, FAULTn+, and FAULTn-. These signals are almost always part of the amplifier cable and connector. Supplemental Flags There are five supplemental flag inputs to PMAC2 for each motor that can be used for several purposes: T, U, V, W, and USER. The actual signal names are CHTn, CHUn CHVn, CHWn, and USERn. These are single-ended inputs, pulled up to +5V in the PMAC2. These flag inputs can be used for low-resolution absolute motor position to prevent the need for a power-on phasing search on a synchronous motor. The U, V, and W inputs are commonly used for the hall-effect commutation inputs of a brushless motor. Some motors such as Fanuc have low-resolution binary absolute tracks on their encoders that can be brought in on T, U, V, and W. Another use for these flags is as a fault code. T, U, V, and W can serve as a 4bit fault code to tell PMAC why the drive faulted. A third use for these flags is sub-count position information when interpolating from an analog encoder. PMAC2 can accept up to 5 bits of fractional information on T, U, V, W, and USER, with T as the most significant bit, and USER as the least significant bit. With external multiplexing, it is possible to use these flags for more than one purpose. For example, they could be used to read hall-effect sensors on powerup, sub-count information in normal operation, and fault codes when the amplifier has faulted. Other Signals If the JMACH connector on PMAC2 connects directly to the amplifier without any interface board, non-amplifier signals for that motor must be passed through the amplifier, even if they are not used by the amplifier. This includes , such as encoder, home and limit flags, and hall-effect inputs. 4-8 PMAC2 User’s Manual – 15 March 1997 3A0-602413-363 PMAC2 Parameter Setup Much of the PMAC2 interface hardware is software-configurable through Ivariables. This section provides basic information on each of the I-variables that is important in this type of application. There is a detailed description of each Ivariable in the Software Reference. Parameters to Set up Global Hardware Signals PWM Frequency Control: I900, I906 Set PMAC2 I-variable I900 to define the PWM frequency you want on machine interface channels 1-4 (typically motors 1-4) according to the equation: 117,964.8kHz I 900 = int − 1 4 * PWMFreq(kHz) The frequency should be set within the specified range for the drives controlled by PMAC2. Too high a frequency can lead to excessive drive heating due to switching losses; too low a frequency can lead to lack of responsiveness, excess acoustic noise, possible physical vibration, and excessive motor heating due to high current ripple. I906 controls the PWM frequency of machine interface channels 5-8 by the same equation. This frequency does not have to be the same as the frequency for channels 1-4, but it does have to have a synchronous relationship with the phase clock derived from the PWM 1-4 frequency with I901. The following relationship must hold for proper operation of channels 5-8: 2* PWM [5 − 8]Freq = {Integer} PhaseFreq I900 also sets the frequency of the MaxPhase clock to twice the PWM frequency. The MaxPhase clock is the highest frequency at which PMAC2's phase update tasks, which include phase commutation and digital current loop closure, can operate. Note that any change to I900 automatically changes the phase and servo clock frequencies. Phase Clock Frequency Control: I901 Any change to the value of I901 also automatically changes the servo clock frequency. I901 determines how the actual PHASE clock is generated from the MaxPhase clock, using the equation PhaseFreq ( kHz ) = PMAC2 User’s Manual – 15 March 1997 MaxPhaseFreq ( kHz ) I 901 + 1 4-9 3A0-602413-363 Every phase clock cycle, PMAC closes the digital current loop and performs the commutation for motors that have been configured for these algorithms. I901 is an integer value with a range of 0 to 15, permitting a division range of 1 to 16. Typically, the PHASE clock frequency is in the range of 8 kHz to 12 kHz.. The 60 MHz PMAC2 is capable of performing commutation and digital current loop for 8 axes at up to 12 kHz; the 40 MHz is capable of doing this for 8 axes at up to 9 kHz, or for 6 axes at up to 12 kHz. Generally the phase clock frequency that fits within the 8 to 12 kHz range within PMAC2's computation capabilities is chosen. Sometimes the actual PWM frequency is adjusted slightly to provide a suitable phase clock frequency. For example, on large drives set up for 5 kHz PWM, the MaxPhase frequency is 10 kHz, so an I901 value of 0 sets the phase clock frequency to 10 kHz. On smaller drives set up for 18 kHz PWM, the MaxPhase frequency is 36 kHz, so an I901 value of 2 sets the phase clock frequency to 12 kHz, or a value of 3 sets 9 kHz. Servo Clock Frequency Control: I902 I902 determines how the SERVO clock is generataed from the PHASE clock, using the equation ServoFreq ( kHz ) = PhaseFreq ( kHz ) I 902 + 1 I902 is an integer value with a range of 0 to 15, permitting a division range of 1 to 16. On the servo update, which occurs once per SERVO clock cycle, PMAC2 updates commanded position (interpolates) and closes the position/velocity servo loop for all active motors, whether or not commutation and/or a digital current loop is closed by PMAC2. Typical servo clock frequencies are 1 to 4 kHz. I10 tells the PMAC2 interpolation routines how much time there is between servo clock cycles. It must be changed any time I900, I901, or I902 is changed. I10 can be set according to the formula: I10 = 640 ( 2 * I 900 + 3)( I 901 + 1)( I 902 + 1) 9 Hardware Clock Frequency Control: I903, I908 I903 determines the frequency of four hardware clock signals use for machine interface channels 1-4; I907 does the same for machine interface channels 5-8. These can probably be left at the default values. The four hardware clock signals are SCLK (encoder sample clock), PFM_CLK (pulse frequency modulator clock, DAC_CLK (digital-to-analog converter clock), and ADC_CLK (analog-to-digital converter clock). Only the ADC_CLK signal is directly used with the digital current loop, to control the frequency of the serial data stream from the current-loop ADCs. The ADC clock frequency must be at least 96 times higher than the PWM frequency, but it must be within the capability of the serial ADCs Refer to the I903 and I908 descriptions for detailed information on setting these variables. 4-10 PMAC2 User’s Manual – 15 March 1997 3A0-602413-363 The encoder SCLK frequency should be at least 20% greater than the maximum count (edge) rate that is possible for the encoder on any axis. Higher SCLK frequencies than this minimum may be used, but these make the digital delay anti-noise filter less effective. PWM Deadtime Control: I904, I908 I904 determines the PWM deadtime between top and bottom signals on for machine interface channels 1-4; I908 does the same for machine interface channels 5-8. I904 and I908 have a range of 0 to 255, and the deadtime is 0.135 usec time the I-variable value. The deadtime should not be set smaller than the recommended minimum for the drive, or excessive drive heating could occur. Too large a deadtime value can cause unresponsive performance. The default value of 15, which produces a deadtime of 2.0 usec, is large enough to protect almost all drives, and small enough not to create unresponsive performance unless PWM frequencies are extremely high. Parameters to Set Up Per-Channel Hardware Signals For each machine interface channel n (n = 1 to 8) used for PWM outputs, a few I-variables must be set up properly. I9n0 must be set up to decode the commutation encoder properly. Almost always a value of 3 or 7 is used to provide times-4 decode of a quadrature encoder. The difference between 3 and 7 is the direction sense of the encoder; a test described below allows you to evaluate the direction you want. I9n6 must be set to 0 to specify all 3 outputs A, B, and C are in PWM format for a 3-phase motor. If only 2 PWM output pairs are used (for a 1, 2, or 4-phase motor), I9n6 could also be set to 2, permitting the C-outputs to be PFM format for other uses. I9n7 controls whether the PWM output signals are inverted or not. At the default value of 0 (non-inverted) the transistor-on signals are high (+5V) on the PWM+ lines, and low on the PWM- lines. This setting will be used for almost all PWM drives. Parameters to Set Up Motor Operation Several I-variables must be set up for each Motor x to enable and configure the Direct digital current loop for that motor. Of course, Ix00 must be set to 1 for any PWM control of active motor, regardless of whether digital current loop is used for that motor or not. brush motors with digital current loop Commutation Enable: Ix01 utilizes PMAC2’s Ix01 is set to 1 to instruct PMAC2 to perform the phase commutation commutation for this motor. If PMAC2 is performing algorithms even the digital current loop closure, it must also perform though the the phase commutation for the motor. motor does not require PMAC2 User’s Manual – 15 March 1997 4-11 3A0-602413-363 electronic commutation; Ix01 must be set to 1 for this case. 4-12 PMAC2 User’s Manual – 15 March 1997 3A0-602413-363 Command Output Address: Ix02 Ix02 instructs PMAC2 where to place its output commands for Motor x by specifying the address. The default values of Ix02 use the PWM registers A, B, and potentially C for Machine Interface Channel n, where n=x. Ix02 seldom needs to be changed from the default value for PWM applications. The actual address specified is that of the PWM A register; PMAC2 then automatically writes to the B and C registers as well. The values typically used are: Table 3-1. PWM Command Output Addresses (Y-registers) When performing direct PWM control over the MACRO ring, Ix02 points to the first of a set of three MACRO output registers for the node used. The values typically used are dependent on whether MACRO Type 0 or Type 1 protocol is employed for the node: Table 3-2. MACRO Ix02 Values PMAC2 User’s Manual – 15 March 1997 4-13 3A0-602413-363 Current Feedback Address: Ix82 Ix82 instructs PMAC2 where to look for its current feedback values for Motor x. It also acts as the variable that tells PMAC2 whether or not to perform currentloop closure itself. If Ix82=0 (the default), PMAC2 will not execute the current loop for Motor x; any current loop must be executed in the amplifier. If Ix82>0, PMAC2 will look at the Y-register whose address is specified by Ix82, and for a multi-phase motor, the next lower addressed register, to get the current feedback information for its current loop. Almost always, the registers specified are the serial ADC shift registers in PMAC2's gate array IC. The actual address specified is that of the ADC B register; PMAC2 then automatically reads from the A register as well. The values typically used are: Table 3-3. ADC Current Feedback Addresses (Y-registers) When performing direct PWM control over the MACRO ring, Ix82 points to the second of a set of two MACRO input registers for the node used. The values typically used are the same whether MACRO Type 0 or Type 1 protocol is employed for the node: Table 3-4. MACRO Ix82 Values Current Feedback Mask Word: Ix84 4-14 PMAC2 User’s Manual – 15 March 1997 3A0-602413-363 Ix84 specifies a mask word to tell PMAC2 what bits of the register(s) specified by Ix82 are to be used in the current-loop algorithm. This permits the use of ADCs of various resolutions; it also permits use of the rest of the 18-bit ADC shift register for other information, such as fault codes. Ix84 is a 24-bit value that is combined with the feedback word in a bit-by-bit AND operation. The default value of $FFF000 specifies that the top 12 bits of the feedback word(s) are to be used. The Delta Tau interface boards designed to date use 12-bit ADCs, so $FFF000 is the appropriate value for these boards. PWM Scale Factor: Ix66 Ix66, the PWM Scale Factor, scales the output command values so that they use the PWM circuitry effectively. The result of the current-loop calculations is a fractional value between -1.0 and +1.0. This value is multiplied by Ix66 before between written to a PWM command register, where it is digitally compared to a PWM up/down counter moving between I900+1 and -I900-2 (between I906+1 and -I906-2 for channels 5-8). To utilize the dynamic range of the PWM circuitry well, Ix66 should be set slightly greater than I900 or I906. Typically a value 10% greater is used, permitting full-on conditions at maximum command values over about 1/6 of the commutation cycle. Ix66 acts as a voltage limit for the motor. If the amplifier is oversized for the motor, exceeding the maximum permitted voltage for the motor, Ix66 should be set proportionately less than I900 to limit the maximum possible voltage for the motor. Since Ix66 is a gain, if it its changed, the current loop must be tuned or retuned afterwards. Servo Loop Output Limit: Ix69 Ix69 is the limit of the output of the position/velocity servo loop, which is the torque (quadrature) current command input to the digital current loop. As such, it acts as an instantaneous current limit for the motor. Open-loop O-commands are expressed as a percent of Ix69. A value of 32,767 (215-1) for Ix69 for this parameter is full range, corresponding to a full -1.0 to +1.0 command input range for the current loop, which corresponds to full-range feedback on the current-loop ADCs. PMAC2 User’s Manual – 15 March 1997 4-15 3A0-602413-363 PMAC2 Digital PWM Generation (Per Phase) New Command Loaded at Counter Turnaround Ix66 I900+1 PWM Command Range PWM Command PWM Counter Range Time 4xI900+6 PWM_CLK Cycles PWM Up/Down Counter -I900-2 -Ix66 Current Sampled at Counter Turnaround PWM Top Signal PWM Bottom Signal Deadtime (I904 or I908) Figure 3-3. Digital PWM Generation (Per Phase) If the ADCs are in the drive, the drive manual should specify the level of current that provides full-range feedback from the ADCs. The user should then take the instantaneous current limit for the drive or for the motor, whichever is less, and set Ix69 according to the following relationship: InstCurrentLimit Ix 69 = min 32,767, * 32,768 FullRangeCurrent If the drive outputs analog current readings and the ADCs are on the interface board, the full-range current value must be calculated from the volts-per-amp gain of the current sensing in the drive and the full-range voltage into the interface board. If a non-zero value of Ix77 magnetization current will be used, for induction motor control or for field weakening of a permanent-magnet brushless motor, then Ix69 should be replaced in the above equation by Ix 69 2 + Ix 77 2 . In early testing, it may be desirable to set Ix69 to an artificially low value to prevent accidental overcurrent commands into the motor. 4-16 PMAC2 User’s Manual – 15 March 1997 3A0-602413-363 Continuous Current Limit: Ix57 Ix57 specifies the continuous current limit for the motor/drive system for I2T protection. Almost always it is the continuous current rating of the drive that is used for an axis. Even if its continuous current rating is somewhat higher than that of the motor, its thermal time constant is usually so much shorter that the I2T parameters are set to protect it first. Ix57 is calculated in a manner similar to Ix69: Ix 57 = ContCurrentLimit * 32,768 FullRangeCurrent Integrated Current Limit: Ix58 Ix58 sets the permitted limit of the time-integrated current over the continuous current value. If the time-integrated current exceeds this threshold, PMAC2 will kill this axis as it would for an amplifier fault. Typically, this parameter is set by noting the drive specification for time permitted at the instantaneous current limit, and using this specification in the following equation: Ix 58 = Ix 69 2 + Ix 77 2 − Ix 57 2 * ServoUpdateRate( Hz ) * PermittedTime(sec) 32,768 2 Refer to the section Making Your Application Safe in the User’s Guide for a more detailed explanation of I2T protection. Commutation Cycle Size: Ix70, Ix71 It is very important to set the value of Ix72 properly for your system; otherwise the current loop will have unstable positive feedback and want to saturate. This could cause damage to the motor, the drive, or both, if overcurrent shutdown features do not work properly. If you are unsure of the Ix70 and Ix71 define the size of the commutation cycle (electrical cycle). The cycle is equal to Ix71 divided by Ix70, expressed in encoder counts (after decode). Ix70 and Ix71 must both be integers, but the ratio Ix71/Ix70 does not have to be an integer. On a rotary motor, Ix71 is typically set to the number of counts per mechanical revolution, and Ix70 is set to the number of pole-pairs (half of the number of poles) for the motor, which is equal to the number of commutation cycles per mechanical revolution. Commutation Phase Angle: Ix72 Ix72 controls the angular relationship between the phases of a multiphase motor. When PMAC2 is closing the current loop digitally for motor x, the proper setting of this variable is dependent on the polarity of the current measurements. If the phase current sensors and ADCs are set up so that a positive PWM voltage command for a phase yields a negative current measurement value, Ix72 must be set to a value less than 128: 85 for a 3-phase motor, or 64 for a 2or 4-phase motor. If these are set up so that a positive PWM voltage command yields a positive current measurement value, Ix72 must be set to a value greater than 128: 171 for a 3-phase motor, or 192 for a 2- or 4-phase motor. The testing described below will show how to determine the proper polarity. PMAC2 User’s Manual – 15 March 1997 4-17 3A0-602413-363 current measurement polarity in your drive, consult Testing PWM and Current Feedback Operation, below. When commutating across the MACRO ring with Type 0 protocol, the number of counts per revolution must be multiplied by 256 before setting Ix70 and Ix71. When commutating across the MACRO ring with Type 1 protocol, the number of counts per revolution must be multiplied by 32 before setting Ix70 and Ix71. For commutation with digital current loops, the proper setting of Ix72 is unrelated to the polarity of the encoder counter. This is different from commutation with an analog current loops, in which the polarity of Ix72 (less than or greater than 128) must match the encoder counter polarity. With the digital current loop, the polarity of the encoder counter must be set for proper servo operation; with the analog current loop, once the Ix72 polarity match has been made for commutation, the servo loop polarity match is guaranteed. Commutation Feedback Address: Ix83 Ix83 specifies the address of the register used for the commutation position feedback. This is almost always the address of the encoder phase position register for Channel n in PMAC2's gate array IC, where n=x. This address is the default value for Ix83. The values typically used are: Table 3-5. Commutation Position Feedback Addresses (X-registers) 4-18 PMAC2 User’s Manual – 15 March 1997 3A0-602413-363 When performing direct PWM control over the MACRO ring, Ix83 points to the position feedback register for the node used. These are Y-registers, so bit 19 of Ix83 must be set to 1 The values typically used are dependent on whether MACRO Type 0 or Type 1 protocol is employed for the node: Table 3-6. MACRO Type 0 Or Type 1 Protocol Ix83 Values Using Direct PWM for Brush Motor Control It is possible to use PMAC2’s direct PWM and digital current loop for control of DC brush motors, both those with permanent-magnet fields, and those with wound fields. Because PMAC2’s digital current loop and commutation algorithms are combined, it is still necessary to activate PMAC2’s commutation algorithm for the motor, even though it is not really commutating the motor. The sine-wave commutation is effectively disabled in this technique by telling PMAC2 that the motor has a commutation cycle of 1 count. Each count received causes a 360oe phase increment, leaving the phase angle constant at all times for DC control. With the phase angle always at zero, PMAC2’s quadrature, or torque-producing, output voltage and feedback current are always equivalent to the motor’s rotor, or armature, voltage and current. PMAC2’s direct, or magnetization field, voltage and current are always equivalent to the motor’s stator, or wound field, voltage and current (if any). PMAC2 User’s Manual – 15 March 1997 4-19 3A0-602413-363 Hardware Connection In this technique, the rotor (armature) current is commanded by PMAC2 phases A and C. The motor armature leads should be connected between the two halfbridges of the amplifier driven by PMAC2 phases A & C, together forming a full H-bridge. The armature current sensor should feed an A/D converter that is connected to one of the serial ADC inputs for the channel on PMAC2. If there is a wound field, the armature current reading must be fed into ADC A, and the field current reading must be fed into ADC B. If there is only a permanent magnet field, the armature current reading can either be fed into ADC A or ADC B, with Ix82 telling PMAC2 which one is used. If ADC A is used, the serial digital input for ADC B (+signal only) should be tied to GND so a zero feedback value is forced (alternately a background PLC can periodically zero the direct current integrator register). If ADC B is used, then PMAC uses the Compare A read/write register for the (non-existent) direct current feedback; in this case, a zero value should be written into this register on power-on/reset, and no other value should be written to it during the application. If there is a wound field, it must be commanded from PMAC2’s B phase, and the current feedback must be brought back into PMAC2’s B-phase. If only unidirectional voltage and current are required for the field, the field windings can be commanded from a single half-bridge. If bi-directional voltage or current is required, a full H-bridge must be used, with PMAC2’s B-phase commanding the two half bridges in anti-phase mode (the command for the top of one half is also used for the bottom of the other half). I-Variable Setup To set up a motor for this technique, the following I-variable settings must be made: 4-20 ♦ Ix00 = 1 to activate the motor ♦ Ix01 = 1 to activate commutation algorithms ♦ Ix02 should contain the address of the PWM A register for the output channel used (this is the default), just as for brushless motors ♦ Ix70 = 4, Ix71 = 4: This defines a commutation cycle size of 4/4 = 1 count. The use of 4/4 instead of 1/1 allows us to rotate the angle +90o for test and tuning purposes. ♦ Ix72 = 64 or 192 for 1/4 or 3/4 cycle between the armature (rotor) and field (stator). If a positive voltage output number creates a negative current feedback number, use 64; otherwise use 192. ♦ Ix73 = 0, Ix74 = 0: No power-on phase search will be required ♦ Ix75 = 0: Zero offset in the power-on phase reference ♦ Ix77 = 0 for motors without wound field. With a wound field, Ix77 determines the strength of the field; with field weakening functionality, Ix77 will be a function of motor speed. ♦ Ix78 = 0 for zero slip in the commutation calculations PMAC2 User’s Manual – 15 March 1997 3A0-602413-363 ♦ Ix81 = $80770: This tells PMAC2 to read the low 8 bits of Y:$0770 for the power-on phase position. This register is forced to zero on poweron/reset, so this setting forces the phase position to zero. ♦ Ix82 should contain the address of ADC B register for the feedback channel used (just as for brushless motors) when the ADC A register is used for the rotor (armature) current feedback. If there is a wound field, the stator field current feedback should be connected to ADC B. If there is a permanent magnet field, there will be no feedback to ADC B. ♦ Ix82 should contain the address one greater than that of the ADC B register for the feedback channel used when the ADC B register is used for the rotor (armature) current feedback. This is suitable for motors with only a permanent magnet field. ♦ Ix83 does not really matter here, because the commutation position is defeated by the single-count cycle size. However, it is fine to use the default value. ♦ Ix84 is set just as for brushless motors, specifying which bits the current ADC feedback uses. ♦ Ix61, Ix62, and Ix76 current loop gains are set just as for brushless motors. Before using the current loop tuning aids for the rotor current, force the commutation phase angle to 90o by setting the phase position register Mx71 to 1 (out of 4). Remember to set it back to 0 before actual operation. Testing PWM and Current Feedback Operation Introduction On many motor and drive systems, potentially deadly voltage and current levels are present. Do not attempt to work directly with these high voltage and current levels unless you are fully trained on all necessary safety procedures. Most of the time, while setting up a direct PWM interface, you will not need to execute all of the steps listed in these sections (or the Executive program will do them for you automatically), but the first time you set up this type of interface, or if you are having problems, these steps will be of great assistance. All of these tests should be done with the motor disconnected from any loads for safety reasons. All settings made as a result of these tests are independent of load properties, so will still be valid when the load is connected. Before testing any of PMAC2's software features for digital current loop and direct PWM interface, it is important to know whether the hardware interface is working properly. We will use PMAC's M-variables to access the input and output registers directly. The examples shown here use the suggested Mvariable definitions for Motor 1; for other motors there are equivalent suggested definitions shown in the Examples section of the manual. PMAC2 User’s Manual – 15 March 1997 4-21 3A0-602413-363 Low-level signals on PMAC2 and interface boards can be accessed much more safely. 4-22 PMAC2 User’s Manual – 15 March 1997 3A0-602413-363 Purpose The purpose of this set of tests is to confirm the basic operation of the hardware circuits on PMAC, in the drive, and in the motor, and to check the proper interrelationships. Specifically: ♦ Confirm operation of encoder inputs and decode ♦ Confirm operation of PWM outputs ♦ Confirm operation of ADC inputs ♦ Confirm correlation between PWM outputs and ADC inputs ♦ Determine proper current loop polarity For synchronous motors, these tests also can: ♦ Confirm commutation cycle size ♦ Determine proper commutation polarity Preparation The Mvariables for the ADC current values are not those of the actual ADC input registers. The input registers can only be read reliably inside the phase interrupt. First define the M-variables for the encoder counter, the 3 PWM output registers, the amplifier-enable output bit, and the 2 ADC input registers. Using the suggested definitions for Motor 1, we have: M101->X:$C001,0,24,S M102->Y:$C002,8,16,S M104->Y:$C003,8,16,S M107->Y:$C004,8,16,S M105->X:$0710,8,16,S M106->Y:$0710,8,16,S M114->X:$C005,14 ; ; ; ; ; ; ; Channel Channel Channel Channel Channel Channel Channel 1 1 1 1 1 1 1 Encoder position register PWM Phase A command value PWM Phase B command value PWM Phase C command value Phase A ADC image value* Phase B ADC image value* Amplifier Enable command bit Since M-variable program access is at a lower priority than the phase interrupt, M-variable reads of the actual ADC input registers may result in unstable data. To allow reliable user access to these values, PMAC2 automatically copies the input values into image registers in RAM, where they can safely be read at any time. PMAC2 copies one pair per phase interrupt, updating all 8 channels every 8 phase cycles. The mapping of the image registers is as follows: Table 3-7. Mapping The Image Registers PMAC2 User’s Manual – 15 March 1997 4-23 3A0-602413-363 These are declared as 16-bit variables even though 12-bit ADCs are typically used; this puts the scaling of the variable in the same units as Ix69, Ix57, Ix29, and Ix79. It will be useful to monitor these values in the Watch window of the Executive program, so add the variable names to the Watch window, causing the program to repeatedly query PMAC2 for the values, which it will display. The hardware can then be exercised with on-line commands issued through the Terminal window. To prepare PMAC2 for these tests: ♦ Set I100 to 0 to deactivate the motor ♦ Set I101 to 0 to disable commutation (This allows for manual use of these registers.) ♦ Make sure that I900, I904, I916, and I917 are set up properly to provide the PWM signals you desire. ♦ If the Amplifier Enable bit is 1, set it to zero with the command: M114=0 ♦ 4-24 Set Ix00 and Ix01 for all other motors to zero PMAC2 User’s Manual – 15 March 1997 3A0-602413-363 Position Feedback and Polarity Test If the PWM command values observed in the Watch window are not zero, set them to zero with the command M102=0 M104=0 M107=0 You should be able to turn (or push) the motor freely by hand now. As you turn the motor, monitor the M101 value in the Watch window. Look for the following: ♦ It should change as you move the motor Because I100 has been set to 0, and I103 may not yet have been set properly, any change of position will not be reflected in the motor position window. ♦ It should count up in one direction, and count down in the other direction ♦ It should provide the expected number of counts in one revolution or linear distance increment ♦ As you return the motor repeatedly to a reference position, it should report (approximately) the same position value each time If these things do not happen, you will need to check your encoder/resolver operation, its connection to PMAC2, and the PMAC2 decode variable I9n0. Double-check that the sensor is powered. You may need to look at the encoder waveforms with an oscilloscope. If you know which direction of motion you want to be the positive direction, you can check this here. If the direction is incorrect, you can invert it by changing I9n0, usually from 7 to 3, or from 3 to 7. If you do not know yet which direction sense you want, you can change it later, but you will need to make another change at that time to maintain the proper commutation polarity match; usually by exchanging two of the motor phase leads at the drive. PWM Output & ADC Input Connection First enable the amp, then apply a very small positive command value to Phase A and a very small negative command value to Phase B with the on-line commands: M114=1 M102=I900/50 M104=-I900/50 M107=0 Make sure before you apply any PWM commands to the drive and motor in this fashion that the resulting current levels are within the ; Enable amplifier ; A positive, B negative, C zero This provides a command at 2% of full voltage into the motor; this should be well within the continuous current rating of both drive and motor. It is always a good idea to make the sum of these commands equal to zero so as not to put a net DC voltage on the motor; putting all three commands on one line causes the changes to happen virtually instantaneously. With power applied to the drive and the amplifier enabled (M114=1), you should get current readings in the ADC registers as shown by their Mvariables M105 and M106 in the Watch window. PMAC2 User’s Manual – 15 March 1997 4-25 3A0-602413-363 continuous current rating of both drive and motor. As we have defined the M-variables, +/-32,768 is full current range, which should correspond approximately to the instantaneous current limit. Make sure that the value you read does not exceed the continuous current limit, which is usually about 1/3 of the instantaneous limit. If you are well below the continuous current limit, increase the voltage command to 5% to 10% of maximum. For example: M102=I900/10 M104=-I900/10 M107=0 10% of maximum PWM/ADC Phase Match Command values from PMAC2's Phase A PWM outputs should cause a roughly proportionate response of one sign or the other on PMAC2's Phase A ADC input (whatever the phase is named in the motor and drive). The same is true for Phase B. If you do not get a response on either phase, re-check your entire setup, including: 4-26 ♦ Is your drive properly wired to PMAC2, either directly or through an interface board? ♦ Is your motor properly connected to the drive? ♦ Is your drive properly powered, both the power stage, and the input stage? ♦ Is your interface board properly powered? ♦ Is your amplifier enabled (M114=1 on PMAC2 and indicator ON at the drive)? ♦ Is your amplifier in fault condition? If so, why? PMAC2 User’s Manual – 15 March 1997 3A0-602413-363 If you only get an ADC response on one phase, your phase outputs and inputs may not be properly matched. For example, your Phase B ADC may be reading current from the phase commanded by the Phase C PWM output. You can confirm this by trying other combinations of commands as shown in the six-step test below, and checking which ADC responds to which phase command. If you do not have a proper match, you will have to change the wiring between PMAC2 and the drive. Changing the wiring between drive and motor will not help here. Synchronous Motor Stepper Action With a synchronous motor, this command should cause the motor to lock into a position, at least weakly, like a stepper motor. You may also get this action temporarily on an induction motor, due to temporary eddy currents created in the rotor. Current Loop Polarity Check Observe the signs of the ADC register values in M105 and M106. These two values should be of approximately the same magnitude, and must be of the opposite sign from each other. (Again, remember that these readings will appear noisy. Observe the base value underneath the noise.) If M105 is positive and M106 is negative, the sign of your PWM commands matches the sign of your ADC feedback values. In this case, the PMAC2 phase angle parameter I172 must be set to a value greater than 128 (171 for a 3-phase motor, 192 for a 2- or 4-phase motor). If M105 is negative and M106 is positive, the sign of your PWM commands is opposite that of your ADC feedback values. In this case, I172 must be set to a value less than 128 (85 for a 3-phase motor, 171 for a 2- or 4-phase motor). Make sure your I172 value is set properly before you attempt to close the digital current loops on PMAC2. Otherwise you will have positive feedback creating unstable current loops, which could damage the amplifier and/or motor. If M105 and M106 have the same sign, the polarities of the current sense circuitry for the two phases is not properly matched. In this case, something has been miswired in the drive or between PMAC2 and the drive to give the two phase current readings opposite polarity. One of the phases will have to be fixed. Do not attempt to close the digital current loops on PMAC2 until you have properly matched the polarities of the current sense circuitry for the two phases. This will involve a hardware change in the current sense wiring, the ADC circuitry, or the connection between them. As an extra protection against error, make sure you have set Ix57 and Ix58 properly for I2T protection that will quicklyshut down the axis if there is saturation due to improper feedback polarity. Troubleshooting If you are not getting the current readings you expect, you can probe the motor phase currents on the motor cables with a snap-on hall-effect current sensor. If you do not see current when you are commanding voltages, you can check for phase-to-phase continuity and proper resistance when the motor is disconnected. PMAC2 User’s Manual – 15 March 1997 4-27 3A0-602413-363 Voltage Six-Step Test For a complete test of the motor/drive connection, you should try all six sign combinations for a 3-phase motor, or 8 for a 4-phase motor. It is best to command all phase values on a single command line to get simultaneous changes. For a synchronous motor, this test will step the motor through one commutation cycle. It can be used to confirm the size of the commutation cycle in counts, the pole count of the motor, and the commutation direction sense. What To Look For In performing this test, check the following: ♦ You should get a consistent relationship between M102 and M105 on Phase A, and between M104 and M106 on Phase B. ♦ For synchronous motors (and possibly for induction motors), the M101 position register should change in approximately equal increments between each step. ♦ For synchronous motors (and possibly for induction motors), the total change in M101 between the initial Step 1 and the return to Step 1 should be approximately equal to Ix71/Ix70. ♦ For synchronous motors(and possibly for induction motors),, the physical change in rotor position between the initial Step 1 and the return to Step 1 (mark the rotor if necessary) should be equal to 1 pole pair.On a 2-pole motor, it should be one full mechanical revolution.On a 4-pole motor, it should be one-half mechanical revolutionOn a 6-pole motor, it should be one-third mechanical revolutionOn an 8-pole motor, it should be one-fourth mechanical revolutionOn a 100-pole motor, it should be 7.2omech. Executing the Test For Motor 1 with a 3-phase motor, with 10% voltage commands being acceptable, the commands could be: M102=0 M104=I900/10 M107=-I900/10 ; Step 1: A0, B+, C-: 0o elec. M102=I900/10 M104=0 M107=-I900/10 ; Step 2: A+, B0, C-: 60o elec. M102=I900/10 M104=-I900/10 M107=0 ; Step 3: A+, B-, C0: 120o elec. M102=0 M104=-I900/10 M107=I900/10 ; Step 4: A0, B-, C+: 180o elec. M102=-I900/10 M104=0 M107=I900/10 ; Step 5: A-, B0, C+: 120o elec. M102=-I900/10 M104=I900/10 M107=0 ; Step 6: A-, B+, C0: -60o elec. M102=0 M104=I900/10 M107=-I900/10 ; Step 1: A0, B+, C-: 0o elec. This test moves the motor through the commutation cycle in the positive direction if Ix72 is less than 128 (e.g. 85); it moves through the cycle in the negative direction if Ix72 is greater than 128 (e.g. 171). On a synchronous motor, we can use the position reading to check the commutation polarity match; this may be possible on an induction motor as well. 4-28 PMAC2 User’s Manual – 15 March 1997 3A0-602413-363 Action To Take If the rotor position, as reflected by M101, changed in the wrong direction during this test, we could have a commutation polarity mismatch. With such a mismatch, the motor would lock in (not run away) when commanded. There are two possible fixes for this mismatch: 1. Reverse the feedback direction sense by changing I9n0. However, this changes the direction sense of the axis, which may not be tolerable. 2. Exchange two phase leads between amplifier and motor. This is usually done at the screw terminals on the amplifier. Exchanging any two phases will change the polarity in the same way. However, the relationship between the sensor zero position and PMAC2's commutation cycle zero position is dependent on which two phases are exchanged. For asynchronous induction motors, if the above test did cause proper movement we will have to try each direction polarity and see which works. This is described below. Once you have established your commutation polarity match, your servo polarity match is automatically established. You can check this later by seeing that positive O-commands cause motor position to count in the positive direction. Remember that if you later change I9n0 to get the physical direction sense that you want, you will need to exchange motor phase leads to re-establish your commutation polarity match. Example Table 3-8 shows the results for a sample run of this test. Table 3-8. Commutation Polarity Match Sample Test PMAC2 User’s Manual – 15 March 1997 4-29 3A0-602413-363 4-30 PMAC2 User’s Manual – 15 March 1997 3A0-602413-363 From this test, we can conclude: ♦ PWM operation is fundamentally working (we got 6 approximately equal steps) ♦ We have a 4-pole motor because we moved 1/2 revolution ♦ Current ADC inputs are working: we got proportionate responses ♦ Sign of current is opposite to sign of voltage, so Ix72 should be 85. ♦ We move 2049 counts in one cycle, so 4096 counts per revolution should be correct ♦ Encoder counter increased, so commutation polarity is correct Cleaning Up When done with this section of the testing, write zero values into the command registers and disable the amplifier with the command: M102=0 M104=0 M107=0 M114=0 With zero commands into all of the phases of the drive, with the drive either enabled or disabled, the ADC registers should read nearly zero. PMAC2 can compensate for non-zero values with the offset parameters Ix79 (A-phase offset) and Ix29 (B-phase offset). These offset parameters should hold values of the opposite sign of the phases' ADC values when there are zero PWM commands. Ix29 and Ix79 magnitudes assume 16-bit values; since we are using 16-bit Mvariables to look at the ADC registers, regardless of the true resolution of the ADCs, we can just read the M-variable values at zero command and use the opposite values for Ix79 and Ix29. Debugging With zero commands on the three output registers, you can observe any of the six PWM output signals with an oscilloscope . All six should have 50% duty cycle (minus the deadtime set by I904) at the frequency set by I900. All three top PWM signals should be in phase with each other. All three bottom PWM signals should be in phase with each other, and one-half cycle out of phase with the top signals. Observing a top and bottom pair, you should be able to observe the deadtime between the top and bottom on times. With a positive command into the A-phase, a negative command into the Bphase, and a zero command on the C-phase, these waveforms should change. On the oscilloscope, you should observe PWMATOP1 on-time increase, and PWMABOT1 on-time decrease, while maintaining the deadtime. Similarly, PWMBTOP1 on-time should decrease, and PWMBBOT1 on-time should increase, maintaining the deadtime between them. If the analog voltages representing the current measurements are available, these can be probed for diagnostic purposes. Many direct PWM drives provide analog current measurement outputs and the A/D conversion is done on an interface board; for these drives, the probing is easy. If the A/D conversion is done inside the drive, you will need access to test points to probe these voltage levels. Consult the drive manual for location and scaling of these signals. PMAC2 User’s Manual – 15 March 1997 4-31 3A0-602413-363 Establishing Basic Current Loop Operation Once you have established the proper operation of the PMAC2 PWM output circuits, the PMAC2 ADC input circuits, and all of the drive and motor circuitry between them, you are ready to close the current loop. The PMAC Executive Program V3.2 and newer have both autotuning and interactive tuning procedures for the digital current loop. Most people will use one or both of these procedures to tune the current loop. These procedures can also confirm the proper polarity of the current loop readings. However, you can issue the commands manually as explained in this section. Purpose The purpose of these next tests is to set the current loop gains for quick but stable current response. This is done by giving the motor a current command and observing the current response. The key to testing the current loop is the use of PMAC2's 'O' commands, which close the current loops, while leaving open the position and velocity loops. The magnitude of the O-command value is that of the torque-producing quadrature current command, expressed as a percentage of Ix69; Ix77 controls the magnitude of the direct current command. It is safest not to create any movement while testing the current loop; this can be done by commanding only direct current, accomplished by setting Ix77, then issuing an O0 command. Digital Current Loop Gains Ix61, Ix62, and Ix76 are the gains of the PI (proportional-integral) current loop. They are used for both phases of a multi-phase motor. Ix61 is the integral gain term. There are two proportional gain terms: Ix62 is the forward-path proportional gain, and Ix76 is the back-path proportional gain. Ix62 is multiplied by the current error (commanded minus actual) and the result is added into the output command. Ix76 is multiplied by the actual current value and subtracted from the output command. All three gain terms have a range of 0.0 to 1.0, with 23-bit resolution. Usually only one of Ix62 or Ix76 is used on a given motor; the other gain is set to 0.0. It is more common to use Ix61, the forward-path gain, because it provides greater responsiveness and bandwidth. If Ix76 is used instead of Ix62, only the Ix61 integral gain term directly connects the current command to the output, and its integration effect filters the command, reducing responsiveness. However, if the command from the position/velocity servo loop is noisy, as can be the case with a low-resolution position sensor, this filtering effect can be desirable, and Ix76 can provide better performance than Ix62. 4-32 PMAC2 User’s Manual – 15 March 1997 3A0-602413-363 Forward Path Proportional Gain Current Command Kpf + (Id' or Iq' ) PWM Scale Factor + U -1.0 < U < 1.0 + - Ix66 Voltage Command (Vd or Vq) + Prescaled to range -1.0 < I < 1.0 Ki + -1 1-z Integral Gain Kpb = Ix76 4 Kpf = Ix62 4 Ki = Ix61 Kpb + Back Path Proportional Gain (0.0 < Ix76 < 2.0) (0.0 < Ix62 < 2.0) (0.0 < Ix61 < 1.0) Actual Current (Id or Iq) Prescaled to range -1.0 < I < 1.0 Figure 3-4. PMAC2 Digital Current Loop Preparation To prepare PMAC2 for this test: ♦ Set Ix00 for all other motors to 0 to de-activate them ♦ Set Ix01 for all other motors to 0 to turn off the commutation (these make sure PMAC2 has enough calculation time to gather data fast enough.) ♦ Set I902 to 0 for divide-by-1 to make servo update rate equal to phase update rate (this permits PMAC2 to gather data every phase update.) To set up the motor under test: ♦ Set Ix00 to 1 for the motor under test to activate it ♦ Set Ix01 to 1 for the motor under test to turn on phase/current calculations (these may have been left at zero from the earlier tests) ♦ Give the motor a K command to turn off the outputs ♦ Set Ix71 to 1 to effectively cripple the commutation algorithm and prevent movement during the test. ♦ Make sure the other setup I-variables are set as instructed above (only I902 and Ix71 should be different from what they would be in the final application. ♦ Start with Ix62=0.1, Ix61=0.0, and Ix76=0.0 as current loop gains ♦ Set Ix77 to 3000 to provide about 10% direct current command In the Detailed Plot section of data gathering, specify data gathering at intervals of 1 servo cycle. Select for gathering the commanded and actual direct current registers every servo cycle for the motor under test. The addresses for these registers are found in tables 3-9 and 3-10. PMAC2 User’s Manual – 15 March 1997 4-33 3A0-602413-363 Table 3-9. Commanded direct current registers Table 3-10. Actual direct current registers 4-34 PMAC2 User’s Manual – 15 March 1997 3A0-602413-363 Executing the Current-Loop Test Once the data gathering has been set up, the following commands can be given: DEFINE GATHER #1 GAT O0 ENDG K ; ; ; ; Reserve memory for data gathering buffer Make sure proper motor is addressed Start data gathering and give current command Stop gathering and end current command The data is then uploaded and plotted. The aim is to get as quick a response as possible to the commanded value, with out significant overshoot or any instability. Typical current loop proportional gains are in the range 0.5 to 0.75. Typical current loop integral gains are around 0.01. Clean-Up When finished with this test, restore the following: ♦ Set I171 back to its proper value ♦ Set I902 back to its proper value You should now have properly operating current loops. Your next step is to get the commutation algorithm working properly. See the Setting Up PMAC2 Commutation section, below. PMAC2 User’s Manual – 15 March 1997 4-35 3A0-602413-363 5 Setting Up PMAC2 for Sine-Wave Output Control How to Set Up the Commutation Scheme This section explains how to set up the commutation scheme if PMAC2 is performing the commutation for a motor, but not the digital current loop. In this mode, PMAC2 outputs two phase current commands to the amplifier, usually as analog voltages through digital-to-analog converters (DACs). In the steadystate, these voltages are a sinusoidal function of time, so this mode is often called sine-wave output. Hardware Setup For PMAC2 to operate a motor in the sine-wave commutation analog output mode, an ACC-8E analog interface board or equivalent must be attached to the machine connector for the machine interface channel used. The ACC-8E board contains the DACs, output op-amps, encoder and flag interfaces, and optical isolation circuits. The following discussion assumes an ACC-8E is being used. DAC Output Signals The DACA and DACB outputs on the ACC-8E should be connected to the phase command inputs on the sine-wave input amplifier. If the inputs on the amplifier are single-ended, use the DAC+ output only, and leave the complementary DAC- outputs floating; do not ground them! If the inputs on the amplifier are complementary, use both the DAC+ and DAC- outputs. In either case, tie the AGND reference voltage on the ACC-8E to the reference voltage for the amplifier input. PMAC2 User’s Manual – 15 March 1997 5-1 3A0-602413-363 Magnetization Current Ix77 Id' Direct Current Command I a' + DAC - dq Iq' va PWM Ia to Torque Command from Position/ Velocity Servo Va PI Phase A Current Loop abc I b' Quadrature Current Command + DAC Vb PI - vb PWM Ib Q Phase B Current Loop - - Vc - PWM + vc Balance Loop PMAC AMPLIFIER Figure 4-1. PMAC/PMAC2 Commutation with Analog Loop Amplifier Enable and Fault Interface The amplifier enable outputs on the ACC-8E use dry-contact relays. Normallyopen, normally closed, sinking or sourcing configurations from 12V to 24V can be chosen. The amplifier fault inputs on the ACC-8E pass through AC Opto isolators. Sinking or sourcing configurations from 12V to 24V can be chosen. Encoder Feedback The ACC-8E can accept 3-channel quadrature encoder feedback, either singleended or differential, in the range of 5V to 12V. Supplemental Flags The ACC-8E can accept hall-effect signals for power-on phase information through its supplemental flag connector on the U, V, and W flags. Other Signals The ACC-8E has AC Opto isolator inputs for overtravel limit, home, and user flag inputs. 5-2 PMAC2 User’s Manual – 15 March 1997 E 3A0-602413-363 PMAC2 Parameter Setup Parameters to Set Up Global Hardware Signals Several parameter that set up global and multi-channel hardware operation must be set for proper operation of the analog sine-wave commutation mode. These variables are in the I900 to I909 range. Phase Clock Frequency Control: I900, I901 Every phase clock cycle, PMAC2 performs the commutation for motors that have been configured for these algorithms. I900 and I901 together determine the phase clock frequency. Typically, the phase clock frequency is in the range of 8 kHz to 12 kHz. The 60 MHz PMAC2 is capable of performing commutation for 8 axes at up to 12 kHz. The 40 MHz is capable of doing this for 8 axes at up to 9 kHz, or for 6 axes at up to 12 kHz. The default values for I900 and I901 produce a phase clock frequency of 9.03 kHz; this is suitable for almost all applications. I900 determines the frequency of the MaxPhase clock signal from which the actual phase clock signal is derived. It also determines the PWM cycle frequency for Channels 1 to 4. If you need to generate any PWM signals on Channels 1-4, refer to the section Using PMAC2 for Direct PWM Control, above for details, and use I901 to select how your PHASE clock is derived from MaxPhase. If you do not need to generate PWM signals on channels 1-4, set I900 to make the MaxPhase clock frequency equal to the PHASE clock frequency you want. Use the following formula: 117,964.8kHz I 900 = int − 1 2 * MaxPhaseFreq( kHz ) I901 determines how the actual phase clock is generated from the MaxPhase clock, using the equation: PhaseFreq ( kHz ) = MaxPhaseFreq ( kHz) I 901 + 1 I901 is an integer value with a range of 0 to 15, permitting a division range of 1 to 16. If you have set the MaxPhase frequency equal to your desired phase clock frequency, make I901 equal to 0 for the divide-by-1 setting. PMAC2 User’s Manual – 15 March 1997 5-3 3A0-602413-363 Servo Clock Frequency Control: I902 I902 determines how the SERVO clock is generated from the PHASE clock, using the equation ServoFreq ( kHz ) = PhaseFreq ( kHz ) I 902 + 1 I902 is an integer value with a range of 0 to 15, permitting a division range of 1 to 16. On the servo update, which occurs once per SERVO clock cycle, PMAC2 updates commanded position (interpolates) and closes the position/velocity servo loop for all active motors, whether or not commutation and/or a digital current loop is closed by PMAC2. Typical servo clock frequencies are 1 to 4 kHz. I10 tells the PMAC2 interpolation routines how much time there is between servo clock cycles. It must be changed any time I900, I901, or I902 is changed. I10 can be set according to the formula: I10 = 640 ( 2 * I 900 + 3)( I 901 + 1)( I 902 + 1) 9 Hardware Clock Frequency Control: I903, I907 I903 determines the frequency of four hardware clock signals use for machine interface channels 1-4; I907 does the same for machine interface channels 5-8. These can probably be left at the default values. The four hardware clock signals are SCLK (encoder sample clock), PFM_CLK (pulse frequency modulator clock, DAC_CLK (digital-to-analog converter clock), and ADC_CLK (analog-to-digital converter clock). Only the DAC_CLK signal is directly used with the sine-wave output, to control the frequency of the serial data stream to the DACs. The default DAC clock frequency of 4.9152 MHz is suitable for the DACs on the recommended ACC8E analog interface board. Refer to the I903 and I908 descriptions for detailed information on setting these variables. The encoder SCLK frequency should be at least 20% greater than the maximum count (edge) rate that is possible for the encoder on any axis. Higher SCLK frequencies than this minimum may be used, but these make the digital delay anti-noise filter less effective. DAC Strobe Control: I905, I909 PMAC2 generates a common DAC strobe word for each set of 4 machine interface channels. It does this by shifting out a 24-bit word each phase cycle, one bit per DAC clock cycle, most significant bit first. I905 contains this word for Channels 1-4; I909 contains this word for Channels 5-8. The default values of $7FFFC0 are suitable for use with the DACs on the recommended ACC-8E analog interface board. 5-4 PMAC2 User’s Manual – 15 March 1997 3A0-602413-363 Parameters to Set Up Per-Channel Hardware Signals For each machine interface channel n (n = 1 to 8) used for sine wave analog outputs, a few I-variables must be set up properly. Encoder Decode Control: I9n0 I9n0 must be set up to decode the commutation encoder properly. Almost always a value of 3 or 7 is used to provide times-4 decode of a quadrature encoder (4 counts per encoder line). The difference between 3 and 7 is the direction sense of the encoder; you should set this variable so your motor counts up in the direction you want. The polarity sense of the Ix72 commutation phase angle parameter must match that of I9n0 for your particular wiring; if it is wrong, you will lock into a position rather than generate continuous torque. A test for determining this polarity match is given below. Remember that if you change I9n0 on a working motor, you will have to change Ix72 as well. Output Mode Control: I9n6 I9n6 must be set to 1 or 3 to specify that outputs A and B for Channel n are in DAC mode, not PWM. A setting of 1 puts output C (not used for servo or commutation tasks in this mode) in PWM mode; a setting of 3 puts output C in PFM mode. Output Inversion Control: I9n7 I9n7 controls whether the serial data streams to the DACs on Channel n are inverted or not. The default value of 0 (non-inverted) is suitable for use with the recommended ACC-8E analog interface board. Inverting the bits of the serial data stream has the effect of negating the DAC voltage. In a commutation algorithm this is equivalent to a 180o phase shift, which would produce runaway if the system were working properly before the inversion. Parameters to Set Up Motor Operation Several I-variables must be set up for each Motor x to enable and configure the sine-wave output for that motor. Of course, Ix00 must be set to 1 for any active motor, regardless of the output mode for that motor. Commutation Enable: Ix01 Ix01 is set to 1 to activate the commutation algorithms for Motor x. PMAC2 User’s Manual – 15 March 1997 5-5 3A0-602413-363 Command Output Address: Ix02 Ix02 instructs PMAC2 where to place its output commands for Motor x by specifying the address. The default values of Ix02 use the DAC registers A and B for Machine Interface Channel n, where n=x, by specifying the address of DAC register A. Ix02 seldom needs to be changed from the default value for DAC applications. The values typically used are shown in table 4-1. Table 4-1. DAC An Command Output Addresses (Y-registers) When performing sine-wave output control over the MACRO ring, Ix02 points to the first of a set of two MACRO output registers for the node used. The values typically used which are shown in table 4-2, are dependent on whether MACRO Type 0 or Type 1 protocol is used: Table 4-2. MACRO Command Output Registers Commutation Cycle Size: Ix70, Ix71 Ix70 and Ix71 define the size of the commutation cycle (electrical cycle). The cycle is equal to Ix71 divided by Ix70, expressed in encoder counts (after 5-6 PMAC2 User’s Manual – 15 March 1997 3A0-602413-363 decode). Ix70 and Ix71 must both be integers, but the ratio Ix71/Ix70 does not have to be an integer. On a rotary motor, Ix71 is typically set to the number of counts per mechanical revolution, and Ix70 is set to the number of pole-pairs (half of the number of poles) for the motor, which is equal to the number of commutation cycles per mechanical revolution. Commutation Phase Angle: Ix72 Ix72 sets the angle from phase A to phase B as a fraction of the commutation cycle. PMAC2 splits the commutation cycle (360oe) into 256 parts. For a 3phase motor, the angle from A to B is either 1/3 of a cycle (Ix72=85) or 2/3 of a cycle (Ix72=171). For a 2-phase or 4-phase motor, the angle from A to B is either 1/4 of a cycle (Ix72=64) or 3/4 of a cycle (Ix72=192). The proper choice of Ix72 is dependent on the commutation feedback encoder’s direction sense as determined by its wiring and the encoder decode variable I9n0, and on the wiring of the phases of the motor. This choice is generally determined experimentally through a test explained below. Changing Ix72 between, say, 85 and 171 is equivalent to exchanging two phase wires of the motor. PMAC2 User’s Manual – 15 March 1997 5-7 3A0-602413-363 Commutation Feedback Address: Ix83 Ix83 specifies the address of the register used for the commutation position feedback. This is almost always the address of the encoder phase position register for Channel n in PMAC2's gate array IC, where n = x. This address is the default value for Ix83. The values typically used are: Table 4-3. Commutation Position Feedback Addresses (X-registers) When performing sine wave control over the MACRO ring, Ix83 points to the position feedback register for the node used. These are Y-registers, so bit 19 of Ix83 must be set to 1 The values typically used are dependent on whether MACRO Type 0 or Type 1 protocol is employed for the node: Table 4-4. MACRO Commutation Feedback Registers Establishing Basic Output Operation 5-8 PMAC2 User’s Manual – 15 March 1997 3A0-602413-363 A quick test can establish basic operation of the commutation outputs, the drive and motor, and the feedback. The test uses the output offset variables Ix29 and Ix79 to force current directly into the particular phases and drive the motor like a stepper motor. The test can be used to verify: ♦ That output voltages are obtained from the ACC-8E board ♦ That currents flow in the phases of the motor ♦ That the currents cause the motor to lock into a position (it only does this well for a synchronous motor) ♦ To set the proper polarity of the Ix72 commutation phase angle parameter. (It only does this well for a synchronous motor. For an asynchronous induction motor, the polarity of Ix72 may have to be determined by trial and error.) PMAC2 User’s Manual – 15 March 1997 5-9 3A0-602413-363 Executing the Test This test, which can easily be done from the terminal window of the Executive program by typing in a few simple commands, is best illustrated by an example, which will use Motor 1. It should first be done on a bare motor with no load for safety reasons: M101->X:$C001,24,S ; Encoder 1 phase position register #1O0 ; Command zero output I129=2000 ; Positive offset of 2000 bits on 1st phase M101 ; Request position (after motor settles) 382 ; PMAC responds with position I179=2000 ; Positive offset of 2000 bits on 2nd phase M101 ; Request position (after motor settles) 215 ; PMAC responds with position If the servo-loop feedback has already been established with Ix03, the position query P command, or the position window in the Executive program, can be used instead of the Mx01 encoder position register. Verifying Basic Operation Setting a non-zero value for Ix29 should force a voltage on DACAn, which can be read with a voltmeter or oscilloscope. It should also force current in the matching phase of the motor, which can be measured with a current probe. Setting a non-zero value for Ix79 should do the same for Phase B. A synchronous motor should lock into a position and hold it when an Ix29 offset is given. An induction motor may lock in briefly for a brief period of time due to short-term eddy currents in the rotor. When the Ix79 offset is added, a synchronous motor should lock into a new position a fraction of a cycle away from the earlier position. An induction motor may do this also, but probably not as strongly. Evaluating the Polarity Match By looking at the direction of motion between the two steps, we can determine the proper setting of Ix72. If the position changed in the negative direction, Ix72 should be set less than 128 -- to 85 for a 3-phase motor, or 64 for a 2- or 4-phase motor. If the position changed in the positive direction, Ix72 should be set greater than 128 -- to 171 for a 3-phase motor, or 192 for a 2- or 4-phase motor. For the motor in this example, we conclude that we want a value of 64 if it is a 4-phase motor, or 85 if it is a 3-phase motor. If the encoder direction is subsequently changed for system reasons, I172 should be changed as well, to match. 5-10 PMAC2 User’s Manual – 15 March 1997 3A0-602413-363 6 Setting Up PMAC2 Commutation (Direct PWM or Sine Wave) Operation of the Digital Current Loops By this point, proper operation of the digital current loops should be established for direct PWM control, or basic operation should be established for analog sine-wave control. The commutation I-variables Ix70 and Ix71 (commutation cycle size), Ix72 (commutation phase angle), and Ix83 (commutation feedback address) should already be set properly. The next steps, explained in this section, are common for both types of control, with a shared commutation algorithm. Confirming Commutation Polarity Match For the PMAC2 commutation algorithms to work properly, the polarity of the output phases must match the feedback polarity. If there is a mismatch, the algorithm will lock up the motor at a point of zero torque. For a synchronous motor, we tested the polarity match in previous sections, but we can confirm the results here. For an asynchronous induction motor, we may be testing the polarity for the first time here. The test to see whether there is a match is simple, and slightly different for synchronous and asynchronous motors. Synchronous Motor Test With a synchronous motor, we try applying both a direct current command and a quadrature current command. Because we have not established a phase reference yet, we cannot be sure that a quadrature current command really produces quadrature current. But if the commutation polarity is correct, at least one of the commands should cause steady movement of the motor. First, we apply a direct current command with: Ix77=3000 O0 ; ~10% direct current command PMAC2 User’s Manual – 15 March 1997 6-1 3A0-602413-363 If this does not produce steady movement, we apply a quadrature current command with: Ix77=0 O10 ; 10% quadrature current command To finish the test, we issue a K command and make sure Ix77 has been returned to 0. If one of these commands produces steady movement, the commutation polarity is correct, and we can move on to the next stage of establishing a phase reference. However, if neither of these commands produces steady motion, we probably have commutation polarity mismatch. To correct the mismatch, reference Correcting Polarity Mismatch, Synchronous and Asynchronous Motors below. Asynchronous Motor Test For an asynchronous AC induction motor, we apply direct and quadrature current simultaneously. We do this with a command such as Ix78=3000 Ix77=3000 O10 The actual values may need to change depending on the rotor time constant. Finish the test with a K command. If this command produces steady movement, the commutation polarity is correct, and we can move on to the next stage of optimizing magnetization current and slip gain. However, if we do not get steady motion, we probably have commutation polarity mismatch (although if the motor cannot be made to move in either direction, try varying Ix77 and Ix78 by factors of two in both directions). To correct the mismatch, see the next section. Correcting Polarity Mismatch, Synchronous and Asynchronous Motors To correct a commutation polarity mismatch, there are two possible options: ♦ Reverse the feedback direction sense by changing I9n0. However, this changes the direction sense of the axis, which may not be tolerable. ♦ Reverse the output direction sense. For analog sine-wave output, this can be done by changing Ix72, for example from 171 to 85, or by exchanging two phase leads between amplifier and motor. For direct PWM, this must be done by exchanging phase leads. This is usually done at the screw terminals on the amplifier. Exchanging any two phases will change the polarity in the same way. However, the relationship between the sensor zero position and PMAC2's commutation cycle zero position is dependent on which two phases are exchanged. After changing the polarity match by one of the above three methods, repeat the test to make sure that you have solved the problem. 6-2 PMAC2 User’s Manual – 15 March 1997 3A0-602413-363 Establishing A Phase Reference (Synchronous Motors Only) Purpose When commutating a synchronous multi-phase motor such as a permanentmagnet brushless motor, the commutation algorithm must know the absolute position of the rotor. With an absolute sensor such as a resolver, the phase vitally referencing must just be done once, on assembly of the system. With an important for the safety of the incremental sensor such as an incremental optical encoder, the phase machine that a referencing must be done every time the system is powered up. If incremental reliable phase sensor power on signal is lost, even if controller power is retained, the phase referencing must be done again before enabling the signal. referencing method be used, whether with an Hall-effect commutation sensors, or their equivalent on an optical encoder, are absolute or absolute, but of a very low resolution (+30oe). In a high-performance incremental application, they are suitable to create a rough, temporary phase reference, sensor. If the permitting movement until a more accurate reference is established. phase reference is incorrect by The index pulse on an incremental encoder is absolute with high accuracy, but more than 1/4 in general, there must be movement before this pulse is reached. This requires of the phasing at least a rough phasing, either from a low-resolution absolute sensor such as cycle, runaway hall-effect, or from a power-on phasing search. will occur when the servo loop is closed. Test your phase referencing carefully with a bare motor before attaching a load, to make sure your method is reliable. Before attaching a load, make sure that the PMAC2 fatal following error limit parameter Ix11 and the amplifier overcurrent fault are active and working properly. Also make sure that required mechanical It is PMAC2 User’s Manual – 15 March 1997 6-3 3A0-602413-363 protections are in place. Preparation These tests require that both the commutation and current loop be working properly. Double-check that your setup variables are correct for these actions, especially ones that you may have changed for earlier tests. For motor 1, make sure ♦ I100=1 to activate the motor ♦ I101=1 to enable commutation ♦ I170 and I171 are set to their proper value For these tests, we will want access to the motor phase position register, where PMAC2 keeps track of where it is in the phase cycle. The phase position register is 48 bits long, using both X and Y memory. The Y-memory portion of this register has only fractional information, so we will use only the X-memory portion. Its units are (counts*Ix70). The registers are shown in table 5-1. Table 5-1. Phase Position Angle Registers 6-4 PMAC2 User’s Manual – 15 March 1997 3A0-602413-363 This register normally varies from -Ix71/2 to +Ix71/2, although if you are monitoring it, sometimes you will see it jump by Ix71 units and be temporarily outside this range. This is normal behavior. Access to this register is useful in many ways for establishing a phase reference. Define the suggested M-variable for the Motor 1 phase position register: M171->X:$0040,0,24,S ; Motor 1 phase position (counts*Ix70) Add this M-variable to the Watch window. Current Command Six-Step Test On preliminary firmware versions dated before October 95 (use DATE command), these commands produce angles rotated -30o from the results shown here. On preliminary firmware versions dated 10/5/95 or 10/16/95 these commands produce angles rotated 180o from the results shown here, possibly leading to a dangerous runaway condition. If you have any of these firmware versions, contact the factory for a free firmware upgrade. The basic technique we will use here, either for a one-time phase reference with an absolute sensor, or power-up phase reference with an incremental sensor, is all or part of the current command six-step test. This is very similar to the voltage command six-step test described above, except the current loops are active. We use the ADC input offset registers to bias the phase current feedback, and hence the phase command outputs, to drive the motor as a stepper motor to a particular location in the commutation cycle, usually the 0o position. Then we can write a 0 to the phase position register. Ix29 is the A-phase offset; Ix79 is the B-phase offset. The third phase is not directly commanded; PMAC2 will automatically command it as part of the digital current loop to balance the first two phases. For motor 1, the following sequence of commands for the current six-step test, and the expected results, could be: #1O0 ; Open loop command of zero magnitude I179=3000 I129=0 ; Step 1: (A) 0oelec.; (B) 180oelec. I179=3000 I129=-3000 ; Step 2: (A) -60oelec.; (B) 120oelec. I179=0 I129=-3000 ; Step 3: (A) -120oelec.; (B) 60oelec. I179=-3000 I129=0 ; Step 4: (A) 180oelec.; (B) 0oelec. I179=-3000 I129=3000 ; Step 5: (A) 120oelec.; (B) 60oelec. I179=0 I129=3000 ; Step 6: (A) 60oelec.; (B) 120oelec. I179=3000 I129=0 ; Step 1: (A) 0oelec.; (B) 180oelec. Case (A) is the proper result for all direct PWM setups (Ix82>0), regardless of the setting of Ix72. It is the proper result for sine-wave output setups (Ix82=0) with Ix72<128. Case (B) is the proper result for sine-wave output setups (Ix82=0) with Ix72>128. PMAC2 User’s Manual – 15 March 1997 6-5 3A0-602413-363 These commands will force about 1/10 of maximum current into phases to drive the motor to known positions in the phase cycle. Remember to clear the offsets when you are finished with this test: I179=0 I129=0 Direction Balance Fine Phasing Test The stepper motor phasing test will establish a phase reference typically to within 1 or 2 degrees. This is adequate for many purposes, but for complete optimization of the motor phase reference, it is necessary to perform another test. This test, described below, finds the best phase reference by making sure that key performance measures are the same in both directions. Usually the improvement seen in performance from this fine phasing is better smoothness, not increased torque. The use of current-loop integrator registers as explained below can only be used in direct PWM systems. The tests can still be run on sine-wave output systems, but the measurement to be compared in both directions is the motor velocity. This can simply be read in the position window of the PMAC Executive Program. This measurement, which is also possible on direct PWM systems, is not quite as sensitive to phase differences as the measurement explained below, but can still result in an improvement. This test only needs to be performed once for a given motor. Its purpose is to establish a relationship between the motor phase angle and an absolute sensor on the motor (e.g. resolver or incremental encoder index pulse). Most motor manufacturers who mount feedback devices at the factory do not specify a mounting repeatability tolerance (between motor phase angle and sensor angle) tighter than 1 or 2 degrees. The results of this test do not necessarily carry from one motor to another of a given design. This test is generally not appropriate for linear motors, because of the relatively uncontrolled movement it produces. It should only be done on unloaded rotary motors. On linear motors, a fine phasing test can be done by adjusting the phase position register so that no movement occurs when a large value of Ix77 (e.g. 16,000) is given with an O0 command. The test should start with small values, and movement quickly stopped with a K command. Preparation In the Detailed Plot menu of the data gathering section of the PMAC Executive program, set up to gather the Direct Integrator Output and Quadrature Integrator Output registers. Set the gathering period to about 10 servo cycles. The addresses of the registers for each of the motors are shown in tables 5-2 and 5-3. Table 5-2. Direct Integrator Output Registers 6-6 PMAC2 User’s Manual – 15 March 1997 3A0-602413-363 Table 5-3. Quadrature Integrator Output Registers Executing the Test Before performing this test, first use the stepper-motor method of phasing to get close. Then, in the terminal window of the Data Gathering section of the PMAC PMAC2 User’s Manual – 15 March 1997 6-7 3A0-602413-363 Executive, you can use the following set of commands (wait a couple of seconds between commands): DEFINE GATHER GAT O10 O-10 ENDG K ; ; ; ; Reserve memory for gathered data Positive command Negative command Stop gathering and kill motor Upload the gathered data and plot direct and quadrature voltage vs. time. The goal is to have the average direct voltage reading be the same for the moves in both directions. The quadrature voltage will change in sign at the move reversal. To adjust the system, wait until the motor is stopped after the test (M171 is constant) and make a small adjustment to the M171 phase position register with a command like: M171=M171+5 Then repeat the test as needed until you get the direct voltage readings as close as possible in both directions. You will quickly get a feel for both the direction and magnitude of the changes you will need to make. This test is sensitive to a count of phasing error, so the last change should probably be +1 count. Using the Test Results for Absolute Sensor This test is only useful when we match our super-accurate phase position to an absolute position sensor or the index pulse of an incremental sensor. With an absolute sensor, assign an M-variable to the sensor register, and add this to the Watch window. For example: M175->TWR:0,0 ; Abs. pos. of 1st resolver on 1st ACC-8D Opt 7 R/D Make sure the motor is completely at rest. Now take the sensor position value you read, multiply this by I170, and subtract this from the phase position read by M171. (If you move the motor manually so that M171=0, you can negate the product). Enter this value into I175. Mathematically speaking, I175=M171-(M175*I170) Finally, set up I181 to read the absolute sensor on subsequent PMAC2 resets and store these values with the SAVE command. You will never need to perform another phase reference on this motor. 6-8 PMAC2 User’s Manual – 15 March 1997 3A0-602413-363 Using the Test Results for Incremental Index Pulse For the incremental encoder index pulse, we will use the position capture feature to note where the index is. Set variable I912 to 1 if you have a high-true index pulse, or to 9 if you have a low-true index pulse. (To see which it is, define M119->X:$C000,14 and put M119 in the Watch window. If it is generally 0, you have a high-true pulse.) If you want to make sure the effective index pulse is only 1 count wide, set I914 to 1, and I915 to the appropriate value for your encoder. Now assign an M-variable to the encoder flag capture register: M103->X:$C003,0,24,S ; Encoder 1 flag capture register Add this to the Watch window. With the motor at rest, note the phase position value in M171 and the encoder position register in M101. Write these values down. Now turn/push the motor manually in the direction you plan to home the machine until you see M103 change. The new value is the value of the encoder register captured at the index pulse. Subtract your starting M101 value from this new M103 value. Multiply the difference by I170 and add this to the starting M171 value. The result is the value we will write to the phase position register when we are settled at the index to refine our initial rough phasing. Mathematically speaking: IndexPhasePos = I 170 * (IndexM 103 − StartM 101) + StartM 171 Alternately, in a technique that is easier mathematically but harder physically, put M119 in the Watch window (or the index signal on an oscilloscope) and turn the motor shaft until it stops on the index pulse. Read the M171 phase position register value. This is the avlue we will write to the phase position register when we are settled at the index to refine our initial rough phasing. Using Hall-Effect Sensors for Phase Reference Hall-effect sensors, or their optical equivalents on a commutation encoder, for a 3-phase motor can be used for rough phasing on power-up without the need for a phasing search move. This initial phasing provides reasonable torque, but it will need to be corrected for top operation. Usually the correction is done when the index pulse is reached, in the same technique that is described above for the correction after a power-on phasing search move. Hall-effect sensors usually map out 6 zones of 60oelec. each. In terms of PMAC2's commutation cycle, the boundaries should be at 180o, -120o, -60o, 0o, 60o, and 120o. Typically a motor manufacturer will align the sensors to within a few degrees of this, because these are the proper boundary points if all commutation is done from the commutation sensors. If you are mounting the hall-effect sensors yourself, you should take care to align the boundaries at these points. The simplest way is to force the motor to the zero degree point with a current offset (as shown above) and adjust the sensor while watching its outputs to get a boundary as close as possible to this point. PMAC2 User’s Manual – 15 March 1997 6-9 3A0-602413-363 Preparation Define M-variables to the hall-effect or equivalent inputs. Suggested definitions for Channel 1 are: M124->X:$C000,20 M125->X:$C000,21 M126->X:$C000,22 M127->X:$C000,23 ; ; ; ; Channel Channel Channel Channel effect) M128->X:$C000,20,4 ; Channel 1 1 1 1 W V U T flag flag flag flag (not usually hall- 1 TUVW as a 4-bit value Make these definitions and add these variables to the Watch window (you may want to delete other variables you no longer need to monitor). With the motor killed, move the motor slowly by hand to verify that the inputs you expect to change do change. Executing the Test On preliminary firmware versions dated before October 95 (use DATE command), these commands produce angles rotated -30o from the results shown here. On preliminary firmware versions dated 10/5/95 or 10/16/95 these commands produce angles rotated 180o from the results shown here, possibly leading to a dangerous runaway condition. If you have any of these firmware versions, contact the factory for a free firmware upgrade. To map the hall-effect sensors, we will use the current-loop six-step test, or a variant of it, to force the motor to known positions in the commutation cycle, and observe the states of the hall-effect signals. The current-loop test shown above should force the motor right to the boundaries of the hall-effect zones. If you use these commands, you will want to move the motor by hand a little bit at each point to observe the transition. You may want to force the motor to the expected mid-point of each hall-effect zone instead (or in addition). To do this, the command sequence would be: #1O0 I179=3000 I129=-1500 ; Open loop command of zero magnitude ; Step 1: (A)-30oelec.; (B)150oelec. I179=1500 I129=-3000 ; Step 2: (A)-90 elec.; (B)90oelec. o o I179=-1500 I129=-1500 ; Step 3: (A)-150 elec.; (B)30oelec. If the T flag input is 1, the values of 6-10 o I179=-3000 I129=1500 ; Step 4: (A)150 elec.; (B)-30oelec. I179=-1500 I129=3000 ; Step 5: (A)90 elec.; (B)-90oelec. I179=1500 I129=1500 ; Step 6: (A)30 elec.; (B)-150oelec. I179=3000 I129=-1500 ; Step 1: (A)-30 elec.; (B)150oelec. o o o Case (A) is the proper result for all direct PWM setups, regardless of the setting of Ix72. It is the proper result for sine-wave output setups with Ix72<128. Case (B) is the proper result for sine-wave output setups with Ix72>128. PMAC2 User’s Manual – 15 March 1997 3A0-602413-363 Mx28 will be 8 greater than what is shown in the table. Remember to clear the offsets when you are finished with this test: I179=0 I129=0 It is advisable to create a table listing the values of M124 through M128 for each position. Table 5-4 is a typical position table for these values. Table 5-4. The Values Of M124 Through M128 For Each Position PMAC2 User’s Manual – 15 March 1997 6-11 3A0-602413-363 Using the Test Results To execute a power-on phasing using the hall-effect sensors, you can use new modes of the Ix81 power-on phase position parameter, or you can write a simple PLC program that executes once on power-up/reset. Setting bit 23 of Ix81 to 1 specifies a hall-effect power-on phase reference. In this case, the address portion of Ix81 specifies a PMAC X-address, usually that of the flag register used for the motor, the same address as in Ix25. PMAC expects to find the hall-effect inputs at bits 20, 21, and 22 of the specified register. In a flag register, these bits match the CHWn, CHVn, and CHUn inputs, respectively. Hall-effect inputs are traditionally labeled U, V, and W. The hall-effect signals must each have a duty cycle of 50% (180oe). PMAC can use hall-effect commutation sensors separated by 120oe. There is no industry standard with hall-effect sensors as to direction sense or zero reference, so this must be handled with software settings of Ix81. Bit 22 controls the direction sense of the hall-effect sensors as shown in the following diagrams, where a value of 0 for bit 22 is standard and a value of 1 is reversed: 6-12 PMAC2 User’s Manual – 15 March 1997 3A0-602413-363 UV W Value: 1 3 2 6 4 5 1 U 0 1 V 0 1 W 0 Standard: -30 30 90 150 Reversed: 30 -30 -90 -150 -150 150 -90 90 Figure 4-2. Hall-Effect Waveforms With Zero Offset This diagram shows the hall-effect waveforms with zero offset, defined such that the V-signal transition when the U-signal is low (defined as the zero point in the hall-effect cycle) represents the zero point in PMAC’s commutation cycle. If the hall-effect sensors do not have this orientation, bits 16 to 21 of Ix81 can be used to specify the offset between PMAC’s zero point and the hall-effect zero point. These bits can take a value of 0 to 63 with units of 1/64 of a commutation cycle (5.625oe). The offset can be computed using the mapping test shown above. In our example, the the hall effect zero (HEZ) point was found to be between +30oe and +90oe, so we will call +60oe. The offset value can be computed as Offset = HEZ %360 o * 64 360 o The offset computed here should be rounded to the nearest integer. In our example, this comes to: Offset = − 60 o% 360 360 o o ∗ 64 = 60 o 360 o ∗ 64 = 10.667 ≈ 11 = B hex The test showed that the hall-effect sensors were in the reversed direction, not standard, so bit 22 is set to one. With bit 23 (a value of 8 in the first hex digit) Ix75 is not used for the set to 1 to specify hall effect sensing, the first two hex digits of Ix81 become phase position $CB. If Flag register 1 at address $C000 were used for the hall-effect inputs, Ix81 would be set to $CBC000. offset in this method. It can be used to store The description of Ix81 in the Software Reference shows the common values of offsets used, for all the cases where the zero point in the hall-effect cycle is the final at a 0o, 60o, 120o, 180o, -120o, or -60o point -- where manufacturers generally correction align the sensors.. based off fine phasing. PMAC2 User’s Manual – 15 March 1997 6-13 3A0-602413-363 Overall Procedure Summary The full phase reference then consists of the following steps: ♦ Do a rough phase reference using the hall-effect sensors as specified by Ix81, either automatically on power-up/reset if Ix80=1, or on the $ command if Ix80=0. ♦ Do a homing search move on the motor, using the index pulse as part of the home trigger. ♦ Wait for the motor to settle in-position (following error less than Ix27) at the home position using the motor in-position status bit -- suggested M-variable Mx40 -- [WHILE(M140=0)...] ♦ Force the motor phase position register to the pre-determined value at this point with a command like Mx71=Ix75. PLC-Based Hall-Effect Reference Ix75 is not used for the phase position offset in this method. It can be used to store the final correction based off fine phasing. The test showed that the hall-effect sensors were in the standard direction, not reversed, so bit 22 is left at zero. With bit 23 (a value of 8 in the first hex digit) set to 1 to specify hall effect sensing, the first two hex digits of Ix81 become $B5. If Flag register 1 at address $C000 were used for the hall-effect 6-14 Alternately a power-on PLC program could be used to do the hall-effect phasing. This is useful if extra error trapping is desired, or if sensors of a different format are used. A program based on the results of our example table would be: OPEN PLC 1 CLEAR IF (M128&7=2) M171=I171/-12 P170=1 ENDIF IF (M128&7=6) M171=I171*-3/12 P170=1 ENDIF IF (M128&7=4) M171=I171*-5/12 P170=1 ENDIF IF (M128&7=5) M171=I171*5/12 P170=1 ENDIF IF (M128&7=1) M171=I171*3/12 P170=1 ENDIF IF (M128&7=3) M171=I171/12 ; Hall Effect State 1 (0 to -60 deg)? ; Set phase angle to -30 deg ; Phasing OK flag ; Hall Effect State 2 (-60 to -120 deg)? ; Set phase angle to -90 deg ; Phasing OK flag ; Hall Effect State 3 (-120 to -180 deg)? ; Set phase angle to -150 deg ; Phasing OK flag ; Hall Effect State 4 (180 to 120 deg)? ; Set phase angle to 150 deg ; Phasing OK flag ; Hall Effect State 5 (120 to 60 deg)? ; Set phase angle to 90 deg ; Phasing OK flag ; Hall Effect State 6 (60 to 0 deg)? ; Set phase angle to 30 deg PMAC2 User’s Manual – 15 March 1997 3A0-602413-363 P170=1 ; Phasing OK flag ENDIF IF (M128&7=0 OR M128&7=7) ; Invalid states P170=0 ; Phasing not OK ENDIF The description of IF (P170=1) ; Phasing OK? Ix81 in the CMD#1J/ ; Enable motor Software ELSE Reference CMD#1K ; Not OK; disable motor shows the common values ENDIF of offsets used, DISABLE PLC 1 ; So program will not repeat for all the cases CLOSE where the zero point in the hall-effect cycle is at a 0o, 60o, 120o, 180o, 120o, or -60o point -- where manufacturers generally align the sensors. inputs, Ix81 would be set to $B5C000. Power-On Phasing Search An unreliable phasing search method can lead to a runaway condition. Test your phasing search method carefully to make sure it works properly under all conceivable conditions. Make sure your Ix11 fatal following error limit is active and as tight as possible so the If a non-absolute sensor is used for commutation, PMAC2 must perform a search move for the proper phasing reference every time it powers up (with an absolute sensor, this only needs to be done once in the development of the system). There are several ways to do this phasing search. PMAC2 has two automatic methods executed by firmware; other methods or enhancements of these methods can be executed with PLC programs. A power-on phasing search permits commutation of permanent-magnet brushless motors without the need for a more expensive and possibly less accurate absolute sensor. However, a phasing search may not be dependable in some applications; in these cases an absolute sensor will be required. The estimate from a power-on phasing search should be within +1-2oe of the true zero position, so many people will just use the phasing established here throughout the application. It is also possible to adjust the estimate when settled at the index pulse, using the results of the fine phasing test described above. PMAC2 User’s Manual – 15 March 1997 6-15 3A0-602413-363 motor will be killed quickly in the event of a serious phasing search error. When properly phased, a positive O-command should cause movement in the positive direction; a negative O-command should cause movement in the negative direction. If you get the opposite results, you will get a dangerous runaway condition when the servo loop is closed. Two-Guess Phasing Search PMAC2’s first automatic phasing search method is called the two-guess phasing search, because it makes two arbitrary guesses as to the phase position, briefly applies a torque command using each guess, and observes the response of the motor to each command. Based on the magnitude and direction of the two responses, PMAC2 calculates the two responses, PMAC2 calculates the proper phasing reference point. It then starts the commutation based on this reference, and closes the servo loop to hold position. The two-guess phasing search is very quick and requires little movement. It works well provided that external loads such as gravity and friction are low. However, if there are significant external loads, it may not prove to be a reliable phasing search method (and unreliable phasing search methods can be dangerous); if this is the case, another method such as the stepper-motor method described below should be used. The two-guess method is selected by setting Ix80 to 0 or 1. With Ix80 at 0, the phasing search is not executed automatically during the power-on/ reset cycle; a $ command must be used to execute the phasing search. With Ix80 at 1, the phasing search will automatically be executed during the power-on reset cycle; it can also be subsequently executed with a $ command. Two parameters must be specified to tell PMAC2 how to do this phasing search. Ix73 specifies the magnitude of the torque command during each guess, with units of 16-bit DAC bits. Typical values are 2000 to 6000; 4000 (about 1/8 of full range) is a usual starting point. Ix74 sets the duration of each torque command and the evaluation of its repsonse, with units of servo cycles. Typical values are 3 to 10; 5 (about 2 msec at the default servo update) is a usual starting point. Stepper-Motor Phasing Search The other automatic method of phasing search for a synchronous motor is the stepper-motor method. This method forces current through particular phases of the motor, as a stepper-motor controller would, and waits for it to settle. With proper operation, this will be at a known position in the commutation cycle. This method is equivalent to two steps of the current-loop six-step test described above. The stepper-motor phasing search requires more movement and more time than the two-guess method, but it is more reliable in finding the phase accurately in the presence of large external loads. The stepper-motor method is selected by setting Ix80 to 2 or 3. With Ix80 at 2, the phasing search is not executed automatically during the power-on/reset 6-16 PMAC2 User’s Manual – 15 March 1997 3A0-602413-363 cycle; a $ command must be used to execute the phasing search. With Ix80 at 3, the phasing search will automatically be executed during the power-on reset cycle (this is not recommended); it can also be subsequently executed with a $ command. In this method, Ix73 controls the magnitude of the current through the phases, with 32,767 representing full range. Typically a value near 3000, about 1/10 of full range, will be used, although the actual value will depend on the loads. Ix74 controls the settling time for each of the two steps used in the search. In this mode, the units of Ix74 are servo cycles*256, about 1/10 sec with the default servo cycle time. Typically a settling time of 1-2 seconds is used. In the stepper-motor phasing search, PMAC2 first forces current to put the motor at the +/-60o point in the phasing cycle and waits for the settling time. Then it forces current to put the motor at the 0o point in the phasing cycle and again waits for the settling time. It checks to see that there has been at least 1/16 cycle (22.5o) movement between the two steps. If there has been, it forces the phase position register to 0, clears the phasing-search-error motor status bit, and closes the servo loop. If it has detected less movement than this, it sets the phasing-search-error bit, and disables (kills) the servo loop. If the stepper motor phasing search is done outside of the power-on/reset cycle, the phasing search algorithm will also fail if an amplifier fault or overtravel limit condition is detected. PMAC2 will set the phasing-search-error bit and disable the servo loop. If done inside the power-on/reset cycle, PMAC2 cannot automatically detect these errors, but the search will likely fail due to lack of movement. Custom Phasing Search Methods It may be necessary or desirable to write a custom phasing-search algorithm. Usually these are executed as PMAC2 PLC programs, but often they can be tried and debugged using on-line commands. The on-line commands are sure an particularly useful if the phasing search is done only in development to algorithm of this type can be establish a reference for an absolute sensor. executed Most custom algorithms are variations on the stepper-motor phasing search reliably. Do not attempt this method. They use the phase-current offset values Ix29 and Ix79 with an O0 algorithm if the command to force current into particular phases so the motor will lock at a position sensor certain physical position in its phasing cycle. The following table shows the positions in the phasing cycle created by different combinations of Ix29 and or drive is Ix79 for 3-phase motors. Usually the magnitudes of the non-zero values are unpowered or 2000 to 3000: faulted. PMAC2 does not permit the Ix29 open-loop enabled state required for Ix79 this PLC if it is into overtravel A. limits. The PHAS automatic E overtravel limit POS. functions may have to be Make PMAC2 User’s Manual – 15 March 1997 6-17 3A0-602413-363 disabled with Ix13, Ix14, and Ix25. Special logic may be required to step out of a limit before the full phasing can be done. Remember that improper phase referencing can lead to runaway conditions. Make sure that both PMAC2 fatal following error limit Ix11 and amplifier overcurrent fault protections are active and working. On preliminary firmware versions dated before October 95 (use DATE command), these commands produce angles rotated -30o from the results shown here. With preliminary firmware of dates 10/5/95 and 10/16/95 the phase references are 180o off from what is shown in this example. Using this 6-18 B. PHAS E POS. Case A shows the resulting positions for all direct PWM systems, and for sinewave output systems with Ix72<128. Case B shows the resulting phase positions for sine-wave output systems with Ix72>128. For example, the following set of on-line commands typed into the terminal window of the PMAC2 Executive program could be used to force a motor to the zero position in its phasing cycle, set the phase position register as zero, and enable the motor. #1O0 I129=0 I179=3000 M171=0 I179=0 J/ ; ; ; ; ; ; Enable the motor with open-loop zero magnitude No offset on Phase A Positive offset on Phase B to force to 0 deg Write zero into phase position register No offset on Phase B Close servo loop PMAC2 User’s Manual – 15 March 1997 3A0-602413-363 example unchanged with firmware of those dates will likely lead to dangerous runaway conditions. If you have firmware of these dates, contact the factory for free upgrades. The time between typing the commands would provide sufficient delay for settling into position. The following PLC program is a good starting point for variants on the steppermotor phasing search method. Extensions to this program could be to phase two gantry motors simultaneously or to step out of a position limit. This example uses Ix73 and Ix74 as they would be used in the automatic stepper-motor phasing search method. PMAC2 User’s Manual – 15 March 1997 6-19 3A0-602413-363 ;****************** Set-up and Definitions ******************** CLOSE ; Make sure all buffers are closed M70->X:$0700,0,24,S ; 24-bit automatic timer register M271->X:$007D,0,24,S ; Motor 2 phase position register ;****************** Program OPEN PLC 1 CLEAR CMD#2O0 ; P229=I229 ; P279=I279 ; I229=-I273 ; I279=I273 ; M70=I274*256 ; WHILE (M70>0) ; ENDWHILE P271=M271 ; I229=P229 ; M70=I274*256 ; WHILE (M70>0) ; ENDWHILE P271=P271-M271 ; IF (I282>0 OR I272<128) ; M271=0 ; ELSE ; M271=I271/2 ; I279=P279 ; IF (ABS(P271)>I271/12) ; CMD #2J/ ; ELSE ; CMD#2K ; SENDPHASING FAILED DISABLE PLC 1 ; CLOSE 6-20 to do phasing search ************** Force zero-magnitude open-loop Save real Phase A bias Save real Phase B bias Force negative bias into A Force positive bias into A Starting value for countdown timer Wait for prescribed time Store phase position at this point Restore real bias to A for 0 deg Starting value for countdown timer Wait for prescribed time Get difference between two positions Direct PWM or check analog phase Set phase position to zero Analog system with Ix72>128 Set phase position to 180 deg Restore real bias to B Greater than 1/12 cycle? Close servo loop Not enough movement Bad phasing, kill Keep from executing again PMAC2 User’s Manual – 15 March 1997 3A0-602413-363 Final Phase Correction with Index Pulse If you want to make the final phase correction, you must move PMAC to the index pulse and force the value you obtained during the fine phasing test into the phase position register. Before you can do this, the position/velocity servo loop must be reasonably tuned; the tuning for this loop is the same as for any other PMAC motor. Usually the move to the index pulse will be the homing search move, where the trigger for the home position includes the leading edge of the index pulse; typically the first index pulse inside the home flag pulse. I-variables I9n2 and I9n3 control the home trigger. Typically the preliminary phasing will permit a reasonable move all the way to the home position. It is also possible to perform a preliminary homing search to the first index pulse, correct the phase, then do the real homing search. A sample motion program segment that performs the homing search and phase correction is: HOME1 WHILE (M140=0) WAIT M171=P171 ; Command homing search move ; Loop until in position ; Force value into phase position register What To Do Next Once the appropriate steps in this section have been taken, the motor's commutation and current loop should be operating correctly. You should be able to turn the motor in both directions with O-commands; positive Ocommands should cause the motor position to count in the positive direction, and negative O-commands should cause the motor position to count in the negative direction. Once this is done, the next step is to set up and tune the position/velocity loop servo, either the standard PID loop, or the optional Extended Servo Algorithm. This is done in the same method as for PMAC motors without digital current loop and/or PMAC commutation. For purposes of tuning, a system with PMAC commutation and/or current loop looks like a torque mode drive to the position/velocity loop. Remember to store the I-variable values you have set here to the non-volatile flash memory with the SAVE command. PMAC2 User’s Manual – 15 March 1997 6-21 3A0-602413-363 7 Setting Up PMAC2 For Velocity or Torque Control Single Output Command If PMAC2 is not performing the commutation for a motor, it provides a single output command value for the motor. Usually this output represents either a velocity command or a torque (force, or current magnitude) command, and typically this output is encoded as an analog signal voltage level. When driving a hydraulic cylinder through either a proportional valve or a servo valve, the dynamics appear to the PMAC2 to be those of a velocity command to a motor. Hardware Setup For PMAC2 to operate a motor with analog velocity-mode or torque-mode outputs, an ACC-8E analog interface board or equivalent must be attached to the machine connector for the machine interface channel used. The ACC-8E board contains the DACs, output op-amps, encoder and flag interfaces, and optical isolation circuits. The following discussion assumes an ACC-8E is being used. DAC Output Signals The DACA outputs on the ACC-8E should be connected to the command inputs on the velocity-mode or torque-mode amplifiers. If the inputs on the amplifier are single-ended, use the DAC+ output only, and leave the complementary DAC- outputs floating; do not ground them! If the inputs on the amplifier are complementary, use both the DAC+ and DAC- outputs. In either case, tie the AGND reference voltage on the ACC-8E to the reference voltage for the amplifier input. PMAC2 User’s Manual – 15 March 1997 7-1 3A0-602413-363 Amplifier Enable and Fault Interface The amplifier enable outputs on the ACC-8E use dry-contact relays. Normallyopen, normally closed, sinking or sourcing configurations from 12V to 24V can be chosen. The amplifier fault inputs on the ACC-8E pass through AC Opto isolators. Sinking or sourcing configurations from 12V to 24V can be chosen. Encoder Feedback The ACC-8E can accept 3-channel quadrature encoder feedback, either singleended or differential, in the range of 5V to 12V. Supplemental Flags The ACC-8E can accept hall-effect signals for power-on phase information through its supplemental flag connector on the U, V, and W flags. Other Signals The ACC-8E has AC Opto isolator inputs for overtravel limit, home, and user flag inputs. PMAC2 Parameter Setup Parameters to Set Up Global Hardware Signals Several parameters that set up global and multi-channel hardware operation must be set for proper operation of the analog velocity and torque-mode outputs. These variables are in the I900 to I909 range. Servo Clock Frequency Control: I900, I901, I902 Every cycle of the SERVO clock, PMAC2 updates commanded position (interpolates) and closes the position/velocity servo loop for all active motors, whether or not commutation and/or a digital current loop is closed by PMAC2. Typical servo clock frequencies are 1 to 4 kHz. The default frequency of 2.25 kHz is suitable for most applications. The servo clock frequency is determined by the settings of I900, I901, and I902. I900 determines the frequency of the MaxPhase clock signal from which the actual phase clock and servo clock signals are derived. It also determines the PWM cycle frequency for Channels 1 to 4. If you need to generate any PWM signals on Channels 1-4, refer to the section Using PMAC2 for Direct PWM Control, above for details, and use I901 to select how your PHASE clock is derived from MaxPhase. If you do not need to generate PWM signals on channels 1-4, set I900 to make the MaxPhase clock frequency equal to the PHASE clock frequency you want. 7-2 PMAC2 User’s Manual – 15 March 1997 3A0-602413-363 This must be an integer multiple of the SERVO clock frequency you want. Use the following formula: 117,964.8kHz I 900 = int − 1 2 * MaxPhaseFreq( kHz ) I901 determines how the actual phase clock is generated from the MaxPhase clock, using the equation: PhaseFreq ( kHz ) = MaxPhaseFreq ( kHz ) I 901 + 1 I901 is an integer value with a range of 0 to 15, permitting a division range of 1 to 16. If you have set the MaxPhase frequency equal to your desired phase clock frequency, make I901 equal to 0 for the divide-by-1 setting. I902 determines how the Servo clock is generated from the Phase clock, using the equation ServoFreq ( kHz ) = PhaseFreq ( kHz ) I 902 + 1 I902 is an integer value with a range of 0 to 15, permitting a division range of 1 to 16. I10 tells the PMAC2 interpolation routines how much time there is between servo clock cycles. It must be changed any time I900, I901, or I902 is changed. I10 can be set according to the formula: I10 = 640 ( 2 * I 900 + 3)( I 901 + 1)( I 902 + 1) 9 Hardware Clock Frequency Control: I903, I907 I903 determines the frequency of four hardware clock signals use for machine interface channels 1-4; I907 does the same for machine interface channels 5-8. These can probably be left at the default values. The four hardware clock signals are SCLK (encoder sample clock), PFM_CLK (pulse frequency modulator clock, DAC_CLK (digital-to-analog converter clock), and ADC_CLK (analog-to-digital converter clock). Only the DAC_CLK signal is directly used with the analog output, to control the frequency of the serial data stream to the DACs. The default DAC clock frequency of 4.9152 MHz is suitable for the DACs on the recommended ACC8E analog interface board. Refer to the I903 and I908 descriptions for detailed information on setting these variables. PMAC2 User’s Manual – 15 March 1997 7-3 3A0-602413-363 The encoder SCLK frequency should be at least 20% greater than the maximum count (edge) rate that is possible for the encoder on any axis. Higher SCLK frequencies than this minimum may be used, but these make the digital delay anti-noise filter less effective. DAC Strobe Control: I905, I909 PMAC2 generates a common DAC strobe word for each set of 4 machine interface channels. It does this by shifting out a 24-bit word each phase cycle, one bit per DAC clock cycle, most significant bit first. I905 contains this word for Channels 1-4; I909 contains this word for Channels 5-8. The default values of $7FFFC0 are suitable for use with the DACs on the recommended ACC-8E analog interface board. Parameters to Set Up Per-Channel Hardware Signals For each machine interface channel n (n = 1 to 8) used for analog outputs, a few I-variables must be set up properly. Encoder Decode Control: I9n0 I9n0 must be set up to decode the feedback encoder properly. Almost always a value of 3 or 7 is used to provide times-4 (x4) decode of a quadrature encoder (4 counts per encoder line). The difference between 3 and 7 is the direction sense of the encoder; you should set this variable so your motor counts up in the direction you want. The polarity sense of the analog output must match that of I9n0 for your particular wiring; if it is wrong, you will get unstable positive feedback and a probable runaway condition. A test for determining this polarity match is given below. Remember that if you change I9n0 on a working motor, you will have to change your output polarity as well. Output Mode Control: I9n6 I9n6 must be set to 1 or 3 to specify that outputs A and B for Channel n are in DAC mode, not PWM. A setting of 1 puts output C (not used for servo or commutation tasks in this mode) in PWM mode; a setting of 3 puts output C in PFM mode. Output Inversion Control: I9n7 I9n7 controls whether the serial data streams to the DACs on Channel n are inverted or not. The default value of 0 (non-inverted) is suitable for use with the recommended ACC-8E analog interface board. Inverting the bits of the serial data stream has the effect of negating the DAC voltage. In a servo algorithm this is changes the polarity match between output and input, which would produce runaway if the system were working properly before the inversion. 7-4 PMAC2 User’s Manual – 15 March 1997 3A0-602413-363 Parameters to Set Up Motor Operation Several I-variables must be set up for each Motor x to enable and configure the sine-wave output for that motor. Of course, Ix00 must be set to 1 for any active motor, regardless of the output mode for that motor. Commutation Enable: Ix01 Ix01 is set to 0 to disable the commutation algorithms for Motor x. Commutation is performed in the drive or the motor in this mode of operation. Command Output Address: Ix02 Ix02 instructs PMAC2 where to place its output commands for Motor x by specifying the address. The default values of Ix02 use the DAC register A for Machine Interface Channel n, where n = x. Ix02 seldom needs to be changed from the default value for DAC applications. The values typically used are shown in table 6-1. Table 6-1. DACnA Command Output Addresses (Y-registers) When the PMAC2 is operating Motor x in velocity mode or torque mode commanded over a MACRO ring, Ix02 will contain the address of a MACRO output register for one of the MACRO nodes. When using the Type 0 MACRO protocol commonly found on single-axis MACRO drives such as the Performance Controls FLX Drive and the Kollmorgen Fast Drive, use the Ix02 values shown in table 6-2. Table 6-2. Type 0 MACRO Ix02 values PMAC2 User’s Manual – 15 March 1997 7-5 3A0-602413-363 When using the Type 1 MACRO protocol commonly found on multi-axis MACRO components such as the Delta Tau Compact MACRO Station, use the Ix02 values shown in table 6-3. Table 6-3. Type 1 MACRO Ix02 values 7-6 PMAC2 User’s Manual – 15 March 1997 3A0-602413-363 8 Setting Up PMAC2 For Pulse-andDirection Control Pulse-And-Direction Format Input The PMAC2 is capable of commanding stepper-motor drives that require pulseand-direction format input, or stepper-replacement servo drives that require this format. PMAC2 can command these drives either in open-loop fashion, in which case it internally routes the pulse train into its own encoder counters to create a pseudo-closed loop, or in closed-loop fashion, in which case am external feedback device is wired to the PMAC2 to create a true feedback loop. PMAC2 creates its pulse-and-direction output signal with an on-board fully digital pulse frequency modulation (PFM) circuit. This circuit repeatedly adds the latest command frequency value into an accumulator at a programmable rate of up to 40 MHz. When the accumulator overflows, an output pulse is generated with a positive direction signal; when the accumulator underflows, and output pulse is generated with a negative direction signal. This creates a pulse train whose frequency is directly proportional to the command value, with virtually no harmonic distortion, and none of the offset problems that affect analog pulse generation schemes. Hardware Connection PMAC2 has interface connections for 4 or 8 axes, depending on hardware configuration, numbered 1 to 4 or 1 to 8. Each axis interface has 3 output command registers, labeled A, B, and C (e.g. 3A, 3B, and 3C), which each drive their own output lines. The PFM circuitry uses the output command register C for each axis interface, and therefore the output signal lines for register C. There are two differential signal pairs (4 lines) for each output command register. For register C these signal pairs can either hold a pulse-width modulated (PWM) signal or a PFM signal. The selection between the two types of signals on these pins is made with PMAC software parameters; see below. The signal lines for the PFM signals for each axis interface are labeled: PMAC2 User’s Manual – 15 March 1997 8-1 3A0-602413-363 1. PWMCTOPn+/DIRn+ 2. PWMCTOPn-/DIRn- 3. PWMCBOTn+/PULSEn+ 4. PWMCBOTn-/PULSEn- where n is the number of the axis interface (1-8). That is, the pins can be used for the third (C) PWM outputs for axis n, top and bottom, for a PWM-driven amplifier, or the PFM outputs for a pulse-and-direction amplifier. Some pinout listings may only show the 'PWM' names for the pins, but they can always be used for PFM signals as well, because the selection is made in software. The outputs are 5V differential line driver pairs, with RS-422-style drivers that are capable of transmitting the signal significant distances particularly with shielded, twisted-pair cables. These outputs can be used directly to drive the inputs of most stepper drives, whether the inputs are electrically or optically coupled to the rest of the drive circuitry. On the PMAC 100-pin JMACH connectors, these signals are brought out on pins 43-46 for odd-numbered axes, and pins 93-96 for even-numbered axes. On the ACC-8S stepper interface board, which is recommended as the most cost-effective breakout board for stepper systems, these signals are brought out on pins 1-4 of TB6 for odd-numbered axes, and on pins 1-4 of TB7 for evennumbered axes. On the ACC-8E analog interface board, they are brought out on points 9-12 of TB2 for the odd-numbered axes, and points 9-12 of TB3 for the even-numbered axes. These are available on the -101 and newer versions of the board, but not on the prototype -100 version On the ACC-8F digital interface board, these signals are brought out on pins 1114 of the DB-37 connector for each axis. Signal Timing The PULSEn and DIRn signals are driven from the internal PFM_CLK signal, whose frequency is controlled by I903 or I907 (see below). The width of the pulse is controlled by the PFM_CLK frequency and I904 or I908 (see below). The output on PULSEn can be high-true (high during pulse, low otherwise) or low-true, as controlled by I9n7; the default is high-true. The polarity of the DIRn is controlled by I9n8. PULSEn and DIRn signals can only change on the rising edge of PFM_CLK. If DIRn changes on a pulse, it will change simultaneously with the front end of PULSEn. Some stepper drives require a setup time on the DIRn line before the rising edge of PULSEn; these systems can be accommodated by inverting the PULSEn signal with I9n7. The DIRn signal is latched in this state at least until the front end of the next pulse. The PULSEn signal stays true for the number of PFM_CLK cycles set by I904 or I908. It then goes false and stays false for a minimum of this same time. 8-2 PMAC2 User’s Manual – 15 March 1997 3A0-602413-363 This guarantees that the pulse duty cycle never exceeds 50%; the pulse signal can be inverted with I9n7 without violating minimum pulse width specifications. Note: Some older stepper drives sample the DIRn line in software and assume that all of the pulses received since the last software sample are in that direction. This requires a long direction setup time than the PMAC2 can directly produce. In these cases, simple logic external to PMAC2 may be required to swallow the first pulse produced after a direction change. Furthermore, it is the modified pulse train out of the pulse swallower that must be fed into the PMAC2 encoder counter to simulate a closed loop. Therefore, these systems must have some sort of loop-back circuitry, usually on the same board as the pulse swallower, and must use an I9n0 decode setting to accept external pulse and direction (=0 or 4) rather than internal pulse and direction (=8). Delta Tau's ACC-8S stepper interface board contains this pulse swallowing circuitry; I9n0 should be set to 0 for any channel using the ACC-8S. Parameter Setup Several PMAC2 I-variables must be set correctly to generate and use the PFM circuitry properly. This section covers each of these variables. (Note: The PMAC2 I-variables that control the hardware setup of the DSP-GATE ASIC -those in the I900s -- are in general different in meaning from those for the original PMAC, because of the difference in the ASICs.). Parameters to Set Up Global Hardware Signals PFM Clock Frequency Control: I903, I907, I993 An I-variable controls the frequency of addition of the command value into the accumulator by setting the frequency of a clock signal called PFMCLK. One addition is performed during each PFMCLK cycle, so the addition frequency is equal to the PFMCLK frequency. The pulse frequency for a given command value is directly proportional to this addition frequency. This PFMCLK/addition frequency puts an upper limit on the pulse frequency that can be generated -- with an absolute limit of 1/4 of the PFMCLK/addition frequency. Depending on the worst-case frequency distortion that can be tolerated at high speeds, most people will limit their maximum pulse frequency to 1/10 of the PFMCLK/addition frequency. Therefore, they will select a PFMCLK/ addition frequency 10 to 20 times greater than their maximum desired pulse frequency. PMAC2 User’s Manual – 15 March 1997 8-3 3A0-602413-363 The PFMCLK/addition frequency sets a lower limit on the pulse frequency as well -- an absolute limit of one eight-millionth of the addition frequency (without dithering). The default frequency of approximately 10 MHz can provide a useful range of about 1 Hz to 1 million Hz, and is suitable for a wide variety of applications, especially with microstepping drives. For full or half step drives, the PFMCLK/addition frequency will probably be set considerably lower -- to the approximately 1.2 MHz or 600 kHz settings. I903 controls the PFMCLK frequency for axis interface channels 1 to 4; I907 does the same for axis interface channels 5 to 8; I993 does the same for supplementary channel 1*. The input to the clock control circuitry is a 39.3216 MHz signal; this can be divided by 1, 2, 4, 8, 16, 32, 64, or 128 to create the PFMCLK signal. Therefore, the possible PFMCLK frequencies are: DIVID E BY: DIVID ER N (1/2^ N) PFMC LK FREQ 1 0 39.321 6 MHz 2 1 19.660 8 MHz 4 2 9.8304 MHz 8 3 4.9152 MHz 16 4 2.4576 MHz 32 5 1.2288 MHz 64 6 611.44 kHz 128 7 305.72 kHz The divider N is used in these I-variable to determine the frequency. These variables also independently control the frequencies of the encoder sample clock SCLK, plus the clocks for the serial D/A and A/D converters, DACCLK and ADCCLK. They are also divided down in the same way from the same 39.3216 MHz signal. The SCLK frequency should be the same as the PFMCLK frequency if the pulse train is fed into the encoder counters. 8-4 PMAC2 User’s Manual – 15 March 1997 3A0-602413-363 PFM Pulse Width: I904, I908, I994 I904 controls the pulse width for axis interfaces 1 to 4; I908 does the same for axis interfaces 5 to 8; and I994 does so for supplementary channel 1*. The pulse width is specified in PFMCLK cycles; the range is 1 to 255 cycles. The minimum gap between pulses is equal to the pulse width, so the minimum pulse cycle period is twice the pulse width set here. This sets a maximum frequency of the PFM output. If the algorithm asks for a higher frequency, PMAC2 will not produce the requested frequency. PMAC2 User’s Manual – 15 March 1997 8-5 3A0-602413-363 Parameters to Set Up Per-Channel Hardware Signals For the circuitry of each of the 8 machine interface channels, there are several hardware setup I-variables, arranged in sets of 10. I910 to I919 control the circuitry for machine interface channel 1 (usually used with motor 1); I920 to I929 control for machine interface channel 2, and so on. An 'n' in place of the ten's digit permits us to talk generically about a variable for interface channel n; for example I9n6 refers to I916 for machine interface channel 1, and to I976 for machine interface channel 7. Output Mode Control: I9n6 I9n6 controls what types of signals are brought out from Channel n's A, B, & C command registers; it must be set to 2 or 3 to use the PFM signals from the C register. Output Inversion Control: I9n7 I9n7 controls whether the pulse signals are inverted or not. A value of 0 or 1 means the C pulse is high-true; a value of 2 or 3 means that it is low true. PFM Direction Inversion Control: I9n8 I9n8 controls the polarity of the PFM direction signal. A value of 0 means positive direction is low; a value of 1 means the negative direction is low. Encoder Decode Control: I9n0 I9n0 controls the source of the position feedback signal and how it is decoded. Values of 0 to 7 set up for an external signal wired into PMAC, with the different values in this range determining how the signal is decoded. One of these values should be used if you have a real feedback sensor; typically 3 or 7 for 'times-4' decode of a quadrature encoder signal. A value of 8 selects the internally generated PFM signal, and automatically selects the pulse-and-direction decode for the signal. Note that no external cable is required to feed back the PFM signal. If the pulse train is modified externally to the PMAC2 to meet the limitations of a particular stepper drive, I9n0 must be set to 0 or 4 to accept this external pulse-and-direction signal. If there has been no net inversion of the direction signal, I9n0 will be set to 0. When using the ACC-8S stepper interface board, which does modify the pulse train external to PMAC2 and feeds back the modified pulse train, I9n0 should be set to 0. For an external feedback signal, the correct setting of I9n0 should cause the encoder counter to count up in the direction you desire. It must also match the direction sense of the output; a positive command value (for instance, with the O10 command) must cause the counter to count up, and a negative command value (e.g. O-10) must cause the counter to count down. You can invert the direction sense of the output with I9n8, or by changing the wiring. 8-6 PMAC2 User’s Manual – 15 March 1997 3A0-602413-363 Parameters to Set Up Basic Motor Operation Several motor I-variables must be set up properly to use the PFM signals properly. Most of these are address registers. Typically motor #1 will use the circuits for axis interface 1, and so on, but this is not absolutely required. Activation and Mode: Ix00, Ix01 Ix00 must be 1 to activate the software for the motor, and Ix01 must be 0 to tell PMAC2 not to do the commutation (the drive does the commutation in this mode). Command Output Address: Ix02 Ix02 tells PMAC2 where to write the output command value for motor x. To use the PFM, the output must be written to the C command register for the axis interface circuit of the proper number (the default is to the A command register). The addresses of the C command registers for each of the 8 main channels and the two supplementary channels are shown in table 7-1. Table 7-1. C Command Register Addresses PMAC2 User’s Manual – 15 March 1997 8-7 3A0-602413-363 Assuming that motor x uses axis interface channel x, the required values for Ix02 are: Table 7-2. Ix02 Required Values Encoder Conversion Table The encoder conversion table does the initial processing of the real or simulated feedback registers. The default conversion table in PMAC2 processes the eight main encoder channels, plus the two supplemental encoder channels, with timer- 8-8 PMAC2 User’s Manual – 15 March 1997 3A0-602413-363 based 1/T sub-count interpolation, in its first ten entries. These are the ideal settings if real incremental encoder feedback is used. The addresses of the counters and timers specified in the PMAC2 conversion table itself are different from those in PMAC, but these have been taken care of in the default table setup. However, an older PMAC Executive program released before PMAC2 may identify the contents of the specified addresses incorrectly. However, if the output pulse train is used for simulated feedback, it is best to process the counts without any sub-count interpolation. This will prevent the PMAC from trying to position between pulses and create dithering. In the PMAC Executive program Encoder Table Configure window, you can change the entry from Incremental with 1/T Interpolation to Incremental with No Interpolation. If you are writing directly to the memory location of the table, you would change the format byte from $00 to $C0. The addresses of the counters and timer sets in PMAC2 are shown in table 7-2. These addresses are the source addresses for the encoder conversion table. Table 7-3 shows the configuration of the encoder conversion table for the ten encoder channels, with either 1/T interpolation, or no interpolation. For example, change the default conversion table to one processing the first four encoder inputs without interpolation, the following command could be used: WY:$0720,$C0C000,$C0C008,$C0C010,$C0C018 Table 7-3. Counters and Timer Sets Addresses COUN TER/TI MERS 1 COUN TER/TI MERS 5 COUN TER/TI MERS 2 COUN TER/TI MERS 6 COUN TER/TI MERS 3 COUN TER/TI MERS 7 COUN TER/TI MERS 4 COUN TER/TI MERS 8 COUN TER/TI MERS 1* COUN TER/TI MERS 2* Table 7-4. Configuration Of The Encoder Conversion Table PMAC2 User’s Manual – 15 March 1997 8-9 3A0-602413-363 A D D R E S S O F S E T U P W O R D 8-10 1 / T I N T E R P . S E T U P W O R D N O I N T E R P . S E T U P A D D R E S S O F R E S U L T W O R D Y : $ 0 7 2 0 $ 0 0 C 0 0 0 $ C 0 C 0 0 0 X : $ 0 7 2 0 Y : $ 0 7 2 1 $ 0 0 C 0 0 8 $ C 0 C 0 0 8 X : $ 0 7 2 1 Y : $ 0 7 2 2 $ 0 0 C 0 1 0 $ C 0 C 0 1 0 X : $ 0 7 2 2 Y : $ 0 7 2 3 $ 0 0 C 0 1 8 $ C 0 C 0 1 8 X : $ 0 7 2 3 Y : $ 0 $ C X : PMAC2 User’s Manual – 15 March 1997 3A0-602413-363 $ 0 7 2 4 0 C 0 2 0 0 C 0 2 0 $ 0 7 2 4 Y : $ 0 7 2 5 $ 0 0 C 0 2 8 $ C 0 C 0 2 8 X : $ 0 7 2 5 Y : $ 0 7 2 6 $ 0 0 C 0 3 0 $ C 0 C 0 3 0 X : $ 0 7 2 6 Y : $ 0 7 2 7 $ 0 0 C 0 3 8 $ C 0 C 0 3 8 X : $ 0 7 2 7 Y : $ 0 7 2 8 $ 0 0 C 0 9 0 $ C 0 C 0 9 0 X : $ 0 7 2 8 Y : $ 0 7 2 9 $ 0 0 C 0 9 8 $ C 0 C 0 9 8 X : $ 0 7 2 9 PMAC2 User’s Manual – 15 March 1997 8-11 3A0-602413-363 Feedback Addresses: Ix03, Ix04 Ix03 tells PMAC2 where to look to get its position-loop feedback. Whether, real or simulated feedback is used, this location should be that of a processed encoder counter in PMAC2's encoder conversion table. In a typical setup, Motor x on PMAC2 will use the xth entry of the conversion table, with addresses $0720 to $0727. These are the default values for Ix03. Ix04 tells PMAC2 where to look to get its velocity-loop feedback. For the simulated feedback, this should be set to the same address as Ix03 for each motor. Scale Factors: Ix08, Ix09 Ix08 and Ix09 should be minimized to allow the most possible flexibility in setting servo loop gains to optimize pulse train performance. If no position following (electronic gearing) is desired, Ix08 and Ix09 should be set to the minimum possible value of 1. Output (Frequency) Limit: Ix69 Ix69 controls the maximum pulse frequency for a given PFMCLK frequency. At the maximum Ix69 value of 32,767, the maximum pulse frequency is oneIx70 must be set to 0 half of PFMCLK (this would require that the pulse width set by I904 or I908 be only 1 PFMCLK cycle). Typically you will want a maximum frequency on a motor substantially below this. The formula for setting Ix69 is: using PFM outputs for MaxFreq( kHz, MHz ) * 65,536 Ix 69 = internal PMAC PFMCLK ( kHz, MHz ) computational reasons. Otherwise, slow drift can occur (Ix70 effectively acts as a fractional bias term). For example, with PFMCLK at the default of 9.83 MHz, and a desired maximum frequency of 500 kHz, Ix69 = (0.5 MHz / 9.83 MHz) * 65,536 = 3333. Parameters to Set Up Motor Servo Gains If you are using real feedback sensors, the motor should be tuned as a normal servo motor would be tuned. If you are feeding the pulse train back into the encoder counter to create a fully electronic loop, the loop response is very predictable, and the tuning gains can be set by formula as explained here. In either case, the control loop appears to PMAC2 to act as a velocity-mode servo drive. To create a closed-loop position response with a natural frequency of 25 Hz and a damping ratio of 1 (suitable for almost all systems), use the gain settings as calculated in the following sections. 8-12 PMAC2 User’s Manual – 15 March 1997 3A0-602413-363 Proportional Gain: Ix30 The proportional gain term Ix30 is set according to the equation: Ix 30 = 660,000 Ix 08 * PFMCLK ( MHz ) For example, with PFMCLK at the default of 9.83 MHz, and Ix08 at the default of 96, Ix30 = 660,000 / (96 * 9.83) = 700. Derivative Gain: Ix31 The derivative gain term Ix31 is set to zero, because the loop behaves like a velocity-loop servo drive, and there is no need to have the PMAC2 add damping. Velocity Feedforward Gain: Ix32 The velocity feedforward gain term Ix32 is set according to the equation: Ix 32 = 6660 * ServoFreq( kHz ) where ServoFreq is the frequency of the servo interrupt as established by I900, I901, and I902. For example, with ServoFreq at the default of 2.26 kHz (I900=6527, I901=0, I902=3), Ix32 = 6660 * 2.26 = 15,050. If you set Ix30 differently from what its above formula dictates, Ix32 should be changed from the value its above formula dictates in inverse proportion to the change in Ix30. For instance, if Ix30 is half of what is calculated above, Ix32 should be twice what is calculated above. Integral Gain: Ix33, Ix34 The integral gain term Ix33 is typically set to zero because there are no offsets or disturbances to the digital electronic loop. Some people will use integral gain to force zero steady-state errors, even when other gains are not well set. Integration mode Ix34 is irrelevant if Ix33 is set to zero. If Ix33 is used, setting Ix34 to 1 turns on the integral gain only when the commanded velocity is zero; setting Ix34 to 0 turns it on all of the time. Acceleration Feedforward Gain: Ix35 The acceleration feedforward gain term Ix35 is typically set to zero, because the electronic loop has no inertia to overcome. However, some users will want to use Ix35 to compensate for the small time delays created by the addition process in pulse generation that will cause small following errors when the velocity is changing. For a given servo update time, an optimum Ix35 value can be found that virtually eliminates errors at all accelerations. Notch Filter Parameters: Ix36 - Ix39 PMAC2 User’s Manual – 15 March 1997 8-13 3A0-602413-363 Notch filter parameters Ix36 to Ix39 are set to zero in the open-loop case, because the electronic loop itself has no resonance, even if the mechanical system does. 8-14 PMAC2 User’s Manual – 15 March 1997 3A0-602413-363 Testing the Setup Preparing for the Test With an open-loop system, you can test much of the initial operation of the setup without attaching anything to the PMAC2, because the loop operates entirely within PMAC2. To do this, you will have to disable your position limits with Ix25. For example, the default value of I125 is $C000, which dictates the use of the first set of flags. Changing I125 to $2C000 disables the limit flag inputs, permitting an unconnected PMAC to command moves. The initial test should be simple monitoring of motor position and velocity as commands are given to the motor. The position reporting window in the PMAC Executive program provides a very convenient way to monitor this. Select the window option that displays position, velocity, and following error for the motor you are testing. In the 3.0 Executive and newer, you can specify the units of the reported position and velocity (counts per second for velocity equals Hertz). Executing the Open-Loop Test First, use the 'O' (open-loop output) command to verify the operation of the frequency generator. This command simply places a value proportional to the magnitude of the command into the output register. This should generate a constant frequency output from the pulse generator that shows up as a constantly changing position and a steady non-zero (for non-zero commands) velocity in the reporting window. Do not worry about exact values now; just see if you can create a change. An O10 command should create a positive velocity and a position counting in the positive direction; an O-10 command should create a negative velocity and a position counting in the negative direction. Troubleshooting the Open-Loop Test If you do not get this result, look at the following: 5. Use the Why Am I Not Moving? screen in the Executive program to see if there is some reason PMAC2 firmware is not permitting the command. For instance, your overtravel limit inputs may need to be held low, or the limit function disabled with Ix25. 6. If you have an oscilloscope or frequency counter, see if you are getting a pulse train on your output pin. This will help you isolate the problem. If you do get the pulse train with a non-zero O command, and no pulse train with an O0 command, you are generating pulses but not feeding them back properly. If you get no pulse train, you are not generating pulses properly. PMAC2 User’s Manual – 15 March 1997 8-15 3A0-602413-363 7. Assign an M-variable to the output command register pointed to by Ix02, double-checking to be sure that that this address is one of the Output Command C registers that can drive a PFM circuit. For example, define M102->Y:$C004,8,16,S to look at the Output Command Register 1C. Now monitor the M-variable in the Executive program's Watch window or in the Terminal window as you issue O commands. The value should change. The reported value should be equal to Ix69 * (O-command magnitude) / 100. (Note: The command register is really a 24-bit register. By assigning the M-variable to the top 16 bits only, the reported value is in the units of the Ix69 limit.) 8. If you are not getting changes in the reported M-variable, recheck Ix02 and the Why Am I Not Moving? window. If you are getting changes here, next check variable I9n6 for the machine interface channel n that you are using to make sure you are permitting the pulse and direction signals to be output. 9. To check the feedback path, first look at I9n0 for the machine interface channel n that you are using. It should be set to 8 to take the internal pulse and direction signal into encoder counter n, or to 0 or 4 for external pulse and direction. Next, look at the setup of the Encoder Conversion Table under the Configure menu of the Executive program. It should contain an entry specifying the quadrature conversion of the address of the encoder counter n (listed above) that you are using, possibly with 1/T interpolation, but preferably without. Remember that a PMAC Executive program released before PMAC2 may identify the name of the source address incorrectly. Check the actual hexadecimal address value (e.g. $C000 for Encoder 1, $C008 for Encoder 2). Note the address of the result register in the table (e.g. $0720 for the first entry). 10. Now check Ix03 and Ix04. They should contain the address of the result register from the conversion table that was just noted above. This tells the motor to use the processed value in the conversion table as its feedback. 11. Once you have verified the presence of a pulse train and its feedback into the encoder counter and the motor position registers, check to see if you have the frequency range you desire. Issue an O100 command. You can check the frequency by looking at the reported velocity in the window, and/or by examining the output pulse train on an oscilloscope or frequency counter. Check the frequency at several other positive and negative command values (e.g. O50, O-50, O-100) so you feel comfortable that the frequency is proportional to the command and covers the range that you want. 12. If you are not getting the proper frequency range, double check your setting of I903 or I907 that sets your PFMCLK frequency. Also check your value of Ix69 that determines your maximum frequency (O100 frequency) at this PFMCLK frequency. 8-16 PMAC2 User’s Manual – 15 March 1997 3A0-602413-363 Executing the Closed-Loop Test Next, close the loop with a J/ command. The reported position should hold steady, and the reported velocity should be zero. Set up your jogging I-variables Ix19 to Ix22 to get the speeds and accelerations you want. Issue a J+ command; you should count up at the rate specified by Ix22 (watch your units). Issue a Jcommand; you should count down at this same rate. Now that you are executing what PMAC considers to be closed-loop moves, the servo loop gain parameters are important. The easiest way to monitor performance is with the position window in the PMAC Executive Program, configured to display position, velocity, and following error for the current motor. More detailed analysis can be done with the data gathering plots. Troubleshooting the Closed-Loop Test When troubleshooting these jogging moves, it is important to note what PMAC thinks the motor is doing based on the pulse feedback compared to what the motor is actually doing. For example, if the motor has stopped, but you see through the position window that PMAC keeps counting position, the motor has probably stalled. Possibilities here include excessive velocity command, excessive load, and resonance problems. However, if PMAC is also reporting a stop, something in the PMAC simulated loop has failed, probably causing a shutdown on excessive following error. The main possibilities here are values set too low for Ix30 proportional gain, Ix32 velocity feedforward, or Ix69 output limit. PMAC2 User’s Manual – 15 March 1997 8-17 3A0-602413-363 9 Using PMAC2 with MACRO Interface Introduction The PMAC2 controller supports the MACRO ring interface to drives and motors. MACRO (Motion and Control Ring Optical) is a fiber-optic or copper ring network between controllers such as PMAC2, and drives and I/O modules. Its key features are a very high data rate of 125 Mbits/sec, and a very simple protocol that makes its use almost transparent to the control software. It can greatly simplify the wiring of a motion control or I/O system, particularly if the electronic components are distributed about a large machine. PMAC2 can support two different protocols in a packet of MACRO information: the Type 0 protocol, and the Type 1 protocol. The Type 0 protocol is typically used by single-node MACRO slave stations such as the Performance Controls FLX Drive. The Type 1 protocol is usually used by multiple-node MACRO slave stations such as the Delta Tau Compact MACRO Station. A single PMAC2 can simultaneously communicate with slave stations using both protocols. In the following sections, note carefully which protocol is referenced. Hardware Setup The PMAC2 Ultralite boards have the full MACRO interface on board. Other PMAC2 boards have the MACRO ASIC on board, but require the ACC-42P2 board for the actual interface circuitry. Each PMAC2 with MACRO interface has a single ring output and a single ring input. The output on any station in the ring is connected to the ring input of the next station on the ring. The connections between stations on the MACRO ring can be made with either fiber optical cable with SC connectors, or with twisted-pair electrical cables with RJ-45 connectors. PMAC2 Ultralite boards and ACC-42P2 boards can be purchased with either type of interface, or with both types, which makes it possible to have an input of one type, and an output of the other type. PMAC2 User’s Manual – 15 March 1997 9-1 3A0-602413-363 Parameter Setup Several parameters have to be set up for proper operation of the MACRO ring. In addition, because the MACRO interface uses different registers than the local analog or digital interfaces, the address I-variables and conversion table entries for servo and commutation setup will contain different values for MACRO. Ring Configuration There are several I-variables on a PMAC2 that control the general configuration of the MACRO ring. I995: MACRO Role/Status I995 controls PMAC2’s role on the MACRO ring; for example, whether it is a master or a slave. In most applications, PMAC2 will be a master commanding slave amplifiers and I/O stations across the ring. These will be the only cases covered here; for other cases, refer to the detailed description of I995 in the Software Reference. Each MACRO ring must have one and only one synchronizing master on the ring. If this PMAC2 is to be the synchronizing master, set I995 to $30. If this PMAC2 is a master on the ring, but not the synchronizing master, set I995 to $10 or, preferably, $90. A setting of $90 permits this PMAC2’s phase cycle to stay synchronized to the synchronizing master, by resetting an internal counter on receipt of a packet specified in I996. I996: MACRO Node Activation I996 controls the address configuration of the PMAC2 on the ring. It is a 24-bit value, and should be thought of as 6 hexadecimal digits each representing 4 bits. The first hex digit specifies PMAC2’s master number on the ring, with a range of $0 to $F (0 to 15) Unless this PMAC2 is a secondary master on a multimaster ring, this should be Master #0. The second hex digit specifies which packet will cause a sync lock when received by this PMAC2. The sync lock performs two important functions. On MACRO stations other than the synchronizing master, it forces synchronization of the phase clock. On all MACRO stations, it can be used to verify ring integrity -- on PMAC2, I1001 is used for this. This digit, which specifies the slave number of the packet that will cause the sync lock, is generally set to the number of the highest activated node for this PMAC2. This means that the response from the last node will cause the sync lock. For example, if nodes 0 to 3 are active on this PMAC2, this digit should be set to 3. The 16 bits of the third through sixth hex digits specify which nodes of 0 to 15 are active. . On a PMAC2 that is a master on the ring, each ring cycle a data packet is sent out for every active node. Setting bit n to 1 activates node n; setting bit n to 0 deactivates node n. In the hexadecimal representation 4 bits are grouped together to form 1 hex digit; bits 0 to 3 represent the last hex digit. If only nodes 0 and 1 are to be active, bits 0 and 1 are set to 1; bits 2 to 15 are set to 0, and the last 4 hex digits are set to $0003. 9-2 PMAC2 User’s Manual – 15 March 1997 3A0-602413-363 I1000: MACRO Node Auxiliary Function Enable I1000 controls which nodes have their auxiliary read/write functions enabled. Setting bit n of I1000 to 1 enables the auxiliary functions for node n; setting bit n to 0 disables these functions for node n. Generally every active node will have its auxiliary functions enabled, so I1000 is equal to the last four digits of I996. It is required that auxiliary functions be enabled to use the nodes for servo flags. I1001: MACRO Ring Check Control I1001 permits automatic checking for ring failure. If set greater than 0, PMAC2 must receive 2 sync lock packets (as defined by I996) in I1001 servo cycles, or it will report a ring failure and disable all servo and I/O outputs on the ring. Generally, values of I1001 between 10 and 20 are used. I1002: MACRO Node Protocol Type Control I1002 is a 16-bit I-variable (bits 0-15) in which each bit controls whether the PMAC2 uses the MACRO Type 0 protocol or the MACRO Type 1 protocol for the node whose number matches the bit number. This is done for the purposes of the auxiliary servo flag transfer. A bit value of 0 sets a Type 0 protocol for the node in which the 24-bit register of the node is used for the flag transfer; a bit value of 1 sets Type 1 protocol for the node in which the third 16-bit register of the node is used for the flag transfer. I1003: MACRO Auxiliary Timeout Control If I1003 is set greater than 0, the MACRO Type 1 Auxiliary Communications protocol using Node 15 is enabled. PMAC2 implements this communications protocol using the MS, MSR, and MSW commands. If his function is enabled, I1003 sets the timeout value in units of PMAC2 servo cycles. In this case, if PMAC2 does not get a response to a Node 15 auxiliary communications command within I1003 servo cycles, it will stop waiting and register a MACRO auxiliary communications error, setting Bit 5 of global status register X:$0003. A value of 32 is suggested when Type 1 MACRO stations are used. If a value of I1003 greater than 0 has been saved into PMAC2’s non-volatile memory, then at subsequent power-up/resets, bit 15 of I1000 is forced to 0, regardless of the value saved for I1000. This reserves Node 15 for the Type 1 auxiliary communications. Examples The PMAC2 is the synchronizing master, and master #0 with nodes 0 to 7 active. I995 should be set to $30, I996 should be set to $0700FF, and I1000 should be set to $00FF. The PMAC2 is a master, but not synchronizing master, master #1 with nodes 0, 1, 4, 5, 8, and 9 active. I995 should be set to $90, I996 should be set to $190333, and I1000 should be set to $0333. PMAC2 User’s Manual – 15 March 1997 9-3 3A0-602413-363 Ring Cycle Frequency Control The MACRO ring communications cycle is started on the phase clock interrupt of the synchronizing master. The phase clock frequency is set in two steps; first the MaxPhase’ clock frequency is set, the phase clock is created by dividing down the MaxPhase clock. The MaxPhase clock frequency is set by I992 on a PMAC2 Ultralite (or I900 on regular PMAC2) according to the formula: MaxPhase( kHz ) = 117,964.8 2 * I 992 + 3 The phase clock frequency is determined by the MaxPhase frequency and I997 on a PMAC2 Ultralite (or I901 on a regular PMAC2) according to the formula: Phase(kHz ) = MaxPhase( kHz ) I 997 + 1 The default value for I992 (I900) of 6527 produces a MaxPhase frequency of 9.03 kHz. The default value for I997 (I901) of 0 makes the phase frequency equal to the MaxPhase frequency. These values are suitable for most applications. If there are multiple PMAC2s on a single MACRO ring, all should have the same setting of these variables. Feedback Processing in Encoder Conversion Table The position feedback from a MACRO node must be processed through the encoder conversion table before it is used in the servo loop. The default conversion table must be modified to handle this feedback. Newer versions of the PMAC Executive program for Windows (Nov. 96 or newer) fully support this modification in the Configure Conversion Table screen; otherwise, direct memory-write commands can be used as explained in this section. Type 0 Nodes In a Type 0 MACRO node, the position feedback comes in the high 16 bits (bits 8-23) of a 24-bit register, with a count as the LSB (bit 8). The PMAC2 conversion table must treat this data as parallel feedback, and shift the data right 3 bits, because the output of the conversion table should start at bit 5. The PMAC servo algorithms that use the results of the conversion table expect 5 bits of fractional count data. This parallel, shift-right conversion uses format $2C or $3C for data appearing in Y-registers (not filtered or filtered, respectively), and format $6C or $7C for data appearing in X-registers (not filtered or filtered, respectively). Due to MACRO’s own error detection schemes, the use of filtering generally is not necessary. 9-4 PMAC2 User’s Manual – 15 March 1997 3A0-602413-363 Type 1 Nodes In a Type 1 MACRO node, the position feedback comes in the 24-bit register for the node, with a count in Bit 5, and fractional count data in Bits 0 - 4. The PMAC 2 conversion table must treat this data as parallel feedback, and pass it through unshifted, because the output of the conversion table should have a count at Bit 5. This parallel, unshifted conversion uses format $28 or $38 for data appearing in Y-registers (not filtered or filtered, respectively. PMAC2 does not support the Type 1 protocol with X-registers. Due to MACRO’s own error detection schemes, the use of filtering generally is not necessary. Both Protocol Types The unfiltered parallel conversion table entry takes two lines (addresses) in the table. The first setup word is contains the conversion method format and the source register address. In the Type 0 MACRO protocol, the address of the position feedback register for a node depends on the mode of operation for that node. It is different in direct PWM mode because phase current information is also sent back. However, in the Type 1 MACRO protocol, it is the same in all modes. Table 8-1contains the required setup word for each node in each operational mode. Table 8-1. Setup Words For Each Node TYPE 0 VELO CITY / TOR QUE MOD E TYPE 0 PHAS E CUR RENT MOD E T Y P E 0 DI R E C T P W M M O D E T Y P E 1: A L L M O D E S $2CC0 A2 $2CC0 A2 $2 C C 0 A 3 $2 C C 0 A 0 $2CC0 A6 $2CC0 A6 $2 C C 0 $2 C C 0 PMAC2 User’s Manual – 15 March 1997 9-5 3A0-602413-363 Table 8-1. Setup Words For Each Node TYPE 0 VELO CITY / TOR QUE MOD E 9-6 TYPE 0 PHAS E CUR RENT MOD E T Y P E 0 DI R E C T P W M M O D E T Y P E 1: A L L M O D E S A 7 A 4 $6CC0 A2 N/A. N/ A. N/ A. $6CC0 A6 N/A. N/ A. N/ A. $2CC0 AA $2CC0 AA $2 C C 0 A B $2 C C 0 A 8 $2CC0 AE $2CC0 AE $2 C C 0 A F $2 C C 0 A C $6CC0 AA N/A. N/ A. N/ A. $6CC0 N/A. N/ N/ PMAC2 User’s Manual – 15 March 1997 3A0-602413-363 Table 8-1. Setup Words For Each Node TYPE 0 VELO CITY / TOR QUE MOD E TYPE 0 PHAS E CUR RENT MOD E AE T Y P E 0 DI R E C T P W M M O D E T Y P E 1: A L L M O D E S A. A. $2CC0 B2 $2CC0 B2 $2 C C 0 B 3 $2 C C 0 B 0 $2CC0 B6 $2CC0 B6 $2 C C 0 B 7 $2 C C 0 B 4 $6CC0 B2 N/A. N/ A. N/ A. $6CC0 B6 N/A. N/ A. N/ A. $2CC0 BA $2CC0 BA $2 C $2 C PMAC2 User’s Manual – 15 March 1997 9-7 3A0-602413-363 Table 8-1. Setup Words For Each Node TYPE 0 VELO CITY / TOR QUE MOD E TYPE 0 PHAS E CUR RENT MOD E T Y P E 0 DI R E C T P W M M O D E T Y P E 1: A L L M O D E S C 0 B B C 0 B 8 $2CC0 BE $2CC0 BE $2 C C 0 B F $2 C C 0 B C $6CC0 BA N/A. N/ A. N/ A. $6CC0 BE N/A. N/ A. N/ A. The second word contains the bits-enabled mask word. It is a 24-bit word that should have 1’s for each bit of real feedback, and 0’s for all other bits, after the shift operation. Therefore, the mask word should be $1FFFE0 for the Type 0 16-bit position feedback from any node. If the position feedback is provided in only the low 12 bits of the 16-bit register, as in the case of the Kollmorgen 9-8 PMAC2 User’s Manual – 15 March 1997 3A0-602413-363 FAST Drive or the Performance Controls FLX Drive, the mask word would be $01FFE0. The mask word should be $FFFFFF for the Type 1 24-bit position feedback from any node. The result of the conversion, the processed data, is placed in the X-register of the last line of the entry. This is the second line if no filtering is used, or the third line if filtering is used. Examples: To overwrite the default conversion table and enter a conversion table to process Type 0 16-bit position feedback from nodes 0-3 in torque mode, and 12-bit position feedback from nodes 4-7 in torque mode, the following direct memory write commands could be used: WY:$0720,$2CC0A2,$1FFFE0 WY:$0722,$2CC0A6,$1FFFE0 WY:$0724,$6CC0A2,$1FFFE0 WY:$0726,$6CC0A6,$1FFFE0 WY:$0728,$2CC0AA,$01FFE0 WY:$072A,$2CC0AE,$01FFE0 WY:$072C,$6CC0AA,$01FFE0 WY:$072E,$6CC0AE,$01FFE0 ; ; ; ; ; ; ; ; Node Node Node Node Node Node Node Node 0 1 2 3 4 5 6 7 conversion conversion conversion conversion conversion conversion conversion conversion The results from this conversion are in the following registers: NOD E ADD RESS NOD E ADD RESS Node 0: X:$07 21 Node 4: X:$07 29 Node 1: X:$07 23 Node 5: X:$07 2B Node 2: X:$07 25 Node 6: X:$07 2D Node 3: X:$07 27 Node 7: X:$07 2F PMAC2 User’s Manual – 15 March 1997 9-9 3A0-602413-363 To enter a conversion table to process Type 1 24-bit position feedback data from the 8 nodes mapped into PMAC2’s Y-registers in any mode (this is the default conversion table on PMAC2 Ultralites), the following direct memory write commands could be used: WY:$0720,$28C0A0,$FFFFFF WY:$0722,$28C0A4,$FFFFFF WY:$0724,$28C0A8,$FFFFFF WY:$0726,$28C0AC,$FFFFFF WY:$0728,$28C0B0,$FFFFFF WY:$072A,$28C0B4,$FFFFFF WY:$072C,$28C0B8,$FFFFFF WY:$072E,$28C0BC,$FFFFFF ; ; ; ; ; ; ; ; Node Node Node Node Node Node Node Node 0 conversion 1 conversion 4 conversion 5 conversion 8 conversion 9 conversion 12 conversion 13 conversion The results from this conversion are in the following registers: 9-10 PMAC2 User’s Manual – 15 March 1997 3A0-602413-363 Feedback Address I-variables: Ix03, Ix04 Ix03 and Ix04 specify the addresses for the position-loop and velocity-loop feedback registers, respectively. In most applications the same feedback sensor is used for both loops, so the values of both variables is the same. The feedback register to be read is virtually always that of the processed data in the conversion table. In either of the above examples, the converted position from Node 0 is placed in X:$0721, so to use this for the position-loop and velocity-loop feedback for Motor 1, I103 and I104 would each be set to $0721. E. Command Output Address I-variables: Ix02 Ix02 specifies the address of the register(s) to which PMAC2 writes its command outputs. Bits 0 - 15 contain the address of the register, normally a Yregister on PMAC. If bit 19 of Ix02 is set to 1, then the command output is written to a PMAC2 X-register rather than the typical Y-register. The main use for this is to be able to write to those MACRO registers that are mapped into Xregisters. This feature is only usable in the Type 0 protocol and if PMAC2 is not performing the commutation for the motor -- if PMAC2 is commutating the motor through MACRO registers and/or using the Type 1 protocol, only those MACRO nodes mapped into Y-registers (0, 1, 4, 5, 8, 9, 12, 13) can be used. PMAC2 User’s Manual – 15 March 1997 9-11 3A0-602413-363 To write command outputs to MACRO registers, the following values of Ix02 should be used: Table 8-2. Command Outputs To MACRO Registers 9-12 TYPE 0 VELO CITY / TOR QUE MOD E TYPE 0 PHAS E CUR RENT MOD E T Y P E 0 DI R E C T P W M M O D E T Y P E 1: A N Y M O D E $C0A 3 $C0A 2 $ C 0 A 1 $ C 0 A 0 $C0A 7 $C0A 6 $ C 0 A 5 $ C 0 A 4 $8C0 A3 N/A. N/ A. N/ A. $8C0 A7 N/A. N/ A. N/ A. $C0A B $C0A A $ C 0 A 9 $ C 0 A 8 PMAC2 User’s Manual – 15 March 1997 3A0-602413-363 Table 8-2. Command Outputs To MACRO Registers TYPE 0 VELO CITY / TOR QUE MOD E TYPE 0 PHAS E CUR RENT MOD E T Y P E 0 DI R E C T P W M M O D E T Y P E 1: A N Y M O D E $C0A F $C0A E $ C 0 A D $ C 0 A C $8C0 AB N/A. N/ A. N/ A. $8C0 AF N/A. N/ A. N/ A. $C0B3 $C0B2 $ C 0 B 1 $ C 0 B 0 $C0B7 $C0B6 $ C 0 B 5 $ C 0 B 4 $8C0B 3 N/A. N/ A. N/ A. PMAC2 User’s Manual – 15 March 1997 9-13 3A0-602413-363 Table 8-2. Command Outputs To MACRO Registers 9-14 TYPE 0 VELO CITY / TOR QUE MOD E TYPE 0 PHAS E CUR RENT MOD E T Y P E 0 DI R E C T P W M M O D E T Y P E 1: A N Y M O D E $8C0B 7 N/A. N/ A. N/ A. $C0B B $C0B A $ C 0 B 9 $ C 0 B 8 $C0B F $C0B E $ C 0 B D $ C 0 B C $8C0B B N/A. N/ A. N/ A. PMAC2 User’s Manual – 15 March 1997 3A0-602413-363 Table 8-2. Command Outputs To MACRO Registers TYPE 0 VELO CITY / TOR QUE MOD E TYPE 0 PHAS E CUR RENT MOD E T Y P E 0 DI R E C T P W M M O D E T Y P E 1: A N Y M O D E $8C0B F N/A. N/ A. N/ A. Flag Address I-variables: Ix25 When bit 18 of Ix25 is set to 1, PMAC2 will expect that the flag register be a MACRO auxiliary register. If a MACRO auxiliary node n is used for the flag register, then bit n of I1000 must be set so PMAC2 performs auxiliary node update functions for the node. Bit n of I1002 must specify whether node n is using Type 0 protocol, in which the 24-bit register holds the flag information, or it is using Type 1 protocol, in which the third 16-bit register holds the flag information. Also, bit 23 of Ix25 must be set to 1 to designate a high-true amplifier fault, which is the MACRO standard. This makes the first two hex digits of Ix25 equal to $84. (Other bits of bit 16-23 may also be set. When using a MACRO auxiliary register for the flags, the address part of Ix25 should contain the address of a holding register in RAM, not the actual Type 0 or Type 1 MACRO register. The address of the holding register is $0F7n for node n. PMAC2 firmware automatically copies between the holding registers and the MACRO registers as enabled by I1000 and I1002. When the flag information uses MACRO nodes, the following settings of Ix25 should be used (both Type 0 and Type 1 MACRO protocols): PMAC2 User’s Manual – 15 March 1997 9-15 3A0-602413-363 9-16 PMAC2 User’s Manual – 15 March 1997 3A0-602413-363 Commutation Position Feedback Address: Ix83 If PMAC2 is performing commutation for the motor (Ix01=1), Ix83 must specify the address where it reads the position feedback for the commutation. When commutating across the MACRO ring, only nodes that appear in PMAC2 Y-registers can be used for commutation (nodes 0, 1, 4, 5, 8, 9, 12, and 13). If bit 19 of Ix83 is set to 1, PMAC2 uses a Y-register for commutation feedback. The values of Ix83 to be used when commutating with MACRO are: Table 8-3. Commutation Position Feedback Address TYPE 0 PHAS E CUR RENT MOD E TYPE 0 DIRE CT PWM MOD E T Y P E 1: EI T H E R M O D E $8C0 A2 $8C0 A3 $8 C 0 A 0 $8C0 A6 $8C0 A7 $8 C 0 A 4 PMAC2 User’s Manual – 15 March 1997 9-17 3A0-602413-363 9-18 $8C0 AA $8C0 AB $8 C 0 A 8 $8C0 AE $8C0 AF $8 C 0 A C $8C0B 2 $8C0B 3 $8 C 0 B 0 $8C0B 6 $8C0B 7 $8 C 0 B 4 $8C0B A $8C0B B $8 C 0 B 8 $8C0B E $8C0B F $8 C 0 B C PMAC2 User’s Manual – 15 March 1997 3A0-602413-363 Commutation Cycle Size: Ix70, Ix71 When commutating across the MACRO ring with Type 0 protocol, the commutation position feedback appears in the upper 16 bits of a 24-bit word. Therefore it appears to PMAC2 to be 256 times bigger than it really is. The commutation cycle size is specified on PMAC2 as the ratio Ix71/Ix70. For a motor commutated across MACRO with Type 0 protocol, the value of these variables should produce a ratio 256 times bigger than the number of counts in the commutation cycle. For example, for a two-pole motor (one commutation cycle per revolution) with 4096 counts per revolution, Ix70 should be set to 1 and Ix71 should be set to 4096 * 256 = 1,048,576. When commutating across the MACRO ring with Type 1 protocol, the commutation position feedback appears in the 24-bit register for the node, with a count appearing in Bit 5, having a value of 32. Therefore it appears to PMAC2 to be 32 times bigger than it really is. The commutation cycle size is specified on PMAC2 as the ratio Ix71/Ix70. For a motor commutated across MACRO with Type 1 protocol, the value of these variables should produce a ratio 32 times bigger than the number of counts in the commutation cycle. For example, for a two-pole motor (one commutation cycle per revolution) with 4096 counts per revolution, Ix70 should be set to 1 and Ix71 should be set to 4096 * 32 = 131,072. Current Loop Feedback Address: Ix82 If PMAC2 is closing the current loop for a motor, Ix82 must contain the address of the current feedback registers for that motor. This must be a Y-register, which means for MACRO, only nodes 0, 1, 4, 5, 8, 9, 12, and 13 can be used When MACRO is used for this motor, the current feedback appears in two of the real-time registers for the node; Ix82 specifies the higher address. The values of Ix82 to be used for each MACRO node in either Type 0 or Type 1 protocol are: PMAC2 User’s Manual – 15 March 1997 9-19 3A0-602413-363 9-20 PMAC2 User’s Manual – 15 March 1997 3A0-602413-363 10 Setting Up PMAC2 for MLDT Feedback Introduction PMAC2 can provide direct interface to magnetostrictive linear displacement transducers (MLDTs), such as MTS's Temposonics brand. MLDTs can provide absolute position information in rugged environments; they are particularly well suited to hydraulic applications. In this interface PMAC2 provides a periodic excitation pulse output to the MLDT, receives the echo pulse that returns at the speed of sound in the transducer, and very accurately measures the time between these pulses, which is directly proportional to the distance of the moving member from the stationary base of the transducer. The timer therefore contains a position measurement. Interface Type MLDTs are available with several different interface formats; for this interface, a format with external excitation is required, because PMAC2 provides the excitation pulse. Usually this format has an RS-422 interface, because the excitation and echo pulses are at RS-422 levels. The PMAC2 MLDT interface inputs and outputs are at RS-422 levels. Note: If the Handwheel port of PMAC2 will be used either to provide the excitation pulse or to accept the return signal, the DSPGate2 (MACRO gate) must be at least a DSPGate2B. The modifications between the DSPGate2A and DSPGate2B allow the functions used to perform pulse creating and acceptance on the Handwheel port to be used. Signal Formats There are two common signal formats of the external excitation type; MTS calls them RPM and DPM. In the RPM format (see Figure 9-1) there are two short pulses returned from the MLDT; an immediate start pulse, and a delayed stop pulse. In the DPM format (see Figure 9-2) there is only one long pulse returned from the MLDT. Since PMAC2 uses the first rising signal edge returned after the falling edge of the output pulse to latch the timer, the key setup issue in this format is to make PMAC2 User’s Manual – 15 March 1997 10-1 3A0-602413-363 sure that the output pulse width is large enough so that the falling edge of the output pulse occurs after the rising edge of the return line’s start. Pulse Out Return Start Stop Figure 9-1. RPM Signal Format The rising edge of the return pulse in the DPM format is the equivalent of the rising edge of the start pulse in the RPM format. The falling edge of the return pulse in the DPM format is the equivalent to the rising edge of the stop pulse in the RPM format. Because PMAC2 is expecting a rising signal edge to latch the timer, in this signal format the return signals should be inverted so that the ‘+’ output of the MLDT is wired into PMAC2’s ‘-‘ input, and vice versa. Pu l s e Out Return Start Stop Figure 9-2. DPM Signal Format Hardware Setup The PULSEn output that is commonly used to command stepper drives is used as the excitation signal for the MLDT; the CHAn input that is typically part of encoder feedback is used to accept the response. These outputs and inputs are on PMAC2's JMACH connectors. Usually these are connected to the sensors thru one of the ACC-8 family of interface boards; alternatively, a customized interface can be used. Most common is the ACC-8E board, which provides analog output commands for the servo drives, but also provides the pulse output. The PULSEn output is an RS-422 style differential line-drive pair. The CHAn input is an RS-422 style differential line receiver pair. The use of differential pairs for both inputs and outputs is strongly encouraged for the common-mode noise rejection it provides. Remember that in the DPM signal format or equivalent (see above), the ‘+’ output of the MLDT should be wired into the CHAn- input, and the ‘-‘ output of the MLDT should be wired into the CHAn+ input. 10-2 PMAC2 User’s Manual – 15 March 1997 3A0-602413-363 PMAC2 Hardware-Control Parameter Setup PFMCLK Frequency: I903 & I907 The pulse output uses PMAC2's pulse frequency modulation (PFM) feature. The PFM circuitry generates periodic output pulses by repeatedly adding a command value into an accumulator. When the accumulator overflows, an output pulse is generated. The addition of the command value into the accumulator is performed once per PFMCLK cycle. The PFMCLK frequency is governed by I903 for channels 14; it is governed by I907 for channels 5-8. The default frequency of the PFMCLK for all channels is 9.83 MHz; this frequency should be suitable for all MLDT applications. PFM Output Frequency: Mn07 The PFM command registers are actually 24-bit registers; the suggested definitions just use the high 16 bits, which provides enough resolution for our purposes here. The pulse output frequency for Channel n is controlled by both the PFMCLK frequency and the PFM command value for the channel, which is the C-output register for that channel. When used for stepper motor applications, the PFM command value is determined by the instantaneous command velocity and the gains of the simulated servo loop on PMAC2; Ix02 tells PMAC2 to write this to the PFM command register. For MLDT use, we will write to the PFM command register once on power-up/reset with an M-variable. The suggested M-variable definitions for this purpose are: M107->Y:$C004,8,16,S M207->Y:$C00C,8,16,S M307->Y:$C014,8,16,S M407->Y:$C01C,8,16,S M507->Y:$C024,8,16,S M607->Y:$C02C,8,16,S M707->Y:$C034,8,16,S M807->Y:$C03C,8,16,S The servo update time for the motor using the MLDT should be at ; ; ; ; ; ; ; ; Channel Channel Channel Channel Channel Channel Channel Channel 1 2 3 4 5 6 7 8 PFM PFM PFM PFM PFM PFM PFM PFM (C) (C) (C) (C) (C) (C) (C) (C) command command command command command command command command value value value value value value value value The frequency of the pulse output should produce a period just slightly longer than the longest expected response time for the echo pulse. For MLDTs, the response time is approximately 0.35 µsec/mm (9 µsec/inch). On an MLDT 1500 mm (~60 in) long, the longest response time is approximately 540 µsec; a recommended period between pulse outputs for this device is 600 µsec, for a frequency of 1667 Hz. To produce the desired pulse output frequency, the following formula can be PMAC2 User’s Manual – 15 March 1997 10-3 3A0-602413-363 used (assuming a 16-bit M-variable definition): least as high as the output Mn07 time set here OutputFreq ( kHz ) = PFMCLK _ Freq ( kHz ) 65,536 (the servo or: frequency should be as OutputFreq ( kHz ) low or lower Mn07 = 65,536 * PFMCLK _ Freq ( kHz ) than the output frequency). The servo interrupt time for PMAC2 is set up with I900, I901, and I902; the default is 442 µsec. The servo update time for an individual Motor x can be extended in increments of the servo interrupt time with Ix60. To produce a pulse output frequency of 1.667 kHz with the default PFMCLK frequency of 9.83 MHz, we calculate: Mn07 = 65,536 * 1667 . ≅ 11 9,380 To write this value to the register, a power-on PLC routine is suggested; this can also be done with on-line commands from the host computer. A two-step power-on sequence is required, because PMAC2 will initially try to read the absolute position before this value is in place. Therefore, it is necessary to write the value to the register, then make the card do a software reset. Sample PLC code to do this for Channel 1, using the above example value, is: OPEN PLC 1 ; PLC 1 is first program to execute CLEAR IF (M107!=11) ; Pulse frequency not set M107=11 ; Set pulse frequency CMD$$$ ; Do a software reset on the card ELSE {other reset actions} ENDIF DISABLE PLC 1 ; So will not execute again 10-4 PMAC2 User’s Manual – 15 March 1997 3A0-602413-363 PFM Pulse Width: I904 & I908 The width of the output pulse is controlled by the PFMCLK frequency with I904 for channels 1-4; with I908 for channels 5-8. I904 and I908 specify the pulse width as the number of PFMCLK cycles. At the default PFMCLK frequency of 9.83 MHz, the default I904/I908 value of 15 produces a 1.5 µsec output pulse width. This should be satisfactory for most MLDT devices. When using the RPM format or equivalent (see Signal Format, above), the pulse width must be large enough to enclose the rising edge of the returned start pulse. FM Format Select: I9n6 In order for the C-register circuitry of Channel n to output a PFM pulse train rather than a PWM pulse train, variable I9n6 must be set to 2 or 3. Most You commonly, I9n6 will be set to 3, so that the A and B registers for Channel n cannot use one channel of output DAC signals rather than PWM. PMAC2 simultaneousl y for direct PWM control of a motor, and for MLDT pulse generation. Direct PWM control of a motor automatically writes to the channel’s A, B, and C registers every phase cycle. MLDT Feedback Select: I9n0 For proper decoding of the MLDT signal, I9n0 for Channel n must be set to 12. With this setting, the pulse timer is cleared to zero at the falling edge of The MLDT feedback the output pulse. It then counts up at 117.96 MHz until a rising edge on the return pulse is received, at which time the timer's value is latched into a uses the same memory-mapped register that the processor can read. The addresses of these circuitry that would be used registers are: PMAC2 User’s Manual – 15 March 1997 10-5 3A0-602413-363 for quadrature encoder feedback on that channel, so you cannot simultaneously connect an encoder and MLDT to the same channel’s feedback on PMAC2. In this mode, it is the pulse timer that is used as a position measurement for feedback, not the pulse counter that is used with encoders. The counter still registers the number of pulses returned, but does not represent a position measurement here. Y: $ C 00 0 Y: $ C 02 0 Y: $ C 00 8 Y: $ C 02 8 Y: $ C 01 0 Y: $ C 03 0 Y: $ C 01 8 Y: $ C 03 8 PMAC2 Conversion Table Processing Setup To use this latched timer value for position feedback, the value must be processed through the Encoder Conversion Table. Method and Address: Entry First Line 10-6 PMAC2 User’s Manual – 15 March 1997 3A0-602413-363 These timer registers are processed as parallel feedback just as an absolute encoder would be. Using the Executive program Encoder Table Configure window, you select the Parallel Y Data with Filtering conversion method. If writing directly to the table, this is the $30 format. The source address is the address of the appropriate timer as shown above ($C000, $C008, etc.) Bits Enabled: Entry Second Line The second line of the conversion table entry is the Bits Enabled Mask word. This should be set to $07FFFF, specifying use of 19 bits of the timer. Note that 19 this does not necessarily limit the absolute position range to 19 bits (2 LSBs, or 524,288 LSBs); the full range is set by the number of bits read by Ix10 at power-up/reset; this is suggested to be 23 bits for a range of 2 8,388,608 LSBs (see below). 23 LSBs, or Maximum Change: Entry Third Line The third line of the conversion table entry is the Maximum Change filter value. This value, expressed in bits per servo cycle, specifies the maximum change in the source data that will be accepted as real. This is an important protection against extra or missing return pulses. It should be set to a value slightly greater than the maximum real velocity expected in the application. Table Result Register The result of this conversion is in the X-register of the last (third) line of the entry. Any function using this value should address this register. For example, if this were the first entry in the table, which starts at $0720, the result would be in X:$0722. Example To set up the encoder conversion table to process MLDTs on Channels 1 to 8 only, with a maximum change per servo cycle of 32 LSBs per servo cycle, the following direct memory write commands could be used: WY:$0720,$30C000,$07FFFF,32 WY:$0723,$30C008,$07FFFF,32 WY:$0726,$30C010,$07FFFF,32 WY:$0729,$30C018,$07FFFF,32 WY:$072C,$30C000,$07FFFF,32 WY:$072F,$30C008,$07FFFF,32 WY:$0732,$30C010,$07FFFF,32 WY:$0735,$30C018,$07FFFF,32 ; ; ; ; ; ; ; ; Parallel Parallel Parallel Parallel Parallel Parallel Parallel Parallel read read read read read read read read of of of of of of of of Timer Timer Timer Timer Timer Timer Timer Timer 1 2 3 4 5 6 7 8 The resulting values from these conversions are in the following registers: Channel 1 X:$0722 Channel 2 X:$0725 PMAC2 User’s Manual – 15 March 1997 10-7 3A0-602413-363 Channel 3 X:$0728 Channel 4 X:$072B Channel 5 X:$072E Channel 6 X:$0731 Channel 7 X:$0734 Channel 8 X:$0737 Motor variables Ix03 and Ix04 should contain the addresses of these resulting values to use the MLDT for position- and velocity-loop feedback, respectively. PMAC2 Servo Loop I-Variable Setup Position Loop Feedback Address: Ix03 The MLDT position is commonly used in the servo loop. If it is used for the position loop feedback of Motor x, Ix03 should contain the address of the result register in the conversion table for the appropriate MLDT value -- $0722 in the example above. Velocity Loop Feedback Address: Ix04 If the MLDT position is also used for the velocity loop feedback of Motor x (this is the usual case), Ix04 should also contain the address of the result register in the conversion table. Master Position Address: Ix05 If the MLDT position is used for the master position of Motor x, Ix05 should contain the address of the result register in the conversion table. Absolute Power-Up Position Address: Ix10 In order to use the MLDT as an absolute position sensor, reporting the proper position on power-up and reset, Ix10 must be set to read the MLDT timer register directly on power-up/reset. If Ix10 is left at its default value of 0, PMAC will report the power-up/reset position as 0, regardless of what the MLDT reports, and change position incrementally from there. To read the MLDT timer register, Ix10 should be set to $17aaaa where 17hex (=23dec) tells PMAC to read all 23 bits of the timer register, and aaaa is the address of the timer register (as above, $C000 for Timer 1, $C008 for Timer 2, etc.). Remember that Ix10 will read the timer during the power-up/reset cycle, before any user programs or commands have had a chance to be executed. In an actual power-up, this will occur before a pulse frequency setting has been made to create an output pulse. Therefore it is required to do an extra software reset of 10-8 PMAC2 User’s Manual – 15 March 1997 3A0-602413-363 the card after writing to the pulse frequency register, either with a PLC program (see PFM Output Frequency, above), or with on-line commands from the host computer. Example To set up Motors 1 to 8 to use MLDT timers 1 to 8, respectively, for absolute power-up/reset position, the following settings should be used: I110=$17C000 I510=$17C020 I210=$17C008 I610=$17C028 I310=$17C010 I710=$17C030 I410=$17C018 I810=$17C038 Scaling the Feedback Units Motor Units For a motor set up with MLDT feedback, a count is one increment (LSB) of the timer. The physical length of this increment, which is the resolution of the measurement, is dependent on the speed of the return pulse in the MLDT, and the frequency of the timer in the PMAC2. The speed of the return pulse varies from device to device, but is always approximately the inverse of 0.35 µsec/mm, or 9.0 µsec/inch. The frequency of the timer is 117.96 MHz. The resolution can be calculated as: length 1 length µ sec Resolution = * ReturnSpeed increment TimerFreq increment µ sec µ sec increments mm 1 mm 1 ≅ ≅ 0.024 * 41.3 mm increment 117.96 increment 0.35 µ sec ≅ µ sec 1 1 inches inches increments ≅ 0.00094 * 1060 117.96 increment 9.0 µ sec increment inch Axis User Units Typically the axis assigned to the motor using the MLDT for feedback will be given engineering units of millimeters or inches. The scaling is done in the axis definition statement. With the above example, an axis definition statement to create axis user units of millimeters would be: #1->41.3X An axis definition statement to create axis user units of inches would be: #1->1061X PMAC2 User’s Manual – 15 March 1997 10-9 3A0-602413-363 11 PMAC2 General Purpose I/O Use JIO Port The JIO port has 32 discrete digital I/O lines for general purpose use. The lines are configurable by byte for input or output (on the DSPGATE2 I/O IC, the lines are individually configurable for input or output, but the buffer ICs are only byte-configurable), and individually configurable for inverting or non-inverting format. Hardware Characteristics Because all of these lines default to inputs at power-up/reset, any lines to be used as outputs will pull to +5V at powerup/reset until software configures them as outputs. When configured as an output, each line has a 5V CMOS totem-pole driver. This driver can sink or source up to 20 mA. There is a 10 kΩ pull-up resistor to 5V on each line for input purposes, but the driver IC can hold the line high or low despite this resistor. When configured as an input, the buffer IC presents a high-impedance input either sinking or sourcing; no significant current will flow. The pull-up resistor on the line will bias the line high in the absence of anything actively pulling the line low at significantly lower impedance. Suggested M-Variables The 32 I/O lines are memory-mapped into PMAC's address space in registers Y:$C080 and Y:$C081. Typically these I/O lines are accessed individually with M-variables. Following is a suggested set of M-variable definitions to use these data lines: M0->Y:$C080,0 M1->Y:$C080,1 PMAC2 User’s Manual – 15 March 1997 ; I/O00 Data Line; J3 Pin 1 ; I/O01 Data Line; J3 Pin 2 11-1 3A0-602413-363 M2->Y:$C080,2 M3->Y:$C080,3 M4->Y:$C080,4 M5->Y:$C080,5 M6->Y:$C080,6 M7->Y:$C080,7 M8->Y:$C080,8 M9->Y:$C080,9 M10->Y:$C080,10 M11->Y:$C080,11 M12->Y:$C080,12 M13->Y:$C080,13 M14->Y:$C080,14 M15->Y:$C080,15 M16->Y:$C080,16 M17->Y:$C080,17 M18->Y:$C080,18 M19->Y:$C080,19 M20->Y:$C080,20 M21->Y:$C080,21 M22->Y:$C080,22 M23->Y:$C080,23 M24->Y:$C081,0 M25->Y:$C081,1 M26->Y:$C081,2 M27->Y:$C081,3 M28->Y:$C081,4 M29->Y:$C081,5 M30->Y:$C081,6 M31->Y:$C081,7 ; ; ; ; ; ; ; ; ; ; ; ; ; ; ; ; ; ; ; ; ; ; ; ; ; ; ; ; ; ; I/O02 I/O03 I/O04 I/O05 I/O06 I/O07 I/O08 I/O09 I/O10 I/O11 I/O12 I/O13 I/O14 I/O15 I/O16 I/O17 I/O18 I/O19 I/O20 I/O21 I/O22 I/O23 I/O24 I/O25 I/O26 I/O27 I/O28 I/O29 I/O30 I/O31 Data Data Data Data Data Data Data Data Data Data Data Data Data Data Data Data Data Data Data Data Data Data Data Data Data Data Data Data Data Data Line; Line; Line; Line; Line; Line; Line; Line; Line; Line; Line; Line; Line; Line; Line; Line; Line; Line; Line; Line; Line; Line; Line; Line; Line; Line; Line; Line; Line; Line; J3 J3 J3 J3 J3 J3 J3 J3 J3 J3 J3 J3 J3 J3 J3 J3 J3 J3 J3 J3 J3 J3 J3 J3 J3 J3 J3 J3 J3 J3 Pin Pin Pin Pin Pin Pin Pin Pin Pin Pin Pin Pin Pin Pin Pin Pin Pin Pin Pin Pin Pin Pin Pin Pin Pin Pin Pin Pin Pin Pin 3 4 5 6 7 8 9 10 11 12 13 14 15 16 17 18 19 20 21 22 23 24 25 26 27 28 29 30 31 32 Direction Control The direction control bit for each of these I/O bits is in the corresponding bit in the matching X register. For example, the direction control bit for I/O03 is located at X:$C080,3; the direction control bit for I/O30 is located at X:$C081,6. Because the buffer ICs can only be switched by byte, it is best to define 8-bit M-variables for the direction control. Suggested definitions are: M32->X:$C080,0,8 M34->X:$C080,8,8 M36->X:$C080,16,8 M38->X:$C081,0,8 ; ; ; ; Direction Direction Direction Direction control control control control for for for for I/O00 I/O08 I/O16 I/O24 to to to to I/O07 I/O15 I/O23 I/O31 These M-variables should take values of 0 or 255 ($FF) only; 0 sets the byte to input, 255 sets the byte to output. In addition, the bidirectional buffer IC for each byte has a direction control line accessible as a software control bit. These control lines and bits must match the ASIC direction bits. The buffer direction control bits are at PMAC address 11-2 PMAC2 User’s Manual – 15 March 1997 3A0-602413-363 Y:$E800, with bits 0 to 3 controlling the four bytes of the JIO port. A bit value of 0 specifies input; 1 specifies output. Suggested M-variable definitions are: M33->Y:$E800,0 M35->Y:$E800,1 M37->Y:$E800,2 M39->Y:$E800,3 ; ; ; ; Buffer Buffer Buffer Buffer direction direction direction direction control control control control for for for for I/O00 I/O08 I/O16 I/O24 to to to to I/O07 I/O15 I/O23 I/O31 In the default configuration automatically set at power-up/reset, I/O00 to I/O31 are set up as inputs (M32 through M39 = 0). This is done for maximum safety; no lines can be forced into an undesirable high or low state. Any of these lines that are to be used as outputs must be changed to outputs by user programs (usually this is done in PLC 1 acting as a reset PLC, scanning through once on power-up/reset, then disabling itself). Inversion Control Each line on the JIO port is individually controllable as to whether it is an inverting I/O point (0=+5V; 1=0V) or a non-inverting I/O point (0=0V; 1=+5V). Registers X:$C084 and X:$C085 contain the inversion control bits: X:$C084 bits 0 to 23 control I/O00 to I/O23, respectively X:$C085 bits 0 to 7 control I/O24 to I/O31, respectively A value of 0 in the control bit sets the corresponding I/O point as non-inverting. A value of 1 in the control bits sets the corresponding I/O point as inverting. At power-up/reset, PMAC automatically sets all of the I/O points on the JIO port as non-inverting. Alternate Uses The directioncontrol of the buffer ICs must be set properly for the alternate uses of the I/O points, just as for the generalpurpose I/O uses. Each general-purpose I/O point on the JIO port has an alternate use as a supplemental fixed-use I/O point on a supplemental machine interface channel (1* or 2*). The points are individually controllable as to general-purpose use or fixed use by control registers Y:$C084 and Y:$C085. Refer to these registers in the memory-I/O map to see the alternate uses of each point. At power-up/reset, PMAC2 automatically sets up all of the I/O points on the port for general purpose use. Multiplexer Port (JTHW) The JTHW multiplexer port has 16 discrete digital I/O lines for general purpose use. The lines are configurable by byte for input or output (on the DSPGATE2 I/O IC, the lines are individually configurable for input or output, but the buffer PMAC2 User’s Manual – 15 March 1997 11-3 3A0-602413-363 ICs are only byte-configurable), and individually configurable for inverting or non-inverting format. Hardware Characteristics When configured as an output, each line has a 5V CMOS totem-pole driver. This driver can sink or source up to 20 mA. There is a 10 kΩ pull-up resistor to 5V on each line for input purposes, but the driver IC can hold the line high or low despite this resistor. When configured as an input, the buffer IC presents a high-impedance input either sinking or sourcing; no significant current will flow. The pull-up resistor on the line will bias the line high in the absence of anything actively pulling the line low at significantly lower impedance. Suggested M-Variables The 16 I/O lines are memory-mapped into PMAC's address space in register Y:$C082. These lines are typically used as a unit with specially designed multiplexing I/O accessories and appropriate multiplexing M-variables (TWB, TWD, TWR, and TWS formats), in which case PMAC2 handles the direct control of these I/O lines automatically. However, these lines can also be accessed individually with M-variables. Following is a suggested set of Mvariable definitions to use these data lines: M40->Y:$C082,8 M41->Y:$C082,9 M42->Y:$C082,10 M43->Y:$C082,11 M44->Y:$C082,12 M45->Y:$C082,13 M46->Y:$C082,14 M47->Y:$C082,15 M48->Y:$C082,8,8,U M50->Y:$C082,0 M51->Y:$C082,1 M52->Y:$C082,2 M53->Y:$C082,3 M54->Y:$C082,4 M55->Y:$C082,5 M56->Y:$C082,6 M57->Y:$C082,7 M58->Y:$C082,0,8,U ; ; ; ; ; ; ; ; ; ; ; ; ; ; ; ; ; ; SEL0 Line; J2 Pin 4 SEL1 Line; J2 Pin 6 SEL2 Line; J2 Pin 8 SEL3 Line; J2 Pin 10 SEL4 Line; J2 Pin 12 SEL5 Line; J2 Pin 14 SEL6 Line; J2 Pin 16 SEL7 Line; J2 Pin 18 SEL0-7 Lines treated as a byte DAT0 Line; J2 Pin 3 DAT1 Line; J2 Pin 5 DAT2 Line; J2 Pin 7 DAT3 Line; J2 Pin 9 DAT4 Line; J2 Pin 11 DAT5 Line; J2 Pin 13 DAT6 Line; J2 Pin 15 DAT7 Line; J2 Pin 17 DAT0-7 Lines treated as a byte Direction Control In the default configuration automatically set at power-up/reset, DAT0 to DAT7 are set up as non-inverting inputs; SEL0 to SEL7 are set up as non-inverting outputs with a zero (low voltage) value. If any of the multiplexer port accessories are to be used, this configuration must not be changed. 11-4 PMAC2 User’s Manual – 15 March 1997 3A0-602413-363 The direction control bit for each of these I/O bits is in the corresponding bit in the matching X register. For example, the direction control bit for DAT3 is located at X:$C082,3; the direction control bit for SEL6 is located at X:$C082,14. Because the buffer ICs can only be switched by byte, it is best to define 8-bit M-variables for the direction control. Suggested definitions are: M60->X:$C082,0,8 M62->X:$C082,8,8 ; Direction control for DAT0 to DAT7 ; Direction control for SEL0 to SEL7 These M-variables should take values of 0 or 255 ($FF) only; 0 sets the byte to input, 255 sets the byte to output. In addition, the bi-directional buffer IC for each byte has a direction control line accessible as a software control bit. These control lines and bits must match the ASIC direction bits. In the PC-bus versions of the PMAC2, the buffer direction control bits are at PMAC2 address Y:$E800, with bits 4 and 5 controlling the two bytes of the JTHW port. A bit value of 0 specifies input; 1 specifies output. Suggested M-variable definitions are: M61->Y:$E800,4 M63->Y:$E800,5 ; Buffer direction control for DAT0 to DAT7 ; Buffer direction control for SEL0 to SEL7 In the VME-bus versions of the PMAC2, the buffer direction control bits are at PMAC2 address Y:$E802, with bits 0 and 1 controlling the two bytes of the JTHW port. A bit value of 0 specifies input; 1 specifies output. Suggested Mvariable definitions are: M61->Y:$E802,0 M63->Y:$E802,1 ; Buffer direction control for DAT0 to DAT7 ; Buffer direction control for SEL0 to SEL7 If it is desired to change either of these I/O bytes, it must be done by user programs (usually this is done in PLC 1 acting as a reset PLC, scanning through once on power-up/reset, then disabling itself). Inversion Control Each line on the JTHW port is individually controllable as to whether it is an inverting I/O point (0=+5V; 1=0V) or a non-inverting I/O point (0=0V; 1=+5V). Register X:$C086 contains the inversion control bits: X:$C086 bits 0 to 7 control DAT0 to DAT7, respectively X:$C086 bits 8 to 15 control SEL0 to SEL7, respectively A value of 0 in the control bit sets the corresponding I/O point as non-inverting. A value of 1 in the control bits sets the corresponding I/O point as inverting. At power-up/reset, PMAC automatically sets all of the I/O points on the JTHW port as non-inverting. To use any of the multiplexed I/O accessory boards on the JTHW port, all I/O points on the port must be left non-inverting. Alternate Uses PMAC2 User’s Manual – 15 March 1997 11-5 3A0-602413-363 Because of the byte-wide directioncontrol buffer ICs, it is not possible to use all of the I/O points on the JTHW in their alternate uses. Each general-purpose I/O point on the JTHW port has an alternate use as a supplemental fixed-use I/O point on a supplemental machine interface channel (1* or 2*). The points are individually controllable as to general-purpose use or fixed use by control register Y:$C086. Refer to this register in the memoryI/O map to see the alternate uses of each point. At power-up/reset, PMAC2 automatically sets up all of the I/O points on the port for general purpose use. JANA Port The JANA port is present only if Option 12 is ordered for the PMAC2. Option 12 provides 8 12-bit analog inputs (ANAI00-ANAI07). Option 12A provides 8 additional 12-bit analog inputs (ANA08-ANAI15) for a total of 16 inputs. Hardware Characteristics The analog inputs can be used as unipolar inputs in the 0V to +5V range, or bipolar inputs in the -2.5V to +2.5V range. Each input has a 470Ω input resistor in-line, and a 0.033 µF resistor to ground. This provides a 16 µsec time constant on each input line. The analog-to-digital converters on PMAC2 require +5V and -12V supplies. These supplies are not isolated from digital +5V circuitry on PMAC If the PMAC2 is plugged into the bus (PC or VME), these supplies are taken from the bus power supply. In a standalone application, these supplies must be brought in on terminal block TB1. The -12V and matching +12V supply voltages are available on the J1 connector to supply the analog circuitry providing the signals. The +12V supply is not used by PMAC2; it is merely passed through to the J1 connector for convenience. If use of this supply is desired, it must either come from the bus supply through PMAC2's bus connector, or from TB1. Multiplexing Principle Only one pair of analog-to-digital converter registers is available to the PMAC2 processor at any given time. The data appears to the processor at address Y:$FFC0. The data from the selected analog input 0 to 7 (ANAI00-ANAI07) appears in the low 12 bits; the data from the selected analog input 8 to 15 (ANAI08-ANAI15) appears in the high 12 bits (this data is only present if Option 12A has been ordered). The input is selected and the conversion is started by writing to this same word address Y:$FFC0. A value of 0 to 7 written into the low 12 bits selects the analog input channel of that number (ANAI00-ANAI07) to be converted in unipolar mode (0V to +5V). A value of 0 to 7 written into the high 12 bits selects the analog input channel numbered 8 greater (ANAI08-ANAI15) in unipolar mode. If the value written into either the low 12 bits or the high 12 bits 11-6 PMAC2 User’s Manual – 15 March 1997 3A0-602413-363 is 8 higher (8 to 15), the same input channel is selected, but the conversion is in bipolar mode (-2.5V to +2.5V). Analog Data Table PMAC2 firmware automatically selects and reads the channels of the A/D converters in a round-robin fashion. This function is controlled by a data table (reference Table 10-1) in registers $0708 to $070F which operates much like the encoder conversion table. The eight X registers contain the channel select information, and the eight Y registers contain the A/D results. Each X and Y word is split into two 12-bit halves, where the lower 12 bits work with the first A/D converter set (Option 12), and the higher 12 bits work with the second A/D converter set (Option 12A). Table 10-1. The A/D Converter Data Table P M A C 2 A D D R E S S X W O R D U P P E R 1 2 BI T S X W O R D L O W E R 1 2 BI T S Y W O R D U P P E R 1 2 BI T S Y W O R D L O W E R 1 2 BI T S $0 70 8 C O N FI G _ W 2 C O N FI G _ W 1 D A T A _ W 2 D A T A _ W 1 $0 70 9 C O N FI G _ W 2 C O N FI G _ W 1 D A T A _ W 2 D A T A _ W 1 PMAC2 User’s Manual – 15 March 1997 11-7 3A0-602413-363 $0 70 A C O N FI G _ W 2 C O N FI G _ W 1 D A T A _ W 2 D A T A _ W 1 $0 70 B C O N FI G _ W 2 C O N FI G _ W 1 D A T A _ W 2 D A T A _ W 1 $0 70 C C O N FI G _ W 2 C O N FI G _ W 1 D A T A _ W 2 D A T A _ W 1 $0 70 D C O N FI G _ W 2 C O N FI G _ W 1 D A T A _ W 2 D A T A _ W 1 $0 70 E C O N FI G _ W 2 C O N FI G _ W 1 D A T A _ W 2 D A T A _ W 1 $0 70 F C O N FI G _ W 2 C O N FI G _ W 1 D A T A _ W 2 D A T A _ W 1 where: 11-8 PMAC2 User’s Manual – 15 March 1997 3A0-602413-363 ♦ CONFIG_W2 is the selection word for the second A/D converter set (Option 12A) ♦ CONFIG_W1 is the selection word for the first A/D converter set (Option 12) ♦ DATA_W2 is the matching A/D data from the second A/D converter set (Option 12A) ♦ DATA_W1 is the matching A/D data from the first A/D converter set (Option 12) ♦ A value of 0-7 in CONFIG_W1 tells PMAC2 to read channel ANAI0007, respectively, as a 0 to+5V input. ♦ A value of 8-15 in CONFIG_W1 tells PMAC2 to read ANAI00-07, respectively, as a -2.5 to +2.5V input. ♦ A value of 0-7 in CONFIG_W2 tells PMAC2 to read channel ANAI0815, respectively, as a 0 to+5V input. ♦ A value of 8-15 in CONFIG_W1 tells PMAC2 to read ANAI08-15, respectively, as a -2.5 to +2.5V input. Each phase update (9 kHz default), PMAC2 increments through one line of the table. It copies the ADC reading(s) selected in the previous cycle into RAM, then writes the next configuration words to the ADC(s). Typically, this will be used to cycle through all 8 ADCs or pairs of ADCs (refernce Table 10-2). Table 10-2. Cycling Through All 8 Pairs Of ADCs In Unsigned Mode P M A C A D D R E S S X W O R D U P P E R 1 2 BI T S X W O R D L O W E R 1 2 BI T S Y W O R D U P P E R 1 2 BI T S Y W O R D L O W E R 1 2 BI T S $0 70 8 0 0 A N AI 08 A N AI 00 PMAC2 User’s Manual – 15 March 1997 11-9 3A0-602413-363 $0 70 9 1 1 A N AI 09 A N AI 01 $0 70 A 2 2 A N AI 10 A N AI 02 $0 70 B 3 3 A N AI 11 A N AI 03 $0 70 C 4 4 A N AI 12 A N AI 04 $0 70 D 5 5 A N AI 13 A N AI 05 $0 70 E 6 6 A N AI 14 A N AI 06 $0 70 F 7 7 A N AI 15 A N AI 07 Suggested M-variable definitions for the configuration words are: M990->X:$0708,0,24,U M991->X:$0709,0,24,U M992->X:$070A,0,24,U M993->X:$070B,0,24,U M994->X:$070C,0,24,U M995->X:$070D,0,24,U M996->X:$070E,0,24,U M997->X:$070F,0,24,U ; ; ; ; ; ; ; ; 1st 2nd 3rd 4th 5th 6th 7th 8th CONFIG_W1 CONFIG_W1 CONFIG_W1 CONFIG_W1 CONFIG_W1 CONFIG_W1 CONFIG_W1 CONFIG_W1 and and and and and and and and CONFIG_W2 CONFIG_W2 CONFIG_W2 CONFIG_W2 CONFIG_W2 CONFIG_W2 CONFIG_W2 CONFIG_W2 Typically, the configuration words are written once, on power up/reset. A good way to do this is in a PLC program that executes one scan disabling itself. It could look like this: 11-10 PMAC2 User’s Manual – 15 March 1997 3A0-602413-363 OPEN PLC 1 CLEAR M990=$000000 M991=$001001 M992=$002002 M993=$003003 M994=$004004 M995=$005005 M996=$006006 M997=$007007 DISABLE PLC 1 CLOSE ; ; ; ; ; ; ; ; ; ; PLC 1 is first to run after power-up/reset Select ANAI00 and ANAI08 (if present) single-ended Select ANAI01 and ANAI09 (if present) single-ended Select ANAI02 and ANAI10 (if present) single-ended Select ANAI03 and ANAI08 (if present) single-ended Select ANAI04 and ANAI08 (if present) single-ended Select ANAI05 and ANAI08 (if present) single-ended Select ANAI06 and ANAI08 (if present) single-ended Select ANAI07 and ANAI08 (if present) single-ended So will not run again PMAC2 User’s Manual – 15 March 1997 11-11 3A0-602413-363 To set up the configuration words for bipolar analog inputs, the PLC could look like this: OPEN PLC 1 CLEAR M990=$008008 M991=$009009 M992=$00A00A M993=$00B00B M994=$00C00C M995=$00D00D M996=$00E00E M997=$00F00F DISABLE PLC 1 CLOSE ; ; ; ; ; ; ; ; ; ; PLC 1 is first to run after power-up/reset Select ANAI00 and ANAI08 (if present) bipolar Select ANAI01 and ANAI09 (if present) bipolar Select ANAI02 and ANAI10 (if present) bipolar Select ANAI03 and ANAI08 (if present) bipolar Select ANAI04 and ANAI08 (if present) bipolar Select ANAI05 and ANAI08 (if present) bipolar Select ANAI06 and ANAI08 (if present) bipolar Select ANAI07 and ANAI08 (if present) bipolar So will not run again Once this setup has been made, PMAC2 will automatically cycle through the analog inputs, copying the converted digital values into RAM. These image registers can then be read as if they were the actual A/D converters. For user program use, the image registers would be accessed with M-variables. Suggested definitions are: M1000->Y:$0708,0,12,U M1001->Y:$0709,0,12,U M1002->Y:$070A,0,12,U M1003->Y:$070B,0,12,U M1004->Y:$070C,0,12,U M1005->Y:$070D,0,12,U M1006->Y:$070E,0,12,U M1007->Y:$070F,0,12,U M1008->Y:$0708,12,12,U M1009->Y:$0709,12,12,U M1010->Y:$070A,12,12,U M1011->Y:$070B,12,12,U M1012->Y:$070C,12,12,U M1013->Y:$070D,12,12,U M1014->Y:$070E,12,12,U M1015->Y:$070F,12,12,U 11-12 ; ; ; ; ; ; ; ; ; ; ; ; ; ; ; ; ANAI00 ANAI01 ANAI02 ANAI03 ANAI04 ANAI05 ANAI06 ANAI07 ANAI08 ANAI09 ANAI10 ANAI11 ANAI12 ANAI13 ANAI14 ANAI15 image image image image image image image image image image image image image image image image register; register; register; register; register; register; register; register; register; register; register; register; register; register; register; register; from from from from from from from from from from from from from from from from J1 J1 J1 J1 J1 J1 J1 J1 J1 J1 J1 J1 J1 J1 J1 J1 pin pin pin pin pin pin pin pin pin pin pin pin pin pin pin pin 1 2 3 4 5 6 7 8 9 10 11 12 13 14 15 16 PMAC2 User’s Manual – 15 March 1997 3A0-602413-363 Servo Feedback Use For servo feedback use, the images of ANAI00 to ANAI07 can be processed through the conversion table. To the conversion table, they look like 12-bit When parallel encoders. They should be processed with the Parallel Y-data with using some of these ADCs for filtering format (format $30). The active bit mask should be $000FFF to servo feedback, specify the use of the low 12 bits only. The maximum velocity (change in in order to get position per servo cycle) should be set to a value slightly larger than the new data every maximum real velocity expected. servo cycle, it is For example, to set up the encoder conversion table to process ADC data from necessary either to have a ANAI00 to ANAI07 only, with a maximum change per servo cycle of 16 LSBs per servo cycle, the following direct memory write commands could be phase update used: rate at least 8 times the servo WY:$0720,$300708,$000FFF,16 ; Parallel read of ANAI00 update rate WY:$0723,$300709,$000FFF,16 ; Parallel read of ANAI01 (I902>=7) or to extend the WY:$0726,$30070A,$000FFF,16 ; Parallel read of ANAI02 servo updates WY:$0729,$30070B,$000FFF,16 ; Parallel read of ANAI03 for the WY:$072C,$30070C,$000FFF,16 ; Parallel read of ANAI04 individual WY:$072F,$30070D,$000FFF,16 ; Parallel read of ANAI05 motors using this feedback WY:$0732,$30070E,$000FFF,16 ; Parallel read of ANAI06 with Ix60 so WY:$0735,$30070F,$000FFF,16 ; Parallel read of ANAI07 that their actual update rate is less than 1/8 the phase update rate. To convert ANAI08 to ANAI15, the $70 Parallel X-data with filtering format is used instead of the $30 format in this example. The resulting values from these conversions are in the following registers: ANAI00 X:$0722 ANAI01 X:$0725 ANAI02 X:$0728 ANAI03 X:$072B ANAI04 X:$072E ANAI05 X:$0731 ANAI06 X:$0734 ANAI07 X:$0737 Motor variables Ix03 and Ix04 should contain the addresses of these resulting values to use the ADC values for position- and velocity-loop feedback, respectively. PMAC2 User’s Manual – 15 March 1997 11-13 3A0-602413-363 Absolute Power-On Position PMAC2 can use these ADC inputs for absolute power-on position using the Ix10 variable. Ix10 is told to read the image register for the analog input as a 12-bit parallel input. Bits 0-15 contain the address of the image register; bits 16-21 contain the value of 12 decimal (0C hex) to specify the width; bit 22 is 0 to specify a Y-register in the case of ANAI00-07, or 1 to specify an X-register in the case of ANAI08-15. Table 10-3 shows the values of Ix10 to be used for each input. Table 10-3. Values Of Ix10 To Be Used For Each Input I N P U T I x 1 0 I N P U T V A L U E V A L U E 11-14 I x 1 0 A N A I 0 0 $ 0 C 0 7 0 8 A N A I 0 8 $ 4 C 0 7 0 8 A N A I 0 1 $ 0 C 0 7 0 9 A N A I 0 9 $ 4 C 0 7 0 9 A N A I 0 2 $ 0 C 0 7 0 A A N A I 1 0 $ 4 C 0 7 0 A A N A I 0 3 $ 0 C 0 7 0 B A N A I 1 1 $ 4 C 0 7 0 B PMAC2 User’s Manual – 15 March 1997 3A0-602413-363 A N A I 0 4 $ 0 C 0 7 0 8 A N A I 1 2 $ 4 C 0 7 0 C A N A I 0 5 $ 0 C 0 7 0 9 A N A I 1 3 $ 4 C 0 7 0 D A N A I 0 6 $ 0 C 0 7 0 A A N A I 1 4 $ 4 C 0 7 0 E A N A I 0 7 $ 0 C 0 7 0 B A N A I 1 5 $ 4 C 0 7 0 F PMAC2 User’s Manual – 15 March 1997 11-15 3A0-602413-363 12 Using the Position Compare Feature on PMAC2 Software-Configurable Hardware Registers The position compare feature on PMAC2 provides a very fast and very accurate compare output function based on the actual position counter. This feature has been significantly enhanced from PMAC1. The position compare function is implemented in software-configurable hardware registers in the DSPGATE1 ASIC. The software configuration gives the function its flexibility; the hardware circuitry gives the function its speed. Each encoder counter in PMAC2 has a position compare function. Furthermore, the first encoder counter in each ASIC (Encoder 1 and Encoder 5 on PMAC2) can use the position compare circuitry from any of the other channels on the ASIC, so Encoder 1 and Encoder 5 can utilize up to 4 independent compare circuits. The position compare outputs are brought out on the J8 JEQU connector through a 24V driver IC. The output for Channel n is labeled EQUn. The factorydefault IC is a ULN2803A sinking (open-collector) driver IC. This IC is socketed, so it can easily be replaced with a UDN2981A sourcing (open-emitter) driver IC. These ICs can be used to drive external hardware, such as the triggers for scanning and measurement equipment. On the PMAC2-PC, the compare outputs for Channel 1 and Channel 5 (if present) can also be used to interrupt the host computer over the PC bus. On the PMAC2-Lite the compare outputs for Channel 1 and Channel 2 can be used to interrupt the host computer over the PC bus. In addition, there is a memory-mapped status bit for the output that PMAC2 software can access with M-variables for its own use. PMAC2 User’s Manual – 15 March 1997 12-1 3A0-602413-363 The position compare circuitry for each channel is based on three memorymapped registers: ♦ Compare A ♦ Compare B ♦ Compare Auto-Increment There are three control bits for each channel: ♦ Compare Channel Select ♦ Compare Direct-Write (Initial State) Value ♦ Compare Direct-Write Enable The is one status bit for each channel: ♦ Compare Output Status The channel-select bit is an I-variable: I9n1 for Channel n. The registers and other control bits are typically accessed with M-variables. There are suggested M-variables for all of these. For Encoder 1, the suggested definitions are: M108->Y:$C007,0,24,S M109->X:$C007,0,24,S M110->X:$C006,0,24,S M111->X:$C005,11 M112->X:$C005,12 M113->X:$C000,9 ; ; ; ; ; ; ; Position Compare A Value (counts) Position Compare B Value (counts) Compare Auto-Increment Value (counts) Position Compare Write Enable Position Compare Direct Write (Initial State) Value Position Compare Output Status Refer to the Suggested M-variable list in the Software Reference Manual for equivalent definitions for other channels. Principle of Operation When the encoder counter value matches the value in either Channel n’s Compare A Register or Compare B Register, the compare output n is toggled from the existing state; either from 0 to 1, or from 1 to 0. The toggling occurs on the transition from not-equal to equal in either direction. In addition, when the counter becomes equal with one of the compare registers, the other register is immediately incremented by the amount in the AutoIncrement register. If the encoder becomes equal by moving in the positive direction, the value in the Auto-Increment register is added to the other compare register. If the encoder becomes equal by moving in the negative direction, the value in the Auto-Increment register is subtracted from the other compare register. The user can determine the On/Off polarity of the signal by directly writing an output value to the initial state register at any time. It is the user’s responsibility 12-2 PMAC2 User’s Manual – 15 March 1997 3A0-602413-363 to determine whether he is in his desired On region or the Off region when he uses the direct-write feature. Scaling and Offset of Position Compare Registers The position compare registers are scaled in encoder counts. A count is defined by the channel Encoder Decode I-variable I9n0, typically with 4 counts per cycle or line. The compare registers are always referenced to the position at the most recent power-up or reset, called Encoder Zero. This reference does not change with motor homing, which changes Motor Zero, or axis offsets, which change Axis Zero. See the section Converting from Motor and Axis Coordinates, below, for more details. Initial Setup Use variable I9n1 to select whether the Channel n compare circuit will use Encoder n (I9n1=0) or the first encoder on the ASIC, ENC1 or ENC5 (I9n1=1). Note that for Channels 1 and 5, there is no need to make a choice; I911 and I951 always report as 1. The power-up/reset default for the other channels is I9n1=0. Setting Up for a Single Pulse Output If just a single compare pulse is desired (no using the auto-increment feature), the following steps should be taken: ♦ Write the encoder value at the front edge into the Compare A register ♦ Write the encoder value at the back edge into the Compare B register ♦ Set the Auto-Increment register to zero ♦ Set the initial state with the direct-write feature Write a value to the initial state bit Write a ‘1’ to the direct-write enable bit (this is self-clearing to 0) ♦ Start the move that will cause the compare function PMAC2 User’s Manual – 15 March 1997 12-3 3A0-602413-363 EQUn START POSITION COMPARE A VALUE COMPARE B VALUE DIRECTION OF MOTION Figure 11-1. Compare Function For example, with the axis sitting still at about encoder position 100, and a ‘1’ value of position compare desired between encoder positions 1000 and 1010, the following code could be used: M108=1000 ; M109=1010 ; M110=0 ; M112=0 ; M111=1 ; {Command to start the move} Set front end compare in A Set back end compare in B No auto-increment Prepare initial value of 0 Enable direct write (resets immediately to zero) Setting Up for Multiple Pulse Outputs By using the auto-increment feature, it is possible to create multiple compare pulses with a single software setup operation. When the auto-increment register is a non-zero value, its value is automatically added to or subtracted from one compare register’s value when the other compare value is matched. PMAC keeps track of the direction of incrementing, so only positive values should be used in the auto-increment register, even if the encoder will be counting in the negative direction. The setup for multiple pulses is like the setup for a single pulse, except that a non-zero value must be entered into the auto-increment register, and the value entered for the back edge must be that of the first back edge minus the autoincrement if the move will be positive, or that of the first back edge plus the auto-increment value if the move will be negative. In other words, the starting values to the two compare registers must bracket the starting position. When either compare value is matched by the encoder counter, the other compare value is incremented in the direction of movement. 12-4 PMAC2 User’s Manual – 15 March 1997 3A0-602413-363 START POSITION EQUn AUTO-INCREMENT STARTING COMPARE B REGISTER STARTING COMPARE A REGISTER Figure 11-2. Setup For Multiple Pulses Example Starting from the above example, desiring the compare output on between 1000 and 1010 counts, but adding an auto-increment value of 2000 counts, with a starting position of about 100 counts, program code to start the sequence could be: M110=2000 M108=1000 M109=1010-M110 M112=0 M111=1 ; ; ; ; ; Auto-increment of 2000 encoder counts First front edge at 1000 counts First back edge at 1010 counts Prepare initial value of 0 Enable direct write (resets immediately to zero) Converting from Motor and Axis Coordinates The compare registers are scaled in encoder counts, referenced to the power-up position. Typically, the user wants to work in either motor coordinates, still in counts and referenced to the home position, or in axis coordinates, in engineering units (mm, inches, degrees) and referenced to a user-set origin. Two values are needed to convert motor position to encoder position for compare calculations. First is the home capture offset, the encoder position captured at the home trigger, a value PMAC stores for future use. The second is the home offset variable Ix26, which contains the difference between the trigger position and the home position. The relationship is: EncoderPosition = MotorPosition + HomeCaptureOffset + HomeOffset PMAC2 User’s Manual – 15 March 1997 12-5 3A0-602413-363 The home capture offset is a 24-bit signed integer, expressed in counts. It is best accessed with a 24-bit signed M-variable. The registers and suggested Mvariables for each motor are: M173->Y:$0815,0,24,S M273->Y:$08D5,0,24,S M373->Y:$0995,0,24,S M473->Y:$0A55,0,24,S M573->Y:$0B15,0,24,S M673->Y:$0BD5,0,24,S M773->Y:$0C95,0,24,S M873->Y:$0D55,0,24,S ; ; ; ; ; ; ; ; Motor Motor Motor Motor Motor Motor Motor Motor 1 2 3 4 5 6 7 8 home home home home home home home home capture capture capture capture capture capture capture capture offset offset offset offset offset offset offset offset The home offset I-variable Ix26 is in units of 1/16 count, so it should be divided by 16 before adding to the motor position. For example, for Motor 1 using Encoder 1, if you want to set the Compare 1A register to trigger at motor position +1500, you could use the following command, on-line, in a motion program, or in a PLC program: M108=1500+M173+I126/16 The conversion from axis position to motor position involves a scale factor and an offset, with the following equation: MotorPosition = ScaleFactor * AxisPosition + Offset The scale factor is specified in the axis definition statement in counts per engineering unit; it should be constant for an application. You can specify the scale factor directly in your equation, or you can access the actual register that PMAC is using with suggested M-variables: Mx91 x Mx92 Mx93 ; Axis scale factor for X, U, A, B, or C assigned to Motor ; Axis scale factor for Y or V assigned to Motor x ; Axis scale factor for Z or W assigned to Motor x The offset is the position bias term, with suggested M-variable Mx64, and units of 1/(Ix08*32) counts. It is set equal to the axis definition offset (usually 0) on power-up/reset and homing. It can be changed after this with on-line command {axis}= or motion program command PSET. For example, with Motor 1 assigned to the X-axis, if you want to set the compare 1A register to trigger at +2.5 engineering units from the axis origin, you can compute motor position in counts as: P1=M191*2.5+M164/(I108*32) Then you can set the actual compare register with: M108=P1+M173+I126/16 12-6 PMAC2 User’s Manual – 15 March 1997 3A0-602413-363 PMAC2 User’s Manual – 15 March 1997 12-7 3A0-602413-363 13 Using the PMAC2 to Interrupt the Host Computer Programmable Interrupt Controller (PIC) The PC versions of the PMAC2 have a built-in programmable interrupt controller (PIC) that can be used to let PMAC2 interrupt the host computer over the PC bus. Any of eight signals on PMAC2 can be used for these interrupts. The PIC is similar, but not identical, to the 8259 PIC on the PMAC1 and in the PC. Interrupt Controller Structure The PIC appears as four 8-bit registers in the I/O space of the PC. The actual address of these registers depends on the setting of the base address (Base) of the PMAC2 in the I/O space of the PC as set by the DIP-switches on SW1. These 4 registers are: ♦ Base+8: .........................................................Interrupt Status Register ♦ Base+9: ..............................................Interrupt Signal Status Register ♦ Base+10: .......................................... Interrupt Mask Control Register ♦ Base+11: ................................. Interrupt Edge/Level Control Register With the base address at the factory default of 528 (210 hex), these four registers are at 536-539 (218-21B hex). PMAC2 User’s Manual – 15 March 1997 13-1 3A0-602413-363 The eight bits in each register represent the status or control of the eight interrupt source signals as follows: ♦ Bit 0: ................................IPOS: In-position for the addressed coordinate system ♦ Bit 1: .......................BREQ: Buffer-request for the addressed coordinate system ♦ Bit 2: ............ EROR: Fatal following error for the addressed coordinate system ♦ Bit 3: .......F1ER: Warning following error for the addressed coordinate system ♦ Bit 4: ........................................................................................ HREQ: Host-request ♦ Bit 5: ...........EQU1: Position Compare 1 (PMAC2-PC and PMAC2-Lite only) (also used for DPRAM ASCII interrupt) ♦ Bit 6: .......................................... EQU5: Position Compare 5 (PMAC2-PC only) EQU2: Position Compare 2 (PMAC2-Lite only) ♦ Bit 7: ...................................................................................WD0: Watchdog Timer A jumper is used to select which PC interrupt line receives the interrupt signal from PMAC2. The choices are: ♦ E7: IRQ10 ♦ E8: IRQ11 ♦ E9: IRQ12 ♦ E10: ...........................................................................................IRQ14 ♦ E11: ..........................................................................IRQ15 (on newer PIC Registers Interrupt Status Register (Base+8): This register, when read, shows the status of the 8 interrupts. It will be read by any interrupt service routine to find out which signal created the interrupt to the PC. A 1 in a bit indicates an interrupt for the matching signal; a 0 indicates no interrupt. An interrupt signal must be unmasked before it can show an interrupt in this register. The act of writing to this register will clear any edge-triggered interrupts, no matter what value is written. Interrupt Signal Status Register (Base+9): This register, when read, shows the status of the 8 signal inputs to the PIC. It is not useful in interrupt service routines, but provides a fast and easy method for polling the status of these signals without any overhead to the PMAC2. Interrupt Mask Control Register (Base+10): This register permits the PC to mask out interrupt signals that the user does not want to interrupt the PC. Writing a 1 to a bit in this register enables the corresponding signal to interrupt the PC; writing a 0 to a bit in this register disables (masks out) that signal. Note that this polarity is the opposite of an 8259 PIC used on PMAC1 or in the PC. This register can be read at any time to find which signals are masked without affecting the masking. 13-2 PMAC2 User’s Manual – 15 March 1997 3A0-602413-363 Interrupt Edge/Level Control Register (Base+11): This register permits the PC to control whether an interrupt signal interrupts the PC on an edge-triggered basis or by level. Writing a 1 to a bit in this register sets the corresponding signal for a level-triggered interrupt; writing a 0 to a bit in this register sets that signal for an edge-triggered interrupt. Edge-triggered interrupts are the default, and are typically more useful. If an interrupt is edge-triggered, in order for that signal to generate another interrupt to the PC (after the PC clears the interrupts by writing to Base+8), the signal must go low, then high again. If an interrupt is level-triggered, if the signal is still high after the PC clears the interrupts, it will immediately interrupt the PC again. Interrupt Source Signals In-Position: The in-position signal goes true if PMAC2 determines that all motors in the addressed coordinate system are in position. For a motor to be inposition, the following conditions must be met: the servo loop must be closed, the desired velocity must be zero, the move timer must be off (it must be in some kind of indefinite wait, not in a move, dwell, or delay), and the following error magnitude must be smaller than Ix28. These conditions must be true for (I7+1) consecutive background scans. Buffer-Request: The buffer-request signal goes true when an open motion program buffer, particularly a rotary buffer, is ready to accept another line from the PC. For the fixed motion program buffers (PROG), the ready state is controlled by I18; for the rotary program buffers (ROT), the ready state is controlled by I16 and I17. Refer to Rotary Motion Program Buffers under Writing a Motion Program for more details Fatal Following Error: The fatal following error signal goes true when any axis in the addressed coordinate system exceeds its fatal following error limit as set by Ix11. Warning Following Error: The warning following error signal goes true when any axis in the addressed coordinate system exceeds its warning following error limit as set by Ix12. Host Request: The host-request signal goes true when the PMAC2 is ready to read or write another character over the PC bus. The user can select by writing to the base address of the PMAC2 whether the host request signal reflects writeready only, read-ready only, or both. Writing a 0 to the PMAC2 base address disables generation of the host-request signal; writing a 1 enables the signal for host read-ready only; writing a 2 enables the signal for host write-ready only; writing a 3 enables the signal for both. Position Compare 1 (EQU1): The EQU1 signal goes true as toggled by the position compare registers and/or the direct-write feature of the position compare function. The direct-write feature permits the use of this signal as a software-generated interrupt from PMAC2 programs. With the suggested Mvariable definitions, the code to trigger a software-generated interrupt is: M112=1 M111=1 ; Prepare to set EQU1 high ; Enable writing of M112 value to EQU1 ; (M111 is self-clearing) PMAC2 User’s Manual – 15 March 1997 13-3 3A0-602413-363 To clear EQU1 in advance of the next interrupt, the code is: M112=0 M111=1 ; Prepare to set EQU1 low ; Enable writing of M112 value to EQU1 ; (M111 is self-clearing) If I56 and I58 are both set to 1 to enable DPRAM ASCII communications with interrupts, PMAC2 will automatically generate an interrupt on the EQU1 line each time it has loaded a response line into the DPRAM ASCII response buffer. With this function active, no other use of the EQU1 line should be made. Note that this interrupt is not available on PMAC2-PC Ultralite boards at this time, so the DPRAM ASCII interrupt function is also not available on these boards. Position Compare 5 (EQU5): [PMAC2-PC only] The EQU5 signal goes true as toggled by the position compare registers and/or the direct-write feature of the position compare function. The direct-write feature permits the use of this signal as a software-generated interrupt from PMAC2 programs. With the suggested M-variable definitions, the code to trigger a software-generated interrupt is: M512=1 M511=1 ; Prepare to set EQU5 high ; Enable writing of M512 value to EQU5 ; (M511 is self-clearing) To clear EQU5 in advance of the next interrupt, the code is: M512=0 M511=1 ; Prepare to set EQU5 low ; Enable writing of M512 value to EQU5 ; (M511 is self-clearing) On the PMAC2-Lite, EQU2 provides this interrupt instead of EQU5. Suggested M-variables M212 and M211 can be used in place of M512 and M511 in the above examples. This interrupt is not currently available on the PMAC2-PC Ultralite board. Watchdog: The watchdog signal goes true when the PMAC2 watchdog timer trips and shuts down the card. 13-4 PMAC2 User’s Manual – 15 March 1997