1
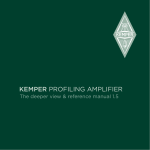
Slate Digital - Virtual Buss Compressors Virtual Mix Rack User Guide Trimmer Revival Mix Bundle VCC Bundle CS Bundle FG-Bomber Virtual Mix Rack 2 Virtual Mix Rack Version 1.1 Advanced Algorithms™ by Fabrice Gabriel Fabrice Gabriel : Plugin and Algorithm Design Steven Slate : Plugin Design and Tuning Romain Moret : Project and Development Management François Reme : DSP Development François Best : GUI and Plugin Development Niccolo Comin : GUI and Plugin Development Nicolas Lacombe : GUI and Plugin Development Romain Clement : GUI and Plugin Development Vincent Gau<er : Graphical Design and Rendering Anthony TaglianeB : Quality Assurance and Beta Management Mathias Claveau : Quality Assurance Virtual Mix Rack 3 User Manual by Anthony Taglianetti, Romain Moret, Mathias Claveau, Steven Slate & Fabrice Gabriel Virtual Mix Rack 4 Introduction 7 System Overview 9 Modular System System Components 9 9 VMR Plugin 9 VMR Modules 9 Requirements 10 Supported Architectures 10 Rack and Module Licenses 10 Rack and Module Versions 10 Installation 11 Redeeming Your iLok License 11 Installing Virtual Mix Rack 11 VMR Overview 12 Slots & Modules 13 Slots 13 Modules 13 Library 14 Interacting with Modules 14 Using Category Filters 14 Handling the Modules 15 Adding Modules 15 Moving Modules 15 Duplicating Modules 16 Virtual Mix Rack 5 Removing Modules 16 Moving / Cloning Modules between Rack Instances 17 Using the Modules 17 Power & Solo Modes 17 Module Preset System 17 Automation Panel 17 Key Commands 18 Preset System 19 VMR Preset System 19 Rack Presets 19 Module Presets 21 Modified Preset Status 21 A/B Preset Snapshots 22 The Default Preset Feature 22 Misc Features 23 Rotary Knob Mode 23 About Panel 23 Virtual Mix Rack Modules 24 Revival 24 Trimmer 25 FG-116 26 FG-401 28 FG-N 30 FG-S 31 Virtual Channel and Mixbuss 32 Virtual Mix Rack 6 Custom Series EQ 37 Custom Series Lift 41 FG-Bomber 43 iLok Protection 46 3rd Party iLok License Transfer Fee 46 Protection Messages and Statuses 46 Contacting Support User System and Hardware Information Log Making the Virtual Mix Rack 49 49 50 Virtual Mix Rack 7 Introduction It’s brings me such joy to introduce you to the Virtual Mix Rack. This is a processor that everyone at Slate is so proud of, and I hope that once you put it into use on your mixes, you’ll understand why. The concept of the Virtual Mix Rack actually started years ago when I began to record my first drum samples. I had a rack of gear all wired into each other that would process my drum mics. What I found was that I always loved combining different gear because I preferred to blend the best parts of each one. For instance, I remember for a particular snare sample, I used the top end of a famous tube EQ, then used the midrange of a US EQ to add punch, then some low end shelf from a classic British EQ, and then finalized it with a touch of compression from a VCA compressor. I found it so convenient to have all the processors in one rack. Years later I saw something similar at NRG Recording Studios as I watched my good friend, Grammy award winning producer / mixer Jay Baumgardner, do a mix. I noticed on several tracks he had combined multiple pieces of gear to craft the final sound. On one vocal track, he had the top end of a famous tube EQ, the midrange and lows of a British console EQ, and then two different compressors combined all in a hybrid manner. I found it really clever how he used all the unique aspects of each processor. In the analog world, the need for multiple processors in one easy to use rack became extremely popular with the now industry standard 500 series. When I started using 500 series racks, I was delighted to be able to get my processing done so much more fast and efficiently. I knew that if we could recreate this in plugin form with precise analog modeling, we’d have a hit. So in 2012, I drew a picture on a piece of paper and showed it to Fabrice. “I love it. Let’s do it”, he said. Little did I know what a complex world we’d be getting into. The Rack structure itself is a work of art, with the Slate Digital development team doing a fantastic job on creating a rack that has innovative concepts in its workflow. The graphical elements and ability to arrange the processors uniquely to the engineer’s demands is fantastic. The rack works exactly as you’d want it to, and it provides the exact same creativity as the analog version does, but with even more versatility. And then there is the analog modeling. All I can say is that these five processors have been the most challenging in our history, with special attention to the FG-116 which models the classic American FET compressor. In case, you’re unaware of how we model analog processors, it starts with an examination of the schematic and then leads to an extensive testing of the actual gear, which then leads to initial algorithm modules created by Fabrice and the DSP team. These complex modules represent all the aspects of the gear. For instance, a transformer can have several modules that correspond to how this component affects the sound of the audio. It is then up to Virtual Mix Rack 8 me to tweak these modules, and send notes back to Fabrice and the DSP team if there are changes that need to be made. This back and forth process can happen many dozens of times. Because of the complexity of the FG-116, where every parameter affects all other parameters (such as how the gain reduction affects timing, output level affects transformer response), it becomes extremely difficult to match the analog gear. Often I’d be able to match one piece of reference material exactly, but then the same setting would sound incorrect on another reference piece of material. It was really frustrating. But with perseverance (and a lot of coffee), the team came through and were able to recreate the sound with such precision that a room full of pro audio engineers was unable to hear the difference in a blind A/B test. That was a fun day for sure. The EQs are absolutely stunning. I can’t find anything that the FG-N British EQ does not sound good on. It’s so musical and fat, and is a staple in my mixing. For special effects, it’s fun to crank the line input while on drive mode and to slam all the bands into a distortion. The FG-S is a musical craftsman. I love doing precise cuts with it, especially with its famous hi pass filter which has the magical ability to not make the frequencies above its cutoff point sound awkward like some other hi pass filters do. When you make the bandwidth wide, it can be really punchy on drums and transparently enhance a vocal after slamming it with some compression. The FG-401 is a compressor that is made to be a swiss army knife for mixing. Circuit 1 is your classic grabby VCA style compression, and is perfect for modern music of all kinds. Circuit 2 has a different circuit path and timing characteristic that is smoother and more transparent. You can slam stuff on circuit 2 without making it sound too squashed. It’s amazing on bass, vocals, and is my go to for drum overheads. The transformer on the 401 is inspired by several designs, but I customized it by ear and it adds some beautiful depth and harmonic spark to liven up the source track. In conclusion, the Virtual Mix Rack has revolutionized the way I mix in the box. Combined with our other analog modeled processors, I’m getting the best sounding mixes of my life and having more fun. I hope you find the same enjoyment. Happy mixing! Steven Slate CEO Slate Digital Virtual Mix Rack 9 System Overview Modular System Slate Digital VMR System is a modular architecture that allows the use of processing units, the Modules, within a Rack Platform, the Virtual Mix Rack Plugin. In the VMR System architecture, the Rack and the Modules are independent. They both reside on the system as two separate binary sets. This offers a more flexible way of adding new modules in the Virtual Mix Rack ecosystem, without having to systematically update the entire set of existing modules. This separation also allows an easier and more powerful way to deal with iLok licenses. Each Module could have it’s own license, gathered into a licensed bundle, or even use the same license as the Virtual Mix Rack itself. System Components The VMR Platform is made of two components; the Virtual Mix Rack Plugin and the Virtual Mix Rack Modules. VMR Plugin The Virtual Mix Rack Plugin is the corner stone of the VMR System. It is the actual plugin you insert in the host. Within this plugin, you can load, use, move and remove VMR Modules. VMR Modules VMR Modules are like small plugins. In fact, they are plugins, except that they exist as a plugin format that only the VMR Rack can interpret and use. From the VMR System perspective, the Virtual Mix Rack Plugin is the host, and the VMR Modules are the modular processing units. Modules can be of any kind, dynamic processing, EQs, delay, reverbs, mixing utilities, mastering units, metering, etc. Virtual Mix Rack 10 Requirements Supported Architectures Macintosh ๏ ๏ ๏ Mac OS X 10.7 or later (32 and 64-bit) Mac Dual-Core Intel Processor, 4GB RAM Plugin Formats: VST2, VST3, AudioUnit, AAX, RTAS (32-bit only) Windows ๏ ๏ ๏ Windows 7 or later (32 and 64-bit) Dual-Core Intel or AMD Processor, 4GB RAM Plugin Formats: VST2, VST3, AAX, RTAS (32-bit only) Rack and Module Licenses Due to the Modular architecture of the Virtual Mix Rack plugin, you will need multiple licenses to get the VMR System up and running: ๏ ๏ The VMR Rack license, which activates the VMR Rack and free Modules like Revival and Trimmer. Module / Modules Bundles licenses: for instance, the VMR Mix Bundle license contains licenses for the FG-116, FG-401, FG-N and FG-S modules. Bundled licenses cannot be separated.* Rack and Module Versions It’s important to understand that the VMR Rack and Modules must always share the same version number. For instance a Module under version X will only work within a Rack that is also under version X, and vice-versa. Click the Slate Digital logo in the toolbar to open the About Panel, which will display the version number for the Rack and Modules.† * See the iLok Protection section for more information. † See the About Panel section for more information. Virtual Mix Rack 11 Installation Redeeming Your iLok License Before downloading the iLok License for Virtual Mix Rack or any Module or Bundle of Modules, you will need to install the latest iLok License Manager. You can download the latest installers here. In order to download your iLok license to your iLok 2 dongle, please visit the link that was given to you in your email receipt and enter the required info including the issued passcode. This will unlock your iLok Activation Code. 1. Launch the iLok License Manager and sign in to your iLok account. 2. Click this button in the upper right corner of the window. 3. Enter your Activation Code and click “Next”. 4. Select your iLok 2 Dongle from the Activation Location dialog and click “Activate”. 5. You will receive a confirmation message when the license is moved to your iLok 2 Dongle. Installing Virtual Mix Rack Macintosh Double-Click on the installer icon and follow the on-screen prompts. You may customize your installation by clicking the “Customize” button to select in particular: ๏ ๏ ๏ Module Presets you want to install VMR Modules you want to install VMR Plugin Formats you want to install Windows Double-Click on the installer icon and follow the on-screen prompts. You may choose to customize your installation in “Select Components” rubric. Choose the desired plug-in directory paths (those default are usually best), and proceed. Virtual Mix Rack 12 VMR Overview The VMR Rack is divided into three areas; the Preset Bar (top), Library (left), and Slots (center). • Preset Bar provides functions to manage Rack Presets, access the About Panel and other additional settings. • On the Left, the Library, where you find all your installed Modules. • At the Center, the Slots, where you add and use actual Modules. Virtual Mix Rack 13 Slots & Modules There is an important distinction to be made between the VMR Slots and Modules. Slots ๏ ๏ ๏ ๏ ๏ The VMR Plugin can host up to eight Slots. Slots are empty spaces that load Modules. Host Automation is written to Slot parameters, not to Module parameters. Slots parameters belong to the Rack and they are the ones that are declared to your the Host.* Each Slot has its own header with utility and preset functions.* Slots can be empty, in which case, a blank metal plate covers it, preventing it from virtual dust. Modules ๏ ๏ ๏ Modules are audio processing units that are loaded into an empty Slot. Module parameters are automatically mapped to Slot parameters. Module parameters are automatable only via Slot parameters. * See the Using the Modules section for more information. Virtual Mix Rack 14 Library Interacting with Modules The Library displays all the Modules that are installed on your system, and provides you some information about them. The Library Filter feature also allows to filter the Modules depending on their processing category. The Library is a good place to get quick information about a Module, such as: • Module Status: has a license been found for this Module ? • Module Category: Dynamics, EQ, Harmonics, etc. • Quick description for each Module The small Info icon below each Module name in the Library indicates the module status. Clicking on this icon will display a small popup that unveils more info. Using Category Filters You can use Category Filters to quickly search the VMR Module Library. Clicking on a filter will enable or disable it. Clicking on a filter while holding the Cmd/Ctrl key will add it to the current filtering group, allowing you to create more complex filters. Virtual Mix Rack 15 Handling the Modules Adding Modules There are two ways of adding Modules: 1. By double clicking on the Module’s Thumbnail in the Library. 2. By Dragging the Module’s Thumbnail from the Library and dropping it into a Rack Slot. Moving Modules To Move a Module, grab it by its panel and start moving it around. The Rack processing sequence is updated during the drag operation, both visually and sonically (the audio path follows what’s happening visually in real-time). Virtual Mix Rack 16 Duplicating Modules To duplicate a Module, Drag’n Drop it while holding the Opt/Alt key. More generally, as long as the Opt/Alt key is pressed during a Drag’n Drop operation, then the dragged Module will be a clone of the original one. Removing Modules There are two ways of removing Modules and Slots: 1. By clicking on the X icon in the Slot Header: this will remove the entire Slot, with the Module that is inside (note: the Rack will always have a minimum number of visible Slots, so when removing a Module, you can potentially end up with an empty Slot). 2. By dragging the Slot and dropping it outside of the Rack. Then the Slot is displaying a trash icon, as shown below: Virtual Mix Rack 17 Moving / Cloning Modules between Rack Instances This is one of the nice feature of the VMR from a workflow perspective: you can add, move and duplicate Modules between two Rack Instances. To Move / Clone a Module from an instance to another, just drag the Module from the first Rack view to the second. Holding Opt/Alt during the Drag operation will duplicate the Module instead of moving it. This also works with the Library, you can grab a Module from any Rack instance’s Library, and drop into any other Rack instance’s Slot. Using the Modules Power & Solo Modes Each Slot processing can be bypassed and soloed. To bypass a Slot, press the yellow Power Button in the left of the Slot Header. To Solo a Slot, press the “S” Button. Slot Solo has two modes of operations: 1. X-OR Solo: Left Click on a Solo Button to Solo the Slot and cancel any other Slot Solos. 2. Latch Solo: Cmd / Ctrl + Left Click on a Solo Button to add / remove the Slot in the current solo group. Module Preset System Each Slot embeds a light preset system which allows you to Save, Load and Delete presets for individual Modules*. Automation Panel For an easier handling of Automation, the Virtual Mix Rack has a special panel, dedicated to Automation Display. You can access this panel by clicking on the Slot Letter in each Slot Header. * See the Preset System section for more information. Virtual Mix Rack 18 This panel displays a list of all the Automation Mappings, for all the currently loaded Modules. In the “Automation Name” column, you can read the names of the parameters as they will be seen by the Host. In the “Parameter” column, you can read the names of the Module Parameters. Depending on the plugin format your Rack is running, the Automation Names that are exposed to the Host by the Rack can be generic (like “H-10”), or they can be dynamically changed (like “H-Drive”). Click anywhere outside the panel to dismiss it. Key Commands Reset Parameters to Default • Mac: Double-Click or Opt + Click • Win: Double-Click or Alt + Click Fine adjustments • Mac: Right-Click + Drag or Cmd + Drag • Win: Right-Click + Drag or Ctrl + Drag Enable Automation Dialog in Pro Tools and VST3 DAWs* only • Mac: Ctrl + Opt + Cmd + Click • Win: Ctrl + Win + Alt + Click * Most of VST3 DAWs support this feature. This dialog often also allows the control assignment. Virtual Mix Rack 19 Preset System VMR Preset System The Preset System allows you to fasten your workflow by using predefined configuration. If you consider the VMR System not just as a channel-strip, but as a complete Processing ToolBox, then Presets could easily become the starting point of any of your Virtual Mix Rack Plugin instance usage. Presets are divided in two Layers: 1. Rack Presets: handled through the top Preset Bar 2. Module Presets: handled through the Preset Label within each Slot Rack and Module Preset Systems are independent. A Rack Preset contains all the Slots and Modules configuration, but it doesn’t store which Module Preset has been used in which Slot, to avoid unnecessary synchronization mismatches. It just stores the Module Preset Names which have been used. Rack Presets Clicking on the Preset Label area will open the Preset List: • The Main Menu displays the Banks • The Sub-Menus display the Presets Clicking on the Menu Icon on the left will open the Preset Menu, from which you can: • Rename/Delete the current Bank • Import/Export Bank as ”.ebf” files • Visualize and Edit Preset Information • Rename/Delete the current Preset Virtual Mix Rack Clicking on the arrows on the right will navigate through the Presets and Banks. • Clicking on the Save Button will update your current Preset, or do the same as “Save As” if your Preset doesn’t exist yet. • Clicking on the Save As Button will open the Save Preset Panel, in which you can edit the Preset Information. 20 Virtual Mix Rack 21 Module Presets Clicking on the Preset Label area will open the Preset List, from which you can: • Save/Save As the current Preset • Delete the current Preset • Reset the Module to its Default State • Load a Module Preset Clicking on the Save As Button will open the “Save Preset As…” Panel. Modified Preset Status When you modify a Preset (both Rack and Module), a star exponent appears next to the Preset Name in order to inform you that the Preset is in a Modified Status. Saving the Preset will update it and then the star exponent will disappear. If this updated Preset is used in an other instance (or an other session), the star exponent will be displayed in this instance. Recalling the Preset will update it and then the star exponent will disappear. Virtual Mix Rack 22 A/B Preset Snapshots The Virtual Mix Rack offers a simple A/B System to quickly compare two Racks configurations. A/B Snapshots can be controlled and switched from the dedicated A/B buttons. The Plugin is always operating on one of the two Snapshots, A or B, the current Snapshot being highlighted in yellow. Clicking on a Snapshot letter will switch your Rack to this Snapshot. Clicking on the arrow between the two buttons will copy the current Snapshot to the other. The Default Preset Feature The Virtual Mix Rack Plugin has one additional feature which is the ability to override the Default State of the Virtual Mix Rack upon instantiation. Clicking on the “Default Preset” icon in the Preset Bar will open the following menu: In this Menu : • “Set Current As Default” will overwrite the default Modules configuration with the current Rack configuration. • “Restore Factory As default” will overwrite the Modules configuration with the Factory Default (an empty Rack). • “Reset To Default” will reset the current Rack instance to the current Default Preset. Virtual Mix Rack 23 Misc Features Rotary Knob Mode Clicking on the “Rotary Knob Mode” icon in the Preset Bar toggles the Knob Mode between Linear and Rotary. In Linear Mode, the Knobs follow horizontal and vertical mouse moves. In Rotary Mode, the Knobs follow circular mouse moves (pretty useful on touch devices). The icon is highlighted in yellow when the Knobs are in Rotary Mode. Note: fine adjustments (Cmd/Ctrl+Drag) are also available in Rotary Knob Mode. About Panel Clicking on the Slate Digital Logo in the Preset Bar opens the About Panel. In this Panel: • Clicking on the Slate Digital logo will redirect you to the Slate Digital Website. • Clicking on the “Virtual Mix Rack” Label will open this User Manual. • Left-Clicking on the Version Number Label will toggle between build information. • Right-Clicking on the Version Number Label will open a quick support Menu. • The Module Version Table displays useful information about all the installed Modules: their Names, Versions and Statuses. Virtual Mix Rack 24 Virtual Mix Rack Modules Revival The Revival is the product of years of research into what makes things sound ‘better.’ The Slate Digital Team analyzed what it was about classic analog gear that could turn tracks into audio masterpieces, and broke the process down into two knobs. That may sound a bit crazy, but wait till you hear Revival. Revival borrows aspects of tubes, tape, transformers, and world class analog filters to create two processes. Shimmer adds depth, clarity, space, width, and air like you’ve never heard. Thickness adds warmth, punch, body, and fatness. Revival can be used on individual tracks, such as to create air on a pop vocal or add fatness to drums, but is also amazing in mastering to bring out details in full mixes. VU Meter The VU Meter displays the RMS level of the signal that is going out of the unit. The meter is calibrated to display 0VU when being fed by a 1kHz sine wave with a Peak level of -18dBFS. Shimmer & Thickness Shimmer adds to the high-end of the signal. It can be used to add air, brightness and clarity without harshness. Thickness affects the low-end, it will fatten up just about anything! Virtual Mix Rack 25 Trimmer The Trimmer is a very useful Module which brings you few basic operations within the Virtual Mix Rack: a RMS and Peak Level Monitoring, a simple Trim control and a Phase Reverse Switch. When using it in the first slot, the Trimmer allows you to define how the signal will hit the following VMR module, with a precise output level monitoring. VU Meter The VU Meter displays the RMS level of the signal at the Output of the module. The meter is calibrated to display 0VU when being fed by a 1kHz sine wave with a Peak level of -18dBFS by default. You can recalibrate this level by adjusting the screw below. The calibration is a global setting, affecting all Trimmer modules in your session. Led Meter The Led Meter displays the Peak level of the signal at the Output of the module. The level is in dB Full Scale and going from -72dBFS to 0dBFS. Trim Knob The Trim Knob is a simple gain control, going from -24dB to +24dB. Phase Reverse Switch The Phase Reverse Switch is very classical: in Mono and Stereo, it flips the signal’s polarity for all channels. Virtual Mix Rack 26 FG-116 The FG-116 is the most precise digital replication of the classic American FET limiter. No expense was spared to capture every nuance of this classic sounding compressor / limiter. From its trademark timing characteristics to the extremely musical sound of its transformer, the FG-116 will give engineers the musical and fat tone that has made the hardware so famous. The FG-116 sounds great on everything like lead vocals, drums, and bass guitars. GR Meter Displays the amount of compression in dB. Input / Output Increasing your Input Gain will result in more compression. When Input + Output equals 48dB, then the unit has a unity gain, meaning that the signal that the output signal has the same level as the input signal. Moving the Input or Output Knob while holding the Shift key will link the two controls, meaning that the unit will keep an internal unity gain whatever your adjustment, giving you a very useful way to adjust the compression without being biased by a level change. Ratio Sets the amount of gain reduction. For example, if the ratio is set to 4:1: this means for input level 4dB over the threshold, 1dB will be output. Attack Controls the speed at which compression occurs after the signal has exceeded the threshold value. Turn clockwise for a fast attack, and counterclockwise for a slow attack. Shift+Click the Attack knob to turn toggle compression on and off. When set to off, the unit will bypass the compression, while continuing to process with the Input and Output Gains. This allows you to impart some nice transformer saturation, without reducing the dynamic range of the track. Virtual Mix Rack 27 Release Controls the speed at which compression stops, once the signal has fallen below the threshold value. Turn clockwise for a fast release, and counterclockwise for a slow release. Noise Reduction Disables the modeled noise. Mix Controls the blend between the compressed and uncompressed signals, which is very useful to achieve parallel compression without any additional routing. Virtual Mix Rack 28 FG-401 The FG-401 started as a recreation of the classic British console channel compressor, but morphed into quite a lot more. First, we gave it variable attack and release with increased range, adding more tonal options. We then added an optimal transformer inout, and not just any transformer, the famous transformer from the British Class A Console! This adds a beautiful warmth and sheen to the compressor. Last, we added an entirely unique second circuit path that provides and additional smooth and rich tone. The FG-401 is perhaps the most versatile mix compressor in the world that can sound good on any source you feed into it! GR Meter Displays the amount of compression in dB. Threshold Sets the point at which compression will occur after an audio signals amplitude exceeds this set level. Ratio The Ratio Knob adjusts the slope of the compression curve. Attack Controls the speed at which compression occurs after the signal has exceeded the threshold value. Turn to the left for a fast attack, and to the right for a slow attack. Release Controls the speed at which compression stops, once the signal has fallen below the threshold value. Turn to the left for a fast release, and to the right for a slow release. Virtual Mix Rack 29 Make-Up The Make-Up Gain parameter allows for adjusting the output level; to compensate for level reduction as a result of compression. It’s range is from -24dB to +24dB. Mix Controls the blend between the compressed and uncompressed signals, which is very useful to achieve parallel compression without any additional routing Transformer The Transformer Switch toggles the Transformer enablement. Circuit Toggles the FG-401’s processing between two circuits: Circuit 1 is punchier and more dynamic. Circuit 2 is more transparent and gives more space to the bass. Virtual Mix Rack 30 FG-N The FG-N is a digital recreation of one of the most classic discrete Class A British equalizers from the 70’s. All aspects of the circuit are modeled, including the rich harmonics and saturations that naturally occur when the equalizer is in use. The original model only contained one mid band, so we thought it would be nice to double it so that it has two mid bands. This equalizer is lush, fat, and bold. It sounds great on everything from drums to vocals, and can even add the perfect saturation to synth and electronic tracks. High-Shelf The High-Shelf has only one Gain Control. This band operates at a fixed frequency. EQ Bands 1 and 2 The EQ Bands have two controls: Frequency and Gain. Clicking on the frequency value labels will snap the Frequency Knob to the indicated value. Low-Shelf The Low-Shelf Band has two controls: Frequency and Gain. Clicking on the frequency value labels will snap the Frequency Knob to the indicated value. High-Pass Filter The High-pass Filter Frequency Knob controls the frequency of the high-pass filter. When set to "Off", the High-Pass is disabled. Line & Drive Line gain reduces the headroom of the equalizer, driving it into saturation and increasing the output level. You’ll notice it’s effect especially when using the filter gains. With Drive enabled, the Line gain output will be compensated by the same level that it is raised. Providing the same saturation effects without an increase in level.* * When disabling Drive, the Line knob will reset to 0dB. This is a simple UI link designed to protect your speakers and ears from a large jump in volume. Virtual Mix Rack 31 FG-S The FG-S is a digital recreation of one of the most famous British console equalizers from the 80’s. This equalizer also has rich harmonics and interactive mid bands with a fat musical tone. This is the ultimate workhorse mix eq that can be used on any track. It is great for surgical cutting strokes, or wide bell and shelf strokes for making drums and guitars punch out of the speakers. HF The High Filter section has three controls: Frequency, Gain, and Bell / Shelf switch.* The Bell Switch toggles the Filter between a Bell and a Shelf. HMF The High-Mid Filter section has three controls: Frequency, Q and Gain Knobs.* LMF The Low-Mid Filter section has three controls: Frequency, Q and Gain Knobs.* LF The Low Filter sections has three control : Frequency Knob, Gain Knob, and Bell/Shelf Switch.* The Bell Switch toggles the Filter between a Bell and a Shelf. Filter The Filter Frequency Knob controls the frequency of the High-Pass Filter. When set to "Out", the High-Pass is disabled. * Clicking on the frequency value labels will snap the Frequency Knob to the indicated value. Virtual Mix Rack 32 Virtual Channel and Mixbuss The Virtual Console Collection consists of two modules: Virtual Channel and Virtual Mixbuss. Each module allows the user to choose from one of six meticulously modeled consoles. The Virtual Channel was designed for use on individual mixing channels, while the Virtual Mixbuss should be the first module insert of the master fader. When using the Virtual Console Collection across a mix, your DAW takes on the personality of a real analog mixing desk. The imaging and depth improves, instruments sit better in the frequency spectrum, and mixing becomes easier and more musical. You can even push the DAW faders up to find each mixer's "sweet spot.” VU Meter & Reference Level Displays the RMS level of the signal just after the Console and before the Output gain. The VCC Channel and Mixbuss modules are calibrated to display 0VU when being fed by a 1kHz sine wave with a Peak level of -18dBFS by default. You can recalibrate this level by adjusting the screw below. The Reference Level is a global setting, per Channel and Mixbuss modules, affecting all Channel and Mixbuss modules in your session. Clip-LED The VCC Channel and Mixbuss are saturation modules. Above a certain input level proper to each consoles, the algorithm starts clipping, which means more saturation and non-linearities. As soon as the signal gets above the Clip Threshold, the Clip-LED lights. Thus, you can easily visualize how the signal behaves in the console. Input & Output Trim Input Trim adjusts the level pre-processing. Increasing the Input Trim will allow you to hit the Channel or Mixbuss harder. Boosting the Input Trim will have a different effect than boosting the Console Drive. Output Trim adjusts the level post-processing, which is useful for gain staging into following VMR modules. Virtual Mix Rack 33 Group I/O Group I/O allows to isolate the Input and Output section from the Group. Link I/O Link I/O allows for constant gain as the Input or Output Trims are adjusted.* Console Selects between the six console models. Console Drive Increases the nonlinear response of the selected console without increasing the output level. Drive can add more analog response without altering balances. Boosting the Console Drive will have a different effect than boosting the Input Trim. You can reduce the Console Drive level by turning it counterclockwise or add even more tone than before by pushing it all the way to 18! Group Assigns the VCC Channel or Mixbuss module to one of the eight groups. Noise Reduction Disables the modeled noise for each console model. Group Bypass Bypasses processing for the selected group. The Group Bypass state is identical to using the Power Button to bypass the module, but with the benefit of affecting every VCC module in the group. * Input & Output Link is a User Interface (UI) link only and therefore will not work when automation or hardware controllers are modifying the Input or Output Trims. Virtual Mix Rack 34 Grouping Groups make using the Virtual Console Collection very simple, quick, and intuitive. At its most basic use, you can just set all VCC Channels and the Mixbuss to the same group, emulating mixing through one console. You could also use several groups and make your own hybrid console! Grouped Parameters ๏ ๏ ๏ ๏ ๏ Input and Output Input / Output Link Console Console Drive Noise Reduction Grouping Operations Below are some rules that explain how grouping works with the VCC modules: ๏ ๏ ๏ ๏ ๏ When a VCC module is ungrouped, then the module uses the it’s own settings. When a VCC module is grouped, then the module uses the Group’s Settings. When a VCC module is joining an empty group, then the module keeps it’s own settings, and applies it to the group. When a VCC module is joining an occupied group, then the module takes on the settings of the group. When a VCC module becomes ungrouped, then the module keeps it’s last known settings. Tips Each Group label around the Group knob is clickable, allowing the user to directly select a Group, without having to scroll through the intermediate Groups. The Group’s Tooltips allow you to select a Group simply by typing the Group number. Virtual Mix Rack 35 The Consoles Every console has been optimized so that it matches the original tone of it's analog counterpart with absolute precision. In most of the consoles, you'll likely not hear a difference. However, the US-A and RC-Tube models were modified to match some new reference units that we obtained, and while the changes are very subtle, we think they are for the better and hope you'll agree! Brit 4k E This console models an early 80's British mixing desk that we were told about by many local LA engineers who were fans of the console's uniquely fat tone. This desk has a tight but punchy low end, warm low mid, and punchy and present mids. You can really hit the mix buss hard (do this either by pushing the faders into it OR by using the new input/out link), and it gives you an amazing saturation and makes transients sit in the mix much better. Brit N Discrete This classic desk has been a staple of the recording industry for over thirty years. Known for a rich, fat, and warm sound, it can add some classic vibe to your mixes. Brit 4k The most popular mixing console in the industry, this desk has a clean, punchy, wide, and slightly aggressive quality that has made it the go-to desk for rock, pop, metal, and hip hop. Push it hard to get some extra grit to the transients. US A Discrete One of the most sought after desks in the industry, this American made discrete console is known for a thick and fat tone with lots of vibe and midrange punch. Ψ Another classic British console, this desk is known for being the ultimate rock desk, with a wide soundstage, smooth highs, and fat low end. Push it hard for some extra fatness. RC-Tube The RC-Tube is based on a 50's, all tube broadcast desk. It has a super thick midrange, smooth high end, and fat and warm bottom end. Virtual Mix Rack 36 RC-Tube License & Feature Set RC-Tube is a feature-limited version of the Virtual Console Collection. If you have an RC-Tube license instead of a Virtual Console Collection license, the VCC Bundle modules will operate as follows: ๏ ๏ ๏ Console Models Brit 4k E, Brit 4k G, US A, Brit N, and Ψ will be dimmed. Console Models Brit 4k E, Brit 4k G, US A, Brit N, and Ψ may be selected, however, the VU Meter will not move and the selected Console will have no effect on the signal. The RC-Tube Console Model will not be dimmed and will process the signal when selected. If you purchase a Virtual Console Collection license, there’s no need to install additional software; simply move the Virtual Console Collection license to your iLok 2 dongle and all Console Models will be unlocked! Virtual Mix Rack 37 Custom Series EQ Introduction Shortly after the release of the Virtual Mix Rack last November, I found myself sitting in my Los Angeles studio staring at a rack of some of the industry’s finest analog equalizers. Some I had bought, some I had borrowed, some I had rented, but it didn’t matter, because on that day… they were all mine. My objective was straightforward, but it was not easy. I was going to patch in all of the EQs and use them on a few dozen reference mixes so that I could understand which would be the most complimentary to the two classic EQ’s that we already have in the Virtual Mix Rack, the FG-N and FG-S. But what ended up happening was way beyond what I had in mind... I started combining multiple EQ’s on various tracks to form hybrid equalization sounds that I found to be superior to any single EQ. Within a month, I had developed the concept of an EQ where every single band’s boost and cut was customized with combinations of the best analog filters so that it could be the most musical and intuitive tone shaping processor for modern audio production. The Custom Series Equalizer was born. Virtual Mix Rack 38 Boosts So many equalizers have the same behaviour throughout their entire spectrum. The curve style and nonlinear sound of all the filter bands are clones of one another. But I began to realize that for the perfect EQ, this did not make sense. To make the most intuitive and musical equalizer that would be best suited for a wide variety of sources, the boosts would have to all be unique to their specific job and role. Each boost filter would have to be customized. Boosting the Highs For high end boosts, the goal is clarity, depth, and musical sheen. I noticed that I could achieve a lot of these aspects with a famous tube EQ boost on the highs. It was so smooth and lush. But then I started adding a bit of an old mastering eq on the highs to combine it with the tube eq to make a hybrid boost. This was an even more magnificent sound on both individual tracks and full mixes. Boosting the Upper Mids I realized that for upper mids, I wanted something broad and present that wouldn’t have the nasal and honky sound that I’d experienced in some other EQ’s. So by combining some of the upper bands of some discrete analog EQs, I made yet another unique tone that became my new standard for what an upper midrange boost should sound like. Boosting the Low Mids For the low mids, I found that combining another old tube EQ and a solid state American EQ gave me a boost that was warm and thick, but not too boxy. It could add body without adding mud. Boosting the Lows Finally, on the lows, I combined the boost of two different mastering EQs and after a week of tweaking the proportional gains and setting the ideal bandwidths, I created one of the most perfect sounding low filters I’ve ever heard. It was massive, punchy, and deep, yet focused and clear. Virtual Mix Rack 39 Cuts After working on boosts, I began to use a transparent modern mastering EQ to experiment with cuts. My goal was to create attenuation shapes that accomplished exactly what most people are looking for when cutting frequencies, which is to remove the bad aspects of the sound that you dislike, without removing the aspects of the sound you DO like ! Cutting the Highs For high end cuts, you want to attenuate the thinness and tinny aspects of the source, but not dull it. I was able to create a shape that could do this quite elegantly and musically. Cutting the Upper Mids The upper mid cut is very important, because you want to take out the honkiness and nasal sounds without losing impact and presence. Again, after a lot of work, I figured a way to accomplish this harmonious compromise. Cutting the Low Mids and Lows For the low mids and lows, you want to remove the boxiness but not the warmth. And for lows, you want to remove the boominess but not the body. Using customized curves, I was able to figure out the perfect method to meet these goals. Virtual Mix Rack 40 Creating the Custom Series EQ Once I had the entire topology complete in the analog domain, the Slate Digital team and I carefully recreated the exact tonality and function of this extremely hybrid equalizer in digital form, with precise attention being paid to every musical detail. This attention was especially crucial when dealing with the range and proportions of the the hybrid filters and their unique harmonics. When all was done, I had created what many of my trusted industry colleagues are calling the ALL STAR of equalizers. Every cut and boost is inspired by classic analog equalizers in unique proportional combinations, with a custom harmonic profile to give each band the perfect musical tone.You’re going to hear smooth and clear highs, present and punchy mids, warm low mids, and massive lows that stay focused and clear. Each band contains three fixed frequency settings, and due to the wide tonal shape of the filters, this covers a lot of ground. This is by no means a surgical EQ ! And then to top it all off, we added some extremely slick high and low pass filters. Conclusion Overall, the Custom Series EQ is the ultimate companion to the FG-N and FG-S. Whereas these two existing VMR EQs are strong, bold, and loaded with character, the Custom Series EQ can be more slick, cohesive, and broad. On light boosts it can sound so natural that it doesn’t sound like the track has ever been EQ’d. On stronger boosts, it can add a beautiful color and character without sounding artificial or overdone. It is truly, the All Star of equalizers! Virtual Mix Rack 41 Custom Series Lift Introduction The story of the Custom Series Lift also begins with that same rack of analog equalizers. As I began pulling up old mixes so that I could have some fresh tracks to hear the EQs on, I suddenly realized something that seems so obvious now. A lot of tracks, and even full mixes, required a pretty universal processing: They needed to be brighter and more present in the mix, fatter and deeper in the mix, or a bit of both. I began using some of our analog modeled filter algorithms to create a series of high end and low end parallel curves that had custom output stages using musical harmonic profiles. Eventually, I ended up with two curves, one which lifted the entire upper frequencies in a natural and musical way, and the other that lifted the entire low end frequencies, also in a very natural and musical way. I started using these two Lift processes on some tracks and was stunned at the results. With one knob, I could accomplish my processing goals instantly. I had a snare drum that was a bit dull and boxy. Adding some Hi Lift added sizzle and upper midrange punch, and some Low Lift added the perfect weight and body. Soon I tweaked each of the LIFTs so that there were two unique options for each one. Virtual Mix Rack 42 Hi Lift ‘Present’ This effect focuses a bit more on lifting upper midrange frequencies and contains customized harmonics for amazing presence and impact. It sounds wonderful on drums, vocals, guitars, bass, and full mixes. Hi Lift ‘Silky’ This effect focuses a bit more on the higher ‘silky’ frequencies and adds the perfect clarity and depth. Acoustics, vocals, and full mixes can all benefit from this effect. Low Lift ‘Big’ This effect adds a solid fat weight to the lows in an even and broad stroke. Anything that needs to be bigger and fatter will be the perfect match from this effect. Low Lift ‘Punchy’ This effect has a bit more of a defined resonance and will add amazing punch to the lows. It’s incredible on drums, full mixes, and electronic music. Conclusion Overall, the Custom Series Lift is going to be another amazing tool for your virtual analog arsenal that will get your ideas out faster and more intuitively, using only one knob to accomplish major audio tasks. I hope you use them to make the best sounding music of your career. Happy Mixing! Virtual Mix Rack 43 FG-Bomber Introduction One of the qualities of a great mix is its ability to transcend the music out of the 2 dimensional speakers, and to transcend it into the listening space, creating a 3D impact that allows the listener to feel like he or she has become part of the music. This 3D quality has always been one of the most difficult to achieve, but pro engineers have accomplished it with clever use of compression, eq, and fx. But at Slate Digital, we decided to decode the mystery once and for all. And so with the use of all of our analog know-how and expertise, we created a process that with only three knobs, can increase impact and dimension, enhance energy and liveliness, improve front to back depth, add tons of punch, and make sounds explode out of your speakers. And that’s why we call it the FG-BOMBER. The FG-BOMBER has the most complex internal circuit path of any plugin we’ve created. To get its unique effect, it combines all analog modeled transient processing, dynamic frequency manipulation, specialized compression, tube saturation, harmonic generation, filtering… there is a ton behind the scenes. But we’ve condensed all of these processes into a simple interface with just four knobs. Drive The Drive sets the level that is sent to the processing network. We’ve set a marking on the Bomber meter (the little bomb icon) so that you can set the internal level in a way that is most optimized for the intended effect, but of course you can get great tone if you experiment beyond this level. Intensity The Intensity parameter adjusts how much of the effect is mixed in with the signal, and can be as little as a few percent to add some extra imaging to full masters, or cranked to create unique effects for drum mics and vocals. Tone The Tone parameter changes the character of the effect. ‘Present’ focuses the effect on the mid frequencies, and will increase the transient impact sometimes dramatically, as well as extend the sustain and width. ‘Fat’ will also increase the transient impact and depth in a lush and ‘fat’ way where the low end will become bigger and wider. ‘Tight’ is the most evenly balanced of the three tone settings, and will add clarity, punch, and tightness to the lows. Virtual Mix Rack 44 Output Trim Finally, an output trim controls the overall output of the entire module. Metering The Meter is monitoring the input signal after the Drive. Its goal is to show, through the bomb icon which corresponding to the sweet spot, how hot the signal should enter the effect for it to sound good. Getting Started with FG-Bomber Drum buss You may want to remove some compression if you have it on, just so you can really get to know the effect first. Note that it can work in conjunction with drum buss compression. Put it on Fat, adjust Drive so that it’s peaking at Bomb, and slowly mix in the intensity. IMPORTANT, depending on the source material, it could be a very strong effect so sometimes it only needs a very little bit of intensity to make things sound amazing. But other times blending the effect in heavily can sound really huge. I have a really cool example where I recorded a drum-kit with ONE mic in front of the kit. Using Bomber on Present, I was able to make it sound like I had close mics on the kit too, it was pretty incredible. Mixes/Masters Here I would probably use Fat or Tight, and a little goes a long way. Hit the Bomb icon on the meter, and then slowly blend it in. You’ll notice the mix starts to take on a more 3D effect, the percussion gets punchier, the vocal gets clearer. For Mastering when you are hitting a limiter that is crushing the impact of the mix, Bomber can pre-compensate in a way that makes everything sound just like the mix. Vocals Bomber can make the vocals sound much more articulate and clear. This is especially true when you compress a vocal first to make it sit in the mix. Sometimes the consonances of the words become a bit muffled, and Bomber can bring it back. Try it on Present and see if that makes the vocal pop, and again, sometimes all it takes is just a little turn of the intensity knob for it to work. Bass Bomber can make a bass sound incredible. Try it post compression on the present setting, and in this case play with the Drive and Intensity to see where it makes the bass pop out in an expressive way. Virtual Mix Rack 45 Playing with Drive/Intensity Interaction The Drive and Intensity are very interactive. Get to know how they play off each other. You can decrease the percussiveness of the effect by overloading the drive past the Bomb icon, and then compensating with less (but sometimes more!) Intensity. Conclusion The FG-BOMBER can be used to enhance the impact and dimension of any track or mix. Used with low intensity, it can be the perfect process to ‘wake up’ a mix that needs some more excitement. On vocals, it can increase the clarity of the words, and make the vocals stand out more in busy mixes. For drums, it can be used on the buss to make them more punchy, lively, and deep. Overall, the FG-BOMBER will be the perfect companion to your other Slate Digital tools, and will ensure your mixes stand out above the rest! Virtual Mix Rack 46 iLok Protection 3rd Party iLok License Transfer Fee When reselling any Slate software product, there will be a $10 License Transfer Fee in order for us to process the new customer into our user database. It is the responsibility of the seller to inform the buyer of this fee at the time of sale. Protection Messages and Statuses The Virtual Mix Rack Plugin have two different kinds of Licenses: • Rack License • Modules/Modules Bundles Licenses During the DAW plugin scan, if you don’t have the Rack license on your iLok or if your iLok is unplugged, then you will get this panel: From this panel, by clicking on “Activate”, you will be able to move the Rack License to your iLok, without using the iLok License Manager. Virtual Mix Rack 47 In the DAW session, if you suddenly don’t have the Rack License on your iLok or if your iLok is unplugged, then you will get this panel: By activating the Rack License through iLok License Manager or replugging your iLok, this panel will disappear. Virtual Mix Rack 48 If you have the Rack License, but then you don’t have one specific Module’s License on your iLok, then only this Module will be disabled in your Rack, and the Information Panel will display a specific message: If you own the specific Module’s License, by clicking on “Activate”, you will be able to move the Module’s License to your iLok, without using iLok License Manager. Virtual Mix Rack 49 Contacting Support All technical support inquiries must be logged through our help desk for attention. Please login to your help desk account at Slate Digital Support. Click "Ask A Question..." and choose the respective category relevant to your product/query. And, be sure to include the information log within the ticket comments or as an attachment… User System and Hardware Information Log • Open the About panel. • Right click on the version number to open a menu "Copy plug-‐in info to clipboard", click it. • Open a text editor, an e-‐mail or a support Acket, and paste. Example of informa.on displayed: Plugin & Host Informa2on: -‐-‐-‐-‐-‐-‐-‐-‐-‐-‐-‐-‐-‐-‐-‐-‐-‐-‐-‐-‐-‐-‐-‐-‐-‐-‐-‐-‐-‐-‐-‐-‐-‐-‐-‐-‐-‐-‐-‐-‐-‐-‐-‐-‐-‐-‐-‐-‐-‐-‐-‐-‐-‐ Version: <version number> -‐ 64 bit Build: <build number> <date> <2me> Format: <VST, AudioUnit, RTAS, AAX> Host: <DAW name> OS Informa2on: -‐-‐-‐-‐-‐-‐-‐-‐-‐-‐-‐-‐-‐-‐-‐-‐-‐-‐-‐-‐-‐-‐-‐-‐-‐-‐-‐-‐-‐-‐-‐-‐-‐-‐-‐-‐-‐-‐-‐-‐-‐-‐-‐-‐-‐-‐-‐-‐-‐-‐-‐-‐-‐-‐-‐-‐-‐-‐-‐-‐-‐-‐-‐-‐ Name: <opera2ng system name and version> 64 bit: yes Hardware Informa2on: -‐-‐-‐-‐-‐-‐-‐-‐-‐-‐-‐-‐-‐-‐-‐-‐-‐-‐-‐-‐-‐-‐-‐-‐-‐-‐-‐-‐-‐-‐-‐-‐-‐-‐-‐-‐-‐-‐-‐-‐-‐-‐-‐-‐-‐-‐-‐-‐-‐-‐-‐-‐-‐-‐-‐-‐-‐-‐ CPU: Unknown Num cores (per cpu): 4 Num cores (total): 16 Speed: 2400 MHz Max Cache: 12582912 bytes CPU Flags: <mmx, sse, sse2, sse3, ssse3, sse4.1, sse4.2, etc...> RAM (MB): 8192 Page size: 4096 Language Informa2on: -‐-‐-‐-‐-‐-‐-‐-‐-‐-‐-‐-‐-‐-‐-‐-‐-‐-‐-‐-‐-‐-‐-‐-‐-‐-‐-‐-‐-‐-‐-‐-‐-‐-‐-‐-‐-‐-‐-‐-‐-‐-‐-‐-‐-‐-‐-‐-‐-‐-‐-‐-‐-‐-‐-‐-‐-‐-‐ User Lang: <FR, ENG, GER, etc...> Region: <FR, ENG, GER, etc...> Display Lang: <FR, ENG, GER, etc...> Virtual Mix Rack 50 Making the Virtual Mix Rack By Fabrice Gabriel The VMR started with two main ideas. Steven had the idea of a horizontal rack much like the beloved 500 series that would allow engineers to have an entire track’s mix chain on the screen at once. This would also allow engineers the ability to easily change the workflow of mixing, making it closer to what people are used to do in analog, with all the processors next to each other, with all their parameters accessible at the same time. And of course we wanted to create modules that would bring the sensation of analog mixing in the digital world with simplicity of use and the extraordinary sound that is scientifically analyzed, and approved by extensive listening. For the first idea, I have to say that our development team did an amazing job, taking care of all the workflow details in a way that would make the Virtual Mix Rack a new experience in the digital world. It needed to be fluid, simple, and very reactive. Here the idea was to combine the straightforward aspect of analog gear mounted in a rack, with all the flexibility that software can bring. For the second idea, we had to use all our knowledge from our past experiences, and bring it even further. Because the VMR is intended to be used in mixing situations, not only it has to sound perfect, but it also has to be very CPU efficient. The sonic characteristics of each processor took an incredible amount of effort. Starting with the compressors: the complexity of the FET compressor the FG-116 circuit’s behavior has been inspired from has been very carefully reproduced. There are many aspects that make the sound of this processor special : the capacitors coupling, their charging/ discharging behavior, the feedback circuit structure, and of course all the saturation and transformer aspects. It was definitely the hardest processor to make right, because of its highly leveldependent reactions, in all aspects. And the original is so legendary, that we didn’t want to miss any aspect of it! After so many hours of fine tuning, algo tweaking, and listening sessions, we now have a beautiful compressor that replicates the snappiness of the original, its raw dynamics, its saturation and bass warmth, and its very specific timing behavior. We developed the FG-401 with the intentions of being one of these classic compressors that can be used in many different situations, that’s why it has several settings. We initially modeled it from several VCA designs, but then gave it some modifications that allows it to be more versatile by adding new sonic options. Here it was very interesting to get creative, and that’s why the circuit 1 and circuit 2 will be very diverse options for a variety of tracks. Virtual Mix Rack 51 For the EQs, the challenge was to reproduce the feeling that you have when using an analog EQ, which relies on very tiny details, all which need to be taken into account. This includes the way the EQ circuit saturates, the structure of its bands, the band interaction for the FG-S, the transformer for the FG-N, and the critical filter shapes. All of this was carefully analyzed and recreated in the algorithms. The FG-S has a parallel topology for the two upper and two lower bands, so the HF and HMF bands, as well as the LF and LMF bands interact together. This is a key characteristic of the FG-S, and make this EQ extremely musical. A lot of work has been done by the team to reproduce this behavior perfectly, as well as integrating the different “issues” that the original circuit introduces, which also add to its musicality. For the FG-N, again the work of the team has been extraordinary, from transformer behavior or the curves matching, to the precise way with which original circuit deals with saturation and harmonics. In order to reproduce legendary analog feeling of this processor, all the tiniest details had to reproduced, without distinction. the the the be I’m very proud of the collective effort that made the Virtual Mix Rack and its modules a reality, the team effort was incredible and everyone was focused on the main goal: providing the best experience of analog feeling in the digital world. Fabrice Gabriel CTO Slate Digital