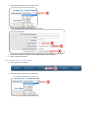
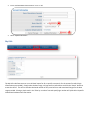
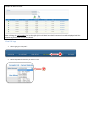
1
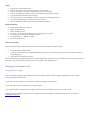
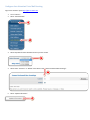
4C’s CCS User Manual
Cloud Communication Solutions
TABLE OF CONTENTS
END-USER PORTAL ACCESS & MANAGEMENT ............................................................................................................................ 4
LOGIN TO CUSTOMER ADMIN PORTAL HTTP://DPS.4C-COMM.COM .................................................................................................. 4
LOGIN DEFAULT VIEW(S) ........................................................................................................................................................ 4
MY ACCOUNT: ............................................................................................................................................................................ 5
LINE SETUP ................................................................................................................................................................................. 6
UPDATE USERNAMES AND PASSWORDS FOR WEB ACCESS ............................................................................................................... 6
HOW TO EDIT LINE / DIRECTORY INFORMATION ........................................................................................................................... 7
SETTING UP CALLER ID........................................................................................................................................................... 8
HOW TO EDIT CALLER ID INFORMATION..................................................................................................................................... 8
HOW TO BLOCK CALLER ID INFORMATION .................................................................................................................................. 9
MY CALLS ................................................................................................................................................................................. 10
VIEW CALL LOGS ................................................................................................................................................................ 11
MY MESSAGES:......................................................................................................................................................................... 13
FEATURES: ................................................................................................................................................................................ 13
SMS CALLBACK ................................................................................................................................................................. 13
VOICEMAIL OPTIONS ................................................................................................................................................................ 14
UPDATE YOUR PERSONAL GREETING ....................................................................................................................................... 15
EDIT VOICEMAIL PASSWORD ................................................................................................................................................. 16
EDIT VOICEMAIL PROMPT LEVELS ........................................................................................................................................... 17
CHANGING THE 'RING TIME' BEFORE VOICEMAIL ANSWERS? ........................................................................................................... 18
ANNOUNCE TIME AND DATE WHILE LISTENING TO VOICEMAIL ........................................................................................................ 19
“AUTO PLAY” WHILE LISTENING TO VOICEMAIL........................................................................................................................... 20
EDIT VOICEMAIL TO EMAIL DELIVERY SETTINGS ........................................................................................................................... 21
FORWARD VOICEMAIL TO ANOTHER PHONE ............................................................................................................................... 21
REMOTE ACCESS FOR VOICEMAIL ........................................................................................................................................... 22
ACCESS VOICE MAIL THROUGH END USER PORTAL ....................................................................................................................... 24
HOW TO ACCESS AND RECORD VOICEMAIL MESSAGES ............................................................................................................ 24
METHOD 1: IP PHONE (USE THIS GUIDE WHEN YOU HAVE PHYSICAL ACCESS TO YOUR IP PHONE) ............................................................ 24
METHOD 2: IP PHONE ALTERNATE (USE THIS GUIDE WHEN YOU DO NOT HAVE PHYSICAL ACCESS TO YOUR IP PHONE) ............................... 24
METHOD 3: VIRTUAL VOICE MAILBOX (USE THIS GUIDE TO SETUP AND MANAGE A VIRTUAL VOICE MAIL BOX) ............................................ 24
METHOD 4: CHANGE VOICE MAIL FOR AN AUTO ATTENDANT (THIS IS ONLY USED WHEN YOU SET 'VOICE MAIL' FOR A NUMBERED OPTION) ....... 24
*TO FIND YOUR IP PHONE ACCOUNT NUMBER .......................................................................................................................... 25
**TO LOOK UP OR CHANGE YOUR VOICE MAIL PASSWORD PLEASE FOLLOW THESE STEPS: ALL IP PHONES USE INTERNAL EXTENSIONS. .............. 25
SETTING UP VOICE MAIL TO EMAIL “WHITE LISTS” ................................................................................................................... 25
MICROSOFT OUTLOOK: ........................................................................................................................................................ 26
MSN HOTMAIL: ................................................................................................................................................................ 27
GMAIL: ............................................................................................................................................................................ 27
YAHOO! ........................................................................................................................................................................... 28
NETSCAPE WEB MAIL: ......................................................................................................................................................... 28
AMERICA ONLINE (AOL): ..................................................................................................................................................... 28
MANAGING AUTO ATTENDANT (IVR) ....................................................................................................................................... 28
CHANGE IVR RECORDING ..................................................................................................................................................... 28
CONFIGURE AUTO ATTENDANT VOICE MAIL GREETING ................................................................................................................ 29
CONFIGURE AUTO ATTENDANT VOICE TO EMAIL MAIL DELIVERY .................................................................................................... 30
HOW TO FORWARD AUTO ATTENDANT VOICEMAIL TO ANOTHER PHONE ........................................................................................... 31
MANAGING FIND-ME-FOLLOW-ME .......................................................................................................................................... 32
HOW TO DEACTIVATE FIND ME / FOLLOW ME .......................................................................................................................... 32
HOW TO ACTIVATE FINE ME / FOLLOW ME .............................................................................................................................. 33
HOW TO FORWARD ALL CALLS TO ANOTHER PHONE ..................................................................................................................... 34
ABBREVIATED DIALING:............................................................................................................................................................ 37
HOW EDIT OR UPDATE ABBREVIATED DIALING RULES .................................................................................................................. 37
AUTO ATTENDANT ................................................................................................................................................................... 38
SETUP AUTO ATTENDANT CALL TREE ....................................................................................................................................... 39
EDIT GREETINGS IN YOUR AUTO ATTENDANT ............................................................................................................................. 41
SETUP TIME DEFINITION FOR AUTO ATTENDANT ........................................................................................................................ 43
DID MANAGER ......................................................................................................................................................................... 48
EDIT DIRECT INWARD DIALING (DID) RULES ............................................................................................................................. 48
MANAGING RING GROUPS ....................................................................................................................................................... 49
CREATING RING GROUPS ...................................................................................................................................................... 50
EDIT RING GROUP NAME ..................................................................................................................................................... 51
EDIT RING GROUP ORDER .................................................................................................................................................... 52
SETUP TIME DEFINITION FOR RING GROUPS .............................................................................................................................. 53
End-user Portal Access & Management
The portal is web based and can be accessed from anywhere you have an internet connection. The URL is http://dps.4ccomm.com. Once opened, you must log in using either your customer username or password, provided by 4C
Communications Customer Care or a specific account number and user specified password, assigned through the portal
for individual users to manage their accounts without system wide access. Use the Tab bar to navigate the different
areas of the members’ portal
Login to Customer Admin Portal http://dps.4c-comm.com
1.
2.
3.
Enter “User Name”
Enter “Password”
Select “Submit”
1
2
3
Login Default View(s)
Upon Logging in, you will see the Overview page. This screen provides at-a-glance information on the last 10 calls made.
Using your customer login, information will be provided on an office wide basis while account level access is limited to
account specific information. (See Line Setup description for information on configuring account level access.)
My Account:
The My Account tab displays current address, billing and invoice related information. This section allows you to update
company contact information, credit card information to facilitate automatic payment and to view a summary of both
current and past billed invoices. Located at the bottom of the ‘Account Information’ section of the My Account tab is
the Change Master Password tool. This allows you to change the Customer Level access password. Changes will not
take effect until the ‘Update Information’ is clicked to confirm a change.
Line Setup
The Line Setup tab allows you to make changes to specific accounts active within your phone system. The Line
Information is included for reference only, while the Account Information is user manageable and should always reflect
the contact information for the current user. At the bottom of the Account Information section, you will find the
account specific password. As mentioned earlier, account level access can be provided to allow individual users to
manage their own account features while restricting access to other accounts.
Update Usernames and Passwords for web access
1.
After Login go to “Line Setup”:
1
2.
Select Dropdown for Account you want to edit:
2
(Scroll to the bottom of the page)
3
4
5
6
3.
4.
5.
6.
Update “Login” field
Update “New Password”
Update “Confirm Password”
Select “Update Account Information”
How to Edit Line / Directory Information
After Login go to “Line Setup”
Select Dropdown for Account you want to edit
In the “Name / Description of account:” field Edit the “User Name”
In the “Email” field edit the “User Email”
Select “Update Information”
Contact Support at 1(707) 676-8913 or email [email protected] and request they “rebuild your configuration file”
After Confirmation from support reboot your phone.
Setting up Caller ID
Login to end user portal at http://dps.4c-comm.com
1.
Click “Line Setup”
1
2.
3.
4.
5.
From the “Select Account” drop down menu, select the extension you’d
like to change the caller ID
2
Verify that “Block Caller ID” is set to “No”
For the “Caller ID Number” update the dropdown to the number to be displayed
Select “Update Information
3
4
5
How to Edit Caller ID Information
Login to end user portal at http://dps.4c-comm.com
1.
After Login Select “Line Setup”:
1
2.
Select Dropdown for Account you want to edit:
2
3.
Ensure the field labeled “Block Caller ID” is set to “No”:
3
4
5
4.
5.
Select Phone Number in Dropdown next to field labeled “Caller ID Number”
Select “Update Information”
How to Block Caller ID Information
1.
After Login go to “Line Setup”
1
2.
Select Dropdown for Account you want to edit:
2
3.
Ensure the field labeled “Block Caller ID” is set to “Yes”
3
4
4.
Select “Update Information”
My Calls
The My Calls tab allows users to run a call detail report for all or specific accounts (or for the account for which login
information was provided). Simply select the date range, call type and line information and click the ‘Search’ button to
create the call list. The call list includes calculated number of calls, total call time and associated charges for the date
range provided. Placing a check-mark in the ‘Filter by a number’ box and specifying a number will yield caller-id specific
inbound and outbound call information.
Sample call detail records:
Note: clicking the ‘call: number’ link to the right of the call detail record will connect the number displayed with the
account to/from which the call was placed.
View Call Logs
1.
After Login go to “My Calls”:
1
2.
Select Dropdown for Account you want to view:
2
3.
4.
Select the “From Date” field:
Select the “To Date” field:
3
4
5
6
7
Select the type of call you want to view:
•
•
•
5.
To filter query by number
•
•
6.
All
Placed Calls
Received Calls
Select Check Box Next to “Filter by Number”
Input Number into “Filter by Number” field:
Select Hover Button Next to “Show Calls From” field:
•
•
Selected Account
All Accounts
7. Select “Search”
My Messages:
The My Messages tab displays the time stamp and caller id information for voicemail messages and faxes
(depending on account type) associated with a particular account. As a voicemail message is left on a user’s phone,
the phone voicemail indicator will blink, a stuttered dial-tone will be heard when initiating a call and the message
will be posted in the My Messages list. Messages can be managed from the phone or My Messages Tab.
Additionally, messages will be sent as an email attachment to the email address specified on the My Account tab, by
default, or the address specified in the ‘Voicemail Options’ section of the Features Tab. (see below for more details)
Features:
The features tab is home to a host of system specific call management
options. Depending on account type your feature set will include some,
if not all of the features described below. Information on additional
features can be obtained by contacting your account executive or 4C
CommunicationsCustomer Care.
SMS Callback
SMS callback allows a user to initiate a long distance or international phone call from a mobile phone simply by sending
an SMS or text message to TelCentris. A text from a registered mobile phone number must include only the destination
number. A few seconds after the message is received, our system dials the user’s mobile phone and the destination
number then bridges the call. This feature allows our users to call anywhere on the planet while taking advantage of our
inexpensive per minute rate, and only paying for the incoming cell phone call. While registering a mobile phone to our
system is the most convenient way to use the SMS callback functionality, the SMS callback feature page demonstrates
the format for including the account information necessary to use ANY mobile device to initiate a phone call between
ANY two phone numbers anywhere in the world. Please see the SMS callback page for more details.
Voicemail Options
The Voicemail Options Feature page allows users to manage greetings, time until answer, password and delivery
options. All voicemail options can be managed both from this feature page and by following the voice prompts when
dialing *98 from a user’s phone. The primary advantages of the web management interface are: 1) the ability to upload
professionally recorded greetings and point of service sales messages and 2) the ability to specify where messages are
delivered. Messages can be delivered to a specified email address and/or another phone in your office.
Update your Personal Greeting
1.
2.
After Login go to “Features”
“Voicemail Options”:
1
2
3.
Select Dropdown for Account you want to edit:
3
Under “Greetings” Heading
4.
Select what greeting you would like for people to hear:
4
•
•
•
•
Extended Absence
Personal
Name
Standard
5.
Select “Update Information”
5
Edit Voicemail Password
1.
2.
After Login go to “Features”
“Voicemail Options”:
1
2
3.
Select Dropdown for Account you want to edit:
3
Under “Voice Menu” Heading:
4
4.
Edit “Password” Field (All Voice Mail Passwords are default to “777”)
5.
Select “Update Information”
5
Edit Voicemail Prompt Levels
1.
2.
After Login go to “Features”
“Voicemail Options”:
1
2
3.
Select Dropdown for Account you want to edit:
3
Under “Voice Menu” Heading:
4
4.
Edit “Prompt Levels” Field
•
•
•
5.
Standard
Extended
Rapid
Select “Update Information”
5
Changing the 'ring time' before voicemail answers?
To modify the amount of time a phone will ring before the call is passed to the
1
user(s) voicemail, follow the steps below:
2
Log into the members portal at http://dps.4c-comm.com
1.
2.
Click on the ‘Features’ tab
Select ‘Voicemail Options’ from the drop down box.
3.
Click the ‘Select Account’ drop down menu and select the extension
#/name of line you wish to modify
4.
In the ‘Timeout’ section, change the ‘Time until voicemail picks up’ value to
reflect the seconds of desired ring time.
(As a guideline assume roughly four (4) seconds per ring.)
5.
Click the ‘Update Information’ button at the bottom of the screen to save changes.
3
4
Announce Time and Date while listening to voicemail
1.
2.
After Login go to “Features”
Select “Voicemail Options”
1
2
3.
Select Dropdown for Account you want to edit:
3
Under “Voice Menu” Heading:
4
4.
5.
Select Check Box next to “Announce Date & Time” field
Select “Update Information”
5
“Auto Play” while listening to voicemail
1.
2.
After Login go to “Features”
Select “Voicemail Options”
1
2
3.
Select Dropdown for Account you want to edit:
3
Under “Voice Menu” Heading:
4
4.
5.
Select Check Box next to “Auto Play” field:
Select “Update Information”
5
Edit Voicemail to Email delivery settings
1.
2.
After Login go to “Features”
Select “Voicemail Options”
1
2
3.
Select Dropdown for Account you want to edit:
3
Under “Voicemail Delivery” Heading:
4
4.
5.
Edit “Voicemail to Email” field (enter desired email)
Select “Update Information”
5
Forward Voicemail to another phone
1.
2.
After Login go to “Features”
Select “Voicemail Options”
1
2
3.
Select Dropdown for Account you want to edit:
3
Under “Voicemail Delivery” Heading:
4
5
4.
5.
6.
Select Hover Button next to “Send voicemail to another phone”
Select Account in Drop down box
Select “Update Information”
6
Remote Access for Voicemail
To check your voicemail from any phone follow these simple steps:
From any phone dial 1(707) 676-8915
Enter your account number and press # if you do not know your account number:
Log onto the member portal at http://dps.4c-comm.com
1.
Click "Line Setup" on the top:
1
2.
Select your account or extension from the drop down
2
3.
You will find your account number under the "Line Information" section. (The Default Password is 777#):
3
Access Voice Mail through end user portal
Login to Customer Admin Portal http://dps.4c-comm,com
Enter “User Name”
Enter “Password”
Select “Submit”
Select “My Messages”
Click the ‘Select Account’ drop down menu and select the extension #/name of line you wish to check
How to Access and Record Voicemail Messages
The following guide will describe 4 methods to record a new message and access your voice mail settings for various 4C
Communications Accounts. Please use the guide which best fits your needs
Method 1: IP Phone (use when you have physical access to your IP Phone)
Method 2: IP Phone Alternate (use when you DO NOT have physical access to your IP Phone)
Method 3: Virtual Voice mail Box (use to setup and manage a Virtual Voice mail box)
Method 4: Change Voice mail for an Auto Attendant (this is only used when you set 'voice mail' for
a numbered option)
Please review the diagram below before moving on to the detailed guides below. This diagram describes the Menu Functions of your
4C Communications Voice mail box. The red boxes below represent numbers on your phone's keypad, while the accompanying text
describes the result of the pressing the number.
Method 1: IP Phone (use this guide when you have physical access to your IP Phone)
1) Access your voice mail from your IP phone by dialing *98
2) Referencing the guide above, press 3 for 'personal options' >> then press 3 for 'greetings'
3) Now, depending on the type of message you would like to record, press 1, 2, or 3 and follow the
prompts. (the most common option will be #2)
Method 2: IP Phone Alternate (use this guide when you DO NOT have physical access to your IP Phone)
1) From any phone dial (707) 676-8915
2) Enter your account number and press # (see * below for instructions to lookup your account number)
3) Enter your password and press # (see ** below for instructions to lookup your voice mail password)
Method 3: Virtual Voice mailbox (use this guide to setup and manage a Virtual Voice mail box)
1) From any phone dial (707) 676-8915
2) Enter your account number and press # (see * below for instructions to lookup your account number)
3) Enter your password and press # (see ** below for instructions to lookup your voice mail password)
Method 4: Change Voice mail for an Auto Attendant (this is only used when you set 'voice mail' for a numbered option)
1) From any phone dial (707) 676-8915
2) Lookup your Auto Attendant account number by following the instructions under the * footnote below
3) Enter your Auto Attendant account number and press #
4) Enter your password and press # (see ** below for instructions to lookup your voice mail password)
*To find your IP Phone Account Number
(All IP phones use internal extensions. The Telephone number that may ring on your phone will not be the account number for that
phone therefore you must enter your IP phone account number which can be found in your member portal. To find your IP Phone
account number)
a) Log onto the member portal at http://dps.4c-comm.com
b) Click "Line Setup" on the top of the members portal
c) Select your account or extension from the drop down list at the top
d) You will find your account number under the "Line Information" section
**To look up or change your Voice mail Password please follow these steps: All IP phones use internal
extensions.
a) Log onto the member portal at http://dps.4c-comm.com
b) Click "Features > Voice mail Options" on the top of the members portal
c) Select your account or extension from the drop down list at the top
d) You will find your voice mail password under the Voice mail section
Setting up voice mail to email “White Lists”
Login to the member portal – http://dps.4c-comm.com
1.
2.
Click on the 'features' tab
Select 'Voice Mail Options'
1
2
3.
4.
Verify that the 'Voicemail to Email' button is selected
and that the email address specified is correct.
3
4
If this feature is configured correctly and you are still not receiving your voicemail or faxes, your junk email filter may be sending
them directly to a folder other than your inbox. The following are instructions for configuring some popular email applications to
properly direct your inbound messages or to make sure that junk mail policies do not redirect your mail from our mail server.
Microsoft Outlook:
Go to the ‘Tools’ menu.
• Select ‘Options’.
•
Select ‘Junk E-mail’ button:
•
Select ‘Safe Senders’ tab:
•
Select ‘Add’ button:
•
•
•
•
Type in ‘messaging.xeex.com’.
Select ‘OK’ button for the ‘add address or domain’ menu.
Select ‘OK’ button for the ‘junk e-mail options’ menu.
Select ‘OK’ button for the ‘options’ menu.
MSN Hotmail:
•
•
•
•
•
•
•
•
Click on the 'Options' link in the top right corner of the screen.
Click on 'Junk E-Mail Protection'.
Click on 'Junk E-Mail Filter'.
Verify that your Junk E-Mail filter settings are set to either 'Low' or 'Enhanced'.
Click 'OK'
Click on 'Safe List'
In the 'Type an address or domain:' field, enter the text ‘messaging.xeex.com’.
Click 'Add' button.
Gmail:
Log into Gmail.
Click on 'Settings' on the top right of the screen.
•
•
•
•
•
•
Click on 'Filters'.
Click on ‘Create a new filter’
In the ‘Has the words’ box enter the text ‘messaging.xeex.com’
Click ‘Next Step’.
Put a check next to ‘Star it’
Click on the ‘Create Filter’ button at the bottom of the screen.
Yahoo!
•
•
•
•
•
•
•
•
Log into your Yahoo! Mail account.
Click on the ‘Options’ link on the top left corner of your browser.
Click on the ‘Filters’ link under the ‘Management’ section of the page.
Click on the ‘Add’ button above the filter list (the filter list may initially be empty).
In the ‘Filter Name’ field enter the text ‘Xeex’.
In the text box next to ‘From Header: contains’ enter the text ‘messaging.xeex.com’.
From the ‘Move Message to:’ drop down box, select ‘Inbox’.
Click the ‘Add Filter’ button on the bottom left side of the window.
Netscape Web Mail:
• Select ‘Options’ link from the menu
• Select ‘Email Rules’ link
• Select ‘Add Rule’ button
• For the ‘If…’ make sure the drop down ‘From’ and ‘contains’ are chosen
• In ‘the phrase’ text field type ‘messaging.xeex.com’
• For ‘then deliver to…’ ‘INBOX’ is choose
• Select ‘Add Rule’ button
America Online (AOL):
Check your Spam Folder to make certain that your filters have not mistaken our emails as Spam:
•
•
Go to AOL Keyword: Spam Folder.
If there are any emails from ‘[email protected]’ select them (where xxxxxxxxxxx is the phone number of
the sending party).
• Then select ‘This Is Not Spam’ button.
For any email clients or web based email services not described above, simply contact your provider’s customer service department
and inform them that you need to unblock mail from the domain ‘messaging.xeex.com’.
Managing Auto Attendant (IVR)
Change IVR Recording
To record new IVR messages with the highest level of quality please submit a ticket to support regarding this request. When
directed, please follow these steps
1) Call your main line and leave a voicemail with your IVR recording on your extension
2) This will send a copy of the voicemail to your email address
3) You will now have a new voicemail message in your Email. Play the message to make sure it sounds correct.
4) Once you have verified the message is correct, please attach the recording to the already opened request. Or email it to
[email protected]
Configure Auto Attendant Voice Mail Greeting
Login to the members’ portal http://dps.4c-comm.com
1.
2.
Go to “Features”
Select “Auto Attendant”
1
2
3.
Select Dropdown for Auto Attendant Account you want to edit:
3
4.
Select either “Customer” or “Default” hover button under “General Voicemail Box Greetings”:
4
5.
Select “Update Information”
5
Configure Auto Attendant Voice to Email Mail Delivery
Login to the members’ portal http://dps.4c-comm.com
1.
2.
Go to “Features”
Select “Auto Attendant”
1
2
3.
Select Dropdown for Auto Attendant Account you want to edit:
3
Under “General Voicemail Box Delivery” Heading:
4
5
4.
5.
Edit “Voicemail to Email” field (enter desired email):
Select “Update Information”:
How to forward Auto Attendant voicemail to another phone
Login to the members’ portal http://dps.4c-comm.com
1.
2.
Go to “Features”
Select “Auto Attendant”
1
2
3.
Select Dropdown for Auto Attendant Account you want to edit:
3
Under “General Voicemail Box Delivery” Heading:
4
5
4.
5.
6.
Select Hover Button next to “Send voicemail to another phone”
Select Account in Drop down box
Select “Update Information”
6
Managing Find-Me-Follow-Me
This feature allows a user to specify alternate numbers for the system to ring in sequence, simultaneously, or randomly
when a call is placed to the user’s account. Common applications of the ‘Find me Follow me’ feature include adding a
mobile or home office number to ring should the user not answer a call to their phone within a specified amount of
time. Find me Follow me can be set to dial another extension, by choosing the appropriate account from the drop down
menu, or any external number, by entering in the area code and number into the input field below the drop down
menu. Clicking the magic wand icon under the ‘Define Active Time’ heading opens a wizard to guide the user through
setting when calls will ‘hunt’ for the user based on their Find me Follow me settings. To add an additional number
record, click the ‘Add number’ link on the left side of the screen.
How to Deactivate Find Me / Follow Me
Login to end user portal http://dps.4c-comm.com
1.
2.
After Login go to “Features”
Select “Find Me / Follow Me”
1
2
3.
Select Dropdown for Account you want to edit
3
4.
Select the hover button next to “Inactive”
4
5
5.
Select “Update Information”
How to Activate Fine Me / Follow Me
Login to end user portal http://dps.4c-comm.com
1.
2.
After Login go to “Features”
Select “Find Me / Follow Me”
1
2
3.
Select Dropdown for Account you want to edit
3
4.
Select the hover button next to “Ring my desk phone for”
4
5
6
5.
6.
Input the time associated with ring your desk phone:
Select “In Order” or “Simultaneous” in the drop down
7. Select “Add Number”
7
8
9
11
10
8
13
8.
9.
10.
11.
12.
13.
Select Extension to forward calls to under the “Choose and extension” field or
Enter your desired number to forward calls to under the “Enter Phone Number” field
Enter the number discretion under the “Description of Number” (optional) field
Enter the duration to forward the call for under the “Ring Time” field
Select the check box under the “Active” field
Select “Update Information”
How to forward all Calls to another phone
Login to end user portal http://dps.4c-comm.com
12
1.
2.
After Login go to “Features”
Select “Find Me / Follow Me”
1
2
3.
Select Dropdown for Account you want to edit
3
4.
Select the hover button next to “Immediately forward all incoming calls...”
4
5
5.
6.
7.
Select “In Order” or “Simultaneous” in the drop down:
Select “Add Number”:
Select Extension to forward calls to under the “Choose and extension” field or:
6
7
8
9
8.
9.
Enter your desired number to forward calls to under the “Enter Phone Number” field
Select “Update Information”
Abbreviated Dialing:
The abbreviated dialing feature page allows you to manage your system’s dial-able extensions and to which accounts
they are assigned. By default each phone account is given an extension of a user specified convention. By clicking the
‘Add Number’ link on the top, left side of the page, a new record is created allowing a user to specify the abbreviated
number (must be same number of digits as preconfigured extensions), the number to dial, and a description for ease of
viewing. The ‘Number to Dial’ can be any 11-digit number (internal account or external phone number) allowing for
commonly dialed numbers to be treated as system extensions. Calls can then be transferred to abbreviated numbers in
the same fashion as they would be passed to phones in the office.
How Edit or Update Abbreviated Dialing Rules
1.
2.
After Login go to “Features”
Select “Abbreviated Dialing”
1
2
3.
Select Dropdown for Account you want to edit
3
4.
Select “Add Number”
4
5
6
7
8
5.
6.
7.
8.
Enter Abbreviated Number under “Abbreviated Number” field:
Enter Phone/Account Number under “Number to Dial” field:
Enter Description of Number under “Description” field:
Select “Update Information”:
Auto Attendant
This feature page gives you a summary of your auto attendant inventory. An auto attendant is a feature that greets your
callers and gives them a list of options to route their call to the appropriate party. If your system includes an auto
attendant, it will be configured by 4C CommunicationsCustomer Care to your specification and at least one entry will be
displayed on this page. Clicking on the ‘Name’ of your auto attendant will take you to its detail page:
This page allows users to determine how calls are routed by the auto attendant’s Interactive Voice Response (IVR) menu
recording. The IVR recording can be provided by the user or recorded professionally by 4C Communicationsand is the
voice menu that directs callers through their choices. The detail screen allows users to upload new IVR recordings,
modify when the auto attendant will answer and where the caller is sent based on their keypad input. Making changes
to your auto attendant can yield unforeseen or unwanted results. Please only make changes if you are very clear on
how your attendant operates. We recommend that you contact our Customer Care department before making any
changes to the auto attendant configuration.
Setup Auto Attendant Call Tree
Login to the members’ portal http://dps.4c-comm.com
1.
2.
Go to “Features”
Select “Auto Attendant”
1
2
Under “Auto Attendant Configuration” Heading
3
3.
4.
Select “Root”
Select Dropdown for Auto Attendant Account you want to edit:
4
5.
In the “Not Active” field select an “Action” in drop down:
5
a.
6.
Definition of Actions
i. Default – Default Action and Message plays with this action
ii. Transfer – Transfer to Account Number only
iii. Transfer to E.164 number – Transfer to off network Phone number
iv. Transfer to Voicemail – Transfers caller to Auto Attendant Voicemail
v. Transfer to Extension – Transfers caller to a directory dialing option (max size field will set the dialing rules
for directory dialing options)
vi. Menu – Transfer to Auto Attendant menu or sub-menus
Select “Action” for each “Event” in Auto Attendant Call Tree:
6
7.
Select “Update Information”
7
Edit Greetings in your Auto Attendant
Recording your Auto Attendant Menu and Directory information
Login to the members’ portal http://dps.4c-comm.com
1.
2.
Go to “Features”
Select “Auto Attendant”
1
2
Under “Auto Attendant Configuration” Heading
3
3.
4.
Select “Root”
Select Dropdown for Auto Attendant Account you want to edit:
4
5.
Next to the “Intro” Field Select “Browse…”
5
Select your Intro message file (intro messages are required; event actions are not available while intro messages are playing.
Generally a file with 1 second of silence is loaded into this field)
•
•
•
•
Select “Open”
Next to the “Menu” Field Select “Choose File”:
Select your Menu message file:
Select “Open”
6.
Select “Update Information”:
6
Setup Time Definition for Auto Attendant
Update “Active” field (Default Setting is “Always” to update the Active Time Definition follow the instructions below)
1.
2.
Go to “Features”
Select “Auto Attendant”
1
2
Under “Auto Attendant Configuration” Heading
3
3.
4.
Select “Root”
Select Dropdown for Auto Attendant Account you want to edit:
4
5.
Select “Wizard”:
5
6.
Select the hover button next to either 12 or 24 hour format:
6
7
7.
Select “Next”:
8
8.
9.
Select the From Hour:
Select the From Minute:
9
10. Select the Until Hour:
10
11. Select the Until Minute:
11
Select “Next”
12. Select the Day of week
12
Select “Next”
13. Select the Day of Month
13
Select “Next”
14. Select the Month
14
15. Select “Next”
15
16. Select “Finish” or “Add another Definition”
16
17. Select “Update Information”:
17
DID Manager
The DID
manager is a list of all Direct Inward Dial numbers that are associated with your phone system. Because your 4C
Communicationssystem operates primarily on internal account numbers, you have the flexibility to define to which
phones inbound calls ring. DIDs can be purchased new or can be brought from your current telephone company
through the Local Number Portability process. To update the phone or “Ring Group” (see below) to which a particular
DID is associated, simply locate the desired DID from the ‘Telephone Number’ column, click the down arrow to the right
of the ‘Rings To’ box and select the account you like it to ring. After the change is made, click the Update Information
button at the bottom of the list and all calls to that number will ring the select account or Ring Group.
Edit Direct Inward Dialing (DID) Rules
(Note: If your numbers have not been ported do not update DID Manager Settings)
1.
2.
After Login go to “Features”
“DID Manager”
1
2
Under “DID Manager”
3. Select the Drop Down under the “Ring to” Heading next to the Telephone Number you with to update
3
4
5
4.
5.
Select the account you want the DID to ring:
Select “Update Information”
Managing Ring Groups
When your business needs mandate that more than one phone ring when an incoming call is received, the Ring Group
feature allows you to specify which phones ring in which combinations. The layout of the Ring Group management tool
resembles the Find me Follow me feature page very closely. The primary difference between the two is that the Find
Me Follow Me options define behavior for a specific account whereas Ring Group allows for call routing without the
mandatory participation of a particular account. To modify a ring group, select the desired group from the ‘Select
Account’ list. Next, choose a ring order option to determine whether the call hunts through the numbers below in
sequence, simultaneously, or randomly. Click the ‘Add Number’ link to add another line to the group. As the changes
made, click the ‘Update Information’ button to save any changes.
Creating Ring Groups
1.
2.
After Login go to “Features”
Select “Ring Groups”
1
2
3.
Select Dropdown for Account you want to edit
3
Under “Ring Groups” Heading
4.
Select “Add Number”
4
5.
Select Extension or Phone Number to include in Ring Group
6
5
7
8
6.
7.
8.
Input the “Ring Time” for each Extension or Phone Number in Ring Group
Select Check Box under “On Off” field:
Select “Update Information”
Edit Ring Group Name
1.
2.
After Login go to “Features”
Select “Ring Groups”
1
2
3.
Select Dropdown for Account you want to edit
3
Under “Ring Groups” Heading
4.
Edit “Description” field to desired name
4
Select “Update Information”
5
Edit Ring Group Order
1.
2.
After Login go to “Features”
Select “Ring Groups”
1
2
3.
Select Dropdown for Account you want to edit
3
Under “Ring Groups” Heading
4.
Edit Hover Button next to desired Ring Group Order
5.
Select “Update Information”
4
5
Setup Time Definition for Ring Groups
1.
2.
After Login go to “Features”
Select “Ring Groups”
1
2
3.
Select Dropdown for Account you want to edit
3
Update “Active Time” field (Default Setting is “Always” to update the Active Time Definition follow the instructions below)
4.
Select “Wizard”
4
5.
Select hover button next to either 12 or 24 hour format
5
6
6.
Select “Next”:
7.
8.
9.
10.
11.
Select the From Hour
Select the From Minute:
Select the Until Hour:
Select the Until Minute:
Select “Next”:
8
7
9
10
11
12. Select the Day of week
12
13. Select “Next”
13
14. Select the Day of Month
14
15. Select “Next”
15
16. Select the Month
16
17. Select “Next”
17
Select “Finish” or “Add Another Definition”
18. Select “Update Information”
18