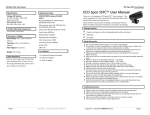
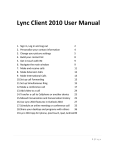
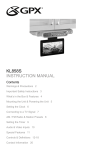
1
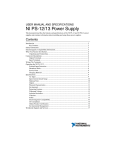
User Manual
Undercabinet Range Hoods
KM300
ENGLISH
Thank you for choosing Krüger home appliances!
Please follow the recommendations and guidelines contained in this
manual. This way the appliance will give you consistent high performance
and efficiency for many years to come.
TABLE OF CONTENTS
Characteristics.........................................................................3
Warnings & Caution ..................................................................4
Installation & Usage.....................................................................8
Maintenance & Cleaning...........................................................17
Warranty......................................................................20
Guide to using this manual
The following symbols will help you when reading this instruction manual:
Suggestions & Advice
!
Safety Information
2
SPECIFICATIONS & TECHNICAL PARAMETERS
ALTO - M
KM300
Rated Voltage
110V - 120V
Rated Power Frequency
60Hz
Lighting Power Consumption
2 x 50W
Motor Power Consumption
2 x 100W
Total Power Consumption
300W
Number of Motors
2
Dimensions of Duct Exhaust
7” Ø (Circular) or 3 ¼” x 10”
Overall Dimensions
29 3/4” (Width) x 22” (Depth) x 6 7/8” (Height)
6 7/8”
2 3/8”
22”
29 3/4 ”
3
WARNING
These instructions have been drawn up for your safety and that of others.
You are therefore strongly urged to read them carefully before installing
and using the appliance. Keep this instruction manual for future reference
as necessary. If the appliance is sold or moved, make sure that the manual
is transferred over to the new user.
TO REDUCE RISK OF FIRE, ELECTRIC SHOCK
OR INJURY TO PERSONS, PLEASE OBSERVE
THE FOLLOWING:
i.1 Installation
❏❏ Installation of the appliance and its connection to the electrical mains
must only be carried out by QUALIFIED PERSONNEL in accordance
with local applicable codes and standards, including fire-rated
construction.
❏❏ The hood must be placed at a minimum distance of 26” and a
maximum of 30” from the cooktop for best capture of cooking
impurities, and a minimum distance of 28” from the gas range.
❏❏ In order to provide sufficient air for proper exhausting of gases through
the chimney, follow the heating equipment manufacturer’s guideline
and safety standards such as those published by the National Fire
Protection Association, and the American Society for Heating,
Refrigeration and Air Conditioning Engineer (ASHRAE), and local code
authorities.
❏❏ To reduce the risk of fire or electric shock, do not use this fan with any
solid-state speed control device.
❏❏ When cutting or drilling into the wall or ceiling, do not damage
electrical wiring and other hidden utilities.
❏❏ This unit is meant for household kitchen use only. To ensure your
safety, it needs to be connected to a GFCI protected branch circuit.
4
❏❏ Before any cleaning or service procedure, it is important to check that
the appliance is DISCONNECTED from the electrical service panel.
This will prevent power from being switched on accidentally.
❏❏ It is risky to modify or attempt to modify the characteristics of this
product.
❏❏ After removing the appliance from the packaging, make sure that
it is undamaged, and that the electrical lead is in perfect condition.
Otherwise contact your dealer before putting the appliance into
operation.
❏❏ Use this unit only in the manner it is intended for by the manufacturer.
If you have any questions regarding the usage of this appliance,
please contact the manufacturer or the local agent closest to you.
❏❏ The Manufacturer declines all responsibility in case of failure to comply
with the accident prevention regulations.
❏❏ Make sure that air is able to circulate freely around the appliance. Poor
ventilation may result in a shortage of oxygen.
❏❏ Make sure that the appliance is supplied with the type of gas indicated
on the relative sticker next to the main gas connection pipe.
❏❏ Use of a gas cooking appliance produces heat and moisture in the
room in which it is installed. Ensure that the room is well ventilated by
keeping the air intakes open and in good working order or by installing
an extractor hood with a discharge pipe.
❏❏ If the appliance is required to be used intensively for a long period of
time, the effectiveness of the ventilation will have to be increased, for
example by opening a window or increasing the power of any electric
extractor fan.
❏❏ The stainless steel structural housing may have sharp edges. Be
careful to avoid cuts and abrasions during installation and cleaning.
5
i.2 During Use
❏❏ This product is designed to cook food inside ordinary homes and
for non-professional purposes. It should not be used for any other
purpose.
❏❏ After using the appliance, make sure that all controls are in the “OFF”
position.
❏❏ If you use an electrical socket in close proximity to this appliance, take
care that the cables of the appliances you are using are far away from
any parts of this appliance that may heat up.
i.3 Child Safety
❏❏ This appliance is designed and intended to be operated by adults
only. Children are not allowed to tamper with the controls or play with
this appliance.
❏❏ The exposed parts of this appliance heat up during cooking and
remain hot for some time even after it is switched off. Keep children
well away until the appliance has cooled down.
i.4 Cleaning & Maintenance
❏❏ Keep the appliance thoroughly cleaned after every use. Grease should
not be allowed to accumulate on the fan or filter, as food residues
such as scraps, oils, and fats, may become a fire hazard.
i.5 Servicing & Parts
❏❏ In the unlikely instance of a malfunction, never attempt to repair the
appliance yourself. Repairs by unskilled persons may further damage
the unit, and can greatly jeopardize the safety of yourself and your
family.
❏❏ To diagnose the malfunction, please refer to the contents of this
manual. If you do not find the necessary information, please contact
your nearest service centre.
❏❏ Servicing work on this appliance must be carried out by a KRÜGER™
authorized technical service centre. Always request the use of original
replacement parts.
6
i.6 Environmental Protection
❏❏ All the materials used to build this appliance are environmentally
compatible and recyclable. Please make your contribution to
conserving the environment by using the various waste collection
channels available.
❏❏ Appliances which are no longer used or usable are not worthless
waste. Through environmentally friendly disposal, a number of
materials used in the production of your appliance can be recovered.
❏❏ Find out about the current disposal options from your dealer, or your
local authority.
❏❏ Before scrapping the appliance, cut the power supply lead and render
it unusable for safe handling.
7
INSTALLATION
!
This appliance must only be installed and used in rooms with permanent
ventilation to local standards.
Installation of the appliance and its connection to the electrical mains
must only be carried out by QUALIFIED PROFESSIONALS.
Before installation, it is important to check that the appliance is
DISCONNECTED from the electrical main service terminal. KRUGER™
declines all responsibility for any damages arising from installation in
breach of the regulations in force or from failure to comply with the
accident prevention regulations.
Carefully remove the blue coloured plastic protective film prior to final
installation.
Installation Premises
For proper operation of a gas appliance, the air necessary for the combustion
of the gas must be able to flow into the room naturally.
The air must flow into the room directly through openings in the outside
walls. These openings must have an unobstructed cross-section not less
than 1.18CFM or 2m3/h for each kw of power (see total power in kw on the
appliance nameplate).
This opening must be constructed so that it will not be obstructed from inside
or outside, or constructed close to the floor. The opening is recommended to
be on the side opposite to that on which the flue gases are discharged.
If it is not feasible to provide these openings in the room where the appliance
is installed, the necessary air may be taken from an adjacent room, provided
that:
• This room is not a bedroom or a hazardous environment;
• This room has ventilation;
• The ventilation between the room where the appliance is installed and the
adjacent room have openings.
8
1. Use the dimensional drawings above to lay out the range hood’s mounting
holes, wiring access and ductwork. Mark the cabinet bottom and drywall
where applicable.
2. Make a cutout for the wiring and duct work.
3. Install the ductwork so that it is flush with the range hood’s mounting
surface.
4. Run two conductor wires from a power source to the hood location. Bring
approximately 12’’ of wiring through wiring hole.
5. Drill 3/32” diameter pilot holes at the points where mounting holes are
marked.
6. Insert 4 mounting screws, leaving approximately ¼” of thread exposed.
9
Hood Preparation
1. Remove the baffle filters by pushing down the
tab then pulling them out of the slots.
2. Remove the bottom panel of the hood by
removing its 8 mounting screws. Set aside the
bottom panel once it has been removed.
3. Depending on the type of exhaust options you
would like to go with, please skip ahead to vertical
exhaust installation or horizontal exhaust installation.
Vertical Exhaust Option
3. Install the small shut-off plate, or backdraft damper, inside the back of the
hood. (see below)
10
4. Install the small shut-off
plate, or backdraft damper,
outside the back of the hood.
5. Install the rubber gasket
(Included) on the top of the hood.
6.
Install either the 6” circular duct or 3 ¼” x 10” rectangular duct.
Mount the 6” round duct on the top of the hood.
Uses 10 screws. Seal with duct tape when finished.
Mount the 3¼” x 10” duct onto the top of the hood.
Uses 5 Screws. Seal with duct tape when finished.
11
Rear Exhaust Option
Install the gasket onto the top of the hood. Mount the shut off plate onto the
top of the hood. Seal with duct tape when finished.
Install the adaptor to the back of the hood, using 6 screws.
Electrical Connection
1. Using provided wire connectors, connect
wires as follows:
BLACK to BLACK (A)
WHITE to WHITE (B)
GREEN to BARE or GREEN-YELLOW (C)
2. Reinstall the wiring box converter. And
plug back all the small connectors inside
the hood.
12
Mounting The Hood
1. Insert the power cable in the hood and tighten
the wire clamp to screw in the cable.
2. Align the hood’s keyhole mounting slots over
the 4 partially installed screws.
3. Making sure the duct positions over the hood’s
duct adaptor, push the hood against the rear
wall.
LIGHTING
The range hood requires two GU10 halogen bulbs. Max 50W ea.
!
Always switch off the electrical supply before carrying out any
operation or maintenance on the appliance.
1. Wait for the bulbs to cool if the range hood has been in use.
2. Remove and replace the bulb with an identical GU10 bulb.
13
OPERATION
This range hood is operated using push
button switches on the front panel.
1.
2.
3.
4.
Lights
Increase Power
Reduce Power
On / Off
How to set the clock?
1.
2.
3.
4.
5.
6.
When the fan is off, press and hold the Power button for 3 seconds.
The time indicator will begin blinking, and you are ready to set the hour.
Use the + and - buttons to increase or decrease the hour number.
Press the Power button to switch over to set minutes.
Use the + and - buttons to increase or decrease the minutes.
The clock will automatically confirm the settings in 5 secods without any
additional input.
How to set the Auto-Off Timer?
1.
2.
3.
4.
5.
When the fan is on, press and hold the Power button for 3 seconds.
The time indicator will begin blinking.
Use the + and - buttons to set the number of minutes you would like.
The Auto-Off timer delay can be set between 1 minute to 15 minutes.
The Auto-Off timer will automatically confirm the settings in 3 seconds
without any additional input.
14
CLEANING & MAINTENANCE
!
Before cleaning or servicing your appliance, disconnect it from the
electrical service panel and allow it to cool down.
Stainless steel is one of the easiest materials to keep clean. Occasional care
will help preserve its fine appearance for years to come.
General Cleaning
Wash enameled and stainless steel parts with lukewarm water and detergent.
Do not use abrasive products which might damage them.
Hot water with liquid soap can remove most stains easily. Always rinse the
surface with clean water and wipe dry with a soft clean cloth to prevent water
marks.
For tougher stains, use ordinary non-abrasive detergents or stainless steel
polishing powder with a little water.
For stubborn grimes and deposits, use a scouring pad or soft bristle brush
along with a stainless steel cleaner and water. Always rub in the direction of
the polished lines, or “grain” of the stainless steel finish. Avoid using too much
pressure as it may mar the surface. We strongly advise you against using acids
for cleaning.
Do not allow deposits to remain for long periods of time. Do not use ordinary
steel wool or steel brushes to clean the range hood.
Do not allow salt solutions, disinfectants, bleaches, or cleaning compounds
to remain in contact with the stainless steel surface for prolonged periods of
time. Many of these compounds contain chemicals that can be harmful to the
stainless steel finish. Always rinse with water after every cleaning and wipe dry
with a clean cloth.
15
Follow These Steps to Clean The Fans Manually
1. Disengage the small grease guard cups from the filters by turning them
counter-clockwise.
2. Remove the screw holding the filters in place.
3. Remove the filters from the hood and then the bottom piece of the
housing can come off.
4. Remove the wheel center cap and loosen the wheel set screw in order to
disengage the wheel from its motorshaft.
5. Soak all the removed parts for 30 minutes in warm water with liquid soap.
Then wash with a nylon brush or a soft scouring pad. Rinse and dry
completely before reinstalling.
!
When reinstalling the fan, align the end of the set screw with the flat notch
on the motor shaft.
Follow These Steps to Clean The Exterior
Stainless steel is one of the easiest materials to keep clean. Occasional care
will help preserve its fine appearance for years to come.
1. Hot water with liquid soap can remove most stains easily.
2. Harder to remove stains, discolourations, and persistent deposits can be
removed with a non-abrasive household cleaner or stainless steel polishing
powder with a little water.
3. For stubborn stains and deposits, use a scouring pad or soft bristle brush
along with a stainless steel cleaner and water. Always rub in the direction
of the polished lines, or “grain” of the stainless steel finish. Avoid using too
much pressure as it may mar the surface.
4. Do not allow deposits to remain for long periods of time. Do not use
ordinary steel wool or steel brushes to clean the range hood.
5. Do not allow salt solutions, disinfectants, bleaches, or cleaning
compounds to remain in contact with the stainless steel surface for
prolonged periods of time. Many of these compounds contain chemicals
that can be harmful to the stainless steel finish. Always rinse with water
after every cleaning and wipe dry with a clean cloth.
16
Routine Maintenance
Have the condition and efficiency of the motor and the structure of the duct
work checked periodically. If anomalies are found, do not attempt to repair, but
have the faulty part replaced completely.
To ensure good performance and safety, the motor must be inspected
periodically.
!
Periodic lubrication of the motor must only be carried out by qualified
personnel, who must also be contacted if the appliance malfunctions.
Service & Parts
Before leaving the factory, this appliance was tested and adjusted by qualified
professional technicians to give the best operating results. Any subsequent
necessary repairs or adjustments must be carried out with the greatest care
and attention.
For this reason, we strongly advise you always to contact the dealer who
sold you the appliance or our nearest service centre, specifying the nature of
the problem, the model of the equipment (Mod.), The product number (Prod.
No.) And the serial number (Ser. No.). These can be found on a sticker placed
underneath the cooktop. Always request the use of original spare parts.
Warranty Conditions
You new appliance is covered by a warranty. The warranty conditions are
provided in full at the back of this manual.
Keep the receipt or delivery note, either of which documents your purchase of
the appliance and provides proof of date of purchase, in a safe place together
with this manual.
In the event that a technician is required to visit your home, show these
documents to the technician prior to the inspection and subsequent repairs.
If this procedure is not followed, KRÜGER™ will have no option but to charge
for any repairs.
17
1 YEAR LIMITED VENTILATION PRODUCT WARRANTY
The KRÜGER™ limited warranty is subject to the original purchaser
(consumer) of its products only and is not transferable. KRÜGER™ warrants
that its products will be free from defects in materials or workmanship for a
period of one year from the date of original purchase. THERE ARE NO OTHER
WARRANTIES, EXPRESS OR IMPLIED, INCLUDING, BUT NOT LIMITED
TO, IMPLIED WARRANTIES OF MERCHANTABILITY OR FITNESS FOR A
PARTICULAR PURPOSE.
During this one year warranty period, KRÜGER™ will, at its option, repair any
product or part that is found to be defective under normal use and service.
The end user will need to submit the defective part(s) to the KRÜGER™ head
office for processing. Once the part(s) has been received, a replacement will be
sent out to the sender’s address.
This warranty does not cover:
(1) Normal maintenance and service.
(2) Any products or parts that have been subject to misuse, negligence,
accident, improper maintenance or repair, faulty installation or installation not in
accordance to recommended installation instructions.
(3) Any parts that are considered as consumable parts.
(4) Any normal wear and tear on mechanical and/or movable and/or removable
parts, including tracks, ball bearings, and extensions.
The duration of any implied warranty is also limited to the one year period as
specified above for the express warranty. In that case the above limitation may
not apply to you.
KRÜGER’S OBLIGATION TO REPAIR OR REPLACE PRODUCT OR PARTS,
AT KRÜGER’S OPTION, WILL BE THE PURCHASER’S SOLE AND FINAL
REMEDY UNDER THIS WARRANTY. KRÜGER™ WILL NOT BE LIABLE FOR
INDIRECT, INCIDENTAL, CONSEQUENTIAL OR SPECIAL DAMAGES ARISING
OUT OF OR IN CONNECTION WITH PRODUCT USE OR PERFORMANCE.
Some provinces do not allow the exclusion of incidental or consequential
damages. In that case the above limitation may not apply to you.
18
This warranty gives the original purchaser (consumer) specific legal rights, and
there may also be other rights that vary depending on provincial legislation.
This warranty supersedes all prior warranties.
To qualify for warranty service, first;
(1) Notify your local KRÜGER™ dealership at the address shown below, by
telephone: 1-604-214-4477, or by email: [email protected] ;
(2) Give the model number and part identification and;
(3) Describe the nature of any defect in the product or part. At the time
warranty service is requested, proof of purchase and evidence showing the
original purchase date must be presented.
Keep this manual and your sales slip or receipt together for future reference.
You must provide proof of purchase or installation date for in-warranty service.
Fax or email this form in to register your warranty with KRÜGER™.
Write down the following information to better help you obtain assistance
or service should you need it. You will need to know your complete model
number and serial number. You can find this information on the inspection label
located on your appliance.
Dealer:
Customer Name:
Customer Address:
Customer Phone Number:
Model Number:
Serial Number:
Invoice Number:
Date Purchased:
19
KRÜGER™ Kitchen Appliances Inc.
© 2015 KRÜGER™ All Rights Reserved.
The KRÜGER® word mark and logos are registered
trademarks owned by KRÜGER™ Kitchen Appliances Inc.
Some features of this product are not available in all areas.
Feature availability is subject to change.
Content of this manual and the website is subject to change.
Other company and product names mentioned herein may
be trademarks of their respective companies.
Mention of third-party products is for informational
purposes only and constitutes neither an endorsement nor
a recommendation. KRÜGER™ assumes no responsibility
with regard to the performance or use of these products. All
understandings, agreements, or warranties, if any, take place
directly between the vendors and the prospective users.
Every effort has been made to ensure that the information
in this manual is accurate. KRÜGER™ is not responsible for
printing or clerical errors.
019-2266/2012-10