1
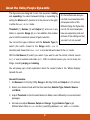
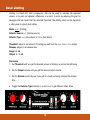
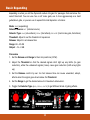
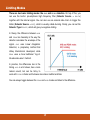
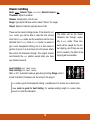
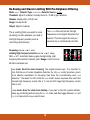
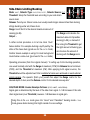
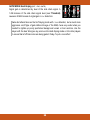
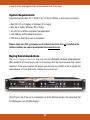
2
Table of Contents
Contact Details.............................................................................................. 4
Installation and Authorization.......................................................................5
Introduction................................................................................................... 7
About the Valley People Dyna-mite.............................................................. 8
User Interface................................................................................................ 9
Basic Limiting.............................................................................................. 10
Basic Expanding..........................................................................................11
Switches...................................................................................................... 12
Knobs...........................................................................................................14
Limiting Modes............................................................................................17
Expanding Modes........................................................................................22
Technical Stuff............................................................................................. 26
3
Contact Details
If you would like to get in touch with Softube, please e-mail [email protected].
Alternatively, you could use the phone or send an old-fashioned mail (do you remember
envelopes, stamps and paper?) to:
Softube AB
S:t Larsgatan 10c
Web: www.softube.com
E-mail: [email protected]
SE-582 24 Linköping
Sweden
Phone: +46 13 21 1623 (9 am – 5 pm CET)
Support
On the Softube website (www.softube.com) you will find answers to common questions
(FAQ) and other topics that might interest you.
Support questions can be posted at http://www.softube.com, where we will help you as
fast as we can!
© 2010 SOFTUBE AB, SWEDEN. ALL PRODUCT AND COMPANY NAMES ARE TRADEMARKS OF THEIR
RESPECTIVE OWNERS. SOFTUBE IS A REGISTERED TRADEMARK OF SOFTUBE AB, SWEDEN. ALL
VISUAL AND AURAL REFERENCES TO THE VALLEY PEOPLE DYNA-MITE ARE TRADEMARKS BEING
MADE WITH WRITTEN PERMISSION FROM PMI AUDIO. THE VALLEY PEOPLE, DYNA-MITE AND
ASSOCIATED LOGOS ARE TRADEMARKS OF PMI AUDIO GROUP, USED UNDER LICENSE. ALL
SPECIFICATIONS SUBJECT TO CHANGE WITHOUT NOTICE. ALL RIGHTS RESERVED.
THIS SOFTUBE PRODUCT IS PROTECTED BY PATENT SE525332 AND PENDING PATENTS US20040258250, EP1492081 AND JP2004-183976.
4
Installation and Authorization
IF YOU BOUGHT THE PRODUCT IN A BOX
you will have to register it in order to transfer the
license to your iLok account:
1.
Go to http://www.softube.com/register to transfer the license to your iLok
account. You will need the License Code found in the box, your iLok.com
User ID, and your iLok USB dongle. Follow the instructions on the web page.
and have got the confirmation e-mail, the license
will already be deposited in your iLok account:
IF YO U B OU GH T THE PRO DU CT ONL INE
2.
Make sure that you have the latest iLok drivers installed. They can be found at
http://www.ilok.com.
3.
Log on to http://www.ilok.com and transfer the newly received license to your
physical iLok dongle.
4.
Install the software from the DVD, or download the latest version from
http://www.softube.com/installers.
Sometimes the DVD contains installers for all Softube products, but you will only be able to
run those that you have acquired licenses for. In some cases, extra demo licenses are
included when you buy a Softube product.
5
6
Introduction
If you haven't used the Dyna-mite before, you will feel extremely confused.
DON'T PANIC!
As soon as you have acquainted yourself with the slightly weird layout and panel labels,
you will learn how to master this powerful tool, and soon you will feel comfortable in
knowing that you belong to the music industry's version of the “Trekkies”, ie., the Valley
People fanatics.
Take your time to look through the manual (start with the “Quick Overview” and “User
Interface” to get acquainted with the normal modes of operation). During the learning
period you will go through these steps:
1. Utter confusion. Desparation. Did I really pay for this?
Solution: Read “Basic Limiting”, “Basic Expanding” and “User Interface”. It's just three
pages. Listen to the sound examples on the Softube web site.
2. Pride. You have learned what the controls do. You think you master every aspect of it.
Solution: Read the entire manual, as well as the manual for the original hardware (it's
included on the CD).
3. Awe. You realize all the potential that is in this little thing, and start to think about all the
cool things you can do with it.
Solution: Do it!
But don't despair. It doesn't take much time to learn how to use it, it's just that the first 15
minutes can be a bit confusing.
Final word from the developers: Expanding is the new black!
7
About the Valley People Dyna-mite
The Dyna-mite was designed for two main purposes: limiting
and expanding. You select between limiting or expanding by
setting the Mode switch (number 4 in the picture to the right)
in either the L I M I T or E X P mode.
Threshold (1), Release (2) and Output (7) works as in any
limiter or expander. Range (6) is a nice addition that enables
you to limit the maximum amount of gain reduction.
On the Softube web site you
can find sound examples that
showcases some of the
different things the Dyna-mite
can do. All sound examples
have an explanatory text and
pictures of the settings so that
you can try it out yourself.
You can set the type of detector with the Detector Type (5)
switch (the switch closest to the Range knob) . A V G is
smoother and slower than P E A K . G A T E is a mode that works best in the E X P mode.
With the Det Source (3) switch you select if you want to use the normal, internal, source
(I N T ) or use an external side-chain (E X T ). With an external source you can do many fun
things, including keying and ducking.
You will always get a brief explanation about the current mode in the “Modes Display”
beneath the unit.
General Procedure:
1. Set Release to 0.05 (fully CCW), Range to 60 (fully CCW) and Output to 0 (12 o'clock)
2. Select your desired mode with the three switches, Detector Type, Detector Source
and Mode.
3. Adjust Threshold so that the Gain Reduction Meter reacts differently on loud and silent
passages.
4. Go back and adjust Release, Output and Range. Toggle Detector Type to get
different attack times. In L I M I T mode, try switching between L I M I T and D S - F M modes.
8
User Interface
1) Threshold: Adjusts the level at which the Dyna-mite starts to expand or limit.
2) Release: Adjusts the time it takes to restore the gain after expansion/limiting.
3) Detector Source: Set it to I N T (normal operating mode) as a start. D S - F M and E X T are
advanced modes.
4) Mode: Selects main mode. E X P =Expander/Gate, O U T =Bypass, L I M I T =Limiter.
5) Detector Type: Three different ways to detect the signal. Play around and try them out.
6) Range: Sets maximum amount of gain reduction. Advanced. Leave at 60 dB as a start.
7) Output: Sets output volume. Lower the volume if the output clips to much.
A) Modes Display: Shows quick help and parameter values.
B) Gain Reduction Meter: Displays the current amount of gain reduction.
C) Clip LED: Lights up when the output signal is clipping.
For more detailed explanations of each knob, please see the following chapters.
9
Basic Limiting
Limiting is a hard Inf:1 ratio compression that can be used to increase the apparent
volume, or to even out dynamic differences in a track. It works by reducing the gain for
passages that are louder than the selected threshold. The limiting mode on the Dyna-mite
is often used to squash drum tracks.
Mode: L I M I T (limiting)
Detector Source: I N T (internal source)
Detector Type: A V G (slow attack) or P E A K (fast attack)
Threshold: Adjust to set amount of limiting (as read from the G A I N
Release: Adjust to set release time
Range: 60 dB
Output: 0—15 dB
REDU CTI ON
meter).
Procedure
1. Set Threshold until you get the desired amount of limiting, as red on the LED array
2. Set the Output volume until you get the desired output volume.
3. Set the Release control by ear. If you get too much pumping, increase the release
time.
4. Toggle the Detector Type between A V G and P E A K to get different attack times.
10
Basic Expanding
Expanding is when you let the Dyna-mite reduce the gain for passages that are below the
select threshold. You can use it as a soft noise gate, use it more aggressively as a hard
guitar/drum gate, or you can use to expand the total dynamics of a track.
Mode: E X P (expanding)
Detector Source: I N T (internal source)
Detector Type: A V G (slow attack), P E A K (fast attack), or G A T E (hard noise gate, fast attack)
Threshold: Adjust to set the threshold of expansion
Release: Adjust to set release time
Range: 60—20 dB
Output: –15—0 dB
Procedure
1. Set the Release and Range to their min positions (CCW).
2. Adjust the Threshold so that the desired signals don't light up any LEDs (no gain
reduction), while the undesired signals (noise) cause gain reduction (LED array lights
up).
3. Set the Release control by ear: too fast release time can cause unwanted, abrupt,
effects when the signal goes down below the Threshold.
4. Set the Range to get the desired amount of maximum attenuation.
5. Toggle the Detector Type (A V G , P E A K , G A T E ) to get different kinds of gating effects.
11
Switches
Detector Source
( I N T, D S - F M , E X T )
Determines the source of the detector.
INT: Internal source,
normal operating mode
for noise gating,
expanding or limiting.
The gain reduction
circuit acts upon the
same signal that is fed
to the detector.
EXT: External source, or “sidechaining”. The detector is fed a
separate signal (a side-chain)
and calculates the gain
reduction from this signal. This
gain reduction is then applied to
the main signal. This is used for
keying (side-chain expanding)
and ducking (side-chain
compression) modes.
DS-FM (De-Essing and FM):
Internal source, but with a detector
filter that boosts the high
frequencies, thus making it easier for
high frequencies to trig the detector.
This mode can be used for deessing, or it can be used rather
creatively when increased sensitivity
to high frequencies is desirable.
All three switches work independently
of each other, but don't be alarmed.
Once you know what each switch does,
the Dyna-mite will be easy to operate.
12
Mode
( E X P, O U T, L I M I T )
Determines if the Dyna-mite should expand or limit the sound.
LIMIT: Limiting mode.
Reduce gain for signals
OUT: Bypass mode.
Output volume knob and output
EXP: Expander mode.
Reduce gain for signals
increasing above Threshold.
stage clipping still active.
below Threshold.
Detector Type
(GAT E, PEAK , AVG)
This switch determines the ratio and attack times of the detector.
AVG: A slower and
more complex attack
time (about 1–
15 ms). Inf:1 ratio in
L I M I T mode, and 1:2
ratio in E X P modes
(for soft noise
gating).
PEAK: Fast attack
time (about 50 µs),
useful for hard
limiting of transient
material. Inf:1 ratio in
L I M I T mode, and 1:2
ratio in E X P modes
(for soft noise
gating).
GATE: This is the most extreme mode. Fast attack
time (about 50 µs). In L I M I T mode, the ratio is
negative (1:–20), which means that for every dB
above threshold, the output signal will be reduced
by 20 dB! In E X P mode, you'll have a hard noise
gate with a 1:20 ratio. So for every dB below the
threshold, the signal will be reduced by another
19 dBs.
Detector Type=G A T E can be confusing in the
beginning, but you can see it this way: In E X P mode,
the signal gets gated when the level drops below the
threshold (that's normal). In L I M I T mode, the signal
gets gated when the level goes above the threshold
(that's weird).
13
Knobs
Threshold
Classic
threshold
control.
Determines the signal level above
which Limiting, or below which
Expanding action begins.
Variable from –40 dBv to +20 dBv, which in a plug-in
translates to about –60 dBFS to 0 dBFS. A full scale
(0 dBFS) sine wave, with Threshold set at max
(+20 dBv), will cause the Dyna-mite to just start to
limit or expand. The exact values depends on the
mode selected.
VCA Gain Coupling
(a.k.a. Auto Make-Up Gain)
In internal L I M I T and D S - F M modes, the
Dyna-mite engages the VCA Gain
Coupling which acts like an automatic
make-up gain.
Range
This innovative control limits the maximum gain
reduction. It varies from 0 dB (no gain reduction) to
60 dB possible gain reduction.
This control is very useful when expanding, gating or
keying. If you use the Keying mode ( E X T, E X P,
A V G / P E A K ) to, for example, duck a background
music score whenever a narrator speaks, you can set
the Range control to 15 dB to prevent the music to
be reduced by more than 15 dB.
14
In the original hardware, the Range
control was only available in the E X P
mode and left out in the L I M I T mode.
This was probably due to implementation difficulties, so we decided to introduce the Range knob to the other
modes as well. (To get the plug-in to
behave exactly like the hardware, just
set the Range knob back to 60 dB in
the L I M I T modes.)
Advanced: Range Knob in Limiting Mode (Zones)
When limiting, the Range control gives you a very powerful tool to create a “zone” in which
the limiting occurs. If you for example limit a drum track and the Gain Reduction meter
reads 40 dB in the peaks, you can set the Range control to 25 dB and thus get three
different zones:
1. No limiting when the drums are below –40 dB
2. Inf:1 limiting in the range –40 dB to –15 dB
3. No limiting for peaks exceeding –15 dB
Since the peaks in the third zone would cause a gain
reduction above the limit of 25 dB, and the Range is
set at 25 dB, no further gain reduction will occur. The
effect is that you have a very effective limiting in zone
2, but with the transients of zone 3
Anticipatory Release Computation
being let through. It's different, but
soundssomewhat similar to that of a
parallel or “New York style”
compression.
Release
Classic release time control.
Determines the rate at which a gain
is restored after Limiting or Ducking,
as well as the rate at which gain is
reduced after Gating, Keying or
Expansion attacks.
Variable from 50 ms to 5 sec/20dB.
With fast release time settings and certain material, the
gain reduction will follow the signal envelope too tightly,
and “pumping” will occur. To escape these effects, yet
still allow the user to select rapid release times, Valley
International developed a proprietary circuit scheme
known as Anticipatory Release Computation (ARC). It
analyzes the program input and anticipate conditions
which would cause either waveform gain modulation or
excessively rapid pumping, and computes a different
release envelope in order to prevent, or greatly diminish,
these effects.
Technical explanations apart, the ARC circuit is definitely
a big part of the famous Dyna-mite sound.
15
Output
Output volume control. Ranges from –15 dBv to +15 dBv. In limiting modes (L I M I T and
D S - F M ), the output volume will be automatically corrected to fit with the chosen Threshold
level. In all other modes, the Output volume will act as a simple gain control. You will soon
find that this auto make-up feature is very handy, since it is extremely easy to make
changes to the amount of limiting (with the Threshold control) without disturbing the
balance of the mix.
Clip Indicator
The plug-in features an accurate
model of the output stage in the
hardware. So whenever the hardware
would clip, the plug-in will as well.
This is indicated by a Clip LED, and
just as with the hardware, it is
possible for the clip LED to flash, even
with very heavy limiting, because the
transients will in some cases slip
through (for example in the A V G
mode).
The original manual states: “The clipping signal is
[often] of exceedingly short duration, and is, in all
probability, fully inaudible. Any decision to lower the
output level because of sporadic flashing of the
clip LED should be based upon what you hear. If
the signal sounds “clean”, you are probably better
off to leave the output level alone.”
Times change, and today we often strive for a
“dirtier” sound with distortion and clipping, so feel
free to crank up the Output volume and experience
the brutal distortion of the original Dyna-mite
hardware...
16
Limiting Modes
There are two basic limiting modes: the A V G and P E A K detection. On top of this, you
can use the built-in pre-emphasis high frequency filter (Detector Source = D S - F M )
together with the internal signal. You can also use an external side chain to trigger the
limiter (Detector Source = E X P ), which is usually called ducking. Finally, you can set the
Detector Type to G A T E , which will give you negative limiting.
In theory, the difference between A V G
and P E A K lies basically in the way the
detector calculates the envelope of the
signal. A V G uses Linear Integration
Detection, a proprietary method that
Valley International developed, while
P E A K uses a more traditional “log-ofthe-absolute-value” method.
In practice, the differences lies in the
timing. A V G is a bit slower, has a more
natural sound, but can be tricky to
work with. P E A K is faster and behaves more like a traditional limiter.
You can always toggle between the P E A K and A V G modes and listen to the difference.
17
Classic Limiting
Mode: L I M I T , Detector Type: A V G / P E A K , Detector Source: I N T
Threshold: Adjust to material
Release: Usually short, 0.05-0.5 sec
Range: Typically 60 dB (see section about “Zones” for usage)
Output: Adjust to material, typically above 0 dB.
These are the classic limiting modes. If the detector is in
P E A K mode, you will be able to raise the total volume
more than in A V G mode, but the waveforms will be more
distorted than in A V G mode. In A V G mode it is easier to
get a more transparent limiting, but it is also easier to
get lots of punch in a drum track since the slower attack
time will let the transients through. The original manual
recommends the A V G position except when you have
very transient sounds.
The limiter will let the fastest
transients slip through, especially in A V G mode. These transients will be caught by the output clipping, and if they are very
short in duration, the effect of the
clipping will be inaudible.
Level Limiting ( I N T, L I M I T, A V G )
Peak Limiting ( I N T, L I M I T, P E A K )
Ratio = Inf:1, Automatic make-up gain during limiting. Range control
forced to 60 dB on hardware unit, but active in the plug-in.
AVG
mode is good for transparent limiting, or added punch to a bass line or drum track.
mode is good for hard limiting, for example adding length to a snare drum
sound or to limit fast transients.
PEAK
18
De-Essing and Classic Limiting With Pre-Emphasis Filtering
Mode: L I M I T , Detector Type: A V G / P E A K , Detector Source: D S - F M
Threshold: Adjust to material, normally about 6—10 dB of gain reduction.
Release: Usually short, 0.05-0.5 sec
Range: Usually 60 dB
Output: Adjust to material
The D S - F M filter only boosts the high
frequencies on the signal that enters the
detector. The main signal (the one you
can listen to) is not affected by this filter.
This is a setting that's very useful for vocal
de-essing, but also whenever you need to
limit high frequency sounds (such as
controlling cymbal levels).
De-essing ( D S - F M , L I M I T, A V G )
Limiting High Frequency Sounds ( D S - F M , L I M I T, P E A K )
Ratio = Inf:1. Automatic make-up gain during limiting. High
frequency EQ inserted in detector path. Range control forced to
60 dB on hardware unit.
mode: Good for vocal de-essing. The original manual says: “It is important to
note that the use of Linear Integration Detection [ie. the A V G mode] provides a much
more effective mechanism for de-essing than does the conventionally used P E A K
detection.” The reason for this is that the A V G mode's slower response time won't limit
transient high frequency sounds (like a 't'), but will limit longer high frequency sounds
(like in 'sss').
AVG
mode: Good for drum track limiting, if you want to limit the cymbal sibliants.
Setup a good limiting without using the D S - F M mode, and then toggle between I N T and
D S - F M to hear which one you like the best.
PEAK
19
Side-Chain Limiting/Ducking
Mode: L I M I T , Detector Type: A V G / P E A K / G A T E , Detector Source: E X T
Threshold: Setup the threshold level according to your side chain
source level.
Release: Tune by ear. Classic voice-over usually needs longer release times than ducking
strings ducking under a 4/4 bass drum.
Range: Use it! Set it to the desired maximum amount of
ducking (in dB).
The Range knob decides the
Output: –
maximum amount of possible
A rather normal procedure is to let one track “duck”
below another. For example ducking a synth pad by the
strike of the bass drum (good use for the G A T E mode).
Another classic example is using it to duck background
music below a voice-over (good use for the A V G mode).
ducking (in dB), so instead of
fine tuning the Threshold to get
the right amount of ducking you
can fine tune the amount of
ducking with the Range knob.
Operating procedure (from the original manual): “In setting up for the Ducking operation,
one would normally start with the Range at maximum (CCW) the Release time at minimum
(CCW), and the Threshold at maximum (CW). After applying both signal sources, the
Threshold would be adjusted such that a reliable full duck were achieved on each external
signal passage. The operator [that's you!] would then adjust the Range control for the
desired depth of duck, and the Release control for the desired recovery rate.”
AVG/PEAK MODE: Inverse Envelope Follower ( E X T, L I M I T, A V G / P E A K )
Signal gain is determined by the level of the side chain signal. A 1 dB increase of the side
chain signal level (over Threshold) causes a 1 dB decrease in signal gain.
Using this in the A V G mode gives the “nicest” and “friendliest” ducking mode.
mode gives a faster ducking that might crackle for some settings.
20
PEAK
GATE MODE: Hard Ducking ( E X T, L I M I T, G A T E )
A 1 dB increase of the side chain signal level (over Threshold) causes a 20 dB decrease in
signal gain. P E A K detection.
Extreme ducking. Each time the side chain signal goes just a teeny bit above
Threshold, the main signal will be almost entirely gated. Can be quite effective together
with a limited gain reduction, as set by the Range knob.
Weird Limiting
Mode: L I M I T , Detector Type: G A T E , Detector Source: D S - F M or I N T
In the category “Weird Limiting” we can find the negative ratio stuff. The negative limiting
mode is a very special case, and is normally used together with longer release times and
the Range control. In some settings, specifically with long release times and a Range at
about 10–15 dB, you can get a very crackling sound. Increase the Range or the Release
time to avoid this.
Negative Limiting for "Organ Effects" ( I N T, L I M I T, G A T E )
Modified Negative Limiting ( D S - F M , L I M I T, G A T E )
Ratio = 1:-20. As input signal exceeds Threshold, a 1 dB
increase causes a 20 dB decrease in output level.
This is the mode that is the hardest to find some use for. It crackles and pops a lot, and
one might suspect when reading the original manual that this is a mode that wasn't
planned when designing the gear. More like “Wait, what happens if you use the gate
together with the limiting mode? Ahh...”
21
Expanding Modes
The expansion modes is operated in a very
similar way to the limiting modes, with the
big exception that it is, well, expanding rather
than limiting.
Another exception is that the G A T E mode
actually gates the signal in the E X P mode,
while it in the L I M I T mode acts like a negative
ratio limiter.
Classic Expansion/Noise Gating
Mode: E X P , Detector Type: A V G / P E A K / G A T E , Detector Source: I N T / D S - F M
Threshold: Adjust so that the desired sound levels extinguish all lights on the Gain
Reduction LED array.
Release: Start with minimum setting, and then adjust “by ear”.
Range: Start with 60 dB, adjust to decrease the effect caused by the gating.
Output: Usually below 0 dB
In the classic noise gating mode you have three different settings of the
Detector Type: A V G , P E A K and G A T E . The G A T E mode is the most brutal mode, and is
pretty efficient to use on drums or heavy metal guitar if you want a more aggressive sound,
but it should be regarded more as a creative tool rather than a problem solver.
In all of these modes you can toggle between I N T and D S - F M to get different weighting of
the frequencies. Setting the Detector Source in D S - F M mode will make the expander trig
more easily on high frequencies, which can be a good thing if you for example are gating a
drum beat and want to avoid gating the high frequency cymbals. Since noise often have a
lots of high frequency content, you should set it to I N T if you want to do actual noise
gating. But you probably want to use it more creatively anyway...
22
AVG MODE: Soft Noise Gating ( I N T / D S - F M , E X P, A V G )
Ratio = 1:2. A signal x dB below Threshold, will be attenuated
another x dBs.
The least obtrusive noise gate. Good for classic noise gating with sources that doesn't
have strong transients (such as voice and strings). Use on slow to medium attack
sounds.
PEAK MODE: Soft Noise Gating with Faster Attack Time
( I N T / D S - F M , E X P, P E A K )
Ratio = 1:2. A signal x dB below Threshold, will be attenuated
another x dBs.
If the attack of the instrument is moderate to fast, such as with drums or certain types of
guitar, it is better to use this P E A K mode. The faster attack time in P E A K mode assures
that the gain is fully restored when the transient strikes.
This mode can be pretty nice to use if you want to shorten the decay of a sound, such
as a bass line or steel stringed acoustic guitar. With this mode you can get a standard
Jazz Bass to sound like a damped Hofner string bass, or a steel stringed $3000 Martin
to sound like a $30 banjo... Just set the Release time so that you get the right amount of
decay.
GATE MODE: Hard Noise Gating ( I N T / D S - F M , E X P, G A T E )
Ratio = 1:20, P E A K detection of input signal. A signal x dB below
Threshold, will be attenuated another x dBs.
Use it as a traditional, boring hard noise gate, or... use it to create hard hitting beats
from almost any drum track! Set a short release time and aggressive gating, and set the
Output volume high to get some distortion. Stack up many Dyna-mites with different
amounts of distortion and release times to get fat snare and bass drum sounds... Toggle
the D S - F M switch to include/exclude cymbals.
23
Keying Modes
Mode: E X P , Detector Type: A V G / P E A K / G A T E , Detector Source:
EXT
While most people are accustomed to ducking, a.k.a side chain compression—for
example ducking a synth pad when the bass drum strikes, the art of keying is still
somewhat of a hidden secret for most people. I mean, how many times have you heard
Oprah talk about the benefits of keying?
Keying is when you let your main track (say a bass line) follow the envelope of the side
chain track (for example a bass drum). So with this example, the bass line will be gated
whenever the bass drum is silent, and whenever the bass drum strikes, so will the bass
line.
AVG MODE: Envelope Following Soft Keying ( E X T, E X P, A V G )
Signal gain is determined by the level of the side chain signal. A
1 dB increase of the side chain signal level (over Threshold)
causes a 1 dB increase in signal gain.
mode has (as usual) a more natural sound, but will slow down the attack of the
main signal. Use when you don't need a fast attack time when opening the gate.
AVG
PEAK MODE: Envelope Following Soft Keying with Faster
Attack ( E X T, E X P, P E A K )
Signal gain is determined by level of the side chain signal. A 1 dB
increase of the side chain signal level (over Threshold) causes a
1 dB increase in signal gain.
The extremely fast attack time will assure that the keyed signal has full gain when the
attack of the side chain signal arrives, but this can sometimes cause the transient to
“pop” or “crack” when the gate opens. This is usually not a problem if your mix consists
of both the keyed and the side chain signal, since the real transient from the side chain
signal will be audible at the same time as the (unwanted) “pop” sound.
24
GATE MODE: Hard Keying ( E X T, E X P, G A T E )
Signal gain is determined by level of the side chain signal. A
1 dB increase of the side chain signal level (over Threshold)
causes a 20 dB increase in signal gain. P E A K detection.
Same fast attack times as the Soft Keying mode with P E A K detection, but a much more
aggressive on/off type of gate. Before the age of the DAW, it was very useful when you
needed to tighten up poorly performed background vocals or horn sections. Use the
player with the best timing as key, and use the Hard Keying mode on the other players
to assure that all off-time notes are being gated. Today, it's just a cool effect.
25
Technical Stuff
Key and Mouse Commands
All numbers in the GUI are clickable. This allows you to easy select a setting by clicking on
the wanted value. Hovering above a label will turn the mouse pointer into a pointing hand.
Mouse
UP/DOWN
or
MOUSE WHEEL
(Mac only): Change a parameter, such as a knob or a switch.
Keyboard Commands
⌘ (Mac) or Ctrl (Win), while changing the parameter value.
FINE ADJUST:
R E S E T T O D E FA U LT :
Alt, while clicking on the knob or fader.
Pro Tools Specific Keyboard Commands
Ctrl+⌘/ÿ+Alt+click
AUTOMATION CONTROL WIND OW :
S HO W AU T O M AT IO N T R A C K:
Ctrl+⌘/ÿ+click
Mono and Stereo Operation
The V A L L E Y P E O P L E D Y N A - M I T E plug-in is designed to work in both stereo and mono.
How the different modes are selected depends on your host software. In most hosts you
can select these when you select the plug-in. In other cases, inserting one the plug-in on a
mono track will usually make it use the M O N O mode, while selecting it on a stereo track
makes it use the S T E R E O mode.
Inserting the Dyna-mite in
Couple” mode.
STEREO
mode makes it behave just as the real unit in “Stereo
Side Chain Operation
Since side chaining isn't offically supported by the VST 2 format (the VST format used by
most VST hosts), it might not work in your host. The plug-in will add two extra inputs
26
(inputs 3 and 4) and regards these as the external side chain input.
System Requirements
Supported sample rates: 44.1, 48, 88.2, 96, 176.4 and 192 kHz, in both mono and stereo.
• Mac OS X (10.4 or higher) or Windows XP or higher
• Mac: G4 or higher, Windows: PIII or higher
• Any VST, AU or RTAS compatible host application
• iLok USB key and the latest iLok drivers.
• DVD drive or Internet access for installation
Please, make sure that you always use the latest iLok driver. It is not included in the
Softube installer, but can be downloaded from www.ilok.com.
Buying Recommendations
The V A L L E Y P E O P L E D Y N A - M I T E is a very cool and affordable hardware limiter/expander.
Many people don't know how to use it and say they don't like it just because they cannot
operate it. Once you've learned the plug-in you will have no problem at all to operate the
real hardware, so if you find a unit—make sure you pick it up!
(The thing on top of the unit is a description of all the different modes, the same texts that
are displayed in our nifty little display.)
27
Valley People Dyna-mite plug-in was made by: Oscar Öberg – modeling, Niklas
Odelholm – graphics programming. Torsten Gatu – framework programming. Arvid Rosén
– modeling and framework programming. Ulf Ekelöf – 3D rendering. Original hardware was
designed by Valley People Incorporated.
© 2010 Softube AB, Sweden