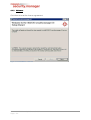
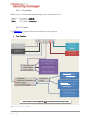
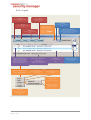
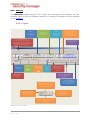
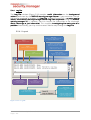
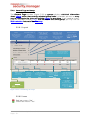
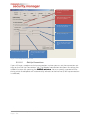
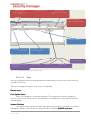
1
User manual
for the
IKARUS security.manager
© 2012 IKARUS Security Software GmbH
1
ABOUT IKARUS ................................................................................................................ - 4 -
2 INTRODUCTION ............................................................................................................... - 5 3 THE IKARUS SECURITY.MANAGER
SECURITY.MANAGER................................................................................. - 6 3.1 THE IKARUS SECURITY. MANAGER SERVER .......................................................................... - 7 3.2 THE IKARUS SECURITY. MANAGER UI .................................................................................. - 8 4 INSTALLING THE IKARUS SECURITY.MANAGER
SECURITY.MANAGER ........................................................... - 9 4.1 INSTALLING THE IKARUS SECURITY. MANAGER SERVER ....................................................... - 10 4.1.1 SYSTEM REQUIREMENTS.......................................................................................................... - 11 4.1.2 WELCOME ............................................................................................................................... - 12 4.1.3 LICENSE AGREEMENT .............................................................................................................. - 13 4.1.4 LDAP SETTINGS ..................................................................................................................... - 14 4.1.5 DEPLOYMENT SETTINGS .......................................................................................................... - 15 4.1.6 USER SETTINGS ...................................................................................................................... - 16 4.1.7 NETWORK SETTINGS ............................................................................................................... - 17 4.1.8 DATABASE SETTINGS .............................................................................................................. - 18 4.1.9 SELECTING THE INSTALLATION FOLDER ................................................................................... - 19 4.1.10 CONFIRM INSTALLATION ........................................................................................................ - 20 4.1.11
INSTALLATION COMPLETE...................................................................................................... - 21 4.2 INSTALLING THE IKARUS SECURITY. MANAGER UI ............................................................... - 22 4.2.1 SYSTEM REQUIREMENTS.......................................................................................................... - 23 4.2.2 WELCOME ............................................................................................................................... - 24 4.2.3 LICENSE AGREEMENT .............................................................................................................. - 25 4.2.4 SELECTING THE INSTALLATION FOLDER ................................................................................... - 26 4.2.5 CONFIRM INSTALLATION .......................................................................................................... - 27 4.2.6 INSTALLATION COMPLETE........................................................................................................ - 28 4.3 U PGRADING A LEGACY IKARUS SECURITY MANAGER X VERSION TO THE NEW IKARUS
SECURITY. MANAGER ................................................................................................................. - 29 5 THE IKARUS SECURITY.MANAGER
SECURITY.MANAGER UI ...........................................................................- 30 5.1 LOGIN ............................................................................................................................. - 30 5.1.1 SET PASSWORD ...................................................................................................................... - 31 5.1.2 CHANGE MANAGEMENT .......................................................................................................... - 32 5.1.3 SET LICENSE ........................................................................................................................... - 33 5.1.4 LICENSE VIOLATION ................................................................................................................ - 33 5.2 THE U SER INTERFACE....................................................................................................... - 35 5.2.1 DIRECTORY ............................................................................................................................. - 36 5.2.2 PENDING TASKS ...................................................................................................................... - 41 5.2.3 VIRUS LIST .............................................................................................................................. - 44 5.2.4 LOG FILE ................................................................................................................................. - 46 5.2.5 CHANGE LOG .......................................................................................................................... - 47 5.2.6 OVERVIEW PAGE ..................................................................................................................... - 48 5.2.7 PROPERTIES PAGE ................................................................................................................... - 49 5.2.8 GENERAL PAGE ON GROUPS ................................................................................................... - 51 5.2.9 GENERAL PAGE ON CLIENTS .................................................................................................... - 52 © 2012 IKARUS Security Software GmbH
Page - 2 -
5.2.10
5.2.11
5.2.12
5.2.13
5.2.14
5.2.15
5.2.16
NOTIFICATION BAR ............................................................................................................... - 54 IKARUS ANTI.VIRUS CONFIGURATIONS ................................................................................. - 55 IKARUS SECURITY.MANAGER SETTINGS ................................................................................ - 67 DIALOG “CLEAN HOST-ENTRIES FROM DATABASE” ................................................................. - 71 ABOUT DIALOG ..................................................................................................................... - 72 THE MENU BAR ..................................................................................................................... - 73 THE TOOLBAR ....................................................................................................................... - 76 -
6 THE SHARED DIRECTORY ..............................................................................................- 77 7 LICENSING INFORMATION
INFORMATION .............................................................................................- 78 7.1 REGISTRATION ................................................................................................................. - 78 7.1.1 LAYOUT .................................................................................................................................. - 78 7.2 ACTIVATION KEY.............................................................................................................. - 78 7.2.1 LAYOUT .................................................................................................................................. - 79 8 SOFTWARE DISTRIBUTION
DISTRIBUTION ............................................................................................- 80 8.1 INSTALLING THE IKARUS ANTI. VIRUS ................................................................................ - 81 8.2 U NINSTALLING THE IKARUS ANTI. VIRUS ............................................................................ - 83 9 CONFIG FILE ...................................................................................................................- 84 9.1 THE <CONFIG> SECTION .................................................................................................. - 85 9.2 THE <LDAP> SECTION ...................................................................................................... - 86 10
TABLE OF FIGURES ......................................................................................................- 87 -
11
GLOSSARY ....................................................................................................................- 89 -
© 2012 IKARUS Security Software GmbH
Page - 3 -
1
About IKARUS
As one of the first antivirus software providers, IKARUS is both a pioneer and a vibrant,
fast-growing company. For more than 25 years, IKARUS software has been a name you
can trust to provide outstanding antivirus protection and content security.
The development team recruited UNIX and Microsoft specialists as well as former employees from universities and research institutes. Through its numerous cooperation
arrangements and special agreements with IT security experts, IKARUS is able to provide up-to-the-minute information and responses in all areas relating to security software.
Our products range from simple yet highly effective antivirus protection (IKARUS
IKARUS anti.virus) to sophisticated software for networks and gateways (IKARUS
IKARUS securiti.virus
security.manager,
ty.manager IKARUS security.proxy)
security.proxy all the way to IKARUS web.security and IKARUS
my.mailwall,
my.mailwall a high-end managed security product that protects your network from viruses before they strike.
© 2012 IKARUS Security Software GmbH
Page - 4 -
2
Introduction
Thank you for choosing the IKARUS security.manager,
security.manager the simple and inspired solution that always provides the computers on your network with the latest virus and spam
database updates and IKARUS anti.virus versions. Basically, IKARUS securisecurity.manager distributes the databases and updates from a central point to the computers on your network to save bandwidth, download volume, and, above all, administration time and costs.
© 2012 IKARUS Security Software GmbH
Page - 5 -
3
The IKARUS security.manager
The IKARUS security.manager allows for installing, updating, uninstalling, and configuring the IKARUS anti.virus on your network.
The IKARUS security.manager consists of two separate applications: the IKARUS ses ecurity.manager Server and the IKARUS security.manager UI.
UI Both can be installed
and run on different computers separately from each other. This separation allows you
to control and maintain your network protection from anywhere you want, anytime you
want.
© 2012 IKARUS Security Software GmbH
Page - 6 -
3.1
The IKARUS security.manager Server
The IKARUS security.manager Server is the core of the IKARUS security.manager.
security.manager It
is the part that actually does all the distributional and statistical work and also handles
the communication between the IKARUS security.manager and the IKARUS anti.virus
installed on the computers on your network.
The IKARUS security.manager Server runs on a Windows server operating system as
a service. All of the settings and information the IKARUS security.manager Server
holds are saved in a MSSQL database, which can but does not need to reside on the
computer where the IKARUS security.manager Server is installed. The communication
between the IKARUS security.manager and the IKARUS anti.virus on your network is
established via TCP using 9887 as the default port number. That port can be modified
in the Config File of the IKARUS security.manager Server.
Server
Since the IKARUS security.manager Server needs to perform executional tasks remotely on computers on your network, it needs appropriate rights. Therefore, we highly
recommend installing the IKARUS security.manager Server service using a user account with administrative rights for your domain. This will ensure that the IKARUS secusecurity.manager Server is allowed to install and administer the IKARUS anti.virus on computers within the domain on your network. For further information about this topic and
the administration of computers outside your domain, please read the Software Distribution chapter.
© 2012 IKARUS Security Software GmbH
Page - 7 -
3.2
The IKARUS security.manager UI
The IKARUS security.manager UI provides the graphical interface to control the
IKARUS security.manager Server.
Server You can install the IKARUS security.manager UI on
any computer you wish to control the IKARUS security.manager Server from. For more
information about the layout and different windows of the IKARUS security.manager
UI,
UI refer to section 5.2.
Note:
Note You must run the UI as an administrator; otherwise the update of the UI to a later
version might fail.
© 2012 IKARUS Security Software GmbH
Page - 8 -
4
Installing the IKARUS security.manager
In this chapter, you will be guided through the installation process of the IKARUS secusecurity.manager.
rity.manager The setup is split into two separate installation processes: the IKARUS
security.manager Server setup and the IKARUS security.manager UI setup. Both setup processes will automatically check your target system for installed prerequisites
needed for the application to run and will optionally install missing software requirements automatically before the actual installation of the IKARUS product is started. Note
that a restart of the target computer may be required during the installation of missing
prerequisites. In this case, the setup process will automatically continue after a successful restart of the computer.
Note:
Note To install the Server and the UI you need administrative rights. If the User Access
Control feature is enabled, launch setup using the Run as Administrator command.
© 2012 IKARUS Security Software GmbH
Page - 9 -
4.1
Installing the IKARUS security.manager Server
To launch the installation of the IKARUS security.manager Server,
Server double-click the
Setup-- ISM(server)_xxxx
Setup
ISM(server)_xxxx file (where xxxx represents the version number).
© 2012 IKARUS Security Software GmbH
Page - 10 -
4.1.1
System Requirements
Hardware requirements:
• x86-based PC with 2 GHz or better
• 1 GB RAM
• Screen resolution: 1024 × 768 or higher
• Approx. 500 MB of disk space (depending on the log volume and the download-cache size)
• Internet connection
Software Requirements:
• Windows 2003 Server or later (32-bit/64-bit)
• Windows XP or later (32-bit/64-bit)
• MSSQL Server (Express) 2005 or later (does not need to be installed on the
target machine)
• Active directory (Microsoft Windows Domain structure)
© 2012 IKARUS Security Software GmbH
Page - 11 -
4.1.2
Welcome
Click Next to read the license agreement.
Figure 4-1 Server Installation – Welcome
© 2012 IKARUS Security Software GmbH
Page - 12 -
4.1.3
License Agreement
The licensing conditions must be accepted to install the IKARUS security.manager
Server.
Server
Figure 4-2 Server Installation – License Agreement
© 2012 IKARUS Security Software GmbH
Page - 13 -
4.1.4
LDAP Settings
If the IKARUS security.manager Server setup is unable to automatically read out and
provide the necessary information about your LDAP configuration, you may define the
server name and credentials the IKARUS security.manager Server should use for
communicating with the LDAP server.
Figure 4-3 Server Installation – LDAP Settings
© 2012 IKARUS Security Software GmbH
Page - 14 -
4.1.5
Deployment Settings
To distribute the IKARUS anti.virus on your network, the IKARUS security.manager
Server needs a place to store the binaries used for installing the IKARUS virus.utilties.
virus.utilties
For that purpose, you will need to set up (if you have not done so already) a network
share where all clients you want to install the IKARUS anti.virus on have at least read
access to. For further information about the IKARUS anti.virus deployment, refer to the
Software Distribution and Shared Directory sections.
Figure 4-4 Server Installation – Deployment Settings
© 2012 IKARUS Security Software GmbH
Page - 15 -
4.1.6
User Settings
The IKARUS security.manager Server is installed as a service. Services can be installed with the local system accounts or a user account within your domain. Since the
IKARUS security.manager Server needs appropriate rights to perform a binary execution remotely, it is highly recommended to install the IKARUS security.manager Server
service with a user account which is allowed to administer the domain.
Figure 4-5 Server Installation – User Settings
© 2012 IKARUS Security Software GmbH
Page - 16 -
4.1.7
Network Settings
If you have set up a proxy server for your Internet connection, you need to specify the
correct settings for your proxy server to allow the IKARUS security.manager Server to
access the Internet. The accuracy of the information you provide here is mandatory for
an expedient use of the IKARUS security.manager.
security.manager No Internet access means that no
updates can be retrieved from the IKARUS update servers; thus, your network will be
open to possible threats.
threats
Figure 4-6 Server Installation – Network Settings
© 2012 IKARUS Security Software GmbH
Page - 17 -
4.1.8
Database Settings
The IKARUS security.manager Server needs a MSSQL database to store the settings,
configurations, and the client information. The database may reside on the computer
where the IKARUS security.manager Server will be installed. If you want to specify a
MSSQL database on a different computer, click User defined connection and replace
the SERVER=.\ string with SERVER=SERVER_NAME\. (Replace “SERVER_NAME” with
the server name of the target computer where the MSSQL database resides.)
If you already have at least one MSSQL instance installed, setup will list the installed
instances you can choose from. If no MSSQL instances be installed locally, you will be
asked if you want to install Microsoft SQL Express 2005 or Microsoft SQL Express
2008. (These programs are free of charge.) If the download process fails, you may want
to check the proxy server information you provided in the Network Settings dialog to
ensure your Internet connection is working.
Figure 4-7 Server Installation – Database Settings
© 2012 IKARUS Security Software GmbH
Page - 18 -
4.1.9
Selecting
Selecting the Installation
Ins tallation Folder
In this dialog, you can choose the destination folder to install the IKARUS securisecurity.manager Server files to.
Figure 4-8 Server Installation – Select Installation Folder
© 2012 IKARUS Security Software GmbH
Page - 19 -
4.1.10 Confirm Installation
This is the final step before the IKARUS security.manager Server files are actually installed. Click Next to start the copy process.
Figure 4-9 Server Installation – Confirm Installation
© 2012 IKARUS Security Software GmbH
Page - 20 -
4.1.11
Installation Complete
Congratulations! You successfully installed the IKARUS security.manager Server.
Server If a
different text is displayed in this dialog, contact the IKARUS support hotline.
Figure 4-10 Server Installation – Installation Complete
© 2012 IKARUS Security Software GmbH
Page - 21 -
4.2
Installing
Installing the IKARUS security.manager UI
To launch the installation of the IKARUS security.manager UI,
UI double-click the SetupSetupISM(UI)_xxxx file (where xxxx represents the version number).
© 2012 IKARUS Security Software GmbH
Page - 22 -
4.2.1
System Requirements
Hardware requirements:
• x86-based PC with 2 GHz or better
• 1 GB RAM
• Screen resolution: 1024 × 768 or higher
• Approx. 20 MB of disk space.
• LAN connection
Software requirements:
• Windows 2003 Server or later (32-bit/64-bit)
• Windows XP or later (32-bit/64-bit)
• .NET framework 4.0
© 2012 IKARUS Security Software GmbH
Page - 23 -
4.2.2 Welcome
Click Next to read the license agreement.
Figure 4-11 UI Installation – Welcome
© 2012 IKARUS Security Software GmbH
Page - 24 -
4.2.3
License Agreement
The licensing conditions must be accepted to install the IKARUS security.manager UI.
UI
Figure 4-12 UI Installation – License Agreement
© 2012 IKARUS Security Software GmbH
Page - 25 -
4.2.4
Selecting
Selecting the Installation Folder
In this dialog, you can choose the destination folder to install the IKARUS securisecurity.manager UI files to.
Figure 4-13 UI Installation – Select Installation Folder
© 2012 IKARUS Security Software GmbH
Page - 26 -
4.2.5 Confirm Installation
This is the final step before the IKARUS security.manager UI files are actually installed.
Click Next to start the copy process.
Figure 4-14 UI Installation – Confirm Installation
© 2012 IKARUS Security Software GmbH
Page - 27 -
4.2.6 Installation Complete
Congratulations! You successfully installed the IKARUS security.manager UI.
UI If a different text is displayed in this dialog, contact the IKARUS support hotline.
Figure 4-15 UI Installation – Installation Complete
© 2012 IKARUS Security Software GmbH
Page - 28 -
4.3
Upgrading
Upgrading a Legacy IKARUS Security Manager X Version to the New IKARUS securisecur ity.manager
A legacy version of IKARUS Security Manager X will automatically upgrade to the new
IKARUS security.manager. (This requires to enable silent updates – see section
5.2.12.4.)
After the upgrade is complete, the installation path is unchanged but the directory structure contained in will have been rearranged, and binary filenames will have changed.
Therefore, you might need to create new firewall rules as appropriate.
When the upgrade has been completed successfully, the database will assume the new
structure and layout.
During the upgrade, a backup of your old database named
ISMX_DATABASE_BACKUP.bak will be created in the log folder of your installation.
© 2012 IKARUS Security Software GmbH
Page - 29 -
5
5.1
The IKARUS security.manager UI
Login
When launching the IKARUS security.manager UI,
UI the first window to be displayed is
the Login window (Figure 5-1). You will be asked for credentials and the server to connect to (i.e. the server where the IKARUS security.manager Server is installed). The
default TCP port the connections are established with is 9887 for the IKARUS securisecurity.manager Server to IKARUS security.manager UI communication and 9888 for the
communication between the IKARUS security.manager Server and the IKARUS anti.virus clients.
clients You can change the ports in the Config File of the IKARUS securisecurity.manager Server.
Server
Figure 5-1 UI – Login
© 2012 IKARUS Security Software GmbH
Page - 30 -
5.1.1
Set Password
At the initial login attempt, you do not need to enter a password since you have not
configured it yet. Leave the Password field empty and click the OK button. You will then
be prompted to enter a new password for the specified user.
Figure 5-2 UI – Set Password
© 2012 IKARUS Security Software GmbH
Page - 31 -
5.1.2
Change Management
If Ask for Request for Change (RfC) ID is enabled in the IKARUS security.manager
Server settings (see chapter 5.2.12), you will be asked to enter a request for change ID
in the login window (Figure 5-1). If Ask for comment on log-in screen (see chapter 5.2.5)
is enabled, you will be asked to enter a comment each time you try to log in. This is
useful if you want to track any changes made to settings, and for indicating what you
are going to do during that session.
Figure 5-3 UI – Change Management
© 2012 IKARUS Security Software GmbH
Page - 32 -
5.1.3
Set License
If you not have chosen a valid license file during the setup of the IKARUS securisecurity.manager Server,
Server you will now be prompted again to either choose a license file or
complete the registration using an Activation Key.
5.1.4
License Violation
If you are not a current IKARUS security.manager X user, you may skip this section; if
you are, there are a number of reasons why there are more administered clients on
your network than actually allowed. This is a license violation, which is handled in this
new version of the IKARUS security.manager.
security.manager You will be prompted to remove the
excessive number of clients from administration to meet the requirements of the license
you are using.
License Information
Displays the expiration
date and how much of
your license capacity
is used and free.
Shows how many clients
you need to remove from
administration.
Moves all clients to the
right-hand list.
Moves selected clients to
the right-hand list.
Moves selected clients to
the left-hand list.
Moves all clients
to the left –hand list.
Applies all changes. This
button is only enabled
when you choose an
appropriate number of
clients.
Renew License
Opens the registration window,
see section 7.1.
Lists of all clients that
are administrated.
Figure 5-4 UI – License Violation
© 2012 IKARUS Security Software GmbH
Page - 33 -
List of all clients that will
be removed from administration.
You may cancel this process but will not be allowed to login to the IKARUS securisecurity.manager UI until you solve this issue. The clients will still be administered and protected by the IKARUS security.manager Server if you cancel this process.
If you need to purchase new licenses or have any questions concerning your license,
please feel free to contact our sales team at [email protected].
© 2012 IKARUS Security Software GmbH
Page - 34 -
5.2
The User Interface
The layout of the IKARUS security.manager UI can be customized. Each window can
be docked or undocked and moved anywhere on the screen. The window layout will
be stored upon closing the IKARUS security.manager UI.
UI
Figure 5-5 UI – User Interface
© 2012 IKARUS Security Software GmbH
Page - 35 -
5.2.1
Directory
The Directory (Figure 5-6) is the center of almost all client related operations. It holds
the clients of your Active Directory and the clients you manually add (e.g. clients that
exist outside your domain or in a different domain). All clients in the Active Directory are
automatically listed with their FQDN.
FQDN It is highly recommended to always specify the
FQDN of manually added clients – clients with the same name might exist in differdiffe rent domains and there is no way to distinguish between them
th em.
em
Toolbar
See Figure 5-7
Group/Client Tree
See Figure 5-8
Filter Section
See Figure 5-9
Figure 5-6 UI – Directory
© 2012 IKARUS Security Software GmbH
Page - 36 -
5.2.1.1 Formatting
Node names are formatted depending on their respective status:
Normal: This client is online.
online
Italic:
This client is offline.
offline
Bold:
This node is selected.
Bold
selected
5.2.1.2 Layout
The Directory is separated into the following three sections:
1. The Toolbar:
Toolbar:
Refresh the
Directory
Collapse all
group nodes
The clients are reenumerated.
Expand all
group nodes
Start IKARUS
anti.virus (*)
Fast System Scan (*)
Scans the windows directory
and active processes.
System Partition (*)
Scans the system partition.
Entire Computer (*)
Scans the entire system.
Administrate/Exclude
from administration (*)
Allows/prevents updates and
system protection.
Administrate/Exclude from
administration forced (*)
Ignores administration from another
IKARUS security.manager.
Inherit Settings/Do not
Inherit Settings (*)
Settings are taken/not taken
from the parent node.
* These actions will be applied to the currently selected node of the
tree.
Figure 5-7 UI – Directory Toolbar
© 2012 IKARUS Security Software GmbH
Page - 37 -
2. The Group/
Group/C
roup/Client Tree:
Group node
(Selected)
Right-click will open the context menu.
(*)
Client node
(Not selected)
Add Group (**)
Add Computer (**)
Delete (**)
Rename (**)
Start IKARUS anti.virus (*)
Save IKARUS anti.virus Configuration (*)
Administrate/Exclude
from administration (*)
Allows/prevents updates and
system protection.
Administrate/Exclude from
administration forced (*)
Ignores administration from
another ISM.
Inherit Settings/Do not
Inherit Settings (*)
Settings are taken/not taken
from the parent node.
Collapse (*)
Expand (*)
Install IKARUS anti.virus (*)
Update client (*)
Uninstall IKARUS anti.virus (*)
* These actions will be applied to the currently selected node of the tree.
** These actions are only available on nodes within the Manual g roup (see
section 5.2.1.4 for more information).
Figure 5-8 UI – Directory Tree
© 2012 IKARUS Security Software GmbH
Page - 38 -
3. The Filter Section:
Filter
Applies a case-insensitive filter
by name. Only nodes meeting
the filter criteria will be displayed in the directory.
All (active)
Overview of all clients in
your directory and all
manually added clients.
Jump to Next Match
Selects the next node matching the filter pattern.
Infected (inactive)
Overview of all
clients that are
infected.
Figure 5-9 UI – Directory Filter
© 2012 IKARUS Security Software GmbH
Page - 39 -
Warning (inactive)
An overview of all outdated clients, i.e. clients with a virus
database, spam database (should spam detection be enadatabase
bled) and anti.virus update being older than 2 weeks.
weeks Also
includes clients that are administrated and online but do
not execute IKARUS anti.virus or cannot be reached by
the IKARUS security.manager.
security.manager
5.2.1.3 Icons
The icons of the nodes in the Directory provide a quick overview of the node statuses.
This node is a group.
group
This client is offline.
offline
This client is online and has no IKARUS anti.virus installed.
installed
This client is online,
online has the IKARUS anti.virus installed,
installed and is administered.
administered
This client is online,
online has the IKARUS anti.virus installed,
installed and is
not administered.
administered
(Overlaid) This node inherits settings from its parent.
parent
(Overlaid) This node or one of its children is infected.
infected
(Overlaid) This node or one of its children is outdated or administered but unu nreachable.
reachable
5.2.1.4 Manual group
The Manual group (displayed as MANUAL
MANUAL in the directory) is the bottommost group
node in the root (All
All)
All node of the directory.
directory If you want to add computers from other
domains, or from no domain at all, this is the place to do so. You can add, rename, remove, and move nodes (clients and groups).
5.2.1.5 Multi-selection
You can select multiple nodes by holding the Ctrl key on your keyboard while
wh ile clickclicking. Consider multi-selection a temporary group node which stops existing when multiing
selection is canceled (e.g. by simply selecting a single item). Actions and views availaavailable for group nodes are also available for a temporary group.
group
5.2.1.6 Administering Groups
If you administer a group, all children (clients and subgroups) will inherit from that group
and binary updates will be automatically allowed for each client. All clients within the
group where the IKARUS anti.virus are installed will be administered by your IKARUS
security.manager.
© 2012 IKARUS Security Software GmbH
Page - 40 -
5.2.2 Pending Tasks
Actions such as installing the IKARUS anti.virus or (un)administering clients are configured as tasks on the IKARUS security.manager Server.
Server Tasks are session-specific and
get lost when the IKARUS security.manager UI login session is closed. The Pending
Tasks window (Figure 5-10) displays all available tasks (either client specific and for the
whole Directory tree) with their current states, results and resolve times. Consider the
resolve time the date when the task state will be re-evaluated. Depending on the task
state, an action will be performed to resolve the task.
© 2012 IKARUS Security Software GmbH
Page - 41 -
5.2.2.1 Layout
Pending
Processed
Shows or hides pending
tasks.
Shows or hides processed tasks.
Refresh
Active
Shows or hides active
tasks.
Client specific
Waiting
Shows or hides waiting
tasks.
(Sub) Task (Selected)
Shows the status of the
task, see section 5.2.2.2.
Double-clicking an item will
open the detail view, see
Section 5.2.2.3.
Right-click will open
the context menu.
Retrieves an updated
task list.
Displays tasks from
the currently selected
node in the Directory if
enabled, otherwise all
tasks are displayed.
Next Scheduled Resolve Time
The date and time all tasks
will be resolved again.
Task List
List of all available
tasks.
Force
Stop
Forces the completion
of the task.
Stops the completion of
the task.
Restart All
Restarts all subtasks.
Restart Incomplete
Restarts only the incomplete subtasks.
Details
Opens the detail task
view, see Section
5.2.2.3.
Figure 5-10 UI – Pending Tasks
© 2012 IKARUS Security Software GmbH
Page - 42 -
Automatic Refresh
Retrieves an updated task list
automatically based on the userdefined update Interval.
Update Interval
Sets the update interval
of the task list.
5.2.2.2 Task States
Icon
State
Active
Pending
Waiting
Processed
Not processed
Processed with an error
Reason
The action is currently
in progress.
The action has not
been processed yet.
The action has been
launched at least once
but the target client(s)
were not reachable.
The action was successfully processed.
The action was not
processed because
the user canceled the
task.
The action was processed but there was
an error during the
action.
Action on Resolving
Evaluates the task state
only.
The task will be processed
soon.
Will retry to reach target
clients.
Evaluates the task state
only.
Evaluates the task state
only.
Evaluates the task state
only.
5.2.2.3 Task Details
Refresh
Retrieves an updated
host- and task list.
Automatic Refresh
Number of Hosts
Retrieves an updated host list
automatically based on the userdefined update Interval
Shows the amount of
hosts which are targeted in this task.
Host State
Update Interval
Shows the status of
the target host, see
Section 5.2.1.3.
Sets the update interval
of the host list.
Hostname
Shows the name of the
target host.
Host List
List of all target hosts.
Result
Force
Shows the result of the
task.
Forces the completion
of the task on this host.
Right-click will open
the context menu.
Cancel
Cancels the completion
of the task on this host.
Figure 5-11 UI – Task Details
© 2012 IKARUS Security Software GmbH
Page - 43 -
5.2.3 Virus List
The Virus List window (Figure 5-12) is useful for investigating the infections on your
network. You can view all infections found or just those on the node currently selected
in the Directory.
5.2.3.1 Layout
Date
The date the
infection was
found.
Filename
The filename of
the infection.
Virus Description
Path
The name of the infection. Clicking will open
the virus dictionary for
this particular infection.
The directory the
infection was
found in.
Client Specific
The total amount
of infections shown
in the list.
Shows infections of all clients if
enabled, otherwise only those of
the currently selected node in the
Directory, see Section 5.2.1.
Is Active?
Ignore this.
Shows the
status of the
client, see
Section
5.2.1.3.
Hostname
Shows the
name of the
client.
Refresh
the virus
list.
Purge System
Deletes the selected infections of
the list.
Select All
Temporary Unblock
(De)Selects all
entries.
Releases the file from
quarantine.
Save & Delete
Right-clicking an infection entry will open
the context menu.
Creates a backup of the
infected file and deletes
the original.
Virus Dictionary
Details
Opens the virus dictionary entry for the
infection.
Opens the detail view
for this infection, see
Section 5.2.3.2.
Send to IKARUS Virus Lab
Sends the infection to IKARUS
for analysis.
Figure 5-12 UI – Virus List
© 2012 IKARUS Security Software GmbH
Page - 44 -
5.2.3.2 Virus Information
The Virus Information window (Figure 5-13) displays useful information about a particular infection. You can copy the information to the clipboard by clicking the Copy to Clipboard button.
Figure 5-13 UI – Virus Information
© 2012 IKARUS Security Software GmbH
Page - 45 -
5.2.4 Log File
The Log File window (Figure 5-14) provides useful information on the background
actions performed by the IKARUS security.manager Server.
erver If you encounter unusual
behavior or any kind of problem, the Log File window (Figure 5-14) is an easy way to
access the IKARUS
IKARUS security.manager Server log from anywhere using the IKARUS
security.manager UI.
UI In addition, you can narrow the information to be displayed:
Alerts, Warnings or just information.
information This simplifies investigating the root cause of a
problem
problem.
lem Alternatively, you may use the search field to step through the Log File.
File
5.2.4.1 Layout
Refresh
Retrieves an updated log file
from the ISM server.
Alert
Shows or hides alerts.
Automatic Refresh
Warn
Shows or hides warnings.
Info
Shows or hides information.
Retrieves an updated log file
from the ISM server automatically based on the userdefined update interval.
Auto Scroll
Scrolls to the bottom of the log
file on automatic refreshes.
Search field
Find
Update Interval
Set a case-insensitive
search pattern.
Select and jump to
the next match.
Set the interval at which the
log file should be updated.
Select all
Log file text
Right-clicking will open
the context menu.
Select all text in the log
file.
Copy to Clipboard
Copy the current selection to the clipboard.
Figure 5-14 UI – Log File
© 2012 IKARUS Security Software GmbH
Page - 46 -
5.2.5 Change Log
The Change Log window (Figure 5-15) provides an overview of the changes a user
made to settings and when they have occurred.
5.2.5.1 Layout
Id
Category
Field Id
Refresh
Identification number of the
modification.
Shows where the modification happened.
Shows which particular
setting was modified.
Updates the
change log list.
Old Value
New Value
Timestamp
Comment
Shows the value before the
modification.
Shows the value after the
modification.
Shows when the value
modification happend.
Shows the
comment entered at the
login process.
Figure 5-15 UI – Change Log
© 2012 IKARUS Security Software GmbH
Page - 47 -
5.2.6 Overview Page
The Overview Page window (Figure 5-16) aggregates general information on the
IKARUS security.manager Server and statistical information on the clients in the Directory.
rectory
5.2.6.1 Layout
Refresh
Update information on this page.
Server information
Displays information about
the ISM Server version and
the host it is running on.
Quick client overview
Provides a quick overview
of all clients in the directory.
License Information
Displays the expiration
date and how much of
your license capacity
is used and free.
Update Overview
Provides a quick overview
of the version numbers
the ISM Server has ready
to deploy to its clients.
Figure 5-16 UI – Overview Page
© 2012 IKARUS Security Software GmbH
Page - 48 -
5.2.7
Properties Page
The Properties Page window (Figure 5-17) provides a quick overview of the IKARUS
anti.virus Configuration a client or group uses and when and how updates are isissued for this client or group. You can set these settings clientclient- wide or groupgroup- wide and
let a group’s clients inherit settings from the parent level.
level If you choose to inherit
settings for a group,
group you will be asked if you also want the clients in that group to
inherit the settings
settings;
tings on the contrary, if you choose to remove the inheritance settings
of a group,
group you will be asked if you want to remove
rem ove the inheritance settings from the
clients
in
that
group
as
well.
well
5.2.7.1
Update Section
In the Update Section,
Section , you can specify when and how updates are performed.
performed If you
disallow binary updates, only virus and spam databases will be updated;
updated; the
IKARUS anti.virus will not.
not If you for any reason want to hide the IKARUS anti.virus
system tray status notifications (e.g. on a computer used for presentations where
pop-up windows would otherwise distract the audience),
audience enable the Disable
Disable system
tray Status Notifications checkbox.
5.2.7.2
Rights Management
The Rights Management section is useful for clients that are outside the domain of
the IKARUS
IKARUS security.manager Server.
Server Since the IKARUS security.manager Server
needs appropriate rights to establish a connection and execute binaries remotely,
remotely,
you can specify credentials having the appropriate rights on this client to perform
these operations.
operations
© 2012 IKARUS Security Software GmbH
Page - 49 -
5.2.7.3 Layout
Node
Inherit Settings
Shows the name and status icon
of the current node.
Inherits/disinherits settings from the
parent node. Inheritance is saved
automatically e.g. you do not need
to click the „Save” button.
IKAURS anti.virus Configuration
Sets the configuration this client is
using.
Update Time
Choose the time span in which
updates are performed.
Allow Binary Updates
Allows updates to the IKARUS
anti.virus binaries. Databases will
still be updated if binary updates
are disallowed.
Disable system tray Status
Notifications
Prevents the IKARUS anti.virus
tray status notifications to pop up.
Get Updates from External
Servers
Allows IKARUS anti.virus to download updates from the Internet
should the ISM be unable to
provide updates.
Username/Password
Sets the credentials to be used
for interaction with this client. If
the client is not in the same domain as the ISM server, setting
these credentials correctly is
mandatory to ensure correct
administrative behavior on this
client.
Browse Directory Group
Opens the Directory Group
browser where you can choose
the group the client will belong to
to be allowed being administrated.
Delete restriction
Removes a previously set Directory Group restriction.
Save
Saves these settings.
Figure 5-17 UI – Properties Page
© 2012 IKARUS Security Software GmbH
Page - 50 -
Cancel
Discards any changes
made.
5.2.8 General Page on Groups
The General Page window (Figure 5-18) on groups
groups displays statistical information
about clients within the currently selected group node.
node. It provides you with an easy
way to investigate the status of multiple clients in one place.
place If you need to investigate the status of multiple clients that are not in the same group,
group you may use the
MultiMulti- selection feature of the Directory.
Directory
5.2.8.1 Layout
Node
Shows the name
and status icons
of the current
node.
Total Number of
Viruses
Shows the total
number of infections
on the current node.
Number of Clients Online
Number of Clients Guarded
Shows the total
number of online
clients on the current node.
Shows the total
number of guarded
clients on the current node.
Administrated
Shows the total
number of administrated clients on the
current node.
Online
Service Installed
Shows the
online status
of this client.
Shows the service
installation status of
this client.
Status Icon
Name
Infections
Administrated
Last Update
Shows the
status icons of
this client.
Shows the
name of
this client.
Shows the number
of infections on this
client.
Shows the administration status of
this client.
Shows the date in
UTC of the last
update process on
this client.
Clients
Shows a list of
clients in the current
node.
Figure 5-18 UI – General Page on Groups
5.2.8.2 Icons
Red icon means “No“
Green icon means “Yes“
© 2012 IKARUS Security Software GmbH
Page - 51 -
Last Time
Online
Shows the date (in
UTC format) of the
last time this client
was online.
5.2.9 General
Ge neral Page on Clients
The General Page Window (Figure 5-19) of a Client displays detailed information on
the currently selected client.
client
© 2012 IKARUS Security Software GmbH
Page - 52 -
5.2.9.1 Layout
Node
Shows the name and status icons of the current node.
General
Displays online,
service installation
and administration
statuses of this client.
Update
Displays the time of the last
update to this client and the
date the next update
process will occur.
Versions
Displays the
IKARUS anti.virus,
database, scan engine
and update versions
of this client.
Protection
Displays the
serial number,
scan status,
number of infections
and protection
mechanisms that are
enabled or disabled.
Figure 5-19 UI – General Page on Clients
© 2012 IKARUS Security Software GmbH
Page - 53 -
5.2.10 Notification Bar
The N otification Bar control (Figure 5-20) is hidden by default. It will only be displayed
if there have been changes to the virus list of a client. If the IKARUS security.manager
UI is not the active (foreground) application, the IKARUS security.manager UI entry in
the Windows taskbar will start flashing to inform you that there are virus list changes.
5.2.10.1
Layout
Hide
Hides this notification bar.
Clients
List of all clients whose virus
list has changed. Clicking on
the client name will change to
the Directory entry.
Figure 5-20 UI – Notification Bar
© 2012 IKARUS Security Software GmbH
Page - 54 -
5.2.11 IKARUS anti.virus Configurations
The IKARUS anti.virus Configurations window (Figure 5-21) lists all available IKARUS
anti.virus configurations and the clients that use them. You can edit a configuration by
clicking the Edit selected Configuration button or double-clicking the configuration you
want to alter. For further information about the IKARUS anti.virus configuration and the
various settings, refer to the IKARUS anti.virus manual.
manual
5.2.11.1
Add Configuration
Layout
Edit
selected
Configuration
Delete selected Configuration
Import Configuration
Export selected Configuration
List of all
available
configurations
Shows or
hides a list of
all clients that
use the selected configuration
List of all clients that use
the selected
configuration
Figure 5-21 UI – IKARUS anti.virus Configurations
5.2.11.2
General
On the General tab of the IKARUS anti.virus Configuration dialog, all necessary protection settings can be enabled or disabled. The configuration can be saved by clicking
the OK or the Save button and the changes can be discarded by clicking the Cancel
button. Clicking the OK or Cancel buttons will also close the IKARUS anti.virus ConfigConfig-
© 2012 IKARUS Security Software GmbH
Page - 55 -
uration dialog.
Enables or disables
system protection (if
disabled, all other
options will be disabled, too)
Enables or disables
protection for Internet
downloads
Enables or disables
spyware protection
Enables or disables
dialer protection
Figure 5-22 Configuration General tab
5.2.11.3
E-mail
On the e-mail tab of the IKARUS anti.virus Configuration,
Configuration e-mail protection of the client
can be enabled or disabled. Additionally, the administrator can configure various settings such as where the scan report is placed in the e-mail. With incoming and outgoing
e-mails, the e-mail scan report can be positioned at the beginning or the end of the email or be omitted.
© 2012 IKARUS Security Software GmbH
Page - 56 -
Enables or disables email protection
Specifies whether
attachments should
be saved on the client
side
Shows the scan status
Sets the position of
the scan report in
incoming mail
Sets the position of
the scan report in
outgoing mail
Figure 5-23 Configuration e-mail tab
5.2.11.4
Update
All settings necessary for updates to the IKARUS anti.virus are configured on the Update tab. In particular, when using a proxy server, you need to specify the correct settings here.
© 2012 IKARUS Security Software GmbH
Page - 57 -
Enables automatic
search
Automatically installs
product updates
Enables/disables use
of a proxy server
Proxy-server port
The password for the
proxy server if needed
Proxy-server address
The username for the
proxy server if needed
Figure 5-24 Configuration Update tab
5.2.11.5
Dial-Up Connections
If you still have a modem or dial-up connection in place you can set the connection settings on the Dial-Up Connections tab. The Modem connection tab allows for setting the
autodial function for updating the IKARUS anti.virus.
anti.virus You can specify a period of time
during which AutoUpdate will automatically connect to the Internet (if dial-up connection
is selected).
© 2012 IKARUS Security Software GmbH
Page - 58 -
Enter the dial-up or
modem connection
name here
Enables automatic dialing
Sets the time frame
when the connection is
automatically established
Figure 5-25 Configuration Dial-Up Connections tab
5.2.11.6
Exclusions
On the Exclusions tab, you can select files and process that will be excluded from the
IKARUS anti.virus scan. This is useful when you want to exclude a service from the
scan that is already using a considerable amount of the system resources (e.g. MP3,
holiday photos, etc.), or if you do not want to scan a specific directory.
If you have set environment variables for specific folders/drives you want to exclude
system-wide, use this function rather than specifying the path. If the path is different on
every host, the IKARUS anti.virus
an ti.virus will exclude the correct path. Use Ctrl + Spacebar in
the textbox to display all environment variables of your current system (i.e. the system
where the user interface is installed).
© 2012 IKARUS Security Software GmbH
Page - 59 -
Enables or disables file
scanning for files bigger
than the specified size
Adds paths and environment variables on
the file exclusion tab
This is a list of already
selected
paths/environment variables
If you are not sure
whether there is an
environment variable for
a path, click Generalize
Paths
The path you entered
The path replaced with
environment variables
Figure 5-26 Configuration Exclusion tab (File exclusion)
© 2012 IKARUS Security Software GmbH
Page - 60 -
Check if you want to
apply the change
Add processes here
that should not be
scanned
Figure 5-27 Configuration Exclusion tab (Process exclusion)
5.2.11.7
Logs
On the Logs tab, the administrator defines actions that will be logged in the IKARUS
anti.virus.
anti.virus
Logs the system supervision to the IKARUS
anti.virus main log.
Enable if logs should be
written for the scans.
Enable if all data
should be recorded.
An existing log will be
overwritten when a new
scan is started.
Figure 5-28 Configuration Logs tab
© 2012 IKARUS Security Software GmbH
Page - 61 -
5.2.11.8
Extras
Use the Extras tab to restore the defaults of the IKARUS anti.virus and to enable system protection for the startup processes of your operation system.
Start system protection
on startup
Restore the IKARUS
anti.virus default configuration
Figure 5-29 Configuration Extras tab
5.2.11.9
Anti-Spam
The IKARUS AntiAnti- Spam Module allows for filtering e-mail received in Outlook, Outlook
Express, or Windows Mail. Click the Activate Anti-Spam option in the settings of IKARUS
anti.virus to enable spam protection.
The Anti-Spam Module will be enabled after the subsequent program restart.
For configuring spam evaluation, click the yellow and red controls (yellow indicates
possible spam, and red indicates spam).
At the bottom, you can choose the action to perform when receiving spam mail:
- Mark e-mail with a “Possible Spam” label in the subject line, or
- Move mail to the junk mail folder of your mail client
E-mail considered possible spam will always be labeled in the subject line but will remain in the inbox of your mail client.
© 2012 IKARUS Security Software GmbH
Page - 62 -
Enable the Anti-Spam
module
Spam assessment
Anti-Spam Action
Mark Mail, Move Mail
Opens the Advanced
Spam Protection dialog
Figure 5-30 Configuration Anti-Spam tab
Advanced Spam Protection:
rotection :
This option allows for configuring your own spam filter. You can define spam rules for
senders, recipients, subjects, and contents.
© 2012 IKARUS Security Software GmbH
Page - 63 -
E-mail Section
Content to parse for
Sender, recipient, subject,
content
Type of e-mail
Regular mail, possible spam,
spam
Click to enable advanced spam protection
List entry e-mail type
List entry e-mail section
List entry content
Move to Bottom
Delete Advanced Spam
Protection
Move to Top
Move up
Move down
Figure 5-31 Configuration Advanced Spam Protection
5.2.11.10
Scan
You can configure the scan to be performed automatically or launch the scan manually
in IKARUS anti.virus.
You can manage and add as many scans as required.
Preset scans:
Fast System
System Scan
Scans the Windows installation directory. The majority of malicious programs
such as viruses and Trojan horses are located in this directory and are quickly and reliably detected.
System Partition
This preset scans the drive where your operating system is installed. All archives,
directories, folders, and files on this drive will be scanned by IKARUS anti.virus.
anti.virus
© 2012 IKARUS Security Software GmbH
Page - 64 -
Entire Host
IKARUS anti.virus will scan all drives on your computer.
Removable media
All external drives such as USB sticks and CD ROM drives will be scanned.
List of scan profiles
Edit scan profile
Add a new scan profile
Figure 5-32 Configuration Scans tab
Click Add Scan Profile to configure a custom scan profile. You can enter any name for
the scan. Click Browse to select the folders or files to scan. You can also set the program to perform an automatic scan where required.
The automatic scan can be scheduled for any time (for example, every Friday, 12pm).
The scan will be performed only for those areas selected by the user.
© 2012 IKARUS Security Software GmbH
Page - 65 -
Profile Name
Use Automatic Scan
Time when scan is
started
Select when the automatic scan will start
(daily, weekly, monthly)
Enter path here
List of paths in Scan
Profile
Figure 5-33 Configuration Add Scan Profile
© 2012 IKARUS Security Software GmbH
Page - 66 -
5.2.12 IKARUS security.manager Settings
The IKARUS security.manager Settings window (Figure 5-34) shows settings for the
IKARUS security.manager Server.
Server The window is separated into three tabs: General,
E-Mail Notifications and Update. Changes to the settings are committed upon clicking
clicking
the OK or Apply buttons
button s at the bottom of the window. These two buttons will be disadis abled when entries are missing or invalid.
invalid Clicking the Cancel button will close the
window and discard all changes;
changes clicking the OK button will save all changes and
close the window
win dow.
dow
5.2.12.1
General
Shared Directory
Sets the directory where
ismxstartup.exe is stored
for the IKARUS anti.virus
deployment.
Open Browser
Opens a browser window
for choosing the shared
directory.
Enforce Client Update
Enable or disable deployment over TCP.
Enforce Client Update
Port
Enable deployment over
specified TCP port.
Administration Port
The port the ISM UI uses for
communicating with the ISM
server.
Automatically Add
Clients
Specifies whether new
clients in the LDAP are
automatically added to the
Directory.
Enable Change Management according to
the ITIL
Enables or disables change
tracking.
Ask for comment at
Log-in screen
If enabled, the user must
enter a comment on login
attempts.
Maintain change log
for server settings
If enabled, logs all changes
made to settings.
Ask for Request for
Change (RfC) ID
If enabled, the user must
enter an RfC ID on login
attempts.
Figure 5-34 UI – IKARUS security.manager Settings – General
© 2012 IKARUS Security Software GmbH
Page - 67 -
5.2.12.2 E-Mail Notifications
Enable E-Mail Reports
Enable or disable E-Mail
reports.
Mail Server
The Mail server the reports
are sent over.
Sender
The address from which the
reports are sent.
Enable Authentication
Enables or disables user
authentication with the email server.
Username
The username used to
authenticate with the e-mail
server.
Password
The password used to
authenticate with the e-mail
server.
Available Reports
Lists all available reports.
Add New Report
Open the IKARUS security.manager Reports window,
see Section 5.2.12.3.
Figure 5-35 UI – IKARUS security.manager Settings – E-Mail Notifications
© 2012 IKARUS Security Software GmbH
Page - 68 -
5.2.12.3
IKARUS security.manager Reports
“On Virus” Report
Send report when a virus is found.
“On Auto-Add” Report
Send report when a computer is
added to the LDAP automatically.
Report Type
Day Report
Sets the type of the report.
Send report on the set days.
ISM Server Startup Report
Send report as the server starts up.
Report Name
Sets the name of the report.
Enable Report
Interval Report
Enables or disables
sending of this report.
Send report at the specified time.
Scheduled Time
Sets the time the report is sent.
Day Mask
Sets the days on which the
report is sent.
Enable Virus Report
Include virus information.
Enable Version Report
Include version information.
Enable Client Report
Include client information.
Enable Server Report
Include server information.
Add
Add a recipient for the report.
Recipients
List of all recipients of the
report.
Figure 5-36 UI – IKARUS security.manager Settings – Reports
© 2012 IKARUS Security Software GmbH
Page - 69 -
5.2.12.4
Update
Silent Update of the ISM
Server
Enables the automatic update
of the ISM Server.
Proxy Server
Sets the proxy server through
which the ISM Server is accessing the updates.
Proxy Port
Sets the port the connection is
established through.
Username
Sets the username for authenticating with the proxy server if
needed.
Password
Sets the password for authenticating with the proxy server if
needed.
Figure 5-37 UI – IKARUS security.manager Settings – Update
© 2012 IKARUS Security Software GmbH
Page - 70 -
5.2.13 Dialog “Clean
“ Clean hosthost-entries from database”
database ”
This dialog should only be used if hosts were manually deleted from the Active Directory. In this case the deleted hosts may still be available in the database, and this dialog
provides a way to finally delete them from the database. Please note that the selected
hosts will be deleted irrevocably!
Cleaning up the database from unused hosts, licenses that were assigned to the selected hosts may be given free. This dialog is available under Tools
Clean hosthostentries from database.
database
© 2012 IKARUS Security Software GmbH
Page - 71 -
5.2.14 About Dialog
5.2.14.1
Layout
Version Information
Displays the ISM UI,
ISM Server and
Updater versions.
License Information
Displays the expiration
date and how much of
your license capacity
is used and free.
Renew License
Opens the Registration window for
choosing a new license.
Figure 5-38 UI – About Dialog
© 2012 IKARUS Security Software GmbH
Page - 72 -
5.2.15 The Menu Bar
The menu bar (Figure 5-39) is located at the top of the IKARUS security.manager UI
main window.
The menu bar includes the following sub-menus:
• File Menu
(Figure 5-39)
• View Menu
(Figure 5-40)
• Tools Menu
(Figure 5-41)
• Help Menu
(Figure 5-42).
5.2.15.1
File Menu
Update ISM (F6)
Exit (Alt+F4)
Logout (Ctrl+Alt+F4)
Invokes an update process of
the ISM server.
Quits the current session and
the ISM UI.
Quits the current session and
opens the Login window.
Figure 5-39 UI – Menu Bar – File Menu
© 2012 IKARUS Security Software GmbH
Page - 73 -
5.2.15.2
View Menu
Overview Page
Main toolbar
Shows or hides the Main
toolbar, see section
5.2.16.
Shows or hides the Overview
Page, see section 5.2.6.
Directory
Shows or hides the Directory,
see section 5.2.1.
General
Shows or hides the General
Page, see section 5.2.8/5.2.9.
Properties
Shows or hides the Properties
Page, see section 5.2.7.
Pending Tasks
Shows or hides the Pending
Tasks window, see section
5.2.2.
Virus List
Shows or hides the Virus List,
see section 5.2.3.
Log File
Shows or hides the Log File,
see section 5.2.4.
Change Log
Shows or hides the Change
Log, see section 5.2.5.
IKARUS anti.virus Configurations
Opens the VU Configurations Window, see section 5.2.11.
Restore Default Layout
Restores the default window layout.
Figure 5-40 UI – Menu Bar – View Menu
© 2012 IKARUS Security Software GmbH
Page - 74 -
5.2.15.3
Tools Menu
Change Password
Options (F12)
Opens the ISM Options window, see Section 5.2.12.
Opens the Change Password
window where you can set a
new password for the ISM.
IKARUS Virus Dictionary
Opens the Change Language
window where you can select
a different ISM UI language.
Changing the UI language
does not require a program
restart.
Change Language
Opens the default web browser and changes to the IKARUS
Virus Dictionary.
Figure 5-41 UI – Menu Bar – Tools Menu
Note:
Note It is now possible to clean up the database from unused hosts by using the new
dialog “Clean
Clean hosthost- entries from database”.
database For further information on this dialog see
section 5.2.13.
5.2.15.4
Help Menu
User Manual (F1)
Contact Information
Opens this ISM User Manual.
Opens the Contact Information window.
About IKARUS security.manager
General Business
Terms
Opens the About dialog displaying the ISM version and
information about the license
in use.
Figure 5-42 UI – Menu Bar – Help Menu
© 2012 IKARUS Security Software GmbH
Page - 75 -
Opens the General Business Terms of the IKARUS
security.manager.
5.2.16 The Toolbar
The Toolbar (Figure 5-43) can be found at the top of the IKARUS security.manager UI
main window right below the Menu Bar.
5.2.16.1
Layout
IKARUS anti.virus Configurations
Opens the IKARUS anti.virus Configurations window,
see section 5.2.11 for more information.
Figure 5-43 UI – Toolbar
© 2012 IKARUS Security Software GmbH
Page - 76 -
6
The Shared Directory
The Shared Directory is the network share where the ismxstartup.exe file will reside.
As this executable is required for installing the IKARUS anti.virus on a client, that particular client needs read access to that share and file. Further, the IKARUS securisecurity.manager Server needs write access to that network share to place the file on the
share in the first place. You can specify the Shared Directory in the General IKARUS
security.manager Settings dialog (Figure 5-34).
© 2012 IKARUS Security Software GmbH
Page - 77 -
7
Licensing Information
To secure your network and operate the IKARUS security.manager,
security.manager you will need a
valid license.
license A license grants a defined amount of user licenses and should be selected appropriately for the size of your company.
company The IKARUS security.manager license is shared with all clients you need to administer. It is not possible to administer
and run more IKARUS anti.virus instances on your network than the license allows.
There may exist licenses for non-administered clients (if you previously have bought
one or more licenses for them); if not, you will not be able to administer any more clients
after reaching the client limit of your IKARUS security.manager license. In this case,
those particular clients will not be secured by the IKARUS anti.virus and will thus be
unsecure. Remember that clients
lients without a valid license are a possible threat to
your entire network.
network
7.1
Registration
If there is no valid IKARUS security.manager license, the following dialog (Figure 7-1)
will show up asking you to provide a valid license using an IKARUS license file or an
IKARUS Activation Key.
7.1.1
Layout
License File
Opens a file browser where you
can choose the IKARUS license
file you want to use.
Activation Key
Opens the activation window, see
section 7.2.
Figure 7-1 UI – IKARUS security.manager Registration
7.2
Activation Key
If you have an IKARUS Activation Key rather than IKARUS license file, you may obtain a
valid license from the License Activation window (Figure 7-2). Provide the information
requested and submit your data. Upon successful submission of your data, you will get
an e-mail with your license file attached to the specified address.
© 2012 IKARUS Security Software GmbH
Page - 78 -
7.2.1
Layout
Obligatory information to be entered in
order to complete the license activation process
Submit
Sends the information
you entered to IKARUS.
Figure 7-2 UI – IKARUS security.manager License Activation
© 2012 IKARUS Security Software GmbH
Page - 79 -
8
Software Distribution
The installation and uninstallation processes for the IKARUS anti.virus are subdivided
into different steps. To complete these steps successfully, the following criteria must be
met:
met
•
•
•
•
•
•
The IKARUS security.manager Server needs a shared directory (Figure 5-34)
set to place the binaries needed for a remote installation.
The IKARUS security.manager Server needs appropriate rights to remotely execute binaries on the target client. If the IKARUS security.manager Server has
been installed with a domain administrator account and the target client is on the
same domain as the IKARUS security.manager Server,
Server no further adjustments
need to be made for that client; otherwise, you need to specify credentials having appropriate rights to launch executable files on the target client. You can
configure this on a client’s Rights Management tab on the IKARUS securisecurity.manager UI.
UI
The target client needs at least read access to the user-defined shared directory
to retrieve the ismxstartup binary.
The TCP communication ports need to be forwarded when using a firewall.
The target client must meet the hardware and software requirements specified
to operate the IKARUS anti.virus.
anti.virus Refer to the requirements indicated in the
IKARUS anti.virus manual.
manual
The Enforce Client Update option in the IKARUS security.manager Settings
windows (Figure 5-34) must be enabled.
© 2012 IKARUS Security Software GmbH
Page - 80 -
8.1
Installing
Installing the IKARUS anti.virus
To install and deploy the IKARUS anti.virus,
anti.virus right-click a client or group in the Directory
to open the context menu and click on the Install anti.virus entry (Figure 5-8). The installation of the IKARUS anti.virus includes the below steps (Figure 8-1). It can take a moment, so please wait patiently:
•
•
•
•
Step 1: The IKARUS security.manager Server places the needed executable
files in the Shared Directory.
Step 2: The IKARUS security.manager Server tries to install the ismxstartup
service remotely from the Shared Directory. The target client needs read access
to the Shared Directory and to files in it.
Step 3: The ismxstartup service retrieves the guardxup binary from the IKARUS
security.manager Server,
Server places it into the Windows temp directory of the target client, and launches it.
Step 4: The guardxup binary performs all further steps left for installing the
IKARUS anti.virus on the target client. This includes retrieving the IKARUS anti.virus binaries from the IKARUS security.manager Server and installing them
on the target.
Shared Directory
Places installation binaries in
the Shared Directory
Installs the
„ismxstartup”
binary remotely
as a service from
the Shared Directory.
1
Needs read
access to the
Shared Directory.
2
ismxstartup
3
Retrieves the
guardxup binary
and executes it
in the Windows
temp folder.
guardxup
4
Retrieves and
installs IKARUS
anti.virus binaries.
Figure 8-1 Software Distribution – Installation process
© 2012 IKARUS Security Software GmbH
Page - 81 -
© 2012 IKARUS Security Software GmbH
Page - 82 -
8.2
Uninstalling
Uninstalling the IKARUS anti.virus
To uninstall the IKARUS anti.virus, right-click the client or group of the Directory. In the
opening context menu, click the Uninstall anti.virus item (Figure 5-8).
Note: Uninstallation can be done administered clients only.
© 2012 IKARUS Security Software GmbH
Page - 83 -
9
Config File
The Config File (named ism.conf) exists in the conf directory of the installation destination selected chosen when installing the IKARUS security.manager Server (see section 4.1.9). The MSSQL-database connection information as well as the LDAP connection settings and the TCP ports used for the communication between the IKARUS anti.virus and the IKARUS security.manager are configured using this file.
Sample Config file:
<config>
dbconnstring
serverport
clientupdateport
</config>
DRIVER={SQL Server};SERVER=localhost
9887
9888
<ldap>
type
servername
searchpath
authmethod
username
password
attribute
filter
</ldap>
native
esx-2k8-de-srv.labor.local
dc=labor,dc=local
simple
LDAP Connector
none
dNSHostName
(objectCategory=computer)
© 2012 IKARUS Security Software GmbH
Page - 84 -
9.1
The <config> Section
In the <config> section, you can provide information about the MSSQL database used
by the IKARUS security.manager Server for storing data and information and about
the TCP ports used for communication.
Setting
Description
dbconnstring
The information used for establishing a connection to the target
MSSQL database. Includes the server name where the database
resides and authentication methods needed for accessing the database. For more information about the syntax and available properties of the connection string, refer to your MSSQL documentation.
serverport
The TCP port used for the communication between the IKARUS
security.manager Server and the IKARUS security.manager UI.
UI
If you use a firewall,
firewall make sure to forward this port.
clientupdateport
The TCP port used for the communication between the update
binaries and the IKARUS anti.virus.
anti.virus
If you use a firewall,
firewall make sure to forward this port.
© 2012 IKARUS Security Software GmbH
Page - 85 -
9.2
The <ldap> Section
The <ldap> section includes information about the LDAP server the IKARUS securisecurity.manager Server connects to to resolve the clients existing in your active directory. If
no <ldap> section is found in the config file, the IKARUS security.manager Server will
try to obtain the information from the domain controller.
Setting
Description
type
The type of the LDAP configuration.
servername
The name of the domain controller.
searchpath
Specifies the domains to scan. Domain levels are split with the dc
(Domain component) keyword.
Example for a .company.local domain:
searchpath
dc=company dc=local
authmethod
Describes the method used for authenticating with the domain
controller. If you do not want to authenticate with a specific user,
specify anonymous here.
username
Sets the username used for authenticating with the domain controller. Only required if the authentication method is not set to
anonymous.
password
Sets the password used for authenticating with the domain controller. Only required if the authentication method is not set to
anonymous.
attribute
Sets the attribute to read.
filter
Sets the criteria used on resolving the specified attribute.
© 2012 IKARUS Security Software GmbH
Page - 86 -
10 Table of Figures
Figure 4-1 Server Installation – Welcome ....................................................................... - 12 Figure 4-2 Server Installation – License Agreement ..................................................... - 13 Figure 4-3 Server Installation – LDAP Settings .............................................................. - 14 Figure 4-4 Server Installation – Deployment Settings .................................................. - 15 Figure 4-5 Server Installation – User Settings ............................................................... - 16 Figure 4-6 Server Installation – Network Settings ......................................................... - 17 Figure 4-7 Server Installation – Database Settings....................................................... - 18 Figure 4-8 Server Installation – Select Installation Folder ........................................... - 19 Figure 4-9 Server Installation – Confirm Installation ..................................................... - 20 Figure 4-10 Server Installation – Installation Complete ................................................ - 21 Figure 4-11 UI Installation – Welcome ............................................................................. - 24 Figure 4-12 UI Installation – License Agreement ........................................................... - 25 Figure 4-13 UI Installation – Select Installation Folder.................................................. - 26 Figure 4-14 UI Installation – Confirm Installation ........................................................... - 27 Figure 4-15 UI Installation – Installation Complete ........................................................ - 28 Figure 5-1 UI – Login ......................................................................................................... - 30 Figure 5-2 UI – Set Password .......................................................................................... - 31 Figure 5-3 UI – Change Management ............................................................................ - 32 Figure 5-4 UI – License Violation .................................................................................... - 33 Figure 5-5 UI – User Interface ......................................................................................... - 35 Figure 5-6 UI – Directory .................................................................................................. - 36 Figure 5-7 UI – Directory Toolbar.................................................................................... - 37 Figure 5-8 UI – Directory Tree ......................................................................................... - 38 Figure 5-9 UI – Directory Filter ........................................................................................ - 39 Figure 5-10 UI – Pending Tasks ....................................................................................... - 42 Figure 5-11 UI – Task Details ............................................................................................ - 43 Figure 5-12 UI – Virus List ................................................................................................. - 44 Figure 5-13 UI – Virus Information.................................................................................... - 45 Figure 5-14 UI – Log File ................................................................................................... - 46 Figure 5-15 UI – Change Log ........................................................................................... - 47 Figure 5-16 UI – Overview Page ...................................................................................... - 48 Figure 5-17 UI – Properties Page ..................................................................................... - 50 Figure 5-18 UI – General Page on Groups ..................................................................... - 51 Figure 5-19 UI – General Page on Clients ...................................................................... - 53 Figure 5-20 UI – Notification Bar ..................................................................................... - 54 Figure 5-21 UI – IKARUS anti.virus Configurations ......................................................... - 55 Figure 5-22 Configuration General tab .......................................................................... - 56 Figure 5-23 Configuration e-mail tab .............................................................................. - 57 Figure 5-24 Configuration Update tab ............................................................................ - 58 Figure 5-25 Configuration Dial-Up Connections tab..................................................... - 59 Figure 5-26 Configuration Exclusion tab (File exclusion) ............................................. - 60 Figure 5-27 Configuration Exclusion tab (Process exclusion) ...................................... - 61 Figure 5-28 Configuration Logs tab ................................................................................ - 61 Figure 5-29 Configuration Extras tab .............................................................................. - 62 Figure 5-30 Configuration Anti-Spam tab....................................................................... - 63 Figure 5-31 Configuration Advanced Spam Protection ................................................. - 64 Figure 5-32 Configuration Scans tab .............................................................................. - 65 Figure 5-33 Configuration Add Scan Profile .................................................................. - 66 Figure 5-34 UI – IKARUS security.manager Settings – General .................................. - 67 © 2012 IKARUS Security Software GmbH
Page - 87 -
Figure 5-35 UI – IKARUS security.manager Settings – E-Mail Notifications............... - 68 Figure 5-36 UI – IKARUS security.manager Settings – Reports .................................. - 69 Figure 5-37 UI – IKARUS security.manager Settings – Update ................................... - 70 Figure 5-38 UI – About Dialog ......................................................................................... - 72 Figure 5-39 UI – Menu Bar – File Menu ......................................................................... - 73 Figure 5-40 UI – Menu Bar – View Menu ....................................................................... - 74 Figure 5-41 UI – Menu Bar – Tools Menu ....................................................................... - 75 Figure 5-42 UI – Menu Bar – Help Menu ....................................................................... - 75 Figure 5-43 UI – Toolbar .................................................................................................. - 76 Figure 7-1 UI – IKARUS security.manager Registration ................................................. - 78 Figure 7-2 UI – IKARUS security.manager License Activation ..................................... - 79 Figure 8-1 Software Distribution – Installation process ................................................. - 81 -
© 2012 IKARUS Security Software GmbH
Page - 88 -
11
Glossary
Abbreviation
Term
Description
IKARUS anti.virus
The IKARUS virus.utilities will be renamed to
IKARUS anti.virus in 2012; This is why the new
name of the product is already used in this
document.
Windows service
A Windows service is an executable designed
for running in the background without user
interaction. Windows services can be set up to
automatically start at boot time. Windows services can be installed either using a user account available on your Windows network or a
local service account.
MSSQL
Microsoft Structured
Query Language
Microsoft SQL Server is a relational database
server developed by Microsoft. Its primary
function is to store and retrieve data as requested by other software applications running on the same computer or a different
computer on a network (including the Internet).
TCP
Transmission Control
Protocol
The Transmission Control Protocol is one of
the core protocols of the Internet Protocol
Suite. TCP is one of the two original components of the suite and complements the Internet Protocol. Therefore, the entire suite is
commonly referred to as TCP/IP. TCP provides
reliable ordered delivery of a byte stream from
a program on one computer to another program on a different computer.
IP
Internet Protocol
The Internet Protocol is the principal communication protocol used for relaying datagrams
(packets) across an internetwork using the IP
Suite. It allows for routing packets across network boundaries and is the primary foundation
of the Internet.
LDAP
Lightweight Directory
Access Protocol
LDAP is an application protocol for accessing
and maintaining distributed directory information services over an Internet Protocol network.
Proxy Server
In computer networks, a proxy server is a
server (i.e. a computer system or an application) acting as an intermediary for requests
from clients seeking resources from other
servers.
© 2012 IKARUS Security Software GmbH
Page - 89 -
LAN
AD
DC
Network share
In computing, a shared resource or network
share is a device or piece of information on a
computer that can be remotely accessed from
another computer, typically on a local area
network or an enterprise intranet. The access
is transparent: There is no difference between
accessing a local or remote resource.
Local Area Network
A local area network is a computer network
that interconnects computers in a specific area
such as a home, a school, a computer laboratory, or an office building.
Intranet
An intranet is a computer network that uses
Internet Protocol technology for securely sharing any parts of an organization’s information
or network operating system within that organization.
Active Directory
The Active Directory is a directory service developed by Microsoft for Windows domain
networks. It is part of the most Windows Server
operating systems. Server computers running
Active Directory are referred to as domain
controllers.
Windows domain
A Windows domain is a collection of security
principals sharing a central directory database.
This central database (known as Active Directory starting with Windows 2000[1], Active Directory Domain Services in Windows Server
2008 and Server 2008 R2, also referred to as
NT Directory Services on Windows NT operating systems, or NTDS) holds the user accounts
and security information for resources in that
domain. Each person who uses computers in a
domain gets a unique account or user name.
This account can then be assigned access to
resources within the domain.
Directory Service
A directory service is the software system that
stores, organizes and provides access to information in a directory. In software engineering, a directory is a map between names and
values. It allows for looking up values associated with a name; this is similar to a dictionary.
Domain Controller
On Windows Server systems, a domain controller is a server handling security authentication requests (logins, permissions checks, etc.)
in the Windows Server domain. A domain is a
concept introduced with Windows NT that
© 2012 IKARUS Security Software GmbH
Page - 90 -
grants a user access to a number of computer
resources if he or she can provide a combination of a username and password.
Server
In the context of client-server architectures, a
server is a computer program serving the requests of other computer programs named
clients. The means that the server performs
computational tasks on behalf of clients. The
clients either run on the same computer or
connect through a network.
Client
A client is an application or system that accesses a service made available by a server.
The server typically (but not always) exists on a
different computer system. In that case, the
client accesses the service over the network.
Fully Qualified Domain
Name
A fully qualified domain name, sometimes also
referred as an “absolute domain name”, is a
domain name that specifies its exact location
in the tree hierarchy of the Domain Name System (DNS). The FQDN includes all domain levels including the top-level domain and the root
zone. A fully qualified domain name is distinguished by its unambiguity; it can only be interpreted one way.
Domain Name
A domain name is an identification string that
defines a scope of administrative autonomy,
authority, or control on the Internet. Domain
names are formed according to the rules and
procedures of the Domain Name System
(DNS).
DNS
Domain Name System
The Domain Name System is a hierarchical
distributed naming system for computers, services, or any resource connected to the Internet or a private network. It associates various
pieces of information with domain names assigned to each of the participating entities.
Most importantly, it translates domain names
meaningful to humans to the numerical identifiers associated with networking equipment for
the purpose of locating and addressing those
devices worldwide.
TLD
Top-Level Domain
A top-level domain is a domain at the highest
level in the hierarchical Domain Name System
(DNS). Top-level domain names are installed in
the root zone of the name space. For all subordinate domains, the top-level domain is the
FQDN
© 2012 IKARUS Security Software GmbH
Page - 91 -
last part of the domain name, that is, the last
label of a fully qualified domain name.
Root Zone
A root zone is the top-level DNS zone in a hierarchical namespace using the Domain Name
System (DNS). The term typically refers to the
root zone of the largest global network, the
Internet.
DNS Zone
A DNS zone is a part of a domain name space
using the Domain Name System (DNS), for
which administrative responsibility has been
delegated.
IKARUS Activation Key
Administer
In the context of the IKARUS security.manager,
administration means that a client with the
IKARUS anti.virus installed is managed by the
IKARUS security.manager: The client gets updates, configurations, licenses and settings
from the IKARUS security.manager. If a client is
not administered, only status information will
be displayed. The limit of clients you are allowed to administer is specified in the license
you are using.
Application (Software)
Application software, also known as an application or an “app”, is computer software designed to help the user to perform specific
tasks.
Computer Software
Computer software, or just software, is a computer programs with its related data providing
instructions for telling a computer what to do
and how to do it. In other words, software is a
conceptual entity, which is a set of computer
programs, procedures, and associated documentation concerned with the operation of a
data processing system.
Firewall
A firewall is a device or set of devices designed to permit or deny network communication based upon a set of rules. Firewalls are
typically used for protecting networks from
unauthorized access while permitting legitimate communications.
© 2012 IKARUS Security Software GmbH
Page - 92 -
© 2012 IKARUS Security Software GmbH. All rights reserved
The information contained in this document represents the current view of IKARUS Security Software GmbH on the issues discussed as of the date of publication. Because
IKARUS Security Software GmbH must respond to changing market conditions, it should
not be interpreted to be a commitment on the part of IKARUS Security Software GmbH,
and IKARUS cannot guarantee the accuracy of any information presented after the date
of publication.
This paper is for informational purposes only. IKARUS Security Software GmbH MAKES
NO WARRANTIES, EXPRESS OR IMPLIED, IN THIS DOCUMENT.
Other product and company names mentioned herein may be the trademarks of their
respective owners.
IKARUS Security Software GmbH Blechturmgasse 11 in 1050 Vienna Austria
© 2012 IKARUS Security Software GmbH
Page - 93 -