1
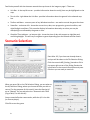
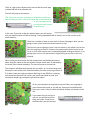
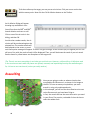
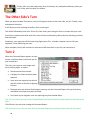
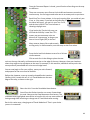
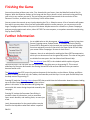
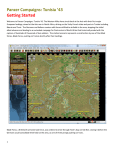
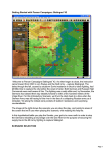
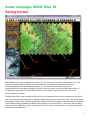
Panzer Campaigns DEMO: Mius ‘43 Getting Started WELCOME to the Panzer Campaigns Demo: Mius ‘43. It is the summer of 1943 on the Russian Front. The Germans’ last gasp attack in the East, the Kursk Offensive, has failed and the panzers have been withdrawn, giving up the hard fought for ground. It is now time for the Soviets to begin their counteroffensive at many places along the front line. One such place is the Army Group South sector of the Donbas, along the North Donets and Mius Rivers. This scenario represents the first move in the Russian attack on the Mius. The Mius River flows south through the Ukraine in the area around Rostov, where it empties into the Sea of Azov. The Soviets prepare to attack this heavily fortified section, known as the "Mius Line." The action begins at first light of dawn. Several Russian and Russian Guards Rifle Divisions begin the assault at the critical sector at the Corps boundary between the 294th Infantry Division of XVII Army Corps, in the north, and the 336th Infantry Division of XXIX Army Corps, in the south. This is an infantry assault in force, through the minefields, to overwhelm the defenders. 1 Familiarize yourself with the elements around the map shown in the image on page 1. These are: Unit Box - in the top left corner - provides information about the unit(s) that may be highlighted on the map. Terrain Info - right below the Unit Box - provides information about the ground in the selected map hex. Toolbar and Menu - common parts of any Windows Interface - are used to control the game functions. Status Bar - on bottom left - shows the current time, date, turn progression, ground condition, and night\daylight conditions. This area also displays information about why an action you may be attempting is not allowed by the game or rules. Graphical Time Indicator - on bottom right - shows the time of day with respect to night\day and remaining daylight. This will vary from game to game depending upon the latitude and the month. Scenario Selection Start Mius ‘43, if you have not already done so, and you will be taken to the File Selection Dialog. Click the scenario #00_Getting_Started.scn file in the upper right corner of the Dialog. Review the information in the scenario Description and press OK when you are ready to continue. When you press OK on the File Selection Dialog, you are taken to the A/I Selection Dialog, where you choose the side you wish to control. For the purposes of this tutorial, leave the Russian A/I set as "Manual" for you and select the "Automatic with FOW (Fog-of-War)" for the Axis A/I. You are now the Russian commander, while the A/I is the Axis (or German player). Click OK to start the game. 2 The map will now appear on your screen, along with your first Command Report. A Command Report will appear at the start of every turn and contains useful information. The first Command Report, at the beginning of the game, is fairly brief without much critical information. However, it does tell you *** Air units are available ***. You will come back to Air units later. Click OK to proceed. Objective of the Game On the Menu Bar, click Info and then Victory…. The Victory Dialog shows how many points the first side (the Russians, in this case) must earn for each level of victory. As you can see, to obtain a major victory in this battle, you must earn 250 Victory Points by the scenario’s end. If you get 150 points, you earn a minor victory. With 100 points, you get a draw. Less than 100 points puts you into the defeat levels. Click OK to close the Victory Dialog. If you look at the map, you will see several oval shapes with the values of 50, 100, and 150 inside. These are your objectives. To win a major victory, you need to capture and hold a combined point total of 250 points from points for destroying enemy units plus Objectives. As you incur losses, points are taken away from you. Alternatively, you can capture the 150 and the 50 point objectives, and inflict 150 more points in causalities than you incur yourself. 3 On the map, you will see many units. The brown ones are your Russian units, and the red ones are your Russian Guards units. Do not worry - you will only control a few of your units this turn, not all of them! The front line is defined by a line of grey minefields. Some Mines are stronger than others, as shown by the red value in the bottom left corner. There is also one enemy unit visible in a gap in the mines. This unit, shown in the yellow square, is a blue colored German unit. The Terrain Information box shows visibility is ‘1km.’ Because friendly units are next to the German unit, the German unit is shown on the map at the start of the game. (Tip: Each hex is 1 km across. Visibility and ranges are all expressed in km’s and counted in hexes.) There are more Germans - you just cannot see them yet. In the lower right corner of the screen, you will see a Time Indicator. The red block marks the current time as the first turn after night. Notice the block shows a little grey - it is Dawn. As you can see from the Status Bar, it is actually 04:00 17 July 1943, the Russian Turn 1 of 9, Normal ground conditions. Turn 1 Movement Basics Panzer Campaigns is a turn-based game. Side One, the Russians in this scenario, perform all actions - Moving, Firing, Calling in artillery or air support etc. - in any order you like. Each unit action costs Movement Points, or MPs, to be expended. When you are done with all the units you want to move and fire, you end your turn. Then, the second player - in this case, the A/I - plays his turn. After both players have taken turns, the time is advanced one game turn, or two hours of real time, and the cycle is repeated. To explain which unit, from which group of units, you are going to select for movement, firing, or other actions, locate and press the button with the yellow square, as show at the right. It is just below the Settings menu. If you hover the cursor over the button, you will see a tool tip. This button enables Divisional Markings. This will color the unit symbol for each unit showing which group of units belong and function best when they remain together. 4 (Tip: Try to keep similar colored units together. Later, when you review the full game instructions, you will learn more about this Command & Control concept.) Toward the center of your map, you will see a cluster of units that now have a purple background color on the unit type symbol. Click on the unit indicated by the yellow arrow. It is a Russian Infantry Unit. A Red Box, or Hot Spot, will appear in the hex. A unit picture will now appear above the Terrain Info box. The unit picture shows a MAN and you can see the unit is made up of 397 Men. You can also see the Morale is D - not great - and the unit has 21 MPs. Fatigue is ZERO, meaning the unit is fresh. When a unit fights, Fatigue levels build and it becomes less effective until it is rested. To check further details on this Infantry unit, right click on it. On the left side of the Unit box, you will see the chain of command for the unit. The unit’s combat factors, with speed in km/h, are shown on the right side. Some units may display specialty functions, such as Engineer or Recon. To practice moving units, you are now going to move this one closer to the front. Double click to select this unit on the map, or left mouse click on the Unit Box, so that the Unit Box lights up. It is now "selected" and ready for orders. It is time to move it 1 hex toward the front. 5 To do so, right click an adjacent hex, the one directly south west, or down and left of the selected unit. The unit will jump to the new hex. (Tip: If you issue an order, movement or otherwise, and the unit does not obey the order, look at the Status Bar on the bottom left to see a message telling you why the order cannot be performed.) In this case, if you look at the unit window again, you will see the unit you moved now has 15 MPs remaining - having expended 6 MPs to move 1 hex in clear terrain at the same elevation. There are a number of ways to move units in Panzer Campaigns. Next, you are going to move a unit more than several hexes at a time. The next unit you are going to move is the one shown in the yellow circle on the left. You are going to move it 3 hexes to the new location shown by the arrow. To do so, first make sure the unit is selected by double clicking on the hex, or by putting your cursor in the hex and then single clicking on the unit in the unit window. Next, clicking on the unit with the left mouse button and holding the button down, drag the mouse to the new location 3 hexes south west, as indicated by the arrow, then release the button. The unit will move to the new hex. The computer will determine the path the unit takes, so it is wise to drag small distances to control the path. Sometimes when you order a unit to go from A to B, it takes a path you might not expect. With Fog-of-war (FOW) on, meaning you cannot see the other side’s units, you are not permitted to undo your movement should it go somewhere you did not expect. So far, you have been moving infantry around. Next, you are going to move some artillery and, as you will see, these units work differently. Place your cursor in the hex with the Guards Artillery unit shown on the left. If you select this unit and try to move it, you will find it will not obey your order. If you look at the Status Bar, you will see why! 6 To move towed guns such as these, you have to take them out of their firing positions, limber them up to their trucks, load up the ammo, pack up any communication gear, and finally put all the vehicles in a mode for movement. In the game, this is called Travel Mode, or T Mode for short. Now, select the artillery unit - again, just double click the hex. With the artillery unit selected ON, click the Change Travel Mode button on the Toolbar. You will see a white line appear at the bottom of the unit and a "T" next to the movement points in the Unit Box. Notice that the movement point number dropped from 36 MPs to 24 MPs. It takes time to get the unit ready to move, and this time is paid in MPs expended. Also, an artillery unit has to SETUP again when you take it out of Travel Mode. Travel Mode represents units in a column formation, and for towed artillery, being limbered. For Motorized Infantry, it means the men are loaded onto trucks, ready for transport rather than fighting. For tanks, it means they are lined up in column, ready for movement. (Tip: Units that can move in both Travel Mode and non-Travel Mode (or Deployed) will generally be able to move much farther in Travel Mode. However, at the end of their turn, if they remain in Travel Mode, they are more vulnerable to enemy fire. Therefore, it is best to ensure units in Travel mode remain out of harm’s way.) With the artillery unit still selected, click the Reachable Hexes button on the Toolbar and the map will light up, to highlight where this unit might reach on this turn. With the Unit still selected, click on the hex and hold and drag the mouse to the destination shown by the arrow. The unit will move off, following the road because that is the fastest route to take. When it reaches the destination hex, the unit has 4MPs remaining - not enough to go anywhere else. Nor is that enough to change out of Travel Mode and put the guns back in line to fire. This unit cannot go any further. Now, press the Reachable Hexes button again to toggle this feature off. You are now ready to evaluate what to do next. (Tip: If you had enough Movement Points remaining and you were close to the front, it might be a good idea to switch out of Travel Mode by pressing the Change Travel Mode button again with the unit selected. However, in this case, you do not have enough MPs remaining.) 7 Firing: Indirect Fire & Direct Fire At the start of the game and this turn, there is one single German Unit visible. In this next task, you will fire artillery at it. In game terms, this is called Indirect Fire because the artillery unit cannot normally see the target. Select the Artillery Dialog from the Tool Bar to see what Units may be available for firing. At first glance, you will see a fairly long list of eight different units you can call on. But, if you look closer, you will see that all of these units, except the one circled, are greyed out. When a unit in any list is greyed out, it is unavailable. For artillery units to fire, they must meet certain conditions. First of all, they have to be in range. Secondly, they must have another unit to spot or relay the target information to them. Click on the third line from the top - the 1034th Artillery Regt. With the available artillery unit selected, any enemy units which are valid targets are highlighted with a red square around it, as seen in the image to the right. If you place your cursor on the map (not the dialog), you will see it is now a Crosshairs in a circle - like a sight on a gun - and you are ready to fire. Right click on the enemy unit. A red line will be shown on the map from the artillery unit to the target hex. You will see a small explosion, or fire marker. The sounds of the guns will be heard, after which a result will appear in the target hex. NOTE: Your result may not be the 3 Men shown at the left - fire is calculated and the computer generated value attained will vary. 8 Right click a second time because artillery units have enough MPs to take two shots per turn. Other unit types, using Direct Fire, can fire up to three times if they do not expend any MPs to move prior to firing. It is always a good idea to fire your artillery early in the turn. That way, the enemy is softened up by your barrage before you try to capture the hex by assaulting. Next, you are going to try Direct Fire. With Direct Fire, the units can actually see the enemy at which they are shooting. Double click on the hex with the three Russian Infantry Units. Double clicking automatically selects all units in the hex. (Tip: If you do not want to select ALL units in the hex, you can EITHER place the cursor in the hex and then click on the units you want in the Unit Window, one unit at a time, OR, you can double click on the hex, which selects all the Units, and then single click on the units in the Unit Window that you do not want selected, to De-select them.) With all three infantry units selected in the hex shown above, hold the Control (Ctrl) button down. You notice the cursor turns into a Crosshairs, like when you were firing the artillery. Right click on the enemy unit to fire a single shot at it with each of your units. Again, there will be a flash on the target hex, the sound of gun fire, and a result in killed men in the enemy target hex. Also, the enemy unit may have returned fire and you may have suffered some losses yourself. If you click on the enemy unit, you can see the target is made up of “Men.” The strength of the enemy unit is not displayed. With Fog-of-war (FOW) on, the XXX value tells you there are more than 100, but less than 1000, men. When the enemy strength drops to 99 or less, the displayed value will change to XX. Air Support Recall back to the start of game, the first thing you saw was the Command Report. As you can see, one of the lines in the report said you had ***Air units available*** for your use this turn. 9 To further soften up the target, you may use an air mission. Click your cursor on the hex with the enemy units. Now click the Call Air Mission button on the Toolbar. An Air Mission Dialog will appear showing any available air units. You will see that the 206th and 289th Assault Aviation units are on call. Click on one of the air units in the dialog, and then OK. As with other combat results, the air mission will be conducted against the selected hex. The combat results will be displayed on the screen, or an air unit interception message will appear. If the air unit gets through, all anti-aircraft (AA) fire against your air unit will occur first, with the result of each AA fire displayed. Then, you will be shown the result of your air attack. Results shown in yellow letters are disruptions of the target unit. (Tip: There is one more remaining air unit that you could also use. However, unlike artillery, Air Missions used in one turn have to wait while the planes are refitted, rearmed, and repaired before they are available again. So, it is best to not use them all, unless you really need to.) Assaulting Now you are going to order an advance into the hex occupied by the German unit, as shown in the image to the left. To enter an enemy occupied hex, you must assault it, using only undisrupted units. In this example, you will use the three Russian units next to the German unit you have been firing at. In fact, the assault will use the same three units you used in your Direct Fire practice, so double click on the hex to select the whole stack. 10 As with movement, there are two ways to Assault. With the stack selected, you can right click in the enemy occupied hex because that is essentially what you are doing attempting to move one hex into the German held hex, and hopefully displace the defender. Alternatively, with the stack selected, you can hold the left mouse button down and drag the mouse to the German occupied hex. With either method, the result is the same - an Assault Status box appears, announcing the initiation of an assault. An assault can trigger defensive fire, which may result in losses or even disruption of a friendly unit. Disrupted units are not allowed to participate in an assault, which may change the effectiveness of the attack. (Tip: If you feel the assault is ill advised for any reason, you can cancel the order from the menu “Assault => Cancel Assault.”) You can add units from several different hexes in the same assault. However, in this simple example, you only have one group of units from one hex, with no more to add. To resolve your assault, click the Resolve Assault button on the Toolbar. Results will appear showing losses on both sides. Attacker losses are shown first, followed by those of the defender. If you won, and any remaining enemy retreat (or are eliminated), your units will automatically advance to capture the hex. NOTE: In some assaults, the enemy retreat may be blocked. In this instance, if you win, the defender will remain in place but will incur additional losses. In such cases, your forces, even though victorious, will not occupy the hex. REMEMBER: Do not worry if your outcome does not match the one illustrated, as results will vary with play. The image here shows two very different results from the same combat. In the top left, the attacker has won and captured the hex. With the hex now occupied by your units, more German units are revealed. The image in the bottom right shows a win, with the defender holding the hex at a high cost in men. 11 Fixed Units Up to this point in the game turn, you were focusing on a small section of the map area - units around that one point in the line where the Russians were in contact with German Units. But there are still a lot of units on the map that have not yet been considered. As it happens, many of these units are not available to you this turn. They are present, but because of readiness, orders, or just some condition specified by the scenario designer, they cannot be moved. Press the Fixed Units button on the Toolbar. Most of your units are now highlighted. Click on any hex with highlighted units and you will see these units are designated as “Fixed.” They will be released for use on a later turn. You can check to see a schedule of released units, if you wish, using the menu “Units => Releases.” Now that you know which units are “Fixed,” you can focus your attention for the remainder of the turn on those units which are not Fixed - a band of units clustered along the minefield belt, marking the Front Line. Engineers Several of the “Unfixed” units have a sideways “E” symbol on them. These engineer units have special capabilities. Place your cursor in any hex containing one of your engineer units and then Right Click on the Unit Window. Engineers have a number of basic and some specialized functions, as outlined in the main game documentation. As you can see, this engineer can clear Mines and\or build Bridges. In fact, all three engineers, pointed out on the right, can clear Mines. This will be handy because there are a lot of Mines in this scenario. 12 Mines, in real life, are a deterrent weapon - something to slow down the attacker’s progress, allowing the defender time to react. In Panzer Campaigns, mines are also a deterrent. However, they will not stop a determined attacker with superior numbers. During World War II, the Russians were infamous for driving their forces through minefields, regardless of the cost. In contrast, the more stealth approach of the western Allies involved clearing lanes and moving through with due caution. In this game, you are going to use the Russians’ approach. You will plunge forward all available units into the Minefields and overwhelm the defender in force, while accepting the casualties. Double click on each hex where you have available units and move them forward into the Minefields. At the start of your next turn, where engineers are present in a minefield and undisrupted, one factor of Mines will be removed in each hex. (Tip: Minefields come in strengths of 1, 2 and 3, as shown by the value and the number of circles on each counter.) (Tip: There is NO SUCH THING as a “Friendly Minefield.” If you accidentally move a unit into a hex with a Minefield you knew about, but lost track of, don’t sweat it. It occurred quite commonly on the battlefield then, and to this day.) As you move your units forward into the belt of Minefields, you will hear the sound of mines exploding, and a combat result, like you saw for Direct Fire or Indirect (artillery) Fire, will appear. Sometimes, those results are shown using a yellow value, meaning one of your Units was disrupted. As you move forward, sometimes you will discover more German Units behind those minefields. Occasionally, those units will respond to your movement with Direct Fire of their own. Enemy fire, in your turn, is called “Opportunity Fire.” At this point, you are almost finished your turn, having moved all your available units forward. However, there are a couple of good housekeeping habits to get into. At this point in the turn, consider pressing the Next Stack button. Each press of the button will cycle through any remaining unmoved units. When you are satisfied you have made every move you can, consider Saving your file, either using the button or the menu item under File => Save. (Tip: At the end of a turn, experienced players often save a copy of their file with a turn number. Then they repeat with a “File => Save As” to the default battle file name. This way, they retain a backup file and keep a record of the game as it progresses, for later review.) 13 Finally, after you have made every move, fired every unit, and performed every action you wish to do, press the Next Turn button. The Other Side’s Turn When you press the Next Turn button, control of the game reverts to the other side, the A/I. Sit back, relax, and observe the action. It will likely start with a barrage of artillery from unseen guns. This will be followed by small arms’ Direct Fire from enemy units along the front in contact with your units. You will see combat results with each shot, some of them unfortunately yellow colored, indicating a unit has been disrupted. Sometimes, your own units will fire back using Opportunity Fire - all under computer control, like your opponent’s units did during your turn. When complete, the A/I will end the turn and control will revert back to you for your second turn. Turn 2 When the Command Report appears on your screen, control has been restored to you for your second turn. This time, your report is much longer and has a scrolling region. It reports: Reinforcements have arrived. A lengthy list of units that have been released. Some units are reporting Low Ammo and will not be as effective at fighting this turn. Disrupted units are checked for disruption recovery and the Command Report tells you how many succeeded out of how many were checked. And, some of your engineer units are reporting they have cleared Mines. (Tip: You can click on any item in the Command Report with a hex location to jump instantly to that area of the map.) Click OK when you are done viewing the Command Report. (Tip: During your turn, you can recall the last Command Report by selecting the item under the Info menu.) 14 Once the Command Report is closed, you will notice a few things on the map are different. There are now many more German Units visible and some are more than one hex away. You no longer need to be next to an enemy unit to spot them. Recall that Turn 1 was at dawn. In the early morning light, you could only see 1 hex, or 1 km, away. If you look at the Status Bar in the lower left corner, you see it is now Turn 2 of 9, and the time is 06:00. The Time Indicator is showing a daylight turn. If you look at the Terrain Info area, you will find the Visibility is now 3km. This means you can see enemy units at a distance of 3 hexes away, as long as you have a Line-of-Sight (LOS) to the hex. Many veteran players like to place newly arriving units, or reinforcements, onto the map as their first action. Press the Arrived Units button to see a list of all new reinforcements. Click on each line in the dialog to place the new units on the map. Normally, reinforcements arrive on the edge of the map. However, there are situations where they might arrive anywhere on the map. For example, in this scenario, additional artillery units that were previously unavailable will arrive on non-edge hexes. You can now begin to fire your artillery, move your units forward, and prepare for the next round of Assaults. Before that, however, move up a newly released Rocket Launcher (Artillery Unit). Locate this unit. It is in Travel Mode near the east edge of the map, as shown to the right. Select the Unit. Press the Reachable Hexes button. You will see the Rocket Launcher can move 4 hexes down the road. Now press the Save Movement Cost button. The reachable hexes highlighted area shrinks to how far this unit can move while still having enough MPs remaining to change out of Travel Mode after moving. But is this a wise move, changing out of Travel Mode here? That is your choice you are in command! 15 Finishing the Game You now know how to Move your units, Fire, Assault with your forces, clear the Minefield, and call for Air Support. With the Objective markers on the map and the Victory levels in mind, continue moving and firing your units in any manner you see fit. The end of the game will be announced at the conclusion of the Germans’ final turn, at which time, final Victory Points will be shown. You can restart the scenario at any time by selecting the File => Selection menu. A list of scenarios will appear from which you may select. After you feel comfortable with this smaller scenario, you can move on to the larger Campaign scenario that is also part of this demo. Maybe even enlist a friend to try Panzer Campaigns and you can play against each other, either HOT SEAT on one computer, or anywhere around the world using Play-by-Email (PBEM). Further Information As an added value to this demo game, a Player Guide written by long time Panzer Campaign tester, Robert Barker, is included. While this Getting Started PDF is designed to help increase your comfort level with the basic functions and game controls in the series, the Player Guide PDF will help you master Panzer Campaigns. Be sure to check it out! However, there is no substitute for reading the Game PDF Documentation, which you can also access from the game Help menu. The rules of the game are divided into two parts: the User Manual and General Help. The User Manual (user.PDF) is the rulebook which explains all game concepts by topic. You can open the User Manual from the Help menu or by pressing F2. This manual elaborates on the topics discussed in the Getting Started PDF and outlines additional rules you need to become familiar with. The General Help (pzc.PDF) covers the various elements of the interface, such as Menus, Dialogs, and Other Features including Hex Area Info, the Toolbar, the Status Bar, and Hot Keys. You can open General Help from the Help menu or by pressing F1. Pressing F3 loads the Campaign Notes (notes.PDF) that provide historical information about the events leading up to the Mius Campaign and how they relate to other games in this series. It also describes the fighting that occurred in this sector during the period covered by the campaign. Pressing F4 invokes the Parameter Data Dialog. It provides a host of information, such as movement costs, terrain benefits, and stacking limits, to name just a few. Lastly, documentation for the game’s editors may be found in the Help Menu when each editor is opened. ENJOY! 16