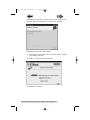
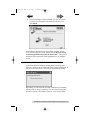
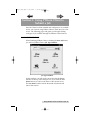
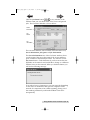
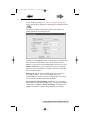
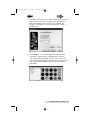
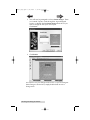
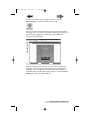
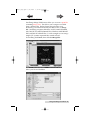
1
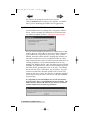
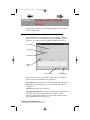
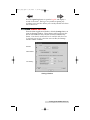
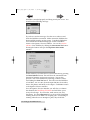
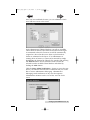
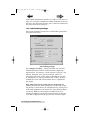
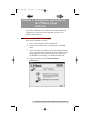
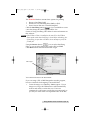
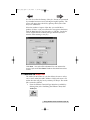
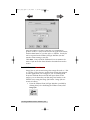
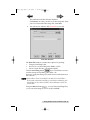
510869_big.qxd
3/13/2005
7:30 PM
Page 1
PTBurn
TM
030705-510869-(03)
Network Software
TM
USER’S MANUAL
DISC PUBLISHER
PTBurn™ Network
Software
© 2005 All rights reserved.
510869_big.qxd
3/13/2005
7:30 PM
Page ii
Notices: The information in this document is subject to change without notice.
NO WARRANTY OF ANY KIND IS MADE WITH REGARD TO THIS
MATERIAL, INCLUDING, BUT NOT LIMITED TO, THE IMPLIED
WARRANTIES OF MERCHANTABILITY AND FITNESS FOR A PARTICULAR
PURPOSE. No liability is assumed for errors contained herein or for incidental
or consequential damages in connection with the furnishing, performance, or
use of this material. This document contains proprietary information that is
protected by copyright. All rights are reserved. No part of this document may
be photocopied, reproduced, or translated into another language without
priorwritten consent.
Trademark Acknowledgments: Windows® is a registered trademark of
Microsoft Corporation. All other trademarks are the property of their
respective owners.
Bravo™ and PTBurn™ are trademarks of Primera Technology, Inc.
Printing History
510869-030705
ii
510869.qxd
3/14/2005
9:47 AM
Page iii
INDEX
Table of Contents
Section 1: Introduction. . . . . . . . . . . . . . . . . . . . . . . . . . . . . . . . . . . . . . . . 1
A. How PTBurn Network Software Works . . . . . . . . . . . . . . . . . . . 1
B. Note on Terms and Conventions . . . . . . . . . . . . . . . . . . . . . . . . . 2
C. System Requirements (PTBurn Server) . . . . . . . . . . . . . . . . . . . . 2
D. System Requirements (PTBurn Client) . . . . . . . . . . . . . . . . . . . . 3
Section 2: Installation of PTBurn Server . . . . . . . . . . . . . . . . . . . . . . . . 4
A. Installation and Setup of PTBurn Server . . . . . . . . . . . . . . . . . . . 4
B. Running the PTBurn Server for the First Time . . . . . . . . . . . . . . 6
Section 3: Setting up the PTBurn Server . . . . . . . . . . . . . . . . . . . . . . . . . 8
A. PTBurn Server's Main Application Window . . . . . . . . . . . . . . . . 8
B. PTBurn Server Settings . . . . . . . . . . . . . . . . . . . . . . . . . . . . . . . . . 9
B.1. Robotics Settings . . . . . . . . . . . . . . . . . . . . . . . . . . . . . . . . . . 10
B.2. Administration Settings . . . . . . . . . . . . . . . . . . . . . . . . . . . . 13
B.3. Job Handling Settings. . . . . . . . . . . . . . . . . . . . . . . . . . . . . . 16
Section 4: Installation and Setup of the PTBurn Client Software . . . 19
A. Installing the PTBurn Client . . . . . . . . . . . . . . . . . . . . . . . . . . . . 19
B. Running PTBurn Client For the First Time . . . . . . . . . . . . . . . . 21
Section 5: Using PTBurn Client to Submit a Job . . . . . . . . . . . . . . . . . 23
A. Job Type Window. . . . . . . . . . . . . . . . . . . . . . . . . . . . . . . . . . . . . 23
B. Sending a Data Job. . . . . . . . . . . . . . . . . . . . . . . . . . . . . . . . . . . . 24
C. Creating an Audio Job . . . . . . . . . . . . . . . . . . . . . . . . . . . . . . . . . 29
D. Creating an Image Job . . . . . . . . . . . . . . . . . . . . . . . . . . . . . . . . . 34
E. Creating a Print-Only Job . . . . . . . . . . . . . . . . . . . . . . . . . . . . . . 38
F. Opening a Saved Job . . . . . . . . . . . . . . . . . . . . . . . . . . . . . . . . . . 42
G. Using the 'Get Status' Feature . . . . . . . . . . . . . . . . . . . . . . . . . . . 42
H. Advanced Job Options. . . . . . . . . . . . . . . . . . . . . . . . . . . . . . . . . 45
Section 6: Using SureThing CD Labeler . . . . . . . . . . . . . . . . . . . . . . . . 48
A. Creating a Disc Design . . . . . . . . . . . . . . . . . . . . . . . . . . . . . . . . 48
B. Using Merge Fields . . . . . . . . . . . . . . . . . . . . . . . . . . . . . . . . . . . 53
Section 7: Troubleshooting and Technical Support . . . . . . . . . . . . . . . 55
A. Problems and Solutions. . . . . . . . . . . . . . . . . . . . . . . . . . . . . . . . 55
B. Reinstalling PTBurn Server. . . . . . . . . . . . . . . . . . . . . . . . . . . . . 57
C. Reinstalling PTBurn Client . . . . . . . . . . . . . . . . . . . . . . . . . . . . . 58
D. Disabling the Autoplay on your Server Workstation . . . . . . . . 58
E. Technical Support. . . . . . . . . . . . . . . . . . . . . . . . . . . . . . . . . . . . . 59
Index
. . . . . . . . . . . . . . . . . . . . . . . . . . . . . . . . . . . . . . . . . . . . . . . . . . . . 60
iii
510119pdf.qxd
5/29/2002
11:14 AM
Page iv
Interactive Feature in this
PDF Document
There are interactive features that will allow you to
jump to different locations within the document. Each
listing in the Table of Contents is interactive. Place the
cursor on either the words or the page number. A
small hand with a pointing finger icon appears. Click
on the line with the icon and the document will jump to
that page. If you want to return to the Table of
Contents, move the icon to the top of the page and
click on the arrow marked TOC. Navigating through
the Index is similar. Place the icon on one of the
listings or page numbers, click on it, and it will move to
that page. The text relating to the Index listing will
appear in red. Returning to the Index can be done by
clicking on the arrow marked Index.
iv
510869_big.qxd
3/13/2005
7:30 PM
Page 1
TOC
INDEX
Section 1: Introduction
THANK YOU…
…for purchasing PTBurn™ Network Software for your Disc
Publisher. This software will enable your Publisher to be
accessed by up to 5 users on your network, thus increasing your
productivity. PTBurn™ adds the power and flexibility to allow
multiple users to schedule record-and-print disc jobs, with the
ability to design labels right from their workstations.
A. HOW PTBURN NETWORK SOFTWARE WORKS
PTBurn Network Software consists of three unique applications,
PTBurn Server, PTBurn Client and SureThing CD Labeler.
PTBurn Server is a server application that runs on the PC
connected to your Disc Publisher. This application must be
running for the Publisher to accept jobs over the network. The
PTBurn Server creates a 'PTBurnJobs Shared Folder' upon
installation. This folder is a shared directory that acts as a
collecting point for jobs sent from around the network. The
PTBurn Server Software will constantly monitor the PTBurnJobs
Shared Folder for job requests, and then queue submitted jobs
for processing. The PTBurn Server is able to prioritize jobs, and
will keep a log and status file on all activity in the server.
PTBurn Client runs on up to 5 workstations. Additional user
licenses are available from Primera Technology. The PTBurn
Client is a simple, wizard-like interface that allows a user to
easily and quickly create several different types of recording
jobs. PTBurn Client also provides real-time status to the user
allowing them instant access to the status of the jobs that are
being processed.
Once a job is submitted using PTBurn Client, the files to be
recorded and the print file to be used to label the discs are
temporarily copied over to the PTBurnJobs Shared Folder. A job
request is also submitted at that time. The PTBurn Server reads
in the job request, records and prints the discs to fulfill the job,
and moves on to the next job in queue.
Introduction 1
510869_big.qxd
3/13/2005
7:30 PM
Page 2
TOC
INDEX
SureThing CD Labeler is a powerful yet easy-to-use application
for creating the image to be printed on your disc jobs.
SureThing is set up in an easy step-by-step wizard allowing
even users with little or no background in graphic design to
create fast, professional looking labels. SureThing also has a
powerful merge tool built in to allow for the automated
insertion of serialized numbers, dates, merge fields from
databases and even unique images.
These three applications combine to create a network software
package that will allow users to create discs over the network as
simply as using an office printer or copier.
B. NOTE ON TERMS AND CONVENTIONS:
From this point forward, the following terms and conventions
will apply:
The Disc Publisher will be abbreviated simply as the Publisher.
Optical discs, such as CD-Rs, CD-RWs, DVD-Rs and more are all
referred to as CDs or discs. Please note that in order to copy
and record DVDs, you need to have purchased the DVD-R
version of the Publisher.
C. SYSTEM REQUIREMENTS (PTBURN SERVER):
•
•
•
•
•
•
•
•
•
•
•
1 GHz genuine Pentium III/IV CPU or better
Windows 2000 or XP Professional
512 MB SDRAM or greater
Available IEEE 1394 FireWire® port (Bravo Only)
Available USB 1.1/2.0 port (2.0 is required for BravoPro
and Bravo II)
Free hard drive space of at least 40 GB for CD jobs; if using
DVD, at least 80 GB of space is recommended
10/100 Ethernet Connection
Windows XP, service pack1 or Windows 2000, service pack3
An administrator equivalent account logged into the PC
A PC dedicated to the server function with the above specs
will provide best duplication results.
Networking requirements: clients and servers must be
members of the same Windows Domain.
2 Introduction
510869_big.qxd
3/13/2005
TOC
7:30 PM
Page 3
INDEX
D. SYSTEM REQUIREMENTS (PTBURN CLIENT):
•
•
•
•
•
750 MHz Pentium III/IV CPU or better
Windows 2000 or XP Professional
512 MB SDRAM
Free hard drive space of at least 10 GB or better
10/100 Ethernet Connection
Introduction 3
510869_big.qxd
3/13/2005
7:30 PM
Page 4
TOC
INDEX
Section 2: Installation of PTBurn
Server
This software is installed in two components, PTBurn Server and
PTBurn Client. PTBurn Server is the server software for the
Publisher and should be installed on the host PC connected to
your Publisher. You will need to install PTBurn Server prior to
installing PTBurn Client. A third application, SureThing CD
Labeler is also found on the installation disc and can be installed
on any workstation that will be using the Publisher.
Make sure the following criteria are met prior to installing
PTBurn Server:
1.
You have a Publisher properly installed and working on
this workstation (per the Publisher User's Manual).
2.
This workstation meets the System Requirement for
PTBurn Server (listed on Page 2).
3.
Autoplay is Disabled (described on Page 57).
4.
You have Administrator Rights on this PC.
If all of these statements are true, you can now install the
PTBurn Server on your PC.
A. INSTALLATION AND SETUP OF PTBURN SERVER
As mentioned above, PTBurn Server is the server application
and must be installed on the PC to which the Publisher is
connected. Make certain this PC is networked and accessible to
all who will be using the Publisher to publish discs, and verify
the Publisher is connected and properly functioning. You must
have Administrator Rights on this PC to install this software
properly. Make certain this PC is running Windows 2000 or
XP Professional.
Install PTBurn Server software as follows:
a.
DO NOT remove or uninstall the Publisher software
applications.
b. Close down all other software applications.
c.
Insert the included CD into your computer's CD-ROM
drive.
4 Installation of PTBurn Server
510869_big.qxd
3/13/2005
TOC
7:30 PM
Page 5
INDEX
d. After a moment, the installer should automatically launch.
If not, right-click the Start button, then select Explore from
the pop-up menu, then double-click on the icon for the
CD-ROM drive containing your PTBurn Installer CD.
e.
From the Installer, Click the Install PTBurn™
Server button.
This will open the PTBurn Server Install Menu
Click on the Next> button to start the install process.
After installing server you will now see this screen:
Click Next to continue. You will now be guided through the
installation of the SureThing CD Labeler Software. Once
complete, close the SureThing Installer and return the PTBurn
Master Installer.
Installation of PTBurn Server 5
510869_big.qxd
3/13/2005
7:30 PM
TOC
Page 6
INDEX
You will now be prompted to reboot your system.
Click the Restart button to reboot your computer. You MUST
reboot prior to launching the PTBurn Server Application.
B. RUNNING PTBURN SERVER FOR THE FIRST TIME
Launch PTBurn Server by clicking Start> Programs> PTBurn
Server. When launching the PTBurn Server for the first time,
you will be prompted to select a 'PTBurnJobs' Shared folder.
You can use the default location shown, or click Browse to find
another directory. This folder is where files will be temporarily
copied while jobs are queued for processing. Once a job has
finished, these files will be deleted. Keeping that in mind, you
will want to make sure you are creating this folder on a drive
with enough hard drive space to hold several jobs while they are
awaiting completion. We recommend 40 GB for those only
making CDs, 80GB for DVDs. Once the folder has been selected,
click OK. The PTBurn Server Software will automatically make
the folder shared, granting full access to all users. The PTBurn
Server will also create 2 sub folders, Log and Status. Log will
contain a text file that constantly updates with a record of all
events on this server. Status also contains a constantly updated
text file that records the status of the server and jobs submitted
for processing.
It is important to note that PTBurn Server will not function
properly unless it has a valid PTBurnJobs Shared folder. The
folder must be shared with full access to all users, and must
contain subdirectories named Log and Status.
6 Installation of PTBurn Server
510869_big.qxd
3/13/2005
TOC
7:30 PM
Page 7
INDEX
After clicking OK, you will see the following alert the first time
PTBurn Server is launched:
Until you call to activate the PTBurn Server, you will only have
1 of the allowed 5 Clients available. Activating the additional
clients is covered in Section 3 - B. Administration. Click OK to
open the PTBurn Server Main Application Window. The next
section will guide you through the use and administration of the
PTBurn Server Software.
Installation of PTBurn Server 7
510869_big.qxd
3/13/2005
7:30 PM
Page 8
TOC
INDEX
Section 3: Setting up the PTBurn
Server
This section will guide you through the PTBurn Server software
and it configuration.
A. PTBURN SERVER'S MAIN APPLICATION WINDOW
Launch PTBurn Server by clicking Start> Programs> PTBurn
Server. If you see an Available Client Alert, click OK to open the
software. You will see the Server Main Application Window.
Drive Status
Pause Button
Abort Button
Waiting Job
Queue
Open Log Button
Settings Button
This window is where the current status of the server and the
jobs that have been submitted for completion.
Drive Status shows the progress of recording of the current disc.
Pause Job will pause the server after the current disc has been
completed.
Abort Job will abort the current job.
Waiting Job Queue displays all jobs that have been submitted to
the Server. The widow also displays the number of discs
requested with the job, priority set in the client, and the Client
who submitted the job to the server.
8 Setting up the PTBurn Server
510869_big.qxd
3/13/2005
7:30 PM
Page 9
TOC
INDEX
Press the Open Log button to open the log file and display a
record of all events. This log is very useful in spotting any
recording errors and also allows you to track jobs that have been
sent to the server.
B. PTBURN SERVER SETTINGS
From the Main Application Window, click the Settings button to
open the Settings Window. These settings will govern how the
Server will handle the disc jobs that have been submitted by
clients. Note that this window will not be available while the server
is completing queued jobs. Once the server is idle, the Settings
window will be available.
Robotics
Administration
Job Handling
Settings Window
Setting up the PTBurn Server 9
510869_big.qxd
3/13/2005
7:30 PM
Page 10
TOC
INDEX
The PTBurn Settings Window can be broken down into three
groups, Robotics, Administration and Job Handling. These
sections are discussed below.
B.1. Robotics Settings
The Robotics Settings are controls that allow the Administrator
to test the robotics of the Publisher and to configure how discs
will be delivered.
Robotics Settings
Under Robotics you will see two buttons, Options and
Movements Test. Press the Options button to open the
Options/Services window. This window contains some
settings for the server allowing you to control how the Publisher
creates discs.
10 Setting up the PTBurn Server
510869_big.qxd
3/13/2005
TOC
7:30 PM
Page 11
INDEX
In this window you will have the following options:
Enable Kiosk Mode will allow your server to operate in Kiosk
Mode. Kiosk Mode allows the Publisher to use both bins as
input doubling the capacity of the Publisher. The finished discs
will be ejected out the front of the unit. An optional Kiosk Kit
containing an output bin for the front reject area of the Publisher
is available from Primera.
Print "Reject" will cause rejected discs to be printed with the
word "Reject" instead of the graphic selected for the job. This is
useful in Kiosk Mode since all discs are deposited out the front
of the unit. If this mode is disabled the reject discs will contain
no printing whatsoever.
Record and Print Simultaneously allows the Publisher to start
recording a new disc while printing a disc from the previous
round. This will greatly increase the throughput of the
Publisher, but will also use more system resources.
Minimize Printing Dialog will suppress the printing dialog that
would otherwise be displayed during the printing of jobs. If this
feature is disabled, a dialog box showing the amount of
remaining ink and printing status will be pop up every time a
disc job is printing.
It is a good idea after a clean install to make certain the Server is
communicating properly with the Publisher. In the Options/
Services window you will see an option for the USB Port
currently used to connect the Publisher to your system. You will
also see a Check Communications button. Select the proper
port, then press the Check Communications button to see if the
Setting up the PTBurn Server 11
510869_big.qxd
3/13/2005
7:30 PM
TOC
Page 12
INDEX
Publisher is attached properly and being seen by the server. You
should see the following message:
If you do not see this message, close the server software and
check the Publisher connection. Make certain the Publisher has
been installed properly on this system. Consult the Publisher's
User's Manual for troubleshooting tips on this Click OK to
return to the Options/Services Window. You can also test the
robotics of the Publisher by clicking the Movements Test button.
Pressing this button will open the Duplicator Movements
window.
In this window you will be able to reset the Robotics by pressing
the Reset Robotics button. This will clear the commands from
the internal memory and reset its processor. You can also
perform a test of the Publisher by selecting a number of discs
and clicking the Start Test button. This will cause the Publisher
to load discs, one at a time, from the input bin into the recorder,
then to the printer, and finally to the output. Click Exit to return
to the Options/Services window.
In to the Options/Services Window you will also see a button
that launches the SureThing CD labeler and will allow you to
create a disc design. If you use this, make certain you close
SureThing. It is very important that you do not have SureThing
running on the server while it is accepting jobs. If SureThing is
running when the server attempts to print, the job will fail.
12 Setting up the PTBurn Server
510869_big.qxd
3/13/2005
7:30 PM
Page 13
TOC
INDEX
B.2. Administration Settings
The Administration Settings will allow the Administrator to
choose the shared folder for job queuing and administrate the
clients allowed to submit jobs to the server.
Administrator Settings
Click the Admin Utilities to access and administer licenses and
clients for the PTBurn Server Software.
The way the Administrator Utility works is available clients will
be automatically added to the Clients In Use… list on a firstcome-first-serve basis until the number of available clients has
been used. As mentioned in the Install instructions, the PTBurn
Setting up the PTBurn Server 13
510869_big.qxd
3/13/2005
7:30 PM
Page 14
TOC
INDEX
Software will come with 1 client active prior to unlocking the
4 users included with your purchase price.
Unlock additional Clients as follows:
Click the Generate Key button.
Jot down the key as shown or highlight and press Ctrl+C to
copy it to the clipboard. This key will need to be presented to
Primera Technology to redeem your 4 additional users.
Call Primera Technology's Supply department at 800-797-2772
with this key and the serial number on your software box.
A representative will then provide you with a License Key to
unlock the users. Additional users can be added in the same
manner.
Once you have received the License Key from a Primera
Technology Supply Sales Representative, click the Enter New
License Key button and enter the key in the area provided.
Click Submit when finished.
The generated key and license key produced as described above
are hardware specific to a given server. If you move the server
software to another PC you will need to repeat the unlocking
procedure with Primera Technology with the new generated key.
14 Setting up the PTBurn Server
510869_big.qxd
3/13/2005
TOC
7:30 PM
Page 15
INDEX
Once you have unlocked the users, you can administer which
users will have access to the server.
In the Administrator Utilities Window, you will see Available
Clients listed on the left, and Clients In Use listed on the right.
As mentioned earlier, the Clients in use will be automatically
assigned in a first-come-first-serve basis as jobs from these
clients are submitted to the Server. If an administrator is
running short on licenses, a Client can be removed by simply
highlighting the client in the Client In Use window and pressing
the <Remove button and an alternative client can then be
selected from the Available Client Window and added by
clicking the Add> button.
Click the Setup Admin Notifications… button to access the user
list for your network and select the workstation that you would
like to receive Administrator Messaging. Administrator
Messaging sends notifications of any error that requires
Administrator attention such as 'out of disc' and 'out of ink'
errors.
Setting up the PTBurn Server 15
510869_big.qxd
3/13/2005
7:30 PM
Page 16
TOC
INDEX
In the Admin Notifications window you will see a check box to
allow you to enable or disable the Admin Notifications and you
will see a drop down list allowing you to select the workstation
that will receive these messages.
B.3. Job Handling Settings
This section identifies how the Server will handle queued jobs
and report their status.
Job Handling Settings
The Complete all copies… setting will allow you to decide
whether failed discs will be counted towards completing a
requested job. For instance, a client requests 5 copies in a job
request. When the server processes the job, 4 discs are
successful, and 1 fails. If this option is disabled, the job will
be completed as is, with 4 good discs and 1 failure. If this is
enabled, the server will record another disc to complete the
job request.
How Long before lower priority jobs get 'Promoted' will
identify jobs that have been waiting for a set time and change
the priority to allow them to be completed faster. Priority is set
in the client application (see Section 5G. Using PTBurn Client's
'Get Status' Window) and assigned a number from 0 to 5
(0 being the highest, 5 being the lowest) allowing certain jobs
to be able to skip ahead in the queue if they are more urgent.
16 Setting up the PTBurn Server
510869_big.qxd
3/13/2005
TOC
7:30 PM
Page 17
INDEX
How long information is available to Clients will allow the
administrator to decide how long status on completed jobs will
be displayed in the PTBurn Client Get Status (see section 5F
Using PTBurn Client's 'Get Status' Window) Window.
How many rejects in a row are tolerated before giving up
allows the Administrator to decide how many back-two-back
recording failures will be tolerated before the Server aborts the
job and goes to the next request in the queue.
Once you have these values set, click Save Values. You will then
need to close and restart the PTBurn Server to have these
changes take effect (not necessary)
The Job Request Folder Window will allow you to select a
folder in which jobs will be queued for processing. As
mentioned in the Install instructions, all files to be burned on to
a disc will be temporarily copied to this folder so you will want
to make certain the volume containing this folder has ample
space. If you want to change the folder, click the Change button.
You will see the following window:
Click Browse to create a new 'shared folder' or select an
existing folder.
Setting up the PTBurn Server 17
510869_big.qxd
3/13/2005
7:30 PM
TOC
Page 18
INDEX
Browse to a drive with ample space and either highlight the
desired folder, or click Make New Folder to create a folder.
Click OK once you have highlighted the new Shared Folder.
Once you have clicked OK, the selected folder will automatically
be made. The Server Software will automatically force this
folder to be shared with full access rights to everyone on the
network. The Server will also create two subdirectories, Log
and Status.
Note that a shared folder is required for the Server to work
properly, and a valid shared folder is one that has full access
and contains the Log and Status subdirectories.
Click the Exit
button to close this window and return
to the Main Application Window.
18 Setting up the PTBurn Server
510869_big.qxd
3/13/2005
7:30 PM
Page 19
TOC
INDEX
Section 4: Installation and Setup of
the PTBurn Client
Software
Now that the PTBurn Server Software has been installed and
configured, we will look at the installation and use of the
PTBurn Client Software.
A. INSTALLING THE PTBURN CLIENT
The Client is installed as follows:
1.
Close down all other software applications.
2.
Insert the included CD into your computer's CD-ROM
drive.
3.
After a moment, the installer should automatically launch.
If not, right-click the Start button, then select Explore from
the pop-up menu, then double-click on the icon for the
CD-ROM drive containing your PTBurn Installer CD.
4.
From the Installer, Click the Install PTBurn™
Client button.
Installation and Setup of the PTBurn Client Software 19
510869_big.qxd
3/13/2005
7:30 PM
Page 20
TOC
INDEX
Click Next > to continue. Follow the on-screen instructions.
Once the Client has installed, you will see this window:
Click Close to go back to the installer.
5.
The Client has installed, now you will be asked to install
the printing software.
You will now see the following window:
Click Next> to continue.
20 Installation and Setup of the PTBurn Client Software
510869_big.qxd
3/13/2005
TOC
6.
7:30 PM
Page 21
INDEX
Once SureThing has fully installed, you may be asked
to reboot your computer, the installer will ask you to
click Finish.
Your PTBurn Client has been successfully installed. Before
you can start using the Client, please refer to the next section,
"B. Running PTBurn Client For the First Time. " This section
describes how to point the Client application to an available
server.
B. RUNNING PTBURN CLIENT FOR THE FIRST TIME
Launch the PTBurn Client by clicking Start> All Programs>
PTClient. If this is the first time the Client has been launched, it
will try to find the server. You will see the following dialog:
Depending on your network and the workstations availability,
this may take as long as 5 minutes. Do not cancel during this
process as it may cause PTBurn Client to close unexpectedly.
Installation and Setup of the PTBurn Client Software 21
510869_big.qxd
3/13/2005
7:30 PM
Page 22
TOC
INDEX
Once the Client has found all available PTBurn Servers on the
network, they will be displayed with the Server Status.
Select an available Server and click Select.
22 Installation and Setup of the PTBurn Client Software
510869_big.qxd
3/13/2005
7:30 PM
Page 23
TOC
INDEX
Section 5: Using PTBurn Client to
Submit a Job
Once the Client has been installed and configured to an available
server, you can start using PTBurn Client to send disc jobs to the
server. The following pages will guide you through sending
each type of job available through the PTBurn Client Software.
A. JOB TYPE WINDOW
When launching PTBurn Client, or clicking the New Job button,
you will see PTBurn Client's Job Type Window:
Job Type Window
In this window, you will see the server listed in the Server
window at the top of the dialogue box. If you click the Get
Status button you will see the status of the current server.
The Get Status window will be discussed in further detail
later in this section.
Using PTBurn Client to Submit a Job 23
510869_big.qxd
3/13/2005
7:30 PM
Page 24
TOC
INDEX
Select the desired Job Type. The job types are as follows:
Data Job: This is a standard Data Job where files or folders on
your PC (or the network) are selected, a disc label is created, and
the job is submitted to the PTBurn Server.
Audio Job: The Audio Job will allow the user to select one or
more MP3 or WAV file(s) a disc label is created, and the job is
submitted to the PTBurn Server. The songs are recorded to a
disc that would play in a normal CD Player.
Image Job: The Image Job will allow the user to take a ISO or GI
disc image created in any other application and submit it to the
server for recording.
Print Job: Print Job allows the user to create a disc label in
SureThing or submit a JPG or BMP file created in any
application for printing. The Print Job is used when the client
only wishes to print on discs without recording any information.
Open Job: All the other jobs listed above can be saved for future
use. The Open Jobs feature will allow you to open a previously
saved job and submit it to the PTBurn Server.
The following pages will detail the steps involved in creating
each of these job types.
B. SENDING A DATA JOB
This section will describe how to send a Data Job with PTBurn
Client. This client has been created in a very simple wizard-like
interface to allow you to quickly and intuitively create disc jobs.
1.
From the Job Type Window, click the Data Job icon.
24 Using PTBurn Client to Submit a Job
510869_big.qxd
3/13/2005
TOC
2.
7:30 PM
Page 25
INDEX
This will open the File Selection window. You will be
asked to select the files you wish to record. The Data Job
File Selection Window looks like this:
Data
Area
3.
In the Data Job Window you can simply drag and drop
files into the data area. You can also right click in the data
area and choose to add files or folders.
Using PTBurn Client to Submit a Job 25
510869_big.qxd
3/13/2005
7:30 PM
Page 26
TOC
INDEX
As you add files and folders, you will see the size of the
resulting disc at the bottom of the Data Job Window.
Size of
Recorded
Disc
Files and folders can also be removed from this window by
right clicking in the Data Area and selecting the remove
options available in the drop-down menu. Once you have
selected the files you wish to burn to this disc, select Next.
4.
You will now be asked to add a print file to your job.
Print File Window
26 Using PTBurn Client to Submit a Job
510869_big.qxd
3/13/2005
7:30 PM
Page 27
TOC
INDEX
The Print File Window contains three options for printing:
•
Design a SureThing Label
•
Browse for save SureThing Files, BMPs, or JPGs
•
Insert Custom Text into a standard template
Click the SureThing button
if you would like to create
a new disc design in SureThing CD Labeler. See
Section 6: Using SureThing CD Labeler for more information on
this software.
NOTE: If the PTBurn Client is installed on the same PC as the PTBurn
Server make certain that SureThing is closed before submitting jobs.
If SureThing is open when a PTBurn Server attempts to print, the
job will fail.
Using the Browse button
you can select SureThing
Files, or you can select Image Files such as JPG and BMP.
Click Browse then select the desired file of type.
File of Type
You can then browse to the desired file.
If you are using a JPG or BMP designed in another program,
here are some hints for designing a successful label:
•
Create the image as a 120mm by 120mm square. If your
image is too large, the PTBurn Server will automatically
resize it and center it on the disc area. If it is not
symmetrical, it will center it on the disc proportionately so
you may see some white or non-printed areas on the disc.
Using PTBurn Client to Submit a Job 27
510869_big.qxd
3/13/2005
7:30 PM
Page 28
TOC
INDEX
The PTBurn Server will crop the image to the shape of a
disc for you. If you try to crop out areas for the outer and
inner diameter of the disc, and you are not perfectly
accurate you will end up with an egg shaped or misshapen
print area on the disc. If you flood the entire area of the
disc with color, you will have a perfectly formed print area
on the disc.
• If you want to create a template in a drawing application
such as Illustrator or Corel, start with a 120mm square
document with no margins. Center a 120mm transparent
circle on the document to see the outer diameter of the disc.
If using Primera's TuffCoat discs, center a 38mm
transparent circle on the inner diameter of the document to
show the inner diameter area of the disc. Note that the
center size of discs may vary from manufacturer to
manufacturer.
• Create your image using the circles as a guide. When
finished, remove the circles from the guide and export the
image at 300 dpi as a JPG or BMP.
If you do not want to use a SureThing Design or Image file, but
only wish to print a simple line of text on the disc, enter the text
in the Custom Text Window. There is a standard template that
PTBurn Server will use for your image and will insert the
custom text in to the template for you.
•
Custom Text Field
5.
Once you have selected your Print File, click Next. This
will bring up the Burn Window
In the Burn window, name your Job (or use the default job name
generated by the Client).
28 Using PTBurn Client to Submit a Job
510869_big.qxd
3/13/2005
7:30 PM
Page 29
TOC
INDEX
You can also select the Priority of the job. Priority is represented
by a number between 0 and 5, 0 being the highest priority. The
server will queue disc jobs first by priority, then by the order
they were submitted.
Select the number of copies of this disc you would like to
produce. If this is a job you will need to run again in the future,
click the Save button to save this job as a *.PJB file. Saved jobs
can be reopened in the PTBurn Job Type Window (the first
window when starting a new job).
Click Burn. Your job will be submitted You can monitor the
status of jobs in the Get Status Window described later in this
section.
C. CREATING AN AUDIO JOB
The Audio Job in PTBurn is a job that allows the user to select
one or more audio files (MP3, WMA or WAV) and create a CD
Audio disc that will play in any ordinary CD Player. The Audio
Job is created as follows:
1.
From the PTBurn Client Job Type Window (available by
clicking New Job or launching the PTBurn Client) click
Audio Job.
Using PTBurn Client to Submit a Job 29
510869_big.qxd
3/13/2005
7:30 PM
Page 30
TOC
2.
INDEX
This will open the File Selection Window. Select files by
dragging and dropping them into the file area. Files can
also be cut and pasted into this area, or added by right
clicking in the file area and selecting Add Files.
After the files are added to the File Selection Window,
you can rearrange the order of tracks by selecting a track
and pressing the Move Track Up or Move Track Down
buttons.
30 Using PTBurn Client to Submit a Job
510869_big.qxd
3/13/2005
7:30 PM
Page 31
TOC
3.
INDEX
Once you are satisfied with the contents of your Audio
Disc, press Next. You will now be asked to add a print file
to your job.
Print File Window
The Print File Window contains three options for printing:
• Design a SureThing Label
• Browse for save SureThing Files, BMPs, or JPGs
• Insert Custom Text into a standard template
Click the SureThing button
if you would like to create a
new disc design in SureThing CD Labeler. See Section 6: Using
SureThing CD Labeler for more information on this software.
NOTE: If the PTBurn Client is installed on the same PC as the PTBurn
Server make certain that SureThing is closed before submitting jobs.
If SureThing is open when a PTBurn Server attempts to print, the
job will fail.
Using PTBurn Client to Submit a Job 31
510869_big.qxd
3/13/2005
7:30 PM
Page 32
TOC
INDEX
Using the Browse button
you can select SureThing Files,
or you can select Image Files such as JPG and BMP.
Click Browse then select the desired file of type.
File of Type
You can then browse to the desired file.
If you are using a JPG or BMP designed in another program,
here are some hints for designing a successful label:
•
•
•
Create the image as a 120mm by 120mm square. If your
image is too large, the PTBurn Server will automatically
resize it and center it on the disc area. If it is not
symmetrical, it will center it on the disc proportionately so
you may see some white or non-printed areas on the disc.
The PTBurn Server will crop the image to the shape of a
disc for you. If you try to crop out areas for the outer and
inner diameter of the disc, and you are not perfectly
accurate you will end up with an egg shaped or misshapen
print area on the disc. If you flood the entire area of the
disc with color, you will have a perfectly formed print area
on the disc.
If you want to create a template in a drawing application
such as Illustrator or Corel, start with a 120mm square
document with no margins. Center a 120mm transparent
circle on the document to see the outer diameter of the disc.
If using Primera's TuffCoat discs, center a 38mm
transparent circle on the inner diameter of the document to
show the inner diameter area of the disc. Note that the
center size of discs may vary from manufacturer to
manufacturer.
32 Using PTBurn Client to Submit a Job
510869_big.qxd
3/13/2005
7:30 PM
TOC
Page 33
INDEX
Create your image using the circles as a guide. When
finished, remove the circles from the guide and export the
image at 300 dpi as a JPG or BMP.
If you do not want to use a SureThing Design or Image file, but
only wish to print a simple line of text on the disc, enter the text
in the Custom Text Window. There is a standard template that
PTBurn Server will use for your image and will insert the
custom text in to the template for you.
•
Custom Text Field
4.
Once you have added a print file to your job, click Next.
This will bring up the Burn Window
In the Burn window, name your Job (or use the default job name
generated by the Client).
You can also select the Priority of the job. Priority is represented
by a number between 0 and 5, 0 being the highest priority. The
server will queue disc jobs first by priority, then by the order
they were submitted.
Using PTBurn Client to Submit a Job 33
510869_big.qxd
3/13/2005
7:30 PM
Page 34
TOC
INDEX
Select the number of copies of this disc you would like to
produce. If this is a job you will need to run again in the future,
click the Save button to save this job as a *.PJB file. Saved jobs
can be reopened in the PTBurn Job Type Window (the first
window when starting a new job).
Click Burn. Your job will be submitted. You can monitor the
status of jobs in the Get Status Window described later in this
section.
D. CREATING AN IMAGE JOB
Image Jobs are jobs created using a disc image file such as *. ISO
or *.GI files. This job type is useful when creating disc projects
in other applications. For example, if you are creating DVD
Projects in Adobe® Encore™DVD and export them as ISO
images, you can then take your ISO image and send it to the
PTBurn Server using the Image Job Feature. Image Jobs are
creates as follows:
1.
From the PTBurn Client Job Type Window (available by
clicking New Job or launching the PTBurn Client) click
Image Job.
34 Using PTBurn Client to Submit a Job
510869_big.qxd
3/13/2005
7:30 PM
Page 35
TOC
INDEX
This will launch the File Selection Window.
Click Browse to select your ISO or GI disc image file. Once
you have selected the Disc Image File, click Next.
2.
You will now be asked to add a print file to your job.
Print File Window
The Print File Window contains three options for printing:
• Design a SureThing Label
• Browse for save SureThing Files, BMPs, or JPGs
• Insert Custom Text into a standard template
Click the SureThing button
if you would like to create a
new disc design in SureThing CD Labeler. See
Section 6: Using SureThing CD Labeler for more information on
this software.
NOTE: If the PTBurn Client is installed on the same PC as the PTBurn
Server make certain that SureThing is closed before submitting jobs.
If SureThing is open when a PTBurn Server attempts to print, the
job will fail.
Using the Browse button
you can select SureThing Files,
or you can select Image Files such as JPG and BMP.
Using PTBurn Client to Submit a Job 35
510869_big.qxd
3/13/2005
7:30 PM
Page 36
TOC
INDEX
File of Type
Click Browse then select the desired file of type.
You can then browse to the desired file.
If you are using a JPG or BMP designed in another program,
here are some hints for designing a successful label:
•
•
•
•
Create the image as a 120mm by 120mm square. If your
image is too large, the PTBurn Server will automatically
resize it and center it on the disc area. If it is not
symmetrical, it will center it on the disc proportionately so
you may see some white or non-printed areas on the disc.
The PTBurn Server will crop the image to the shape of a
disc for you. If you try to crop out areas for the outer and
inner diameter of the disc, and you are not perfectly
accurate you will end up with an egg shaped or misshapen
print area on the disc. If you flood the entire area of the
disc with color, you will have a perfectly formed print area
on the disc.
If you want to create a template in a drawing application
such as Illustrator or Corel, start with a 120mm square
document with no margins. Center a 120mm transparent
circle on the document to see the outer diameter of the disc.
If using Primera's TuffCoat discs, center a 38mm
transparent circle on the inner diameter of the document to
show the inner diameter area of the disc. Note that the
center size of discs may vary from manufacturer to
manufacturer.
Create your image using the circles as a guide. When
finished, remove the circles from the guide and export the
image at 300 dpi as a JPG or BMP.
36 Using PTBurn Client to Submit a Job
510869_big.qxd
3/13/2005
7:30 PM
TOC
Page 37
INDEX
If you do not want to use a SureThing Design or Image file, but
only wish to print a simple line of text on the disc, enter the text
in the Custom Text Window. There is a standard template that
PTBurn Server will use for your image and will insert the
custom text in to the template for you.
Custom Text Field
3.
Once you have added a print file to your job, click Next.
This will bring up the Burn Window
In the Burn window, name your Job (or use the default job name
generated by the Client).
You can also select the Priority of the job. Priority is represented
by a number between 0 and 9, 0 being the highest priority. The
server will queue disc jobs first by priority, then by the order
they were submitted.
Select the number of copies of this disc you would like to
produce. If this is a job you will need to run again in the future,
click the Save button to save this job as a *.PJB file. Saved jobs
can be reopened in the PTBurn Job Type Window (the first
window when starting a new job).
Using PTBurn Client to Submit a Job 37
510869_big.qxd
3/13/2005
7:30 PM
Page 38
TOC
INDEX
Click Burn. Your job will be submitted. You can monitor the
status of jobs in the Get Status Window described later in this
section.
E. CREATING A PRINT ONLY JOB
The Print Only Job allows the user to select a SureThing Design
or a Graphic and print several copies of that design onto discs
with out recording. This is useful if you wish to print on prerecorded media, or print several copies for recording at a later
time. A Print-Only Job is created as follows:
1.
From the PTBurn Client Job Type Window (available by
clicking New Job or launching the PTBurn Client) click
Print Job.
38 Using PTBurn Client to Submit a Job
510869_big.qxd
3/13/2005
7:30 PM
Page 39
TOC
2.
INDEX
This will launch the Print File Window and ask you to
select the image you wish to print on your discs.
Print File Window
The Print File Window contains three options for printing:
• Design a SureThing Label
• Browse for save SureThing Files, BMPs, or JPGs
• Insert Custom Text into a standard template
Click the SureThing button
if you would like to
create a new disc design in SureThing CD Labeler. See
Section 6: Using SureThing CD Labeler for more information on
this software.
NOTE: If the PTBurn Client is installed on the same PC as the PTBurn
Server make certain that SureThing is closed before submitting jobs.
If SureThing is open when a PTBurn Server attempts to print, the
job will fail.
Using the Browse button
you can select SureThing Files,
or you can select Image Files such as JPG and BMP.
Using PTBurn Client to Submit a Job 39
510869_big.qxd
3/13/2005
7:30 PM
Page 40
TOC
INDEX
Click Browse then select the desired file of type.
File of Type
You can then browse to the desired file.
If you are using a JPG or BMP designed in another program,
here are some hints for designing a successful label:
•
•
•
•
Create the image as a 120mm by 120mm square. If your
image is too large, the PTBurn Server will automatically
resize it and center it on the disc area. If it is not
symmetrical, it will center it on the disc proportionately so
you may see some white or non-printed areas on the disc.
The PTBurn Server will crop the image to the shape of a
disc for you. If you try to crop out areas for the outer and
inner diameter of the disc, and you are not perfectly
accurate you will end up with an egg shaped or misshapen
print area on the disc. If you flood the entire area of the
disc with color, you will have a perfectly formed print area
on the disc.
If you want to create a template in a drawing application
such as Illustrator or Corel, start with a 120mm square
document with no margins. Center a 120mm transparent
circle on the document to see the outer diameter of the disc.
If using Primera's TuffCoat discs, center a 38mm
transparent circle on the inner diameter of the document to
show the inner diameter area of the disc. Note that the
center size of discs may vary from manufacturer to
manufacturer.
Create your image using the circles as a guide. When
finished, remove the circles from the guide and export the
image at 300 dpi as a JPG or BMP.
40 Using PTBurn Client to Submit a Job
510869_big.qxd
3/13/2005
7:30 PM
TOC
Page 41
INDEX
If you do not want to use a SureThing Design or Image file, but
only wish to print a simple line of text on the disc, enter the text
in the Custom Text Window. There is a standard template that
PTBurn Server will use for your image and will insert the
custom text in to the template for you.
Custom Text Field
3.
Once you have selected your Print File, click Next.
This will launch a Print Window.
In the Print window, name your Job (or use the default job name
generated by the Client).
You can also select the Priority of the job. Priority is represented
by a number between 0 and 5, 0 being the highest priority. The
server will queue disc jobs first by priority, then by the order
they were submitted.
Select the number of copies of this disc you would like to
produce. If this is a job you will need to run again in the future,
click the Save button to save this job as a *.PJB file. Saved jobs
can be reopened in the PTBurn Job Type Window (the first
window when starting a new job).
Using PTBurn Client to Submit a Job 41
510869_big.qxd
3/13/2005
7:30 PM
Page 42
TOC
INDEX
Click Print. Your job will be submitted You can monitor the
status of jobs in the Get Status Window described later in
this section.
F. OPENING A SAVED JOB
This feature allows you to open jobs you've previously created
with the PTBurn Client Application. Simply click Open Job
from PTBurn Client's Job Type Window.
Browse to a saved PTBurn Job (PJB) file. This will open
the job and allow you to modify any part of the job. Simply click
Next to go through the Add File, Print and Burn/Print Windows
and submit the job by clicking the appropriate button.
G. USING THE "GET STATUS" FEATURE
One of the powerful features of the PTBurn Network Software is
its real- time status reporting. At the click of a button one can
see how many jobs are in queue, how many discs have been
completed, what stage the current job is in, and whether or not
the Server is online and producing discs.
42 Using PTBurn Client to Submit a Job
510869_big.qxd
3/13/2005
TOC
7:30 PM
Page 43
INDEX
Click the Get Status button
in any window of the
PTBurn Client you can check status of the server and queued
jobs. The Get Status Window is shown below:
Server
Information
Job
Queue
Job
Information
The Get Status Window can be broken down into three areas,
Server Information, Job Queue and Job Information.
The Server Information area of the Get Status window shows
you the name of the server, the status of the server and drive
space available in the Shared Job Folder. You will also see the
Set Server button. Click this button if you have more than one
Publisher on the network and would like to change to a different
PTBurn Server on the network. When you click this button you
will see the following message:
It can take as long as 5 minutes to scan your network depending
on the status of workstation and speed of computers on the
network. It is important to let it finish scanning, closing out of
this window prematurely could make PTBurn Client close
unexpectedly.
Using PTBurn Client to Submit a Job 43
510869_big.qxd
3/13/2005
7:30 PM
Page 44
TOC
INDEX
Once the servers have been found, you will see a list of the
available servers on the network.
Simply highlight the desired server and click the Select button.
The Job Queue area displays all the jobs that have been
submitted to the server. This list refreshes every few seconds.
By default, job information is retained in the view for 1 hour so
you will see both completed and queued jobs in this window. To
see more information on a particular job, click on it and you will
see it highlight in blue.
Below the Job Queue Window you will see all the specific details
of the selected job in the Job Status area. In this example we can
see that the selected job is currently in the printing stage. We can
also see when it was submitted, when it was started, the
completion time (when it is finished) and the jobs currently
ahead of it in queue. You will also see the number of successfully
recorded discs and the number of discs that failed in recording.
You can abort a queued job by highlighting it in the Job Queue
window and clicking the Abort button. A job can only be
aborted by the client who submitted it to the PTBurn Server.
44 Using PTBurn Client to Submit a Job
510869_big.qxd
3/13/2005
7:30 PM
Page 45
TOC
INDEX
H. ADVANCED JOB OPTIONS
At any point in creating Data, Audio or Image Jobs, you can
access Advanced Job Options by clicking the Set Options button.
The Advances Options Window will allow the client to set
certain options for recording the job.
You will see a Set Server button. If more than one Publisher has
been networked with PTBurn, you can click the Set Server
button to search for the desired Publisher to process your jobs.
Volume Name allows you to name the disc you are creating.
This is the name that Windows Explorer will show when the
disc is inserted in drive.
Burn Speed will show the available speeds you can set for
recording your disc. If you are recording audio, it is
recommended to use 8x or slower for best quality. Data discs
can be recorded at Max speed with reliability.
Use merge file with SureThing will allow you to use merge
fields with your SureThing Design files. For more information
on this refer to Section 6: Using SureThing. SureThing will
support the ability to include merge fields in your design.
Using PTBurn Client to Submit a Job 45
510869_big.qxd
3/13/2005
7:30 PM
Page 46
TOC
INDEX
This powerful feature allows users to automate the unique
labeling of discs. Serial numbers, dates, text fields and even
images can be merged into standard SureThing Designs making
each disc label truly custom. If you are selecting a SureThing
File when making a job, and this checkbox is enabled, you will
be prompted to provide a Merge File with the following
message:
If you did not use the Merge Fields feature in this SureThing
Design, simply click No. If you have included merge field(s) in
your SureThing Design, click Yes and you will be prompted to
browse to your Merge File.
Enable Client Notification will allow you to receive notification
on the status of your jobs in addition to the information
displayed in the Get Status window. These notifications are in
the form of a pop-up dialog boxes that will notify you of job
completion, or any errors concerning jobs sent from your
workstation.
The DVD checkbox should be checked when creating a DVD.
You must have the DVD version of the Disc Publisher to create
DVD discs. This is not available for Audio Jobs.
The Close Disc check box will finalize the disc so no further
data can be recorded onto the finished disc.
The Delete Folder checkbox is checked by default and is
recommended. This will delete the temporary files on the server
workstation once your job has completed. Failure to check this
could cause the server to run low on disc space.
When enabled, Reject if not blank will force the server to reject
any disc that has previously recorded data. If this checkbox is
not checked, the PTBurn Server would be allowed to burn
multiple sessions on discs.
46 Using PTBurn Client to Submit a Job
510869_big.qxd
3/13/2005
7:30 PM
Page 47
TOC
INDEX
Verify Disc tells PTBurn Server to check the disc bit for bit to
make certain an accurate burn was made. This option is only
available on Data Jobs.
Data Image options are only available when creating a
Data Disc.
These options are described below:
Set Now sets the 'Created On' date of the files on the disc to the
date and time the disc was created instead of the date and time
the particular file was created.
Mode 2 enables Mode 2 Recording. This mode uses less error
checking than the PTBurn Server's default mode of Mode 1.
Session At Once enables your disc to be burned in Session-AtOnce as opposed to Track-At-Once.
Using PTBurn Client to Submit a Job 47
510869_big.qxd
3/13/2005
7:30 PM
Page 48
TOC
INDEX
Section 6: Using SureThing CD
Labeler
This section will detail the SureThing CD Labeler program.
SureThing is an easy-to-use CD Labeling application that allows
users to create professional looking discs with out having to
know anything about graphic design. This section will provide
some basic information on how to use this software. More
information is available in SureThing's Online Help by pressing
F1 on your keyboard or clicking Help then Contents in the
SureThing Main Application Window.
A. CREATING A DISC DESIGN
To create a quick, easy design in SureThing, please do the
following:
1.
Launch SureThing from your desktop or by clicking Start>
Programs> SureThing CD Labeler.
2.
Click File then New to create a new design. This will
launch SureThing's New CD Wizard.
48 Using SureThing CD Labeler
510869_big.qxd
3/13/2005
TOC
7:30 PM
Page 49
INDEX
3.
SureThing will allow you to create 120mm discs as well as
some custom sizes that are supported by the Publisher.
Select the 120mm size for most of your standard disc
designs. Click Next>. You will be prompted to select a
Background.
4.
Click Browse… to see the backgrounds included with
SureThing. Double click on a background to add it to
your design, then click Next. If you do not want to use
any of the included backgrounds and want to import your
own, simply click Cancel to return to the Wizard, then
click Next.
Using SureThing CD Labeler 49
510869_big.qxd
3/13/2005
7:30 PM
TOC
Page 50
INDEX
5.
You will now be prompted to select a Smart Design. These
are "canned" layouts. Click through the 18 pre-designed
layouts, or disable the Use Smart Design check box if you
wish to design the disc your own layout.
Click Next>.
6.
Click Finish.
You will now see your design on the screen. If you are using the
Smart Design as shown here, simply double click on text to
change areas.
50 Using SureThing CD Labeler
510869_big.qxd
3/13/2005
TOC
7:30 PM
Page 51
INDEX
If you would like to insert a graphic or photo, click the
Photos/Clipart tool on the left side of the screen.
Select Use Picture Tool from the drop down menu, and click in
the image area. You will see a Browse winbdow allowing you to
browse for your image file. SureThing accepts BMP, JPG,
PCX,PNG, TIF, WMF files.
Once the image has been placed, you can resize by using the
"handles" on the image box and reposition it by clicking and
dragging. If you would like to remove the border around the
imported image, double click on the graphic to open the Picture
Property box and select the Color tab.
Using SureThing CD Labeler 51
510869_big.qxd
3/13/2005
7:30 PM
TOC
Page 52
INDEX
Check the Set Transparency checkbox and set the RGB value of
the color you want to eliminate. In this case it is black, which
has a RGB value of 0,0,0. Click Ok.
Once you are satisfied with your design, save it and close
SureThing. This Print File is ready to be used with your PTBurn
Client.
52 Using SureThing CD Labeler
510869_big.qxd
3/13/2005
7:30 PM
Page 53
TOC
INDEX
B. USING MERGE FIELDS
SureThing's Merge Field features allow you to create a print file
containing merge data. This allows you to import a text field
from a database file. Before placing merge fields in your
document, you will need to insert your data source, or merge
file. SureThing recognizes Windows/ANSI Comma Delimited
files, DOS-PC8 Comma Delimited Files, Windows ANSI dBASE
Files and DOS PC8 dBASE files. For this example we are using a
simple CSV (comma separated file) created in Excel.
In SureThing click Insert, then select Set Merge File.
Select your file and click Set.
Using SureThing CD Labeler 53
510869_big.qxd
3/13/2005
7:30 PM
TOC
Page 54
INDEX
Once you have set the Merge Field you can import your
merge fields. Click Insert then Insert Merge Field from the
main menu.
Simply double click on the field from your database that you
would like to import into your print file. After inserting the
field, resize it by clicking and dragging on the "handles" of the
field to make sure it is large enough for the amount of text to be
displayed. Once you are satisfied with the design, save the
SureThing File.
When you use this SureThing File in a job you are creating with
the PTBurn Client, make sure to click Set Options and select the
"Use Merge File with SureThing" option (see Section 5H:
Advanced Job Options). The Print File Window will prompt you
for the merge file you used with this template. You will need to
include the merge file when prompted so it can be sent to the
server along with the rest of the job for processing.
54 Using SureThing CD Labeler
510869_big.qxd
3/13/2005
7:30 PM
Page 55
TOC
INDEX
Section 7: Troubleshooting and
Technical Support
The PTBurn Software is designed to be easy to use and reliable.
However, should you run into any problems, this section should
provide some assistance in getting your system up and running.
A. PROBLEMS AND SOLUTIONS
The following is a list of possible problems with
suggested solutions.
PROBLEM:
I have submitted a job with the PTBurn Client but it is not being
processed.
SOLUTIONS:
•
•
•
Click the Get Status button in the PTBurn Client to make
sure that the server status is listed as 'OK'. If the Publisher
is out of discs or ink, administrator attention may be
required to get the Publisher back on line. Please refer to
the Publisher User Manual for information on changing ink
or adding discs.
If there is more than one Publisher on your network, make
sure the correct server has been selected.
In PTBurn Server's Main Application Window, click Check
Log. The Log may contain more information on the error
PROBLEM:
I have submitted a job with the PTBurn Client but it is not being
seen in the queue.
SOLUTIONS:
•
Make sure PTBurn Server has a valid Shared Job Folder.
The Shared Folder must be shared with full access to all
users. To check this, browse to the folder in Windows
Explorer. Right click on the folder and select Properties.
Click the Sharing tab and look at the sharing properties.
Troubleshooting and Technical Support 55
510869_big.qxd
3/13/2005
7:30 PM
Page 56
TOC
INDEX
Make sure the folder is shared and User Limit is set to
Maximum Allowed. Click the Permissions button.
Make sure access is granted to everyone and that full control is
granted to the users.
•
The PTBurn Client submits jobs by writing a file with the
extension JRQ into the shared job folder the job request.
Once the job has been recognized the extension will be
changed to QRJ. If the job is being processed, the extension
will read INP. A finished job will have a DON file
extension. If the job is not changing from JRQ to QRJ, make
sure the server has not been paused.
56 Troubleshooting and Technical Support
510869_big.qxd
3/13/2005
7:30 PM
Page 57
TOC
•
•
•
INDEX
Click the Get Status button in the PTBurn Client to make
sure that the server status is listed as 'OK'. If the Publisher
is out of discs or ink, the administrator attention may be
required to get the Publisher back on line. Please refer to
the Publisher User Manual for information on changing ink
or adding discs.
If there is more than one Publisher on your network, make
sure the correct server has been selected.
In PTBurn Server's Main Application Window, click Check
Log. The Log may contain more information on the error
PROBLEM:
My job has failed. What can I check?
SOLUTIONS:
•
•
•
•
•
•
Check the server log for more information on the error.
Make sure there are enough client licenses. The PTBurn
Software will allow 5 clients. Additional licenses are
available by calling Primera Technology's Supply Sales
department at 1-800-797-2772.
Make sure there is ample hard drive space on the server.
Make sure the Publisher has blank disc media.
Make sure the disc media used in your Publisher is not
defective.
If the workstation connected to the Publisher does not meet
the recommended system requirements, the PTBurn Server
may not be able to burn and print simultaneously. In the
PTBurn Server Settings Window you can disable this
option. The Publisher will then record a full disc, and wait
until the disc is fully printed before recording the next disc
in queue. This will reduce throughput but will allow for
more system resources to be dedicated to the recording job.
B. REINSTALLING PTBURN SERVER
If all else fails, you may want to reinstall the PTBurn Server
Application. This is done as follows:
a.
Delete your Shared Job Folder. When reinstalling the
PTBurn Server we want to make sure it creates a new
shared folder.
b. Insert your PTBurn Network Software Disc and let the
Installer Program launch. This should happen
automatically. If it does not, right click on Start and select
Explore. Browse to the PTBurn Installer Disc and double
click the INSTALL icon.
Troubleshooting and Technical Support 57
510869_big.qxd
3/13/2005
7:30 PM
Page 58
TOC
c.
INDEX
Click the Install PTBurn Server icon.
d. You will then be prompted to Repair or Remove the
PTBurn Server. Choose Remove and click Finish.
e.
Reboot the workstation and reinstall the PTBurn Server per
the instructions provided in Section 2 of this manual.
C. REINSTALLING PTBURN CLIENT
If all else fails, you may want to reinstall the PTBurn Client
Application. This is done as follows:
a.
Insert your PTBurn Network Software Disc and let the
Installer Program launch. This should happen
automatically. If it does not, right click on Start and select
Explore. Browse to the PTBurn Installer Disc and double
click the INSTALL icon.
b. Click the Install PTBurn Client icon.
c.
You will then be prompted to Repair or Remove the
PTBurn Client. Choose Remove and click Finish.
Reboot the workstation and reinstall the PTBurn Client per the
instructions provided in Section 4 of this manual.
D. DISABLING THE AUTOPLAY ON YOUR SERVER
WORKSTATION
If clients are creating discs that autoplay such as DVDs or
multimedia CD-Rs, you will want to disable Autoplay. This will
keep the workstation that acts as the server for the Publisher
from autoplaying discs after they are created. To turn off
Autoplay please do the following:
1.
Click on Start and then click on Run. When prompted for
the name of the program you wish to run, type
GPEDIT.MSC and press Enter.
2.
This will open the Group Policy editor for Windows. In
here click the + symbol next to Computer Configuration to
expand the options available. Then double click
Administrative Templates, then System and to display the
System options in the right pane.
58 Troubleshooting and Technical Support
510869_big.qxd
3/13/2005
7:30 PM
TOC
Page 59
INDEX
3.
Right-click the Turn off Autoplay option and select
Properties.
4.
Select the Enabled button and change the “Turn off
Autoplay on:” option to All Drives.
5.
Select Apply and then OK and you can close the Group
Policy editor.
E. TECHNICAL SUPPORT
This manual and the Users Manual should help in resolving
most issues. However if you still need assistance, we are here to
help. Primera Technology's Technical Support Department is
available from 8:00 AM to 6:00 PM, CST from Monday to Friday.
Support documentation is also available on line at
www.primera.com and by email at [email protected].
When calling, make sure to have the serial number of the
Publisher available as well as the log file from PTBurn Server.
Troubleshooting and Technical Support 59
510869.qxd
3/14/2005
8:36 AM
Page 60
TOC
Index
Adding a New License . . . . . . . . . . . . . . . . . . . . . . . . . . . . . . . 14
Adding Client Licenses. . . . . . . . . . . . . . . . . . . . . . . . . . . . . . . . . 1
Administrating Clients . . . . . . . . . . . . . . . . . . . . . . . . . . . . . . . . 13
Administration Settings . . . . . . . . . . . . . . . . . . . . . . . . . . . . . . . 13
Audio Job . . . . . . . . . . . . . . . . . . . . . . . . . . . . . . . . . . . . . 24, 29, 45
Data Job . . . . . . . . . . . . . . . . . . . . . . . . . . . . . . . . . . . 24, 25, 26, 45
Delete Folder . . . . . . . . . . . . . . . . . . . . . . . . . . . . . . . . . . . . . . . . 46
Disabling Autoplay on the Server . . . . . . . . . . . . . . . . . . . . . . . 58
Generating a License Key . . . . . . . . . . . . . . . . . . . . . . . . . . . . . . 14
Get Status. . . . . . . . . . . . . . . . . . . . . . . . . . . . . . . . . . . . . . . . . . . 42
Image Job . . . . . . . . . . . . . . . . . . . . . . . . . . . . . . . . . . . . . 24, 34, 45
Kiosk Mode . . . . . . . . . . . . . . . . . . . . . . . . . . . . . . . . . . . . . . . . . 11
Log File . . . . . . . . . . . . . . . . . . . . . . . . . . . . . . . . . . . . . . . . . . 9, 59
Merge Data . . . . . . . . . . . . . . . . . . . . . . . . . . . . . . . . . . . . . . . . . 53
Open a Saved PTBurn Job . . . . . . . . . . . . . . . . . . . . . . . . . . . . . 42
Print Files . . . . . . . . . . . . 1, 26, 27, 28, 31, 33, 35, 37, 39, 52, 53, 54
Print-Only Job . . . . . . . . . . . . . . . . . . . . . . . . . . . . . . . . . . . . . . . 38
PTBurn Client (Installing) . . . . . . . . . . . . . . . . . . . . . . . . . . . . . 19
PTBurn Server (Installing) . . . . . . . . . . . . . . . . . . . . . . . . . . . . . . 8
PTBurnJobs Shared folder. . . . . . . . . . . . . . . . . . . . . . . . . . . . . 1, 6
Reject if not Blank . . . . . . . . . . . . . . . . . . . . . . . . . . . . . . . . . . . . 46
Robotics Test . . . . . . . . . . . . . . . . . . . . . . . . . . . . . . . . . . . . . 10, 12
Selecting a Server . . . . . . . . . . . . . . . . . . . . . . . . . . . . . . . . . . . . 22
Server Settings. . . . . . . . . . . . . . . . . . . . . . . . . . . . . . . . . . . . . 9, 57
Session at Once . . . . . . . . . . . . . . . . . . . . . . . . . . . . . . . . . . . . . . 47
Set Now . . . . . . . . . . . . . . . . . . . . . . . . . . . . . . . . . . . . . . . . . . . . 47
SureThing CD Labeler. . . . . . . . . . . . . . . . . . . . . . . . 1, 2, 5, 12, 48
System Requirements (Client) . . . . . . . . . . . . . . . . . . . . . . . . . . . 3
System Requirements (Server). . . . . . . . . . . . . . . . . . . . . . . . . . . 2
Verify Disc . . . . . . . . . . . . . . . . . . . . . . . . . . . . . . . . . . . . . . . . . . 47
60 Index
510869_big.qxd
3/13/2005
7:30 PM
Page 61
510869_big.qxd
3/13/2005
7:30 PM
Page 62
510869_big.qxd
3/13/2005
7:30 PM
Page 63
510869_big.qxd
3/13/2005
7:30 PM
Page 64
Printed in the United States of America
P/N 510869