1
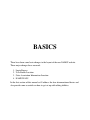
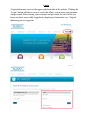
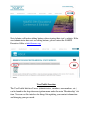
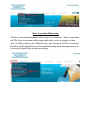
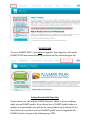
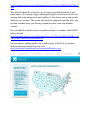
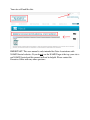
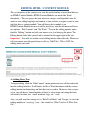
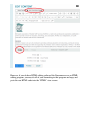
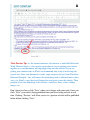
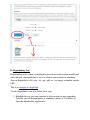
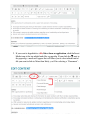
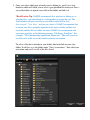
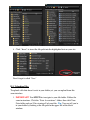
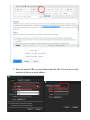
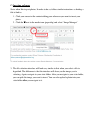
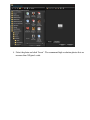
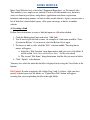
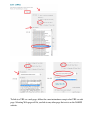
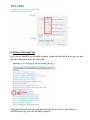
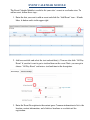
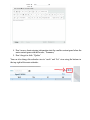
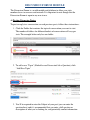
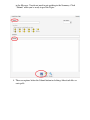
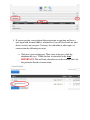
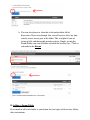
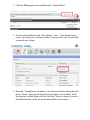
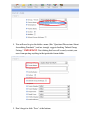
State Association Website
User Manual
(For Website Administrators)
BASICS
There have been some basic changes to the layout of the new NAMSS website.
Three major changes have occurred:
1.
2.
3.
4.
Login Process
User Profile Location
State Association Information Location
NAMSS PASS
In the first section of this manual we’ll address the four aforementioned basics and
also provide some essentials on how to get set up with editing abilities.
Login
A login button now exists in the upper right-hand side of the website. Clicking the
“Login” button will direct you to a screen that allows you to enter your username
and password. After entering your username and password, the site will let you
know you have successfully logged in by displaying a button that says “Logout”,
indicating you are logged in.
State Admins will notice editing buttons when viewing their state’s website. If the
user/administrator does not see editing buttons, please contact the NAMSS
Executive Office at [email protected].
User Profile Location
The User Profile link for all users (administrators, members, non-members, etc.)
can be found in the drop-down navigation menu under the main “Membership” tab
item. You can use this interface for things like updating your contact information
and changing your password:
State Association Information
All State Association information and resources live under the “About” main menu
tab. The State Association website map which allows users to navigate to their
state’s website, resources for Affiliated states, and a listing of all State Association
President and President-Elects can be found in the drop-down navigation menu, or
by using the Quick Links on the content page:
NAMSS PASS
To access NAMSS PASS, a user must be logged in. Once logged in, click on the
NAMSS PASS main menu tab and a green button will be seen in the upper left:
Getting Started with Your State
To get started, you will need the NAMSS Executive Office to grant you editing
rights on your NAMSS profile. If you already have a NAMSS profile (either as a
member or a non-member) you will use the same profile to log in and edit. If you
don’t believe that you have ever had a NAMSS profile or never logged into the
NAMSS website, navigate to the following page URL:
https://members.namss.org/eweb/DynamicPage.aspx?Site=NAMSS&WebCode=V
erify
This link will check the system for a pre-existing user profile based off of your
email address. We strongly suggest opening this page in several browser tabs and
entering both work and personal email addresses. You do not want to end up with
duplicate user accounts. The system will check for a duplicate and then allow you
to either continue using a pre-existing account or create a new non-member
account.
If you would like to both create a user profile and join as a member with NAMSS,
follow this link:
https://members.namss.org/eweb/DynamicPage.aspx?Site=NAMSS&WebKey=66
e4c35d-b367-46a2-ab7d-961c089ec838
Once you have a working profile, log in and navigate to the State Association
Website map page and click on your state:
http://www.namss.org/About/StateAssociationWebsites.aspx.
Your site will look like this:
IMPORTANT: This user manual is only intended for State Associations with
NAMSS-hosted websites. If you do not see the NAMSS logo at the top, your site is
not NAMSS-hosted and this manual will not be helpful. Please contact the
Executive Office with any other questions.
CONTENT MODULES &
EDITING OVERVIEW
NAMSS State Websites contain “content modules” that hold your information.
There are primarily four different modules you will have contained in your website
tabs:
1.
2.
3.
4.
HTML / Content Module
Links Module
Event Calendar Module
Discussion Forum Module
EDITING HTML / CONTENT MODULE
The vast majority of the content your state has posted online is more than likely in
an HTML/Content Module. HTML/Content Modules are much like Word
documents – They are pages that you enter text, images, and hyperlinks into. In
order to start adding language and content to your website, navigate to one of your
tabs that have a content module. You will know that a module is an
HTML/Content Module because it will be text-heavy and the edit menu will have
two options: “Edit Content” and “My Work”. To view the editing options menu,
find the “Editing” button and roll your mouse over it to bring up the menu. The
Editing button looks like a pencil and is oriented in the upper right of the tab.
Important – You will see another set of editing buttons above the tabs. When you
roll your mouse over the pencil icon it will say “Edit Tabs”. This is NOT the
editing menu you want:
A) Adding Basic Text
To begin editing, click the “Edit Content” menu option and you will be redirected
into the editing interface. It will look a lot like a Word document with the various
editing buttons for formatting and font that you’re used to. However, fonts are preset so you will have a limited number of fonts to select from and sizing the fonts
will need to be done on a “small, medium, large, etc.” scale.
Also, you will want the settings set to “Rich Text Editor” and “Design” to view the
editing module in “wysiwyg” view – this stands for “What You See Is What You
Get”:
However, if you do have HTML editing software like Dreamweaver or an HTML
editing program, you may do all of your formatting in that program and copy and
paste the raw HTML code into the “HTML” view screen:
*Best-Practice Tip: As this manual mentions, the interface is much like Microsoft
Word. However there is a best practice procedure if you are putting your content
together in a word document and copying/pasting onto the website. If you are
getting your content ready in Word, we recommend only using it to develop and
correct text. Once your document is ready, copy and paste the text from Word into
Microsoft Notepad – this will remove the formatting such as different fonts, colors,
sizes, etc. Finally, copy the clean Notepad text and paste it onto the website. Then
perform all of your formatting in the website’s interface; Fonts, colors, adding
images, etc.
Don’t forget to always click “Save” when you’re happy with your work. Once you
click “Save” your work is being published onto your user-facing website in real
time. Clicking “Preview” will allow you to see a preview of what will be published
below before clicking “Save”:
B) Hyperlinking Text
Hyperlingking text is when you highlight a piece of text in the content module and
add a link that, when published, a user can click to open or direct to something.
You can hyperlink to a file (.doc, .xls, .ppt, .pdf, etc.), an image, or another website
URL.
This is an example of a hyperlink.
To add a hyperlink in your text, follow these steps:
1. Highlight the text you want someone to click in order to open something.
Text that you will be highlighting is commonly similar to “Click Here to
Open the Membership Application”.
2. If you want to hyperlink to a file, like a form or application, click the Insert
Media icon at the top which looks like a paperclip. If you click the next to
the paperclip, a menu will appear that will allow you to select which kind of
file you want to link to. More than likely, you’ll be selecting a “Document”:
3. Once you select which type of media you’re linking to, you’ll see a new
interface which will allow you to select a pre-uploaded file from your State’s
server file folder, or upload a new file to that folder and link to it.
*Best-Practice Tip: NAMSS recommends that, previous to linking to, or
selecting files, you email them to a staff member to upload for you. The
Staff member will place the file in your folder which will be State
Associations/ “Your State” and you can select it. NAMSS recommends this
to ensure your file is properly uploaded in the correct folder and does not
overwrite another file in another location. NAMSS also recommends that
you name your files in the following manner: “FileName_YourState”. For
example: “2014 Membership Application_Minnesota”. This will ensure no
two files exist in the server that could overwrite one another.
To select a file that is already in your folder, find and click on your state
folder. It will live as a sub-folder under “State Associations”, then click your
state name and you’ll see all of the files listed:
4. Click “Insert” to insert the file path into the highlighted text on your site.
Don’t forget to click “Save”
B-1) Uploading Files
To upload a file that doesn’t exist in your folder yet, you can upload from this
same interface:
1. IMPORTANT! You MUST first navigate to your file folder. Follow the
same instructions: Click the “State Associations” folder, then click Your
State folder and you’ll be viewing all of your files. Tip: You can tell you’re
in your folder by looking at the file path in the upper left of the black
window:
2. Then, click the Upload button at the top of the black window. You’ll see
several lines to select multiple files at once if you want to. Click “Add” if
you have more than three files to upload at once. To add files to upload,
click the “Select” button for each line – one file per line – and find the file
you want to upload on your computer’s drive:
3. Click Upload.
If you want to link to another website, simply follow these similar directions:
1. Highlight the text in the editing pane that you want people to click to direct
to another site. Common text would resemble, “Click here to visit the
_ (State) _ Department of Health Website”
2. Instead of clicking the paperclip icon for media, simply click the Hyperlink
Manager icon at the top. It will look like a chain link:
3. Enter the website URL you want linked and click OK. You can also use this
interface to link to an email address:
C) Inserting an Image
States often like to post photos. In order to do so, follow similar instructions as finding a
file to link to:
1. Click your curser in the content editing pane wherever you want to insert your
photo
2. Click the next to the media icon (paperclip) and select “Image Manager”
3. The file selection interface will look very similar to that when you select a file to
hyperlink. The difference is that the interface will show you the image you’re
selecting. Again, navigate to your state folder. After you navigate to your state folder,
you can pick the image you want to insert. You can also upload a photo into your
state folder after you navigate to it.
4. Select the photo and click “Insert”. We recommend high-resolution photos that are
no more than 350 pixels wide.
LINKS MODULE
Many State Websites have a tab called “Document Repository” or “Resource Links.”
This module is very simple to use and edit. The uses for this module vary, but many
states use them to post bylaws and policies, applications and forms, registration
brochures and meeting minutes, or links to other useful websites. Again, you may enter a
list of links that, when clicked, opens a file, opens an image, or directs to another
website.
A) Creating a Link
Follow these instructions to create a link that opens to a file when clicked:
1. Click the Editing pencil icon and select “Add Link”
2. You’ll need to give the link a name. An example of a link name would be “State
Association Bylaws” if you were to select the Bylaws file to open.
3. To choose to link to a file, click the “File” selection bubble. Two drop down
menus will appear.
a. In the first “File Location” drop-down menu, find your state’s file folder. It
will be called “State Associations/Your State”. Let the site refresh
b. The second “File Name” drop-down menu, find the file you want to link to
4. Click “Update” at the bottom.
You may also select the order that the file is displayed in by using the View Order at the
bottom.
File Upload: In order to upload a file, follow Step 2 and 3-A above. After you have
proerly selected your state file folder, an “Upload New File” button will appear,
ensuring that you are uploading the file to the right folder.
To link to a URL or a web page, follow the same instructions except select URL or web
page. Selecting Web page will let you link to any other page that exists on the NAMSS
website.
B) Editing an Existing Link
If you have a link that you just need to update, simply find the link title on your site and
click the edit button to the left of the link:
You will be directed into the same interface and will just need to select the new
file/URL/web page you want the link to open to.
EVENT CALENDAR MODULE
The Event Calendar Module is useful to list your state’s events in a calendar view. To
add an event, follow these steps:
1. Enter the date you want to add an event and click the “Add Event” icon – It looks
like a
+ button and is in the upper right
2. Add an event title and select the start and end date(s). You can also click “All Day
Event” if you don’t want to put a start/end time on the event. Note: you can opt to
choose “All Day Event” and enter a start/end time in the description.
3. Enter the Event Description in the content pane. Common information to list is the
location, contact information, and a link to a brochure or a website url for
registration:
4. Don’t worry about entering information into the smaller content pane below the
main content pane with the header, “Summary”
5. Don’t forget to click “Update”
You can also change the calendar view to “week” and “list” view using the buttons in
the top right of the main calendar:
DISCUSSION FORUM MODULE
The Discussion Forum is a useful module and platform to allow your state
members/users to converse and network. It is important to note though that the
Discussion Forum is open to any user to use.
A) Posting Discussion Topics
To post or reply to a conversation, or read previous posts, follow these instructions:
1. Click the Folder that contains the topic of conversation you want to start.
The number of folders for different buckets of conversation will vary per
state. The example below only has one folder:
2. To add a new “Topic” (Kickoff a new Discussion/Ask a Question), click
“Add New Topic”
3. You’ll be required to enter the Subject of your post (you can enter the
question here) and it’s recommended that you enter a full question or
description of what you’re looking for, and potentially contact information
in the Message. You do not need to put anything in the Summary. Click
“Submit” when you’re ready to post the Topic:
4. There are options below the Submit button to do things like attach files or
crate polls.
5. If you are posting a new/original discussion topic or question and have a
user login with an email address attached to it, you will be alerted any time
there is activity on your post. You may also subscribe to other topics of
conversation the following two ways:
a. Click into a pre-existing post. Then, once in the post, click the
checkbox that says “Check this box to subscribe to this topic”.
IMPORTANT: This will only subscribe you to the activity alerts for
this particular thread of conversation.
b. You can also choose to subscribe to the entire folder full of
discussions. Please note though, that you will receive alerts any time
activity occurs on any post in the folder. This is helpful if you are
trying to fully and thoroughly monitor activity. Simply go into the
Forum Folder you want to folder and click the box that says “Click to
subscribe to this Forum”
B) Adding a Forum Folder
If you need to add a new folder to your forum for new topics of discussion, follow
these instructions:
1. Click the Editing pencil icon and then click “Control Panel”
2. On the main Dashboard, click “New Forum”. Note – “New Forum Group”
creates an entirely new section for folders. You generally won’t need to add
an entirely new Group:
3. From the “Group/Forum” dropdown, select the main Forum Group that will
be the “Parent” group for the new discussion folder you’re making. All of
the other pre-existing folders will also be listed. You may choose to create a
sub folder that lives under one of the main folders if you choose.
4. You will need to give the folder a name (like “Questions/Discussions About
Accrediting Standards”) and we strongly suggest checking “Inherit Group
Settings”. IMPORTANT: Not clicking that box will severely restrict your
users from posting anything in that particular forum folder.
5. Don’t forget to click “Save” at the bottom.