1
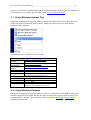
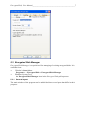
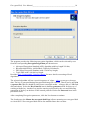
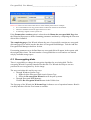
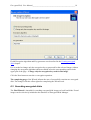
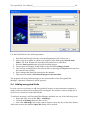
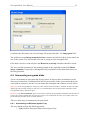
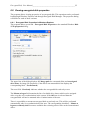
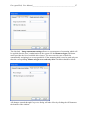
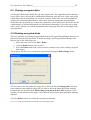
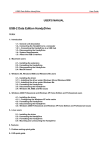
Encrypted Disk 3.0
User Manual
Encrypted Disk, User Manual_______________________________________________2
CONTENTS
1
2
3
4
5
About Encrypted Disk........................................................................................................ 2
Package Components ......................................................................................................... 3
Minimal System Requirements .......................................................................................... 3
Basic Cryptographic Concepts ........................................................................................... 3
Interface overview.............................................................................................................. 4
5.1
Using Windows System Tray..................................................................................... 5
5.2
Using Windows Explorer ........................................................................................... 5
5.3
Encrypted Disk Manager............................................................................................ 7
5.3.1
General layout .................................................................................................... 7
5.3.2
Explorer bar........................................................................................................ 8
5.3.3
Encrypted disk list.............................................................................................. 9
5.3.4
Tool bar .............................................................................................................. 9
5.3.5
Main menu.......................................................................................................... 9
5.3.6
Utilities bar....................................................................................................... 10
5.3.7
Status bar .......................................................................................................... 11
6 Encrypted Disk Management ........................................................................................... 11
6.1
Creating encrypted disks .......................................................................................... 11
6.2
Re-encrypting disks.................................................................................................. 16
6.3
Searching encrypted disks........................................................................................ 19
6.4
Adding encrypted disks ............................................................................................ 20
6.5
Mounting encrypted disks ........................................................................................ 21
6.5.1
Mounting via Windows System Tray............................................................... 21
6.5.2
Mounting via Windows Explorer..................................................................... 22
6.5.3
Mounting via Encrypted Disk Manager ........................................................... 22
6.6
Unmounting encrypted disks.................................................................................... 23
6.6.1
Unmounting via Windows System Tray .......................................................... 23
6.6.2
Unmounting via Windows Explorer ................................................................ 24
6.6.3
Unmounting via Encrypted Disk Manager....................................................... 24
6.7
Formatting encrypted disks ...................................................................................... 24
6.8
Viewing encrypted disk properties........................................................................... 25
6.8.1
Encrypted Disk Properties in Windows Explorer ............................................ 25
6.8.2
Encrypted Disk Properties in ED Manager ...................................................... 26
6.9
Sharing encrypted disks ........................................................................................... 28
6.10 Deleting encrypted disks .......................................................................................... 28
1 About Encrypted Disk
Encrypted Disk is a set of system drivers, plug-ins, wizards and utilities to store data in an
encrypted form but use these data in a common way as if they are not encrypted. This
software is intended for people who want to have their important information encrypted but
do not have enough time to study cryptography.
The program has the following key features:
•
Encryption/decryption on the fly with all operations absolutely transparent to the user.
•
Re-encryption without moving data.
•
Protection by password or with the external key that can be placed on removable media.
•
Place encrypted disk container files (image files) wherever you need: on hard disks,
network disks or removable media.
Encrypted Disk, User Manual_______________________________________________3
The program was designed on the base of Encrypted Disk SDK, which is a separate software
product intended for Windows application development.
2 Package Components
The installation package of the program includes:
•
System Drivers and Crypto Plug-ins.
•
Plug-ins to Windows Explorer (Windows Shell Extensions).
•
Windows System Tray Menu.
•
Creation Wizard (New Encrypted Disk Wizard).
•
Re-encryption Wizard.
•
Encrypted Disk Manager.
3 Minimal System Requirements
To use the program on your computer, make sure the system meets the following minimum
system requirements:
•
Operating Systems: Windows 98/Me/2000/XP/Server 2003
•
Intel Pentium CPU or its equivalent, with 300 MHz processor clock speed
•
64 MB of RAM
•
Hard disk drive with 12MB of available space
•
SVGA video adapter and monitor
•
Mouse
4 Basic Cryptographic Concepts
Encryption is the process of converting intelligible data into a cipher which can be decoded
back into the original form. The set of rules for such a converting is expressed in an
algorithm. Some basic algorithms may be combined to form more complex ones. For instance
basic algorithms may change the order of the individual symbols or replace the symbols by
other symbols.
A cipher that is produced by simultaneously converting a group of intelligible data bits into a
group of cipher bits is called a block cipher. In general, the groups have the same size.
In order to encrypt the data a cipher algorithm uses so called encryption key. An encryption
key is a sequence of values that are chosen randomly. The type and length of this sequence
depend upon the encryption algorithm and the amount of security needed.
If the user can encrypt data and decrypt it with a single key then such a cipher algorithm is
termed symmetric. In asymmetric algorithms, the encryption key and the decryption key are
different. One is a public key by which the sender can encrypt a text and the other is a private
key by which a recipient can decrypt the text.
Encrypted Disk, User Manual_______________________________________________4
The most popular symmetric algorithms are the following:
DES (Data Encryption Standard). This algorithm was developed by the IBM Corporation
and became wide used since 1977. It works with 64-bit data blocks. The key length amounts
64 bits but actually 8 bits may be used for error detection, so the real key length is 56 bits.
Nowadays the algorithm is a little obsolete as the length of utilized encryption keys is not
enough to protect data against the breaking by exhaustively testing keys.
Triple DES. This is the improved version of DES. During the encryption process it uses the
DES algorithm three times and each time different keys are applied. The algorithm is more
protective than DES.
Blowfish. The algorithm was designed in 1993 by Bruce Schneier as a fast, free alternative to
existing encryption algorithms. Since then it has been analyzed considerably slowly gaining
acceptance as a strong encryption algorithm. It works with 64-bit data blocks. The
characteristic property of the algorithm is a variable-length key which amounts from 32 bits to
448 bits. While the key is generated the algorithm uses 521 encryption cycles what severely
embarrasses the breaking by exhaustively testing keys. Blowfish works much faster than
DES.
AES (Advanced Encryption Standard). The algorithm was designed as new federal
standard of the USA (instead of DES). It operates data blocks of 128, 192 and 256-bits and
uses encryption keys with the length of 128, 192 or 256 bits (there are 9 possible
combinations).
5 Interface overview
The majority of operations on encrypted disks can be performed through Windows System
Tray or through Windows Explorer. For that the program uses a set of special drivers and
Encrypted Disk, User Manual_______________________________________________5
plug-ins. If a user has a considerable number of encrypted disks, then they can be organized in
a convenient way by using a special utility called Encrypted Disk Manager.
5.1 Using Windows System Tray
During the installation the program adds its icon into Windows System Tray. By right-click
on the icon a user can start the pull-up menu, which provides the access to all necessary
functions of the program.
The menu items are divided into four sections:
Encrypted Disk
Manager
New Encrypted
Disk Wizard
Re-encryption
Wizard
Mount
Disks
Help
About
Exit
Wizards starting
Organize existing encrypted disks
Create new encrypted disk
Re-encrypt an existing encrypted disk or change
the encrypted key for it.
Encrypted disks management
Mount one of existing encrypted disks
Access to the list of encrypted disks and
operations on them (open, unmount).
Help
Open this manual
Starts the About window
Exit
Close the program. In this case the program icon
disappears from Windows System Tray.
5.2 Using Windows Explorer
During the installation the program adds new item Encrypted Disk into the File section of the
Windows Explorer main menu and into the same section of the context-sensitive menu (if an
encrypted disk or its image file is selected). This menu allows mounting or unmounting a
selected encrypted disk.
Encrypted Disk, User Manual_______________________________________________6
The program’s drivers also allow creating new encrypted disk through the New section of the
Windows Explorer context menu. This sub-menu is intended for creating new files of
registered software. Selecting the Encrypted Disk Image item the user starts New Encrypted
Disk Wizard.
The File / Disk Properties window will have an additional tab – Encrypted Disk
Properties, which contains information about the selected encrypted disk or the image file (a
file that contains the encrypted disk data). See the Viewing encrypted disk properties chapter
for more details.
Encrypted Disk, User Manual_______________________________________________7
5.3 Encrypted Disk Manager
Encrypted Disk Manager is a special tool for managing of existing encrypted disks. It is
available from:
•
Window’s Start Menu:
Programs > …Encrypted Disk > Encrypted Disk Manager
•
Windows System Tray:
the Encrypted Disk Manager item in the Encrypted Disk pull-up menu.
5.3.1
General layout
The main window of the program can be subdivided into several parts that differ in their
purposes:
Encrypted Disk, User Manual_______________________________________________8
1.
2.
3.
4.
5.
6.
5.3.2
Explorer bar
Encrypted disks list
Tool bar
Main menu
Utilities bar
Status bar
Explorer bar
The Explorer bar is intended for organizing and displaying contents of the local data base of
encrypted disk images in hierarchic form and quick managing encrypted disks.
In the data base of encrypted disk images, all images are sorted in multiple categories, which
are displayed as data base folders. A user is allowed to manipulate images listed in the data
base:
• create new folders and subfolders
• rename folders (with the exception of default ones)
• delete folders (with the exception of default ones)
The user can perform all these function within the special data base folder named Available
Images.
The Explorer bar displays also two other special folders which have their peculiarities:
•
•
The special folder named Images Overview provides the throughout list of all images
in the data base, generally for fast searching of lost images. Within this folder, no subfolders can be created and no images can be moved in.
The folder named Mounted Images displays the list of all encrypted disk images that
are mounted in the system. The program adds new mounted images automatically.
Within this folder, no sub-folders can be created too.
Encrypted Disk, User Manual_______________________________________________9
5.3.3
Encrypted disk list
The Encrypted disk list is located on the right part of the main window. It displays encrypted
disk images of the folder which is selected in the Explorer bar. A user is allowed to
manipulate images:
• arbitrarily move images between folders
• create new folders and subfolders
• rename folders (with the exception of default ones)
• rename images
• delete folders (with the exception of default ones)
5.3.4
Tool bar
The Tool bar provides the fast access to most frequently usable operations:
Button
Functionality
Mount a selected encrypted disk
Unmount a selected encrypted disk
Search for encrypted disk images
Add an encrypted disk image into the
current folder
Delete an encrypted disk image from the
current folder
Create new subfolder in the current folder
Move to the upper level folder
Exit the program
5.3.5
Main menu
The Main menu is intended for providing the unified access to the entire functionality of the
program:
File
New
Folder
Add Image
Create a new subfolder in this folder
Available only in case of some folder was selected in
the Manager's window
Manually include an encrypted disk image, which is not
listed in the data base, to this folder
Note that this item does not activate the Find images
Encrypted Disk, User Manual_______________________________________________10
Wizard.
Remove the image from the data base (with the ability
of deletion image files from a disk)
Change a label of the encrypted disk image, which
represents the image in the data base.
Change a pictogram that represents disk images in the
data base.
Display and edit properties of the selected disk image
Exit the Encrypted Disk Manager.
Delete
Rename
Change Icon
Image properties
Exit
Actions
Mount
Mount the image of the encrypted disk selected in the
Encrypted Disk List
Unmount the image of the encrypted disk selected in
the Encrypted Disk List
Unmount all encrypted disk images
Unmount
Unmount all
View
Utilities Bar
Show the Utilities Bar at the left of the Encrypted Disk
Manager's window
Show the Toolbar at the upper of the Encrypted Disk
Manager's window
Show the Toolbar at the bottom of the Encrypted Disk
Manager's window
Use big pictograms for folders and images in the data
base
Use small pictograms for folders and images in the data
base
List contents of data base folders (one item per line)
Re-scan and display the contents the data base of
images
Toolbar
Status bar
Big Icons
Small Icons
List
Refresh
Tools
Search for images
New Encrypted Disk
Images
Re-encrypt Encrypted
Disk Image
Help
Index
About…
5.3.6
Run the Find Wizard that allows searching encrypted
disk images not listed in the data base.
Create new encrypted disk image
Re-encrypt an existing encrypted disk image
Display Help contents
Display the About the Program dialog
Utilities bar
The Utilities toolbar is located on the left of the main window. It is intended for fast running
program’s Wizards:
Button
Functionality
Search for encrypted disk images
Create new encrypted disk
Re-encrypt an existing encrypted disk
Encrypted Disk, User Manual_______________________________________________11
5.3.7
Status bar
This is the undermost part of the main window. The status bar displays some additional
information – menu hints (brief description), the full path of selected image files.
6 Encrypted Disk Management
The main goal of this program is creating and managing encrypted disks.
Actually the program creates an encrypted disk image file, which can be represented as a
normal drive letter. All user data in this image is encrypted. It is transparent for the user and
applications which run or load files from an encrypted disk.
Physically image files of encrypted disks can be kept as on local disks as on network disks. In
last case the encryption gives the user’s data the additional protection. Even if ordinary
network security tools are broken the image files will be left as encrypted ones and therefore
inaccessible without the encryption key.
This chapter describes operations that a user can perform on encrypted disks.
6.1 Creating encrypted disks
Creating new encrypted disks is realized with New Encrypted Disk Wizard. There are three
ways to start it:
• Through Windows System Tray:
1. Right-click the Encrypted Disk icon in System Tray.
2. Select the New Encrypted Disk Wizard item in the pull-up menu.
• Through the Windows desktop:
1. Right-click on the Windows desktop.
2. Select the New item in the context menu.
3. Select the Encrypted Disk Image item.
• Through Encrypted Disk Manager:
Click the New Encrypted Disk Wizard button in the Utilities bar.
The first page of the Wizard (the Welcome Page) informs a user of the operation features.
Read it carefully and then click the Next button to continue.
Encrypted Disk, User Manual_______________________________________________12
The second page (the Disk Image Placement and Size Page) proposes to define a place and
size of the file that will contain new encrypted disk. Such files are called images.
Encrypted Disk, User Manual_______________________________________________13
The user can type the full path to a future image file on the hard disk or use the standard file
browser for that goal. To start the file browser click the Browse button. Files of encrypted
disk images have file extension - *.ed.
Size of new image file is indicated in the corresponding Image size filed under the Image
path field. Use arrowed sliders on the right side of the field to correct the value.
As soon as the image file parameters are defined, click the Next button to continue.
The third page (the Disk Image Encryption Page) allows defining encryption parameters for
new encrypted disk. The user should set the encryption algorithm and a key generation
method. The key generation method determines whether the encryption key will be generated
on the base of an entered password or on the base of some random system event (the Key
from file item). In the last case the key will be stored in a separated file on an external media.
Encrypted Disk, User Manual_______________________________________________14
The program provides the following encryption algorithms, which can be selected by user
from the corresponding Encryption algorithm pull-down menu:
• Advanced Encryption Standard (AES) algorithm with key length 256-bits;
• Blowfish 448-Bit Key, 64-Bit Block Cipher by B.Schneier;
• DES (Date Encryption Standart) with a 56-bit key length;
• Triple DES with a 168-bit key length.
Read the Basic Cryptographic Concepts chapter for more details concerning offered
algorithms.
The selected algorithm will use a special sequence of values – a key to encrypt or decrypt
data. The key is generated during encrypted disk image file creation. Then it can be stored in
a separate file (this file should be placed on a removable media – a floppy disk, a USB flash
disk and others). Select the Key from file item in the Key generator menu for this way of
working with the key. Another way implies entering a password by the user and following
generation of the key on the base of the entered password. Select the Password item in the
pull-down menu.
After completing Encryption parameters, click the Next button to continue.
The fourth page (the Mount the encrypted disk Page) allows mounting new encrypted disk
as a local drive. New encrypted disk can be also mounted later after creation.
Encrypted Disk, User Manual_______________________________________________15
There are four options which can be defined by user on this page:
Mount after creation. Tick this option to mount the creating disk image as a local drive and
then define which drive letter will be assigned to it. The list of available drive letters is
represented as a pull-down menu on the right.
Format after creation. Tick this option to format new disk.
Mount at logon. Tick this option to mount new disk after every logon of the user. The pulldown menu allows selecting a drive letter. The checkbox on the right allows mounting the
disk as a read-only one.
Click the Next button to start creating new encrypted disk image. It takes 2-3 minutes. In
some cases new encryption disk settings may require to specify parameters during the
operation:
So if the Key from file value was selected as a key generator (on the Disk Image
Encryption Page) then the Wizard will propose to define a safe place for encryption key
storing.
Please note! It is recommended to store it on removable media. It decreases a chance of the unauthorized access
to data.
If the Password value was selected as a key generator (on the Disk Image Encryption Page)
then the Wizard will propose to enter the password and then confirm it.
Encrypted Disk, User Manual_______________________________________________16
Please note! There are some rules which allow to select reliable passwords. For example:
• It is recommended to use long passwords that contain both characters and numbers.
• Characters should be entered in upper and in lower cases.
• Avoid using a regular word as a password.
If the Format after creation option is selected on the Mount the encrypted disk Page then
the Wizard will propose to define formatting parameters and then by completing the form new
disk will be formatted.
The completing page of the Wizard informs the user of successfully creation new encrypted
disk and proposes to add it into the data base of Encrypted Disk Manager. Tick the Add into
Encrypted Disk Manager checkbox for that.
If mounting parameters were defined then new encrypted disk will appear in the system with
the assigned drive letter. The total number of encrypted disks to create and use are limited
only by available storage space.
6.2 Re-encrypting disks
There is a possibility to change the encryption algorithm for an existing disk. The Reencrypting Wizard is specially intended for this task. The Wizard also helps to set new
password or new encryption key for the image.
The user can initiate this tool by two ways:
• Through Windows System Tray:
1. Right-click the Encrypted Disk icon in System Tray.
2. Select the Re-encryption Wizard item in the pull-up menu.
• Through Encrypted Disk Manager:
Click the Re-encryption Wizard button in the Utilities bar.
The first page of the Wizard (the Welcome Page) informs a user of operation features. Read it
carefully and then click the Next button to continue.
Encrypted Disk, User Manual_______________________________________________17
The second page (the Disk Image Placement Page) proposes to define the place of the
existing encrypted disk image.
Encrypted Disk, User Manual_______________________________________________18
The user can type the full path to the image file on the hard disk or use the standard file
browser for that goal. To start the file browser click the Browse button.
After the image file parameters are defined, click the Next button to continue.
The third page (the Disk Image Encryption Page) allows changing encryption parameters
for the selected encrypted disk. The user can choose another encryption algorithm or change a
key generation method only. A key generation method determines whether an encryption key
will be generated on the base of the entered password or on the base of some random system
event (the Key from file item). In the last case the key will be stored in a separated file on an
external media.
Encrypted Disk, User Manual_______________________________________________19
Fields Encryption algorithm and Key generator were described in the Creating encrypted
disks chapter.
If it is needed to change only the encryption key or password for the selected image (without
changing the encryption algorithm) then one should select the corresponding option at the
upper part of the page – Change only the encryption key used for this image.
Click the Next button to start the re-encryption operation.
The completing page of the Wizard informs the user of successfully creation new encrypted
disk. The changes will take effect right after completing the Wizard work.
6.3 Searching encrypted disks
The Find Wizard is intended for searching encrypted disk images on local hard disks. Found
images can be selectively included to the data base of Encrypted Disk Manager.
Encrypted Disk, User Manual_______________________________________________20
Use the Find Wizard in the following manner:
1. Start the Find Wizard (click the corresponding button in the Utilities bar).
2. Select a top-level folder or a disk to be scanned, in the field named Search from
folder. The Find Wizard will scan this folder and all of its subfolders.
3. Press the Start search button to begin searching images.
4. The program will display found images in the list labeled Images found.
5. One can stop scanning before the process ends, by pressing the Stop button located on
the bottom of the window.
6. Select images that should be included to the database.
7. Then press the button Add selected images to current folder.
The program will insert selected images to the current folder of the Encrypted Disk
Manager’s data base. Duplicates will be ignored.
6.4 Adding encrypted disks
In some cases it is necessary to add encrypted disk images created on another computer or
images whose location has been changed. It can happen, for instance, when an image file is
moved or it is located on removable media.
To add such an image, run Encrypted Disk Manager and then use one of the following ways:
• Select the main menu items: File > Add image.
• Click the Add image button in the tool bar.
• Select the Add image item in the context-sensitive menu for any of data base folders.
After these actions the standard Open file dialog will be opened.
Encrypted Disk, User Manual_______________________________________________21
Select the necessary image file to make it available for the program.
6.5 Mounting encrypted disks
An encrypted disk should be mounted in order to be accessible in the system as a drive letter.
The program allows mounting up to 23 encrypted disks at the same time.
There are three ways to mount encrypted disks.
6.5.1
Mounting via Windows System Tray
The user should perform the following actions:
1. Right-click the Encrypted Disk icon in System Tray.
2. Select the Mount item in the pull-up menu.
3. Select the image file of the encrypted disk which will be mounted.
4. Select a drive letter which will be assigned to the disk. (The Choose drive letter
pull down menu is used for this. It contains the full list of drive letters that are
available in the system.)
5. Tick the Mount as a read-only-drive checkbox if the disk must have this feature.
6. Click the OK button.
The last two steps perform in the special dialog Mount Image.
Encrypted Disk, User Manual_______________________________________________22
The operation takes just a few seconds. The encrypted disk will be represented in the system
as a usual local drive with an assigned drive letter.
6.5.2
Mounting via Windows Explorer
The user should perform the following actions:
1. Select an encrypted disk image file on the local disk.
2. Select the Encrypted Disk item in the context menu.
3. Select the Mount item in the Encrypted Disk sub-menu.
4. Select a drive letter which will be assigned to the disk. (The Choose drive letter
pull down menu is used for this. It contains the full list of drive letters that are free
in the system.)
5. Tick the Mount as a read-only-drive checkbox if the disk must have such a
feature.
6. Click the OK button.
The last two steps perform in the special dialog Mount Image. The operation takes just a few
seconds. The encrypted disk will be represented in the system as a usual local drive with an
assigned drive letter.
6.5.3
Mounting via Encrypted Disk Manager
Encrypted Disk Manager allows initiating this operation by some ways. At first the user
should select the image of the encrypted disk, then:
• Select the main menu items: Actions > Mount
• Click the Mount button in the tool bar.
• Select the Mount item in the context-sensitive menu for any image in the data base.
After these actions the special Mount Image dialog will be opened. It is a little different from
the described above.
Encrypted Disk, User Manual_______________________________________________23
It indicates the full path to the selected image file on the hard disk – the Image path field.
The pull-down menu Image mount drive letter contains the full list of drive letters which are
free in the system. The user should select one to assign it to the encrypted disk.
If the disk is used as a read only then the Mount for read only checkbox should be ticked.
The user can add comments for the mounting image in the separated textual field Mount
image comments. It may help to distinguish some peculiarities of the data which stores on
the encrypted disk.
6.6 Unmounting encrypted disks
A user can unmount an encrypted disk by any reason. It does not have an influence on the
data stored on this disk. Unmounted disk will be just invisible in the system and nobody can
work with its contents. Later the user can mount the disk again and continue to work with it.
Please note! If the encrypted disk is used by any other software then the attempt to unmount the disk will lead to
displaying of the warning message. In this case it is recommended to close all opened files and folders of the
encrypted disk and try unmount it again.
Please note! The Forced Unmount option can be used to unmount encrypted disks immediately but then there is
a high risk of losing valuable data! Use this option only in case of desperate necessity, for example, when your
private data may be under threat of outside intrusion.
There are three ways to unmount an encrypted disk.
6.6.1
Unmounting via Windows System Tray
The user should perform the following actions:
1. Right-click the Encrypted Disk icon in System Tray.
Encrypted Disk, User Manual_______________________________________________24
2. Select the Disks item in the pull-up menu.
3. Select the drive letter in the appeared list.
4. Select the Unmount item in the sub-menu.
The operation takes just a few seconds. The encrypted disk disappears from the system but all
its data will be kept without any changes.
There is a possibility to unmount all encrypted disk. To perform this operation, follow the
next steps:
1. Right-click the Encrypted Disk icon in the System Tray.
2. Select the Disks item in the pull-up menu.
3. Select the Unmount All item in sub-menu.
By this action the user unmounts all encrypted disks mounted in the system.
6.6.2
Unmounting via Windows Explorer
The user should perform the following actions:
1. Select the encrypted disk represented as a drive letter in the system.
2. Select the Encrypted Disk item in the context menu.
3. Select the Unmount item in the Encrypted Disk sub-menu.
The drive letter will be unassigned from the encrypted disk and it becomes inaccessible as a
local drive. Later the user can mount the disk again and continue working with it.
6.6.3
Unmounting via Encrypted Disk Manager
Encrypted Disk Manager allows initiating this operation by some ways. At first the user
should select an image of the mounted encrypted disk, then:
• Select the main menu items: Actions > Unmount
• Click the Unmount button in the tool bar.
• Select the Unmount item in the context-sensitive menu for any image in the data base.
After these actions the program informs of successful unmounting the disk.
There is a possibility to unmount all encrypted disk. To perform this operation, select in the
main menu: Actions > Unmount All
6.7 Formatting encrypted disks
Like any other logical drive in the system, a mounted encrypted disk should be formatted. The
program supports the following file system types:
• FAT
• FAT32
• NTFS
The formatting operation is realized by the standard Windows tool. To format the encrypted
disk the user should:
1. Select it in Windows Explorer (or in any other Windows file browser which supports
such an operation).
2. Select the Format item in the context menu.
3. Define formatting parameters in the Format [:drive letter\] dialog. The encrypted
disk does not need any special parameters for this operation.
4. Click the Start button.
Encrypted Disk, User Manual_______________________________________________25
6.8 Viewing encrypted disk properties
The program allows viewing properties of an encrypted disk. This operation can be performed
both through Windows Explorer and through Encrypted Disk Manager. The properties dialog
will differ for each of these variants.
6.8.1
Encrypted Disk Properties in Windows Explorer
The program adds a special tab – Encrypted Disk Properties to the standard Windows Disk
/ File properties dialog.
The upper line of the dialog displays full Image path for a mounted disks and an assigned
drive letter for image file properties (if the disk is not mounted this line displays the
corresponding label – Not mounted).
The next field – Read only indicates whether the encrypted disk read-only or not.
The Mount at logon field contains the list of available drive letters which can be assigned
after every the user’s authorization in the system. If the Off item is selected then the
encrypted disk will not be mounted after re-authorization of the user.
There is a possibility to mount an encrypted disk as read-only one. This will be performed
automatically after every authorization of the user. The corresponding checkbox – Mount at
logon as read only drive becomes available after selecting a drive letter at the list mentioned
above.
Encrypted Disk, User Manual_______________________________________________26
The next field displays the size of the encrypted disk in bytes.
The last field – Crypto algorithm used displays the algorithm by which the disk was
encrypted.
6.8.2
Encrypted Disk Properties in ED Manager
Encrypted Disk Manager provides more functionality through the Properties dialog than
Windows Explorer does. To call the dialog, the user should initially select an encrypted disk
image and then:
• Select the main menu items: File > Image Properties
• Select the Image Properties item in the context-sensitive menu.
The dialog has three tabs. The first one – General is intended to display standard information
about the image file:
• The image file name;
• Full path to the image on the local disk (the Image path field);
• Image size;
• The amount of sectors in the encrypted disk (the Sectors field);
• The file type (Encrypted Disk Archive for this case).
The second tab – Image mount settings is intended to set mounting parameters for the image
file. So from this tab the user can mount an encrypted disk as a local drive with any of
available drive letters (the Image mount drive letter field contains the full list of drive letters
which are free to assign in the system).
The Mount for read only checkbox allows mounting an encrypted disk as read-only one. It
can be helpful if the user is not going to change the disk contents.
The Mount image comments textual field allows entering some notes concerning the disk
usage or concerning the data stored on it.
Encrypted Disk, User Manual_______________________________________________27
The third tab – Image automount settings allows to set parameters of mounting which will
be applied after the user’s authorization in the system. So the Mount at logon pull-down
menu provides the list of available drive letters. The user can select one of them for
automatically assigning it to an encrypted disk. If the mounting disk is used as read-only one
then the corresponding Mount at logon as a read-only drive checkbox should be ticked.
All changes entered through Properties dialog will take effect by clicking the OK button at
the bottom of the window.
Encrypted Disk, User Manual_______________________________________________28
6.9 Sharing encrypted disks
An encrypted disk can be shared like any other logical disk. This opportunity allows having a
server where users can keep their confidential information. Only the users of the work group,
which shares the encrypted disk, can access its contents. In this case one of this group users
(namely the workgroup administrator, who exactly performs sharing the encrypted disk)
should have the encryption key or know the password to control the access. It will provide the
confidentiality of internal information (the intra-group information). Even if the server hard
disk is stolen, nobody can read the information from encrypted disks like it can happen with
usual partitions.
6.10 Deleting encrypted disks
The user can delete an existing encrypted disk from the Encrypted Disk Manager data base or
physically from the local hard disk. To delete an image, run Encrypted Disk Manager and
then use one of the following ways:
• Select the main menu items: File > Delete
• Click the Delete button in the tool bar.
• Select the Delete item in the context-sensitive menu for any of the existing encrypted
disk images.
The program asks the user to confirm the operation displaying the Delete Image dialog.
The user can see the full path to the image file on the local disk (the Image path field) and
read comments concerning the image file. In order to delete the image physically from the
hard disk the user should tick the Delete image from physical drive also checkbox. If this
checkbox is not ticked then the image will be deleted only from the Encrypted Disk Manager
data base.
Click the Delete! button to confirm the operation performing.
Please note! Only unmounted encrypted disks can be deleted physically.