1
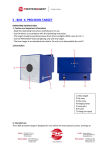
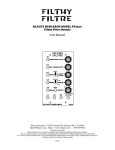
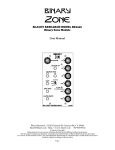
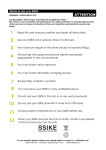
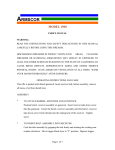
Eko-Aims Laser manual 2014
User Manual
Page 1/10
Laser manual 2014 2014.21.02
1 GENERAL DESCRIPTION OF EKO-AIMS LASER PRODUCTS
Eko-Aims optical sport shooting equipment is suitable both for practising and competitions. The core of the
product is its software in the circuit board with an integrated laser module. This equipment is compatible
with the electronic targets approved by the International Modern Pentathlon Union UIPM. The laser beam
includes the 15,6 ms code required by UIPM for the year 2014. Also the 25,2ms pulse included to ensure
maximum compatibility with officially homologated UIPM competition equipment.
To emulate traditional shooting, the gun has a so-called barrel time; a time a bullet would normally take to
go through the barrel. This shot delay is 6ms. The shooter should thus take into consideration the same
aspects as with a normal gun when pulling the trigger.
These laser products belong to Laser Class 2. Products have been tested by Finnish Institute of Occupational
Health among classification method EN 60825-1:2007 (IEC 60825-1:2007). Please read the safety
instructions carefully.
Buttons, connectors and indicator lights.
Battery level
On/Off button
Charging led
USB-port for
charging
Speaker
Pulse code:
15,6ms = green
25,2ms = red
Cocked = green
Uncocked = red
Please note! In the earlier production lots the middle indicator led has had different functions. In older
products the red light can also define an un-coded laser pulse. Before including two coding options there
was also one production lot that had no function in the middle led, and it was not in use at all.
2 HOW TO USE THE SYSTEM
2.1 Start-up
Page 2/10
Laser manual 2014 2014.21.02
In the newer software version the user can only turn the gun on or off from the red button in the gun. To
change the settings, the gun needs to be attached to a computer, and the changes have to be done via
“Eko-Aims UIPM2014 Lasergun Setup v1.x”-program.
In the early production models (BRU &ELP-2011 & LP-2014) these changes are done by pressing the red
power button longer or shorter times.
2.2 Lasergun Setup v1.x
This program allows the user to make changes to the
settings of the gun.
Sighting - a pulsed beam to make initial sighting. The
gun needs to be connected to a computer during the
sighting.
Counter – total shot counter and user shot counter,
which can be reset. Click ”Read counters” to show
current shot count.
Sounds – sounds On/Off.
Page 3/10
Laser manual 2014 2014.21.02
Sensitivity – sensitivity adjustment for BRU-units.
Not needed with PP500 / PP300 / LP 2014-pistol!
The range of the setting can be from 0-127.
Sensitivity is set at the factory to an average working
value.
Remember to press ”Set sensitivity”-button to
activate changes.
Software version – States the current software
version of the gun.
2.3 Cocking and shooting
PP300 / PP500 / LP-2014 : The gun is cocked by using a cocking rod. It has to be cocked after every shot
fired. PLEASE NOTE! The cocking rod needs a little lubrication in the joint. One drop once a month will be
ok, see chapter 5 Cleaning and maintenance for more details.
P3-E L has semiautomatic action, so the pistol will reload itself and is ready for new shot after releasing the
trigger.
2.4 Sights
The laser beam is fixed. The initial zeroing has been done at the factory. The end user can do the initial
zeroing with the adjusting program, but is not recommended.
Page 4/10
Laser manual 2014 2014.21.02
Adjusting the rear sight:
AZ-version (Eko-Aims products delivered
before 2014, pictured left)
o
o
Turning the screw on the right side
clockwise will move the hits to the left.
Turning the screw on top of the sight
clockwise will move the hits downward.
Eko-Aims PS500
o Turning the screw on the right side
clockwise will move the sight to the left.
o Turning the screw on the left side clockwise
will move the sight downward.
2.5 Trigger unit
A micro-switch and a magnet form the basis for the trigger mechanism. The functions of the micro switch
are adjusted at the factory and should not be manipulated. Any unauthorised opening of the trigger
mechanism will remove any guarantee from the manufacturer’s side.
Adjusting the trigger
The trigger adjustments are set at the factory, to ensure that the trigger pulling force meets the ISSFshooting rules and that everything works smoothly. The user may want to adjust the trigger to fit their
personal needs. Adjustments are recommended to be carried out in the following order:
1. Adjust the blade angle. Turning the screw clockwise will turn the blade backwards.
2. Length of double-pull. Turning the screw clockwise will shorten the double-pull (1.5mm Allen
screw).
3. Trigger stop. Turning the screw clockwise will shorten the after-travel of trigger after triggering.
Caution! Too close adjustment will increase the trigger force and finally prevent the trigger
mechanism from travelling over the threshold.
4. Double-pull pressure, 150 – 350g. Turning the screw clockwise will increase the pressure.
5. Pull pressure, ~500g. Turning the screw clockwise will decrease the pressure.
Page 5/10
Laser manual 2014 2014.21.02
2.6 Changing the grip - PP500 / LP-2014 (also ELP-2011)
Steyr LP10-grips will fit PP500 or LP 2014-pistol. Follow these instructions in changing the grip.
1.
Detach the original Eko-Aims grip with 4mm Allen key. Remove the grip.
2.
Attach the wooden grip to its place, and tighten it with Allen key. Please note! The wooden grip
might need some carving to fit the cocking rod, and possibly some material under the metal plate
of the grip attachment point.
Page 6/10
Laser manual 2014 2014.21.02
The original composite grips are adjustable. Loosen the screws to change the height of the support plate.
Page 7/10
Laser manual 2014 2014.21.02
3 CHARGING & CHANGING THE BATTERY
The laser unit is charged via a USB-cable. It can be connected to
a USB-port of a computer, or to mains current with USB-charging
device. A green led indicates that the battery is being charged, it
turns off when the battery is full. Re-charging an empty battery
takes about three hours. When the battery runs very low, the
system gives a warning signal.
Changing the battery (PP300, PP500 and LP-2014 only)
The expected battery life is at least 24 months in regular use.
PP300/PP500: Open the hex-screw and detach the front plate.
Slide the aluminium rail under the pistol forward. Battery hatch
is in front of the trigger.
Take the battery carefully out, and disconnect the JST-connector.
Connect new battery, and put it in its place. Close the hatch,
attach the front plate and tighten the hex-screw.
LP-2014: detach the battery-hatch on the right side of the pistol.
Open the torx-screws and disconnect the battery’s JSTconnector. Take the battery out. Connect new battery, and put it
in its place. Close the hatch.
Page 8/10
Laser manual 2014 2014.21.02
4 SAFETY INSTRUCTIONS
LASER RADIATION
DO NOT LOOK DIRECTLY AT THE BEAM
CLASS 2 LASER DEVICE
This is a Class 2 -sport shooting device. The laser follows the standard EN 60825 – 1:2007.
o
o
o
o
o
o
o
o
o
o
o
type E650D1-3-1235
nominal wave length 650 nm
nominal output 2,5mW
never direct the laser beam at another person or an animal
do not look at the beam either directly or through any optical devices
do not direct the beam at air planes, cars, windows or other similar objects
use the device only in an area specified for this purpose
keep away from children
do not hand over the device to anyone who does not understand the dangers of using the
laser beam
it is forbidden to open or modify the device, excluding the changing of battery or the grip
operating temperature -10 o + 50 o C
WARNING! Failure to follow these instructions may expose the user to dangerous laser radiation.
Read the safety instructions carefully before using the device.
Always follow firearm regulations when handling an optical gun. Carry it in a proper case or bag. A person
not familiar with this kind of equipment may mistake it for a regular weapon, not an optical and safe one.
The system is meant for outdoor use as well, and is protected against normal humidity and rain.
Nevertheless, heavy rain may damage the electronic parts. Always cover the gun from rain. Keep it in the
carrying case when not in use.
Page 9/10
Laser manual 2014 2014.21.02
5 CLEANING AND MAINTENANCE
In ordinary use and normal conditions the guns are
maintenance-free and thus do not require any daily
maintenance, except a quick check. The cocking lever joint
needs to be oiled once a month, but do not use the oil
excessively, one drop is enough. If there is too much oil, it
might cause errors in the electronics.
In a case of malfunction, please contact the manufacturer
via email:
[email protected].
Page 10/10
Laser manual 2014 2014.21.02