1
75KV+/75KV2/75JV/75JV2
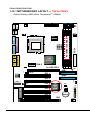
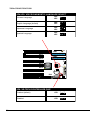
2-5 HDD / FDD INSTALLATION
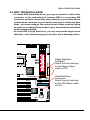
• To install HDD (Hard Disk Drive), you may connect the cable’s blue
connector to the motherboard’s primary (IDE1) or secondary IDE
connector, and then connect the gray connector to your slave device
and the black connector to your master device.If you install two hard
disks , you must configure the second drive to Slave mode by setting
its jumper accordingly.Please refer to your hard disk documentation
for the jumper settings.
• To install FDD (Floppy Disk Drive), you may connect the single end to
the board , and connect two plugs on the other end to the floppy drives.
5 4 3 2 1
DIP
ATX POWER
1
4 3 2 1
ON
DIP
SW1
1
1
SOCKET A
PC100/PC133 SDRAM
GAME/MIDI PORT
3
3
JP11
Clock
Generator
DIMM1
DIMM2
DIMM3
COM 1
LPT1
LINE
OUT
LINE
IN
SSF1
JP10
3
JP9
MIC
ON
SW2
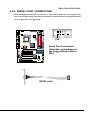
Floppy Disk Drive
Connector:
Orient the red markings
on the floppy ribbon
cable to Pin1.
FDD1
upper
upper
PS/2
USB0
MOUSE
lower
lower
PS/2
USB1
K/B
FAN1
VIA
KT-133
COM 2
ZD1
IDE1
1
1
Hard Disk Drive
Connector:
Orient the red markings
on the IDE ribbon cable
to Pin1.
4x AGP PRO
JP3
3
3
CD_IN2
CD_IN1
PCI 1
AC'97
Codec
IDE2
1
15
SMI
T/LED
3
PWR
1
15
J3
J4
RT2
JBAT1
ISA
W5280
IR
RST
SPK
Li
Battery
PCI 5
+
-
PCI 4
VIA
686A
or
686B
PWR/LED
PCI 3
HDD/LED
3 JP1
3 JP2
+ - - +
1
1
15
1
WOL1
16
1
USB1
1
FLASH BIOS
2
JP7
3
PCI 2
FAN2
19