1
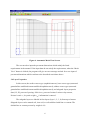
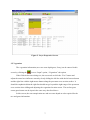
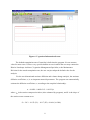
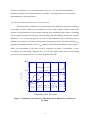
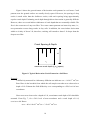
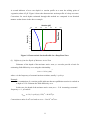
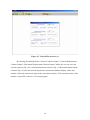
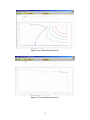
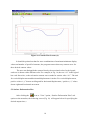
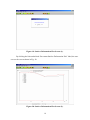
FLODEF
USER MANUAL
Version 1.0
by
Robert Lytton
Professor
Texas A&M University
Charles Aubeny
Associate Professor
Texas A&M University
Xiaoyan Long
Research Assistant
Texas Transportation Institute
Texas A&M University
Product 5-4518-01-P4
Project Number 5-4518-01
Project Title: Pilot Implementation of a New System to Calculate IRI Used for Pavement
Design Procedures
Performed in cooperation with
Texas Department of Transportation
and the
Federal Highway Administration
October 2006
Published: March 2007
TEXAS TRANSPORTATION INSTITUTE
The Texas A&M University System
College Station, Texas 77843-3135
TABLE OF CONTENTS
Page
LIST OF FIGURES ............................................................................................................. iv
LIST OF TABLES............................................................................................................... vi
1. INTRODUCTION ........................................................................................................... 1
2. PROGRAM INSTALLATION........................................................................................ 1
3. INPUT.............................................................................................................................. 1
3.1 Site Information ..................................................................................................... 2
3.2 Pavement Section Geometry.................................................................................. 3
3.3 Mesh View ............................................................................................................. 5
3.4 Layer Properties ..................................................................................................... 6
3.5 Vegetation .............................................................................................................. 7
4. RUN ................................................................................................................................. 12
5. OUTPUT.......................................................................................................................... 12
5.1 Vertical Profile Plots.............................................................................................. 13
5.2 Contour Plots ......................................................................................................... 15
5.3 Surface Deformation Plot ...................................................................................... 18
5.4 Time History Plots ................................................................................................. 20
6. SUPPLEMENT................................................................................................................ 22
APPENDIX.......................................................................................................................... 23
Case Description .......................................................................................................... 23
Illustration: Input Screens ............................................................................................ 24
Illustration: Output Plot Screens.................................................................................. 27
iii
LIST OF FIGURES
Page
Figure 1. Site Information Screen..............................................................................................3
Figure 2. Texas Map with TMI Value Indicated. ......................................................................3
Figure 3. Pavement Section Geometry Screen. .........................................................................5
Figure 4. Automatic Mesh View Screen....................................................................................6
Figure 5. Layer Properties Screen..............................................................................................7
Figure 6. Vegetation Information Screen...................................................................................8
Figure 7. Adjustment of Laboratory Measurements of Diffusivity for Effects of Cracking. ....9
Figure 8. Typical Desiccation Crack Pattern in a Soil Mass. ..................................................10
Figure 9. Characteristic Suction Profile for a Deep Root Zone...............................................11
Figure 10. Running Screen. .....................................................................................................12
Figure 11. Vertical Profile Screens (1). ...................................................................................13
Figure 12. Vertical Profile Screens (2). ...................................................................................14
Figure 13. Vertical Profile Screens (3). ...................................................................................14
Figure 14. Vertical Profile Screens (4). ...................................................................................15
Figure 15. Vertical Plot Screens (1).........................................................................................16
Figure 16. Contour Plot Screens (2). .......................................................................................17
Figure 17. Contour Plot Screens (3). .......................................................................................17
Figure 18. Contour Plot Screens (4). .......................................................................................18
Figure 19. Surface Deformation Plot Screen (1). ....................................................................19
Figure 20. Surface Deformation Plot Screen (2). ....................................................................19
Figure 21. Time History Plot Screens (1). ...............................................................................20
Figure 22. Time History Plot Screens (2). ...............................................................................21
Figure 23. Time History Plot Screens (3). ...............................................................................21
Figure 24. Time History Plot Screens (4). ...............................................................................22
Figure 25. Atlanta Site Cross Section Sketch. .........................................................................23
Figure 26. Input Screen 1: Site Information. ...........................................................................24
Figure 27. Input Screen 2: Pavement Section Geometry.........................................................25
Figure 28. Input Screen 3: Automatic Mesh View. .................................................................25
Figure 29. Input Screen 4: Layer Properties. ...........................................................................26
Figure 30. Input Screens: Vegetation.......................................................................................26
Figure 31. Output Plots Screens: Vertical Profile Plots Selection...........................................28
iv
LIST OF FIGURES (Contd.)
Figure 32. Output Plots Screens: Vertical Profile Plots-Suction. ............................................29
Figure 33. Output Plots Screens: Vertical Profile Plots-Vertical Displacement. ....................29
Figure 34. Output Plots Screens: Vertical Profile Plots-Horizontal Displacement. ................30
Figure 35. Output Plots Screens: Contour Plot Selection. .......................................................31
Figure 36. Output Plots Screens: Contour Plots Screens-Suction. ..........................................31
Figure 37. Output Plots Screens: Contour Plots Screens-Vertical Displacement....................32
Figure 38. Output Plots Screens: Contour Plots Screens-Horizontal Displacement. ..............32
Figure 39. Output Plots Screens: Surface Deformation Plot Screen (1)..................................33
Figure 40. Output Plots Screens: Surface Deformation Plot Screen (2)..................................33
Figure 41. Output Plots Screens: Time History Plot Selection................................................34
Figure 42. Output Plots Screens: Time History Plot-Suction..................................................34
Figure 43. Output Plots Screens: Time History Plot-Vertical Displacement. .........................35
Figure 44. Output Plots Screens: Time History Plot-Horizontal Displacement. .....................35
v
LIST OF TABLES
Page
Table 1. Soil Properties for Subgrade Layers in the Atlanta US 271 Site Example................24
vi
1. INTRODUCTION
FLODEF is a sequentially coupled unsaturated flow and deformation finite element
method (FEM) analysis program. Originally developed by Dr. Robert Lytton and Dr. Derek
Gay in 1993, the program computes the transient unsaturated moisture flow and movement in
an expansive clay domain. Unsaturated moisture flow is analyzed through Mitchell’s model
by converting the nonlinear partial differential equation given in the modified Darcy’s law
into an ordinary partial differential equation.
The program has provided a friendly graphic user interface (GUI). The input part is
composed of four sections: site information, pavement section geometry, layer properties,
and vegetation. For the post-processing part, the user can have the options of viewing
surface deformation plots, contour plots, time history plots, and vertical profile plots to check
the analysis results.
2. PROGRAM INSTALLATION
It is recommended that the user’s computer screen resolution be set to 1024 by 768
pixels. If the current computer monitor setting is not compatible with this requirement, adjust
the setting by pressing the mouse’s right button at the window screen to enter the
“Properties” option, “Settings” tab, then change the screen resolution to 1024 by 768 pixels
and select the “Apply” button.
To install the program, the user just inserts the attached CD in the computer drive and
clicks the file “Flodef_setup.exe”. Then the program winflow can be automatically installed
in any user-defined destination path.
3. INPUT
For the purpose of executing the program, the user needs to fill in the data for Site
Information
Vegetation
, Pavement Section Geometry
, Layer Properties
and
screens. The user can click the associated icon or menu toolbar to enter each
input screen.
1
3.1 Site Information
The program provides choices of seasonal weather data at nine different locations in
Texas (west Texas, central Texas, and east Texas): El Paso, Snyder, Wichita Falls,
Converse, Seguin, Dallas, Ennis, Houston, and Port Arthur. If the actual field site is not
located near any of these nine cities, select the region for analysis based on the TMI value
and geological location (Fig. 1).
Initial moisture conditions at the beginning of analysis fall into three categories: wet
condition (winter season), equilibrium condition (spring/fall season), and dry condition
(summer season). Select the season most appropriate for the roadway during its expected
lifespan.
Based on the user’s requirement, the analysis period of 5 years, 10 years, 15 years, or
20 years can be selected. The program has the capability to compute the effects of vertical
embedded moisture barrier, horizontal moisture barrier, median condition and drainage
condition. The information of special geological formation such as a tinted limestone layer
can be input in the “Special Soil Layer” box. The existences of one format of geological
formation in different locations are accounted for more than one type of special subgrade
layers.
The default equilibrium suctions for these nine locations are automatically calculated
in the computer program. If the site has specific equilibrium suction value which doesn’t
match with the default value, the user can input the measured equilibrium suction value in the
input screen to overwrite the default value.
Click the “Map” button on this screen to view a Texas map with indicated TMI values
(Fig. 2).
2
Figure 1. Site Information Screen.
Figure 2. Texas Map with TMI Value Indicated.
3.2 Pavement Section Geometry
This section requires the user to input the roadway geometry dimensions (surface,
base, subbase, and subgrade layer thicknesses plus pavement cross section information).
Normally, the moisture active zone depth zm is around 20 ft. If the sum of individual
3
subgrade layers is not less than 20 ft, the mesh analysis depth is set to 20 ft by the program.
Where the total depth of the subgrade layers is less than 20 ft, for instance, in the situation
that bedrock is encountered at shallow depth, the mesh depth is equal to the bedrock depth.
If the number of total subgrade layers is less than four, the user must split the deepest
individual subgrade layer into two layers with duplicate data. The depth of the two layers
does not have to be exactly equal but can be rounded to the nearest foot to make the sum of
the two equal the total. (Example: The Drill Log only shows three subgrade layers. Subgrade
layer 2 is 9 ft thick. Split this into subgrade layers 2 and 3 with depths of 5 ft, and 4 ft,
respectively, and make the previous subgrade layer 3, subgrade layer 4.
The unit for thicknesses of the surface, base, subbase courses is inches, while the
depth of each subgrade layer is counted in ft. The side slopes S1, S2, R3, S4, R5, R6 and S7 are
unitless and given by common slope designations used in construction, such as 2 to 1 or 10 to
1. It should be emphasized that none of the parameters (S2, S4, S7, Z4, Z5, Z6, Z7, X3, X4, X5
and X6) can receive an input value of zero. The minimum value that can be input is 0.01.
Figure 3 below shows an illustration of the physical meanings of these parameters.
The manual provides examples of several types of mesh dimension combinations
from the Fort Worth Loop 820, Atlanta US 271, and Austin Loop 1 field conditions used
in the initial research:
1) If the shoulder slope S1 is not equal to zero (Atlanta US 271 type), then the input
pavement dimension parameters should agree with the following two requirements: a) the
sum of the surface and base course thickness equals the elevation difference of two sides of
the shoulder ( (Z1+Z2)/12.0=(-1)*X4/S1,where Z1, Z2 have units in inches, and X4 has units in
ft); b) the total sum of surface, base course and subbase course thickness plus the subgrade
layer 1 depth equals the value of elevation difference from the surface course to the ditch
bottom ((Z1+Z2+Z3)/12+Z4=(-1)*X4/S1+ (-1)*X5/S2, where Z1, Z2 have units in inches, and
X4, X5 have units in ft). The slope is negative when it goes clockwise and positive when
rotating counterclockwise.
2) If the shoulder slope S1 is equal to zero and the elevation difference from the
surface course to the ditch bottom is very small (around 1 ft ) (Fort Worth study Section B
type), then the input pavement dimension parameters should conform to the following
restriction: adjust the input value of surface course thickness Z1, and make Z1 equal to the
elevation difference from the surface course to the ditch bottom (Z1/12.0=(-1)*X5/S2, where
Z1 has units in inches, X5 has units in ft ). If the shoulder slope S1 is equal to zero and the
elevation difference from the surface course to the ditch bottom is not small (greater than 1 ft)
4
(Fort Worth study Section A type, Austin Loop 360 type), then the input pavement
dimension parameters should be input as follows: the total sum of surface course thickness
Z1, base course thickness Z2, subbase course thickness Z3, and subgrade layer 1 thickness Z4
should equal the elevation difference from the surface course to the ditch bottom
((Z1+Z2+Z3/12.0)+Z4=(-1)*X5/S2, where Z1, Z2, Z3 have units in inches and Z4 has units in
ft).
Figure 3. Pavement Section Geometry Screen.
3.3 Mesh View
After the user inputs the pavement section dimension values, the user should click the
“Mesh View” icon
to review the mesh automatically generated by the program. The
element types in the mesh are 8 nodes quadratic element and 6 nodes bilinear triangle
element. The user can click the element to view the global node numbers for each element in
the upper right window.
5
Figure 4. Automatic Mesh View Screen.
The user needs to input the pavement dimensions which satisfy the listed
requirements in the manual. If the input data do not satisfy the requirements, when the “Mesh
View” button is clicked, the program will give an error message and ask for a new input of
pavement dimensions which conform to the described restrictions above.
3.4 Layer Properties
In this screen, the surface course type (asphalt/concrete), base course type (untreated
granular/lime stabilized/cement stabilized/asphalt-treated), subbase course type (untreated
granular/lime stabilized/cement stabilized/asphalt-treated), and subgrade layers properties
data (LL, PI, percent of passing -200# sieve, percent of minus 2 micron clay content,
Poisson’s ratio ν , dry unit weight γ d ) information is entered .
The subgrade layers are labeled in four layers (layer 1, 2, 3, 4) from top to bottom.
Subgrade layers can be natural soil, inert soil, or soil stabilized with lime or cement. The
default lime or cement percent by weight is 6%.
6
Figure 5. Layer Properties Screen.
3.5 Vegetation
The vegetation information (tree root zone depth/grass, if any) can be entered in this
screen by clicking the
icon or “Input” option, “Vegetation” sub option.
If the field site has an existing tree, the user needs to click the “Tree” button and
adjust the actual tree influence extent by slowly sliding the left line with the left mouse button
and the right line with the right mouse button along the pavement cross section surface. It
should be emphasized that the right line should not go beyond the right range of the pavement
cross section when sliding and adjusting the vegetation location extent. The surface grass
extent grass button can be input in the same way described above.
In this screen, the root transpiration rate and root zone depth are also required for the
tree and grass information.
7
Figure 6. Vegetation Information Screen.
The default transpiration rate of 3mm/day is built into the program. It is an accurate
value for most cases. Unless a very special situation occurs in which the user may contact the
District Landscape Architect, Vegetation Management Specialist, or the Maintenance
Division for the actual transpiration rate, the user can just adopt the default value for the
analysis.
For the two-dimensional moisture diffusion and volume change analysis, the moisture
diffusion coefficient, α, is an important material parameter. The program can automatically
estimate the diffusion coefficient, α, according to the empirical relationship:
α = 0.0029– 0.000162 S – 0.0122 γh
where γh is the suction compression index (also estimated by program), and S is the slope of
the suction-water content curve:
S = -20.3 – 0.155 (LL) – 0.117 (PI) + 0.068 (%-#200)
8
The above estimation of α is a default option; however, a site-specific determination is
definitely desirable when sufficient data are available. Two approaches for a site-specific
determination are discussed below.
(1) Laboratory Measurement with Crack Correction
The unsaturated soil diffusivity test performed in the laboratory represents conditions
of an intact soil mass. While intact conditions can occur under certain conditions such as the
absence of root penetration or desiccation cracking, more commonly some degree of cracking
can be expected within the soil mass. Such cracking will substantially increase the apparent
diffusivity, αfield, of the soil mass to well above that indicated from a laboratory test. In
addition, the existence of fractures will generate heterogeneity in the soil mass such that αfield
depends on sampling location; hence, αfield must be expressed in probabilistic terms. Figure 7
shows the relationship of the ratio αfield/αlab expressed in terms of probability of nonexceedance for crack depths ranging from 1 to 16 ft. This figure shows that for crack depths
up to 16 ft, αfield can exceed αlab by a factor of greater than 100.
1000
Crack Depth = 16 ft
lab
100
α
field
/α
8 ft
4 ft
10
2 ft
1 ft
1
0
0.2
0.4
0.6
0.8
1
Probability
Non-Excedance
Probability
ofof
NonExceedance
Figure 7. Adjustment of Laboratory Measurements of Diffusivity for Effects of
Cracking.
9
Figure 8 shows the general nature of desiccation crack patterns in a soil mass. Crack
patterns near the ground surface are usually closely spaced. However, the spacing of deep
cracks is much wider than the shallower cracks, with crack spacing being approximately
equal to crack depth. Estimating crack depth through direct observation is generally difficult.
However, there are several indirect indicators of crack depth that are reasonably reliable. The
first is the occurrence of any root fiber. Tree roots cannot penetrate an intact clay mass; i.e.,
root penetration occurs along cracks in clay soils. In addition, the roots induce desiccation
within a vicinity of about 2 ft; therefore, cracking will extend to about 2 ft deeper than the
deepest root fiber.
Crack Spacing & Depth:
dc
s0
maximum crack depth dc=s0 (space)
Figure 8. Typical Desiccation Crack Pattern in a Soil Mass.
Example
A diffusivity measured in a laboratory diffusion test indicates αlab = 8.0x10⁻⁵ cm2/sec.
Root fibers in the borehole from which the soil sample was taken were observed to a
depth of 6 ft. Estimate the field diffusivity αfield corresponding to a 50% level of nonexceedance.
Since roots were observed to a depth of 6 ft, a maximum crack depth of 8 ft should be
assumed. From Fig. 7, for a 50% level of non-exceedance and a crack depth of 8 ft,
αfield/αfield=40. Hence:
αfield = 40 x 8.0x10-5 cm2/sec = 3.2x10⁻³ cm2/sec
10
A second indicator of tree root depth is a suction profile at or near the wilting point of
vegetation, about 4.5 pF. Figure 9 shows the characteristic suction profile of a deep root zone.
Corrections for crack depths estimated through this method are computed in an identical
manner as that shown in the above example.
Suction (pF)
2.0
2.5
3.0
3.5
4.0
4.5
5.0
0
Root Zone
2
Depth (ft)
4
6
8
10
12
14
16
Figure 9. Characteristic Suction Profile for a Deep Root Zone.
(2) Diffusivity from the Depth of Moisture Active Zone
Estimates of the depth of the moisture active zone yma can also provide a basis for
estimating field diffusivity αfield using the relationship:
αfield = 0.6 n (yma)
2
where n is the frequency of seasonal suction variation, usually 1 cycle/yr.
Example
An examination of a suction profile indicates that an equilibrium suction is reached at
a depth of 12 ft. Estimate the field diffusivity αfield.
In this case, the depth of the moisture active zone yma = 12 ft. Assuming a seasonal
frequency n = 1 yr leads to:
2
αfield = 0.6 (1 cycle/yr) (12 ft) = 86.4 ft2/yr
Conversion to units of cm2/sec leads to αfield = 2.6x10⁻³ cm2/sec.
11
4. RUN
After inputting all the required data information, click the “Run” icon
on the
toolbar or “Analysis” option in the menu at the top of the screen to execute the program and
perform an analysis.
The usual run time for a 5-year analysis on a PC (CPU around 1GHz) is about 20
minutes; 10 years, 40 minutes; 15 years, 60 minutes; and 20 years, 80 minutes. The running
screen appears below in Fig. 10.
Figure 10. Running Screen.
5. OUTPUT
The program provides output options of vertical profile plot (suction/vertical
displacements/horizontal displacements), contour plot (suction/vertical
displacements/horizontal displacements), surface deformation plot and time history plot
(suction/vertical displacements/horizontal displacements) to review the analysis results.
12
5.1 Vertical Profile Plots
The user can view the vertical profiles (Suction/Vertical Displacements/ Horizontal
Displacements) of 30 equally divided segments along the pavement cross section.
After clicking the
icon or “View” option, “Vertical Profiles” sub option on the
menu bar, the following screen (Fig. 11) will appear.
Figure 11. Vertical Profile Screens (1).
The user can view the associated vertical profile plots by inputting the desired output
time in the textboxes and clicking the underlined label (suction/vertical
displacement/horizontal displacement). If the cursor is moved along the vertical profile curve
(black color), the associated suction (Fig. 12)/vertical displacement (Fig. 13)/horizontal
displacement (Fig. 14) value and elevation y coordinate for this location will appear in the
left upper screen (text in blue color). The blue dotted lines in Fig. 12/Fig. 13/Fig. 14 stand for
the 30 equally divided segments in the pavement cross section, while the black solid lines are
the suction curves (Fig. 12)/ vertical displacement curves (Fig. 13)/horizontal displacement
curves (Fig. 14) for these segments.
13
Figure 12. Vertical Profile Screens (2).
.
Figure 13. Vertical Profile Screens (3).
14
Figure 14. Vertical Profile Screens (4).
5.2 Contour Plots
After clicking the icon or “View” option, “Contours” sub option on the menu bar, the
following screen (Fig. 15) will be shown.
15
Figure 15. Vertical Plot Screens (1).
By clicking the underlined blue “Suction Contour Output”/“Vertical Displacement
Contour Output”/“Horizontal Displacement Contour Output” labels, the user can view the
suction contours (Fig. 16)/ vertical displacement contours (Fig. 17)/horizontal displacement
contours (Fig. 18) after the desired output time, maximum/minimum display values and
number of desired contours are input to the associated textboxes. The maximum value of the
number of specified contours is 12 in this program.
16
Figure 16. Contour Plot Screens (2).
Figure 17. Contour Plot Screens (3).
17
Figure 18. Contour Plot Screens (4).
It should be pointed out that for some combinations of maximum/minimum display
values and number of specified contours, the program can not show any contour curve for
these desired contour values.
The user can distinguish the contour lines by the associated colors. In the legend,
each text is shown with a different color. For example, in Fig. 16, the text “4.1” in the legend
has a red font color, so the red suction contour curve stands for suction value “4.1”. The unit
for vertical displacement and horizontal displacement is inches. For vertical displacement,
positive values “(+)” denote swelling and for horizontal displacement, “positive (+)” values
denote rightward horizontal movement.
5.3 Surface Deformation Plot
After clicking the
icon or “View” option, “Surface Deformation Plots” sub
option on the menu bar, the following screen (Fig. 19) will appear below for specifying the
desired output time, t.
18
Figure 19. Surface Deformation Plot Screen (1).
By clicking the blue underlined “Pavement Surface Deformation Plot” label, the user
can see the screen shown in Fig. 20.
Figure 20. Surface Deformation Plot Screen (2).
19
5.4 Time History Plots
Figure 21 provides the options for the program to view different time history plots
[suction (Fig. 22)/ vertical displacement (Fig. 23)/ horizontal displacement (Fig. 24)] for any
desired location in the pavement cross section. The viewer can either click the
icon or
click on “View → Time History Plots → Suction/Vertical Displacement/Horizontal
Displacement” sub option on the menu bar to review the time history plots (Figs. 21-24) for
5,10,15, and 20 years analysis periods.
The “Time History Output Charts Control Screen” (Fig. 21) will appear only if the
user clicks the
icon.
Figure 21. Time History Plot Screens (1).
By clicking the blue labels for “Suction,” “Vertical Displacement,” “Horizontal
Displacement,” the user can view Figs. 22, 23, and 24.
20
Figure 22. Time History Plot Screens (2).
Figure 23. Time History Plot Screens (3).
21
Figure 24. Time History Plot Screens (4).
6. SUPPLEMENT
The user can create a new file, open an existing file, save a file, or save a file as a
different name by clicking the “File” option, “New”/ “Open”/ “Save”/ “Save As” sub options
on the menu bar or clicking the associated icons
/
/
.
The program also provides “Print” functions for the user to get hard copies of all the
input forms and output plots. In printer preferences, the “layout” setting should be
“Landscape” on the orientation tab.
22
APPENDIX
An example of the Atlanta US 271 site case study is given below to demonstrate the
input and output steps for the FLODEF program more in detail.
Case Description
In the Atlanta US 271 site, there are trees and grasses existing from the ditch line out
to the right-of-way line. For the two-dimensional finite element analysis in FLODEF, the tree
root zone depth is assumed to be 14 ft according to the borehole data. The root transpiration
rate and grass transpiration rate are estimated to be 0.12 in/day. The site cross section is
shown in Fig. 25.
1
20
1
20
10
12
40
Figure 25. Atlanta Site Cross Section Sketch.
Four subgrade layers are employed for the mesh generation and finite element method
analysis purposes with the thicknesses for the layers from top to bottom being: 2 ft, 7 ft, 4 ft,
and 2 ft. The pavement structure has an asphalt surface (flexible pavement), and untreated
granular base and subbase courses. The soil properties of the subgrade layers are illustrated in
Table 1.
23
Table 1. Soil Properties for Subgrade Layers in the Atlanta US 271 Site Example.
Location
Soil Type
LL (%)
PI (%)
-200#
-2μm
Subgrade layer 1
Natural
37
17
83.5
7.6
Subgrade layer 2
Natural
48
26
92
8.7
Subgrade layer 3
Natural
37
15
94.1
9
Subgrade layer 4
Natural
37
15
89.9
8.5
(From top to bottom)
Illustration: Input Screens
Based on the information of the pavement cross section geometries, soil layer
properties, and vegetation condition, the user will click the icons
and
,
,
,
,
to enter “Site Information,” “Pavement Section Geometry,” “Mesh View,” “Layer
Properties,” and “Vegetation” input data. Figure 26 through Figure 30 show the associated
user inputs for this example.
Figure 26. Input Screen 1: Site Information.
24
Figure 27. Input Screen 2: Pavement Section Geometry.
Figure 28. Input Screen 3: Automatic Mesh View.
25
Figure 29. Input Screen 4: Layer Properties.
Figure 30. Input Screens: Vegetation.
26
After the user clicks the “Run”
icon with the fulfillment of the input screen
parts, the program generates a file “input.dat” used for the internally built Fortran program.
The format of this file is shown below:
File name: Input.Dat
**********************************************************************
S1-info
Location: PRES
Engineer:
Special Soil Layer Configuration?(1:yes;0:no)
0
0
Region, Ini Condition, Duration, Vertical barrier, Horizontal barrier, Paved Shoulder Width,Barrier depth,Median Condition
9
3
4
0
0
0
0 0
Tree (no:0;yes:1), Grass(no:0;yes:1)
1
1
Drainage Condition?(0:good;1:poor)
0
0
S2-section
Z1,Z2,Z3,Z4,Z5,Z6,Z7
2 4 4.8 2 7 4 7
x1, x2, X3,X4,X5,X6,X7,X8
12 10 12 18 2 8 0 0
S1,S2,S3,S4,S5,S6,S7
-20 -5 0.05 20 0.05 0 0
S3-property-pavement
Layer Poisson's-Ratio Dry-unit-weight
1
1
0.3
110
2
1
0.3
110
3
1
0.3
110
S4-property-subgrade
No. ID LL(%) PI(%) -200# -2um Poisson's-Ratio Dry-unit-weight %Lime-or-Cement
1
1
37
17
83.5
7.6
0.3
110
0
2
1
48
26
92
8.7
0.3
110
0
3
1
37
15
94.1
9
0.3
110
0
4
1
37
15
89.9
8.5
0.3
110
0
S5-tree
-4
33.6279726261762
61.790504704876
14
S6-grass
-3
33.8666381522669
61.6313943541488
Illustration: Output Plot Screens
After FLODEF has executed, the program generates output files for the suction and
displacement (vertical/horizontal) calculations. If the analysis period is 5 years, the output
files will be PF1.DAT~PF6.DAT, DY1.DAT~DF6.DAT. For the case of a 20 year analysis
period, the output files then will be PF1.DAT~PF24.DAT, DY1.DAT~DY24.DAT. The user
can review all the output files in the directory where the program is installed.
27
For this example, the associated output plot screens for Vertical Profile Plots/ Contour
Plots/Surface Deformation Plot/Time History Plots are demonstrated in Fig. 31 through
Fig. 34 for an arbitrary selected output time of 720 days. The users can change the output
time according to their review needs.
After the user clicks the
icon, the vertical profile plots for suction/vertical
displacement/horizontal displacement options can be displayed for review purposes.
Figure 31. Output Plots Screens: Vertical Profile Plots Selection.
28
Figure 32. Output Plots Screens: Vertical Profile Plots-Suction.
Figure 33. Output Plots Screens: Vertical Profile Plots-Vertical Displacement.
29
Figure 34. Output Plots Screens: Vertical Profile Plots-Horizontal Displacement.
The contour plots screens can be accessed after the user clicks the
icon, as
shown in Fig. 35 through Fig. 38. The unit for vertical and horizontal displacement is inches.
30
Figure 35. Output Plots Screens: Contour Plot Selection.
Figure 36. Output Plots Screens: Contour Plots Screens-Suction.
31
Figure 37. Output Plots Screens: Contour Plots Screens-Vertical Displacement.
Figure 38. Output Plots Screens: Contour Plots Screens-Horizontal Displacement.
32
The surface deformation plot (Fig. 39 and Fig. 40) is displayed with the click of the
icon.
Figure 39. Output Plots Screens: Surface Deformation Plot Screen (1).
Figure 40. Output Plots Screens: Surface Deformation Plot Screen (2).
33
By clicking the
icon, the user can view the time history plots for suction/vertical
displacement/horizontal displacement, which are shown in Fig. 41 through Fig. 44.
Figure 41. Output Plots Screens: Time History Plot Selection.
Figure 42. Output Plots Screens: Time History Plot-Suction.
34
Figure 43. Output Plots Screens: Time History Plot-Vertical Displacement.
Figure 44. Output Plots Screens: Time History Plot-Horizontal Displacement.
35