1
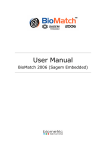
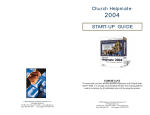
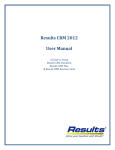
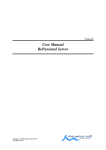
Software User Manual
Flextime V6.6
AUSTRALIAN MADE AND SUPPORTED
CONTENTS
TM ONLINE................................................................................................................................ 3
Activating a new card ......................................................................................................... 3
Changing a person's card .................................................................................................. 4
Setting the time / Daylight Savings Time (DST) .............................................................. 4
TIMEFLEX PROGRAM.............................................................................................................. 5
PASSWORDS............................................................................................................................ 5
Activate Password .............................................................................................................. 5
Change Password ............................................................................................................... 5
PUBLIC HOLIDAYS .................................................................................................................. 6
LEAVE CODES.......................................................................................................................... 7
DEPARTMENTS ........................................................................................................................ 8
SHIFT DEFINITIONS (DAILY FLEXI RULES)......................................................................... 8
Modify ................................................................................................................................... 9
Meal Breaks ....................................................................................................................... 10
EMPLOYEE RECORDS .......................................................................................................... 11
Generate an Employee Record........................................................................................ 11
Rosters ............................................................................................................................... 13
Modify an Employee Record............................................................................................ 14
Delete/deactivate an Employee Record.......................................................................... 15
List Employee Records .................................................................................................... 15
REPORTS ................................................................................................................................ 16
Daily Report ....................................................................................................................... 16
Time Sheet ......................................................................................................................... 17
Period Totals...................................................................................................................... 18
Leave Report...................................................................................................................... 19
CORRECTION OF EMPLOYEE RECORDS .......................................................................... 20
LEAVE PLANNING ................................................................................................................. 22
TABLE OF FIGURES .............................................................................................................. 23
INDEX....................................................................................................................................... 24
Time-Minder Manual
January 2008
Page 2 of 26
TM ONLINE
The Time-Minder Flextime system runs 2 programs – TM Online & Flex-Minder.
Figure 1: TM Online Screen
The TM Online program needs to stay open at all times. This program monitors activity on the clock to
show peoples current status, last booking time and provides balance information at the clock (i.e.
balance to yesterday and today’s total). Every hour it collects bookings from the clock to the PC. It
does a complete automatic reconciliation procedure at 5am to update everyone’s balance.
The TM Online screen can be minimized but not closed. When minimized, look for the small TimeMinder clock icon rotating in the tool bar at the bottom right of your screen.
If this program is closed for any reason, bookings will be stored in the clock for collection & processing
when restored. However, balance information will not be updated until the online program is re
opened. (If closed you can reopen by going to Programs/Startup – TM Online)
If Leave or adjustments are made in the TimeFlex program the new balances can be updated to the
clock immediately by pressing the “Load” button in the TM Online screen. Otherwise the information
will automatically update overnight.
To activate the other options, click in the secret spot – in the centre of the ‘O’ of OUT. You can
then set the time on the clocks (make sure the PC time is correct first) and activate unidentified cards.
Activating new cards
The conversion table opens at the bottom when you activate the screen. This is used when setting up
new employee cards or changing cards (see Figure 2).
1. Generate the person on the system in the TimeFlex program employee record with the card
number shown on the card.
2. Open the TM Online screen & activate so that the unidentified card box is visible on the
bottom.
3. Get the person to swipe the new card at the clock – the encoded number will appear in
the unidentified cards box.
4. Click on the unidentified No. and a box will pop up. Enter the No which is printed on the
outside of the card (& entered in the employee record) and then press “Add card No.”
5. To confirm press the “Load” button to send the information to the clock. The persons name &
time should change to the IN column.
6. ALWAYS de activate the screen by clicking in the “O” again & minimize the TM Online screen
The system will now recognize & convert that number when ever a booking is made.
Time-Minder Manual
January 2008
Page 3 of 26
Figure 2: TM Online Screen Activated
Changing a persons card
1. Make sure they have clocked out with their old card & then press “Load” in the TM Online
screen. This will process any bookings on their old card.
2. Go to their employee record in TimeFlex, highlight the card field & enter the new number &
save. Close the program.
3. Open the TM Online & activate – follow the steps above to register the new card.
4. De activate & minimize the TM Online screen
Setting the time on the clock
If the time on the clock needs changing –
1. Make sure the time & date on the PC are correct (double click on the PC time
in bottom right toolbar & change the settings accordingly)
2. Open & activate the TM Online screen
3. Click on “ Set time on all clocks”
4. The PC time will be reflected in a box in the centre – press “Set time”
5. Check that the time has changed next to the clock number in the bottom right.
6. De activate & minimize the TM Online screen
DST (Daylight Savings Time)
If the PC has been set to change to DST automatically & is left on with the TM Online screen open,
the clock will be automatically adjusted at the 5am auto reconciliation
Time-Minder Manual
January 2008
Page 4 of 26
TIMEFLEX PROGRAM
and Department selection Menu will
and the Main Menu will appear.
To start the Time-Flex software, double click on icon
open. Your department will be displayed, click on OK
A box may also appear saying that clocking data is available to
be processed. If you select OK, Time-Minder will process this
data, and your reports will be up-to-date to within the hour. If you
select cancel, your reports will only be up-to-date to the day
before.
Processing will take a few minutes, so only press OK if
you need the data to be updated to the current day.
Click on
to get to the main Time-Minder Program.
A pop-up Password box appears;
[NB. The default password is AMS]
type
in
the
password
and
press
<Enter>.
For security reasons all key entries are masked, i.e. displayed as *.
Click on
will return to Windows.
From the Time Minder Main Menu Bar, click on Time-Minder. A drop down menu opens, with four
options:
• Activate Password,
• Change Password,
• Download and Process Data and
• Exit Time-Minder.
PASSWORDS
Activate Password
Activate Password.....use this to return to the password screen. No activity can occur until a
password has been re-entered. This function can be used as security when the PC is left unattended.
Change Password
Change Password.....the password change box appears. Select the Password to change. If setting
the Passwords for the first time the factory default is AMS
There are two password levels:
• Supervisor Access…enables access to all fields, including Change password and
Terminal Set-up program.
• General Access.....limited to access Reports and List Employee Records only.
Click on Supervisor Access....type the current password and press <Enter>.
The next prompt requests a new password and press <Enter>. Re-type to confirm and press <Enter>.
Click on General Access.....and follow the same steps.
Download and Process Data.......to return to the Main Menu.
Exit Time-Minder.....to return to the Windows Program Manager.
Time-Minder Manual
January 2008
Page 5 of 26
PUBLIC HOLIDAYS
Public Holidays is a table of dates recognised as approved days of absence from work. If you
choose this option all dates entered into the calendar list (up to 15) will be recognised if the option of
Public Holidays is selected in the employee records (refer to Figure 6). This feature enables an
automatic credit to the employee hours worked for dates entered in the table, providing it is a normal
work day.
Note: It is necessary to enter the Public Holiday dates in the calendar before the
commencement of the working week in which they arise or before you activate a download for
the current week. This ensures that the necessary automatic credit of time occurs as entered
in the employee details. These dates are usually entered once a year in January.
From the Time-Minder Main Menu Bar, click on Holidays.....a dialog box will open.
Figure 3: Public Holidays Screen
Enter dates of holidays in the list (up to 15).
Time-Minder Manual
Click on
January 2008
to record the dates.
Page 6 of 26
LEAVE CODES
Leave codes is a table of codes recognised for leave planning and corrections. They are also printed
on the reports as abbreviations of the leave taken.
Leave codes credit the target hours unless
otherwise specified.
From the Time-Minder Main Menu Bar, click on Holidays, then select leave codes.....a dialog box will
open.
Figure 4: Leave Codes
Up to 30 leave codes can be entered. For deduction from the Flex bank column, (saved cutback
hours) use codes with an asterisk and a single letter – eg. *B for Bereavement leave – special types of
leave allowed to be used from banked hours. When used, these codes will automatically deduct from
the bank column & not the flex balance. NB. This cannot go into a negative – only use if hours are
available.
Enter the codes and descriptions of your leave.
Click on
Time-Minder Manual
to record the details.
January 2008
Page 7 of 26
DEPARTMENTS
Departments can be generated so that staff can be selected by groups for reporting. Only the first
field is necessary and is selected in the employee record & reports.
From the Time-Minder Main Menu Bar, click on Departments. (Generate, Modify or Delete).
Figure 5: Departments
SHIFT DEFINITIONS (DAILY FLEXI RULES)
From the Time-Minder Main Menu Bar, click on Shifts.....a drop down menu opens.
Print all.....prints a hard copy of all generated shifts. Shifts that do not have a name will not print.
This function should be used when all shifts have been entered for a hard copy record.
Note: At this point you must decide what flex rules are to be applied and enter the shift details
accordingly. Most staff will be on a standard daily program with a daily target, however there
may be some people who work part time. New shifts need to be made with the appropriate
daily target.
Figure 6: Shift Definition
Time-Minder Manual
January 2008
Page 8 of 26
Modify
From the Main Menu Bar select Shifts.
Click on Modify.....and the Shift Definition screen will open.
Click on Shift Number
to drop down a list of shift numbers from 1 to 99, and enter or select the
number to be assigned to the shift.
Click on Name Box
to assign a name to the shift e.g. Standard Flex, 6 hour target, TOIL etc.
Click on Flextime bandwidth Box.....enter the normal work, start and end time of this shift.
Click on Overtime/toil bandwidth Box.....enter the extended work, start and end time of this shift. Set
these to the same as the flextime bandwidth if no toil / overtime is to be calculated.
Note: This can be used for overtime or toil time. (Time accumulated outside of flexi bandwidth
separately from Flex time)
Note: All fields marked
(Optional) should be left blank if they are not applicable to your
work pattern.
Click on Meal Breaks.....there are two start and end times for breaks with automatic
deductions. If the minimum is not taken between this bracket, it will be deducted & shown in the
deduct column.
Click on Daily Target....and enter the normal target hours for the day. If there is no target
then enter 00.00.
Click on
to store these settings.
Click on
for a hard copy of the shifts setup.
Click on
to return to the Main Menu
The purpose of setting shifts is to detail the hours of work for all employees. Even if there is one
standard working pattern for all employees the times must be entered. Up to 99 different shift
definitions can be entered to encompass different target hours for part time staff or standard hours
with no target. These are applied to the employee for the appropriate days.
The following time points can be entered:
• Flextime bandwidth
• Toil or Overtime bandwidth
Time points for overtime/toil outside of flexitime
• Meal Breaks
2 times (i.e. 2 per day) with minimum taken.
• Target hours
Time-Minder Manual
January 2008
Page 9 of 26
EXPLANATION OF SHIFT FIELDS
BANDWIDTH
For example, the sample shift below has a flextime bandwidth of 8 am til 6 pm with overtime/toil
between 6 and 8am and 6 and 10pm. Time worked within the flexi bandwidth will be compared to the
target for that day to give a flex balance. Time worked within the overtime bandwidth, outside of flexi,
will go into the overtime or toil column.
MEAL BREAKS
This enables both lunch and tea breaks to be included in the shift pattern. Also the duration of the
break can be entered. If a break is not taken during the specified time an automatic deduction of the
specified duration will occur. Usually for flextime only one break is used. If it is the standard day,
break 1 is used as per the example in figure 6. Break type 2 can be used for standard hours or for
those with a part day target who might not take a break unless working longer.
Break 1
If a meal break is to be taken between certain times, enter these times, as well as the minimum
duration into break 1. Any clocking times during the break time will be taken into account when
calculating the deduction. Any deducted time shows in the deduct column.
Break 2
If a meal break is to be taken after, say 5 hours worked with a minimum deduction of 30 minutes then
that break will be automatically deducted from the employee’s total hours. If an employee books out
and back in again during the shift before the set time, that time will be taken into account when
calculating the deduction. For example if someone already clocked out for 25 minutes, only a further 5
minutes will be deducted. Any deducted time shows in the deduct column.
If employees book IN and OUT for all meal breaks with no automatic deductions, leave all meal break
fields blank.
TARGET HOURS
This field specifies the Daily target hours. The example in figure 6 is for standard 7.5 hr daily target
(75 hrs fortnight or 150 hrs per month). You may have part time staff who work 3 days a week with a 6
hr target per day (36 hrs fortnight or 72 hrs per month). If a part time person can come in any day with
a target of 40 hrs fortnight then you would make a shift with the standard bandwidth & a 4 hr target &
apply to Monday to Friday.
Time-Minder Manual
January 2008
Page 10 of 26
EMPLOYEE RECORDS
This section is essential to record the details of all employees who are to use Time-Minder. Each
employee must have a unique employee code and card number. The record includes an employee
code, either Alpha or Numeric up to 8 characters, employee name up to 20 characters, card number
(this refers to the magnetic stripe or proximity card issued to operate the Time-Minder clock) and
department number (up to 8 characters). The department number enables employees to be printed on
separate reports. Shifts are to be entered, i.e. different shifts for different days or the roster system.
Click on Employee Records.....on the Main Menu Bar and a drop down menu will open with four
options: Generate, Modify, Delete and List.
Figure 7: Generate Employee Records Screen
Generate an Employee Record
Click on Generate......to enrol new employee’s record.
Click on Employee Code.....enter an identification number or name for the employee.
Note: This field can not be left blank or changed once saved.
Click on Name.....enter the employee’s name as you want it to appear on the reports.
Click on Card Number.....enter the number of the card allocated to the employee.
Click on Clock Number…..Leave as 00 if only one clock or if employee is allowed to use any clock. If
multiple clocks, by entering a clock number, it restricts the employee to only using that clock.
Click on EOP Carry forward limit.... enter the amount of hours the employee is allowed to carry from
one flex period to the next.
Click on Public Holiday credit time…. Enter the target hours to be credited.
Time-Minder Manual
January 2008
Page 11 of 26
Public Holiday shift …. This is only required if the person ever works on a public holiday. A
shift would be setup with the appropriate rules & allocated here.
Click on Weekly Programme.....enter the number of the shift this employee will be working for each
day of the week. Any days not worked are entered as 00. Unless alternative shifts are entered in other
weeks of the shifts roster, the employee will be regarded as working the same shifts every week.
Enter the department that the employee works in on each particular day. (Select from the drop down)
Roster Week.....if an employee works different shifts according to a rotating roster, enter the
shift patterns for each week of the cycle, starting with week 1 as the current week. Click on the slide
box below the roster - press the <Right Arrow> key → or click to Week No2.....and press <Enter>,
the cursor moves to Monday.....you can now enter a shift for the next week.
If you wish to delete shifts from an employee roster click on Clear Roster Weeks.....followed by the
number of shifts to be removed.
Click on
to store.
Click on
if any errors have been entered or the record is not required.
Click on
to return to the main menu.
The staff are now ready to commence using the Time-Minder.
Note: If using HID Prox cards, the first booking will record the encoded number in the
unidentified cards box. You will then need to link it to the generated number (i.e. the number
printed on the card) by clicking on the number. A box will pop up requesting the conversion
number. Enter the number which is printed on the outside of the card (& entered in the
employee record). The conversion table on the right will then record the converted number for
future use.
The system will now recognize & convert that number when ever a booking is
made.
Time-Minder Manual
January 2008
Page 12 of 26
Rosters
This section enables the different shifts that staff work, to be entered. If there is only one type of shift
worked without rosters, it is only necessary to enter that shift number for all days. If different shift
patterns exist on different days, it is necessary to enter the shift number for each day. These shift
numbers are specified in the Shift Definition section.
If a roster with different shift patterns exists, it is necessary to utilize the roster set-up. This can cater
for 8 different weeks. For example, someone might work Monday, Wednesday & Friday in week 1 &
then Tuesday & Thursday in Week 2. These can be entered in the shift roster & they will automatically
rotate each week. The shifts rotate from the current week (Week 1) through to the last rostered shift
that has been entered. When viewing the roster the current week is always Week 1 providing that the
data has been downloaded and processed.
PUBLIC HOLIDAY CREDIT & PUBLIC HOLIDAY SHIFT
This section allows for Public Holidays to be credited automatically.
The following rules apply for Public Holidays if they fall on working days, (i.e. the employee has a
number entered in the shift roster that is greater than zero.)
If a Public Holiday Shift:
1) is not zero then that shift number will replace the normal shift number for that day,
2) is zero then the normal shift will remain,
3) if there is any time in a Public Holiday credit this will be added to the P.Hol. record for that day.
If an employee is entitled to work a Public Holiday then enter the number of the shift they will be
assigned to for that day in the Shift box. It is not necessary to enter any data in Time Credit.....
If an employee is not entitled to work but is entitled to a time credit for that day leave shift box at 00
and enter hours to be paid in Time Credit..... Leave both of these boxes blank if employees are not
entitled to Public Holidays.
Time-Minder Manual
January 2008
Page 13 of 26
Modify an Employee Record
This function is used to change any information in an employee record.
Click on Employee Record from the Main Menu Bar.
Note: The fields at the top are selection fields only. Once the person has been selected from
the drop down list of code, name or card, only the fields in the Personal Details or Weekly
Program box can be used to modify details.
Note: You can only access this screen with the Supervisor Access Password.
Click on Modify and the Modify screen will open.
Figure 8: Modify Employee Records Screen
To identify the record select the employee by Code…, Name…..or Card Number…..from the drop
down list next to the appropriate field. Having selected the record you will now have the employee
details on the screen and any field except the Employee code can be changed. Click on the box you
wish to modify, i.e. Name, Card Number, Department or roster and type in changes.
You can also assign new Shifts, change Roster or authorise Public Holiday entitlement.
Click on
to store changes.
Click on
to return to the Main Menu
Time-Minder Manual
January 2008
Page 14 of 26
Deactivate an Employee Record
This function is used when an employee leaves and you no longer want them on current reports but
you want to retain their past timesheet information.
Click on Employee Record from the Main Menu Bar.
Click on Deactivate – a confirmation box will appear – OK.
Figure 9: Deactivate Employee Records Screen
Search for the record by Code....., Name.....or Card Number.....The record will be displayed and you
will be asked if you wish to Deactivate This Record, click on yes or no. If YES you will be asked the
question
Are You Sure?
Click on
Click on yes or no. If YES the record will be deactivated.
to return to Main Menu.
Note: You cannot re-use an employee code
List Employee Records
This produces a report displaying all employee’s personnel records that have been generated.
Click on Employee Record from the main menu bar.
Click on List.....a drop down menu opens.
Click on Screen.....to display all employee records.
Click on Print.....for a hard copy of all employee records
Click on
Time-Minder Manual
to return to the Main Menu.
January 2008
Page 15 of 26
REPORTS
The reports have been designed to provide hard copy details of all employee bookings, hours worked,
and leave taken for a specified period. All reports can be viewed on the screen, printed out or sent to a
file on the hard disc of the controlling PC.
Note: Weekly records are automatically deleted after 55 weeks. If data is required for longer
periods backups should be made (Refer Backup).
Click on Reports…..on the Main Menu Bar and a drop down menu opens. There is a choice of four
report types: Daily, Time Sheets, Period Totals or Leave
Daily Report
This function is used to generate varying reports for one day.
From the Report drop down menu, click on Daily report…..on the Main Menu Bar.
A blank record will be displayed.
Enter the Date required for the report. (If you press enter it will default to the current date. If you put a
previous date & enter it will default to the current month & year.)
Select whether the report is for 1 Department, a Shift or All Employees. If for one department, click
on that circle and select the department from the list that appears.
Click on Extra Criteria.....to select the type of report required in the appropriate circle.
Extra Criteria
All Employees :
All employees in the company or a department.
Present Employees :
All employees who have booked on the date of Report.
Absent Employees :
All employees who have not booked on the date of report.
Exceptions :
Absences, missed booking or anything unusual- Incomplete booking pattern. If an
employee has worked part of the day, this will not appear as an exception on the report.
You are now ready to generate the report.
Click on
for viewing on the PC.
Click on
to produce a hard copy.
Click on
to save a report to the hard disc of the controlling PC. Each report will be stored
in the client folder (TimeFlex\ ?) as Daily.txt. If another report is saved to file, it will overwrite any
existing file.
Click on
Time-Minder Manual
to return to the Main Menu.
January 2008
Page 16 of 26
Time Sheet Report
This report is the one most often used to look at the employees details for the period.
Figure 10: Time Sheet Report Screen
From the Report drop down menu, click on Time Sheets.
Enter the start and end date for the report in the From and Till boxes.
Click on 1 Employee - select EMP. CODE. (Employee Code)
or 1 Department - enter department name or number.
or All Employees - will display all records.
Click on
to show the report for the first employee and the button will change to
to view the next employee in code order, or
to produce a hard copy. Click on
to
save a report to the hard disc of the controlling PC. Each report will be stored in the client folder
(TimeFlex\ ?) as T-Sheet.txt. If another report is saved to file, it will overwrite any existing file.
Click on EXIT to return to Main Menu.
Note: To edit the report you can double click on the date of any line on the report to go to the
Corrections screen for the selected individual on that day.
Time-Minder Manual
January 2008
Page 17 of 26
Period Totals Report
From the Report drop down menu:
Click on Period Total.....a screen will open.
Figure 11: Period Totals Report Screen
This report displays the time worked, plus leave, to give the total for the period, the target for the
period, the balance, bank/overtime and any deducted hours. It does not show arrivals and departures
and is a preferred report when compiling a payroll.
Enter the start and end dates of the period then.
Click on 1 Employee - select EMP. CODE. (Employee Code)
or 1 Department - enter department name or number
or All Employees - will display all records.
Click on
to show the report for the first employee and the button will change to
for more records.
Click on
to produce a hard copy, or
to save a report to the hard disc of the
controlling PC.
Each report will be stored in the client folder (TimeFlex\ ?) as Period.txt. If another report is saved
to file, it will overwrite any existing file.
Click on
Time-Minder Manual
to return to the Main Menu.
January 2008
Page 18 of 26
Leave Report
You can view a summary of leave that has been taken or planned for a single person or for everyone.
Enter a from / til date range & select a combination for ALL employees, ALL leave types & ALL
departments or select the grouping you require.
Figure 12: Leave Report Screen
Time-Minder Manual
January 2008
Page 19 of 26
CORRECTION OF EMPLOYEE RECORDS
This function can be used to make adjustments to an employee’s record although it is easier to do it
while reviewing the timesheet reports by opening the particular day.
Note: A quicker way to do corrections is while viewing the timesheet report. By
clicking on the date to be corrected, the correction screen will open for that person on
that day. The adjustment can be entered – either leave or edit of times – calculated,
saved & the balance updated.
For individual corrections you can Click on Corrections..
...from the Main Menu Bar and then Click on Employee and the Corrections screen will open.
Figure 13: Corrections Screen
Search for an employee by Code....., Name.....or Card Number.....
Click on the
box, this will display a list box showing all the Codes, Names or Card Numbers.
Select which employee you wish to make the adjustment for then enter the date in the box and press
<Enter>. A screen will now appear showing all activities for that day.
•
If you are to correct an employee’s arrival or departure, click on the appropriate box and use
the (D) key to Delete previous data and type in correct data.
•
If a booking is missing you can click on the appropriate box and use the (I) key to Insert a time
– the other times will shift across one box.
•
If you have made a mistake, use the (U) key to Undo.
2 types of Leave can be entered – select the appropriate code and enter the hours in HH.MM format.
Time-Minder Manual
January 2008
Page 20 of 26
This correction is also available when viewing the timesheet report by double clicking on the date to be
corrected.
Click on
if you changed the booking times, shift number or entered leave to re-adjust hours
worked and balance.
Click on
to save the corrections. This will automatically adjust the balance up to the present
day, so if you are correcting for some time in the past, it may take a little while.
Save Options:
No Update: The correction will be saved but the balance will not be updated after the correction date.
Update bal. (default): The correction will be saved and the balance updated from the correction date
to the current date.
Update calc.: The correction will be saved and everyday from the correction date to the current date
will be re-calculated and saved.
To make further corrections to the same employee, click in the date box and enter the new date and
you will now have the screen for that day’s activities.
If you have an adjustment to make for a different employee click on
alongside Code, Name or
Card Number and select employee.
When you have completed all your corrections, click on
Time-Minder Manual
January 2008
to return to the Main Menu.
Page 21 of 26
LEAVE PLANNING
This function is used to make adjustments to an employee’s records for leave taken or to be taken
over a period of days.
Click on Corrections.....from the Main Menu Bar and then click on Leave Planning and the Leave
Planning screen will open.
Figure 14: Leave Planning
Search for an employee by Code….., Name…..or Card Number….. by clicking on the
box, this
will display a list box showing all the Codes, Names or Card Numbers.
Select which employee has taken, or is going to take leave. Any current leave plans will be displayed.
To enter leave, simply enter the start date, end date and leave code.
Leave may be credited automatically with the daily target hours, or by selecting the other amount
option you can enter the daily credit. If a person has a block of hours one day a week for a period of
time (eg. Study leave for a 3 hour course every Tuesday for 2 months) you can enter the date of the
first day to the last day, select Other amount & enter the hours & tick the box Every week. Each
Tuesdays date for that period will be entered with the hours & code.
NB – To book a Flexday use the FX code & Other hours & leave the 00:00 hours – save.
Click on
to update the current leave list. Future dates will then be credited with that leave
code. Past dates will be added to that employees records & updated.
You may delete leave plans once they are in the past and the record is no longer required by clicking
on the list to highlight the particular leave plan, then pressing the DELETE button. This does NOT
delete the leave from the employee’s records. If you delete future plans, they will not be put into the
employees records when those dates come around. (NB. They must be past the Monday of the next
week.)
If you have a plan to make for a different employee click on
alongside Code, Name or Card
Number and select employee. When you have completed all your corrections, click on
.
End of period reconciliation
This function is used to make sure that no-one carried forward more than their specified end of period
balance limit. This function is pre set in the software at installation & will be automatically carried out.
You will see any cutback amount on the last day of the period (Sunday date). This can be banked if
required and used at a later date if authorized.
Time-Minder Manual
January 2008
Page 22 of 26
TABLE OF FIGURES
Figure 1. TM Online screen .......................................................................................3
Figure 2. TM Online Activated screen……………………………………………………4
Figure 3. Public Holidays Screen...............................................................................6
Figure 4. Leave Codes ..............................................................................................7
Figure 5. Departments ...............................................................................................8
Figure 6. Shift Definitions...........................................................................................9
Figure 7. Generate Employee Records Screen .......................................................12
Figure 8. Modify Employee Records Screen ...........................................................15
Figure 9. Delete Employee Records Screen............................................................16
Figure 10. Time Sheet Report Screen .......................................................................17
Figure 11. Period Totals Report Screen ...................................................................19
Figure 12. Leave Report Screen ………………………………………………………..20
Figure 13. Corrections Screen..................................................................................21
Figure 14. Leave Planning Screen ...........................................................................22
Time-Minder Manual
January 2008
Page 23 of 26
INDEX
Activating password................................................................................................................................. 5
Activating a new card .............................................................................................................................. 3
Bandwidth .............................................................................................................................................. 10
Change a password................................................................................................................................. 5
Changing a card ...................................................................................................................................... 4
Correction of employee timesheets/records.......................................................................................... 20
Daily report ............................................................................................................................................ 16
Daily programs - shifts............................................................................................................................. 8
Daylight Saving change........................................................................................................................... 4
Deactivate an employee record............................................................................................................. 15
Departments ............................................................................................................................................ 8
Employee Records, generate, modify, list............................................................................................. 11
Flexi day ................................................................................................................................................ 22
General Access ....................................................................................................................................... 5
Generate an employee record............................................................................................................... 11
Leave codes ............................................................................................................................................ 7
Leave planning ...................................................................................................................................... 22
Leave report .......................................................................................................................................... 19
List employee records ........................................................................................................................... 15
Meal Breaks........................................................................................................................................... 10
Modify an employee record ................................................................................................................... 14
Modify shift............................................................................................................................................... 9
Password Activate, change, levels .......................................................................................................... 5
Public Holidays ........................................................................................................................................ 6
Reports .................................................................................................................................................. 16
Period totals........................................................................................................................................... 18
Rosters .................................................................................................................................................. 13
Setting time on a clock ............................................................................................................................ 4
shift setup ................................................................................................................................................ 8
Shift definitions ........................................................................................................................................ 8
STARTING THE PROGRAM................................................................................................................... 5
Supervisor Access................................................................................................................................... 5
Target hours .......................................................................................................................................... 10
Table of Figures..................................................................................................................................... 25
Time sheets ........................................................................................................................................... 17
Time-Minder icon..................................................................................................................................... 5
Time-Minder Menu .................................................................................................................................. 5
TM Online ................................................................................................................................................ 3
Time-Minder Manual
January 2008
Page 24 of 26
NOTES
Time-Minder Manual
January 2008
Page 25 of 26
Time-Minder Manual
January 2008
Page 26 of 26