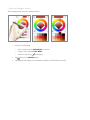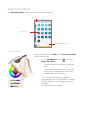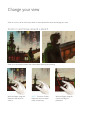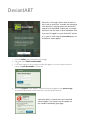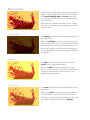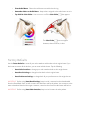
1
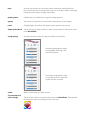
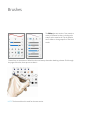
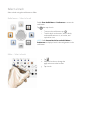
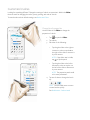
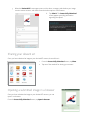
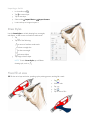
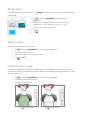
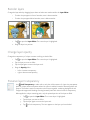
Copyrights and Trademarks
Autodesk SketchBook® Mobile (2.9)
©2013 Autodesk, Inc. All Rights Reserved. Except as otherwise permitted by Autodesk, Inc., this publication, or parts thereof, may not be
reproduced in any form, by any method, for any purpose.
Certain materials included in this publication are reprinted with the permission of the copyright holder.
Trademarks
The following are registered trademarks or trademarks of Autodesk, Inc., and/or its subsidiaries and/or affiliates in the USA and other countries:
SketchBook, SketchBook Copic Edition, SketchBook Designer, SketchBook Express, SketchBook Express for iPad, SketchBook Express for Android,
SketchBook Mobile, SketchBook Mobile Express, SketchBook MobileX, SketchBook Ink, SketchBook Pro, SketchBook Pro for iPad, SketchBook Pro for
Android, and SketchBook for Galaxy.
All other brand names, product names or trademarks belong to their respective holders.
Disclaimer
THIS PUBLICATION AND THE INFORMATION CONTAINED HEREIN IS MADE AVAILABLE BY AUTODESK, INC. “AS IS.” AUTODESK,
INC. DISCLAIMS ALL WARRANTIES, EITHER EXPRESS OR IMPLIED, INCLUDING BUT NOT LIMITED TO ANY IMPLIED WARRANTIES OF
MERCHANTABILITY OR FITNESS FOR A PARTICULAR PURPOSE REGARDING THESE MATERIALS.
Published by:
Autodesk, Inc.
111 McInnis Parkway
San Rafael, CA
94903, USA
ENU version
Contents
Copyrights and Trademarks
Swatch panel20
2
Select a swatch
What’s New 5
20
Create and change a swatch 21
Copic Color Library22
Introduction6
Select a swatch
22
Sketching6
Clutch 6
Change your view
Info/Settings7
Zoom in and move around a sketch23
Pen Mode8
Zoom out of a sketch24
Zoom into and out of the canvas
8
23
View the full canvas24
Reposition the canvas8
Gallery
Brush Properties puck10
Access the Brush Properties puck
Resize a brush
10
Sharing your deviant art27
Opening a submitted image in a browser27
10
Change paint opacity 10
Sketching and painting
Corner tools10
Customize the corner tools
25
28
Create a new sketch28
10
Import a sketch28
Glossary
Importing a sketch
11
29
Drawshapes29
Brushes
14
Flood fill an area29
Select a brush 15
Symmetry30
Radial menu – Select a brush 15
Editor – Select a brush
15
Brush Palette – Select a brush Customize brushes17
Change brush properties
Undo and redo30
17
16
Undo brushstrokes
30
Redo brushstrokes
30
Adding Text 31
How do I add text31
Transforming text31
Colors18
Create a custom color18
Using layers 32
Change RGB and HSB19
Using the Color Picker
20
Layers and the Layer Editor32
What are layers?
32
How do I use layers? 32
Add a layer33
Duplicate a layer33
Add an image33
Clearing a layer33
Merge layers34
Delete a layer34
Hide and show a layer34
Reorder layers35
Change layer opacity35
Preserve layer transparency35
Blend modes36
Multiply layers
Add layers
36
36
Screen layers36
Apply blend modes 37
Transforming a layer37
Move, rotate, or scale a layer 37
Save, export, and post sketches
39
Save your sketch39
Export your sketch39
Open a saved sketch39
Changing preferences
40
General40
Brushes and Colors40
Factory Defaults41
Getting SketchBook information42
Tour Guide42
About 42
SketchBook News42
What’s New
This chapter introduces new features and lists the improvements and enhancements found in this release of
SketchBook® Mobile.
We’ve added the following tools to this release:
•
S hare images to the deviantART Autodesk-SketchBook group and get inspiration
from other SketchBook artists.
•
Access the SketchBook Mobile User Guide from the Info/Settings menu.
Improvements and enhancements
Improvements have been made in the following areas:
•
Palm rejection
•
Quick Tour slides
•
Bug fixes
Introduction
Welcome to Autodesk SketchBook® Mobile. Enjoy the same SketchBook® desktop experience on your Android
device with a professional-grade stroke engine, and produce stunning quality results.
Sketching
Drag your finger to start sketching. A default brush and color are used.
To change the brush or color, see Colors.
Clutch (Clutch) to access the corner tool and Brush Properties
Tap
puck (see Brush Properties puck). Double-tap a corner to access its
corner tool.
To display the customizable radial menu
and the palettes, see Brushes and Colors.
Toolbar
Use the tools in the toolbar to save, create, edit, and access an assortment of editors, and tools.
NOTE The toolbar may look different, depending on the type of device you’re using.
Gallery
New Sketch
Save Gallery
Info/Settings
Preferences Pen Mode
Quick Tour
About
SketchBook News
User Manual
Undo and
redo
Sketching and
painting
NOTE For smaller handheld devices, these options are found as corner tools.
Symmetry
Horizontal
Draw Styles
Free
Guides
Ruler Tools
Fill
Vertical
Line
Rectangle
Circle
Transform
Text
Brushes
Colors
Using layers
Info/Settings
After tapping
, the Info/Settings menu appears. It contains the following options:
Preferences
Customise tools and application settings.
Pen ModeResponds to the pen pressure, if sketching with a
pressure-sensitive stylus.
Quick Tour
Access the tour guide slides.
User Manual Access the user manual.
AboutFind which version of the app you’re running.
SketchBook NewsConnect to SketchBookNews.com and get support,
enter feedback, find documentation and articles,
and more.
Oval
Pen Mode
Responds to the pen pressure if sketching with a pressure-sensitive stylus. In Pen Mode, you can only sketch
with a pen. This is to prevent your fingers from leaving accidental strokes. You can still use your fingers to open
the menu, pick different brushes, or do multi-touch gestures.
Tap
, then
to turn on or off Pen Mode.
Gestures
In the canvas, double tap the corners of the screen to access different tools or use two fingers for zooming,
moving, and rotating.
Zoom into and out of the canvas
On the screen, pinch together or expand two fingers to zoom in or out.
Pinch and expand your
fingers to zoom in.
P
inch your fingers
together to zoom out.
Reposition the canvas
With two fingers, drag in different directions to change your view of the canvas. Keep in mind, this does not
change the placement of layers on the canvas. For this, see Move, rotate, or scale a layer.
With two fingers, tap-drag to the right to pull the canvas
and see the left side of it.
With two fingers, tap-drag to the left to pull the canvas
and see the right side of it.
With two fingers, tap-drag up to pull the canvas and see
the lower part of it.
With two fingers, tap-drag down to pull the canvas and
see the upper part of it.
Brush Properties puck
Use the Brush Properties puck for changing the size of a brush and its opacity.
Access the Brush Properties puck
To access the Brush Properties puck, at the bottom of
.
the canvas, tap
TIP Either tap the canvas with three fingers or tap
to access the toolbar.
Resize a brush
From within the Brush Properties puck:
•
Tap-drag right to increase the size of a brush.
•
Tap-drag left to decrease the size of a brush.
Change paint opacity
From within the Brush Properties puck:
•
Tap-drag up to increase opacity.
•
Tap-drag down to decrease opacity.
NOTE To change layer opacity, see Change layer opacity.
Corner tools
, the Corner tools are visible.
When you tap
Another way of accessing these without making
them visible is to double-tap the corners of the
screen.
The default corner quick tool mappings are:
Top left
Top right
Bottom left
Bottom right
Customize the corner tools
To set your own corner tools, tap
to display
them. Tap-hold a corner tool to display a list of
all available tools. Select one. This new tools will
replace the previous one.
Glossary
Definitions of terms used in this help.
brush A tool for adding brushstrokes to the canvas. Available brushes include pencil, pen,
eraser, paintbrush, airbrush, marker, chisel brush, felt pen, and smear pen.
Brush Editor Part of the Editor for choosing brushes and changing
their attributes.
brush outline A circular outline that shows the size of a brush. This is only visible when resizing a
brush. This is only visible when resizing a brush.
brushstroke A mark made when you drag a finger across the canvas.
canvas The paintable area where strokes are applied and images are imported.
clutch A UI element for accessing the toolbar and Brush Properties puck.
Color Editor Part of the Editor with options for selecting, creating,
and making changes to colors.
eye-dropper A tool, also known as the color picker, for grabbing a color.
Flick The quick action of moving your finger to mimic the turning of a page. This action is
used in the Editor for accessing different pages of brushes.
layer An entity that contains its own content. When combined or stacked with other
layers, it becomes part of a composition. Layers can be visible or hidden, rearranged,
transformed, their opacity changed, and blended.
marking menu A hidden menu accessible when using a three-finger gestures.
opacity The amount of transparency. Paint/brush and layer opacity can be changed.
panel A flippable piece of an editor that displays options specific to this section.
Shape texture brush A brush that uses a shape to create its stroke. An assortment of these can be found
in the Brush Editor.
stamp spacing The space between a series of stamps that defines a brushstroke.
Decreasing spacing places stamps
closer together, producing a dark
smooth brushstroke.
Increasing spacing spreads stamps
out, producing a brush-stroke that
is lighter and not as smooth.
stroke What is created when you sketch or paint.
SV (saturation and
value) triangle The values that combine to create the diamond in the Color Wheel. Tap-drag within
the diamond to adjust the shading and tint of the color.
swatch A color chip found in the Swatches panel of the Editor. Swatches can be added to
the panel.
swipe The action of quickly dragging three fingers across the canvas to access a certain tools.
tap The action of lightly rapping the corners of the screen or middle of the canvas with
two or three fingers to access a certain tools.
transparency
(of layer, of brush) The amount of detail you can see underneath a layer or brushstroke.
Brushes
The Editor has two sections. One contains a
variety of different brushes, including color
stamps and a smear brush. Flip the panel to
access sliders to change aspects of the brush
stroke.
Choose from an assortment of default brushes and stamps that make sketching a breeze. Flick through
the pages of brushes, then tap one to select it.
NOTE The last-used brush is saved for the next session.
Select a brush
Select a brush using the radial menu or Editor.
Radial menu – Select a brush
Enable Show Radial Menu in Preferences to access the
radial menu.
Tap
, then tap a brush.
•
To access the radial menu, tap
•
T o add a brush to the menu, select a brush,
make modifications to it, set a color, and
tap-hold an icon.
.
NOTE Enable Remember Colors on Radial Menu in
Preferences to display a brush’s color assignments in the
radial menu.
Editor – Select a brush
1.
Tap
.
2. S wipe the brushes to change the
page and access other brushes.
3. Tap a brush.
Brush Palette – Select a brush
1.
Enable Use Palettes in
Preferences.
to access the Brush Palette.
2. T ap
Tap a brush.
•
Tap
or
NOTE If the palette doesn’t appear, enable Use Palettes in
Preferences.
To add a brush to the palette, tap-hold a brush, then select
another brush from the popup.
NOTE Using Reset Brush Settings, permanently resets the
brush palette.
to pin a palette in place
to hide it.
•
T ap-hold a brush to access other
brushes and customize the
palette. The Brush Palette is
scrollable and has 24 customizable slots.
•
ouble-tap a brush to close the
D
palette.
Customize brushes
Looking for something different? Change the settings of a brush to customize it. Within the Editor,
there are tools for changing the radius, opacity, spacing, and color of a brush.
To reset brushes to their default settings, see Brushes and Colors.
Change brush properties
Use the sliders in the Editor to change the
properties of a brush.
1.
Tap
to open the Editor.
2. Tap a brush.
3. Do either of the following:
•
Tap-drag the slider to the right to
increase its value or tap the + to
the right of the slider to increase it
by a set amount.
NOTE If the sliders aren’t visible,
tap
to flip the panel.
•
T ap-drag the slider to the left to
decrease its value or tap the - to
the left of the slider to decrease it
by a set amount.
NOTE The properties panel scrolls
to list more parameters.
4. T ap one of these to change the brush
tip:
NOTE Use the radial menu to access
custom brushes quickly.
See Radial menu – Select a brush.
Colors
Current color
Using the Color Picker
Copic Color Library
Create a custom color
Swatch panel
Change RGB and HSB
The Color Editor contains a color wheel for selecting a color, color picker for grabbing a color, Copic Color
Library, and sliders for setting RGB and HSB values. Flip the panel to access color swatches and create a
custom library of color.
Create a custom color
Use the panels of the Color Editor to create or choose a color.
1. Tap
.
2. Do any of the following:
Tap-drag within the diamond to change the
saturation and luminance.
Tap-drag the sliders to change the RGB or HSB values.
Tap-drag within the ring to change the hue.
Change RGB and HSB
You can create a color by setting RGB and HSB values. Do one of the following:
•
Tap HSB to flip to the RGB panel.
•
Tap RGB to flip to the HSB panel.
•
Tap-drag the sliders to set a value.
Using the Color Picker
Tap
. Tap-drag the Color Picker
over a color to select it.
Swatch panel
The Swatch panel houses a selection of pre-defined color chips. As you create swatches, they replace
others and appear in this panel.
IMPORTANT You must close out of the Editor to save your
swatches. Do this by either selecting another tool from the
toolbar, sketching, saving, or letting the editor close on its
own.
When working on projects where the client has provided a
color palette, capture and store swatches of these colors for
future use.
After a project is completed, to remove swatches, there are
two methods:
•
Reset preferences
•
Replace the swatches
Select a swatch
After you have accessed the Editor, use the Swatches panel to select a color swatch.
1. Tap
to flip to the
Swatches panel.
2. T ap a swatch, then start
painting.
Create and change a swatch
After creating a color, save it by creating a swatch.
1. Do any of the following:
•
Select a color using the Color Wheel or a swatch.
•
Create a color using the Color Wheel.
•
Capture a color using
2. Tap
(eyedropper).
to flip to the Swatches panel.
3. Tap-drag the color ribbon onto or between swatches to add the color to the list.
Copic Color Library
The Copic Color Library houses a selection of pre-defined color chips.
Colors
Select a swatch
Complementary color
Select a swatch
After you have accessed the Editor, use the Copic Color Library
to select a color swatch.
1.
If in the Color Wheel panel, tap
Copic Color Library.
to flip to the
•
T o access different color palettes, tap-drag the
slider.
•
T o select the complementary color, tap a color
chip to load its complementary color. Tap the
complementary color to select it.
NOTE Not every color will have an assigned
complementary color. For those without, a selection
of colors similar to its complementary or nothing
will appear.
2. Tap a swatch, then start painting.
Change your view
Zoom in on or out of an area of your sketch, or move around the canvas and change your view.
Zoom in and move around a sketch
Zoom in to see details and have finer control when sketching and painting.
With two fingers, drag and
expand on the canvas to
zoom in.
NOTE To zoom in further,
repeat this action as many
times as necessary.
With two fingers, drag the
canvas to change its
placement.
Zoom out of a sketch
Use zooming out for when you want to have a better view of the overall composition.
With two fingers, pinch the
canvas.
NOTE To zoom out further, repeat this
action as many times as necessary.
View the full canvas
Set a corner tool to
Frame Canvas (see Customize the corner tools) and tap it to instantly
change the view and display the full canvas.
Gallery
In the toolbar, tap
, then
Gallery to access the Gallery. You will be prompted to Save your sketch,
save a copy if a version already exists, not save it, or cancel.
In the Gallery, tap one of the following:
New Sketch to Create a new sketch Tap
and select a canvas size.
A new blank canvas is created.
New from image to load the image onto the canvas
Tap and select an image from a location on your device.
a thumbnail of a sketch Tap a thumbnail and select one of the following options:
Edit
Tap a thumbnail, then tap
make changes to a sketch.
to return to the canvas and
Favorite
Tap
to tag a sketch as a favorite.
Share
Tap
and select one of the following options:
•
Share as PNG to export a flattened image.
•
Share as JPG to export a flattened image.
•
Share as PSD to export a layered image.
Next, select a method for sharing your image.
Overflow
Tap to delete the selected image from the Gallery.
•
Tap Submit to deviantART to export the selected image
to your deviantART gallery. See DeviantART for more
information.
•
Tap Rotate Left to rotate the selected image left 90 degrees.
•
Tap Rotate Right to rotate the selected image right 90 degrees.
•
Tap Delete to delete the selected image from the Gallery.
DeviantART
DeviantArt is the largest online social network for
artists and art enthusiasts. Autodesk has teamed up
with deviantArt, to bring some of the deviantART
experience to SketchBook. Publish your art and get
inspiration from the work of other SketchBook artist.
If you are not logged in to your deviantART account
or it’s your fist time using the deviantART option, an
introduction screen appears.
1. From the Gallery, tap the thumbnail of an image.
2. Tap and select Submit to deviantART.
3. If you aren’t signed in, do so using the screen that appears. If you don’t have an account,
tap the link Join deviantART to create one.
4. W
hen the Authorize screen appears, check the option at the bottom, then Authorize App,
so your SketchBook work can be submitted to your deviantART account.
A personal gallery is created where your submitted
content appears. Your content may also appear on
the Autodesk-SketchBook group page.
5. W
hen the DeviantART screen appear, enter a title, select a category and whether your image
contains mature content, and check the authorization options at the bottom.
6. Tap Submit. The Successfully Submitted
screen appears providing information
regarding the upload.
Sharing your deviant art
Once you have submitted an image to your deviantART account, share a link to it.
1.
From the Successfully Submitted screen, tap Share.
2. Tap one of the methods for sharing your content.
Opening a submitted image in a browser
Once you have submitted an image to your deviantART account, you can
open it in a browser.
From the Successfully Submitted screen, tap Open in browser.
Sketching and painting
Create a new sketch
To create a sketch, tap
,
and select a canvas size.
Import a sketch
You can import two types of images:
Flattened PNGs and JPGs are imported into SketchBook as flattened images.
Upon import, their orientation is respected and they are scaled and
centered (not stretched).
LayeredPSD layered images work differently. Orientation, layer number, blend
modes, canvas size, and device all need to be considered before
importing or exporting.
LAYERED IMAGES
Before importing layered files into SketchBook, it’s important you read this section.
Since you can import layered files from and export them to different types of devices with varying
capabilities, this section will provide tips for how to best do this.
SketchBook exports layered files as PSDs, which is great for sharing sketches and using the layered
files elsewhere. Share work-in-progress with friends or clients. Have them view it on their device
and add comments, using an annotated layer. Re-import the file, check out their feedback, and get
back to it.
GALLERY AND SAVING
When you import a file, you must actively save it before it will appear in the Gallery.
See Save your sketch for more details.
Importing a sketch
1. In the toolbar, tap
2. Tap
.
to create a layer.
3. Tap the new layer.
4. Select either
Import Photo or
Import Camera.
5. Locate and tap an image to import it.
Draw Styles
Use the Draw Styles to aid with drawing lines, rectangles,
and ellipses, as well as return to freeform stroke mode.
1. Tap
.
2. Tap one of the following:
to return to freeform stroke mode.
to draw a straight line.
to draw a rectangle.
to draw an ellipse.
3. Tap-drag to draw a shape.
NOTE To exit a Draw Styles, tap a different
drawing style, such as
.
Flood fill an area
Fill fills the active layer with color, speeding up the painting process, working like a mask.
1.
Tap
.
2. Select a color.
3. Tap
.
4. Tap
.
5. Tap an area to fill it.
Symmetry
The Symmetry tool enables you to turn symmetry on and off as you sketch. Anything drawn on one
side of the axis is mirrored.
The axis of symmetry always appears at the center of the canvas.
1.
Tap
.
2. Tap either
or
.
3. Draw.
Undo and redo
Undo brushstrokes
SketchBook is more forgiving than paper or canvas. When you
place a stroke and decide it’s not what you had in mind, you can
undo it. You have 10 levels of undo.
To undo an action, do one of following:
•
To undo the previous action, tap
•
Double-tap the bottom left corner of the screen.
.
Redo brushstrokes
If you undo a stroke and decide you want it back, unlike traditional
sketching, you can get it back. You have 10 levels of redo.
To back out of undos (redo), do one of the following:
•
Tap
•
Double-tap the bottom right corner of the screen.
.
Adding Text
How do I add text
1.
Tap
2. Tap
.
.
3. Set the color, size,
and opacity.
4. Press
to access
the keyboard.
5. Set the font.
6. Tap the text field.
7. Tap
.
Transforming text
Use the buttons along the top to transform your text.
With two fingers,
freeform move, rotate,
and scale text.
Vertically flip text.
Move text in any
direction.
Horizontally flip text.
Rotate text.
Rotate text 90 degrees
counterclockwise.
Scale text up or down.
Rotate text 90 degrees
clockwise.
Using layers
Layers and the Layer Editor
Access the Layer Editor and its layers with
the toolbar.
from
Use layers to build a sketch with individual elements.
Simplify changes and explore variations with them.
What are layers?
Layers provide a way to mark up or make changes
to an image without modifying the rest of the
composition. Use multiple layers for building
complex sketches or testing variations of a design.
Layers are created, duplicated, merged, turned on
and off, reordered, blended, and deleted using the
Layer Editor.
As content is added to a layer, the Layer Editor
Preview updates, displaying the content and making
it easier to identify a layer.
Empty layer
Layer with content
How do I use layers?
1. Tap
to open the Layer Editor. The current layer is highlighted.
NOTE Upon startup, the Layer Editor will have one layer listed. Use
more layers.
2. Tap a layer to access the layer tools.
3. Do any of the following:
Hide and show a layer
Merge layers
Preserve layer transparency
Duplicate a layer
Add an image
Delete a layer
Clear a layer
Reorder layers
Change layer opacity
Blend layers
to add up to five
Add a layer
Create a new empty layer.
1.
Tap
to open the Layer Editor. The current layer is highlighted.
2. Tap . In the canvas, the new layer appears over the other layers.
To reposition it, see Reorder layers.
Duplicate a layer
Create a copy of the active layer.
1.
Tap
to open the Layer Editor. The current layer is highlighted.
2. Tap the layer you want to duplicate and access the layer tools.
3. Tap
. A duplicated layer is created and becomes the active layer.
Add an image
Use
or
to add an image to a layer to make modifications to the content and add it to the
overall composition.
1. Tap
to open the Layer Editor. The current
layer is highlighted.
2. In the Layer Editor, tap a layer to access the
layer tools.
3. T ap
Import Photo or
and select an image.
Clearing a layer
Remove all content from a layer. Double-tap the top left corner
.
Import Camera
Merge layers
Once the content of a layer is finalized, use
other content.
1.
Merge to combine layers. This frees up layers for creating
to open the Layer Editor. The current layer is
Tap
highlighted.
The layer to be merged must be above the one it will be
merged with. If it isn’t, reposition it. See Reorder layers.
2. Tap a layer to access the layer tools.
3. Tap
.
4. Tap OK.
Delete a layer
Remove layers to make room for new ones.
1. Tap
to open the Layer Editor. The current layer is highlighted.
2. Tap a layer to make it active.
3. Tap the layer again to access the layer tools.
4. Tap
and OK.
Hide and show a layer
Create different variations of an idea by changing a color, add a logo, place something else in the scene,
or remove an element. Hiding and showing layers allows you this flexibility, making it possible to see only
what you want to see.
1. Tap
to open the Layer Editor. The current layer is highlighted.
2. Tap a layer to access the layer tools.
3. Do either of the following:
Tap
to hide a layer.
Tap
to show a layer.
Reorder layers
Change the layer order by dragging layers above or below one another within the Layer Editor.
•
To make a layer appear in front of another, move it above another.
•
To make a layer appear behind another, move it below another.
1.
Tap
to open the Layer Editor. The current layer is highlighted.
2. Drag the layer into position.
Change layer opacity
Change the transparency of a layer to create a striking or subtle effect.
1. Tap
to open the Layer Editor. The current layer is highlighted.
2. Tap the layer you want to affect.
3. Tap the layer again to access the layer tools.
4. Drag the Opacity slider:
•
left to increase transparency
•
right to decrease transparency
Preserve layer transparency
Use Lock Transparency to make edits to only the visible contents of a layer. Any transparent
pixels on a layer remain transparent when this option is enabled, instead of becoming white and
opaque. This makes it easier to composite various layers together, combining backgrounds and
foreground images with blending occurring between pixels with various levels of transparency.
When applied to a layer containing paint, only the painted portions of the layer are filled.
1.
Tap
to open the Layer Editor. The current layer is highlighted.
2. Tap the layer you want to affect.
3. Tap the layer again to access the layer tools.
4. Tap
to lock transparency. The icon appears on the layer you have locked.
Blend modes
Use blend modes to determine how layers are composited
together. Create complex multi-layered textures. Choose
from Normal, Multiply, Add, and Screen. Apply them
and experiment without the fear of permanently altering
your composition.
When layers are combined, the results can vary. Change
the order and experiment with the settings to achieve the
result you want.
Multiply layers
Use Multiply to produce an overall darkening effect to the
layer appearance.
When using Multiply, the value for each pixel in the layer
is darkened by a value equal to or greater than the value of
pixels on other layers occupying the same location in the
layer stack. It produces a similar effect to combining one
or more photographic transparencies together and looking
through them.
Add layers
Use Add to lighten the overall composition, similar to
Screen, but in a more extreme manner.
When using Add, each pixel is brightened by a value
equal to or lesser than the value of pixels on other layers
occupying the same location in the layer stack. This is
applied as a linear calculation.
Screen layers
Use Screen to produce an overall lightening effect to the
composition.
When using Screen, each pixel in the layer is brightened
by a value equal to or lesser than the value of pixels on
other layers occupying the same location in the layer stack.
It produces an effect opposite to that of Multiply.
Apply blend modes
To add a blend mode, do the following:
1.
Tap
to open the Layer Editor.
2. Tap a layer to access the layer tools.
3. Tap a blend mode.
4. Draw.
Transforming a layer
Rotate, scale, and move a layer using
Layer Transform. Resize a layer, pivot it, or
reposition it without affecting the content on other layers. Don’t confuse this with transforming
a canvas, which changes the view, without affecting the placement or size of the layers.
Move, rotate, or scale a layer
Use two-fingers to drag along the canvas and transform your layer.
NOTE When transforming a layer, keep in mind that any content that is resized and expands
beyond the size of the canvas (not your view) will be cropped off. Undoing this action will
restore the content; otherwise, it is lost.
1. Tap
2. Tap
to access the toolbar.
, then
. The canvas changes, displaying the following:
•
With two fingers, freeform move, rotate, and scale the layer.
•
Move the layer in any direction.
•
Rotate the layer.
•
Scale the layer.
•
Horizontally flip the layer.
•
Vertically flip the layer.
•
Rotate the layer 90 degrees counterclockwise.
•
Rotate the layer 90 degrees clockwise.
To rotate, drag in a circular manner with one finger.
Courtesy: (c) Susan Murtaugh
To move, drag up, down, left, or right with one finger.
To scale, drag up, down, left, or right with one finger.
To scale, with two fingers, pinch the canvas for a
smaller layer and expand your fingers for a larger layer.
3. When finished, tap
.
Save, export, and post sketches
Save sketches to your Gallery, then export and post them. The Gallery is a component
of SketchBook Pro. If you accidentally delete the app, your Gallery and all the sketching
within it are deleted. So, we recommend:
•
Exporting to your SD card and Dropbox.
•
T aking snapshots of your canvas to save the image in your Screenshots
folder.
Save your sketch
SketchBook auto saves after 10 strokes; however, we still recommend you save your work
and copies of it. When importing an image, you need to save it before it will appear in
the Gallery.
1. Tap
.
2. Tap Save or Save a Copy.
Export your sketch
Export to your SD card, Dropbox, or another destination. Choose from .PNG or .JPEG
(flattened) or .PSD (all layers are saved, so when the file is reopened, the layer structure
is intact).
1. Tap
,
, then Save, Don’t Save, or Save a Copy.
2. Tap the thumbnail view of the sketch.
3. Tap
to export.
4. Select a file type:
•
PNG or JPEG for a flattened image.
•
PSD for a multi-layered image.
5. Following the onscreen instructions.
Open a saved sketch
Whenever you save a sketch to the Gallery, you can reload it by tapping
. When a
sketch is reopened, the content appears in the Layer Editor and the canvas updates.
Changing preferences
Use the preferences to customize application settings. To access your preferences:
1. Tap
to access the toolbar.
2. Tap
and
Preferences.
General
To turn on a preference, tap the box next to it to add a check.
•
ymmetry: Stop Center - For your strokes to stop at the center point when
S
using symmetry.
•
Toolbar Always Visible - Keeps the toolbar visible, even when sketching.
•
Help Improve Our Products - Approve collection of usage information.
•
Back for Undo - Uses the Back button for Undo. Tap it to undo the last action.
Brushes and Colors
To turn on a preference, tap the box next to it to add a check.
•
Smooth Brush - Makes the strokes smoother.
•
Use Palettes - Turns on the brush and color palettes.
•
Show Radial Menu - Shows the radial menu around the brush ring.
•
Remember Colors on Radial Menu - Keeps colors assigned to the radial menu set to it.
•
Tap-hold for Color Picker - Use to turn on or off the Color Picker
that appears.
The Color Picker
does not appear.
However, when turned on, it does.
Factory Defaults
Use the Factor Defaults to reset all your color swatches and brushes to their original state. If you
don’t want to restore all the brushes, you can reset individual ones. Tap the following:
•
Reset Color Swatches to change your color swatches back to their original state.
•
Reset Brush Settings to change brushes back to their original state.
•
Reset Preference Settings to change back all your preferences to their original state.
IMPORTANT Before using Reset Brush Settings, keep in mind, it removes brushes downloaded
from the SketchBook Store, as well as resets the radial menu and brush palette. You can return to the
store to download those brushes again. However, custom brushes from the radial menu will be lost.
IMPORTANT Before using Reset Color Swatches, keep in mind it resets the color palette.
Getting SketchBook information
Tour Guide
Tap
, then
Tour Guide to access the tour guide slides.
About
Tap
, then
About to find the apps’ version number.
SketchBook News
Opens www.sketchbooknews.com with
the latest SketchBook documentation and
information on the SketchBook family of
products, upcoming events, and show-cased
users.
It provides tips and tricks for using the software, reviews of new gadgets and hardware you can use with
the SketchBook products, as well as printable versions of the Help. Find the latest updates. Send us
feedback and suggestions.