1
Operation
Guide
WX1000
DAQWORX
Installation & Operation
Guide
IM WX1000-01E
12th Edition
Contents
Software License Agreement...............................................................................4
Checking the Contents of the Package................................................................8
CD Handling Guidelines.......................................................................................9
Overview of DAQWORX Installation..................................................................10
Installation Guide
Installing the Software........................................................................................ 11
Upgrading the Software.....................................................................................16
Modifying, Repairing, or Deleting Software........................................................19
Viewing the User’s Manual................................................................................23
List of User's Manuals............................................................................23
Opening a User’s Manual.......................................................................23
Overview of DAQWORX....................................................................................25
Operation Guide
Introduction to Functions....................................................................................26
DAQLOGGER.........................................................................................26
AddMulti..................................................................................................26
GateWT..................................................................................................26
GateCONTROL......................................................................................26
GateMX/MW...........................................................................................26
Flow Chart of Connections and Operation.........................................................27
Setting Up the Temperature Controller...............................................................29
Setting Up GateCONTROL................................................................................30
Setting Up the WT1600......................................................................................33
Setting Up the Ethernet Interface (TCP/IP)............................................33
Setting the User Name and the Password on WT1600..........................35
Setting Up GateWT............................................................................................36
Setting Up the MX100........................................................................................39
Executing GateMX/MW......................................................................................43
Acquiring Data from the Temperature Controller, WT1600, MX100 or Recorder on
DAQLOGGER....................................................................................................45
Logging and Saving Data Using AddMulti..........................................................52
Removing the Firewall.......................................................................................58
Appendix
IM WX1000-01E
Product Registration
Thank you for purchasing Yokogawa products.
Yokogawa provides registered users with a variety of information and services.
Please allow us to serve you best by completing the product registration form
accessible from our Web site.
http://www.yokogawa.com/ns/reg/
IM WX1000-01E
Software License Agreement
IMPORTANT - PLEASE READ CAREFULLY BEFORE INSTALLING OR USING:
THANK YOU VERY MUCH FOR SELECTING SOFTWARE OF YOKOGAWA ELECTRIC CORPORATION ("YOKOGAWA"). BY INSTALLING
OR OTHERWISE USING THE SOFTWARE PRODUCT, YOU AGREE TO BE BOUND BY THE TERMS AND CONDITIONS OF THIS
AGREEMENT. IF YOU DO NOT AGREE, DO NOT INSTALL NOR USE THE SOFTWARE PRODUCT AND PROMPTLY RETURN IT TO THE
PLACE OF PURCHASE FOR A REFUND, IF APPLICABLE.
Software License Agreement
1. Scope
This Agreement applies to the following software products and associated documentation of Yokogawa (collectively, "Software Product").
Unless otherwise provided by Yokogawa, this Agreement applies to the updates and upgrades of the Software Product which may be provided
by Yokogawa.
Software Product: DAQWORX (It is limited to each software that you bought).
2. Grant of License
2.1 Subject to the terms and conditions of this Agreement, Yokogawa hereby grants to you a non-exclusive and non-transferable right to
use the Software Product on a single or, the following specified number of, computer(s) and solely for your internal operation use, in
consideration of full payment by you to Yokogawa of the license fee separately agreed upon.
Granted number of License: 1 (one)
2.2 Unless otherwise agreed or provided by Yokogawa in writing, the following acts are prohibited:
a)to reproduce the Software Product, except for one archival copy for backup purpose, which shall be maintained with due care subject
to this Agreement;
b)to sell, lease, distribute, transfer, pledge, sublicense, make available via the network or otherwise convey the Software Product or the
license granted herein to any other person or entity;
c) to use the Software Product on any unauthorized computer via the network;
d)to cause, permit or attempt to dump, disassemble, decompile, reverse-engineer, or otherwise translate or reproduce the Software
Product into source code or other human readable format, or to revise or translate the Software Product into other language and change
it to other formats than that in which Yokogawa provided;
e) to cause, permit or attempt to remove any copy protection used or provided in the Software Product; or
f) to remove any copyright notice, trademark notice, logo or other proprietary notices or identification shown in the Software Product.
2.3 Any and all technology, algorithms, know-how and process contained in the Software Product are the property or trade secret of Yokogawa
or licensors to Yokogawa. Ownership of and all the rights in the Software Product shall be retained by Yokogawa or the licensors and none
of the rights will be transferred to you hereunder.
2.4 You agree to maintain the aforementioned property and trade secret of Yokogawa or licensors and key codes in strict confidence, not
to disclose it to any party other than your employees, officers, directors or similar staff who have a legitimate need to know to use the
Software Product and agreed in writing to abide by the obligations hereunder.
2.5 Upon expiration or termination of this Agreement, the Software Product and its copies, including extracts, shall be returned to Yokogawa
and any copies retained in your computer or media shall be deleted irretrievably. If you dispose of media in which the Software Product
or its copy is stored, the contents shall be irretrievably deleted.
2.6 The Software Product may contain software which Yokogawa is granted a right to sublicense or distribute by third party suppliers, including
affiliates of Yokogawa ("Third Party Software"). If suppliers of the Third Party Software ("Supplier") provide special terms and conditions
for the Third Party Software which differ from this Agreement, the special terms and conditions separately provided by Yokogawa shall
prevail over this Agreement. Some software may be licensed to you directly by Supplier.
2.7 The Software Product may contain open source software ("OSS"), for which the special terms and conditions separately provided by
Yokogawa shall take precedence over this Agreement.
3. Restrictions on Application
3.1 Unless otherwise agreed in writing between you and Yokogawa, the Software Product is not intended, designed, produced or licensed for
use in relation to aircraft operation or control, ship navigation or marine equipment control, or ground facility or device for support of the
aforesaid operation or control, or for use in relation to rail facility, nuclear related facility, radiation-related equipment, or medical equipment
or facility, or under any other circumstances which may require high safety standards.
3.2 If the Software Product is used for the abovementioned purposes, neither Yokogawa nor Supplier assumes liability for any claim or
damage arising from the said use and you shall indemnify and hold Yokogawa, Supplier, their affiliates, subcontractors, officers, directors,
employees and agents harmless from any liability or damage whatsoever, including any court costs and attorney's fees, arising out of or
related to the said use.
IM WX1000-01E
Software License Agreement
4. Limited Warranty
4.1 The Software Product shall be provided to you on an "as is" basis at the time of delivery and except for physical damage to the recording
medium containing the Software Product, Yokogawa and Supplier shall disclaim all of the warranties whatsoever, express or implied, and
all liabilities therefrom. If any physical defect is found on the recording medium not later than twelve (12) months from delivery, Yokogawa
shall replace such defective medium free of charge, provided that the defective medium shall be returned to the service office designated
by Yokogawa at your expense within the said twelve (12) months. THIS LIMITED WARRANTY PROVIDED IN THIS CLAUSE IS IN LIEU
OF ALL OTHER WARRANTIES OF ANY KIND WHATSOEVER AND YOKOGAWA HEREBY DISCLAIMS ALL OTHER WARRANTIES
RELATING TO THE SOFTWARE PRODUCT, WHETHER EXPRESSED OR IMPLIED, INCLUDING WITHOUT LIMITATION, ANY
IMPLIED WARRANTIES OF MERCHANTABILITY, FITNESS FOR ANY PARTICULAR PURPOSE, NON-INFRINGEMENT, QUALITY,
FUNCTIONALITY, APPROPRIATENESS, ACCURACY, RELIABILITY AND RECENCY. IN NO EVENT SHALL YOKOGAWA WARRANT
THAT THERE IS NO INCONSISTENCY OR INTERFERENCE BETWEEN THE SOFTWARE PRODUCT AND OTHER SOFTWARE NOR
SHALL BE LIABLE THEREFOR. The warranty provisions of the applicable law are expressly excluded to the extent permitted.
4.2 At the sole discretion of Yokogawa, Yokogawa may upgrade the Software Product to the new version number ("Upgrade") and make it
available to you at your expense or free of charge as Yokogawa deems fit. In no event shall Yokogawa be obliged to upgrade the Software
Product or make the Upgrade available to you.
4.3 Certain maintenance service may be available for some types of Software Product at Yokogawa's current list price. Scope and terms and
conditions of the maintenance service shall be subject to those separately provided by Yokogawa. Unless otherwise provided in Yokogawa
catalogues or General Specifications, maintenance services will be available only for the latest version and the immediately preceding
version. In no event will service for the immediately preceding version be available for more than 5 years after the latest version has been
released. In addition, no service will be provided by Yokogawa for the Software Product which has been discontinued for more than 5
years. Notwithstanding the foregoing, maintenance service may not be available for non-standard Software Product. Further, in no event
shall Yokogawa provide any service for the Software Product which has been modified or changed by any person other than Yokogawa.
5. Infringement
5.1 If you are warned or receive a claim by a third party that the Software Product in its original form infringes any third party's patent (which
is issued at the time of delivery of the Software Product), trade mark, copyright or other intellectual property rights ("Claim"), you shall
promptly notify Yokogawa thereof in writing.
5.2 If the infringement is attributable to Yokogawa, Yokogawa will defend you from the Claim at Yokogawa's expense and indemnify you
from the damages finally granted by the court or otherwise agreed by Yokogawa out of court. The foregoing obligation and indemnity of
Yokogawa shall be subject to that i) you promptly notify Yokogawa of the Claim in writing as provided above, ii) you grant to Yokogawa and
its designees the full authority to control the defense and settlement of such Claim and iii) you give every and all necessary information
and assistance to Yokogawa upon Yokogawa's request.
5.3 If Yokogawa believes that a Claim may be made or threatened, Yokogawa may, at its option and its expense, either a) procure for you
the right to continue using the Software Product, b) replace the Software Product with other software product to prevent infringement, c)
modify the Software Product, in whole or in part, so that it become non-infringing, or d) if Yokogawa believes that a) through c) are not
practicable, terminate this Agreement and refund you the paid-up amount of the book value of the Software Product as depreciated.
5.4 Notwithstanding the foregoing, Yokogawa shall have no obligation nor liability for, and you shall defend and indemnify Yokogawa and
its suppliers from, the Claim, if the infringement is arising from a) modification of the Software Product made by a person other than
Yokogawa, b) combination of the Software Product with hardware or software not furnished by Yokogawa, c) design or instruction provided
by or on behalf of you, d) not complying with Yokogawa's suggestion, or e) any other causes not attributable to Yokogawa.
5.5 This section states the entire liability of Yokogawa and its suppliers and the sole remedy of you with respect to any claim of infringement
of a third party's intellectual property rights. Notwithstanding anything to the contrary stated herein, with respect to the claims arising from
or related to the Third Party Software or OSS, the special terms and conditions separately provided for such Third Party Software or OSS
shall prevail.
6. Limitation of Liability
6.1 EXCEPT TO THE EXTENT THAT LIABILITY MAY NOT LAWFULLY BE EXCLUDED IN CONTRACT, YOKOGAWA AND SUPPLIERS
SHALL NOT BE LIABLE TO ANY PERSON OR LEGAL ENTITY FOR LOSS OR DAMAGE, WHETHER DIRECT, INDIRECT, SPECIAL,
INCIDENTAL, CONSEQUENTIAL OR EXEMPLARY DAMAGES, OR OTHER SIMILAR DAMAGES OF ANY KIND, INCLUDING
WITHOUT LIMITATION, DAMAGES FOR LOSS OF BUSINESS PROFITS, BUSINESS INTERRUPTION, LOSS OR DESTRUCTION OF
DATA, LOSS OF AVAILABILITY AND THE LIKE, ARISING OUT OF THE USE OR INABILITY TO USE OF THE SOFTWARE PRODUCT,
OR ARISING OUT OF ITS GENERATED APPLICATIONS OR DATA, EVEN IF ADVISED OF THE POSSIBILITY OF SUCH DAMAGES,
WHETHER BASED IN WARRANTY (EXPRESS OR IMPLIED), CONTRACT, STRICT LIABILITY, TORT (INCLUDING NEGLIGENCE),
OR ANY OTHER LEGAL OR EQUITABLE GROUNDS. IN NO EVENT YOKOGAWA AND SUPPLIER'S AGGREGATE LIABILITY FOR
ANY CAUSE OF ACTION WHATSOEVER (INCLUDING LIABILITY UNDER CLAUSE 5) SHALL EXCEED THE DEPRECIATED VALUE
OF THE LICENSE FEE PAID TO YOKOGAWA FOR THE USE OF THE CONCERNED PART OF THE SOFTWARE PRODUCT. If
the Software Product delivered by Yokogawa is altered, modified or combined with other software or is otherwise made different from
Yokogawa catalogues, General Specifications, basic specifications, functional specifications or manuals without Yokogawa's prior written
consent, Yokogawa shall be exempted from its obligations and liabilities under this Agreement or law.
6.2 Any claim against Yokogawa based on any cause of action under or in relation to this Agreement must be given in writing to Yokogawa
within three (3) months after the cause of action accrues.
IM WX1000-01E
Software License Agreement
7. Export Control
You agree not to export or provide to any other countries, whether directly or indirectly, the Software Product, in whole or in part, without prior
written consent of Yokogawa. If Yokogawa agrees such exportation or provision, you shall comply with the export control and related laws,
regulations and orders of Japan, the United States of America, and any other applicable countries and obtain export/import permit and take all
necessary procedures under your own responsibility and at your own expense.
8. Audit; Withholding
8.1 Yokogawa shall have the right to access and audit your facilities and any of your records, including data stored on computers, in relation to
the use of the Software Product as may be reasonably necessary in Yokogawa's opinion to verify that the requirements of this Agreement
are being met.
8.2 Even after license being granted under this Agreement, should there be any change in circumstances or environment of use which was not
foreseen at the time of delivery and, in Yokogawa's reasonable opinion, is not appropriate for using the Software Product, or if Yokogawa
otherwise reasonably believes it is too inappropriate for you to continue using the Software Product, Yokogawa may suspend or withhold
the license provided hereunder.
9. Assignment
If you transfer or assign the Software Product to a third party, you shall expressly present this Agreement to the assignee to ensure that the
assignee comply with this Agreement, transfer all copies and whole part of the Software Product to the assignee and shall delete any and all
copy of the Software Product in your possession irretrievably. This Agreement shall inure to the benefit of and shall be binding on the assignees
and successors of the parties.
10. Termination
Yokogawa shall have the right to terminate this Agreement with immediate effect upon notice to you, if you breach any of the terms and
conditions hereof. Upon termination of this Agreement, you shall promptly cease using the Software Product and, in accordance with sub-clause
2.5, return or irretrievably delete all copies of the Software Product, certifying the same in writing. In this case the license fee paid by you for the
Software Product shall not be refunded. Clauses 2.4 and 2.5, 3, 5, 6 and 11 shall survive any termination of this Agreement.
11. Governing Law; Disputes
This Agreement shall be governed by and construed in accordance with the laws of Japan.
Any dispute, controversies, or differences which may arise between the parties hereto, out of, in relation to or in connection with this Agreement
("Dispute") shall be resolved amicably through negotiation between the parties based on mutual trust. Should the parties fail to settle the Dispute
within ninety (90) days after the notice is given from either party to the other, the Dispute shall be addressed in the following manner:
(i)If you are a Japanese individual or entity, the Dispute shall be brought exclusively in the Tokyo District Court (The Main Court) in
Japan.
(ii)If you are not a Japanese individual or entity, the Dispute shall be finally settled by arbitration in Tokyo, Japan in accordance with the
Commercial Arbitration Rules of the Japan Commercial Arbitration Association. All proceedings in arbitration shall be conducted in
the English language, unless otherwise agreed. The award of arbitration shall be final and binding upon both parties, however, each
party may make an application to any court having jurisdiction for judgment to be entered on the award and/or for enforcement of the
award.
12. Miscellaneous
12.1This Agreement supersedes all prior oral and written understandings, representations and discussions between the parties concerning
the subject matter hereof to the extent such understandings, representations and discussions should be discrepant or inconsistent with
this Agreement.
12.2If any part of this Agreement is found void or unenforceable, it shall not affect the validity of the balance of the Agreement, which shall
remain valid and enforceable according to its terms and conditions. The parties hereby agree to attempt to substitute for such invalid or
unenforceable provision a valid or enforceable provision that achieves to the greatest extent possible the economic, legal and commercial
objectives of the invalid or unenforceable provision.
12.3Failure by either party to insist on performance of this Agreement or to exercise a right when entitled does not prevent such party from
doing so at a later time, either in relation to that default or any subsequent one.
End of document
IM WX1000-01E
Thank you for purchasing DAQWORX. This guide covers the following topics.
• Installing and uninstalling DAQWORX.
• Examples of how to use DAQLOGGER to easily acquire data from Yokogawa
Green series temperature controllers, the WT1600, and the MX100.
To ensure correct use, please read this manual thoroughly before beginning
operation. After reading the manual, keep it in a convenient location for quick
reference in the event a question arises. See the user’s manuals for the individual
DAQWORX software components for the functions and operating procedures of
those products. After reading this manual, keep it in a convenient location for quick
reference in the event a question arises.
Note
• The contents of this manual are subject to change without prior notice as a
result of improvements in the software’s performance and functions. Display
contents illustrated in this manual may differ slightly from what actually appears
on your screen.
• Every effort has been made in the preparation of this manual to ensure the
accuracy of its contents. However, should you have any questions or find any
errors, please contact your nearest Yokogawa representative.
• Copying or reproducing all or any part of the contents of this manual without the
permission of Yokogawa Electric Corporation is strictly prohibited.
• Use of this product (software and this manual) on more than one computer at the
same time is prohibited. Use by more than one user is also prohibited.
• Transfer or lending of this product to any third party is prohibited.
• Yokogawa Electric Corporation provides no guarantees other than for physical
deficiencies found on the original disk or this manual upon opening the product
package.
• Yokogawa Electric Corporation shall not be held responsible by any party for any
losses or damage, direct or indirect, caused by the use of the product.
• A warranty card is included in the package.
Please read it carefully, and do not lose it as a new one cannot be issued.
• License numbers will not be reissued. Please keep your license numbers
in a safe place.
• Yokogawa holds the copyright to the software that is on the CD-ROM.
Trademarks
• DAQWORX, DAQLOGGER, and DAQEXPLORER are registered trademarks or
trademarks of Yokogawa Electric Corporation.
• Microsoft and Windows are registered trademarks or trademarks of Microsoft
Corporation in the United States and/or other countries.
• Adobe and Acrobat are registered trademarks or trademarks of Adobe Systems
Incorporated.
• Company and product names that appear in this manual are registered
trademarks or trademarks of their respective holders.
• The company and product names used in this manual are not accompanied by
the registered trademark or trademark symbols (® and ™).
Revisions
•
•
•
•
•
•
1st Edition
2nd Edition
3rd Edition
4th Edition
5th Edition
6th Edition
2003 July
2003 December
2004 September
2005 February
2006 March
2006 July
•
•
•
•
•
•
7th Edition
8th Edition
9th Edition
10th Edition
11th Edition
12th Edition
2007 June
2008 March
2009 Junuary
2009 June
2011 January
2011 October
12th Edition : October 2011 (YK)
All Rights Reserved, Copyright © 2003 Yokogawa Electric Corporation
IM WX1000-01E
Checking the Contents of the Package
Unpack the box and check the contents before operating the instrument. If some
items are missing or otherwise inconsistent with the contents description, please
contact your dealer or nearest Yokogawa representative.
Package Contents
The DAQWORX installation CD and user’s manual CD are only included if the /CD
option was specified at the time of purchase.
WX1000 DAQWORX
Installation and Operation Guide (this manual)
(only with the /CD1 option) 1
IM WX1000-01
License sheet 1
DAQWORX installation CD
(only with the /CD1 option) 1
Product number: B9991WD
DAQWORX user’s manual CD
(only with the /CD1 option) 1
Product number: B9991WE
Storing the CDs
Please store your original CDs carefully. Install the products on your hard disk, and
run the products from your hard disk during actual use.
IM WX1000-01E
CD Handling Guidelines
Make sure to take the following precautions.
CAUTION
• Do not store the product near large amounts of refuse or dust.
• Do not touch the surface of the CD with no printed characters.
Dirt or sweat from fingertips can damage the CD. Do not write anything on the
CD.
• Pencil lead or residue from erasers can damage the CD.
• Do not bend or scratch the CD.
Doing so can cause it to become unreadable.
• Never place anything on top of the CD.
Doing so can cause deformities that can render the CD useless.
• Do not drop the CD from high locations as doing so can cause damage or
deformities.
• Do not place the CD in direct sunlight or near heat sources.
• Never allow solvents such as alcohol, benzene, or Freon to come into contact
with the CD.
• Take care when placing the CD into the CD-ROM drive.
• While the CD is being accessed, do not remove the CD from the CD-ROM
drive, cut the power to the PC, or reset the computer.
• Store the CD in its original jewel case.
Do not leave the CD in the CD-ROM drive after use. It can become deformed or
damaged unless it is kept in its case.
IM WX1000-01E
Installation Guide
Overview of DAQWORX Installation
The DAQWORX installer lets you do the following:
• Install the software
• Add or delete software
• Modify or repair a previous software installation
• Install software upgrades
It is recommended that you uninstall any previously installed DAQWORX
components before reinstalling. During installation, only the applications that you
specify are installed in the DAQWORX folder.
The DAQWORX folder can be installed in any location, but changing the structure
of the DAQWORX subdirectories may cause problems when adding, upgrading, or
deleting components.
When using Windows Vista and Windows 7, the software will not function normally
if installed in a subfolder of the Program Files folder. Also, when using Windows XP
or Windows 2000, please do not upgrade to Windows Vista and Windows 7 if the
DAQWORX software is installed in a subfolder of the Program Files folder.
Your license numbers are recorded on the license sheet. Refer the numbers you
purchased when adding or changing software. Please keep your license numbers
in a safe place.
Note
Following message is shown when installer used in previous installation doesn’t support
OS language.
“The language between OS and installer is different. If you continue installation,
language used in software is not changed. If you want to adapt these language,
please uninstall software and install this software again.”
In order to adapt language of software to OS, please uninstall any previously installed
DAQWORX components and install again, otherwise language of software is not
changed.
10
IM WX1000-01E
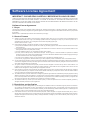
One or more license numbers is required during installation. Please have your
license numbers ready before beginning. Your license numbers are recorded on the
license sheet.
1. Place the DAQWORX installation CD in the CD-ROM drive.
The installer starts. However it will not start if your CD-ROM’S Autoplay
function is turned OFF. In that case, double-click the CD-ROM icon under
My Computer, then double-click the Setup.exe program.
Operation Guide
2. Click Next.
The License Agreement dialog box is displayed.
Appendix
IM WX1000-01E
Installation Guide
Installing the Software
11
Installing the Software
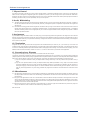
3. After reading the entire contents of the license agreement, click I accept the
terms of the license agreement or I do not accept the terms of the license
agreement.
If You Click “I do not accept the terms of the license agreement”
4. Click Cancel to end the installation. You may not install the software.
If You Click “I accept the terms of the license agreement”
4. Click Next.
The user information dialog box is displayed.
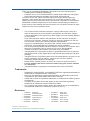
5. Enter the user name and company name.
Note
The user name and company name entered here can be confirmed along with
the version information when choosing Help > About in any DAQWORX software
application.
6. Click Next.
The Choose Destination Location window is displayed.
12
IM WX1000-01E
Installing the Software
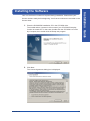
installation destination, click Browse and select a new destination using the
browser. When using Windows Vista, please do not install the software in
a subfolder of the Program Files folder. If installed within the Program Files
folder, the software will not function normally.
8. Click Next.
The Base software installation screen is displayed.
Installation Guide
7. Confirm that you accept the default installation destination. To change the
Operation Guide
9. Enter the license numbers for the applications you wish to install.
10.Click Next.
The Add software installation screen is displayed.
Appendix
11. Enter the license numbers for the applications you wish to install. If you are
not installing any Add software, leave the boxes blank and continue on to
the next step.
IM WX1000-01E
13
Installing the Software
12.Click Next.
The license number entry screen for Gate software is displayed.
13.Enter license numbers for only the number of applications you wish to use. If
you are not installing any Gate software, leave the boxes blank and continue
on to the next step.
14.Click Next.
The Gate software selection screen is displayed. If no license numbers were
entered in step 13, this screen is not displayed.
15.Select the check boxes of the Gate software applications you wish to install.
14
IM WX1000-01E
Installing the Software
Installation Guide
16.Click Next.
The installation confirmation screen appears.
Operation Guide
17.Click Next.
The installation begins.
When installation is complete, the Finish dialog box appears.
Appendix
18.Click Finish.
IM WX1000-01E
The dialog box closes.
15
Upgrading the Software
To upgrade the software, you must have a separate license number for the upgrade
version as well as the license number for the older version.
1. Carry out steps 1 to 7 in “Installing the Software” (page 11–13).
If an earlier version of DAQWORX is installed, the windows below is
displayed.
If an earlier version of the software is not installed, continue on to step 3.
2. Click Next.
Any free upgrades that are available will be automatically installed.
3. Enter the upgrade license number.
16
IM WX1000-01E
Upgrading the Software
Installation Guide
4. Click Next.
When a License Number for a Previous Version Exists
The license number entry screen for Add software is displayed.
Go to step 5.
When a License Number for a Previous Version Does Not Exist
A screen such as the one below is displayed.
Operation Guide
5. Enter the old license number.
If the old license number is a 3-numeric block combination, enter the old
license number in the box leaving the second block blank.
6. Click Next.
The Add software installation screen is displayed.
Appendix
7. Enter the upgrade license number.
IM WX1000-01E
17
Upgrading the Software
8. Click Next.
When a License Number for a Previous Version Exists
The installation screen for Gate software is displayed.
Go to step 10.
When a License Number for a Previous Version Does Not Exist
A screen such as the one below is displayed.
9. Enter the old license number.
If the old license number is a 3-numeric block combination, enter the old
license number in the box leaving the second block blank.
10.Click Next.
The installation screen for Gate software is displayed.
11. Perform steps 16 through 18 under “Installing the Software” on pages 15.
18
IM WX1000-01E
Installation Guide
Modifying, Repairing, or Deleting Software
To modify, repair, or delete software, enter maintenance mode
by performing the following procedure.
• Rerun the DAQWORX installation CD.
• Select Change or Delete under Add/Remove Programs.
1. The program enters maintenance mode.
The Welcome dialog box opens.
2. Select Modify, Repair, or Delete.
Modify: Select when adding software that was not purchased originally,
deleting individual software applications that you no longer need, or
performing a free/fee-based upgrade.
Repair: Select to use a program on the CD to overwrite executable files
CD that may have become corrupt or deleted from the hard disk
accidentally after installation.
Delete: Select to uninstall DAQWORX.
Operation Guide
Appendix
IM WX1000-01E
19
Modifying, Repairing, or Deleting Software
3. Click Next.
The Base software dialog box opens.
Note
The license numbers of the installed applications are displayed.
4. Enter the license numbers of applications to be added or upgraded, and
select the check boxes of any applications that you wish to delete.
Delete: Uninstall applications that have been previously installed.
5. Click Next.
When Entering Upgrade License Numbers
• When a License Number for a Previous Version Exists
The license number entry dialog box for Add software is displayed.
Go to step 8.
• When a License Number for a Previous Version Does Not Exist
A screen such as the one below is displayed.
20
IM WX1000-01E
Modifying, Repairing, or Deleting Software
Installation Guide
6. Enter the old license number.
7. Click Next.
The license number entry dialog box for Add software is displayed.
Operation Guide
Note
The license numbers of the installed applications are displayed.
8. Enter the license numbers of applications to be added or upgraded, and
select the check boxes of any applications that you wish to delete.
When Entering Upgrade License Numbers
• When a License Number for a Previous Version Exists
The license number entry dialog box for Gate software is displayed.
Go to step 11.
When a License Number for a Previous Version Does Not Exist
A screen such as the one below is displayed.
Appendix
9. Enter the old license number.
IM WX1000-01E
21
Modifying, Repairing, or Deleting Software
10.Click Next.
The license number entry dialog box for Gate software is displayed.
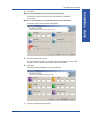
11. If you have new license numbers to add, enter them in the boxes. If you
wish to delete licenses, select the appropriate Delete check boxes.
Note
The license numbers of the installed applications are displayed and can be edited.
12.Click Next.
The Gate software addition check boxes are displayed.
13.Select the Gate software applications you wish to add.
14.Perform steps 13 through 18 under “Installing the Software” on page 14 and 15.
22
IM WX1000-01E
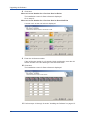
List of User's Manuals
The DAQWORX user’s manual CD contains the following manuals in PDF format.
Please read the appropriate manuals for the applications you plan to use.
Base Software
DAQLOGGER
DAQ32Plus
MXLOGGER
DAQEXPLORER
Add-on software
AddObserver
AddMulti
AddTrigger
DAQLOGGER Client
DAQ32Plus Client
AddObserver Runtime
Gate Software
GateEye
GateWT
GateDX-P
GateOPC
GateMODBUS
GateMX/MW
GateCONTROL
Gate µR
DataBrowser (file searching and waveform comparison software)
Installation Guide
Viewing the User’s Manual
Opening a User’s Manual
1. Insert the DAQWORX User’s Manual CD into the CD-ROM drive. If using
IM WX1000-01E
23
Appendix
If you move the mouse cursor to the product name and click,
the user’s manual is displayed.
Operation Guide
Windows 2000 or Windows XP, the user’s manual selection screen opens.
However, if the auto-play feature of the CD-ROM drive is turned OFF, the
user’s manual selection screen will not open automatically. In this case,
double-click the CD-ROM icon under My Computer.
Viewing the User’s Manual
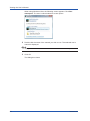
When using Windows Vista, the following screen appears. Click Run
startup.exe. The user’s manual selection screen opens.
2. Double-click the name of the manual you wish to use. The selected user’s
manual is displayed.
Note
To display a user’s manual, Adobe Reader 7.0 or later must be installed on your PC.
3. Click OK.
24
The dialog box closes.
IM WX1000-01E
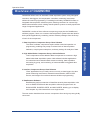
Operation Guide
DAQWORX allows users to assemble a data acquisition system using Yokogawa
recorders, data loggers, the temperature controllers, measuring instruments
without the need for programming. For adding functionality, DAQWORX offers an
integrated data acquisition software system, allowing customers to connect high
added-value software to their existing data acquisition systems to easily expand the
range of supported applications.
DAQWORX consists of three software component groups plus the DataBrowser
software program. Users can construct data acquisitions systems that are ideal for
their specific application by combining various software packages from the lineup
of each of the components.
2.High Added-Value Component Group: Add-on Software
“Add” components can be added to Base components to construct a high
added-value data acquisition system. Add software includes applications
for customized and network-based remote monitoring, data acquisition
and saving by group, and monitoring of measured data for triggered data
acquisition.
3.Interface Component Group: Gate Software
“Gate” applications let you easily connect not only to data loggers, but also
power measuring instruments, industrial instrumentation, data via OPC
servers, and images from network cameras-all without programming.
The next section describes how common components from each group are typically
connected.
IM WX1000-01E
25
Appendix
4.DataBrowser Software
DataBrowser performs searches of data files saved by data acquisition units
such as DAQSTATION and data acquisition software programs such as
DAQLOGGER, DAQEXPLORER, and MXLOGGER, allowing you to display
and compare any found waveforms on a single screen.
Operation Guide
1.Data Acquisition Component Group: Base Software
The “Base” software components require neither technical expertise nor
programming, enabling easy setup of various kinds of data acquisition
hardware, a rapid system setup time, and easy settings for analysis of data.
Installation Guide
Overview of DAQWORX
Introduction to Functions
The following sections provide a brief explanation of how GateMODBUS can be
used to acquire data from the UT351 temperature controller on DAQLOGGER,
how GateWT can be used to acquire measured data from Yokogawa’s WT1600
on DAQLOGGER, how GateMX/MW can be used to acquire measured data from
Yokogawa's MX100 Data Acquisition Unit, how measured data from Yokogawa
recorders can be acquired on DAQLOGGER, and how AddMulti software can be
used to acquire and save data on DAQLOGGER on a group-by-group basis.
DAQLOGGER
DAQLOGGER acquires measured or calculated data from recorders connected to
other recorders or PCs. Also, Gate software* (GateWT, GateMODBUS, GateMX/
MW etc.) can be connected allowing data acquisition from measuring instruments
including digital power meters (such as the WT1600), Modbus devices (such as
Yokogawa’s UT351/UT551 temperature controllers), and data acquisition units (such
as the MX100).
* The devices that can be connected differ depending on the Gate software installed.
AddMulti
AddMulti is a software program that allows you to connect data acquisition software
such as DAQLOGGER and simultaneously perform acquisitions under different
logging conditions. This function is called multilogging. For example, data acquired
from the WT1600 Digital Power Meter, data from a Modbus device (the UT351
temperature controller), and data from recorders can be divided into several groups
on DAQLOGGER, then each group can be logged and saved to a designated folder
at a specified timing. You can also mix data from the WT1600, Modbus device
(UT351), and recorders in a single group.
GateWT
GateWT is a software program that acquires data from WT series instruments and
transfers it to DAQLOGGER.
GateCONTROL
GateCONTROL is a software program that acquires data from temperature
controllers and signal converters that support data output via the Modbus/RTU and
Modbus/TCP protocols, and transfers the data to DAQLOGGER.
GateMX/MW
GateMX/MW is a software program that monitors measured data from MX100 data
acquisition units and transfers it to DAQLOGGER or remote monitors.
26
IM WX1000-01E
Installation Guide
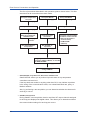
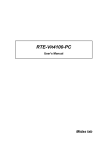
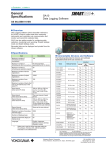
Flow Chart of Connections and Operation
The following is an example configuration for DAQWORX.
Group 1
Group 2
Group 3
Group 4
AddMulti
Log data by groups
Save files by groups
Group 50
Ethernet
DAQLOGGER
GateCONTROL
GateWT
GateMX/MW
RS-422 cable
RS-232/RS-485
CONVERTER
RS-232 cable
Operation Guide
Ethernet
RS-232 cable
μR1000/1800, VR, DX, MV, DARWIN
MX100
Ethernet
Ethernet
WT1600
RS-422/RS-485
Appendix
UT351
UT551
IM WX1000-01E
UT551
UT551
27
Flow Chart of Connections and Operation
The flow of procedures described in this operation guide is shown below. This flow
assumes that all connections have been made.
Set up the temperature
controller
See page 29
Set up GateCONTROL
See page 30
Performing the Loop
Back Test, Read Test,
and Write Test*
See pages 31
and 32
Run GateCONTROL
as a process
Set up the MX100
Set up the WT210
See page 33
Set up GateWT
See page 38
Executing GateMX/MW
See page 35
Perform the test
execution**
See page 36
See page 43
Check the communication
conditions of the recorder
• Ethernet (IP address
and host name)
• COM1-COM9
(address)
Run GateWT as
a process
See page 32
See page 36
Logging data from the temperature
controller, WT210, MX100, or recorder
on DAQLOGGER
See page 44
Logging and saving data
using AddMulti
See page 51
* GateCONTROL Loop Back Test, Read Test, and Write Test
GateCONTROL allows you to perform loop back tests on any temperature
controllers connected to it.
If the loop back test results in anything other than OK, it may indicate a problem
in the wiring of the communication cable, or a mismatched baud rate, parity, or
Modbus address.
Also, by performing a test acquisition you can determine whether the data set for
each tag is correct.
** GateWT Test Execution
During GateWT’s test acquisition, data is read from WT output channels assigned
to each tag and displayed as digital values. This allows you to determine whether
the communication settings for each tag are correct.
28
IM WX1000-01E
Installation Guide
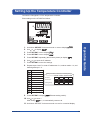
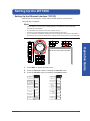
Setting Up the Temperature Controller
Connect the Yokogawa’s UT351 temperature controller.
Enter settings on the UT350E as follows:
1. Hold down SET/ENT for three seconds or more to display
or
to display
.
3. Press SET/ENT once to display
.
4. Press SET/ENT once to display
.
5 Press SET/ENT repeatedly (about twenty times) to display
6. Use
or
Operation Guide
2. Use
.
.
to enter the IP address.
7. Press SET/ENT to save the settings.
8. Repeat steps 6 and 7 to enter IP addresses 2–4, subnet masks 1–4, and
default gateways 1–4.
IP address 1
IP address 2
Setting the IP address, Subnet mask, and Default gateway
IP address 3
0 to 255
0 to 255
0 to 255
0 to 255
IP address
IP1
IP2
IP3
IP4
Subnet mask 2
Subnet mask
SM1
SM2
SM3
SM4
Subnet mask 3
Default gateway
DG1
DG2
DG3
DG4
IP address 4
Subnet mask 1
Subnet mask 4
Appendix
Default gateway 1
Default gateway 2
Default gateway 3
Default gateway 4
9. Press SET/ENT to display
10.Use
or
(Ethernet setting switch).
to enter 1.
After setting
to 1, it automatically reverts to 0.
11. Hold down SET/ENT for three seconds or more for numerical display.
IM WX1000-01E
29
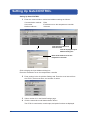
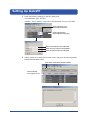
Setting Up GateCONTROL
Setting Up GateCONTROL
1. Enter the communication method and address settings as follows:
Communication method : Ether
Host name :
IP address set on the temperature controller
Modbus address :
Unknown
Click and select Ethernet
from the menu
Click to display the Input
Address dialog box
Enter the IP address set on the
temperature controller
Click to display the Input Address dialog box
Enter the IP address set on the temperature controller
2. Enter settings in the Acquisition Settings tab. Enter the scan interval from
the UT351, the timeout time, and number of retries.
3. Select number 01 in the Model Settings page.
4. Click the automatic model determination button.
30
The UT351’s control mode, control output, and option functions are displayed.
IM WX1000-01E
Setting Up GateMODBUS
Performing the Loop Back Test
The results of the loop back test are displayed in the Status box.
Loop back test result
The results of the loop back test are displayed in the Status box
6. Click the Detail Settings button in the Model Settings tab page of the model
on which you wish to perform the read test.
The Tag Setting dialog box opens.
Click to display the Tag Settings dialog box
Operation Guide
Performing a Read Test
Installation Guide
5. Click the Loop Back Test button in the Model Settings page.
Monitor execution
results
Specifies the output
values during the
output test
Drag to select the tag on which
to perform the output test
IM WX1000-01E
Monitor start button
Monitor Stop and Output Test Buttons
31
Appendix
Output test
results
Setting Up GateMODBUS
7. Click the Start monitor button.
The value of each tag from the instrument is loaded, and displayed in the
loaded value column of the input tab sheet.
To quit monitor execution, proceed to step 11.
Performing a Write Test
8. Specify the Output Values of the tags on which you wish to perform the
output test in the output tab page.
9. Select the tags on which to perform the output test
10.Click the Output Test button during the Read Test.
The output values are written to registers, then the values are acquired from
the write registers and the loaded results are displayed in the loaded value
column in the output tab page.
Stopping the Read Test
11. Click the Stop monitor button.
The Monitor Test/Read Test is concluded.
Launching GateCONTROL
12.Click the Start button in the Acquisition/Status tab.
Click to display the
Error dialog box
The practice status
is displayed using
colors
Green: Normal
(comm. open)
Red: Error
(comm. stopped)
Yellow: Data lost, etc.
(comm. open)
No display: Stopped
Start button
Reconnect button
Click here to reopen
communications with the
selected instruments
Error display example
32
IM WX1000-01E
Setting Up the Ethernet Interface (TCP/IP)
With DHCP, the IP address, subnet mask, default gateway, and DNS are
automatically configured.
Note
• The IP address, subnet mask, default gateway, and DNS can be automatically
specified by using DHCP.
• To use DHCP, the network must have a DHCP server.
• Consult your network administrator to see if DHCP can be used.
• If you use DHCP, a different IP address may be assigned every time the WT1600 is
powered up. You must be careful when using the FTP server function of the WT1600.
Operation Guide
Installation Guide
Setting Up the WT1600
To exit the menu during operation, press ESC.
1. Press MISC to display the Misc menu.
2. Press the Next 1/2 soft key to display the Next 2/2 menu.
3. Press the Network soft key to display the Network menu.
Appendix
IM WX1000-01E
33
Setting Up the WT1600
4. Press the TCP/IP Setup soft key to display the TCP/IP Setup dialog box.
5. Turn the jog shuttle to select DHCP.
6. Press SELECT to select ON.
7. Turn the jog shuttle to select DNS.
8. Press SELECT to display the DNS selection box.
9. Turn the jog shuttle to select OFF.
Note
If you changed settings related to the Ethernet network, the WT1600 must be power
cycled.
34
IM WX1000-01E
Setting Up the WT1600
Entering the User Name and Password of the WT1600
Set the user name and password of the WT1600 on GateWT also.
1. The procedure is the same as steps 1 through 3 of “Setting Up the Ethernet
Interface (TCP/IP).”
2. Press the User Account soft key to display the User Account dialog box.
Installation Guide
Setting the User Name and the Password on WT1600
Operation Guide
Setting the User Name
3. Turn the jog shuttle to select User Name.
4. Press SELECT to display the keyboard.
5. Use the keyboard to enter the user name.
When not restricting the access, specify anonymous. If you specify
anonymous, you do not have to set the password.
Setting the Password
(If you set user name to anonymous in step 5, you do not have to set the
password.)
6. Turn the jog shuttle to select Password.
7. Press SELECT to display the keyboard.
8. Use the keyboard to enter the password.
IM WX1000-01E
Set on GateWT
Appendix
35
Setting Up GateWT
1. Enter the following settings on the WT Setting tab.
Communication type : ETHER
Address : The IP address, user name, and password set on the WT1600.
Click to display a list,
then make a selection
Click to display the
Input Address dialog box
Enter the IP address of the WT1600
Enter the user name for the WT1600
Enter the password for the WT1600
2. Select number 01 (causing the number to turn red) then click the Automatic
Model Determination button.
Automatic model determination button
Items selected
here appear in red
36
IM WX1000-01E
Setting Up GateWT
Installation Guide
3. Enter the following settings on the Scan Interval Setting tab.
Scan interval :1000 msec
Retries :
Retry interval :30 sec
ON
Performing the Test Execution
4. Double-click number 01 on the WT Settings tab to display the Tag Setting
dialog box.
Double-click
Running as a Process
6. After clicking the Test Execute button, click the tag numbers for execution as
a process or service to turn them ON (displayed in blue), then click the OK
button.
IM WX1000-01E
37
Appendix
Click to stop the test execution
Test execution results
Click to start the test execution
Turn ON the tags to execute as a process or service
Operation Guide
5. Click the Test Execute button. The test result appears in the Value column.
Setting Up GateWT
7. Click the Process execution button or perform the following operation in the
Execution/Status tab.
Execution Type : select Process
Click the Start button
Process execution button
When the process is run,
Process appears
Click to select
Click to start
The practice status
is displayed using
colors
Green: Normal
Gray: Stopped
Blinking red: Error
38
IM WX1000-01E
Installation Guide
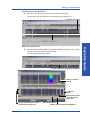
Setting Up the MX100
We assume that the CF card is installed in the MX100.
Connecting the MX100 Standard Software and the MX100
1. Click the Search button on the Connection screen of the MX100 Standard
Software. An icon indicating the MX100 is displayed.
Click here
Operation Guide
2. Select the MX100 icon and then click the Connect button in the box
containing the Edit Network setup button. The Monitor screen opens.
IM WX1000-01E
After selecting the MX100,
click here
Appendix
Select the MX100
39
Setting Up the MX100
Configuring the System
3. Click System. Then, configure and confirm the system on the System
screen.
Unit Setup
Module Arrangement
Response check: Click the Check button and confirm that the MX100’
s 7-segment LED displays --CALL--.
Click Receive current configuration on the Actual Configuration tab.
Compact Flash information
Status: Check that it is Exists(Usable)
Click here
40
Check the CF card status
Click here to reconfigure the system
IM WX1000-01E
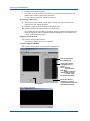
Setting Up the MX100
Setting the Acquisition Conditions
Installation Guide
4. Click Acquisition and enter settings as follows:
Start Condition: On Record
Stop Condition: Continuous
Drag and drop the input module icons to appropriate interval groups.
Monitor interval of interval groups : 50 msec, 100 msec, and 200 msec
Record interval of interval groups : 1
Drag and drop
Operation Guide
Select these option buttons
Set to 1
Setting the Channels
5. Click Channel. Then, select the check boxes for the channels you wish to
record on the Meas. Channel tab.
Appendix
Select the check boxes for the
channels you wish to record
IM WX1000-01E
Click here to show the channels
corresponding to the unit in red
characters
41
Setting Up the MX100
6. For the selected channels, set the mode, range, span, scale, difference
input, RRJC, unit, tag number, tag comment, filter, burnout, RJC, alarm, etc.
7. Click the Math Channel tab and set the expression, unit, tag number, tag
comment, alarm, timer, etc.
Disconnecting the MX100 Standard Software from the MX100
8. Click Connection. Click the Disconnect button on the Connection screen.
The connection will be dropped.
42
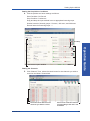
IM WX1000-01E
1. On the System tab, click the Search button. MX100 information such as
the machine name, serial number, and address is displayed under MX100/
MW100 nearby.
2. Drag the machine name from MX100 nearby onto the IP Address/Host box
of No. 0 under MX100 unit list.
Drag and drop
Operation Guide
Click here
Installation Guide
Executing GateMX/MW
3. Click the Get Info. button. The machine name is displayed.
Appendix
Click here
IM WX1000-01E
43
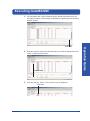
Executing GateMX/MW
4. Click the number under Unit No. on the Channel tab to check the channel
settings. The channel information corresponding to the unit number is
highlighted.
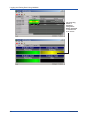
5. Click the Start Monitoring button or choose Start Monitoring from the
Monitoring menu. The communication status is displayed on the Run tab.
Start monitoring button
44
IM WX1000-01E
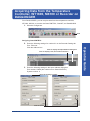
From DAQLOGGER, you can acquire data from the temperature controller,
WT1600, MX100, or recorder via GateCONTROL, GateWT, and GateMX/MW.
1. Start the Configurator.
Click
Installation Guide
Acquiring Data from the Temperature
Controller, WT1600, MX100 or Recorder on
DAQLOGGER
Assigning GateCONTROL
2. Enter the following settings for number 01 on the Recorder Setting tab.
Port : Ethernet
Click the Address box.
Operation Guide
Click to display the Input Address dialog box
Click to display a list, then make a selection
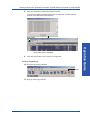
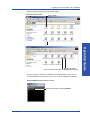
3. Enter the following settings in the Input Address dialog box.
Port number: 50299 (the number set on GateCONTROL)
System number: 0
Recorder Settings number
Appendix
Click to select
IM WX1000-01E
45
Acquiring Data from the Temperature Controller, WT1600, MX100 or Recorder on DAQLOGGER
Assigning GateWT
4. Repeat steps 2 to 3 to enter the following settings for number 02.
Port :
Ethernet
Port number :
50295 (the number set on GateWT)
System number :0 (GateWT connected to number 01)
Assigning GateMX/MW
5. Repeat steps 2 to 3 to enter the following settings for number 03.
Port :
Port number : 50297 (the number set on GateMX/MW)
Ethernet
No system number (acquire the data from all the channels of the MX100
connected to GateMX/MW)
Recorder Settings number
Select the check boxes
Not necessary if multiple
Gate software programs or
multiple systems are not
running on the same PC.
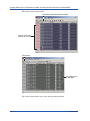
Assigning Recorders
6. Assign the recorders to be connected starting form number 03. Match the
port and address settings with those on the recorder.
Automatic Model Determination
7. On the recorder settings tab, drag to select the number of software
applications and recorders to be connected, starting from number 01.
Automatic model determination button
Drag to select only those to be connected
46
IM WX1000-01E
Acquiring Data from the Temperature Controller, WT1600, MX100 or Recorder on DAQLOGGER
Installation Guide
8. Click the Automatic model Determination button.
The Communication Message dialog box is displayed. Confirm that the
models were determined successfully.
Save button
9. Click the Save button, then close the configurator.
Entering Tag Settings
10.Start the tag setting software.
Click
Operation Guide
The model name is displayed
11. Drag to select tag numbers.
Appendix
IM WX1000-01E
47
Acquiring Data from the Temperature Controller, WT1600, MX100 or Recorder on DAQLOGGER
12.Click the Auto Assign button.
Automatic model determination button
Drag to select only
those to be connected
Save button
The model name
is displayed
13.Click the Save button, then close the tag setting software.
48
IM WX1000-01E
Acquiring Data from the Temperature Controller, WT1600, MX100 or Recorder on DAQLOGGER
Setting Logging Conditions
Installation Guide
14.Choose Logger > Configuration from the menu bar in the manager
window.
15.Set data logging conditions from GateCONTROL, GateWT, and GateMX/
MW, then click OK.
Operation Guide
Data logging conditions
Save settings then close the dialog box
Appendix
Start Data Logging
16.Click the SCAN button.
Click
IM WX1000-01E
Data is logged from GateCONTROL, GateWT, GateMX/MW, and recorders.
49
Acquiring Data from the Temperature Controller, WT1600, MX100 or Recorder on DAQLOGGER
The host name of the PC on which DAQLOGGER is being installed is
displayed in GateCONTROL’s Monitor/Status tab or GateWT’s Execution/
Status tab.
The host name of
the PC driven by
DAQLOGGER is
displayed
50
The host name of
the PC driven by
DAQLOGGER is
displayed
IM WX1000-01E
Acquiring Data from the Temperature Controller, WT1600, MX100 or Recorder on DAQLOGGER
The host name of the PC that has DAQLOGGER installed is displayed on
the Run tab of GateMX/MW.
Displays the host name of
the PC running DAQLOGGER
System number whose
communication is in
progress is displayed in green
MX100 channels and monitor
intervals specified on the
MX100 Standard Software
Operation Guide
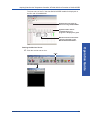
Starting the Monitor Server
Installation Guide
17.Click the monitor server icon.
Click
Appendix
IM WX1000-01E
51
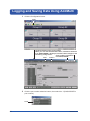
Logging and Saving Data Using AddMulti
1. Click the Configuration button.
Click
Get Host Info/Recording Config button
When you click the Get Host Info button, information obtained
from DAQLOGGER is displayed, and the button changes to the
Recording Config button
Click to obtain information
Click
Enter 0
from DAQLOGGER
2. Click the port number selection button, then select No. 2 (DAQLOGGER’s
port number).
52
Click
IM WX1000-01E
Logging and Saving Data Using AddMulti
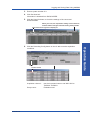
4. Click Get Host Info.
Information is obtained from DAQLOGGER.
5. Click the Host Info button to check the settings of the connected
DAQLOGGERs.
When you click, the acquisition setting screen switches,
and the button changes to the Recording Config button
Connected server types are displayed
Operation Guide
6. Click the Recording Config button on the 01 tab to set the acquisition
conditions.
Click
Click to select
Acquisition channel :use the increment button to set W01-W10 to
TAG0001-TAG0010.
Group name :
Appendix
IM WX1000-01E
Installation Guide
3. Enter a system number of 0.
Evaluation test 1
53
Logging and Saving Data Using AddMulti
Change the
group name
Drag to
select
Increment button
Acquisition channel numbers are filled from the first cell in the selection to
the last, each channel being assigned a number +1 higher than the last.
7. Set groups 02, 03, and 04 in the same manner.
Click OK to save the settings.
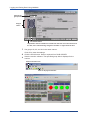
8. Click the SCAN button. Data is acquired from DAQLOGGER.
9. Start the monitor software. The specified group data is displayed in the
monitor.
Click to start the scan
Click to display the monitor
54
IM WX1000-01E
Click the desired groups
To stop, click the Record Stop button.
To start or stop data acquisition on only one group, click the Start or Stop
button for that group.
Record Start button
Record Stop button
Overview button
, then click the Record Start button.
Click to display the Config dialog box
The recording status is
displayed using colors
Green: Recording
Yellow: Scanning
Red: Error
To start or stop data acquisition for individual groups,
click the Start or Stop button for the group
Record Starts/Stops controls all groups displayed in blue
Click the Overview button to display the acquisition status by group.
Operation Guide
Clicking once changes
the displayed color to
blue, clicking once
again changes it to gray
Installation Guide
Logging and Saving Data Using AddMulti
10.Select several groups and start data acquisition on all of them.
IM WX1000-01E
Appendix
Data count The data file list for the
Time of top data
group selected here is
Group name Time of end data
Group number
displayed
File name
File number
55
Logging and Saving Data Using AddMulti
The recording
status is
displayed
using colors
Status displayed
in red when an
error occurs
56
IM WX1000-01E
Logging and Saving Data Using AddMulti
Data is stored by group in the specified folder.
Default destination folder
Installation Guide
Click a folder
Operation Guide
Sequence number
File name specified in the Configuration dialog box
When scanning is started on AddMulti, the DQLOGGER monitor server
screen displays the host name of the PCs on which AddMulti is installed.
DAQLOGGER monitor server screen
Appendix
Host names of PCs running AddMulti.
IM WX1000-01E
57
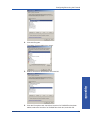
Appendix
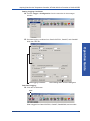
Removing the Firewall
The following is an example of how to add the DAQ32Plus Launcher as a firewall
exception.
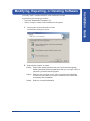
1. From the Start menu, choose Control Panel.
The control panel window appears.
2. Double-click Windows Firewall.
The Windows Firewall dialog box opens.
3. If the Off option button is selected, click Cancel to close the dialog box.
58
If the On option button is selected, clear the Don't allow exceptions check
box and click the Exceptions tab.
IM WX1000-01E
Configuring/Removing the Firewall
Installation Guide
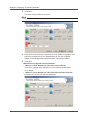
4. Click Add Program.
The Add a Program dialog box opens.
Operation Guide
5. Select Launcher for DAQ32Plus and click OK.
Appendix
6. Click the Exceptions tab, check that Launcher for DAQ32Plus has been
added, select the Launcher for DAQ32Plus check box, and click OK.
IM WX1000-01E
59