1
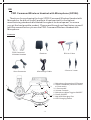
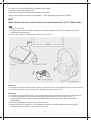
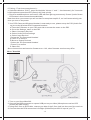
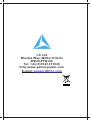
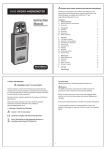
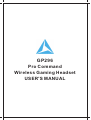
GP296
Pro Command
Wireless Gaming Headset
USER'S MANUAL
EN
PRO Command Wireless Headset with Microphone (GP296)
Thank you for purchasing the Logic3 PRO Command Wireless Headset with
Microphone. As with all Logic3 products it has been built to the highest
manufacturing standards and tested throughout its development, to ensure
you get the best possible product. Please read through and familiarize yourself
with this manual before you use the PRO Command Wireless Headset with
Microphone.
Contents
PRO Command
Wireless Headset
Receiver
RCA to 3.5mm
USB Charge Cable
Xbox Connector
1
1. Microphone Connection LED status
2. Game/Chat Mode (Switches Game
or Chat mode)
3
3. 2.5mm socket
4. Volume Controls
5. Microphone Mute Toggles ON/OFF
6 6. Power ON/OFF
7. Mini USB Charging Port
8. LED Charging Status
2
5
4
8
7
-1-
3.5mm to 3.5mm
9
12
13
11
9. Connection Status LED
10. 3.5mm jack
11. USB Connector
12. Left/Right RCA
13. 3.5mm Audio in socket
10
Set up of PRO Command Wireless Headset with Microphone
No drivers are needed to set up the PRO Command Wireless Headset with PC/MAC/Xbox or PS3
1. Firstly you need to charge the Wireless Headset:
Charging
4hrs
Fully Charged
USB Charge Cable
PC/MAC
1. Turn on your PC.
2. Connect the receiver's USB connector to a spare USB port on your PC/MAC (Receiver's LED
(Green) will flash slowly)
3. Ensure the headset is within 50cm of the receiver.
4. Press the ON/OFF button on your Headset to power it ON (Microphone connection LED
(Green) will flash slowly – once every 2 seconds)
5. Pairing - First time connection only:a. Switch the Mode to 'CHAT', press and hold the Volume '+' and '-', simultaneously for 3 seconds.
b. Microphone connection Green LED will flash quickly
c. Receiver and Microphone connection LED will then light up permanently 'Green' (both of these
LED status's show connection established)
Next time when you connect you will not have to complete step 5A-C, as it will automatically pair
once you turn on the power.
6. Your PRO Command Wireless Headset is now ready to use, please set up the PC/MAC (Audio
Set up) to use the Wireless PRO Command headset:PC
a. Right click 'Speaker' icon (Bottom right hand corner of Screen)
b. Select 'Playback devices'
c. A new Window will open
-2-
d. Select 'Pro command Wireless Headset' and 'Apply'
e. Next go to the 'Recording' Tab
f. Select 'Pro command Wireless Headset' and 'Apply'
Above instructions are based on Windows 7, other Operating Systems may differ
MAC
Note: Game volume control will be de-activated while in PC / Mac mode
1. Turn on your PS3
2. Connect the receiver's USB connector to a spare USB port on your PS3 (Receiver's LED
(Green) will flash slowly)
3. There are 2 ways to connect the receiver to your PS3:-
Method 1
a. Using the 3.5mm to 3.5mm cable, connect one side of the 3.5mm jack to the rear of the receiver
b. Connect the other 3.5mm jack to your headphone socket of your TV
Method 2
a. Using the 3.5mm to RCA cable, connect one side of the 3.5mm jack to the rear of the receiver
b. Connect the male RCA connectors Left/Right (White/Red) to the A/V input of your TV
c. Connect the PS3 A/V cable Left/Right (White/Red) into the end of the RCA connectors
(White/Red)
4. Ensure the headset is within 50cm of the receiver.
5. Press the ON/OFF button on your Headset to power it ON (Microphone connection LED
(Green) will flash slowly – once every 2 seconds)
-3-
6. Pairing - First time connection only:a. Switch the Mode to 'CHAT', press and hold the Volume '+' and '-', simultaneously for 3 seconds.
b. Microphone connection LED (Green) will flash quickly
c. Receiver and Microphone connection LED will then light up permanently 'Green' (both of these
LED status's show connection established)
Next time when you connect you will not have to complete step 6A-C, as it will automatically pair
once you turn on the power.
7. Your PRO Command Wireless Headset is now ready to use, please set up the PS3 (Audio Set
up) to use the Wireless PRO Command headset:a. Press the PS button on your PS3 controller to access the menu on the PS3
b. Go to the 'Settings' menu on the PS3
c. Select 'Accessory Devices'
d. Select 'Audio Device Settings'
e. Select 'Input Devices'
f. Select the 'Pro Command Headset'
g. Press 'X' to confirm
h. Move to 'Output Devices'
i. Select the 'Pro Command Headset'
j. Press 'X' to confirm
k. Select OK
Above instructions are based on firmware ver. 4.46, other firmware versions may differ
Xbox / Xbox 360
1. Turn on your Xbox/Xbox360
2. Connect the USB connector to a spare USB port on your Xbox (Microphone receiver LED
(Green) will flash slowly)
3. Using the 3.5mm to RCA cable, connect one side of the 3.5mm jack into the rear of the receiver
4. Connect the male RCA connectors Left/Right (White/Red) to the A/V Input of your TV
-4-
5. Connect the Xbox A/V cable Left/Right (White/Red) into the RCA connectors.
6. Connect the Xbox connector to your Xbox controller and connect the 2.5mm jack into the 2.5mm
socket on the right side of the PRO Command headset.
7. Ensure the headset is within 50cm of the receiver.
8. Press the ON/OFF button on your Headset to power it ON (Microphone connection LED (Green)
will flash slowly – once every 2 seconds)
9. Pairing - First time connection only:a. Switch the Mode to 'CHAT', press and hold the Volume '+' and '-', simultaneously for 3
seconds.
b. Microphone Connection LED (Green) will flash quickly
c. Receiver and Microphone connection LED will then light up permanently 'Green' (both these
LED status shows connection established)
Next time when you connect you will not have to complete step 9A-C, as it will automatically pair
once you turn on the power.
10. Your PRO Command Wireless Headset is now ready to use.
11. Please ensure you have chosen the correct settings in your Xbox/Xbox360 menu to allow you
to use the Pro Command Headphones.
Force connection - If the headset does not respond to any commands, please carryout the
following:
1. Close down the application used i.e. music player, or game on console.
2. Ensure the headset is within 50cm of the receiver.
3. Switch the Mode to CHAT and press and hold the Volume '+' and '-', simultaneously for 3 seconds.
4. Microphone connection LED (Green) will flash quickly
5. Receiver and microphone connection LED will then light up permanently 'Green' (both these LED
status shows connection established)
Game and Chat Modes
To offer comfort and practicality, you can adjust the volume settings individually for Gaming or
Chat modes.
Low battery Alert:
When the battery is low, the microphone connection LED (Green) indicator will flash once every 1
second, to indicate the low battery status.
Sleep mode:
When the headset has not been used for three minutes or more, the headset will automatically go
into sleep mode. The Microphone connection LED (Green) will flash once every five seconds.
To resume normal function, press the Volume “+” and “-“buttons simultaneously this will exit the
sleep mode.
Anti-Jamming
With auto frequency adjustment technology, the headset will adjust the frequency to unoccupied
frequency to avoid jamming from the common jamming source of WIFI, Microwave, 2.4G wireless
telephone.
-5-
Trouble Shooting
Specifications:
1. Compatible with PC/PS3/XBOX360
2. 2.4GHz Technology with auto frequency adjustment for Anti-Jamming.
3. Operational range up to 7M
4. Built-in Lithium-ion rechargeable battery: 3.7V/780mAh
5. Working current: <50mA, sleeping current: 200uA
6. Approximately 10 hours per one charge
-6-
L3i Ltd
Rhodes Way, Watford Herts
WD24 4YW UK
Tel: +44 (0)1923 471020
http:/www.gamespower.com
E-mail: [email protected]