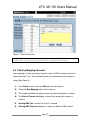
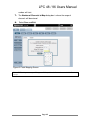
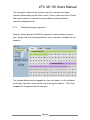
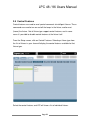
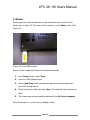
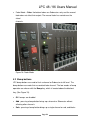
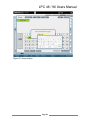
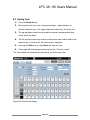
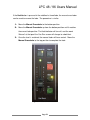
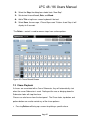
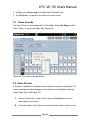
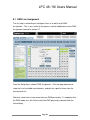
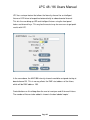
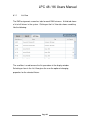
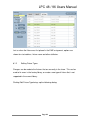
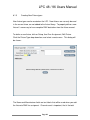
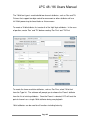
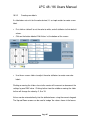
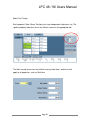
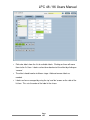
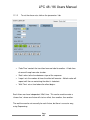
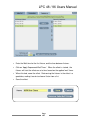
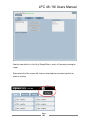
1
LPC 48 / 96 Users Manual
Publication 28-0721
Document Revision: C
17 Jan 2011
For LPC software versions 2.1.10 and above
Copyright © 2010, 2011 by Leprecon L.L.C.
This document contains proprietary information. No part of this work may be
reproduced or transmitted in any form or by any means, electronic or mechanical,
including photocopying and recording, or by any information storage or retrieval
system without the prior written permission of Leprecon Lighting L.L.C. unless
such copying is expressly permitted by federal copyright law.
Page 2
LPC 48 / 96 Users Manual
Contents
INTRODUCTION........................................................................................................................................ 6
LPC CONSOLE LAYOUT.............................................................................................................................. 7
VIDEO INTERFACE LAYOUT....................................................................................................................... 8
1
SPECIFICATIONS ................................................................................................................................ 9
1.1
1.2
1.3
1.4
1.5
1.6
1.7
2
STARTUP ....................................................................................................................................... 11
2.1
2.2
2.3
2.4
3
CHANNEL CAPACITY ............................................................................................................................... 9
DMX DIMMERS .................................................................................................................................... 9
POWER SUPPLY .................................................................................................................................... 9
PERIPHERALS ........................................................................................................................................ 9
SHOW STORAGE ................................................................................................................................... 9
WORK LIGHTS .................................................................................................................................... 10
ACCESSORIES ...................................................................................................................................... 10
CONNECTING TO YOUR SYSTEM .............................................................................................................. 11
BACK PANEL CONNECTIONS .................................................................................................................. 11
BOOT SEQUENCE ................................................................................................................................. 12
POWER-OFF ....................................................................................................................................... 12
SETUP ........................................................................................................................................... 13
3.1 REAL TIME CLOCK ............................................................................................................................... 13
3.2 ON-SCREEN KEYPAD ............................................................................................................................ 13
3.3 PATCH .............................................................................................................................................. 14
3.4 CREATING A CUSTOM PATCH................................................................................................................. 15
3.5 EDIT THE CUSTOM PATCH ..................................................................................................................... 16
3.6 PATCH BY MAPPING CHANNELS ............................................................................................................. 17
3.7 DMX ASSIGNMENT ............................................................................................................................. 19
3.7.1
Adding conventional dimmers .............................................................................................. 19
3.7.2
Modifying existing assignments ........................................................................................... 21
3.8 CONTROL FEATURES ............................................................................................................................ 22
3.9 SETTINGS ........................................................................................................................................... 24
3.10 MANUAL MODE ................................................................................................................................. 24
3.11 DMX MODE ...................................................................................................................................... 24
3.12 LITTLELITE® INTENSITY ......................................................................................................................... 24
3.13 BLACKOUT ENABLE / DISABLE ................................................................................................................ 25
3.14 LITTLITE® INTENSITY SHORTCUT ............................................................................................................. 25
3.15 DEFAULTS .......................................................................................................................................... 27
3.16 CLEAR ............................................................................................................................................... 28
3.17 PARK ................................................................................................................................................ 28
3.18 SHOW ............................................................................................................................................... 30
3.19 UPDATES ........................................................................................................................................... 32
Page 3
LPC 48 / 96 Users Manual
4
STAGE VIEW - MANUAL CHANNELS............................................................................................... 33
4.1
4.2
4.3
4.4
4.5
4.6
5
SUBMASTERS ................................................................................................................................ 40
5.1
5.2
5.3
5.4
5.5
5.6
5.7
5.8
6
CUE PROPERTIES ................................................................................................................................. 48
6.2. RECORDING CUES ......................................................................................................................... 48
SAVING CUES ..................................................................................................................................... 49
CUE LIST............................................................................................................................................ 50
CUE PLAYBACK ................................................................................................................................... 50
MANUAL CROSSFADE........................................................................................................................... 51
CUE PROPERTIES ................................................................................................................................. 52
TAKING CONTROL WITH THE MANUAL CROSSFADER................................................................................... 52
CUE OVERRIDE ................................................................................................................................... 54
CUE PREVIEW ..................................................................................................................................... 54
CHASE ........................................................................................................................................... 56
7.1
7.2
7.3
7.4
7.5
8
SUBMASTER PROPERTIES ...................................................................................................................... 40
MOVING ABOUT THE SCREEN ................................................................................................................. 40
RECORDING SUBMASTERS ..................................................................................................................... 40
SAVING SUBMASTERS........................................................................................................................... 41
SUBMASTER PLAYBACK ......................................................................................................................... 43
SUBMASTER PREVIEW .......................................................................................................................... 43
QUICK LOOKS ..................................................................................................................................... 45
COPY SCENE ....................................................................................................................................... 46
CUES ............................................................................................................................................. 48
6.1
6.2
6.3
6.4
6.5
6.6
6.7
6.8
6.9
6.10
7
USING CHANNEL FADERS ...................................................................................................................... 33
BUMP BUTTONS .................................................................................................................................. 34
USING THE KEYPAD.............................................................................................................................. 35
SETTING CHANNELS WITH VIDEO INTERFACE ............................................................................................. 36
INCREMENTAL LEVELS .......................................................................................................................... 37
GROUPS ............................................................................................................................................ 38
CHASE PROPERTIES .............................................................................................................................. 56
RECORDING CHASES ............................................................................................................................ 56
CHASE PLAYBACK ................................................................................................................................ 57
CHASE OVERRIDE ................................................................................................................................ 58
CHASE PREVIEW.................................................................................................................................. 58
INTELLIGENT FIXTURE PROGRAMMING ........................................................................................ 60
8.1 DMX LINE ASSIGNMENT ...................................................................................................................... 61
8.1.1
List View................................................................................................................................ 63
8.1.2
Editing Fixture Types............................................................................................................. 64
8.1.3
Creating New Fixture types................................................................................................... 66
9
CONTROLLING LED AND INTELLIGENT FIXTURES ........................................................................... 69
9.1 SETTING INTENSITY FOR INTELLIGENT FIXTURES ......................................................................................... 71
9.1.1
Setting intensity - step by step.............................................................................................. 73
9.2 SETTING PROPERTIES FOR INTELLIGENT FIXTURES ....................................................................................... 73
9.2.1
More about the Details screen ............................................................................................. 75
9.3 INTELLIGENT FIXTURE PROGRAMMING ..................................................................................................... 78
9.3.1
Before starting ...................................................................................................................... 78
10
BUILDING SCENES ......................................................................................................................... 82
Page 4
LPC 48 / 96 Users Manual
10.1 CHOOSE SUBMASTER OR CUE RECORD MODE. .......................................................................................... 83
10.2 SELECT FIXTURES, SET INTENSITY LEVELS ................................................................................................... 84
10.3 SET PROPERTIES .................................................................................................................................. 85
10.3.1 Set Color................................................................................................................................ 86
10.3.2 Creating new labels: ............................................................................................................. 87
10.3.3 Using the Color Mixer ........................................................................................................... 89
10.3.4 Set Beam............................................................................................................................... 90
10.3.5 Set Position ........................................................................................................................... 91
4.
CHANGE FIXTURE SELECTION .................................................................................................................. 94
10.4 SAVE SUBMASTER OR CUE .................................................................................................................... 95
11
WORKING WITH EFFECTS .............................................................................................................. 98
11.1 COLOR EFFECTS ................................................................................................................................. 100
11.1.1 To create a new Label Chase: ............................................................................................. 101
11.1.2 To set the chase rate, click on the ‘parameters’ tab........................................................... 103
11.1.3 Sequencing.......................................................................................................................... 104
11.2 BEAM EFFECTS ................................................................................................................................. 108
11.3 POSITION EFFECTS ............................................................................................................................. 109
11.3.1 To create a new Position Effect: ......................................................................................... 110
12
WIRELESS DMX OPTION .............................................................................................................. 114
12.1 WIRELESS DMX PROPERTIES .............................................................................................................. 114
13
SUPPORT AND CONTACT INFORMATION .................................................................................... 116
14
GLOSSARY OF CONSOLE RELATED TERMS ................................................................................... 117
15
INDEX.......................................................................................................................................... 120
Page 5
LPC 48 / 96 Users Manual
Introduction
The LPC console is perfect for users who desire a simple approach to lighting but
require the feature set that will grow along with their needs. Theatres, Houses of
Worship, Schools, Production, and Rental Houses can use this console and keep
it up-to-date with new expanding lighting technology.
With the release of Version 2 software, the LPC has a substantially new set of
features for controlling LED and intelligent fixtures. Sections have been added
to the manual to address these new Version 2 features.
Additional copies of this LPC manual can be downloaded from the Leprecon
website at www.leprecon.com.
Page 6
LPC 48 / 96 Users Manual
LPC Console Layout
Page 7
LPC 48 / 96 Users Manual
Video Interface Layout
Page 8
LPC 48 / 96 Users Manual
1 Specifications
The following specifications may be changed at any time without notice. Future
software upgrades may affect these system specs.
1.1 Channel capacity
The LPC-48V and LPC-96V manages up to 512 control channels.
1.2 DMX dimmers
Controls 2 Universes of 512 DMX channels for a total of 1024 DMX channels.
Industry standard 5 pin XLR connectors are used. W-dmx Wireless link is
available as an option for the first Universe (512 channels) only.
1.3 Power Supply
LPC uses an internal power supply, operating over a voltage range of 85 to 260
VAC. No separate power adapter is used. Line cord connection is IEC C12.
1.4 Peripherals
LPC can be used with a standard USB mouse and keyboard.
A standard VGA monitor and USB mouse are needed for operation. Minimum
monitor resolution is 1024 x 768, LPC will auto-detect monitor resolutions up to
1440 x 900.
ELO touch screen monitors are supported by LPC, allowing easy touch control
instead of using a mouse. Contact Leprecon for order number and availability
information.
1.5 Show Storage
Page 9
LPC 48 / 96 Users Manual
All show data is stored on internal flash. Internal show can be backed up to USB
flash memory.
1.6 Work Lights
The LPC has provisions for two 12 VDC work lights (Littlites®). The 4 pin XLR
connectors are located on the far left and right of the console’s back panel. The
internal work lamp dimmer supports lamps with incandescent or LED light
sources.
1.7 Accessories
An optional road case and dust cover can be ordered.
Page 10
LPC 48 / 96 Users Manual
2 Startup
2.1 Connecting to your system
1. Connect the monitor to the Video port. The LPC requires a minimum
monitor resolution of 1024 x 768 (Standard VGA)
2.
Connect a USB mouse and keyboard, if needed.
3.
If an ELO touch screen is being used, connect the USB from touch
screen monitor.
4.
Connect 5 pin DMX data cable(s) to DMX A or B connector(s).
5. Connect the AC power cord.
6. Turn on the Power switch.
If using the optional wireless DMX transmitter see section 12
2.2 Back Panel Connections
Figure 1: Back Panel Connections
AC Power and Switch
DMX Outputs line A & B
Page 11
LPC 48 / 96 Users Manual
Littlite
Connection
USB Connections
Touchscreen,
Keyboard, Mouse
Touchscreen
Connection
Ethernet
Connections
(for future use)
Video Monitor
Connection
2.3 Boot sequence
On V1 consoles, a Linux boot screen appears and text displays that shows the
boot progress. This is normal operation. LPC V2 software will display a blank
screen, then a Leprecon logo. LPC V2 fully boots in about 45 seconds.
2.4 Power-off
To turn off the LPC:
1. Click on the X in the upper right corner of the screen. A dialog box
appears asking ‘are you sure?’
2.
Confirm the shutdown dialog box by clicking or touching Yes.
3.
Wait for the applications to shut down, and then turn off the power switch.
Page 12
LPC 48 / 96 Users Manual
3 Setup
The main setup screen shows the current software versions, and contains
submenus for all setup functions, (See Figure 3).
Three software components comprise the LPC system, and the revision level and
release date for each of the components is shown in the main Setup screen.
3.1 Real Time Clock
The Real Time Clock is a way of visually checking fade cues in real time. This
feature is located at the top of each screen in the LPC title bar.
Clicking on the clock face will start, pause or reset the elapsed time display.
Figure 3: Setup Screen
3.2 On-screen Keypad
The On-screen Keypad allows quick access for entering numeric values in any
given field. It is an alternative to using the keypad on the console (See Figures 4
and 5). The on-screen keypad can be found next to any dialog box. This icon
Page 13
LPC 48 / 96 Users Manual
follows the action when a dialog box is selected and highlighted in yellow.
Figure 4: Keypad icon
Figure 5: Opened Keypad
Example of use:
If the user wants to set the Cue Stack fade-up time value.
Select the Keypad icon
Select numeric value.
Close keypad select the X located at the lower right corner.
The Backspace button will erase the entered numeric values.
3.3 Patch
Patch is a way to reassign the order of desk channels to DMX dimmer channels.
The default patch is set 1 to 1, which is to say desk channels 1 through 512 are
assigned to DMX dimmer channels 1 through 512. Dimmer to board channel
assignments are set in the patch screen. The LPC is set up to store numerous
custom patches. Each patch will have a unique name that is given by you, or the
patch will be assigned an ID default number.
All patches will be listed in the patch screen (See Figure 6). Only one patch can
be used at a time. Applying a patch makes it active, and the dimmer to channel
assignment changes at the time it is applied. Patches can be viewed by desk
Channel or by DMX Dimmer.
System default patch cannot be modified, but it can be copied to a new patch.
Page 14
LPC 48 / 96 Users Manual
3.4 Creating a Custom Patch.
1. Select the Set up tab; select the Patch tab.
2. The patch list window will open, and Default (System) (Active) is
highlighted in green.
3. Select the New tab in the left column. A window will open with the
message, “Enter name for the new patch”.
4. The icon to the right of the dialog box is an onscreen keyboard which can
be used to name the patch. If a name is not given, “Patch 01” is the
default.
5. Select Save and the new patch will appear in the Patch List window, (See
Figure 6).
6. Select the Newly named patch from the list; it should now be highlighted in
green.
7. To make the patch Active, select the Apply tab located on the left column.
Active will appear next to the name in the Patch list.
Page 15
LPC 48 / 96 Users Manual
Figure 6: Patch List Screen
3.5 Edit the Custom Patch
The Patch can now be edited in two ways; by Dimmer, or by Channel. The
choice can be made by selecting the tabs located on the left column, (See Figure
7). In this example we will create a patch by using the channel method.
1. Select the Edit tab on the left column
2. Select the Add tab on the left column and the control window opens.
3. By Channel (default), select desired Console channel the dialog box.
4. Enter desired light Level (default is 100%).
5. Choose DMX Line output A or B.
6. Enter desired dimmer DMX channel number(s) by selecting the Dim
Window which will highlight in yellow.
7. Use the command keys on console Dim, Thru, Except, And to enter a
patch string. Use the format example: Dim 1 Thru 12 And 22 Enter.
8. Select Save and Exit to go back to the patch list screen.
Page 16
LPC 48 / 96 Users Manual
Figure 7: Patch Edit Screen
Note: Multiple dimmer channels can be patched to a single desk channel, but
multiple desk channels cannot be patched to a single dimmer channel.
3.6 Patch by Mapping Channels
New mapping is a time saving way to patch a chain of DMX or dimmer channels
to desk channels 1 to 1, but starting the patch at a desired channel and given a
range (See Figure 8).
1. In the Patch screen, select the Edit tab in the left column.
2. Select the New Mapping tab in the left column.
3. The mapping window will appear where the patch information is entered.
4. The Start at Channel dialog box is where the starting desk channel is
entered.
5. Starting DMX line is where line A or B is entered.
6. Starting DMX Channel dialog box is where the dimmer DMX channel
Page 17
LPC 48 / 96 Users Manual
number will start.
7. The Number of Channels to Map dialog box is where the range of
channels will be entered.
8.
Select Save and Exit.
Figure 8: Patch Mapping Screen
Note: A Warning message will appear if the patched channels are outside the
range.
Page 18
LPC 48 / 96 Users Manual
3.7 DMX Assignment
The LPC can be configured to control many different types of DMX fixtures. The
DMX Assignment controls are used to set up the LPC for the specific fixtures in
the lighting system.
Conventional dimmers (intensity control only) as well as intelligent fixtures are all
added to the system in DMX Assignment.
Tabbed folders Line A and Line B are used to show the state of the two DMX
universes, and add or remove DMX devices. The List View tab summarizes all
DMX devices in a single table.
3.7.1
Adding conventional dimmers
Page 19
LPC 48 / 96 Users Manual
The default (empty) show in an LPC contains 48 channels reserved for dimmers.
This is shown as two 24 channel ‘generic’ dimmers as shown above. More
dimmers can be added to the system by clicking on the ‘Add New’ box on the
right side of the screen, and choosing ‘conventional dimmers’
Once the dimmer type is selected, drag or simply click on the destination DMX
address. Once the fixture is placed, a dialog will be displayed allowing a name to
be entered, and changes made if needed to the start address or DMX length
before the data is finally saved.
Page 20
LPC 48 / 96 Users Manual
The ‘auto patch’ feature can be used to assign the new dimmer to board
channels without going into the Patch screen. Enter a value in the Start Channel
field, and all channels in the newly assigned dimmer will be patched to
consecutive board channels.
3.7.2
Modifying existing assignments
Dimmers already placed in the DMX Assignment can be moved or re-named
later. Simply click on the displayed dimmer, when it has been selected it will turn
magenta:
The selected dimmer can be ‘dragged’ to a new start address, or the text boxes
on the right side of the screen can be used to change the address. Click ‘Save’
to update the assignment with the new data.
Page 21
LPC 48 / 96 Users Manual
3.8 Control Features
Control features are used to send special commands to intelligent fixtures. These
commands are used to turn on and off the lamps in the fixture, and to reset
(home) the fixture. Not all fixture type support control features, and in some
cases it’s possible to disable control features at the fixture itself.
From the Setup screen, click on Control Features. Selecting a fixture type from
the list of fixtures in your show will display the control features available for that
fixture type.
Select the control feature, and LPC will show a list of individual fixtures.
Page 22
LPC 48 / 96 Users Manual
The image above shows Lamp ON selected. Click on individual fixtures to send
Lamp On commands to those fixtures, or click ‘Activate For All’ to send Lamp On
commands to all of the MAC600 fixtures.
Note: Control Features are applied one at a time to the selected fixture. This
prevents excessive current draw when using Lamp On for a large number of
fixtures.
Page 23
LPC 48 / 96 Users Manual
3.9 Settings
The Settings screen is where one can change the application of the console. The
manual fader operation, DMX output, Littlite® intensity, and Blackout enable can
be set in this screen, (See Figure 9).
3.10 Manual Mode
This selects 2 scene preset, or wide mode for the manual faders, (See Figure 9).
Wide Mode – allows the upper and lower bank faders to be a single scene.
Two Scene Preset Mode – mixes between the upper and lower bank of
faders channels using the manual fader as control.
Note: This change can disrupt stage output, so is set as a configuration item.
3.11 DMX Mode
The DMX Mode allows the user to have a choice in how the DMX channels are
output. The console has the capability to output a total of 1024 channels on DMX
line A and line B. An alternative choice would be to send a total of 512 DMX
channels on 2 separate outputs; DMX line A will mirror line B.
The DMX Mode has two settings
Normal (A & B lines) – This mode allows the user to control a total of 1024
DMX channels on two lines.
Mirrored (A mirrored to B) – This mode allows the user to control 512 DMX
channels; Line B will mirror the output of Line A.
3.12 Littlelite® Intensity
This control sets the light level of the gooseneck work lamps. Use the on screen
keypad to set the level (See Figure 9).
Page 24
LPC 48 / 96 Users Manual
3.13 Blackout Enable / Disable
When Blackout Enabled option is selected the Black Out button on the console,
which is located above the Grandmaster fader, will set all desk channels to Zero
when pushed. Alternatively when the Black Out is Disabled option is set, the
Black Out button will not activate when pushed (See Figure 9).
Figure 9: Settings Screen
3.14 Littlite® Intensity Shortcut
The Littlite® intensity setting shortcut is located on the LPC title bar at the top of
every screen, and is represented by the icon in Figure 10. When the screen is
open the user can move the slider to the desired light level (See Figure 11).
Page 25
LPC 48 / 96 Users Manual
Figure 10: Littlite® Icon
Figure 11: Intensity Setting
Page 26
LPC 48 / 96 Users Manual
3.15 Defaults
The Defaults area is used to set standard operating times for the LPC.
This includes default times for Cue stacks, Submasters, Quicklooks, and Chase
properties. These defaults are applied to newly created items, (See Figure 12).
Figure 12: Default Settings
Page 27
LPC 48 / 96 Users Manual
3.16 Clear
Clear functions are used to erase selected areas or the entire board memory,
(See Figure 13).
Figure 13: Clear Settings
3.17 Park
Board channels or specific DMX dimmer circuits can be set to a specific value for
the duration of a show or programming session. This is called Parking. This
can be useful to turn on work lights or turn off an improperly focused fixture.
Page 28
LPC 48 / 96 Users Manual
Parked channels levels are not included in Cues or Submasters that are
recorded while the channels are on.
The interface for Park is shown in figure 14.
Select the Park tab and the Park screen will appear.
•
To park a desk channel use the left dialog box.
•
To park a DMX or dimmer channel use the right dialog box
1. Select the desired dialog box and the on-screen keypad will appear.
2. Enter the Channel number and Level
3. The parked channel number and level will appear in a list to the right of
the dialog box.
4.
To Un-Park a channel, highlight a desk channel or dimmer channel from
the list and select Delete.
Figure 14: Park Screen
If any channels or dimmers are Parked, a red indicator with the letter ‘P’ is shown
on the title bar at the top of the screen.
Page 29
LPC 48 / 96 Users Manual
3.18 Show
Backing up and restoring show data can be achieved using an external flash
device seen in figure 15. The access to this function is in the Show screen, (See
Figure 16).
Figure 15: Front USB Location
Shows can be Loaded and Saved in the following example.
1. In the Setup section, select Show.
2. Insert the USB storage devise.
3. Select Load Show and the window will open with the information from
your USB storage devise.
4. Select the desired show and select Open. The show will take a moment to
load.
5. The show name can be entered or edited with the On Screen keyboard.
Save Show works in a similar way as loading a show.
Page 30
LPC 48 / 96 Users Manual
1. In the Setup section, select Show.
2. Insert USB storage devise.
3. Select Save Show and the Save Show window will open.
4. Select the desired file location for the Show.
5. Using the On Screen Keyboard name the show.
6. Select Save.
Figure 16: Load Show Screen
Page 31
LPC 48 / 96 Users Manual
3.19 Updates
Software updates are installed in LPC in the Updates screen, (See figure 17).
Files are loaded from flash memory to LPC program storage. Updates may
contain new features and performance enhancements.
Future software updates may be obtained from the Leprecon website or e-mailed
directly.
Figure 17: Software Update Screen
Page 32
LPC 48 / 96 Users Manual
4 Stage View - Manual Channels
The LPC allows manual channel control using front panel faders. Channels
beyond the fader range are set using the video interface or keypad, and are
referred to as Virtual Channels.
The Manual Fader on the left side of the fader banks controls the output of the
desk channel faders. Getting output from the manual scene requires the Grand
Master and the Manual fader to be up. LPC must be in Run Mode to see Stage
view. Submaster Run and Cue Run controls and features are similar.
4.1 Using Channel Faders
Operation of the desk channel faders are chosen in the Settings screen, (see
section 3.3.1.) The desired use of the desk faders is selected by either Wide
Mode or Two Scene Preset Mode. The Fader Mode key, located above the
manual fader, is a secondary control of the operation, (See Figure 18).
The two banks of faders can be used in the following ways:
Wide Mode
Fader Mode – Manual: all desk channel faders are used as a single scene.
The manual fader has control over the desk and virtual channel output.
Fader Mode – Subs: the lower bank faders are Submasters only, and the
manual fader does not affect their output. The upper bank and virtual channel
outputs are controlled by the manual fader.
Two Scene Preset Mode
Fader Mode – Manual: upper and lower bank of desk channel faders are set
as two separate scenes. The manual fader is used to crossfade between the
two scenes, and the virtual channels are not affected.
Page 33
LPC 48 / 96 Users Manual
Fader Mode – Subs: the bottom faders are Submasters only and the manual
fader does not affect their output. The manual fader has control over the
virtual
channels.
Figure 18: Fader Mode
4.2 Bump buttons
LPC bump buttons are used to flash a channel or Submaster to full level. The
bump buttons are under their associated fader channel. The four modes of bump
operation are chosen with the Bump key, which is located above the blackout
key, (See Figure 19).
Off - bumps are disabled.
Add - pressing a bump button brings up a channel or Submaster without
affecting other channels.
Solo - pressing a bump button brings up a single channel or sub, and blacks
Page 34
LPC 48 / 96 Users Manual
out all other channels.
Latch - pressing and releasing a bump turns on a channel or sub. Pressing
the bump a second time turns off the channel or sub.
When a Submaster is turned on with Latch mode, it will fade up and down using
Submaster fade times.
4.3 Using the Keypad
LPC includes a numeric keypad and function keys to set channel levels.
Pressing the Channel key brings up the dialog for selecting and setting channel
levels.
Example: Channel xx Thru xx at Level xx Enter.
With channels selected, use the level slider to tweak levels.
Repeating the channel selection process allows a new group of channels to be
selected, (See Figure 19).
Figure 19: Keypad
Page 35
LPC 48 / 96 Users Manual
4.4 Setting Channels with Video Interface
If a touch screen is connected, touch a channel selection to capture it. The
channel number and level field will turn green. Use the Level slider located left
of the channel markers to set the channel levels, (see figure 20). Touching or
clicking channels will select and de-select them.
If there is not a touch screen installed, selecting elements with the mouse has the
same effect.
The commands at the bottom of the screen are used to control channel
operation, (See Figure 20).
Touching the Channel command opens a dialog box where the user can
select channels and levels using the keypad.
A group of channels can be set by touching the first channel number, select
the Thru command at the bottom of the screen, and the last channel number.
A string of channel numbers should turn green. Touch the Level Slider and
move to set levels.
The Release command deselects channels, and the green highlight
disappears. New channels can now be selected.
Pressing the Clear All command sets all channels to zero.
Page 36
LPC 48 / 96 Users Manual
Figure 20: Stage Run Screen
4.5 Incremental Levels
The 6 Incremental selectors are located to the right of the level selector and are
represented by the icons in figure 21. The purpose of the Increment icons is a
time saving way to change the overall light level of a look while keeping the
individual channel levels in proportion. So instead of changing the level of
individual channels, the user can select one of the Incremental icons which will
affect the scene.
Page 37
LPC 48 / 96 Users Manual
Increase by 10
Increase by 5
Increase by 1
Decrease by 1
Decrease by 5
Decrease by 10
Figure 21: Incremental Levels
4.6 Groups
Any set of selected channels can be saved as a group. This provides a shortcut
for using the same channels again later for Cue or Submaster recording, (See
Figure 22). Channels can be selected and de-selected from the group screen as
well.
1. In any Run or Record screen, press the Group key located on the front
panel, or click on the word Group located at the bottom of the screen.
2. Once channels are selected, touch Save As… to create the new group.
3. Give the group a convenient name, and it can be re-used for future
recording.
If there are channels selected when the Group button is pressed, that selection
will be carried into the Group creation screen.
Page 38
LPC 48 / 96 Users Manual
Figure 22: Group Screen
Page 39
LPC 48 / 96 Users Manual
5 Submasters
5.1 Submaster Properties
The Submaster record screen is used to record channel levels, as well as all
other properties.
Page - selects the current Submaster page. The current page can also be
set at any time using the front panel Page key.
Sub - this control selects the Submaster to be recorded.
Title - a name can be set for the Submaster. This title will be shown in the
Submaster Run screen.
Upfade and Downfade - sets up and down fade time for a Submaster. Fade
times only apply to bump toggle mode.
Linked Chase - each Submaster can have a chase linked to it. Bringing up a
Submaster will then start the selected chase.
Chase Rate - sets the speed of the linked chase.
5.2 Moving about the screen
Left and right arrow keys are used to 'tab' from field to field.
Adjust the levels within a field with up and down arrows, or use the keypad to
enter a new value.
5.3 Recording Submasters
Selecting the Record and Submaster tabs bring up the Submaster Record
screen.
The screen shows Submaster properties at the top of the screen, and channel
levels at the bottom (See Figure 23).
Channel levels shown are the actual LPC output, so previously recorded
Page 40
LPC 48 / 96 Users Manual
Submasters can be used to build new looks.
5.4 Saving Submasters
1. Set channel levels for Submasters using manual faders, video interface, or
channel selection keys.
2. The stage output will show levels set for Submaster recording. Use the
incremental levels to fine tune the look.
3. Pressing the Enter key on keypad or select Save tab will store the
Submaster data. A message will be displayed, “Scene Saved: Page ##
Sub ##,” which confirms the Submaster was saved.
•
The Submaster number will automatically advance so that a sequence
of subs can be recorded.
•
If a Submaster already contains data, LPC offers the options of
replacing the current data, inserting a new Submaster, or canceling the
operation.
•
Inserting a new Submaster will shuffle all higher numbered
Submasters up to make room for the inserted cue. If there is data on
Submaster 24, that scene will be lost.
Predefined groups can be used also to select channels for recording. Press the
Group key on the front panel to show previously created groups, (see Groups in
section 4.6). Click or touch on the group name to select, then click or touch ‘OK’
to return to the record screen.
Page 41
LPC 48 / 96 Users Manual
Figure 23: Submaster Record Screen
Page 42
LPC 48 / 96 Users Manual
5.5 Submaster Playback
The Submaster Run screen shows the status of all LPC Submasters. The
display at the top includes Submaster name, current level, and page status.
Stage view channel levels are shown below the Submaster status display.
Next and Previous scroll controls allow viewing the complete set of 24
Submasters.
The active Submaster page can be changed from the Run screen.
Submaster Run screen allows access to manual channels as well.
Use the bottom bank of faders on the LPC to control the corresponding
Submaster playbacks.
Figure 27: Submaster Run Screen
5.6 Submaster Preview
LPC uses a Preview function to check and change subs that have already been
Page 43
LPC 48 / 96 Users Manual
recorded. The background color changes to show that the channel display no
longer shows Stage view.
Preview also allows blind changes to Submasters. Previewing and changing an
active Submaster will show the changes in the board output. Changing a
Submaster that is down will be done blind, with no changes seen on the stage.
From the Submaster Run screen, click or touch the Preview control in the lower
corner of the screen.
The background changes color, and the channel levels shown are the values
of the Submaster, not stage levels.
In Preview mode, all the channel selection methods (faders, touch screen,
channel dialog) can be used to change Submaster channel levels.
Change the channels individually or use the incremental level buttons.
Clicking Save will update the Submaster channel values.
Another Submaster can be previewed, or click Exit to return to Submaster
Run screen.
Figure 28: Submaster Preview Screen
Page 44
LPC 48 / 96 Users Manual
5.7 Quick Looks
Six special scenes, called Quick Looks, give fast access to specific scenes.
Quick Looks are special Submasters, with no page location (See Figure 24).
Quick Looks are always available and are ideal for giving lighting control for
specific scenes to untrained operators. Selecting Quick Looks gives access to
the six memories.
To record Quick Looks:
1. In the Submaster Record screen, click the Page drop down menu. Above
Page 1 are Quick Looks.
2. Select desired Quick Look location: (1- 6)
3. Set channel data and fade times.
4. Select Save
To playback a Quick Look simply press one of the pre-recorded buttons.
Pressing it again will turn it off.
Figure 24: Quick Looks Buttons
Quick Look channels ARE NOT included when subs, cues or chases are
recorded. Also, Quick Looks are independent of the Master level, but are
controlled by the Blackout switch.
Page 45
LPC 48 / 96 Users Manual
5.8 Copy Scene
Copy Scene is a way to move a recorded scene to a different location. The LPC
can change the order of a list or move a recorded scene to a different operation
mode such as Cue, Submaster, or Chase. The scene can be copied in Record or
in Preview mode. The user can copy the scene with its fade time intact, or copy a
scene with only the light levels; this will set the fade times to default. Copy
Scene Icon can be found at the top right of the Record and Preview screens,
(See Figure 25).
1. In the Record or Preview screen select Copy.
2. A window will open and a question will ask, “Where do you want to paste
this scene” (See figure 26).
3.
Select the lower window to open the menu; Cue, Submaster/ Quicklook,
or Chase.
4. If Cue is selected.
•
Enter the desired Cue Number in the window.
•
Save Copy.
5. If Submaster/Quicklook is selected.
•
Enter the desired number in the Page and Submaster window.
•
Save Copy.
6. To copy Scene to a Quicklook.
•
Select the page window and select the drop down menu. The
Quicklook tab will be at the top of the menu.
•
Save Copy
7. If Chase is selected.
•
Enter the desired number in the Pattern window; enter desired number
in the Step window.
•
Save Copy.
Page 46
LPC 48 / 96 Users Manual
Figure 25: Copy Scene
Figure 26: Copy Scene Menu
Page 47
LPC 48 / 96 Users Manual
6 Cues
6.1 Cue Properties
In the Cue Record screen, properties for the cues to be recorded are shown at
the top of the screen. Stage view below shows channel status, which is the data
for cue recording.
Each cue has these timing properties:
Wait time - Time that can be set to delay the start of the fade after pressing
'GO'
Follow time - Setting Hold Time will start a cue automatically after the
previous cue without another 'Go' press.
Up Fade - Time for the new cue to reach 100%
Down Fade - Time needed for the previous cue to completely fade out.
In addition, each cue can have a Chase associated, with a specific rate.
When the cue starts to fade in, the chase will also start.
Cues can be named using the Title field, and this name will appear in the Cue
Run screen. The Link field can be used to set out of sequence playback.
6.2 6.2. Recording cues
LPC can save and playback up to 999 cues. Point Cues can be inserted inbetween two Cues. This is good for editing a show after the Cue stack has been
recorded. Example: Cue# 3, [3.5], 4. Each cue has independent up and down
fade times. If desired, each cue can have associated delay and follow times. The
entire Cue Stack can be turned off if LPC is used only for manual and Submaster
control.
Page 48
LPC 48 / 96 Users Manual
6.3 Saving Cues
1. Press the Stack On key.
2. Set channel levels for a cue using manual faders, video interface, or
channel selection keys. The stage output will show levels set for the cue.
3. The up and down arrows can be used to increment and decrement time
values within the fields.
4. The left and right arrow keys can be used to move from field to field on the
record screen, similar to the ‘tab’ function on a computer.
5. Pressing the Enter key or select Save will store the Cue.
6. A message will be displayed confirming that the “Cue was saved.”
The Cue number will automatically advance to set up the next step.
Figure 29: Cue Record Screen
Page 49
LPC 48 / 96 Users Manual
6.4 Cue List
From the Cue Record screen, clicking or touching the Cue List control will open
the Cue List screen.
This screen shows a summary of current cue timing parameters, and the cue
order. The graphic at the bottom of the screen represents scene timing values.
Future releases will enable timing to be changed by dragging the timelines.
Cue Order can be changed by selecting a cue. Using the up and down arrows
on the left side of the screen will move a cue up or down the list, (See figure 30).
Figure 30: Cue List Screen
6.5 Cue Playback
Opening the Cue Run screen shows Cue status, with graphic displays for active
fades. The top part of the screen shows current Cue information and the bottom
Page 50
LPC 48 / 96 Users Manual
of the screen shows Stage levels. The two vertical bar graphs show the fade
progress of an active fade, (See Figure 31). If there are wait times or follow
times that are elapsing, that are also shown with a progress bar.
Information about the next cue in the list is shown to the right of the fade display.
The cue number and name is show, as well as the fade times.
Figure 31: Cue Run Screen
6.6 Manual Crossfade
When the Cue Stack is first turned on, the Cue list will be in a blackout state.
Moving the manual crossfader will transition from blackout to the first cue. The
fade status will be shown on the bar graph displays at the top of the screen.
When the cue is complete moving the manual fader back to its original position
will crossfade between the next two cues. An image of the LPC’s Cue control
section is figure 32.
Page 51
LPC 48 / 96 Users Manual
6.7 Cue Properties
Cue fades are handled with three front panel buttons:
Go - Starts the fade to the next cue
Hold - Stops the fade. Press 'Go' to resume.
Back - Reverses a fade that is in progress
For automatically timed cross fades, press the Go button. The cues will fade up
and down according to the fade times associated with the cue.
6.8 Taking Control with the Manual Crossfader
After cues have been played back with the Go button, the manual fader can be
used to advance the cue stack. This requires pressing the Hold key to stop
further timed fades.
1. Press Hold. An indicator will appear on screen that cue playback is on
Hold.
2. Move the Manual Crossfader to the bottom position, then to the top to
match the level of the completed fade. The Hold indicator will turn off, and
the word ‘Manual’ at the top of the Cue Run screen will change to a bold
font.
3. Move the Manual Crossfader from the top position to the bottom position
to change to the next cue.
Page 52
LPC 48 / 96 Users Manual
If the Hold button is pressed in the middle of a timed fade, the manual crossfader
can be used to resume the fade. The procedure is similar:
1. Move the Manual Crossfader to the bottom position.
2. Move the Manual Crossfader up from the bottom position until it matches
the current fade position. The Hold indicator will turn off, and the word
‘Manual’ at the top of the Cue Run screen will change to a bold font.
3. Once the level is matched, the manual fader will have control. Move the
Manual Crossfader to the top position to complete the fade.
Figure 32: Cue Control Section
Page 53
LPC 48 / 96 Users Manual
6.9 Cue Override
To jump out of sequence to a different cue, use the Override controls, (See
Figure 33).
1. Press the front panel Cue button this will move the cursor to the Next Step
field.
2. Enter a new cue number, and set timing if it is to be different than the
saved time.
3. Pressing Apply or Enter loads this new cue as the next cue to be played
back when the Go button is pressed.
4. Verify the selected cue is in the Upcoming box.
Figure 33: Cue Override Screen
6.10 Cue Preview
LPC uses a Preview function to check and change Cues that have already been
recorded. When entering Preview, the background color will change to show that
the channel display no longer shows Stage view.
Preview also allows blind changes to Cues. Previewing and changing an active
Cue will show the changes in the board output. Changing a Cue that is down will
be done blind, with no changes seen on the stage.
Page 54
LPC 48 / 96 Users Manual
1. From Cue Run, click or touch the Preview control at the bottom of the
screen.
2. All properties of the selected cue will be shown.
3.
Channel levels can be adjusted using the same techniques that are used
to create the Cues; faders, channel controls, or touching a channel, (See
Figure 34).
4. Selecting Save will update the cue. Previous and Next can be used to
preview other cues in the show.
Figure 34: Cue Preview Screen
Page 55
LPC 48 / 96 Users Manual
7 Chase
LPC uses Chase patterns to run sequences. Chases can be linked to Cues or
Submasters, or selected and controlled from a front panel fader.
The first four chases are permanent system chases, and cannot be altered.
There are a total of sixteen programmable chase patterns available.
7.1 Chase properties
Each LPC chase has the following properties:
Pattern - specified which chase is being recorded.
Step - shows the last step saved
Rate - the speed of the chase, shown in Beats Per Minute (BPM)
Loop Count – Setting a value for Loop Count will stop the chase after a
specific number of cycles.
Blend - Chases can be set to snap from step to step, or fade from one step to
the next. Setting blend to zero sets the chase to snap, and a blend value of
100% will produce a fluid chase that is constantly fading from one step to the
next.
Title – A name given to a specific Chase pattern.
7.2 Recording Chases
Select Record Chase to see the options for building a new chase. Data relating
to the specific chase is shown at the top of the screen, and channel data is
shown below, (See Figure 35).
Patterns 1 - 4 are permanent and the steps cannot be changed.
1. In Record mode select the Pattern number from the menu.
Page 56
LPC 48 / 96 Users Manual
2. Select the Step; the dialog box should state “New Step”.
3. Set desired channel Level, Rate, and Blend.
4. Add a Title using the on screen keyboard if desired.
5. Select Save, the message, “Chase Step saved. Pattern: # and Step: # will
display for 5 seconds.
The Delete… control is used to remove steps from a chase pattern.
Figure 35: Chase Record Screen
7.3 Chase Playback
If chases are associated with a Cue or Submaster, they will automatically start
when the cue or Submaster is used. Fading out the cue, or bringing down the
Submaster fader will stop the chase.
Chases can also be run from the front panel. The Chase fader, tap button, and
pattern button are used to control any of the chase patterns.
Pressing Pattern will bring up a screen for picking a specific chase.
Page 57
LPC 48 / 96 Users Manual
Bringing up the Chase fader will fade up that selected chase.
The Tap button is used to set the rate for an active chase.
7.4 Chase Override
The Chase Rate can be changed while in Run Mode. Select Set Chase and the
Chase Pattern’s rate can be edited (See Figure 36).
Figure 36: Chase Rate Override Screen
7.5 Chase Preview
In Preview a recorded chase pattern can be checked, and each step edited. The
screen’s background color changes to show that the channel display no longer
shows Stage view, (See Figure 37.).
1. From the Chase Run screen, click or touch the Preview control in the
lower corner of the screen.
2. In Preview mode, all the channel selection methods (faders, touch screen,
Page 58
LPC 48 / 96 Users Manual
channel dialog) can be used to change step channel levels.
3. The Blend of a chase can be changed and will affect the current output.
4. Clicking Save will update the pattern step values.
6. Previous and Next controls will allow more steps to be previewed.
7.
Click or touch Exit to leave the preview mode and return to Chase Run.
Figure 37: Chase Preview Screen
Page 59
LPC 48 / 96 Users Manual
8 Intelligent Fixture Programming
LPC can be used with conventional dimmers, and also with almost any DMX
controlled LED fixture or intelligent fixture. Programming, editing and playing
back cues with intelligent fixtures is more complex than conventional
programming, but the techniques used in LPC are very similar.
In the following sections, it’s assumed that the user has a basic understanding of
how to use the LPC for programming conventional dimmers and fixtures.
Page 60
LPC 48 / 96 Users Manual
8.1 DMX Line Assignment
The first step in controlling an intelligent fixture is to add it to the DMX
Assignment. This is very similar to the process used to add dimmers to the DMX
Assignment covered in section 3.7
From the Setup Menu, choose DMX Assignment. Click the drop down box to
show the list of available manufacturers, and pick the specific fixture from the
manufacturer list.
Note that some fixtures have more than one DMX personality. It’s important that
the DMX mode set in the fixture match the DMX personality selected from the
fixture library.
Page 61
LPC 48 / 96 Users Manual
LPC has a unique feature that allows the Intensity channel for an intelligent
fixture or LED fixture to be patched automatically to a board control channel.
This lets the user bring up LED and intelligent fixtures using the front panel
faders and channel keys. This may be the easiest way for new users to get quick
results with LPC.
In the case above, the MAC 500 intensity channels would be assigned starting at
board channel 25. This in no way affects the DMX start address of the fixture,
which will be DMX address 100.
Control buttons on this dialog allow the user to invert pan and tilt for each fixture.
The number of fixtures to be added is shown in the box labeled ‘copies’.
Page 62
LPC 48 / 96 Users Manual
8.1.1
List View
The DMX assignment screen has tabs for each DMX universe. A third tab shows
a list of all fixtures in the system. Clicking on the List View tab shows something
like the following:
The scroll bar is used to move the list up or down in the display window.
Selecting an item in the List View gives the user the option of changing
properties for the selected fixture:
Page 63
LPC 48 / 96 Users Manual
Just as when the fixture was first placed in the DMX assignment, options are
shown for start address, fixture name and other attributes.
8.1.2
Editing Fixture Types
Changes can be made to the fixtures that are currently in the show. This can be
used to fix errors in the factory library, or create a new type of fixture that is not
supported in the current library.
Clicking Edit Fixture Type brings up the following dialog:
Page 64
LPC 48 / 96 Users Manual
Any changes made to a fixture definition will apply only to fixtures in the current
show. If a new show is created, and the fixture loaded from the library, it will
revert to the original definition.
All elements of the fixture definition can be modified; such as name, channel
count and individual attributes.
Deleting the fixture from this screen will not delete it from the library, but will
delete the fixture and all associated data from the show.
Page 65
LPC 48 / 96 Users Manual
8.1.3
Creating New Fixture types
New fixture types can be created on the LPC. New fixtures are can only be used
in the current show, are not added to the fixture library. To properly define a new
fixture it’s necessary to have complete DMX data taken from the fixture manual.
To define a new fixture, click on Setup, then Dmx Assignment, Edit Fixture.
Click the Fixture Type drop down box, and select <create new>. This dialog will
be shown:
The Name and Manufacturer fields are text labels that will be used when you add
the fixture to DMX line assigment. Channel count is important, that is the total
Page 66
LPC 48 / 96 Users Manual
number of DMX channels required for the new fixture. Once the Channel Count
field is filled in, the software will generate a blank profile for the fixture.
Each attribute is defined in DMX channel order. The controls at the right side of
the screen are used to set the properties for the highlighted attribute.
Common choices for ‘Type’ are Color, Beam, Position and Intensity. The ‘edge’
type is used for the focus attribute on fixtures that support an adjustable edge
focus. If the attribute is set to the ‘edge’ type, it can be adjusted while
programming from both the position and beam control tabs.
The ‘Default’ value for each attribute is important. This is the DMX value that is
sent to the fixture when it is first selected for programming. Values should be
chosen that will produce white for the Color property, open for the Beam property
(shutter open, iris open, gobo open) and Position set for mid-range (128).
Page 67
LPC 48 / 96 Users Manual
The ’16 bit low’ type is used to build two channel attributes, such as Pan and Tilt.
Fixtures that support two byte control for movement or other attributes will use
full 16 bit processing for timed fades or fixture moves.
To create a 16 bit attribute, first create all of the ‘high’ byte attributes. In the case
of position, create ‘Pan’ and ‘Tilt’ before creating ‘Pan Fine’ and ‘Tilt Fine’
To create the lower resolution attributes, such as Pan Fine, select ’16 bit low’
from the Type list. The software will prompt you to choose the ‘Parent’ attribute
from the list of existing attributes. Once the Parent is selected, LPC will treat the
pair of channels as a single 16 bit attribute during cue playback.
16 bit attributes can be used for all functions including Intensity.
Page 68
LPC 48 / 96 Users Manual
9 Controlling LED and Intelligent fixtures
Once the LPC is set up with fixtures in the DMX Assignment screen those
fixtures are available for use. Fixtures can be controlled in Run mode without
saving cues, or in Record mode if submaster or stack cues will be saved.
The way the fixtures operate in run and Record modes is quite different.
•
When selected in Run mode, fixtures remain in their current settings, so that
small changes can be made ‘live’ with a minimum of disruption.
•
In Record mode, selected fixture will have their ‘default’ values for Color,
Beam and Position properties loaded.
After adding fixtures, the LPC Stage view looks like this:
Page 69
LPC 48 / 96 Users Manual
In the display above, the 48 conventional channels are shown, and two types of
intelligent fixtures. The LPC display is dynamic; fixture types can be minimized if
they are not being used by clicking on the minus [ - ] sign next to the fixture type
name.
When the fixture types are minimized, they are displayed at the top of the screen
as a minimized fixture. The illustration below shows the Stage view with both
fixture types minimized:
Clicking on the [ + ] sign will restore the fixture list to the display screen.
Page 70
LPC 48 / 96 Users Manual
9.1 Setting Intensity for Intelligent fixtures
If intelligent fixtures have Intensity assigned to board channels, you can use
faders, or the Channel key to select and set level for them. See section 8.1 –
DMX Assignment for more information about this option.
The fixtures in the illustration above were assigned with Intensity channels
mapped to board channels. In the case shown, board channels 49 through 60
are used to control the intensity of the intelligent fixtures.
If board channels were NOT assigned to the fixture intensity control, the Stage
screen will look like this:
Notice that the fixtures are still shown on screen, but have no channel numbers
associated with them.
Page 71
LPC 48 / 96 Users Manual
In either case, clicking on the fixture will select it, shown by the fixture display
turning green.
Clicking on the on-screen level controls, or using the ‘level’ key will adjust the
intensity level of the intelligent fixture or LED. All other fixture parameters, such
as color, position and beam will be unchanged from their current position.
Page 72
LPC 48 / 96 Users Manual
9.1.1
Setting intensity - step by step
1) Make sure Master and Manual faders are up
2) Click on fixture selection on screen, which will highlight it in green
3) Use the on-screen fader to set level.
9.2 Setting properties for Intelligent fixtures
With the intensity on, more properties of the fixtures can be set. From the main
screen, click on the ‘Details’ button.
The small shamrock in the button indicates that the ‘shamrock’ key on the LPC
front panel can be used for the same function. The ‘shamrock’ key is a quick
way to toggle between the main display or record screen and the ‘details’
window.
Page 73
LPC 48 / 96 Users Manual
The ‘details’ screen will open, showing the programming interface for all other
properties of the fixtures in the system.
To close the Details screen and return to the main display screen, click on the
‘Close’ button in the upper right corner, or press the ‘shamrock’ key again.
The ‘close’ button also has a shamrock icon as a reminder that you can use the
front panel key.
Page 74
LPC 48 / 96 Users Manual
9.2.1
More about the Details screen
Lots of information about the intelligent fixtures in the system is displayed in the
Details screen. The LPC software uses tabs to organize the features of the
system.
Fixture Tabs:
There is a tab at the top of the ‘Details’ screen for each type of fixture in the
system. Clicking on one of the tabs will show the fixtures of that type.
Inside each tab, fixtures can be selected and deselected without returning to the
main screen. Intensity can be adjusted for selected fixtures as well.
Shortcut buttons at the bottom of the fixture tabs can be used to select and
deselect all the fixtures at one time, clear all data from selected fixtures, or set
selected fixtures to default values for all properties; Color, Beam, and Position.
Page 75
LPC 48 / 96 Users Manual
Properties Tab:
At the bottom of the ‘Details’ screen are the tabs and controls for setting Color,
Beam and Position for intelligent fixtures. Each property has it’s own tab and
controls.
Not all fixtures will have all properties available, LED fixtures may have only
Color properties, and not all fixtures will support color mixing.
Properties and Attributes:
LPC controls intelligent fixtures by setting four basic properties – Color, Beam,
Position and Dimmer. Each of these properties consists of one or more
Attributes, which are related to the basic functions designed into the fixture.
In the illustration above, the tab for Color is selected, showing the pre-defined
colors (labels) available for the fixtures. At the bottom of the screen are the two
Page 76
LPC 48 / 96 Users Manual
attributes (color wheel 1 and color wheel 2) that make up the Color property on
this fixture.
Page 77
LPC 48 / 96 Users Manual
9.3 Intelligent fixture Programming
The previous sections gave an overview of the LPC control software for
intelligent fixtures. Programming submasters or stack cues with LPC uses these
controls to build a look on stage, then save the results.
9.3.1
Before starting
There are a few things about controlling a system of intelligent fixtures that
makes creating cues very different from creating conventional (intensity) cues.
There is so much to know about programming intelligent fixtures that books have
been written on the subject. If one is new to this type of lighting, purchasing a
book or researching the subject on-line would be time well spent.
LTP
A basic concept of programming intelligent fixtures is the idea of ‘LTP’ – Last
Takes Precedence. The name sounds confusing, but the basic facts are simple.
Conventional fixtures are on or off. The conventional fixture is dark when it is not
used in a cue.
Intelligent fixtures have a larger number of properties, including color, gobo
patterns in the beam, and the position of the fixture. The intelligent fixture may
be dark, but all of the other properties remain in their last used state.
The intensity of a conventional fixture can respond to two submasters that are up
at the same time. The fixture will take its intensity from the highest value of the
two submasters. This is called Highest Takes Precedence.
Page 78
LPC 48 / 96 Users Manual
The mechanics of an intelligent fixture can only be in one position at a time. If
Submaster 1 calls for Gobo1 and Submaster 2 calls for Gobo 2, the fixture
cannot do both at the same time. The LPC, like any other controller, has to
choose between these two contradictory commands. It does so by taking the last
scene or submaster activated as the final position. The Last event Takes
Precedence over earlier events.
‘No Change’ cues
LPC controls intelligent fixtures by setting each property; Dimmer, Color, Beam
and Position. A cue usually contains a definite setting for each of these
properties; a certain color, gobo pattern and position on stage.
However, LPC allows cues to be built that do not set all of the properties. Cues
or submasters like this contain a ‘No Change’ value for some properties. LPC
cues can be recorded that will only change the color of a set of fixtures, and the
gobo will remain unchanged. Other cues or submasters can affect only the
position, and leave color and beam in their last setting.
Page 79
LPC 48 / 96 Users Manual
These cues can be very powerful to use, but the results can be confusing. A cue
with No Change properties can look different each time it is used, depending on
the state of the fixtures when the cue is played back.
Make sure to use No Change properties properly. If a cue or submaster does not
‘look the way it did when it was recorded’, probably one or more properties are
set to No Change.
Labels
The LPC software contains defined colors and beam properties for each fixture,
based on the factory fixture library. LPC uses pre-defined labels to set fixture
channels to the correct value.
For example, the standard library for LPC contains the Martin Mac 500. Predefined color labels for that fixture are shown below:
The selected Blue 104 label was created from the values for the two color wheels
shown in the Attribute section. It’s much easier to build cues by choosing Blue
104 than to create the attribute values of 181 for Color wheel 1 and 169 for color
Page 80
LPC 48 / 96 Users Manual
wheel 2 each time.
There are two huge advantages to using labels:
•
A number of complex attribute values can be set quickly with a single label
•
Any number of cues can be updated by editing the labels used to build the
cues.
New labels are easy to create, and speed the programming process. It’s much
more productive to create labels than to program by setting individual attributes.
For more information about using, creating and modifying label, see chapter 10.
Page 81
LPC 48 / 96 Users Manual
10 Building Scenes
The information in Chapter 9 presents some background on the LPC features
and control screens. Chapter 10 will describe the procedure more completely.
The basic steps for recording cues are straightforward:
1) Choose Submaster or Cue Record mode.
2) Select fixtures, set intensity levels.
3) Switch to Details screen.
4) Set properties - Color, Beam and Position.
5) Change fixture selection as needed.
6) Save Submaster or Cue.
Page 82
LPC 48 / 96 Users Manual
10.1 Choose Submaster or Cue Record mode.
Being familiar with recording conventional fixtures to submasters and cues is the
best starting point for recording cues with intelligent fixtures. Refer to Chapters 5
and 6 for more information on saving cues with LPC.
An example of submaster recording will be used to illustrate the steps for
intelligent fixture programming.
•
Click on the Record tab, then Submaster tab, or use the buttons on the LPC
front panel.
Page 83
LPC 48 / 96 Users Manual
10.2 Select fixtures, set intensity levels
•
Set levels for conventional fixtures using faders, channel keys or on-screen
controls. Use the Release feature to change selections, Clear All to wipe out
previous levels.
•
Select intelligent fixtures, set intensity levels as was done for the
conventionals. Minimize and maximize fixture groups if necessary.
Page 84
LPC 48 / 96 Users Manual
10.3 Set Properties
•
After selecting fixtures and setting level, click the Details button, or press the
Shamrock key to switch into Detail view. All fixtures are still selected, and
hightlighted in green. All properties are set to Default values, meaning that
the fixtures should be white, open beam and middle position.
Page 85
LPC 48 / 96 Users Manual
10.3.1
•
Set Color
Choose the color tab. Labels available for the selected fixtures are shown on
screen, click on any label to set the fixtures to that color. If the color labels
are sufficient, go on to programming beam attributes.
Page 86
LPC 48 / 96 Users Manual
10.3.2
Creating new labels:
If a label does not exist for the color desired, it’s a simple matter to create a new
label.
•
First click on ‘default’ to set the color to white, and all attributes to their default
values.
•
Click on the button labeled ‘Edit Values’ at the bottom of the screen.
•
Use the on-screen sliders to adjust the color attributes to create new color
labels.
Clicking or moving the sliders close to the center will increment or decrement the
settings by one DMX value. Clicking farther from the middle or moving the slider
further will change the value by 2, 5 or 10.
Values can be entered directly into the attribute boxes using the numeric keypad.
The Up and Down arrows can be used to ‘nudge’ the values shown in the boxes.
Page 87
LPC 48 / 96 Users Manual
•
Click ‘save as label’ to save off the new settings as a named label.
•
Choose a new name, and enter it into the highlighted text box. The on-screen
keyboard can be turned on by clicking on the icon to the right of the label
field.
Page 88
LPC 48 / 96 Users Manual
10.3.3
Using the Color Mixer
Fixtures that use color mixing (CYM filters) or LED fixtures (Red, Green, Blue)
can use the LPC color Mixer to create new labels. Click the Color Mixer tab to
enable the color control:
The Color mixer allows a range of color, saturation and brightness values for new
labels.
•
Click on the outer color ring to set the color.
•
Click on the internal triangle to set brightness and saturation.
•
When finished, click ‘Save as Label’ to keep the result as a new label.
Note: When returning to the Details screen from Color Mixer, a
message will be displayed indicating that values have been edited.
Page 89
LPC 48 / 96 Users Manual
10.3.4
Set Beam
The Beam properties include gobos, prisms, shutters and any other fixture
attributes that affect the shape or pattern of the light. Gobo rotation and other
modifiers are also set in the Beam properties.
Clicking on the Beam tab will display the controls for the selected fixtures. In the
illustration, the fixture selection will be the same as used for Color. Fixture
selection can be changed at any time.
The Beam details are shown below. Selected fixtures are shown at the top,
labels available for the fixtures in the middle, and individual attributes at the
bottom.
Page 90
LPC 48 / 96 Users Manual
•
Select a label to set all selected fixtures to a new value. If new labels are
needed, use available attributes to create a new label. See the section 10.3.2
regarding label creation.
10.3.5
Set Position
Moving mirror and moving head fixtures can be programmed to light specific
areas. The Position tab in LPC Details is used to set all attributes related to
positioning a fixture.
Position labels are different from Color and Beam lables in two important ways:
1 ) To illuminate the same spot on stage, the Pan and Tilt values are different for
each fixture. The user must create focus positions for each fixture before
programming.
2) For this reason, there are no pre-defined ‘Position’ labels in the LPC software.
Page 91
LPC 48 / 96 Users Manual
To create Position Labels:
•
Click on the Position tab. The screen below will be shown:
In a new show, there are no position labels. The procedure to create them is
this:
•
Deselect all fixtures, then select only one fixture to position.
•
Set the first position of the first instrument. There are three methods for this:
1. Click on Edit Values and use the on-screen encoders.
Page 92
LPC 48 / 96 Users Manual
2. Click in the Pan and Tilt data box, and use the numeric keypad and the up
and down arrows to enter values.
3. Click on the Position Grid, and click on the target area to set position.
•
When finished, deselect the first fixture, and select the next fixture.
•
Position the next fixture. Continue to select, position, and deselect fixtures.
•
When all fixtures are set to the first position, Save the results as a label.
•
When there are enough focus labels created to start programming, choose
the fixture and position from the label list.
Page 93
LPC 48 / 96 Users Manual
4. Change fixture selection
At any point during programming, fixture selection can be changed without losing
data.
Note the values for Color Beam and Position that have been set in the Details
grid, this is the current state of the selected fixtures.
Any area in the grid with No Change data has not been set, and will not be
saved.
Page 94
LPC 48 / 96 Users Manual
10.4 Save Submaster or Cue
•
Set Color, Beam and Position as previously described. For submaster
recording, press the Shamrock key to return from Details back to the main
record screen:
The submaster page and sub to be recorded are displayed at the top of the
screen.
•
If the destination is correct, press the ‘Save’ (or enter) key to record the new
submaster.
Page 95
LPC 48 / 96 Users Manual
Page 96
LPC 48 / 96 Users Manual
About Cue Timing:
Each property (Color, Beam, Position) can have independent fade times set. The
specific property fade times are in the Details screen in the appropriate tab.
The Main record screen has the field for intensity fade times, and times that
apply to all properties, such as Wait time.
Page 97
LPC 48 / 96 Users Manual
11 Working with Effects
Since intelligent fixture programming can be time consuming, LPC contains preprogrammed ‘effects’ that create movement and animation without setting each
specific step. There are effects available for Color, Beam and Position.
Position effects are the most commonly used. LPC has pre-programmed data for
circles, rectangles, random moves (ballyhoo) and other movement sequences.
Key Facts about Effects:
1) New Effects are created with specific instruments.
2) The combination of fixtures, movement and timing parameters is saved as a
unique effect. It’s best to create a descriptive name for the effect.
3) Any saved effect can be used later when building cues. Effects ONLY
contain fixture selection and movement information; effects DO NOT
automatically set intensity for fixtures. When saving a cue with an effect, the
user must set the level of the fixtures as well as adding the effect.
To work with Effects, click the Effects button on the LPC main screen:
Page 98
LPC 48 / 96 Users Manual
The main screen for effects looks like this:
Note the top line of the screen – Current Stage Effects. This shows all currently
running effects. If an Effect name is shown here, it will be included in any
submaster or cue that is recorded.
To clear effects, click on ‘Remove All’. This will stop effects that are running, and
scenes saved will not include any effect.
Page 99
LPC 48 / 96 Users Manual
11.1 Color effects
Color chases are easy to create with LPC Effects. From the Effects screen, click
the ‘Color’ tab:
So far, there are no current stage effects, and no saved effects.
There are two types of Color effects, Label chases and Wheel order chases.
•
Label chases are sequences built with pre-defined color labels.
•
Wheel order chases are designed for fixtures with one color wheel, and will
sequence from one color to the next color on the wheel. This produces a
smooth chase without intermediate flashes of color.
Page
100
LPC 48 / 96 Users Manual
11.1.1
•
To create a new Label Chase:
Pick ‘label list’ from the list of new effects. The screen will change
dramatically:
•
Select fixtures for the effect. Selecting them will set their intensity to 100%.
This can be changed later if needed.
Page
101
LPC 48 / 96 Users Manual
•
Pick color labels from the list of available labels. Clicking on them will move
them to the ‘list’ box. Labels can be taken back out of the effect by clicking on
‘remove’.
•
The effect should now be visible on stage. Add and remove labels as
needed.
•
Labels can be re-arranged by using the ‘up’ and ‘dn’ arrows on the side of the
list box. This sets the order of the label in the chase.
Page
102
LPC 48 / 96 Users Manual
11.1.2
•
To set the chase rate, click on the ‘parameters’ tab.
‘Fade Time’ controls the transition from one label to another. A fade time
of zero will snap from color to color.
•
‘Rate’ refers to the time between steps of the sequence.
•
‘Loops’ sets the number of times the effect will execute. A blank value will
repeat until the cue containing the effect is faded out.
•
‘Wait Time’ sets a time before the effect begins.
Each fixture can have independent ‘Wait’ time. This can be used to create a
‘chrous line’, where one fixture will start an effect, then another, then another.
The wait time can be set manually for each fixture, but there is an easier way;
using Sequencing.
Page
103
LPC 48 / 96 Users Manual
11.1.3
Sequencing
Click on the ‘Sequence’ tab to get access to the sequencing controls:
Sequencing fixtures will apply staggered ‘wait’ times to each fixture. To sequence
the fixtures:
•
Select fixture names from the effect. Click ‘Add’ to create the sequence
•
Arrange the correct order using up and down arrows next to the Sequence
list.
Page
104
LPC 48 / 96 Users Manual
•
Enter the Wait time for the first fixture, and the time between fixtures.
•
Click on ‘Apply Sequenced Wait Times’. When the effect is started , the
fixtures will start the effect one at a time, based on the applied ‘wait’ times.
•
When finished, name the effect. Referencing the fixtures in the effect is a
good idea; making it easier to choose it later from a list.
•
Save the effect.
Page
105
LPC 48 / 96 Users Manual
Now the new effect is in the list of Saved Effects, and is still currently running on
stage.
Returning to the Run screen will show an animated icon to remind you that an
effect is running:
Page
106
LPC 48 / 96 Users Manual
Recording submasters or cues with an Effect running and fixture intensity up will
add the effect to the new scene.
Page
107
LPC 48 / 96 Users Manual
11.2 Beam Effects
LPC has two kinds of Beam property effects, Iris Flick and Label Chase.
For information on the Label chase, see the previous section regarding Color
label chase. The concepts and procedures are the same.
Iris Flick is an effect that opens and closes the iris of an iris-equipped fixture.
Clicking on Effects, selecting the Beam tab, and then Iris Flick will display the
control screen:
The properties for Iris Flick are simple, related to the time to open and close the
iris, and the time between opening and closing the effect.
Page
108
LPC 48 / 96 Users Manual
11.3 Position Effects
Movements such as circles, rectangles and random moves are created with LPC
Position effects. Parameter settings control the size, position and speed of these
movement effects.
Click on the ‘Effects’ button on the main screen. Click on the ‘Position’ tab, and
this screen will open:
In a new show, the list of Saved effects will be empty. The choices for new
effects are shown on the right, in the ‘Create New Effect’ list.
•
Ballyhoo is a random movement of lights, similar to random followspot
movement.
•
Circle / Ellipse, Rectangle, Triangle and Polygon are simple geometric
shapes.
Page
109
LPC 48 / 96 Users Manual
•
Sweep is a movement from a start position to an end position, with an option
of repeating back to start.
•
Label Chase is a position chase using defined position labels. See the
section regarding Color Effects to understand how this works.
11.3.1
To create a new Position Effect:
1) Click on the ‘Effect’ button from any screen.
2) Click on the ‘Position’ tab.
3) Select the type of effect. This example will use the ‘ballyhoo’
Page
110
LPC 48 / 96 Users Manual
4) Select fixtures to include in the effect. The intensity will set to 100% for these
fixtures automatically.
5) The fixtures will now be moving, using the default parameters. The Ballyhoo
effect has minimum and maximum values for pan and tilt, which set the area
covered by the ballyhoo.
Page
111
LPC 48 / 96 Users Manual
6) A simple way to set min and max values for the ballyhoo is to use focus labels
as the boundaries. Clicking on any of the Min and Max data fields will open a
window allowing focus labels to be picked:
Clicking on a label will transfer the pan and tilt values for the label into the Min or
Max data box.
7) Movement speed for the ballyhoo, or other position effects, is set in the
Speed data box. Values from 1 to 100 are accepted.
8) Setting a value in ‘Loops’ data box will stop the effect after a determined
number of cycles. A value of zero will run the effect until the associated
submaster or stack cue is faded out.
Page
112
LPC 48 / 96 Users Manual
9) Once the effect is running correctly, name and save the effect.
Page
113
LPC 48 / 96 Users Manual
12 Wireless DMX option
12.1 Wireless DMX Properties
LPC models are available with optional wireless DMX capability, using W-DMX
compatible format. The LPC supports 2 DMX universes, however, only Universe
A will be transmitted via Wireless DMX.
The wireless transmitter has a simple interface with one LED and one
momentary function switch, (See Figure 37).
The LED shows the current state of the wireless DMX link:
ON – Normal DMX link operation
Fast blink – Linking all available receivers
Slow blink – Unlinking all receivers
To set up a Wireless DMX System:
1.
Power on only the receiver units to be used with the LPC DMX universe ensure that they are not linked with any other transmitter (Receiver LINK
indicators should be OFF).
2.
On the transmitter unit, press and release the FUNCTION switch. The
transmitter will scan for all unlinked receivers for a period of ten seconds.
The LINK indicator will flash rapidly.
If successful, each receiver’s LINK indicator will go ON. If any fail, check that the
receiver is in range and repeat procedure.
Page
114
LPC 48 / 96 Users Manual
To unlink all receivers from a DMX universe
On the LPC back panel, press and hold the Function button until the Link
LED begins flashing, (See Figure 38).
All receivers linked to that DMX universe will be unlinked.
Link Indicator
Function Switch
Figure 38: Wireless DMX
Page
115
LPC 48 / 96 Users Manual
13 Support and Contact Information
The latest product information is available from our website:
www.Leprecon.com
We can also be reached at our physical address:
Leprecon, LLC
10087 Industrial Drive
PO Box 218
Hamburg, MI 48139
(810) 852-4300
Page
116
LPC 48 / 96 Users Manual
14 Glossary of Console Related Terms
A.C.
In Alternating Current, it is the flow of electricity that reverses polarity a number
of times per second.
Amp
The measurement used to describe the amount of electrical current flowing in a
wire or circuit.
Blackout
A switch that, when pressed, will blackout the entire show. It is very useful when
the operator wants to show external effects like pyrotechnics, video, or spotlights.
Board Channel
On a console a channel may only be represented by a number which is
assigned by the system to control any number of physical dimmers, color
scrollers, or other devices. Generally a control channel represents the smallest
easily divisible set of controls a designer has over groups of lighting instruments.
A soft patch or pin patch is used to assign dimmers or groups of dimmers to
individual control channels.
Bump Button
A switch used to quickly bring a board channel to full intensity. Pressing a bump
button is an alternative to using a fader. Bump buttons allow rapid manual control
over lighting control channels. On some consoles bump buttons can be put into
solo mode where all channels except those controlled by the bump button go
out.
Chase
A lighting design term referring to a group of lights which are turned on and off in
a sequence. A chase can be a complex multi-part cue affecting large groups of
lighting instruments, and can be manipulated by rate, intensity, and fadetime.
Page
117
LPC 48 / 96 Users Manual
Crossfade
A lighting term that refers to a cue which one set of lights increases in intensity
while another set simultaneously decreases in intensity. A crossfade is one
common way in which a change of scene can be indicated in a theatrical
production.
Cue
Theatrical way of recording and playback looks. A Section of a lighting desk
which allows a list of pre-plotted lighting states to be 'played back' on the push of
a button. These lighting states normally have fade times allocated to them.
D.C.
Direct Current; does not change polarity, and is usually associated with batteries.
DMX
DMX 512 is a standard dimmer control protocol implemented by U.S.I.T.T. to
provide a means for interfacing dimming and control equipment from different
manufacturers. A single DMX control cable carries dimmer intensity information
for 512 dimmers serially down 2 wires.
Dimmer
A device which causes connected lamps to decrease in intensity. Most dimmers
for entertainment lighting use are some variation of an SCR. Individual dimmers
are traditionally arranged in modules of two dimmers with modules combined into
dimmer racks. Solid state electronic device used to vary the intensity of the lights.
It provides the electrical muscle for the console.
Fader
A potentiometer used to set the level of a board channel.
Group
A group is a convenient way to combine multiple lights and select them at once.
Incandescent Light
Most standard household light bulbs as well as tungsten halogen lamps are
incandescent. The color temperature of most incandescent lamps ranges from
1800 to about 3800.Kelvin.
Page
118
LPC 48 / 96 Users Manual
Intensity
The brightness of a light usually and is controlled by a dimmer.
Load
The amount of power required for a lighting element.
Non Dim
A term used to describe a circuit that does not pass through a dimmer, or a load
that is not intended to be connected to a dimmer.
Patch
Patching is a component of most computer memory consoles that allows
dimmers to be patched electronically to control channels within the system.
Generally multiple dimmers can be patched to single control channels, but a
dimmer cannot be patched to more than one control channel. The term patching
takes place at several key points in a lighting system: at a patch panel, at a pin
patch, or in a soft patch.
Phase Control
A dimming method normally used to control the power to the light.
Preset or Submaster
A lighting term for a scene stored in the console’s memory that contains levels for
each board channel for later use during a performance.
Programming
The process of recording cue values into a console’s memory.
Volt
It describes the amount of electrical potential available from the power source to
a load.
Watt
The most commonly used term to describe electrical power. It is the product of
Voltage multiplied by Current. Volts X Amps = Watts.
Page
119
LPC 48 / 96 Users Manual
15 Index
Back
Submaster, 29
Cue stack, 53
Clearing settings, 29
Blend, 57
Console Options, 115
Booting up, 13
Console worklights, 11
Bump buttons
Copy Scene
Add, 35
Chase, 47
Solo, 35
Cues, 47
Toggle, 35
Quicklooks, 47
Channel Capacity, 10
Submaster, 47
Chase, 57
Cue
Blend, 57
Crossfader, 52
Edit, 59
Edit, 55
Loop count, 57
Fade times, 53
Override, 58
Linking chase, 49
Pattern, 57
Override, 55
Playback, 58
Playback, 51
Preview, 59
Preview, 55
Rate, 57
Recording, 49
Run, 58
Run, 51
Step, 57
Skip cues, 55
Clear, 29
Timing, 49
Cues, 29
Cue List, 51
Groups, 29
Default
Patch, 29
Fade times, 28
Quicklooks, 29
Setting default times, 28
Shows, 29
DMX Channels, 10
Stack, 29
Edit
Page
120
LPC 48 / 96 Users Manual
Chase, 59
Parking Channels, 29
Fade times
Patch
Cue, 53
Creating, 15
Fader
Custom, 15
Manual plus subs, 34
Editing, 15
Single scene, 34
Mapping, 18
Two scene, 34
Pattern, 57
Go, 53
Playback
Hold, 53
Cue, 51
Linking
Power
Wireless DMX, 115
Line cord type, 10
List
Voltage Requirements, 10
Cue, 51
Power down, 13
Littlelite Shortcut, 26
Power On, 12
Littlelites, 11
Preview
Loop count, 57
Cue, 55
Manual Crossfade, 52
Submaster, 44
Manual Crossfader
Quicklook
Control, 53
Recording, 46
Manual fader, 34
Rate, 57
Manual modes, 34
Record
Monitor
Quicklooks, 46
Requirements, 10
Submaster, 41
Resolution, 10
Record Cue
Touchscreen, 10
Cue, 49
New software, 33
Release, 37
Number of Desk Channels, 10
Settings
On Screen Keypad, 14
Blackout, 25
Override
DMX Mode, 25
Chase, 59
Manual Mode, 20, 23, 25
Panel Connections, 12
Worklight Intensity, 25
Page
121
LPC 48 / 96 Users Manual
Show
DMX cable, 12
New show, 31
Keyboard, 12
Storage, 31
Monitor, 12
USB location, 31
Mouse, 12
Software
Power cord, 12
Updating, 33
System settings, 14
Step, 57
Touchscreen
Stopwatch
Setting channels, 37
Resetting, 14
Turn off power, 13
Setting, 14
Turn on power, 12
Submaster
Unlinking
Fade timing, 41
Wireless DMX, 116
Linking chases, 41
Wireless DMX, 115
Naming, 41
Connecting, 115
Page, 41
disconnecting, 116
Playback, 44
LED signal status, 115
Preview, 44
Set up, 115
Recording, 41
Unlinking, 116
Run, 44
Worklights
Saving, 41
Type, 11
System Connections
Page
122